Download as PDF, PPTX
![def ua_display_good2(request):
ua = request.META.get(’HTTP_USER_AGENT’, ’unknown’)
return HttpResponse("Your browser is %s" % ua)
Getting
Data
From
the
Request
Object
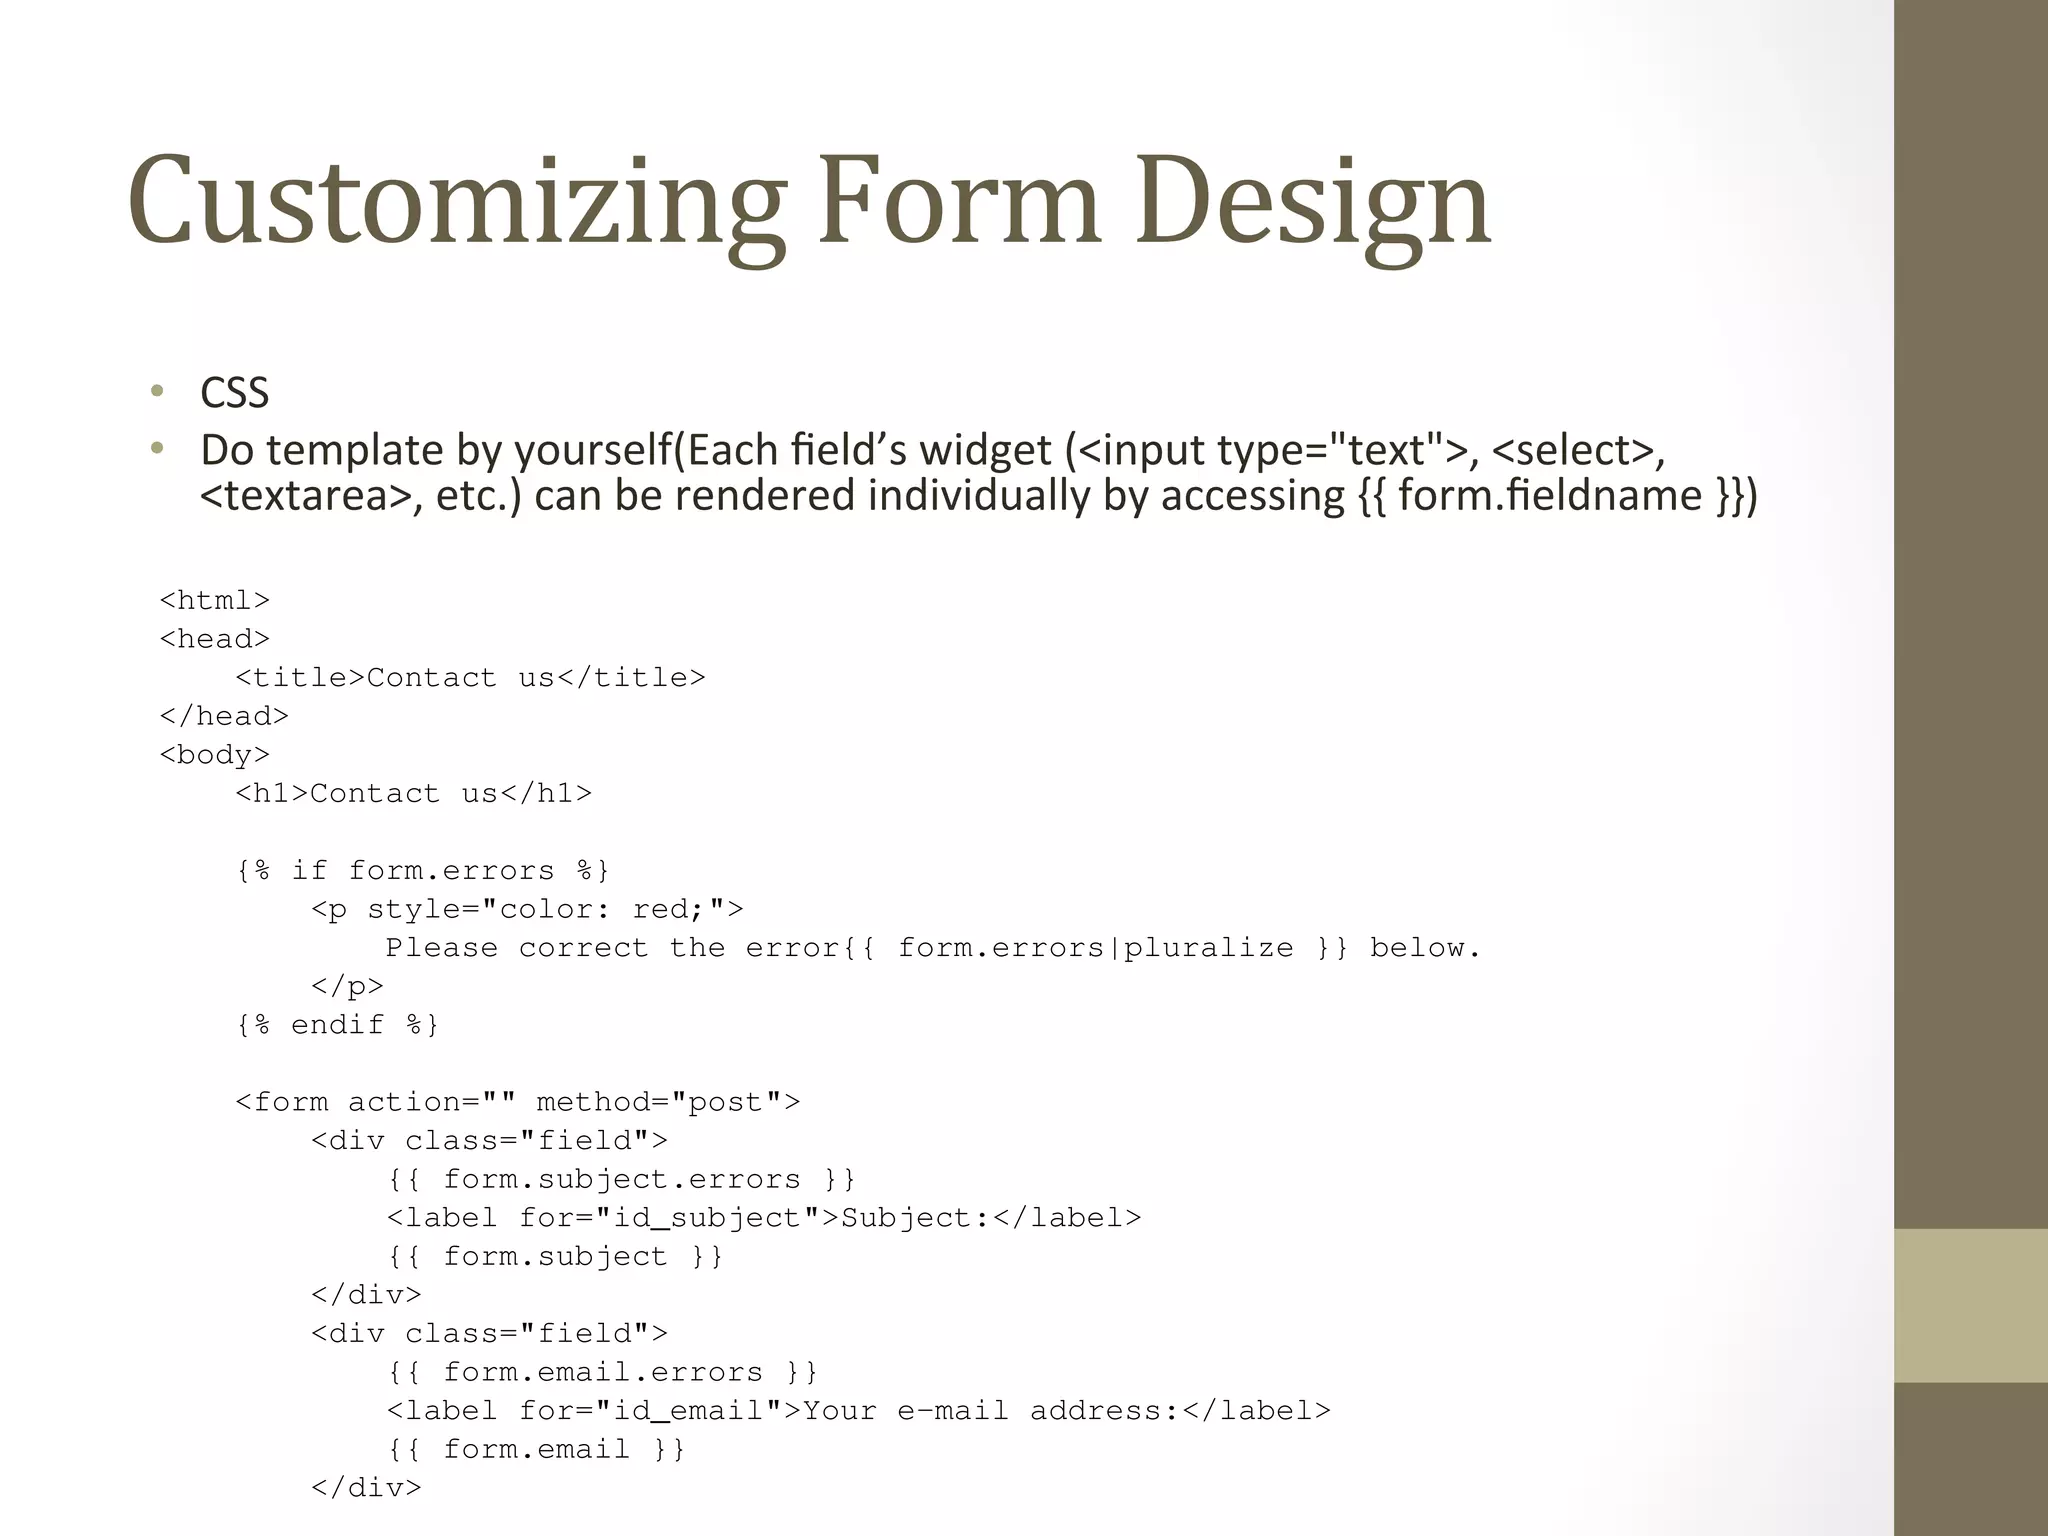
We encourage you to write a small view that displays all of the request.META data so you in there. Here’s what that view might look like:
def display_meta(request):
values = request.META.items()
values.sort()
html = []
for k, v in values:
Django Book Documentation, html.append(’<tr><td>%s</td><td>%s</td></tr>’ % (k, v))
return HttpResponse(’<table>%s</table>’ % ’n’.join(html))
104 Chapter As an exercise, see whether you can convert this view to use Django’s template system instead of hard-HTML. Also try adding request.path and the other HttpRequest methods from the previous section.
8.1.3 Information About Submitted Data
Beyond basic metadata about the request, HttpRequest objects have two attributes that contain information by the user: request.GET and request.POST. Both of these are dictionary-like objects access to GET and POST data.
Dictionary-like objects
When we say request.GET and request.POST are “dictionary-like” objects, we mean that they](https://image.slidesharecdn.com/chapter7-forms-140820075438-phpapp01/75/The-Django-Book-Chapter-7-forms-2-2048.jpg)

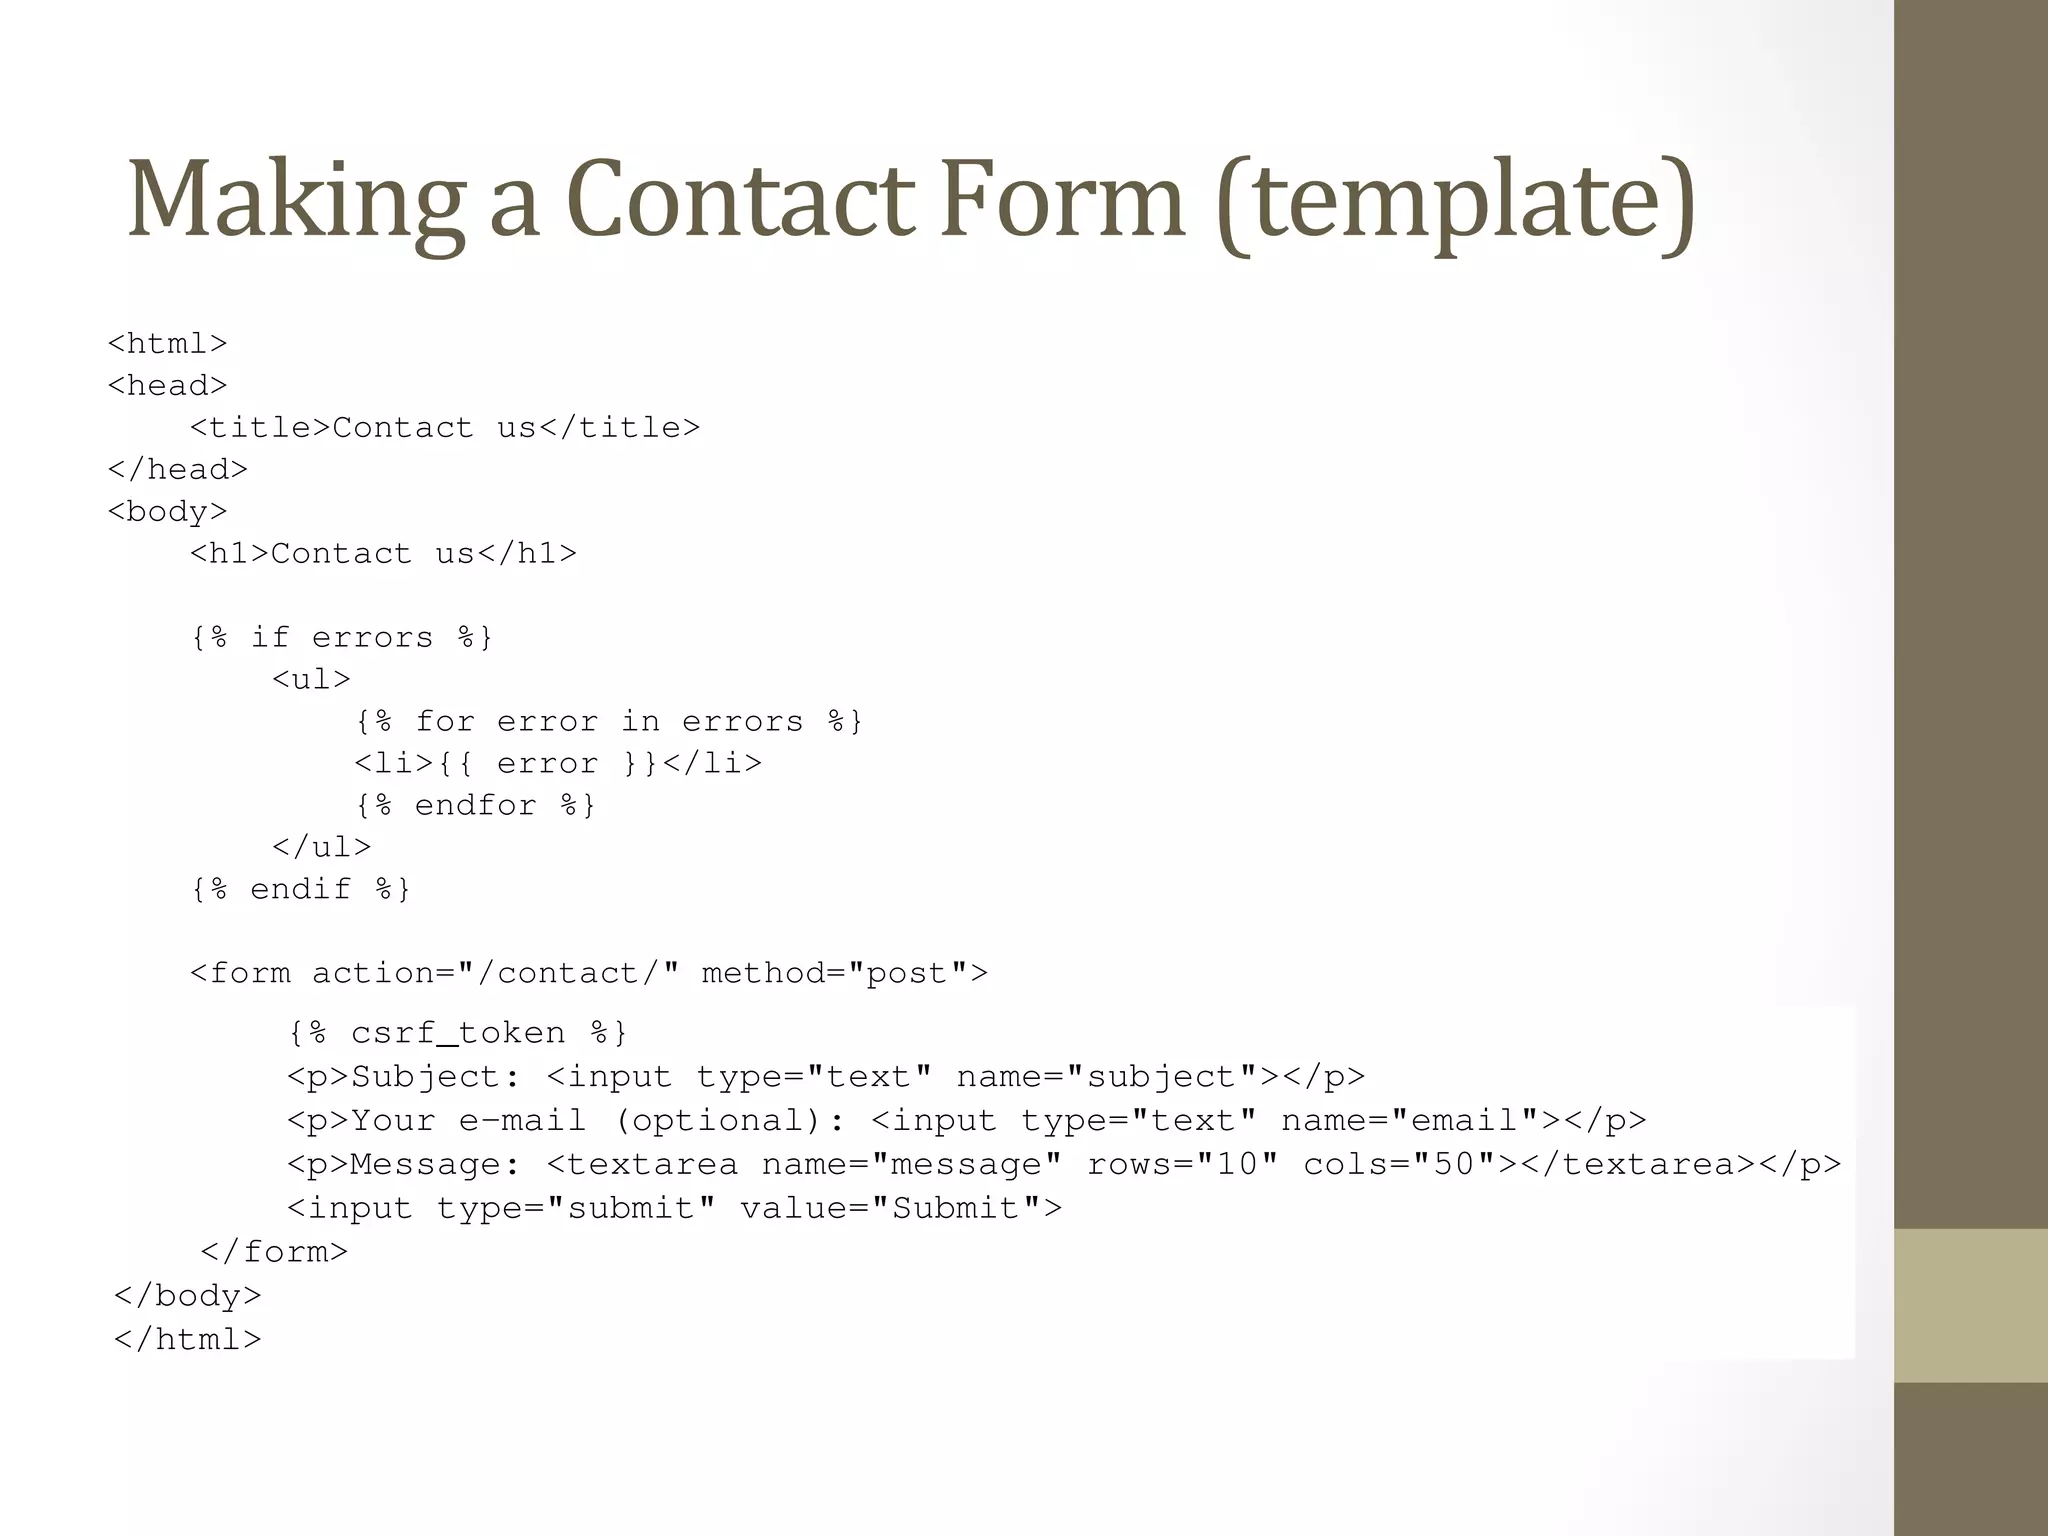
![We’ve defined three fields: the subject, e-mail address and message. The second is optional, but the other two
fields are required. Note we’re using method="post" here instead of method="get" because this form sub-mission
has a side effect – it sends an e-mail. Also, we copied the error-displaying code from our previous template
search_If Making
form.html.
we continue down the a
road Contact
established by our Form
search() view (from views.the previous py)
section, a naive version of our
contact() view might look like this:
from django.core.mail import send_mail
from django.http import HttpResponseRedirect
from django.shortcuts import render
from django.template import RequestContext
def contact(request):
errors = []
if request.method == ’POST’:
if not request.POST.get(’subject’, ’’):
errors.append(’Enter a subject.’)
if not request.POST.get(’message’, ’’):
errors.append(’Enter a message.’)
if request.POST.get(’email’) and ’@’ not in request.POST[’email’]:
errors.append(’Enter a valid e-mail address.’)
if not errors:
send_mail(
request.POST[’subject’],
request.POST[’message’],
request.POST.get(’email’, ’noreply@example.com’),
[’siteowner@example.com’],
)
return HttpResponseRedirect(’/contact/thanks/’)
return render(request, ’contact_form.html’,
{’errors’: errors}, context_instance=RequestContext(request))
#todo - explain CSRF token
(If you’re following along, you may be wondering whether to put this view in the file. It doesn’t](https://image.slidesharecdn.com/chapter7-forms-140820075438-phpapp01/75/The-Django-Book-Chapter-7-forms-5-2048.jpg)
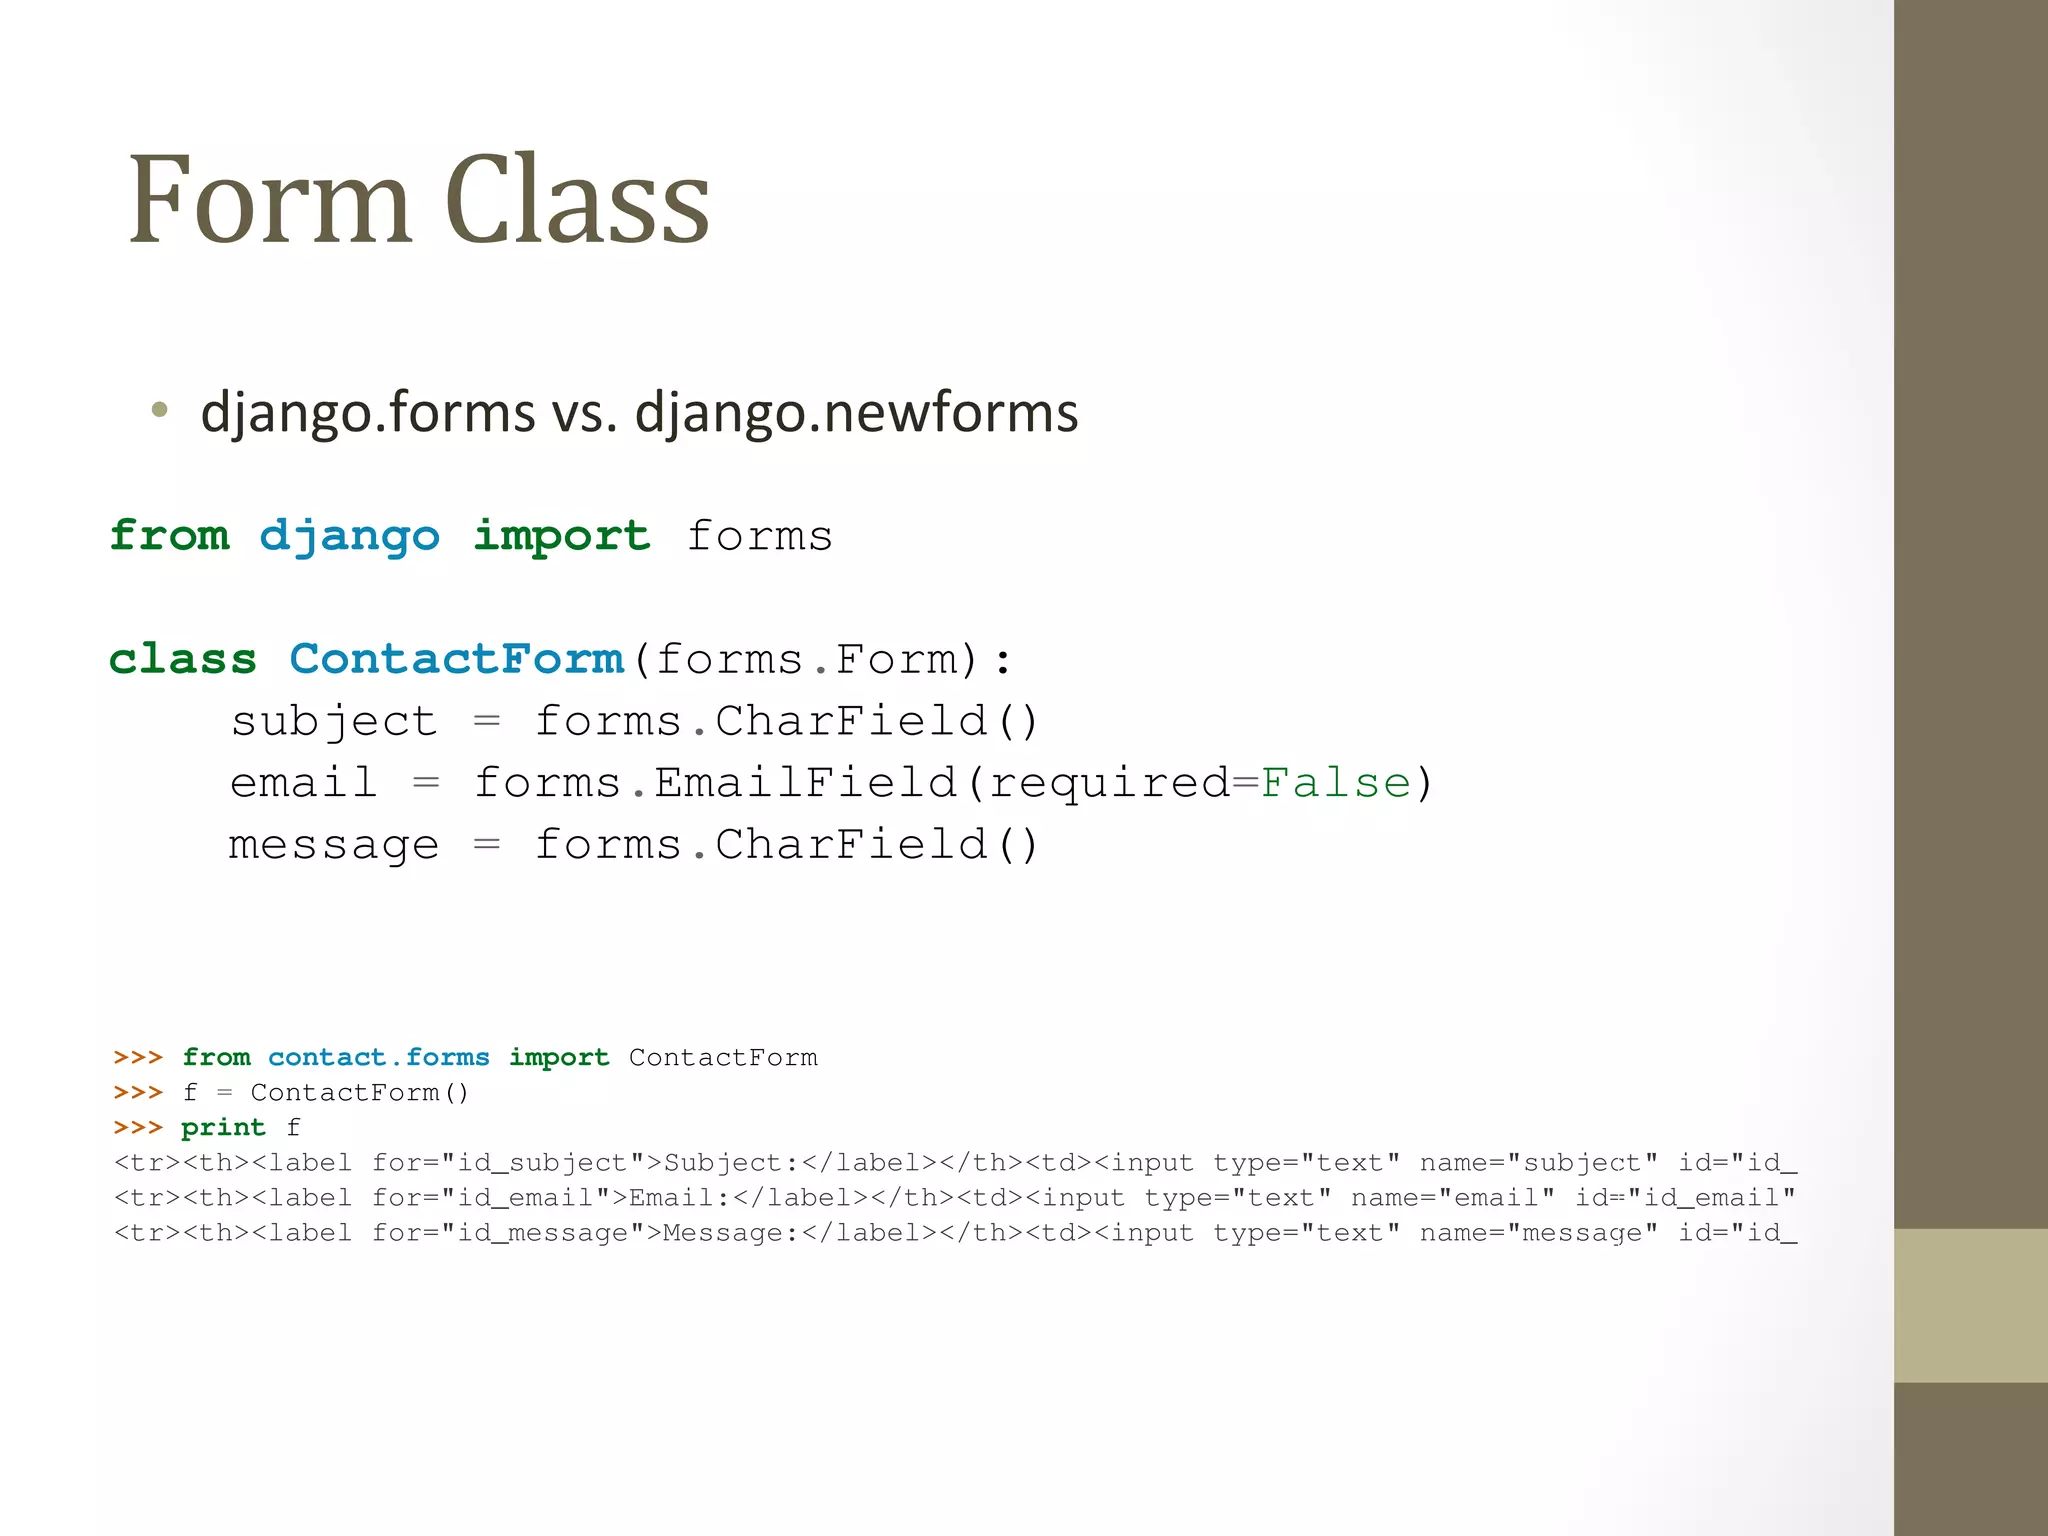
![<tr><th><label for="id_subject">Subject:</label></th><td><input type="text" name="subject" id="<tr><th><label for="id_email">Email:</label></th><td><input type="text" name="email" id="id_email" <tr><th><label for="id_message">Message:</label></th><td><input type="text" name="message" id="Django adds a label to each field, along with <label> tags for accessibility. The idea is to make the default behavior
as optimal as possible.
This default output is in the format of an HTML <table>, but there are a few other built-in outputs:
>>> print f.as_ul()
<li><label for="id_subject">Subject:</label> <input type="text" name="subject" id="id_subject" <li><label for="id_email">Email:</label> <input type="text" name="email" id="id_email" /></li>
<li><label for="id_message">Message:</label> <input type="text" name="message" id="id_message" >>> print f.as_p()
<p><label for="id_subject">Subject:</label> <input type="text" name="subject" id="id_subject" <p><label for="id_email">Email:</label> <input type="text" name="email" id="id_email" /></p>
<p><label for="id_message">Message:</label> <input type="text" name="message" id="id_message" Note that the opening and closing <table>, <ul> and <form> tags aren’t included in the output, so that you can
add any additional rows and customization if necessary.
These methods are just shortcuts for the common case of “display the entire form.” You can also display the HTML
for a particular field:
>>> print f[’subject’]
<input type="text" name="subject" id="id_subject" />
>>> print f[’message’]
<input type="text" name="message" id="id_message" />
The second thing Form objects can do is validate data. To validate data, create a new Form object and pass it a
dictionary of data that maps field names to data:
>>> f = ContactForm({’subject’: ’Hello’, ’email’: ’adrian@example.com’, ’message’: ’Nice site!’})
Once you’ve associated data with a Form instance, you’ve created a “bound” form:
>>> f.is_bound
True
Call the method on any bound to find out whether its data is valid. We’ve passed a valid value
as optimal as possible.
This default output is in the format of an HTML <table>, but there are a few other built-in outputs:
>>> <Other
print f.as_ul()
li><label for="output
id_subject">Subject:</format
label> <input type="text" name="subject" id="id_subject" <li><label for="id_email">Email:</label> <input type="text" name="email" id="id_email" /></<li><label for="id_message">Message:</label> <input type="text" name="message" id="id_message" >>> print f.as_p()
<p><label for="id_subject">Subject:</label> <input type="text" name="subject" id="id_subject" <p><label for="id_email">Email:</label> <input type="text" name="email" id="id_email" /></<p><label for="id_message">Message:</label> <input type="text" name="message" id="id_message" Note that the opening and closing <table>, <ul> and <form> tags aren’t included in the output, so that you can
add any additional rows and customization if necessary.
These methods are just shortcuts for the common case of “display the entire form.” You can also display the HTML
for a particular field:
>>> print f[’subject’]
<input type="text" name="subject" id="id_subject" />
>>> print f[’message’]
<input type="text" name="message" id="id_message" />
The second thing Form objects can do is validate data. To validate data, create a new Form object and pass it a
dictionary of data that maps field names to data:
>>> f = ContactForm({’subject’: ’Hello’, ’email’: ’adrian@example.com’, ’message’: ’Nice site!’})
Once you’ve associated data with a Form instance, you’ve created a “bound” form:
>>> f.is_bound
True
Call the is_valid() method on any bound Form to find out whether its data is valid. We’ve passed a valid value
for each field, so the Form in its entirety is valid:](https://image.slidesharecdn.com/chapter7-forms-140820075438-phpapp01/75/The-Django-Book-Chapter-7-forms-7-2048.jpg)
![8.7 Tying Form Objects Into Views
Tying
Form
Objects
Into
Views
With some basic knowledge about Form classes, you might see how we can use this infrastructure to the cruft in our contact() view. Here’s how we can rewrite contact() to use the forms framework:
# views.py
Book Documentation, Release def contact(request):
Django from django.shortcuts import render
from mysite.contact.forms import ContactForm
if request.method == ’POST’:
116 Chapter 8. Chapter form = ContactForm(request.POST)
if form.is_valid():
cd = form.cleaned_data
send_mail(
cd[’subject’],
cd[’message’],
cd.get(’email’, ’noreply@example.com’),
[’siteowner@example.com’],
)
return HttpResponseRedirect(’/contact/thanks/’)
else:
form = ContactForm()
return render(request, ’contact_form.html’, {’form’: form})
# contact_form.html
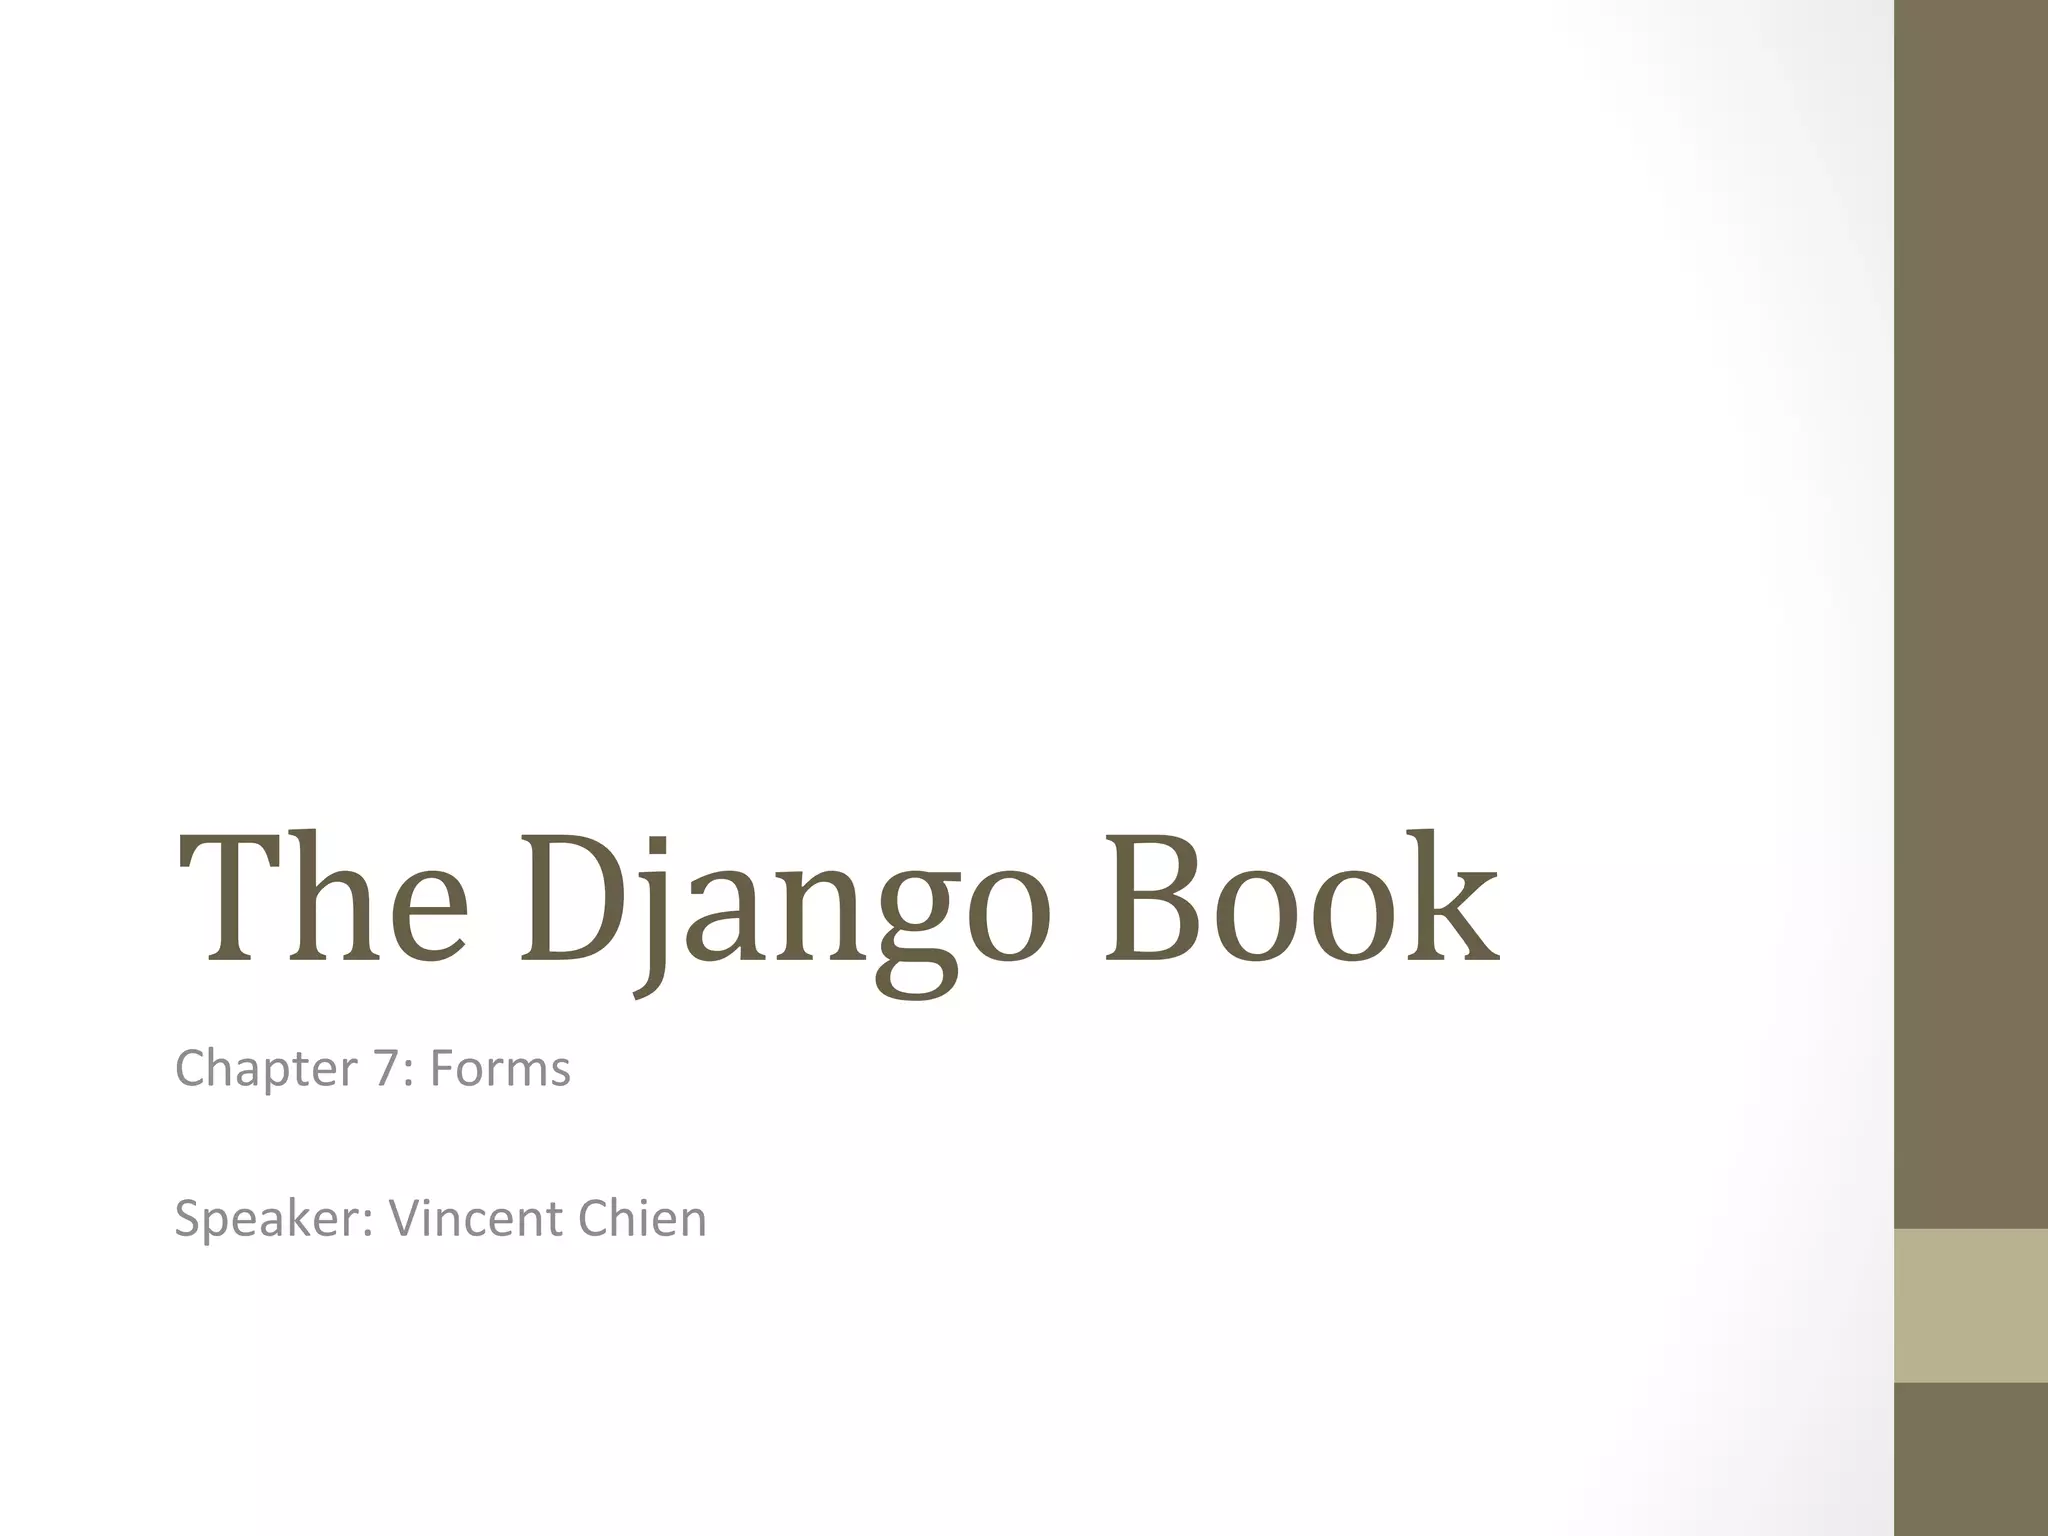
<html>
<head>](https://image.slidesharecdn.com/chapter7-forms-140820075438-phpapp01/75/The-Django-Book-Chapter-7-forms-8-2048.jpg)
![[’siteowner@example.com’],
)
return HttpResponseRedirect(’/contact/thanks/’)
Tying
else:
form = Form
ContactForm()
Objects
Into
Views
return render(request, ’contact_form.html’, {’form’: form})
# contact_form.html
<html>
<head>
<title>Contact us</title>
</head>
<body>
<h1>Contact us</h1>
{% if form.errors %}
<p style="color: red;">
Please correct the error{{ form.errors|pluralize }} below.
</p>
{% endif %}
<form action="" method="post">
<table>
{{ form.as_table }}
</table>
<input type="submit" value="Submit">
</form>
</body>
</html>
Look at how much cruft we’ve been able to remove! Django’s forms framework handles the HTML display,](https://image.slidesharecdn.com/chapter7-forms-140820075438-phpapp01/75/The-Django-Book-Chapter-7-forms-9-2048.jpg)
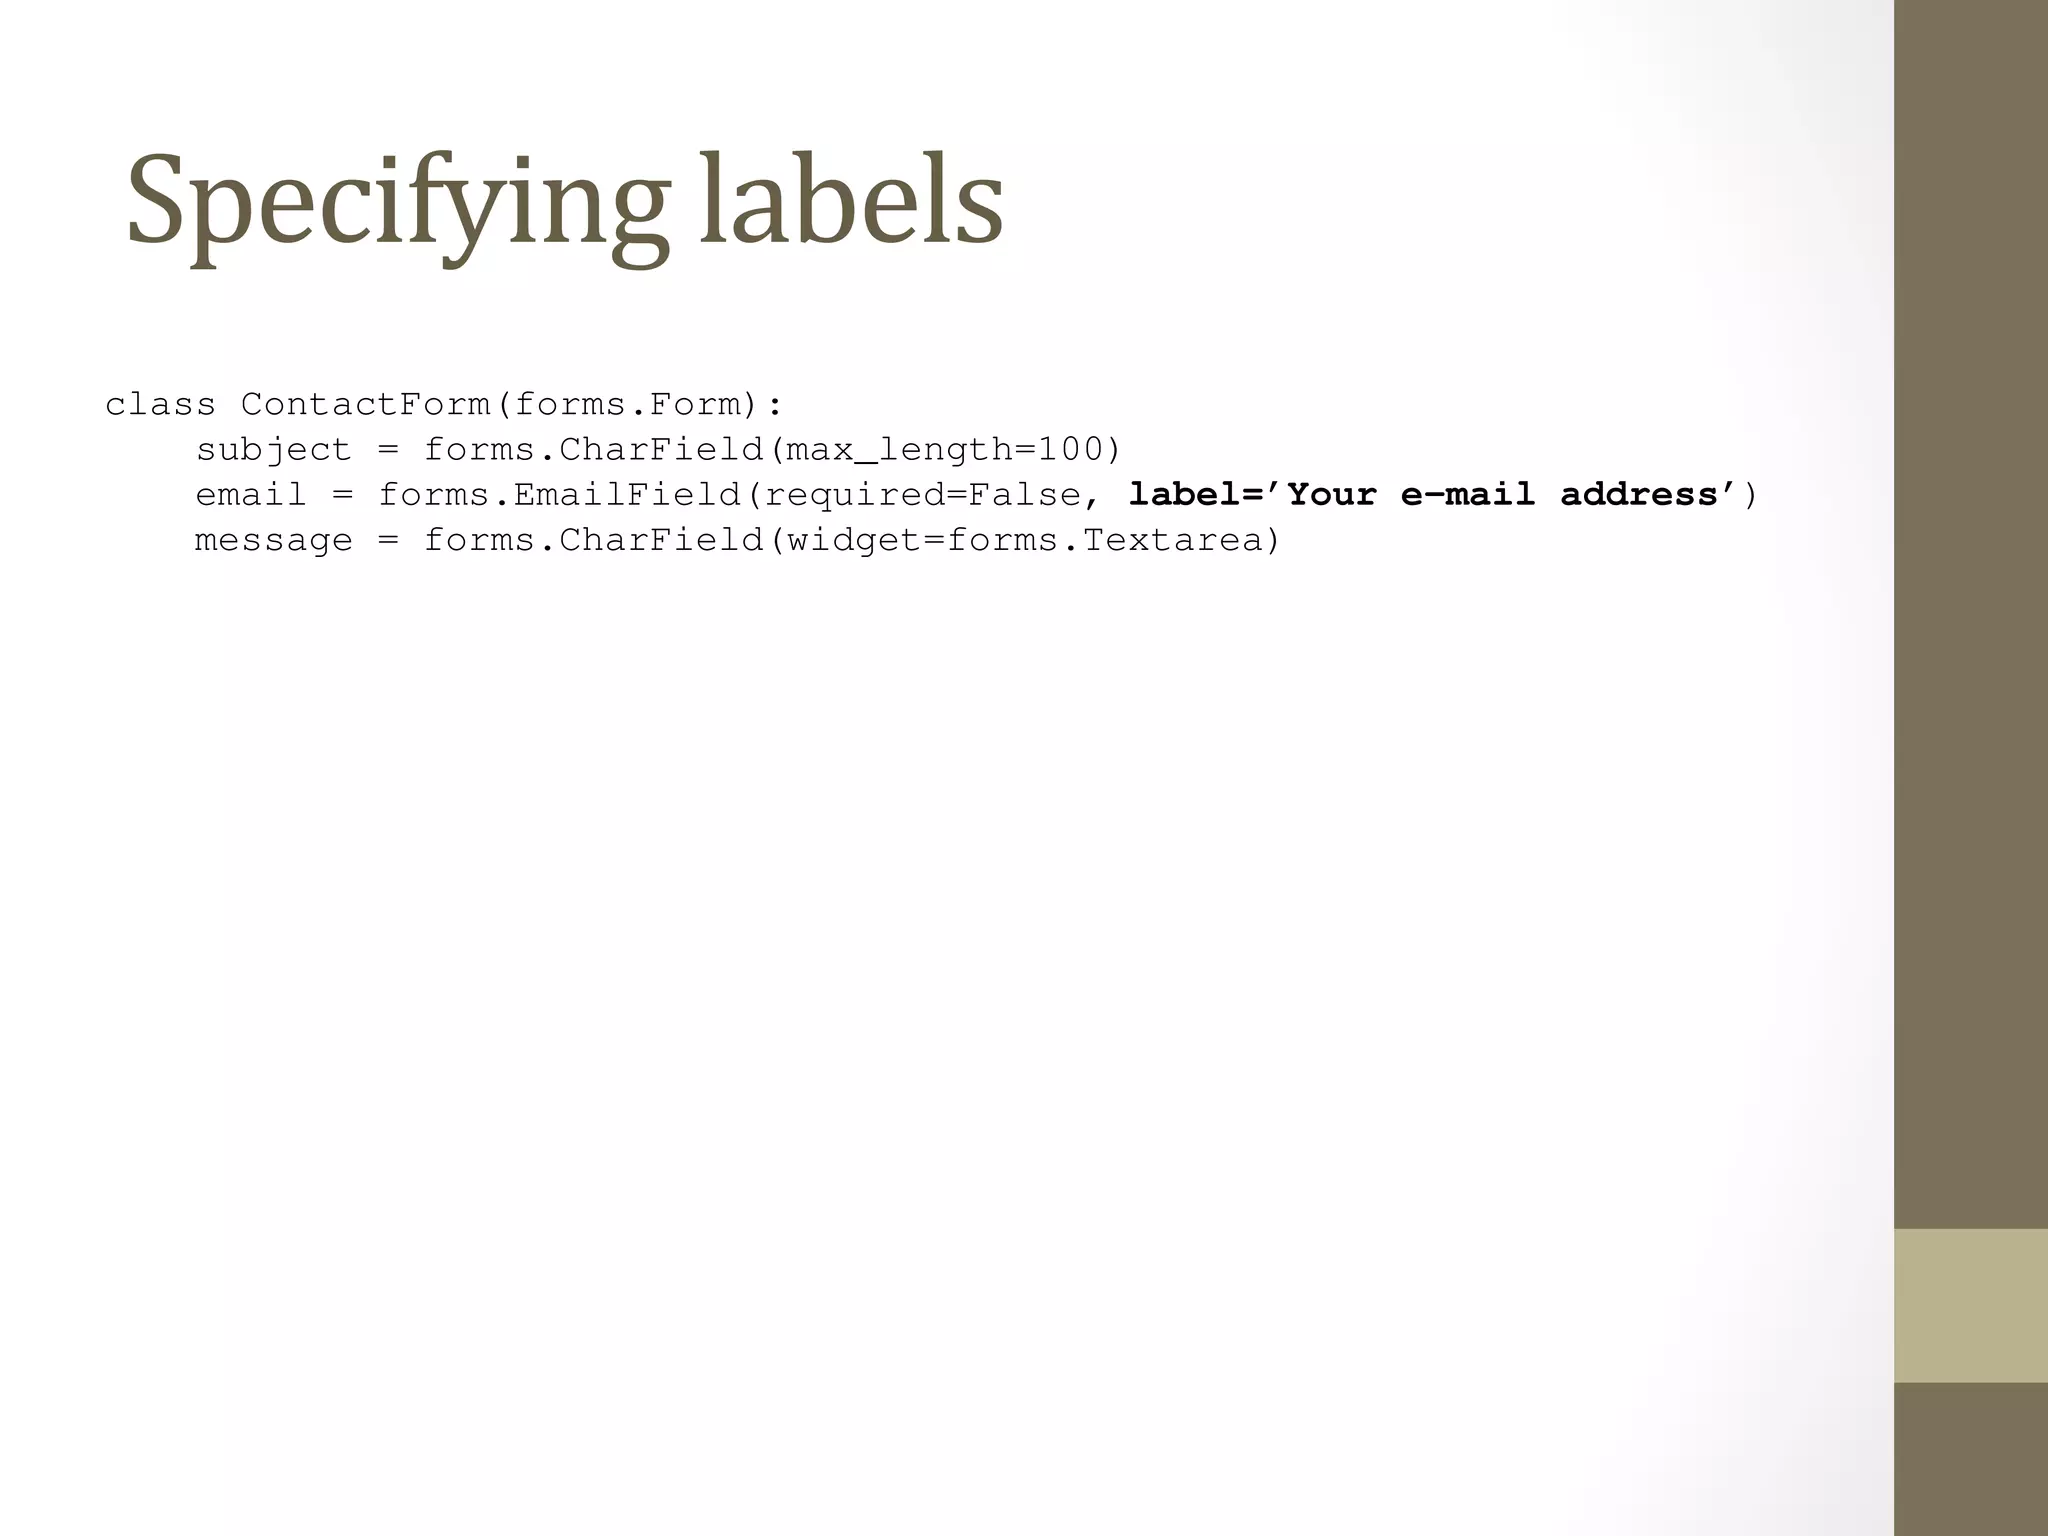
![message = forms.CharField(widget=forms.Textarea)
Think of the Field classes as representing validation logic, while widgets represent 8.9 Setting a Maximum Length
As an improvement to this form, let’s add an initial value for the subject field: "I power of suggestion can’t hurt.) To do this, we can use the initial argument when An optional min_length argument is also available.
Custom
Form
Objects
8.10 Setting Initial Values
Django Book Documentation, Release 0.1
As an improvement to this form, let’s add an initial value for the subject field: "I love your site!" power • Changing
of suggestion How
can’t Fields
hurt.) To Are
do this, Rendered
we can use the initial argument when we create a Form instance:
def contact(request):
One of the most common validation needs is to check that a field is of a certain size. improve our ContactForm to limit the subject to 100 characters. To do that, just CharField, like this:
from django import forms
email = forms.EmailField(required=False)
message = forms.CharField(widget=forms.Textarea)
if request.method == ‘POST’:
form = ContactForm(request.POST)
if form.is_valid():
The forms framework separates out the presentation logic for each field into a set of widgets. Each default • SeOwidget, ng
a
but Maximum
you can easily Length
override the default, or provide a custom widget of your own.
cd = form.cleaned_data
Think class of the Field ContactForm(send_classes mail(
as representing forms.validation Form):
logic, while widgets represent presentation subject cd[’= subject’],
forms.CharField(max_length=100)
cd[’message’],
email 8.9 Setting a cd.= Maximum get(‘forms.email’, EmailField(‘noreply@required=example.com‘),
False)
message [‘siteowner@= forms.example.CharField(Length
com‘],
widget=forms.Textarea)
• SeOng
Ini@al
Values
)
return HttpResponseRedirect(‘/contact/thanks/’)
An optional min_length argument is also available.
One of else:
the most common validation needs is to check that a field is of a certain size. For good improve our form ContactForm = ContactForm(
to limit the subject to 100 characters. To do that, just supply a max_CharField, 8.10 like Setting initial={‘this:
subject’: Initial Values
‘I love your site!’}
)
from django import forms
return render(request, ‘contact_form.html’, {‘form’: form})
Now, class the subject ContactForm(field will be forms.displayed Form):
prepopulated with that kind statement.
Note that subject there is a difference = forms.between CharField(passing initial max_data length=and passing 100)
data that binds the form. The biggest difference
is that if you’re just passing initial data, then the form will be unbound, which means it won’t have any error messages.](https://image.slidesharecdn.com/chapter7-forms-140820075438-phpapp01/75/The-Django-Book-Chapter-7-forms-10-2048.jpg)
![There are a number of ways to hook custom validation into a Django form. If our rule is again and again, we can create a custom field type. Most custom validations are one-off tied Custom
directly to the Form Validation
class.
Rules
We want additional validation on the message field, so we add a clean_message() method from django import forms
class ContactForm(forms.Form):
subject = forms.CharField(max_length=100)
email = forms.EmailField(required=False)
message = forms.CharField(widget=forms.Textarea)
def clean_message(self):
message = self.cleaned_data[’message’]
num_words = len(message.split())
if num_words < 4:
raise forms.ValidationError("Not enough words!")
return message
Django’s form system automatically looks for any method whose name starts with clean_ of a field. If any such method exists, it’s called during validation.
Specifically, the clean_message() method will be called after the default validation logic case, the validation logic for a required CharField). Because the field data has already we pull it out of self.cleaned_data. Also, we don’t have to worry about checking non-empty; that’s done by the default validator.](https://image.slidesharecdn.com/chapter7-forms-140820075438-phpapp01/75/The-Django-Book-Chapter-7-forms-11-2048.jpg)

This document discusses forms in Django, including: - Getting data from the request object and information about submitted data via request.GET and request.POST. - Creating a ContactForm class with CharField and EmailField to represent the form fields. - Validating form data and accessing cleaned data via the is_valid() and cleaned_data attributes. - Rendering form fields and the entire form in different formats like HTML tables and lists. - Improving the ContactForm by setting initial values, maximum lengths, and using Textarea for multi-line fields.


![CHAPTER_4_DJANGO_FORMS[1] [Read-Only].pptx](https://cdn.slidesharecdn.com/ss_thumbnails/chapter4djangoforms1read-only-250214215440-2556e5be-thumbnail.jpg?width=640&height=640&fit=bounds)