Automating Business Process via MuleSoft Composer | Bangalore MuleSoft Meetup...
Technology used
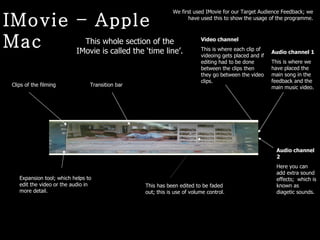
1. We first used IMovie for our Target Audience Feedback; we have used this to show the usage of the programme. This whole section of the IMovie is called the ‘time line’. Video channel This is where each clip of videoing gets placed and if editing had to be done between the clips then they go between the video clips. Audio channel 1 This is where we have placed the main song in the feedback and the main music video. Audio channel 2 Here you can add extra sound effects; which is known as diagetic sounds. Clips of the filming Expansion tool; which helps to edit the video or the audio in more detail. This has been edited to be faded out; this is use of volume control. Transition bar IMovie – Apple Mac
2. These are the different tabs available to do different editing for the video. When connecting the camera the clips individually install and this is where they go to sort through and cut. This is the control to switch from editing to the video camera when it is connected. This is the viewing screen to see every step that you do clearly. And when you have finished the task this is how you can also view it.
3. These are the many different transitions also known as editing; these are what you can put in-between video clips to add professionalism There is four tabs for the editing on IMovie; however we mainly use the transitions as this makes the most successful editing changes towards our videos. Here you can change the speed of the transition if you would want it to be a quick to change between clips of if you want them to be slow. IMovie – Apple Mac Transitions
4. This is one of the other tabs we used; specifically to help with adding title to the feedback to show what the questions were that were actually asked. This is the example of how the titles are displayed for an example. Titles This are different ways that the title could come on the page; if we wanted it to be simple of to add editing to them.
5. This is the tool bar; where there is a different variety of editing tools. This is the main product that has been developed. This is where we alter the different layers so we can place objects and titles over the top of each other. Adobe Photoshop Elements is the main programme which we used to edit our print work including the poster as well. Adobe Photoshop Elements Hand tool; to move objects and texts about. Crop tool Paint tool; can choose brush size. Choose a specific colour tool. This is the enhance tools; you can change brightness of the image and alter the contrast.
6. This is the magnetic tool; where we have used to edit the person, to remove her from her original surroundings. Which aloud us to place her on a different background and to edit in other objects such as the stereo. This is the shape tool which was used to make shapes of the logos. This is the dodge and burn tool. This was used to edit the actual image of the girl as we needed to brighten parts of the photo and darken parts. By doing this it adds more detail into the image.
7. http://www.dafont.com/ Dafont is the website where we get our font as we can look up a specific font that we are aiming to look for. However by using this website it takes a long process of loading it to the fonts to be able to use it. Text is a main tool which we used. This is the first step to find all of the fonts; to be able to upload the fonts which we have used. Step two Step three