
Recommended
More Related Content
Viewers also liked
Viewers also liked (20)
More from Talie Colbourne
More from Talie Colbourne (14)
Recently uploaded
Recently uploaded (20)
Prison Scenes Film Script
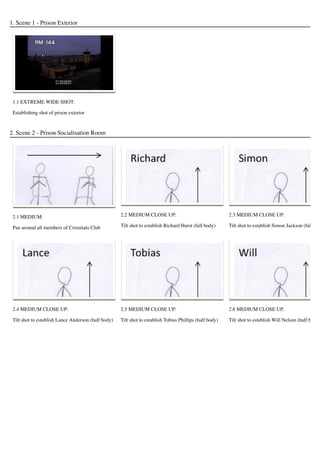
- 1. 1. Scene 1 - Prison Exterior 1.1 EXTREME WIDE SHOT: Establishing shot of prison exterior 2. Scene 2 - Prison Socialisation Room 2.1 MEDIUM: Pan around all members of Criminals Club 2.2 MEDIUM CLOSE UP: Tilt shot to establish Richard Hurst (full body) 2.3 MEDIUM CLOSE UP: Tilt shot to establish Simon Jackson (full bod 2.4 MEDIUM CLOSE UP: Tilt shot to establish Lance Anderson (half body) 2.5 MEDIUM CLOSE UP: Tilt shot to establish Tobias Phillips (half body) 2.6 MEDIUM CLOSE UP: Tilt shot to establish Will Nelson (half body)
- 2. 2.7 MEDIUM CLOSE UP: Richard's dialogue 3. Scene 3 - Disused Warehouse 3.1 MEDIUM: Whittaker’s feet as he walks towards the disused warehouse (scene 3 all one shot) 3.2 CLOSE UP: Whittaker’s feet as he walks towards the disused warehouse (scene 3 all one shot) 3.3 MEDIUM CLOSE UP: Whittaker’s feet as he walks towards the disused warehouse (scene 3 all one shot) 3.4 EXTREME CLOSE UP: Whittaker’s feet as he walks towards the disused warehouse (scene 3 all one shot) 4. Scene 4 - Prison Socialisation Room
- 3. 4.1 MEDIUM CLOSE UP: Simon's dialogue 4.2 MEDIUM CLOSE UP: Richard's dialogue 4.3 MEDIUM: Pan of Criminals Club’s reactions to Richard dialogue 4.4 MEDIUM CLOSE UP: Richard's dialogue (continued) 5. Scene 5 - Dark Corner 5.1 MEDIUM: Richard cowering with bloody knife (scene 5 all one shot, zooming in) 5.2 CLOSE UP: Richard cowering with bloody knife (scene 5 all one shot, zooming in) 5.3 MEDIUM CLOSE UP: Richard cowering with bloody knife (scene 5 one shot, zooming in)
- 4. 5.4 EXTREME CLOSE UP: Richard cowering with bloody knife (scene 5 all one shot, zooming in) 6. Scene 6 - Train Station Ramp 6.1 MEDIUM: Richard running away from camera covered in blood down ramp (scene 6.1-2 all one shot) 6.2 WIDE: Richard running away from camera covered in blood down ramp (scene 6.1-2 all one shot) 6.3 WIDE: Richard running towards camera covered in blood down ramp (scene 6.3-4 all one shot) 6.4 MEDIUM: Richard running towards camera covered in blood down ramp (scene 6.3-4 all one shot) 7. Scene 7 - Disused Warehouse
- 5. 7.1 WIDE: Whittaker’s hat/upper head as he walks towards the disused warehouse (scene 7 all one shot) 7.2 MEDIUM: Whittaker’s hat/upper head as he walks towards the disused warehouse (scene 7 all one shot) 7.3 CLOSE UP: Whittaker’s hat/upper head as he walks towards the disused warehouse (scene 7 all one shot) 7.4 MEDIUM CLOSE UP: Whittaker’s hat/upper head as he walks towards the disused warehouse (scene 7 all one shot) 7.5 EXTREME CLOSE UP: Whittaker’s hat/upper head as he walks towards the disused warehouse (scene 7 all one shot) 8. Scene 8 - Prison Socialisation Room 8.1 MEDIUM CLOSE UP: Richard's dialogue 8.2 MEDIUM CLOSE UP: Pan of Criminals Club’s reactions to Richard’s dialogue 9. Scene 9 - Disused Warehouse
- 6. 9.1 EXTREME CLOSE UP: Whittaker walking away from camera towards disused warehouse (scene 9 all one shot) 9.2 MEDIUM CLOSE UP: Whittaker walking away from camera towards disused warehouse (scene 9 all one shot) 9.3 CLOSE UP: Whittaker walking away from camera towards disused warehouse (scene 9 all one shot) 9.4 MEDIUM: Whittaker walking away from camera towards disused warehouse (scene 9 all one shot) 9.5 WIDE: Whittaker walking away from camera towards disused warehouse (scene 9 all one shot) 9.6 VERY WIDE SHOT: Whittaker walking away from camera towards disused warehouse (scene 9 all one shot)