This document provides instructions for teachers on how to set up and use a United Streaming account to access educational videos, as well as how to download, save, and display videos for classroom use. Key steps include registering for a new account, searching for videos, previewing and downloading videos, organizing saved videos into folders, and using dual displays to watch videos on a TV while working on a computer. The Teacher Center allows users to create multimedia projects and access a library of lesson plans related to videos.
Oreilly.active.directory.cookbook.3rd.edition.dec.2008Rose Valley Groups
This document provides an overview and table of contents for the third edition of the book "Active Directory Cookbook". It includes an introduction that discusses the approach and tools used in the book. The table of contents outlines 35 chapters and over 330 recipes for performing common administrative tasks in Active Directory like creating and managing forests, domains, trusts, domain controllers, users, groups and more.
This document provides instructions for installing Mac OS X Leopard, including upgrading an existing system and performing a custom installation. It describes preparing for installation by backing up data or noting network settings. The installation process involves inserting the install disc, selecting a destination and installation options, and following on-screen instructions. Additional software can also be selected for installation. After installing, users may need to set up accounts, network connections, and preferences. Troubleshooting tips are provided for common installation issues.
This document provides instructions on how to use basic features in the Frog VLE, including:
1) Customizing preferences such as changing the VLE language, background, and password.
2) Using the personal dashboard to add and configure widgets.
3) Managing files by uploading, creating folders, copying, and deleting files.
4) Creating, editing, and sharing calendar events and resources bookings.
5) Sending and receiving email within the VLE.
1. The document provides instructions for creating data CD/DVD projects, burning data projects, creating audio CD projects, and ripping audio CDs to MP3 files using Free Easy CD DVD Burner software.
2. For data projects, the user adds files and folders to the project, then clicks "Burn!" to start the burning process. For audio CD projects, the user adds audio files to the project, they are decoded, then burning begins.
3. The ripping process decodes an audio CD to MP3 files. The user must first configure the ripper settings like output path before ripping CD tracks to their computer.
1. This chapter covers the basic features and tools in Frog such as preferences, file management, calendars, and resource booking.
2. It explains how to customize settings like changing the interface language and background, how to upload and organize files, and how to create, edit, and share calendar events and resource bookings.
3. Step-by-step instructions are provided for common tasks like changing passwords, adding widgets to the dashboard, and inviting other users to shared calendars.
Formatting a floppy disk involves arranging the storage area into tracks and sectors to hold data, creating a directory and file allocation table. New disks must be formatted before use. Formatting erases existing data and prepares the disk for new information. Users insert the disk, open Windows Explorer, right click the disk, select Format, choose format options, and click Start to begin formatting.
How to use Firecoresoft DVD Maker for Mac burn DVD with all popular videos in formats such as MP4, AVI, HDV, WMV, MOV, FLV, MOV, AVCHD etc. http://www.firecoresoft.com/dvd-maker-mac.html
This document provides instructions for installing and using various apps and features in Windows 8. It begins by listing the minimum system requirements for installing Windows 8 and provides instructions for upgrading from Windows 7. It then covers how to use the default apps that come with Windows 8 like Internet Explorer, Mail, People and Calendar. It also provides directions for accessing settings and personalization options, installing apps from the Windows Store, using OneDrive for cloud storage, and sharing files.
The document provides step-by-step instructions for uploading videos to Picasa Web Albums and embedding them in a Blackboard discussion forum. It outlines downloading Picasa software, creating a Google account, uploading videos to new or existing albums, setting the album's visibility options, and obtaining the embed code to include videos elsewhere. The process allows restricting access to uploaded files through "Unlisted" and "Sign-in required" privacy settings.
This document provides a step-by-step process to enable Classic Environment support on PowerPC Macs running Mac OS X 10.4 or lower without the original Mac OS 9 recovery disc. It involves downloading a pre-made Mac OS 9 disk image from Apple's support website, running the installer, enabling the root user to access the disk image files, copying the OS 9 system files to the hard drive, and starting up Classic Environment from System Preferences. This allows users to run classic Mac applications on newer PowerPC Macs that do not natively support booting into Mac OS 9.
How to Use Your StadiumRoar Website - For Camp DirectorsStadiumRoar.com
This document provides an overview of how to use the key features of the StadiumRoar website for camp directors. It outlines 18 sections that allow camp directors to customize their site, manage registrations, schedule facilities, share photos and videos, and more. The sections include login/getting started, site customization, registration tools, navigation buttons, forms/documents, discussions, calendar, and scores/stats. The document provides brief descriptions of each section and how camp directors can utilize the tools.
This document provides instructions for installing Windows XP. It lists the system requirements as a 533MHz processor, 5GB of hard disk space, and 128MB of RAM. It describes installing from a bootable CD/DVD, flash drive, over a LAN, or from a system image. The types of installations are new, upgrade, and multiple operating systems. The steps outlined are to start from the BIOS, boot from the disc, accept agreements, partition and format the hard disk, copy files, restart without the disc, configure settings, and add a user.
1. The document discusses various collaboration tools available in the Frog VLE including discussion forums, message walls, file sharing, and calendar sharing.
2. It provides instructions for teachers on how to create discussion forums and message walls and add them to sites. It also explains how to share sites with other schools through the MoE repository.
3. The Frog VLE allows for seamless collaboration across departments, classes, and locations through tools like forums, walls, file sharing, and calendar sharing. It also facilitates cross-school collaboration through community features and a site sharing process.
The document is a letter of intent from the government of the Republic of Moldova to the IMF requesting completion of the fourth review under Moldova's PRGF arrangement and approval of an $18.6 million disbursement. It outlines Moldova's commitment to policies that promote macroeconomic stability, fiscal discipline, and structural reforms. Recent economic developments and performance under the program are also discussed. The government requests the fifth review be conducted by end-January 2009 based on end-September 2008 data.
This document provides instructions for 3 levels of abdominal exercises that can be performed on the floor or using an exercise ball. Level 1 exercises are easiest and focus on basic crunches, leg lifts, and bridges. Level 2 exercises add movement like bicycles and planks. Level 3 exercises are hardest and involve complex motions like crunches with arm movements. Rest periods of 60-90 seconds are recommended between each exercise. Safety advice is given to consult a doctor before starting and to stop if back pain occurs.
This document is a letter of intent for the land application of biosolids to agricultural land. It provides general information about the facility generating the biosolids, the land applier, site owner, and site location. It includes details on site characteristics, proposed application methods and rates, biosolids quality testing results, and pathogen and vector attraction reduction methods. Attachments include maps, soils information, site operating plans, and driving directions. The letter of intent must be submitted to the state for review and issuance of required permits and authorizations.
This document provides information about transferring VHS, SVHS, and VHS-C videotapes to DVD or other formats. It outlines several package options for the transfer ranging in price from $24.95 to $99.95, with more expensive packages offering additional features like video stabilization, timecode correction, and digital color correction. The document also lists additional upgrade options and services available.
Patchin Pictures Film Transfer Information Sheetcrysatal16
The document provides information about video transfer and copying services offered by Innovation Studios located in Steubenville, OH. It lists pricing for transferring VHS or MiniDV videos to DVD starting at $25 for the first 2 hours and $10 for each additional hour, with options to add custom menus, chapters, and background music. Copies of VHS or DVDs are $15 each. The final section is a form for customers to provide details about their transfer request and preferences for chapter markers or background music.
This document provides help and instructions for using DVD Copy Express software. It discusses installation, main interface features, how to copy DVD videos in full disc or main movie modes to DVD discs or hard disk using one DVD burner, and how to set language, skin, and other program options. Technical support contact information and how to purchase the software are also included.
This document provides instructions for several abdominal exercises that can be used to strengthen the abdominal muscles. It begins by explaining the abdominal muscles and benefits of strengthening them, such as improved posture and appearance. It then describes popular exercises like sit-ups, noting modifications for individuals with limb differences. Exercises are grouped by level from beginner to advanced. Photos demonstrate proper form for exercises using equipment or with assistance. Safety cautions are also provided.
Application Deadline is February 2, 2009crysatal16
The document provides instructions for applying to the College of Creative Studies Physics program at UCSB. It is a two-step process that involves first applying to UCSB and then applying separately to CCS Physics. The CCS Physics application requires submitting an application form, letter of intent, transcripts, optional work samples, and 2+ letters of recommendation. Application priority is given to those who apply by February 12th for Fall admission. Students already attending UCSB can apply at any time.
The document describes abdominal stretching and strengthening exercises called ThermaKinetics that are recommended to alleviate menstrual cramps. It provides instructions for exercises like the cat stretch, lower trunk rotation, and abdominal curl up. Performing these low-impact, non-aerobic exercises in combination with ThermaCare HeatPatches is suggested for maximum benefit in easing menstrual pain. Safety instructions are also provided to ensure the correct form is followed.
LETTER OF INTENT/AUTOBIOGRAPHICAL LETTER FOR UNIVERSITY APPLICATIONScrysatal16
This document provides guidance on writing a letter of intent or autobiographical letter for university applications. It recommends starting early, finding out the specific requirements, and consulting with current students in the program. The letter should have a clear format and structure, with an introduction, body paragraphs about key qualities and experiences, and a conclusion linking these to career goals. Examples to highlight include extracurricular activities, accomplishments, talents, background, and work experience. The letter aims to convince the reader that the applicant has qualities that would make them a strong fit for the program and field. Avoid cliches and generic descriptions, and focus on demonstrating strengths through specific examples.
in this chapter will discuss some technologies that can help the main tasks of the secretary with the support of
current technological advances, so that they can become professional secretaries, while the topics in this
chapter are
Part 2 : Google Drive
Google Drive is a cloud-based storage and collaboration tool that allows users to store files and access them from any device. It provides features like real-time collaboration where multiple users can work on the same file simultaneously, easy file sharing both internally and externally, and version control for files. The document provides instructions on getting started with Google Drive, working with files, troubleshooting issues, and some tips for using Drive features.
Google Drive is a cloud-based storage and collaboration tool that allows users to store files and access them from any device. It provides features like real-time collaboration where multiple users can work on the same file simultaneously, easy file sharing both internally and externally, and version control and revision history. The document provides instructions on getting started with Google Drive, working with files, sharing files, and includes some tips and tricks for power users.
Google Drive is a cloud-based storage and collaboration tool that allows users to store, access, and share files across devices. Some key features include:
- Storing files securely in the cloud and accessing them from any device.
- Real-time collaboration where multiple users can work on files simultaneously.
- Easy file sharing inside and outside an organization with customizable sharing settings and permissions.
- Version control and revision history to manage file changes over time.
- Compatibility with desktop and mobile devices as well as offline access through file syncing.
Only Tea Burn delivers you a powerful and robust combination of immune-boosting vitamins to help keep you strong, energized and healthy.
Only Tea Burn has a patent-pending nutritional complex designed to amplify the incredible health benefits of tea while neutralizing the downsides…
Instantly transforming your favorite tea into an absolute SUPER TEA...
A SUPER TEA that can deliver you a much healthier, more beneficial and more rewarding experience that you can look forward to enjoying just that much more each and every day
Google Drive is a cloud-based file storage and synchronization service that allows users to access and share files across devices. It provides several features including real-time collaboration where multiple users can work on the same file simultaneously, version control to manage file revisions, and offline access to files on mobile devices. The document provides instructions on getting started with Google Drive, working with files, troubleshooting issues, and some tips for using the service.
Google Drive is a cloud-based storage and collaboration tool that allows users to store, access, and share files across devices. Key features include:
- Storing files and folders in a safe, cloud-based location accessible from any device.
- Real-time collaboration where multiple users can work on files simultaneously.
- Syncing files to a desktop folder to access and edit them using desktop applications.
- Easy file sharing inside or outside an organization with customizable permission settings.
Google Drive is a cloud-based storage and collaboration tool that allows users to store files and access them from any device. It provides features like real-time collaboration where multiple users can work on the same file simultaneously, easy file sharing both internally and externally, and version control to manage file revisions. The document provides instructions on getting started with Google Drive, including how to set it up on different devices, upload files, and organize files and folders. It also explains how to use key Drive features like creating and editing files, searching, sharing, and troubleshooting potential issues.
Google Drive is a cloud-based storage and collaboration tool that allows users to store files and access them from any device. It provides features like real-time collaboration where multiple users can work on the same file simultaneously, easy file sharing both internally and externally, and version control to manage file revisions. The document provides instructions on getting started with Google Drive, including how to set it up on different devices, upload files, and organize files and folders. It also explains how to use key Drive features like creating and editing files, searching, sharing, and troubleshooting issues.
Google Drive is a cloud-based storage and collaboration tool that allows users to store files and access them from any device. It provides features like real-time collaboration where multiple users can work on the same file simultaneously, easy file sharing both internally and externally, and version control to manage file revisions. The document provides instructions on getting started with Google Drive, including how to set it up on different devices, upload files, and organize files and folders. It also explains how to use key Drive features like creating and editing files, searching, sharing, and troubleshooting potential issues.
The document provides instructions for setting up and using Final Cut Pro video editing software. It includes steps for:
1. Creating a student folder and new project in Final Cut Pro.
2. Opening the software and understanding the interface which includes the browser, viewer, canvas, and timeline windows.
3. Setting preferences like the scratch disk location and project format.
4. Logging and capturing video clips from a camera into the browser.
5. Editing clips on the timeline using tools like the blade to cut and delete portions of footage.
6. Exporting the finished sequence as a QuickTime movie.
2010 Creating Videocast Lectures for Online CoursesWCET
Creating videocast lectures and embedding them in Pearson LearningStudio involves several steps:
1. Create a YouTube account to upload videos. Use iMovie or Windows Live Movie Maker to record a short lecture video under 10 minutes with good lighting and notes.
2. Upload the raw video file to YouTube. Then use editing tools to trim clips and add titles, music, etc. Save and publish the edited video to YouTube.
3. Copy the HTML embed code from the YouTube video page. Paste this code into the HTML view of a "Text/Multimedia" content item in Pearson LearningStudio. This embeds the YouTube video in the course.
Creating videocast lectures allows instructors to engage online students who are separated by distance. The document provides instructions for creating a videocast lecture using iMovie or Windows Live Movie Maker, uploading the video to YouTube, and embedding the video in a Pearson LearningStudio course. Key steps include recording the video, editing and adding effects, publishing to YouTube, copying the HTML code from YouTube, and pasting it into the course content on LearningStudio. Following best practices for lighting, location and using notes can improve video quality.
The document provides tips and instructions for various computing tasks, including backing up files, using useful programs like WinRAR and Firefox, downloading videos from YouTube and VideoJug, backing up a DVD movie using DVD Shrink, backing up files using ImgBurn, resizing images using Microsoft Image Resizer, and more. Instructions are provided in point form with details on steps to complete each task.
Cloud storage is a model where user data is stored virtually in pools hosted by third parties rather than locally on users' computers. It offers advantages like flexibility to access files from any device, automatic backups, and pay-as-you-go pricing. Popular cloud storage services discussed in the document include Google Drive, YouTube, Just Cloud, Scribd, Picasa, and SlideShare. Each service offers its own features for file sharing, video hosting, backup, document sharing, photo organization, and presentation sharing over the internet.
1. The document provides step-by-step instructions for uploading a recorded Zoom lecture video to YouTube. It explains how to locate the recorded Zoom file, create a YouTube account, select the video file for upload, edit video settings and privacy options, and view the uploaded video on the YouTube dashboard.
2. Key steps include finding the auto-saved Zoom recording, clicking the "+" camera icon on YouTube to upload the file, processing the video while customizing settings, and accessing analytics and comments through the YouTube Create dashboard.
3. Uploading a video to YouTube allows professors to share recorded lectures in a mobile-friendly format for students to access remotely with options for viewer interaction and response.
This document provides a training syllabus for using an education portal with multiple levels of instruction. Level 1 teaches how to access the portal, view programs, and check the schedule and asset library. Level 2 covers how to record, upload, and organize videos. It provides step-by-step instructions for recording live or scheduling recordings, uploading existing videos, and adding metadata. Level 3 describes how to create folders in the asset library to organize videos. Contact information is provided for technical support or training workshops.
Introduction to Pilates Controlology & Exercises the EasyVigour Waycrysatal16
This document provides exercises that can be safely performed during pregnancy and the postpartum period. It recommends exercising 3-5 times per week and offers modified versions of stretches, strength exercises, and yoga poses. Special precautions are outlined, such as avoiding exercises while lying flat after the first trimester. The full-body routine stretches muscles from neck to calves and includes pelvic tilts and Kegel exercises. Walking or mild activity is emphasized along with staying hydrated and listening to one's body.
This document provides an introduction to Pilates controlology exercises using the EasyVigour method. It begins with relaxation techniques and scripts to reduce tension. It then covers foundational Pilates exercises like the zip and hollow to engage the transverse abdominis and stabilize the lower back. Finally, it discusses breathing exercises and techniques like the pelvic clock to find pelvic neutral alignment. The overall document serves as an introductory guide to performing Pilates exercises with an emphasis on proper form, technique, and tension reduction.
Ron's Core Workouts - Abs and Back Crunch Circuit Safety First!crysatal16
The document provides guidelines for exercise during pregnancy, including physiologic changes that occur, recommended and precautionary exercises, warning signs, and specific exercises considered safe or not safe. It recommends regular mild to moderate aerobic exercise for 30 minutes daily, preceded by warm-up and followed by cool-down. Intensity should allow conversation and include ample fluid intake before, during and after. Exercises like walking, swimming and yoga are considered safe, while contact sports, scuba diving and mountain climbing pose risks.
This document provides exercises to target the abs and back, with an emphasis on safety and proper form. It includes over 20 core exercises that can be done on the floor or with equipment like an exercise ball or Bosu ball. Exercises are divided into circuits for abs, back, and dynamic stabilizers to work the entire core. Safety tips are provided, such as supporting the lower back and avoiding jerky motions, with modifications suggested for those with back issues.
This document provides an abdominal exercise guide that includes descriptions of various abdominal exercises. It lists the main and secondary muscles worked, equipment needed, and exercise mechanics (isolation or compound) for each exercise. It also provides tips for properly performing each exercise to engage the abdominal muscles and avoid injury. The exercises include both machine and bodyweight exercises targeting the entire abdominal region.
This article provides exercises to sculpt rock-hard abs and tone love handles. It describes 6 moves targeting the upper and lower abs as well as obliques, including the long-arm weighted crunch, seated ab crunch, corkscrew, and weighted one-sided crunch. Another section outlines 6 exercises for the obliques like the oblique V-up, Saxon side bend, speed rotation, and side jackknife. Repetition ranges from 8 to 15 are recommended to sculpt the abs and love handles.
VHS / S-VHS / VHS-C / MINI-DV Transfer to DVDcrysatal16
This comment supports exemptions to allow circumvention of access controls on DVDs for purposes of media literacy education. It provides background on media literacy education and its importance in teaching students to critically analyze media messages. Due to legal restrictions, media literacy teachers are currently unable to access contemporary film and television content needed for instruction, limiting the effectiveness of media literacy education. Exemptions would enable use of short clips for criticism, commentary and media literacy assignments, in line with fair use.
This document provides pricing and services for duplication, transfer, and packaging of DVDs, CDs, videos, and other media. It lists rates for DVD and CD duplication in various quantities, as well as options like printing, packaging, and customization. Video-to-DVD transfer rates are provided per hour of video transferred. Pricing for duplication of videos in various formats and quantities is also listed. Additional services around audio/video conversion, editing, and repairs are outlined.
Royal Camera Service provides video and photo transfer services at their location in Glendale Heights, Illinois. They offer video transfers from various formats like VHS, DVD, and digital formats to DVD or VHS for prices ranging from $12-18 per item depending on the quantity. They also offer DVD and VHS duplication, digital photo recovery from memory cards, and international format conversion services. Rush service is available for 25% more and editing services are $40 per hour.
This document provides pricing and service information for various media conversion and duplication services. It details pricing for transferring video tapes, films, photos and audio to video tapes, DVDs, or CDs. It also provides pricing for duplicating video tapes, DVDs, audio tapes and CDs. Additional services mentioned include tape repair, mastering, packaging, graphics, and technical support services like identification, authentication and enhancement of media.
This document provides step-by-step instructions for transferring video from a miniDV tape to a DVD using a DVD/VHS deck and Firewire cable. The key steps are: 1) Connect the miniDV deck to the DVD/VHS deck with the Firewire cable; 2) Insert the miniDV tape and a blank DVD; 3) Use the DVD recorder to dub the video from the tape onto the DVD by selecting the appropriate record mode and starting the recording. When finished, finalize the DVD so it can play in other DVD players. Eject the tape and disk, turn off all devices, and return equipment when complete.
Super 8, Regular 8, and 16mm Transfer Servicecrysatal16
The document provides instructions for searching the online catalog of the UCLA Film & Television Archive. It outlines a 4-step process: 1) Enter search terms, 2) Choose a search type, 3) Select optional search limits, 4) Click search. It describes limiting searches by date, location, language, and other advanced options. Catalog records include key information about holdings such as format and availability.
This document provides pricing and services for transferring film, video tapes, slides, and photos to DVD or digital formats. It lists flat fees of $10 per order plus $1.50 per minute for transferring film or tapes to DVD. Additional DVD copies are $29.99 each. Slideshows can be created from various media for $10 plus 50 cents per slide or JPEG file. Photo prints up to 8x10 can be transferred for $10 plus 90 cents per print. Tape repairs are $29.99 and foreign tape conversions are $48 for up to two hours of footage.
TRANSFER VIDEO TAPE (VHS) TO VIDEO TAPE. Any system to any system ...crysatal16
Kurt's Digital Video Editing provides video and photo transfer services to help preserve memories. The document outlines:
1) Copyrighted materials like wedding photos require a release form due to copyright laws, otherwise they cannot be legally reproduced.
2) A price list for services including transferring videos and photos to DVDs starting at $30, and repairing computers starting at $30 per hour.
3) Instructions for customers to watch their video and note chapter points before submitting for transfer to DVD with a basic navigation menu.
DVD / VHS / Hi-8 / Digital-8 Recorder with Camera – Room # 5crysatal16
This document provides pricing and services for transferring film, prints, and slides to video tape as well as DVD duplication services from video tapes or previous transfers. Key services include:
- Transferring film, prints, and slides to video tape starting at $30 minimum with prices ranging from $0.10 to $0.75 per foot or print.
- Transferring the contents of up to 2 hours of video tapes, DVDs, or previous transfers to DVD for $29.95 for the first DVD and $19.95 for additional copies.
- Duplicating video tapes with prices ranging from $15-20 per copy depending on the quantity of copies.
SPECIALIST FILM LABS: FILM AND VIDEO TRANSFER SERVICEScrysatal16
This document is a form for transferring VHS tapes to DVD. It requests the customer's contact information and the number of tapes. It details options to add labels and liners to the DVDs for an additional fee and provides space to list titles. The form calculates the total cost based on the number of DVDs and any added options. It provides payment and shipping instructions and notes that copyrighted content cannot be transferred.
The document provides instructions for using a Polycom video conferencing system, including its main components and how to operate the ViewStation, monitors, microphones, remote control, and other devices. It describes how to turn on the equipment, adjust cameras and volume, select sources, connect directly to other locations manually or via an address book, and contact technical support.
HaFree Business, Computer, Engineering and Trade Magazine Subscriptions crysatal16
The document provides instructions for integrating video, audio, and computers. It discusses getting video into older computers through ports like RCA jacks, as well as newer methods like FireWire ports. It also covers getting video out of computers and onto tape using devices like scan converters. The document provides diagrams to illustrate the various connections between computers, cameras, VCRs, mixers and other devices.
HaFree Business, Computer, Engineering and Trade Magazine Subscriptions
start here – quick set-up guide
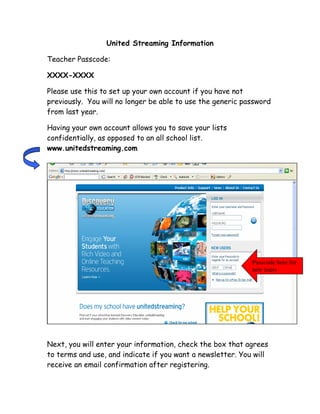
1. United Streaming Information
Teacher Passcode:
XXXX-XXXX
Please use this to set up your own account if you have not
previously. You will no longer be able to use the generic password
from last year.
Having your own account allows you to save your lists
confidentially, as opposed to an all school list.
www.unitedstreaming.com
Passcode here for
new users
Next, you will enter your information, check the box that agrees
to terms and use, and indicate if you want a newsletter. You will
receive an email confirmation after registering.
2. After you enroll, you will be taken to the main menu where you
can search and look for videos for use in your curriculum.
3. A Crash Course in United Streaming: Downloading and Saving
(Thanks for Linda Culver’s help)
1. Open www.unitedstreaming.com . If you have not already set up an account,
please see the previous instructions for setting up an account. If you
previously set up an account, it should still be active.
2. Log in with the username and password you created.
3. Now you should see a screen similar to this:
You can search by
subject, by grade
level, by general
search in all content,
or you can specify
videos, segments,
pictures, etc. on the
pull down menu.
You can also do a
general search and
refine it later using
grade levels or
subjects.
4. Search for a topic. Let’s choose “tornadoes” and full videos, but not set
any other limits.
We received 28 video
hits. We can further
refine our search. The
side panel lets you
choose a subject area or
to refine by grade level.
4. For example; if you refine by literature, you have one video that fits that
category, but if you refine by science grade 6-8, you have nine.
Below each video description, you are told what supporting materials are
available to go with it and the grade level. You are also linked to Kansas
Standards.
5. If you see a video that sounds promising you can click on it to get more
information. You will see tabs with the description, a list of segments,
citation information and any supporting materials.
You will also see
three important
features: a play
button to preview,
a download button,
and an “add to”
feature so you can
save it to look at
later. You can
create your own
folders to store
content.
5. 6. DO NOT PLAN ON ARRIVING AT SCHOOL TO PLAY A MOVIE
DIRECTLY FROM THIS SCREEN FOR STUDENTS OR TO DOWNLOAD
QUICKLY. The server tends to be slow, and some 20 minute movies can take
two hours to download. If you try to stream from school to watch, you’ll
notice it’s choppy due to stress on the server. You can download during
school and still use your computer to do other things while the download is
occurring, but it may be pretty slow. From home, you’ll see that previewing is
much easier and downloading a breeze. Search at school, create a folder
(explained below) and then preview and download at home.
7. To save a movie to look at later, add it to your content. That way you don’t
have to
search again.
When you
click add, you
get a new
browser
window that
lets you add it
to a folder
you have or
you can
create a new
folder. If you
really like the
video you can
download it to play for your class. You can also add only certain segments to
your content folders by opening the tab that says “segments” and checking
the ones you want to add.
They will be downloaded separately in
segments if you download later. You can
download only segments if you want by
clicking the download icon next to the
green play button.
6. 8. Downloading an entire video or segments:
Click download,
and you will get
a new browser
window asking
you where you
want to save.
It is recommended that you save to the desktop, even from home. It’s easy
to find and to delete later when you know you have made a copy on a CD or
transferred it to a flash drive. Movies take up a lot of space on the server
and computer.
Click save and give a
location.
You can give it a new
name if you want, as
long as you don’t
change the file
extension.
Once you save, the downloading will
begin. You can minimize the window
and work to continue work on your
computer.
7. 9. When downloading is complete:
You will see the little movie icon on your desktop with the file name. Now you
can view or show it directly from your desktop, or burn it to a CD, or
transfer it to another memory device.
Be sure to save the movies you like. You can download the support files and
burn everything into one disc to save.
Copyright laws allow you to show the movie as much as you like until the
subscription is canceled.
8. Setting Up Your Computer for Dual Display
Display
Displaying United Streaming Videos on Your TV Monitor
and
Using Your Computer for Other Tasks
Directions:
1. Close all open programs.
Right Click on your Computer
Desktop and choose Properties
2. The Display Properties dialog
box opens. Click the
Settings
Tab.
3. Click the Advanced command
button at the bottom of the
dialog box.
9. 4. Click the GeForce FX 5200
Tab.
5. Click the drop-down arrow to
change the nView Modes
setting from Clone TO
Dualview, as shown.
Verify that the Display pair
setting is: Analog Display +
TV, as shown.
10. 6. IF your monitor changes
resolution and the icons and
objects on your screen
enlarge, you will need to
click the Change Resolution
command in the side menu,
as shown…..and also
complete step #7.
Otherwise, simply click Apply
and then click OK.
7. Drag the slider from 800 x
600 screen resolution to
1024 x 768.
Click Apply.
You should see your screen
resolution switch back to
normal size/font.
Then Click OK.
Click OK to return to the
Desktop.
8. You are now ready to use the DualView mode.
Open a Video from either the Desktop or Network Drive. Click on the Title
Bar, and Drag the Entire Window to the right, as if you are dragging it off the
screen.
You will see the Window start to appear on the television screen.
Computer TV
Monitor Monitor
11. 9. Once the Windows Media Player Window has been moved entirely to the
TV Monitor, you will need to change the view to Full Screen. To do this,
Right Click in the Black Area of the Windows Media Player Window and
choose Full Screen, or press Alt+Enter on your keyboard.
10. The video should now continue to play on the television monitor. Once
the video is finished, you will need to drag the Windows Media Player
window back to your computer and close the window. If the window is
too large to be able to easily click on the Title Bar, press ESCAPE on your
keyboard to restore the window’s size.
11. You should be able to continue working on any separate program on your
computer while students are viewing the video on the television monitor.
12. teacher center
The Teacher Center provides you with powerful tools that allow you to create dynamic, interactive
multimedia projects for your students. You can save and organize your projects in folders you
create within My Content for easy editing, sharing and retrieval.
13. Lesson Plan Library
The Lesson Plan Library has a new search interface and contains more than 200
lessons designed for use with Discovery Education unitedstreaming videos.
Lesson plans can be viewed or saved in PDF or Microsoft
Access the Lesson Plan Library from anywhere on the site
Word format. To save a lesson plan, click on the appropriate
by clicking on the Teacher Center link in the navigation bar
at the top of the screen. Click on a subject area to view format and select “Save.” Navigate to the desired location.
lesson plans that contain descriptions and indications You can change the name of the lesson, but keep the “.pdf”
regarding the recommended grade ranges. or “.doc” file extension.