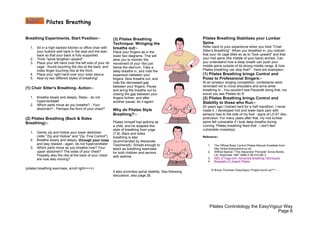
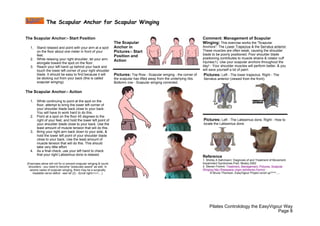
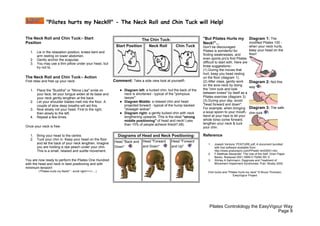
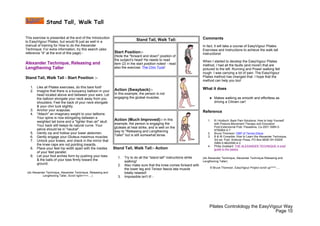
More Related Content
Similar to Abdominal Muscle Strain
Similar to Abdominal Muscle Strain (20)
More from crysatal16 (20)
Abdominal Muscle Strain
- 1. Introduction to Pilates Controlology & Exercises the EasyVigour Way
Page Controlology Exercise Introduction to Pilates Controlology & Exercises the
2 The Relaxation EasyVigour Way
3 The Zip and Hollow
Thank you for taking the time to check out Pilates Controlology & Exercises
4 Fine Control of Zip and Hollow
the EasyVigour Way ! Before you start, you should know that I am not
5 Pilates Pelvic Clock and Pelvic
teaching classical Pilates. You would need to go to an accredited Pilates
Alignment
studio for that. EasyVigour Pilates is Classical Pilates Method in alliance
6 The Scapular Anchor for with Alexander Technique and quot;Fourth Era Physiotherapyquot;. There are
Scapular Winging certain techniques utilized with each and every exercise. Once you have
learned these techniques, you will find them of great help for Pilates Mat
7 Pilates Breathing
Workouts. Even more importantly, the same techniques, when applied
8 Pilates Buttock Exercises
through your day will protect and enhance you and the way you move! -
9 quot;Pilates hurts my Neck!!!quot; - Your whole lifestyle will be improved! - Take it from me, they can make a
The Neck Roll and Chin Tuck huge difference - Take time to get these instructions right!
will Help!
Oh, and just a word of encouragement here. It took me a good 2 years to
10 Stand Tall, Walk Tall
learn to apply the basic Pilates Exercise techniques competently, and I am
still improving. The great thing is that benefits occur even before full
competency is achieved! If you are struggling to quot;get it rightquot;, just keep
How to do Pilates trying, and you will get there.
Exercises the
EasyVigour Way... P.S. Please always work within the comfortable limits of pain or frustration!
P.P.S. If you like the concepts in this free e-book, please check out the
EasyVigour Project at the web site address below. More publications will
follow!
© Bruce Thomson, Introduction to How to do Pilates Exercise
the EasyVigour Way
Publisher: The EasyVigour Project
http://www.easyvigour.net.nz
June 2004
Pilates Controlology the EasyVigour Way
Page 1
- 2. The Relaxation Script
The Relaxation Script: Start Relaxation Script: Position The Alexander Technique, and quot;Inhibitingquot;.
quot;Inhibitingquot; is pausing to apply a relaxation script at the
1. Lie in the Relaxation Position (see diagram).
precise moment that you are likely to tense up. It's that
Use a comfortable mat or carpet.
simple. Take the example of a snooker champion just
2. Support your head with a folded up towel or
before hitting the ball. He pauses just at the moment of
bath mat, about 3 cm thick.
play. He quot;inhibitsquot; unnecessary tension by use of a tried
3. Keep your feet and knees in line with your hips,
and trusted relaxation script. (He might use the
or a little wider if that is more comfortable.
relaxation exercises described above, because they can
4. Place hands on abdomen (see diagram) Take a
be done standing), thus:
deep breath, hold, then release it slowly.
He quot;inhibitsquot; unecessary tension.
The Relaxation Script: Action What the Relaxation Script Does: His mind and body tune into each other. This is
quot;posture-movement awarenessquot;.
1. (Breathing In): Raise your shoulders toward Provides a quick and simple relaxation script
your ears. that can be applied anywhere. He is now ready to do his (Alexander style) quot;Orderingquot;:
2. (Breathing out): Lower your shoulders towards Teaches quot;posture-movement awarenessquot;. By those quiet mind to body instructions. For example, he
your hips. doing a relaxation exercise, you are learn to feel thinks to himself: quot;Bend at the hips... to achieve
3. (Breathing normally): Let your shoulders totally the patterns of muscle tension in the body, and alignment of pocket.. with target ball.. with white ball ...
relax. also the feel of relaxation from tension. with que ... with eye ...quot; You get the picture!
4. Feel your body widen and lengthen. This page introduces you to quot;inhibitingquot;, or quot;relaxation at
5. Imagine sand trickling out of your back pockets. rest and in actionquot;. Please review the references below.
Comment on Relaxation Techniques
6. Imagine sand trickling out from double pockets Relaxation and the quot;relaxation scriptquot; is a very big
on your shirt subject, and is worthy of further study.
Doing nothing seems a strange way to learn a new
7. Imagine sand trickling from the middle of the
Reference:
exercise program! Nevertheless, you need a relaxation
back of your neck.
technique! You need to quot;not doquot; what is bad and to quot;doquot;
8. Say quietly to yourself: quot;There is no tension
what is good. quot;Doingquot; inappropriate muscle tension - 1. The Official Body Control Pilates Manual Available from:
from my toes.... to my tail bone... to the frown
http://www.bodycontrol.co.uk/
whether during rest or while in movement - is definitely
on my forehead.
2. FM Alexander: The Use of the Self; Orion Paper Backs,
bad! Thus a relaxation technique is the first thing you
9. Repeat the relaxation exercise as often as you Reissued 2001 ISBN 0 75284 391 5
should apply before any exercise! Indeed you should
need to to get the relaxation to occur. Get to 3. John E. Sarno: Healing Back Pain : The Mind-Body
apply a quick relaxation technique before and during
know and enjoy the feeling! Connection
each and every movement during the day!
Relaxation Scripts
4.
(relaxation scripts, Scroll right>>>>....)
relaxation script, © Bruce Thomson EasyVigour Project
Pilates Controlology the EasyVigour Way
Page 2
- 3. Lumbar stabilization exercises(1): The Zip & Hollow
The Zip and Hollow:- Start Position Comments
The Pilates Zip and Hollow
Start Position
1. Lie on your back in the relaxation position There are four muscles that are major quot;joint
with your knees bent toward your chest. stabilizersquot; for the lower back:-
2. Put your hands on the area of your
abdomen that would be covered by the The Transversus abdominis(1).
front part of a bikini. (the “bikini patch”. The Multifidus(1).
3. Have your thumbs touching at the navel, The Gluteus maximus, together with its co-
and your fingers touching at the midline, contracters(2).
about 6 cm below the navel. The Psoas muscle (part of the quot;Iliopsoasquot;
muscle group)(3).
The Transversus
The Zip and Hollow:- Action
abdominis: If you are serious about exercises for low back
(The Corset Muscle) pain stabilization, you need to learn how to
1. Now imagine that you have to zip into a
Right: Viewed from the front. activate all of these muscles!
very tight pair of jeans: -
Below: Viewed from the side.
2. Hollow the area under you thumbs and
fingers toward your spine. There may only Reference
be a very small movement. (Maintain Pelvic
Neutral!) 1. The Official Body Control Pilates Manual Available from:
3. Now imagine (if it hasn’t aready happened), http://www.bodycontrol.co.uk/
that the area under your fingers is being 2. SGT Gibbons, MJ Comerford, PL Emerson:
http://www.kineticcontrol.com/pages/
zipped together like that tight pair of jeans! references/Publications/Psaos.htm
(keep the rest of your body relaxed, and 3. M Comerford: Interpretation of Modified Force Closure
maintain Pelvic Neutral!) Model http://www.kineticcontrol.com/pages/
What it does newsletters/Winter%202002.pdf
This is an isometric abdominal exercise. Use it through 4. Dynamic Lumbar stabilization exercises: Fine Control of
(If you are having trouble making the above the Zip and Hollow
the day to facilitate Transversus abdominis protection of
the lower back - Further reading, refer ref (4).
happen, try leaving just one hand over the “bikini
patch”, and sucking your thumb with the other- (Abdominal muscle exercise & chronic low back pain stabilization
Watch Points exercises: The Zip and Hollow for the transversus abdominis,
suck gently for stage (2), and hard for stage (3)- © Bruce Thomson, EasyVigour Project scroll up^^^^.....
Many Pilates and physiotherapeutic programs promote
Sounds weird, but it does help!).
the quot;Zip and Hollowquot; together with Multifidus activation in
chronic low back pain stabilization exercises, but neglect
(Chronic low back pain stabilization exercises, Zip and Hollow,
the other muscles of lumbar stability. That's not good! -
transversus abdominis, Scroll right>>>>....)
see comments!
Pilates Controlology the EasyVigour Way
Page 3
- 4. Lumbar stabilization exercises (2): Fine Control of Zip & Hollow
Fine Control of the Zip and Hollow- Start Fine Control of Zip & Hollow:- A Dynamic Stabilization Exercise:-
Position
Applying a gentle zip and hollow through
the day means that the transvsersus
Lie in the Relaxation Position in pelvic neutral.
Imagine four buttons along the mid line of your abdominis will automatically trigger when
abdomen:- required to dynamically fulfil its role in
1. On the pubic symphysis. lumbar stability.
2. Mid-way between the pubic symphysis
and the belly button.
Comments
3. On the belly button.
4. Just below the breast bone.
The most subtle part of the zip and hollow is to
contract the front part of your pelvic floor muscles
Fine Control of the Zip and Hollow- Action
without gripping about the anus or under the tail
bone (that's that quot;tight assedquot; feel).
1. Lengthen up through the spine and tuck your
chin slightly.
In women, it should feel like sucking water
2. Gently zip and hollow over button 1.
3. Gently zip and hollow from buttons 1 to 2. up into the vagina!
4. Gently zip and hollow from button 1 to 3. In men, the movement is quot;raising the
5. Gently zip and hollow over the entire mid line of urethraquot; - imagine wading into a very cold
your abdomen. Watch Points:- river!
6. Now slowly increase the force of the zip and
hollow over the entire length of your abdominal Maintain a relaxed and properly positioned body,
Zip and Hollow throughout the day!
mid-line -increase gradually, and keep the rest specifically:-
of your body relaxed!
7. Now relax back to a gentle level 1 or 2 zip and
Once you have mastered the gentle zip and
Avoid that quot;tight assedquot; feel!
hollow. Try to maintain this level throughout your
hollow while in the relaxation position, try it
Don't let the Rectus abdominus (the quot;washboard
day!
lying on your stomach, and standing.
absquot;) cut in.
Gently anchor your scapulas! During most activities, such as walking,
Maintain Pelvic Neutral. jogging or gardening, you only need to zip
You should be able to breathe easily. and hollow to level 1 or 2.
(Dynamic Lumbar stabilization exercises for the lower abdominal
muscles, Scroll right>>>>....)
Reference
(Dynamic Lumbar stabilization for the lower abdominal muscles:
100 © Bruce Thomson, EasyVigour Project)
Pilates Lumbar stabilization exercises (1): The Zip and
Hollow
Pilates Controlology the EasyVigour Way
Page 4
- 5. Pilates Pelvic Clock, Pelvic Alignment Exercises
Pelvic Neutral: Start What this Exercises do:
(1) Relaxation Position
1. Lie down in the Relaxation Position Places the joint between the hips and the spine
(lumbo-sacral joint) at its mid-point.
Teaches the feel of pelvic neutral.
Before we can find “Pelvic Neutral” alignment, we need
to explore the full range of pelvic tilt.
Comment
Pelvic Neutral: Action
This is the first of the pelvic alignment exercises!
Caution! Do not push your pelvic tilt beyond the level The lumbo-sacral joint is one of the most
of mild discomfort! The first thing we are going to do is vulnerable joints in the body. 50% of lumbar disc
explore the full range of pevic tilt. herniations occur at this point!
All joints are strongest and least prone to
(3) Clock looking damage at or around their “mid-point”. The
(2) Clock Looking
1. Imagine there is a clock face attached to the
toward 6 lumbo-sacral joint is no exception to this rule!
front of your pelvis and looking forward. toward 12
2. Make your clock face quot;look upwardquot; toward your
head by tilting your pelvis so that 6 o'clock is You and your body do not automaticaly
higher than 12 o'clock. Hold, and take a couple
know a joint's strong middle point, but they
of shallow breathes.
can be taught!
3. Now make your pelvic quot;clock facequot; look
downward by tilting your pelvis so that 6 o'clock
Further information on Pelvic Alignment Exercises,
is below 12 o'clock . Hold and take a couple of
refer:-
shallow breathes.
(4)Clock looking straight ahead
4. Now come back to the centre of your pelvic
quot;Left Looking, or twisted Pelvisquot;
range of movement. You should still have a
small natural arch in your back (not quite
enough to get your fingers under). Relax, and Reference
get the feel of pelvic neutral into your mind!
1. Shirley A Sahrmann: Diagnosis and Treatment of
The quot;pelvic clock facequot; is now looking straight ahead. Movement Impairment Syndromes; Publ. Mosby 2002
2. The Official Body Control Pilates Manual Available from:
This is Pelvic Neutral!
http://www.bodycontrol.co.uk/
(Pilates Pelvic Clock & Pelvic Alignment Exercises, Scroll
right>>>>....) © Bruce Thomson EasyVigour Project (scroll up^^^^.....)
Pilates Controlology the EasyVigour Way
Page 5
- 6. Pilates Breathing
Breathing Experiments, Start Position:- Pilates Breathing Stabilizes your Lumbar
(3) Pilates Breathing
Spine.
Technique: Wringing the
Refer back to your experience when you tried quot;Chair
1. Sit in a high backed kitchen or office chair with breathe out:-
Sitter's Breathingquot;. When you breathed in, you noticed
your buttock well back in the seat and the lean Place your fingers as in the
that your rib cage tilted so as to quot;look upwardquot; and that
back so that your back is fully supported. lower two diagrams. This will
your mid spine (the middle of your back) arched. Can
2. Think quot;spine lengthen upwardquot;. alow you to monitor the
you understand how a deep breath can push your
3. Place your left hand over the left side of your rib movement of your ribs just
middle spine outside of its strong middle range, & how
cage - thumb touching the ribs at the back, and below the sternum. Take a
Pilates breathing can stop that? - Here are examples:-
index finger touching ribs at the front. deep breathe in, and note the
(1) Pilates Breathing brings Control and
4. Place your right hand over your solar plexus. expansion between your
Poise to Professional Singers:-
5. Now try two different styles of breathing! fingers. Now breathe out, and
At an amateur singing competition, contestants were
note the decreased gap
reminded not to move shoulders and arms while
between your fingers. Pause
(1) Chair Sitter's Breathing- Action:- breathing in - You wouldn't see Pavarotti doing that, nor
and wring the breathe out by
would you see Pilates do it!
closing the gap between your
1. Breathe slowly and deeply. Relax - do not (2) Pilates Breathing brings Control and
fingers further, and after
hyperventilate! another pause, do it again! Stability to those who Run:-
2. Which parts move as you breathe? - Your 20 years ago I trained hard for a half marathon. I never
abdomen? - Perhaps the front of your chest? Why do Pilates Style made it. I developed mid and lower back pain with
Breathing?:- sensory loss to the side of my foot - signs of L5-S1 disc
protrusion. For many years after that, my mid lumbar
(2) Pilates Breathing (Back & Sides
spine felt vulnerable if I took deep breaths during
Pilates himself had asthma as
Breathing):-
running. Pilates breathing fixed that - I don't feel
a child, and he adapted this
vulnerable nowadays.
style of breathing from yoga
1. Gently zip and hollow your lower abdomen. (7,8). Back and sides
(refer quot;Zip and Hollowquot; and quot;Zip, Fine Controlquot;). Reference:-
breathing is also
2. Breathe slowly and deeply, through your nose recommended by Alexander
and stay relaxed - again, do not hyperventilate! Teachers(6). Simple enough to 1. The Official Body Control Pilates Manual Available from:
3. Which parts move as you breathe now? Your teach as breathing exercises http://www.bodycontrol.co.uk/
upper abdomen? The sides of your chest? 2. Wilfred Barlow: quot;The Alexander Principlequot; Arrow Books
for both children and seniors
Ltd. Reprinted 1987 ISBN 0 09 910160 2
Possibly also the ribs at the back of your chest with asthma. 3. ABC of Yoga.com: Advanced Breathing Techniques
are now also moving?
4. Biography of Joseph Pilates
(pilates breathing exercises, scroll right>>>>) © Bruce Thomson EasyVigour Project scroll up^^^....
It also promotes spinal stability. See following
discussion, also page 26.
Pilates Controlology the EasyVigour Way
Page 6
- 7. Buttocks Exercises
Buttocks Exercises(1) While Standing, Start Buttocks Exercises(2) At quot;Heel Strikequot;:- Comment (1) - What Gluteus maximus
Position:- Contraction Does:
It takes rough surface walking to quot;triggerquot; the latent
1. Stand as for quot;Engage Gluteus maximus while
stabilizing power of the Gluteus. With quot;Walking on
Standingquot;.
1. Stand upright and relaxed with your feet hip
Sharp Pebblesquot;, you will have noticed that your Gluteus
2. Start walking: Each time your foot lands, engage
width apart and your toes pointing slightly
maximus tended to engage, your knees tended not to
your Gluteus maximus on that side.
outwards and unlock your knees.
collapse inwards, and your foot arches found it easy to
2. Your pelvis should be in quot;neutralquot;.
form just as they are supposed to. Modern shoeing and
3. Gently zip and hollow your lower abdomen. Buttocks Exercises(3) Walking on Sharp smooth sidewalks have taken away this natural
Pebbles quot;buttocks firmingquot; stimulus. Worse still, the quot;lazy
Action:- Gluteusquot; is even lazier when the back is sore or the
ankle is sprained(3). The laziness of this lower back &
1. Make sure that you are in bare feet, and imagine
hip stabilizer is a disaster for modern musculo-skeletal
1. Tense your gluteals, & hold for 3 seconds - you that you are walking on sharp, painful pebbles!
health(1,2). Hence the need for Gluteus maximus
can check that the Gluteus maximus has You should find that -
engagement with exercises to firm the buttocks!
engaged by placing a hand over the relevant Your foot lands very gently!
Comment (2) - Buttocks firming is definitely
area (see picture below) - repeat 3-5 times. Heal and toe land at the same time!
part of the traditional Pilates workout! -
Knee over foot, not behind it!
- just listen to Mari Winsor in her phenomenally
2. Pause just after your foot has landed and at the
Monitoring for Gluteal Engagement successful Pilates Video Series ('Sculpt your Body
moment that you are standing on one foot, and
Slim') as she describes the Roll Up: (quot;Squeeze your
take note whether your Gluteus maximus is
Monitoring Gluteus tushe and engage your power housequot;!)
engaging! - (2-4 minutes is a good workout).
Gluteal Anatomy
activity Comment (3): The Gluteus maximus is a
dynamic stabilizer! -
Buttocks Exercises(4) While bare Foot
Only engage the Gluteus maximus at heel strike, when
Running on Tar Seal:- squatting, bending forward or climbing stairs! Keep it
(Not for the faint hearted!) Engage the Gluteus maximus
relaxed at all other times.
as the foot touches the ground, and land your foot
quietly, with the knees and hips bending a little more
1. Shirley A Sahrman: quot;Movement Impairment Syndromesquot;
than you are used to. Your knees should not collapse
Publ. Mosby, 2002 ISBN 0-8016-7205-8
inwards: The kneecap looks straight over the second toe
2. Bruce Thomson: Engage Gluteus maximus!
of your foot. One minute to start with: don't overdo it! 3. Bullock-Saxton JE; Janda V; Bullock MI:Int J Sports Med
1994; 15 (6) Aug: 330–334
Solve your lower back pain! - Learn to (Exercises, thighs, buttocks, & © Bruce Thomson, EasyVigour
walk like the Kalahari Bushman... Project)
(Walking exercises thighs as well as buttocks Scroll right >>..)
Pilates Controlology the EasyVigour Way
Page 7
- 8. The Scapular Anchor for Scapular Winging
The Scapular Anchor:- Start Position Comment: Management of Scapular
The Scapular Winging: This exercise works the quot;Scapular
Anchorsquot;: The Lower Trapezius & the Serratus anterior.
Anchor in
1. Stand relaxed and point with your arm at a spot
These muscles are often weak, causing the shoulder
Pictures:- Start
on the floor about one meter in front of your
blade to be poorly positioned. Poor shoulder blade
feet. Position and
positioning contributes to muscle strains & rotator cuff
2. While relaxing your right shoulder, let your arm Action injuries(1). Use your scapular anchors throughout the
elongate toward the spot on the floor.
day! - Your shoulder muscles will perform better, & you
3. Reach your left hand up behind your back and
will save yourself a lot of pain!.
touch the lower left corner of your right shoulder
Pictures: Top Row - Scapular winging - the corner of
blade. It should be easy to find because it will Pictures: Left - The lower trapezius. Right - The
be sticking out from your back (this is called the scapular has lifted away from the underlying ribs. Serratus anterior (viewed from the front).
scapular winging). Bottomn row - Scapular winging corrected.
The Scapular Anchor:- Action
1. While continuing to point at the spot on the
floor, attempt to bring the lower left corner of
your shoulder blade back close to your back.
You will have to work hard to do this.
2. Point at a spot on the floor 45 degrees to the
Pictures: Left - The Latissimus dorsi. Right - How to
right of your feet, and hold the lower left point of
locate the Latissimus dorsi.
your shoulder blade close to your back. Use the
least amount of muscle tension that will do this.
3. Bring your right arm back down to your side, &
hold the lower left point of your shoulder blade
close to your back. Use the least amount of
muscle tension that will do this. This should
take very little effort.
4. As a final check, use your left hand to check
that your right Latissimus dorsi is relaxed.
Reference
1. Shirley A Sahrmann: Diagnosis of and Treatment of Movement
Impairment Syndromes Publ. Mosby 2002
(Exercises alone will not fix or prevent scapular winging & round
2. Steven Fromm: Treatment, Management, Pictures, Scapular
shoulders - you need to become quot;posturally awarequot; as well. In
Winging http://freespace.virgin.net/steven.fromm/ -
severe cases of scapular winging, there may be a surgically
© Bruce Thomson, EasyVigour Project scroll up^^^^.....
treatable nerve deficit - see ref (2) - Scroll right>>>>....)
Pilates Controlology the EasyVigour Way
Page 8
- 9. quot;Pilates hurts my Neck!!!quot; - The Neck Roll and Chin Tuck will Help!
The Neck Roll and Chin Tuck:- Start quot;But Pilates Hurts my Diagram 1: The
The Chin Tuck:
Position modified Pilates 100 -
Neck!quot;...
Start Position Neck Roll Chin Tuck when your neck hurts,
Don't be discouraged.
keep your head on the
Pilates is wonderful for
1. Lie in the relaxation position, knees bent and
floor!
finding weaknesses, and
arm resting on lower abdomen.
even sports pro's find Pilates
2. Gently anchor the scapulas.
difficult to start with. Here are
3. You may use a thin pillow under your head, but
three suggestions:-
try not to.
(1) During the moves that
hurt, keep you head resting
The Neck Roll and Chin Tuck:- Action on the floor (diagram 1).
Comment: Take a side view look at yourself!-
First relax and free up your neck: (2) After class, gently work Diagram 2: Not this
on the sore neck by doing
way !
the quot;chin tuck and look
Diagram left: a tucked chin, but the back of the
1. Place the quot;Buddhaquot; or quot;Mona Lisaquot; smile on
between kneesquot; by itself as a
neck is shortened - typical of the quot;pompous
your face, let your tongue widen at its base and
Pilates exercise (diagram 3).
lawyerquot;.
your neck gently lengthen at the back.
(3) During your day, avoid
Diagram Middle: a relaxed chin and head
2. Let your shoulder blades melt into the floor. A
quot;head forward and downquot;.
projected forward - typical of the hump backed
couple of slow deep breaths will aid this.
Diagram 3: The safe
For example, when bringing
quot;dowager widowquot;.
3. Now slowly roll your head. First to the right,
a soup spoon to your mouth, chin tuck !
Diagram right: a gently tucked chin with neck
then slowly to the left.
bend at your hips to let your
lengthening upwards. This is the ideal quot;strong
4. Repeat a few times.
whole torso come forward,
middle positioningquot; of head and neck! Less
lengthen your neck & tuck
than 10% of people achieve this(47,48).
Once your neck is free: your chin.
Reference
Diagrams of Head and Neck Positioning:
1. Bring your head to the centre.
2. Tuck your chin in. Keep your head on the floor
Head quot;Forward Head quot;Forward
Head quot;Back and
and let the back of your neck lengthen. Imagine 1. Joseph Ventura: POSTURE.pdf; A document bundled
and Downquot; and Upquot;
Downquot;
you are holding a ripe peach under your chin. with trial software available from:
This is a small, relaxed and subtle movement. http://www.posturepro.com/PPweb/ itm00001.htm
2. F Matthias Alexander: The Use of the Self; Orion Paper
Backs, Reissued 2001 ISBN 0 75284 391 5
You are now ready to perform the Pilates One Hundred 3. Shirley A Sahrmann: Diagnosis and Treatment of
Movement Impairment Syndromes; Publ. Mosby 2002
with the head and neck in best positioning and with
minimum tension!
(quot;Pilates hurts my Neck!quot; - scroll right>>>>....) Chin tucks and quot;Pilates hurts my neckquot; © Bruce Thomson,
EasyVigour Project
Pilates Controlology the EasyVigour Way
Page 9
- 10. Stand Tall, Walk Tall
This exercise is presented at the end of the Introduction Comments
Stand Tall, Walk Tall:
to EasyVigour Pilates, but would fit just as well in a
manual of training for How to do the Alexander In fact, it will take a course of EasyVigour Pilates
Technique. For extra information, try this search (also Exercises and Instructions to achieve the walk tall
Start Position:-
reference quot;4quot; at the end of this page) - instructions!
(Note the quot;forward and downquot; position of
the subject's head! He needs to read When I started to develop the EasyVigour Pilates
Alexander Technique, Releasing and item (2) in the start position notes! - read method, I had all the faults (and more!) that are
Lengthening Taller also the exercise: The Chin Tuck! pictured to the left. Running and Power walking felt
rough. I was carrying a lot of pain. The EasyVigour
Pilates method has changed that. I hope that the
Stand Tall, Walk Tall - Start Position :-
method can help you too!
1. Like all Pilates exercises, do this bare foot! What it does
Action (Swayback):-
2. Imagine that there is a buoyancy balloon in your
In this example, the person is not
head located above and between your ears. Let
engaging the gluteal muscles. Makes walking as smooth and effortless as
the balloon elongate your neck away from you
driving a Citroen car!
shoulders. Feel the back of your neck elongate
& your chin tuck slightly.
3. Anchor your scapulas. Reference
4. quot;Attachquot; an imaginary weight to your tailbone.
Your spine is now elongating between a
Action (Much Improved):- In this 1. B I Kodisch: Back Pain Solutions: How to help Yourself
weighted tail bone and a quot;lighter than airquot; skull.
example, the person is engaging the with Posture-Movement Therapy and Education
Your back still keeps its natural curve. Your Publ.Extensional Publ. Pasadena, Ca 2001 ISBN 0-
gluteals at heal strike, and is well on the
pelvis should be in quot;neutralquot;. 9700664-5-7
way to quot;Releasing and Lengthening
5. Gently zip and hollow your lower abdomen. 2. Bruce Thomson: OBP of Tennis Elbow
Tallerquot; but is still somewhat tense. 3. B & W Conarble: How to Learn the Alexander Technique,
6. Gently engage your Gluteus maximus muscles
3rd ed. Publ. Andover Press, PO Box 6838 OH 43205
7. Unlock your knees, and check in the mirror that
ISBN 0-9622595-4-3
the knee caps are not pointing inwards. 4. Philip Goddard: THE ALEXANDER TECHNIQUE A brief
Stand Tall, Walk Tall:- Action
8. Place your feet hip width apart with the insides guide to the basics
of your feet parallel.
9. Let your foot arches form by pushing your toes 1. Try to do all the quot;stand tallquot; instructions while (do Alexander Technique, Alexander Technique Releasing and
& the balls of your toes firmly toward the walking! Lengthening Taller)
ground. 2. Also make sure that the knee comes forward with
© Bruce Thomson, EasyVigour Project scroll up^^^^.....
the lower leg and Tensor fascia lata muscle
(do Alexander Technique, Alexander Technique, Releasing and totally relaxed!
Lengthening Taller, Scroll right>>>>....) 3. Impossible isn't it! -
Pilates Controlology the EasyVigour Way
Page 10