

GenerativeArt—MadewithUnity
ティーチャートレーニングデイ
「認定プログラマー編」
ユニティ・テクノロジーズ・ジャパン株式会社
荒川 巧也
1
自己紹介
2
荒川 巧也
ユニティ・テクノロジーズ・ジャパン株式会社所属。
ユニティでは”トレーナー”として主に企業様向けに
Unityに関する導入講義実施や効率的な実装方法
のアドバイスを行っています。
Unity認定プログラマー試験
前提条件の内容:
• Unity を使用したビデオゲームまたは3D インタラクティブコンテンツ
のプ ログラミングの実務経験2 年以上
• C# を含むコンピュータープログラミングの実務経験2 年以上
• 構想から完成までソフトウェア開発ライフサイクル全般に携わった経
験
• ゲーム開発、インタラクティブエンターテイメント、デザインビジュアラ
イゼーションなど、Unity を使用したソフトウェア開発のための専門的な
ア プリケーションの知識
• キャラクターや環境の設定など、Unity でのビジュアル /3D アセット
および アニメーションパイプラインについての基本的な知識
(一部抜粋
3
認定プログラマー試験の試験範囲
   ・プログラミングの核となるインタラクション
   ・アートパイプラインでの作業
   ・アプリケーションシステムの開発
   ・シーンと環境デザインのためのプログラミング
   ・パフォーマンスとプラットフォームの最適化
   ・ソフトウェア開発チームでの作業
4
今回使用するUnityのバージョンなど
Unityのバージョン: Unity2019.4.8f1を使用します。
使用するプロジェクト:BaseProject_2019.4.8.1f
※以下のURLからダウンロード可能です。
https://drive.google.com/file/d/1L3WExri_sPexkMKz-OaJ0mQTLj4v88LH/view?usp
=sharing
5
Profiler
6
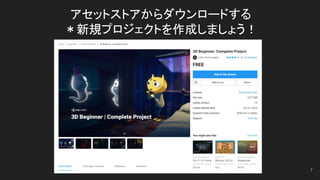
アセットストアからダウンロードする
*新規プロジェクトを作成しましょう!
7
新規プロジェクトを作成
8
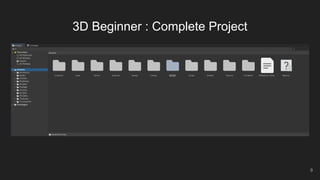
3D Beginner : Complete Project
9
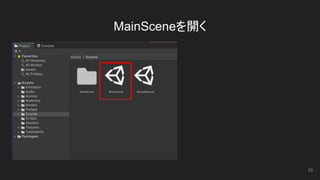
MainSceneを開く
10
Main Sceneが開く
11
Stats (Statics)
12
FPS :
1秒間に何フレーム処理を行えるか。
CPU:
メインスレッドとレンダリングスレッドに費やした時間
Batches:
Unityが複数のオブジェクトをレンダリングの際にまとめようとします。
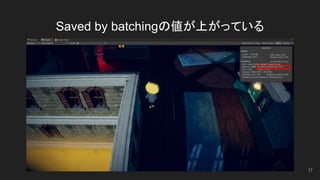
Saved by batching :
まとまったバッチ数
SetPass Calls :
CPUからGPUに送られる描画命令(レンダリングパス)の数。
バッチ処理について
オブジェクトをスクリーンに描画するためには、グラフィックスAPI (OpenGL や Direct3D 等) に対してドローコールが必要です。グラフィックス
API はドローコールごとに非常に多くの処理をするため、ドローコールは高負荷で、CPU 側のパフォーマンスオーバーヘッドの原因になりま
す。これは大抵、ドローコール間に状況の変更(例えばマテリアルの切り替えなど) が発生することに起因し、グラフィックスドライバーで高負
荷な検証と変換処理の原因となります。
Unity では、それに対処するために2 つのテクニックが使用されます。
動的バッチ処理: かなり小さいメッシュ用に、その頂点を CPU 上に変換して多数の類似したものを群にし、ひとまとめにして
描画します。
静的バッチ処理: 静的 (つまり、動かない) ゲームオブジェクトを大きなメッシュと結合して、それを高速でレンダリングします。
13
https://docs.unity3d.com/ja/2019.4/Manual/DrawCallBatching.html
静的バッチ処理について
14
静的バッチ処理: 静的 (つまり、動かない)
ゲームオブジェクトを大きなメッシュと結
合して、それを高速でレンダリングしま
す。
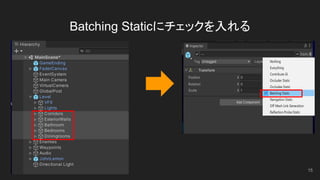
Batching Staticにチェックを入れる
15
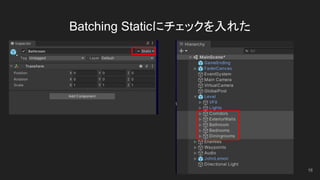
Batching Staticにチェックを入れた
16
Saved by batchingの値が上がっている
17
Edit → Project Settings
18
Profiler
Profilerを使うことによってCPUやGPU、メモリの負荷など再生することによって確認すること
ができます。「Window → Analysis → Profiler」
19
Profilerの役割
Profilerを使うことで現在のプロジェクトにおける負荷を視覚的に確認する。また Profilerを使うことで
具体的に負荷がかかる箇所を確認することができる。
プロジェクトの制作者は負荷がかかる原因を突き止めて負荷がなるべくかからないように検討するこ
とができる。
20
とりあえずゲームを再生してみます
21
Profilerの構成について
Profiler Modules
詳細
22
時間のかかっている処理を確認する
23
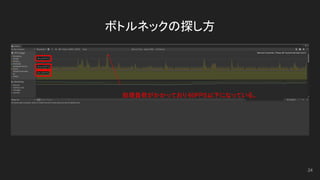
ボトルネックの探し方
処理負荷がかかっており 60FPS以下になっている。
24
Deep Profile
Deep Profileを使用すると、Unity標準の幾つかのAPIだけでなく、もっと深い階層のAPI
負荷も見れるようになります。
25
Deep Profileだと各関数の負荷を確認することもできる
26
モジュールを追加したり減らすことができる
27
実機でテストすることができます
28
おすすめの資料
29
https://www.slideshare.net/UnityTechnologiesJapan/unity-111054310
【CEDEC2018】一歩先のUnityでのパフォーマンス/メモリ計測、デバッグ術
Tips: occlusion culling
オクルージョンカリングは、あるオブジェクトが他のオブジェクトに隠されていて現在カメラに映
らないときに、オブジェクトのレンダリングを無効にする機能です。
https://docs.unity3d.com/ja/2018.4/Manual/OcclusionCulling.html
30
Occluder StaticとOccludee Staticにチェックを入れる
31
Window→Rendering→Occlusion Culling
32
Occlusion Cullingを有効にする
33
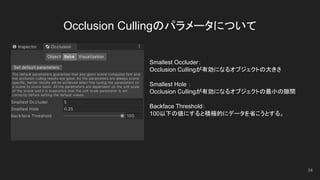
Occlusion Cullingのパラメータについて
34
Smallest Occluder:
Occlusion Cullingが有効になるオブジェクトの大きさ
Smallest Hole :
Occlusion Cullingが有効になるオブジェクトの最小の隙間
Backface Threshold:
100以下の値にすると積極的にデータを省こうとする。
Occlusion Cullingの効きを視覚で確認
35
他のオブジェクトに隠されていて現在カメラに映らないときに、オブ
ジェクトのレンダリングを無効にしています。
Backface Thresholdの効果について
36
Backface Thresholdの効果について
37
Tips : Physicsに関するパフォーマンス最適化
Fixed Timestep 設定 (Time ウィンドウ内) を調整して、物理演算の更新に費やす時間を削減できます。 Timestep を高くすると、物理演算の
精度を犠牲にして CPU のオーバーヘッドを削減します。多くの場合、精度を下げることと引き換えに速度を上げるのは許容できるトレードオ
フです。
Time ウィンドウで Maximum Allowed Timestep を 8–10FPS の範囲の設定し、最悪の場合の物理計算に要する時間を制限します。
メッシュコライダーはプリミティブコライダーよりもはるかに高いパフォーマンスオーバーヘッドを持っているため、使用を控えめ目にしてくださ
い。プリミティブコライダー付きの子オブジェクトを使用して、メッシュの形状を近似することが可能な場合もよくあります。子コライダーは、親の
リジッドボディによって単一の複合コライダーとして一括して制御されます。
ホイールコライダーは、厳密にはソリッドオブジェクトの意味でのコライダーではありませんが、それにもかかわらず、高い CPU のオーバー
ヘッドを持っています。
38
https://docs.unity3d.com/ja/2018.4/Manual/iphone-Optimizing-Physics.html (一部抜粋)
CapsuleColliderとMeshColliderの負荷の違いを確認します
新しいシーンを作成します
39
John Lemonをシーン上に追加する
40
John Lemonをシーン上に配置した
41
42
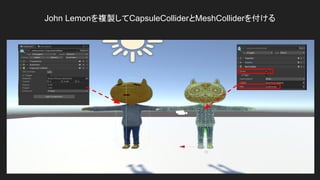
John Lemonを複製してCapsuleColliderとMeshColliderを付ける
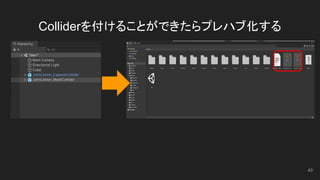
Colliderを付けることができたらプレハブ化する
43
ObjInstatiation
MainCameraに追加
44
using UnityEngine;
public class ObjInstatiation : MonoBehaviour
{
public GameObject obj;
void Update()
{
if (Input.GetMouseButtonDown(0))
{
for (int y = 0; y < 10; y++)
{
for (int x = 0; x < 10; x++)
{
GameObject instantiatedObj = Instantiate(obj) as GameObject;
instantiatedObj.AddComponent<Rigidbody>();
instantiatedObj.transform.position = new Vector3(x, y, 0);
}
}
}
}
}
CapsuleColliderを追加したJohnLemonを追加
45
コンテンツを再生して左クリック
CapsuleColliderの追加モデルが生成される
46
同じようにMeshColliderを付けたJohnLemonを追加
47
MeshColliderの追加モデルが生成される
48
Tips: FrameDebugger
フレームデバッガー を使用すると、特定のフレーム上で実行されているゲームの再生を凍結し、
そのフレームをレンダリングするために使用されている個々の ドローコール を表示することがで
きます。同様に、ドローコールをリストとして、デバッガーはまた、それを1つずつ実行することが
できます。だから、シーンが、どのようにそのグラフィックエレメントから構成されていくかをとても
詳細に見ることができます。フレームデバッガウィンドウ (Window > Analysis > Frame
Debugger) は、drawcall 情報が表示され、構築中のフレームの playback を制御することがで
きます。
49
https://docs.unity3d.com/ja/2019.4/Manual/FrameDebugger.html
より詳しく確認できる
50
ベースとなるミニゲーム
(アソシエイト試験対策で制作したゲーム)
51
Object Pool
コンテンツ制作においてオブジェクトを生成(Instantiate)したり削除(Destroy)することは
一般的に行われています。ただし、オブジェクトの生成と削除は負荷がかかります。
Object Poolは一度生成したオブジェクトを非表示にして必要に応じて表示(有効化)して
使いまわす方法です。何度もオブジェクトを生成したり削除する必要がなくなるので負荷
を改善することができます。
52
このベースのミニゲームにObjectPoolを適用する
53
PlayerShootを開きます
→PlayerShootを開きます。
54
PlayerShoot.cs
ベースとなるプロジェクトを確認。
using System.Collections;
using System.Collections.Generic;
using UnityEngine;
public class PlayerShoot : MonoBehaviour {
public GameObject bullet; //PrefabのFireを追加
public Transform muzzle; //空のオブジェクトの muzzleを設定
public float bulletSpeed = 1000f;
// Use this for initialization
void Start () {
}
// Update is called once per frame
void Update () {
   // 左クリックが押された時に
    if (Input.GetMouseButtonDown(0))
  {
// Fireを生成する  (シンプルにInstantiateをしている。 )
GameObject bullets = Instantiate(bullet) as GameObject;
// Fireの位置を調整する
bullets.transform.position = muzzle.position;
Vector3 bulletDirection;
bulletDirection = gameObject.transform.forward * bulletSpeed;
// Fireに力を加えて発射
bullets.GetComponent<Rigidbody>().AddForce(bulletDirection);
}
}
} 55
今のままだと左クリックの分だけ bulletを生成する
Object Pool 適用:
PlayerShoot
using System.Collections;
using System.Collections.Generic;
using UnityEngine;
public class PlayerShoot : MonoBehaviour {
 public GameObject bullet;
 public Transform muzzle;
 public float bulletSpeed = 1000f;
Animator animator;
List<GameObject> bulletStocks;
// Start関数内でbulletを10個生成する
void Start()
{
animator = GetComponent<Animator>();
bulletStocks = new List<GameObject>();
for (int i = 0; i < 10; i++)
{
GameObject obj = (GameObject)Instantiate(bullet);
obj.SetActive(false);
bulletStocks.Add(obj);
}
}
//左クリックで押された数のBulletを有効化する
void Fire()
{
for (int i = 0; i < bulletStocks.Count; i++)
{
if (!bulletStocks[i].activeInHierarchy)
{
bulletStocks[i].transform.position = muzzle.transform.position;
bulletStocks[i].transform.rotation = muzzle.transform.rotation;
bulletStocks[i].SetActive(true);
Rigidbody bullet = bulletStocks[i].GetComponent<Rigidbody>();
bullet.AddForce(bullet.transform.forward * bulletSpeed);
break;
}
}
}
// Update is called once per frame
void Update () {
// z キーが押された時
if (Input.GetMouseButtonDown(0))
{
animator.SetTrigger("Attack");
Fire();
}
}
}
56
Bulletを開く
ベースとなるプロジェクトを確認。
using System.Collections;
using System.Collections.Generic;
using UnityEngine;
public class Bullet : MonoBehaviour {
// Use this for initialization
void Start () {
Destroy(gameObject, 3.0f); //3秒後に削除
}
}
57
3秒後に削除される
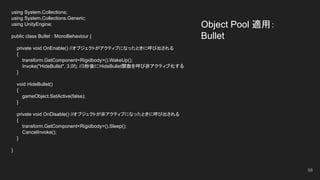
Object Pool 適用:
Bullet
using System.Collections;
using System.Collections.Generic;
using UnityEngine;
public class Bullet : MonoBehaviour {
private void OnEnable() //オブジェクトがアクティブになったときに呼び出される
{
transform.GetComponent<Rigidbody>().WakeUp();
Invoke("HideBullet", 3.0f); //3秒後にHideBullet関数を呼び非アクティブ化する
}
void HideBullet()
{
gameObject.SetActive(false);
}
private void OnDisable() //オブジェクトが非アクティブになったときに呼び出される
{
transform.GetComponent<Rigidbody>().Sleep();
CancelInvoke();
}
}
58
EnemyControllerを開く
void OnCollisionEnter(Collision col)
{
if(col.gameObject.tag == "Bullet")
{
Destroy(col.gameObject);
TakeDamage(damageValue);
}
}
59
Bulletがカラスに当たった時に削除する。
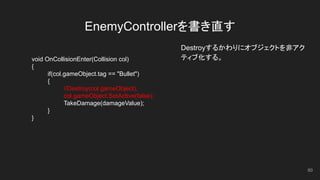
EnemyControllerを書き直す
Destroyするかわりにオブジェクトを非アク
ティブ化する。void OnCollisionEnter(Collision col)
{
if(col.gameObject.tag == "Bullet")
{
//Destroy(col.gameObject);
col.gameObject.SetActive(false);
TakeDamage(damageValue);
}
}
60
Fireが生成されるようになった
61
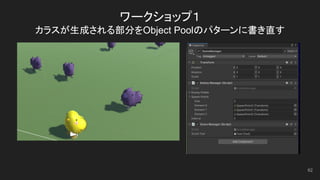
ワークショップ1
カラスが生成される部分をObject Poolのパターンに書き直す
62
ワークショップ1
こちらをまず変更してみましょう
63
using UnityEngine;
using System.Collections;
public class EnemyManager : MonoBehaviour
{
public GameObject enemyPrefab; //Karasuのプレハブを追加する
public Transform[] spawnPoints; //Karasuの生成ポイントを追加する
public float interval = 3.0f; //Karasuの生成インターバル
float time = 0.0f;
void Update()
{
time += Time.deltaTime; //時間をはかる
if(time > interval) //インターバルの時間以上に過ぎれば
{
int spawnPointIndex = Random.Range(0, spawnPoints.Length); //生成ポイントをランダムで選ぶ
GameObject enemy = Instantiate(enemyPrefab,spawnPoints[spawnPointIndex].position,spawnPoints[spawnPointIndex].rotation); //Enemyを生成する
time = 0f; //時間を0秒に戻す
}
}
}
おすすめのチュートリアル
64https://learn.unity.com/tutorial/object-pooling#
コルーチン
我々になじみのあるStart関数やUpdate関数は基本的に順番に実行されて
おり、処理を途中で中断したり待機させたりすることができません。 コルー
チン(Coroutine)は処理を中断したり待機したり終了させることができます。
65
https://docs.unity3d.com/ja/2018.4/Manual/Coroutines.html
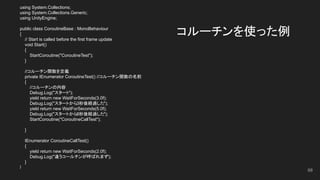
コルーチンを使った例using System.Collections;
using System.Collections.Generic;
using UnityEngine;
public class CoroutineBase : MonoBehaviour
{
// Start is called before the first frame update
void Start()
{
StartCoroutine("CoroutineTest");
}
//コルーチン関数を定義
private IEnumerator CoroutineTest() //コルーチン関数の名前
{
Debug.Log("スタート");
yield return new WaitForSeconds(3.0f);
Debug.Log("スタートから3秒後経過した");
}
}
66
コルーチンを使った例
using System.Collections;
using System.Collections.Generic;
using UnityEngine;
public class CoroutineBase : MonoBehaviour
{
// Start is called before the first frame update
void Start()
{
StartCoroutine("CoroutineTest");
}
//コルーチン関数を定義
private IEnumerator CoroutineTest() //コルーチン関数の名前
{
//コルーチンの内容
Debug.Log("スタート");
yield return new WaitForSeconds(3.0f);
Debug.Log("スタートから3秒後経過した");
yield return new WaitForSeconds(5.0f);
Debug.Log("スタートから8秒後経過した");
}
}
67
コルーチンを使った例
using System.Collections;
using System.Collections.Generic;
using UnityEngine;
public class CoroutineBase : MonoBehaviour
{
// Start is called before the first frame update
void Start()
{
StartCoroutine("CoroutineTest");
}
//コルーチン関数を定義
private IEnumerator CoroutineTest() //コルーチン関数の名前
{
//コルーチンの内容
Debug.Log("スタート");
yield return new WaitForSeconds(3.0f);
Debug.Log("スタートから3秒後経過した");
yield return new WaitForSeconds(5.0f);
Debug.Log("スタートから8秒後経過した");
StartCoroutine("CoroutineCallTest");
}
IEnumerator CoroutineCallTest()
{
yield return new WaitForSeconds(2.0f);
Debug.Log("違うコールチンが呼ばれます");
}
}
68
Tips:Script Execution Order Setting
CallTest.cs
***********************
using UnityEngine;
public class CallTest : MonoBehaviour
{
// Start is called before the first frame update
void Start()
{
Debug.Log("ユニティの本社はアメリカにあります ");
}
}
***********************
SecondCall.cs
***********************
using UnityEngine;
public class SecondCall : MonoBehaviour
{
// Start is called before the first frame update
void Start()
{
Debug.Log("今日の夕食はカレーです ");
}
}
*********************** 69
異なるクラス間で、どのスクリプトの Start()が先に呼ばれるかを明示的に指定する方法を説明します。
Tips:Script Execution Order Setting
70
Tips:Script Execution Order Setting
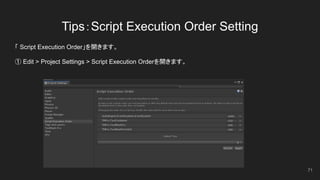
「 Script Execution Order」を開きます。
① Edit > Project Settings > Script Execution Orderを開きます。
71
Tips:Script Execution Order Setting
② Script Execution Orderの「+」を押して登録したいスクリプトを選択します。
72
Tips:Script Execution Order Setting
③ スクリプトの実行順を設定します。
④ 実行順は、先に実行したいスクリプトが上で後に実行したいスクリプトは下に移動させます。
(正確には、数値が低い方が優先されます。標準のコンポーネントは実行順は 0です。)
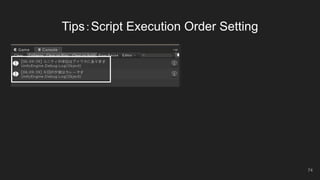
CallTest.csを優先した場合:
73
Tips:Script Execution Order Setting
74
Tips:Script Execution Order Setting
SecondCall.csを優先した場合:
75
↓SecondCallを上にしている。
Tips:Script Execution Order Setting
76
*ここからプロジェクトに戻ります。
77
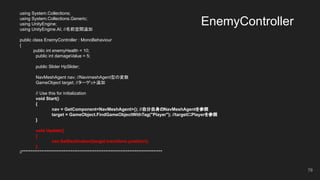
EnemyController
using System.Collections;
using System.Collections.Generic;
using UnityEngine;
using UnityEngine.AI; //名前空間追加
public class EnemyController : MonoBehaviour
{
public int enemyHealth = 10;
public int damageValue = 5;
public Slider HpSlider;
NavMeshAgent nav; //NavimeshAgent型の変数
GameObject target; //ターゲット追加
// Use this for initialization
void Start()
{
nav = GetComponent<NavMeshAgent>(); //自分自身のNavMeshAgentを参照
target = GameObject.FindGameObjectWithTag("Player"); //targetにPlayerを参照
}
void Update()
{
nav.SetDestination(target.transform.position);
}
//*********************************************************************************
78
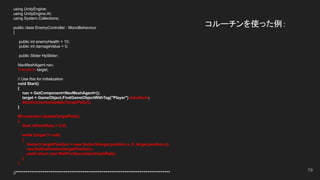
コルーチンを使った例:
using UnityEngine;
using UnityEngine.AI;
using System.Collections;
public class EnemyController : MonoBehaviour
{
public int enemyHealth = 10;
public int damageValue = 5;
public Slider HpSlider;
NavMeshAgent nav;
Transform target;
// Use this for initialization
void Start()
{
nav = GetComponent<NavMeshAgent>();
target = GameObject.FindGameObjectWithTag("Player").transform;
StartCoroutine(UpdateTargetPath());
}
IEnumerator UpdateTargetPath()
{
float refreshRate = 0.5f;
while (target != null)
{
Vector3 targetPosition = new Vector3(target.position.x, 0, target.position.z);
nav.SetDestination(targetPosition);
yield return new WaitForSeconds(refreshRate);
}
}
//*********************************************************************************
79
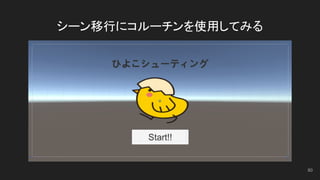
シーン移行にコルーチンを使用してみる
80
StartGameを開きます
81
using System.Collections;
using System.Collections.Generic;
using UnityEngine;
using UnityEngine.SceneManagement;
public class StartGame : MonoBehaviour {
public void LoadNewScene()
{
SceneManager.LoadScene(1); //シーンを呼び出す
}
}
ロード確認用のスライダーを追加する
82
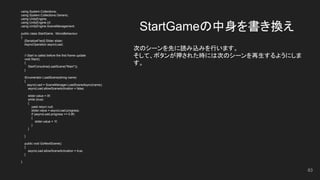
StartGameの中身を書き換え
83
using System.Collections;
using System.Collections.Generic;
using UnityEngine;
using UnityEngine.UI;
using UnityEngine.SceneManagement;
public class StartGame : MonoBehaviour
{
[SerializeField] Slider slider;
AsyncOperation asyncLoad;
// Start is called before the first frame update
void Start()
{
StartCoroutine(LoadScene("Main"));
}
IEnumerator LoadScene(string name)
{
asyncLoad = SceneManager.LoadSceneAsync(name);
asyncLoad.allowSceneActivation = false;
slider.value = 0f;
while (true)
{
yield return null;
slider.value = asyncLoad.progress;
if (asyncLoad.progress >= 0.9f)
{
slider.value = 1f;
}
}
}
public void GoNextScene()
{
asyncLoad.allowSceneActivation = true;
}
}
次のシーンを先に読み込みを行います。
そして、ボタンが押された時には次のシーンを再生するようにしま
す。
Sliderを追加します
84
Scriptable Object
85
Scriptable Object
ScriptableObject は、クラスインスタンスとは無関係に、大量のデータを保存するために使
用できるデータコンテナです。ScriptableObject の主な使用例の 1 つは、値に対し複数の
コピーを避けることによってプロジェクトのメモリ消費を削減することです。これは、プロジェ
クトに、プレハブ (同じデータをアタッチした MonoBehaviour スクリプトに格納します) があ
る場合に便利です。プレハブは、インスタンス化するたびにそれぞれがデータのコピーを作
成します。
https://docs.unity3d.com/ja/2018.4/Manual/class-ScriptableObject.html
86
Scriptable Objectを使うと良いこと
プレハブでは、同じパラメータであっても
10、100と同じオブジェクトが生成
(Instantiate)するたびにこれらの変数がメ
モリに確保されてしまう。例えばパラメータ
の使用メモリが10KBだとしてプレハブが10
体いれば使用メモリは100KBになる。
それに対してScriptableObjectを使えば同
じ100体いても使用メモリは10KBのままで
ある。
87
Scriptable Objectの生成サンプル
using UnityEngine;
[CreateAssetMenu(menuName = "ScriptableObject/Create ParameterTable", fileName = "ParameterTable")]
public class ScriptableSample : ScriptableObject
{
public string name;
public int age;
public string occupation;
}
88
Scriptable Objectを生成する
89
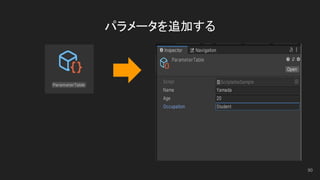
パラメータを追加する
90
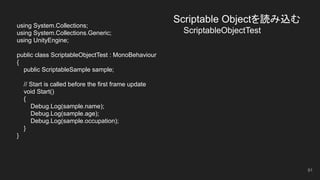
Scriptable Objectを読み込む
    ScriptableObjectTest
using System.Collections;
using System.Collections.Generic;
using UnityEngine;
public class ScriptableObjectTest : MonoBehaviour
{
public ScriptableSample sample;
// Start is called before the first frame update
void Start()
{
Debug.Log(sample.name);
Debug.Log(sample.age);
Debug.Log(sample.occupation);
}
}
91
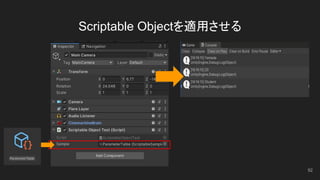
Scriptable Objectを適用させる
92
Resourcesフォルダを作成しそこにScriptable Objectを追加
*動的にScriptable Objectを読み込む
93
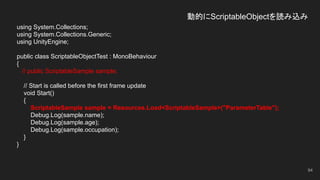
動的にScriptableObjectを読み込み
using System.Collections;
using System.Collections.Generic;
using UnityEngine;
public class ScriptableObjectTest : MonoBehaviour
{
// public ScriptableSample sample;
// Start is called before the first frame update
void Start()
{
ScriptableSample sample = Resources.Load<ScriptableSample>("ParameterTable");
Debug.Log(sample.name);
Debug.Log(sample.age);
Debug.Log(sample.occupation);
}
}
94
ScriptableObjectが読み込まれた
95
カラスを複製してマテリアルを適用する
複製: Ctrl + D
Scriptable Objectを使ってカラスのパラメータを複数作ってみる
96
複製したカラスの色違いを作る
97
2種類のカラスプレハブができた
98
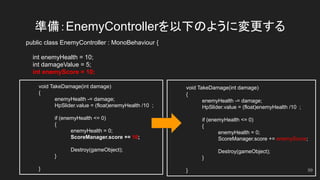
準備:EnemyControllerを以下のように変更する
public class EnemyController : MonoBehaviour {
int enemyHealth = 10;
int damageValue = 5;
int enemyScore = 10;
void TakeDamage(int damage)
{
enemyHealth -= damage;
HpSlider.value = (float)enemyHealth /10 ;
if (enemyHealth <= 0)
{
enemyHealth = 0;
ScoreManager.score += 10;
Destroy(gameObject);
}
}
void TakeDamage(int damage)
{
enemyHealth -= damage;
HpSlider.value = (float)enemyHealth /10 ;
if (enemyHealth <= 0)
{
enemyHealth = 0;
ScoreManager.score += enemyScore;
Destroy(gameObject);
}
} 99
CharacterManagerを作成する
using System.Collections;
using System.Collections.Generic;
using UnityEngine;
[CreateAssetMenu(fileName = "ScriptableObject/Create NewCharacter", menuName = "NewCharacter")]
public class CharacterManager : ScriptableObject
{
public int enemyHealth;
public int damageValue;
public int enemyScore;
}
100