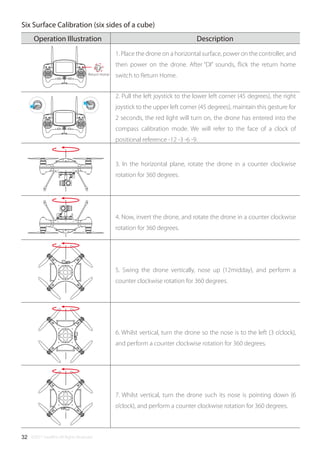
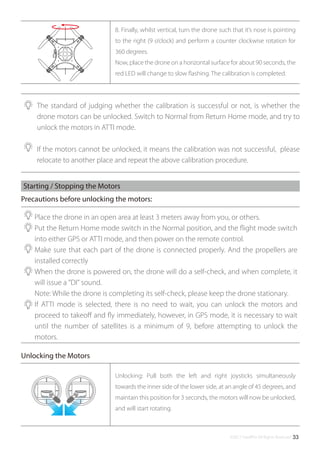
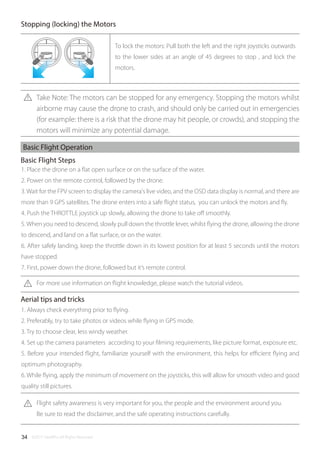
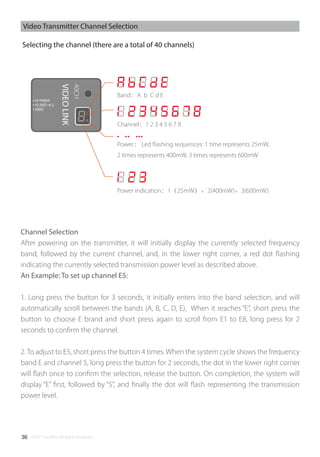
The document is the user manual for the Swellpro Splash Drone 3, detailing its design, features, and operational guidelines. It emphasizes the drone's waterproof capabilities, modular design for various payloads, and includes instructions on assembly, flight control systems, and safety precautions. Users are encouraged to refer to tutorial videos and follow guidelines to ensure safe and effective operation of the drone.
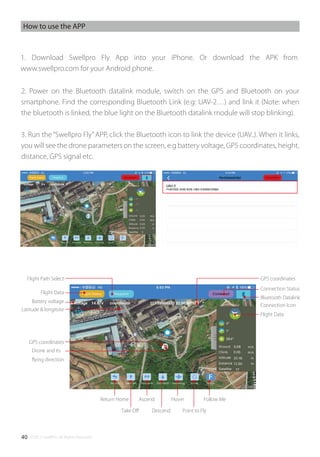
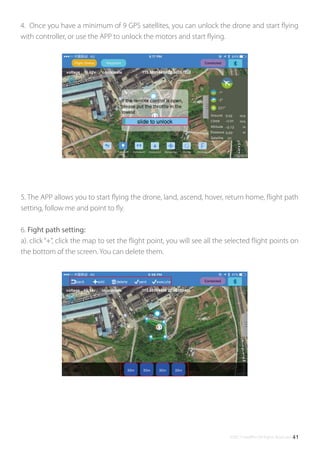
![©2017 SwellPro All Rights Reserved 09
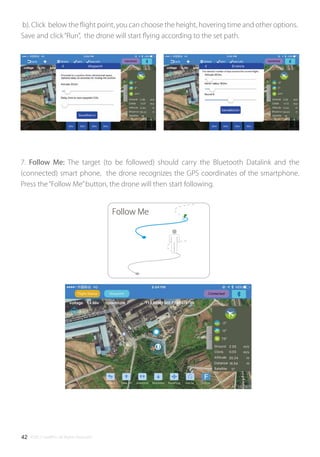
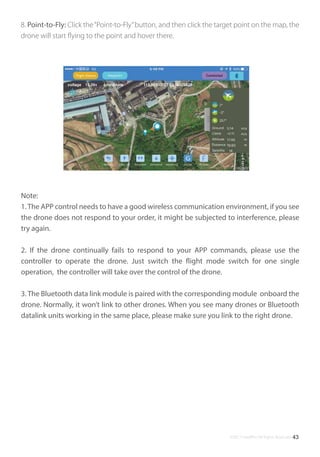
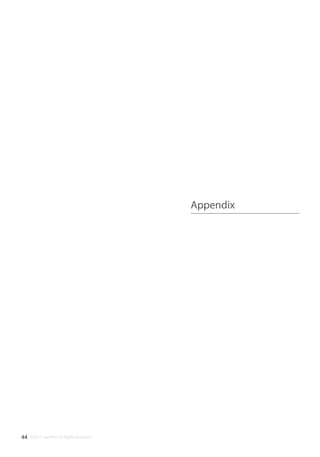
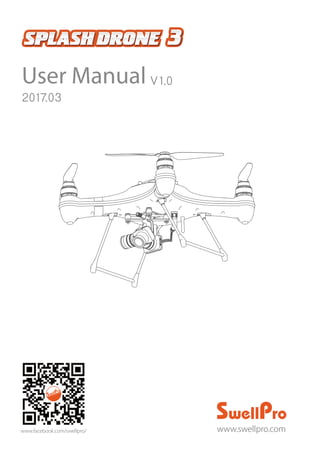
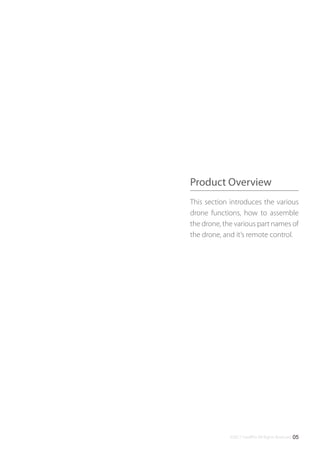
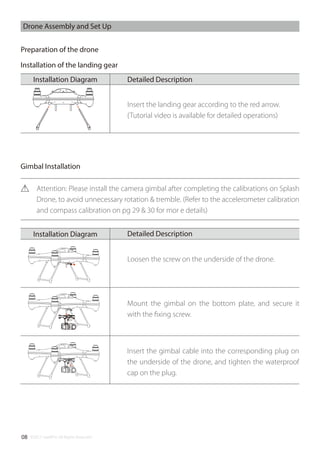
Note: When opening the top cover, be careful of the GPS cable, When closing the top
cover, please make sure to place the hatch in such a way that the arrow faces the front
of the drone.
Nose Direction
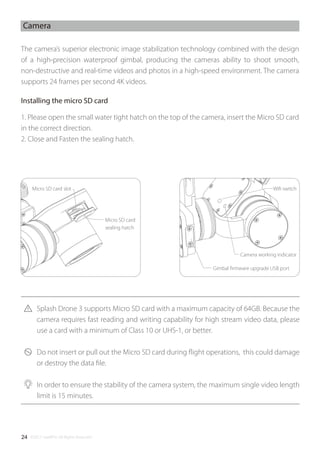
[01] Cover/hatch screw
[02] Quick release carbon fiber propeller
[03] Nose direction
[04] Flight indication lights (Front – 2 Red, Rear – 2 Green)
[05] Gimbal damping ball
[06] Waterproof gimbal and camera
[07] Landing gear
[08] Gimbal quick release screw
[09] Waterproof cable plug/socket
[10] Rubber foot
[11] Waterproof brushless motor
[12] Propeller Spinner
[13] GPS top cover/hatch
Drone Illustration
[01]
[03]
[02]
[04]
[05]
[06]
[07]
[09]
[08]
[10]
[11]
[12]
[13]
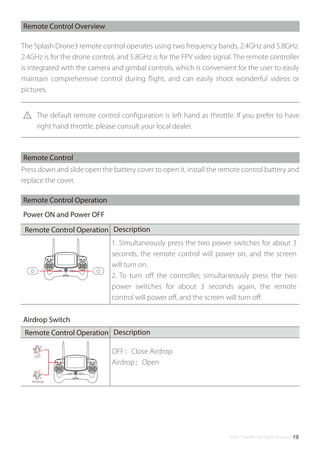
Before closing the GPS Top cover, please make sure that the watertight gasket and
the sealing surfaces on the drone are in good condition and are free of dirt, sand or
any other contamination. Sand & other foreign materials will greatly influence the
integrity of waterproof seal on the Splash Drone.](https://image.slidesharecdn.com/splashdrone3usermanualv1-170516053847/85/Splash-drone-3-user-manual-v1-0-en-9-320.jpg)
![©2017 SwellPro All Rights Reserved10
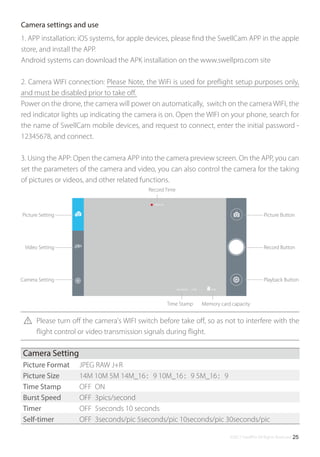
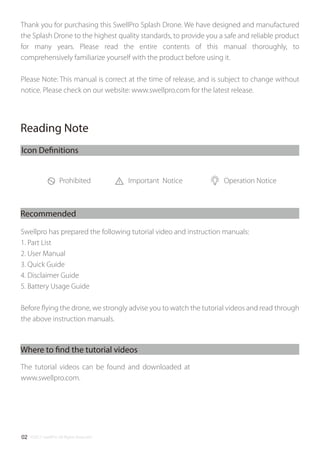
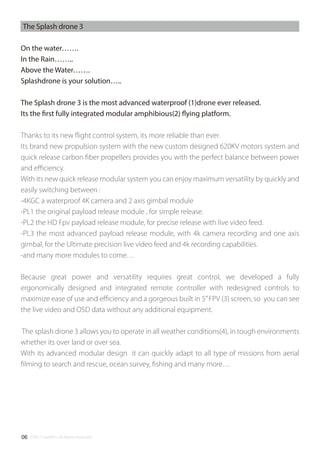
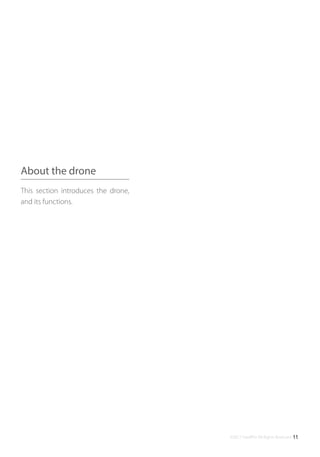
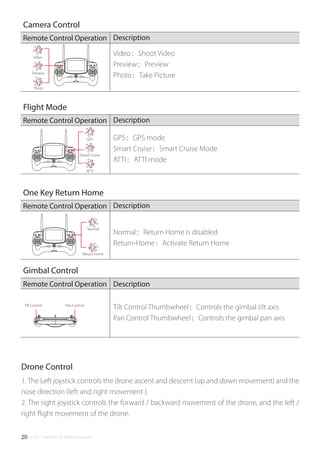
[01] Remote Antenna
For drone operation signal
Power Button
Auto powers on the FPV screen,
but can be manually powered off.
[02] Left pairing button
Bind the RC with drone
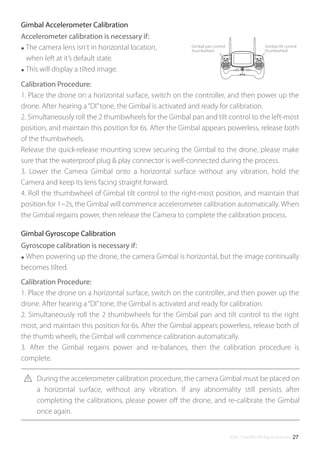
[03] Gimbal pan control
thumbwheel
Adjust the gimbal PAN axis
[04] Camera switch
Controls the camera to
take pictures, or record videos
[05] Airdrop switch
Controls the payload release
[06] Left Joystick
Control the drone’s ascend,
descend / left or right turn
[07] Working Status lights
Remote control working status
[08] Left power button
Press the left and right power
buttons simultaneously to
power on the controller
[09] USB Port
For remote control firmware
upgrade use
[10] Hanger ring
For securing the lanyard to the
controller
[11] Right power button
Press the left and right power
button simultaneously, to
power on the controller
[12] Power status lights
Displaying the remote
controller’s battery status
[13] Right joystick
Controls the drone for forward,
backward, left and right flight
[14] Return-Home switch
Commands the drone to
return automatically
[15] Flight mode switch
GPS / Cruise Flight / ATTI
[16] Gimbal tilt control
thumbwheel
Controls the gimbal tilt axis
[17] Right pairing button
Bind the RC with drone
[18] Video antenna
Transmits FPV live video
[19] FPV screen
Displays FPV live video
Remote controller illustration
[01]
[03]
[02]
[04]
[05]
[06]
[07]
[08]
[09] [10]
[11]
[12]
[13]
[14]
[15]
[16]
[17]
[18]
[19]
Channel / Decrease (-)
Manual channel Selection /
Decrease value
Auto search/Menu Select
Use the auto search function to select
the most suitable channel / Switch
between the different menus
Band / Increase (+)
Manual band Selection / Increase
value
Menu / Menu Selection
Enter into the menu / Shift among of
various menus](https://image.slidesharecdn.com/splashdrone3usermanualv1-170516053847/85/Splash-drone-3-user-manual-v1-0-en-10-320.jpg)
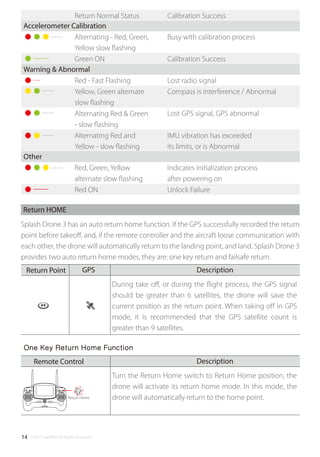
![©2017 SwellPro All Rights Reserved22
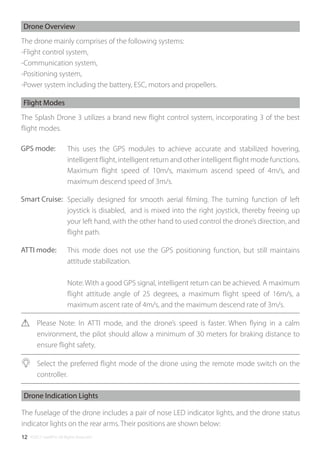
B16.2V P -0.1°
R 3.3°
V 0.0M/S
Y 26.8°
15
00:07:00
0.0D 0M
H 0M
FS
ATT
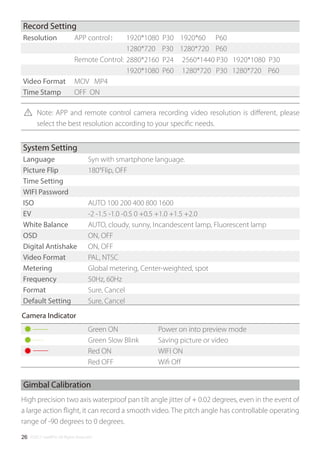
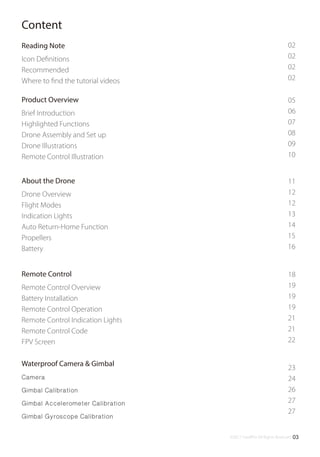
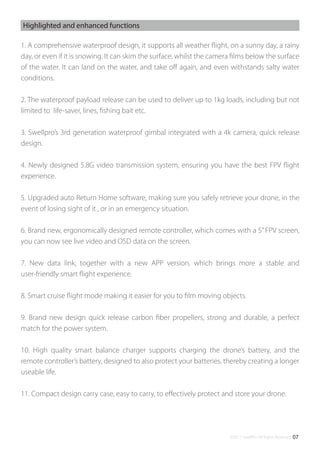
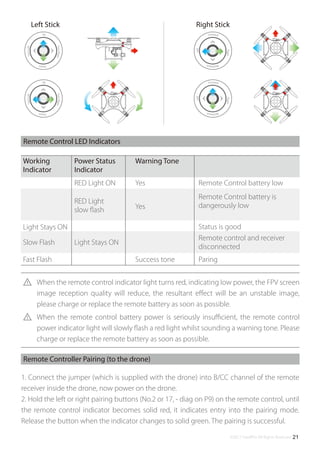
FPV screen
Display Interface
The Splash Drone 3 uses 5.8G video transmission technology, reducing the delay to a
minimum. The 5.8G transmission range can reach 1km. 40 channels are available to select
from.
In the absence of obstacles, or without interference, the video transmission range can reach 1km
[01] Battery Voltage
Drone battery voltage
[02] Return Home direction
[03] Flight Attitude
Verification of the flight attitude
[04] Flight Distance
The horizontal distance between the drone, and
the home point
[05] Flight Height
The vertical height of the drone above the home
point
[06] Connection lost notice
Notification when the connection is lost between
the drone and the controller.
[07] Flight Mode
[08] Time
The running time
[09] Ascend speed / Descend speed
[10] GPS status
( )Not located / ( )located
[11] Satellite Quantity
The receiving satellite quantity
[12] Horizontal speed
The drone’s horizontal speed
[13] Angle of yaw
The actual angle of yaw
[14] Angle of roll
The actual angle of roll
[15] Angle of tilt
The actual angle of tilt
[01]
[04]
[05]
[06]
[07] [08]
[09]
[10]
[11]
[13][14] [12][15]
[03]
[02]
Dynamically displays the relative angle between
the nose and the return point. When the mark is
displayed in middle of the FPV screen, it means the
nose of the drone is facing the return point.
The vertical speed of the drone
when ascending or descending,
units are metres/ second
ATT: ATTI Mode, GPS:GPS Mode, CIR:Smart
Cruise](https://image.slidesharecdn.com/splashdrone3usermanualv1-170516053847/85/Splash-drone-3-user-manual-v1-0-en-22-320.jpg)