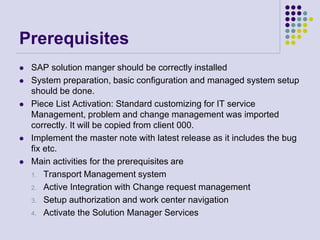
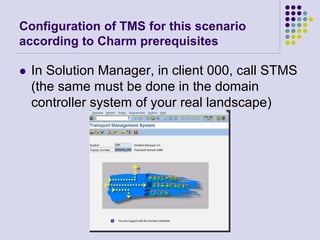
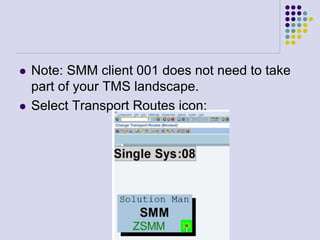
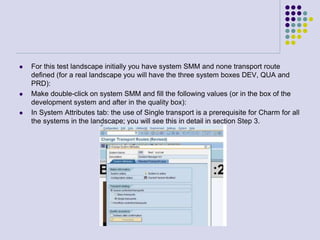
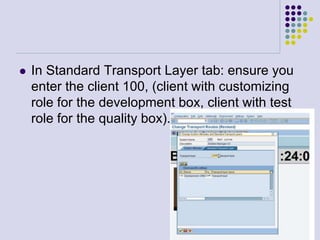
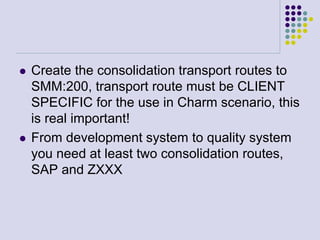
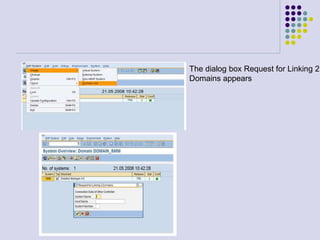
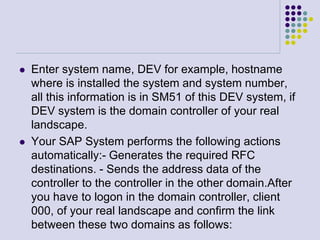
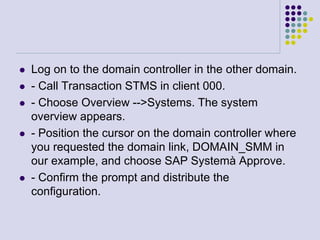
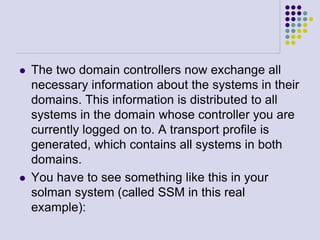
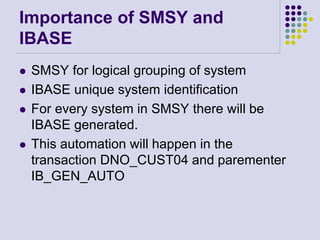
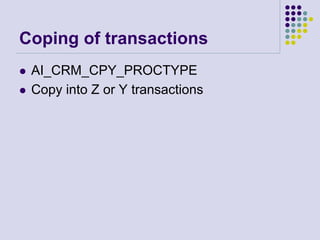
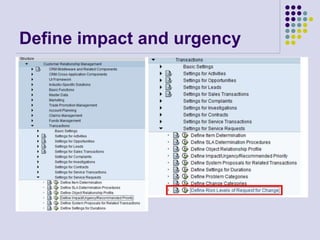
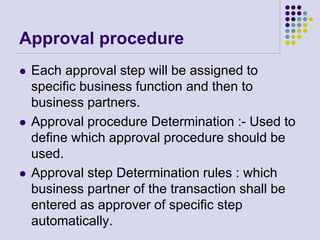
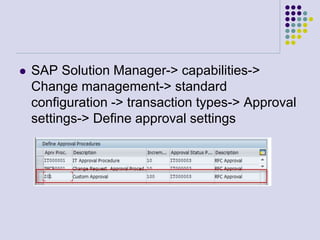
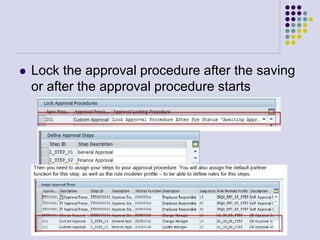
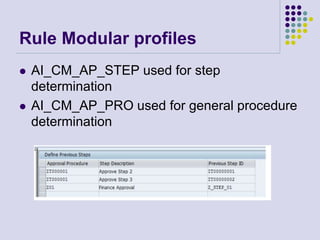
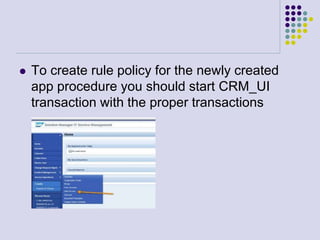
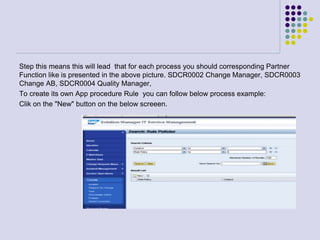
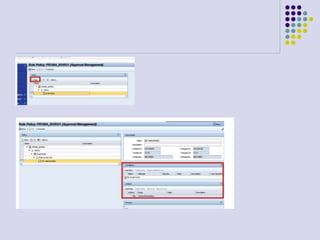
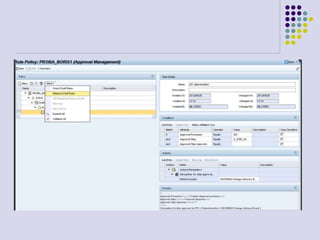
Change request
Management
Presented by
Rishav Garg
Change request management
Training Outline
 Lesson 1: Name
 Provide brief description, if desired.
 Lesson 2: Name
 Provide brief description, if desired.
 Lesson 3: Name
 Provide brief description, if desired.
Prerequisites
 SAP solution manger should be correctly installed
 System preparation, basic configuration and managed system setup
should be done.
 Piece List Activation: Standard customizing for IT service
Management, problem and change management was imported
correctly. It will be copied from client 000.
 Implement the master note with latest release as it includes the bug
fix etc.
 Main activities for the prerequisites are
1. Transport Management system
2. Active Integration with Change request management
3. Setup authorization and work center navigation
4. Activate the Solution Manager Services
Configuration of TMS for this scenario
according to Charm prerequisites
 In Solution Manager, in client 000, call STMS
(the same must be done in the domain
controller system of your real landscape)
 Note: SMM client 001 does not need to take
part of your TMS landscape.
 Select Transport Routes icon:
 For this test landscape initially you have system SMM and none transport route
defined (for a real landscape you will have the three system boxes DEV, QUA and
PRD):
 Make double-click on system SMM and fill the following values (or in the box of the
development system and after in the quality box):
 In System Attributes tab: the use of Single transport is a prerequisite for Charm for all
the systems in the landscape; you will see this in detail in section Step 3.
 In Standard Transport Layer tab: ensure you
enter the client 100, (client with customizing
role for the development box, client with test
role for the quality box).
 Create the consolidation transport routes to
SMM:200, transport route must be CLIENT
SPECIFIC for the use in Charm scenario, this
is real important!
 From development system to quality system
you need at least two consolidation routes,
SAP and ZXXX
Go with the pencil from the system SMM to
system SMM and get this pop-up
 Make the same to create the Delivery
transport route from SMM:200 to SMM:300,
delivery routes are always from quality to
production systems.
Links between different
Domains
 Log on to one of the two domain controller
systems, in solman system for example.
 - Call transaction STMS (always being in
client 000).
 - Choose Overview --> Systems.
 The system overview appears.
 - Choose SAP System-->Create --> Domain
link.
The dialog box Request for Linking 2
Domains appears
 Enter system name, DEV for example, hostname
where is installed the system and system number,
all this information is in SM51 of this DEV system, if
DEV system is the domain controller of your real
landscape.
 Your SAP System performs the following actions
automatically:- Generates the required RFC
destinations. - Sends the address data of the
controller to the controller in the other domain.After
you have to logon in the domain controller, client
000, of your real landscape and confirm the link
between these two domains as follows:
 Log on to the domain controller in the other domain.
 - Call Transaction STMS in client 000.
 - Choose Overview -->Systems. The system
overview appears.
 - Position the cursor on the domain controller where
you requested the domain link, DOMAIN_SMM in
our example, and choose SAP Systemà Approve.
 - Confirm the prompt and distribute the
configuration.
 The two domain controllers now exchange all
necessary information about the systems in their
domains. This information is distributed to all
systems in the domain whose controller you are
currently logged on to. A transport profile is
generated, which contains all systems in both
domains.
 You have to see something like this in your
solman system (called SSM in this real
example):
 Create logical component.
Create project in solar_project_admin and active Change
request management
and check
 Create a Project Cycle and Task List.
 The initial phase will be development without
release and the tasks for the project tasks for
the project track will still be locked. You can
unlock by right mouse click or use the
lock/release transport Tracks incl. role types.
Importance of SMSY and
IBASE
 SMSY for logical grouping of system
 IBASE unique system identification
 For every system in SMSY there will be
IBASE generated.
 This automation will happen in the
transaction DNO_CUST04 and parementer
IB_GEN_AUTO
Business partners
 There are two types of it
 Organization and Person.
 Creation of BPs can be automatically or
manually.
 SE38->AI_SDK_USER_BP_GEN
 Or BP_GEN transaction
 Manually by transaction BP
Coping of transactions
 AI_CRM_CPY_PROCTYPE
 Copy into Z or Y transactions
Define impact and urgency
Approval procedure
 Each approval step will be assigned to
specific business function and then to
business partners.
 Approval procedure Determination :- Used to
define which approval procedure should be
used.
 Approval step Determination rules : which
business partner of the transaction shall be
entered as approver of specific step
automatically.
 SAP Solution Manager-> capabilities->
Change management-> standard
configuration -> transaction types-> Approval
settings-> Define approval settings
 Lock the approval procedure after the saving
or after the approval procedure starts
Rule Modular profiles
 AI_CM_AP_STEP used for step
determination
 AI_CM_AP_PRO used for general procedure
determination
 To create rule policy for the newly created
app procedure you should start CRM_UI
transaction with the proper transactions
Step this means this will lead that for each process you should corresponding Partner
Function like is presented in the above picture. SDCR0002 Change Manager, SDCR0003
Change AB, SDCR0004 Quality Manager,
To create its own App procedure Rule you can follow below process example:
Clik on the "New" button on the below screeen.
Define multilevel
categorization
Define Status and action
profiles
Lesson 1: Content
 Add text here.
 To add a picture, chart,
or other content in the
right column, click the
appropriate icon.
 To add a slide, click
New Slide on the
Insert menu, or press
CTRL+M.
Lesson 1: Wrap-up
 Summarize important points.
 Allow time for questions.
Lesson 2: Objectives
 List the intended outcomes for this training
session.
 Each objective should be concise, should
contain a verb, and should have a
measurable result.
Lesson 2: Content
 Add text here.
 To add a picture, chart,
or other content in the
right column, click the
appropriate icon.
 To add a slide, click
New Slide on the
Insert menu, or press
CTRL+M.
Lesson 2: Wrap-up
 Summarize important points.
 Allow time for questions.
Lesson 3: Objectives
 List the intended outcomes for this training
session.
 Each objective should be concise, should
contain a verb, and should have a
measurable result.
Lesson 3: Content
 Add text here.
 To add a picture, chart,
or other content in the
right column, click the
appropriate icon.
 To add a slide, click
New Slide on the
Insert menu, or press
CTRL+M.
Lesson 3: Wrap-up
 Summarize important points.
 Allow time for questions.
Summary of Training
 List important points from each lesson.
 Provide resources for more information on
subject.
 List resources on this slide.
 Provide handouts with additional resource
material.
Assessment and Evaluation
 Prepare a quiz or challenge to assess how
much information participants learned.
 Survey participants to see if they found the
training beneficial.

Sap solution manager change request management

  • 1.
  • 2.
  • 3.
    Training Outline  Lesson1: Name  Provide brief description, if desired.  Lesson 2: Name  Provide brief description, if desired.  Lesson 3: Name  Provide brief description, if desired.
  • 4.
    Prerequisites  SAP solutionmanger should be correctly installed  System preparation, basic configuration and managed system setup should be done.  Piece List Activation: Standard customizing for IT service Management, problem and change management was imported correctly. It will be copied from client 000.  Implement the master note with latest release as it includes the bug fix etc.  Main activities for the prerequisites are 1. Transport Management system 2. Active Integration with Change request management 3. Setup authorization and work center navigation 4. Activate the Solution Manager Services
  • 5.
    Configuration of TMSfor this scenario according to Charm prerequisites  In Solution Manager, in client 000, call STMS (the same must be done in the domain controller system of your real landscape)
  • 6.
     Note: SMMclient 001 does not need to take part of your TMS landscape.  Select Transport Routes icon:
  • 7.
     For thistest landscape initially you have system SMM and none transport route defined (for a real landscape you will have the three system boxes DEV, QUA and PRD):  Make double-click on system SMM and fill the following values (or in the box of the development system and after in the quality box):  In System Attributes tab: the use of Single transport is a prerequisite for Charm for all the systems in the landscape; you will see this in detail in section Step 3.
  • 8.
     In StandardTransport Layer tab: ensure you enter the client 100, (client with customizing role for the development box, client with test role for the quality box).
  • 9.
     Create theconsolidation transport routes to SMM:200, transport route must be CLIENT SPECIFIC for the use in Charm scenario, this is real important!  From development system to quality system you need at least two consolidation routes, SAP and ZXXX
  • 10.
    Go with thepencil from the system SMM to system SMM and get this pop-up
  • 11.
     Make thesame to create the Delivery transport route from SMM:200 to SMM:300, delivery routes are always from quality to production systems.
  • 13.
    Links between different Domains Log on to one of the two domain controller systems, in solman system for example.  - Call transaction STMS (always being in client 000).  - Choose Overview --> Systems.  The system overview appears.  - Choose SAP System-->Create --> Domain link.
  • 14.
    The dialog boxRequest for Linking 2 Domains appears
  • 15.
     Enter systemname, DEV for example, hostname where is installed the system and system number, all this information is in SM51 of this DEV system, if DEV system is the domain controller of your real landscape.  Your SAP System performs the following actions automatically:- Generates the required RFC destinations. - Sends the address data of the controller to the controller in the other domain.After you have to logon in the domain controller, client 000, of your real landscape and confirm the link between these two domains as follows:
  • 16.
     Log onto the domain controller in the other domain.  - Call Transaction STMS in client 000.  - Choose Overview -->Systems. The system overview appears.  - Position the cursor on the domain controller where you requested the domain link, DOMAIN_SMM in our example, and choose SAP Systemà Approve.  - Confirm the prompt and distribute the configuration.
  • 17.
     The twodomain controllers now exchange all necessary information about the systems in their domains. This information is distributed to all systems in the domain whose controller you are currently logged on to. A transport profile is generated, which contains all systems in both domains.  You have to see something like this in your solman system (called SSM in this real example):
  • 19.
     Create logicalcomponent. Create project in solar_project_admin and active Change request management and check
  • 20.
     Create aProject Cycle and Task List.
  • 21.
     The initialphase will be development without release and the tasks for the project tasks for the project track will still be locked. You can unlock by right mouse click or use the lock/release transport Tracks incl. role types.
  • 23.
    Importance of SMSYand IBASE  SMSY for logical grouping of system  IBASE unique system identification  For every system in SMSY there will be IBASE generated.  This automation will happen in the transaction DNO_CUST04 and parementer IB_GEN_AUTO
  • 24.
    Business partners  Thereare two types of it  Organization and Person.  Creation of BPs can be automatically or manually.  SE38->AI_SDK_USER_BP_GEN  Or BP_GEN transaction  Manually by transaction BP
  • 25.
    Coping of transactions AI_CRM_CPY_PROCTYPE  Copy into Z or Y transactions
  • 26.
  • 27.
    Approval procedure  Eachapproval step will be assigned to specific business function and then to business partners.  Approval procedure Determination :- Used to define which approval procedure should be used.  Approval step Determination rules : which business partner of the transaction shall be entered as approver of specific step automatically.
  • 28.
     SAP SolutionManager-> capabilities-> Change management-> standard configuration -> transaction types-> Approval settings-> Define approval settings
  • 29.
     Lock theapproval procedure after the saving or after the approval procedure starts
  • 30.
    Rule Modular profiles AI_CM_AP_STEP used for step determination  AI_CM_AP_PRO used for general procedure determination
  • 31.
     To createrule policy for the newly created app procedure you should start CRM_UI transaction with the proper transactions
  • 32.
    Step this meansthis will lead that for each process you should corresponding Partner Function like is presented in the above picture. SDCR0002 Change Manager, SDCR0003 Change AB, SDCR0004 Quality Manager, To create its own App procedure Rule you can follow below process example: Clik on the "New" button on the below screeen.
  • 35.
  • 36.
    Define Status andaction profiles
  • 38.
    Lesson 1: Content Add text here.  To add a picture, chart, or other content in the right column, click the appropriate icon.  To add a slide, click New Slide on the Insert menu, or press CTRL+M.
  • 39.
    Lesson 1: Wrap-up Summarize important points.  Allow time for questions.
  • 40.
    Lesson 2: Objectives List the intended outcomes for this training session.  Each objective should be concise, should contain a verb, and should have a measurable result.
  • 41.
    Lesson 2: Content Add text here.  To add a picture, chart, or other content in the right column, click the appropriate icon.  To add a slide, click New Slide on the Insert menu, or press CTRL+M.
  • 42.
    Lesson 2: Wrap-up Summarize important points.  Allow time for questions.
  • 43.
    Lesson 3: Objectives List the intended outcomes for this training session.  Each objective should be concise, should contain a verb, and should have a measurable result.
  • 44.
    Lesson 3: Content Add text here.  To add a picture, chart, or other content in the right column, click the appropriate icon.  To add a slide, click New Slide on the Insert menu, or press CTRL+M.
  • 45.
    Lesson 3: Wrap-up Summarize important points.  Allow time for questions.
  • 46.
    Summary of Training List important points from each lesson.  Provide resources for more information on subject.  List resources on this slide.  Provide handouts with additional resource material.
  • 47.
    Assessment and Evaluation Prepare a quiz or challenge to assess how much information participants learned.  Survey participants to see if they found the training beneficial.