Downloaded 46 times


![Integration
Some features or services in Oracle have their own views. When such features are not active, their related views do not provide any result.
One such feature is the Oracle Log Miner. Its related views (logmnr_*) cannot be queried unless the service is up and running.
1.22.1.6.2 Parameter Configuration
Definition
This submonitor in the SAP/Oracle Database Monitor lets you view the active Oracle database parameters and the contents of the init<SID>.ora file. You
can also see the history of changes to the parameters. You can use this submonitor to view parameters on different instances of an Oracle Real Application
Cluster (RAC).
Data is retrieved at run time from the database through a query to the views V$PARAMETER and V$SPPARAMETER. The view V$SPPARAMETER shows the
current values of the parameters in the Oracle spfile but not the current values used by the instance. This view returns NULL values if a server parameter file
(spfile) is not being used by the instance. You can also check this by looking at the value of the parameter SPFILE in the view V$PARAMETER.
The view V$PARAMETER shows the current values for the parameters used (not the spfile values). If a parameter in the database is changed, it is logged in
the alert file. This lets us retrieve the history of changes to each parameter.
Use
· For each instance, you need to create a table called sap_alert_<Inst_ID> in order to access the corresponding alert log file data. For this you need to
perform the following commands to create this table to access the external alert log file
a. Create the path of the alert log file :
[ create directory DIR_1 as 'ALERT_LOG_PATH' ; ]
ALERT_LOG_PATH contains the path of the alert log file of the required instance.
b. Create the database table corresponding to the above alert log file by issuing the following SQL command:
[ CREATE TABLE sap_alert_<INST_ID>
(entry VARCHAR2(2000) ) ORGANIZATION EXTERNAL
(TYPE oracle_loader DEFAULT DIRECTORY DIR_1 ACCESS PARAMETERS
(RECORDS DELIMITED BY NEWLINE
NOBADFILE
NOLOGFILE
NODISCARDFILE
FIELDS TERMINATED by ' '
MISSING FIELD VALUES ARE NULL
(entry )
) location('ALERT_LOG_FILE_NAME') ); ]
Notice the directory DIR_1 near the top of the above command. Make sure that you provide the file name in the ALERT_LOG_FILE_NAME.
Make sure that the tables match the alert log file path whenever its directory or its name changed.
· To start the submonitor, you choose Detailed Analyses → Additional Functions → Display V$/GV$ Views and Values . You cannot view history
information in this monitor.
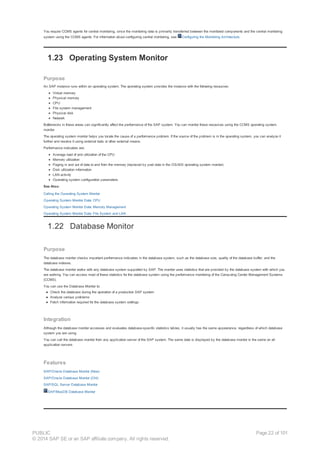
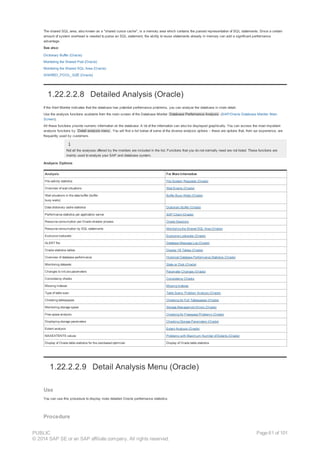
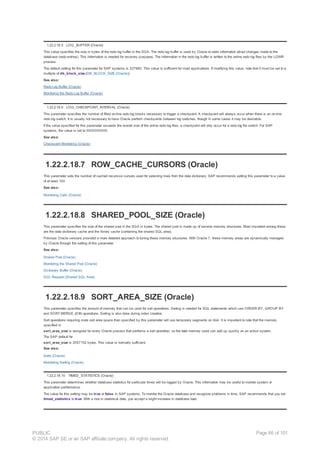
Structure
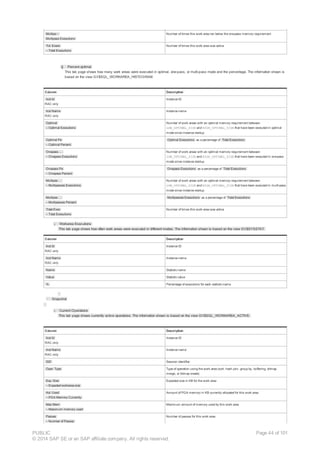
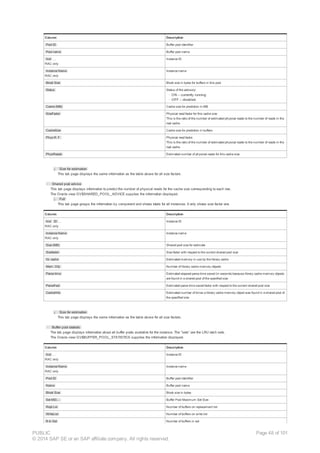
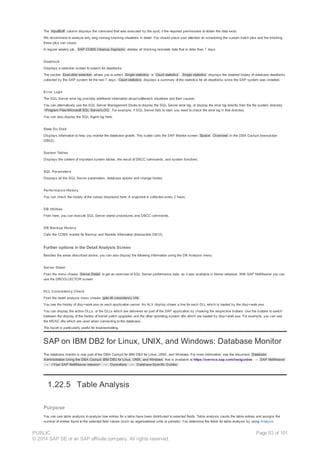
· Active Parameters
This tab page displays the parameters that are currently active in the database. It displays the following information:
Column Description
Instance ID Instance ID
SID Name of the RAC instance
Parameter Name of the active parameter
Parameter value Value of the parameter
Value in SPFILE Value in SPFILE (if present)
· Init<SID> file
This tab page displays the contents of the init<SID>.ora file. It displays the following information:
Column Description
Parameter Name of the parameter
Value Value of the parameter
· Compare Parameter Config.
This tab page only appears for RAC.
· Parameters History
PUBLIC
© 2014 SAP SE or an SAP affiliate company. All rights reserved.
Page 52 of 101](https://image.slidesharecdn.com/ccms-150303051143-conversion-gate01/85/SAP-Basis-CCMS-52-320.jpg)
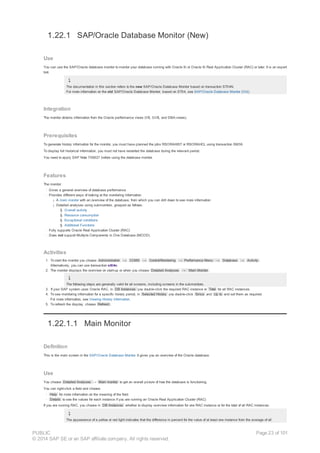
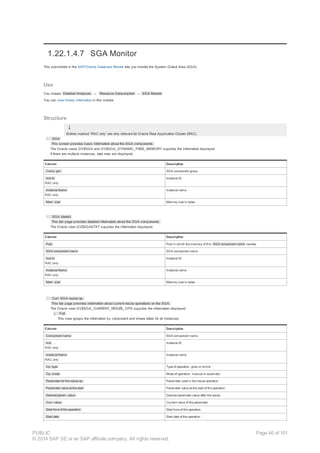
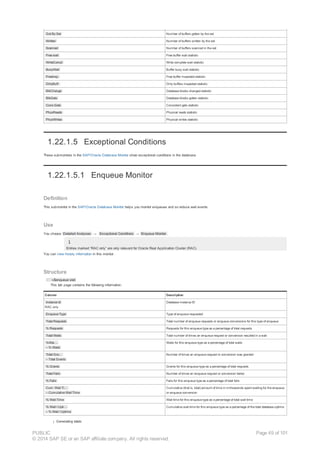
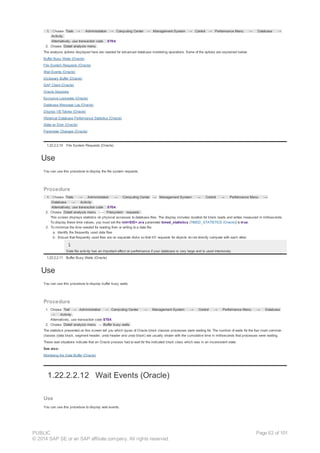
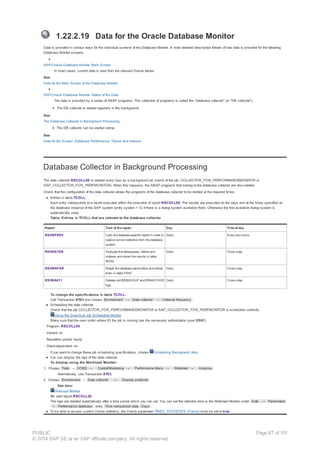
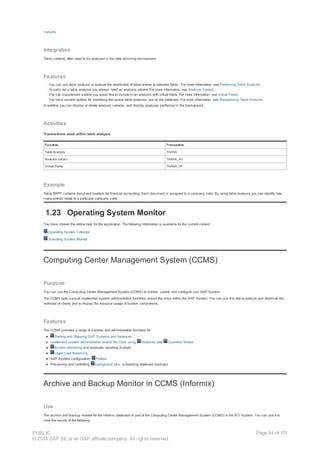
![This tab page uses the alert log file to display all changes in database parameters.
Choose Show parameters history to display the following information:
Column Description
Instance ID Instance ID
SID Name of the RAC instance
Parameter Name of the parameter
Value Value of the parameter
Timestamp Timestamp for this value of the parameter
Scope Indicates whether the parameter change is only temporary, or persistent and in memory
Target instance RAC instance for which the change applies
1.22.1.6.3 Arbitrary Monitoring
Definition
This submonitor in the SAP/Oracle Database Monitor lets you display the results of native Oracle select statements. The access is restricted to oracle views and
tables with owner SYS and PUBLIC (mainly GV$, V$, and DBA views).
Use
You choose Detailed Analyses → Additional Functions → Arbitrary Monitoring .
You cannot view history information in this monitor.
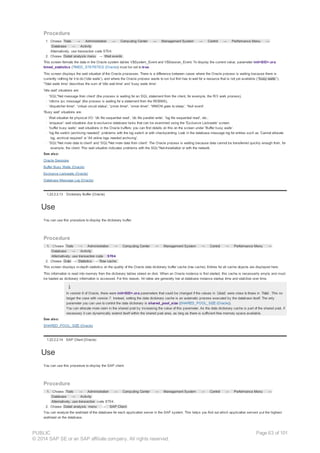
Structure
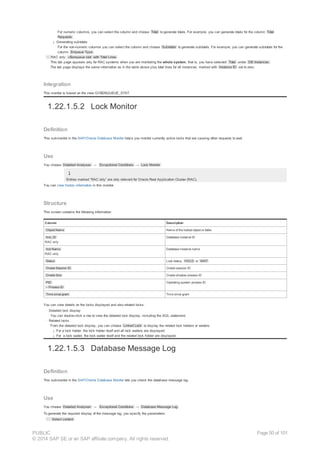
The submonitor consists of an editor screen where you enter the SQL statement and a result screen that displays the result of the SQL statement.
You can choose:
· SQL Command → Parse
This function starts a simple parser to check the syntax. This parser only makes sure that the monitor is able to generate a display structure and display the
result of the statement. It also checks the owner of the tables and views that have to be read.
It does not check the complete Oracle syntax. Therefore, it does not guarantee that the statement can be executed.
· SQL Command → Execute
This function starts the parser, executes the statement, and displays the result of the statement.
· Save as local file or Load local file
This function lets you save your SQL statement to a local file or load an SQL statement from a local file into the editor.
Syntax
· A statement must have the following syntax:
SELECT [ hint ] [ { DISTINCT | UNIQUE } | ALL ] select_list
FROM table_reference [, table_reference]...
[ WHERE condition ]
[ hierarchical_query_clause ]
[ group_by_clause ]
[ HAVING condition ]
[ { UNION | UNION ALL | INTERSECT | MINUS } ( subquery )]
[ order_by_clause ]
You can put comments between "/*+" and "*/"
· A select list must have the following syntax:
{ * |
{[table_alias.]dbfieldname | expression} alias [,[table_alias.]dbfieldname | expression} alias] ... }
An expression within this select list can use a calculation operator such as +, -, *, /, ||. Also unary functions (LN, MIN, AVG ...), null, or numbers, are
allowed.
· A table reference must have the following syntax:
{(select statement) [table_alias] | table [table_alias]}
Otherwise the syntax follows the SQL standard.
Conventions and Restrictions
· Each column that is specified in the select list will be a column in the output list.
· If a select list element is specified with a column alias, this alias will be used as header text in the output list. Otherwise the program uses the field name of
the select list element as header text. If a select list element is an expression (that is, without a database field), the alias is obligatory.
For every expression that is not a database field, use a column alias.
PUBLIC
© 2014 SAP SE or an SAP affiliate company. All rights reserved.
Page 53 of 101](https://image.slidesharecdn.com/ccms-150303051143-conversion-gate01/85/SAP-Basis-CCMS-53-320.jpg)


The document discusses monitoring tools available in the Computing Center Management System (CCMS). CCMS provides various monitors for monitoring SAP environments and components, which are useful for understanding system performance and diagnosing issues. Key monitoring tools in CCMS include the DBA Planning Calendar, Archive and Backup Monitor, Database Monitor, Alert Monitor, and Operating System Monitor. CCMS enables centralized monitoring of a system landscape from one system and helps ensure SAP installations are running efficiently.