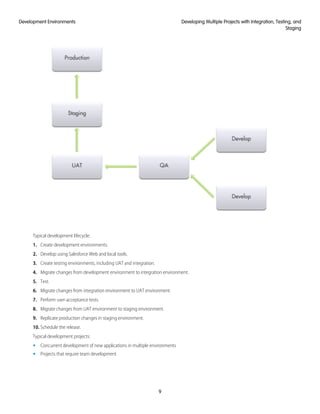
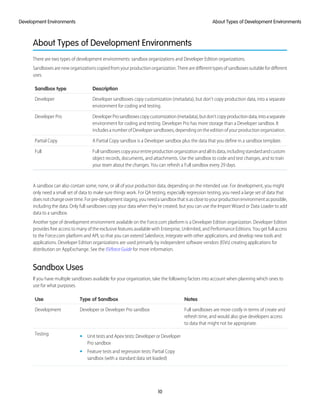
Development Lifecycle Guide
Enterprise Development on the Force.com
Platform
Version 34.0, Summer ’15
@salesforcedocs
Last updated: July 10, 2015
© Copyright 2000–2015 salesforce.com, inc. All rights reserved. Salesforce is a registered trademark of salesforce.com, inc.,
as are other names and marks. Other marks appearing herein may be trademarks of their respective owners.
CONTENTS
Chapter 1: Introduction to the Force.com Development Lifecycle . . . . . . . . . . . . . . . . . . 1
Developing in a Production Organization . . . . . . . . . . . . . . . . . . . . . . . . . . . . . . . . . . . . . . 1
Developing with Sandbox . . . . . . . . . . . . . . . . . . . . . . . . . . . . . . . . . . . . . . . . . . . . . . . . 2
About Sandbox Organizations . . . . . . . . . . . . . . . . . . . . . . . . . . . . . . . . . . . . . . . . . 3
About Migrating Changes between Organizations . . . . . . . . . . . . . . . . . . . . . . . . . . . . 3
Quick Start: Using a Sandbox and Change Sets . . . . . . . . . . . . . . . . . . . . . . . . . . . . . . . . . 4
Create a Developer Sandbox . . . . . . . . . . . . . . . . . . . . . . . . . . . . . . . . . . . . . . . . . . 4
Authorize a Deployment Connection . . . . . . . . . . . . . . . . . . . . . . . . . . . . . . . . . . . . . 4
Create and Upload an Outbound Change Set . . . . . . . . . . . . . . . . . . . . . . . . . . . . . . . 5
Validate an Inbound Change Set . . . . . . . . . . . . . . . . . . . . . . . . . . . . . . . . . . . . . . . . 5
Deploy an Inbound Change Set . . . . . . . . . . . . . . . . . . . . . . . . . . . . . . . . . . . . . . . . 5
Chapter 2: Development Environments . . . . . . . . . . . . . . . . . . . . . . . . . . . . . . . . . . . . 7
Isolating Development and Testing . . . . . . . . . . . . . . . . . . . . . . . . . . . . . . . . . . . . . . . . . . 7
Developing Multiple Projects with Integration, Testing, and Staging . . . . . . . . . . . . . . . . . . . . 8
About Types of Development Environments . . . . . . . . . . . . . . . . . . . . . . . . . . . . . . . . . . . . 10
Sandbox Uses . . . . . . . . . . . . . . . . . . . . . . . . . . . . . . . . . . . . . . . . . . . . . . . . . . . 10
Sandbox Considerations and Limitations . . . . . . . . . . . . . . . . . . . . . . . . . . . . . . . . . . 11
Creating a Development Sandbox . . . . . . . . . . . . . . . . . . . . . . . . . . . . . . . . . . . . . . . . . . 12
Updating Environmental Dependencies . . . . . . . . . . . . . . . . . . . . . . . . . . . . . . . . . . 12
Creating User Templates . . . . . . . . . . . . . . . . . . . . . . . . . . . . . . . . . . . . . . . . . . . . 13
Managing Sandboxes . . . . . . . . . . . . . . . . . . . . . . . . . . . . . . . . . . . . . . . . . . . . . . 14
Chapter 3: Development Tools . . . . . . . . . . . . . . . . . . . . . . . . . . . . . . . . . . . . . . . . . 15
Force.com App Builder Tools . . . . . . . . . . . . . . . . . . . . . . . . . . . . . . . . . . . . . . . . . . . . . 15
Force.com IDE . . . . . . . . . . . . . . . . . . . . . . . . . . . . . . . . . . . . . . . . . . . . . . . . . . . . . . . 16
About Metadata API . . . . . . . . . . . . . . . . . . . . . . . . . . . . . . . . . . . . . . . . . . . . . . . . . . . 17
Force.com Migration Tool . . . . . . . . . . . . . . . . . . . . . . . . . . . . . . . . . . . . . . . . . . . . . . . . 17
Data Loader . . . . . . . . . . . . . . . . . . . . . . . . . . . . . . . . . . . . . . . . . . . . . . . . . . . . . . . . . 18
Chapter 4: Tracking and Synchronizing Development Changes . . . . . . . . . . . . . . . . . 20
Establishing a Change Process for Production . . . . . . . . . . . . . . . . . . . . . . . . . . . . . . . . . 20
Tracking Changes Manually . . . . . . . . . . . . . . . . . . . . . . . . . . . . . . . . . . . . . . . . . . 21
Tracking Changes Using the Force.com Migration Tool . . . . . . . . . . . . . . . . . . . . . . . . 21
Tracking Changes Using the Force.com IDE . . . . . . . . . . . . . . . . . . . . . . . . . . . . . . . . 22
Synchronizing Changes . . . . . . . . . . . . . . . . . . . . . . . . . . . . . . . . . . . . . . . . . . . . . . . . 22
Synchronizing Multiple Sandboxes . . . . . . . . . . . . . . . . . . . . . . . . . . . . . . . . . . . . . 22
Integrating Changes Across Development Environments . . . . . . . . . . . . . . . . . . . . . . . 23
Chapter 5: Release Management . . . . . . . . . . . . . . . . . . . . . . . . . . . . . . . . . . . . . . . 26
Developing Enterprise Applications . . . . . . . . . . . . . . . . . . . . . . . . . . . . . . . . . . . . . . . . . 26
Scheduling Concurrent Development Projects . . . . . . . . . . . . . . . . . . . . . . . . . . . . . . . . . . 27
Delivering Applications on a Release Train . . . . . . . . . . . . . . . . . . . . . . . . . . . . . . . . 29
How Salesforce Upgrades May Affect Delivery Schedules . . . . . . . . . . . . . . . . . . . . . . 29
Chapter 6: Migrating Changes Between Environments . . . . . . . . . . . . . . . . . . . . . . . 30
Migrating Changes Manually . . . . . . . . . . . . . . . . . . . . . . . . . . . . . . . . . . . . . . . . . . . . . 30
How Metadata Files are Migrated . . . . . . . . . . . . . . . . . . . . . . . . . . . . . . . . . . . . . . . . . . 31
What Affects Deployment Time? . . . . . . . . . . . . . . . . . . . . . . . . . . . . . . . . . . . . . . . . . . . 31
Monitoring the Status of Your Deployments . . . . . . . . . . . . . . . . . . . . . . . . . . . . . . . . . . . 32
Deployment Dependencies . . . . . . . . . . . . . . . . . . . . . . . . . . . . . . . . . . . . . . . . . . . . . . 36
Migrating Files in Batches . . . . . . . . . . . . . . . . . . . . . . . . . . . . . . . . . . . . . . . . . . . . . . . 36
Determining Which Files to Deploy Together . . . . . . . . . . . . . . . . . . . . . . . . . . . . . . . 36
Deploying Batches of Files Using the Force.com IDE . . . . . . . . . . . . . . . . . . . . . . . . . . 37
How to Migrate Batches of Files Using the Force.com Migration Tool . . . . . . . . . . . . . . . 38
Deleting and Renaming Components . . . . . . . . . . . . . . . . . . . . . . . . . . . . . . . . . . . . . . . 39
Using the AppExchange to Migrate Changes . . . . . . . . . . . . . . . . . . . . . . . . . . . . . . . . . . 39
Deploying to Production . . . . . . . . . . . . . . . . . . . . . . . . . . . . . . . . . . . . . . . . . . . . . . . . 39
Scheduling the Release . . . . . . . . . . . . . . . . . . . . . . . . . . . . . . . . . . . . . . . . . . . . . 40
Using Profiles to Control Maintenance Updates . . . . . . . . . . . . . . . . . . . . . . . . . . . . . 41
Fixing Bugs . . . . . . . . . . . . . . . . . . . . . . . . . . . . . . . . . . . . . . . . . . . . . . . . . . . . . . . . . 41
Chapter 7: Advanced Development Lifecycle Scenario . . . . . . . . . . . . . . . . . . . . . . . . 43
Source Control System and Deployment Tools . . . . . . . . . . . . . . . . . . . . . . . . . . . . . . . . . 43
Development Lifecycle and Sandbox Environments . . . . . . . . . . . . . . . . . . . . . . . . . . . . . . 45
Patch Releases . . . . . . . . . . . . . . . . . . . . . . . . . . . . . . . . . . . . . . . . . . . . . . . . . . . . . . 49
Development Lifecycle Scenario: AW Computing . . . . . . . . . . . . . . . . . . . . . . . . . . . . . . . . 51
Continuous Integration Process . . . . . . . . . . . . . . . . . . . . . . . . . . . . . . . . . . . . . . . . . . . 55
Handling Metadata That’s Not Supported in the API . . . . . . . . . . . . . . . . . . . . . . . . . . . . . . 55
Configuring the Force.com Migration Tool . . . . . . . . . . . . . . . . . . . . . . . . . . . . . . . . . . . . 56
Production Release Considerations . . . . . . . . . . . . . . . . . . . . . . . . . . . . . . . . . . . . . . . . . 58
Refreshing a Sandbox Environment . . . . . . . . . . . . . . . . . . . . . . . . . . . . . . . . . . . . . . . . . 58
Glossary . . . . . . . . . . . . . . . . . . . . . . . . . . . . . . . . . . . . . . . . . . . . . . . . . . . . . . . . . . 59
Index . . . . . . . . . . . . . . . . . . . . . . . . . . . . . . . . . . . . . . . . . . . . . . . . . . . . . . . . . . . . . 71
Contents
CHAPTER 1 Introduction to the Force.com Development
Lifecycle
Developing applications on the Force.com platform is easy, straightforward, and highly productive. A developer can define application
components,suchascustomobjectsandfields,workflowrules,Visualforcepages,andApexclassesandtriggers,usingthepoint-and-click
toolsoftheWebinterface.Simplechangescanbeimplementedanddeployedimmediatelywithoutaffectingotherusersintheproduction
organization. More complex features can be left in development status until they have been fully tested, and then deployed to everyone
in the production organization.
But how do those same development practices work when building a large-scale enterprise application in collaboration with several
other developers? When developing complex applications with highly customized logic and user interfaces, configuring on-the-fly in a
single environment no longer makes sense. Such applications take time to develop, and require more formal practices to ensure they
work as intended and meet users' needs.
There’s also a lot of middle ground. Your project might not seem all that large, and perhaps you’re doing the development by yourself
along with day-to-day administration tasks. You can still benefit from using a sandbox as a development environment—a place where
you can develop customizations and code without affecting end users. More traditional project-based development opens up new
possibilities for Force.com development, but also requires new processes for development, migration, and synchronization.
Whether you are an architect, administrator, developer, or manager, this guide prepares you to undertake the development and release
of applications on the Force.com platform. It starts with the most basic scenario, using a developer sandbox and change sets. Later
chapters address other development environments, tools, and processes for more complex enterprise scenarios.
Developing in a Production Organization
The easiest way to develop new functionality is to customize a production organization using the Salesforce Web user interface. You
candevelopnewobjectsandapplicationsusingdeclarativetoolsthatarepowerfulandeasytouse.Inthisscenario,allofthedevelopment
occurs on the production organization, so there is no need for separate development or testing environments. While this process is the
fastest way to complete a circuit of the development lifecycle, you are limited in what you can accomplish. For example, you can’t write
Apex code directly in a production organization.
Typical development lifecycle:
1. Plan functional requirements.
2. Develop using Salesforce Web tools, using profiles to hide your changes until they’re ready to deploy.
1
3. Update profiles to reveal your changes to the appropriate users.
4. Notify end users of changes.
Asingleadministratorcaneffectivelydevelopnewdashboards,reports,andemailtemplatesoraddnewcustomfieldstoexistingobjects
this way. However, when development is more complex and multiple team members are involved, a more formal application lifecycle
scenario is appropriate.
Developing with Sandbox
For development tasks that are slightly more complex or that must be isolated from the production organization, you can use a separate
developmentenvironment,usuallyasandbox.Inthisscenario,allofthedevelopmentandtestingoccursinthedevelopmentenvironment,
and then the changes are promoted to the production organization.
If you are simultaneously developing projects in production and sandbox organizations, consider tracking setup changes you make in
theproductionorganizationandreplicatingtheminthesandbox.Thisisimportantbecauseifyoursandboxhasout-of-datecustomizations,
youmightinadvertentlyreplaceyournewerchangesinproductionwiththeseoldercustomizationswhenpromotingthemfromsandbox.
Typical development lifecycle:
1. Create a development environment.
2. Develop using Salesforce Web and local tools.
3. Test within the development environment.
4. Replicate production changes in the development environment.
5. Deploy what you’ve developed to your production organization.
Typical development projects:
• New custom objects, tabs, and applications
• Integrations with other systems
• Apps involving Apex, Visualforce, workflow, or new validation rules
2
Developing with SandboxIntroduction to the Force.com Development Lifecycle
About Sandbox Organizations
A sandbox is a copy of your production organization. Sandboxes contain the same metadata—which is configuration information such
as the types of custom objects and fields, applications, and workflows—as your production organization. That metadata, as well as data
in the case of a full sandbox, is copied to a new organization, isolated from your production organization. Operations you perform in
your sandbox don’t affect your production organization.
Sandboxes are available in Enterprise, Unlimited, and Performance Editions. With Unlimited and Performance Edition, you can create
multiple sandbox copies of different types. Use sandboxes for development, testing, training, or other purposes without compromising
thedataandapplicationsinyourSalesforceproductionorganization.Eachsandboxinstanceisisolatedfromeveryothersandboxinstance,
just as they are from production.
About Migrating Changes between Organizations
The easiest way to send configuration changes from one organization to another is to use a change set. To send customizations from
your current organization to another organization, you create an outbound change set. Once you send the change set, the receiving
organization sees it as an inbound change set.
Change sets can only contain changes that you can make through the Setup menu, and they don’t support every type of component
that can be customized. You also can’t use change sets to rename or delete a component. If you make changes that aren’t supported
by a change set, you can migrate them manually by repeating the steps you performed in the other organization. For more information
about components available in change sets, see the Salesforce online help.
Some components are dependent on other components. For example, the custom fields of a custom object rely on the existence of
that custom object. If you try to migrate those custom fields to an organization that doesn’t contain the custom object upon which
they’re dependent, the deployment will fail. When you create a change set, it’s easy to view and add the dependencies to ensure all the
necessary components are migrated.
Sendingachangesetbetweentwoorganizationsrequiresadeploymentconnection.Changesetscanonlybesentbetweenorganizations
that are affiliated with a production organization. For example, a production organization and a sandbox, or two sandboxes created
from the same organization can send or receive change sets.
3
About Sandbox OrganizationsIntroduction to the Force.com Development Lifecycle
A deployment connection alone doesn't enable change sets to be sent between organizations. Each organization must be authorized
to send and receive change sets. This added level of security enforces code promotion paths and keeps organizations' setup metadata
from being overwritten by mistake.
Quick Start: Using a Sandbox and Change Sets
Follow these steps to create a developer sandbox and migrate configuration changes you make in it to your production organization
using a change set.
• Create a Developer Sandbox
• Authorize a Deployment Connection
• Create and Upload an Outbound Change Set
• Validate an Inbound Change Set
• Deploy an Inbound Change Set
Create a Developer Sandbox
Use a developer sandbox to ensure that your changes are isolated from production until you’re ready to deploy them.
Sandboxes are only available in Enterprise, Unlimited, and Performance editions.
1. From Setup, click Sandboxes.
2. Click New Sandbox.
3. Enter a name and description for the sandbox.
4. Select Developer for the type of sandbox.
5. Click Start Copy.
The process can take a while, depending on the size of your organization. You’ll receive a notification email when your sandbox has
completed copying.
6. Click the link in the notification email to access your sandbox.
Youcanlogintothesandboxat test.salesforce.com/login.jsp byappending .sandbox_name toyourusername.
For example, if your username for your production organization is user1@acme.com, then your username for a sandbox named
“test” is user1@acme.com.test.
Note: Salesforce automatically changes sandbox usernames but does not change passwords.
If you’d like to experiment with change sets before using them for a development project, create a test custom object with a custom
field in your developer sandbox now. You can practice deploying these customizations in the next steps, and delete them when you’re
finished.
Authorize a Deployment Connection
Before you can receive change sets from a sandbox or other organization, authorize a deployment connection in the organization that
receives the changes.
1. Log into the organization that’ll receive inbound change sets. Usually this is the production organization associated with your
sandbox.
2. From Setup, click Deploy > Deployment Connections.
4
Quick Start: Using a Sandbox and Change SetsIntroduction to the Force.com Development Lifecycle
3. Click Edit next to the organization from which you want to receive outbound change sets. Usually this is your sandbox.
4. Select Allow Inbound Changes and click Save.
Create and Upload an Outbound Change Set
Typically,youcreateanoutboundchangesetinasandboxorganizationanddeployittoproduction.Butdependingonyourdevelopment
lifecycle, you might choose to migrate changes in either direction between related organizations.
1. From Setup, click Deploy > Outbound Change Sets.
2. Click New.
3. Enter a name for your change set and click Save.
4. In the Change Set Components section, click Add.
5. Choose the type of component (for example, Custom Object or Custom Field), the components you want to add, and click Add To
Change Set.
If you are experimenting with a test custom object and custom field, try adding just one of them to the change set first.
6. Click View/Add Dependencies to see whether the components you’ve added to the change set are dependent on other
customizations.
In the case of the test custom object and custom field, the related component and page layout will both be listed.
7. Select the dependent components you want to add and click Add To Change Set.
8. Click Upload and choose your target organization.
The outbound change set detail page displays a message and you get an email notification when the upload is complete.
Now log into the target organization, where you can see the inbound change set.
Validate an Inbound Change Set
Validating a change set allows you to see the success or failure messages without committing the changes.
1. From Setup, click Deploy > Inbound Change Sets.
2. Click the name of a change set.
3. Click Validate.
Note: You can't make any changes to your organization while a test deployment is in progress.
4. After the validation completes, click View Results.
If you receive any error messages, resolve them before you deploy. The most common causes of errors are dependent components
that aren’t included in the change set and Apex test failures.
Deploy an Inbound Change Set
Deploying a change set commits the changes it contains to the target organization.
1. From Setup, click Deploy > Inbound Change Sets.
2. In the Change Sets Awaiting Deployment list, click the name of the change set you want to deploy.
3. Click Deploy.
5
Create and Upload an Outbound Change SetIntroduction to the Force.com Development Lifecycle
A change set is deployed in a single transaction. If the deployment is unable to complete for any reason, the entire transaction is
rolled back. After a deployment completes successfully, all changes are committed to your organization and the deployment can’t
be rolled back.
6
Deploy an Inbound Change SetIntroduction to the Force.com Development Lifecycle
CHAPTER 2 Development Environments
Developing on the Force.com platform requires a development environment, a place where you can work without affecting other users.
In traditional software development, a development environment is little more than a space to call your own, but on the Force.com
platform, each development environment is its own fully functional Salesforce organization.
In Quick Start: Using a Sandbox and Change Sets on page 4, we used a single development environment, a developer sandbox, to
make changes isolated from the production organization. In more complex scenarios, you might have multiple environments for various
purposes, such as development, integration, testing, and training. There are also different types of development environments best
suited for different uses.
When using a single development environment for development and testing, you must stop development to test, and you can only
resume development after you deploy. Unless you have a single developer doing all of these tasks, this can be an inefficient use of
resources. A more sophisticated development model allows development to continue while testing and deployment take place. In this
case you need two isolated environments, one for development and one for testing.
Isolating Development and Testing
Having separate development and test environments increases the complexity of the development process, and introduces a question:
where do changes to existing components take place? For example, imagine you have an application you developed and then migrate
those changes to your testing environment. During testing, you find that some changes need to take place to deploy to production. Do
you make those changes in the testing environment or go back to your development organization and start the process again? If you
onlyhavetwosandboxes,youmightwanttomakethosechangesinyourtestingorganization,becausethisisafasterandeasierprocess,
and your development sandbox might have already changed to the point where you can’t start over easily. However, you will still want
to replicate any changes made in your test environment back to your development environment, to ensure the next time you promote
from development to test that the fix is retained. The arrangement and flow of the application development process is shown in the
following image:
Typical development lifecycle:
7
1. Create a development environment.
2. Develop using Salesforce Web and local tools.
3. Create a testing environment.
4. Migrate changes from development environment to testing environment.
5. Test.
6. Replicate production changes in other environments.
7. Deploy what you’ve developed to your production organization.
Typical development projects:
• New custom objects, tabs, and applications
• Integrations with other systems
• Apps involving workflow or new validation rules
Developing Multiple Projects with Integration, Testing, and Staging
If you have multiple developers and more than one project in development that will be released at the same time, you need integration
testingtomakesurethattheseparatecodelinescanbemergedwithoutconflict.Inthefuture,youmightwanttoincludeuser-acceptance
testing(UAT)todetermineiftheoriginaldesignrequirementsaremet.Amoreelaboratedevelopmentprocesscanalsocontainastaging
environment where you ensure that the deployment to production goes exactly as planned.
In such a development scenario, you might wonder where to make changes to the code line. If a feature fails any test on the way towards
production deployment, do you fix the feature in the organization where it failed, or start the entire process over again? As the complexity
of your application development process increases, you will find that fixing things as you go is not a good model. Instead, you will want
to make all fixes in a development organization and follow a repeatable process for migrating that change toward production. The
following image depicts this process:
8
Developing Multiple Projects with Integration, Testing, and
Staging
Development Environments
Typical development lifecycle:
1. Create development environments.
2. Develop using Salesforce Web and local tools.
3. Create testing environments, including UAT and integration.
4. Migrate changes from development environment to integration environment.
5. Test.
6. Migrate changes from integration environment to UAT environment.
7. Perform user-acceptance tests.
8. Migrate changes from UAT environment to staging environment.
9. Replicate production changes in staging environment.
10. Schedule the release.
Typical development projects:
• Concurrent development of new applications in multiple environments
• Projects that require team development
9
Developing Multiple Projects with Integration, Testing, and
Staging
Development Environments
About Types of Development Environments
There are two types of development environments: sandbox organizations and Developer Edition organizations.
Sandboxes are new organizations copied from your production organization. There are different types of sandboxes suitable for different
uses.
DescriptionSandbox type
Developer sandboxes copy customization (metadata), but don't copy production data, into a separate
environment for coding and testing.
Developer
DeveloperProsandboxescopycustomization(metadata),butdon'tcopyproductiondata,intoaseparate
environment for coding and testing. Developer Pro has more storage than a Developer sandbox. It
includes a number of Developer sandboxes, depending on the edition of your production organization.
Developer Pro
A Partial Copy sandbox is a Developer sandbox plus the data that you define in a sandbox template.Partial Copy
Fullsandboxescopyyourentireproductionorganizationandallitsdata,includingstandardandcustom
object records, documents, and attachments. Use the sandbox to code and test changes, and to train
your team about the changes. You can refresh a Full sandbox every 29 days.
Full
A sandbox can also contain some, none, or all of your production data, depending on the intended use. For development, you might
only need a small set of data to make sure things work. For QA testing, especially regression testing, you need a large set of data that
doesnotchangeovertime.Forpre-deploymentstaging,youneedasandboxthatisasclosetoyourproductionenvironmentaspossible,
including the data. Only full sandboxes copy your data when they’re created, but you can use the Import Wizard or Data Loader to add
data to a sandbox.
Another type of development environment available on the Force.com platform is a Developer Edition organization. Developer Edition
provides free access to many of the exclusive features available with Enterprise, Unlimited, and Performance Editions. You get full access
to the Force.com platform and API, so that you can extend Salesforce, integrate with other applications, and develop new tools and
applications. Developer Edition organizations are used primarily by independent software vendors (ISVs) creating applications for
distribution on AppExchange. See the ISVforce Guide for more information.
Sandbox Uses
If you have multiple sandboxes available for your organization, take the following factors into account when planning which ones to
use for what purposes.
NotesType of SandboxUse
Full sandboxes are more costly in terms of create and
refresh time, and would also give developers access
to data that might not be appropriate.
Developer or Developer Pro sandboxDevelopment
Testing • Unit tests and Apex tests: Developer or Developer
Pro sandbox
• Feature tests and regression tests: Partial Copy
sandbox (with a standard data set loaded)
10
About Types of Development EnvironmentsDevelopment Environments
NotesType of SandboxUse
Partial Copy sandboxes may be appropriate in special
cases when you want to use sample data or a subset
Full sandbox is best when an external system expects
full production data to be present.
Testing external
integrations
of your actual data. Works well if you’re using external
IDs.
Partial Copy sandboxes are appropriate if testing
against a subset of production data is acceptable, for
example, for regional tests.
Full sandbox is best for validation of new applications
against production configuration and data.
Staging and
user-acceptance
testing
Full sandboxProduction
debugging
Sandbox Considerations and Limitations
Sandbox functionality is not identical to production, and you’ll need to plan for the differences as well as for the copy process itself.
Consider the following when creating or refreshing a sandbox:
• Creating or refreshing a sandbox copy is a long-running operation that might complete in minutes, days, or even more than a week.
Several conditions factor into the duration, including the number of customizations, data size and configuration (for full copies),
numbers of objects, and server load. Also, sandbox refreshes are queued, so your requested copy might not start immediately after
your request. So plan ahead, and accept the default minimums for optional data in a full sandbox whenever possible.
• Refreshing a sandbox deletes and recreates the sandbox as a new copy of the production organization. In effect, this reverses any
manualaccesschangesyouhaveperformed.Ifyoucreatedusersinasandbox,theynolongerexist;ifyouchangedauser’spermissions
and access settings, those revert to their values in the production organization. This means that after a refresh, any access changes
youperformedmustberepeatedinthenewcopy.Toavoidthisprocess,youcancreateusertemplatesinyourproductionorganization,
and then activate them in the sandbox organization.
• Setup and data changes to your production organization during the sandbox creation and refresh operations might result in
inconsistencies in your sandbox. Therefore, it’s best to freeze or minimize changes to your production organization while creating
or refreshing a sandbox.
The following features are disabled and cannot be enabled in sandboxes:
• Contract expiration warnings.
• Case escalation.
Contract expiration warnings and case escalation are disabled because they automatically send email to contacts, customers, and
production organization users.
• Subscription summary.
• Data exports (in Setup at Data Management > Data Export > Export Now or Data Management > Data Export > Schedule
Export).
• The ability to create Salesforce sandboxes.
• The ability to copy email service addresses that you create in your sandbox to your production organization.
• The ability to publish Site.com sites.
SEE ALSO:
Creating User Templates
11
Sandbox Considerations and LimitationsDevelopment Environments
Creating a Development Sandbox
After you have determined the type of development environment you need for a particular project or task, create a sandbox copy of
your production organization.
1. From Setup, click Sandboxes.
2. Click New Sandbox.
3. Enter a name and description for the sandbox.
4. Select the type of sandbox.
5. Click Start Copy.
The process can take a while, depending on the size of your organization. You’ll receive a notification email when your sandbox has
completed copying.
6. Click the link in the notification email to access your sandbox.
Youcanlogintothesandboxat test.salesforce.com/login.jsp byappending .sandbox_name toyourusername.
For example, if your username for your production organization is user1@acme.com, then your username for a sandbox named
“test” is user1@acme.com.test. Your password is the same as it is in production.
7. Small changes are made to ensure that the sandbox doesn’t accidentally communicate with the production organization. Before
you use the sandbox you created in this trail, be sure to adjust those settings as described in Development Lifecycle Guide (PDF)
section “Updating Environmental Dependencies.”
Tip: The number and types of sandboxes availabile depends on the Salesforce organization.
SEE ALSO:
Updating Environmental Dependencies
Establishing a Change Process for Production
Synchronizing Changes
Updating Environmental Dependencies
Once you create a sandbox, configure it to update environmental dependencies and merge project contents before beginning
development.Ifyouhavemultipledevelopmentenvironments,youneedtomergeyourchangeswithchangesfromotherteammembers
into a single development environment as the project progresses. During this phase, you must track changes in all environments so that
you can merge those changes successfully.
Environmental dependencies are settings that are different between a development environment and the production organization.
When you work in a development environment, you need to update who has access to what, turn certain features on or off, and update
the addresses of internal and external systems so that they point to the development environment instead of production. The reverse
is also true—when you deploy to production, you might need to update certain settings that you used in development so they work
with production.
DetailsEnvironmental
Dependency
If your developers and testers do not have logins on production, or do not have the necessary privileges, you need
to give them the necessary access in the development environment.
Login privileges
12
Creating a Development SandboxDevelopment Environments
DetailsEnvironmental
Dependency
When you create a sandbox, email addresses are automatically changed so that email alerts and other automatic
notifications are not sent from the sandbox during development. When your developers and testers log into the
Email addresses
sandbox, they must change their email address back to a real address to receive email messages sent from the
sandbox.
If you want to test outbound email for features such as escalations or dashboards, you must update the list of
recipients, because these lists are removed when the sandbox is created to prevent unnecessary emails.
Email recipients
If your production organization is integrated with external systems, you will probably not want your sandbox copy
to communicate with the production versions of those external systems, so as not to mix production and
External URLs
non-productiondata.Forexample,ifyouuseoutboundmessagingorwebservicecallouts,youwillwanttoupdate
the URLs called by those services to point to your external development environment(s) for those applications.
Likewise, since sandboxes run on a different instance than the production organization, to test integrations with
sandbox you will need to change the API endpoint hostname from login.salesforce.com to
test.salesforce.com.
In general, when linking from one Force.com page to another, the links should be relative (omitting the hostname)
rather than absolute, and dynamic (looking up the ID, record, or page by name) rather than static. This allows you
Hard-coded URLs
to migrate the URLs between different organizations, which might have different hostnames or record IDs. If your
application contains hard-coded URLs from one Force.com page to another, they might break when they are
clicked from the sandbox or, worse, take a user who thinks he is in a development environment back to the
production organization.
Some components are commonly accessed via their ID, such as RecordTypes. When you create a sandbox copy,
code that uses these IDs to reference these components continues to work because production IDs are retained
Hard-coded IDs
by the sandbox copy. However, the reverse is not true—migrating from sandbox to production (or between any
two organizations) via metadata maintains components' names, but if the component does not exist in the target
organization, a new ID will be generated. Therefore, migrating code that contains a hard-coded ID can cause the
code to break. As a best practice, wherever possible, you should obtain a component's ID by querying for it by
name.
If you have existing development projects, you need to merge that work into the new development environment.Existing projects
Creating User Templates
Refreshing a sandbox creates a new copy of the production organization. This means that all user permissions within the sandbox are
copiedfromproduction,andthatuseraccessorpermissionschangesyoumadeinthesandboxbeforeitwasrefreshedmustbereapplied.
If you have multiple sandboxes, or refresh sandboxes on a regular basis, consider creating a developer user template on your production
organization. A developer user template is an abstract user that has permissions required to develop on the sandbox (for example, the
“Modify All Data” permission), but is not active on your production organization. After you create or refresh a sandbox, you activate the
developer user in the sandbox and assign it to the individual who will be developing there.
To create a developer template:
1. Create a new user on your production organization.
2. Edit the user to give it the necessary permissions.
3. Deactivate the user on the production organization.
4. Create or refresh a sandbox.
13
Creating User TemplatesDevelopment Environments
5. Activate the user on the sandbox.
6. Optionally change the email address, password, or other environmental settings.
Warning: Exercise caution when granting permissions in sandbox organizations that contain sensitive information copied from
production (for example, social security numbers).
You might find it helpful to create multiple templates for different roles. For example, you can have a developer role that has the “Modify
All Data” permission, and a QA tester role that has standard user privileges.
Your sandbox has the same number of licenses as production, but it is unlikely that all of your users will log into it. When you create or
refresh a sandbox, the same users who are active in production are active in the sandbox, so if all licenses are occupied you will need to
deactivate an active user to activate the inactive developer user. Just make sure that the user you're deactivating in sandbox is one of
themanyproductionuserswhowillneverlogintothatenvironment.Likewise,youshouldmakeyourproductiondeveloperusertemplate
inactive on the production organization, so it doesn't consume a paid production license.
For more information on how to activate, deactivate, or edit users, see “Edit Users” in the Salesforce online help.
Managing Sandboxes
To manage a sandbox, from Setup click Sandboxes. A list of your existing sandboxes displays.
• Click New Sandbox to create a new sandbox. Salesforce deactivates the New Sandbox button when an organization reaches its
sandbox limit. If necessary, contact Salesforce to order more sandboxes for your organization.
• Click SandboxHistory to see a log of your sandbox refresh history, including when sandboxes were created and who created them.
• Click Refresh to replace an existing sandbox with a new copy. Salesforce only displays the Refresh link for sandboxes that are
eligible for refreshing, which varies for different types of sandboxes. Your existing copy of this sandbox remains available while you
wait for the refresh to complete. The refreshed copy is inactive until you activate it.
• Click Activate to activate a refreshed sandbox. You must activate your refreshed sandbox before you can access it. Salesforce only
displays this option for sandboxes that are not activated.
Warning: Activating a refreshed sandbox replaces the existing sandbox with the refreshed version. This permanently deletes
the existing version and all data in it. Your production organization and its data will not be affected.
• Click Del to delete a sandbox. The delete option is only available if your organization exceeds its sandbox limit.
Warning: Deleting a sandbox permanently erases the sandbox and all data in it.
• Administrators can click Login to log into a sandbox as a user. Salesforce only displays this option for active sandboxes. Users can
logintothesandboxat https://test.salesforce.com byappending .sandbox_name totheirSalesforceusernames.
For example, if a username for a production organization is user1@acme.com, and the sandbox is named “test,” the modified
username to log in to the sandbox is user1@acme.com.test.
• Click on a sandbox name to view details about the sandbox, including the sandbox type and when it was created.
14
Managing SandboxesDevelopment Environments
CHAPTER 3 Development Tools
Regardless of your role in the development process, it is important to understand at a high level how all of the Force.com development
tools operate, and the development tasks that overlap each other. A challenge of release management is tracking the changes in every
organization, and knowledge of the tools makes tracking changes an easier job.
You are probably familiar with how to build applications using the Salesforce Web user interface. Project-based development requires
working with desktop tools as well. The Force.com IDE is the best tool for team development, migration of selected components, and
writing Apex. The Force.com Migration Tool, on the other hand, is useful for migrating large scale or repetitive changes between
environments. These and other Force.com tools are examined in the following sections.
Force.com App Builder Tools
While there are many tools you can use to create and modify application components, the Web interface is the easiest place to start.
The Salesforce user interface makes application development easy with point-and-click app builder tools. From Setup, you can modify
the metadata of your organization.
15
Because the Web interface is so easy to use, administrators often make changes directly in the production organization, rather than using
a development environment. This is great for users who need the functionality immediately, but the change in production needs to be
tracked so that you can migrate the same functionality to your testing or staging sandboxes, if necessary.
Force.com IDE
The Force.com IDE is an integrated development environment for developing applications on the Force.com platform using Apex,
Visualforce,andmetadatacomponents.Designedfordevelopersanddevelopmentteams,theIDEprovidestoolstoaccelerateForce.com
application development, including wizards, source code editors, test execution tools, deployment aids, and integrated help.
TheForce.comIDEisbuiltontopoftheopen-sourceEclipsePlatform,andisavailableasaplug-in.Eclipseprovidesarichsetofcapabilities;
learn more about Eclipse features in the Workbench User Guide in the help contents.
Force.com project-based development leverages the tools and processes of traditional software development, such as development
environments (sandboxes), integrated development environments (IDEs), and source control systems. The Force.com platform enables
project-based development by using text-based files to represent the various components in a Salesforce organization. These files are
easily transported, can be stored and versioned in a source control system, and enable traditional development. All of this is made
possible by Metadata API.
A Force.com project is a collection of metadata files gathered together so that you can work with the files locally. Depending on your
needs, you can create a Force.com project that contains a single component or every component in your organization. The latter case,
retrieving every portable component from your organization, is not always the best choice because it can make deployment a longer
and more difficult process.
16
Force.com IDEDevelopment Tools
Note: Metadata API can deploy and retrieve up to 10,000 files or 400 MB at one time. If you need to retrieve or deploy more than
either of these limits, you must do so in batches.
Agoodwaytostructureyourprojectistothinkaboutwhatyouwanttoaccomplish,andthencreateaprojectforonlythosecomponents.
You can later edit the project if you have components you want to add or remove.
About Metadata API
Metadata API provides two parts that work in conjunction: a rich and powerful metadata model and an application programming
interface (API). The metadata model describes the components in your organization. For example, Salesforce custom objects and their
fieldscanbecontrolledbymanipulatingtheXMLfilesprovidedbyMetadataAPI.MetadataAPIalsoincludesasetofWebservicemethods
that provide programmatic access to the configuration and source of your metadata components. In other words, it describes what you
can do with those components, such as create an object or deploy one. If it helps you to separate them into two parts, you can think of
the metadata components as nouns, and the API calls as verbs.
With Metadata API you can:
• Work with setup configuration as metadata files.
• Copy, paste, merge, and manipulate metadata files using familiar tools, such as text editors, IDEs, batch scripts, and source control
systems.
• Migrate configuration changes between organizations, either between two development environments or from development to
production.
• Create your own tools for managing organization and application metadata.
For more information, including a list of the components that are and aren’t supported, see the Metadata API Developer’s Guide.
Force.com Migration Tool
The Force.com Migration Tool is a Java/Ant-based command-line utility for moving metadata between a local directory and a Salesforce
organization. The Force.com Migration Tool allows you to migrate metadata between unrelated organizations, so in that sense it’s more
powerful than change sets. Unlike the Force.com IDE, the Force.com Migration Tool has no graphical user interface. You choose the
components you want to deploy, the server address, and other deployment details by editing control files in a text editor and using
command-line arguments.
Most people will find the graphical user interface of the Force.com IDE easier to use than editing text files and providing arguments on
the command line. However, the Force.com Migration Tool is especially useful in the following scenarios:
• Development projects where you need to populate a test environment with large amounts of setup changes—making changes
with an automated script is far faster than entering them by hand.
• Deployments where you need to change the contents of files between organizations—for example, if you want to change the
Running User on a dashboard, you can retrieve the Running User from organization A, make a change, and then deploy the Running
User to organization B. If you tried to do this in the Force.com IDE, the IDE would force you to save the change back to organization
A (where the organization B user probably does not exist) before launching the Deploy Wizard to deploy to organization B. The
Force.com Migration Tool gives you complete control over the retrieve() and deploy() commands; editing and saving
a file on your local file system does not change the metadata in any organization until you choose to deploy it.
• Multi-stage release processes—a typical development process requires iterative building, testing, and staging before releasing to
a production environment. Scripted retrieval and deployment of components can make this process much more efficient.
• Repetitive deployment using the same parameters—you can retrieve metadata from your organization, make changes, and deploy
your changes to an organization. If you need to repeat this process, it is as simple as calling the same deployment target again.
17
About Metadata APIDevelopment Tools
• When migration from staging to production is done by highly technical resources—anyone who prefers deploying in a scripting
environment will find the Force.com Migration Tool a familiar process.
For more information, see the Force.com Migration Tool Guide.
Data Loader
Data Loader is a client application for the bulk import or export of data. Use it to insert, update, delete, or export Salesforce records.
Whenimportingdata,DataLoaderreads,extracts,andloadsdatafromcommaseparatedvalues(CSV)filesorfromadatabaseconnection.
When exporting data, it outputs CSV files.
Data Loader can be useful for loading data into testing environments, such as Developer Pro sandboxes that don’t contain any data. For
regression testing, it’s advisable to use a stable set of data that doesn’t change from release to release, so it’s useful to store a set of data
locallyanduseDataLoadertopopulateyourtestenvironment.DataLoaderhasacommand-lineinterfacesothatscriptscanautomatically
load data into a fresh organization.
Note: Data Loader is strictly a tool for loading data, not metadata. You can’t add or delete fields on an object or load any kind of
setup changes.
To import data, you can use either the import wizards or Data Loader. Data Loader complements the Web-based import wizards that
are accessible from the Setup menu in the online application. Refer to the following guidelines to determine which method of importing
best suits your business needs:
18
Data LoaderDevelopment Tools
Use Web-based importing when:
• You are loading less than 50,000 records.
• The object you need to import is supported by import wizards. To see what import wizards are available and thus what objects they
support, from Setup, click Data Management.
• You want to prevent duplicates by uploading records according to account name and site, contact email address, or lead email
address.
Use Data Loader when:
• You need to load 50,000 to 5,000,000 records. Data Loader is supported for loads of up to 5 million records. If you need to load more
than 5 million records, we recommend you work with a Salesforce partner or visit the App Exchange for a suitable partner product.
• You need to load into an object that is not yet supported by the import wizards.
• You want to schedule regular data loads, such as nightly imports.
• You want to export your data for backup purposes.
For more information on importing data, see “Importing Overview” in the Salesforce online help and the Data Loader Guide.
19
Data LoaderDevelopment Tools
CHAPTER 4 Tracking and Synchronizing Development
Changes
One challenge of release management is tracking changes. It sounds simple in concept, but in practice, it may not be. Changes can
occur simultaneously in both production and development organizations, and in components that are, and are not, available in the
Metadata API.
The easiest way to track changes is to use traditional development tools to diff, merge, and version the code. However, these tools only
work with components available in the Metadata API, and so it is necessary to manually track changes. This may seem like a lot of work,
but being able to track and replicate changes in all environments is the only way to ensure that functionality can be successfully deployed
without overwriting changes on the production organization. On the Force.com platform, the most important reason to track changes
is because you might have to manually migrate some changes from one organization to another.
Establishing a Change Process for Production
The ability to quickly develop and customize applications in your production organization using the Salesforce Web user interface is one
ofthemanystrengthsoftheForce.complatform.However,whenitcomestodevelopingenterpriseapplications,thiseaseofdevelopment
can lead to changes occurring on the production organization while applications are being developed in sandbox. To guarantee a
successful deployment to your production organization, it is necessary for your development environments to have the same changes
that occurred on production. This may seem like a backwards thing to do, to move modifications from your production organization to
your development environments, but it’s necessary because migrating from development to production can overwrite the changes
already made on production.
When modifications occur on the production organization, you can perform a sandbox refresh and get the latest changes. However,
sandbox refreshes are not always possible (you are limited to one refresh every 29 days for full sandboxes), and may require you to
performconfigurationchanges,suchasmodifyinguserprofilesorpermissionsetssothatyourdevelopershavethenecessarypermissions.
Therefore, tracking changes between the production and development environments, and then merging those differences from
production to development, can be a necessary process. To make these tasks easier, it’s a good idea to establish a change process for
yourproductionorganization.Achangeprocessdetermineswhatkindsofmodificationscantakeplaceonyourproductionorganization,
when they can occur, and who is responsible for making the changes. The change process you adopt will depend on the kinds of
modificationsyourequireinyourproductionenvironment.Thefollowinglistsuggestssomebestpracticesforchangeprocesses,arranged
from simplest to most complex.
• Allow no changes on production—This is the simplest, but also the most draconian measure you can enforce. In effect, you are
sacrificing immediate setup changes for easier deployment. If you choose this process, all of the development happens on sandbox.
• Modify only components in the Metadata API—Manually tracking and deploying changes is far more complicated than using the
Metadata API. If you can limit production changes to components that are accessible through the Metadata API, then this will simplify
change tracking, merging, and deployment.
• Allow only one administrator to make setup changes—Some organizations find it useful to assign a single administrator who is
responsible for all setup changes on production. This makes it easier to track changes on the production organization and replicate
thosechangesbackintodevelopmentenvironmentsbetweensandboxrefreshes.Thisisamoreflexibleapproachthatallowschanges
in production and project-based development at the same time. However, this is only a workable solution if your organization is
small enough that one administrator can make all of the setup changes.
• Schedule production changes—If your organization requires frequent changes to the production environment, you can schedule
a time to migrate those changes to your development environments. Depending on the number of organizations you have, this
could be an easy migration done frequently (weekly, perhaps), or a more elaborate process performed less often (once per quarter).
20
Tracking Changes Manually
Any changes you make to components that are available in the Metadata API can be tracked and merged using desktop tools. If you
use the Force.com IDE or Force.com Migration Tool, you can put your files in a version control system, and you can track changes using
the version control system’s built-in functionality. However, most IT organizations make numerous changes to components that are not
represented in the Metadata API, and thus require manually tracking changes for both production and development organizations.
It is important to have a method for tracking all changes, and especially important if those changes require manual migration. A useful
tool is a change request form that users and administrators fill out for every enhancement requested or change performed. You can
create a custom application within Salesforce to record change requests and the actual changes made.
Tip: The AppExchange includes custom apps that you can install to manage this process, such as the free Change Control app.
Most IT organizations also use a spreadsheet to log and track those changes. Spreadsheets allow you to sort by headers, create pivot
tables, and perform other useful operations when migrating or tracking those changes. On the spreadsheet list every change that
occurred, including:
• Who made the change
• The organization where the change occurred
• Date and time
• Which component was changed
When do you need to track changes manually?
• ChangesmadetocomponentsnotintheMetadataAPI—Youmustmanuallytrackeverychangetocomponentsthatarenotavailable
in the Metadata API.
• ChangesmadeusingtheSalesforceWebuserinterface—EvenifthecomponentsareavailablethroughtheMetadataAPI,youshould
trackchangesmadeusingtheWebtools.ConcurrentchangesbetweentheWebtoolsandtheMetadataAPIoftencreatedependencies
and are a common source of deployment problems. To be on the safe side, it is better to manually track all changes made through
the Web interface.
Changes made in the Salesforce Web user interface are logged in the setup audit trail. Using the audit trail in conjunction with your
manual change tracking tool is the best way to ensure you do not miss any changes. How you manage this process is up to you, but it
is a good idea to regularly transfer all changes in the audit trail to your change list (once a week, for example), or use the audit trail only
to cross-check changes on your change list. For more information on using the setup audit trail, see “Monitoring Setup Changes” in the
Salesforce online help.
Tracking Changes Using the Force.com Migration Tool
The Force.com Migration Tool is especially useful for script-based deployments, such as migrating batches of components. Another
particularly useful batch script can be written to diff metadata changes. Such a script would allow you to perform diffs at scheduled
times, or with different sets of components.
1. Create a package.xml file that lists the components you want to compare.
2. Create a retrieve target to download the components. For example:
<target name="retrieve-production">
<sf:retrieve
username="${sf.username}"
password="${sf.password}"
serverurl="${sf.serverurl}"
retrieveTarget="production"
unpackaged="package.xml" />
21
Tracking Changes ManuallyTracking and Synchronizing Development Changes
3. Write an external script to diff the files.
4. Specify a target that calls the script and outputs the results to a file. For example:
<target name="show-production-differences">
<!-- get metadata from organization -->
<antcall target="retrieve-production"/>
<!-- perl script to find changes -->
<exec executable="/bin/bash">
<arg value-"-c" />
<arg value-"cd production;
svn stat|../showdiffs.perl>../report.txt"/>
</exec>
</target>
Note: This procedure is only an example of the basic steps you would take to perform a programmatic diff. You might want to
define more than one folder and package.xml file so that you can retrieve components in batches.
Tracking Changes Using the Force.com IDE
Any change made in the Force.com IDE can be easily tracked and merged using the built-in features within Eclipse, or any other
change-tracking utility. For more information, click Help in the Force.com IDE.
Synchronizing Changes
The Metadata API describes Force.com components as text-based files that can be transported between different environments. Using
third-party tools, these files can be stored, versioned, and divided between developers and across development environments. The
complexity of your application development lifecycle increases as you introduce such concepts as multiple development environments,
code branches, versions, etc.
Synchronizingallthosechangescanbeachallenge.Forexample,youmighthaveonedevelopmentsandboxdedicatedtoenhancements
to existing applications on your production organization, and another development sandbox for new applications. Each of those
organizationscouldhavemultipleprojects,allmakingchangesatthesametime.Mergingthosechangesrequirestwoseparateprocesses:
synchronizing changes between projects in the same organization, and then integrating the changes between organizations.
Synchronizing Multiple Sandboxes
A fundamental difference between traditional software development and cloud computing is that in cloud computing the server always
has the true definition of the components. The files you work with in a local Force.com project are a representation of the objects on
the server. This is an important distinction because synchronization does not happen between projects directly, but between each
project and the server:
22
Tracking Changes Using the Force.com IDETracking and Synchronizing Development Changes
If you use the Force.com IDE, synchronizing your changes with the home organization is as easy as clicking the Save button. For changes
that occur simultaneously in both organizations, the synchronization tools allow you to overwrite files in either direction, or merge the
changes. How to save, synchronize, and refresh files is covered in the Force.com IDE help.
Integrating Changes Across Development Environments
If you have more than one development environment, you must merge all changes into one organization from which you can deploy.
Ifyouhaveonlytwosandboxes,youcanmigratechangesbackandforthbetweenthemfairlyeasily.Eachsandboxcanbeusedtodeploy
changes to the other organization, or to production.
23
Integrating Changes Across Development EnvironmentsTracking and Synchronizing Development Changes
As you add development environments, the complexity of synchronizing them goes up exponentially. In this case, it is much easier to
mergethechangesinaseparateintegrationsandboxorganizationthanwitheachother.Insuchascenario,migrationfromdevelopment
sandbox to integration is one way only:
24
Integrating Changes Across Development EnvironmentsTracking and Synchronizing Development Changes
If you use change sets to migrate components, you can edit the deployment connection so that changes follow defined integration
paths.
25
Integrating Changes Across Development EnvironmentsTracking and Synchronizing Development Changes
CHAPTER 5 Release Management
One of the most productive features of the Force.com platform is that customizations can be made directly in the Web user interface
and become available to end users immediately. These kinds of changes do not require elaborate development tools or processes. From
a release management standpoint, very little effort is required.
A more involved upgrade, such as creating a new user interface for an existing application, requires an environment where you can
isolate your development efforts from production users. Reintegrating the changes you make in your development environment back
intotheproductionorganizationintroducesanewlevelofcomplexitytothedevelopmentprocess,becauseyourproductionorganization
mayhavechangedduringthatsametime.Releasemanagementatthislevelrequirestrackingchangesbetweenthevariousenvironments
to make sure there are no clashes when you deploy.
A complex application that affects all users might require multiple development and testing environments. This kind of long-term project
canbefurthercomplicatedbyhavingconcurrentprojectsondifferentdevelopmentcycles,andcouldrequireseveralintegrationsbefore
the application is deployed to production. In many cases, all of these development efforts happen simultaneously. Release management
at this level is a very complex puzzle.
How do you manage these development projects so they don’t conflict with each other or the processes of your IT department? How
do you juggle the different time frames and production lifecycles? And how do you merge the changes between environments so there
are no conflicts when you roll out the functionality in a production organization? The answers to these questions are in the way you
construct your application lifecycle management process, and only by understanding all the variables can you make those decisions.
Developing Enterprise Applications
Large organizations tend to have complex development processes that span multiple release schedules. In this case, it is not only the
divisionbetweendevelopmentandtestingthatisimportant,butthesynchronizationofprojectsondifferentschedules.Inthisdevelopment
scenario,youhavemultipledevelopmentenvironmentsthatmustintegratewitheachotherbeforemergingintoastagingarea.Additional
environments could be added for training, production support, or other purposes. An organization can manage this type of enterprise
development in a number of ways. One possible method is shown in the following image:
26
Managing multiple projects of various complexities and durations on different release schedules requires a release plan and stringent
change tracking processes. Development teams that include distributed developers and testers also need to synchronize and integrate
their changes in order to collaborate effectively.
Scheduling Concurrent Development Projects
Unlike traditional software development, where all upgrades occur in a single release, an online application can be upgraded at any
time. Enhancements that are easier to develop, require less testing, or are of higher priority can be released to end users very quickly.
Therefore, an important step in release management is scheduling your development efforts. For IT organizations, this means putting
development projects into categories such as short-term, medium-term, and long-term. These categories are often defined by where
development takes place, how much testing is required, and when new features must be available.
27
Scheduling Concurrent Development ProjectsRelease Management
While you can use as many categories as necessary, a three-tier scheme is a good starting point. Aside from the duration of the project,
here are some other possible ways you can categorize your development efforts.
Where development takes place:
• Production-only—If the functionality can be developed and tested entirely in the production Web interface, the development cycle
is faster and users can get the functionality sooner.
• Metadata API components—If all of the necessary components are available in the Metadata API, then it is much easier to track and
merge changes between environments.
• Single sandbox—If the functionality can be developed in a sandbox and then immediately deployed to a production organization,
the development cycle does not require integration or staging environments.
• Multipleenvironments—Developmentprojectscanspanmultiplesandboxes,inwhichcasethecomplexityofintegratingcodelines
is increased. Complicated projects should not keep the simple ones from being rolled out.
By the number of developers:
• One—Ifasingledevelopercancreate,test,anddeploythefunctionality,youarefarlesslikelytorunintoproblemsmergingchanges,
or other time-consuming issues.
• Smallteam—Asmalldevelopmentteamcanpartitionlargeprojectsintomanageablepieces,andisstillcapableofrapiddevelopment.
Projects of this nature can be easily integrated with single-developer projects and rolled out quickly.
• Large team—A full development team is necessary for large-scale development projects. Projects of this nature require tracking
and merging changes from different code branches, acceptance testing, and other involved processes that can slow down the
development process.
28
Scheduling Concurrent Development ProjectsRelease Management
Delivering Applications on a Release Train
A release train is a scheduling technique for delivering application upgrades on a regular basis. Release trains are predictable and
incremental, so they ease the development process by setting limits on how much can be done in any one development cycle. Because
updates to your application can be impacted by Salesforce upgrades, you might find it useful to schedule your release before Salesforce
upgrades occur.
The general process for delivering multiple applications on a release train is the following:
1. Plan your release around Salesforce upgrades.
2. Schedule your concurrent development projects. This will help you determine if the new functionality can be done now, in the
current release, or sometime in the future.
3. Establish a process for changes to the production organization.
4. Trackchangesinallenvironments.Thiswillensurethatshort-termfunctionalitythatisdeliveredtoproductiondoesnotgetoverwritten
when you deploy from your development environment.
5. Integrate changes and deploy to staging or test environments.
6. Release to production.
How Salesforce Upgrades May Affect Delivery Schedules
SeveralthingshappenwhenSalesforceupgradestothenextversion.Forstarters,sandboxandproductioninstancesupgradeatdifferent
times.Thismeansthat,forabrieftime,yoursandboxandproductionorganizationsarerunningdifferentversionsofSalesforce.Asandbox
may be upgraded earlier or later than the production organization, depending on the instance. The schedule is determined by the
sandbox copy date.
Upgradesarescheduledduringoff-peakhours,andrarelyaffectusers.However,ITdepartmentsoftenscheduletheirownbatchprocesses
during these same hours, so it is important to avoid any conflicts. Things that happen during an upgrade are:
• New logo—The Salesforce logo is a quick way to verify which version you are using. Sandboxes may upgrade before or after your
production organization; therefore, it is a good idea to check the logo in the upper left corner of your sandbox home page around
the time of a Salesforce release to see if the sandbox has been upgraded or not.
• New features—Every release contains new features. Among those are new components available through the Metadata API. Click
the What's New link in the Help and Training window to view the release notes.
• Incremented API version—The API version increments every release, and access to new features requires connecting to the new
version of the API.
• Staggered upgrades—Because your production and sandbox organizations might not be running the same version of the platform
during the upgrade window, you might have to wait to deploy components that are new or have additional metadata. If you try to
upload a change set that has newer components to an organization that hasn’t been upgraded to support them, the deployment
will fail.
You can view the upcoming maintenance schedule by visiting trust.salesforce.com/trust/status and clicking the View Upcoming
Maintenance Schedule link.
29
Delivering Applications on a Release TrainRelease Management
CHAPTER 6 Migrating Changes Between Environments
Migration is the act of moving configuration changes from one Salesforce organization to another. During the development cycle, you
might migrate many times, either to keep development organizations in sync or to move changes through development organizations
toward production.
Migration can happen in two ways: manually or through the Metadata API.
• Manual migration—Changes to components that are not available in the Metadata API must be manually migrated in each
environment. That is, you must repeat the exact same modifications in every production or development organization. Manual
migration is made easier by diligently tracking changes.
• Metadata migration—Components that are available in the Metadata API can be migrated using desktop tools or change sets.
The typical steps to migrate changes are:
1. Determinewhichcomponentsneedtobemigratedfirst.Thisisespeciallyimportantifyouhavebothmanualandmetadatamigrations
to perform. For example, if you need to create a queue against a custom object, the custom object must be migrated first.
2. Migrate components in the order required:
• Look at your change list to determine if anything needs to be manually migrated. If so, log into the organization you will be
migrating changes into and make those setup changes manually.
• Retrieve the latest metadata changes from the server.
3. Optionally modify your Force.com project or outbound change set to deploy only a subset of components.
4. Deploy.
SEE ALSO:
Tracking and Synchronizing Development Changes
Migrating Changes Manually
Manual migration requires performing setup changes through the Salesforce user interface. For example, suppose you require new
search settings in your production organization, but you want to develop and test it in a sandbox before you expose it to users. Because
search settings are not available in the Metadata API, the only way to migrate the search settings to your production organization is to
manually recreate them in sandbox.
You might think that the easiest way to avoid manual migration is to make all of your changes on production and then refresh your
sandbox. While this is possible, full sandboxes can only be refreshed once every 29 days, and there are other important considerations.
Also, any changes on production must be manually migrated in each of your development organizations. Because component
dependencies play a large role in deployment, changes you make on your production organization might prevent you from deploying
applications you develop on sandbox. If you have multiple development organizations, you must manually migrate changes from
productiontosandboxmanytimes.Forthesereasons,developingonproductioncanbemoredifficultthanmanuallymigratingchanges
from sandbox to production.
Note: Many customizations and features can be developed on production, but these changes should require no testing and little
training.
30
The best way to manage manual migrations is to establish a change process on your production organization, and to track the changes
that require manual migration.
SEE ALSO:
Establishing a Change Process for Production
How Metadata Files are Migrated
Migrating changes from one organization to another using metadata files requires an intermediate tool that interacts with both
environments using the Metadata API. The following figure shows how changes are migrated from sandbox to production.
You might be wondering why you need a local project to migrate files that are stored in the cloud. This is because the Metadata API
was designed to support traditional software development tools that operate on source files, such as text editors, diff/merge utilities,
and version control systems, all of which require a local file system. Once you create a Force.com project, you can deploy directly to the
production organization any number of times; you don’t need to retrieve files unless you want to synchronize with the server.
What Affects Deployment Time?
MigratingmetadatafromalocaldirectorytoaSalesforceorganizationisaccomplishedbycallingtheMetadataAPI deploy() method.
Both the Force.com IDE and the Force.com Migration Tool use this method, and so there should be very little difference in deployment
time when using either tool. The deploy() method is asynchronous, meaning that it may not return results immediately, and there
are several factors that determine how quickly those results are returned:
• Number and size of files—The more you have to deploy, the longer deployment takes. However, network payloads are rarely larger
than 10 MB, so raw file size usually does not play a significant role.
31
How Metadata Files are MigratedMigrating Changes Between Environments
• Type of components—Some components take longer to process than others. For example, custom fields, custom junction objects,
and profiles take longer to deploy than other components.
• Processing time—Making a change that requires recalculating data takes an amount of time proportional to the amount of data
that has to be modified. For example, if you change a field type, this could require modifying all of the records that use that field.
• Test execution—When deploying to a production organization, the number and complexity of Apex tests has a large impact on the
deployment time.
• Network and server availability—These are of minimal concern compared to other factors. However, you may want to schedule
long-duration deployments during off-peak hours so that you are not waiting on deployments during working hours, or locking
components from use.
• Locking—If users are working in the organization during deployment, this can interfere with both users and the deployment. Users
may be locked out of components, or the deployment may be waiting for a user to release a lock. The longest running processes
are those that reorganize users (or groups of users) who own large numbers of records. For example, changing a sharing rule does
not take much time if the rule shares 100 records owned by three users with another six users, but moving one user on a role or
territory hierarchy takes a long time if that user owns a gigabyte of records. Other ways users can force the processing of large
numbers of records include:
– Creating portal users or users affected by forecasting
– Creating, modifying, or deleting sharing rules
– Moving or changing users, roles, groups, account owners, or team membership, when there are a large number of associated
records
Monitoring the Status of Your Deployments
Thesizeandcomplexityofthemetadatacomponentsaffectthedeploymenttime.Totrackthestatusofdeploymentsthatareinprogress
or have completed in the last 30 days, from Setup, click Deployment Status or Deploy > Deployment Status. Deployments are listed
in different sections depending on their status.
Youcanmonitordeploymentsthatareinprogress,checkwhichdeploymentsarewaitingforexecution,andviewtheresultsofcompleted
deploymentsontheDeploymentStatuspage.Thispagelistsalldeployments—changesets,MetadataAPI-baseddeployments,including
deployments started from the Force.com IDE and the Force.com Migration Tool, and package installations.
In-Progress and Queued Deployments
When running a deployment, the Deployment Status page shows you the real-time progress of your current deployment. This page
contains charts that provide a visual representation of the overall deployment progress. The first chart shows how many components
have already been deployed out of the total and includes the number of components with errors. For example, the following chart
indicates that 302 components were processed successfully out of 450 and there were 45 components with errors.
32
Monitoring the Status of Your DeploymentsMigrating Changes Between Environments
After all components have been deployed without errors, Apex tests start executing, if required or enabled. A second chart shows how
many Apex tests have run out of the total number of tests and the number of errors returned. In addition, the chart shows the name of
the currently running test. For example, in the following chart, 77 tests have completed execution out of a total of 120, and 1 test failed.
The following information is displayed for the current deployment.
DescriptionField
The change set name or a unique identifier that’s used to track the Metadata API deployment. For a Metadata API
deployment, this value is returned by the deploy() call.
Name
The deployment type: Change Set or API.Type
The name of the user performing the deployment.Deployed By
The date and time when the deployment actually started, not the time the request was queued. This value is the
time the deployment Status is set to In Progress.
Start Time
The date and time when the deployment validation finished.Validated
If the current deployment has errors, you can view these errors before the deployment finishes by clicking View Errors.
Pending Deployments
You can initiate multiple deployments. Only one deployment can run at a time. The other deployments will remain in the queue waiting
to be executed after the current deployment finishes. Queued deployments are listed under Pending Deployments in the order they
will be executed.
Deployment Validations
A deployment validation is a deployment that is used only to check the results of deploying components and is rolled back. A validation
doesn't save any deployed components or change the organization in any way. You can determine whether a deployment is a validation
only (Validate) or an actual deployment (Deploy) by inspecting the information for pending deployments or the Status column of
deployments in the Failed and Succeeded sections.
If a validation completed successfully in the last four days, and all tests passed with sufficient code coverage, you can perform a quick
deployment by deploying this validation to production without running tests. See Quick Deployments.
Canceling a Deployment
You can cancel a deployment while it’s in progress or in the queue by clicking Cancel next to the deployment. The deployment then
has the status Cancel Requested until the deployment is completely canceled. A canceled deployment is listed in the Failed
section.
33
Monitoring the Status of Your DeploymentsMigrating Changes Between Environments
Completed Deployments
Deployments that have finished are listed either in the Failed or Succeeded sections depending on their status.
Deployments that have finished but failed, and deployments that were canceled are listed in the Failed section. No changes were
committed to the organization for these deployments because files were missing, components had errors, tests failed, or the deployment
was canceled.
Deployments that have completed successfully or have partially succeeded are listed in the Succeeded section. Only deployments to a
non-production organization can partially succeed. These are deployments that have the rollbackOnError field set to false
in the deployment options and have errors in a subset of components. In a partially succeeded deployment, the failed components
aren’t committed and the remaining components are committed to the organization.
To get more details about a deployment, click View Details next to a deployment. Use the information on the Deployment Details page
to view the errors and troubleshoot problems for a failed or partially succeeded deployment. The Deployment Details page includes the
error messages that occurred during the deployment, errors for Apex tests with stack trace information, code coverage warnings, and
information about slow tests. For a successful deployment, the Deployment Details page shows information about the deployment
including how many components were deployed and how many Apex tests were run.
Deployment Status
The Status column for completed deployments in the Failed and Succeeded sections lists the type and status of a deployment and
has two parts:
• The prefix indicates whether the deployment is a validation only (Validate:) or an actual deployment (Deploy:).
• The second part of the status value contains the status of the deployment: Failed or Canceled for failed deployments, Succeeded
for succeeded deployments, or Partially Succeeded for partially succeeded deployments.
Quick Deployments
As part of a deployment, all Apex tests are run in production. If the production organization contains many Apex tests, the execution of
all tests can be time-consuming and can delay your deployment. To reduce deployment time to production, you can perform a quick
deployment by skipping the execution of all tests. Quick deployments are available for change sets and Metadata API components when
the following requirements are met.
• The components have been validated successfully for the target environment within the last four days (96 hours).
• As part of the validation, all Apex tests in the target organization have passed.
• The overall code coverage in the organization is at least 75%, and Apex triggers have some coverage.
A validation is a deployment that’s used only to check the results of deploying components and doesn’t save any components in the
organization. A validation enables you to view the success or failure messages that you would receive with an actual deployment. You
can validate change sets or metadata components through the API or the Force.com Migration Tool.
To learn how to validate a change set, see Validating a Change Set in the Salesforce Help.
To validate components with the Force.com Migration Tool, set the checkOnly option to true in the deploy target. See Deploying
Changes to a Salesforce Organization in the Force.com Migration Tool Guide.
Performing a Quick Deployment through the User Interface or the API
To perform a quick deployment, first run a validation-only deployment with Apex test execution on the set of components that you
need to deploy. If your validation succeeds and qualifies for a quick deployment, you can start a quick deployment.
You can quick-deploy validated change sets and Metadata API components in the user interface. In the Deployment Status page, deploy
a recent validation by clicking Quick Deploy next to your validation or on the validation’s detail page. This button appears only for
qualifying validations.
34
Monitoring the Status of Your DeploymentsMigrating Changes Between Environments
Alternatively, you can start a quick deployment through Metadata API or the Force.com Migration Tool for Metadata API components
(excluding change sets). For Metadata API, call deployRecentValidation() and pass it the validation ID. For the Force.com
Migration Tool, use the <sf:deployRecentValidation> task.
Note: Quick Deploy is enabled for recent validations in which all Apex tests have executed successfully and code coverage
requirements have been met. Note the following.
• In production, quick deployments are supported for validations that meet the criteria. You can deploy recent validations of
change sets and Metadata API components (including components validated by using the Force.com Migration Tool).
• Insandbox,QuickDeployissupportedonlyforvalidationsthatexplicitlyenabletestexecution(forexample,viathe testLevel
parameter for the Migration Tool). By default, Apex tests aren’t required nor ran in sandbox deployments. Quick Deploy is not
supported for change sets in sandbox, because an option to enable test runs for change sets in sandbox isn’t available.
• If you perform a deployment after a validation, whether through Quick Deploy, a package installation, or a regular deployment,
all validations no longer qualify for quick deployment. Revalidate the set of components to quick-deploy.
Performance Tuning Resources for Long-Running Tests
If required or enabled, Apex tests run as part of a deployment after all components are deployed. Apex tests that take a long time to
execute delay the entire deployment. The top-five long-running tests, that is the top-five tests that ran longer than two minutes, are
flagged for a completed deployment in the Deployment Details page. You can improve the performance of these tests to make them
more efficient and speed up future deployments. There can be many causes for slow performance. For example, accessing organization
data instead of using test data, or exercising SOQL queries or Apex code with poor performance. Here are some resources you can use
to learn about performance best practices for Apex and SOQL.
• Isolation of Test Data from Organization Data in Unit Tests
• Working with Very Large SOQL Queries
• Webinar: Inside the Force.com Query Optimizer
• Query and Search Optimization Cheat Sheet
• Performance Tuning for Visualforce and Apex Webinar
• Architect Core Resources
35
Monitoring the Status of Your DeploymentsMigrating Changes Between Environments
Deployment Dependencies
Whether you are migrating changes between development environments or deploying changes to a production organization, there
are a number of factors that affect whether or not the deployment succeeds. The most significant of these factors are dependencies.
There are a few different kinds of dependencies:
• Parent-child—Metadata components may depend on other components. For example, you can’t deploy a custom field without
deploying its custom object as well because the field's existence depends on the object. These kinds of object dependencies are
not always within the same object; they can be across different objects. For example, a relationship field on one object can’t be
deployed without the target object being included in the deployment, or already present in the target organization.
• Referenced file—Every file that is referenced by another file must either be included in the deployment plan, or already in the
destination organization. For example, if you have a Visualforce page that references an image as a static resource and the image
does not exist in the target organization, you must include the image in the deployment. The referenced file must be available
through the Metadata API. For example, if that same Visualforce page had referenced an image in a personal document folder, and
you included all folders in the deployment plan, the deployment would fail because personal documents are not available via the
Metadata API.
• Ordering—Dependencies require that components are deployed in a specific order, and within a single deploy operation, this
order is handled automatically by the Metadata API. However, if you deploy a subset of components, or split your deployment into
multiple batches, you must take into account the ordering dependencies yourself.
• Mandatory fields—When you create an object using the Force.com IDE or the Salesforce user interface, the tool enforces the
creation of mandatory fields. However, when working with files in a local directory, it is possible to create or modify metadata files
that are missing mandatory fields and therefore can’t be deployed. You can also introduce these kinds of errors by copying and
pasting between components.
Migrating Files in Batches
The easiest way to migrate changes is to deploy all of them in a single operation. However, there are a number of reasons you might
want to divide the deployment into smaller pieces:
• The deployment is too large—Metadata API can deploy and retrieve up to 10,000 files or 400 MB at one time.
• Long deployments—If you experience unusually long deployments, you can divide your deployment into smaller pieces. This can
reduce user impact due to locks being held in long-running operations.
• Apex testing—You might want to divide your components into two parts: those that require testing and those that don’t. This
speeds the deployment of components that don’t require testing and locks fewer components.
Determining Which Files to Deploy Together
If you need to divide your deployment into smaller pieces, it’s important to know which components to deploy at the same time.
• Deploy components that don’t trigger tests—Some components can’t cause a test to break, and therefore they don’t trigger tests
onaproductionorganization.Ifthedeploymentconsistsentirelyofthefollowingcomponents,youcandeploytoproductionwithout
running tests:
– Visualforce component (ApexComponent)
– Visualforce page (ApexPage)
– Dashboard
– Email template
– Report
36
Deployment DependenciesMigrating Changes Between Environments
– Scontrol
– Static resource
• Don’t split dependent components—Because file dependencies play such a large role in migrating metadata, it’s very important
not to separate dependent components.
• Deploy the most numerous components separately—The following components can be the most numerous, and so you may want
to deploy these separately from other components.
– Email templates can be deployed separately, but must be deployed before the components that use the templates.
– Dashboards can be deployed separately, but should be deployed before reports in case a custom button links to a report.
– Reports may contain the largest number of components, and they can be deployed after all other components and in multiple
batches.
Deploying Batches of Files Using the Force.com IDE
There are two ways you can use the Force.com IDE to deploy batches of components: either by changing the project contents or
deselecting the components you do not want to deploy when you use the Force.com Deployment Wizard.
The easiest way to deploy batches of files is to create a new Force.com project and use the Choose Metadata Components dialog to
select only the components you want to deploy. The Choose Metadata Components dialog is a graphical tool that allows you to select
individualcomponentsorallcomponentsofacertaintype.Whenyoucreateaproject,youusethisdialogtodeterminewhichcomponents
you want in the project, but you can edit the project contents at any time, as well.
Whenyoucreateoredityourprojectcontentsinthismanner,whathappensbehindthescenesaremodificationstothe package.xml
file. This file is also called the project manifest, and determines what is in your project, both when you retrieve and deploy components.
You can also edit the package.xml file by hand by dragging it into the Editor pane.
Warning: Editing the package.xml file by hand is only advisable if you must have finer control than the dialog can give you.
Note that if you open the Choose Metadata Components dialog after editing the package.xml file, you may undo some of
the changes you made.
37
Deploying Batches of Files Using the Force.com IDEMigrating Changes Between Environments
The other way to control the deployment plan is to use the Force.com Deployment Wizard. This wizard allows you to choose which
components in your project you want to deploy, and the specific action you want to take: add, delete, overwrite, or take no action. To
use the wizard, right-click a Force.com project and choose Force.com > Deploy to Server.
How to Migrate Batches of Files Using the Force.com Migration Tool
If you use the Force.com Migration Tool, there is no graphical user interface to edit the package.xml file, and so you must become
familiar with the format of the XML files and edit this file by hand. There are two deployment targets you can call that will help you
determine which components to include in each package.xml file you must create.
• describeMetadata—Returns a list of metadata types that are enabled for your organization. This target is useful when you
want to identify the syntax needed for a metadata type in package.xml.
• listMetadata—Returns the names and other properties of individual metadata components in your organization, along with
extra information about each one. This target is useful when you want to include specific components in the package.xml, or
if you want a high-level view of particular metadata types in your organization. For example, you could use this target to return a
list of names of all the reports in your organization, and use this information to create a package.xml file that returns the specific
reports you want to migrate.
For more information about using these deployment targets, see the Force.com Migration Tool Guide.
38
How to Migrate Batches of Files Using the Force.com
Migration Tool
Migrating Changes Between Environments
Deleting and Renaming Components
When you migrate components from one organization to another, the operation is similar to an upsert. That is, you can deploy changes
to a component that already exists, but if the component does not exist, it is created. For example, if you have a component named
foo in organization A and you change a data type, when you deploy that change to organization B, the data type is changed as long
as foo exists in organization B. However, if foo does not exist in organization B, the entire component is created.
If you rename a component in organization A and deploy that component to organization B, you might expect the name to be changed
in organization B, but instead, you create a new component in organization B. This is because the deploy operation looks for matching
names. Because a component with the name doesn’t exist in organization B, a new one is created. For example, if you rename foo to
foos in organization A, and then deploy that change to organization B, this results in two components, both foo and foos, in
organization B.
To rename a component, you must delete the component, and then recreate it with a new name. The process you use to delete a
component depends on the environment:
• For development and testing environments—Delete the components, recreate them with new names, and reload test data.
• Forproductionorstagingenvironments—RenamecomponentsusingtheSalesforceuserinterface.Thispreservesthedatainexisting
records.
The project manifest (package.xml) determines what is deployed in a project, but this file cannot be used to process deletes. To
deletefilesinaForce.comproject,youmustcreateaprojectmanifestandnameit DestructiveChanges.xml.Whenyouinclude
this file in a deployment, the components you specify for deletion are removed in the target organization.
Using the AppExchange to Migrate Changes
It is possible to use the AppExchange to move metadata between organizations, but it is not an efficient way to migrate changes.
Unmanaged packages do not allow you to install components of the same name, and so those components cannot be further modified
(via an unmanaged package) after the initial installation.
Another kind of package is a managed package. Managed packages add constraints that make them poorly suited to use as an IT
development tool. Furthermore, while any type of organization can be used to create an unmanaged package, managed packages must
be created using a Developer Edition organization.
Note: Unmanaged packages can be a useful for distributing initial components to multiple organizations. For example, if you
want all of your development environments to have the same set of core Apex classes, you could package these and distribute
them on the AppExchange. This use of unmanaged packages is a convenient way to deliver files to multiple development
environments, but cannot be used to make further changes to those files.
Deploying to Production
The tools and processes for deploying to a production organization are similar to those for migrating changes from one development
environment to another. However, when deploying to production, there are some important differences and several additional steps.
Because the procedure you take when deploying to your production organization depends on your IT department's policies and on
whatyouaredeploying,thereisnoprescribedprocessfordeployingtoproduction.However,therearesomebestpracticesfordeployment.
It is important to deploy during a period when users will not be making changes to your organization. You should also perform a test
deployment to guarantee the success of the production deployment. These steps typically happen during a maintenance window.
During this time, users should be locked out of the system, so plan this well in advance and during off-peak hours. Deployment is an
all-or-nothing event—for example, a single new field on the production organization can make the entire deployment fail if this field
39
Deleting and Renaming ComponentsMigrating Changes Between Environments
does not exist in the deploying organization. Because any changes you make on production during the deployment phase can nullify
the final deployment, it is important that no changes occur until deployment finishes.
It is advisable to create a staging environment that allows you to do a test deployment before deploying to production. The staging
environment is usually a full-copy sandbox, so it is as similar to the production organization as possible. For this reason, you should create
or refresh the staging environment during the maintenance window, not before. Full-copy sandboxes can take some time to create or
refresh, so it is important to pad your maintenance window to account for this.
Deployment to the staging environment follows the same procedure as migrating from one development organization to another. This
procedure includes manual migration for any component not in the Metadata API, and for any features developed using the Salesforce
user interface. In addition, it’s advisable to manually run all tests in your staging environment to avoid any possible issues before the
production deployment. Development environments don’t enforce Apex test coverage, but a production organization does.
Note: The Force.com platform requires that at least 75% of your code is covered by unit tests before you can deploy it to a
production organization. Ideally, you should strive for 100% coverage. The code coverage restriction is not enforced for sandbox
or Developer Edition organizations.
After you successfully deploy to your staging environment, you need to make some additional changes before deploying to production.
If you modified any environmental dependencies in your development environment (for example, to give developers permissions they
do not have on production), you need to change those values back to the production values. If you configured service endpoints to test
integration with external services, those must also be changed to their production values.
You are now ready to deploy to production. First lock users out of the system, and then perform a Metadata API test deployment on the
production organization. This is a validation “check-only” deployment, meaning that the deployment is fully simulated and the success
or failure of the deployment is returned, but no components are actually deployed. This step is especially important if there is a time
lapse between when the deployment was staged (during normal business hours, for example) and when the actual deployment takes
place (when users are locked out over the weekend, for example). If this test deployment is successful, you can deploy changes using
the Metadata API or Web interface, depending on the components.
Keeping in mind that all IT organizations are different, the following procedure recaps the high-level steps you might follow for deploying
an enterprise application to a production organization:
1. Announce a maintenance window.
2. Stop all setup changes on production.
3. Create a staging environment.
4. Migrate changes to the staging environment.
5. Change environmental dependencies and services from testing settings to production values.
6. Lock users out of the application.
7. Test deploy using the Metadata API.
8. Deploy to production.
9. Unlock the production organization.
Scheduling the Release
Any time you deploy changes to a production environment your users are directly affected, so it is a good idea to have guidelines for
rolling out new functionality. Salesforce has over a decade of experience in this area, and you might want to base your rollout procedure
on our model:
1. Don’t break anything:
a. Release your production functionality in a test environment first. If you successfully deploy and test in a full-copy sandbox, you
can be confident your final deployment to production will succeed.
40
Scheduling the ReleaseMigrating Changes Between Environments
b. Back up everything.
c. Have a fallback plan, just in case.
2. Schedule the release:
a. Create and announce a maintenance window during which your organization will be unavailable to most users.
b. Use profiles to control maintenance updates.
3. Inform users of every change:
a. Create detailed release notes that document new functionality and changes to existing behavior.
b. Send an email announcing the main features with a link to the release notes.
c. Create webinars and training sessions to educate users.
Using Profiles to Control Maintenance Updates
During a deployment window, you can use user profiles to limit end user access to the production organization:
1. Create and announce a maintenance window during which your organization will be unavailable to most users:
• From Setup, click Manage Users > Mass Email Users to access an email wizard that allows you to alert all active users about
the maintenance window.
2. Use profiles to create and manage the maintenance window:
• Edit Login Hours in user profiles to lock most users out during the maintenance window. Be sure that any system administrator
or integration users have access if they need it.
• Roll out objects, tabs, and apps selectively to different user profiles if you want to allow some users to have access for user
acceptance testing.
If your organization includes many profiles, use the following strategy for setting up a maintenance window:
1. Create a new profile named Maintenance with all login hours locked out.
2. Use the Data Loader to extract and save a mapping of users and their user profiles.
3. At the beginning of the maintenance window, use the Data Loader to change all user profiles except the administrator's to the
Maintenance profile. Note that it is very important to leave login access with the administrator because otherwise all users could
remain locked out of the system indefinitely. If any integrations are going to run during the maintenance window, the integration
user should also not be locked out.
4. At the end of the maintenance window, use the Data Loader to reload the users with their original profiles.
Fixing Bugs
Where you make bug fixes depends on the severity of the bug and on the specifics of your IT department. Generally speaking, there are
two choices: make the fix in the production organization or in a development environment. The best practice is to make all your changes
in one place, and then follow a repeatable process for moving the change to production. One version of this process is shown in the
following image:
41
Using Profiles to Control Maintenance UpdatesMigrating Changes Between Environments
This process is not always practical when you have high-priority bugs fixes that need to get to production immediately. In that case, you
mustfixthebugintheproductionenvironmentandthenmigratethesamebugfixtoyourdevelopmentenvironments.Thisisimportant
becausechangesmadetotheproductionorganizationcanbeoverwrittenwhenyoumigratechangesfromadevelopmentenvironment.
One version of this process is shown in the following image:
42
Fixing BugsMigrating Changes Between Environments
CHAPTER 7 Advanced Development Lifecycle Scenario
This chapter covers the recommended development lifecycle for advanced development and release management.
The advanced development lifecycle applies to companies where concurrent application development occurs and where some of the
customizations are performed programmatically. Concurrent development takes place when developers in multiple business units are
working on multiple projects in parallel or when developers in the same team are sharing the development task for an application. The
processofperformingconcurrentdevelopmentinSalesforce,integratingchangesfromdifferentdevelopers,testing,andreleasingthose
changes to production via multiple intermediate environments constitutes a development lifecycle.
The advanced development lifecycle is described and followed by an example of a development lifecycle in a fictitious company.
Example: Example Company: AW Computing
For the scenario in this chapter, a fictitious company, called AW Computing, is used. AW Computing is a midsize company that
supplies office computing equipment to businesses and individual consumers. AW Computing has an internal development team
that includes four developers, two quality engineers, a release manager, and a product manager, among others. AW Computing
has integrated data into Salesforce from an external system, SAP, an enterprise resource planning and business system. The AW
Computing development team must put all its work through user acceptance testing. Also, AW Computing provides a formal
training process to employees before deploying releases to production. The company also needs the ability to quickly deploy
patch fixes to production.
Here are descriptions of roles that are held at AW Computing.
• Release manager—is in charge of managing the release schedule and coordinating releases with the business. The release
manager is also in charge of managing the source control system.
• Product manager—provides the business requirements of apps and features and works with the development team to
implement those requirements. The product manager also performs user acceptance testing to ensure that requirements
have been implemented.
• Software developer—writes applications outside of the production environment.
• Quality engineer —performs testing of applications that are under development.
• Administrator—performs administrative tasks in the production organization, such as creating reports.
• Trainer—conducts training of company employees for new applications and features.
Source Control System and Deployment Tools
Source Control System
Customizations are migrated from sandbox to a central source control repository before being migrated to other environments. The
repository, such as Git or Apache Subversion (SVN), helps integrate the changes that were implemented by concurrent development
and separates the different versions of an application.
The source control repository contains a copy of your entire organization’s metadata as exposed by Metadata API. Team members can
add their customizations, such as custom objects, fields, and reports, and Apex or Visualforce code to the source control repository.
These changes are then merged with changes that were made by other team members or developers on other teams. A source control
system ensures a quality development process and has many other benefits, including the ability to deploy only a specific version of
customizations, and maintaining a separate branch for each project without overwriting customization done as part of other projects.
43
In the source control system that you use, such as Git, you can create a repository with multiple branches. Each branch contains a set of
changes that are developed by a separate team. For example, one team of developers might be working on a feature that’s going live
inFebruary. Anotherteammightbeworkingonafeaturethat’sgoingliveinMarch. TheseteamsneedseparateDeveloperorganizations
and integration test sandboxes. In addition, because patch releases contain bug fixes and therefore different customization metadata
and Apex code than new features, use a separate branch for a patch release.
You can use the Force.com Migration Tool to retrieve a copy of your organization’s metadata to commit to source control. Conversely,
the Force.com Migration Tool can be used to deploy metadata that’s saved in source control to an organization.
Force.com Migration Tool
The Force.com Migration Tool is a Java- and Ant-based command-line utility for downloading metadata from one organization and
storing it in a local directory on your file system. You can also deploy metadata from a local directory to a different Salesforce organization.
The Force.com Migration Tool provides ease of automation and flexibility. You can automate deployments through scripts, and specify
deployment options in control files. Also, this tool enables you to change the content of the metadata in the files before you deploy.
See the Force.com Migration Tool section earlier in this guide.
Force.com IDE
The Force.com IDE is an integrated development environment for developing applications on the Force.com platform by using Apex,
Visualforce,andmetadatacomponents.TheForce.comIDEisbuiltontopoftheopen-sourceEclipsePlatformandisavailableasaplug-in.
Apex, Visualforce, and metadata components are saved on the local file system by the IDE. Developers can use a tool to commit these
changes from the file system to the source control repository. An Eclipse plug-in is available that enables interacting with the source
control system directly from the IDE, which makes it easy for developers to quickly commit their changes. See the Force.com IDE earlier
in this guide.
For our AW Computing example company, here is a summary of the tools that are used.
• A source control system: In our example company, we use Git, but any source control system is fine.
• Force.com Migration Tool: Engineers typically have the Force.com Migration Tool configured on their local environment.
• Force.com IDE for development
44
Source Control System and Deployment ToolsAdvanced Development Lifecycle Scenario
Change Sets
Change sets can be used to migrate metadata components. Change sets are designed for ease of use but have limitations. For example,
change sets can contain only changes made through the Salesforce user interface and not through the Force.com IDE, and change sets
can’t be used to rename or delete a component. To be able to automate your migrations and to have wider metadata migration support,
we recommend using the Force.com Migration Tool.
Development Lifecycle and Sandbox Environments
Duringadevelopmentlifecycle,multipletasksarecarriedoutbyseparateteams.Fromdevelopinganapplicationtotestingandreleasing,
tasks must follow a specific release process. Some development and testing tasks are done in parallel, while other tasks depend on other
deployments to be completed first. Separating environments for these tasks (development, testing, integration, and staging) makes
team development possible and helps ensure a high quality for the release.
You can obtain separate development and testing environments for the development lifecycle by creating sandbox organizations.
Sandboxes contain a copy of your organization’s metadata and sometimes its data too.
Sandbox Types
The following sandbox environments are available. For a full description of each sandbox type, see About Types of Development
Environments.
• Developer
• Developer Pro
• Partial Copy
• Full
Developer and Developer Pro sandboxes are recommended for development and testing. They don’t include any data (standard and
custom data objects). Partial Copy sandboxes are typically used for integration or user-acceptance testing (UAT) environments and
include a subset of the organization’s data in addition to the metadata. Full sandboxes are full copies of all of the organization’s data
and metadata. Full sandboxes are exact replicas of your production organization, while the other sandboxes are partial copies.
Sandbox Data Templates
Use sandbox templates with your Partial Copy and Full sandboxes to pick specific objects and data to copy to your sandbox. Sandbox
templates enable you to control the size and content of each sandbox.
In a large organization with multiple project teams, you can leverage data templates with Partial Copy sandboxes to segment the testing
effort. For example, you can break up regression testing to occur across multiple sandboxes with shorter refresh cycles (rather than a
Full sandbox).
Recommended Sandbox Environments for Feature Releases
For feature releases, these are the recommended sandbox environments, broken up by tasks.
• For development and testing, the following sandboxes are recommended.
– An exclusive Developer or Developer Pro sandbox for development (one per engineer)
– A shared Developer or Developer Pro sandbox for shared testing
• For integration and user acceptance testing, shared Partial Copy sandboxes
45
Development Lifecycle and Sandbox EnvironmentsAdvanced Development Lifecycle Scenario
• For staging changes, a Full sandbox
Create a sandbox user for each user who logs in to a shared sandbox. Each user logs in to the sandbox with a unique user account.
Using Exclusive versus Shared Sandboxes for Development
We recommend that each developer create and work on his or her own sandbox. Having one sandbox per developer provides more
control for each developer—each developer decides when to refresh his or her sandbox with the latest changes from the repository or
when to commit changes.
If your team members work closely together and primarily use point-and-click tools in the Salesforce user interface, team members can
share a sandbox. A sandbox can be shared by creating user accounts for each user. Sharing a sandbox makes the process of managing
sandboxes and synchronizing them with source control easier, but it makes the development process more complex.
The following diagram illustrates a layout of sandbox environments for development and testing. This high-level diagram assumes that
there are an arbitrary number (n) of developers and QA engineers, each with a sandbox.
46
Development Lifecycle and Sandbox EnvironmentsAdvanced Development Lifecycle Scenario
User Acceptance Testing Sandbox
Employees in the company can use the user acceptance testing (UAT) sandbox to try out new features or perform ad hoc testing. For
example, the product manager might want to perform some ad hoc testing to ensure that features are implemented and to prepare a
demo. Also, a trainer can use the new app to prepare formal training materials before the app is rolled out in production.
A Partial Copy sandbox or Full sandbox is recommended to test the customizations with data from production. A Partial Copy sandbox
contains all the organization’s metadata and a selected amount of production’s data, while a Full sandbox contains all of production’s
metadata and data. The following diagram builds on the previous one and shows a Partial Copy sandbox used.
The Staging Sandbox
The staging environment is the last environment in the development lifecycle before production. The staging sandbox is a Full sandbox
that contains all data and metadata that’s in production—it’s a full replica of production that enables you to perform real-world testing
and catch any data-dependent issues that affect the behavior of the app. Use the staging environment to perform a test deployment
and to perform final regression testing—run all tests and make sure that the deployment is successful. This task is equivalent to a
validation-only deployment to production.
Note:
• For Force.com Migration Tool version 34.0 and later, run local tests in the staging sandbox by adding the
testLevel="RunLocalTests" parametertoyourdeploytarget.Thisparameterensuresthatthetestsruninsandbox
are the same as the tests that are run by default in production, if required.
• ForForce.comMigrationToolversion33.0andearlier,youcanrunallteststhroughtheForce.comMigrationToolinthestaging
sandbox,includingteststhatoriginatefrominstalledmanagedpackages,bysettingthe runAllTests parameterto true.
Managedpackagetestscan’tbeexcludedwhenusingthe runAllTests parameter.Incontrast,teststhatrunautomatically
in production are only local tests (with no namespace) that don’t originate from installed packages. See Tips for Configuring
the Force.com Migration Tool to Run Tests.
Also, use the staging environment to perform stress and performance testing. Note that because the hardware for sandbox in the
Force.com platform differs from the production organization hardware, the results of performance testing on sandbox might not match
those in production. Nonetheless, performance testing on the staging sandbox can still help catch performance issues and errors that
arise from Apex governor limits.
Running unit tests continuously and early in the development process is recommended to ensure a high quality for your application.
For more information, see Continuous Integration Process.
47
Development Lifecycle and Sandbox EnvironmentsAdvanced Development Lifecycle Scenario
Note: Changes are typically migrated one way only: from the source control system to your production organization. However,
sometimes if you make changes manually in your production organization, you must replicate those changes back to your source
control repository so that they won’t be lost on the next deployment. You can do so by making those changes manually in a
Developer sandbox and by committing the changes to source control.
Full Application Lifecycle Diagram for Feature Releases
The following diagram incorporates all the stages in the application development lifecycle for feature releases.
48
Development Lifecycle and Sandbox EnvironmentsAdvanced Development Lifecycle Scenario
Patch Releases
Sometimes it’s necessary to push a new version of the application as a patch after it has been released. The reason for the change might
be an important bug fix that needs to go out quickly or a more involved enhancement. For an urgent bug fix (a hotfix), the change can
be applied quickly to production by using a short release cycle. For a larger change, more thorough testing is required and the short
cycle is not appropriate. Instead, we recommend that you use the same release process as for a major release for major changes.
49
Patch ReleasesAdvanced Development Lifecycle Scenario
After a major release, the development team has likely moved on to a new version of customizations. To prevent interference with new
features and mix bug fixes or feature enhancements with features that can’t be released, you must isolate the released version of
customizations from the new version that the development team is working on. Therefore, use a separate source control branch for new
feature work.
Patch Release Lifecycle
For small changes that need to be released quickly, or hotfixes, we recommend a development lifecycle that provides a quick path to
production. Use the following sandboxes:
• A Developer sandbox that’s configured with the latest work from production. This sandbox is used by the developer who is on
production support duty.
• A test environment that consists of a Developer or Partial Copy sandbox
Use separate source control branches for a patch release and the next feature release.
• One branch for the patch release, which corresponds to the version currently deployed in production (the production version)
• One branch for the new customizations, which will be released at a future time to production. This branch also contains changes
from the patch release branch.
To apply patch releases, a deployment is done from the patch branch to the production organization. Also, patch changes need to be
integrated from the patch branch to the branch for the next feature release to ensure that the changes won’t be lost on the next major
release.
This diagram shows a typical patch environment that contains sandboxes and source control systems. Before you deploy the patch to
production, perform a test deployment to the staging sandbox.
50
Patch ReleasesAdvanced Development Lifecycle Scenario
Development Lifecycle Scenario: AW Computing
Let’slookatatypicalprocessfordevelopmentanddeploymentforourfictitiouscompany,AWComputing.Forthisprocess,AWComputing
is developing and deploying a custom Force.com application.
The following tools are used at AW Computing for development.
• The Force.com IDE for developing apps
• Git as a source control system and a Git repository, such as GitHub or Bitbucket.
• The Force.com Migration Tool for updating sandboxes from source control
Each engineer at AW Computing’s development team has his or her own sandbox.
AW Computing: Source Control Setup
The release manager, Nishi, must first set up the Git repository. The default branch in the repository is the master branch, which
corresponds to the metadata that is in production. For feature development, Nishi must create a separate branch and share it with the
development team. A feature branch isolates the customizations in production from new features that are in development.
After creating the Git repository, Nishi populates the master branch with metadata from production. Here are the steps that Nishi follows:
1. Creates a central Git repository with a default master branch.
The Git repository is remote and has to be cloned by each user once.
2. Prepares a package.xml manifest that specifies all metadata types in the organization by using wildcards. Nishi can obtain this
file from the Force.com IDE or manually (see Tips for Generating package.xml for All Metadata).
3. Retrieves all the metadata from production by using the Force.com Migration Tool and the package.xml manifest.
4. Commits the downloaded metadata files, the package.xml manifest, and the tool’s control files to the master branch and
pushes them to the remote repository. See Configuring the Force.com Migration Tool.
Now that the master branch is set up and has been populated, Nishi creates a branch for new feature work that is based on master
and pushes this branch to the central repository. Let’s refer to this branch as the feature branch. This branch is specific to a set of features
that a team is developing.
The feature branch is now ready to be used by the development team. Each developer in the team must clone the Git repository to get
a local snapshot on their systems. Next, each developer must switch to the feature branch. Because Git repositories are local for each
user, any work done by a developer that gets committed in the local repository must eventually be pushed to the remote repository.
Note: The Git workflow described in this scenario is one approach for a branching model. Git offers a lot of flexibility for working
with branches. You may want to select a branching model that works best for your organization. For more information, see the
Git website.
AW Computing: First Developer Adds First Feature to Source Control
1. Andrew,aseniordeveloper,beginsbycreatinghisDevelopersandbox.Andrew’ssandboxcontainsacopyofproduction’sapplication
and configuration information.
2. Andrew uses the Force.com IDE to connect to his sandbox organization. Andrew chooses to retrieve all the metadata that’s available
in his sandbox organization to the IDE. The IDE creates a package.xml file dynamically for this retrieval.
3. Andrew clones the feature branch to get a local copy.
4. Andrew builds the app by adding new components, Apex code, and a Visualforce page. All these components are saved to the
sandbox organization from the IDE.
51
Development Lifecycle Scenario: AW ComputingAdvanced Development Lifecycle Scenario
5. After Andrew finishes his first feature, he performs unit testing.
6. It’s time to commit his changes to the feature branch in Git, but first Andrew needs to update his IDE with any changes that were
done manually in his sandbox user interface that aren’t in his IDE. To this end, Andrew runs the Refresh from Server command in
the Force.com IDE.
7. Andrew commits his files to the feature branch in his local repository and then to the remote repository by using the git push
command. The files consist of the folders and their contents that were created by the IDE and that correspond to the sandbox’s
metadata.
AW Computing: Second Developer Integrates with Other Changes
Jane is another developer on the team who wants to add features to the app.
1. Jane creates her sandbox based on the production organization.
2. Jane clones the feature branch to get a local copy that includes Andrew’s customizations.
3. To deploy the metadata files that she got in the previous step to her sandbox, Jane uses the Force.com Migration Tool. First, Jane
configures the tool.
4. JanerunstheForce.comMigrationToolwiththe package.xml that’sinGittogetthelatestchangesfromGittoherownsandbox.
Now Jane’s sandbox contains Andrew’s changes.
5. Jane adds her own customizations in the Force.com IDE.
6. To get any changes that Jane made manually in her sandbox user interface, she runs the Refresh from Server command in the
Force.com IDE.
7. Jane finishes her work and tests her changes.
8. Jane commits her changes locally.
9. Before updating the Git repository, Jane executes a git fetch and git merge command to include any changes that might
have been uploaded to the repository by Andrew or another developer since she created her local project. She addresses any
conflicts.
10. Jane executes a git push command to push her changes to the Git repository.
AW Computing: Quality Engineer Tests the Application
Robert, a quality engineer on the team, wants to test Andrew’s and Jane’s changes. He follows the same process as Jane did to create
his sandbox and get the changes from Git. Next, Robert adds more Apex test methods, runs those tests, and performs additional ad hoc
testing, as required. Robert adds his tests to the Git feature branch.
AW Computing: Engineers Synchronize Changes during Simultaneous
Application Development
When other engineers on the team need to work on the same application or test the application, they need to follow the same process
as Jane did to deploy changes from Git to their sandboxes and then commit the new changes back to Git.
This diagram shows the sandboxes owned by the team members and how changes are synchronized to the source control repository.
In this diagram, Dev Sandbox stands for Developer sandbox.
52
Development Lifecycle Scenario: AW ComputingAdvanced Development Lifecycle Scenario
AW Computing: Integration and Shared Testing
Now that the customizations have been completed and fully tested, the team wants to perform more thorough testing to ensure that
data in the organization from external systems will work with these customizations. To this end, Robert creates a Partial Copy sandbox
and deploys the latest customizations to it by starting a deployment from the Git repository. Robert uses a sandbox template for the
Partial Copy sandbox. The template enables the selection of the data to copy and allows controlling the size and content of the sandbox.
Robert follows this process:
1. Create a Partial Copy sandbox and then populate it by using a sandbox template.
2. Deploy the latest customizations to this sandbox from Git by using the Force.com Migration Tool and the package.xml file from
Git.
3. Create user accounts on this sandbox for all users who will perform integration testing.
4. If bugs are found, we recommend that the fixes be done on the Developer sandboxes by using the Force.com IDE and then be
committed into Git.
Also, Robert creates the shared QA sandbox that’s used for testing by other employees outside the test team. The shared QA sandbox
is a Developer sandbox, so it doesn’t contain data or support data templates. Robert creates multiple user accounts for all users who will
access this sandbox.
AW Computing: User Acceptance Testing and Training
Now that integration and shared testing is done, the app can be shared with other employees.
1. The release manager, Nishi, sets up a Partial Copy sandbox for user acceptance testing and deploys the customizations to it from
Git.
This process is similar to setting up the integration sandbox. The customizations contain the latest bug fixes that the team made as
a result of additional testing.
2. Other teams at the company want to verify the new changes or check out the new features. For example:
53
Development Lifecycle Scenario: AW ComputingAdvanced Development Lifecycle Scenario
The product manager might want to perform some ad hoc testing to ensure that features are implemented and to prepare a
demo.
•
• The trainer can use the new app to prepare formal training materials before the app is rolled out in production.
If issues are discovered in the user acceptance testing sandbox, the fixes are implemented in the Developer sandboxes and committed
into Git.
AW Computing: Staging Environment and Final Release to Production
Nowthatheapphasbeentestedandreviewed,theappisreadyforproductionrelease.Beforereleasingtheapprovedapptoproduction,
a test deployment should be performed as well as final regression, performance, and stress testing. To this end, an intermediate sandbox
environment is set up for staging. This sandbox is similar to the production organization—it has all the configurations and data that
production contains.
1. The release manager, Nishi, creates a Full sandbox for staging.
2. Nishi simulates the deployment by deploying the app to the staging sandbox environment and by running all Apex tests.
3. The QA team performs stress and performance testing, and final regression testing.
Note: Because the hardware for the sandbox in the Force.com platform differs from the production organization hardware,
the results of performance testing on the sandbox might not match those in production. Nonetheless, performance testing
on the staging sandbox can still help catch performance issues (even if not entirely identical to production) and errors that
arise from Apex governor limits.
Note:
• For Force.com Migration Tool version 34.0 and later, run local tests in the staging sandbox by adding the
testLevel="RunLocalTests" parametertoyourdeploytarget.Thisparameterensuresthatthetestsruninsandbox
are the same as the tests that are run by default in production, if required.
• ForForce.comMigrationToolversion33.0andearlier,youcanrunallteststhroughtheForce.comMigrationToolinthestaging
sandbox,includingteststhatoriginatefrominstalledmanagedpackages,bysettingthe runAllTests parameterto true.
Managedpackagetestscan’tbeexcludedwhenusingthe runAllTests parameter.Incontrast,teststhatrunautomatically
in production are only local tests (with no namespace) that don’t originate from installed packages. See Tips for Configuring
the Force.com Migration Tool to Run Tests.
After the release manager finishes the deployment and obtains successful results on the staging sandbox, she schedules a release to
production and performs the final deployment to the production organization at the scheduled time.
AW Computing: Fixing Bugs in Patch Environments
1. After the app is deployed to production, Andrew refreshes a Developer sandbox to get the latest changes from production.
2. Andrew makes the fix in his Developer sandbox and uploads his change to the patch branch in Git.
3. The release manager, Nishi, performs a validation deployment from Git to the staging sandbox by using the Force.com Migration
Tool.
4. Nishi performs the hotfix deployment from Git to production.
Note: All changes that are made to the patch branch must periodically be merged into the master branch so that the changes
will be incorporated in the next feature release.
54
Development Lifecycle Scenario: AW ComputingAdvanced Development Lifecycle Scenario
Continuous Integration Process
For a robust quality assurance process, use a continuous integration system, such as Jenkins, to run test deployments for each addition
ofcustomizationstothesourcecontrolrepository.Youcanperformthesedeploymentsinadedicatedsandboxforcontinuousintegrations.
Apex tests are executed as part of each deployment. Configure the Force.com Migration Tool to enable tests. See Tips for Configuring
the Force.com Migration Tool to Run Tests.
You can use a continuous integration system to automate deployments. For example, you can use Jenkins to automate deployments
to the user acceptance testing (UAT) sandbox.
The following diagram shows the relationship between the continuous integration server, sandbox, and source control.
Handling Metadata That’s Not Supported in the API
Some metadata components aren’t supported by the Metadata API and therefore don’t get migrated by tools such as the Force.com
Migration Tool. For example, mail merge templates or the fiscal year aren’t supported. For a full list of metadata that’s not supported,
see Unsupported Metadata Types in the Force.comMetadataAPIDeveloper’sGuide. This metadata must be created every time a sandbox
is updated with new metadata from source control. You can create this metadata in the Salesforce user interface either manually or in
an automated way. If you create the metadata components manually, we recommend you document these metadata changes and
keep a checklist of these changes to validate migrations. To automate the creation of this metadata, you can use a browser user interface
automation tool, such as Selenium. For more information about Selenium, see Selenium Browser Automation.
55
Continuous Integration ProcessAdvanced Development Lifecycle Scenario
Configuring the Force.com Migration Tool
Here are tips for common configuration tasks for the Force.com Migration Tool.
Tips for Configuring the Force.com Migration Tool for Git
To integrate the Force.com Migration Tool with a source control system, such as Git, the tool must be configured differently than when
you run it on the command line and usse the local file system for storage. By integrating the Force.com Migration Tool with Git, you can
have the tool store its output and take its input from the repository. Here are some best practices for configuring this tool for Git.
• In Git, create the source (src) folder inside the project folder that contains package.xml.
• Copy build.properties and build.xml from the tool’s sample directory to the Git project source (src) folder.
• Don’t use package names for metadata retrievals or deployments. Instead, use unpackaged retrievals and deployments.
Tips for Using a Remote Git Repository
For a remote Git repository, you can integrate the Force.com Migration Tool with the Git repository to access files in a Git branch. Add
this snippet to build.xml.
<macrodef name="git">
<attribute name="dir" default="" />
<attribute name="branch" default="master" />
<sequential>
<exec executable="git" dir="@{dir}">
<arg value="pull" />
<arg value="origin" />
<arg value="@{branch}" />
</exec>
</sequential>
</macrodef>
<target name="checkoutFromGit">
<echo>Issuing git pull from directory: ${git.dir}</echo>
<echo>Pulling from branch: ${git.branch}</echo>
<git dir="${git.dir}" branch="${git.branch}" />
</target>
Tips for Configuring the Force.com Migration Tool to Run Tests
When you deploy to a staging sandbox, we recommend running Apex tests. By default, tests aren’t required and don’t run in sandboxes.
However, you can enable test runs in the Force.com Migration Tool by adding the testLevel="RunLocalTests" parameter
to your deployment target (<sf:deploy> tag) in the build.xml file. This deployment option runs local tests and excludes tests
that originate from installed managed packages. This test execution corresponds to the tests run in production, when required. The
followingexampleshowshowtestrunsareenabledinadeploymenttargetthroughthe testLevel="RunLocalTests" attribute,
which is in bold.
<sf:deploy username="${sf.username}" password="${sf.password}" testLevel="RunLocalTests"
… />
56
Configuring the Force.com Migration ToolAdvanced Development Lifecycle Scenario
Note: If you’re using a previous version of the Force.com Migration Tool (version 33.0 or earlier), the
testLevel="RunLocalTests" parameter isn’t availabe. Instead, add the runAllTests="true" parameter. This
parameter causes tests from installed managed packages to be run—not only local tests. If the tests in these managed packages
don’t pass, set runAllTests to false and then run tests after deployment in the production organization by using the
Apex Test Execution console, which you can access from Setup, by clicking Develop > Apex Test Execution.
Tips for Generating package.xml for All Metadata
To migrate all metadata components with the Force.com Migration Tool, you must use a package.xml manifest file that references
all the metadata components in your organization. The following steps show how to create this file manually.
1. Using the Force.com Migration Tool, run this command: ant describeMetadata.
The output of this command lists all metadata components along with child objects. You only need to include the parent objects
(XMLName fields), because child objects are included with their parents when retrieving or deploying metadata with the Force.com
Migration Tool.
2. Filter the returned list by excluding the types with the InFolder: true attribute (Dashboard, Document, EmailTemplate, and
Report).
3. From the filtered list, copy the value of each XMLName fields into a <name> tag that’s nested in <types> in package.xml,
and then associate a <members> tag with a * value. For example, for CustomLabels, the tag pair is:
<types>
<members>*</members>
<name>CustomLabels</name>
</types>
This example shows a portion of package.xml. The contents of package.xml depend on the metadata available in your
organization.
<?xml version="1.0" encoding="UTF-8"?>
<Package xmlns="http://soap.sforce.com/2006/04/metadata">
<fullName>SampleManifest</fullName>
<types>
<members>*</members>
<name>AnalyticSnapshot</name>
</types>
<types>
<members>*</members>
<name>AuthProvider</name>
</types>
<types>
<members>*</members>
<name>CustomLabels</name>
</types>
<types>
<members>*</members>
<name>CustomObject</name>
</types>
. . .
<version>31.0</version>
</Package>
57
Configuring the Force.com Migration ToolAdvanced Development Lifecycle Scenario
Production Release Considerations
When deploying customizations to the production organization:
• Ensure that planned Salesforce releases don’t impact your release. Schedule your release around Salesforce upgrades.
• Ensure that tests run as part of a release.
• Plan for the Salesforce Sandbox Preview. We recommend that you designate a few of your sandboxes to participate in our release
preview. One month before every major release, Salesforce upgrades a set of its sandbox instances. All the sandbox organizations
that reside on these instances will have access to the upcoming Salesforce release. Use these sandboxes for regression testing or
trying out new functionality.
Refreshing a Sandbox Environment
We recommend that you refresh your sandboxes periodically to ensure that they have current configuration information and data. The
staging and user acceptance testing (UAT) sandboxes can be refreshed at any time from the central source control repository. Because
all the latest changes are stored and can be retrieved from the source control repository, there is no need to wait until the deployment
to production finishes and succeeds. The sandbox refresh from source control can be automated by using a continuous integration
process. See Continuous Integration Process.
Sandbox Refresh Recommendations
To refresh your sandbox, follow these recommendations.
• Refresh your staging sandbox environment after each feature deployment period or every month, whichever is longer.
• Refresh your UAT sandbox environment periodically to ensure that the partial data copy has current data.
• Refresh your Developer sandboxes as needed. For instance, developers can refresh their sandboxes to have a clean copy of the
organization’s configurations and metadata that they can use as a baseline and add customizations to.
58
Production Release ConsiderationsAdvanced Development Lifecycle Scenario
GLOSSARY
A | B | C | D | E | F | G | H | I | J | K | L | M | N | O | P | Q | R | S | T | U | V | W | X | Y | Z
A
Administrator (System Administrator)
One or more individuals in your organization who can configure and customize the application. Users assigned to the System
Administrator profile have administrator privileges.
Apex
Apex is a strongly typed, object-oriented programming language that allows developers to execute flow and transaction control
statements on the Force.com platform server in conjunction with calls to the Force.com API. Using syntax that looks like Java and
acts like database stored procedures, Apex enables developers to add business logic to most system events, including button clicks,
related record updates, and Visualforce pages. Apex code can be initiated by Web service requests and from triggers on objects.
App
Short for “application.” A collection of components such as tabs, reports, dashboards, and Visualforce pages that address a specific
business need. Salesforce provides standard apps such as Sales and Call Center. You can customize the standard apps to match the
way you work. In addition, you can package an app and upload it to the AppExchange along with related components such as
customfields,customtabs,andcustomobjects.Then,youcanmaketheappavailabletootherSalesforceusersfromtheAppExchange.
App Menu
See Force.com App Menu.
AppExchange
The AppExchange is a sharing interface from Salesforce that allows you to browse and share apps and services for the Force.com
platform.
AppExchange Upgrades
Upgrading an app is the process of installing a newer version.
Application Programming Interface (API)
The interface that a computer system, library, or application provides to allow other computer programs to request services from it
and exchange data.
Approval Process
An approval process is an automated process your organization can use to approve records in Salesforce. An approval process
specifies the steps necessary for a record to be approved and who must approve it at each step. A step can apply to all records
includedintheprocess,orjustrecordsthatmeetcertainadministrator-definedcriteria.Anapprovalprocessalsospecifiestheactions
to take when a record is approved, rejected, recalled, or first submitted for approval.
B
No Glossary items for this entry.
59
C
Child Relationship
A relationship that has been defined on an sObject that references another sObject as the “one” side of a one-to-many relationship.
For example, contacts, opportunities, and tasks have child relationships with accounts.
See also sObject.
Class, Apex
A template or blueprint from which Apex objects are created. Classes consist of other classes, user-defined methods, variables,
exception types, and static initialization code. In most cases, Apex classes are modeled on their counterparts in Java.
Client App
An app that runs outside the Salesforce user interface and uses only the Force.com API or Bulk API. It typically runs on a desktop or
mobile device. These apps treat the platform as a data source, using the development model of whatever tool and platform for
which they are designed.
Cloud Computing
A model for software development and distribution based on the Internet. The technology infrastructure for a service, including
data, is hosted on the Internet. This allows consumers to develop and use services with browsers or other thin clients instead of
investing in hardware, software, or maintenance.
Component, Visualforce
Something that can be added to a Visualforce page with a set of tags, for example, <apex:detail>. Visualforce includes a
number of standard components, or you can create your own custom components.
Component Reference, Visualforce
A description of the standard and custom Visualforce components that are available in your organization. You can access the
component library from the development footer of any Visualforce page or the Visualforce Developer's Guide.
Composite App
An app that combines native platform functionality with one or more external Web services, such as Yahoo! Maps. Composite apps
allow for more flexibility and integration with other services, but may require running and managing external code. See also Client
App and Native App.
Controller, Visualforce
AnApexclassthatprovidesaVisualforcepagewiththedataandbusinesslogicitneedstorun.Visualforcepagescanusethestandard
controllers that come by default with every standard or custom object, or they can use custom controllers.
Custom App
See App.
Custom Field
A field that can be added in addition to the standard fields to customize Salesforce for your organization’s needs.
Custom Links
Custom links are URLs defined by administrators to integrate your Salesforce data with external websites and back-office systems.
Formerly known as Web links.
Custom Object
Custom records that allow you to store information unique to your organization.
Custom Report Type
See Report Type.
60
Glossary
Custom S-Control
Note: S-controls have been superseded by Visualforce pages. After March 2010 organizations that have never created
s-controls, as well as new organizations, won't be allowed to create them. Existing s-controls will remain unaffected, and can
still be edited.
Custom Web content for use in custom links. Custom s-controls can contain any type of content that you can display in a browser,
for example a Java applet, an Active-X control, an Excel file, or a custom HTML Web form.
Custom View
A display feature that lets you see a specific set of records for a particular object.
D
Dashboard
A dashboard shows data from source reports as visual components, which can be charts, gauges, tables, metrics, or Visualforce pages.
The components provide a snapshot of key metrics and performance indicators for your organization. Each dashboard can have up
to 20 components.
Database
An organized collection of information. The underlying architecture of the Force.com platform includes a database where your data
is stored.
Database Table
A list of information, presented with rows and columns, about the person, thing, or concept you want to track. See also Object.
Data Loader
A Force.com platform tool used to import and export data from your Salesforce organization.
Data Manipulation Language (DML)
An Apex method or operation that inserts, updates, or deletes records.
Dependent Field
Any custom picklist or multi-select picklist field that displays available values based on the value selected in its corresponding
controlling field.
Developer Edition
Afree,fully-functionalSalesforceorganizationdesignedfordeveloperstoextend,integrate,anddevelopwiththeForce.complatform.
Developer Edition accounts are available on developer.salesforce.com.
Salesforce Developers
The Salesforce Developers website at developer.salesforce.com provides a full range of resources for platform developers, including
sample code, toolkits, an online developer community, and the ability to obtain limited Force.com platform environments.
E
Email Alert
Email alerts are workflow and approval actions that are generated using an email template by a workflow rule or approval process
and sent to designated recipients, either Salesforce users or others.
Email Template
A form email that communicates a standard message, such as a welcome letter to new employees or an acknowledgement that a
customer service request has been received. Email templates can be personalized with merge fields, and can be written in text,
HTML, or custom format.
61
Glossary
Enterprise Edition
A Salesforce edition designed for larger, more complex businesses.
Enterprise WSDL
A strongly-typed WSDL for customers who want to build an integration with their Salesforce organization only, or for partners who
are using tools like Tibco or webMethods to build integrations that require strong typecasting. The downside of the Enterprise WSDL
is that it only works with the schema of a single Salesforce organization because it is bound to all of the unique objects and fields
that exist in that organization's data model.
F
Field
A part of an object that holds a specific piece of information, such as a text or currency value.
Field Dependency
A filter that allows you to change the contents of a picklist based on the value of another field.
Field-Level Security
Settings that determine whether fields are hidden, visible, read only, or editable for users. Available in Enterprise, Unlimited,
Performance, and Developer Editions only.
Folder
A folder is a place where you can store reports, dashboards, documents, or email templates. Folders can be public, hidden, or shared,
and can be set to read-only or read/write. You control who has access to its contents based on roles, permissions, public groups,
and license types. You can make a folder available to your entire organization, or make it private so that only the owner has access.
Force.com
The Salesforce platform for building applications in the cloud. Force.com combines a powerful user interface, operating system, and
database to allow you to customize and deploy applications in the cloud for your entire enterprise.
Force.com App Menu
A menu that enables users to switch between customizable applications (or “apps”) with a single click. The Force.com app menu
displays at the top of every page in the user interface.
Force.com IDE
An Eclipse plug-in that allows developers to manage, author, debug and deploy Force.com applications in the Eclipse development
environment.
Force.com Migration Tool
A toolkit that allows you to write an Apache Ant build script for migrating Force.com components between a local file system and
a Salesforce organization.
Web Services API
A Web services application programming interface that provides access to your Salesforce organization's information. See also SOAP
API and Bulk API.
Foreign Key
A field whose value is the same as the primary key of another table. You can think of a foreign key as a copy of a primary key from
another table. A relationship is made between two tables by matching the values of the foreign key in one table with the values of
the primary key in another.
62
Glossary
G
Governor Limits
Apex execution limits that prevent developers who write inefficient code from monopolizing the resources of other Salesforce users.
Group
A groups is a set of users. Groups can contain individual users, other groups, or the users in a role. Groups can be used to help define
sharing access to data or to specify which data to synchronize when using Connect for Outlook or Connect for Lotus Notes.
Users can define their own personal groups. Administrators can create public groups for use by everyone in the organization.
Group Edition
A product designed for small businesses and workgroups with a limited number of users.
H
No Glossary items for this entry.
I
Import Wizard
A tool for importing data into your Salesforce organization, accessible from Setup.
Instance
Theclusterofsoftwareandhardwarerepresentedasasinglelogicalserverthathostsanorganization'sdataandrunstheirapplications.
The Force.com platform runs on multiple instances, but data for any single organization is always stored on a single instance.
Integration User
A Salesforce user defined solely for client apps or integrations. Also referred to as the logged-in user in a SOAP API context.
J
Junction Object
Acustomobjectwithtwomaster-detailrelationships.Usingacustomjunctionobject,youcanmodela“many-to-many”relationship
between two objects. For example, you may have a custom object called “Bug” that relates to the standard case object such that a
bug could be related to multiple cases and a case could also be related to multiple bugs.
K
No Glossary items for this entry.
L
Layout
See Page Layout.
63
Glossary
Letterhead
Determines the basic attributes of an HTML email template. Users can create a letterhead that includes attributes like background
color, logo, font size, and font color.
M
Managed Package
A collection of application components that is posted as a unit on the AppExchange and associated with a namespace and possibly
a License Management Organization. To support upgrades, a package must be managed. An organization can create a single
managedpackagethatcanbedownloadedandinstalledbymanydifferentorganizations.Managedpackagesdifferfromunmanaged
packages by having some locked components, allowing the managed package to be upgraded later. Unmanaged packages do not
include locked components and cannot be upgraded. In addition, managed packages obfuscate certain components (like Apex) on
subscribing organizations to protect the intellectual property of the developer.
Many-to-Many Relationship
A relationship where each side of the relationship can have many children on the other side. Many-to-many relationships are
implemented through the use of junction objects.
Master-Detail Relationship
A relationship between two different types of records that associates the records with each other. For example, accounts have a
master-detail relationship with opportunities. This type of relationship affects record deletion, security, and makes the lookup
relationship field required on the page layout.
Metadata
Informationaboutthestructure,appearance,andfunctionalityofanorganizationandanyofitsparts.Force.comusesXMLtodescribe
metadata.
Metadata-Driven Development
An app development model that allows apps to be defined as declarative “blueprints,” with no code required. Apps built on the
platform—their data models, objects, forms, workflows, and more—are defined by metadata.
Metadata WSDL
A WSDL for users who want to use the Force.com Metadata API calls.
Multitenancy
An application model where all users and apps share a single, common infrastructure and code base.
MVC (Model-View-Controller)
A design paradigm that deconstructs applications into components that represent data (the model), ways of displaying that data
in a user interface (the view), and ways of manipulating that data with business logic (the controller).
N
Native App
An app that is built exclusively with setup (metadata) configuration on Force.com. Native apps do not require any external services
or infrastructure.
64
Glossary
O
Object
AnobjectallowsyoutostoreinformationinyourSalesforceorganization.Theobjectistheoveralldefinitionofthetypeofinformation
you are storing. For example, the case object allow you to store information regarding customer inquiries. For each object, your
organization will have multiple records that store the information about specific instances of that type of data. For example, you
mighthaveacaserecordtostoretheinformationaboutJoeSmith'straininginquiryandanothercaserecordtostoretheinformation
about Mary Johnson's configuration issue.
One-to-Many Relationship
A relationship in which a single object is related to many other objects. For example, an account may have one or more related
contacts.
Organization
AdeploymentofSalesforcewithadefinedsetoflicensedusers.Anorganizationisthevirtualspaceprovidedtoanindividualcustomer
of Salesforce. Your organization includes all of your data and applications, and is separate from all other organizations.
Organization-Wide Defaults
Settings that allow you to specify the baseline level of data access that a user has in your organization. For example, you can set
organization-wide defaults so that any user can see any record of a particular object that is enabled via their object permissions, but
they need extra permissions to edit one.
Outbound Message
An outbound message is a workflow, approval, or milestone action that sends the information you specify to an endpoint you
designate, such as an external service. Outbound messaging is configured in the Salesforce setup menu. Then you must configure
the external endpoint. You can create a listener for the messages using the SOAP API.
Owner
Individual user to which a record (for example, a contact or case) is assigned.
P
Package
A group of Force.com components and applications that are made available to other organizations through the AppExchange. You
use packages to bundle an app along with any related components so that you can upload them to AppExchange together.
Page Layout
Page layout is the organization of fields, custom links, and related lists on a record detail or edit page. Use page layouts primarily for
organizing pages for your users. In Enterprise, Unlimited, Performance, and Developer Editions, use field-level security to restrict
users’ access to specific fields.
Personal Edition
Product designed for individual sales representatives and single users.
Picklist
Selection list of options available for specific fields in a Salesforce object, for example, the Industry field for accounts. Users can
choose a single value from a list of options rather than make an entry directly in the field. See also Master Picklist.
Picklist (Multi-Select)
Selection list of options available for specific fields in a Salesforce object. Multi-select picklists allow users to choose one or more
values. Users can choose a value by double clicking on it, or choose additional values from a scrolling list by holding down the CTRL
key while clicking a value and using the arrow icon to move them to the selected box.
65
Glossary
Picklist Values
Selections displayed in drop-down lists for particular fields. Some values come predefined, and other values can be changed or
defined by an administrator.
Platform Edition
A Salesforce edition based on Enterprise, Unlimited, or Performance Edition that does not include any of the standard Salesforce
apps, such as Sales or Service & Support.
Primary Key
A relational database concept. Each table in a relational database has a field in which the data value uniquely identifies the record.
This field is called the primary key. The relationship is made between two tables by matching the values of the foreign key in one
table with the values of the primary key in another.
Production Organization
A Salesforce organization that has live users accessing data.
Professional Edition
A Salesforce edition designed for businesses who need full-featured CRM functionality.
Profile
Defines a user’s permission to perform different functions within Salesforce. For example, the Solution Manager profile gives a user
access to create, edit, and delete solutions.
Q
No Glossary items for this entry.
R
Read Only
One of the standard profiles to which a user can be assigned. Read Only users can view and report on information based on their
role in the organization. (That is, if the Read Only user is the CEO, they can view all data in the system. If the Read Only user has the
role of Western Rep, they can view all data for their role and any role below them in the hierarchy.)
Record
A single instance of a Salesforce object. For example, “John Jones” might be the name of a contact record.
Record Type
A record type is a field available for certain records that can include some or all of the standard and custom picklist values for that
record. You can associate record types with profiles to make only the included picklist values available to users with that profile.
Record-Level Security
A method of controlling data in which you can allow a particular user to view and edit an object, but then restrict the records that
the user is allowed to see.
Relationship
A connection between two objects, used to create related lists in page layouts and detail levels in reports. Matching values in a
specified field in both objects are used to link related data; for example, if one object stores data about companies and another
object stores data about people, a relationship allows you to find out which people work at the company.
Report
A report returns a set of records that meets certain criteria, and displays it in organized rows and columns. Report data can be filtered,
grouped, and displayed graphically as a chart. Reports are stored in folders, which control who has access. See Tabular Report,
Summary Report, and Matrix Report.
66
Glossary
Report Type
A report type defines the set of records and fields available to a report based on the relationships between a primary object and its
related objects. Reports display only records that meet the criteria defined in the report type. Salesforce provides a set of pre-defined
standard report types; administrators can create custom report types as well.
Running User
Each dashboard has a running user, whose security settings determine which data to display in a dashboard. If the running user is a
specific user, all dashboard viewers see data based on the security settings of that user—regardless of their own personal security
settings. For dynamic dashboards, you can set the running user to be the logged-in user, so that each user sees the dashboard
according to his or her own access level.
S
SaaS
See Software as a Service (SaaS).
S-Control
Note: S-controls have been superseded by Visualforce pages. After March 2010 organizations that have never created
s-controls, as well as new organizations, won't be allowed to create them. Existing s-controls will remain unaffected, and can
still be edited.
Custom Web content for use in custom links. Custom s-controls can contain any type of content that you can display in a browser,
for example a Java applet, an Active-X control, an Excel file, or a custom HTML Web form.
IdeaExchange
A forum where Salesforce customers can suggest new product concepts, promote favorite enhancements, interact with product
managers and other customers, and preview what Salesforce is planning to deliver in future releases. Visit IdeaExchange at
ideas.salesforce.com.
Salesforce SOA (Service-Oriented Architecture)
A powerful capability of Force.com that allows you to make calls to external Web services from within Apex.
Sandbox
A nearly identical copy of a Salesforce production organization for development, testing, and training. The content and size of a
sandbox varies depending on the type of sandbox and the editioin of the production organization associated with the sandbox.
Session ID
An authentication token that is returned when a user successfully logs in to Salesforce. The Session ID prevents a user from having
to log in again every time he or she wants to perform another action in Salesforce. Different from a record ID or Salesforce ID, which
are terms for the unique ID of a Salesforce record.
Session Timeout
The period of time after login before a user is automatically logged out. Sessions expire automatically after a predetermined length
ofinactivity,whichcanbeconfiguredinSalesforcefromSetupbyclickingSecurityControls.Thedefaultis120minutes(twohours).
The inactivity timer is reset to zero if a user takes an action in the Web interface or makes an API call.
Setup
AmenuwhereadministratorscancustomizeanddefineorganizationsettingsandForce.comapps.Dependingonyourorganization’s
user interface settings, Setup may be a link in the user interface header or in the drop-down list under your name.
Sharing
Allowing other users to view or edit information you own. There are different ways to share data:
• Sharing Model—defines the default organization-wide access levels that users have to each other’s information and whether
to use the hierarchies when determining access to data.
67
Glossary
• Role Hierarchy—defines different levels of users such that users at higher levels can view and edit information owned by or
shared with users beneath them in the role hierarchy, regardless of the organization-wide sharing model settings.
• SharingRules—allowanadministratortospecifythatallinformationcreatedbyuserswithinagivengrouporroleisautomatically
shared to the members of another group or role.
• Manual Sharing—allows individual users to share records with other users or groups.
• Apex-Managed Sharing—enables developers to programmatically manipulate sharing to support their application’s behavior.
See Apex-Managed Sharing.
Sharing Model
Behavior defined by your administrator that determines default access by users to different types of records.
Sites
Force.com Sites enables you to create public websites and applications that are directly integrated with your Salesforce
organization—without requiring users to log in with a username and password.
SOAP (Simple Object Access Protocol)
A protocol that defines a uniform way of passing XML-encoded data.
Software as a Service (SaaS)
A delivery model where a software application is hosted as a service and provided to customers via the Internet. The SaaS vendor
takes responsibility for the daily maintenance, operation, and support of the application and each customer's data. The service
alleviates the need for customers to install, configure, and maintain applications with their own hardware, software, and related IT
resources. Services can be delivered using the SaaS model to any market segment.
SOQL (Salesforce Object Query Language)
A query language that allows you to construct simple but powerful query strings and to specify the criteria that should be used to
select data from the Force.com database.
SOSL (Salesforce Object Search Language)
A query language that allows you to perform text-based searches using the Force.com API.
Standard Object
A built-in object included with the Force.com platform. You can also build custom objects to store information that is unique to
your app.
System Log
Part of the Developer Console, a separate window console that can be used for debugging code snippets. Enter the code you want
to test at the bottom of the window and click Execute. The body of the System Log displays system resource information, such as
how long a line took to execute or how many database calls were made. If the code did not run to completion, the console also
displays debugging information.
T
Test Method
An Apex class method that verifies whether a particular piece of code is working properly. Test methods take no arguments, commit
no data to the database, and can be executed by the runTests() system method either through the command line or in an
Apex IDE, such as the Force.com IDE.
Translation Workbench
The Translation Workbench lets you specify languages you want to translate, assign translators to languages, create translations for
customizationsyou’vemadetoyourSalesforceorganization,andoverridelabelsandtranslationsfrommanagedpackages.Everything
from custom picklist values to custom fields can be translated so your global users can use all of Salesforce in their language.
68
Glossary
Trigger
A piece of Apex that executes before or after records of a particular type are inserted, updated, or deleted from the database. Every
trigger runs with a set of context variables that provide access to the records that caused the trigger to fire, and all triggers run in
bulk mode—that is, they process several records at once, rather than just one record at a time.
U
Unit Test
A unit is the smallest testable part of an application, usually a method. A unit test operates on that piece of code to make sure it
works correctly. See also Test Method.
Unlimited Edition
Unlimited Edition is Salesforce’s solution for maximizing your success and extending that success across the entire enterprise through
the Force.com platform.
Unmanaged Package
A package that cannot be upgraded or controlled by its developer.
URL (Uniform Resource Locator)
The global address of a website, document, or other resource on the Internet. For example, http://www.salesforce.com.
V
Validation Rule
A rule that prevents a record from being saved if it does not meet the standards that are specified.
Visualforce
A simple, tag-based markup language that allows developers to easily define custom pages and components for apps built on the
platform. Each tag corresponds to a coarse or fine-grained component, such as a section of a page, a related list, or a field. The
components can either be controlled by the same logic that is used in standard Salesforce pages, or developers can associate their
own logic with a controller written in Apex.
W
Web Service
A mechanism by which two applications can easily exchange data over the Internet, even if they run on different platforms, are
written in different languages, or are geographically remote from each other.
WebService Method
An Apex class method or variable that can be used by external systems, like a mash-up with a third-party application. Web service
methods must be defined in a global class.
Wizard
A user interface that leads a user through a complex task in multiple steps.
WSDL (Web Services Description Language) File
An XML file that describes the format of messages you send and receive from a Web service. Your development environment's SOAP
client uses the Salesforce Enterprise WSDL or Partner WSDL to communicate with Salesforce using the SOAP API.
69
Glossary
X
XML (Extensible Markup Language)
A markup language that enables the sharing and transportation of structured data. All Force.com components that are retrieved or
deployed through the Metadata API are represented by XML definitions.
Y
No Glossary items for this entry.
Z
Zip File
A data compression and archive format.
A collection of files retrieved or deployed by the Metadata API. See also Local Project.
70
Glossary
INDEX
A
Accessing sandbox 13
Advanced lifecycle management
configuring the Force.com Migration Tool 56
continuous integration process 55
Deployment tools 43
example scenario: AW Computing 51
patch releases 49
production release considerations 58
refreshing sandbox environments 58
sandbox environments 45
Source control 43
unsupported metadata 55
Ant tool 17
App builder 15
AppExchange 39
Application defects 41
Application lifecycle management
advanced scenario 43
B
Bugs 41
C
Change process 20
Change sets
creating 5
deploying 5
selecting components 5
uploading 5
validating 5
Change tracking
manual 21
migration tool 21
Cloud computing 1
Components
packaged 39
Configuring the Force.com Migration Tool 56
Continuous integration process 55
D
Data Loader 15, 18
Declarative app builder 15
Deleting files 39
Delivery strategy 1–2, 7–8, 26, 29
Dependencies 36
Deploying changes
batch 37
change sets 3–4
manual 30
Metadata API 31
Deployment
batch migration 36, 38
dependencies 36
monitoring 32
time 31
Deployment connection 4
Developer Edition organization 10
Developer sandbox 4
Development
creating a development environment 12
environmental dependencies 12
tools 15–18
tracking changes 20, 22
tracking changes manually 21
tracking changes using migration tool 21
Development environments 3, 7, 10
E
Enterprise applications 26
Environmental dependencies 12
Environments, development
creating 12
F
Force.com Builder 15
Force.com deployment 40–41
Force.com IDE 15–16
Force.com Migration Tool 15, 17
Force.com project 17
H
Hotfix Releases 49
I
IDE 15–16
Inbound change sets 5
L
Loading data 18
71
M
Managing releases 40–41
Metadata API 17
Migrating changes
batch 37
change sets 3
manual 30
Metadata API 31
Migration Tool 15, 17
O
Outbound change sets 5
P
PaaS 1
Packaging components 39
Patch Releases 49
Permissions 13
Platform as a Service 1
Product defects 41
Production
change process 20
deployment 39
Project-based development 17
R
Refreshing a sandbox 13
Release management
advanced scenario 43
Release process 40–41
Renaming files 39
S
SaaS 1
Salesforce upgrades 29
Sandbox
access 13
disabled features 11
managing 14
use cases 10
Sandbox refresh recommendations 58
Scheduling projects 27
Schema Explorer 15
Software as a Service 1
SOQL 15
Source control 20, 22
Synchronization 20, 22–23
T
Test environments 7
Tools 15–18
Tracking changes
manually 21
migration tool 21
U
User licenses 13
User permissions 13
72
Index

Salesforce development lifecycle

  • 1.
    Development Lifecycle Guide EnterpriseDevelopment on the Force.com Platform Version 34.0, Summer ’15 @salesforcedocs Last updated: July 10, 2015
  • 2.
    © Copyright 2000–2015salesforce.com, inc. All rights reserved. Salesforce is a registered trademark of salesforce.com, inc., as are other names and marks. Other marks appearing herein may be trademarks of their respective owners.
  • 3.
    CONTENTS Chapter 1: Introductionto the Force.com Development Lifecycle . . . . . . . . . . . . . . . . . . 1 Developing in a Production Organization . . . . . . . . . . . . . . . . . . . . . . . . . . . . . . . . . . . . . . 1 Developing with Sandbox . . . . . . . . . . . . . . . . . . . . . . . . . . . . . . . . . . . . . . . . . . . . . . . . 2 About Sandbox Organizations . . . . . . . . . . . . . . . . . . . . . . . . . . . . . . . . . . . . . . . . . 3 About Migrating Changes between Organizations . . . . . . . . . . . . . . . . . . . . . . . . . . . . 3 Quick Start: Using a Sandbox and Change Sets . . . . . . . . . . . . . . . . . . . . . . . . . . . . . . . . . 4 Create a Developer Sandbox . . . . . . . . . . . . . . . . . . . . . . . . . . . . . . . . . . . . . . . . . . 4 Authorize a Deployment Connection . . . . . . . . . . . . . . . . . . . . . . . . . . . . . . . . . . . . . 4 Create and Upload an Outbound Change Set . . . . . . . . . . . . . . . . . . . . . . . . . . . . . . . 5 Validate an Inbound Change Set . . . . . . . . . . . . . . . . . . . . . . . . . . . . . . . . . . . . . . . . 5 Deploy an Inbound Change Set . . . . . . . . . . . . . . . . . . . . . . . . . . . . . . . . . . . . . . . . 5 Chapter 2: Development Environments . . . . . . . . . . . . . . . . . . . . . . . . . . . . . . . . . . . . 7 Isolating Development and Testing . . . . . . . . . . . . . . . . . . . . . . . . . . . . . . . . . . . . . . . . . . 7 Developing Multiple Projects with Integration, Testing, and Staging . . . . . . . . . . . . . . . . . . . . 8 About Types of Development Environments . . . . . . . . . . . . . . . . . . . . . . . . . . . . . . . . . . . . 10 Sandbox Uses . . . . . . . . . . . . . . . . . . . . . . . . . . . . . . . . . . . . . . . . . . . . . . . . . . . 10 Sandbox Considerations and Limitations . . . . . . . . . . . . . . . . . . . . . . . . . . . . . . . . . . 11 Creating a Development Sandbox . . . . . . . . . . . . . . . . . . . . . . . . . . . . . . . . . . . . . . . . . . 12 Updating Environmental Dependencies . . . . . . . . . . . . . . . . . . . . . . . . . . . . . . . . . . 12 Creating User Templates . . . . . . . . . . . . . . . . . . . . . . . . . . . . . . . . . . . . . . . . . . . . 13 Managing Sandboxes . . . . . . . . . . . . . . . . . . . . . . . . . . . . . . . . . . . . . . . . . . . . . . 14 Chapter 3: Development Tools . . . . . . . . . . . . . . . . . . . . . . . . . . . . . . . . . . . . . . . . . 15 Force.com App Builder Tools . . . . . . . . . . . . . . . . . . . . . . . . . . . . . . . . . . . . . . . . . . . . . 15 Force.com IDE . . . . . . . . . . . . . . . . . . . . . . . . . . . . . . . . . . . . . . . . . . . . . . . . . . . . . . . 16 About Metadata API . . . . . . . . . . . . . . . . . . . . . . . . . . . . . . . . . . . . . . . . . . . . . . . . . . . 17 Force.com Migration Tool . . . . . . . . . . . . . . . . . . . . . . . . . . . . . . . . . . . . . . . . . . . . . . . . 17 Data Loader . . . . . . . . . . . . . . . . . . . . . . . . . . . . . . . . . . . . . . . . . . . . . . . . . . . . . . . . . 18 Chapter 4: Tracking and Synchronizing Development Changes . . . . . . . . . . . . . . . . . 20 Establishing a Change Process for Production . . . . . . . . . . . . . . . . . . . . . . . . . . . . . . . . . 20 Tracking Changes Manually . . . . . . . . . . . . . . . . . . . . . . . . . . . . . . . . . . . . . . . . . . 21 Tracking Changes Using the Force.com Migration Tool . . . . . . . . . . . . . . . . . . . . . . . . 21 Tracking Changes Using the Force.com IDE . . . . . . . . . . . . . . . . . . . . . . . . . . . . . . . . 22 Synchronizing Changes . . . . . . . . . . . . . . . . . . . . . . . . . . . . . . . . . . . . . . . . . . . . . . . . 22 Synchronizing Multiple Sandboxes . . . . . . . . . . . . . . . . . . . . . . . . . . . . . . . . . . . . . 22 Integrating Changes Across Development Environments . . . . . . . . . . . . . . . . . . . . . . . 23 Chapter 5: Release Management . . . . . . . . . . . . . . . . . . . . . . . . . . . . . . . . . . . . . . . 26
  • 4.
    Developing Enterprise Applications. . . . . . . . . . . . . . . . . . . . . . . . . . . . . . . . . . . . . . . . . 26 Scheduling Concurrent Development Projects . . . . . . . . . . . . . . . . . . . . . . . . . . . . . . . . . . 27 Delivering Applications on a Release Train . . . . . . . . . . . . . . . . . . . . . . . . . . . . . . . . 29 How Salesforce Upgrades May Affect Delivery Schedules . . . . . . . . . . . . . . . . . . . . . . 29 Chapter 6: Migrating Changes Between Environments . . . . . . . . . . . . . . . . . . . . . . . 30 Migrating Changes Manually . . . . . . . . . . . . . . . . . . . . . . . . . . . . . . . . . . . . . . . . . . . . . 30 How Metadata Files are Migrated . . . . . . . . . . . . . . . . . . . . . . . . . . . . . . . . . . . . . . . . . . 31 What Affects Deployment Time? . . . . . . . . . . . . . . . . . . . . . . . . . . . . . . . . . . . . . . . . . . . 31 Monitoring the Status of Your Deployments . . . . . . . . . . . . . . . . . . . . . . . . . . . . . . . . . . . 32 Deployment Dependencies . . . . . . . . . . . . . . . . . . . . . . . . . . . . . . . . . . . . . . . . . . . . . . 36 Migrating Files in Batches . . . . . . . . . . . . . . . . . . . . . . . . . . . . . . . . . . . . . . . . . . . . . . . 36 Determining Which Files to Deploy Together . . . . . . . . . . . . . . . . . . . . . . . . . . . . . . . 36 Deploying Batches of Files Using the Force.com IDE . . . . . . . . . . . . . . . . . . . . . . . . . . 37 How to Migrate Batches of Files Using the Force.com Migration Tool . . . . . . . . . . . . . . . 38 Deleting and Renaming Components . . . . . . . . . . . . . . . . . . . . . . . . . . . . . . . . . . . . . . . 39 Using the AppExchange to Migrate Changes . . . . . . . . . . . . . . . . . . . . . . . . . . . . . . . . . . 39 Deploying to Production . . . . . . . . . . . . . . . . . . . . . . . . . . . . . . . . . . . . . . . . . . . . . . . . 39 Scheduling the Release . . . . . . . . . . . . . . . . . . . . . . . . . . . . . . . . . . . . . . . . . . . . . 40 Using Profiles to Control Maintenance Updates . . . . . . . . . . . . . . . . . . . . . . . . . . . . . 41 Fixing Bugs . . . . . . . . . . . . . . . . . . . . . . . . . . . . . . . . . . . . . . . . . . . . . . . . . . . . . . . . . 41 Chapter 7: Advanced Development Lifecycle Scenario . . . . . . . . . . . . . . . . . . . . . . . . 43 Source Control System and Deployment Tools . . . . . . . . . . . . . . . . . . . . . . . . . . . . . . . . . 43 Development Lifecycle and Sandbox Environments . . . . . . . . . . . . . . . . . . . . . . . . . . . . . . 45 Patch Releases . . . . . . . . . . . . . . . . . . . . . . . . . . . . . . . . . . . . . . . . . . . . . . . . . . . . . . 49 Development Lifecycle Scenario: AW Computing . . . . . . . . . . . . . . . . . . . . . . . . . . . . . . . . 51 Continuous Integration Process . . . . . . . . . . . . . . . . . . . . . . . . . . . . . . . . . . . . . . . . . . . 55 Handling Metadata That’s Not Supported in the API . . . . . . . . . . . . . . . . . . . . . . . . . . . . . . 55 Configuring the Force.com Migration Tool . . . . . . . . . . . . . . . . . . . . . . . . . . . . . . . . . . . . 56 Production Release Considerations . . . . . . . . . . . . . . . . . . . . . . . . . . . . . . . . . . . . . . . . . 58 Refreshing a Sandbox Environment . . . . . . . . . . . . . . . . . . . . . . . . . . . . . . . . . . . . . . . . . 58 Glossary . . . . . . . . . . . . . . . . . . . . . . . . . . . . . . . . . . . . . . . . . . . . . . . . . . . . . . . . . . 59 Index . . . . . . . . . . . . . . . . . . . . . . . . . . . . . . . . . . . . . . . . . . . . . . . . . . . . . . . . . . . . . 71 Contents
  • 5.
    CHAPTER 1 Introductionto the Force.com Development Lifecycle Developing applications on the Force.com platform is easy, straightforward, and highly productive. A developer can define application components,suchascustomobjectsandfields,workflowrules,Visualforcepages,andApexclassesandtriggers,usingthepoint-and-click toolsoftheWebinterface.Simplechangescanbeimplementedanddeployedimmediatelywithoutaffectingotherusersintheproduction organization. More complex features can be left in development status until they have been fully tested, and then deployed to everyone in the production organization. But how do those same development practices work when building a large-scale enterprise application in collaboration with several other developers? When developing complex applications with highly customized logic and user interfaces, configuring on-the-fly in a single environment no longer makes sense. Such applications take time to develop, and require more formal practices to ensure they work as intended and meet users' needs. There’s also a lot of middle ground. Your project might not seem all that large, and perhaps you’re doing the development by yourself along with day-to-day administration tasks. You can still benefit from using a sandbox as a development environment—a place where you can develop customizations and code without affecting end users. More traditional project-based development opens up new possibilities for Force.com development, but also requires new processes for development, migration, and synchronization. Whether you are an architect, administrator, developer, or manager, this guide prepares you to undertake the development and release of applications on the Force.com platform. It starts with the most basic scenario, using a developer sandbox and change sets. Later chapters address other development environments, tools, and processes for more complex enterprise scenarios. Developing in a Production Organization The easiest way to develop new functionality is to customize a production organization using the Salesforce Web user interface. You candevelopnewobjectsandapplicationsusingdeclarativetoolsthatarepowerfulandeasytouse.Inthisscenario,allofthedevelopment occurs on the production organization, so there is no need for separate development or testing environments. While this process is the fastest way to complete a circuit of the development lifecycle, you are limited in what you can accomplish. For example, you can’t write Apex code directly in a production organization. Typical development lifecycle: 1. Plan functional requirements. 2. Develop using Salesforce Web tools, using profiles to hide your changes until they’re ready to deploy. 1
  • 6.
    3. Update profilesto reveal your changes to the appropriate users. 4. Notify end users of changes. Asingleadministratorcaneffectivelydevelopnewdashboards,reports,andemailtemplatesoraddnewcustomfieldstoexistingobjects this way. However, when development is more complex and multiple team members are involved, a more formal application lifecycle scenario is appropriate. Developing with Sandbox For development tasks that are slightly more complex or that must be isolated from the production organization, you can use a separate developmentenvironment,usuallyasandbox.Inthisscenario,allofthedevelopmentandtestingoccursinthedevelopmentenvironment, and then the changes are promoted to the production organization. If you are simultaneously developing projects in production and sandbox organizations, consider tracking setup changes you make in theproductionorganizationandreplicatingtheminthesandbox.Thisisimportantbecauseifyoursandboxhasout-of-datecustomizations, youmightinadvertentlyreplaceyournewerchangesinproductionwiththeseoldercustomizationswhenpromotingthemfromsandbox. Typical development lifecycle: 1. Create a development environment. 2. Develop using Salesforce Web and local tools. 3. Test within the development environment. 4. Replicate production changes in the development environment. 5. Deploy what you’ve developed to your production organization. Typical development projects: • New custom objects, tabs, and applications • Integrations with other systems • Apps involving Apex, Visualforce, workflow, or new validation rules 2 Developing with SandboxIntroduction to the Force.com Development Lifecycle
  • 7.
    About Sandbox Organizations Asandbox is a copy of your production organization. Sandboxes contain the same metadata—which is configuration information such as the types of custom objects and fields, applications, and workflows—as your production organization. That metadata, as well as data in the case of a full sandbox, is copied to a new organization, isolated from your production organization. Operations you perform in your sandbox don’t affect your production organization. Sandboxes are available in Enterprise, Unlimited, and Performance Editions. With Unlimited and Performance Edition, you can create multiple sandbox copies of different types. Use sandboxes for development, testing, training, or other purposes without compromising thedataandapplicationsinyourSalesforceproductionorganization.Eachsandboxinstanceisisolatedfromeveryothersandboxinstance, just as they are from production. About Migrating Changes between Organizations The easiest way to send configuration changes from one organization to another is to use a change set. To send customizations from your current organization to another organization, you create an outbound change set. Once you send the change set, the receiving organization sees it as an inbound change set. Change sets can only contain changes that you can make through the Setup menu, and they don’t support every type of component that can be customized. You also can’t use change sets to rename or delete a component. If you make changes that aren’t supported by a change set, you can migrate them manually by repeating the steps you performed in the other organization. For more information about components available in change sets, see the Salesforce online help. Some components are dependent on other components. For example, the custom fields of a custom object rely on the existence of that custom object. If you try to migrate those custom fields to an organization that doesn’t contain the custom object upon which they’re dependent, the deployment will fail. When you create a change set, it’s easy to view and add the dependencies to ensure all the necessary components are migrated. Sendingachangesetbetweentwoorganizationsrequiresadeploymentconnection.Changesetscanonlybesentbetweenorganizations that are affiliated with a production organization. For example, a production organization and a sandbox, or two sandboxes created from the same organization can send or receive change sets. 3 About Sandbox OrganizationsIntroduction to the Force.com Development Lifecycle
  • 8.
    A deployment connectionalone doesn't enable change sets to be sent between organizations. Each organization must be authorized to send and receive change sets. This added level of security enforces code promotion paths and keeps organizations' setup metadata from being overwritten by mistake. Quick Start: Using a Sandbox and Change Sets Follow these steps to create a developer sandbox and migrate configuration changes you make in it to your production organization using a change set. • Create a Developer Sandbox • Authorize a Deployment Connection • Create and Upload an Outbound Change Set • Validate an Inbound Change Set • Deploy an Inbound Change Set Create a Developer Sandbox Use a developer sandbox to ensure that your changes are isolated from production until you’re ready to deploy them. Sandboxes are only available in Enterprise, Unlimited, and Performance editions. 1. From Setup, click Sandboxes. 2. Click New Sandbox. 3. Enter a name and description for the sandbox. 4. Select Developer for the type of sandbox. 5. Click Start Copy. The process can take a while, depending on the size of your organization. You’ll receive a notification email when your sandbox has completed copying. 6. Click the link in the notification email to access your sandbox. Youcanlogintothesandboxat test.salesforce.com/login.jsp byappending .sandbox_name toyourusername. For example, if your username for your production organization is user1@acme.com, then your username for a sandbox named “test” is user1@acme.com.test. Note: Salesforce automatically changes sandbox usernames but does not change passwords. If you’d like to experiment with change sets before using them for a development project, create a test custom object with a custom field in your developer sandbox now. You can practice deploying these customizations in the next steps, and delete them when you’re finished. Authorize a Deployment Connection Before you can receive change sets from a sandbox or other organization, authorize a deployment connection in the organization that receives the changes. 1. Log into the organization that’ll receive inbound change sets. Usually this is the production organization associated with your sandbox. 2. From Setup, click Deploy > Deployment Connections. 4 Quick Start: Using a Sandbox and Change SetsIntroduction to the Force.com Development Lifecycle
  • 9.
    3. Click Editnext to the organization from which you want to receive outbound change sets. Usually this is your sandbox. 4. Select Allow Inbound Changes and click Save. Create and Upload an Outbound Change Set Typically,youcreateanoutboundchangesetinasandboxorganizationanddeployittoproduction.Butdependingonyourdevelopment lifecycle, you might choose to migrate changes in either direction between related organizations. 1. From Setup, click Deploy > Outbound Change Sets. 2. Click New. 3. Enter a name for your change set and click Save. 4. In the Change Set Components section, click Add. 5. Choose the type of component (for example, Custom Object or Custom Field), the components you want to add, and click Add To Change Set. If you are experimenting with a test custom object and custom field, try adding just one of them to the change set first. 6. Click View/Add Dependencies to see whether the components you’ve added to the change set are dependent on other customizations. In the case of the test custom object and custom field, the related component and page layout will both be listed. 7. Select the dependent components you want to add and click Add To Change Set. 8. Click Upload and choose your target organization. The outbound change set detail page displays a message and you get an email notification when the upload is complete. Now log into the target organization, where you can see the inbound change set. Validate an Inbound Change Set Validating a change set allows you to see the success or failure messages without committing the changes. 1. From Setup, click Deploy > Inbound Change Sets. 2. Click the name of a change set. 3. Click Validate. Note: You can't make any changes to your organization while a test deployment is in progress. 4. After the validation completes, click View Results. If you receive any error messages, resolve them before you deploy. The most common causes of errors are dependent components that aren’t included in the change set and Apex test failures. Deploy an Inbound Change Set Deploying a change set commits the changes it contains to the target organization. 1. From Setup, click Deploy > Inbound Change Sets. 2. In the Change Sets Awaiting Deployment list, click the name of the change set you want to deploy. 3. Click Deploy. 5 Create and Upload an Outbound Change SetIntroduction to the Force.com Development Lifecycle
  • 10.
    A change setis deployed in a single transaction. If the deployment is unable to complete for any reason, the entire transaction is rolled back. After a deployment completes successfully, all changes are committed to your organization and the deployment can’t be rolled back. 6 Deploy an Inbound Change SetIntroduction to the Force.com Development Lifecycle
  • 11.
    CHAPTER 2 DevelopmentEnvironments Developing on the Force.com platform requires a development environment, a place where you can work without affecting other users. In traditional software development, a development environment is little more than a space to call your own, but on the Force.com platform, each development environment is its own fully functional Salesforce organization. In Quick Start: Using a Sandbox and Change Sets on page 4, we used a single development environment, a developer sandbox, to make changes isolated from the production organization. In more complex scenarios, you might have multiple environments for various purposes, such as development, integration, testing, and training. There are also different types of development environments best suited for different uses. When using a single development environment for development and testing, you must stop development to test, and you can only resume development after you deploy. Unless you have a single developer doing all of these tasks, this can be an inefficient use of resources. A more sophisticated development model allows development to continue while testing and deployment take place. In this case you need two isolated environments, one for development and one for testing. Isolating Development and Testing Having separate development and test environments increases the complexity of the development process, and introduces a question: where do changes to existing components take place? For example, imagine you have an application you developed and then migrate those changes to your testing environment. During testing, you find that some changes need to take place to deploy to production. Do you make those changes in the testing environment or go back to your development organization and start the process again? If you onlyhavetwosandboxes,youmightwanttomakethosechangesinyourtestingorganization,becausethisisafasterandeasierprocess, and your development sandbox might have already changed to the point where you can’t start over easily. However, you will still want to replicate any changes made in your test environment back to your development environment, to ensure the next time you promote from development to test that the fix is retained. The arrangement and flow of the application development process is shown in the following image: Typical development lifecycle: 7
  • 12.
    1. Create adevelopment environment. 2. Develop using Salesforce Web and local tools. 3. Create a testing environment. 4. Migrate changes from development environment to testing environment. 5. Test. 6. Replicate production changes in other environments. 7. Deploy what you’ve developed to your production organization. Typical development projects: • New custom objects, tabs, and applications • Integrations with other systems • Apps involving workflow or new validation rules Developing Multiple Projects with Integration, Testing, and Staging If you have multiple developers and more than one project in development that will be released at the same time, you need integration testingtomakesurethattheseparatecodelinescanbemergedwithoutconflict.Inthefuture,youmightwanttoincludeuser-acceptance testing(UAT)todetermineiftheoriginaldesignrequirementsaremet.Amoreelaboratedevelopmentprocesscanalsocontainastaging environment where you ensure that the deployment to production goes exactly as planned. In such a development scenario, you might wonder where to make changes to the code line. If a feature fails any test on the way towards production deployment, do you fix the feature in the organization where it failed, or start the entire process over again? As the complexity of your application development process increases, you will find that fixing things as you go is not a good model. Instead, you will want to make all fixes in a development organization and follow a repeatable process for migrating that change toward production. The following image depicts this process: 8 Developing Multiple Projects with Integration, Testing, and Staging Development Environments
  • 13.
    Typical development lifecycle: 1.Create development environments. 2. Develop using Salesforce Web and local tools. 3. Create testing environments, including UAT and integration. 4. Migrate changes from development environment to integration environment. 5. Test. 6. Migrate changes from integration environment to UAT environment. 7. Perform user-acceptance tests. 8. Migrate changes from UAT environment to staging environment. 9. Replicate production changes in staging environment. 10. Schedule the release. Typical development projects: • Concurrent development of new applications in multiple environments • Projects that require team development 9 Developing Multiple Projects with Integration, Testing, and Staging Development Environments
  • 14.
    About Types ofDevelopment Environments There are two types of development environments: sandbox organizations and Developer Edition organizations. Sandboxes are new organizations copied from your production organization. There are different types of sandboxes suitable for different uses. DescriptionSandbox type Developer sandboxes copy customization (metadata), but don't copy production data, into a separate environment for coding and testing. Developer DeveloperProsandboxescopycustomization(metadata),butdon'tcopyproductiondata,intoaseparate environment for coding and testing. Developer Pro has more storage than a Developer sandbox. It includes a number of Developer sandboxes, depending on the edition of your production organization. Developer Pro A Partial Copy sandbox is a Developer sandbox plus the data that you define in a sandbox template.Partial Copy Fullsandboxescopyyourentireproductionorganizationandallitsdata,includingstandardandcustom object records, documents, and attachments. Use the sandbox to code and test changes, and to train your team about the changes. You can refresh a Full sandbox every 29 days. Full A sandbox can also contain some, none, or all of your production data, depending on the intended use. For development, you might only need a small set of data to make sure things work. For QA testing, especially regression testing, you need a large set of data that doesnotchangeovertime.Forpre-deploymentstaging,youneedasandboxthatisasclosetoyourproductionenvironmentaspossible, including the data. Only full sandboxes copy your data when they’re created, but you can use the Import Wizard or Data Loader to add data to a sandbox. Another type of development environment available on the Force.com platform is a Developer Edition organization. Developer Edition provides free access to many of the exclusive features available with Enterprise, Unlimited, and Performance Editions. You get full access to the Force.com platform and API, so that you can extend Salesforce, integrate with other applications, and develop new tools and applications. Developer Edition organizations are used primarily by independent software vendors (ISVs) creating applications for distribution on AppExchange. See the ISVforce Guide for more information. Sandbox Uses If you have multiple sandboxes available for your organization, take the following factors into account when planning which ones to use for what purposes. NotesType of SandboxUse Full sandboxes are more costly in terms of create and refresh time, and would also give developers access to data that might not be appropriate. Developer or Developer Pro sandboxDevelopment Testing • Unit tests and Apex tests: Developer or Developer Pro sandbox • Feature tests and regression tests: Partial Copy sandbox (with a standard data set loaded) 10 About Types of Development EnvironmentsDevelopment Environments
  • 15.
    NotesType of SandboxUse PartialCopy sandboxes may be appropriate in special cases when you want to use sample data or a subset Full sandbox is best when an external system expects full production data to be present. Testing external integrations of your actual data. Works well if you’re using external IDs. Partial Copy sandboxes are appropriate if testing against a subset of production data is acceptable, for example, for regional tests. Full sandbox is best for validation of new applications against production configuration and data. Staging and user-acceptance testing Full sandboxProduction debugging Sandbox Considerations and Limitations Sandbox functionality is not identical to production, and you’ll need to plan for the differences as well as for the copy process itself. Consider the following when creating or refreshing a sandbox: • Creating or refreshing a sandbox copy is a long-running operation that might complete in minutes, days, or even more than a week. Several conditions factor into the duration, including the number of customizations, data size and configuration (for full copies), numbers of objects, and server load. Also, sandbox refreshes are queued, so your requested copy might not start immediately after your request. So plan ahead, and accept the default minimums for optional data in a full sandbox whenever possible. • Refreshing a sandbox deletes and recreates the sandbox as a new copy of the production organization. In effect, this reverses any manualaccesschangesyouhaveperformed.Ifyoucreatedusersinasandbox,theynolongerexist;ifyouchangedauser’spermissions and access settings, those revert to their values in the production organization. This means that after a refresh, any access changes youperformedmustberepeatedinthenewcopy.Toavoidthisprocess,youcancreateusertemplatesinyourproductionorganization, and then activate them in the sandbox organization. • Setup and data changes to your production organization during the sandbox creation and refresh operations might result in inconsistencies in your sandbox. Therefore, it’s best to freeze or minimize changes to your production organization while creating or refreshing a sandbox. The following features are disabled and cannot be enabled in sandboxes: • Contract expiration warnings. • Case escalation. Contract expiration warnings and case escalation are disabled because they automatically send email to contacts, customers, and production organization users. • Subscription summary. • Data exports (in Setup at Data Management > Data Export > Export Now or Data Management > Data Export > Schedule Export). • The ability to create Salesforce sandboxes. • The ability to copy email service addresses that you create in your sandbox to your production organization. • The ability to publish Site.com sites. SEE ALSO: Creating User Templates 11 Sandbox Considerations and LimitationsDevelopment Environments
  • 16.
    Creating a DevelopmentSandbox After you have determined the type of development environment you need for a particular project or task, create a sandbox copy of your production organization. 1. From Setup, click Sandboxes. 2. Click New Sandbox. 3. Enter a name and description for the sandbox. 4. Select the type of sandbox. 5. Click Start Copy. The process can take a while, depending on the size of your organization. You’ll receive a notification email when your sandbox has completed copying. 6. Click the link in the notification email to access your sandbox. Youcanlogintothesandboxat test.salesforce.com/login.jsp byappending .sandbox_name toyourusername. For example, if your username for your production organization is user1@acme.com, then your username for a sandbox named “test” is user1@acme.com.test. Your password is the same as it is in production. 7. Small changes are made to ensure that the sandbox doesn’t accidentally communicate with the production organization. Before you use the sandbox you created in this trail, be sure to adjust those settings as described in Development Lifecycle Guide (PDF) section “Updating Environmental Dependencies.” Tip: The number and types of sandboxes availabile depends on the Salesforce organization. SEE ALSO: Updating Environmental Dependencies Establishing a Change Process for Production Synchronizing Changes Updating Environmental Dependencies Once you create a sandbox, configure it to update environmental dependencies and merge project contents before beginning development.Ifyouhavemultipledevelopmentenvironments,youneedtomergeyourchangeswithchangesfromotherteammembers into a single development environment as the project progresses. During this phase, you must track changes in all environments so that you can merge those changes successfully. Environmental dependencies are settings that are different between a development environment and the production organization. When you work in a development environment, you need to update who has access to what, turn certain features on or off, and update the addresses of internal and external systems so that they point to the development environment instead of production. The reverse is also true—when you deploy to production, you might need to update certain settings that you used in development so they work with production. DetailsEnvironmental Dependency If your developers and testers do not have logins on production, or do not have the necessary privileges, you need to give them the necessary access in the development environment. Login privileges 12 Creating a Development SandboxDevelopment Environments
  • 17.
    DetailsEnvironmental Dependency When you createa sandbox, email addresses are automatically changed so that email alerts and other automatic notifications are not sent from the sandbox during development. When your developers and testers log into the Email addresses sandbox, they must change their email address back to a real address to receive email messages sent from the sandbox. If you want to test outbound email for features such as escalations or dashboards, you must update the list of recipients, because these lists are removed when the sandbox is created to prevent unnecessary emails. Email recipients If your production organization is integrated with external systems, you will probably not want your sandbox copy to communicate with the production versions of those external systems, so as not to mix production and External URLs non-productiondata.Forexample,ifyouuseoutboundmessagingorwebservicecallouts,youwillwanttoupdate the URLs called by those services to point to your external development environment(s) for those applications. Likewise, since sandboxes run on a different instance than the production organization, to test integrations with sandbox you will need to change the API endpoint hostname from login.salesforce.com to test.salesforce.com. In general, when linking from one Force.com page to another, the links should be relative (omitting the hostname) rather than absolute, and dynamic (looking up the ID, record, or page by name) rather than static. This allows you Hard-coded URLs to migrate the URLs between different organizations, which might have different hostnames or record IDs. If your application contains hard-coded URLs from one Force.com page to another, they might break when they are clicked from the sandbox or, worse, take a user who thinks he is in a development environment back to the production organization. Some components are commonly accessed via their ID, such as RecordTypes. When you create a sandbox copy, code that uses these IDs to reference these components continues to work because production IDs are retained Hard-coded IDs by the sandbox copy. However, the reverse is not true—migrating from sandbox to production (or between any two organizations) via metadata maintains components' names, but if the component does not exist in the target organization, a new ID will be generated. Therefore, migrating code that contains a hard-coded ID can cause the code to break. As a best practice, wherever possible, you should obtain a component's ID by querying for it by name. If you have existing development projects, you need to merge that work into the new development environment.Existing projects Creating User Templates Refreshing a sandbox creates a new copy of the production organization. This means that all user permissions within the sandbox are copiedfromproduction,andthatuseraccessorpermissionschangesyoumadeinthesandboxbeforeitwasrefreshedmustbereapplied. If you have multiple sandboxes, or refresh sandboxes on a regular basis, consider creating a developer user template on your production organization. A developer user template is an abstract user that has permissions required to develop on the sandbox (for example, the “Modify All Data” permission), but is not active on your production organization. After you create or refresh a sandbox, you activate the developer user in the sandbox and assign it to the individual who will be developing there. To create a developer template: 1. Create a new user on your production organization. 2. Edit the user to give it the necessary permissions. 3. Deactivate the user on the production organization. 4. Create or refresh a sandbox. 13 Creating User TemplatesDevelopment Environments
  • 18.
    5. Activate theuser on the sandbox. 6. Optionally change the email address, password, or other environmental settings. Warning: Exercise caution when granting permissions in sandbox organizations that contain sensitive information copied from production (for example, social security numbers). You might find it helpful to create multiple templates for different roles. For example, you can have a developer role that has the “Modify All Data” permission, and a QA tester role that has standard user privileges. Your sandbox has the same number of licenses as production, but it is unlikely that all of your users will log into it. When you create or refresh a sandbox, the same users who are active in production are active in the sandbox, so if all licenses are occupied you will need to deactivate an active user to activate the inactive developer user. Just make sure that the user you're deactivating in sandbox is one of themanyproductionuserswhowillneverlogintothatenvironment.Likewise,youshouldmakeyourproductiondeveloperusertemplate inactive on the production organization, so it doesn't consume a paid production license. For more information on how to activate, deactivate, or edit users, see “Edit Users” in the Salesforce online help. Managing Sandboxes To manage a sandbox, from Setup click Sandboxes. A list of your existing sandboxes displays. • Click New Sandbox to create a new sandbox. Salesforce deactivates the New Sandbox button when an organization reaches its sandbox limit. If necessary, contact Salesforce to order more sandboxes for your organization. • Click SandboxHistory to see a log of your sandbox refresh history, including when sandboxes were created and who created them. • Click Refresh to replace an existing sandbox with a new copy. Salesforce only displays the Refresh link for sandboxes that are eligible for refreshing, which varies for different types of sandboxes. Your existing copy of this sandbox remains available while you wait for the refresh to complete. The refreshed copy is inactive until you activate it. • Click Activate to activate a refreshed sandbox. You must activate your refreshed sandbox before you can access it. Salesforce only displays this option for sandboxes that are not activated. Warning: Activating a refreshed sandbox replaces the existing sandbox with the refreshed version. This permanently deletes the existing version and all data in it. Your production organization and its data will not be affected. • Click Del to delete a sandbox. The delete option is only available if your organization exceeds its sandbox limit. Warning: Deleting a sandbox permanently erases the sandbox and all data in it. • Administrators can click Login to log into a sandbox as a user. Salesforce only displays this option for active sandboxes. Users can logintothesandboxat https://test.salesforce.com byappending .sandbox_name totheirSalesforceusernames. For example, if a username for a production organization is user1@acme.com, and the sandbox is named “test,” the modified username to log in to the sandbox is user1@acme.com.test. • Click on a sandbox name to view details about the sandbox, including the sandbox type and when it was created. 14 Managing SandboxesDevelopment Environments
  • 19.
    CHAPTER 3 DevelopmentTools Regardless of your role in the development process, it is important to understand at a high level how all of the Force.com development tools operate, and the development tasks that overlap each other. A challenge of release management is tracking the changes in every organization, and knowledge of the tools makes tracking changes an easier job. You are probably familiar with how to build applications using the Salesforce Web user interface. Project-based development requires working with desktop tools as well. The Force.com IDE is the best tool for team development, migration of selected components, and writing Apex. The Force.com Migration Tool, on the other hand, is useful for migrating large scale or repetitive changes between environments. These and other Force.com tools are examined in the following sections. Force.com App Builder Tools While there are many tools you can use to create and modify application components, the Web interface is the easiest place to start. The Salesforce user interface makes application development easy with point-and-click app builder tools. From Setup, you can modify the metadata of your organization. 15
  • 20.
    Because the Webinterface is so easy to use, administrators often make changes directly in the production organization, rather than using a development environment. This is great for users who need the functionality immediately, but the change in production needs to be tracked so that you can migrate the same functionality to your testing or staging sandboxes, if necessary. Force.com IDE The Force.com IDE is an integrated development environment for developing applications on the Force.com platform using Apex, Visualforce,andmetadatacomponents.Designedfordevelopersanddevelopmentteams,theIDEprovidestoolstoaccelerateForce.com application development, including wizards, source code editors, test execution tools, deployment aids, and integrated help. TheForce.comIDEisbuiltontopoftheopen-sourceEclipsePlatform,andisavailableasaplug-in.Eclipseprovidesarichsetofcapabilities; learn more about Eclipse features in the Workbench User Guide in the help contents. Force.com project-based development leverages the tools and processes of traditional software development, such as development environments (sandboxes), integrated development environments (IDEs), and source control systems. The Force.com platform enables project-based development by using text-based files to represent the various components in a Salesforce organization. These files are easily transported, can be stored and versioned in a source control system, and enable traditional development. All of this is made possible by Metadata API. A Force.com project is a collection of metadata files gathered together so that you can work with the files locally. Depending on your needs, you can create a Force.com project that contains a single component or every component in your organization. The latter case, retrieving every portable component from your organization, is not always the best choice because it can make deployment a longer and more difficult process. 16 Force.com IDEDevelopment Tools
  • 21.
    Note: Metadata APIcan deploy and retrieve up to 10,000 files or 400 MB at one time. If you need to retrieve or deploy more than either of these limits, you must do so in batches. Agoodwaytostructureyourprojectistothinkaboutwhatyouwanttoaccomplish,andthencreateaprojectforonlythosecomponents. You can later edit the project if you have components you want to add or remove. About Metadata API Metadata API provides two parts that work in conjunction: a rich and powerful metadata model and an application programming interface (API). The metadata model describes the components in your organization. For example, Salesforce custom objects and their fieldscanbecontrolledbymanipulatingtheXMLfilesprovidedbyMetadataAPI.MetadataAPIalsoincludesasetofWebservicemethods that provide programmatic access to the configuration and source of your metadata components. In other words, it describes what you can do with those components, such as create an object or deploy one. If it helps you to separate them into two parts, you can think of the metadata components as nouns, and the API calls as verbs. With Metadata API you can: • Work with setup configuration as metadata files. • Copy, paste, merge, and manipulate metadata files using familiar tools, such as text editors, IDEs, batch scripts, and source control systems. • Migrate configuration changes between organizations, either between two development environments or from development to production. • Create your own tools for managing organization and application metadata. For more information, including a list of the components that are and aren’t supported, see the Metadata API Developer’s Guide. Force.com Migration Tool The Force.com Migration Tool is a Java/Ant-based command-line utility for moving metadata between a local directory and a Salesforce organization. The Force.com Migration Tool allows you to migrate metadata between unrelated organizations, so in that sense it’s more powerful than change sets. Unlike the Force.com IDE, the Force.com Migration Tool has no graphical user interface. You choose the components you want to deploy, the server address, and other deployment details by editing control files in a text editor and using command-line arguments. Most people will find the graphical user interface of the Force.com IDE easier to use than editing text files and providing arguments on the command line. However, the Force.com Migration Tool is especially useful in the following scenarios: • Development projects where you need to populate a test environment with large amounts of setup changes—making changes with an automated script is far faster than entering them by hand. • Deployments where you need to change the contents of files between organizations—for example, if you want to change the Running User on a dashboard, you can retrieve the Running User from organization A, make a change, and then deploy the Running User to organization B. If you tried to do this in the Force.com IDE, the IDE would force you to save the change back to organization A (where the organization B user probably does not exist) before launching the Deploy Wizard to deploy to organization B. The Force.com Migration Tool gives you complete control over the retrieve() and deploy() commands; editing and saving a file on your local file system does not change the metadata in any organization until you choose to deploy it. • Multi-stage release processes—a typical development process requires iterative building, testing, and staging before releasing to a production environment. Scripted retrieval and deployment of components can make this process much more efficient. • Repetitive deployment using the same parameters—you can retrieve metadata from your organization, make changes, and deploy your changes to an organization. If you need to repeat this process, it is as simple as calling the same deployment target again. 17 About Metadata APIDevelopment Tools
  • 22.
    • When migrationfrom staging to production is done by highly technical resources—anyone who prefers deploying in a scripting environment will find the Force.com Migration Tool a familiar process. For more information, see the Force.com Migration Tool Guide. Data Loader Data Loader is a client application for the bulk import or export of data. Use it to insert, update, delete, or export Salesforce records. Whenimportingdata,DataLoaderreads,extracts,andloadsdatafromcommaseparatedvalues(CSV)filesorfromadatabaseconnection. When exporting data, it outputs CSV files. Data Loader can be useful for loading data into testing environments, such as Developer Pro sandboxes that don’t contain any data. For regression testing, it’s advisable to use a stable set of data that doesn’t change from release to release, so it’s useful to store a set of data locallyanduseDataLoadertopopulateyourtestenvironment.DataLoaderhasacommand-lineinterfacesothatscriptscanautomatically load data into a fresh organization. Note: Data Loader is strictly a tool for loading data, not metadata. You can’t add or delete fields on an object or load any kind of setup changes. To import data, you can use either the import wizards or Data Loader. Data Loader complements the Web-based import wizards that are accessible from the Setup menu in the online application. Refer to the following guidelines to determine which method of importing best suits your business needs: 18 Data LoaderDevelopment Tools
  • 23.
    Use Web-based importingwhen: • You are loading less than 50,000 records. • The object you need to import is supported by import wizards. To see what import wizards are available and thus what objects they support, from Setup, click Data Management. • You want to prevent duplicates by uploading records according to account name and site, contact email address, or lead email address. Use Data Loader when: • You need to load 50,000 to 5,000,000 records. Data Loader is supported for loads of up to 5 million records. If you need to load more than 5 million records, we recommend you work with a Salesforce partner or visit the App Exchange for a suitable partner product. • You need to load into an object that is not yet supported by the import wizards. • You want to schedule regular data loads, such as nightly imports. • You want to export your data for backup purposes. For more information on importing data, see “Importing Overview” in the Salesforce online help and the Data Loader Guide. 19 Data LoaderDevelopment Tools
  • 24.
    CHAPTER 4 Trackingand Synchronizing Development Changes One challenge of release management is tracking changes. It sounds simple in concept, but in practice, it may not be. Changes can occur simultaneously in both production and development organizations, and in components that are, and are not, available in the Metadata API. The easiest way to track changes is to use traditional development tools to diff, merge, and version the code. However, these tools only work with components available in the Metadata API, and so it is necessary to manually track changes. This may seem like a lot of work, but being able to track and replicate changes in all environments is the only way to ensure that functionality can be successfully deployed without overwriting changes on the production organization. On the Force.com platform, the most important reason to track changes is because you might have to manually migrate some changes from one organization to another. Establishing a Change Process for Production The ability to quickly develop and customize applications in your production organization using the Salesforce Web user interface is one ofthemanystrengthsoftheForce.complatform.However,whenitcomestodevelopingenterpriseapplications,thiseaseofdevelopment can lead to changes occurring on the production organization while applications are being developed in sandbox. To guarantee a successful deployment to your production organization, it is necessary for your development environments to have the same changes that occurred on production. This may seem like a backwards thing to do, to move modifications from your production organization to your development environments, but it’s necessary because migrating from development to production can overwrite the changes already made on production. When modifications occur on the production organization, you can perform a sandbox refresh and get the latest changes. However, sandbox refreshes are not always possible (you are limited to one refresh every 29 days for full sandboxes), and may require you to performconfigurationchanges,suchasmodifyinguserprofilesorpermissionsetssothatyourdevelopershavethenecessarypermissions. Therefore, tracking changes between the production and development environments, and then merging those differences from production to development, can be a necessary process. To make these tasks easier, it’s a good idea to establish a change process for yourproductionorganization.Achangeprocessdetermineswhatkindsofmodificationscantakeplaceonyourproductionorganization, when they can occur, and who is responsible for making the changes. The change process you adopt will depend on the kinds of modificationsyourequireinyourproductionenvironment.Thefollowinglistsuggestssomebestpracticesforchangeprocesses,arranged from simplest to most complex. • Allow no changes on production—This is the simplest, but also the most draconian measure you can enforce. In effect, you are sacrificing immediate setup changes for easier deployment. If you choose this process, all of the development happens on sandbox. • Modify only components in the Metadata API—Manually tracking and deploying changes is far more complicated than using the Metadata API. If you can limit production changes to components that are accessible through the Metadata API, then this will simplify change tracking, merging, and deployment. • Allow only one administrator to make setup changes—Some organizations find it useful to assign a single administrator who is responsible for all setup changes on production. This makes it easier to track changes on the production organization and replicate thosechangesbackintodevelopmentenvironmentsbetweensandboxrefreshes.Thisisamoreflexibleapproachthatallowschanges in production and project-based development at the same time. However, this is only a workable solution if your organization is small enough that one administrator can make all of the setup changes. • Schedule production changes—If your organization requires frequent changes to the production environment, you can schedule a time to migrate those changes to your development environments. Depending on the number of organizations you have, this could be an easy migration done frequently (weekly, perhaps), or a more elaborate process performed less often (once per quarter). 20
  • 25.
    Tracking Changes Manually Anychanges you make to components that are available in the Metadata API can be tracked and merged using desktop tools. If you use the Force.com IDE or Force.com Migration Tool, you can put your files in a version control system, and you can track changes using the version control system’s built-in functionality. However, most IT organizations make numerous changes to components that are not represented in the Metadata API, and thus require manually tracking changes for both production and development organizations. It is important to have a method for tracking all changes, and especially important if those changes require manual migration. A useful tool is a change request form that users and administrators fill out for every enhancement requested or change performed. You can create a custom application within Salesforce to record change requests and the actual changes made. Tip: The AppExchange includes custom apps that you can install to manage this process, such as the free Change Control app. Most IT organizations also use a spreadsheet to log and track those changes. Spreadsheets allow you to sort by headers, create pivot tables, and perform other useful operations when migrating or tracking those changes. On the spreadsheet list every change that occurred, including: • Who made the change • The organization where the change occurred • Date and time • Which component was changed When do you need to track changes manually? • ChangesmadetocomponentsnotintheMetadataAPI—Youmustmanuallytrackeverychangetocomponentsthatarenotavailable in the Metadata API. • ChangesmadeusingtheSalesforceWebuserinterface—EvenifthecomponentsareavailablethroughtheMetadataAPI,youshould trackchangesmadeusingtheWebtools.ConcurrentchangesbetweentheWebtoolsandtheMetadataAPIoftencreatedependencies and are a common source of deployment problems. To be on the safe side, it is better to manually track all changes made through the Web interface. Changes made in the Salesforce Web user interface are logged in the setup audit trail. Using the audit trail in conjunction with your manual change tracking tool is the best way to ensure you do not miss any changes. How you manage this process is up to you, but it is a good idea to regularly transfer all changes in the audit trail to your change list (once a week, for example), or use the audit trail only to cross-check changes on your change list. For more information on using the setup audit trail, see “Monitoring Setup Changes” in the Salesforce online help. Tracking Changes Using the Force.com Migration Tool The Force.com Migration Tool is especially useful for script-based deployments, such as migrating batches of components. Another particularly useful batch script can be written to diff metadata changes. Such a script would allow you to perform diffs at scheduled times, or with different sets of components. 1. Create a package.xml file that lists the components you want to compare. 2. Create a retrieve target to download the components. For example: <target name="retrieve-production"> <sf:retrieve username="${sf.username}" password="${sf.password}" serverurl="${sf.serverurl}" retrieveTarget="production" unpackaged="package.xml" /> 21 Tracking Changes ManuallyTracking and Synchronizing Development Changes
  • 26.
    3. Write anexternal script to diff the files. 4. Specify a target that calls the script and outputs the results to a file. For example: <target name="show-production-differences"> <!-- get metadata from organization --> <antcall target="retrieve-production"/> <!-- perl script to find changes --> <exec executable="/bin/bash"> <arg value-"-c" /> <arg value-"cd production; svn stat|../showdiffs.perl>../report.txt"/> </exec> </target> Note: This procedure is only an example of the basic steps you would take to perform a programmatic diff. You might want to define more than one folder and package.xml file so that you can retrieve components in batches. Tracking Changes Using the Force.com IDE Any change made in the Force.com IDE can be easily tracked and merged using the built-in features within Eclipse, or any other change-tracking utility. For more information, click Help in the Force.com IDE. Synchronizing Changes The Metadata API describes Force.com components as text-based files that can be transported between different environments. Using third-party tools, these files can be stored, versioned, and divided between developers and across development environments. The complexity of your application development lifecycle increases as you introduce such concepts as multiple development environments, code branches, versions, etc. Synchronizingallthosechangescanbeachallenge.Forexample,youmighthaveonedevelopmentsandboxdedicatedtoenhancements to existing applications on your production organization, and another development sandbox for new applications. Each of those organizationscouldhavemultipleprojects,allmakingchangesatthesametime.Mergingthosechangesrequirestwoseparateprocesses: synchronizing changes between projects in the same organization, and then integrating the changes between organizations. Synchronizing Multiple Sandboxes A fundamental difference between traditional software development and cloud computing is that in cloud computing the server always has the true definition of the components. The files you work with in a local Force.com project are a representation of the objects on the server. This is an important distinction because synchronization does not happen between projects directly, but between each project and the server: 22 Tracking Changes Using the Force.com IDETracking and Synchronizing Development Changes
  • 27.
    If you usethe Force.com IDE, synchronizing your changes with the home organization is as easy as clicking the Save button. For changes that occur simultaneously in both organizations, the synchronization tools allow you to overwrite files in either direction, or merge the changes. How to save, synchronize, and refresh files is covered in the Force.com IDE help. Integrating Changes Across Development Environments If you have more than one development environment, you must merge all changes into one organization from which you can deploy. Ifyouhaveonlytwosandboxes,youcanmigratechangesbackandforthbetweenthemfairlyeasily.Eachsandboxcanbeusedtodeploy changes to the other organization, or to production. 23 Integrating Changes Across Development EnvironmentsTracking and Synchronizing Development Changes
  • 28.
    As you adddevelopment environments, the complexity of synchronizing them goes up exponentially. In this case, it is much easier to mergethechangesinaseparateintegrationsandboxorganizationthanwitheachother.Insuchascenario,migrationfromdevelopment sandbox to integration is one way only: 24 Integrating Changes Across Development EnvironmentsTracking and Synchronizing Development Changes
  • 29.
    If you usechange sets to migrate components, you can edit the deployment connection so that changes follow defined integration paths. 25 Integrating Changes Across Development EnvironmentsTracking and Synchronizing Development Changes
  • 30.
    CHAPTER 5 ReleaseManagement One of the most productive features of the Force.com platform is that customizations can be made directly in the Web user interface and become available to end users immediately. These kinds of changes do not require elaborate development tools or processes. From a release management standpoint, very little effort is required. A more involved upgrade, such as creating a new user interface for an existing application, requires an environment where you can isolate your development efforts from production users. Reintegrating the changes you make in your development environment back intotheproductionorganizationintroducesanewlevelofcomplexitytothedevelopmentprocess,becauseyourproductionorganization mayhavechangedduringthatsametime.Releasemanagementatthislevelrequirestrackingchangesbetweenthevariousenvironments to make sure there are no clashes when you deploy. A complex application that affects all users might require multiple development and testing environments. This kind of long-term project canbefurthercomplicatedbyhavingconcurrentprojectsondifferentdevelopmentcycles,andcouldrequireseveralintegrationsbefore the application is deployed to production. In many cases, all of these development efforts happen simultaneously. Release management at this level is a very complex puzzle. How do you manage these development projects so they don’t conflict with each other or the processes of your IT department? How do you juggle the different time frames and production lifecycles? And how do you merge the changes between environments so there are no conflicts when you roll out the functionality in a production organization? The answers to these questions are in the way you construct your application lifecycle management process, and only by understanding all the variables can you make those decisions. Developing Enterprise Applications Large organizations tend to have complex development processes that span multiple release schedules. In this case, it is not only the divisionbetweendevelopmentandtestingthatisimportant,butthesynchronizationofprojectsondifferentschedules.Inthisdevelopment scenario,youhavemultipledevelopmentenvironmentsthatmustintegratewitheachotherbeforemergingintoastagingarea.Additional environments could be added for training, production support, or other purposes. An organization can manage this type of enterprise development in a number of ways. One possible method is shown in the following image: 26
  • 31.
    Managing multiple projectsof various complexities and durations on different release schedules requires a release plan and stringent change tracking processes. Development teams that include distributed developers and testers also need to synchronize and integrate their changes in order to collaborate effectively. Scheduling Concurrent Development Projects Unlike traditional software development, where all upgrades occur in a single release, an online application can be upgraded at any time. Enhancements that are easier to develop, require less testing, or are of higher priority can be released to end users very quickly. Therefore, an important step in release management is scheduling your development efforts. For IT organizations, this means putting development projects into categories such as short-term, medium-term, and long-term. These categories are often defined by where development takes place, how much testing is required, and when new features must be available. 27 Scheduling Concurrent Development ProjectsRelease Management
  • 32.
    While you canuse as many categories as necessary, a three-tier scheme is a good starting point. Aside from the duration of the project, here are some other possible ways you can categorize your development efforts. Where development takes place: • Production-only—If the functionality can be developed and tested entirely in the production Web interface, the development cycle is faster and users can get the functionality sooner. • Metadata API components—If all of the necessary components are available in the Metadata API, then it is much easier to track and merge changes between environments. • Single sandbox—If the functionality can be developed in a sandbox and then immediately deployed to a production organization, the development cycle does not require integration or staging environments. • Multipleenvironments—Developmentprojectscanspanmultiplesandboxes,inwhichcasethecomplexityofintegratingcodelines is increased. Complicated projects should not keep the simple ones from being rolled out. By the number of developers: • One—Ifasingledevelopercancreate,test,anddeploythefunctionality,youarefarlesslikelytorunintoproblemsmergingchanges, or other time-consuming issues. • Smallteam—Asmalldevelopmentteamcanpartitionlargeprojectsintomanageablepieces,andisstillcapableofrapiddevelopment. Projects of this nature can be easily integrated with single-developer projects and rolled out quickly. • Large team—A full development team is necessary for large-scale development projects. Projects of this nature require tracking and merging changes from different code branches, acceptance testing, and other involved processes that can slow down the development process. 28 Scheduling Concurrent Development ProjectsRelease Management
  • 33.
    Delivering Applications ona Release Train A release train is a scheduling technique for delivering application upgrades on a regular basis. Release trains are predictable and incremental, so they ease the development process by setting limits on how much can be done in any one development cycle. Because updates to your application can be impacted by Salesforce upgrades, you might find it useful to schedule your release before Salesforce upgrades occur. The general process for delivering multiple applications on a release train is the following: 1. Plan your release around Salesforce upgrades. 2. Schedule your concurrent development projects. This will help you determine if the new functionality can be done now, in the current release, or sometime in the future. 3. Establish a process for changes to the production organization. 4. Trackchangesinallenvironments.Thiswillensurethatshort-termfunctionalitythatisdeliveredtoproductiondoesnotgetoverwritten when you deploy from your development environment. 5. Integrate changes and deploy to staging or test environments. 6. Release to production. How Salesforce Upgrades May Affect Delivery Schedules SeveralthingshappenwhenSalesforceupgradestothenextversion.Forstarters,sandboxandproductioninstancesupgradeatdifferent times.Thismeansthat,forabrieftime,yoursandboxandproductionorganizationsarerunningdifferentversionsofSalesforce.Asandbox may be upgraded earlier or later than the production organization, depending on the instance. The schedule is determined by the sandbox copy date. Upgradesarescheduledduringoff-peakhours,andrarelyaffectusers.However,ITdepartmentsoftenscheduletheirownbatchprocesses during these same hours, so it is important to avoid any conflicts. Things that happen during an upgrade are: • New logo—The Salesforce logo is a quick way to verify which version you are using. Sandboxes may upgrade before or after your production organization; therefore, it is a good idea to check the logo in the upper left corner of your sandbox home page around the time of a Salesforce release to see if the sandbox has been upgraded or not. • New features—Every release contains new features. Among those are new components available through the Metadata API. Click the What's New link in the Help and Training window to view the release notes. • Incremented API version—The API version increments every release, and access to new features requires connecting to the new version of the API. • Staggered upgrades—Because your production and sandbox organizations might not be running the same version of the platform during the upgrade window, you might have to wait to deploy components that are new or have additional metadata. If you try to upload a change set that has newer components to an organization that hasn’t been upgraded to support them, the deployment will fail. You can view the upcoming maintenance schedule by visiting trust.salesforce.com/trust/status and clicking the View Upcoming Maintenance Schedule link. 29 Delivering Applications on a Release TrainRelease Management
  • 34.
    CHAPTER 6 MigratingChanges Between Environments Migration is the act of moving configuration changes from one Salesforce organization to another. During the development cycle, you might migrate many times, either to keep development organizations in sync or to move changes through development organizations toward production. Migration can happen in two ways: manually or through the Metadata API. • Manual migration—Changes to components that are not available in the Metadata API must be manually migrated in each environment. That is, you must repeat the exact same modifications in every production or development organization. Manual migration is made easier by diligently tracking changes. • Metadata migration—Components that are available in the Metadata API can be migrated using desktop tools or change sets. The typical steps to migrate changes are: 1. Determinewhichcomponentsneedtobemigratedfirst.Thisisespeciallyimportantifyouhavebothmanualandmetadatamigrations to perform. For example, if you need to create a queue against a custom object, the custom object must be migrated first. 2. Migrate components in the order required: • Look at your change list to determine if anything needs to be manually migrated. If so, log into the organization you will be migrating changes into and make those setup changes manually. • Retrieve the latest metadata changes from the server. 3. Optionally modify your Force.com project or outbound change set to deploy only a subset of components. 4. Deploy. SEE ALSO: Tracking and Synchronizing Development Changes Migrating Changes Manually Manual migration requires performing setup changes through the Salesforce user interface. For example, suppose you require new search settings in your production organization, but you want to develop and test it in a sandbox before you expose it to users. Because search settings are not available in the Metadata API, the only way to migrate the search settings to your production organization is to manually recreate them in sandbox. You might think that the easiest way to avoid manual migration is to make all of your changes on production and then refresh your sandbox. While this is possible, full sandboxes can only be refreshed once every 29 days, and there are other important considerations. Also, any changes on production must be manually migrated in each of your development organizations. Because component dependencies play a large role in deployment, changes you make on your production organization might prevent you from deploying applications you develop on sandbox. If you have multiple development organizations, you must manually migrate changes from productiontosandboxmanytimes.Forthesereasons,developingonproductioncanbemoredifficultthanmanuallymigratingchanges from sandbox to production. Note: Many customizations and features can be developed on production, but these changes should require no testing and little training. 30
  • 35.
    The best wayto manage manual migrations is to establish a change process on your production organization, and to track the changes that require manual migration. SEE ALSO: Establishing a Change Process for Production How Metadata Files are Migrated Migrating changes from one organization to another using metadata files requires an intermediate tool that interacts with both environments using the Metadata API. The following figure shows how changes are migrated from sandbox to production. You might be wondering why you need a local project to migrate files that are stored in the cloud. This is because the Metadata API was designed to support traditional software development tools that operate on source files, such as text editors, diff/merge utilities, and version control systems, all of which require a local file system. Once you create a Force.com project, you can deploy directly to the production organization any number of times; you don’t need to retrieve files unless you want to synchronize with the server. What Affects Deployment Time? MigratingmetadatafromalocaldirectorytoaSalesforceorganizationisaccomplishedbycallingtheMetadataAPI deploy() method. Both the Force.com IDE and the Force.com Migration Tool use this method, and so there should be very little difference in deployment time when using either tool. The deploy() method is asynchronous, meaning that it may not return results immediately, and there are several factors that determine how quickly those results are returned: • Number and size of files—The more you have to deploy, the longer deployment takes. However, network payloads are rarely larger than 10 MB, so raw file size usually does not play a significant role. 31 How Metadata Files are MigratedMigrating Changes Between Environments
  • 36.
    • Type ofcomponents—Some components take longer to process than others. For example, custom fields, custom junction objects, and profiles take longer to deploy than other components. • Processing time—Making a change that requires recalculating data takes an amount of time proportional to the amount of data that has to be modified. For example, if you change a field type, this could require modifying all of the records that use that field. • Test execution—When deploying to a production organization, the number and complexity of Apex tests has a large impact on the deployment time. • Network and server availability—These are of minimal concern compared to other factors. However, you may want to schedule long-duration deployments during off-peak hours so that you are not waiting on deployments during working hours, or locking components from use. • Locking—If users are working in the organization during deployment, this can interfere with both users and the deployment. Users may be locked out of components, or the deployment may be waiting for a user to release a lock. The longest running processes are those that reorganize users (or groups of users) who own large numbers of records. For example, changing a sharing rule does not take much time if the rule shares 100 records owned by three users with another six users, but moving one user on a role or territory hierarchy takes a long time if that user owns a gigabyte of records. Other ways users can force the processing of large numbers of records include: – Creating portal users or users affected by forecasting – Creating, modifying, or deleting sharing rules – Moving or changing users, roles, groups, account owners, or team membership, when there are a large number of associated records Monitoring the Status of Your Deployments Thesizeandcomplexityofthemetadatacomponentsaffectthedeploymenttime.Totrackthestatusofdeploymentsthatareinprogress or have completed in the last 30 days, from Setup, click Deployment Status or Deploy > Deployment Status. Deployments are listed in different sections depending on their status. Youcanmonitordeploymentsthatareinprogress,checkwhichdeploymentsarewaitingforexecution,andviewtheresultsofcompleted deploymentsontheDeploymentStatuspage.Thispagelistsalldeployments—changesets,MetadataAPI-baseddeployments,including deployments started from the Force.com IDE and the Force.com Migration Tool, and package installations. In-Progress and Queued Deployments When running a deployment, the Deployment Status page shows you the real-time progress of your current deployment. This page contains charts that provide a visual representation of the overall deployment progress. The first chart shows how many components have already been deployed out of the total and includes the number of components with errors. For example, the following chart indicates that 302 components were processed successfully out of 450 and there were 45 components with errors. 32 Monitoring the Status of Your DeploymentsMigrating Changes Between Environments
  • 37.
    After all componentshave been deployed without errors, Apex tests start executing, if required or enabled. A second chart shows how many Apex tests have run out of the total number of tests and the number of errors returned. In addition, the chart shows the name of the currently running test. For example, in the following chart, 77 tests have completed execution out of a total of 120, and 1 test failed. The following information is displayed for the current deployment. DescriptionField The change set name or a unique identifier that’s used to track the Metadata API deployment. For a Metadata API deployment, this value is returned by the deploy() call. Name The deployment type: Change Set or API.Type The name of the user performing the deployment.Deployed By The date and time when the deployment actually started, not the time the request was queued. This value is the time the deployment Status is set to In Progress. Start Time The date and time when the deployment validation finished.Validated If the current deployment has errors, you can view these errors before the deployment finishes by clicking View Errors. Pending Deployments You can initiate multiple deployments. Only one deployment can run at a time. The other deployments will remain in the queue waiting to be executed after the current deployment finishes. Queued deployments are listed under Pending Deployments in the order they will be executed. Deployment Validations A deployment validation is a deployment that is used only to check the results of deploying components and is rolled back. A validation doesn't save any deployed components or change the organization in any way. You can determine whether a deployment is a validation only (Validate) or an actual deployment (Deploy) by inspecting the information for pending deployments or the Status column of deployments in the Failed and Succeeded sections. If a validation completed successfully in the last four days, and all tests passed with sufficient code coverage, you can perform a quick deployment by deploying this validation to production without running tests. See Quick Deployments. Canceling a Deployment You can cancel a deployment while it’s in progress or in the queue by clicking Cancel next to the deployment. The deployment then has the status Cancel Requested until the deployment is completely canceled. A canceled deployment is listed in the Failed section. 33 Monitoring the Status of Your DeploymentsMigrating Changes Between Environments
  • 38.
    Completed Deployments Deployments thathave finished are listed either in the Failed or Succeeded sections depending on their status. Deployments that have finished but failed, and deployments that were canceled are listed in the Failed section. No changes were committed to the organization for these deployments because files were missing, components had errors, tests failed, or the deployment was canceled. Deployments that have completed successfully or have partially succeeded are listed in the Succeeded section. Only deployments to a non-production organization can partially succeed. These are deployments that have the rollbackOnError field set to false in the deployment options and have errors in a subset of components. In a partially succeeded deployment, the failed components aren’t committed and the remaining components are committed to the organization. To get more details about a deployment, click View Details next to a deployment. Use the information on the Deployment Details page to view the errors and troubleshoot problems for a failed or partially succeeded deployment. The Deployment Details page includes the error messages that occurred during the deployment, errors for Apex tests with stack trace information, code coverage warnings, and information about slow tests. For a successful deployment, the Deployment Details page shows information about the deployment including how many components were deployed and how many Apex tests were run. Deployment Status The Status column for completed deployments in the Failed and Succeeded sections lists the type and status of a deployment and has two parts: • The prefix indicates whether the deployment is a validation only (Validate:) or an actual deployment (Deploy:). • The second part of the status value contains the status of the deployment: Failed or Canceled for failed deployments, Succeeded for succeeded deployments, or Partially Succeeded for partially succeeded deployments. Quick Deployments As part of a deployment, all Apex tests are run in production. If the production organization contains many Apex tests, the execution of all tests can be time-consuming and can delay your deployment. To reduce deployment time to production, you can perform a quick deployment by skipping the execution of all tests. Quick deployments are available for change sets and Metadata API components when the following requirements are met. • The components have been validated successfully for the target environment within the last four days (96 hours). • As part of the validation, all Apex tests in the target organization have passed. • The overall code coverage in the organization is at least 75%, and Apex triggers have some coverage. A validation is a deployment that’s used only to check the results of deploying components and doesn’t save any components in the organization. A validation enables you to view the success or failure messages that you would receive with an actual deployment. You can validate change sets or metadata components through the API or the Force.com Migration Tool. To learn how to validate a change set, see Validating a Change Set in the Salesforce Help. To validate components with the Force.com Migration Tool, set the checkOnly option to true in the deploy target. See Deploying Changes to a Salesforce Organization in the Force.com Migration Tool Guide. Performing a Quick Deployment through the User Interface or the API To perform a quick deployment, first run a validation-only deployment with Apex test execution on the set of components that you need to deploy. If your validation succeeds and qualifies for a quick deployment, you can start a quick deployment. You can quick-deploy validated change sets and Metadata API components in the user interface. In the Deployment Status page, deploy a recent validation by clicking Quick Deploy next to your validation or on the validation’s detail page. This button appears only for qualifying validations. 34 Monitoring the Status of Your DeploymentsMigrating Changes Between Environments
  • 39.
    Alternatively, you canstart a quick deployment through Metadata API or the Force.com Migration Tool for Metadata API components (excluding change sets). For Metadata API, call deployRecentValidation() and pass it the validation ID. For the Force.com Migration Tool, use the <sf:deployRecentValidation> task. Note: Quick Deploy is enabled for recent validations in which all Apex tests have executed successfully and code coverage requirements have been met. Note the following. • In production, quick deployments are supported for validations that meet the criteria. You can deploy recent validations of change sets and Metadata API components (including components validated by using the Force.com Migration Tool). • Insandbox,QuickDeployissupportedonlyforvalidationsthatexplicitlyenabletestexecution(forexample,viathe testLevel parameter for the Migration Tool). By default, Apex tests aren’t required nor ran in sandbox deployments. Quick Deploy is not supported for change sets in sandbox, because an option to enable test runs for change sets in sandbox isn’t available. • If you perform a deployment after a validation, whether through Quick Deploy, a package installation, or a regular deployment, all validations no longer qualify for quick deployment. Revalidate the set of components to quick-deploy. Performance Tuning Resources for Long-Running Tests If required or enabled, Apex tests run as part of a deployment after all components are deployed. Apex tests that take a long time to execute delay the entire deployment. The top-five long-running tests, that is the top-five tests that ran longer than two minutes, are flagged for a completed deployment in the Deployment Details page. You can improve the performance of these tests to make them more efficient and speed up future deployments. There can be many causes for slow performance. For example, accessing organization data instead of using test data, or exercising SOQL queries or Apex code with poor performance. Here are some resources you can use to learn about performance best practices for Apex and SOQL. • Isolation of Test Data from Organization Data in Unit Tests • Working with Very Large SOQL Queries • Webinar: Inside the Force.com Query Optimizer • Query and Search Optimization Cheat Sheet • Performance Tuning for Visualforce and Apex Webinar • Architect Core Resources 35 Monitoring the Status of Your DeploymentsMigrating Changes Between Environments
  • 40.
    Deployment Dependencies Whether youare migrating changes between development environments or deploying changes to a production organization, there are a number of factors that affect whether or not the deployment succeeds. The most significant of these factors are dependencies. There are a few different kinds of dependencies: • Parent-child—Metadata components may depend on other components. For example, you can’t deploy a custom field without deploying its custom object as well because the field's existence depends on the object. These kinds of object dependencies are not always within the same object; they can be across different objects. For example, a relationship field on one object can’t be deployed without the target object being included in the deployment, or already present in the target organization. • Referenced file—Every file that is referenced by another file must either be included in the deployment plan, or already in the destination organization. For example, if you have a Visualforce page that references an image as a static resource and the image does not exist in the target organization, you must include the image in the deployment. The referenced file must be available through the Metadata API. For example, if that same Visualforce page had referenced an image in a personal document folder, and you included all folders in the deployment plan, the deployment would fail because personal documents are not available via the Metadata API. • Ordering—Dependencies require that components are deployed in a specific order, and within a single deploy operation, this order is handled automatically by the Metadata API. However, if you deploy a subset of components, or split your deployment into multiple batches, you must take into account the ordering dependencies yourself. • Mandatory fields—When you create an object using the Force.com IDE or the Salesforce user interface, the tool enforces the creation of mandatory fields. However, when working with files in a local directory, it is possible to create or modify metadata files that are missing mandatory fields and therefore can’t be deployed. You can also introduce these kinds of errors by copying and pasting between components. Migrating Files in Batches The easiest way to migrate changes is to deploy all of them in a single operation. However, there are a number of reasons you might want to divide the deployment into smaller pieces: • The deployment is too large—Metadata API can deploy and retrieve up to 10,000 files or 400 MB at one time. • Long deployments—If you experience unusually long deployments, you can divide your deployment into smaller pieces. This can reduce user impact due to locks being held in long-running operations. • Apex testing—You might want to divide your components into two parts: those that require testing and those that don’t. This speeds the deployment of components that don’t require testing and locks fewer components. Determining Which Files to Deploy Together If you need to divide your deployment into smaller pieces, it’s important to know which components to deploy at the same time. • Deploy components that don’t trigger tests—Some components can’t cause a test to break, and therefore they don’t trigger tests onaproductionorganization.Ifthedeploymentconsistsentirelyofthefollowingcomponents,youcandeploytoproductionwithout running tests: – Visualforce component (ApexComponent) – Visualforce page (ApexPage) – Dashboard – Email template – Report 36 Deployment DependenciesMigrating Changes Between Environments
  • 41.
    – Scontrol – Staticresource • Don’t split dependent components—Because file dependencies play such a large role in migrating metadata, it’s very important not to separate dependent components. • Deploy the most numerous components separately—The following components can be the most numerous, and so you may want to deploy these separately from other components. – Email templates can be deployed separately, but must be deployed before the components that use the templates. – Dashboards can be deployed separately, but should be deployed before reports in case a custom button links to a report. – Reports may contain the largest number of components, and they can be deployed after all other components and in multiple batches. Deploying Batches of Files Using the Force.com IDE There are two ways you can use the Force.com IDE to deploy batches of components: either by changing the project contents or deselecting the components you do not want to deploy when you use the Force.com Deployment Wizard. The easiest way to deploy batches of files is to create a new Force.com project and use the Choose Metadata Components dialog to select only the components you want to deploy. The Choose Metadata Components dialog is a graphical tool that allows you to select individualcomponentsorallcomponentsofacertaintype.Whenyoucreateaproject,youusethisdialogtodeterminewhichcomponents you want in the project, but you can edit the project contents at any time, as well. Whenyoucreateoredityourprojectcontentsinthismanner,whathappensbehindthescenesaremodificationstothe package.xml file. This file is also called the project manifest, and determines what is in your project, both when you retrieve and deploy components. You can also edit the package.xml file by hand by dragging it into the Editor pane. Warning: Editing the package.xml file by hand is only advisable if you must have finer control than the dialog can give you. Note that if you open the Choose Metadata Components dialog after editing the package.xml file, you may undo some of the changes you made. 37 Deploying Batches of Files Using the Force.com IDEMigrating Changes Between Environments
  • 42.
    The other wayto control the deployment plan is to use the Force.com Deployment Wizard. This wizard allows you to choose which components in your project you want to deploy, and the specific action you want to take: add, delete, overwrite, or take no action. To use the wizard, right-click a Force.com project and choose Force.com > Deploy to Server. How to Migrate Batches of Files Using the Force.com Migration Tool If you use the Force.com Migration Tool, there is no graphical user interface to edit the package.xml file, and so you must become familiar with the format of the XML files and edit this file by hand. There are two deployment targets you can call that will help you determine which components to include in each package.xml file you must create. • describeMetadata—Returns a list of metadata types that are enabled for your organization. This target is useful when you want to identify the syntax needed for a metadata type in package.xml. • listMetadata—Returns the names and other properties of individual metadata components in your organization, along with extra information about each one. This target is useful when you want to include specific components in the package.xml, or if you want a high-level view of particular metadata types in your organization. For example, you could use this target to return a list of names of all the reports in your organization, and use this information to create a package.xml file that returns the specific reports you want to migrate. For more information about using these deployment targets, see the Force.com Migration Tool Guide. 38 How to Migrate Batches of Files Using the Force.com Migration Tool Migrating Changes Between Environments
  • 43.
    Deleting and RenamingComponents When you migrate components from one organization to another, the operation is similar to an upsert. That is, you can deploy changes to a component that already exists, but if the component does not exist, it is created. For example, if you have a component named foo in organization A and you change a data type, when you deploy that change to organization B, the data type is changed as long as foo exists in organization B. However, if foo does not exist in organization B, the entire component is created. If you rename a component in organization A and deploy that component to organization B, you might expect the name to be changed in organization B, but instead, you create a new component in organization B. This is because the deploy operation looks for matching names. Because a component with the name doesn’t exist in organization B, a new one is created. For example, if you rename foo to foos in organization A, and then deploy that change to organization B, this results in two components, both foo and foos, in organization B. To rename a component, you must delete the component, and then recreate it with a new name. The process you use to delete a component depends on the environment: • For development and testing environments—Delete the components, recreate them with new names, and reload test data. • Forproductionorstagingenvironments—RenamecomponentsusingtheSalesforceuserinterface.Thispreservesthedatainexisting records. The project manifest (package.xml) determines what is deployed in a project, but this file cannot be used to process deletes. To deletefilesinaForce.comproject,youmustcreateaprojectmanifestandnameit DestructiveChanges.xml.Whenyouinclude this file in a deployment, the components you specify for deletion are removed in the target organization. Using the AppExchange to Migrate Changes It is possible to use the AppExchange to move metadata between organizations, but it is not an efficient way to migrate changes. Unmanaged packages do not allow you to install components of the same name, and so those components cannot be further modified (via an unmanaged package) after the initial installation. Another kind of package is a managed package. Managed packages add constraints that make them poorly suited to use as an IT development tool. Furthermore, while any type of organization can be used to create an unmanaged package, managed packages must be created using a Developer Edition organization. Note: Unmanaged packages can be a useful for distributing initial components to multiple organizations. For example, if you want all of your development environments to have the same set of core Apex classes, you could package these and distribute them on the AppExchange. This use of unmanaged packages is a convenient way to deliver files to multiple development environments, but cannot be used to make further changes to those files. Deploying to Production The tools and processes for deploying to a production organization are similar to those for migrating changes from one development environment to another. However, when deploying to production, there are some important differences and several additional steps. Because the procedure you take when deploying to your production organization depends on your IT department's policies and on whatyouaredeploying,thereisnoprescribedprocessfordeployingtoproduction.However,therearesomebestpracticesfordeployment. It is important to deploy during a period when users will not be making changes to your organization. You should also perform a test deployment to guarantee the success of the production deployment. These steps typically happen during a maintenance window. During this time, users should be locked out of the system, so plan this well in advance and during off-peak hours. Deployment is an all-or-nothing event—for example, a single new field on the production organization can make the entire deployment fail if this field 39 Deleting and Renaming ComponentsMigrating Changes Between Environments
  • 44.
    does not existin the deploying organization. Because any changes you make on production during the deployment phase can nullify the final deployment, it is important that no changes occur until deployment finishes. It is advisable to create a staging environment that allows you to do a test deployment before deploying to production. The staging environment is usually a full-copy sandbox, so it is as similar to the production organization as possible. For this reason, you should create or refresh the staging environment during the maintenance window, not before. Full-copy sandboxes can take some time to create or refresh, so it is important to pad your maintenance window to account for this. Deployment to the staging environment follows the same procedure as migrating from one development organization to another. This procedure includes manual migration for any component not in the Metadata API, and for any features developed using the Salesforce user interface. In addition, it’s advisable to manually run all tests in your staging environment to avoid any possible issues before the production deployment. Development environments don’t enforce Apex test coverage, but a production organization does. Note: The Force.com platform requires that at least 75% of your code is covered by unit tests before you can deploy it to a production organization. Ideally, you should strive for 100% coverage. The code coverage restriction is not enforced for sandbox or Developer Edition organizations. After you successfully deploy to your staging environment, you need to make some additional changes before deploying to production. If you modified any environmental dependencies in your development environment (for example, to give developers permissions they do not have on production), you need to change those values back to the production values. If you configured service endpoints to test integration with external services, those must also be changed to their production values. You are now ready to deploy to production. First lock users out of the system, and then perform a Metadata API test deployment on the production organization. This is a validation “check-only” deployment, meaning that the deployment is fully simulated and the success or failure of the deployment is returned, but no components are actually deployed. This step is especially important if there is a time lapse between when the deployment was staged (during normal business hours, for example) and when the actual deployment takes place (when users are locked out over the weekend, for example). If this test deployment is successful, you can deploy changes using the Metadata API or Web interface, depending on the components. Keeping in mind that all IT organizations are different, the following procedure recaps the high-level steps you might follow for deploying an enterprise application to a production organization: 1. Announce a maintenance window. 2. Stop all setup changes on production. 3. Create a staging environment. 4. Migrate changes to the staging environment. 5. Change environmental dependencies and services from testing settings to production values. 6. Lock users out of the application. 7. Test deploy using the Metadata API. 8. Deploy to production. 9. Unlock the production organization. Scheduling the Release Any time you deploy changes to a production environment your users are directly affected, so it is a good idea to have guidelines for rolling out new functionality. Salesforce has over a decade of experience in this area, and you might want to base your rollout procedure on our model: 1. Don’t break anything: a. Release your production functionality in a test environment first. If you successfully deploy and test in a full-copy sandbox, you can be confident your final deployment to production will succeed. 40 Scheduling the ReleaseMigrating Changes Between Environments
  • 45.
    b. Back upeverything. c. Have a fallback plan, just in case. 2. Schedule the release: a. Create and announce a maintenance window during which your organization will be unavailable to most users. b. Use profiles to control maintenance updates. 3. Inform users of every change: a. Create detailed release notes that document new functionality and changes to existing behavior. b. Send an email announcing the main features with a link to the release notes. c. Create webinars and training sessions to educate users. Using Profiles to Control Maintenance Updates During a deployment window, you can use user profiles to limit end user access to the production organization: 1. Create and announce a maintenance window during which your organization will be unavailable to most users: • From Setup, click Manage Users > Mass Email Users to access an email wizard that allows you to alert all active users about the maintenance window. 2. Use profiles to create and manage the maintenance window: • Edit Login Hours in user profiles to lock most users out during the maintenance window. Be sure that any system administrator or integration users have access if they need it. • Roll out objects, tabs, and apps selectively to different user profiles if you want to allow some users to have access for user acceptance testing. If your organization includes many profiles, use the following strategy for setting up a maintenance window: 1. Create a new profile named Maintenance with all login hours locked out. 2. Use the Data Loader to extract and save a mapping of users and their user profiles. 3. At the beginning of the maintenance window, use the Data Loader to change all user profiles except the administrator's to the Maintenance profile. Note that it is very important to leave login access with the administrator because otherwise all users could remain locked out of the system indefinitely. If any integrations are going to run during the maintenance window, the integration user should also not be locked out. 4. At the end of the maintenance window, use the Data Loader to reload the users with their original profiles. Fixing Bugs Where you make bug fixes depends on the severity of the bug and on the specifics of your IT department. Generally speaking, there are two choices: make the fix in the production organization or in a development environment. The best practice is to make all your changes in one place, and then follow a repeatable process for moving the change to production. One version of this process is shown in the following image: 41 Using Profiles to Control Maintenance UpdatesMigrating Changes Between Environments
  • 46.
    This process isnot always practical when you have high-priority bugs fixes that need to get to production immediately. In that case, you mustfixthebugintheproductionenvironmentandthenmigratethesamebugfixtoyourdevelopmentenvironments.Thisisimportant becausechangesmadetotheproductionorganizationcanbeoverwrittenwhenyoumigratechangesfromadevelopmentenvironment. One version of this process is shown in the following image: 42 Fixing BugsMigrating Changes Between Environments
  • 47.
    CHAPTER 7 AdvancedDevelopment Lifecycle Scenario This chapter covers the recommended development lifecycle for advanced development and release management. The advanced development lifecycle applies to companies where concurrent application development occurs and where some of the customizations are performed programmatically. Concurrent development takes place when developers in multiple business units are working on multiple projects in parallel or when developers in the same team are sharing the development task for an application. The processofperformingconcurrentdevelopmentinSalesforce,integratingchangesfromdifferentdevelopers,testing,andreleasingthose changes to production via multiple intermediate environments constitutes a development lifecycle. The advanced development lifecycle is described and followed by an example of a development lifecycle in a fictitious company. Example: Example Company: AW Computing For the scenario in this chapter, a fictitious company, called AW Computing, is used. AW Computing is a midsize company that supplies office computing equipment to businesses and individual consumers. AW Computing has an internal development team that includes four developers, two quality engineers, a release manager, and a product manager, among others. AW Computing has integrated data into Salesforce from an external system, SAP, an enterprise resource planning and business system. The AW Computing development team must put all its work through user acceptance testing. Also, AW Computing provides a formal training process to employees before deploying releases to production. The company also needs the ability to quickly deploy patch fixes to production. Here are descriptions of roles that are held at AW Computing. • Release manager—is in charge of managing the release schedule and coordinating releases with the business. The release manager is also in charge of managing the source control system. • Product manager—provides the business requirements of apps and features and works with the development team to implement those requirements. The product manager also performs user acceptance testing to ensure that requirements have been implemented. • Software developer—writes applications outside of the production environment. • Quality engineer —performs testing of applications that are under development. • Administrator—performs administrative tasks in the production organization, such as creating reports. • Trainer—conducts training of company employees for new applications and features. Source Control System and Deployment Tools Source Control System Customizations are migrated from sandbox to a central source control repository before being migrated to other environments. The repository, such as Git or Apache Subversion (SVN), helps integrate the changes that were implemented by concurrent development and separates the different versions of an application. The source control repository contains a copy of your entire organization’s metadata as exposed by Metadata API. Team members can add their customizations, such as custom objects, fields, and reports, and Apex or Visualforce code to the source control repository. These changes are then merged with changes that were made by other team members or developers on other teams. A source control system ensures a quality development process and has many other benefits, including the ability to deploy only a specific version of customizations, and maintaining a separate branch for each project without overwriting customization done as part of other projects. 43
  • 48.
    In the sourcecontrol system that you use, such as Git, you can create a repository with multiple branches. Each branch contains a set of changes that are developed by a separate team. For example, one team of developers might be working on a feature that’s going live inFebruary. Anotherteammightbeworkingonafeaturethat’sgoingliveinMarch. TheseteamsneedseparateDeveloperorganizations and integration test sandboxes. In addition, because patch releases contain bug fixes and therefore different customization metadata and Apex code than new features, use a separate branch for a patch release. You can use the Force.com Migration Tool to retrieve a copy of your organization’s metadata to commit to source control. Conversely, the Force.com Migration Tool can be used to deploy metadata that’s saved in source control to an organization. Force.com Migration Tool The Force.com Migration Tool is a Java- and Ant-based command-line utility for downloading metadata from one organization and storing it in a local directory on your file system. You can also deploy metadata from a local directory to a different Salesforce organization. The Force.com Migration Tool provides ease of automation and flexibility. You can automate deployments through scripts, and specify deployment options in control files. Also, this tool enables you to change the content of the metadata in the files before you deploy. See the Force.com Migration Tool section earlier in this guide. Force.com IDE The Force.com IDE is an integrated development environment for developing applications on the Force.com platform by using Apex, Visualforce,andmetadatacomponents.TheForce.comIDEisbuiltontopoftheopen-sourceEclipsePlatformandisavailableasaplug-in. Apex, Visualforce, and metadata components are saved on the local file system by the IDE. Developers can use a tool to commit these changes from the file system to the source control repository. An Eclipse plug-in is available that enables interacting with the source control system directly from the IDE, which makes it easy for developers to quickly commit their changes. See the Force.com IDE earlier in this guide. For our AW Computing example company, here is a summary of the tools that are used. • A source control system: In our example company, we use Git, but any source control system is fine. • Force.com Migration Tool: Engineers typically have the Force.com Migration Tool configured on their local environment. • Force.com IDE for development 44 Source Control System and Deployment ToolsAdvanced Development Lifecycle Scenario
  • 49.
    Change Sets Change setscan be used to migrate metadata components. Change sets are designed for ease of use but have limitations. For example, change sets can contain only changes made through the Salesforce user interface and not through the Force.com IDE, and change sets can’t be used to rename or delete a component. To be able to automate your migrations and to have wider metadata migration support, we recommend using the Force.com Migration Tool. Development Lifecycle and Sandbox Environments Duringadevelopmentlifecycle,multipletasksarecarriedoutbyseparateteams.Fromdevelopinganapplicationtotestingandreleasing, tasks must follow a specific release process. Some development and testing tasks are done in parallel, while other tasks depend on other deployments to be completed first. Separating environments for these tasks (development, testing, integration, and staging) makes team development possible and helps ensure a high quality for the release. You can obtain separate development and testing environments for the development lifecycle by creating sandbox organizations. Sandboxes contain a copy of your organization’s metadata and sometimes its data too. Sandbox Types The following sandbox environments are available. For a full description of each sandbox type, see About Types of Development Environments. • Developer • Developer Pro • Partial Copy • Full Developer and Developer Pro sandboxes are recommended for development and testing. They don’t include any data (standard and custom data objects). Partial Copy sandboxes are typically used for integration or user-acceptance testing (UAT) environments and include a subset of the organization’s data in addition to the metadata. Full sandboxes are full copies of all of the organization’s data and metadata. Full sandboxes are exact replicas of your production organization, while the other sandboxes are partial copies. Sandbox Data Templates Use sandbox templates with your Partial Copy and Full sandboxes to pick specific objects and data to copy to your sandbox. Sandbox templates enable you to control the size and content of each sandbox. In a large organization with multiple project teams, you can leverage data templates with Partial Copy sandboxes to segment the testing effort. For example, you can break up regression testing to occur across multiple sandboxes with shorter refresh cycles (rather than a Full sandbox). Recommended Sandbox Environments for Feature Releases For feature releases, these are the recommended sandbox environments, broken up by tasks. • For development and testing, the following sandboxes are recommended. – An exclusive Developer or Developer Pro sandbox for development (one per engineer) – A shared Developer or Developer Pro sandbox for shared testing • For integration and user acceptance testing, shared Partial Copy sandboxes 45 Development Lifecycle and Sandbox EnvironmentsAdvanced Development Lifecycle Scenario
  • 50.
    • For stagingchanges, a Full sandbox Create a sandbox user for each user who logs in to a shared sandbox. Each user logs in to the sandbox with a unique user account. Using Exclusive versus Shared Sandboxes for Development We recommend that each developer create and work on his or her own sandbox. Having one sandbox per developer provides more control for each developer—each developer decides when to refresh his or her sandbox with the latest changes from the repository or when to commit changes. If your team members work closely together and primarily use point-and-click tools in the Salesforce user interface, team members can share a sandbox. A sandbox can be shared by creating user accounts for each user. Sharing a sandbox makes the process of managing sandboxes and synchronizing them with source control easier, but it makes the development process more complex. The following diagram illustrates a layout of sandbox environments for development and testing. This high-level diagram assumes that there are an arbitrary number (n) of developers and QA engineers, each with a sandbox. 46 Development Lifecycle and Sandbox EnvironmentsAdvanced Development Lifecycle Scenario
  • 51.
    User Acceptance TestingSandbox Employees in the company can use the user acceptance testing (UAT) sandbox to try out new features or perform ad hoc testing. For example, the product manager might want to perform some ad hoc testing to ensure that features are implemented and to prepare a demo. Also, a trainer can use the new app to prepare formal training materials before the app is rolled out in production. A Partial Copy sandbox or Full sandbox is recommended to test the customizations with data from production. A Partial Copy sandbox contains all the organization’s metadata and a selected amount of production’s data, while a Full sandbox contains all of production’s metadata and data. The following diagram builds on the previous one and shows a Partial Copy sandbox used. The Staging Sandbox The staging environment is the last environment in the development lifecycle before production. The staging sandbox is a Full sandbox that contains all data and metadata that’s in production—it’s a full replica of production that enables you to perform real-world testing and catch any data-dependent issues that affect the behavior of the app. Use the staging environment to perform a test deployment and to perform final regression testing—run all tests and make sure that the deployment is successful. This task is equivalent to a validation-only deployment to production. Note: • For Force.com Migration Tool version 34.0 and later, run local tests in the staging sandbox by adding the testLevel="RunLocalTests" parametertoyourdeploytarget.Thisparameterensuresthatthetestsruninsandbox are the same as the tests that are run by default in production, if required. • ForForce.comMigrationToolversion33.0andearlier,youcanrunallteststhroughtheForce.comMigrationToolinthestaging sandbox,includingteststhatoriginatefrominstalledmanagedpackages,bysettingthe runAllTests parameterto true. Managedpackagetestscan’tbeexcludedwhenusingthe runAllTests parameter.Incontrast,teststhatrunautomatically in production are only local tests (with no namespace) that don’t originate from installed packages. See Tips for Configuring the Force.com Migration Tool to Run Tests. Also, use the staging environment to perform stress and performance testing. Note that because the hardware for sandbox in the Force.com platform differs from the production organization hardware, the results of performance testing on sandbox might not match those in production. Nonetheless, performance testing on the staging sandbox can still help catch performance issues and errors that arise from Apex governor limits. Running unit tests continuously and early in the development process is recommended to ensure a high quality for your application. For more information, see Continuous Integration Process. 47 Development Lifecycle and Sandbox EnvironmentsAdvanced Development Lifecycle Scenario
  • 52.
    Note: Changes aretypically migrated one way only: from the source control system to your production organization. However, sometimes if you make changes manually in your production organization, you must replicate those changes back to your source control repository so that they won’t be lost on the next deployment. You can do so by making those changes manually in a Developer sandbox and by committing the changes to source control. Full Application Lifecycle Diagram for Feature Releases The following diagram incorporates all the stages in the application development lifecycle for feature releases. 48 Development Lifecycle and Sandbox EnvironmentsAdvanced Development Lifecycle Scenario
  • 53.
    Patch Releases Sometimes it’snecessary to push a new version of the application as a patch after it has been released. The reason for the change might be an important bug fix that needs to go out quickly or a more involved enhancement. For an urgent bug fix (a hotfix), the change can be applied quickly to production by using a short release cycle. For a larger change, more thorough testing is required and the short cycle is not appropriate. Instead, we recommend that you use the same release process as for a major release for major changes. 49 Patch ReleasesAdvanced Development Lifecycle Scenario
  • 54.
    After a majorrelease, the development team has likely moved on to a new version of customizations. To prevent interference with new features and mix bug fixes or feature enhancements with features that can’t be released, you must isolate the released version of customizations from the new version that the development team is working on. Therefore, use a separate source control branch for new feature work. Patch Release Lifecycle For small changes that need to be released quickly, or hotfixes, we recommend a development lifecycle that provides a quick path to production. Use the following sandboxes: • A Developer sandbox that’s configured with the latest work from production. This sandbox is used by the developer who is on production support duty. • A test environment that consists of a Developer or Partial Copy sandbox Use separate source control branches for a patch release and the next feature release. • One branch for the patch release, which corresponds to the version currently deployed in production (the production version) • One branch for the new customizations, which will be released at a future time to production. This branch also contains changes from the patch release branch. To apply patch releases, a deployment is done from the patch branch to the production organization. Also, patch changes need to be integrated from the patch branch to the branch for the next feature release to ensure that the changes won’t be lost on the next major release. This diagram shows a typical patch environment that contains sandboxes and source control systems. Before you deploy the patch to production, perform a test deployment to the staging sandbox. 50 Patch ReleasesAdvanced Development Lifecycle Scenario
  • 55.
    Development Lifecycle Scenario:AW Computing Let’slookatatypicalprocessfordevelopmentanddeploymentforourfictitiouscompany,AWComputing.Forthisprocess,AWComputing is developing and deploying a custom Force.com application. The following tools are used at AW Computing for development. • The Force.com IDE for developing apps • Git as a source control system and a Git repository, such as GitHub or Bitbucket. • The Force.com Migration Tool for updating sandboxes from source control Each engineer at AW Computing’s development team has his or her own sandbox. AW Computing: Source Control Setup The release manager, Nishi, must first set up the Git repository. The default branch in the repository is the master branch, which corresponds to the metadata that is in production. For feature development, Nishi must create a separate branch and share it with the development team. A feature branch isolates the customizations in production from new features that are in development. After creating the Git repository, Nishi populates the master branch with metadata from production. Here are the steps that Nishi follows: 1. Creates a central Git repository with a default master branch. The Git repository is remote and has to be cloned by each user once. 2. Prepares a package.xml manifest that specifies all metadata types in the organization by using wildcards. Nishi can obtain this file from the Force.com IDE or manually (see Tips for Generating package.xml for All Metadata). 3. Retrieves all the metadata from production by using the Force.com Migration Tool and the package.xml manifest. 4. Commits the downloaded metadata files, the package.xml manifest, and the tool’s control files to the master branch and pushes them to the remote repository. See Configuring the Force.com Migration Tool. Now that the master branch is set up and has been populated, Nishi creates a branch for new feature work that is based on master and pushes this branch to the central repository. Let’s refer to this branch as the feature branch. This branch is specific to a set of features that a team is developing. The feature branch is now ready to be used by the development team. Each developer in the team must clone the Git repository to get a local snapshot on their systems. Next, each developer must switch to the feature branch. Because Git repositories are local for each user, any work done by a developer that gets committed in the local repository must eventually be pushed to the remote repository. Note: The Git workflow described in this scenario is one approach for a branching model. Git offers a lot of flexibility for working with branches. You may want to select a branching model that works best for your organization. For more information, see the Git website. AW Computing: First Developer Adds First Feature to Source Control 1. Andrew,aseniordeveloper,beginsbycreatinghisDevelopersandbox.Andrew’ssandboxcontainsacopyofproduction’sapplication and configuration information. 2. Andrew uses the Force.com IDE to connect to his sandbox organization. Andrew chooses to retrieve all the metadata that’s available in his sandbox organization to the IDE. The IDE creates a package.xml file dynamically for this retrieval. 3. Andrew clones the feature branch to get a local copy. 4. Andrew builds the app by adding new components, Apex code, and a Visualforce page. All these components are saved to the sandbox organization from the IDE. 51 Development Lifecycle Scenario: AW ComputingAdvanced Development Lifecycle Scenario
  • 56.
    5. After Andrewfinishes his first feature, he performs unit testing. 6. It’s time to commit his changes to the feature branch in Git, but first Andrew needs to update his IDE with any changes that were done manually in his sandbox user interface that aren’t in his IDE. To this end, Andrew runs the Refresh from Server command in the Force.com IDE. 7. Andrew commits his files to the feature branch in his local repository and then to the remote repository by using the git push command. The files consist of the folders and their contents that were created by the IDE and that correspond to the sandbox’s metadata. AW Computing: Second Developer Integrates with Other Changes Jane is another developer on the team who wants to add features to the app. 1. Jane creates her sandbox based on the production organization. 2. Jane clones the feature branch to get a local copy that includes Andrew’s customizations. 3. To deploy the metadata files that she got in the previous step to her sandbox, Jane uses the Force.com Migration Tool. First, Jane configures the tool. 4. JanerunstheForce.comMigrationToolwiththe package.xml that’sinGittogetthelatestchangesfromGittoherownsandbox. Now Jane’s sandbox contains Andrew’s changes. 5. Jane adds her own customizations in the Force.com IDE. 6. To get any changes that Jane made manually in her sandbox user interface, she runs the Refresh from Server command in the Force.com IDE. 7. Jane finishes her work and tests her changes. 8. Jane commits her changes locally. 9. Before updating the Git repository, Jane executes a git fetch and git merge command to include any changes that might have been uploaded to the repository by Andrew or another developer since she created her local project. She addresses any conflicts. 10. Jane executes a git push command to push her changes to the Git repository. AW Computing: Quality Engineer Tests the Application Robert, a quality engineer on the team, wants to test Andrew’s and Jane’s changes. He follows the same process as Jane did to create his sandbox and get the changes from Git. Next, Robert adds more Apex test methods, runs those tests, and performs additional ad hoc testing, as required. Robert adds his tests to the Git feature branch. AW Computing: Engineers Synchronize Changes during Simultaneous Application Development When other engineers on the team need to work on the same application or test the application, they need to follow the same process as Jane did to deploy changes from Git to their sandboxes and then commit the new changes back to Git. This diagram shows the sandboxes owned by the team members and how changes are synchronized to the source control repository. In this diagram, Dev Sandbox stands for Developer sandbox. 52 Development Lifecycle Scenario: AW ComputingAdvanced Development Lifecycle Scenario
  • 57.
    AW Computing: Integrationand Shared Testing Now that the customizations have been completed and fully tested, the team wants to perform more thorough testing to ensure that data in the organization from external systems will work with these customizations. To this end, Robert creates a Partial Copy sandbox and deploys the latest customizations to it by starting a deployment from the Git repository. Robert uses a sandbox template for the Partial Copy sandbox. The template enables the selection of the data to copy and allows controlling the size and content of the sandbox. Robert follows this process: 1. Create a Partial Copy sandbox and then populate it by using a sandbox template. 2. Deploy the latest customizations to this sandbox from Git by using the Force.com Migration Tool and the package.xml file from Git. 3. Create user accounts on this sandbox for all users who will perform integration testing. 4. If bugs are found, we recommend that the fixes be done on the Developer sandboxes by using the Force.com IDE and then be committed into Git. Also, Robert creates the shared QA sandbox that’s used for testing by other employees outside the test team. The shared QA sandbox is a Developer sandbox, so it doesn’t contain data or support data templates. Robert creates multiple user accounts for all users who will access this sandbox. AW Computing: User Acceptance Testing and Training Now that integration and shared testing is done, the app can be shared with other employees. 1. The release manager, Nishi, sets up a Partial Copy sandbox for user acceptance testing and deploys the customizations to it from Git. This process is similar to setting up the integration sandbox. The customizations contain the latest bug fixes that the team made as a result of additional testing. 2. Other teams at the company want to verify the new changes or check out the new features. For example: 53 Development Lifecycle Scenario: AW ComputingAdvanced Development Lifecycle Scenario
  • 58.
    The product managermight want to perform some ad hoc testing to ensure that features are implemented and to prepare a demo. • • The trainer can use the new app to prepare formal training materials before the app is rolled out in production. If issues are discovered in the user acceptance testing sandbox, the fixes are implemented in the Developer sandboxes and committed into Git. AW Computing: Staging Environment and Final Release to Production Nowthatheapphasbeentestedandreviewed,theappisreadyforproductionrelease.Beforereleasingtheapprovedapptoproduction, a test deployment should be performed as well as final regression, performance, and stress testing. To this end, an intermediate sandbox environment is set up for staging. This sandbox is similar to the production organization—it has all the configurations and data that production contains. 1. The release manager, Nishi, creates a Full sandbox for staging. 2. Nishi simulates the deployment by deploying the app to the staging sandbox environment and by running all Apex tests. 3. The QA team performs stress and performance testing, and final regression testing. Note: Because the hardware for the sandbox in the Force.com platform differs from the production organization hardware, the results of performance testing on the sandbox might not match those in production. Nonetheless, performance testing on the staging sandbox can still help catch performance issues (even if not entirely identical to production) and errors that arise from Apex governor limits. Note: • For Force.com Migration Tool version 34.0 and later, run local tests in the staging sandbox by adding the testLevel="RunLocalTests" parametertoyourdeploytarget.Thisparameterensuresthatthetestsruninsandbox are the same as the tests that are run by default in production, if required. • ForForce.comMigrationToolversion33.0andearlier,youcanrunallteststhroughtheForce.comMigrationToolinthestaging sandbox,includingteststhatoriginatefrominstalledmanagedpackages,bysettingthe runAllTests parameterto true. Managedpackagetestscan’tbeexcludedwhenusingthe runAllTests parameter.Incontrast,teststhatrunautomatically in production are only local tests (with no namespace) that don’t originate from installed packages. See Tips for Configuring the Force.com Migration Tool to Run Tests. After the release manager finishes the deployment and obtains successful results on the staging sandbox, she schedules a release to production and performs the final deployment to the production organization at the scheduled time. AW Computing: Fixing Bugs in Patch Environments 1. After the app is deployed to production, Andrew refreshes a Developer sandbox to get the latest changes from production. 2. Andrew makes the fix in his Developer sandbox and uploads his change to the patch branch in Git. 3. The release manager, Nishi, performs a validation deployment from Git to the staging sandbox by using the Force.com Migration Tool. 4. Nishi performs the hotfix deployment from Git to production. Note: All changes that are made to the patch branch must periodically be merged into the master branch so that the changes will be incorporated in the next feature release. 54 Development Lifecycle Scenario: AW ComputingAdvanced Development Lifecycle Scenario
  • 59.
    Continuous Integration Process Fora robust quality assurance process, use a continuous integration system, such as Jenkins, to run test deployments for each addition ofcustomizationstothesourcecontrolrepository.Youcanperformthesedeploymentsinadedicatedsandboxforcontinuousintegrations. Apex tests are executed as part of each deployment. Configure the Force.com Migration Tool to enable tests. See Tips for Configuring the Force.com Migration Tool to Run Tests. You can use a continuous integration system to automate deployments. For example, you can use Jenkins to automate deployments to the user acceptance testing (UAT) sandbox. The following diagram shows the relationship between the continuous integration server, sandbox, and source control. Handling Metadata That’s Not Supported in the API Some metadata components aren’t supported by the Metadata API and therefore don’t get migrated by tools such as the Force.com Migration Tool. For example, mail merge templates or the fiscal year aren’t supported. For a full list of metadata that’s not supported, see Unsupported Metadata Types in the Force.comMetadataAPIDeveloper’sGuide. This metadata must be created every time a sandbox is updated with new metadata from source control. You can create this metadata in the Salesforce user interface either manually or in an automated way. If you create the metadata components manually, we recommend you document these metadata changes and keep a checklist of these changes to validate migrations. To automate the creation of this metadata, you can use a browser user interface automation tool, such as Selenium. For more information about Selenium, see Selenium Browser Automation. 55 Continuous Integration ProcessAdvanced Development Lifecycle Scenario
  • 60.
    Configuring the Force.comMigration Tool Here are tips for common configuration tasks for the Force.com Migration Tool. Tips for Configuring the Force.com Migration Tool for Git To integrate the Force.com Migration Tool with a source control system, such as Git, the tool must be configured differently than when you run it on the command line and usse the local file system for storage. By integrating the Force.com Migration Tool with Git, you can have the tool store its output and take its input from the repository. Here are some best practices for configuring this tool for Git. • In Git, create the source (src) folder inside the project folder that contains package.xml. • Copy build.properties and build.xml from the tool’s sample directory to the Git project source (src) folder. • Don’t use package names for metadata retrievals or deployments. Instead, use unpackaged retrievals and deployments. Tips for Using a Remote Git Repository For a remote Git repository, you can integrate the Force.com Migration Tool with the Git repository to access files in a Git branch. Add this snippet to build.xml. <macrodef name="git"> <attribute name="dir" default="" /> <attribute name="branch" default="master" /> <sequential> <exec executable="git" dir="@{dir}"> <arg value="pull" /> <arg value="origin" /> <arg value="@{branch}" /> </exec> </sequential> </macrodef> <target name="checkoutFromGit"> <echo>Issuing git pull from directory: ${git.dir}</echo> <echo>Pulling from branch: ${git.branch}</echo> <git dir="${git.dir}" branch="${git.branch}" /> </target> Tips for Configuring the Force.com Migration Tool to Run Tests When you deploy to a staging sandbox, we recommend running Apex tests. By default, tests aren’t required and don’t run in sandboxes. However, you can enable test runs in the Force.com Migration Tool by adding the testLevel="RunLocalTests" parameter to your deployment target (<sf:deploy> tag) in the build.xml file. This deployment option runs local tests and excludes tests that originate from installed managed packages. This test execution corresponds to the tests run in production, when required. The followingexampleshowshowtestrunsareenabledinadeploymenttargetthroughthe testLevel="RunLocalTests" attribute, which is in bold. <sf:deploy username="${sf.username}" password="${sf.password}" testLevel="RunLocalTests" … /> 56 Configuring the Force.com Migration ToolAdvanced Development Lifecycle Scenario
  • 61.
    Note: If you’reusing a previous version of the Force.com Migration Tool (version 33.0 or earlier), the testLevel="RunLocalTests" parameter isn’t availabe. Instead, add the runAllTests="true" parameter. This parameter causes tests from installed managed packages to be run—not only local tests. If the tests in these managed packages don’t pass, set runAllTests to false and then run tests after deployment in the production organization by using the Apex Test Execution console, which you can access from Setup, by clicking Develop > Apex Test Execution. Tips for Generating package.xml for All Metadata To migrate all metadata components with the Force.com Migration Tool, you must use a package.xml manifest file that references all the metadata components in your organization. The following steps show how to create this file manually. 1. Using the Force.com Migration Tool, run this command: ant describeMetadata. The output of this command lists all metadata components along with child objects. You only need to include the parent objects (XMLName fields), because child objects are included with their parents when retrieving or deploying metadata with the Force.com Migration Tool. 2. Filter the returned list by excluding the types with the InFolder: true attribute (Dashboard, Document, EmailTemplate, and Report). 3. From the filtered list, copy the value of each XMLName fields into a <name> tag that’s nested in <types> in package.xml, and then associate a <members> tag with a * value. For example, for CustomLabels, the tag pair is: <types> <members>*</members> <name>CustomLabels</name> </types> This example shows a portion of package.xml. The contents of package.xml depend on the metadata available in your organization. <?xml version="1.0" encoding="UTF-8"?> <Package xmlns="http://soap.sforce.com/2006/04/metadata"> <fullName>SampleManifest</fullName> <types> <members>*</members> <name>AnalyticSnapshot</name> </types> <types> <members>*</members> <name>AuthProvider</name> </types> <types> <members>*</members> <name>CustomLabels</name> </types> <types> <members>*</members> <name>CustomObject</name> </types> . . . <version>31.0</version> </Package> 57 Configuring the Force.com Migration ToolAdvanced Development Lifecycle Scenario
  • 62.
    Production Release Considerations Whendeploying customizations to the production organization: • Ensure that planned Salesforce releases don’t impact your release. Schedule your release around Salesforce upgrades. • Ensure that tests run as part of a release. • Plan for the Salesforce Sandbox Preview. We recommend that you designate a few of your sandboxes to participate in our release preview. One month before every major release, Salesforce upgrades a set of its sandbox instances. All the sandbox organizations that reside on these instances will have access to the upcoming Salesforce release. Use these sandboxes for regression testing or trying out new functionality. Refreshing a Sandbox Environment We recommend that you refresh your sandboxes periodically to ensure that they have current configuration information and data. The staging and user acceptance testing (UAT) sandboxes can be refreshed at any time from the central source control repository. Because all the latest changes are stored and can be retrieved from the source control repository, there is no need to wait until the deployment to production finishes and succeeds. The sandbox refresh from source control can be automated by using a continuous integration process. See Continuous Integration Process. Sandbox Refresh Recommendations To refresh your sandbox, follow these recommendations. • Refresh your staging sandbox environment after each feature deployment period or every month, whichever is longer. • Refresh your UAT sandbox environment periodically to ensure that the partial data copy has current data. • Refresh your Developer sandboxes as needed. For instance, developers can refresh their sandboxes to have a clean copy of the organization’s configurations and metadata that they can use as a baseline and add customizations to. 58 Production Release ConsiderationsAdvanced Development Lifecycle Scenario
  • 63.
    GLOSSARY A | B| C | D | E | F | G | H | I | J | K | L | M | N | O | P | Q | R | S | T | U | V | W | X | Y | Z A Administrator (System Administrator) One or more individuals in your organization who can configure and customize the application. Users assigned to the System Administrator profile have administrator privileges. Apex Apex is a strongly typed, object-oriented programming language that allows developers to execute flow and transaction control statements on the Force.com platform server in conjunction with calls to the Force.com API. Using syntax that looks like Java and acts like database stored procedures, Apex enables developers to add business logic to most system events, including button clicks, related record updates, and Visualforce pages. Apex code can be initiated by Web service requests and from triggers on objects. App Short for “application.” A collection of components such as tabs, reports, dashboards, and Visualforce pages that address a specific business need. Salesforce provides standard apps such as Sales and Call Center. You can customize the standard apps to match the way you work. In addition, you can package an app and upload it to the AppExchange along with related components such as customfields,customtabs,andcustomobjects.Then,youcanmaketheappavailabletootherSalesforceusersfromtheAppExchange. App Menu See Force.com App Menu. AppExchange The AppExchange is a sharing interface from Salesforce that allows you to browse and share apps and services for the Force.com platform. AppExchange Upgrades Upgrading an app is the process of installing a newer version. Application Programming Interface (API) The interface that a computer system, library, or application provides to allow other computer programs to request services from it and exchange data. Approval Process An approval process is an automated process your organization can use to approve records in Salesforce. An approval process specifies the steps necessary for a record to be approved and who must approve it at each step. A step can apply to all records includedintheprocess,orjustrecordsthatmeetcertainadministrator-definedcriteria.Anapprovalprocessalsospecifiestheactions to take when a record is approved, rejected, recalled, or first submitted for approval. B No Glossary items for this entry. 59
  • 64.
    C Child Relationship A relationshipthat has been defined on an sObject that references another sObject as the “one” side of a one-to-many relationship. For example, contacts, opportunities, and tasks have child relationships with accounts. See also sObject. Class, Apex A template or blueprint from which Apex objects are created. Classes consist of other classes, user-defined methods, variables, exception types, and static initialization code. In most cases, Apex classes are modeled on their counterparts in Java. Client App An app that runs outside the Salesforce user interface and uses only the Force.com API or Bulk API. It typically runs on a desktop or mobile device. These apps treat the platform as a data source, using the development model of whatever tool and platform for which they are designed. Cloud Computing A model for software development and distribution based on the Internet. The technology infrastructure for a service, including data, is hosted on the Internet. This allows consumers to develop and use services with browsers or other thin clients instead of investing in hardware, software, or maintenance. Component, Visualforce Something that can be added to a Visualforce page with a set of tags, for example, <apex:detail>. Visualforce includes a number of standard components, or you can create your own custom components. Component Reference, Visualforce A description of the standard and custom Visualforce components that are available in your organization. You can access the component library from the development footer of any Visualforce page or the Visualforce Developer's Guide. Composite App An app that combines native platform functionality with one or more external Web services, such as Yahoo! Maps. Composite apps allow for more flexibility and integration with other services, but may require running and managing external code. See also Client App and Native App. Controller, Visualforce AnApexclassthatprovidesaVisualforcepagewiththedataandbusinesslogicitneedstorun.Visualforcepagescanusethestandard controllers that come by default with every standard or custom object, or they can use custom controllers. Custom App See App. Custom Field A field that can be added in addition to the standard fields to customize Salesforce for your organization’s needs. Custom Links Custom links are URLs defined by administrators to integrate your Salesforce data with external websites and back-office systems. Formerly known as Web links. Custom Object Custom records that allow you to store information unique to your organization. Custom Report Type See Report Type. 60 Glossary
  • 65.
    Custom S-Control Note: S-controlshave been superseded by Visualforce pages. After March 2010 organizations that have never created s-controls, as well as new organizations, won't be allowed to create them. Existing s-controls will remain unaffected, and can still be edited. Custom Web content for use in custom links. Custom s-controls can contain any type of content that you can display in a browser, for example a Java applet, an Active-X control, an Excel file, or a custom HTML Web form. Custom View A display feature that lets you see a specific set of records for a particular object. D Dashboard A dashboard shows data from source reports as visual components, which can be charts, gauges, tables, metrics, or Visualforce pages. The components provide a snapshot of key metrics and performance indicators for your organization. Each dashboard can have up to 20 components. Database An organized collection of information. The underlying architecture of the Force.com platform includes a database where your data is stored. Database Table A list of information, presented with rows and columns, about the person, thing, or concept you want to track. See also Object. Data Loader A Force.com platform tool used to import and export data from your Salesforce organization. Data Manipulation Language (DML) An Apex method or operation that inserts, updates, or deletes records. Dependent Field Any custom picklist or multi-select picklist field that displays available values based on the value selected in its corresponding controlling field. Developer Edition Afree,fully-functionalSalesforceorganizationdesignedfordeveloperstoextend,integrate,anddevelopwiththeForce.complatform. Developer Edition accounts are available on developer.salesforce.com. Salesforce Developers The Salesforce Developers website at developer.salesforce.com provides a full range of resources for platform developers, including sample code, toolkits, an online developer community, and the ability to obtain limited Force.com platform environments. E Email Alert Email alerts are workflow and approval actions that are generated using an email template by a workflow rule or approval process and sent to designated recipients, either Salesforce users or others. Email Template A form email that communicates a standard message, such as a welcome letter to new employees or an acknowledgement that a customer service request has been received. Email templates can be personalized with merge fields, and can be written in text, HTML, or custom format. 61 Glossary
  • 66.
    Enterprise Edition A Salesforceedition designed for larger, more complex businesses. Enterprise WSDL A strongly-typed WSDL for customers who want to build an integration with their Salesforce organization only, or for partners who are using tools like Tibco or webMethods to build integrations that require strong typecasting. The downside of the Enterprise WSDL is that it only works with the schema of a single Salesforce organization because it is bound to all of the unique objects and fields that exist in that organization's data model. F Field A part of an object that holds a specific piece of information, such as a text or currency value. Field Dependency A filter that allows you to change the contents of a picklist based on the value of another field. Field-Level Security Settings that determine whether fields are hidden, visible, read only, or editable for users. Available in Enterprise, Unlimited, Performance, and Developer Editions only. Folder A folder is a place where you can store reports, dashboards, documents, or email templates. Folders can be public, hidden, or shared, and can be set to read-only or read/write. You control who has access to its contents based on roles, permissions, public groups, and license types. You can make a folder available to your entire organization, or make it private so that only the owner has access. Force.com The Salesforce platform for building applications in the cloud. Force.com combines a powerful user interface, operating system, and database to allow you to customize and deploy applications in the cloud for your entire enterprise. Force.com App Menu A menu that enables users to switch between customizable applications (or “apps”) with a single click. The Force.com app menu displays at the top of every page in the user interface. Force.com IDE An Eclipse plug-in that allows developers to manage, author, debug and deploy Force.com applications in the Eclipse development environment. Force.com Migration Tool A toolkit that allows you to write an Apache Ant build script for migrating Force.com components between a local file system and a Salesforce organization. Web Services API A Web services application programming interface that provides access to your Salesforce organization's information. See also SOAP API and Bulk API. Foreign Key A field whose value is the same as the primary key of another table. You can think of a foreign key as a copy of a primary key from another table. A relationship is made between two tables by matching the values of the foreign key in one table with the values of the primary key in another. 62 Glossary
  • 67.
    G Governor Limits Apex executionlimits that prevent developers who write inefficient code from monopolizing the resources of other Salesforce users. Group A groups is a set of users. Groups can contain individual users, other groups, or the users in a role. Groups can be used to help define sharing access to data or to specify which data to synchronize when using Connect for Outlook or Connect for Lotus Notes. Users can define their own personal groups. Administrators can create public groups for use by everyone in the organization. Group Edition A product designed for small businesses and workgroups with a limited number of users. H No Glossary items for this entry. I Import Wizard A tool for importing data into your Salesforce organization, accessible from Setup. Instance Theclusterofsoftwareandhardwarerepresentedasasinglelogicalserverthathostsanorganization'sdataandrunstheirapplications. The Force.com platform runs on multiple instances, but data for any single organization is always stored on a single instance. Integration User A Salesforce user defined solely for client apps or integrations. Also referred to as the logged-in user in a SOAP API context. J Junction Object Acustomobjectwithtwomaster-detailrelationships.Usingacustomjunctionobject,youcanmodela“many-to-many”relationship between two objects. For example, you may have a custom object called “Bug” that relates to the standard case object such that a bug could be related to multiple cases and a case could also be related to multiple bugs. K No Glossary items for this entry. L Layout See Page Layout. 63 Glossary
  • 68.
    Letterhead Determines the basicattributes of an HTML email template. Users can create a letterhead that includes attributes like background color, logo, font size, and font color. M Managed Package A collection of application components that is posted as a unit on the AppExchange and associated with a namespace and possibly a License Management Organization. To support upgrades, a package must be managed. An organization can create a single managedpackagethatcanbedownloadedandinstalledbymanydifferentorganizations.Managedpackagesdifferfromunmanaged packages by having some locked components, allowing the managed package to be upgraded later. Unmanaged packages do not include locked components and cannot be upgraded. In addition, managed packages obfuscate certain components (like Apex) on subscribing organizations to protect the intellectual property of the developer. Many-to-Many Relationship A relationship where each side of the relationship can have many children on the other side. Many-to-many relationships are implemented through the use of junction objects. Master-Detail Relationship A relationship between two different types of records that associates the records with each other. For example, accounts have a master-detail relationship with opportunities. This type of relationship affects record deletion, security, and makes the lookup relationship field required on the page layout. Metadata Informationaboutthestructure,appearance,andfunctionalityofanorganizationandanyofitsparts.Force.comusesXMLtodescribe metadata. Metadata-Driven Development An app development model that allows apps to be defined as declarative “blueprints,” with no code required. Apps built on the platform—their data models, objects, forms, workflows, and more—are defined by metadata. Metadata WSDL A WSDL for users who want to use the Force.com Metadata API calls. Multitenancy An application model where all users and apps share a single, common infrastructure and code base. MVC (Model-View-Controller) A design paradigm that deconstructs applications into components that represent data (the model), ways of displaying that data in a user interface (the view), and ways of manipulating that data with business logic (the controller). N Native App An app that is built exclusively with setup (metadata) configuration on Force.com. Native apps do not require any external services or infrastructure. 64 Glossary
  • 69.
    O Object AnobjectallowsyoutostoreinformationinyourSalesforceorganization.Theobjectistheoveralldefinitionofthetypeofinformation you are storing.For example, the case object allow you to store information regarding customer inquiries. For each object, your organization will have multiple records that store the information about specific instances of that type of data. For example, you mighthaveacaserecordtostoretheinformationaboutJoeSmith'straininginquiryandanothercaserecordtostoretheinformation about Mary Johnson's configuration issue. One-to-Many Relationship A relationship in which a single object is related to many other objects. For example, an account may have one or more related contacts. Organization AdeploymentofSalesforcewithadefinedsetoflicensedusers.Anorganizationisthevirtualspaceprovidedtoanindividualcustomer of Salesforce. Your organization includes all of your data and applications, and is separate from all other organizations. Organization-Wide Defaults Settings that allow you to specify the baseline level of data access that a user has in your organization. For example, you can set organization-wide defaults so that any user can see any record of a particular object that is enabled via their object permissions, but they need extra permissions to edit one. Outbound Message An outbound message is a workflow, approval, or milestone action that sends the information you specify to an endpoint you designate, such as an external service. Outbound messaging is configured in the Salesforce setup menu. Then you must configure the external endpoint. You can create a listener for the messages using the SOAP API. Owner Individual user to which a record (for example, a contact or case) is assigned. P Package A group of Force.com components and applications that are made available to other organizations through the AppExchange. You use packages to bundle an app along with any related components so that you can upload them to AppExchange together. Page Layout Page layout is the organization of fields, custom links, and related lists on a record detail or edit page. Use page layouts primarily for organizing pages for your users. In Enterprise, Unlimited, Performance, and Developer Editions, use field-level security to restrict users’ access to specific fields. Personal Edition Product designed for individual sales representatives and single users. Picklist Selection list of options available for specific fields in a Salesforce object, for example, the Industry field for accounts. Users can choose a single value from a list of options rather than make an entry directly in the field. See also Master Picklist. Picklist (Multi-Select) Selection list of options available for specific fields in a Salesforce object. Multi-select picklists allow users to choose one or more values. Users can choose a value by double clicking on it, or choose additional values from a scrolling list by holding down the CTRL key while clicking a value and using the arrow icon to move them to the selected box. 65 Glossary
  • 70.
    Picklist Values Selections displayedin drop-down lists for particular fields. Some values come predefined, and other values can be changed or defined by an administrator. Platform Edition A Salesforce edition based on Enterprise, Unlimited, or Performance Edition that does not include any of the standard Salesforce apps, such as Sales or Service & Support. Primary Key A relational database concept. Each table in a relational database has a field in which the data value uniquely identifies the record. This field is called the primary key. The relationship is made between two tables by matching the values of the foreign key in one table with the values of the primary key in another. Production Organization A Salesforce organization that has live users accessing data. Professional Edition A Salesforce edition designed for businesses who need full-featured CRM functionality. Profile Defines a user’s permission to perform different functions within Salesforce. For example, the Solution Manager profile gives a user access to create, edit, and delete solutions. Q No Glossary items for this entry. R Read Only One of the standard profiles to which a user can be assigned. Read Only users can view and report on information based on their role in the organization. (That is, if the Read Only user is the CEO, they can view all data in the system. If the Read Only user has the role of Western Rep, they can view all data for their role and any role below them in the hierarchy.) Record A single instance of a Salesforce object. For example, “John Jones” might be the name of a contact record. Record Type A record type is a field available for certain records that can include some or all of the standard and custom picklist values for that record. You can associate record types with profiles to make only the included picklist values available to users with that profile. Record-Level Security A method of controlling data in which you can allow a particular user to view and edit an object, but then restrict the records that the user is allowed to see. Relationship A connection between two objects, used to create related lists in page layouts and detail levels in reports. Matching values in a specified field in both objects are used to link related data; for example, if one object stores data about companies and another object stores data about people, a relationship allows you to find out which people work at the company. Report A report returns a set of records that meets certain criteria, and displays it in organized rows and columns. Report data can be filtered, grouped, and displayed graphically as a chart. Reports are stored in folders, which control who has access. See Tabular Report, Summary Report, and Matrix Report. 66 Glossary
  • 71.
    Report Type A reporttype defines the set of records and fields available to a report based on the relationships between a primary object and its related objects. Reports display only records that meet the criteria defined in the report type. Salesforce provides a set of pre-defined standard report types; administrators can create custom report types as well. Running User Each dashboard has a running user, whose security settings determine which data to display in a dashboard. If the running user is a specific user, all dashboard viewers see data based on the security settings of that user—regardless of their own personal security settings. For dynamic dashboards, you can set the running user to be the logged-in user, so that each user sees the dashboard according to his or her own access level. S SaaS See Software as a Service (SaaS). S-Control Note: S-controls have been superseded by Visualforce pages. After March 2010 organizations that have never created s-controls, as well as new organizations, won't be allowed to create them. Existing s-controls will remain unaffected, and can still be edited. Custom Web content for use in custom links. Custom s-controls can contain any type of content that you can display in a browser, for example a Java applet, an Active-X control, an Excel file, or a custom HTML Web form. IdeaExchange A forum where Salesforce customers can suggest new product concepts, promote favorite enhancements, interact with product managers and other customers, and preview what Salesforce is planning to deliver in future releases. Visit IdeaExchange at ideas.salesforce.com. Salesforce SOA (Service-Oriented Architecture) A powerful capability of Force.com that allows you to make calls to external Web services from within Apex. Sandbox A nearly identical copy of a Salesforce production organization for development, testing, and training. The content and size of a sandbox varies depending on the type of sandbox and the editioin of the production organization associated with the sandbox. Session ID An authentication token that is returned when a user successfully logs in to Salesforce. The Session ID prevents a user from having to log in again every time he or she wants to perform another action in Salesforce. Different from a record ID or Salesforce ID, which are terms for the unique ID of a Salesforce record. Session Timeout The period of time after login before a user is automatically logged out. Sessions expire automatically after a predetermined length ofinactivity,whichcanbeconfiguredinSalesforcefromSetupbyclickingSecurityControls.Thedefaultis120minutes(twohours). The inactivity timer is reset to zero if a user takes an action in the Web interface or makes an API call. Setup AmenuwhereadministratorscancustomizeanddefineorganizationsettingsandForce.comapps.Dependingonyourorganization’s user interface settings, Setup may be a link in the user interface header or in the drop-down list under your name. Sharing Allowing other users to view or edit information you own. There are different ways to share data: • Sharing Model—defines the default organization-wide access levels that users have to each other’s information and whether to use the hierarchies when determining access to data. 67 Glossary
  • 72.
    • Role Hierarchy—definesdifferent levels of users such that users at higher levels can view and edit information owned by or shared with users beneath them in the role hierarchy, regardless of the organization-wide sharing model settings. • SharingRules—allowanadministratortospecifythatallinformationcreatedbyuserswithinagivengrouporroleisautomatically shared to the members of another group or role. • Manual Sharing—allows individual users to share records with other users or groups. • Apex-Managed Sharing—enables developers to programmatically manipulate sharing to support their application’s behavior. See Apex-Managed Sharing. Sharing Model Behavior defined by your administrator that determines default access by users to different types of records. Sites Force.com Sites enables you to create public websites and applications that are directly integrated with your Salesforce organization—without requiring users to log in with a username and password. SOAP (Simple Object Access Protocol) A protocol that defines a uniform way of passing XML-encoded data. Software as a Service (SaaS) A delivery model where a software application is hosted as a service and provided to customers via the Internet. The SaaS vendor takes responsibility for the daily maintenance, operation, and support of the application and each customer's data. The service alleviates the need for customers to install, configure, and maintain applications with their own hardware, software, and related IT resources. Services can be delivered using the SaaS model to any market segment. SOQL (Salesforce Object Query Language) A query language that allows you to construct simple but powerful query strings and to specify the criteria that should be used to select data from the Force.com database. SOSL (Salesforce Object Search Language) A query language that allows you to perform text-based searches using the Force.com API. Standard Object A built-in object included with the Force.com platform. You can also build custom objects to store information that is unique to your app. System Log Part of the Developer Console, a separate window console that can be used for debugging code snippets. Enter the code you want to test at the bottom of the window and click Execute. The body of the System Log displays system resource information, such as how long a line took to execute or how many database calls were made. If the code did not run to completion, the console also displays debugging information. T Test Method An Apex class method that verifies whether a particular piece of code is working properly. Test methods take no arguments, commit no data to the database, and can be executed by the runTests() system method either through the command line or in an Apex IDE, such as the Force.com IDE. Translation Workbench The Translation Workbench lets you specify languages you want to translate, assign translators to languages, create translations for customizationsyou’vemadetoyourSalesforceorganization,andoverridelabelsandtranslationsfrommanagedpackages.Everything from custom picklist values to custom fields can be translated so your global users can use all of Salesforce in their language. 68 Glossary
  • 73.
    Trigger A piece ofApex that executes before or after records of a particular type are inserted, updated, or deleted from the database. Every trigger runs with a set of context variables that provide access to the records that caused the trigger to fire, and all triggers run in bulk mode—that is, they process several records at once, rather than just one record at a time. U Unit Test A unit is the smallest testable part of an application, usually a method. A unit test operates on that piece of code to make sure it works correctly. See also Test Method. Unlimited Edition Unlimited Edition is Salesforce’s solution for maximizing your success and extending that success across the entire enterprise through the Force.com platform. Unmanaged Package A package that cannot be upgraded or controlled by its developer. URL (Uniform Resource Locator) The global address of a website, document, or other resource on the Internet. For example, http://www.salesforce.com. V Validation Rule A rule that prevents a record from being saved if it does not meet the standards that are specified. Visualforce A simple, tag-based markup language that allows developers to easily define custom pages and components for apps built on the platform. Each tag corresponds to a coarse or fine-grained component, such as a section of a page, a related list, or a field. The components can either be controlled by the same logic that is used in standard Salesforce pages, or developers can associate their own logic with a controller written in Apex. W Web Service A mechanism by which two applications can easily exchange data over the Internet, even if they run on different platforms, are written in different languages, or are geographically remote from each other. WebService Method An Apex class method or variable that can be used by external systems, like a mash-up with a third-party application. Web service methods must be defined in a global class. Wizard A user interface that leads a user through a complex task in multiple steps. WSDL (Web Services Description Language) File An XML file that describes the format of messages you send and receive from a Web service. Your development environment's SOAP client uses the Salesforce Enterprise WSDL or Partner WSDL to communicate with Salesforce using the SOAP API. 69 Glossary
  • 74.
    X XML (Extensible MarkupLanguage) A markup language that enables the sharing and transportation of structured data. All Force.com components that are retrieved or deployed through the Metadata API are represented by XML definitions. Y No Glossary items for this entry. Z Zip File A data compression and archive format. A collection of files retrieved or deployed by the Metadata API. See also Local Project. 70 Glossary
  • 75.
    INDEX A Accessing sandbox 13 Advancedlifecycle management configuring the Force.com Migration Tool 56 continuous integration process 55 Deployment tools 43 example scenario: AW Computing 51 patch releases 49 production release considerations 58 refreshing sandbox environments 58 sandbox environments 45 Source control 43 unsupported metadata 55 Ant tool 17 App builder 15 AppExchange 39 Application defects 41 Application lifecycle management advanced scenario 43 B Bugs 41 C Change process 20 Change sets creating 5 deploying 5 selecting components 5 uploading 5 validating 5 Change tracking manual 21 migration tool 21 Cloud computing 1 Components packaged 39 Configuring the Force.com Migration Tool 56 Continuous integration process 55 D Data Loader 15, 18 Declarative app builder 15 Deleting files 39 Delivery strategy 1–2, 7–8, 26, 29 Dependencies 36 Deploying changes batch 37 change sets 3–4 manual 30 Metadata API 31 Deployment batch migration 36, 38 dependencies 36 monitoring 32 time 31 Deployment connection 4 Developer Edition organization 10 Developer sandbox 4 Development creating a development environment 12 environmental dependencies 12 tools 15–18 tracking changes 20, 22 tracking changes manually 21 tracking changes using migration tool 21 Development environments 3, 7, 10 E Enterprise applications 26 Environmental dependencies 12 Environments, development creating 12 F Force.com Builder 15 Force.com deployment 40–41 Force.com IDE 15–16 Force.com Migration Tool 15, 17 Force.com project 17 H Hotfix Releases 49 I IDE 15–16 Inbound change sets 5 L Loading data 18 71
  • 76.
    M Managing releases 40–41 MetadataAPI 17 Migrating changes batch 37 change sets 3 manual 30 Metadata API 31 Migration Tool 15, 17 O Outbound change sets 5 P PaaS 1 Packaging components 39 Patch Releases 49 Permissions 13 Platform as a Service 1 Product defects 41 Production change process 20 deployment 39 Project-based development 17 R Refreshing a sandbox 13 Release management advanced scenario 43 Release process 40–41 Renaming files 39 S SaaS 1 Salesforce upgrades 29 Sandbox access 13 disabled features 11 managing 14 use cases 10 Sandbox refresh recommendations 58 Scheduling projects 27 Schema Explorer 15 Software as a Service 1 SOQL 15 Source control 20, 22 Synchronization 20, 22–23 T Test environments 7 Tools 15–18 Tracking changes manually 21 migration tool 21 U User licenses 13 User permissions 13 72 Index