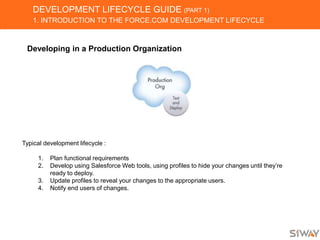
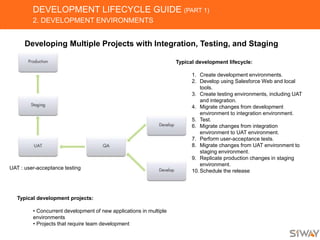
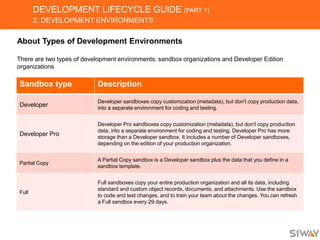
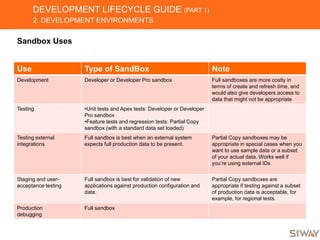
SlideShare a Scribd company logo
Development Lifecycle Guide (part 1)
ABDELHAKIM
MOUTTAQUI
Chef de projets Sénior, SIWAY
@adbelhakim
@casasfdug
@SiWay_WebAgency
https://ma.linkedin.com/in/abdelhakimmouttaqui
https://www.linkedin.com/company/siway
http://abdelhakimmouttaqui.blogspot.com/
abdelhakim.mouttaqui@siway.fr
contact@siway.fr
SIWAY - VOTRE INTÉGRATEUR CERTIFIE SALESFORCE
DEVELOPMENT LIFECYCLE GUIDE (PART 1)
Sommaire :
1. Introduction to the Force.com Development Lifecycle
2. Development Environments
3. Development Tools
DEVELOPMENT LIFECYCLE GUIDE (PART 1)
1. INTRODUCTION TO THE FORCE.COM DEVELOPMENT LIFECYCLE
Developing in a Production Organization
Typical development lifecycle :
1. Plan functional requirements
2. Develop using Salesforce Web tools, using profiles to hide your changes until they’re
ready to deploy.
3. Update profiles to reveal your changes to the appropriate users.
4. Notify end users of changes.
DEVELOPMENT LIFECYCLE GUIDE (PART 1)
1. INTRODUCTION TO THE FORCE.COM DEVELOPMENT LIFECYCLE
Developing with Sandbox
Typical development lifecycle:
1. Create a development environment.
2. Develop using Salesforce Web and
local tools.
3. Test within the development
environment.
4. Replicate production changes in the
development environment.
5. Deploy what you’ve developed to your
production organization.
Typical development projects:
•New custom objects, tabs, and
applications
•Integrations with other systems
•Apps involving Apex, Visualforce,
workflow, or new validation rules
DEVELOPMENT LIFECYCLE GUIDE (PART 1)
1. INTRODUCTION TO THE FORCE.COM DEVELOPMENT LIFECYCLE
About Sandbox Organizations
A sandbox is a copy of your production organization. Sandboxes contain the same metadata as your
production organization. That metadata, as well as data in the case of a full sandbox, is copied to a
new organization, isolated from your production organization. Operations you perform in your sandbox
don’t affect your production organization.
Sandboxes are available in :
• Enterprise
• Unlimited
• and Performance Editions.
With Unlimited and Performance Edition, you can create multiple sandbox copies of different types.
Each sandbox instance is isolated from every other sandbox instance, just as they are from production.
DEVELOPMENT LIFECYCLE GUIDE (PART 1)
1. INTRODUCTION TO THE FORCE.COM DEVELOPMENT LIFECYCLE
About Migrating Changes between Organizations
A deployment connection alone doesn't enable change sets to be sent between organizations. Each
organization must be authorized to send and receive change sets. This added level of security
enforces code promotion paths and keeps organizations' setup metadata from being overwritten by
mistake.
DEVELOPMENT LIFECYCLE GUIDE (PART 1)
1. INTRODUCTION TO THE FORCE.COM DEVELOPMENT LIFECYCLE
DEMO
DEVELOPMENT LIFECYCLE GUIDE (PART 1)
2. DEVELOPMENT ENVIRONMENTS
Developing on the Force.com platform requires a development environment, a place where you can
work without affecting other users.
When using a single development environment for development and testing, you must stop
development to test, and you can only resume development after you deploy. A more sophisticated
development model allows development to continue while testing and deployment take place. In this
case you need two isolated environments, one for development and one for testing.
Isolating Development and Testing
Typical development lifecycle:
1. Create a development environment.
2. Develop using Salesforce Web and local tools.
3. Create a testing environment.
4. Migrate changes from development
environment to testing environment.
5. Test.
6. Replicate production changes in other
environments.
7. Deploy what you’ve developed to your
production organization.
Typical development projects:
•New custom objects, tabs, and applications
•Integrations with other systems
•Apps involving workflow or new validation
rules
DEVELOPMENT LIFECYCLE GUIDE (PART 1)
2. DEVELOPMENT ENVIRONMENTS
Developing Multiple Projects with Integration, Testing, and Staging
UAT : user-acceptance testing
Typical development lifecycle:
1. Create development environments.
2. Develop using Salesforce Web and local
tools.
3. Create testing environments, including UAT
and integration.
4. Migrate changes from development
environment to integration environment.
5. Test.
6. Migrate changes from integration
environment to UAT environment.
7. Perform user-acceptance tests.
8. Migrate changes from UAT environment to
staging environment.
9. Replicate production changes in staging
environment.
10.Schedule the release
Typical development projects:
• Concurrent development of new applications in multiple
environments
• Projects that require team development
DEVELOPMENT LIFECYCLE GUIDE (PART 1)
2. DEVELOPMENT ENVIRONMENTS
About Types of Development Environments
There are two types of development environments: sandbox organizations and Developer Edition
organizations
Sandbox type Description
Developer
Developer sandboxes copy customization (metadata), but don't copy production data,
into a separate environment for coding and testing.
Developer Pro
Developer Pro sandboxes copy customization (metadata), but don't copy production
data, into a separate environment for coding and testing. Developer Pro has more
storage than a Developer sandbox. It includes a number of Developer sandboxes,
depending on the edition of your production organization.
Partial Copy
A Partial Copy sandbox is a Developer sandbox plus the data that you define in a
sandbox template.
Full
Full sandboxes copy your entire production organization and all its data, including
standard and custom object records, documents, and attachments. Use the sandbox
to code and test changes, and to train your team about the changes. You can refresh
a Full sandbox every 29 days.
DEVELOPMENT LIFECYCLE GUIDE (PART 1)
2. DEVELOPMENT ENVIRONMENTS
Sandbox Uses
Use Type of SandBox Note
Development Developer or Developer Pro sandbox Full sandboxes are more costly in
terms of create and refresh time, and
would also give developers access to
data that might not be appropriate
Testing •Unit tests and Apex tests: Developer or Developer
Pro sandbox
•Feature tests and regression tests: Partial Copy
sandbox (with a standard data set loaded)
Testing external
integrations
Full sandbox is best when an external system
expects full production data to be present.
Partial Copy sandboxes may be
appropriate in special cases when you
want to use sample data or a subset
of your actual data. Works well if
you’re using external IDs
Staging and user-
acceptance testing
Full sandbox is best for validation of new
applications against production configuration and
data.
Partial Copy sandboxes are
appropriate if testing against a subset
of production data is acceptable, for
example, for regional tests.
Production
debugging
Full sandbox
DEVELOPMENT LIFECYCLE GUIDE (PART 1)
2. DEVELOPMENT ENVIRONMENTS
Sandbox Considerations and Limitations
Sandbox functionality is not identical to production, and you will need to plan for the differences as well as for the copy
process itself.
Consider the following when creating or refreshing a sandbox:
• Creating or refreshing a sandbox copy is a long-running operation that might complete in minutes, days, or even
more than a week.
• Refreshing a sandbox deletes and recreates the sandbox as a new copy of the production organization.
• Setup and data changes to your production organization during the sandbox creation and refresh operations might
result in inconsistencies in your sandbox. Therefore, it’s best to freeze or minimize changes to your production
organization while creating or refreshing a sandbox.
The following features are disabled and cannot be enabled in sandboxes:
• Contract expiration warnings
• Case escalation Contract expiration warnings and case escalation are disabled because they automatically send
email to contacts, customers, and production organization users.
• Subscription summary
• Data exports (by clicking Export Now or Schedule Export on the Weekly Export Service page in Setup)
• The ability to create Salesforce sandboxes
• The ability to copy email service addresses that you create in your sandbox to your production organization
• The ability to publish Site.com sites
DEVELOPMENT LIFECYCLE GUIDE (PART 1)
2. DEVELOPMENT ENVIRONMENTS
Updating Environmental Dependencies
Once you create a sandbox, configure it to update environmental dependencies and merge project contents before
beginning development.
Environmental
Dependency
Details
Login privileges If your developers and testers do not have logins on production, or do not have the necessary privileges, you need to give them the necessary
access in the development environment.
Email addresses When you create a sandbox, email addresses are automatically changed so that email alerts and other automatic notifications are not sent from
the sandbox during development. When your developers and testers log into the sandbox, they must change their email address back to a real
address to receive email messages sent from the sandbox.
Email recipients If you want to test outbound email for features such as escalations or dashboards, you must update the list of recipients, because these lists are
removed when the sandbox is created to prevent unnecessary emails.
External URLs If your production organization is integrated with external systems, you will probably not want your sandbox copy to communicate with the
production versions of those external systems, so as not to mix production and non-production data. For example, if you use outbound messaging
or web service callouts, you will want to update the URLs called by those services to point to your external development environment(s) for those
applications. Likewise, since sandboxes run on a different instance than the production organization, to test integrations with sandbox you will
need to change the API endpoint hostname from login.salesforce.com to test.salesforce.com
Hard-coded URLs In general, when linking from one Force.com page to another, the links should be relative (omitting the hostname) rather than absolute, and
dynamic (looking up the ID, record, or page by name) rather than static. This allows you to migrate the URLs between different organizations,
which might have different hostnames or record IDs. If your application contains hard-coded URLs from one Force.com page to another, they
might break when they are clicked from the sandbox or, worse, take a user who thinks he is in a development environment back to the production
organization.
Hard-coded IDs Some components are commonly accessed via their ID, such as RecordTypes. When you create a sandbox copy, code that uses these IDs to
reference these components continues to work because production IDs are retained by the sandbox copy. However, the reverse is not true—
migrating from sandbox to production (or between any two organizations) via metadata maintains components' names, but if the component does
not exist in the target organization, a new ID will be generated. Therefore, migrating code that contains a hard-coded ID can cause the code to
break. As a best practice, wherever possible, you should obtain a component's ID by querying for it by name.
Existing projects If you have existing development projects, you need to merge that work into the new development environment.
DEVELOPMENT LIFECYCLE GUIDE (PART 1)
2. DEVELOPMENT ENVIRONMENTS
Creating User Templates
A developer user template is an abstract user that has permissions required to develop on the sandbox (for example, the
“Modify All Data” permission), but is not active on your production organization. After you create or refresh a sandbox,
you activate the developer user in the sandbox and assign it to the individual who will be developing there.
To create a developer template:
1. Create a new user on your production organization.
2. Edit the user to give it the necessary permissions.
3. Deactivate the user on the production organization.
4. Create or refresh a sandbox.
5. Activate the user on the sandbox.
6. Optionally change the email address, password, or other environmental settings
Your sandbox has the same number of licenses as production, but it is unlikely that all of your users will log into it. When
you create or refresh a sandbox, the same users who are active in production are active in the sandbox, so if all
licenses are occupied you will need to deactivate an active user to activate the inactive developer user. Just make
sure that the user you're deactivating in sandbox is one of the many production users who will never log into that
environment. Likewise, you should make your production developer user template inactive on the production
organization, so it doesn't consume a paid production license
DEVELOPMENT LIFECYCLE GUIDE (PART 1)
2. DEVELOPMENT ENVIRONMENTS
Managing Sandboxes
To manage a sandbox, from Setup enter Sandboxes in the Quick Find box, then select Sandboxes. A list of your existing
sandboxes displays.
• Click New Sandbox to create a new sandbox. Salesforce deactivates the New Sandbox button when an organization
reaches its sandbox limit. If necessary, contact Salesforce to order more sandboxes for your organization.
• Click Sandbox History to see a log of your sandbox refresh history, including when sandboxes were created and who
created them.
• Click Refresh to replace an existing sandbox with a new copy. Salesforce only displays the Refresh link for sandboxes that
are eligible for refreshing, which varies for different types of sandboxes. Your existing copy of this sandbox remains available
while you wait for the refresh to complete. The refreshed copy is inactive until you activate it.
• Click Activate to activate a refreshed sandbox. You must activate your refreshed sandbox before you can access it.
Salesforce only displays this option for sandboxes that are not activated.
• Click Del to delete a sandbox. The delete option is only available if your organization exceeds its sandbox limit.
• Administrators can click Login to log into a sandbox as a user. Salesforce only displays this option for active sandboxes.
Users can log in to the sandbox at https://test.salesforce.com by appending .sandbox_name to their Salesforce usernames.
For example, if a username for a production organization is user1@acme.com, and the sandbox is named “test,” the
modified username to log in to the sandbox is user1@acme.com.test.
• Click on a sandbox name to view details about the sandbox, including the sandbox type and when it was created
DEVELOPMENT LIFECYCLE GUIDE (PART 1)
3. DEVELOPMENT TOOLS
Regardless of your role in the development process, it is important to understand at a high level how all of the
Force.com development tools operate, and the development tasks that overlap each other.
The Force.com IDE is the best tool for team development, migration of selected components, and writing Apex.
The Force.com Migration Tool, on the other hand, is useful for migrating large scale or repetitive changes between
environments.
These and other Force.com tools are examined in the following sections
DEVELOPMENT LIFECYCLE GUIDE (PART 1)
3. DEVELOPMENT TOOLS
Force.com App Builder Tools
The Salesforce user interface makes application development easy with point-and-click app builder tools. From Setup,
you can modify the metadata of your organization
DEVELOPMENT LIFECYCLE GUIDE (PART 1)
3. DEVELOPMENT TOOLS
Force.com IDE
The Force.com IDE is an integrated development environment for developing applications on the Force.com
platform using Apex, Visualforce, and metadata components
Metadata API can deploy and retrieve up to 10,000 files or 400 MB at one time. If you need to retrieve or
deploy more than either of these limits, you must do so in batches.
DEVELOPMENT LIFECYCLE GUIDE (PART 1)
3. DEVELOPMENT TOOLS
About Metadata API
Metadata API provides two parts that work in conjunction: a rich and powerful metadata model and an application
programming interface (API). The metadata model describes the components in your organization.
For example, Salesforce custom objects and their fields can be controlled by manipulating the XML files provided by
Metadata API.
Metadata API also includes a set of Web service methods that provide programmatic access to the configuration and
source of your metadata components.
In other words, it describes what you can do with those components, such as create an object or deploy one. If it helps
you to separate them into two parts, you can think of the metadata components as nouns, and the API calls as verbs.
With Metadata API you can:
• Work with setup configuration as metadata files.
• Copy, paste, merge, and manipulate metadata files using familiar tools, such as text editors, IDEs, batch
scripts, and source control systems.
• Migrate configuration changes between organizations, either between two development environments or from
development to production.
• Create your own tools for managing organization and application metadata
DEVELOPMENT LIFECYCLE GUIDE (PART 1)
3. DEVELOPMENT TOOLS
Force.com Migration Tool
The Force.com Migration Tool is a Java/Ant-based command-line utility for moving metadata between a local
directory and a Salesforce organization. The Force.com Migration Tool allows you to migrate metadata between
unrelated organizations, so in that sense it’s more powerful than change sets.
Unlike the Force.com IDE, the Force.com Migration Tool has no graphical user interface. You choose the
components you want to deploy, the server address, and other deployment details by editing control files in a text
editor and using command-line arguments.
Most people will find the graphical user interface of the Force.com IDE easier to use than editing text files and
providing arguments on the command line.
However, the Force.com Migration Tool is especially useful in the following scenarios:
• Development projects where you need to populate a test environment with large amounts of setup
changes—making changes with an automated script is far faster than entering them by hand.
• Deployments where you need to change the contents of files between organizations—for example, if you
want to change the Running User on a dashboard, you can retrieve the Running User from organization A,
make a change, and then deploy the Running User to organization B. If you tried to do this in the
Force.com IDE, the IDE would force you to save the change back to organization A (where the organization
B user probably does not exist) before launching the Deploy Wizard to deploy to organization B. The
Force.com Migration Tool gives you complete control over the retrieve() and deploy() commands; editing
and saving a file on your local file system does not change the metadata in any organization until you
choose to deploy it.
• Multi-stage release processes—a typical development process requires iterative building, testing, and
staging before releasing to a production environment. Scripted retrieval and deployment of components
can make this process much more efficient.
• Repetitive deployment using the same parameters—you can retrieve metadata from your organization,
make changes, and deploy your changes to an organization. If you need to repeat this process, it is as
simple as calling the same deployment target again.
• When migration from staging to production is done by highly technical resources—anyone who prefers
deploying in a scripting environment will find the Force.com Migration Tool a familiar process.
DEVELOPMENT LIFECYCLE GUIDE (PART 1)
3. DEVELOPMENT TOOLS
Data Loader
Data Loader is a client application for the bulk import or export of data. Use it to insert, update, delete, or export
Salesforce records.
Use Web-based importing when:
• You are loading less than 50,000 records.
• The object you need to import is supported by
import wizards. To see what import wizards are
available and thus what objects they support, from
Setup, enter Data Management in the Quick Find
box, then select Data Management.
• You want to prevent duplicates by uploading
records according to account name and site,
contact email address, or lead email address.
Use Data Loader when:
• You need to load 50,000 to 5,000,000 records.
Data Loader is supported for loads of up to 5
million records. If you need to load more than 5
million records, we recommend you work with a
Salesforce partner or visit the App Exchange for a
suitable partner product.
• You need to load into an object that is not yet
supported by the import wizards.
• You want to schedule regular data loads, such
as nightly imports.
• You want to export your data for backup
purposes.
Q & A
Merci !
CONTACT
www.siway.fr
Tel Maroc : 05 22 26 99 97
contact@siway.fr

More Related Content

What's hot

JavaScript Patterns and Practices from the Salesforce Experts
JavaScript Patterns and Practices from the Salesforce ExpertsJavaScript Patterns and Practices from the Salesforce Experts
JavaScript Patterns and Practices from the Salesforce Experts
Salesforce Developers
 

What's hot (20)

Managing Change With A Sensible Sandbox Architecture
Managing Change With A Sensible Sandbox ArchitectureManaging Change With A Sensible Sandbox Architecture
Managing Change With A Sensible Sandbox Architecture
 
Dependency Injection with the Force DI Framework
Dependency Injection with the Force DI FrameworkDependency Injection with the Force DI Framework
Dependency Injection with the Force DI Framework
 
How to Setup Continuous Integration With Git, Jenkins, and Force.com
How to Setup Continuous Integration With Git, Jenkins, and Force.comHow to Setup Continuous Integration With Git, Jenkins, and Force.com
How to Setup Continuous Integration With Git, Jenkins, and Force.com
 
Continuous delivery with Spring Cloud Pipelines Case Study
Continuous delivery with Spring Cloud Pipelines Case StudyContinuous delivery with Spring Cloud Pipelines Case Study
Continuous delivery with Spring Cloud Pipelines Case Study
 
Enterprise Heroku for Java
Enterprise Heroku for JavaEnterprise Heroku for Java
Enterprise Heroku for Java
 
不只自動化而且更敏捷的Android開發工具 gradle
不只自動化而且更敏捷的Android開發工具 gradle不只自動化而且更敏捷的Android開發工具 gradle
不只自動化而且更敏捷的Android開發工具 gradle
 
Introduction to Javascript Unit Testing With xUnit.js
Introduction to Javascript Unit Testing With xUnit.jsIntroduction to Javascript Unit Testing With xUnit.js
Introduction to Javascript Unit Testing With xUnit.js
 
Salesforce.com Sandbox management
Salesforce.com Sandbox management Salesforce.com Sandbox management
Salesforce.com Sandbox management
 
The definitive guide to salesforce sandbox flosum
The definitive guide to salesforce sandbox flosumThe definitive guide to salesforce sandbox flosum
The definitive guide to salesforce sandbox flosum
 
Salesforce API Series: Release Management with the Metadata API webinar
Salesforce API Series: Release Management with the Metadata API webinarSalesforce API Series: Release Management with the Metadata API webinar
Salesforce API Series: Release Management with the Metadata API webinar
 
TDX19 - Accelerate DevOps with GitLab and Salesforce
TDX19 - Accelerate DevOps with GitLab and SalesforceTDX19 - Accelerate DevOps with GitLab and Salesforce
TDX19 - Accelerate DevOps with GitLab and Salesforce
 
Best Practices for Successful Deployment
Best Practices for Successful DeploymentBest Practices for Successful Deployment
Best Practices for Successful Deployment
 
A holistic approach to scaling Agile
A holistic approach to scaling Agile A holistic approach to scaling Agile
A holistic approach to scaling Agile
 
Under the Hood of Sandbox Templates
Under the Hood of Sandbox TemplatesUnder the Hood of Sandbox Templates
Under the Hood of Sandbox Templates
 
5 Essentials for Simplifiied Release Management and Continuous Delivery
5 Essentials for Simplifiied Release Management and Continuous Delivery5 Essentials for Simplifiied Release Management and Continuous Delivery
5 Essentials for Simplifiied Release Management and Continuous Delivery
 
SPS Oslo : 10 things you should do with your O365 demo or dev tenant
SPS Oslo : 10 things you should do with your O365 demo or dev tenant SPS Oslo : 10 things you should do with your O365 demo or dev tenant
SPS Oslo : 10 things you should do with your O365 demo or dev tenant
 
Scrum at Scale
Scrum at ScaleScrum at Scale
Scrum at Scale
 
Master Your MarTech Migration: A Guide for Switching Web-Based Marketing and ...
Master Your MarTech Migration: A Guide for Switching Web-Based Marketing and ...Master Your MarTech Migration: A Guide for Switching Web-Based Marketing and ...
Master Your MarTech Migration: A Guide for Switching Web-Based Marketing and ...
 
JavaScript Patterns and Practices from the Salesforce Experts
JavaScript Patterns and Practices from the Salesforce ExpertsJavaScript Patterns and Practices from the Salesforce Experts
JavaScript Patterns and Practices from the Salesforce Experts
 
Visual Studio Enterprise 2015 Overview atidan
Visual Studio Enterprise 2015 Overview   atidanVisual Studio Enterprise 2015 Overview   atidan
Visual Studio Enterprise 2015 Overview atidan
 

Viewers also liked

Salesforce com-architecture
Salesforce com-architectureSalesforce com-architecture
Salesforce com-architecture
drewz lin
 

Viewers also liked (20)

The Ideal Salesforce Development Lifecycle
The Ideal Salesforce Development LifecycleThe Ideal Salesforce Development Lifecycle
The Ideal Salesforce Development Lifecycle
 
Apex Enterprise Patterns: Building Strong Foundations
Apex Enterprise Patterns: Building Strong FoundationsApex Enterprise Patterns: Building Strong Foundations
Apex Enterprise Patterns: Building Strong Foundations
 
Apex collection patterns
Apex collection patternsApex collection patterns
Apex collection patterns
 
Salesforce Coding techniques that keep your admins happy (DF13)
Salesforce Coding techniques that keep your admins happy (DF13)Salesforce Coding techniques that keep your admins happy (DF13)
Salesforce Coding techniques that keep your admins happy (DF13)
 
Apex Design Patterns
Apex Design PatternsApex Design Patterns
Apex Design Patterns
 
Secure Development on the Salesforce Platform - Part 3
Secure Development on the Salesforce Platform - Part 3Secure Development on the Salesforce Platform - Part 3
Secure Development on the Salesforce Platform - Part 3
 
Advanced Apex Development - Asynchronous Processes
Advanced Apex Development - Asynchronous ProcessesAdvanced Apex Development - Asynchronous Processes
Advanced Apex Development - Asynchronous Processes
 
Salesforce Release Management - Best Practices and Tools for Deployment
Salesforce Release Management - Best Practices and Tools for DeploymentSalesforce Release Management - Best Practices and Tools for Deployment
Salesforce Release Management - Best Practices and Tools for Deployment
 
Secure Development on the Salesforce Platform - Part I
Secure Development on the Salesforce Platform - Part ISecure Development on the Salesforce Platform - Part I
Secure Development on the Salesforce Platform - Part I
 
Salesforce Data Structures
Salesforce Data StructuresSalesforce Data Structures
Salesforce Data Structures
 
Salesforce.com process map (from lead to opportunity)
Salesforce.com process map (from lead to opportunity)Salesforce.com process map (from lead to opportunity)
Salesforce.com process map (from lead to opportunity)
 
Secure Development on the Salesforce Platform - Part 2
Secure Development on the Salesforce Platform - Part 2Secure Development on the Salesforce Platform - Part 2
Secure Development on the Salesforce Platform - Part 2
 
Enterprise Architecture Salesforce
Enterprise Architecture SalesforceEnterprise Architecture Salesforce
Enterprise Architecture Salesforce
 
Introduction to Campaigns in Salesforce - Create, Manage, Launch, and Measure
Introduction to Campaigns in Salesforce - Create, Manage, Launch, and MeasureIntroduction to Campaigns in Salesforce - Create, Manage, Launch, and Measure
Introduction to Campaigns in Salesforce - Create, Manage, Launch, and Measure
 
Data model in salesforce
Data model in salesforceData model in salesforce
Data model in salesforce
 
Salesforce com-architecture
Salesforce com-architectureSalesforce com-architecture
Salesforce com-architecture
 
Top 10 Checklist For Successful Salesforce Implementation
Top 10 Checklist For Successful Salesforce ImplementationTop 10 Checklist For Successful Salesforce Implementation
Top 10 Checklist For Successful Salesforce Implementation
 
Build Cloud & Mobile App on Salesforce Force.com Platform in 15 mins
Build Cloud & Mobile App on Salesforce Force.com Platform in 15 minsBuild Cloud & Mobile App on Salesforce Force.com Platform in 15 mins
Build Cloud & Mobile App on Salesforce Force.com Platform in 15 mins
 
Salesforce Presentation
Salesforce PresentationSalesforce Presentation
Salesforce Presentation
 
Salesforce CRM 7 domains of Success
Salesforce CRM 7 domains of SuccessSalesforce CRM 7 domains of Success
Salesforce CRM 7 domains of Success
 

Similar to Development lifecycle guide (part 1)

Star team 13 datasheet(1)
Star team 13 datasheet(1)Star team 13 datasheet(1)
Star team 13 datasheet(1)
Noel_Slane
 

Similar to Development lifecycle guide (part 1) (20)

Tech Insiders Salesforce: SFDX e Integración Continua
Tech Insiders Salesforce: SFDX e Integración ContinuaTech Insiders Salesforce: SFDX e Integración Continua
Tech Insiders Salesforce: SFDX e Integración Continua
 
DevOps explained
DevOps explainedDevOps explained
DevOps explained
 
Case Study: How CA’s IT Automated Salesforce Deployments with CA Release Auto...
Case Study: How CA’s IT Automated Salesforce Deployments with CA Release Auto...Case Study: How CA’s IT Automated Salesforce Deployments with CA Release Auto...
Case Study: How CA’s IT Automated Salesforce Deployments with CA Release Auto...
 
Salesforce Development Lifecycle: Detailed Phases
Salesforce Development Lifecycle: Detailed PhasesSalesforce Development Lifecycle: Detailed Phases
Salesforce Development Lifecycle: Detailed Phases
 
Sandboxes: The Future of App Development by Evan Barnet & Pam Barnet
Sandboxes: The Future of App Development by Evan Barnet & Pam BarnetSandboxes: The Future of App Development by Evan Barnet & Pam Barnet
Sandboxes: The Future of App Development by Evan Barnet & Pam Barnet
 
Trank and branches for configuration management
Trank and branches for configuration managementTrank and branches for configuration management
Trank and branches for configuration management
 
Whats new in Enterprise 5.0 Product Suite
Whats new in Enterprise 5.0 Product SuiteWhats new in Enterprise 5.0 Product Suite
Whats new in Enterprise 5.0 Product Suite
 
Microsoft DevOps AZ-400 Real Dumps 2023
Microsoft DevOps AZ-400 Real Dumps 2023Microsoft DevOps AZ-400 Real Dumps 2023
Microsoft DevOps AZ-400 Real Dumps 2023
 
Application Lifecycle Management (ALM).pdf
Application Lifecycle Management (ALM).pdfApplication Lifecycle Management (ALM).pdf
Application Lifecycle Management (ALM).pdf
 
Dev ops developer (session 3)
Dev ops developer (session 3)Dev ops developer (session 3)
Dev ops developer (session 3)
 
Life cycle-management-for-oracle-data-integrator-(odi)
Life cycle-management-for-oracle-data-integrator-(odi)Life cycle-management-for-oracle-data-integrator-(odi)
Life cycle-management-for-oracle-data-integrator-(odi)
 
Configure an Integrated Exchange, Lync, and SharePoint Test Lab
Configure an Integrated Exchange, Lync, and SharePoint Test LabConfigure an Integrated Exchange, Lync, and SharePoint Test Lab
Configure an Integrated Exchange, Lync, and SharePoint Test Lab
 
The Solution
The SolutionThe Solution
The Solution
 
Continuous Everything
Continuous EverythingContinuous Everything
Continuous Everything
 
Star team 13 datasheet(1)
Star team 13 datasheet(1)Star team 13 datasheet(1)
Star team 13 datasheet(1)
 
Continuous Integration for z using Test Data Management and Application D...
Continuous  Integration for z  using  Test Data Management  and Application D...Continuous  Integration for z  using  Test Data Management  and Application D...
Continuous Integration for z using Test Data Management and Application D...
 
devops certification
devops certificationdevops certification
devops certification
 
devops certification
devops certificationdevops certification
devops certification
 
Whitepaper life cycle-management-for-odi
Whitepaper life cycle-management-for-odiWhitepaper life cycle-management-for-odi
Whitepaper life cycle-management-for-odi
 
Test Lab Guide: Windows Server 2012 R2 Base Configuration
Test Lab Guide: Windows Server 2012 R2 Base ConfigurationTest Lab Guide: Windows Server 2012 R2 Base Configuration
Test Lab Guide: Windows Server 2012 R2 Base Configuration
 

Recently uploaded

Essentials of Automations: Optimizing FME Workflows with Parameters
Essentials of Automations: Optimizing FME Workflows with ParametersEssentials of Automations: Optimizing FME Workflows with Parameters
Essentials of Automations: Optimizing FME Workflows with Parameters
Safe Software
 
Search and Society: Reimagining Information Access for Radical Futures
Search and Society: Reimagining Information Access for Radical FuturesSearch and Society: Reimagining Information Access for Radical Futures
Search and Society: Reimagining Information Access for Radical Futures
Bhaskar Mitra
 

Recently uploaded (20)

PLAI - Acceleration Program for Generative A.I. Startups
PLAI - Acceleration Program for Generative A.I. StartupsPLAI - Acceleration Program for Generative A.I. Startups
PLAI - Acceleration Program for Generative A.I. Startups
 
UiPath Test Automation using UiPath Test Suite series, part 1
UiPath Test Automation using UiPath Test Suite series, part 1UiPath Test Automation using UiPath Test Suite series, part 1
UiPath Test Automation using UiPath Test Suite series, part 1
 
Essentials of Automations: Optimizing FME Workflows with Parameters
Essentials of Automations: Optimizing FME Workflows with ParametersEssentials of Automations: Optimizing FME Workflows with Parameters
Essentials of Automations: Optimizing FME Workflows with Parameters
 
Key Trends Shaping the Future of Infrastructure.pdf
Key Trends Shaping the Future of Infrastructure.pdfKey Trends Shaping the Future of Infrastructure.pdf
Key Trends Shaping the Future of Infrastructure.pdf
 
IESVE for Early Stage Design and Planning
IESVE for Early Stage Design and PlanningIESVE for Early Stage Design and Planning
IESVE for Early Stage Design and Planning
 
Integrating Telephony Systems with Salesforce: Insights and Considerations, B...
Integrating Telephony Systems with Salesforce: Insights and Considerations, B...Integrating Telephony Systems with Salesforce: Insights and Considerations, B...
Integrating Telephony Systems with Salesforce: Insights and Considerations, B...
 
Bits & Pixels using AI for Good.........
Bits & Pixels using AI for Good.........Bits & Pixels using AI for Good.........
Bits & Pixels using AI for Good.........
 
AI for Every Business: Unlocking Your Product's Universal Potential by VP of ...
AI for Every Business: Unlocking Your Product's Universal Potential by VP of ...AI for Every Business: Unlocking Your Product's Universal Potential by VP of ...
AI for Every Business: Unlocking Your Product's Universal Potential by VP of ...
 
Software Delivery At the Speed of AI: Inflectra Invests In AI-Powered Quality
Software Delivery At the Speed of AI: Inflectra Invests In AI-Powered QualitySoftware Delivery At the Speed of AI: Inflectra Invests In AI-Powered Quality
Software Delivery At the Speed of AI: Inflectra Invests In AI-Powered Quality
 
Kubernetes & AI - Beauty and the Beast !?! @KCD Istanbul 2024
Kubernetes & AI - Beauty and the Beast !?! @KCD Istanbul 2024Kubernetes & AI - Beauty and the Beast !?! @KCD Istanbul 2024
Kubernetes & AI - Beauty and the Beast !?! @KCD Istanbul 2024
 
SOQL 201 for Admins & Developers: Slice & Dice Your Org’s Data With Aggregate...
SOQL 201 for Admins & Developers: Slice & Dice Your Org’s Data With Aggregate...SOQL 201 for Admins & Developers: Slice & Dice Your Org’s Data With Aggregate...
SOQL 201 for Admins & Developers: Slice & Dice Your Org’s Data With Aggregate...
 
Demystifying gRPC in .Net by John Staveley
Demystifying gRPC in .Net by John StaveleyDemystifying gRPC in .Net by John Staveley
Demystifying gRPC in .Net by John Staveley
 
Exploring UiPath Orchestrator API: updates and limits in 2024 🚀
Exploring UiPath Orchestrator API: updates and limits in 2024 🚀Exploring UiPath Orchestrator API: updates and limits in 2024 🚀
Exploring UiPath Orchestrator API: updates and limits in 2024 🚀
 
Search and Society: Reimagining Information Access for Radical Futures
Search and Society: Reimagining Information Access for Radical FuturesSearch and Society: Reimagining Information Access for Radical Futures
Search and Society: Reimagining Information Access for Radical Futures
 
De-mystifying Zero to One: Design Informed Techniques for Greenfield Innovati...
De-mystifying Zero to One: Design Informed Techniques for Greenfield Innovati...De-mystifying Zero to One: Design Informed Techniques for Greenfield Innovati...
De-mystifying Zero to One: Design Informed Techniques for Greenfield Innovati...
 
WSO2CONMay2024OpenSourceConferenceDebrief.pptx
WSO2CONMay2024OpenSourceConferenceDebrief.pptxWSO2CONMay2024OpenSourceConferenceDebrief.pptx
WSO2CONMay2024OpenSourceConferenceDebrief.pptx
 
Connector Corner: Automate dynamic content and events by pushing a button
Connector Corner: Automate dynamic content and events by pushing a buttonConnector Corner: Automate dynamic content and events by pushing a button
Connector Corner: Automate dynamic content and events by pushing a button
 
Custom Approval Process: A New Perspective, Pavel Hrbacek & Anindya Halder
Custom Approval Process: A New Perspective, Pavel Hrbacek & Anindya HalderCustom Approval Process: A New Perspective, Pavel Hrbacek & Anindya Halder
Custom Approval Process: A New Perspective, Pavel Hrbacek & Anindya Halder
 
Slack (or Teams) Automation for Bonterra Impact Management (fka Social Soluti...
Slack (or Teams) Automation for Bonterra Impact Management (fka Social Soluti...Slack (or Teams) Automation for Bonterra Impact Management (fka Social Soluti...
Slack (or Teams) Automation for Bonterra Impact Management (fka Social Soluti...
 
"Impact of front-end architecture on development cost", Viktor Turskyi
"Impact of front-end architecture on development cost", Viktor Turskyi"Impact of front-end architecture on development cost", Viktor Turskyi
"Impact of front-end architecture on development cost", Viktor Turskyi
 

Development lifecycle guide (part 1)

  • 2. ABDELHAKIM MOUTTAQUI Chef de projets Sénior, SIWAY @adbelhakim @casasfdug @SiWay_WebAgency https://ma.linkedin.com/in/abdelhakimmouttaqui https://www.linkedin.com/company/siway http://abdelhakimmouttaqui.blogspot.com/ abdelhakim.mouttaqui@siway.fr contact@siway.fr
  • 3. SIWAY - VOTRE INTÉGRATEUR CERTIFIE SALESFORCE DEVELOPMENT LIFECYCLE GUIDE (PART 1) Sommaire : 1. Introduction to the Force.com Development Lifecycle 2. Development Environments 3. Development Tools
  • 4. DEVELOPMENT LIFECYCLE GUIDE (PART 1) 1. INTRODUCTION TO THE FORCE.COM DEVELOPMENT LIFECYCLE Developing in a Production Organization Typical development lifecycle : 1. Plan functional requirements 2. Develop using Salesforce Web tools, using profiles to hide your changes until they’re ready to deploy. 3. Update profiles to reveal your changes to the appropriate users. 4. Notify end users of changes.
  • 5. DEVELOPMENT LIFECYCLE GUIDE (PART 1) 1. INTRODUCTION TO THE FORCE.COM DEVELOPMENT LIFECYCLE Developing with Sandbox Typical development lifecycle: 1. Create a development environment. 2. Develop using Salesforce Web and local tools. 3. Test within the development environment. 4. Replicate production changes in the development environment. 5. Deploy what you’ve developed to your production organization. Typical development projects: •New custom objects, tabs, and applications •Integrations with other systems •Apps involving Apex, Visualforce, workflow, or new validation rules
  • 6. DEVELOPMENT LIFECYCLE GUIDE (PART 1) 1. INTRODUCTION TO THE FORCE.COM DEVELOPMENT LIFECYCLE About Sandbox Organizations A sandbox is a copy of your production organization. Sandboxes contain the same metadata as your production organization. That metadata, as well as data in the case of a full sandbox, is copied to a new organization, isolated from your production organization. Operations you perform in your sandbox don’t affect your production organization. Sandboxes are available in : • Enterprise • Unlimited • and Performance Editions. With Unlimited and Performance Edition, you can create multiple sandbox copies of different types. Each sandbox instance is isolated from every other sandbox instance, just as they are from production.
  • 7. DEVELOPMENT LIFECYCLE GUIDE (PART 1) 1. INTRODUCTION TO THE FORCE.COM DEVELOPMENT LIFECYCLE About Migrating Changes between Organizations A deployment connection alone doesn't enable change sets to be sent between organizations. Each organization must be authorized to send and receive change sets. This added level of security enforces code promotion paths and keeps organizations' setup metadata from being overwritten by mistake.
  • 8. DEVELOPMENT LIFECYCLE GUIDE (PART 1) 1. INTRODUCTION TO THE FORCE.COM DEVELOPMENT LIFECYCLE DEMO
  • 9. DEVELOPMENT LIFECYCLE GUIDE (PART 1) 2. DEVELOPMENT ENVIRONMENTS Developing on the Force.com platform requires a development environment, a place where you can work without affecting other users. When using a single development environment for development and testing, you must stop development to test, and you can only resume development after you deploy. A more sophisticated development model allows development to continue while testing and deployment take place. In this case you need two isolated environments, one for development and one for testing. Isolating Development and Testing Typical development lifecycle: 1. Create a development environment. 2. Develop using Salesforce Web and local tools. 3. Create a testing environment. 4. Migrate changes from development environment to testing environment. 5. Test. 6. Replicate production changes in other environments. 7. Deploy what you’ve developed to your production organization. Typical development projects: •New custom objects, tabs, and applications •Integrations with other systems •Apps involving workflow or new validation rules
  • 10. DEVELOPMENT LIFECYCLE GUIDE (PART 1) 2. DEVELOPMENT ENVIRONMENTS Developing Multiple Projects with Integration, Testing, and Staging UAT : user-acceptance testing Typical development lifecycle: 1. Create development environments. 2. Develop using Salesforce Web and local tools. 3. Create testing environments, including UAT and integration. 4. Migrate changes from development environment to integration environment. 5. Test. 6. Migrate changes from integration environment to UAT environment. 7. Perform user-acceptance tests. 8. Migrate changes from UAT environment to staging environment. 9. Replicate production changes in staging environment. 10.Schedule the release Typical development projects: • Concurrent development of new applications in multiple environments • Projects that require team development
  • 11. DEVELOPMENT LIFECYCLE GUIDE (PART 1) 2. DEVELOPMENT ENVIRONMENTS About Types of Development Environments There are two types of development environments: sandbox organizations and Developer Edition organizations Sandbox type Description Developer Developer sandboxes copy customization (metadata), but don't copy production data, into a separate environment for coding and testing. Developer Pro Developer Pro sandboxes copy customization (metadata), but don't copy production data, into a separate environment for coding and testing. Developer Pro has more storage than a Developer sandbox. It includes a number of Developer sandboxes, depending on the edition of your production organization. Partial Copy A Partial Copy sandbox is a Developer sandbox plus the data that you define in a sandbox template. Full Full sandboxes copy your entire production organization and all its data, including standard and custom object records, documents, and attachments. Use the sandbox to code and test changes, and to train your team about the changes. You can refresh a Full sandbox every 29 days.
  • 12. DEVELOPMENT LIFECYCLE GUIDE (PART 1) 2. DEVELOPMENT ENVIRONMENTS Sandbox Uses Use Type of SandBox Note Development Developer or Developer Pro sandbox Full sandboxes are more costly in terms of create and refresh time, and would also give developers access to data that might not be appropriate Testing •Unit tests and Apex tests: Developer or Developer Pro sandbox •Feature tests and regression tests: Partial Copy sandbox (with a standard data set loaded) Testing external integrations Full sandbox is best when an external system expects full production data to be present. Partial Copy sandboxes may be appropriate in special cases when you want to use sample data or a subset of your actual data. Works well if you’re using external IDs Staging and user- acceptance testing Full sandbox is best for validation of new applications against production configuration and data. Partial Copy sandboxes are appropriate if testing against a subset of production data is acceptable, for example, for regional tests. Production debugging Full sandbox
  • 13. DEVELOPMENT LIFECYCLE GUIDE (PART 1) 2. DEVELOPMENT ENVIRONMENTS Sandbox Considerations and Limitations Sandbox functionality is not identical to production, and you will need to plan for the differences as well as for the copy process itself. Consider the following when creating or refreshing a sandbox: • Creating or refreshing a sandbox copy is a long-running operation that might complete in minutes, days, or even more than a week. • Refreshing a sandbox deletes and recreates the sandbox as a new copy of the production organization. • Setup and data changes to your production organization during the sandbox creation and refresh operations might result in inconsistencies in your sandbox. Therefore, it’s best to freeze or minimize changes to your production organization while creating or refreshing a sandbox. The following features are disabled and cannot be enabled in sandboxes: • Contract expiration warnings • Case escalation Contract expiration warnings and case escalation are disabled because they automatically send email to contacts, customers, and production organization users. • Subscription summary • Data exports (by clicking Export Now or Schedule Export on the Weekly Export Service page in Setup) • The ability to create Salesforce sandboxes • The ability to copy email service addresses that you create in your sandbox to your production organization • The ability to publish Site.com sites
  • 14. DEVELOPMENT LIFECYCLE GUIDE (PART 1) 2. DEVELOPMENT ENVIRONMENTS Updating Environmental Dependencies Once you create a sandbox, configure it to update environmental dependencies and merge project contents before beginning development. Environmental Dependency Details Login privileges If your developers and testers do not have logins on production, or do not have the necessary privileges, you need to give them the necessary access in the development environment. Email addresses When you create a sandbox, email addresses are automatically changed so that email alerts and other automatic notifications are not sent from the sandbox during development. When your developers and testers log into the sandbox, they must change their email address back to a real address to receive email messages sent from the sandbox. Email recipients If you want to test outbound email for features such as escalations or dashboards, you must update the list of recipients, because these lists are removed when the sandbox is created to prevent unnecessary emails. External URLs If your production organization is integrated with external systems, you will probably not want your sandbox copy to communicate with the production versions of those external systems, so as not to mix production and non-production data. For example, if you use outbound messaging or web service callouts, you will want to update the URLs called by those services to point to your external development environment(s) for those applications. Likewise, since sandboxes run on a different instance than the production organization, to test integrations with sandbox you will need to change the API endpoint hostname from login.salesforce.com to test.salesforce.com Hard-coded URLs In general, when linking from one Force.com page to another, the links should be relative (omitting the hostname) rather than absolute, and dynamic (looking up the ID, record, or page by name) rather than static. This allows you to migrate the URLs between different organizations, which might have different hostnames or record IDs. If your application contains hard-coded URLs from one Force.com page to another, they might break when they are clicked from the sandbox or, worse, take a user who thinks he is in a development environment back to the production organization. Hard-coded IDs Some components are commonly accessed via their ID, such as RecordTypes. When you create a sandbox copy, code that uses these IDs to reference these components continues to work because production IDs are retained by the sandbox copy. However, the reverse is not true— migrating from sandbox to production (or between any two organizations) via metadata maintains components' names, but if the component does not exist in the target organization, a new ID will be generated. Therefore, migrating code that contains a hard-coded ID can cause the code to break. As a best practice, wherever possible, you should obtain a component's ID by querying for it by name. Existing projects If you have existing development projects, you need to merge that work into the new development environment.
  • 15. DEVELOPMENT LIFECYCLE GUIDE (PART 1) 2. DEVELOPMENT ENVIRONMENTS Creating User Templates A developer user template is an abstract user that has permissions required to develop on the sandbox (for example, the “Modify All Data” permission), but is not active on your production organization. After you create or refresh a sandbox, you activate the developer user in the sandbox and assign it to the individual who will be developing there. To create a developer template: 1. Create a new user on your production organization. 2. Edit the user to give it the necessary permissions. 3. Deactivate the user on the production organization. 4. Create or refresh a sandbox. 5. Activate the user on the sandbox. 6. Optionally change the email address, password, or other environmental settings Your sandbox has the same number of licenses as production, but it is unlikely that all of your users will log into it. When you create or refresh a sandbox, the same users who are active in production are active in the sandbox, so if all licenses are occupied you will need to deactivate an active user to activate the inactive developer user. Just make sure that the user you're deactivating in sandbox is one of the many production users who will never log into that environment. Likewise, you should make your production developer user template inactive on the production organization, so it doesn't consume a paid production license
  • 16. DEVELOPMENT LIFECYCLE GUIDE (PART 1) 2. DEVELOPMENT ENVIRONMENTS Managing Sandboxes To manage a sandbox, from Setup enter Sandboxes in the Quick Find box, then select Sandboxes. A list of your existing sandboxes displays. • Click New Sandbox to create a new sandbox. Salesforce deactivates the New Sandbox button when an organization reaches its sandbox limit. If necessary, contact Salesforce to order more sandboxes for your organization. • Click Sandbox History to see a log of your sandbox refresh history, including when sandboxes were created and who created them. • Click Refresh to replace an existing sandbox with a new copy. Salesforce only displays the Refresh link for sandboxes that are eligible for refreshing, which varies for different types of sandboxes. Your existing copy of this sandbox remains available while you wait for the refresh to complete. The refreshed copy is inactive until you activate it. • Click Activate to activate a refreshed sandbox. You must activate your refreshed sandbox before you can access it. Salesforce only displays this option for sandboxes that are not activated. • Click Del to delete a sandbox. The delete option is only available if your organization exceeds its sandbox limit. • Administrators can click Login to log into a sandbox as a user. Salesforce only displays this option for active sandboxes. Users can log in to the sandbox at https://test.salesforce.com by appending .sandbox_name to their Salesforce usernames. For example, if a username for a production organization is user1@acme.com, and the sandbox is named “test,” the modified username to log in to the sandbox is user1@acme.com.test. • Click on a sandbox name to view details about the sandbox, including the sandbox type and when it was created
  • 17. DEVELOPMENT LIFECYCLE GUIDE (PART 1) 3. DEVELOPMENT TOOLS Regardless of your role in the development process, it is important to understand at a high level how all of the Force.com development tools operate, and the development tasks that overlap each other. The Force.com IDE is the best tool for team development, migration of selected components, and writing Apex. The Force.com Migration Tool, on the other hand, is useful for migrating large scale or repetitive changes between environments. These and other Force.com tools are examined in the following sections
  • 18. DEVELOPMENT LIFECYCLE GUIDE (PART 1) 3. DEVELOPMENT TOOLS Force.com App Builder Tools The Salesforce user interface makes application development easy with point-and-click app builder tools. From Setup, you can modify the metadata of your organization
  • 19. DEVELOPMENT LIFECYCLE GUIDE (PART 1) 3. DEVELOPMENT TOOLS Force.com IDE The Force.com IDE is an integrated development environment for developing applications on the Force.com platform using Apex, Visualforce, and metadata components Metadata API can deploy and retrieve up to 10,000 files or 400 MB at one time. If you need to retrieve or deploy more than either of these limits, you must do so in batches.
  • 20. DEVELOPMENT LIFECYCLE GUIDE (PART 1) 3. DEVELOPMENT TOOLS About Metadata API Metadata API provides two parts that work in conjunction: a rich and powerful metadata model and an application programming interface (API). The metadata model describes the components in your organization. For example, Salesforce custom objects and their fields can be controlled by manipulating the XML files provided by Metadata API. Metadata API also includes a set of Web service methods that provide programmatic access to the configuration and source of your metadata components. In other words, it describes what you can do with those components, such as create an object or deploy one. If it helps you to separate them into two parts, you can think of the metadata components as nouns, and the API calls as verbs. With Metadata API you can: • Work with setup configuration as metadata files. • Copy, paste, merge, and manipulate metadata files using familiar tools, such as text editors, IDEs, batch scripts, and source control systems. • Migrate configuration changes between organizations, either between two development environments or from development to production. • Create your own tools for managing organization and application metadata
  • 21. DEVELOPMENT LIFECYCLE GUIDE (PART 1) 3. DEVELOPMENT TOOLS Force.com Migration Tool The Force.com Migration Tool is a Java/Ant-based command-line utility for moving metadata between a local directory and a Salesforce organization. The Force.com Migration Tool allows you to migrate metadata between unrelated organizations, so in that sense it’s more powerful than change sets. Unlike the Force.com IDE, the Force.com Migration Tool has no graphical user interface. You choose the components you want to deploy, the server address, and other deployment details by editing control files in a text editor and using command-line arguments. Most people will find the graphical user interface of the Force.com IDE easier to use than editing text files and providing arguments on the command line. However, the Force.com Migration Tool is especially useful in the following scenarios: • Development projects where you need to populate a test environment with large amounts of setup changes—making changes with an automated script is far faster than entering them by hand. • Deployments where you need to change the contents of files between organizations—for example, if you want to change the Running User on a dashboard, you can retrieve the Running User from organization A, make a change, and then deploy the Running User to organization B. If you tried to do this in the Force.com IDE, the IDE would force you to save the change back to organization A (where the organization B user probably does not exist) before launching the Deploy Wizard to deploy to organization B. The Force.com Migration Tool gives you complete control over the retrieve() and deploy() commands; editing and saving a file on your local file system does not change the metadata in any organization until you choose to deploy it. • Multi-stage release processes—a typical development process requires iterative building, testing, and staging before releasing to a production environment. Scripted retrieval and deployment of components can make this process much more efficient. • Repetitive deployment using the same parameters—you can retrieve metadata from your organization, make changes, and deploy your changes to an organization. If you need to repeat this process, it is as simple as calling the same deployment target again. • When migration from staging to production is done by highly technical resources—anyone who prefers deploying in a scripting environment will find the Force.com Migration Tool a familiar process.
  • 22. DEVELOPMENT LIFECYCLE GUIDE (PART 1) 3. DEVELOPMENT TOOLS Data Loader Data Loader is a client application for the bulk import or export of data. Use it to insert, update, delete, or export Salesforce records. Use Web-based importing when: • You are loading less than 50,000 records. • The object you need to import is supported by import wizards. To see what import wizards are available and thus what objects they support, from Setup, enter Data Management in the Quick Find box, then select Data Management. • You want to prevent duplicates by uploading records according to account name and site, contact email address, or lead email address. Use Data Loader when: • You need to load 50,000 to 5,000,000 records. Data Loader is supported for loads of up to 5 million records. If you need to load more than 5 million records, we recommend you work with a Salesforce partner or visit the App Exchange for a suitable partner product. • You need to load into an object that is not yet supported by the import wizards. • You want to schedule regular data loads, such as nightly imports. • You want to export your data for backup purposes.
  • 23. Q & A
  • 25. CONTACT www.siway.fr Tel Maroc : 05 22 26 99 97 contact@siway.fr

Editor's Notes

  1. Développer dans l’ORG de Prod: La façon la plus rapide pour developper des nouvelles fonctionalités c’est de costomiser l’org de prod en utilisant des interfaces utilisateurs WEB. Vous pouvez créer des nouveaux objets et des nouvelles applications on utilisant l’outil déclaratif. Dans ce sénario, il n’y a pas besoin de séparer l’environement de DEV et de TEST. Seulement vous ne pouvez pas écrire du code APEX dans une Org de production. Cycle de développement typique : 1- Planifiez exigences fonctionnelles 2- Développer en utilisant Salesforce Web tools, en utilisant les profils pour cacher vos changements jusqu'à ce qu'ils soient prêts à se déployer. 3- Mettez à jour les "profils" pour révéler vos modifications aux utilisateurs appropriés. 4- Prévenez les utilisateurs finaux de changements. Un administrateur peut developper des nouveaux tableaux de bord, Rapport, et templates email ou ajouter des nouveaux champs a des objets . Mais lorsqu’il s’agit d’un développement plus complex et il y a plusieurs membres qui sont impliqués, dans ce cas on doit adopter un autre scénario.
  2. Developper dans les SandBox : Pour des développement plus complexe, on doit séparer l’environement de DEV de celui de la Prod, dans ce cas tous le développement et les tests doivent se faire dans la Sandbox et après le changement sera livré dans la Prod. Si vous êtes entrain de faire du développement dans la production et dans la Sandbox simultanément, il faut noter ces changement et les dupliquer dans la Sandbox. Ceci est important, praceque la sandBox ne se met pas à jour automatiquement et vous pouvez écraser vos modifications dans le cas d’une livraison à partir de la Sandbox. Cycle de développement typique : 1 - Créer un environement de développement 2 - Développer en utilisant les outils web et local de Salesforce. 3 - Faire des tests dans la sandbox 4 - Dupliquer les changements faites dans la production dans la sandbox 5 - Déployer ce que vous avez développer dans la SandBox dans la prod. Projets de développement typiques: Nouveaux objets personalisé, onglets, et applications Intégration avec d’autres systèmes Applications qui utilisent Apex, VisualForce, Workflow, ou nouveau règle de validation.
  3. A propos de la Sandbox : Une sandbox est une copie de l’Org de prod, elle contient les mêmes MetaData que la production (information de configuration : les types des objets personnalisé et les champs, les applications, et les workflow) Ces information ainsi que les données dans le cas d’une Sandbox Full, seront copie dans la sandbox Les opérations que vous faites dans la Sandbox n’impacte pas l’org de Prod. Les Sandbox sont disponible dans les éditions : Entreprise, unlimited, et Performance. Dans unlimited, et Performance vous pouvez créer plusieurs Sandbox de différent types. Chaque Sandbox est isolé de toutes les autres Sandbox, exactement comme la production.
  4. La manière la plus facile pour envoyer les modifications d’une organisation à une autre, c’est d’utiliser les ensembles de changement « Change Set » Pour envoyer les changements, il faut créer un ensemble de changement sortant « outbound change set », une fois que c’est fait, Vous trouvez l’envoi dans l’ensemble de changement entrant « inbound change set ». Les ensembles de changement contient seulement les modifications que vous pouvez faire dans le menu configuration, et il ne support pas tous les types de composants qui peuvent être modifier. Vous ne pouvez pas utiliser les ensembles de changement pour renommer ou supprimer les composants. Si vous faites des modifications qui ne sont pas supportés par les ensembles de changement, dans ce cas il faut envoyer manuellement en répétant les étapes que vous avez suivi lors de la modification. L’envoi des ensembles de changement requis une connexion de déploiement entre deux organisations, ils ne peuvent envoyés que entre deux organisations qui sont affiliés à une org de prod. Par ex : une Org de prod et une Sandbox, deux sandBoxs créer à partir de la même org de prod. La connexion de déploiment n’autorise pas tout seul l’envoi des ensembles de changement, chaque org doit autorisé l’envoi et la réception des ensembles d’autorisation.
  5. Create a Developer Sandbox Use a developer sandbox to ensure that your changes are isolated from production until you’re ready to deploy them. Sandboxes are only available in Enterprise, Unlimited, and Performance editions. 1. From Setup, enter Sandboxes in the Quick Find box, then select Sandboxes. 2. Click New Sandbox. 3. Enter a name and description for the sandbox. 4. Select Developer for the type of sandbox. 5. Click Start Copy. The process can take a while, depending on the size of your organization. You’ll receive a notification email when your sandbox has completed copying. 6. Click the link in the notification email to access your sandbox. You can log into the sandbox at test.salesforce.com/login.jsp by appending .sandbox_name to your username. For example, if your username for your production organization is user1@acme.com, then your username for a sandbox named “test” is user1@acme.com.test. Note: Salesforce automatically changes sandbox usernames but does not change passwords. If you’d like to experiment with change sets before using them for a development project, create a test custom object with a custom field in your developer sandbox now. You can practice deploying these customizations in the next steps, and delete them when you’re finished. Authorize a Deployment Connection Before you can receive change sets from a sandbox or other organization, authorize a deployment connection in the organization that receives the changes. 1. Log into the organization that’ll receive inbound change sets. Usually this is the production organization associated with your sandbox. 2. From Setup, enter Deployment in the Quick Find box, then select Deployment Settings. 3. Click Edit next to the organization from which you want to receive outbound change sets. Usually this is your sandbox. 4. Select Allow Inbound Changes and click Save. Create and Upload an Outbound Change Set Typically, you create an outbound change set in a sandbox organization and deploy it to production. But depending on your development lifecycle, you might choose to migrate changes in either direction between related organizations. 1. From Setup, enter Outbound Change Sets in the Quick Find box, then select Outbound Change Sets. 2. Click New. 3. Enter a name for your change set and click Save. 4. In the Change Set Components section, click Add. 5. Choose the type of component (for example, Custom Object or Custom Field), the components you want to add, and click Add To Change Set. If you are experimenting with a test custom object and custom field, try adding just one of them to the change set first. 6. Click View/Add Dependencies to see whether the components you’ve added to the change set are dependent on other customizations. In the case of the test custom object and custom field, the related component and page layout will both be listed. 7. Select the dependent components you want to add and click Add To Change Set. 8. Click Upload and choose your target organization. The outbound change set detail page displays a message and you get an email notification when the upload is complete. Now log into the target organization, where you can see the inbound change set. Validate an Inbound Change Set Validating a change set allows you to see the success or failure messages without committing the changes. 1. From Setup, enter Inbound Change Sets in the Quick Find box, then select Inbound Change Sets. 2. Click the name of a change set. 3. Click Validate. Note: You can't make any changes to your organization while a test deployment is in progress. 4. After the validation completes, click View Results. If you receive any error messages, resolve them before you deploy. The most common causes of errors are dependent components that aren’t included in the change set and Apex test failures. Deploy an Inbound Change Set Deploying a change set commits the changes it contains to the target organization. 1. From Setup, enter Inbound Change Sets in the Quick Find box, then select Inbound Change Sets. 2. In the Change Sets Awaiting Deployment list, click the name of the change set you want to deploy. 3. Click Deploy. A change set is deployed in a single transaction. If the deployment is unable to complete for any reason, the entire transaction is rolled back. After a deployment completes successfully, all changes are committed to your organization and the deployment can’t be rolled back.
  6. Developpé dans la plateforme Force.com requis un environnement de Dev, un endroit ou on peut faire les modifications sans impacter d’autres utilisateurs. Dans le développement de logiciels traditionnels, un environnement de développement est un peu plus d'un espace pour appeler vos propres Fonctionnalités. Mais sur la plate-forme Force.com, chaque environnement de développement est une Salesforce organisation entièrement fonctionnel. Dans la démo on a utilisé un seul environnement de DEV « Developer SandBox » pour créer des modification isolé de la production. Dans des scénarios plus complexe, on peut avoir plusieurs Sandboxs pour plusieurs raisons : Développment Intégration Testing Formation (Training) Il y a aussi plusieurs types d’environnement de DEV pour plusieurs utilisations. Quand vous utilisé un seul environnement pour de DEV et les Tests, il faut que vous arrêtez de développer pour tester, et vous ne pouvez reprendre le développement que après avoir déployer les changements. Un scénario plus sophistiqué permet de continue le développement pendant que les tests et le déploiement prennent place. Dans ce cas vous avez besoin de séparer les deux environnements, un pour le DEV et l’autre pour les tests et les deploiements. Séparer le DEV du TEST : Avoir des environnements de développement et de test séparées augmente la complexité du processus de développement, et relève une question: d'où viennent les changements ? Imaginez que vous avez une application développée puis les modifications sont migrées sur votre environnement de test. Pendant le test, vous trouvez que certains changements doivent appliquer pour que vous puissiez déployer sur la production. Est-ce que vous allez faire ces modifications dans l’environnement de test ou bien revenir dans l’environnement de DEV est recommencer le process ? Si vous avez que deux environements, vous pourriez vouloir faire ces changements dans votre organisation de test, parce que c’est plus rapide et votre sandbox de développement pourrait avoir déjà changé au point où vous ne pouvez pas démarrer plus facilement. Toutefois, vous aurez toujours envie de répliquer les changements effectués dans votre environnement de test vers votre environnement de développement, afin d'assurer la prochaine fois que vous faites la migration du développement à tester que le correctif est conservée.
  7. Si vous avez plusieurs développeurs et plus qu’un seule projet en cours de développement qui doivent être réalisé en même temps, dans ce cas vous auriez besoin d’un environnement de test d’intégration, pour être sûre que les développements séparés se fusionnent entre eux sans conflits. Dans le future, vous llez avoir besoin de « user-acceptance testing » (tests d'acceptation utilisateur) afin de déterminer si les exigences de conception d'origine sont remplies. Un processus de développement plus élaboré peut également contenir un environnement de mise en scène (staging) où vous vous assurez que le déploiement à la production se passe exactement comme prévu. Dans un tel scénario de développement, vous pourriez vous demander où faire des changements de code. Si une fonction échoue à un test lors du déploiement en production, fixez-vous la fonction dans l'organisation où il a échoué, ou démarrer le processus à zéro? Comme la complexité de votre processus de développement augmente, vous trouverez que la fixation des choses au fur et à mesure n’est pas un bon modèle. Au lieu de cela, vous aurez envie de faire toutes les corrections dans une organisation de développement et de suivre le processus pour la migration de changement vers la production.
  8. Sandboxes sont des nouvelles organisations copiées à partir d’une Org de Prod Une Sandbox peut avoir ou non tous les données de l’org de prod, ça depend de l’utilisation. Pour ce qui est du DEV, vous allez avoir besoin de d’un petit jeux de données, afin d’être sûre que ce que vous développez marche. Pour QA Testing (Quality Assurance Testing), et spécialement les tests de regression vous allez avoir besoin d’un jeux de données important qui ne soit pas changé tous le temps. Pour ce qui du pré-deploiement “Staging”, vous allez avoir besoin d’une SandBox similaire de l’ORG de prod et qui contient tous les données. Seulement le SandBox “Full” copie tous les données présent dans l’org de prod, mais vous pouvez utiliser “import Wizard” ou “Data loader” afin d’ajouter les données dans une Sandbox. L’autre Type de l’environement de développement présent dans la plate-Forme Force.com est “Developer Edition”. Developer Edition fournit un accès gratuit à de nombreuses fonctionnalités exclusives disponibles avec les éditions Enterprise, illimité, et performance. Vous Avez un accès FULL à la plate-forme Force.com et API, ce qui vous permet d’étendre Salesforce, l’intégrer avec d’autres applications, et développer de nouveaux outils et APP. Developer Edition sont principalement utilisés par les éditeurs de logiciels indépendants (ISV) qui créent des applications pour la distribution sur AppExchange.
  9. Si vous disposez de plusieurs SandBoxs disponible pour votre organisation, prennez les facteurs suivants en compte lors de la planification, lesquels utiliser à quelles fins.
  10. Les fonctionnalités de la Sandbox ne sont pas identique au celles de la production, et il faut prendre ceci en compte ainsi que le processus de copie des données. Il faut prendre en compte les points suivants lors de la création ou lors de la mise à jour d’une Sandbox : La création ou la mise à jour d’une Sandbox est une opération qui prend un temps considérable, il peuvent prendre des minutes, des jours ou même plus qu’une semaine. Plusieurs facteurs sont pris en charge ( le nombre de personnalisation, la taille des données et la configuration (Pour les full copies), le nombre des objets, et le temps de chargement du serveur). Aussi le rafraichissement des Sandbox est gérer dans les fils d’attente, donc votre demande peut ne pas commence instantanément. Donc il est préférable de planifier et autoriser au minimum les valeurs optionnel. Considérez ce qui suit lors de la création ou de l'actualisation de la Sandbox : Le rafraichissement de la Sandbox supprime et recrée la Sandbox comme étant une nouvelle copie de l’org de prod. En effet, cela annule toute modification d'accès manuels que vous avez effectuées. Si vous avez créé des utilisateurs dans la sandBox, ils existent plus; Si vous avez modifiez les autorisation et les paramètres d’accès, ils reviennent aux valeurs de l’org de prod. Cela signifie que, après un rafraîchissement, les modifications d'accès que vous avez effectuées doivent être répétés dans la nouvelle copie. Pour éviter ce processus, vous pouvez créer des modèles d'utilisateurs dans votre organisation de la production, puis les activer dans la SandBox. Les opérations de configuration et les modifications de données à votre organisation de la production lors de la création de la Sandbox pourraient entraîner des incohérences dans votre bac à sable. Par conséquent, il est préférable de geler ou de minimiser les changements à votre organisation de la production lors de la création de la Sandbox. Les fonctions suivantes sont désactivées et ne peuvent pas être activées dans les Sandbox : Avertissements d'expiration du contrat Remonté les avertissements d’éxpiration des contrats et la remonté des CAS sont désactivées parcequ’il envoi automatiquement des emails aux contacts, clients, et les utilisateurs de l’Org de prod. Résumé abonnement Les exportations de données (en cliquant sur Exporter maintenant ou à l'annexe d'exportation sur la page Export Service hebdomadaire dans la configuration) La possibilité de créer des Sandboxs La possibilité de copier les adresses de services de messagerie que vous créez dans votre Sandbox à votre organisation de la production La possibilité de publier des sites Site.com
  11. Une fois que vous avez crée la SandBox, configurer là pour mettre à jour les dépendances de l'environnement et de fusionner le contenu du projet avant de commencer le développement. Si vous avez des environnements de développement multiples, vous devez fusionner vos changements avec les changements des autres membres de l'équipe dans un environnement de développement unique en cours de projet. Durant cette phase, vous devez suivre les changements dans tous les environnements de sorte que vous pouvez fusionner ces changements avec succès. Dépendances de l'environnement sont des paramètres qui sont différentes entre un environnement de développement et l'organisation de la production. Lorsque vous travaillez dans un environnement de développement, vous devez mettre à jour qui a accès à quoi, tourner certaines caractéristiques ou désactiver, et mettre à jour les adresses des systèmes internes et externes de sorte qu'ils pointent à l'environnement de développement à la place de la production. L'inverse est également vrai lorsque vous déployez à la production, vous pourriez avoir besoin de mettre à jour certains paramètres que vous avez utilisés dans le développement de sorte qu'ils marchent dans la production.
  12. L’actualisation d’une Sandbox, créer une nouvelle copie de la production. Ce qui veut dire que tous les autorisations utilisateurs sont copié à partir de l’org de Prod, et les changements que vous avez fait dans la sandbox avant l’actualisation doivent être refait. Si vous avez plusieurs Sandboxs, pensez à créer un template utilisateur « Developer user Template » dans votre organisation de prod. Un template utilisateur est un utilisateur abstrait qui a tout les permissions requis dans la sandBox de DEV (par exemple « Modify all Data » autorisation ), mais il n’est pas active dans l’organisation de prod. Après la création ou l’actualisation de la Sandbox, vous activez l’utilisateur developpeur dans la Sandbox et l’assigner à l’individu qui va développer dans la Sandbox.
  13. Indépendamment de votre rôle dans le processus de développement, il est important de comprendre au plus haut niveau, comment les outils de développement de Force.com opèrent, et les tâches de développement qui se chevauchent. La gestion de livraison effectue le suivi de l'évolution de chaque organisation, et la connaissance des outils de suivi des modifications rend la tâche plus facile. Vous êtes probablement familiarisé avec la création une application en utilisant Salesforce Web user interface. En revanche le développement Basé sur les projets nécessite l’utilisation des outils de bureau. L’IDE Froce.com est le meilleur outils pour une équipe de développeurs. L’outils de migration Force.com, est utile pour la migration des changements à grande échelle ou répétitives entre les environnements. Ceux là et d'autres outils Force.com sont examinés dans les sections suivantes.
  14. Bien qu'il existe de nombreux outils que vous pouvez utiliser pour créer et modifier les composants de l'application, l'interface Web est le meilleur endroit pour commencer. L'interface utilisateur Salesforce permet le développement d'applications facile avec point-and-cliquez sur Outils app constructeur. À partir du menu « Configuration », vous pouvez modifier les métadonnées de votre organisation. Parce que l'interface Web est si facile à utiliser, les administrateurs font souvent des modifications directement dans l'organisation de la production, plutôt que d'utiliser un environnement de développement. Ceci est idéal pour les utilisateurs qui ont besoin d’une fonctionnalité immédiatement, mais le changement dans la production doit être suivi afin que vous pouvez faire migrer les mêmes fonctionnalités dans les sandboxs.
  15. Le Force.com IDE est un environnement de développement intégré pour le développement d'applications sur la plate-forme Force.com en utilisant Apex, Visualforce, et des composants de métadonnées. Conçu pour les développeurs et les équipes de développement, l'IDE fournit des outils pour accélérer le développement de l'application Force.com. Ces outils comprennent des assistants, des éditeurs de code source, les outils d'exécution de test, d’aide au déploiement, aide intégrée et un débogueur interactif. Le Force.com IDE est construit au-dessus de l'open-source Eclipse Platform et est disponible en tant que plug-in. Le plug-in est open source. Force.com Développement axée sur les projets, exploite les outils et les processus de développement de logiciels traditionnels, tels que les environnements de développement (SandBox), environnements de développement intégrés (IDE) et les systèmes de contrôle de source. La plate-forme Force.com permet un développement axé sur les projets en utilisant des fichiers à base de texte pour représenter les différentes composantes d'une organisation Salesforce. Ces fichiers sont facilement transportés, stockés et peuvent être versionné dans un système de contrôle de code source, et de permettre le développement traditionnelle. Tout cela est rendu possible par API métadonnées. (MetaData API). Un projet Force.com est une collection de fichiers de métadonnées réunis afin que vous puissiez travailler avec les fichiers localement. Selon vos besoins, vous pouvez créer un projet Force.com qui contient un seul composant ou chaque composant dans votre organisation. Le dernier cas, la récupération de chaque composant de votre organisation, n’est toujours pas le meilleur choix car il peut rendre le déploiement, un processus plus long et plus difficile. Une bonne façon de structurer votre projet est de penser à ce que vous voulez accomplir, puis créer un projet que pour ces composants. Vous pouvez modifier ultérieurement le projet si vous avez des composants que vous souhaitez ajouter ou supprimer.
  16. Lors de l'importation des données, Data Loader lit, extraits, et charge les données de valeurs séparées par des virgules (CSV) ou à partir d'une connexion de base de données. Lors de l'exportation des données, il affiche les fichiers CSV. Pour importer des données, vous pouvez utiliser soit les assistants d'importation ou Data Loader. Data Loader complète les assistants d'importation basés sur le Web qui sont accessibles à partir du menu de configuration de l'application en ligne.