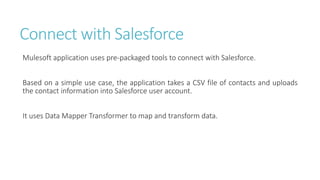
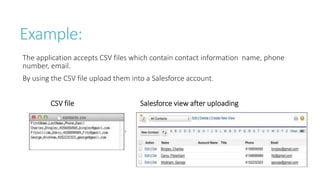
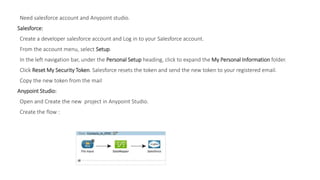
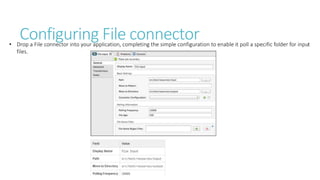
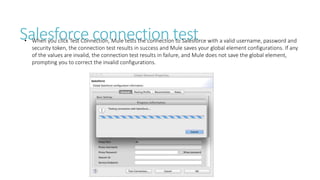
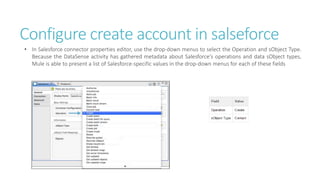
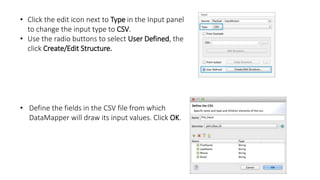
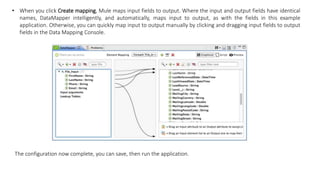
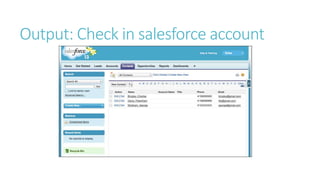
Connect with Salesforce
Mulesoft application uses pre-packaged tools to connect with Salesforce.
Based on a simple use case, the application takes a CSV file of contacts and uploads
the contact information into Salesforce user account.
It uses Data Mapper Transformer to map and transform data.
Example:
The application accepts CSV files which contain contact information name, phone
number, email.
By using the CSV file upload them into a Salesforce account.
CSV file Salesforce view after uploading
Need salesforce account and Anypoint studio.
Salesforce:
Create a developer salesforce account and Log in to your Salesforce account.
From the account menu, select Setup.
In the left navigation bar, under the Personal Setup heading, click to expand the My Personal Information folder.
Click Reset My Security Token. Salesforce resets the token and send the new token to your registered email.
Copy the new token from the mail
Anypoint Studio:
Open and Create the new project in Anypoint Studio.
Create the flow :
Configuring File connector• Drop a File connector into your application, completing the simple configuration to enable it poll a specific folder for input
files.
Configuring Salesforce• Next, add a Salesforce Connector to the flow. At this point, you can configure the connector with your Salesforce
account-specific details and test the connection to Salesforce.
• Modify the display name for the connector, if you wish, then click the plus sign next to the Config Reference drop-
down to create a new Global Element.
• Select the Salesforce global element, then click OK.
• Enter values in the Username, Password and Security token fields, then click OK.
Salesforce connection test• When you click Test Connection, Mule tests the connection to Salesforce with a valid username, password and
security token, the connection test results in success and Mule saves your global element configurations. If any
of the values are invalid, the connection test results in failure, and Mule does not save the global element,
prompting you to correct the invalid configurations.
Configure create account in salseforce
• In Salesforce connector properties editor, use the drop-down menus to select the Operation and sObject Type.
Because the DataSense activity has gathered metadata about Salesforce's operations and data sObject types,
Mule is able to present a list of Salesforce-specific values in the drop-down menus for each of these fields
• Having defined the Salesforce output, you can then drop a DataMapper between
the elements in the flow to map CSV input fields to Salesforce output fields.
Because DataSense has already acquired the operation and sObject information
from Salesforce, the DataMapper demands that you configure only the input
values . In this example application, we used an existing CSV example to define
the input fields in DataMapper.
DataMapper Configuration
• Having defined the Salesforce-friendly output, you can then drop a DataMapper between the elements in the
flow to map CSV input fields to Salesforce output fields. Because DataSense has already acquired the
operation and sObject information from Salesforce, the DataMapper demands that you configure only the
input values (below, left). In this example application, we used an existing CSV example to define the input
fields in DataMapper (below, right).
• Click the edit icon next to Type in the Input panel
to change the input type to CSV.
• Use the radio buttons to select User Defined, the
click Create/Edit Structure.
• Define the fields in the CSV file from which
DataMapper will draw its input values. Click OK.
• When you click Create mapping, Mule maps input fields to output. Where the input and output fields have identical
names, DataMapper intelligently, and automatically, maps input to output, as with the fields in this example
application. Otherwise, you can quickly map input to output manually by clicking and dragging input fields to output
fields in the Data Mapping Console.
The configuration now complete, you can save, then run the application.
Output: Check in salesforce account
<?xml version="1.0" encoding="UTF-8"?>
<mule version="EE-3.5.0" xmlns="http://www.mulesoft.org/schema/mule/core" xmlns:data-
mapper="http://www.mulesoft.org/schema/mule/ee/data-mapper" xmlns:doc="http://www.mulesoft.org/schema/mule/documentation"
xmlns:file="http://www.mulesoft.org/schema/mule/file" xmlns:sfdc="http://www.mulesoft.org/schema/mule/sfdc"
xmlns:spring="http://www.springframework.org/schema/beans" xmlns:tracking="http://www.mulesoft.org/schema/mule/ee/tracking"
xmlns:xsi="http://www.w3.org/2001/XMLSchema-instance" xsi:schemaLocation="http://www.mulesoft.org/schema/mule/file
http://www.mulesoft.org/schema/mule/file/current/mule-file.xsd
http://www.mulesoft.org/schema/mule/ee/data-mapper http://www.mulesoft.org/schema/mule/ee/data-mapper/current/mule-data-mapper.xsd
http://www.mulesoft.org/schema/mule/sfdc http://www.mulesoft.org/schema/mule/sfdc/current/mule-sfdc.xsd
http://www.springframework.org/schema/beans http://www.springframework.org/schema/beans/spring-beans-current.xsd
http://www.mulesoft.org/schema/mule/core http://www.mulesoft.org/schema/mule/core/current/mule.xsd
http://www.mulesoft.org/schema/mule/ee/tracking http://www.mulesoft.org/schema/mule/ee/tracking/current/mule-tracking-ee.xsd">
<sfdc:config doc:name="Salesforce" name="Salesforce" password="password" username="salesforceuser@email.com">
<sfdc:connection-pooling-profile exhaustedAction="WHEN_EXHAUSTED_GROW" initialisationPolicy="INITIALISE_ONE"/>
</sfdc:config>
<data-mapper:config doc:name="DataMapper" name="datamapper_grf" transformationGraphPath="datamapper.grf"/>
<flow doc:description="Upload a csv file of contact information into Salesforce as new contacts." doc:name="Contacts_to_SFDC"
name="Contacts_to_SFDC">
<file:inbound-endpoint doc:name="File Input" moveToDirectory="src/test/resources/output" path="src/test/resources/input"
pollingFrequency="10000" responseTimeout="10000"/>
<data-mapper:transform config-ref="datamapper_grf" doc:name="DataMapper"/>
<sfdc:create config-ref="Salesforce" doc:name="Salesforce" type="Contact">
<sfdc:objects ref="#[payload]"/>
</sfdc:create>
</flow>
</mule>
• Mulesoft website
Salesforce connector Example

Salesforce connector Example

  • 2.
    Connect with Salesforce Mulesoftapplication uses pre-packaged tools to connect with Salesforce. Based on a simple use case, the application takes a CSV file of contacts and uploads the contact information into Salesforce user account. It uses Data Mapper Transformer to map and transform data.
  • 3.
    Example: The application acceptsCSV files which contain contact information name, phone number, email. By using the CSV file upload them into a Salesforce account. CSV file Salesforce view after uploading
  • 4.
    Need salesforce accountand Anypoint studio. Salesforce: Create a developer salesforce account and Log in to your Salesforce account. From the account menu, select Setup. In the left navigation bar, under the Personal Setup heading, click to expand the My Personal Information folder. Click Reset My Security Token. Salesforce resets the token and send the new token to your registered email. Copy the new token from the mail Anypoint Studio: Open and Create the new project in Anypoint Studio. Create the flow :
  • 5.
    Configuring File connector•Drop a File connector into your application, completing the simple configuration to enable it poll a specific folder for input files.
  • 6.
    Configuring Salesforce• Next,add a Salesforce Connector to the flow. At this point, you can configure the connector with your Salesforce account-specific details and test the connection to Salesforce. • Modify the display name for the connector, if you wish, then click the plus sign next to the Config Reference drop- down to create a new Global Element. • Select the Salesforce global element, then click OK. • Enter values in the Username, Password and Security token fields, then click OK.
  • 7.
    Salesforce connection test•When you click Test Connection, Mule tests the connection to Salesforce with a valid username, password and security token, the connection test results in success and Mule saves your global element configurations. If any of the values are invalid, the connection test results in failure, and Mule does not save the global element, prompting you to correct the invalid configurations.
  • 8.
    Configure create accountin salseforce • In Salesforce connector properties editor, use the drop-down menus to select the Operation and sObject Type. Because the DataSense activity has gathered metadata about Salesforce's operations and data sObject types, Mule is able to present a list of Salesforce-specific values in the drop-down menus for each of these fields
  • 9.
    • Having definedthe Salesforce output, you can then drop a DataMapper between the elements in the flow to map CSV input fields to Salesforce output fields. Because DataSense has already acquired the operation and sObject information from Salesforce, the DataMapper demands that you configure only the input values . In this example application, we used an existing CSV example to define the input fields in DataMapper.
  • 10.
    DataMapper Configuration • Havingdefined the Salesforce-friendly output, you can then drop a DataMapper between the elements in the flow to map CSV input fields to Salesforce output fields. Because DataSense has already acquired the operation and sObject information from Salesforce, the DataMapper demands that you configure only the input values (below, left). In this example application, we used an existing CSV example to define the input fields in DataMapper (below, right).
  • 11.
    • Click theedit icon next to Type in the Input panel to change the input type to CSV. • Use the radio buttons to select User Defined, the click Create/Edit Structure. • Define the fields in the CSV file from which DataMapper will draw its input values. Click OK.
  • 12.
    • When youclick Create mapping, Mule maps input fields to output. Where the input and output fields have identical names, DataMapper intelligently, and automatically, maps input to output, as with the fields in this example application. Otherwise, you can quickly map input to output manually by clicking and dragging input fields to output fields in the Data Mapping Console. The configuration now complete, you can save, then run the application.
  • 13.
    Output: Check insalesforce account
  • 14.
    <?xml version="1.0" encoding="UTF-8"?> <muleversion="EE-3.5.0" xmlns="http://www.mulesoft.org/schema/mule/core" xmlns:data- mapper="http://www.mulesoft.org/schema/mule/ee/data-mapper" xmlns:doc="http://www.mulesoft.org/schema/mule/documentation" xmlns:file="http://www.mulesoft.org/schema/mule/file" xmlns:sfdc="http://www.mulesoft.org/schema/mule/sfdc" xmlns:spring="http://www.springframework.org/schema/beans" xmlns:tracking="http://www.mulesoft.org/schema/mule/ee/tracking" xmlns:xsi="http://www.w3.org/2001/XMLSchema-instance" xsi:schemaLocation="http://www.mulesoft.org/schema/mule/file http://www.mulesoft.org/schema/mule/file/current/mule-file.xsd http://www.mulesoft.org/schema/mule/ee/data-mapper http://www.mulesoft.org/schema/mule/ee/data-mapper/current/mule-data-mapper.xsd http://www.mulesoft.org/schema/mule/sfdc http://www.mulesoft.org/schema/mule/sfdc/current/mule-sfdc.xsd http://www.springframework.org/schema/beans http://www.springframework.org/schema/beans/spring-beans-current.xsd http://www.mulesoft.org/schema/mule/core http://www.mulesoft.org/schema/mule/core/current/mule.xsd http://www.mulesoft.org/schema/mule/ee/tracking http://www.mulesoft.org/schema/mule/ee/tracking/current/mule-tracking-ee.xsd"> <sfdc:config doc:name="Salesforce" name="Salesforce" password="password" username="salesforceuser@email.com"> <sfdc:connection-pooling-profile exhaustedAction="WHEN_EXHAUSTED_GROW" initialisationPolicy="INITIALISE_ONE"/> </sfdc:config> <data-mapper:config doc:name="DataMapper" name="datamapper_grf" transformationGraphPath="datamapper.grf"/> <flow doc:description="Upload a csv file of contact information into Salesforce as new contacts." doc:name="Contacts_to_SFDC" name="Contacts_to_SFDC"> <file:inbound-endpoint doc:name="File Input" moveToDirectory="src/test/resources/output" path="src/test/resources/input" pollingFrequency="10000" responseTimeout="10000"/> <data-mapper:transform config-ref="datamapper_grf" doc:name="DataMapper"/> <sfdc:create config-ref="Salesforce" doc:name="Salesforce" type="Contact"> <sfdc:objects ref="#[payload]"/> </sfdc:create> </flow> </mule>
  • 15.