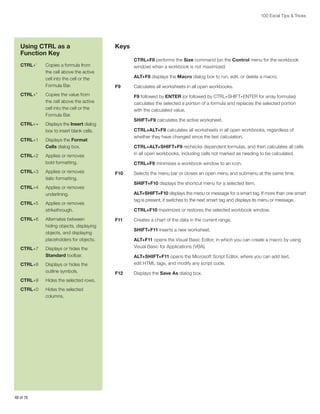
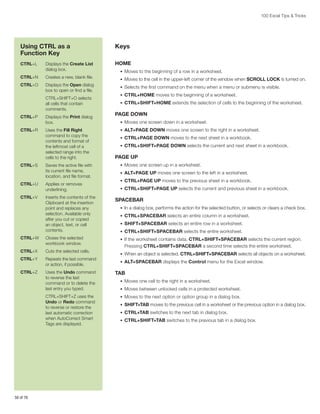
Sage Intelligence
100 Microsoft® Excel® Tips & Tricks
For Advanced Business Reporting in Microsoft® Excel®
Excel® on Steroids
Work smarter, every day!
Anytime Learning courses provide indepth coverage of business reporting
using formulas and functions to provide
enhanced performance and productivity
for better reporting and decision making!
Sign up for training on your favorite
Sage Intelligence product, or take your
Microsoft® Excel® skills to the next level
with Excel® on Steroids developed by
Alchemex™.

www.SageU.com
Sage Intelligence
100 Microsoft® Excel Tips & Tricks
For Advanced Business Reporting in Microsoft® Excel®

Disclaimer
Every effort has been made to trace the copyright holders where required. In the event of unintentional omissions or errors,
any information that would enable the publisher to make the proper copyright arrangements would be appreciated.
Alchemex (Pty) Ltd shall not be liable for any damage, loss or liability of whatsoever nature arising from the use or inability to
use the services or content provided from and through this book.
Alchemex (Pty) Ltd makes no representations or warranties, implied or otherwise, that, amongst others, the content contained
in this book is free from errors or omissions. The book is supplied on an “as is” basis and has not been compiled or supplied
to meet the user’s individual requirements. It is the sole responsibility of the user to satisfy itself that the contents available
from and through this book will meet the user’s individual requirements.
Neither Alchemex (Pty) Ltd nor any of its agents or representatives shall be liable for any damage, loss or liability of whatsoever
nature arising from the use or inability to use this book.

©2011 Sage Software, Inc. All rights reserved. Sage, the Sage logos, and the Sage products and services names mentioned
herein are registered trademarks or trademarks of Sage Software, Inc., or its affiliated entities. Excel is a registered trademark
of Microsoft Corporation in the United States and/or other countries. The 100 Tips & Tricks For Advanced Business Reporting
in Microsoft Excel Booklet is an independent publication by Sage Software, Inc. and is not affiliated with, nor has it been
authorized, sponsored, or otherwise approved by Microsoft Corporation. All other trademarks are the property of their
respective owners.
Alchemex and Business Reporting
Alchemex was founded in the year 2000 with the vision of delivering a simple reporting tool to companies who experience frustrations with
reporting and since inception has become the undisputed leading developer, enabler and support provider of affordable business intelligence
for small to midsized organizations. Although Alchemex is a totally flexible and generic Business Intelligence solution, the success to date is
attributed to focusing on rolling out solutions for the more prevalent install bases in specific regions. For nearly a decade, Alchemex has worked
with and amongst business owners and financial directors of companies varying from the small to the multinational and has built intellectual
property covering various well known accounting and payroll packages like Softline Pastel Partner, Softline Pastel Evolution, Sage ERP Accpac,
Sage ERP MAS, Sage Simply Accounting, Sage Peachtree, Sage ERP X3, SAPB1, SYSPRO, Sage50, MYOB Accounting Plus, MYOB Premier
and MYOB Exo Business, VIP Payroll, and many more.
In this time Alchemex has created a powerful suite of Business Intelligence technology that is the engine that drives information into Microsoft
Excel, and it is the power of Microsoft Excel as an information-gathering and -distribution application that is the common denominator that brings
the innovation of Alchemex together with the increasing appetite of users of Excel to release insightful information to business users across
the spectrum in an organization. Alchemex has a team of more than 40 people and a rapidly expanding network of national and international
business partners who sell, consult, and train on Alchemex software and training products. Over 22,000 different companies now rely on
Alchemex technology for accurate and timely reporting
The fact that Microsoft Excel is the chosen delivery platform for Alchemex technology has also resulted in Alchemex becoming a leader in
training “high end” Excel, and as a result of continued requests from a burgeoning client install base, Alchemex created the now popular Excel on
Steroids workshops. This book shares some of the most powerful tips and tricks that Alchemex has learned from its clients with you so that you
can also use Excel more powerfully for business reporting. If you are not familiar with the basics of Excel, then this book won’t work for you, but if
you are one of those people who is frustrated because you are always looking for the shortcuts and want to become more efficient in Excel 2007,
then this will become your constant companion at your PC.
Excel gets easier to use and even more accessible with a little help from Alchemex.
“We use Alchemex products extensively in our business. I believe that being able to obtain a ‘snapshot view’ of your business is critical in today’s
business environment when there is just too much information floating about. Managers need to dedicate their skills to managing—not sifting
through endless reports trying to make sense of heaps of information. Alchemex does this neatly and efficiently—with no fuss at all and delivers
this information ‘on demand’ and through Excel. What more could you ask for?”
Steven Cohen, managing director, Softline Pastel Software
“Alchemex is a must for any organization serious about information—it’s simple; it’s Microsoft Excel. Possibly one of the shrewdest IT investments
to date.”
Wayne Lambson, financial director, Foreshore Ships Agency
“Successful Alchemex BI implementations are changing the way information is generated and used within their clients’ organisations. This has a
direct impact on the organization’s increased effectiveness and efficiency.”
David Ives, director, developer platform lead, Microsoft South Africa

4 of 76
100 Excel Tips & Tricks

CONTENTS
The Excel 2007 Interface. . . . . . . . . . . . . . . . . . . . . . . . . . . . . . . . . . . . . . . . . . . . . . . . . . . . . . . . . . . . . . . . . . . . . . . . . . . . . . 7
The Office Button. .  .  .  .  .  .  .  .  .  .  .  .  .  .  .  .  .  .  .  .  .  .  .  .  .  .  .  .  .  .  .  .  .  .  .  .  .  .  .  .  .  .  .  .  .  .  .  .  .  .  .  .  .  .  .  .  .  .  .  .  .  .  .  .  .  .  .  .  .  .  .  .  .  .  .  .  .  .  .  .  .  .  .  .  .  .  .  .  .  .  .  .  .  .  .  .  .  .  .  .  .  .  .  .  .  .  . 7
The Quick Access Toolbar.  .  .  .  .  .  .  .  .  .  .  .  .  .  .  .  .  .  .  .  .  .  .  .  .  .  .  .  .  .  .  .  .  .  .  .  .  .  .  .  .  .  .  .  .  .  .  .  .  .  .  .  .  .  .  .  .  .  .  .  .  .  .  .  .  .  .  .  .  .  .  .  .  .  .  .  .  .  .  .  .  .  .  .  .  .  .  .  .  .  .  .  .  .  .  .  .  .  .  .  . 7
Worksheet Navigation Made Easy.  .  .  .  .  .  .  .  .  .  .  .  .  .  .  .  .  .  .  .  .  .  .  .  .  .  .  .  .  .  .  .  .  .  .  .  .  .  .  .  .  .  .  .  .  .  .  .  .  .  .  .  .  .  .  .  .  .  .  .  .  .  .  .  .  .  .  .  .  .  .  .  .  .  .  .  .  .  .  .  .  .  .  .  .  .  .  .  .  .  .  .  .  .  . 8

Range Selection Made Easy. . . . . . . . . . . . . . . . . . . . . . . . . . . . . . . . . . . . . . . . . . . . . . . . . . . . . . . . . . . . . . . . . . . . . . . . . . . . 8
The Home Tab. . . . . . . . . . . . . . . . . . . . . . . . . . . . . . . . . . . . . . . . . . . . . . . . . . . . . . . . . . . . . . . . . . . . . . . . . . . . . . . . . . . . . . . 9
Font Themes .  .  .  .  .  .  .  .  .  .  .  .  .  .  .  .  .  .  .  .  .  .  .  .  .  .  .  .  .  .  .  .  .  .  .  .  .  .  .  .  .  .  .  .  .  .  .  .  .  .  .  .  .  .  .  .  .  .  .  .  .  .  .  .  .  .  .  .  .  .  .  .  .  .  .  .  .  .  .  .  .  .  .  .  .  .  .  .  .  .  .  .  .  .  .  .  .  .  .  .  .  .  .  .  .  .  .  .  .  .  . 9
Wrap Text.  .  .  .  .  .  .  .  .  .  .  .  .  .  .  .  .  .  .  .  .  .  .  .  .  .  .  .  .  .  .  .  .  .  .  .  .  .  .  .  .  .  .  .  .  .  .  .  .  .  .  .  .  .  .  .  .  .  .  .  .  .  .  .  .  .  .  .  .  .  .  .  .  .  .  .  .  .  .  .  .  .  .  .  .  .  .  .  .  .  .  .  .  .  .  .  .  .  .  .  .  .  .  .  .  .  .  .  .  .  .  .  .  . 9
Copying Formatting.  .  .  .  .  .  .  .  .  .  .  .  .  .  .  .  .  .  .  .  .  .  .  .  .  .  .  .  .  .  .  .  .  .  .  .  .  .  .  .  .  .  .  .  .  .  .  .  .  .  .  .  .  .  .  .  .  .  .  .  .  .  .  .  .  .  .  .  .  .  .  .  .  .  .  .  .  .  .  .  .  .  .  .  .  .  .  .  .  .  .  .  .  .  .  .  .  .  .  .  .  .  .  .  .  . 9
Insert Date Shortcut. .  .  .  .  .  .  .  .  .  .  .  .  .  .  .  .  .  .  .  .  .  .  .  .  .  .  .  .  .  .  .  .  .  .  .  .  .  .  .  .  .  .  .  .  .  .  .  .  .  .  .  .  .  .  .  .  .  .  .  .  .  .  .  .  .  .  .  .  .  .  .  .  .  .  .  .  .  .  .  .  .  .  .  .  .  .  .  .  .  .  .  .  .  .  .  .  .  .  .  .  .  .  .  .  . 9
Pasting Paragraphs of Text Into a Single Cell.  .  .  .  .  .  .  .  .  .  .  .  .  .  .  .  .  .  .  .  .  .  .  .  .  .  .  .  .  .  .  .  .  .  .  .  .  .  .  .  .  .  .  .  .  .  .  .  .  .  .  .  .  .  .  .  .  .  .  .  .  .  .  .  .  .  .  .  .  .  .  .  .  .  .  .  .  .  .  .  .  .  .  .  . 10
Converting Negative Values to Positive Values.  .  .  .  .  .  .  .  .  .  .  .  .  .  .  .  .  .  .  .  .  .  .  .  .  .  .  .  .  .  .  .  .  .  .  .  .  .  .  .  .  .  .  .  .  .  .  .  .  .  .  .  .  .  .  .  .  .  .  .  .  .  .  .  .  .  .  .  .  .  .  .  .  .  .  .  .  .  .  .  .  .  .  . 10
Viewing Parts of Several Worksheets on One Worksheet.  .  .  .  .  .  .  .  .  .  .  .  .  .  .  .  .  .  .  .  .  .  .  .  .  .  .  .  .  .  .  .  .  .  .  .  .  .  .  .  .  .  .  .  .  .  .  .  .  .  .  .  .  .  .  .  .  .  .  .  .  .  .  .  .  .  .  .  .  .  .  .  .  .  .  . 11
Keeping 00 in Front of Values .  .  .  .  .  .  .  .  .  .  .  .  .  .  .  .  .  .  .  .  .  .  .  .  .  .  .  .  .  .  .  .  .  .  .  .  .  .  .  .  .  .  .  .  .  .  .  .  .  .  .  .  .  .  .  .  .  .  .  .  .  .  .  .  .  .  .  .  .  .  .  .  .  .  .  .  .  .  .  .  .  .  .  .  .  .  .  .  .  .  .  .  .  .  .  .  . 12
Displaying Values That Are In Millions as Thousands.  .  .  .  .  .  .  .  .  .  .  .  .  .  .  .  .  .  .  .  .  .  .  .  .  .  .  .  .  .  .  .  .  .  .  .  .  .  .  .  .  .  .  .  .  .  .  .  .  .  .  .  .  .  .  .  .  .  .  .  .  .  .  .  .  .  .  .  .  .  .  .  .  .  .  .  .  .  . 13
AutoSum Button .  .  .  .  .  .  .  .  .  .  .  .  .  .  .  .  .  .  .  .  .  .  .  .  .  .  .  .  .  .  .  .  .  .  .  .  .  .  .  .  .  .  .  .  .  .  .  .  .  .  .  .  .  .  .  .  .  .  .  .  .  .  .  .  .  .  .  .  .  .  .  .  .  .  .  .  .  .  .  .  .  .  .  .  .  .  .  .  .  .  .  .  .  .  .  .  .  .  .  .  .  .  .  .  .  .  . 14
Fill Series.  .  .  .  .  .  .  .  .  .  .  .  .  .  .  .  .  .  .  .  .  .  .  .  .  .  .  .  .  .  .  .  .  .  .  .  .  .  .  .  .  .  .  .  .  .  .  .  .  .  .  .  .  .  .  .  .  .  .  .  .  .  .  .  .  .  .  .  .  .  .  .  .  .  .  .  .  .  .  .  .  .  .  .  .  .  .  .  .  .  .  .  .  .  .  .  .  .  .  .  .  .  .  .  .  .  .  .  .  .  .  .  . 14
Break Text Into Different Rows. . . . . . . . . . . . . . . . . . . . . . . . . . . . . . . . . . . . . . . . . . . . . . . . . . . . . . . . . . . . . . . . . . . . . . . . . . . . . . . . . . . . . . . . . . . . . . . . 15
Clear All From Cell/Cells .  .  .  .  .  .  .  .  .  .  .  .  .  .  .  .  .  .  .  .  .  .  .  .  .  .  .  .  .  .  .  .  .  .  .  .  .  .  .  .  .  .  .  .  .  .  .  .  .  .  .  .  .  .  .  .  .  .  .  .  .  .  .  .  .  .  .  .  .  .  .  .  .  .  .  .  .  .  .  .  .  .  .  .  .  .  .  .  .  .  .  .  .  .  .  .  .  .  .  .  . 15
Sorting Data.  .  .  .  .  .  .  .  .  .  .  .  .  .  .  .  .  .  .  .  .  .  .  .  .  .  .  .  .  .  .  .  .  .  .  .  .  .  .  .  .  .  .  .  .  .  .  .  .  .  .  .  .  .  .  .  .  .  .  .  .  .  .  .  .  .  .  .  .  .  .  .  .  .  .  .  .  .  .  .  .  .  .  .  .  .  .  .  .  .  .  .  .  .  .  .  .  .  .  .  .  .  .  .  .  .  .  .  .  .  . 16
Multilevel Sorting.  .  .  .  .  .  .  .  .  .  .  .  .  .  .  .  .  .  .  .  .  .  .  .  .  .  .  .  .  .  .  .  .  .  .  .  .  .  .  .  .  .  .  .  .  .  .  .  .  .  .  .  .  .  .  .  .  .  .  .  .  .  .  .  .  .  .  .  .  .  .  .  .  .  .  .  .  .  .  .  .  .  .  .  .  .  .  .  .  .  .  .  .  .  .  .  .  .  .  .  .  .  .  .  .  .  . 16
Using a Custom Sort Order.  .  .  .  .  .  .  .  .  .  .  .  .  .  .  .  .  .  .  .  .  .  .  .  .  .  .  .  .  .  .  .  .  .  .  .  .  .  .  .  .  .  .  .  .  .  .  .  .  .  .  .  .  .  .  .  .  .  .  .  .  .  .  .  .  .  .  .  .  .  .  .  .  .  .  .  .  .  .  .  .  .  .  .  .  .  .  .  .  .  .  .  .  .  .  .  .  .  . 16
Conditional Formatting .  .  .  .  .  .  .  .  .  .  .  .  .  .  .  .  .  .  .  .  .  .  .  .  .  .  .  .  .  .  .  .  .  .  .  .  .  .  .  .  .  .  .  .  .  .  .  .  .  .  .  .  .  .  .  .  .  .  .  .  .  .  .  .  .  .  .  .  .  .  .  .  .  .  .  .  .  .  .  .  .  .  .  .  .  .  .  .  .  .  .  .  .  .  .  .  .  .  .  .  .  . 17
Tracking Items in Excel .  .  .  .  .  .  .  .  .  .  .  .  .  .  .  .  .  .  .  .  .  .  .  .  .  .  .  .  .  .  .  .  .  .  .  .  .  .  .  .  .  .  .  .  .  .  .  .  .  .  .  .  .  .  .  .  .  .  .  .  .  .  .  .  .  .  .  .  .  .  .  .  .  .  .  .  .  .  .  .  .  .  .  .  .  .  .  .  .  .  .  .  .  .  .  .  .  .  .  .  .  . 18
Find & Select.  .  .  .  .  .  .  .  .  .  .  .  .  .  .  .  .  .  .  .  .  .  .  .  .  .  .  .  .  .  .  .  .  .  .  .  .  .  .  .  .  .  .  .  .  .  .  .  .  .  .  .  .  .  .  .  .  .  .  .  .  .  .  .  .  .  .  .  .  .  .  .  .  .  .  .  .  .  .  .  .  .  .  .  .  .  .  .  .  .  .  .  .  .  .  .  .  .  .  .  .  .  .  .  .  .  .  .  .  . 19
Select Visible Cells Only .  .  .  .  .  .  .  .  .  .  .  .  .  .  .  .  .  .  .  .  .  .  .  .  .  .  .  .  .  .  .  .  .  .  .  .  .  .  .  .  .  .  .  .  .  .  .  .  .  .  .  .  .  .  .  .  .  .  .  .  .  .  .  .  .  .  .  .  .  .  .  .  .  .  .  .  .  .  .  .  .  .  .  .  .  .  .  .  .  .  .  .  .  .  .  .  .  .  .  .  . 19

The Insert Tab . . . . . . . . . . . . . . . . . . . . . . . . . . . . . . . . . . . . . . . . . . . . . . . . . . . . . . . . . . . . . . . . . . . . . . . . . . . . . . . . . . . . . . 20
PivotTable Concept and Layout  .  .  .  .  .  .  .  .  .  .  .  .  .  .  .  .  .  .  .  .  .  .  .  .  .  .  .  .  .  .  .  .  .  .  .  .  .  .  .  .  .  .  .  .  .  .  .  .  .  .  .  .  .  .  .  .  .  .  .  .  .  .  .  .  .  .  .  .  .  .  .  .  .  .  .  .  .  .  .  .  .  .  .  .  .  .  .  .  .  .  .  .  .  . 20
. .
Changing Calculation Method of Subtotals in PivotTables.  .  .  .  .  .  .  .  .  .  .  .  .  .  .  .  .  .  .  .  .  .  .  .  .  .  .  .  .  .  .  .  .  .  .  .  .  .  .  .  .  .  .  .  .  .  .  .  .  .  .  .  .  .  .  .  .  .  .  .  .  .  .  .  .  .  .  .  .  .  .  .  .  .  . 21

A History of Spreadsheets. . . . . . . . . . . . . . . . . . . . . . . . . . . . . . . . . . . . . . . . . . . . . . . . . . . . . . . . . . . . . . . . . . . . . . . . . . . . 22
Excel Version History . . . . . . . . . . . . . . . . . . . . . . . . . . . . . . . . . . . . . . . . . . . . . . . . . . . . . . . . . . . . . . . . . . . . . . . . . . . . . . . . 23
Customizing Sort Options in a PivotTable.  .  .  .  .  .  .  .  .  .  .  .  .  .  .  .  .  .  .  .  .  .  .  .  .  .  .  .  .  .  .  .  .  .  .  .  .  .  .  .  .  .  .  .  .  .  .  .  .  .  .  .  .  .  .  .  .  .  .  .  .  .  .  .  .  .  .  .  .  .  .  .  .  .  .  .  .  .  .  .  .  .  .  .  .  .  .  .
Grouping Fields in a PivotTable.  .  .  .  .  .  .  .  .  .  .  .  .  .  .  .  .  .  .  .  .  .  .  .  .  .  .  .  .  .  .  .  .  .  .  .  .  .  .  .  .  .  .  .  .  .  .  .  .  .  .  .  .  .  .  .  .  .  .  .  .  .  .  .  .  .  .  .  .  .  .  .  .  .  .  .  .  .  .  .  .  .  .  .  .  .  .  .  .  .  .  .  .  .  .  .
Grouping Data in a PivotTable by Days of the Week.  .  .  .  .  .  .  .  .  .  .  .  .  .  .  .  .  .  .  .  .  .  .  .  .  .  .  .  .  .  .  .  .  .  .  .  .  .  .  .  .  .  .  .  .  .  .  .  .  .  .  .  .  .  .  .  .  .  .  .  .  .  .  .  .  .  .  .  .  .  .  .  .  .  .  .  .  .  .  .
Filtering 0 Values in a PivotTable.  .  .  .  .  .  .  .  .  .  .  .  .  .  .  .  .  .  .  .  .  .  .  .  .  .  .  .  .  .  .  .  .  .  .  .  .  .  .  .  .  .  .  .  .  .  .  .  .  .  .  .  .  .  .  .  .  .  .  .  .  .  .  .  .  .  .  .  .  .  .  .  .  .  .  .  .  .  .  .  .  .  .  .  .  .  .  .  .  .  .  .  .  .  .
Change the Source Data in a PivotTable.  .  .  .  .  .  .  .  .  .  .  .  .  .  .  .  .  .  .  .  .  .  .  .  .  .  .  .  .  .  .  .  .  .  .  .  .  .  .  .  .  .  .  .  .  .  .  .  .  .  .  .  .  .  .  .  .  .  .  .  .  .  .  .  .  .  .  .  .  .  .  .  .  .  .  .  .  .  .  .  .  .  .  .  .  .  .  .  .
Clear a PivotTable .  .  .  .  .  .  .  .  .  .  .  .  .  .  .  .  .  .  .  .  .  .  .  .  .  .  .  .  .  .  .  .  .  .  .  .  .  .  .  .  .  .  .  .  .  .  .  .  .  .  .  .  .  .  .  .  .  .  .  .  .  .  .  .  .  .  .  .  .  .  .  .  .  .  .  .  .  .  .  .  .  .  .  .  .  .  .  .  .  .  .  .  .  .  .  .  .  .  .  .  .  .  .  .  .  .
Calculated Fields in a PivotTable.  .  .  .  .  .  .  .  .  .  .  .  .  .  .  .  .  .  .  .  .  .  .  .  .  .  .  .  .  .  .  .  .  .  .  .  .  .  .  .  .  .  .  .  .  .  .  .  .  .  .  .  .  .  .  .  .  .  .  .  .  .  .  .  .  .  .  .  .  .  .  .  .  .  .  .  .  .  .  .  .  .  .  .  .  .  .  .  .  .  .  .  .  .  .
The Field List in a PivotTable.  .  .  .  .  .  .  .  .  .  .  .  .  .  .  .  .  .  .  .  .  .  .  .  .  .  .  .  .  .  .  .  .  .  .  .  .  .  .  .  .  .  .  .  .  .  .  .  .  .  .  .  .  .  .  .  .  .  .  .  .  .  .  .  .  .  .  .  .  .  .  .  .  .  .  .  .  .  .  .  .  .  .  .  .  .  .  .  .  .  .  .  .  .  .  .  .  .
Using the +/- Buttons in a PivotTable .  .  .  .  .  .  .  .  .  .  .  .  .  .  .  .  .  .  .  .  .  .  .  .  .  .  .  .  .  .  .  .  .  .  .  .  .  .  .  .  .  .  .  .  .  .  .  .  .  .  .  .  .  .  .  .  .  .  .  .  .  .  .  .  .  .  .  .  .  .  .  .  .  .  .  .  .  .  .  .  .  .  .  .  .  .  .  .  .  .  .
Using Field Headers in a PivotTable .  .  .  .  .  .  .  .  .  .  .  .  .  .  .  .  .  .  .  .  .  .  .  .  .  .  .  .  .  .  .  .  .  .  .  .  .  .  .  .  .  .  .  .  .  .  .  .  .  .  .  .  .  .  .  .  .  .  .  .  .  .  .  .  .  .  .  .  .  .  .  .  .  .  .  .  .  .  .  .  .  .  .  .  .  .  .  .  .  .  .  .
Using Subtotals in a PivotTable.  .  .  .  .  .  .  .  .  .  .  .  .  .  .  .  .  .  .  .  .  .  .  .  .  .  .  .  .  .  .  .  .  .  .  .  .  .  .  .  .  .  .  .  .  .  .  .  .  .  .  .  .  .  .  .  .  .  .  .  .  .  .  .  .  .  .  .  .  .  .  .  .  .  .  .  .  .  .  .  .  .  .  .  .  .  .  .  .  .  .  .  .  .  .  .
Turn Off Individual Subtotals in a PivotTable.  .  .  .  .  .  .  .  .  .  .  .  .  .  .  .  .  .  .  .  .  .  .  .  .  .  .  .  .  .  .  .  .  .  .  .  .  .  .  .  .  .  .  .  .  .  .  .  .  .  .  .  .  .  .  .  .  .  .  .  .  .  .  .  .  .  .  .  .  .  .  .  .  .  .  .  .  .  .  .  .  .  .  .  .  .
Using Grand Totals in a PivotTable .  .  .  .  .  .  .  .  .  .  .  .  .  .  .  .  .  .  .  .  .  .  .  .  .  .  .  .  .  .  .  .  .  .  .  .  .  .  .  .  .  .  .  .  .  .  .  .  .  .  .  .  .  .  .  .  .  .  .  .  .  .  .  .  .  .  .  .  .  .  .  .  .  .  .  .  .  .  .  .  .  .  .  .  .  .  .  .  .  .  .  .  .
Changing the Report Layout in a PivotTable.  .  .  .  .  .  .  .  .  .  .  .  .  .  .  .  .  .  .  .  .  .  .  .  .  .  .  .  .  .  .  .  .  .  .  .  .  .  .  .  .  .  .  .  .  .  .  .  .  .  .  .  .  .  .  .  .  .  .  .  .  .  .  .  .  .  .  .  .  .  .  .  .  .  .  .  .  .  .  .  .  .  .  .  .  .
Using Blank Rows in a PivotTable.  .  .  .  .  .  .  .  .  .  .  .  .  .  .  .  .  .  .  .  .  .  .  .  .  .  .  .  .  .  .  .  .  .  .  .  .  .  .  .  .  .  .  .  .  .  .  .  .  .  .  .  .  .  .  .  .  .  .  .  .  .  .  .  .  .  .  .  .  .  .  .  .  .  .  .  .  .  .  .  .  .  .  .  .  .  .  .  .  .  .  .  .  .
PivotTable Styles.  .  .  .  .  .  .  .  .  .  .  .  .  .  .  .  .  .  .  .  .  .  .  .  .  .  .  .  .  .  .  .  .  .  .  .  .  .  .  .  .  .  .  .  .  .  .  .  .  .  .  .  .  .  .  .  .  .  .  .  .  .  .  .  .  .  .  .  .  .  .  .  .  .  .  .  .  .  .  .  .  .  .  .  .  .  .  .  .  .  .  .  .  .  .  .  .  .  .  .  .  .  .  .  .  .  .
PivotCharts .  .  .  .  .  .  .  .  .  .  .  .  .  .  .  .  .  .  .  .  .  .  .  .  .  .  .  .  .  .  .  .  .  .  .  .  .  .  .  .  .  .  .  .  .  .  .  .  .  .  .  .  .  .  .  .  .  .  .  .  .  .  .  .  .  .  .  .  .  .  .  .  .  .  .  .  .  .  .  .  .  .  .  .  .  .  .  .  .  .  .  .  .  .  .  .  .  .  .  .  .  .  .  .  .  .  .  .  .  .  .
Microsoft Excel Charts  .  .  .  .  .  .  .  .  .  .  .  .  .  .  .  .  .  .  .  .  .  .  .  .  .  .  .  .  .  .  .  .  .  .  .  .  .  .  .  .  .  .  .  .  .  .  .  .  .  .  .  .  .  .  .  .  .  .  .  .  .  .  .  .  .  .  .  .  .  .  .  .  .  .  .  .  .  .  .  .  .  .  .  .  .  .  .  .  .  .  .  .  .  .  .  .  .  .  .  .  .
. .
Create a New Excel Chart.  .  .  .  .  .  .  .  .  .  .  .  .  .  .  .  .  .  .  .  .  .  .  .  .  .  .  .  .  .  .  .  .  .  .  .  .  .  .  .  .  .  .  .  .  .  .  .  .  .  .  .  .  .  .  .  .  .  .  .  .  .  .  .  .  .  .  .  .  .  .  .  .  .  .  .  .  .  .  .  .  .  .  .  .  .  .  .  .  .  .  .  .  .  .  .  .  .  .  .
Hidden and Empty Cells in an Excel Chart .  .  .  .  .  .  .  .  .  .  .  .  .  .  .  .  .  .  .  .  .  .  .  .  .  .  .  .  .  .  .  .  .  .  .  .  .  .  .  .  .  .  .  .  .  .  .  .  .  .  .  .  .  .  .  .  .  .  .  .  .  .  .  .  .  .  .  .  .  .  .  .  .  .  .  .  .  .  .  .  .  .  .  .  .  .  .
Page Breaks  .  .  .  .  .  .  .  .  .  .  .  .  .  .  .  .  .  .  .  .  .  .  .  .  .  .  .  .  .  .  .  .  .  .  .  .  .  .  .  .  .  .  .  .  .  .  .  .  .  .  .  .  .  .  .  .  .  .  .  .  .  .  .  .  .  .  .  .  .  .  .  .  .  .  .  .  .  .  .  .  .  .  .  .  .  .  .  .  .  .  .  .  .  .  .  .  .  .  .  .  .  .  .  .  .  .  .  .  .
. .
Print Titles .  .  .  .  .  .  .  .  .  .  .  .  .  .  .  .  .  .  .  .  .  .  .  .  .  .  .  .  .  .  .  .  .  .  .  .  .  .  .  .  .  .  .  .  .  .  .  .  .  .  .  .  .  .  .  .  .  .  .  .  .  .  .  .  .  .  .  .  .  .  .  .  .  .  .  .  .  .  .  .  .  .  .  .  .  .  .  .  .  .  .  .  .  .  .  .  .  .  .  .  .  .  .  .  .  .  .  .  .  .  .  .

24
25
25
26
26
26
27
27
27
27
28
28
28
30
30
30
31
32
32
32
33
33

5 of 76
100 Excel Tips & Tricks

The Formulas Tab . . . . . . . . . . . . . . . . . . . . . . . . . . . . . . . . . . . . . . . . . . . . . . . . . . . . . . . . . . . . . . . . . . . . . . . . . . . . . . . . . . . 34
Using Functions.  .  .  .  .  .  .  .  .  .  .  .  .  .  .  .  .  .  .  .  .  .  .  .  .  .  .  .  .  .  .  .  .  .  .  .  .  .  .  .  .  .  .  .  .  .  .  .  .  .  .  .  .  .  .  .  .  .  .  .  .  .  .  .  .  .  .  .  .  .  .  .  .  .  .  .  .  .  .  .  .  .  .  .  .  .  .  .  .  .  .  .  .  .  .  .  .  .  .  .  .  .  .  .  .  .  .  . 34
Update Formulae Manually.  .  .  .  .  .  .  .  .  .  .  .  .  .  .  .  .  .  .  .  .  .  .  .  .  .  .  .  .  .  .  .  .  .  .  .  .  .  .  .  .  .  .  .  .  .  .  .  .  .  .  .  .  .  .  .  .  .  .  .  .  .  .  .  .  .  .  .  .  .  .  .  .  .  .  .  .  .  .  .  .  .  .  .  .  .  .  .  .  .  .  .  .  .  .  .  .  .  . 34
Formula Auditing—Showing Cell Dependencies.  .  .  .  .  .  .  .  .  .  .  .  .  .  .  .  .  .  .  .  .  .  .  .  .  .  .  .  .  .  .  .  .  .  .  .  .  .  .  .  .  .  .  .  .  .  .  .  .  .  .  .  .  .  .  .  .  .  .  .  .  .  .  .  .  .  .  .  .  .  .  .  .  .  .  .  .  .  .  .  .  .  . 34
Finding the Cell with the Highest Value in a Range.  .  .  .  .  .  .  .  .  .  .  .  .  .  .  .  .  .  .  .  .  .  .  .  .  .  .  .  .  .  .  .  .  .  .  .  .  .  .  .  .  .  .  .  .  .  .  .  .  .  .  .  .  .  .  .  .  .  .  .  .  .  .  .  .  .  .  .  .  .  .  .  .  .  .  .  .  .  .  .  . 35
Rounding Numbers to the Nearest Whole Number.  .  .  .  .  .  .  .  .  .  .  .  .  .  .  .  .  .  .  .  .  .  .  .  .  .  .  .  .  .  .  .  .  .  .  .  .  .  .  .  .  .  .  .  .  .  .  .  .  .  .  .  .  .  .  .  .  .  .  .  .  .  .  .  .  .  .  .  .  .  .  .  .  .  .  .  .  .  .  .  . 36
Deleting All NonFormula Data on a Worksheet.  .  .  .  .  .  .  .  .  .  .  .  .  .  .  .  .  .  .  .  .  .  .  .  .  .  .  .  .  .  .  .  .  .  .  .  .  .  .  .  .  .  .  .  .  .  .  .  .  .  .  .  .  .  .  .  .  .  .  .  .  .  .  .  .  .  .  .  .  .  .  .  .  .  .  .  .  .  .  .  .  .  .  . 36
Filter Date Transactions to Show Only Dates That Fall Between a Range .  .  .  .  .  .  .  .  .  .  .  .  .  .  .  .  .  .  .  .  .  .  .  .  .  .  .  .  .  .  .  .  .  .  .  .  .  .  .  .  .  .  .  .  .  .  .  .  .  .  .  .  .  .  .  .  .  .  .  .  .  .  . 37
Converting Text Dates to Dates.  .  .  .  .  .  .  .  .  .  .  .  .  .  .  .  .  .  .  .  .  .  .  .  .  .  .  .  .  .  .  .  .  .  .  .  .  .  .  .  .  .  .  .  .  .  .  .  .  .  .  .  .  .  .  .  .  .  .  .  .  .  .  .  .  .  .  .  .  .  .  .  .  .  .  .  .  .  .  .  .  .  .  .  .  .  .  .  .  .  .  .  .  .  .  . 38
Combining Text From Multiple Cells Into One.  .  .  .  .  .  .  .  .  .  .  .  .  .  .  .  .  .  .  .  .  .  .  .  .  .  .  .  .  .  .  .  .  .  .  .  .  .  .  .  .  .  .  .  .  .  .  .  .  .  .  .  .  .  .  .  .  .  .  .  .  .  .  .  .  .  .  .  .  .  .  .  .  .  .  .  .  .  .  .  .  .  .  .  . 39
An Alternative to VLOOKUP  .  .  .  .  .  .  .  .  .  .  .  .  .  .  .  .  .  .  .  .  .  .  .  .  .  .  .  .  .  .  .  .  .  .  .  .  .  .  .  .  .  .  .  .  .  .  .  .  .  .  .  .  .  .  .  .  .  .  .  .  .  .  .  .  .  .  .  .  .  .  .  .  .  .  .  .  .  .  .  .  .  .  .  .  .  .  .  .  .  .  .  .  .  .  .  .  . 40
. .
Inserting Symbols Into the Cell .  .  .  .  .  .  .  .  .  .  .  .  .  .  .  .  .  .  .  .  .  .  .  .  .  .  .  .  .  .  .  .  .  .  .  .  .  .  .  .  .  .  .  .  .  .  .  .  .  .  .  .  .  .  .  .  .  .  .  .  .  .  .  .  .  .  .  .  .  .  .  .  .  .  .  .  .  .  .  .  .  .  .  .  .  .  .  .  .  .  .  .  .  .  .  . 41
Adding Criteria/Conditions to Your SUM Function .  .  .  .  .  .  .  .  .  .  .  .  .  .  .  .  .  .  .  .  .  .  .  .  .  .  .  .  .  .  .  .  .  .  .  .  .  .  .  .  .  .  .  .  .  .  .  .  .  .  .  .  .  .  .  .  .  .  .  .  .  .  .  .  .  .  .  .  .  .  .  .  .  .  .  .  .  .  .  .  . 42
SUMIF Between Workbooks.  .  .  .  .  .  .  .  .  .  .  .  .  .  .  .  .  .  .  .  .  .  .  .  .  .  .  .  .  .  .  .  .  .  .  .  .  .  .  .  .  .  .  .  .  .  .  .  .  .  .  .  .  .  .  .  .  .  .  .  .  .  .  .  .  .  .  .  .  .  .  .  .  .  .  .  .  .  .  .  .  .  .  .  .  .  .  .  .  .  .  .  .  .  .  .  .  . 43
Calculating Positive and Negative Numbers.  .  .  .  .  .  .  .  .  .  .  .  .  .  .  .  .  .  .  .  .  .  .  .  .  .  .  .  .  .  .  .  .  .  .  .  .  .  .  .  .  .  .  .  .  .  .  .  .  .  .  .  .  .  .  .  .  .  .  .  .  .  .  .  .  .  .  .  .  .  .  .  .  .  .  .  .  .  .  .  .  .  .  .  .  . 44
Using CTRL as a Function Key .  .  .  .  .  .  .  .  .  .  .  .  .  .  .  .  .  .  .  .  .  .  .  .  .  .  .  .  .  .  .  .  .  .  .  .  .  .  .  .  .  .  .  .  .  .  .  .  .  .  .  .  .  .  .  .  .  .  .  .  .  .  .  .  .  .  .  .  .  .  .  .  .  .  .  .  .  .  .  .  .  .  .  .  .  .  .  .  .  .  .  .  .  .  .  . 46

Add-Ins. . . . . . . . . . . . . . . . . . . . . . . . . . . . . . . . . . . . . . . . . . . . . . . . . . . . . . . . . . . . . . . . . . . . . . . . . . . . . . . . . . . . . . . . . . . . 45
Naming a Range using Column Labels.  .  .  .  .  .  .  .  .  .  .  .  .  .  .  .  .  .  .  .  .  .  .  .  .  .  .  .  .  .  .  .  .  .  .  .  .  .  .  .  .  .  .  .  .  .  .  .  .  .  .  .  .  .  .  .  .  .  .  .  .  .  .  .  .  .  .  .  .  .  .  .  .  .  .  .  .  .  .  .  .  .  .  .  .  .  .  .  .  . 45
Name a Range of Cell/Cells.  .  .  .  .  .  .  .  .  .  .  .  .  .  .  .  .  .  .  .  .  .  .  .  .  .  .  .  .  .  .  .  .  .  .  .  .  .  .  .  .  .  .  .  .  .  .  .  .  .  .  .  .  .  .  .  .  .  .  .  .  .  .  .  .  .  .  .  .  .  .  .  .  .  .  .  .  .  .  .  .  .  .  .  .  .  .  .  .  .  .  .  .  .  .  .  .  .  . 45
Use Named Ranges in Formulae.  .  .  .  .  .  .  .  .  .  .  .  .  .  .  .  .  .  .  .  .  .  .  .  .  .  .  .  .  .  .  .  .  .  .  .  .  .  .  .  .  .  .  .  .  .  .  .  .  .  .  .  .  .  .  .  .  .  .  .  .  .  .  .  .  .  .  .  .  .  .  .  .  .  .  .  .  .  .  .  .  .  .  .  .  .  .  .  .  .  .  .  .  .  . 45
Filtering Data.  .  .  .  .  .  .  .  .  .  .  .  .  .  .  .  .  .  .  .  .  .  .  .  .  .  .  .  .  .  .  .  .  .  .  .  .  .  .  .  .  .  .  .  .  .  .  .  .  .  .  .  .  .  .  .  .  .  .  .  .  .  .  .  .  .  .  .  .  .  .  .  .  .  .  .  .  .  .  .  .  .  .  .  .  .  .  .  .  .  .  .  .  .  .  .  .  .  .  .  .  .  .  .  .  .  .  .  .  . 51
Clearing All Filters .  .  .  .  .  .  .  .  .  .  .  .  .  .  .  .  .  .  .  .  .  .  .  .  .  .  .  .  .  .  .  .  .  .  .  .  .  .  .  .  .  .  .  .  .  .  .  .  .  .  .  .  .  .  .  .  .  .  .  .  .  .  .  .  .  .  .  .  .  .  .  .  .  .  .  .  .  .  .  .  .  .  .  .  .  .  .  .  .  .  .  .  .  .  .  .  .  .  .  .  .  .  .  .  .  . 51
Removing Duplicates.  .  .  .  .  .  .  .  .  .  .  .  .  .  .  .  .  .  .  .  .  .  .  .  .  .  .  .  .  .  .  .  .  .  .  .  .  .  .  .  .  .  .  .  .  .  .  .  .  .  .  .  .  .  .  .  .  .  .  .  .  .  .  .  .  .  .  .  .  .  .  .  .  .  .  .  .  .  .  .  .  .  .  .  .  .  .  .  .  .  .  .  .  .  .  .  .  .  .  .  .  .  .  . 51
Splitting Columns  .  .  .  .  .  .  .  .  .  .  .  .  .  .  .  .  .  .  .  .  .  .  .  .  .  .  .  .  .  .  .  .  .  .  .  .  .  .  .  .  .  .  .  .  .  .  .  .  .  .  .  .  .  .  .  .  .  .  .  .  .  .  .  .  .  .  .  .  .  .  .  .  .  .  .  .  .  .  .  .  .  .  .  .  .  .  .  .  .  .  .  .  .  .  .  .  .  .  .  .  .  .  .  .  . 52
. .
Using Data Validation to Ensure the End Date is Greater Than the Start Date.  .  .  .  .  .  .  .  .  .  .  .  .  .  .  .  .  .  .  .  .  .  .  .  .  .  .  .  .  .  .  .  .  .  .  .  .  .  .  .  .  .  .  .  .  .  .  .  .  .  .  .  .  .  .  .  .  .  .  . 53
Circling Invalid Data.  .  .  .  .  .  .  .  .  .  .  .  .  .  .  .  .  .  .  .  .  .  .  .  .  .  .  .  .  .  .  .  .  .  .  .  .  .  .  .  .  .  .  .  .  .  .  .  .  .  .  .  .  .  .  .  .  .  .  .  .  .  .  .  .  .  .  .  .  .  .  .  .  .  .  .  .  .  .  .  .  .  .  .  .  .  .  .  .  .  .  .  .  .  .  .  .  .  .  .  .  .  .  .  . 53

The Review Tab. . . . . . . . . . . . . . . . . . . . . . . . . . . . . . . . . . . . . . . . . . . . . . . . . . . . . . . . . . . . . . . . . . . . . . . . . . . . . . . . . . . . . 54
Protecting Worksheets  .  .  .  .  .  .  .  .  .  .  .  .  .  .  .  .  .  .  .  .  .  .  .  .  .  .  .  .  .  .  .  .  .  .  .  .  .  .  .  .  .  .  .  .  .  .  .  .  .  .  .  .  .  .  .  .  .  .  .  .  .  .  .  .  .  .  .  .  .  .  .  .  .  .  .  .  .  .  .  .  .  .  .  .  .  .  .  .  .  .  .  .  .  .  .  .  .  .  .  .  . 54
. .
Being Able to Edit Certain Cells on a Protected Worksheet .  .  .  .  .  .  .  .  .  .  .  .  .  .  .  .  .  .  .  .  .  .  .  .  .  .  .  .  .  .  .  .  .  .  .  .  .  .  .  .  .  .  .  .  .  .  .  .  .  .  .  .  .  .  .  .  .  .  .  .  .  .  .  .  .  .  .  .  .  .  .  .  .  . 54
Hide Formula on a Protected Worksheet  .  .  .  .  .  .  .  .  .  .  .  .  .  .  .  .  .  .  .  .  .  .  .  .  .  .  .  .  .  .  .  .  .  .  .  .  .  .  .  .  .  .  .  .  .  .  .  .  .  .  .  .  .  .  .  .  .  .  .  .  .  .  .  .  .  .  .  .  .  .  .  .  .  .  .  .  .  .  .  .  .  .  .  .  .  .  . 55
. .
Password Protection and Read Only Access .  .  .  .  .  .  .  .  .  .  .  .  .  .  .  .  .  .  .  .  .  .  .  .  .  .  .  .  .  .  .  .  .  .  .  .  .  .  .  .  .  .  .  .  .  .  .  .  .  .  .  .  .  .  .  .  .  .  .  .  .  .  .  .  .  .  .  .  .  .  .  .  .  .  .  .  .  .  .  .  .  .  .  .  . 55

Top Reasons to Use Microsoft Excel 2007. . . . . . . . . . . . . . . . . . . . . . . . . . . . . . . . . . . . . . . . . . . . . . . . . . . . . . . . . . . . . . . 56
The View Tab. . . . . . . . . . . . . . . . . . . . . . . . . . . . . . . . . . . . . . . . . . . . . . . . . . . . . . . . . . . . . . . . . . . . . . . . . . . . . . . . . . . . . . . 58
Recording Macros.  .  .  .  .  .  .  .  .  .  .  .  .  .  .  .  .  .  .  .  .  .  .  .  .  .  .  .  .  .  .  .  .  .  .  .  .  .  .  .  .  .  .  .  .  .  .  .  .  .  .  .  .  .  .  .  .  .  .  .  .  .  .  .  .  .  .  .  .  .  .  .  .  .  .  .  .  .  .  .  .  .  .  .  .  .  .  .  .  .  .  .  .  .  .  .  .  .  .  .  .  .  .  .  .  . 58
Saving Workbook With a Macro .  .  .  .  .  .  .  .  .  .  .  .  .  .  .  .  .  .  .  .  .  .  .  .  .  .  .  .  .  .  .  .  .  .  .  .  .  .  .  .  .  .  .  .  .  .  .  .  .  .  .  .  .  .  .  .  .  .  .  .  .  .  .  .  .  .  .  .  .  .  .  .  .  .  .  .  .  .  .  .  .  .  .  .  .  .  .  .  .  .  .  .  .  .  . 58
Developer Tab .  .  .  .  .  .  .  .  .  .  .  .  .  .  .  .  .  .  .  .  .  .  .  .  .  .  .  .  .  .  .  .  .  .  .  .  .  .  .  .  .  .  .  .  .  .  .  .  .  .  .  .  .  .  .  .  .  .  .  .  .  .  .  .  .  .  .  .  .  .  .  .  .  .  .  .  .  .  .  .  .  .  .  .  .  .  .  .  .  .  .  .  .  .  .  .  .  .  .  .  .  .  .  .  .  .  .  .  . 58
Macro Security Levels.  .  .  .  .  .  .  .  .  .  .  .  .  .  .  .  .  .  .  .  .  .  .  .  .  .  .  .  .  .  .  .  .  .  .  .  .  .  .  .  .  .  .  .  .  .  .  .  .  .  .  .  .  .  .  .  .  .  .  .  .  .  .  .  .  .  .  .  .  .  .  .  .  .  .  .  .  .  .  .  .  .  .  .  .  .  .  .  .  .  .  .  .  .  .  .  .  .  .  .  .  .  . 58
Sorting Worksheets in Alphabetical Order.  .  .  .  .  .  .  .  .  .  .  .  .  .  .  .  .  .  .  .  .  .  .  .  .  .  .  .  .  .  .  .  .  .  .  .  .  .  .  .  .  .  .  .  .  .  .  .  .  .  .  .  .  .  .  .  .  .  .  .  .  .  .  .  .  .  .  .  .  .  .  .  .  .  .  .  .  .  .  .  .  .  .  .  .  .  .  . 59
Opening a Workbook on a Specific Worksheet.  .  .  .  .  .  .  .  .  .  .  .  .  .  .  .  .  .  .  .  .  .  .  .  .  .  .  .  .  .  .  .  .  .  .  .  .  .  .  .  .  .  .  .  .  .  .  .  .  .  .  .  .  .  .  .  .  .  .  .  .  .  .  .  .  .  .  .  .  .  .  .  .  .  .  .  .  .  .  .  .  .  .  . 59
Copy and Save a Worksheet Into a New File Automatically.  .  .  .  .  .  .  .  .  .  .  .  .  .  .  .  .  .  .  .  .  .  .  .  .  .  .  .  .  .  .  .  .  .  .  .  .  .  .  .  .  .  .  .  .  .  .  .  .  .  .  .  .  .  .  .  .  .  .  .  .  .  .  .  .  .  .  .  .  .  .  .  .  . 60
Removing Embedded Hyperlinks With Visual Basic.  .  .  .  .  .  .  .  .  .  .  .  .  .  .  .  .  .  .  .  .  .  .  .  .  .  .  .  .  .  .  .  .  .  .  .  .  .  .  .  .  .  .  .  .  .  .  .  .  .  .  .  .  .  .  .  .  .  .  .  .  .  .  .  .  .  .  .  .  .  .  .  .  .  .  .  .  .  .  . 61
Using Group and Outline on Protected Worksheets.  .  .  .  .  .  .  .  .  .  .  .  .  .  .  .  .  .  .  .  .  .  .  .  .  .  .  .  .  .  .  .  .  .  .  .  .  .  .  .  .  .  .  .  .  .  .  .  .  .  .  .  .  .  .  .  .  .  .  .  .  .  .  .  .  .  .  .  .  .  .  .  .  .  .  .  .  .  .  . 62
Assigning a Macro to the Quick Access Toolbar.  .  .  .  .  .  .  .  .  .  .  .  .  .  .  .  .  .  .  .  .  .  .  .  .  .  .  .  .  .  .  .  .  .  .  .  .  .  .  .  .  .  .  .  .  .  .  .  .  .  .  .  .  .  .  .  .  .  .  .  .  .  .  .  .  .  .  .  .  .  .  .  .  .  .  .  .  .  .  .  .  .  . 63

Using Programs outside of Microsoft Excel. . . . . . . . . . . . . . . . . . . . . . . . . . . . . . . . . . . . . . . . . . . . . . . . . . . . . . . . . . . . . . 64
PowerPoint to Microsoft Excel. . . . . . . . . . . . . . . . . . . . . . . . . . . . . . . . . . . . . . . . . . . . . . . . . . . . . . . . . . . . . . . . . . . . . . . . . . . . . . . . . . . . . . . . . . . . . . . . 64
Copying Microsoft Excel Data to Microsoft Word.  .  .  .  .  .  .  .  .  .  .  .  .  .  .  .  .  .  .  .  .  .  .  .  .  .  .  .  .  .  .  .  .  .  .  .  .  .  .  .  .  .  .  .  .  .  .  .  .  .  .  .  .  .  .  .  .  .  .  .  .  .  .  .  .  .  .  .  .  .  .  .  .  .  .  .  .  .  .  .  .  . 64

GLOSSARY. . . . . . . . . . . . . . . . . . . . . . . . . . . . . . . . . . . . . . . . . . . . . . . . . . . . . . . . . . . . . . . . . . . . . . . . . . . . . . . . . . . . . . . . . 65

6 of 76
100 Excel Tips & Tricks

1. How do you minimize the Ribbon?

The Excel 2007 Interface

If you want more space on your screen for your worksheets, you can minimize the Ribbon.

The new user interface makes use
of the Ribbon. The Ribbon contains
all the commands previously located
in the complex toolbar and menu
system, but now located in one place.

•	 Right-click on any of the tabs (for example, Home, Insert)

The Office Button

•	 Select Minimize the Ribbon

2. How do you move the Quick Access Toolbar?
•	 Right-click over the Quick Access Toolbar
•	 Select Show Quick Access Toolbar Below the Ribbon or Above the Ribbon

(dependent on the current location)

3. How do you customize the Quick Access Toolbar?

In the top left corner of the Microsoft
Excel application is the Office Button.
Selecting this button brings up a popup menu that allows you to do all the
document functions that were found
in the old menu file functions, namely:
•	 Open
•	 New

•	 Right-click on the Quick Access Toolbar

•	 Save

•	 Select Customize Quick Access Toolbar

•	 Save As

•	 Select the desired Choose Commands From

•	 Print

•	 Select the Commands you want on the Quick Access Toolbar

•	 Prepare

•	 Select Add

•	 Send

•	 Repeat until all the commands you want are on the Quick Access Toolbar

•	 Publish

•	 Select OK

•	 Close

It also contains the Microsoft Excel
Options previously contained in
Microsoft Excel 2003 in the Tools,
Options Menu.

The Quick Access Toolbar
The Quick Access Toolbar, by default,
is located above the Ribbon, next to
the Office Button. This toolbar contains
commands that are independent of the
Ribbon tab that is currently displayed.
You can move the Quick Access
Toolbar from one of the two possible
locations, and you can customize
the toolbar by adding buttons that
represent commands, including
assigning your macros to icons.
7 of 76
100 Excel Tips & Tricks

Working with Worksheets
Worksheet Navigation
Made Easy
Often, you may have multiple
worksheets in a workbook and
struggle to quickly navigate to a
particular worksheet.
Microsoft Excel does provide
navigation arrows on the bottom
left of the screen. By simply clicking
on these arrows, you can scroll to
worksheets on the left or right.
Navigation Arows

4. How do you quickly navigate between worksheets?
•	 Right-click on any of the navigation arrows
•	 You will get a list of all the worksheets in the current workbook
•	 Select the desired worksheet
•	 You will be navigated to that worksheet

5. How do you select a column with only two keystrokes?
•	 Select any cell in the column you would like to select
•	 Press Ctrl + Space Bar

6. How do you select a row with only two keystrokes?
•	 Select any cell in the row you would like to select
•	 Press Shift + Space Bar

However, when you have quite
a few worksheets, it can be time
consuming to use these navigation
arrows.
The “right-click method” can speed
this up.

Range Selection Made Easy
It can be time consuming to use your
mouse to select a range of cells,
especially if it is something you need
to do regularly (for instance, as a
source for charts or PivotTables).
To speed up this process, you can
use Ctrl + Shift + *

8 of 76

7. How do you quickly select a range of cells?
•	 Select any cell in the range of cells
•	 On the keyboard, press Ctrl + Shift + *
100 Excel Tips & Tricks

8. How do you quickly open the Format dialog box?
•	 On the keyboard, press Ctrl + 1

9. How do you quickly wrap text in a cell?
•	 Enter in the desired text
•	 Press Alt + Enter
•	 Press Enter

10. How can you quickly copy formatting?
•	 Select the cell with the desired applied formatting
•	 From the Home tab, in the Clipboard group, double-click

on the Format Painter button

The Home Tab
Font Themes
Built into Microsoft Excel 2007 are
themes that group together colors,
and so on. These are available
depending on the choice you make.
They are used in a number of places
such as when you select the font or
color buttons in the Font group on
the Home Ribbon.

Wrap Text
There is a very nice keyboard
shortcut to Wrap Text. Simply use
your Alt + Enter key.

•	 Select any cell you would like to apply the formatting to
•	 Press Esc

11. How do you quickly insert the date?
•	 Hold down the Ctrl button and then press ; (semicolon) on the keyboard

Copying Formatting
To help speed up the copying of
formatting you can use the Format
Painter button.

Insert Date Shortcut
Rather than typing out the date in a
cell, you can use a keyboard shortcut
to insert the current date instantly.

9 of 76
100 Excel Tips & Tricks

The Home Tab
Pasting Paragraphs of Text
Into a Single Cell
If you have text that is in a text
program (for instance, Microsoft
Word) and would like to copy and
paste it to Microsoft Excel, by
default Microsoft Excel separates the
information into different cells based
on the paragraph marks.
In Microsoft Word

12. How do you paste paragraphs of text into a single cell?
•	 Copy the desired text from the text program (Microsoft Word)
•	 Select the desired cell in Microsoft Excel
•	 Press F3 on the keyboard
•	 Select Paste
•	 Press Enter

13. How can you quickly copy text?
•	 Select the desired text
•	 From the keyboard, press Ctrl + C

14. How do you convert negative values to positive values?
Pasted into Microsoft Excel

•	 In a blank cell, enter in the value -1
•	 Select the cell with the value -1
•	 Select Copy

Pasted into Microsoft Excel using F2

•	 Select the desired range with negative values
•	 Right-click on the selected range
•	 Select Paste Special

By using the below method, you are
able to paste the text into a single
cell in Microsoft Excel.

Converting negative values
to positive values

•	 Under the Operation group, select Multiply
•	 Select OK
•	 Your values are now converted to positive values

Before:

This tip allows you to quickly convert
a range of negative numbers into
positive numbers, without having to
edit each cell.

After:

10 of 76
100 Excel Tips & Tricks

15.  ow do you view parts of several worksheets
H
on one worksheet?
•	 Select the desired range to be copied
•	 Right-click the selected range, select Copy
•	 Navigate to the destination worksheet
•	 From the Home tab, in the Clipboard group, select the down arrow under Paste
•	 Select As Picture, Paste Picture Link
•	 Your object (picture) will now be pasted and can be resized as desired
•	 Repeat the above steps for additional objects

The Home Tab
Viewing Parts of Several
Worksheets on One Worksheet
One worksheet can be used to view
several individually separate and
distinct areas. This can be done using
the Paste Picture Link option.
There are a few options when
consolidating information from multiple
worksheets. The option for this tip
enables you to paste the copied cells
as objects (pictures). Pasting them
as objects is useful as you can resize
the objects. This tool is helpful when
needing to print multiple areas of a
workbook onto one worksheet or
creating a dashboard summarizing
parts of the workbook.

11 of 76
100 Excel Tips  Tricks

The Home Tab
Keeping 00 in Front of Values
Using a custom format allows you
to keep the full number and not lose
any leading zeros.
Before:

16. How do you keep 000 in front of values?
•	 Select the desired cell/cells
•	 Right-click on the selected cell/cells
•	 Select Format Cells
•	 Select the Number tab
•	 Under Category, select Custom
•	 In the Type box, enter 000
•	 Select OK

After:

17. How do you format your dates to show the period number?
Formatting Your Dates to Show
the Period Number

•	 Select the desired cell/cells

By using a Custom Format, you can
show the period of the date (in this
case the month) without changing
the date in the field.

•	 Right-click on the selected cell/cells

Before (dates in March 2007):

•	 In the Type box, enter m

•	 Select Format Cells
•	 Select the Number tab
•	 Under Category, select Custom
•	 Select OK

After (using a Custom Format):

12 of 76
100 Excel Tips  Tricks

18. How do you display values that are millions as thousands?
•	 Select the desired cell/cells
•	 Right-click on the selected cell/cells
•	 Select Format Cells
•	 Select the Number tab
•	 Under Category, select Custom
•	 In the Type box, enter 0
•	 Select OK

The Home Tab
Displaying Values That Are In
Millions as Thousands
Sometimes every figure in a
spreadsheet is in the thousands, tens
of thousands, or even in the millions.
By rounding the figure to smaller,
representative figures, you can save
space.
Before:

After:

13 of 76
100 Excel Tips  Tricks

The Home Tab
AutoSum Button
The AutoSum button has the most
common functions plus the option
to select More Functions, which
opens the Insert Function dialogue
box. You can also key the keyboard
shortcut Alt + = to do the SUM
function.

Fill Series
The series option calls up a dialogue
box that allows you to select how the
series fills the selected cell; for example,
you may want to incrementally increase
the date by a month in a range of cells.

19. How do I quickly sum up numbers?
•	 Select the cell where you would like the result to appear
•	 From the keyboard, press Alt + =

20. How do I fill a range of dates/months?
•	 Enter the start date in your first cell
•	 Select the cells you want to fill, including the first cell
•	 From the Home tab, in the Editing group, select the Copy Down button
•	 Select Series
•	 In Type box select Date
•	 In the Date Unit box select Month
•	 Select OK

21. How do you fill a range of text or formula?
•	 Select the range of cells to be filled
•	 Enter in the desired text or formula into the cell
•	 Press Ctrl + Enter

14 of 76
100 Excel Tips  Tricks

22. How do I break text into different rows?
•	 Select the range of columns you would like to fit the text to
•	 From the Home tab, in the Editing group, select the Fill icon
•	 Select Justify
•	 Select OK

23. How do you Clear All from a cell?
•	 Select the cells you want to clear
•	 From the Home tab, in the Editing group, select the Erase icon
•	 You have the option to Clear All, Formats, Contents, or Comments

The Home Tab
Break Text Into Different Rows
In earlier Microsoft Excel releases,
it was challenging to arrange lines
in a readable layout, but Microsoft
Excel 2007’s new Editing, Fill, Justify
feature makes it easier.
In the below example, the text is
flowing over to column G. You would
rather have the text from columns A
to D. Justify will automatically break
the text.

24. How to Clear a range of cells using the Fill Handle?
•	 Select a range of empty cells
•	 Select the Fill Handle
•	 Drag it back over the area you would like to clear
•	 If you also want to clear the formats in the cells, just hold down the Ctrl key as you

drag the fill handle back over the selection
Before:

After:

Clear All From Cell/Cells
Clear All clears the contents and/or
the formatting of a cell.

Believe it or not, you can do it by
dragging the fill handle backwards.

15 of 76
100 Excel Tips  Tricks

The Home Tab
Sorting Data
You can access the sort functionality
through the Sort and Filter icon in
the Editing group on the Home tab
of the Ribbon. There is also sort
functionality located on the Data tab
of the Ribbon.
Depending on the type of data you
are in when you select the Sort 
Filter icon, the sort option will differ.
For example, for dates it will read
earliest to latest, while for numbers it
will state smallest to largest.

25. How do you quickly sort a column of data?
•	 Select a cell in the column you wish to sort
•	 From the Home tab, in the Editing group, select Sort  Filter
•	 Select the Sort A to Z or the Sort Z to A icon

26. How do you apply multilevel sorting?
•	 Select any cell within the data list you wish to sort
•	 From the Home tab, in the Editing group, select Sort  Filter
•	 Select Custom Sort
•	 Select the drop-down arrow in the Sort by box and select the desired column
•	 Select the drop-down arrow in the Sort On box and select the desired option
•	 Select the drop-down arrow in the Order box and select the desired option
•	 Select the Add Level icon to specify the next sort column

Repeat steps 3 to 5
•	 Repeat steps 6 and 7 for subsequent sort columns
•	 To change the order of the sort, use the Arrow buttons to move the sort items

up or down
•	 Select OK

27. How do you create a Custom List?
Multilevel Sorting
Multilevel sorting allows you to sort
up to 64 columns or levels at a time.

•	 Select the desired list in Microsoft Excel
•	 Select the Office Button
•	 Select Excel Options
•	 Select the Popular category
•	 In the section Top options for working with Excel
•	 Select Edit Custom Lists

In the Custom Lists dialogue box, select Import
•	 The copied list is pasted to the list entries box

Using a Custom Sort Order
The Custom List feature allows the
user to define a specific sort order.
This can be useful when sorting
a column in an order that is not
alphanumeric.

•	 Select OK, OK

28. How do I sort based on a Custom List?
•	 Select any cell within the data list you wish to sort
•	 From the Home tab, in the Editing group, select Sort  Filter
•	 Select Custom Sort, select the desired Column and Sort On
•	 Select the drop-down arrow in the Order box and select Custom List, select the

desired Custom List
•	 Select OK, OK

16 of 76
100 Excel Tips  Tricks

29. How can you add icon conditional formatting?
•	 Select the desired cell or range
•	 From the Home tab, in the Styles group, select Conditional Formatting;

a drop-down box appears
•	 Select Icon Set
•	 Select the desired option

30. How do you highlight duplicates?
•	 Select the desired cell or range
•	 From the Home tab, in the Styles group, select the drop-down arrow under

Conditional Formatting
•	 Select Highlight Cells Rules
•	 Select Duplicate Values
•	 Select the desired Format
•	 Select OK

The Home Tab
Conditional Formatting
In Microsoft Excel 2003, Conditional
Formatting was limited to three
conditions per cell; in Microsoft
Excel 2007 you may have as many
conditions as you like. Another
limitation in Microsoft Excel 2003
was that only one condition per cell
could be true, so according to the
order of the conditional formatting,
the first true condition would be
indicated; however, you can control
this in Microsoft Excel 2007.
Highlight Cell Rules :
•	 Greater Than
•	 A Date Occurring
•	 Duplicate Values

Top/Bottom Rules:
•	 Bottom 10%
•	 Above Average
•	 Below Average

Data Bars:

Color Scales:

Icon Sets:

The parameters of the Conditional
Formatting can be customized by
selecting More Rules from any of the
pop-up dialogue boxes.

17 of 76
100 Excel Tips  Tricks

The Home Tab
Tracking Items in Excel
Many people use Excel to keep
track of things. In the past (pre-Excel
2007) people probably would put
something together like the below:

31. How do you use Conditional Formatting to track items?
•	 Select the desired range of cells
•	 From the Home tab, in the Styles group, select the drop-down arrow under

Conditional Formatting
•	 Select Icon Sets
•	 Select the one with the Tick, Exclamation mark and X
•	 From the Home tab, in the Styles group, select the drop-down arrow under

Conditional Formatting
•	 Select Manage Rules
•	 Select Edit Rule
•	 Select Show Icon Only check box, select Apply, OK

Excel 2007 provides great new
conditional formatting rules, which
allow automatic display of nicely
formatted icon sets.

As Excel best understands values,
it is best to set up the spreadsheet
with 1 for people who attended and
0 for people who didn’t attend.

Apply Conditional Formatting using
Icon Sets.

18 of 76
100 Excel Tips  Tricks

32. How do I select visible cells only?
•	 Select the range of cells
•	 From the Home tab, in the Editing group, select Find  Select
•	 Select Go To Special
•	 Under Select, select Visible cells only
•	 Select OK
•	 On the Home tab, in the Clipboard group, select Copy
•	 Activate the worksheet you want to copy it to
•	 On the Home tab, in the Clipboard group, select Paste

The Home Tab
Find  Select
The Find  Select button has
shortcuts to many of the options
found in the Go To Special dialogue
box previously found in Microsoft
Excel 2003 in the Edit, Go To Menu.

Select Visible Cells Only
There are times when you need
to copy the visible data only. An
example of this is when you need to
copy Subtotals that have hidden
rows and columns and you want to
copy only the visible data. A normal
copy and paste includes the hidden
data, which can then be unhidden.

19 of 76
100 Excel Tips  Tricks

The Insert Tab
PivotTable Concept and
Layout
Microsoft Excel 2007 no longer uses
the PivotTable Wizard. A single
dialogue box allows you to select the
data range (if it was not preselected),
to use external data, and also to
select whether to insert the PivotTable
in an existing worksheet or create a
new worksheet.

33. How do you create a PivotTable?
•	 Select any cell in the data list
•	 From the Insert tab, in the Tables group, select PivotTable
•	 Make sure that Select a table or range is selected
•	 Make sure your data is listed in the Table/Range box
•	 Select where you want the PivotTable to go, either in an existing worksheet or

its own new worksheet
•	 Select OK
•	 A blank PivotTable is now displayed
•	 In the Field List select the fields you want in the Row Area and either drag them into

the row area on the PivotTable or into the Row Labels area on the Field List box
•	 Repeat for columns, page area/filters, and data fields

At this point a blank PivotTable is
inserted with the PivotTable Field List
located to theright of the Microsoft
Excel workspace.

20 of 76
100 Excel Tips  Tricks

34. How do you change the calculation method of subtotals?

The Insert Tab

•	 Select the Value field you wish to change the calculation of in the PivotTable
•	 From the Options tab, in Active Cell group, the Active Field, select Field Settings

(you can also double click on the field)
•	 Select the calculation method you would like to change it to (for instance, Count,

Average etc.)
•	 Select OK

35. How do you create a custom calculation?
•	 Select the Value field you wish to change the calculation of in the PivotTable

Changing Calculation Method
of Subtotals in PivotTables
By default Microsoft Excel sets a field
to SUM if it is in the data area and
contains numbers; if it contains text
then it is set to COUNT. You can,
however, change these calculation
methods as follows:

•	 From the Options tab, in Active Field group, select Field Settings (you can also

double click on the field)
•	 Select the Show Values As tab in the Value Field Settings dialogue box
•	 Select the drop-down arrow for Show values As and select tthe necessary method
•	 Select OK

Custom Calculations
in PivotTables
There is a second tab on the Value
Field Settings that allows you to
select how the calculation are shown
(this is the Custom Calculation
functionality in Microsoft Excel 2003).
For example, you may wish to see the
figure as a percentage of the total.

21 of 76
100 Excel Tips  Tricks

Did You Know?
•	 There are hundreds of ready-made

templates on the Microsoft Excel
website that you can download
for free. Available categories
include brochures, calendars,
expense reports, sports
schedules, and more.
•	 Where Excel 2003 had over

65,000 rows and 256 columns,
Excel 2007 has over 16,000
columns and over 1 million rows!
•	 In May 1996, more than 30 million

people were already using Excel
worldwide.A
A-http://www.thocp.net/companies/microsoft/
microsoft_company_part2.htm

A History of Spreadsheets
1952—First noncomputerized reference to the term “spread sheet” listed in Dictionary For
Accountants and refers to a worksheet providing a two-way analysis of accounting data—
an accounting matrix in which the columns and rows constitute either debit or credit sides
respectively or reverse.
Early ‘60s—Professor Richard Mattessich pioneered computerized spreadsheets for
business accounting, applying computerized spreadsheets to accounting and budget
systems written on a mainframe computer in FORTRAN IV.1
1969—1971 Rene K. Pardo and Remy Landau develop LANPAR spreadsheet compiler.
Pardo and Landau file a patent covering a recalculation algorithm, which is initially rejected.
After 12 years of appeals it is granted and becomes the world’s first software patent.2
1979—Dan Bricklin and Bob Frankston release VisiCalc for the Apple II computer system.
VisiCalc helps the Apple II bridge the gap from hobbyist users to businesses that need a
useful financial analysis tool, which helped propel Apple as a successful business. While not
the first spreadsheet program, its combination of features and affordability helped it become
the first popular spreadsheet program. VisiCalc had 254 rows and 63 columns.3
1980—SuperCalc is developed by Sorcim and is notable for being one of the first
spreadsheet programs capable of solving circular references (that is, cells that depend
on one another’s results).4
1981—Lotus 1-2-3 hits the market and is the IBM PC’s first “killer app” (as VisiCalc was
for the Apple II). Designed primarily to combine visual graph functions with spreadsheet
applications, 1-2-3 was faster, more powerful, and easier to learn than VisiCalc, giving IBM
great success in the PC arena.
1982—Microsoft’s MultiPlan is launched. Designed to compete against VisiCalc, Microsoft’s
first spreadsheet program was its first foray into the realms of business applications. While
being outsold by Lotus 1-2-3 in the United States, Multiplan sold well overseas, giving
Microsoft a solid platform for future international growth.
1984—AppleWorks—one of the first packages that contained an integrated suite of
products, AppleWorks included a spreadsheet module that could work seamlessly with all
other modules, such as the word processor. AppleWorks was so popular for a time it even
overtook Lotus 1-2-3 in industrywide sales charts. It was one of the first applications to use
menu bars rather than a command line interface.5
1985—Microsoft Excel first appears for the Macintosh platform.

http://www.cs.umd.edu/class/spring2002/cmsc434-0101/MUIseum/applications/spreadsheethistory1.html
http://en.wikipedia.org/wiki/Spreadsheet
3
http://www.danbricklin.com/firstspreadsheetquestion.htm
4
http://en.wikipedia.org/wiki/SuperCalc
5
http://apple2history.org/history/ah19.html
1
2

22 of 76
100 Excel Tips  Tricks

Excel Version History
VERSION

COMMENTS

1—1985

Version 1, for the Macintosh, was released. Version 1.0.6 and 1.5 are
released over the course of the next three years.

2—1987

The first Windows version. Labeled “2” to correspond to the Mac version,
it included a run-time version of Windows.

2.2—1989

Excel 2.2 for Macintosh includes the ability to apply different styles within
a single document and a 40% increase in calculation speed.

3—1990

Included workbooks, toolbars, drawing capabilities, outlining, add-in
support, 3D charts, and many more new features.

4—1992

Released for Windows 3.1, it becomes the first “popular” version due to
the widespread use of Windows 3.1.

5—1993

A major upgrade included multisheet workbooks and replaced Excel
Macro language with Visual Basic.

7—1995*

Known as Excel 95. The first major 32-bit version of Excel,**
which is very similar to Excel 5 in relation to features.

8—1997

Known as Excel 97. A new interface for VBA developers, UserForms,
data validation, and more.

9—1999

Known as Excel 2000. Can use HTML as a native file format, “self-repair”
capability, enhanced clipboard, pivot charts, modeless user forms,
digital signing of macros.

10—2001

Known as Excel 2002, this is part of Office XP. It has a long list of new
features, perhaps the most significant of which is the ability to recover
your work when Excel crashes.

11—2003

Microsoft Office Excel 2003. The new features in this version include: (a)
Improved support for XML, (b) A new “list range” feature, (c) Smart Tag
enhancements, and (d) Corrected statistical functions.

12—2007

Microsoft Excel 2007. A major overhaul to the standard Office interface
with the introduction of the “Ribbon,” changes made to the standard
file extensions for Office documents, extended conditional formatting
features, increased business intelligence functionality, and much more.

Importance of
Spreadsheet Security
Typing errors can lead to inaccurate
information, which can have a
devastating effect on business
•	 Nevada, USA, 2006: Incorrectly

typed formulae led to a $5 million
discrepancy in budgetary figures.A
•	 Northern Territory, Australia, 2005:

A manual error in a departmental
spreadsheet led to a AUS$200
million mistake in government
funding figuresB
Excel 2007 is rich with security and
error-checking features, such as
formula evaluation, cell precedent
and dependence tracking, data
validation, and the ability to track
changes made to the sheet.
Combined, these features help give
you the peace of mind about the
data you use to make your decisions.
In addition, automated business
intelligence tools, such as the
Alchemex product range, remove
a large proportion of the manual
aspects of report creation, avoiding
the opportunity for typing errors.
Excel and Alchemex can save your
business time and money, giving you
peace of mind.
A-http://www.nevadadailymail.com/story/1135458.html
B-http://www.abc.net.au/news/newsitems/200506/
s1394937.htm

* here is no Excel 6. Beginning with Excel 7, the version numbering was changed so all of the Microsoft Office applications would have the same
T
version number.
**There was also 32-bit version of Excel 5, but it was not widely distributed

23 of 76
100 Excel Tips  Tricks

The Insert Tab
Customizing Sort Options in a
PivotTable
Adding your own custom sort options
can make your PivotTable even easier
to read.
Often you need to sort your PivotTable
in month order, but normal sorting
sorts your months in alphabetical order
and not month order.

36. How do you apply a Custom Sort when sorting a PivotTable?
•	 Select any cell in the column you would like to sort in the PivotTable
•	 From the Home tab, in the Editing group, select Sort  Filter
•	 Select Custom Sort
•	 Select More Options
•	 Deselect, Sort automatically every…
•	 From the drop-down arrow, select the sort order (for example, Jan, Feb, Mar)
•	 Select OK

37.  ow do you default your PivotTable to sort based on the
H
Custom List?
•	 From the Options tab, in the PivotTable group, select Options
•	 Select the heading tab Tools  Filters
•	 Select Use Custom List when sorting

From PivotTable options, you can
also set the PivotTable to use the
Custom List by default.

24 of 76
100 Excel Tips  Tricks

38. How do you Group Dates in a PivotTable?
•	 Select the Field (Date) you wish to group
•	 From the Options tab, in the Group group, select Group Field
•	 The Grouping dialogue box appears, displaying dates or times
•	 Enter the starting and ending information in the fields provided
•	 In the By list, select the option you wish to group By (for example, Months)
•	 Select OK

The Insert Tab
Grouping Fields in a PivotTable
The group and ungroup functionality
is located on the Options tab, in the
Group group. The function operates
the same way as for Microsoft Excel
2003. You can also right-click to
access this function.

39. Is there a quick way to Ungroup Dates?
•	 To Ungroup Dates, select the Field (Date) you wish to Ungroup
•	 From the Options tab, in the Group group, select Ungroup

40. How do you Group Dates by weeks?
•	 Select the Date field in the PivotTable
•	 From the Options tab, in the Group group, select the Group Selection button
•	 Under By, select Days
•	 Next to Number of Days, select 7

Grouping Data in a PivotTable
by Days of the Week
Extending PivotTable functionality
even further, data can be grouped
into preset categories such as days
of the week.

•	 Select OK

Days

7

25 of 76
100 Excel Tips  Tricks

The Insert Tab
Filtering 0 Values in a PivotTable
It is possible to now show any 0
values in your PivotTable. To do this
you can apply an AutoFilter.

41. How do you ensure that 0 values do not show in the PivotTable?
•	 Select the cell to the right of the last heading on the PivotTable
•	 From the Data tab, in the Sort  Filter group, select Filter
•	 Select the drop-down arrow from the Value heading (for example, Sum of Product Sale)
•	 Deselect 0
•	 Select OK

42. How do I change the Source Data?
•	 Select any cell in the PivotTable
•	 From the Options tab, in the Data group, select Change Data Source
•	 Select the new Data Source
•	 Select OK

Change the Source Data
in a PivotTable
Once you have created your PivotTable,
you may decide that you would like to
refer to a different data source.

43. How do you clear all filters from a PivotTable?
•	 Select any cell in the PivotTable
•	 From the Options tab, in the Actions group, select Clear
•	 Select the desired option

Clear a PivotTable
You may want to clear all the fields
on the PivotTable to start again.
A very nice new feature in Microsoft
Excel 2007 is that if you have applied
multiple filters on the fields in the
PivotTable and you wish to view all
the data, you can clear all filters.

26 of 76
100 Excel Tips  Tricks

44. How do you create a Calculated Field in a PivotTable?
•	 From the Options tab, in the Tools group, select Formulas
•	 Select Calculated Field from the drop-down menu
•	 In the Name box enter the new name
•	 Select the field the calculation is based on in the Field List
•	 Select Insert Field

The Insert Tab
Calculated Fields in a
PivotTable
Selecting Formulas calls up the same
Insert Calculated field dialogue
box as Microsoft Excel 2003.

•	 In the Formula box, create the formula
•	 Select Add
•	 Select OK

45. How to you show or hide the Field List?
•	 From the Options tab, in the Show/Hide group, select Field List

46. How do you use the Hide and Show buttons?
•	 From the Options tab, in the Show/Hide group, select +/- Button

47. How do you remove the Field Headings from the PivotTable?
•	 From the Options tab, in the Show/Hide group, select Field Headers

The Field List in a PivotTable
You will need to use this button if you
close your Field List and then need to
make some changes.

Using the +/- Buttons in a
PivotTable
Hide and Show detail is now located
in the PivotTable as a small plus (show
detail) or minus (hide detail) icon.
You can switch the Show/Hide
button off, by selecting the below
button from the Options tab, in the
Show/Hide group.

Using Field Headers in a
PivotTable
This option removes the headings
from the PivotTable.

27 of 76
100 Excel Tips  Tricks

The Insert Tab
Using Subtotals in a PivotTable
In Microsoft Excel 2007 there is a
shortcut for turning the Subtotals on
and off. This, however, applies to all
the Subtotals and switches them all
off or on.

48. How do you turn off all Subtotals?
•	 Select any cell in the PivotTable
•	 From the Design tab, in the Layout group, select Subtotals
•	 Select Do Not Show Subtotals

49. How to do you turn off individual Subtotals?
•	 Right-click on the desired field
•	 Select the Subtotal “fieldname”

50. How do you turn off all Grand Totals?
•	 Select any cell in the PivotTable
•	 From the Design tab, in the Layout group, select Grand Totals

The Tabular form of the PivotTable
Layouts does not allow for the
subtotals to be shown at the top.

Turn Off Individual Subtotals
in a PivotTable
To turn off individual subtotals you
still need to go to the field settings for
that field.

Using Grand Totals in a
PivotTable
There is a quick way to change
how the grand totals are displayed.
This will be applied to the entire
PivotTable.

28 of 76

•	 Select Off for Rows and Columns
100 Excel Tips  Tricks

Excel Efficiency Calculator
Considering that Excel is used pervasively as a platform to share and present critical information that drives business decisions, have you ever
wondered, How much time and money is inefficient use of Excel costing your business?
Simply automating the reporting process can result in a massive time saving and increased productivity as well as provide less tangible returns
like data integrity, standardization, and elimination of loose spreadsheet use.

“Our expectations have been exceeded by the way Alchemex delivers critical business information from our system. We have
converted weeks of repetitive work every month into a few hours. Now that’s what I call a measurable return on investment”
Ravind Sukdeo, financial director, Bidfreight Port Operations (a member of the BIDvest Group Ltd)
Similarly, improved Excel skills can save time and money.

“I’ve learned amazing new things with Excel on Steroids, and this will definitely improve my efficiency at the office. For example I
finalized our quarterly stock-take three hours earlier than normal just because I was able to work through the data so much quicker.”
Linka Lubbe, financial controller, JOST, South Africa

Visit www.alchemex.com and use our efficiency calculator (example below) for your business.

29 of 76
100 Excel Tips  Tricks

The Insert Tab
Changing the Report Layout
in a PivotTable
By default, Microsoft Excel uses
Compact Form for your PivotTable.
When using Compact Layout,
you lose access to each of the field
headings. You can access them by
selecting the down arrow next to the
main row heading and then changing
the Selected Field box. You will
also not be able to double click to
access the Field Settings.
To view the PivotTable as you would
in Microsoft Excel 2003, choose
Show in Outline Form.

51. Where do you go to change the PivotTable Report Layout?
•	 Select any cell in the PivotTable
•	 From the Design tab, in the Layout group, select Report Layout
•	 Select the desired option

52. How do you insert Blank Rows after each item?
•	 Select any cell in the PivotTable
•	 From the Design tab, in the Layout group, select Blank Rows
•	 Select Insert Blank Line after each Item

53. How do you apply a PivotTable style?
•	 Select any cell in the PivotTable
•	 From the Design tab, in the PivotTable Styles group, select one of the visible styles

or scroll through all the available styles
•	 You can also select the More button, to view the Styles
•	 You also have the option to create your own PivotTable Style at the bottom of the gallery,

which displays the New PivotTable Style dialogue box

Using Blank Rows in a
PivotTable
To space out a PivotTable, you can
choose to insert blank lines after
each item.

PivotTable Styles
In Microsoft Excel 2003, you could
apply AutoFormat to the PivotTable.
In Microsoft Excel 2007 you can
change the style of a PivotTable by
using a gallery of styles. To remove
a format, select Clear at the bottom
of the list. You can only delete your
custom PivotTable styles.

30 of 76
100 Excel Tips  Tricks

54. How do you create a PivotChart from a PivotTable?
•	 Select any cell within the PivotTable report
•	 From the Options tab, in the Tools group, select the PivotChart icon
•	 Select the ChartType
•	 Select OK
•	 You can now edit your chart by using the chart type and other options

55. How do you create a PivotChart from scratch?
•	 Select a cell in the data list
•	 From the Insert tab, in the Tables group, select the drop-down arrow

below PivotTable
•	 Select PivotChart from the drop-down list
•	 Make sure that the selected data range is correct and select OK
•	 Use the PivotTable Field List to create the PivotChart

The Insert Tab
PivotCharts
PivotCharts are much easier to
create and use in the new user
interface. The filtering functionality
is made much easier, and there
are specific PivotChart tools and
context menus available so that you
can analyze the data in the chart.
You can now change the layout,
style, format, and its elements the
same way that you can for a regular
chart. In Microsoft Excel 2007, the
chart formatting that you apply is
preserved when you make changes
to the PivotChart.
As you change the PivotChart, its
associated PivotTable changes and
vice versa. There is a new PivotChart
Filter Pane that gives you access
to your chart fields for filtering. You
can move the PivotChart to another
location (for instance, a new worksheet
using the Move Chart function).
When creating a PivotChart, make
sure your PivotTable report has at
least one row field to become the
Category field in the PivotChart
report, and a Data field to become
the Series field.

31 of 76
100 Excel Tips  Tricks

The Insert Tab
Microsoft Excel Charts
With Microsoft Excel 2007, charts
have a new look; layouts use different
fonts and colors. The Ribbon
interface has a Chart group, which
becomes visible once a chart has
been generated.
Once you have selected your chart
type, the chart is automatically
embedded in the worksheet, and
whenever you select the chart, the
Chart Ribbon will be available on the
Ribbon.

Create a New Excel Chart
To easiest way to create a chart is to
select the data table and then select
the Insert tab. In the Charts group
select the chart type you require.

Hidden and Empty Cells
in an Excel Chart
Selecting the Hidden and Empty
Cells button allows you to determine
how the graph deals with blank
spaces in your data. You have the
option to show them as gaps, as
zeros, or to smooth the graph over
the gaps.

32 of 76

56. How do you create a Chart with a shortcut key?
•	 Select the range you would like to Chart
•	 Press F11 on the keyboard
•	 A new worksheet will be inserted with the Chart

57. How do you have an empty cell show as a zero in a chart?
•	 Select the Chart
•	 From the Design tab, in the Data group, select Select Data
•	 Select Hidden and Empty Cells
•	 Select Zero
•	 Select OK, OK
100 Excel Tips  Tricks

58. How do you change margins in Excel 2007?
•	 From the Page Layout tab, in the Page Setup group, select Margins
•	 Select the desired setting
•	 If you select Custom Margins, you get the Microsoft Excel 2003 Page Setup

dialogue box and you can manually adjust the margins
•	 Select OK

59. How do you insert a Page Break?

The Page Layout Tab
Page Breaks
There is no need to change your view
to Page Break Preview to insert
Page Breaks. Please ensure you are
in column A when you are inserting
a Page Break. You can also select
Remove Page Break to remove a
page break.

•	 Select the cell in column A, below to where the Page break must appear
•	 From the Page Layout tab, in the Page Setup group, select Breaks
•	 Select Insert Page Break

60. How do you remove a Page Break?
•	 Select the cell in column A, below the Page Break to be removed

Print Titles

•	 From the Page Layout tab, in the Page Setup group, select Breaks

This is not a new feature in Microsoft
Excel 2007, but it is now found in
the Page Setup group. Print Titles
are a fantastic tool when you need
to repeat a certain column or row on
each printed page.

•	 Select Remove Page Break

61. How to you repeat a row when printing a worksheet?
•	 Determine which row is to be repeated
•	 From the Page Layout tab, in the Page Setup group, select Print Titles
•	 Select the Collapse Dialogue button in the Rows to Repeat at Top
•	 Select the desired row
•	 Press Enter
•	 Select OK

33 of 76
100 Excel Tips  Tricks

The Formulas Tab
Using Functions
Functions are available on the
Formulas tab. You can insert
a function by using the Insert
Function icon or use the Function
Library group, which lists the
available functions in logical
groupings (for instance, Financial).

Update Formulae Manually
When there are a number of formulas
on a worksheet, especially if there
is a lot of data to be referenced,
changing one formula can slow
the application down substantially.
By using the option to manually
recalculate, you can bypass this
recalculation and avoid the delay. You
can then choose to manually update
your formulae.

62. How do you set your formulas to update manually?
•	 Select the Microsoft Office button
•	 From the bottom right, select Excel Options
•	 Select Manual
•	 Select OK

63.  ow do you trace cells that are preceding or dependant on
H
the current cell?
•	 To trace all cells that are preceding:
•	 Select the desired cell
•	 From the Formulas tab, in the Formula Auditing group, select Trace Precedents
•	 If the Precedent cells are found on another worksheet, you get a dotted line
•	 Double click on the dotted line, select the reference, select OK
•	 To trace all dependant cells:
•	 Select the desired cell
•	 From the Formulas tab, in the Formula Auditing group, select Trace Dependents
•	 To remove all the arrows:
•	 Select the desired cell
•	 From the Formulas tab, in the Formula Auditing group, select Remove Arrows

Formula Auditing—Showing
Cell Dependencies
Some spreadsheets can get very
complicated, with many cells relying
on other cell calculations to deliver
information, and a change of one cell
can have dramatic effects. Formula
Auditing shows you which cells are
connected.

34 of 76
100 Excel Tips  Tricks

64.  ow do I create a Formula that will find a cell with the
H
highest value in a range?
•	 Open Microsoft Excel
•	 Select the desired result cell
•	 Enter in the below:

=ADDRESS(MATCH(MAX(D:D),D:D,0),4,4)
=ADDRESS(MATCH(MAX(“Column to calculate max”), Column to find the max,
finds the first value that is exactly equal), use column D (4) as the result reference,
use relative reference)
MATCH

MATCH(lookup_value,lookup_array,match_type)
The MATCH function returns the row number of the highest value.

The Formulas Tab
Finding the Cell With the
Highest Value in a Range
At times you may be working with
data where you need to find the
maximum value. To do this, you can
sort or use the MAX function. You
may not want to sort the column and
are looking for the MAX value, but
would like to know the cell address
that contains the maximum value.
Example

Lookup_value:
Is the value you use to find the value you want in a table. Lookup_value
can be a value (number, text, or logical value) or a cell reference to a
number, text, or logical value.
Lookup_array:
Is a contiguous range of cells containing possible lookup values.
Match_type:
Is the number -1, 0, or 1. Match_type specifies how Microsoft Excel
matches lookup_value with values in lookup_array. If match_type is
0, MATCH finds the first value that is exactly equal to lookup_value.
Lookup_array can be in any order.
ADDRESS

ADDRESS(row_num,column_num,abs_num,a1,sheet_text)
The ADDRESS function returns the cell address of the highest value.
Row_num:
Is the row number to use in the cell reference.
Column_num:
Is the column number to use in the cell reference.
Abs_num:
Specifies the type of reference to return. 1 - Absolute, 2 - Absolute row;
relative column, 3 Relative row; absolute column, 4 - Relative

MAX

MAX(number1,number2,...)
Number1, number2:
Are 1 to 255 numbers for which you want to find the maximum value.

35 of 76
100 Excel Tips  Tricks

The Formulas Tab

65. How do you round a number to the nearest whole number?

Rounding Numbers to the
Nearest Whole Number
Using the ROUND function, you
can round a number upwards to the
nearest hundred, thousand, million,
or higher.

•	 Select the desired cell
•	 Enter in the below formula:

=ROUND(C2,-2)
•	 Press Enter

Example
The Rounded Up column is rounding
the values up the nearest hundred.

ROUND

ROUND(number,num_digits)
Number:
Is the number you want to round.
Num_digits:
Specifies the number of digits to which you want to round the number.

Deleting All NonFormula Data
on a Worksheet
Have you ever found that at the
beginning of the financial year you
need to make a copy of the previous
year’s workbook? If so, you’d need
to delete all the old year’s data but
you would really like to keep all of the
formulae in the worksheet. By using
the Go To dialogue box, it is a quick
and easy method.

Constant

36 of 76

66. How do you delete all nonformula data?
•	 Make a copy of the desired worksheet
•	 Press F5 on the keyboard (The Go To dialogue box will pop up)
•	 Select Special
•	 Select Constants
•	 Select OK
•	 All cells containing constants (everything except formulae) will be selected
•	 Press Delete on the keyboard
100 Excel Tips  Tricks

67.  ow do I Filter date transaction to only show dates between
H
30 and 60 days?
•	 Select the desired cell
•	 Enter the below:

The Formulas Tab
Filter Date Transactions
to Show Only Dates That Fall
Between a Range

•	 Copy the formula down

By using a combination of the TODAY
and AND function, you can determine
whether a date falls inside of a
particular date range.

•	 Use Filtering to Filter all values that are TRUE

Example

=AND(TODAY()-B3=30,TODAY()-B3=60)

TODAY

TODAY( )
Returns the serial number of the current date. The serial number is the
date-time code used by Microsoft Excel for date and time calculations.
If the cell format was General before the function was entered, the result
is formatted as a date.

AND

AND(logical1,logical2, ...)

This result gives you an answer of
either True or False which you can
then filter or use in combination
with another function. This can be
a handy when used in combination
with a SUMIF to calculate transactions
in certain date range.

Logical1, logical2, ... :
Are 1 to 255 conditions you want to test that can be either TRUE or FALSE.

37 of 76
You have the book.
Now get the hands-on training.
Excel® on Steroids
Learn how to capture more meaningful data,
in less time, using your favorite spreadsheet.
These specialized training workshops
developed by Alchemex provide in-depth
coverage of key Microsoft® Excel®
functionality.
B
Workshop 1:  usiness Reporting Using
Formulas and Functions
M
Workshop 2:  anaging Data Lists
and Macros
D
Workshop 3:  ata Analysis using
PivotTables / Charts

www.SageU.com
Sage Intelligence
Reports you can rely on.
Information you can act on.
Sage Intelligence is a powerful Microsoft® Excel®-based reporting solution powered by Alchemex and integrated into many
Sage accounting software solutions. You can run customized reports, on-demand, without having to manually update
spreadsheets. Now it’s easier than ever to find the answers you need and make informed decisions with confidence.

Critical information made visible
Sage Intelligence uses realtime information
pulled directly from various Sage
Accounting systems—and even other
databases—to give you easier access to
your business information. You can create
dynamic reports that can be refreshed as
needed, drilled into for more detail, and
sliced and diced for further insight. Get
the information you need to make timely,
business-critical decisions.

Spreadsheet-based reporting at
your fingertips
Sage Intelligence is an add-on solution, and
is integrated into multiple Sage accounting
products including Sage ERP Accpac,
Sage ERP MAS, Sage Peachtree and
Sage Simply Accounting. It’s Microsoft
Excel-based, so the tools and features may
already feel familiar and intuitive. Plus, it
includes standard report templates you can
use right away. That’s what we call fast ROI.

The flexibility of customization—
without the frustration
You or your accountant can custom-design
almost any report you need, giving you total
control over your reporting process. Every
customization you make can be saved for
future use, sparing you time and effort.

Role-based security to protect
your data
Security controls give you the ability to set
access to information based on the user’s
role, so you can protect the integrity of
sensitive or confidential data.

Extraordinary business intelligence
at a realistic price
Get the powerful functionality and flexibility
of a business intelligence solution designed
specifically for small and midsized businesses.

FEATURES
Customizable, dynamic, real-time
reports for better visibility into
your business
Ready-to-go within many Sage
Products: no separate installation
required1
Familiar and intuitive Microsoft Excelbased reports
Customizable report templates
included for quick ROI
Role-based security settings allow
you to control user access
Sophisticated business intelligence
created especially for small and
medium-sized businesses

The Sage Intelligence
dashboard provides you
with a real-time overview
of your business activities,
metrics, and revenues
all at a single glance ­ nd
a
refreshes in a single click!

For more information about Sage Intelligence—or to find out if your Sage product has an integrated Business Intelligence (BI) Solution,
visit the product website or go to www.SageNorthAmerica.com/
1 Additional fees required. Subject to Alchemex (Pty) Ltd terms and conditions.
100 Excel Tips  Tricks

The Formulas Tab
Converting Text Dates to Dates
Occasionally, dates may become
formatted and stored in cells as text.
For example, you may have entered
a date in a cell that was formatted
as text, or the data might have been
imported or pasted from an external
data source as text.
Dates that are formatted as text are
leftaligned instead of right-aligned in
a cell. You can use the DATEVALUE
function to convert most other types
of text dates to dates.

68. How do you convert text dates to dates?
•	 Select the desired cell
•	 Enter the below:

=DATEVALUE(A2)
The DATEVALUE function returns the serial number of the date that is represented
by the text date
Format the cell (serial number) to a date:
•	 Select the desired cell/cells (B2:B3)
•	 Right click on the selected cells
•	 Select Format Cells
•	 Select Date
•	 Select the desired Format

DATEVALUE

DATEVALUE(date_text)
Date_text:
Is text that represents a date in a Microsoft Excel date format. For
example, “1/30/2008” or “30-Jan-2008” are text strings within quotation
marks that represent dates. Using the default date system in Excel
for Windows, date_text must represent a date from January 1, 1900,
to December 31, 9999.
Using the default date system in Microsoft Excel for the Macintosh,
date_text must represent a date from January 1, 1904, to December 31,
9999. DATEVALUE returns the #VALUE! error value if date_text is out of
this range.
If the year portion of date_text is omitted, DATEVALUE uses the current year
from your computer’s built-in clock. Time information in date_text is ignored.

40 of 76
100 Excel Tips  Tricks

69. How do you combine text from multiple cells into one cell?
•	 Select the desired cell
•	 Enter in =
•	 Select the first cell to join

The Formulas Tab
Combining Text From Multiple
Cells Into One

•	 If necessary, add any additional data that my not be found in a cell (“/”)

Using the  sign is the same as using
the Concatenate function, but much
simpler.

•	 Enter in 

Example

•	 Enter in 

•	 Select any additional cells to join
•	 Press Enter

Below is an example in column C,
of where the Main Account and
Sub Account numbers need to
be joined into one cell with a / to
separate the Accounts.

41 of 76
100 Excel Tips  Tricks

The Formulas Tab
An Alternative to VLOOKUP
Using a combination of MATCH and
INDEX, you can return values from an
array regardless of what information
is in the first column of the array. In a
VLOOKUP, the main search criteria
(for example, a salesperson’s name)
needs to be in the first column of the
array—using MATCH and INDEX;
it doesn’t matter which column the
result is in.

70. What Formula can I use as an alternative to VLOOKUP?
•	 Select the desired cell
•	 Enter in the below:

=INDEX(A1:C12,MATCH(A15,B2:B12),3)
=INDEX(Complete List,MATCH(Lookup cell,Column from List with Lookup Value),Column
Number from list for result)
•	 Select OK

MATCH

Example

MATCH(lookup_value,lookup_array,match_type)
Returns the row number of the highest value.
Lookup_value:
Is the value you use to find the value you want in a table. Lookup_value can
be a value (number, text, or logical value) or a cell reference to a number,
text, or logical value.

You can either create the functions in
two steps as in cells B20 and C20,
or you can create a Nested Function
as in cell D20.

Lookup_array:
Is a contiguous range of cells containing possible lookup values.
Match_type:
Is the number -1, 0, or 1. Match_type specifies how Microsoft Excel
matches lookup_value with values in lookup_array. If match_type is 0,
MATCH finds the first value that is exactly equal to lookup_value. Lookup_
array can be in any order.
INDEX

INDEX(array,row_num,column_num)
Returns the value of an element in a table or an array, selected by the row
and column number indexes.
INDEX looks at an array, based on the row number found in the
MATCH Function, and return the answer from the specified column.
Array:
Is a range of cells.
Row_num:
Selects the row in array from which to return a value.
Column_num:
Selects the column in array from which to return a value.

42 of 76
100 Excel Tips  Tricks

71. How do you insert a Symbol?
•	 Create the Symbol list:
•	 Open a blank workbook
•	 Select cell A1
•	 Enter in the below:

=CHAR(ROW())
•	 Copy the function down to cell A255

The Formulas Tab
Inserting Symbols Into the Cell
It can sometimes be difficult to insert
a special character, such as 􀀂  or  ®,
into a cell. Special characters each
have their own unique number
combination.
Example

•	 This displays in each cell the character whose code number is that cell’s row

number. For example, the Euro Currency symbol appears in cell A128, which
indicates that its code number is 128
•	 If necessary, save the workbook

CHAR

CHAR(number)
Number:
Is a number between 1 and 255 specifying which character you want. The
character is from the character set used by your computer.

Euro
Ellipsis
Dagger
Double
Dagger
Bullet
Trademark
Cents

€
…
†

0128
0133
0134

Registered ®
Plus/Minus ±
Paragraph ¶

0174
0177
0182

‡

0135

Degree

º

0176

•
™
¢

0149
0153
0162

Pounds
Yen
Copyright

£
¥
©

0163
0165
0169

Code

•	 If using a laptop, be sure to turn on your NUMLOCK pad

Symbol

(for example, 0128)

Common
Symbols

•	 Using the numeric keys on your NUMLOCK pad, enter in the desired code

Code

•	 Hold down ALT on the keyboard

If you know the code number, you
can enter that character any time by
holding down the ALT key, and typing
the four-digit code number on the
numeric keypad (the keys on the far
right of your keyboard; do not use
the “normal” number keys above the
letter keys). Even though character
code numbers are only three digits
(between 0 and 255), you must type
in the leading zeros to ensure that
you get the proper character.
Symbol

•	 Select the desired cell

Common
Symbols

•	 To apply the desired Symbol:

You can change the font of the
column to see what characters are
supplied by various fonts. Fonts with
lots of useful symbols include Symbol,
WebDings, the 3 WingDings fonts,
Ref Specialty, ENCICON, Marlett,
MonoType Sorts, and MS Reference.
Note that you may not have all these
fonts on your computer.

43 of 76
100 Excel Tips  Tricks

The Formulas Tab
Adding Criteria/Conditions
to your SUM function
Using the DSUM function, you
can specify criteria and conditions
regarding which cells should be added
together. An alternative to using DSUM
is using SUMIF. But SUMIF can’t do
complex criteria.
Example
The table contains a list of totals sales
per day, showing how many hours
were worked that day, the week
number, and the month. In cell H4 is a
running total using the DSUM function,
which takes into account a number
of criteria that have been set up in the
range A1:F2 (such as a specific day
for a specific month as long as the
hours in the work day were greater
than 12 but less than 17).

44 of 76

72. How do I add criteria/conditions to the Sum function?
•	 Select the desired cell
•	 Enter in the below formula:

=DSUM(A5:E1121,5,A1:F2)
•	 Press Enter

DSUM

DSUM(database,field,criteria)
Database:
Is the range of cells that makes up the list or database. A database is a list
of related data in which rows of related information are records and columns
of data are fields. The first row of the list contains labels for each column.
Field:
Indicates which column is used in the function. Field can be given as text
with the column label enclosed between double quotation marks, such as
“Age” or “Yield,” or as a number that represents the position of the column
within the list: 1 for the first column, 2 for the second column, and so on.
Criteria:
Is the range of cells that contains the conditions you specify. You can use
any range for the criteria argument, as long as it includes at least one column
label and at least one cell below the column label for specifying a condition
for the column.
100 Excel Tips  Tricks

73. How do you use the SUMIF function between workbooks?
•	 Open the workbook that contains the source
•	 Open the workbook that will contain the formulae
•	 Select the desired cell in the workbook that will contain the formulae
•	 Using the FX button on the Formula Bar, locate the Sum Function
•	 To nest in the IF Function, from the Formula bar, in the Name Box,

from the drop-down arrow, select IF
•	 If the IF function does not appear, select More Functions and locate the IF Function
•	 Enter in the arguments in the Logical Test

Logical_test – If cells A3:A12 in the Data workbook on Sheet 1 = East
Value_if_true – If the above is true, sum the range B3:B12
Value_if_false – IF the above is not true, place 0
•	 Press Ctrl + Shift + Enter

The Formulas Tab
SUMIF Between Workbooks
When using the SUMIF function
between workbooks, you may get a
VALUE error if the source workbook is
not open. This behavior occurs when
the formula that contains the SUMIF,
COUNTIF, or COUNTBLANK function
refers to cells in a closed workbook.
To work around this, use a combination
of the SUM and IF functions together
in an array formula.
An array formula is a formula that can
perform multiple calculations on one
or more of the items in an array. Array
formulas act on two or more sets of
values known as array arguments.
•	 Each argument within an array

must have the same number of
rows and columns
SUMIF

SUMIF(range,criteria,sum_range)
Range:
Is the range of cells that you want evaluated by criteria. Cells in each range
must be numbers or names, arrays, or references that contain numbers.
Blank and text values are ignored.

•	 You must enter an array by

pushing Ctrl + Shift + Enter
•	 You cannot add the {} (braces)

that surround an array yourself,
pushing Ctrl + Shift + Enter will
do this for you

Criteria:
Is the criteria in the form of a number, expression, or text that defines which
cells will be added. For example, criteria can be expressed as 32, “32”,
“32”, or “apples”.
Sum_range:
Are the actual cells to add if their corresponding cells in range match
criteria. If sum_range is omitted, the cells in range are both evaluated by
criteria and added if they match criteria.

45 of 76
100 Excel Tips  Tricks

The Formulas Tab
Calculating Positive and
Negative Numbers
Have you ever had a column with
positive and negative numbers, but
would like to sum the positive and
negative numbers separately? This can
be done by using the SUMIF function.
Example

74. How can I calculate positive and negative numbers?
•	 To add the positive numbers as per the example:
•	 Select the desired cell
•	 Enter in the below:

=SUMIF(A2:A10,“0”)
•	 Press Enter
•	 To add the negative numbers:
•	 Select the desired cell
•	 Enter in the below:

=SUMIF(A2:A10,“0”)
•	 Press Enter

SUMIF

SUMIF(range,criteria,sum_range)
Range:
Is the range of cells that you want evaluated by criteria. Cells in each range
must be numbers or names, arrays, or references that contain numbers.
Blank and text values are ignored.
Criteria:
Is the criteria in the form of a number, expression, or text that defines which
cells will be added. For example, criteria can be expressed as 32, “32”,
“32”, or “apples”.
Sum_range:
Are the actual cells to add if their corresponding cells in range match
criteria. If sum_range is omitted, the cells in range are both evaluated by
criteria and added if they match criteria.

46 of 76
100 Excel Tips  Tricks

75. How do you name a selection using column labels as names?
•	 Select the range you want to name, including the row or column labels
•	 From the Formula tab, in the Defined Names group, select Create from Selection
•	 Select Top Row (assuming your headings are in the top row)
•	 Select OK

76. How do you name a range of cell/cells?

The Formulas Tab
Naming a Range Using
Column Labels
This is useful when you have a list and
want to name the column separately.
You can use the column labels as
the range name.

•	 Select the desired cell/cells
•	 From the Formula bar, click on the Name box
•	 Enter in the desired Named Range
•	 Press Enter

77. How do you insert a Named Range in Formulae?
•	 Place your cursor where you would like to insert the Named Range

Name a Range of Cell/Cells

•	 From the Formulas tab, in the Defined Names group, select Use in Formula

You can also name a range of cell/cells.
This applies a Name to an entire range.

•	 Select the desired Named Range

78.  hat is the keyboard shortcut to insert a Named Range
W
in Formulae?
•	 Place your cursor where you would like to insert the Named Range
•	 Press F3 on the keyboard
•	 Select the desired Named Range
•	 Select OK

79. How do you paste a list of Named Ranges?
•	 Select a cell in the worksheet where you would like the list to be pasted
•	 Press F3
•	 Select Paste List

Use Named Ranges in
Formulae
When using a named range in a
Formula, you can select Use in
Formula to insert the named range.
Alternatively, you can select F3, which
brings up a list of Named Ranges.

47 of 76
100 Excel Tips  Tricks

Using CTRL as a
Function Key
CTRL+’	
Copies a formula from
the cell above the active
cell into the cell or the
Formula Bar.
CTRL+”	
Copies the value from
the cell above the active
cell into the cell or the
Formula Bar.
CTRL++	Displays the Insert dialog
box to insert blank cells.
CTRL+1	Displays the Format
Cells dialog box.
CTRL+2	
Applies or removes
bold formatting.
CTRL+3	
Applies or removes
italic formatting.
CTRL+4	
Applies or removes
underlining.
CTRL+5	
Applies or removes
strikethrough.
CTRL+6	Alternates between
hiding objects, displaying
objects, and displaying
placeholders for objects.
CTRL+7	
Displays or hides the
Standard toolbar.
CTRL+8	
Displays or hides the
outline symbols.
CTRL+9	
Hides the selected rows.
CTRL+0	
Hides the selected
columns.

48 of 76

Keys
	CTRL+F8 performs the Size command (on the Control menu for the workbook
window) when a workbook is not maximized.
	ALT+F8 displays the Macro dialog box to run, edit, or delete a macro.
F9 	

Calculates all worksheets in all open workbooks.

	F9 followed by ENTER (or followed by CTRL+SHIFT+ENTER for array formulas)
calculates the selected a portion of a formula and replaces the selected portion
with the calculated value.
	SHIFT+F9 calculates the active worksheet.
	CTRL+ALT+F9 calculates all worksheets in all open workbooks, regardless of
whether they have changed since the last calculation.
	CTRL+ALT+SHIFT+F9 rechecks dependent formulas, and then calculates all cells
in all open workbooks, including cells not marked as needing to be calculated.
	CTRL+F9 minimizes a workbook window to an icon.
F10 	

Selects the menu bar or closes an open menu and submenu at the same time.

	SHIFT+F10 displays the shortcut menu for a selected item.
	ALT+SHIFT+F10 displays the menu or message for a smart tag. If more than one smart
tag is present, it switches to the next smart tag and displays its menu or message.
	CTRL+F10 maximizes or restores the selected workbook window.
F11 	

Creates a chart of the data in the current range.

	SHIFT+F11 inserts a new worksheet.
	ALT+F11 opens the Visual Basic Editor, in which you can create a macro by using
Visual Basic for Applications (VBA).
	ALT+SHIFT+F11 opens the Microsoft Script Editor, where you can add text,
edit HTML tags, and modify any script code.
F12 	

Displays the Save As dialog box.
100 Excel Tips  Tricks

Other Useful

Using CTRL as a
Function Key

ARROW KEYS

CTRL+A	
Selects the entire
worksheet.

•	 Move one cell up, down, left, or right in a worksheet.
•	 CTRL+ARROW KEY moves to the edge of the current data region in a worksheet.
•	 SHIFT+ARROW KEY extends the selection of cells by one cell.
•	 CTRL+SHIFT+ARROW KEY extends the selection of cells to the last nonblank cell

in the same column or row as the active cell.
•	 LEFT ARROW or RIGHT ARROW selects the menu to the left or right when a menu

is visible. When a submenu is open, these arrow keys switch between the main menu
and the submenu.
•	 DOWN ARROW or UP ARROW selects the next or previous command when a menu

or submenu is open.
•	 In a dialog box, arrow keys move between options in an open drop-down list or between

options in a group of options.
•	 ALT+DOWN ARROW opens a selected drop-down list.

BACKSPACE
•	 Deletes one character to the left in the Formula Bar.
•	 Also clears the content of the active cell.

DELETE
•	 Removes the cell contents (data and formulas) from selected cells without affecting

cell formats or comments.
•	 In cell editing mode, it deletes the character to the right of the insertion point.

END
•	 Moves to the cell in the lower-right corner of the window when SCROLL LOCK

is turned on.
•	 Also selects the last command on the menu when a menu or submenu is visible.
•	 CTRL+END moves to the last cell on a worksheet, in the lowest used row of the

rightmost used column.
•	 CTRL+SHIFT+END extends the selection of cells to the last used cell on the worksheet

(lower-right corner).

ENTER
•	 Completes a cell entry from the cell or the Formula Bar, and selects the cell below

(by default).
•	 In a data form, it moves to the first field in the next record.
•	 Opens a selected menu (press F10 to activate the menu bar) or performs the action

for a selected command.
•	 In a dialog box, it performs the action for the default command button in the dialog box

(the button with the bold outline, often the OK button).
•	 ALT+ENTER starts a new line in the same cell.
•	 CTRL+ENTER fills the selected cell range with the current entry.

		 the worksheet contains
If
data, CTRL+A selects the
current region. Pressing
CTRL+A a second
time selects the entire
worksheet.
		
When the insertion point
is to the right of a function
name in a formula, this
displays the Function
Arguments dialog box.
		CTRL+SHIFT+A inserts
the argument names and
parentheses when the
insertion point is to the
right of a function name in
a formula.
CTRL+B	
Applies or removes bold
formatting.
Copies the selected cells.
CTRL+C	
		
CTRL+C followed by
another CTRL+C displays
the Microsoft Office
Clipboard.
CTRL+D	Uses the Fill Down
command to copy the
contents and format of the
topmost cell of a selected
range into the cells below.
CTRL+F	Displays the Find dialog
box.
		
SHIFT+F5 also displays
this dialog box, while
SHIFT+F4 repeats the last
Find action.
CTRL+G	Displays the Go To dialog
box.
		 also displays this
F5
dialog box.
CTRL+H	Displays the Find and
Replace dialog box.
Applies or removes italic
CTRL+I	
formatting.
CTRL+K	Displays the Insert
Hyperlink dialog box for
new hyperlinks or the Edit
Hyperlink dialog box for
selected existing hyperlinks.

•	 SHIFT+ENTER completes a cell entry and selects the cell above.

49 of 76
100 Excel Tips  Tricks

Using CTRL as a
Function Key

Keys

CTRL+L	Displays the Create List
dialog box.

HOME
•	 Moves to the beginning of a row in a worksheet.

Creates a new, blank file.
CTRL+N	

•	 Moves to the cell in the upper-left corner of the window when SCROLL LOCK is turned on.

CTRL+O	Displays the Open dialog
box to open or find a file.

•	 Selects the first command on the menu when a menu or submenu is visible.

		CTRL+SHIFT+O selects
all cells that contain
comments.

•	 CTRL+SHIFT+HOME extends the selection of cells to the beginning of the worksheet.

CTRL+P	Displays the Print dialog
box.
CTRL+R	Uses the Fill Right
command to copy the
contents and format of
the leftmost cell of a
selected range into the
cells to the right.
CTRL+S	
Saves the active file with
its current file name,
location, and file format.
Applies or removes
CTRL+U	
underlining.
Inserts the contents of the
CTRL+V	
Clipboard at the insertion
point and replaces any
selection. Available only
after you cut or copied
an object, text, or cell
contents.
CTRL+W	
Closes the selected
workbook window.
Cuts the selected cells.
CTRL+X	
CTRL+Y	
Repeats the last command
or action, if possible.
CTRL+Z	Uses the Undo command
to reverse the last
command or to delete the
last entry you typed.
		
CTRL+SHIFT+Z uses the
Undo or Redo command
to reverse or restore the
last automatic correction
when AutoCorrect Smart
Tags are displayed.

50 of 76

•	 CTRL+HOME moves to the beginning of a worksheet.

PAGE DOWN
•	 Moves one screen down in a worksheet.
•	 ALT+PAGE DOWN moves one screen to the right in a worksheet.
•	 CTRL+PAGE DOWN moves to the next sheet in a workbook.
•	 CTRL+SHIFT+PAGE DOWN selects the current and next sheet in a workbook.

PAGE UP
•	 Moves one screen up in a worksheet.
•	 ALT+PAGE UP moves one screen to the left in a worksheet.
•	 CTRL+PAGE UP moves to the previous sheet in a workbook.
•	 CTRL+SHIFT+PAGE UP selects the current and previous sheet in a workbook.

SPACEBAR
•	 In a dialog box, performs the action for the selected button, or selects or clears a check box.
•	 CTRL+SPACEBAR selects an entire column in a worksheet.
•	 SHIFT+SPACEBAR selects an entire row in a worksheet.
•	 CTRL+SHIFT+SPACEBAR selects the entire worksheet.
•	 If the worksheet contains data, CTRL+SHIFT+SPACEBAR selects the current region.

Pressing CTRL+SHIFT+SPACEBAR a second time selects the entire worksheet.
•	 When an object is selected, CTRL+SHIFT+SPACEBAR selects all objects on a worksheet.
•	 ALT+SPACEBAR displays the Control menu for the Excel window.

TAB
•	 Moves one cell to the right in a worksheet.
•	 Moves between unlocked cells in a protected worksheet.
•	 Moves to the next option or option group in a dialog box.
•	 SHIFT+TAB moves to the previous cell in a worksheet or the previous option in a dialog box.
•	 CTRL+TAB switches to the next tab in dialog box.
•	 CTRL+SHIFT+TAB switches to the previous tab in a dialog box.
100 Excel Tips  Tricks

Microsoft
Chart Advisor

Chart Advisor is an add-in that provides an alternate approach for creating charts in
Excel 2007. This add-in uses an advanced rules engine to scan your data and, based on
predefined rules, displays charts according to score. Top scoring charts are available for you
to preview, tweak, and insert into your Excel worksheet.
Method:

Duplicate Remover for Excel
Handy plug-in to find and remove
duplicates from Excel. You can select,
color, copy, or delete duplicate data
or unique entries and compare two
Excel lists with a different number
of columns.

Duplicates Manager for Excel
Excel add-in to find and delete
duplicates in Excel lists. You can
delete Excel duplicates from any
range, remove duplicate rows from a
table, find duplicates in two Excel lists,
and more.

Fuzzy Duplicate Finder for Excel
Allows you to find and correct
Fuzzy Excel duplicates, typos,
misspelled words, and similar
records in Excel workbooks.
Pick a data set you want to chart and select a cell in the data. Then click on the Chart
Advisor button in the Insert Menu (highlighted in this picture).

Merge Cell Wizard for Excel
Add-in for merging Excel cells values,
columns, and rows. Places values
from several cells to one cell or joins
several cells, preserving their values.

Text Manager
Helps you work with text in Excel.
You can change case, remove
characters or text (such as excess
spaces), or join (concatenate), text
from several cells to one.

Backup Assistant

Chart Advisor Overview panel. Notice the chart recommendations in a row at the top and the
ability to see chart scores as tool tips when hovering over the score.

Make backup copies of Excel
workbooks before you change them.
You are prompted to back up a file
immediately after it is opened.

Merge Tables for Excel
Handy add-in to look up and copy
matching data from Excel lists. For
example, you can merge matching
rows from an Excel table of product
numbers and prices to the table with
product IDs and descriptions.

51 of 76
100 Excel Tips  Tricks

Download this add-in at: www.officelabs.com

Advanced Find and Replace
Search and replace in all opened Excel workbooks and worksheets. Simultaneous search
in values, formulas, hyperlinks, and comments.

Advanced Excel Select
If you have ever tried to find cells containing conditional formats, formulas, comments, and
so on, you would highly appreciate this add-in.

List Assistant
Is an easy way to rearrange rows in your worksheet. Swap two rows, Insert a row, and more.

Random Number Generator for Excel
This handy add-in generates random numbers in Excel. Just select a range of cells, indicate
the starting and ending values, and get a random sequence—integer or real numbers, dates,
strings, or Booleans.

Random Sampler
If you need to sample a set of data, the Random Sampler add-in will quickly and easily obtain
samples for you.

CSV File Creator
Converts Excel workbooks into CSV file format. You can convert all Excel worksheets,
convert just a single sheet or a specific range of each selected file, and more.

AutoFormat for Pivot Tables for Excel
With AutoFormat you can create, store, and use your own formats for Excel PivotTables.
You can save your own PivotTable format and apply it as a template for your PivotTables
with one click.
Download these add-ins and more Excel add-ins at: www.officeaddins.com

52 of 76
100 Excel Tips  Tricks

80. How do you apply a Filter?
•	 Select any cell within the data list you wish to filter
•	 From the Data tab, in the Sort  Filter group, select Filter
•	 Drop-down arrows appear on each column heading
•	 Select the drop-down arrow in the column you want to filter
•	 Select the Items you want to filter by
•	 Select OK

81. How do you Clear all Filters?

The Data Tab
Filtering Data
In Microsoft Excel 2007, AutoFilter
is just called Filter.
You are now able to Filter by
Color and Dates. The Filtering
automatically groups the Dates into
Years and Months. You are also
able to Filter by more that one item.

•	 From the Data tab, in the Sort  Filter group, select Clear

82. How do you remove Duplicates?
•	 Select the range of cells/table/list that contains the duplicates
•	 From the Data tab, in the Data Tools group, select Remove Duplicates
•	 Select the Column/s that contains the duplicates
•	 Select OK
•	 You will get a message notifying you of how many duplicates are removed
•	 Select OK

The Column that has been filtered
displays a filter symbol next to the
drop-down arrow .

Clearing All Filters
This allows you to keep the Filter
arrows on but ensures any filters that
have been applied to the columns,
are removed.

Removing Duplicates
When you remove duplicate values,
only the values in the range of cells or
table are affected. Any other values
outside the range of cells or table are
not altered or moved. Ensure that if
you are removing duplicates from a
column within a table, you select the
entire table, as otherwise only those
cells will be removed.
Because you are permanently
deleting data, it’s a good idea to copy
the original range of cells or table
to another worksheet or workbook
before removing duplicate values.

53 of 76
100 Excel Tips  Tricks

The Data Tab
Splitting Columns
There may be times when you need
split one column worth of information
into two or more columns. Using the
Text To Columns tool means that this
split doesn’t have to be a manual
process.
Before:

After:

54 of 76

83. How do you spilt columns?
•	 Identify the item that separates the columns (for instance, #)
•	 Highlight the range of cells you would like to split
•	 From the Data tab, in the Data Tools group, select Text to Columns
•	 Select Next
•	 Enter in the separator symbol (for example, #)
•	 Select Next
•	 Select Finish
100 Excel Tips  Tricks

84.  ow do you ensure the End Date is greater than the Start
H
Date in a cell?
•	 Select the range of cells for which you would like to apply Data Validation
•	 From the Data tab, in the Data Tools group, select Data Validation
•	 From the Allow drop-down box, select Date
•	 From the Data drop-down box, select Greater Than
•	 From the Start Date box, enter in the cell where the first Start Date appears
•	 Select OK
•	 You can now enter in the dates, and if you happen to enter in a date less than the

start date, you will get an error

85. How do you Circle Invalid Data?
•	 Apply the necessary Data Validation
•	 From the Data tab, in the Data Tools group, select the drop-down arrow

from Data Validation
•	 Select Circle Invalid Data

The Data Tab
Using Data Validation to
Ensure the End Date is
Greater Than the Start Date
Making sure that the data users enter
into a worksheet conforms to certain
standards is difficult if you have no
way of enforcing the rule. With Data
Validation, you can:
•	 Provide users with a drop-down

list of choices (so they can’t input
data incorrectly).
•	 Restrict entries to a specific type

or size.
Example
In the below example, you would
like to ensure that the End Date
is always greater than the Start
Date. To ensure this, you apply Data
Validation to ensure that the Date in
cell B2 must be greater than the Date
in cell A2.

Circling Invalid Data
If you have a set of data and wish to
highlight data that is invalid, you can
use the Circle Invalid Data option.
This is usually used with data that
has already been entered.
This is a two stage process:
•	 Apply data validation
•	 Circle invalid data

If you are planning to protect the
worksheet or workbook, protect it
after you have finished setting up
validation. Make sure you unlock any
validated cells before protecting the
worksheet; otherwise, users won’t be
able to type in the cells.

55 of 76
100 Excel Tips  Tricks

The Review Tab
Protecting Worksheets
By protecting your worksheet, you
can prevent users from accidentally
or deliberately changing, moving, or
deleting important information on the
worksheet.
If you deselect Select Locked Cells,
when the worksheet is protected,
the user can only select the cells that
were unlocked.

86. Is there is quick way to Protect and Unprotect worksheets?
•	 Right-click on the Sheet tab and select Protect Sheet
•	 Select the desired options under Allow all users of this worksheet to
•	 Once you have protected the worksheet, the Protect Sheet icon changes to

Unprotect Sheet
•	 Select this icon to unprotect the worksheet

87. How do you Unlock Cells?
•	 Select the cells, columns, or rows that can be edited
•	 On the Home tab, in the Cells group, select Format
•	 Note that the Lock Cell icon is highlighted orange, by default, indicating that the cell will

be locked when the worksheet protection is activated
OR
•	 You can also check the locked status by selecting Format Cells
•	 Select the heading tab Protection
•	 If there is NO tick in the Locked box, it means the cell is NOT locked
•	 Select OK

Being Able to Edit Certain
Cells on a Protected
Worksheet
The cells that you unlock are the cells
that can be edited.

56 of 76
100 Excel Tips  Tricks

88. How do you Hide Formulae on a protected worksheet?
•	 Hide the formulae:
•	 Select the cell/s that need to have formula hidden
•	 Right-click on the selected cells
•	 Select the heading tab Protection
•	 Select the check box Hidden
•	 Select OK
•	 Protect the worksheet:

The Data Tab
Hide Formula on a Protected
Worksheet
By selecting Hidden in the
Protection dialogue box, you are
able to hide any formula used when
you protect the worksheet.

•	 Select Protect Sheet

This is assuming that when you are
protecting your worksheet, you have
allowed for Select Locked Cells.

•	 Enter in a password if necessary

Before:

•	 Right-click on the desired worksheet tab

•	 Select OK
•	 Now when selecting the cells with formulae, the formulae will not show in the formula bar

89. How do you Protect the Workbook and allow Read Only
Access?

After:

•	 Ensure the workbook that is being password protected is open
•	 Select the Office Button
•	 Select Save As
•	 From the bottom left of the Save As dialog box select Tools, General Options
•	 From the Save Options dialog box, in the Password to modify box, enter in the

desired password
•	 The password will appear as stars (****)
•	 You will be asked to enter in the password twice to verify the password
•	 Select OK
•	 Select Save
•	 The next time the file is opened, you will be asked for a password
•	 If the user does not have the password, they can select Read Only

Password Protection and
Read Only Access
You would like to password protect
a workbook but still allow people
to open it as read only. Using the
Password To Modify option makes
this happen.

57 of 76
100 Excel Tips  Tricks

Did You Know?
•	 Using Excel shortcuts can

increase your overall efficiency by
saving you time, hence saving you
money
•	 By applying a keyboard shortcut

to a macro, you can add your
keyboard shortcut combinations.
•	 There have been a number of

hidden “features” in versions
of Excel over the years. These
features, known as easter eggs,
can be found in types of software
such as computer games or on
DVDs. Various Excel easter eggs
have included:
•	 A maze very similar to the

computer game “Doom”
(Excel 95)

Top Reasons to Use Microsoft Excel 2007
Here are the top ten ways in which Microsoft Excel 2007 can help you create spreadsheets
and analyze, share, and manage information more effectively.

1. Create and work with interactive PivotTable views with ease.
PivotTable views enable you to quickly reorient your data to help you answer multiple
questions. Find the answers you need faster and create and use PivotTable views more
easily by dragging fields where you want them to be displayed.

2. mport, organize, and explore massive data sets within significantly
I
expanded spreadsheets.
Work with massive amounts of data in Microsoft Excel 2007, which supports
spreadsheets that can be up to one million rows by 16,000 columns. In addition to the
bigger grid, Microsoft Excel 2007 supports multicore processor platforms for faster
calculation of formula-intense spreadsheets

3. “See” important trends and find exceptions in your data.
Apply conditional formatting to your information more easily to discover patterns and
highlight trends in your data. New schemes include color gradients, heat maps, data bars,
and performance indicator icons.

•	 An auto racing game (Excel 2000)
•	 A flight simulator (Excel 97)

4.  icrosoft Excel 2007 features the Microsoft Office Fluent user interface
M
to help you find powerful tools when you need them.
Find the tools you want when you need them using the results-oriented Office Fluent
user interface in Microsoft Excel 2007. Based on the job you need to accomplish,
whether it’s creating a table or writing a formula, Microsoft Excel 2007 presents the
appropriate commands when you need them.

5. Enjoy improved and powerful support for working with tables.
Create, format, expand, filter, and refer to tables within formulas because Microsoft Excel
2007 has greatly improved support for tables. When you’re viewing data contained in a large
table, Microsoft Excel 2007 keeps table headings in view while you scroll.

58 of 76
100 Excel Tips  Tricks

Top Reasons to Use Microsoft Excel 2007
6.  se the completely redesigned charting engine in Microsoft Excel 2007
U
to communicate your analysis in professional-looking charts.
Build professional-looking charts more quickly with fewer clicks using charting tools in
the Office Fluent user interface. Apply rich visual enhancements to your charts such
as 3-D effects, soft shadowing, and transparency. Create and interact with charts the
same way across all Microsoft Office applications in the same way because the charting
engine is the same in all.

Did You Know?
ALT + Click = “Research”
The Research tool is an easy way to
find more information regarding the
contents of a cell.
For example, type in YHOO in cell
A1. Select the cell holding down
the ALT key. This brings up the
“Research” window, which allows
you to, among other things, search
the word through various language
dictionaries, check the current stock
price (if a valid stock code), and
more. For stock quotes, you can
even insert the current stock price
into the spreadsheet.

7.  se Microsoft Excel 2007 and Excel Services to help share spreadsheets
U
more securely with others.
Excel Services, a feature of Microsoft Office SharePoint Server 2007, dynamically
renders a spreadsheet as HTML so others can access the information using a web
browser. Because of the high degree of fidelity with the Microsoft Excel 2007 client,
Excel Services users can navigate, sort, filter, input parameters, and interact with the
information, all within their web browser.

8.  elp ensure you and your organization work with the most current
H
business information.
Prevent the spread of multiple or outdated copies of a spreadsheet throughout your
organization by using Micosoft Excel 2007 and Office SharePoint Server 2007. Control
which users can view and modify spreadsheets on the server using permission-based
access.

9.  educe the size of spreadsheets and improve damaged file recovery
R
at the same time.
The new, compressed Microsoft Office Excel XML Format offers a dramatic reduction in
file size, while its architecture offers an improvement in data recovery for damaged files.

10.  xtend your business intelligence investments because Office Excel 2007
E
provides full support for Microsoft SQL Server® 2005 Analysis Services.
New cube functions in Microsoft Excel 2007 let you build a custom report from an
OLAP database. You can also connect to external sources of data more easily using the
Data Connection Library.

59 of 76
100 Excel Tips  Tricks

The View Tab

90. How do you record a new Macro?
•	 On the Status bar select the Record Macro button

Recording Macros
A shortcut to recording a macro is
located on the status bar on the
bottom of the Microsoft Excel screen.
Record

•	 From the Macro Name box, enter the desired Name
•	 From the Store Macro In box, select the desired Option

91. How do you activate the Developer Tab?
•	 Select the Office Button

While you are recording a macro, the
Record Macro button changes to a
Stop Recording button.
Stop Recording

Macro names cannot contain spaces.

Saving Workbook With a Macro
You need to ensure that when you
have created a Macro and stored
it in this workbook, you save the
Workbook in a *.xlsm format.

•	 Select Excel Options
•	 Select Show Developer tab in the Ribbon

92. How do you save a Workbook in *.xlsm format?
•	 Select the Office Button
•	 Select Save As
•	 Select Excel Macro-Enabled Workbook

93. How do you change the Security Levels for Macros?
•	 Select the Office Button

Select the Excel Options button

Developer Tab

•	 On the left side of the dialogue box, select Trust Center

You first need to make sure your
Developer tab is activated in order to
get into Visual Basic.

•	 On the right side, select the Trust Center Settings button
•	 On the left side, select Macro Settings
•	 Select Disable all macros with Notification
•	 Select OK, OK

Macro Security Levels
When using macros in Microsoft
Excel 2007, ensure that the
appropriate security level, has been
selected. To access the security levels
you need to use the Trust Center.

60 of 76
100 Excel Tips  Tricks

94.  ow do you create a Macro that sorts worksheets
H
in alphabetical order?
•	 Select the Office button
•	 Select Excel Options
•	 Select Show Developer tab in the Ribbon (if not already on)
•	 From the Developer tab in the Code group, select Visual Basic
•	 Select the Module you would like to insert the coding into
•	 On the right-hand side paste the Visual Basic coding

The View Tab
Sorting Worksheets in
Alphabetical Order
With the following Visual Basic
macro, called SortSheets, added to
your workbook, you can order the
worksheets alphabetically quickly
and easily.

•	 From the Menu bar, select File, Close and Return to Microsoft Excel

Visual Basic Coding:

•	 Press Alt + F8 to get a list of Macros

Sub SortSheets()
Dim sCount As Integer, K As Integer,
L As Integer
Application.ScreenUpdating = False
sCount = Worksheets.Count
If sCount = 1 Then Exit Sub
For K = 1 To sCount - 1
For L = K + 1 To sCount
If Worksheets(L).Name 
Worksheets(K).Name Then
Worksheets(L).Move
Before:=Worksheets(K)
End If
Next L
Next K
End Sub

•	 Select SortSheets
•	 Select Run

95.  ow do you create a Macro that opens a worksheet
H
on a specific worksheet?
•	 Open Microsoft Excel
•	 Press Alt + F11
•	 This opens the Visual Basic Editor
•	 On the far left, under Microsoft Excel Object, select ThisWorkbook
•	 On the right-hand side, paste the coding in the sidebar
•	 In the second line of the coding, change Sheet1, to the sheet name (tab) you wish

to land on
•	 In the third line of the coding, change A1 to the cell you wish to land on
•	 From the Menu bar, select File, Close and Return to Microsoft Excel
•	 Save and close the Microsoft Excel workbook
•	 Ensure you save the Microsoft Excel 2007 workbook as a *.xlsm
•	 The next time you open the workbook, it will open on the specific worksheet and cell

Opening a Workbook on a
Specific Worksheet
The following code allows you to
specify which worksheet, even which
cell, you would like to appear when
the workbook opens.
Visual Basic Coding:
Private Sub Workbook_Open()
Sheets(“Sheet1”).Select
Range(“a1”).Select
End Sub

61 of 76
100 Excel Tips  Tricks

The View Tab
Copy and Save a Worksheet
Into a New File Automatically

96.  ow do you create a Macro that copies and saves
H
a worksheet into a new worksheet automatically?
•	 Ensure you are in Microsoft Excel

By using the following code, you
can automatically copy the current
worksheet to a new workbook, then
automatically save the workbook using
the contents of a cell as the file name.

•	 Press ALT + F11 to open the Visual Basic Editor

Note:

•	 From the Menu bar, select File, Close and Return to Microsoft Excel

•	 The below Macro is written to take

•	 Enter in the necessary data into cell A1

the data from cell A1 and use it as
the file name
•	 The below Macro is written to

automatically save the workbook
in C:My Documents
•	 If you do not have this directory,

the Macro will give an error
Visual Basic Coding:
Public Sub SaveWorksheet()
ActiveSheet.Copy ‘ Copies active
sheet to a new workbook
ActiveWorkbook.SaveAs “C:My
Documents”  Range(“A1”).Value
End Sub

62 of 76

•	 If necessary, Insert a Module
•	 From the VBAProject (Personal.xlsb), select the Module folder
•	 From the Menu, select Insert, Module
•	 On the right-hand side, paste the above coding

•	 Run the Macro
100 Excel Tips  Tricks

97.  ow do you create a Macro that removes embedded
H
hyperlinks?
•	 Ensure you are on the worksheet you would like to remove the hyperlinks from
•	 Press ALT + F11 to open the Visual Basic Editor
•	 From the Menu bar, select Insert Module
•	 Copy and paste the coding in the sidebar into the Window on the right
•	 From the Menu bar, select File, Close and Return to Microsoft Excel
•	 Press ALT + F8 to view a list of Macros

The View Tab
Removing Embedded
Hyperlinks With Visual Basic
Sometimes a copy and paste of
Internet-based materials can also
bring across embedded hyperlinks.
The following code removes all
hyperlinks from the worksheet.

•	 Select the Macro, RemoveHyperlinks

Visual Basic Coding:

•	 Select Run

Sub RemoveHyperlinks()
‘Remove all hyperlinks from the active
sheet
ActiveSheet.Hyperlinks.Delete
End Sub

63 of 76
100 Excel Tips  Tricks

The View Tab
Using Group and Outline
on Protected Worksheets

98.  ow do you create a macro that allows you to use group
H
and outline on protected worksheets?
•	 Open the desired workbook

The Group and Outline tool is a
fantastic utility; however, you cannot,
by default, apply grouping to protected
worksheets. The following code helps
you get around this.

•	 Press Alt + F11 to open the Visual Basic Editor window

Note: If you would like to apply the
Visual Basic coding, simply copy the
coding highlighted in blue and adjust
the worksheet name.

•	 Select the Module 1 and on the right-hand side, paste the below coding

You are going to add some simple
VISUAL BASIC coding into the
workbook. This code has the
password “hi” built in, so it is
automatically protected. You can
change the password in the below
script if you wish. When the user
opens the workbook, they will need to
select, “Enable Macros.”
For this example the workbook name
is Report, and the worksheet name is
January.
Visual Basic Coding:
Option Explicit
Sub auto_open()
With Worksheets(“January”)
.Protect Password:=”hi”,
userinterfaceonly:=True
.EnableOutlining = True
‘.EnableAutoFilter = True
End With
End Sub

64 of 76

•	 On the left you should see your Project (with your file name for example

VBAProjectReport)
•	 Right-click on the Project and select Insert, Module
•	 A folder called modules should appear with a Module underneath
•	 Remember to change the worksheet name and password
•	 Close the Microsoft Visual Basic window (File, Close and Return to Microsoft Excel)
•	 Close the workbook and reopen
•	 You should be asked to Enable Macros
•	 Your workbook should still be protected, but you should be able to use your grouping
100 Excel Tips  Tricks

99. How do you assign a Macro to the Quick Access Toolbar?
•	 Right-click over the Quick Access Toolbar
•	 Select Customize Quick Access Toolbar
•	 In the Choose commands from drop-down box select Macros
•	 Select the macro you want to add
•	 Select Add
•	 To modify the Macro icon, select it in the right-hand window and then select Modify

The View Tab
Assigning a Macro to the
Quick Access Toolbar
Once you have recorded a Macro,
you can assign it to the Quick Access
Toolbar. This makes running the Macro
much easier and more accessible.

•	 Select the new icon and rename the macro
•	 Select OK

There are a number of buttons to
choose from when allocating the
Macro to a button.

65 of 76
100 Excel Tips  Tricks

Using Programs outside
of Microsoft Excel

100.  ow do you link a Microsoft Excel worksheet to
H
Microsoft PowerPoint?

PowerPoint to Microsoft Excel

•	 In Microsoft Excel, select the desired cell/cells

A Microsoft PowerPoint
presentation can be linked to a
Microsoft Excel worksheet by using
the Paste Link option.

•	 Right-click on the selected cell/cells

You don’t need to have both Microsoft
PowerPoint and Microsoft Excel open
for it to update. If you make changes
to the Microsoft Excel workbook,
when you open PowerPoint, you will
be asked to Update Links.

•	 From the Home tab, in the Clipboard group, select the drop-down arrow under Paste

•	 Select Copy
•	 In Microsoft PowerPoint, create a new slide
•	 In Microsoft PowerPoint 2007:
•	 Select Paste Special
•	 Select Paste Link
•	 In the As box, select Microsoft Office Excel 2003 Worksheet Object
•	 Select OK
•	 You can resize the object as desired

Although the title of this book indicates only 100 tips and tricks, at Alchemex we always like
to exceed expectations, so we threw in tip 101 below for good measure as well. We hope
you have benefited from these tips and you have become more efficient in using Excel 2007.

101.  ow do you link a Microsoft Excel worksheet
H
to Microsoft Word?
•	 From Microsoft Excel, select the range to be copied to Microsoft Word
•	 Right-click on the selected range, select Copy
•	 Open the desired document in Microsoft Word
•	 Right-click on the desired area, select Paste

Copying Microsoft Excel Data
to Microsoft Word

•	 From the bottom right of the Pasted object, select the Clipboard icon

You may find at times when working
in Microsoft Word you need to refer
to a part of a worksheet in Microsoft
Excel. It is possible to simply copy
and paste between the two programs,
but even more interesting is that you
can ensure there is a link back to the
Microsoft Excel worksheet in the case
of any changes.

•	 If you now make changes to the Microsoft Excel worksheet, the object in

66 of 76

•	 Select Keep Source Formatting and Link to Excel

Microsoft Word updates
100 Excel Tips  Tricks

GLOSSARY
A
activate
To make a chart sheet or worksheet the
active, or selected, sheet. The sheet that
you activate determines which tabs are
displayed. To activate a sheet, click the tab
for the sheet in the workbook.
active cell
The selected cell in which data is entered
when you begin typing. Only one cell is
active at a time. The active cell is bounded
by a heavy border.
active sheet
The sheet that you’re working on in a
workbook. The name on the tab of the active
sheet is bold.
address
The path to an object, document, file, page,
or other destination. An address can be a
URL (web address) or a UNC path (network
address), and can include a specific location
within a file, such as a Word bookmark or an
Excel cell range.
alternate startup folder
A folder in addition to the XLStart folder that
contains workbooks or other files that you
want to be opened automatically when you
start Excel and templates that you want to be
available when you create new workbooks.
argument
The values that a function uses to perform
operations or calculations. The type of
argument a function uses is specific to the
function. Common arguments that are used
within functions include numbers, text, cell
references, and names.
array
Used to build single formulas that produce
multiple results or that operate on a group
of arguments that are arranged in rows and
columns. An array range shares a common
formula; an array constant is a group of
constants used as an argument.

array formula
A formula that performs multiple calculations
on one or more sets of values, and then
returns either a single result or multiple
results. Array formulas are enclosed
between braces { } and are entered by
pressing CTRL+SHIFT+ENTER.
associated PivotTable report
The PivotTable report that supplies the
source data to the PivotChart report. It is
created automatically when you create a new
PivotChart report. When you change the
layout of either report, the other also changes.
autoformat
A built-in collection of cell formats (such as
font size, patterns, and alignment) that you can
apply to a range of data. Excel determines the
levels of summary and detail in the selected
range and applies the formats accordingly.
axis
A line bordering the chart plot area used
as a frame of reference for measurement.
The y-axis is usually the vertical axis and
contains data. The x-axis is usually the
horizontal axis and contains categories.
B
border
A decorative line that can be applied to
worksheet cells or objects, such as charts,
pictures, or text boxes. Borders distinguish,
emphasize, or group items.
C
calculated column
In an Excel table, a calculated column uses
a single formula that adjusts for each row. It
automatically expands to include additional
rows so that the formula is immediately
extended to those rows.
calculated field (database)
A field in the result set of a query that
displays the result of an expression rather
than data from a database. calculated field
(PivotTable report) A field in a PivotTable

report or PivotChart report that uses a
formula you create. Calculated fields can
perform calculations by using the contents
of other fields in the PivotTable report or
PivotChart report.
calculated item
An item within a PivotTable field or
PivotChart field that uses a formula you
create. Calculated items can perform
calculations by using the contents of other
items within the same field of the PivotTable
report or PivotChart report.
category axis
A chart axis that represents the category
for each data point. It displays arbitrary text
values like Qtr1, Qtr2, and Qtr3; it cannot
display scaled numerical values. category
field A field that’s displayed in the category
area of the PivotChart report. Items in a
category field appear as the labels on the
category axis.
cell
A box formed by the intersection of a row
and column in a worksheet or a table, in
which you enter information.
cell reference
The set of coordinates that a cell occupies
on a worksheet. For example, the reference
of the cell that appears at the intersection of
column B and row 3 is B3.
chart area
The entire chart and all its elements.
chart sheet
A sheet in a workbook that contains only
a chart. A chart sheet is beneficial when
you want to view a chart or a PivotChart
report separately from worksheet data or
a PivotTable report.
column field
A field that’s assigned a column orientation in
a PivotTable report. Items associated with a
column field are displayed as column labels.

67 of 76
100 Excel Tips  Tricks

column heading
The shaded area at the top of each Data
pane column that contains the field name.
column heading
The lettered or numbered gray area at the top
of each column. Click the column heading
to select an entire column. To increase or
decrease the width of a column, drag the line
to the right of the column heading.
comparison operator
A sign that is used in comparison criteria to
compare two values. The six standards are
= Equal to,  Greater than,  Less than, =
Greater than or equal to, = Less than or
equal to, and  Not equal to.
conditional format
A format, such as cell shading or font color,
that Excel automatically applies to cells if a
specified condition is true.

custom calculation
A method of summarizing values in the data
area of a PivotTable report by using the values
in other cells in the data area. Use the Show
data as list on the PivotTable Field dialog for a
data field to create custom calculations.
D
data region
A range of cells that contains data and that is
bounded by empty cells or datasheet borders.
data series
Related data points that are plotted in a
chart and originate from datasheet rows or
columns. Each data series in a chart has a
unique color or pattern. You can plot one or
more data series in a chart. Pie charts have
only one data series.

constant
A value that is not calculated. For example, the
number 210 and the text “Quarterly Earnings”
are constants. An expression, or a value
resulting from an expression, is not a constant.

data source
A stored set of “source” information used
to connect to a database. A data source
can include the name and location of the
database server, the name of the database
driver, and information that the database
needs when you log on.

copy area
The cells that you copy when you want to
paste data into another location. After you
copy cells, a moving border appears around
them to indicate that they’ve been copied.

data source driver
A program file used to connect to a specific
database. Each database program or
management system requires a different driver.

criteria
Conditions you specify to limit which records
are included in the result set of a query.
For example, the following criterion selects
records for which the value for the Order
Amount field is greater than 30,000: Order
Amount  30000.
criteria pane
The area of the window that displays the
criteria used to limit the records included in
the result set of your query.
current region
The block of filled-in cells that includes the
currently selected cell or cells. The region
extends in all directions to the first empty row
or column.
68 of 76

data table
A range of cells that shows the results of
substituting different values in one or more
formulas. There are two types of data tables:
one-input tables and two-input tables.
data validation
An Excel feature that you can use to define
restrictions on what data can or should be
entered in a cell, and to display messages
that prompt users for correct entries and
notify users about incorrect entries.
database
A collection of data related to a particular
subject or purpose. Within a database,
information about a particular entity, such
as an employee or order, is categorized into
tables, records, and fields.

default startup workbook
The new, unsaved workbook that’s displayed
when you start Excel. The default startup
workbook is displayed only if you haven’t
included other workbooks in the XLStart folder.
default workbook template
The Book.xlt template that you create to
change the default format of new workbooks.
Excel uses the template to create a blank
workbook when you start Excel or create a
new workbook without specifying a template.
dependents
Cells that contain formulas that refer to other
cells. For example, if cell D10 contains the
formula =B5, cell D10 is a dependent of cell B5.
destination area
The range of cells that you select to hold
the summarized data in a consolidation.
The destination area can be on the same
worksheet as the source data or on a
different worksheet. A worksheet can contain
only one consolidation.
drop-down list box
A control on a menu, toolbar, or dialog box
that displays a list of options when you click
the small arrow next to the list box.
value field
A field from a source list, table, or database
that contains data that is summarized in a
PivotTable report or PivotChart report. A
value field usually contains numeric data,
such as statistics or sales amounts.
E
embedded chart
A chart that is placed on a worksheet rather
than on a separate chart sheet. Embedded
charts are beneficial when you want to view
or print a chart or a PivotChart report with
its source data or other information in a
worksheet.
Excel add-in
Components that can be installed on your
computer to add commands and functions
to Excel. These add-in programs are specific
to Excel. Other add-in programs that are
100 Excel Tips  Tricks

available for Excel or Office are Component
Object Model (COM) add-ins.
Excel table
Formerly known as an Excel list, you can
create, format, and expand an Excel table to
organize the data on your worksheet.
expression
A combination of operators, field names,
functions, literals, and constants that
evaluates to a single value. Expressions
can specify criteria (such as Order
Amount10000) or perform calculations on
field values (such as Price*Quantity).
external data
Data that is stored in a database, such
as Access, dBASE, or SQL Server, that is
separate from Query and the program from
which you started Query.
external data range
A range of data that is brought into a
worksheet but that originates outside of
Excel, such as in a database or text file. In
Excel, you can format the data or use it in
calculations as you would any other data.
F
field (database)
A category of information, such as last name
or order amount, that is stored in a table.
When Query displays a result set in its Data
pane, a field is represented as a column.
field (PivotTable report)
In a PivotTable or PivotChart report, a
category of data that’s derived from a field in
the source data. PivotTable reports have row,
column, page, and data fields. PivotChart
reports have series, category, page, and data
fields.
fill handle
The small black square in the lowerright corner
of the selection. When you point to the fill
handle, the pointer changes to a black cross.
filter
To display only the rows in a list that
satisfy the conditions you specify. You use

the AutoFilter command to display rows
that match one or more specific values,
calculated values, or conditions.
font
A graphic design applied to all numerals,
symbols, and alphabetic characters. Also
called type or typeface. Arial and Courier
New are examples of fonts. Fonts usually
come in different sizes, such as 10 point, and
various styles, such as bold.
formula
A sequence of values, cell references,
names, functions, or operators in a cell that
together produce a new value. A formula
always begins with an equal sign (=).
formula bar
A bar at the top of the Excel window that
you use to enter or edit values or formulas in
cells or charts. Displays the constant value or
formula stored in the active cell.
Formula Palette
A tool that helps you create or edit a
formula and also provides information about
functions and their arguments.
function (Office Excel)
A prewritten formula that takes a value or
values, performs an operation, and returns a
value or values. Use functions to simplify and
shorten formulas on a worksheet, especially
those that perform lengthy or complex
calculations.
G
grid
A set of intersecting lines used to align objects.
gridlines in charts
Lines you can add to a chart that make it
easier to view and evaluate data. Gridlines
extend from the tick marks on an axis across
the plot area.
group
In an outline or PivotTable report, one
or more detail rows or columns that are
adjacent and subordinate to a summary row
or column.

I
index
A database component that speeds up
searching for data. When a table has an
index, data in the table can be found by
looking it up in the index.
input cell
The cell in which each input value from
a data table is substituted. Any cell on a
worksheet can be the input cell. Although
the input cell does not need to be part of the
data table, the formulas in data tables must
refer to the input cell.
Insert row
In an Excel table, a special row that facilitates
data entry. The Insert row is indicated by an
asterisk.
Internet Explorer
A web browser that interprets HTML files,
formats them into web pages, and displays
them to the user. You can download Internet
Explorer from the Microsoft website at:
http://www.microsoft.com.
item
A subcategory of a field in PivotTable and
PivotChart reports. For instance, the field
“Month” could have items such as “January,”
“February,” and so on.
J
justify
To adjust horizontal spacing so that text is
aligned evenly along both the left and right
margins. Justifying text creates a smooth
edge on both sides.
L
legend
A box that identifies the patterns or colors
that are assigned to the data series or
categories in a chart.

69 of 76
100 Excel Tips  Tricks

legend keys
Symbols in legends that show the patterns
and colors assigned to the data series (or
categories) in a chart. Legend keys appear to
the left of legend entries. Formatting a legend
key also formats the data marker that’s
associated with it.
M
merged cell
A single cell that is created by combining two
or more selected cells. The cell reference
for a merged cell is the upper-left cell in the
original selected range.
moving border
An animated border that appears around a
worksheet range that has been cut or copied.
To cancel a moving border, press ESC.
N

outline
Worksheet data in which rows or columns
of detail data are grouped so that you can
create summary reports. The outline can
summarize either an entire worksheet or a
selected portion of it.
outline symbols
Symbols that you use to change the view
of an outlined worksheet. You can show or
hide detailed data by pressing the plus sign,
minus sign, and the numbers 1, 2, 3, or 4,
indicating the outline level.
P
page break
Divider that breaks a worksheet into separate
pages for printing. Excel inserts automatic
page breaks based on the paper size, margin
settings, scaling options, and the positions of
any manual page breaks that you insert.

name
A word or string of characters that represents
a cell, range of cells, formula, or constant
value. Use easy-to-understand names, such
as Products, to refer to hard-to-understand
ranges, such as Sales!C20:C30.

page break preview
Worksheet view that displays the areas to
be printed and the locations of page breaks.
The area to be printed is displayed in white,
automatic page breaks appear as dashed
lines, and manual page breaks appear as
solid lines.

Name box
Box at left end of the formula bar that
identifies the selected cell, chart item, or
drawing object. To name a cell or range,
type the name in the Name box and press
ENTER. To move to and select a named cell,
click its name in the Name box.

parameter
In Excel, you can add, change, or remove
parameters to specify cells that are editable in
the viewable worksheet data of Excel Services.
When you save the workbook, the changes are
automatically reflected on the server.

nonadjacent selection
A selection of two or more cells or ranges
that don’t touch each other. When plotting
nonadjacent selections in a chart, make
sure that the combined selections form a
rectangular shape.
O
operator
A sign or symbol that specifies the type of
calculation to perform within an expression.
There are mathematical, comparison, logical,
and reference operators.
70 of 76

password
A way to protect your worksheet or
workbook. When you protect worksheet
or workbook elements with a password, it
is very important that you remember that
password. Without it, there is no way to
unprotect the workbook or worksheet. You
should always use strong passwords that
combine uppercase and lowercase letters,
numbers, and symbols. Weak passwords
don’t mix these elements. Strong password:
Y6dh!et5. Weak password: House27. Use a
strong password that you can remember so
that you don’t have to write it down.

paste area
The target destination for data that’s been
cut or copied by using the Office Clipboard.
pivot area
The worksheet area into which you drag
PivotTable or PivotChart fields to change
the layout of the report. On a new report,
dashed blue outlines indicate the pivot area
on the worksheet.
PivotChart category field
A field that is assigned a category orientation
in a PivotChart report. In a chart, categories
usually appear on the x-axis, or horizontal
axis, of the chart.
PivotChart report
A chart that provides interactive analysis
of data, like a PivotTable report. You can
change views of data, see different levels
of detail, or reorganize the chart layout by
dragging fields and by showing or hiding
items in fields.
PivotChart series field
A field that is assigned a series orientation
in a PivotChart report. In a chart, series are
represented in the legend.
PivotTable data
In a PivotTable report, the summarized data
that’s calculated from the data fields of a
source list or table.
PivotTable grand totals
Total values for all cells in a row or all cells in
a column of a PivotTable report. Values in a
grand total row or column are calculated by
using the same summary function used in
the data area of the PivotTable report.
PivotTable list
A Microsoft Office Web Component that
allows you to create a structure similar to an
Excel PivotTable report. Users can view the
PivotTable list in a web browser and change
its layout in a manner similar to an Excel
PivotTable report.
PivotTable report
An interactive, cross-tabulated Excel report
that summarizes and analyzes data, such
100 Excel Tips  Tricks

as database records, from various sources,
including ones that are external to Excel.
PivotTable report
An interactive, cross-tabulated Excel report
that summarizes and analyzes data, such
as database records, from various sources
including ones external to Excel.
PivotTable subtotal
A row or column that uses a summary
function to display the total of detail items in
a PivotTable field.
plot area
In a 2-D chart, the area bounded by the
axes, including all data series. In a 3-D chart,
the area bounded by the axes, including
the data series, category names, tick-mark
labels, and axis titles.
precedents
Cells that are referred to by a formula in
another cell. For example, if cell D10 contains
the formula =B5, cell B5 is a precedent to
cell D10.
print area
One or more ranges of cells that you designate
to print when you don’t want to print the entire
worksheet. If a worksheet includes a print area,
only the print area is printed.
print titles
Row or column labels that are printed at the
top of or on the left side of every page on a
printed worksheet.
protect
To make settings for a worksheet or
workbook that prevent users from viewing or
gaining access to the specified worksheet or
workbook elements.
report filter
A field that’s used to filter a subset of data
in a PivotTable or PivotChart report into one
page for further layout and analysis. You
can either display a summary of all items in
a report filter, or display one item at a time,
which filters out the data for all other items.

R

S

range
Two or more cells on a sheet. The cells in a
range can be adjacent or nonadjacent.

scenario
A named set of input values that you can
substitute in a worksheet model.

read-only
A setting that allows a file to be read or
copied but not changed or saved.

scroll lock
With scroll lock turned on, the arrow keys
scroll the active sheet rather than make a
different cell active. To turn scroll lock off
or on, press the SCROLL LOCK key.

refresh (external data range)
To update data from an external data source.
Each time you refresh data, you see the
most recent version of the information in the
database, including any changes that were
made to the data.
refresh (PivotTable report)
To update the contents of a PivotTable or
PivotChart report to reflect changes to the
underlying source data. If the report is based
on external data, refreshing runs the underlying
query to retrieve new or changed data.
relative reference
In a formula, the address of a cell based on
the relative position of the cell that contains
the formula and the cell referred to. If you
copy the formula, the reference automatically
adjusts. A relative reference takes the form A1.
report template
An Excel template (.xlt file) that includes one
or more queries or PivotTable reports that
are based on external data. When you save
a report template, Excel saves the query
definition but doesn’t store the queried data
in the template.
row heading
The numbered gray area to the left of each
row. Click the row heading to select an entire
row. To increase or decrease the height of a
row, drag the line below the row heading.
row label
A field that’s assigned a row orientation in a
PivotTable report.

select
To highlight a cell or range of cells on a
worksheet. The selected cells will be affected
by the next command or action.
Select All button
The gray rectangle in the upper-left corner
of a datasheet where the row and column
headings meet. Click this button to select
all cells on a datasheet.
series axis
A chart axis that represents the depth
dimension in a true 3-D chart. It displays
the series names as arbitrary text values;
it cannot display scaled numerical values.
series field
A field that’s displayed in the series area of a
PivotChart report. Items in a series field are
listed in the legend and provide the names of
the individual data series.
series lines
In 2-D stacked bar and column charts,
lines that connect the data markers in each
data series that are used to emphasize the
difference in measurement between each
series.
sort order
A way to arrange data based on value or
data type. You can sort data alphabetically,
numerically, or by date. Sort orders use an
ascending (1 to 9, A to Z) or descending (9 to
1, Z to A) order.

71 of 76
100 Excel Tips  Tricks

source data
The list or table that’s used to create a
PivotTable or PivotChart report. Source data
can be taken from an Excel table or range,
an external database or cube, or another
PivotTable report.
summary data
For automatic subtotals and worksheet
outlines, all rows or columns that summarize
detail data. Summary data usually is adjacent
to and below the detail data.
summary function
A type of calculation that combines source data
in a PivotTable report or a consolidation table,
or when you are inserting automatic subtotals
in a list or database. Examples of summary
functions include Sum, Count, and Average.

V
values area
The part of a PivotTable report that contains
summary data. Values in each cell of the
values area represent a summary of data
from the source records or rows.
value axis
A chart axis that displays scaled numerical
values.
view
A set of display and print settings that you
can name and apply to a workbook. You
can create more than one view of the same
workbook without saving separate copies of
the workbook.
W

T
template
A workbook that you create and use as
the basis for other similar workbooks.
You can create templates for workbooks
and worksheets. The default template for
workbooks is called Book.xlt. The default
template for worksheets is called Sheet.xlt.
text box
A rectangular object on a worksheet or chart,
in which you can type text.
tick marks and tick-mark labels
Tick marks are small lines of measurement,
similar to divisions on a ruler, that intersect an
axis. Tickmark labels identify the categories,
values, or series in the chart.
titles in charts
Descriptive text that is automatically aligned
to an axis or centered at the top of a chart.
total row
A special row in an Excel table that provides
a selection of aggregate functions useful for
working with numerical data.

Web query
A query that retrieves data stored on your
intranet or the Internet.
workbook
A spreadsheet program file that you create
in Excel. A workbook contains worksheets
of rows and columns in which you can enter
and calculate data.

World Wide Web
A system for navigating the Internet or
through a collection of workbooks and other
Office documents connected by hyperlinks
and located on a network share, a company
intranet or the Internet. When you use a web
browser, the web appears as a collection of
text, pictures, sounds, and digital movies.
wrap
In text, to break a line of text automatically on
reaching a margin or object and continue the
text on a new line.
X
XML
Extensible Markup Language (XML): A
condensed form of Standard Generalized
Markup Language (SGML) that enables
developers to create customized tags that
offer flexibility in organizing and presenting
information.
3
3-D reference
A reference to a range that spans two or
more worksheets in a workbook.

worksheet
The primary document that you use in Excel
to store and work with data. Also called a
spreadsheet. A worksheet consists of cells
that are organized into columns and rows; a
worksheet is always stored in a workbook.
workspace file
A file that saves display information about
open workbooks, so that you can later
resume work with the same window sizes,
print areas, screen magnification, and display
settings. A workspace file doesn’t contain the
workbooks themselves.

Thank you to the Microsoft Corporation for the detailed Glossary of Terms
72 of 76
Sage Intelligence
Make smarter, more confident business decisions more quickly than
ever before.
A robust, integrated report designer in a familiar Excel format. Sage Intelligence powered by
Alchemex is an intelligent step forward for accounting and business professionals who are struggling
with their current reporting needs. Use the familiar interface of Microsoft Excel to access critical
business information.
	 Make insightful decisions with customizable dashboards
	 Transform data from multiple data sources into strategic decision-making intelligence
	 Quickly identify and respond to trends and abnormalities, use multidimensional analysis,
and perform “what if” scenarios that go beyond just transactional data
	 Easily manage and consolidate data from multiple companies and gain a competitive edge
to succeed in today’s fast-paced global market

Sage Intelligence powered by Alchemex is integrated into many Sage accounting software solutions.
For a complete listing of Sage products, or for further information about Sage North America, visit:
www.SageNorthAmerica.com
Sage North America is part of The Sage Group plc, a leading global supplier of business
management software and services. At Sage, we live and breathe business every day. We are
passionate about helping our customers achieve their ambitions. Our range of business software
and services is continually evolving as we innovate to answer our customers’ needs. Our solutions
support accounting, operations, customer relationship management, human resources, time
tracking, merchant services, and the specialized needs of the construction, distribution, healthcare,
manufacturing, nonprofit, and real estate industries. Sage North America employs more than 5,000
people and supports nearly 2.9 million small and medium-size business customers. The Sage
Group plc, formed in 1981, was floated on the London Stock Exchange in 1989 and now employs
14,800 people and supports 5.7 million customers worldwide.
©2011 Sage Software, Inc. All rights reserved. Sage, the Sage logos, and the Sage product and service
names mentioned herein are registered trademarks or trademarks of Sage Software, Inc., or its affiliated
11-29061/0611
entities. All other trademarks are the property of their respective owners.

Sage Intelligence 100 Microsoft Excel Tips and Tricks

  • 1.
    Sage Intelligence 100 Microsoft®Excel® Tips & Tricks For Advanced Business Reporting in Microsoft® Excel®
  • 2.
    Excel® on Steroids Worksmarter, every day! Anytime Learning courses provide indepth coverage of business reporting using formulas and functions to provide enhanced performance and productivity for better reporting and decision making! Sign up for training on your favorite Sage Intelligence product, or take your Microsoft® Excel® skills to the next level with Excel® on Steroids developed by Alchemex™. www.SageU.com
  • 3.
    Sage Intelligence 100 Microsoft®Excel Tips & Tricks For Advanced Business Reporting in Microsoft® Excel® Disclaimer Every effort has been made to trace the copyright holders where required. In the event of unintentional omissions or errors, any information that would enable the publisher to make the proper copyright arrangements would be appreciated. Alchemex (Pty) Ltd shall not be liable for any damage, loss or liability of whatsoever nature arising from the use or inability to use the services or content provided from and through this book. Alchemex (Pty) Ltd makes no representations or warranties, implied or otherwise, that, amongst others, the content contained in this book is free from errors or omissions. The book is supplied on an “as is” basis and has not been compiled or supplied to meet the user’s individual requirements. It is the sole responsibility of the user to satisfy itself that the contents available from and through this book will meet the user’s individual requirements. Neither Alchemex (Pty) Ltd nor any of its agents or representatives shall be liable for any damage, loss or liability of whatsoever nature arising from the use or inability to use this book. ©2011 Sage Software, Inc. All rights reserved. Sage, the Sage logos, and the Sage products and services names mentioned herein are registered trademarks or trademarks of Sage Software, Inc., or its affiliated entities. Excel is a registered trademark of Microsoft Corporation in the United States and/or other countries. The 100 Tips & Tricks For Advanced Business Reporting in Microsoft Excel Booklet is an independent publication by Sage Software, Inc. and is not affiliated with, nor has it been authorized, sponsored, or otherwise approved by Microsoft Corporation. All other trademarks are the property of their respective owners.
  • 4.
    Alchemex and BusinessReporting Alchemex was founded in the year 2000 with the vision of delivering a simple reporting tool to companies who experience frustrations with reporting and since inception has become the undisputed leading developer, enabler and support provider of affordable business intelligence for small to midsized organizations. Although Alchemex is a totally flexible and generic Business Intelligence solution, the success to date is attributed to focusing on rolling out solutions for the more prevalent install bases in specific regions. For nearly a decade, Alchemex has worked with and amongst business owners and financial directors of companies varying from the small to the multinational and has built intellectual property covering various well known accounting and payroll packages like Softline Pastel Partner, Softline Pastel Evolution, Sage ERP Accpac, Sage ERP MAS, Sage Simply Accounting, Sage Peachtree, Sage ERP X3, SAPB1, SYSPRO, Sage50, MYOB Accounting Plus, MYOB Premier and MYOB Exo Business, VIP Payroll, and many more. In this time Alchemex has created a powerful suite of Business Intelligence technology that is the engine that drives information into Microsoft Excel, and it is the power of Microsoft Excel as an information-gathering and -distribution application that is the common denominator that brings the innovation of Alchemex together with the increasing appetite of users of Excel to release insightful information to business users across the spectrum in an organization. Alchemex has a team of more than 40 people and a rapidly expanding network of national and international business partners who sell, consult, and train on Alchemex software and training products. Over 22,000 different companies now rely on Alchemex technology for accurate and timely reporting The fact that Microsoft Excel is the chosen delivery platform for Alchemex technology has also resulted in Alchemex becoming a leader in training “high end” Excel, and as a result of continued requests from a burgeoning client install base, Alchemex created the now popular Excel on Steroids workshops. This book shares some of the most powerful tips and tricks that Alchemex has learned from its clients with you so that you can also use Excel more powerfully for business reporting. If you are not familiar with the basics of Excel, then this book won’t work for you, but if you are one of those people who is frustrated because you are always looking for the shortcuts and want to become more efficient in Excel 2007, then this will become your constant companion at your PC. Excel gets easier to use and even more accessible with a little help from Alchemex. “We use Alchemex products extensively in our business. I believe that being able to obtain a ‘snapshot view’ of your business is critical in today’s business environment when there is just too much information floating about. Managers need to dedicate their skills to managing—not sifting through endless reports trying to make sense of heaps of information. Alchemex does this neatly and efficiently—with no fuss at all and delivers this information ‘on demand’ and through Excel. What more could you ask for?” Steven Cohen, managing director, Softline Pastel Software “Alchemex is a must for any organization serious about information—it’s simple; it’s Microsoft Excel. Possibly one of the shrewdest IT investments to date.” Wayne Lambson, financial director, Foreshore Ships Agency “Successful Alchemex BI implementations are changing the way information is generated and used within their clients’ organisations. This has a direct impact on the organization’s increased effectiveness and efficiency.” David Ives, director, developer platform lead, Microsoft South Africa 4 of 76
  • 5.
    100 Excel Tips& Tricks CONTENTS The Excel 2007 Interface. . . . . . . . . . . . . . . . . . . . . . . . . . . . . . . . . . . . . . . . . . . . . . . . . . . . . . . . . . . . . . . . . . . . . . . . . . . . . . 7 The Office Button. . . . . . . . . . . . . . . . . . . . . . . . . . . . . . . . . . . . . . . . . . . . . . . . . . . . . . . . . . . . . . . . . . . . . . . . . . . . . . . . . . . . . . . . . . . . . . . . . . . . . . . . . . . . 7 The Quick Access Toolbar. . . . . . . . . . . . . . . . . . . . . . . . . . . . . . . . . . . . . . . . . . . . . . . . . . . . . . . . . . . . . . . . . . . . . . . . . . . . . . . . . . . . . . . . . . . . . . . . . . . . . 7 Worksheet Navigation Made Easy. . . . . . . . . . . . . . . . . . . . . . . . . . . . . . . . . . . . . . . . . . . . . . . . . . . . . . . . . . . . . . . . . . . . . . . . . . . . . . . . . . . . . . . . . . . . . . . 8 Range Selection Made Easy. . . . . . . . . . . . . . . . . . . . . . . . . . . . . . . . . . . . . . . . . . . . . . . . . . . . . . . . . . . . . . . . . . . . . . . . . . . . 8 The Home Tab. . . . . . . . . . . . . . . . . . . . . . . . . . . . . . . . . . . . . . . . . . . . . . . . . . . . . . . . . . . . . . . . . . . . . . . . . . . . . . . . . . . . . . . 9 Font Themes . . . . . . . . . . . . . . . . . . . . . . . . . . . . . . . . . . . . . . . . . . . . . . . . . . . . . . . . . . . . . . . . . . . . . . . . . . . . . . . . . . . . . . . . . . . . . . . . . . . . . . . . . . . . . . . 9 Wrap Text. . . . . . . . . . . . . . . . . . . . . . . . . . . . . . . . . . . . . . . . . . . . . . . . . . . . . . . . . . . . . . . . . . . . . . . . . . . . . . . . . . . . . . . . . . . . . . . . . . . . . . . . . . . . . . . . . . 9 Copying Formatting. . . . . . . . . . . . . . . . . . . . . . . . . . . . . . . . . . . . . . . . . . . . . . . . . . . . . . . . . . . . . . . . . . . . . . . . . . . . . . . . . . . . . . . . . . . . . . . . . . . . . . . . . . 9 Insert Date Shortcut. . . . . . . . . . . . . . . . . . . . . . . . . . . . . . . . . . . . . . . . . . . . . . . . . . . . . . . . . . . . . . . . . . . . . . . . . . . . . . . . . . . . . . . . . . . . . . . . . . . . . . . . . . 9 Pasting Paragraphs of Text Into a Single Cell. . . . . . . . . . . . . . . . . . . . . . . . . . . . . . . . . . . . . . . . . . . . . . . . . . . . . . . . . . . . . . . . . . . . . . . . . . . . . . . . . . . . . 10 Converting Negative Values to Positive Values. . . . . . . . . . . . . . . . . . . . . . . . . . . . . . . . . . . . . . . . . . . . . . . . . . . . . . . . . . . . . . . . . . . . . . . . . . . . . . . . . . . . 10 Viewing Parts of Several Worksheets on One Worksheet. . . . . . . . . . . . . . . . . . . . . . . . . . . . . . . . . . . . . . . . . . . . . . . . . . . . . . . . . . . . . . . . . . . . . . . . . . . . 11 Keeping 00 in Front of Values . . . . . . . . . . . . . . . . . . . . . . . . . . . . . . . . . . . . . . . . . . . . . . . . . . . . . . . . . . . . . . . . . . . . . . . . . . . . . . . . . . . . . . . . . . . . . . . . . 12 Displaying Values That Are In Millions as Thousands. . . . . . . . . . . . . . . . . . . . . . . . . . . . . . . . . . . . . . . . . . . . . . . . . . . . . . . . . . . . . . . . . . . . . . . . . . . . . . . 13 AutoSum Button . . . . . . . . . . . . . . . . . . . . . . . . . . . . . . . . . . . . . . . . . . . . . . . . . . . . . . . . . . . . . . . . . . . . . . . . . . . . . . . . . . . . . . . . . . . . . . . . . . . . . . . . . . . 14 Fill Series. . . . . . . . . . . . . . . . . . . . . . . . . . . . . . . . . . . . . . . . . . . . . . . . . . . . . . . . . . . . . . . . . . . . . . . . . . . . . . . . . . . . . . . . . . . . . . . . . . . . . . . . . . . . . . . . . 14 Break Text Into Different Rows. . . . . . . . . . . . . . . . . . . . . . . . . . . . . . . . . . . . . . . . . . . . . . . . . . . . . . . . . . . . . . . . . . . . . . . . . . . . . . . . . . . . . . . . . . . . . . . . 15 Clear All From Cell/Cells . . . . . . . . . . . . . . . . . . . . . . . . . . . . . . . . . . . . . . . . . . . . . . . . . . . . . . . . . . . . . . . . . . . . . . . . . . . . . . . . . . . . . . . . . . . . . . . . . . . . . 15 Sorting Data. . . . . . . . . . . . . . . . . . . . . . . . . . . . . . . . . . . . . . . . . . . . . . . . . . . . . . . . . . . . . . . . . . . . . . . . . . . . . . . . . . . . . . . . . . . . . . . . . . . . . . . . . . . . . . . 16 Multilevel Sorting. . . . . . . . . . . . . . . . . . . . . . . . . . . . . . . . . . . . . . . . . . . . . . . . . . . . . . . . . . . . . . . . . . . . . . . . . . . . . . . . . . . . . . . . . . . . . . . . . . . . . . . . . . . 16 Using a Custom Sort Order. . . . . . . . . . . . . . . . . . . . . . . . . . . . . . . . . . . . . . . . . . . . . . . . . . . . . . . . . . . . . . . . . . . . . . . . . . . . . . . . . . . . . . . . . . . . . . . . . . . 16 Conditional Formatting . . . . . . . . . . . . . . . . . . . . . . . . . . . . . . . . . . . . . . . . . . . . . . . . . . . . . . . . . . . . . . . . . . . . . . . . . . . . . . . . . . . . . . . . . . . . . . . . . . . . . . 17 Tracking Items in Excel . . . . . . . . . . . . . . . . . . . . . . . . . . . . . . . . . . . . . . . . . . . . . . . . . . . . . . . . . . . . . . . . . . . . . . . . . . . . . . . . . . . . . . . . . . . . . . . . . . . . . . 18 Find & Select. . . . . . . . . . . . . . . . . . . . . . . . . . . . . . . . . . . . . . . . . . . . . . . . . . . . . . . . . . . . . . . . . . . . . . . . . . . . . . . . . . . . . . . . . . . . . . . . . . . . . . . . . . . . . . 19 Select Visible Cells Only . . . . . . . . . . . . . . . . . . . . . . . . . . . . . . . . . . . . . . . . . . . . . . . . . . . . . . . . . . . . . . . . . . . . . . . . . . . . . . . . . . . . . . . . . . . . . . . . . . . . . 19 The Insert Tab . . . . . . . . . . . . . . . . . . . . . . . . . . . . . . . . . . . . . . . . . . . . . . . . . . . . . . . . . . . . . . . . . . . . . . . . . . . . . . . . . . . . . . 20 PivotTable Concept and Layout . . . . . . . . . . . . . . . . . . . . . . . . . . . . . . . . . . . . . . . . . . . . . . . . . . . . . . . . . . . . . . . . . . . . . . . . . . . . . . . . . . . . . . . . . . . . . . 20 . . Changing Calculation Method of Subtotals in PivotTables. . . . . . . . . . . . . . . . . . . . . . . . . . . . . . . . . . . . . . . . . . . . . . . . . . . . . . . . . . . . . . . . . . . . . . . . . . . 21 A History of Spreadsheets. . . . . . . . . . . . . . . . . . . . . . . . . . . . . . . . . . . . . . . . . . . . . . . . . . . . . . . . . . . . . . . . . . . . . . . . . . . . 22 Excel Version History . . . . . . . . . . . . . . . . . . . . . . . . . . . . . . . . . . . . . . . . . . . . . . . . . . . . . . . . . . . . . . . . . . . . . . . . . . . . . . . . 23 Customizing Sort Options in a PivotTable. . . . . . . . . . . . . . . . . . . . . . . . . . . . . . . . . . . . . . . . . . . . . . . . . . . . . . . . . . . . . . . . . . . . . . . . . . . . . . . . . . . . . . . . Grouping Fields in a PivotTable. . . . . . . . . . . . . . . . . . . . . . . . . . . . . . . . . . . . . . . . . . . . . . . . . . . . . . . . . . . . . . . . . . . . . . . . . . . . . . . . . . . . . . . . . . . . . . . . Grouping Data in a PivotTable by Days of the Week. . . . . . . . . . . . . . . . . . . . . . . . . . . . . . . . . . . . . . . . . . . . . . . . . . . . . . . . . . . . . . . . . . . . . . . . . . . . . . . . Filtering 0 Values in a PivotTable. . . . . . . . . . . . . . . . . . . . . . . . . . . . . . . . . . . . . . . . . . . . . . . . . . . . . . . . . . . . . . . . . . . . . . . . . . . . . . . . . . . . . . . . . . . . . . . Change the Source Data in a PivotTable. . . . . . . . . . . . . . . . . . . . . . . . . . . . . . . . . . . . . . . . . . . . . . . . . . . . . . . . . . . . . . . . . . . . . . . . . . . . . . . . . . . . . . . . . Clear a PivotTable . . . . . . . . . . . . . . . . . . . . . . . . . . . . . . . . . . . . . . . . . . . . . . . . . . . . . . . . . . . . . . . . . . . . . . . . . . . . . . . . . . . . . . . . . . . . . . . . . . . . . . . . . . Calculated Fields in a PivotTable. . . . . . . . . . . . . . . . . . . . . . . . . . . . . . . . . . . . . . . . . . . . . . . . . . . . . . . . . . . . . . . . . . . . . . . . . . . . . . . . . . . . . . . . . . . . . . . The Field List in a PivotTable. . . . . . . . . . . . . . . . . . . . . . . . . . . . . . . . . . . . . . . . . . . . . . . . . . . . . . . . . . . . . . . . . . . . . . . . . . . . . . . . . . . . . . . . . . . . . . . . . . Using the +/- Buttons in a PivotTable . . . . . . . . . . . . . . . . . . . . . . . . . . . . . . . . . . . . . . . . . . . . . . . . . . . . . . . . . . . . . . . . . . . . . . . . . . . . . . . . . . . . . . . . . . . Using Field Headers in a PivotTable . . . . . . . . . . . . . . . . . . . . . . . . . . . . . . . . . . . . . . . . . . . . . . . . . . . . . . . . . . . . . . . . . . . . . . . . . . . . . . . . . . . . . . . . . . . . Using Subtotals in a PivotTable. . . . . . . . . . . . . . . . . . . . . . . . . . . . . . . . . . . . . . . . . . . . . . . . . . . . . . . . . . . . . . . . . . . . . . . . . . . . . . . . . . . . . . . . . . . . . . . . Turn Off Individual Subtotals in a PivotTable. . . . . . . . . . . . . . . . . . . . . . . . . . . . . . . . . . . . . . . . . . . . . . . . . . . . . . . . . . . . . . . . . . . . . . . . . . . . . . . . . . . . . . Using Grand Totals in a PivotTable . . . . . . . . . . . . . . . . . . . . . . . . . . . . . . . . . . . . . . . . . . . . . . . . . . . . . . . . . . . . . . . . . . . . . . . . . . . . . . . . . . . . . . . . . . . . . Changing the Report Layout in a PivotTable. . . . . . . . . . . . . . . . . . . . . . . . . . . . . . . . . . . . . . . . . . . . . . . . . . . . . . . . . . . . . . . . . . . . . . . . . . . . . . . . . . . . . . Using Blank Rows in a PivotTable. . . . . . . . . . . . . . . . . . . . . . . . . . . . . . . . . . . . . . . . . . . . . . . . . . . . . . . . . . . . . . . . . . . . . . . . . . . . . . . . . . . . . . . . . . . . . . PivotTable Styles. . . . . . . . . . . . . . . . . . . . . . . . . . . . . . . . . . . . . . . . . . . . . . . . . . . . . . . . . . . . . . . . . . . . . . . . . . . . . . . . . . . . . . . . . . . . . . . . . . . . . . . . . . . PivotCharts . . . . . . . . . . . . . . . . . . . . . . . . . . . . . . . . . . . . . . . . . . . . . . . . . . . . . . . . . . . . . . . . . . . . . . . . . . . . . . . . . . . . . . . . . . . . . . . . . . . . . . . . . . . . . . . Microsoft Excel Charts . . . . . . . . . . . . . . . . . . . . . . . . . . . . . . . . . . . . . . . . . . . . . . . . . . . . . . . . . . . . . . . . . . . . . . . . . . . . . . . . . . . . . . . . . . . . . . . . . . . . . . . Create a New Excel Chart. . . . . . . . . . . . . . . . . . . . . . . . . . . . . . . . . . . . . . . . . . . . . . . . . . . . . . . . . . . . . . . . . . . . . . . . . . . . . . . . . . . . . . . . . . . . . . . . . . . . Hidden and Empty Cells in an Excel Chart . . . . . . . . . . . . . . . . . . . . . . . . . . . . . . . . . . . . . . . . . . . . . . . . . . . . . . . . . . . . . . . . . . . . . . . . . . . . . . . . . . . . . . . Page Breaks . . . . . . . . . . . . . . . . . . . . . . . . . . . . . . . . . . . . . . . . . . . . . . . . . . . . . . . . . . . . . . . . . . . . . . . . . . . . . . . . . . . . . . . . . . . . . . . . . . . . . . . . . . . . . . . Print Titles . . . . . . . . . . . . . . . . . . . . . . . . . . . . . . . . . . . . . . . . . . . . . . . . . . . . . . . . . . . . . . . . . . . . . . . . . . . . . . . . . . . . . . . . . . . . . . . . . . . . . . . . . . . . . . . . 24 25 25 26 26 26 27 27 27 27 28 28 28 30 30 30 31 32 32 32 33 33 5 of 76
  • 6.
    100 Excel Tips& Tricks The Formulas Tab . . . . . . . . . . . . . . . . . . . . . . . . . . . . . . . . . . . . . . . . . . . . . . . . . . . . . . . . . . . . . . . . . . . . . . . . . . . . . . . . . . . 34 Using Functions. . . . . . . . . . . . . . . . . . . . . . . . . . . . . . . . . . . . . . . . . . . . . . . . . . . . . . . . . . . . . . . . . . . . . . . . . . . . . . . . . . . . . . . . . . . . . . . . . . . . . . . . . . . . 34 Update Formulae Manually. . . . . . . . . . . . . . . . . . . . . . . . . . . . . . . . . . . . . . . . . . . . . . . . . . . . . . . . . . . . . . . . . . . . . . . . . . . . . . . . . . . . . . . . . . . . . . . . . . . 34 Formula Auditing—Showing Cell Dependencies. . . . . . . . . . . . . . . . . . . . . . . . . . . . . . . . . . . . . . . . . . . . . . . . . . . . . . . . . . . . . . . . . . . . . . . . . . . . . . . . . . . 34 Finding the Cell with the Highest Value in a Range. . . . . . . . . . . . . . . . . . . . . . . . . . . . . . . . . . . . . . . . . . . . . . . . . . . . . . . . . . . . . . . . . . . . . . . . . . . . . . . . . 35 Rounding Numbers to the Nearest Whole Number. . . . . . . . . . . . . . . . . . . . . . . . . . . . . . . . . . . . . . . . . . . . . . . . . . . . . . . . . . . . . . . . . . . . . . . . . . . . . . . . . 36 Deleting All NonFormula Data on a Worksheet. . . . . . . . . . . . . . . . . . . . . . . . . . . . . . . . . . . . . . . . . . . . . . . . . . . . . . . . . . . . . . . . . . . . . . . . . . . . . . . . . . . . 36 Filter Date Transactions to Show Only Dates That Fall Between a Range . . . . . . . . . . . . . . . . . . . . . . . . . . . . . . . . . . . . . . . . . . . . . . . . . . . . . . . . . . . . . . . 37 Converting Text Dates to Dates. . . . . . . . . . . . . . . . . . . . . . . . . . . . . . . . . . . . . . . . . . . . . . . . . . . . . . . . . . . . . . . . . . . . . . . . . . . . . . . . . . . . . . . . . . . . . . . . 38 Combining Text From Multiple Cells Into One. . . . . . . . . . . . . . . . . . . . . . . . . . . . . . . . . . . . . . . . . . . . . . . . . . . . . . . . . . . . . . . . . . . . . . . . . . . . . . . . . . . . . 39 An Alternative to VLOOKUP . . . . . . . . . . . . . . . . . . . . . . . . . . . . . . . . . . . . . . . . . . . . . . . . . . . . . . . . . . . . . . . . . . . . . . . . . . . . . . . . . . . . . . . . . . . . . . . . . 40 . . Inserting Symbols Into the Cell . . . . . . . . . . . . . . . . . . . . . . . . . . . . . . . . . . . . . . . . . . . . . . . . . . . . . . . . . . . . . . . . . . . . . . . . . . . . . . . . . . . . . . . . . . . . . . . . 41 Adding Criteria/Conditions to Your SUM Function . . . . . . . . . . . . . . . . . . . . . . . . . . . . . . . . . . . . . . . . . . . . . . . . . . . . . . . . . . . . . . . . . . . . . . . . . . . . . . . . . 42 SUMIF Between Workbooks. . . . . . . . . . . . . . . . . . . . . . . . . . . . . . . . . . . . . . . . . . . . . . . . . . . . . . . . . . . . . . . . . . . . . . . . . . . . . . . . . . . . . . . . . . . . . . . . . . 43 Calculating Positive and Negative Numbers. . . . . . . . . . . . . . . . . . . . . . . . . . . . . . . . . . . . . . . . . . . . . . . . . . . . . . . . . . . . . . . . . . . . . . . . . . . . . . . . . . . . . . 44 Using CTRL as a Function Key . . . . . . . . . . . . . . . . . . . . . . . . . . . . . . . . . . . . . . . . . . . . . . . . . . . . . . . . . . . . . . . . . . . . . . . . . . . . . . . . . . . . . . . . . . . . . . . . 46 Add-Ins. . . . . . . . . . . . . . . . . . . . . . . . . . . . . . . . . . . . . . . . . . . . . . . . . . . . . . . . . . . . . . . . . . . . . . . . . . . . . . . . . . . . . . . . . . . . 45 Naming a Range using Column Labels. . . . . . . . . . . . . . . . . . . . . . . . . . . . . . . . . . . . . . . . . . . . . . . . . . . . . . . . . . . . . . . . . . . . . . . . . . . . . . . . . . . . . . . . . . 45 Name a Range of Cell/Cells. . . . . . . . . . . . . . . . . . . . . . . . . . . . . . . . . . . . . . . . . . . . . . . . . . . . . . . . . . . . . . . . . . . . . . . . . . . . . . . . . . . . . . . . . . . . . . . . . . . 45 Use Named Ranges in Formulae. . . . . . . . . . . . . . . . . . . . . . . . . . . . . . . . . . . . . . . . . . . . . . . . . . . . . . . . . . . . . . . . . . . . . . . . . . . . . . . . . . . . . . . . . . . . . . . 45 Filtering Data. . . . . . . . . . . . . . . . . . . . . . . . . . . . . . . . . . . . . . . . . . . . . . . . . . . . . . . . . . . . . . . . . . . . . . . . . . . . . . . . . . . . . . . . . . . . . . . . . . . . . . . . . . . . . . 51 Clearing All Filters . . . . . . . . . . . . . . . . . . . . . . . . . . . . . . . . . . . . . . . . . . . . . . . . . . . . . . . . . . . . . . . . . . . . . . . . . . . . . . . . . . . . . . . . . . . . . . . . . . . . . . . . . . 51 Removing Duplicates. . . . . . . . . . . . . . . . . . . . . . . . . . . . . . . . . . . . . . . . . . . . . . . . . . . . . . . . . . . . . . . . . . . . . . . . . . . . . . . . . . . . . . . . . . . . . . . . . . . . . . . . 51 Splitting Columns . . . . . . . . . . . . . . . . . . . . . . . . . . . . . . . . . . . . . . . . . . . . . . . . . . . . . . . . . . . . . . . . . . . . . . . . . . . . . . . . . . . . . . . . . . . . . . . . . . . . . . . . . 52 . . Using Data Validation to Ensure the End Date is Greater Than the Start Date. . . . . . . . . . . . . . . . . . . . . . . . . . . . . . . . . . . . . . . . . . . . . . . . . . . . . . . . . . . . 53 Circling Invalid Data. . . . . . . . . . . . . . . . . . . . . . . . . . . . . . . . . . . . . . . . . . . . . . . . . . . . . . . . . . . . . . . . . . . . . . . . . . . . . . . . . . . . . . . . . . . . . . . . . . . . . . . . . 53 The Review Tab. . . . . . . . . . . . . . . . . . . . . . . . . . . . . . . . . . . . . . . . . . . . . . . . . . . . . . . . . . . . . . . . . . . . . . . . . . . . . . . . . . . . . 54 Protecting Worksheets . . . . . . . . . . . . . . . . . . . . . . . . . . . . . . . . . . . . . . . . . . . . . . . . . . . . . . . . . . . . . . . . . . . . . . . . . . . . . . . . . . . . . . . . . . . . . . . . . . . . . 54 . . Being Able to Edit Certain Cells on a Protected Worksheet . . . . . . . . . . . . . . . . . . . . . . . . . . . . . . . . . . . . . . . . . . . . . . . . . . . . . . . . . . . . . . . . . . . . . . . . . . 54 Hide Formula on a Protected Worksheet . . . . . . . . . . . . . . . . . . . . . . . . . . . . . . . . . . . . . . . . . . . . . . . . . . . . . . . . . . . . . . . . . . . . . . . . . . . . . . . . . . . . . . . 55 . . Password Protection and Read Only Access . . . . . . . . . . . . . . . . . . . . . . . . . . . . . . . . . . . . . . . . . . . . . . . . . . . . . . . . . . . . . . . . . . . . . . . . . . . . . . . . . . . . . 55 Top Reasons to Use Microsoft Excel 2007. . . . . . . . . . . . . . . . . . . . . . . . . . . . . . . . . . . . . . . . . . . . . . . . . . . . . . . . . . . . . . . 56 The View Tab. . . . . . . . . . . . . . . . . . . . . . . . . . . . . . . . . . . . . . . . . . . . . . . . . . . . . . . . . . . . . . . . . . . . . . . . . . . . . . . . . . . . . . . 58 Recording Macros. . . . . . . . . . . . . . . . . . . . . . . . . . . . . . . . . . . . . . . . . . . . . . . . . . . . . . . . . . . . . . . . . . . . . . . . . . . . . . . . . . . . . . . . . . . . . . . . . . . . . . . . . . 58 Saving Workbook With a Macro . . . . . . . . . . . . . . . . . . . . . . . . . . . . . . . . . . . . . . . . . . . . . . . . . . . . . . . . . . . . . . . . . . . . . . . . . . . . . . . . . . . . . . . . . . . . . . . 58 Developer Tab . . . . . . . . . . . . . . . . . . . . . . . . . . . . . . . . . . . . . . . . . . . . . . . . . . . . . . . . . . . . . . . . . . . . . . . . . . . . . . . . . . . . . . . . . . . . . . . . . . . . . . . . . . . . . 58 Macro Security Levels. . . . . . . . . . . . . . . . . . . . . . . . . . . . . . . . . . . . . . . . . . . . . . . . . . . . . . . . . . . . . . . . . . . . . . . . . . . . . . . . . . . . . . . . . . . . . . . . . . . . . . . 58 Sorting Worksheets in Alphabetical Order. . . . . . . . . . . . . . . . . . . . . . . . . . . . . . . . . . . . . . . . . . . . . . . . . . . . . . . . . . . . . . . . . . . . . . . . . . . . . . . . . . . . . . . . 59 Opening a Workbook on a Specific Worksheet. . . . . . . . . . . . . . . . . . . . . . . . . . . . . . . . . . . . . . . . . . . . . . . . . . . . . . . . . . . . . . . . . . . . . . . . . . . . . . . . . . . . 59 Copy and Save a Worksheet Into a New File Automatically. . . . . . . . . . . . . . . . . . . . . . . . . . . . . . . . . . . . . . . . . . . . . . . . . . . . . . . . . . . . . . . . . . . . . . . . . . 60 Removing Embedded Hyperlinks With Visual Basic. . . . . . . . . . . . . . . . . . . . . . . . . . . . . . . . . . . . . . . . . . . . . . . . . . . . . . . . . . . . . . . . . . . . . . . . . . . . . . . . 61 Using Group and Outline on Protected Worksheets. . . . . . . . . . . . . . . . . . . . . . . . . . . . . . . . . . . . . . . . . . . . . . . . . . . . . . . . . . . . . . . . . . . . . . . . . . . . . . . . 62 Assigning a Macro to the Quick Access Toolbar. . . . . . . . . . . . . . . . . . . . . . . . . . . . . . . . . . . . . . . . . . . . . . . . . . . . . . . . . . . . . . . . . . . . . . . . . . . . . . . . . . . 63 Using Programs outside of Microsoft Excel. . . . . . . . . . . . . . . . . . . . . . . . . . . . . . . . . . . . . . . . . . . . . . . . . . . . . . . . . . . . . . 64 PowerPoint to Microsoft Excel. . . . . . . . . . . . . . . . . . . . . . . . . . . . . . . . . . . . . . . . . . . . . . . . . . . . . . . . . . . . . . . . . . . . . . . . . . . . . . . . . . . . . . . . . . . . . . . . 64 Copying Microsoft Excel Data to Microsoft Word. . . . . . . . . . . . . . . . . . . . . . . . . . . . . . . . . . . . . . . . . . . . . . . . . . . . . . . . . . . . . . . . . . . . . . . . . . . . . . . . . . 64 GLOSSARY. . . . . . . . . . . . . . . . . . . . . . . . . . . . . . . . . . . . . . . . . . . . . . . . . . . . . . . . . . . . . . . . . . . . . . . . . . . . . . . . . . . . . . . . . 65 6 of 76
  • 7.
    100 Excel Tips& Tricks 1. How do you minimize the Ribbon? The Excel 2007 Interface If you want more space on your screen for your worksheets, you can minimize the Ribbon. The new user interface makes use of the Ribbon. The Ribbon contains all the commands previously located in the complex toolbar and menu system, but now located in one place. • Right-click on any of the tabs (for example, Home, Insert) The Office Button • Select Minimize the Ribbon 2. How do you move the Quick Access Toolbar? • Right-click over the Quick Access Toolbar • Select Show Quick Access Toolbar Below the Ribbon or Above the Ribbon (dependent on the current location) 3. How do you customize the Quick Access Toolbar? In the top left corner of the Microsoft Excel application is the Office Button. Selecting this button brings up a popup menu that allows you to do all the document functions that were found in the old menu file functions, namely: • Open • New • Right-click on the Quick Access Toolbar • Save • Select Customize Quick Access Toolbar • Save As • Select the desired Choose Commands From • Print • Select the Commands you want on the Quick Access Toolbar • Prepare • Select Add • Send • Repeat until all the commands you want are on the Quick Access Toolbar • Publish • Select OK • Close It also contains the Microsoft Excel Options previously contained in Microsoft Excel 2003 in the Tools, Options Menu. The Quick Access Toolbar The Quick Access Toolbar, by default, is located above the Ribbon, next to the Office Button. This toolbar contains commands that are independent of the Ribbon tab that is currently displayed. You can move the Quick Access Toolbar from one of the two possible locations, and you can customize the toolbar by adding buttons that represent commands, including assigning your macros to icons. 7 of 76
  • 8.
    100 Excel Tips& Tricks Working with Worksheets Worksheet Navigation Made Easy Often, you may have multiple worksheets in a workbook and struggle to quickly navigate to a particular worksheet. Microsoft Excel does provide navigation arrows on the bottom left of the screen. By simply clicking on these arrows, you can scroll to worksheets on the left or right. Navigation Arows 4. How do you quickly navigate between worksheets? • Right-click on any of the navigation arrows • You will get a list of all the worksheets in the current workbook • Select the desired worksheet • You will be navigated to that worksheet 5. How do you select a column with only two keystrokes? • Select any cell in the column you would like to select • Press Ctrl + Space Bar 6. How do you select a row with only two keystrokes? • Select any cell in the row you would like to select • Press Shift + Space Bar However, when you have quite a few worksheets, it can be time consuming to use these navigation arrows. The “right-click method” can speed this up. Range Selection Made Easy It can be time consuming to use your mouse to select a range of cells, especially if it is something you need to do regularly (for instance, as a source for charts or PivotTables). To speed up this process, you can use Ctrl + Shift + * 8 of 76 7. How do you quickly select a range of cells? • Select any cell in the range of cells • On the keyboard, press Ctrl + Shift + *
  • 9.
    100 Excel Tips& Tricks 8. How do you quickly open the Format dialog box? • On the keyboard, press Ctrl + 1 9. How do you quickly wrap text in a cell? • Enter in the desired text • Press Alt + Enter • Press Enter 10. How can you quickly copy formatting? • Select the cell with the desired applied formatting • From the Home tab, in the Clipboard group, double-click on the Format Painter button The Home Tab Font Themes Built into Microsoft Excel 2007 are themes that group together colors, and so on. These are available depending on the choice you make. They are used in a number of places such as when you select the font or color buttons in the Font group on the Home Ribbon. Wrap Text There is a very nice keyboard shortcut to Wrap Text. Simply use your Alt + Enter key. • Select any cell you would like to apply the formatting to • Press Esc 11. How do you quickly insert the date? • Hold down the Ctrl button and then press ; (semicolon) on the keyboard Copying Formatting To help speed up the copying of formatting you can use the Format Painter button. Insert Date Shortcut Rather than typing out the date in a cell, you can use a keyboard shortcut to insert the current date instantly. 9 of 76
  • 10.
    100 Excel Tips& Tricks The Home Tab Pasting Paragraphs of Text Into a Single Cell If you have text that is in a text program (for instance, Microsoft Word) and would like to copy and paste it to Microsoft Excel, by default Microsoft Excel separates the information into different cells based on the paragraph marks. In Microsoft Word 12. How do you paste paragraphs of text into a single cell? • Copy the desired text from the text program (Microsoft Word) • Select the desired cell in Microsoft Excel • Press F3 on the keyboard • Select Paste • Press Enter 13. How can you quickly copy text? • Select the desired text • From the keyboard, press Ctrl + C 14. How do you convert negative values to positive values? Pasted into Microsoft Excel • In a blank cell, enter in the value -1 • Select the cell with the value -1 • Select Copy Pasted into Microsoft Excel using F2 • Select the desired range with negative values • Right-click on the selected range • Select Paste Special By using the below method, you are able to paste the text into a single cell in Microsoft Excel. Converting negative values to positive values • Under the Operation group, select Multiply • Select OK • Your values are now converted to positive values Before: This tip allows you to quickly convert a range of negative numbers into positive numbers, without having to edit each cell. After: 10 of 76
  • 11.
    100 Excel Tips& Tricks 15. ow do you view parts of several worksheets H on one worksheet? • Select the desired range to be copied • Right-click the selected range, select Copy • Navigate to the destination worksheet • From the Home tab, in the Clipboard group, select the down arrow under Paste • Select As Picture, Paste Picture Link • Your object (picture) will now be pasted and can be resized as desired • Repeat the above steps for additional objects The Home Tab Viewing Parts of Several Worksheets on One Worksheet One worksheet can be used to view several individually separate and distinct areas. This can be done using the Paste Picture Link option. There are a few options when consolidating information from multiple worksheets. The option for this tip enables you to paste the copied cells as objects (pictures). Pasting them as objects is useful as you can resize the objects. This tool is helpful when needing to print multiple areas of a workbook onto one worksheet or creating a dashboard summarizing parts of the workbook. 11 of 76
  • 12.
    100 Excel Tips Tricks The Home Tab Keeping 00 in Front of Values Using a custom format allows you to keep the full number and not lose any leading zeros. Before: 16. How do you keep 000 in front of values? • Select the desired cell/cells • Right-click on the selected cell/cells • Select Format Cells • Select the Number tab • Under Category, select Custom • In the Type box, enter 000 • Select OK After: 17. How do you format your dates to show the period number? Formatting Your Dates to Show the Period Number • Select the desired cell/cells By using a Custom Format, you can show the period of the date (in this case the month) without changing the date in the field. • Right-click on the selected cell/cells Before (dates in March 2007): • In the Type box, enter m • Select Format Cells • Select the Number tab • Under Category, select Custom • Select OK After (using a Custom Format): 12 of 76
  • 13.
    100 Excel Tips Tricks 18. How do you display values that are millions as thousands? • Select the desired cell/cells • Right-click on the selected cell/cells • Select Format Cells • Select the Number tab • Under Category, select Custom • In the Type box, enter 0 • Select OK The Home Tab Displaying Values That Are In Millions as Thousands Sometimes every figure in a spreadsheet is in the thousands, tens of thousands, or even in the millions. By rounding the figure to smaller, representative figures, you can save space. Before: After: 13 of 76
  • 14.
    100 Excel Tips Tricks The Home Tab AutoSum Button The AutoSum button has the most common functions plus the option to select More Functions, which opens the Insert Function dialogue box. You can also key the keyboard shortcut Alt + = to do the SUM function. Fill Series The series option calls up a dialogue box that allows you to select how the series fills the selected cell; for example, you may want to incrementally increase the date by a month in a range of cells. 19. How do I quickly sum up numbers? • Select the cell where you would like the result to appear • From the keyboard, press Alt + = 20. How do I fill a range of dates/months? • Enter the start date in your first cell • Select the cells you want to fill, including the first cell • From the Home tab, in the Editing group, select the Copy Down button • Select Series • In Type box select Date • In the Date Unit box select Month • Select OK 21. How do you fill a range of text or formula? • Select the range of cells to be filled • Enter in the desired text or formula into the cell • Press Ctrl + Enter 14 of 76
  • 15.
    100 Excel Tips Tricks 22. How do I break text into different rows? • Select the range of columns you would like to fit the text to • From the Home tab, in the Editing group, select the Fill icon • Select Justify • Select OK 23. How do you Clear All from a cell? • Select the cells you want to clear • From the Home tab, in the Editing group, select the Erase icon • You have the option to Clear All, Formats, Contents, or Comments The Home Tab Break Text Into Different Rows In earlier Microsoft Excel releases, it was challenging to arrange lines in a readable layout, but Microsoft Excel 2007’s new Editing, Fill, Justify feature makes it easier. In the below example, the text is flowing over to column G. You would rather have the text from columns A to D. Justify will automatically break the text. 24. How to Clear a range of cells using the Fill Handle? • Select a range of empty cells • Select the Fill Handle • Drag it back over the area you would like to clear • If you also want to clear the formats in the cells, just hold down the Ctrl key as you drag the fill handle back over the selection Before: After: Clear All From Cell/Cells Clear All clears the contents and/or the formatting of a cell. Believe it or not, you can do it by dragging the fill handle backwards. 15 of 76
  • 16.
    100 Excel Tips Tricks The Home Tab Sorting Data You can access the sort functionality through the Sort and Filter icon in the Editing group on the Home tab of the Ribbon. There is also sort functionality located on the Data tab of the Ribbon. Depending on the type of data you are in when you select the Sort Filter icon, the sort option will differ. For example, for dates it will read earliest to latest, while for numbers it will state smallest to largest. 25. How do you quickly sort a column of data? • Select a cell in the column you wish to sort • From the Home tab, in the Editing group, select Sort Filter • Select the Sort A to Z or the Sort Z to A icon 26. How do you apply multilevel sorting? • Select any cell within the data list you wish to sort • From the Home tab, in the Editing group, select Sort Filter • Select Custom Sort • Select the drop-down arrow in the Sort by box and select the desired column • Select the drop-down arrow in the Sort On box and select the desired option • Select the drop-down arrow in the Order box and select the desired option • Select the Add Level icon to specify the next sort column Repeat steps 3 to 5 • Repeat steps 6 and 7 for subsequent sort columns • To change the order of the sort, use the Arrow buttons to move the sort items up or down • Select OK 27. How do you create a Custom List? Multilevel Sorting Multilevel sorting allows you to sort up to 64 columns or levels at a time. • Select the desired list in Microsoft Excel • Select the Office Button • Select Excel Options • Select the Popular category • In the section Top options for working with Excel • Select Edit Custom Lists In the Custom Lists dialogue box, select Import • The copied list is pasted to the list entries box Using a Custom Sort Order The Custom List feature allows the user to define a specific sort order. This can be useful when sorting a column in an order that is not alphanumeric. • Select OK, OK 28. How do I sort based on a Custom List? • Select any cell within the data list you wish to sort • From the Home tab, in the Editing group, select Sort Filter • Select Custom Sort, select the desired Column and Sort On • Select the drop-down arrow in the Order box and select Custom List, select the desired Custom List • Select OK, OK 16 of 76
  • 17.
    100 Excel Tips Tricks 29. How can you add icon conditional formatting? • Select the desired cell or range • From the Home tab, in the Styles group, select Conditional Formatting; a drop-down box appears • Select Icon Set • Select the desired option 30. How do you highlight duplicates? • Select the desired cell or range • From the Home tab, in the Styles group, select the drop-down arrow under Conditional Formatting • Select Highlight Cells Rules • Select Duplicate Values • Select the desired Format • Select OK The Home Tab Conditional Formatting In Microsoft Excel 2003, Conditional Formatting was limited to three conditions per cell; in Microsoft Excel 2007 you may have as many conditions as you like. Another limitation in Microsoft Excel 2003 was that only one condition per cell could be true, so according to the order of the conditional formatting, the first true condition would be indicated; however, you can control this in Microsoft Excel 2007. Highlight Cell Rules : • Greater Than • A Date Occurring • Duplicate Values Top/Bottom Rules: • Bottom 10% • Above Average • Below Average Data Bars: Color Scales: Icon Sets: The parameters of the Conditional Formatting can be customized by selecting More Rules from any of the pop-up dialogue boxes. 17 of 76
  • 18.
    100 Excel Tips Tricks The Home Tab Tracking Items in Excel Many people use Excel to keep track of things. In the past (pre-Excel 2007) people probably would put something together like the below: 31. How do you use Conditional Formatting to track items? • Select the desired range of cells • From the Home tab, in the Styles group, select the drop-down arrow under Conditional Formatting • Select Icon Sets • Select the one with the Tick, Exclamation mark and X • From the Home tab, in the Styles group, select the drop-down arrow under Conditional Formatting • Select Manage Rules • Select Edit Rule • Select Show Icon Only check box, select Apply, OK Excel 2007 provides great new conditional formatting rules, which allow automatic display of nicely formatted icon sets. As Excel best understands values, it is best to set up the spreadsheet with 1 for people who attended and 0 for people who didn’t attend. Apply Conditional Formatting using Icon Sets. 18 of 76
  • 19.
    100 Excel Tips Tricks 32. How do I select visible cells only? • Select the range of cells • From the Home tab, in the Editing group, select Find Select • Select Go To Special • Under Select, select Visible cells only • Select OK • On the Home tab, in the Clipboard group, select Copy • Activate the worksheet you want to copy it to • On the Home tab, in the Clipboard group, select Paste The Home Tab Find Select The Find Select button has shortcuts to many of the options found in the Go To Special dialogue box previously found in Microsoft Excel 2003 in the Edit, Go To Menu. Select Visible Cells Only There are times when you need to copy the visible data only. An example of this is when you need to copy Subtotals that have hidden rows and columns and you want to copy only the visible data. A normal copy and paste includes the hidden data, which can then be unhidden. 19 of 76
  • 20.
    100 Excel Tips Tricks The Insert Tab PivotTable Concept and Layout Microsoft Excel 2007 no longer uses the PivotTable Wizard. A single dialogue box allows you to select the data range (if it was not preselected), to use external data, and also to select whether to insert the PivotTable in an existing worksheet or create a new worksheet. 33. How do you create a PivotTable? • Select any cell in the data list • From the Insert tab, in the Tables group, select PivotTable • Make sure that Select a table or range is selected • Make sure your data is listed in the Table/Range box • Select where you want the PivotTable to go, either in an existing worksheet or its own new worksheet • Select OK • A blank PivotTable is now displayed • In the Field List select the fields you want in the Row Area and either drag them into the row area on the PivotTable or into the Row Labels area on the Field List box • Repeat for columns, page area/filters, and data fields At this point a blank PivotTable is inserted with the PivotTable Field List located to theright of the Microsoft Excel workspace. 20 of 76
  • 21.
    100 Excel Tips Tricks 34. How do you change the calculation method of subtotals? The Insert Tab • Select the Value field you wish to change the calculation of in the PivotTable • From the Options tab, in Active Cell group, the Active Field, select Field Settings (you can also double click on the field) • Select the calculation method you would like to change it to (for instance, Count, Average etc.) • Select OK 35. How do you create a custom calculation? • Select the Value field you wish to change the calculation of in the PivotTable Changing Calculation Method of Subtotals in PivotTables By default Microsoft Excel sets a field to SUM if it is in the data area and contains numbers; if it contains text then it is set to COUNT. You can, however, change these calculation methods as follows: • From the Options tab, in Active Field group, select Field Settings (you can also double click on the field) • Select the Show Values As tab in the Value Field Settings dialogue box • Select the drop-down arrow for Show values As and select tthe necessary method • Select OK Custom Calculations in PivotTables There is a second tab on the Value Field Settings that allows you to select how the calculation are shown (this is the Custom Calculation functionality in Microsoft Excel 2003). For example, you may wish to see the figure as a percentage of the total. 21 of 76
  • 22.
    100 Excel Tips Tricks Did You Know? • There are hundreds of ready-made templates on the Microsoft Excel website that you can download for free. Available categories include brochures, calendars, expense reports, sports schedules, and more. • Where Excel 2003 had over 65,000 rows and 256 columns, Excel 2007 has over 16,000 columns and over 1 million rows! • In May 1996, more than 30 million people were already using Excel worldwide.A A-http://www.thocp.net/companies/microsoft/ microsoft_company_part2.htm A History of Spreadsheets 1952—First noncomputerized reference to the term “spread sheet” listed in Dictionary For Accountants and refers to a worksheet providing a two-way analysis of accounting data— an accounting matrix in which the columns and rows constitute either debit or credit sides respectively or reverse. Early ‘60s—Professor Richard Mattessich pioneered computerized spreadsheets for business accounting, applying computerized spreadsheets to accounting and budget systems written on a mainframe computer in FORTRAN IV.1 1969—1971 Rene K. Pardo and Remy Landau develop LANPAR spreadsheet compiler. Pardo and Landau file a patent covering a recalculation algorithm, which is initially rejected. After 12 years of appeals it is granted and becomes the world’s first software patent.2 1979—Dan Bricklin and Bob Frankston release VisiCalc for the Apple II computer system. VisiCalc helps the Apple II bridge the gap from hobbyist users to businesses that need a useful financial analysis tool, which helped propel Apple as a successful business. While not the first spreadsheet program, its combination of features and affordability helped it become the first popular spreadsheet program. VisiCalc had 254 rows and 63 columns.3 1980—SuperCalc is developed by Sorcim and is notable for being one of the first spreadsheet programs capable of solving circular references (that is, cells that depend on one another’s results).4 1981—Lotus 1-2-3 hits the market and is the IBM PC’s first “killer app” (as VisiCalc was for the Apple II). Designed primarily to combine visual graph functions with spreadsheet applications, 1-2-3 was faster, more powerful, and easier to learn than VisiCalc, giving IBM great success in the PC arena. 1982—Microsoft’s MultiPlan is launched. Designed to compete against VisiCalc, Microsoft’s first spreadsheet program was its first foray into the realms of business applications. While being outsold by Lotus 1-2-3 in the United States, Multiplan sold well overseas, giving Microsoft a solid platform for future international growth. 1984—AppleWorks—one of the first packages that contained an integrated suite of products, AppleWorks included a spreadsheet module that could work seamlessly with all other modules, such as the word processor. AppleWorks was so popular for a time it even overtook Lotus 1-2-3 in industrywide sales charts. It was one of the first applications to use menu bars rather than a command line interface.5 1985—Microsoft Excel first appears for the Macintosh platform. http://www.cs.umd.edu/class/spring2002/cmsc434-0101/MUIseum/applications/spreadsheethistory1.html http://en.wikipedia.org/wiki/Spreadsheet 3 http://www.danbricklin.com/firstspreadsheetquestion.htm 4 http://en.wikipedia.org/wiki/SuperCalc 5 http://apple2history.org/history/ah19.html 1 2 22 of 76
  • 23.
    100 Excel Tips Tricks Excel Version History VERSION COMMENTS 1—1985 Version 1, for the Macintosh, was released. Version 1.0.6 and 1.5 are released over the course of the next three years. 2—1987 The first Windows version. Labeled “2” to correspond to the Mac version, it included a run-time version of Windows. 2.2—1989 Excel 2.2 for Macintosh includes the ability to apply different styles within a single document and a 40% increase in calculation speed. 3—1990 Included workbooks, toolbars, drawing capabilities, outlining, add-in support, 3D charts, and many more new features. 4—1992 Released for Windows 3.1, it becomes the first “popular” version due to the widespread use of Windows 3.1. 5—1993 A major upgrade included multisheet workbooks and replaced Excel Macro language with Visual Basic. 7—1995* Known as Excel 95. The first major 32-bit version of Excel,** which is very similar to Excel 5 in relation to features. 8—1997 Known as Excel 97. A new interface for VBA developers, UserForms, data validation, and more. 9—1999 Known as Excel 2000. Can use HTML as a native file format, “self-repair” capability, enhanced clipboard, pivot charts, modeless user forms, digital signing of macros. 10—2001 Known as Excel 2002, this is part of Office XP. It has a long list of new features, perhaps the most significant of which is the ability to recover your work when Excel crashes. 11—2003 Microsoft Office Excel 2003. The new features in this version include: (a) Improved support for XML, (b) A new “list range” feature, (c) Smart Tag enhancements, and (d) Corrected statistical functions. 12—2007 Microsoft Excel 2007. A major overhaul to the standard Office interface with the introduction of the “Ribbon,” changes made to the standard file extensions for Office documents, extended conditional formatting features, increased business intelligence functionality, and much more. Importance of Spreadsheet Security Typing errors can lead to inaccurate information, which can have a devastating effect on business • Nevada, USA, 2006: Incorrectly typed formulae led to a $5 million discrepancy in budgetary figures.A • Northern Territory, Australia, 2005: A manual error in a departmental spreadsheet led to a AUS$200 million mistake in government funding figuresB Excel 2007 is rich with security and error-checking features, such as formula evaluation, cell precedent and dependence tracking, data validation, and the ability to track changes made to the sheet. Combined, these features help give you the peace of mind about the data you use to make your decisions. In addition, automated business intelligence tools, such as the Alchemex product range, remove a large proportion of the manual aspects of report creation, avoiding the opportunity for typing errors. Excel and Alchemex can save your business time and money, giving you peace of mind. A-http://www.nevadadailymail.com/story/1135458.html B-http://www.abc.net.au/news/newsitems/200506/ s1394937.htm * here is no Excel 6. Beginning with Excel 7, the version numbering was changed so all of the Microsoft Office applications would have the same T version number. **There was also 32-bit version of Excel 5, but it was not widely distributed 23 of 76
  • 24.
    100 Excel Tips Tricks The Insert Tab Customizing Sort Options in a PivotTable Adding your own custom sort options can make your PivotTable even easier to read. Often you need to sort your PivotTable in month order, but normal sorting sorts your months in alphabetical order and not month order. 36. How do you apply a Custom Sort when sorting a PivotTable? • Select any cell in the column you would like to sort in the PivotTable • From the Home tab, in the Editing group, select Sort Filter • Select Custom Sort • Select More Options • Deselect, Sort automatically every… • From the drop-down arrow, select the sort order (for example, Jan, Feb, Mar) • Select OK 37. ow do you default your PivotTable to sort based on the H Custom List? • From the Options tab, in the PivotTable group, select Options • Select the heading tab Tools Filters • Select Use Custom List when sorting From PivotTable options, you can also set the PivotTable to use the Custom List by default. 24 of 76
  • 25.
    100 Excel Tips Tricks 38. How do you Group Dates in a PivotTable? • Select the Field (Date) you wish to group • From the Options tab, in the Group group, select Group Field • The Grouping dialogue box appears, displaying dates or times • Enter the starting and ending information in the fields provided • In the By list, select the option you wish to group By (for example, Months) • Select OK The Insert Tab Grouping Fields in a PivotTable The group and ungroup functionality is located on the Options tab, in the Group group. The function operates the same way as for Microsoft Excel 2003. You can also right-click to access this function. 39. Is there a quick way to Ungroup Dates? • To Ungroup Dates, select the Field (Date) you wish to Ungroup • From the Options tab, in the Group group, select Ungroup 40. How do you Group Dates by weeks? • Select the Date field in the PivotTable • From the Options tab, in the Group group, select the Group Selection button • Under By, select Days • Next to Number of Days, select 7 Grouping Data in a PivotTable by Days of the Week Extending PivotTable functionality even further, data can be grouped into preset categories such as days of the week. • Select OK Days 7 25 of 76
  • 26.
    100 Excel Tips Tricks The Insert Tab Filtering 0 Values in a PivotTable It is possible to now show any 0 values in your PivotTable. To do this you can apply an AutoFilter. 41. How do you ensure that 0 values do not show in the PivotTable? • Select the cell to the right of the last heading on the PivotTable • From the Data tab, in the Sort Filter group, select Filter • Select the drop-down arrow from the Value heading (for example, Sum of Product Sale) • Deselect 0 • Select OK 42. How do I change the Source Data? • Select any cell in the PivotTable • From the Options tab, in the Data group, select Change Data Source • Select the new Data Source • Select OK Change the Source Data in a PivotTable Once you have created your PivotTable, you may decide that you would like to refer to a different data source. 43. How do you clear all filters from a PivotTable? • Select any cell in the PivotTable • From the Options tab, in the Actions group, select Clear • Select the desired option Clear a PivotTable You may want to clear all the fields on the PivotTable to start again. A very nice new feature in Microsoft Excel 2007 is that if you have applied multiple filters on the fields in the PivotTable and you wish to view all the data, you can clear all filters. 26 of 76
  • 27.
    100 Excel Tips Tricks 44. How do you create a Calculated Field in a PivotTable? • From the Options tab, in the Tools group, select Formulas • Select Calculated Field from the drop-down menu • In the Name box enter the new name • Select the field the calculation is based on in the Field List • Select Insert Field The Insert Tab Calculated Fields in a PivotTable Selecting Formulas calls up the same Insert Calculated field dialogue box as Microsoft Excel 2003. • In the Formula box, create the formula • Select Add • Select OK 45. How to you show or hide the Field List? • From the Options tab, in the Show/Hide group, select Field List 46. How do you use the Hide and Show buttons? • From the Options tab, in the Show/Hide group, select +/- Button 47. How do you remove the Field Headings from the PivotTable? • From the Options tab, in the Show/Hide group, select Field Headers The Field List in a PivotTable You will need to use this button if you close your Field List and then need to make some changes. Using the +/- Buttons in a PivotTable Hide and Show detail is now located in the PivotTable as a small plus (show detail) or minus (hide detail) icon. You can switch the Show/Hide button off, by selecting the below button from the Options tab, in the Show/Hide group. Using Field Headers in a PivotTable This option removes the headings from the PivotTable. 27 of 76
  • 28.
    100 Excel Tips Tricks The Insert Tab Using Subtotals in a PivotTable In Microsoft Excel 2007 there is a shortcut for turning the Subtotals on and off. This, however, applies to all the Subtotals and switches them all off or on. 48. How do you turn off all Subtotals? • Select any cell in the PivotTable • From the Design tab, in the Layout group, select Subtotals • Select Do Not Show Subtotals 49. How to do you turn off individual Subtotals? • Right-click on the desired field • Select the Subtotal “fieldname” 50. How do you turn off all Grand Totals? • Select any cell in the PivotTable • From the Design tab, in the Layout group, select Grand Totals The Tabular form of the PivotTable Layouts does not allow for the subtotals to be shown at the top. Turn Off Individual Subtotals in a PivotTable To turn off individual subtotals you still need to go to the field settings for that field. Using Grand Totals in a PivotTable There is a quick way to change how the grand totals are displayed. This will be applied to the entire PivotTable. 28 of 76 • Select Off for Rows and Columns
  • 29.
    100 Excel Tips Tricks Excel Efficiency Calculator Considering that Excel is used pervasively as a platform to share and present critical information that drives business decisions, have you ever wondered, How much time and money is inefficient use of Excel costing your business? Simply automating the reporting process can result in a massive time saving and increased productivity as well as provide less tangible returns like data integrity, standardization, and elimination of loose spreadsheet use. “Our expectations have been exceeded by the way Alchemex delivers critical business information from our system. We have converted weeks of repetitive work every month into a few hours. Now that’s what I call a measurable return on investment” Ravind Sukdeo, financial director, Bidfreight Port Operations (a member of the BIDvest Group Ltd) Similarly, improved Excel skills can save time and money. “I’ve learned amazing new things with Excel on Steroids, and this will definitely improve my efficiency at the office. For example I finalized our quarterly stock-take three hours earlier than normal just because I was able to work through the data so much quicker.” Linka Lubbe, financial controller, JOST, South Africa Visit www.alchemex.com and use our efficiency calculator (example below) for your business. 29 of 76
  • 30.
    100 Excel Tips Tricks The Insert Tab Changing the Report Layout in a PivotTable By default, Microsoft Excel uses Compact Form for your PivotTable. When using Compact Layout, you lose access to each of the field headings. You can access them by selecting the down arrow next to the main row heading and then changing the Selected Field box. You will also not be able to double click to access the Field Settings. To view the PivotTable as you would in Microsoft Excel 2003, choose Show in Outline Form. 51. Where do you go to change the PivotTable Report Layout? • Select any cell in the PivotTable • From the Design tab, in the Layout group, select Report Layout • Select the desired option 52. How do you insert Blank Rows after each item? • Select any cell in the PivotTable • From the Design tab, in the Layout group, select Blank Rows • Select Insert Blank Line after each Item 53. How do you apply a PivotTable style? • Select any cell in the PivotTable • From the Design tab, in the PivotTable Styles group, select one of the visible styles or scroll through all the available styles • You can also select the More button, to view the Styles • You also have the option to create your own PivotTable Style at the bottom of the gallery, which displays the New PivotTable Style dialogue box Using Blank Rows in a PivotTable To space out a PivotTable, you can choose to insert blank lines after each item. PivotTable Styles In Microsoft Excel 2003, you could apply AutoFormat to the PivotTable. In Microsoft Excel 2007 you can change the style of a PivotTable by using a gallery of styles. To remove a format, select Clear at the bottom of the list. You can only delete your custom PivotTable styles. 30 of 76
  • 31.
    100 Excel Tips Tricks 54. How do you create a PivotChart from a PivotTable? • Select any cell within the PivotTable report • From the Options tab, in the Tools group, select the PivotChart icon • Select the ChartType • Select OK • You can now edit your chart by using the chart type and other options 55. How do you create a PivotChart from scratch? • Select a cell in the data list • From the Insert tab, in the Tables group, select the drop-down arrow below PivotTable • Select PivotChart from the drop-down list • Make sure that the selected data range is correct and select OK • Use the PivotTable Field List to create the PivotChart The Insert Tab PivotCharts PivotCharts are much easier to create and use in the new user interface. The filtering functionality is made much easier, and there are specific PivotChart tools and context menus available so that you can analyze the data in the chart. You can now change the layout, style, format, and its elements the same way that you can for a regular chart. In Microsoft Excel 2007, the chart formatting that you apply is preserved when you make changes to the PivotChart. As you change the PivotChart, its associated PivotTable changes and vice versa. There is a new PivotChart Filter Pane that gives you access to your chart fields for filtering. You can move the PivotChart to another location (for instance, a new worksheet using the Move Chart function). When creating a PivotChart, make sure your PivotTable report has at least one row field to become the Category field in the PivotChart report, and a Data field to become the Series field. 31 of 76
  • 32.
    100 Excel Tips Tricks The Insert Tab Microsoft Excel Charts With Microsoft Excel 2007, charts have a new look; layouts use different fonts and colors. The Ribbon interface has a Chart group, which becomes visible once a chart has been generated. Once you have selected your chart type, the chart is automatically embedded in the worksheet, and whenever you select the chart, the Chart Ribbon will be available on the Ribbon. Create a New Excel Chart To easiest way to create a chart is to select the data table and then select the Insert tab. In the Charts group select the chart type you require. Hidden and Empty Cells in an Excel Chart Selecting the Hidden and Empty Cells button allows you to determine how the graph deals with blank spaces in your data. You have the option to show them as gaps, as zeros, or to smooth the graph over the gaps. 32 of 76 56. How do you create a Chart with a shortcut key? • Select the range you would like to Chart • Press F11 on the keyboard • A new worksheet will be inserted with the Chart 57. How do you have an empty cell show as a zero in a chart? • Select the Chart • From the Design tab, in the Data group, select Select Data • Select Hidden and Empty Cells • Select Zero • Select OK, OK
  • 33.
    100 Excel Tips Tricks 58. How do you change margins in Excel 2007? • From the Page Layout tab, in the Page Setup group, select Margins • Select the desired setting • If you select Custom Margins, you get the Microsoft Excel 2003 Page Setup dialogue box and you can manually adjust the margins • Select OK 59. How do you insert a Page Break? The Page Layout Tab Page Breaks There is no need to change your view to Page Break Preview to insert Page Breaks. Please ensure you are in column A when you are inserting a Page Break. You can also select Remove Page Break to remove a page break. • Select the cell in column A, below to where the Page break must appear • From the Page Layout tab, in the Page Setup group, select Breaks • Select Insert Page Break 60. How do you remove a Page Break? • Select the cell in column A, below the Page Break to be removed Print Titles • From the Page Layout tab, in the Page Setup group, select Breaks This is not a new feature in Microsoft Excel 2007, but it is now found in the Page Setup group. Print Titles are a fantastic tool when you need to repeat a certain column or row on each printed page. • Select Remove Page Break 61. How to you repeat a row when printing a worksheet? • Determine which row is to be repeated • From the Page Layout tab, in the Page Setup group, select Print Titles • Select the Collapse Dialogue button in the Rows to Repeat at Top • Select the desired row • Press Enter • Select OK 33 of 76
  • 34.
    100 Excel Tips Tricks The Formulas Tab Using Functions Functions are available on the Formulas tab. You can insert a function by using the Insert Function icon or use the Function Library group, which lists the available functions in logical groupings (for instance, Financial). Update Formulae Manually When there are a number of formulas on a worksheet, especially if there is a lot of data to be referenced, changing one formula can slow the application down substantially. By using the option to manually recalculate, you can bypass this recalculation and avoid the delay. You can then choose to manually update your formulae. 62. How do you set your formulas to update manually? • Select the Microsoft Office button • From the bottom right, select Excel Options • Select Manual • Select OK 63. ow do you trace cells that are preceding or dependant on H the current cell? • To trace all cells that are preceding: • Select the desired cell • From the Formulas tab, in the Formula Auditing group, select Trace Precedents • If the Precedent cells are found on another worksheet, you get a dotted line • Double click on the dotted line, select the reference, select OK • To trace all dependant cells: • Select the desired cell • From the Formulas tab, in the Formula Auditing group, select Trace Dependents • To remove all the arrows: • Select the desired cell • From the Formulas tab, in the Formula Auditing group, select Remove Arrows Formula Auditing—Showing Cell Dependencies Some spreadsheets can get very complicated, with many cells relying on other cell calculations to deliver information, and a change of one cell can have dramatic effects. Formula Auditing shows you which cells are connected. 34 of 76
  • 35.
    100 Excel Tips Tricks 64. ow do I create a Formula that will find a cell with the H highest value in a range? • Open Microsoft Excel • Select the desired result cell • Enter in the below: =ADDRESS(MATCH(MAX(D:D),D:D,0),4,4) =ADDRESS(MATCH(MAX(“Column to calculate max”), Column to find the max, finds the first value that is exactly equal), use column D (4) as the result reference, use relative reference) MATCH MATCH(lookup_value,lookup_array,match_type) The MATCH function returns the row number of the highest value. The Formulas Tab Finding the Cell With the Highest Value in a Range At times you may be working with data where you need to find the maximum value. To do this, you can sort or use the MAX function. You may not want to sort the column and are looking for the MAX value, but would like to know the cell address that contains the maximum value. Example Lookup_value: Is the value you use to find the value you want in a table. Lookup_value can be a value (number, text, or logical value) or a cell reference to a number, text, or logical value. Lookup_array: Is a contiguous range of cells containing possible lookup values. Match_type: Is the number -1, 0, or 1. Match_type specifies how Microsoft Excel matches lookup_value with values in lookup_array. If match_type is 0, MATCH finds the first value that is exactly equal to lookup_value. Lookup_array can be in any order. ADDRESS ADDRESS(row_num,column_num,abs_num,a1,sheet_text) The ADDRESS function returns the cell address of the highest value. Row_num: Is the row number to use in the cell reference. Column_num: Is the column number to use in the cell reference. Abs_num: Specifies the type of reference to return. 1 - Absolute, 2 - Absolute row; relative column, 3 Relative row; absolute column, 4 - Relative MAX MAX(number1,number2,...) Number1, number2: Are 1 to 255 numbers for which you want to find the maximum value. 35 of 76
  • 36.
    100 Excel Tips Tricks The Formulas Tab 65. How do you round a number to the nearest whole number? Rounding Numbers to the Nearest Whole Number Using the ROUND function, you can round a number upwards to the nearest hundred, thousand, million, or higher. • Select the desired cell • Enter in the below formula: =ROUND(C2,-2) • Press Enter Example The Rounded Up column is rounding the values up the nearest hundred. ROUND ROUND(number,num_digits) Number: Is the number you want to round. Num_digits: Specifies the number of digits to which you want to round the number. Deleting All NonFormula Data on a Worksheet Have you ever found that at the beginning of the financial year you need to make a copy of the previous year’s workbook? If so, you’d need to delete all the old year’s data but you would really like to keep all of the formulae in the worksheet. By using the Go To dialogue box, it is a quick and easy method. Constant 36 of 76 66. How do you delete all nonformula data? • Make a copy of the desired worksheet • Press F5 on the keyboard (The Go To dialogue box will pop up) • Select Special • Select Constants • Select OK • All cells containing constants (everything except formulae) will be selected • Press Delete on the keyboard
  • 37.
    100 Excel Tips Tricks 67. ow do I Filter date transaction to only show dates between H 30 and 60 days? • Select the desired cell • Enter the below: The Formulas Tab Filter Date Transactions to Show Only Dates That Fall Between a Range • Copy the formula down By using a combination of the TODAY and AND function, you can determine whether a date falls inside of a particular date range. • Use Filtering to Filter all values that are TRUE Example =AND(TODAY()-B3=30,TODAY()-B3=60) TODAY TODAY( ) Returns the serial number of the current date. The serial number is the date-time code used by Microsoft Excel for date and time calculations. If the cell format was General before the function was entered, the result is formatted as a date. AND AND(logical1,logical2, ...) This result gives you an answer of either True or False which you can then filter or use in combination with another function. This can be a handy when used in combination with a SUMIF to calculate transactions in certain date range. Logical1, logical2, ... : Are 1 to 255 conditions you want to test that can be either TRUE or FALSE. 37 of 76
  • 38.
    You have thebook. Now get the hands-on training. Excel® on Steroids Learn how to capture more meaningful data, in less time, using your favorite spreadsheet. These specialized training workshops developed by Alchemex provide in-depth coverage of key Microsoft® Excel® functionality. B Workshop 1: usiness Reporting Using Formulas and Functions M Workshop 2: anaging Data Lists and Macros D Workshop 3: ata Analysis using PivotTables / Charts www.SageU.com
  • 39.
    Sage Intelligence Reports youcan rely on. Information you can act on. Sage Intelligence is a powerful Microsoft® Excel®-based reporting solution powered by Alchemex and integrated into many Sage accounting software solutions. You can run customized reports, on-demand, without having to manually update spreadsheets. Now it’s easier than ever to find the answers you need and make informed decisions with confidence. Critical information made visible Sage Intelligence uses realtime information pulled directly from various Sage Accounting systems—and even other databases—to give you easier access to your business information. You can create dynamic reports that can be refreshed as needed, drilled into for more detail, and sliced and diced for further insight. Get the information you need to make timely, business-critical decisions. Spreadsheet-based reporting at your fingertips Sage Intelligence is an add-on solution, and is integrated into multiple Sage accounting products including Sage ERP Accpac, Sage ERP MAS, Sage Peachtree and Sage Simply Accounting. It’s Microsoft Excel-based, so the tools and features may already feel familiar and intuitive. Plus, it includes standard report templates you can use right away. That’s what we call fast ROI. The flexibility of customization— without the frustration You or your accountant can custom-design almost any report you need, giving you total control over your reporting process. Every customization you make can be saved for future use, sparing you time and effort. Role-based security to protect your data Security controls give you the ability to set access to information based on the user’s role, so you can protect the integrity of sensitive or confidential data. Extraordinary business intelligence at a realistic price Get the powerful functionality and flexibility of a business intelligence solution designed specifically for small and midsized businesses. FEATURES Customizable, dynamic, real-time reports for better visibility into your business Ready-to-go within many Sage Products: no separate installation required1 Familiar and intuitive Microsoft Excelbased reports Customizable report templates included for quick ROI Role-based security settings allow you to control user access Sophisticated business intelligence created especially for small and medium-sized businesses The Sage Intelligence dashboard provides you with a real-time overview of your business activities, metrics, and revenues all at a single glance ­ nd a refreshes in a single click! For more information about Sage Intelligence—or to find out if your Sage product has an integrated Business Intelligence (BI) Solution, visit the product website or go to www.SageNorthAmerica.com/ 1 Additional fees required. Subject to Alchemex (Pty) Ltd terms and conditions.
  • 40.
    100 Excel Tips Tricks The Formulas Tab Converting Text Dates to Dates Occasionally, dates may become formatted and stored in cells as text. For example, you may have entered a date in a cell that was formatted as text, or the data might have been imported or pasted from an external data source as text. Dates that are formatted as text are leftaligned instead of right-aligned in a cell. You can use the DATEVALUE function to convert most other types of text dates to dates. 68. How do you convert text dates to dates? • Select the desired cell • Enter the below: =DATEVALUE(A2) The DATEVALUE function returns the serial number of the date that is represented by the text date Format the cell (serial number) to a date: • Select the desired cell/cells (B2:B3) • Right click on the selected cells • Select Format Cells • Select Date • Select the desired Format DATEVALUE DATEVALUE(date_text) Date_text: Is text that represents a date in a Microsoft Excel date format. For example, “1/30/2008” or “30-Jan-2008” are text strings within quotation marks that represent dates. Using the default date system in Excel for Windows, date_text must represent a date from January 1, 1900, to December 31, 9999. Using the default date system in Microsoft Excel for the Macintosh, date_text must represent a date from January 1, 1904, to December 31, 9999. DATEVALUE returns the #VALUE! error value if date_text is out of this range. If the year portion of date_text is omitted, DATEVALUE uses the current year from your computer’s built-in clock. Time information in date_text is ignored. 40 of 76
  • 41.
    100 Excel Tips Tricks 69. How do you combine text from multiple cells into one cell? • Select the desired cell • Enter in = • Select the first cell to join The Formulas Tab Combining Text From Multiple Cells Into One • If necessary, add any additional data that my not be found in a cell (“/”) Using the sign is the same as using the Concatenate function, but much simpler. • Enter in Example • Enter in • Select any additional cells to join • Press Enter Below is an example in column C, of where the Main Account and Sub Account numbers need to be joined into one cell with a / to separate the Accounts. 41 of 76
  • 42.
    100 Excel Tips Tricks The Formulas Tab An Alternative to VLOOKUP Using a combination of MATCH and INDEX, you can return values from an array regardless of what information is in the first column of the array. In a VLOOKUP, the main search criteria (for example, a salesperson’s name) needs to be in the first column of the array—using MATCH and INDEX; it doesn’t matter which column the result is in. 70. What Formula can I use as an alternative to VLOOKUP? • Select the desired cell • Enter in the below: =INDEX(A1:C12,MATCH(A15,B2:B12),3) =INDEX(Complete List,MATCH(Lookup cell,Column from List with Lookup Value),Column Number from list for result) • Select OK MATCH Example MATCH(lookup_value,lookup_array,match_type) Returns the row number of the highest value. Lookup_value: Is the value you use to find the value you want in a table. Lookup_value can be a value (number, text, or logical value) or a cell reference to a number, text, or logical value. You can either create the functions in two steps as in cells B20 and C20, or you can create a Nested Function as in cell D20. Lookup_array: Is a contiguous range of cells containing possible lookup values. Match_type: Is the number -1, 0, or 1. Match_type specifies how Microsoft Excel matches lookup_value with values in lookup_array. If match_type is 0, MATCH finds the first value that is exactly equal to lookup_value. Lookup_ array can be in any order. INDEX INDEX(array,row_num,column_num) Returns the value of an element in a table or an array, selected by the row and column number indexes. INDEX looks at an array, based on the row number found in the MATCH Function, and return the answer from the specified column. Array: Is a range of cells. Row_num: Selects the row in array from which to return a value. Column_num: Selects the column in array from which to return a value. 42 of 76
  • 43.
    100 Excel Tips Tricks 71. How do you insert a Symbol? • Create the Symbol list: • Open a blank workbook • Select cell A1 • Enter in the below: =CHAR(ROW()) • Copy the function down to cell A255 The Formulas Tab Inserting Symbols Into the Cell It can sometimes be difficult to insert a special character, such as 􀀂 or ®, into a cell. Special characters each have their own unique number combination. Example • This displays in each cell the character whose code number is that cell’s row number. For example, the Euro Currency symbol appears in cell A128, which indicates that its code number is 128 • If necessary, save the workbook CHAR CHAR(number) Number: Is a number between 1 and 255 specifying which character you want. The character is from the character set used by your computer. Euro Ellipsis Dagger Double Dagger Bullet Trademark Cents € … † 0128 0133 0134 Registered ® Plus/Minus ± Paragraph ¶ 0174 0177 0182 ‡ 0135 Degree º 0176 • ™ ¢ 0149 0153 0162 Pounds Yen Copyright £ ¥ © 0163 0165 0169 Code • If using a laptop, be sure to turn on your NUMLOCK pad Symbol (for example, 0128) Common Symbols • Using the numeric keys on your NUMLOCK pad, enter in the desired code Code • Hold down ALT on the keyboard If you know the code number, you can enter that character any time by holding down the ALT key, and typing the four-digit code number on the numeric keypad (the keys on the far right of your keyboard; do not use the “normal” number keys above the letter keys). Even though character code numbers are only three digits (between 0 and 255), you must type in the leading zeros to ensure that you get the proper character. Symbol • Select the desired cell Common Symbols • To apply the desired Symbol: You can change the font of the column to see what characters are supplied by various fonts. Fonts with lots of useful symbols include Symbol, WebDings, the 3 WingDings fonts, Ref Specialty, ENCICON, Marlett, MonoType Sorts, and MS Reference. Note that you may not have all these fonts on your computer. 43 of 76
  • 44.
    100 Excel Tips Tricks The Formulas Tab Adding Criteria/Conditions to your SUM function Using the DSUM function, you can specify criteria and conditions regarding which cells should be added together. An alternative to using DSUM is using SUMIF. But SUMIF can’t do complex criteria. Example The table contains a list of totals sales per day, showing how many hours were worked that day, the week number, and the month. In cell H4 is a running total using the DSUM function, which takes into account a number of criteria that have been set up in the range A1:F2 (such as a specific day for a specific month as long as the hours in the work day were greater than 12 but less than 17). 44 of 76 72. How do I add criteria/conditions to the Sum function? • Select the desired cell • Enter in the below formula: =DSUM(A5:E1121,5,A1:F2) • Press Enter DSUM DSUM(database,field,criteria) Database: Is the range of cells that makes up the list or database. A database is a list of related data in which rows of related information are records and columns of data are fields. The first row of the list contains labels for each column. Field: Indicates which column is used in the function. Field can be given as text with the column label enclosed between double quotation marks, such as “Age” or “Yield,” or as a number that represents the position of the column within the list: 1 for the first column, 2 for the second column, and so on. Criteria: Is the range of cells that contains the conditions you specify. You can use any range for the criteria argument, as long as it includes at least one column label and at least one cell below the column label for specifying a condition for the column.
  • 45.
    100 Excel Tips Tricks 73. How do you use the SUMIF function between workbooks? • Open the workbook that contains the source • Open the workbook that will contain the formulae • Select the desired cell in the workbook that will contain the formulae • Using the FX button on the Formula Bar, locate the Sum Function • To nest in the IF Function, from the Formula bar, in the Name Box, from the drop-down arrow, select IF • If the IF function does not appear, select More Functions and locate the IF Function • Enter in the arguments in the Logical Test Logical_test – If cells A3:A12 in the Data workbook on Sheet 1 = East Value_if_true – If the above is true, sum the range B3:B12 Value_if_false – IF the above is not true, place 0 • Press Ctrl + Shift + Enter The Formulas Tab SUMIF Between Workbooks When using the SUMIF function between workbooks, you may get a VALUE error if the source workbook is not open. This behavior occurs when the formula that contains the SUMIF, COUNTIF, or COUNTBLANK function refers to cells in a closed workbook. To work around this, use a combination of the SUM and IF functions together in an array formula. An array formula is a formula that can perform multiple calculations on one or more of the items in an array. Array formulas act on two or more sets of values known as array arguments. • Each argument within an array must have the same number of rows and columns SUMIF SUMIF(range,criteria,sum_range) Range: Is the range of cells that you want evaluated by criteria. Cells in each range must be numbers or names, arrays, or references that contain numbers. Blank and text values are ignored. • You must enter an array by pushing Ctrl + Shift + Enter • You cannot add the {} (braces) that surround an array yourself, pushing Ctrl + Shift + Enter will do this for you Criteria: Is the criteria in the form of a number, expression, or text that defines which cells will be added. For example, criteria can be expressed as 32, “32”, “32”, or “apples”. Sum_range: Are the actual cells to add if their corresponding cells in range match criteria. If sum_range is omitted, the cells in range are both evaluated by criteria and added if they match criteria. 45 of 76
  • 46.
    100 Excel Tips Tricks The Formulas Tab Calculating Positive and Negative Numbers Have you ever had a column with positive and negative numbers, but would like to sum the positive and negative numbers separately? This can be done by using the SUMIF function. Example 74. How can I calculate positive and negative numbers? • To add the positive numbers as per the example: • Select the desired cell • Enter in the below: =SUMIF(A2:A10,“0”) • Press Enter • To add the negative numbers: • Select the desired cell • Enter in the below: =SUMIF(A2:A10,“0”) • Press Enter SUMIF SUMIF(range,criteria,sum_range) Range: Is the range of cells that you want evaluated by criteria. Cells in each range must be numbers or names, arrays, or references that contain numbers. Blank and text values are ignored. Criteria: Is the criteria in the form of a number, expression, or text that defines which cells will be added. For example, criteria can be expressed as 32, “32”, “32”, or “apples”. Sum_range: Are the actual cells to add if their corresponding cells in range match criteria. If sum_range is omitted, the cells in range are both evaluated by criteria and added if they match criteria. 46 of 76
  • 47.
    100 Excel Tips Tricks 75. How do you name a selection using column labels as names? • Select the range you want to name, including the row or column labels • From the Formula tab, in the Defined Names group, select Create from Selection • Select Top Row (assuming your headings are in the top row) • Select OK 76. How do you name a range of cell/cells? The Formulas Tab Naming a Range Using Column Labels This is useful when you have a list and want to name the column separately. You can use the column labels as the range name. • Select the desired cell/cells • From the Formula bar, click on the Name box • Enter in the desired Named Range • Press Enter 77. How do you insert a Named Range in Formulae? • Place your cursor where you would like to insert the Named Range Name a Range of Cell/Cells • From the Formulas tab, in the Defined Names group, select Use in Formula You can also name a range of cell/cells. This applies a Name to an entire range. • Select the desired Named Range 78. hat is the keyboard shortcut to insert a Named Range W in Formulae? • Place your cursor where you would like to insert the Named Range • Press F3 on the keyboard • Select the desired Named Range • Select OK 79. How do you paste a list of Named Ranges? • Select a cell in the worksheet where you would like the list to be pasted • Press F3 • Select Paste List Use Named Ranges in Formulae When using a named range in a Formula, you can select Use in Formula to insert the named range. Alternatively, you can select F3, which brings up a list of Named Ranges. 47 of 76
  • 48.
    100 Excel Tips Tricks Using CTRL as a Function Key CTRL+’ Copies a formula from the cell above the active cell into the cell or the Formula Bar. CTRL+” Copies the value from the cell above the active cell into the cell or the Formula Bar. CTRL++ Displays the Insert dialog box to insert blank cells. CTRL+1 Displays the Format Cells dialog box. CTRL+2 Applies or removes bold formatting. CTRL+3 Applies or removes italic formatting. CTRL+4 Applies or removes underlining. CTRL+5 Applies or removes strikethrough. CTRL+6 Alternates between hiding objects, displaying objects, and displaying placeholders for objects. CTRL+7 Displays or hides the Standard toolbar. CTRL+8 Displays or hides the outline symbols. CTRL+9 Hides the selected rows. CTRL+0 Hides the selected columns. 48 of 76 Keys CTRL+F8 performs the Size command (on the Control menu for the workbook window) when a workbook is not maximized. ALT+F8 displays the Macro dialog box to run, edit, or delete a macro. F9 Calculates all worksheets in all open workbooks. F9 followed by ENTER (or followed by CTRL+SHIFT+ENTER for array formulas) calculates the selected a portion of a formula and replaces the selected portion with the calculated value. SHIFT+F9 calculates the active worksheet. CTRL+ALT+F9 calculates all worksheets in all open workbooks, regardless of whether they have changed since the last calculation. CTRL+ALT+SHIFT+F9 rechecks dependent formulas, and then calculates all cells in all open workbooks, including cells not marked as needing to be calculated. CTRL+F9 minimizes a workbook window to an icon. F10 Selects the menu bar or closes an open menu and submenu at the same time. SHIFT+F10 displays the shortcut menu for a selected item. ALT+SHIFT+F10 displays the menu or message for a smart tag. If more than one smart tag is present, it switches to the next smart tag and displays its menu or message. CTRL+F10 maximizes or restores the selected workbook window. F11 Creates a chart of the data in the current range. SHIFT+F11 inserts a new worksheet. ALT+F11 opens the Visual Basic Editor, in which you can create a macro by using Visual Basic for Applications (VBA). ALT+SHIFT+F11 opens the Microsoft Script Editor, where you can add text, edit HTML tags, and modify any script code. F12 Displays the Save As dialog box.
  • 49.
    100 Excel Tips Tricks Other Useful Using CTRL as a Function Key ARROW KEYS CTRL+A Selects the entire worksheet. • Move one cell up, down, left, or right in a worksheet. • CTRL+ARROW KEY moves to the edge of the current data region in a worksheet. • SHIFT+ARROW KEY extends the selection of cells by one cell. • CTRL+SHIFT+ARROW KEY extends the selection of cells to the last nonblank cell in the same column or row as the active cell. • LEFT ARROW or RIGHT ARROW selects the menu to the left or right when a menu is visible. When a submenu is open, these arrow keys switch between the main menu and the submenu. • DOWN ARROW or UP ARROW selects the next or previous command when a menu or submenu is open. • In a dialog box, arrow keys move between options in an open drop-down list or between options in a group of options. • ALT+DOWN ARROW opens a selected drop-down list. BACKSPACE • Deletes one character to the left in the Formula Bar. • Also clears the content of the active cell. DELETE • Removes the cell contents (data and formulas) from selected cells without affecting cell formats or comments. • In cell editing mode, it deletes the character to the right of the insertion point. END • Moves to the cell in the lower-right corner of the window when SCROLL LOCK is turned on. • Also selects the last command on the menu when a menu or submenu is visible. • CTRL+END moves to the last cell on a worksheet, in the lowest used row of the rightmost used column. • CTRL+SHIFT+END extends the selection of cells to the last used cell on the worksheet (lower-right corner). ENTER • Completes a cell entry from the cell or the Formula Bar, and selects the cell below (by default). • In a data form, it moves to the first field in the next record. • Opens a selected menu (press F10 to activate the menu bar) or performs the action for a selected command. • In a dialog box, it performs the action for the default command button in the dialog box (the button with the bold outline, often the OK button). • ALT+ENTER starts a new line in the same cell. • CTRL+ENTER fills the selected cell range with the current entry. the worksheet contains If data, CTRL+A selects the current region. Pressing CTRL+A a second time selects the entire worksheet. When the insertion point is to the right of a function name in a formula, this displays the Function Arguments dialog box. CTRL+SHIFT+A inserts the argument names and parentheses when the insertion point is to the right of a function name in a formula. CTRL+B Applies or removes bold formatting. Copies the selected cells. CTRL+C CTRL+C followed by another CTRL+C displays the Microsoft Office Clipboard. CTRL+D Uses the Fill Down command to copy the contents and format of the topmost cell of a selected range into the cells below. CTRL+F Displays the Find dialog box. SHIFT+F5 also displays this dialog box, while SHIFT+F4 repeats the last Find action. CTRL+G Displays the Go To dialog box. also displays this F5 dialog box. CTRL+H Displays the Find and Replace dialog box. Applies or removes italic CTRL+I formatting. CTRL+K Displays the Insert Hyperlink dialog box for new hyperlinks or the Edit Hyperlink dialog box for selected existing hyperlinks. • SHIFT+ENTER completes a cell entry and selects the cell above. 49 of 76
  • 50.
    100 Excel Tips Tricks Using CTRL as a Function Key Keys CTRL+L Displays the Create List dialog box. HOME • Moves to the beginning of a row in a worksheet. Creates a new, blank file. CTRL+N • Moves to the cell in the upper-left corner of the window when SCROLL LOCK is turned on. CTRL+O Displays the Open dialog box to open or find a file. • Selects the first command on the menu when a menu or submenu is visible. CTRL+SHIFT+O selects all cells that contain comments. • CTRL+SHIFT+HOME extends the selection of cells to the beginning of the worksheet. CTRL+P Displays the Print dialog box. CTRL+R Uses the Fill Right command to copy the contents and format of the leftmost cell of a selected range into the cells to the right. CTRL+S Saves the active file with its current file name, location, and file format. Applies or removes CTRL+U underlining. Inserts the contents of the CTRL+V Clipboard at the insertion point and replaces any selection. Available only after you cut or copied an object, text, or cell contents. CTRL+W Closes the selected workbook window. Cuts the selected cells. CTRL+X CTRL+Y Repeats the last command or action, if possible. CTRL+Z Uses the Undo command to reverse the last command or to delete the last entry you typed. CTRL+SHIFT+Z uses the Undo or Redo command to reverse or restore the last automatic correction when AutoCorrect Smart Tags are displayed. 50 of 76 • CTRL+HOME moves to the beginning of a worksheet. PAGE DOWN • Moves one screen down in a worksheet. • ALT+PAGE DOWN moves one screen to the right in a worksheet. • CTRL+PAGE DOWN moves to the next sheet in a workbook. • CTRL+SHIFT+PAGE DOWN selects the current and next sheet in a workbook. PAGE UP • Moves one screen up in a worksheet. • ALT+PAGE UP moves one screen to the left in a worksheet. • CTRL+PAGE UP moves to the previous sheet in a workbook. • CTRL+SHIFT+PAGE UP selects the current and previous sheet in a workbook. SPACEBAR • In a dialog box, performs the action for the selected button, or selects or clears a check box. • CTRL+SPACEBAR selects an entire column in a worksheet. • SHIFT+SPACEBAR selects an entire row in a worksheet. • CTRL+SHIFT+SPACEBAR selects the entire worksheet. • If the worksheet contains data, CTRL+SHIFT+SPACEBAR selects the current region. Pressing CTRL+SHIFT+SPACEBAR a second time selects the entire worksheet. • When an object is selected, CTRL+SHIFT+SPACEBAR selects all objects on a worksheet. • ALT+SPACEBAR displays the Control menu for the Excel window. TAB • Moves one cell to the right in a worksheet. • Moves between unlocked cells in a protected worksheet. • Moves to the next option or option group in a dialog box. • SHIFT+TAB moves to the previous cell in a worksheet or the previous option in a dialog box. • CTRL+TAB switches to the next tab in dialog box. • CTRL+SHIFT+TAB switches to the previous tab in a dialog box.
  • 51.
    100 Excel Tips Tricks Microsoft Chart Advisor Chart Advisor is an add-in that provides an alternate approach for creating charts in Excel 2007. This add-in uses an advanced rules engine to scan your data and, based on predefined rules, displays charts according to score. Top scoring charts are available for you to preview, tweak, and insert into your Excel worksheet. Method: Duplicate Remover for Excel Handy plug-in to find and remove duplicates from Excel. You can select, color, copy, or delete duplicate data or unique entries and compare two Excel lists with a different number of columns. Duplicates Manager for Excel Excel add-in to find and delete duplicates in Excel lists. You can delete Excel duplicates from any range, remove duplicate rows from a table, find duplicates in two Excel lists, and more. Fuzzy Duplicate Finder for Excel Allows you to find and correct Fuzzy Excel duplicates, typos, misspelled words, and similar records in Excel workbooks. Pick a data set you want to chart and select a cell in the data. Then click on the Chart Advisor button in the Insert Menu (highlighted in this picture). Merge Cell Wizard for Excel Add-in for merging Excel cells values, columns, and rows. Places values from several cells to one cell or joins several cells, preserving their values. Text Manager Helps you work with text in Excel. You can change case, remove characters or text (such as excess spaces), or join (concatenate), text from several cells to one. Backup Assistant Chart Advisor Overview panel. Notice the chart recommendations in a row at the top and the ability to see chart scores as tool tips when hovering over the score. Make backup copies of Excel workbooks before you change them. You are prompted to back up a file immediately after it is opened. Merge Tables for Excel Handy add-in to look up and copy matching data from Excel lists. For example, you can merge matching rows from an Excel table of product numbers and prices to the table with product IDs and descriptions. 51 of 76
  • 52.
    100 Excel Tips Tricks Download this add-in at: www.officelabs.com Advanced Find and Replace Search and replace in all opened Excel workbooks and worksheets. Simultaneous search in values, formulas, hyperlinks, and comments. Advanced Excel Select If you have ever tried to find cells containing conditional formats, formulas, comments, and so on, you would highly appreciate this add-in. List Assistant Is an easy way to rearrange rows in your worksheet. Swap two rows, Insert a row, and more. Random Number Generator for Excel This handy add-in generates random numbers in Excel. Just select a range of cells, indicate the starting and ending values, and get a random sequence—integer or real numbers, dates, strings, or Booleans. Random Sampler If you need to sample a set of data, the Random Sampler add-in will quickly and easily obtain samples for you. CSV File Creator Converts Excel workbooks into CSV file format. You can convert all Excel worksheets, convert just a single sheet or a specific range of each selected file, and more. AutoFormat for Pivot Tables for Excel With AutoFormat you can create, store, and use your own formats for Excel PivotTables. You can save your own PivotTable format and apply it as a template for your PivotTables with one click. Download these add-ins and more Excel add-ins at: www.officeaddins.com 52 of 76
  • 53.
    100 Excel Tips Tricks 80. How do you apply a Filter? • Select any cell within the data list you wish to filter • From the Data tab, in the Sort Filter group, select Filter • Drop-down arrows appear on each column heading • Select the drop-down arrow in the column you want to filter • Select the Items you want to filter by • Select OK 81. How do you Clear all Filters? The Data Tab Filtering Data In Microsoft Excel 2007, AutoFilter is just called Filter. You are now able to Filter by Color and Dates. The Filtering automatically groups the Dates into Years and Months. You are also able to Filter by more that one item. • From the Data tab, in the Sort Filter group, select Clear 82. How do you remove Duplicates? • Select the range of cells/table/list that contains the duplicates • From the Data tab, in the Data Tools group, select Remove Duplicates • Select the Column/s that contains the duplicates • Select OK • You will get a message notifying you of how many duplicates are removed • Select OK The Column that has been filtered displays a filter symbol next to the drop-down arrow . Clearing All Filters This allows you to keep the Filter arrows on but ensures any filters that have been applied to the columns, are removed. Removing Duplicates When you remove duplicate values, only the values in the range of cells or table are affected. Any other values outside the range of cells or table are not altered or moved. Ensure that if you are removing duplicates from a column within a table, you select the entire table, as otherwise only those cells will be removed. Because you are permanently deleting data, it’s a good idea to copy the original range of cells or table to another worksheet or workbook before removing duplicate values. 53 of 76
  • 54.
    100 Excel Tips Tricks The Data Tab Splitting Columns There may be times when you need split one column worth of information into two or more columns. Using the Text To Columns tool means that this split doesn’t have to be a manual process. Before: After: 54 of 76 83. How do you spilt columns? • Identify the item that separates the columns (for instance, #) • Highlight the range of cells you would like to split • From the Data tab, in the Data Tools group, select Text to Columns • Select Next • Enter in the separator symbol (for example, #) • Select Next • Select Finish
  • 55.
    100 Excel Tips Tricks 84. ow do you ensure the End Date is greater than the Start H Date in a cell? • Select the range of cells for which you would like to apply Data Validation • From the Data tab, in the Data Tools group, select Data Validation • From the Allow drop-down box, select Date • From the Data drop-down box, select Greater Than • From the Start Date box, enter in the cell where the first Start Date appears • Select OK • You can now enter in the dates, and if you happen to enter in a date less than the start date, you will get an error 85. How do you Circle Invalid Data? • Apply the necessary Data Validation • From the Data tab, in the Data Tools group, select the drop-down arrow from Data Validation • Select Circle Invalid Data The Data Tab Using Data Validation to Ensure the End Date is Greater Than the Start Date Making sure that the data users enter into a worksheet conforms to certain standards is difficult if you have no way of enforcing the rule. With Data Validation, you can: • Provide users with a drop-down list of choices (so they can’t input data incorrectly). • Restrict entries to a specific type or size. Example In the below example, you would like to ensure that the End Date is always greater than the Start Date. To ensure this, you apply Data Validation to ensure that the Date in cell B2 must be greater than the Date in cell A2. Circling Invalid Data If you have a set of data and wish to highlight data that is invalid, you can use the Circle Invalid Data option. This is usually used with data that has already been entered. This is a two stage process: • Apply data validation • Circle invalid data If you are planning to protect the worksheet or workbook, protect it after you have finished setting up validation. Make sure you unlock any validated cells before protecting the worksheet; otherwise, users won’t be able to type in the cells. 55 of 76
  • 56.
    100 Excel Tips Tricks The Review Tab Protecting Worksheets By protecting your worksheet, you can prevent users from accidentally or deliberately changing, moving, or deleting important information on the worksheet. If you deselect Select Locked Cells, when the worksheet is protected, the user can only select the cells that were unlocked. 86. Is there is quick way to Protect and Unprotect worksheets? • Right-click on the Sheet tab and select Protect Sheet • Select the desired options under Allow all users of this worksheet to • Once you have protected the worksheet, the Protect Sheet icon changes to Unprotect Sheet • Select this icon to unprotect the worksheet 87. How do you Unlock Cells? • Select the cells, columns, or rows that can be edited • On the Home tab, in the Cells group, select Format • Note that the Lock Cell icon is highlighted orange, by default, indicating that the cell will be locked when the worksheet protection is activated OR • You can also check the locked status by selecting Format Cells • Select the heading tab Protection • If there is NO tick in the Locked box, it means the cell is NOT locked • Select OK Being Able to Edit Certain Cells on a Protected Worksheet The cells that you unlock are the cells that can be edited. 56 of 76
  • 57.
    100 Excel Tips Tricks 88. How do you Hide Formulae on a protected worksheet? • Hide the formulae: • Select the cell/s that need to have formula hidden • Right-click on the selected cells • Select the heading tab Protection • Select the check box Hidden • Select OK • Protect the worksheet: The Data Tab Hide Formula on a Protected Worksheet By selecting Hidden in the Protection dialogue box, you are able to hide any formula used when you protect the worksheet. • Select Protect Sheet This is assuming that when you are protecting your worksheet, you have allowed for Select Locked Cells. • Enter in a password if necessary Before: • Right-click on the desired worksheet tab • Select OK • Now when selecting the cells with formulae, the formulae will not show in the formula bar 89. How do you Protect the Workbook and allow Read Only Access? After: • Ensure the workbook that is being password protected is open • Select the Office Button • Select Save As • From the bottom left of the Save As dialog box select Tools, General Options • From the Save Options dialog box, in the Password to modify box, enter in the desired password • The password will appear as stars (****) • You will be asked to enter in the password twice to verify the password • Select OK • Select Save • The next time the file is opened, you will be asked for a password • If the user does not have the password, they can select Read Only Password Protection and Read Only Access You would like to password protect a workbook but still allow people to open it as read only. Using the Password To Modify option makes this happen. 57 of 76
  • 58.
    100 Excel Tips Tricks Did You Know? • Using Excel shortcuts can increase your overall efficiency by saving you time, hence saving you money • By applying a keyboard shortcut to a macro, you can add your keyboard shortcut combinations. • There have been a number of hidden “features” in versions of Excel over the years. These features, known as easter eggs, can be found in types of software such as computer games or on DVDs. Various Excel easter eggs have included: • A maze very similar to the computer game “Doom” (Excel 95) Top Reasons to Use Microsoft Excel 2007 Here are the top ten ways in which Microsoft Excel 2007 can help you create spreadsheets and analyze, share, and manage information more effectively. 1. Create and work with interactive PivotTable views with ease. PivotTable views enable you to quickly reorient your data to help you answer multiple questions. Find the answers you need faster and create and use PivotTable views more easily by dragging fields where you want them to be displayed. 2. mport, organize, and explore massive data sets within significantly I expanded spreadsheets. Work with massive amounts of data in Microsoft Excel 2007, which supports spreadsheets that can be up to one million rows by 16,000 columns. In addition to the bigger grid, Microsoft Excel 2007 supports multicore processor platforms for faster calculation of formula-intense spreadsheets 3. “See” important trends and find exceptions in your data. Apply conditional formatting to your information more easily to discover patterns and highlight trends in your data. New schemes include color gradients, heat maps, data bars, and performance indicator icons. • An auto racing game (Excel 2000) • A flight simulator (Excel 97) 4. icrosoft Excel 2007 features the Microsoft Office Fluent user interface M to help you find powerful tools when you need them. Find the tools you want when you need them using the results-oriented Office Fluent user interface in Microsoft Excel 2007. Based on the job you need to accomplish, whether it’s creating a table or writing a formula, Microsoft Excel 2007 presents the appropriate commands when you need them. 5. Enjoy improved and powerful support for working with tables. Create, format, expand, filter, and refer to tables within formulas because Microsoft Excel 2007 has greatly improved support for tables. When you’re viewing data contained in a large table, Microsoft Excel 2007 keeps table headings in view while you scroll. 58 of 76
  • 59.
    100 Excel Tips Tricks Top Reasons to Use Microsoft Excel 2007 6. se the completely redesigned charting engine in Microsoft Excel 2007 U to communicate your analysis in professional-looking charts. Build professional-looking charts more quickly with fewer clicks using charting tools in the Office Fluent user interface. Apply rich visual enhancements to your charts such as 3-D effects, soft shadowing, and transparency. Create and interact with charts the same way across all Microsoft Office applications in the same way because the charting engine is the same in all. Did You Know? ALT + Click = “Research” The Research tool is an easy way to find more information regarding the contents of a cell. For example, type in YHOO in cell A1. Select the cell holding down the ALT key. This brings up the “Research” window, which allows you to, among other things, search the word through various language dictionaries, check the current stock price (if a valid stock code), and more. For stock quotes, you can even insert the current stock price into the spreadsheet. 7. se Microsoft Excel 2007 and Excel Services to help share spreadsheets U more securely with others. Excel Services, a feature of Microsoft Office SharePoint Server 2007, dynamically renders a spreadsheet as HTML so others can access the information using a web browser. Because of the high degree of fidelity with the Microsoft Excel 2007 client, Excel Services users can navigate, sort, filter, input parameters, and interact with the information, all within their web browser. 8. elp ensure you and your organization work with the most current H business information. Prevent the spread of multiple or outdated copies of a spreadsheet throughout your organization by using Micosoft Excel 2007 and Office SharePoint Server 2007. Control which users can view and modify spreadsheets on the server using permission-based access. 9. educe the size of spreadsheets and improve damaged file recovery R at the same time. The new, compressed Microsoft Office Excel XML Format offers a dramatic reduction in file size, while its architecture offers an improvement in data recovery for damaged files. 10. xtend your business intelligence investments because Office Excel 2007 E provides full support for Microsoft SQL Server® 2005 Analysis Services. New cube functions in Microsoft Excel 2007 let you build a custom report from an OLAP database. You can also connect to external sources of data more easily using the Data Connection Library. 59 of 76
  • 60.
    100 Excel Tips Tricks The View Tab 90. How do you record a new Macro? • On the Status bar select the Record Macro button Recording Macros A shortcut to recording a macro is located on the status bar on the bottom of the Microsoft Excel screen. Record • From the Macro Name box, enter the desired Name • From the Store Macro In box, select the desired Option 91. How do you activate the Developer Tab? • Select the Office Button While you are recording a macro, the Record Macro button changes to a Stop Recording button. Stop Recording Macro names cannot contain spaces. Saving Workbook With a Macro You need to ensure that when you have created a Macro and stored it in this workbook, you save the Workbook in a *.xlsm format. • Select Excel Options • Select Show Developer tab in the Ribbon 92. How do you save a Workbook in *.xlsm format? • Select the Office Button • Select Save As • Select Excel Macro-Enabled Workbook 93. How do you change the Security Levels for Macros? • Select the Office Button Select the Excel Options button Developer Tab • On the left side of the dialogue box, select Trust Center You first need to make sure your Developer tab is activated in order to get into Visual Basic. • On the right side, select the Trust Center Settings button • On the left side, select Macro Settings • Select Disable all macros with Notification • Select OK, OK Macro Security Levels When using macros in Microsoft Excel 2007, ensure that the appropriate security level, has been selected. To access the security levels you need to use the Trust Center. 60 of 76
  • 61.
    100 Excel Tips Tricks 94. ow do you create a Macro that sorts worksheets H in alphabetical order? • Select the Office button • Select Excel Options • Select Show Developer tab in the Ribbon (if not already on) • From the Developer tab in the Code group, select Visual Basic • Select the Module you would like to insert the coding into • On the right-hand side paste the Visual Basic coding The View Tab Sorting Worksheets in Alphabetical Order With the following Visual Basic macro, called SortSheets, added to your workbook, you can order the worksheets alphabetically quickly and easily. • From the Menu bar, select File, Close and Return to Microsoft Excel Visual Basic Coding: • Press Alt + F8 to get a list of Macros Sub SortSheets() Dim sCount As Integer, K As Integer, L As Integer Application.ScreenUpdating = False sCount = Worksheets.Count If sCount = 1 Then Exit Sub For K = 1 To sCount - 1 For L = K + 1 To sCount If Worksheets(L).Name Worksheets(K).Name Then Worksheets(L).Move Before:=Worksheets(K) End If Next L Next K End Sub • Select SortSheets • Select Run 95. ow do you create a Macro that opens a worksheet H on a specific worksheet? • Open Microsoft Excel • Press Alt + F11 • This opens the Visual Basic Editor • On the far left, under Microsoft Excel Object, select ThisWorkbook • On the right-hand side, paste the coding in the sidebar • In the second line of the coding, change Sheet1, to the sheet name (tab) you wish to land on • In the third line of the coding, change A1 to the cell you wish to land on • From the Menu bar, select File, Close and Return to Microsoft Excel • Save and close the Microsoft Excel workbook • Ensure you save the Microsoft Excel 2007 workbook as a *.xlsm • The next time you open the workbook, it will open on the specific worksheet and cell Opening a Workbook on a Specific Worksheet The following code allows you to specify which worksheet, even which cell, you would like to appear when the workbook opens. Visual Basic Coding: Private Sub Workbook_Open() Sheets(“Sheet1”).Select Range(“a1”).Select End Sub 61 of 76
  • 62.
    100 Excel Tips Tricks The View Tab Copy and Save a Worksheet Into a New File Automatically 96. ow do you create a Macro that copies and saves H a worksheet into a new worksheet automatically? • Ensure you are in Microsoft Excel By using the following code, you can automatically copy the current worksheet to a new workbook, then automatically save the workbook using the contents of a cell as the file name. • Press ALT + F11 to open the Visual Basic Editor Note: • From the Menu bar, select File, Close and Return to Microsoft Excel • The below Macro is written to take • Enter in the necessary data into cell A1 the data from cell A1 and use it as the file name • The below Macro is written to automatically save the workbook in C:My Documents • If you do not have this directory, the Macro will give an error Visual Basic Coding: Public Sub SaveWorksheet() ActiveSheet.Copy ‘ Copies active sheet to a new workbook ActiveWorkbook.SaveAs “C:My Documents” Range(“A1”).Value End Sub 62 of 76 • If necessary, Insert a Module • From the VBAProject (Personal.xlsb), select the Module folder • From the Menu, select Insert, Module • On the right-hand side, paste the above coding • Run the Macro
  • 63.
    100 Excel Tips Tricks 97. ow do you create a Macro that removes embedded H hyperlinks? • Ensure you are on the worksheet you would like to remove the hyperlinks from • Press ALT + F11 to open the Visual Basic Editor • From the Menu bar, select Insert Module • Copy and paste the coding in the sidebar into the Window on the right • From the Menu bar, select File, Close and Return to Microsoft Excel • Press ALT + F8 to view a list of Macros The View Tab Removing Embedded Hyperlinks With Visual Basic Sometimes a copy and paste of Internet-based materials can also bring across embedded hyperlinks. The following code removes all hyperlinks from the worksheet. • Select the Macro, RemoveHyperlinks Visual Basic Coding: • Select Run Sub RemoveHyperlinks() ‘Remove all hyperlinks from the active sheet ActiveSheet.Hyperlinks.Delete End Sub 63 of 76
  • 64.
    100 Excel Tips Tricks The View Tab Using Group and Outline on Protected Worksheets 98. ow do you create a macro that allows you to use group H and outline on protected worksheets? • Open the desired workbook The Group and Outline tool is a fantastic utility; however, you cannot, by default, apply grouping to protected worksheets. The following code helps you get around this. • Press Alt + F11 to open the Visual Basic Editor window Note: If you would like to apply the Visual Basic coding, simply copy the coding highlighted in blue and adjust the worksheet name. • Select the Module 1 and on the right-hand side, paste the below coding You are going to add some simple VISUAL BASIC coding into the workbook. This code has the password “hi” built in, so it is automatically protected. You can change the password in the below script if you wish. When the user opens the workbook, they will need to select, “Enable Macros.” For this example the workbook name is Report, and the worksheet name is January. Visual Basic Coding: Option Explicit Sub auto_open() With Worksheets(“January”) .Protect Password:=”hi”, userinterfaceonly:=True .EnableOutlining = True ‘.EnableAutoFilter = True End With End Sub 64 of 76 • On the left you should see your Project (with your file name for example VBAProjectReport) • Right-click on the Project and select Insert, Module • A folder called modules should appear with a Module underneath • Remember to change the worksheet name and password • Close the Microsoft Visual Basic window (File, Close and Return to Microsoft Excel) • Close the workbook and reopen • You should be asked to Enable Macros • Your workbook should still be protected, but you should be able to use your grouping
  • 65.
    100 Excel Tips Tricks 99. How do you assign a Macro to the Quick Access Toolbar? • Right-click over the Quick Access Toolbar • Select Customize Quick Access Toolbar • In the Choose commands from drop-down box select Macros • Select the macro you want to add • Select Add • To modify the Macro icon, select it in the right-hand window and then select Modify The View Tab Assigning a Macro to the Quick Access Toolbar Once you have recorded a Macro, you can assign it to the Quick Access Toolbar. This makes running the Macro much easier and more accessible. • Select the new icon and rename the macro • Select OK There are a number of buttons to choose from when allocating the Macro to a button. 65 of 76
  • 66.
    100 Excel Tips Tricks Using Programs outside of Microsoft Excel 100. ow do you link a Microsoft Excel worksheet to H Microsoft PowerPoint? PowerPoint to Microsoft Excel • In Microsoft Excel, select the desired cell/cells A Microsoft PowerPoint presentation can be linked to a Microsoft Excel worksheet by using the Paste Link option. • Right-click on the selected cell/cells You don’t need to have both Microsoft PowerPoint and Microsoft Excel open for it to update. If you make changes to the Microsoft Excel workbook, when you open PowerPoint, you will be asked to Update Links. • From the Home tab, in the Clipboard group, select the drop-down arrow under Paste • Select Copy • In Microsoft PowerPoint, create a new slide • In Microsoft PowerPoint 2007: • Select Paste Special • Select Paste Link • In the As box, select Microsoft Office Excel 2003 Worksheet Object • Select OK • You can resize the object as desired Although the title of this book indicates only 100 tips and tricks, at Alchemex we always like to exceed expectations, so we threw in tip 101 below for good measure as well. We hope you have benefited from these tips and you have become more efficient in using Excel 2007. 101. ow do you link a Microsoft Excel worksheet H to Microsoft Word? • From Microsoft Excel, select the range to be copied to Microsoft Word • Right-click on the selected range, select Copy • Open the desired document in Microsoft Word • Right-click on the desired area, select Paste Copying Microsoft Excel Data to Microsoft Word • From the bottom right of the Pasted object, select the Clipboard icon You may find at times when working in Microsoft Word you need to refer to a part of a worksheet in Microsoft Excel. It is possible to simply copy and paste between the two programs, but even more interesting is that you can ensure there is a link back to the Microsoft Excel worksheet in the case of any changes. • If you now make changes to the Microsoft Excel worksheet, the object in 66 of 76 • Select Keep Source Formatting and Link to Excel Microsoft Word updates
  • 67.
    100 Excel Tips Tricks GLOSSARY A activate To make a chart sheet or worksheet the active, or selected, sheet. The sheet that you activate determines which tabs are displayed. To activate a sheet, click the tab for the sheet in the workbook. active cell The selected cell in which data is entered when you begin typing. Only one cell is active at a time. The active cell is bounded by a heavy border. active sheet The sheet that you’re working on in a workbook. The name on the tab of the active sheet is bold. address The path to an object, document, file, page, or other destination. An address can be a URL (web address) or a UNC path (network address), and can include a specific location within a file, such as a Word bookmark or an Excel cell range. alternate startup folder A folder in addition to the XLStart folder that contains workbooks or other files that you want to be opened automatically when you start Excel and templates that you want to be available when you create new workbooks. argument The values that a function uses to perform operations or calculations. The type of argument a function uses is specific to the function. Common arguments that are used within functions include numbers, text, cell references, and names. array Used to build single formulas that produce multiple results or that operate on a group of arguments that are arranged in rows and columns. An array range shares a common formula; an array constant is a group of constants used as an argument. array formula A formula that performs multiple calculations on one or more sets of values, and then returns either a single result or multiple results. Array formulas are enclosed between braces { } and are entered by pressing CTRL+SHIFT+ENTER. associated PivotTable report The PivotTable report that supplies the source data to the PivotChart report. It is created automatically when you create a new PivotChart report. When you change the layout of either report, the other also changes. autoformat A built-in collection of cell formats (such as font size, patterns, and alignment) that you can apply to a range of data. Excel determines the levels of summary and detail in the selected range and applies the formats accordingly. axis A line bordering the chart plot area used as a frame of reference for measurement. The y-axis is usually the vertical axis and contains data. The x-axis is usually the horizontal axis and contains categories. B border A decorative line that can be applied to worksheet cells or objects, such as charts, pictures, or text boxes. Borders distinguish, emphasize, or group items. C calculated column In an Excel table, a calculated column uses a single formula that adjusts for each row. It automatically expands to include additional rows so that the formula is immediately extended to those rows. calculated field (database) A field in the result set of a query that displays the result of an expression rather than data from a database. calculated field (PivotTable report) A field in a PivotTable report or PivotChart report that uses a formula you create. Calculated fields can perform calculations by using the contents of other fields in the PivotTable report or PivotChart report. calculated item An item within a PivotTable field or PivotChart field that uses a formula you create. Calculated items can perform calculations by using the contents of other items within the same field of the PivotTable report or PivotChart report. category axis A chart axis that represents the category for each data point. It displays arbitrary text values like Qtr1, Qtr2, and Qtr3; it cannot display scaled numerical values. category field A field that’s displayed in the category area of the PivotChart report. Items in a category field appear as the labels on the category axis. cell A box formed by the intersection of a row and column in a worksheet or a table, in which you enter information. cell reference The set of coordinates that a cell occupies on a worksheet. For example, the reference of the cell that appears at the intersection of column B and row 3 is B3. chart area The entire chart and all its elements. chart sheet A sheet in a workbook that contains only a chart. A chart sheet is beneficial when you want to view a chart or a PivotChart report separately from worksheet data or a PivotTable report. column field A field that’s assigned a column orientation in a PivotTable report. Items associated with a column field are displayed as column labels. 67 of 76
  • 68.
    100 Excel Tips Tricks column heading The shaded area at the top of each Data pane column that contains the field name. column heading The lettered or numbered gray area at the top of each column. Click the column heading to select an entire column. To increase or decrease the width of a column, drag the line to the right of the column heading. comparison operator A sign that is used in comparison criteria to compare two values. The six standards are = Equal to, Greater than, Less than, = Greater than or equal to, = Less than or equal to, and Not equal to. conditional format A format, such as cell shading or font color, that Excel automatically applies to cells if a specified condition is true. custom calculation A method of summarizing values in the data area of a PivotTable report by using the values in other cells in the data area. Use the Show data as list on the PivotTable Field dialog for a data field to create custom calculations. D data region A range of cells that contains data and that is bounded by empty cells or datasheet borders. data series Related data points that are plotted in a chart and originate from datasheet rows or columns. Each data series in a chart has a unique color or pattern. You can plot one or more data series in a chart. Pie charts have only one data series. constant A value that is not calculated. For example, the number 210 and the text “Quarterly Earnings” are constants. An expression, or a value resulting from an expression, is not a constant. data source A stored set of “source” information used to connect to a database. A data source can include the name and location of the database server, the name of the database driver, and information that the database needs when you log on. copy area The cells that you copy when you want to paste data into another location. After you copy cells, a moving border appears around them to indicate that they’ve been copied. data source driver A program file used to connect to a specific database. Each database program or management system requires a different driver. criteria Conditions you specify to limit which records are included in the result set of a query. For example, the following criterion selects records for which the value for the Order Amount field is greater than 30,000: Order Amount 30000. criteria pane The area of the window that displays the criteria used to limit the records included in the result set of your query. current region The block of filled-in cells that includes the currently selected cell or cells. The region extends in all directions to the first empty row or column. 68 of 76 data table A range of cells that shows the results of substituting different values in one or more formulas. There are two types of data tables: one-input tables and two-input tables. data validation An Excel feature that you can use to define restrictions on what data can or should be entered in a cell, and to display messages that prompt users for correct entries and notify users about incorrect entries. database A collection of data related to a particular subject or purpose. Within a database, information about a particular entity, such as an employee or order, is categorized into tables, records, and fields. default startup workbook The new, unsaved workbook that’s displayed when you start Excel. The default startup workbook is displayed only if you haven’t included other workbooks in the XLStart folder. default workbook template The Book.xlt template that you create to change the default format of new workbooks. Excel uses the template to create a blank workbook when you start Excel or create a new workbook without specifying a template. dependents Cells that contain formulas that refer to other cells. For example, if cell D10 contains the formula =B5, cell D10 is a dependent of cell B5. destination area The range of cells that you select to hold the summarized data in a consolidation. The destination area can be on the same worksheet as the source data or on a different worksheet. A worksheet can contain only one consolidation. drop-down list box A control on a menu, toolbar, or dialog box that displays a list of options when you click the small arrow next to the list box. value field A field from a source list, table, or database that contains data that is summarized in a PivotTable report or PivotChart report. A value field usually contains numeric data, such as statistics or sales amounts. E embedded chart A chart that is placed on a worksheet rather than on a separate chart sheet. Embedded charts are beneficial when you want to view or print a chart or a PivotChart report with its source data or other information in a worksheet. Excel add-in Components that can be installed on your computer to add commands and functions to Excel. These add-in programs are specific to Excel. Other add-in programs that are
  • 69.
    100 Excel Tips Tricks available for Excel or Office are Component Object Model (COM) add-ins. Excel table Formerly known as an Excel list, you can create, format, and expand an Excel table to organize the data on your worksheet. expression A combination of operators, field names, functions, literals, and constants that evaluates to a single value. Expressions can specify criteria (such as Order Amount10000) or perform calculations on field values (such as Price*Quantity). external data Data that is stored in a database, such as Access, dBASE, or SQL Server, that is separate from Query and the program from which you started Query. external data range A range of data that is brought into a worksheet but that originates outside of Excel, such as in a database or text file. In Excel, you can format the data or use it in calculations as you would any other data. F field (database) A category of information, such as last name or order amount, that is stored in a table. When Query displays a result set in its Data pane, a field is represented as a column. field (PivotTable report) In a PivotTable or PivotChart report, a category of data that’s derived from a field in the source data. PivotTable reports have row, column, page, and data fields. PivotChart reports have series, category, page, and data fields. fill handle The small black square in the lowerright corner of the selection. When you point to the fill handle, the pointer changes to a black cross. filter To display only the rows in a list that satisfy the conditions you specify. You use the AutoFilter command to display rows that match one or more specific values, calculated values, or conditions. font A graphic design applied to all numerals, symbols, and alphabetic characters. Also called type or typeface. Arial and Courier New are examples of fonts. Fonts usually come in different sizes, such as 10 point, and various styles, such as bold. formula A sequence of values, cell references, names, functions, or operators in a cell that together produce a new value. A formula always begins with an equal sign (=). formula bar A bar at the top of the Excel window that you use to enter or edit values or formulas in cells or charts. Displays the constant value or formula stored in the active cell. Formula Palette A tool that helps you create or edit a formula and also provides information about functions and their arguments. function (Office Excel) A prewritten formula that takes a value or values, performs an operation, and returns a value or values. Use functions to simplify and shorten formulas on a worksheet, especially those that perform lengthy or complex calculations. G grid A set of intersecting lines used to align objects. gridlines in charts Lines you can add to a chart that make it easier to view and evaluate data. Gridlines extend from the tick marks on an axis across the plot area. group In an outline or PivotTable report, one or more detail rows or columns that are adjacent and subordinate to a summary row or column. I index A database component that speeds up searching for data. When a table has an index, data in the table can be found by looking it up in the index. input cell The cell in which each input value from a data table is substituted. Any cell on a worksheet can be the input cell. Although the input cell does not need to be part of the data table, the formulas in data tables must refer to the input cell. Insert row In an Excel table, a special row that facilitates data entry. The Insert row is indicated by an asterisk. Internet Explorer A web browser that interprets HTML files, formats them into web pages, and displays them to the user. You can download Internet Explorer from the Microsoft website at: http://www.microsoft.com. item A subcategory of a field in PivotTable and PivotChart reports. For instance, the field “Month” could have items such as “January,” “February,” and so on. J justify To adjust horizontal spacing so that text is aligned evenly along both the left and right margins. Justifying text creates a smooth edge on both sides. L legend A box that identifies the patterns or colors that are assigned to the data series or categories in a chart. 69 of 76
  • 70.
    100 Excel Tips Tricks legend keys Symbols in legends that show the patterns and colors assigned to the data series (or categories) in a chart. Legend keys appear to the left of legend entries. Formatting a legend key also formats the data marker that’s associated with it. M merged cell A single cell that is created by combining two or more selected cells. The cell reference for a merged cell is the upper-left cell in the original selected range. moving border An animated border that appears around a worksheet range that has been cut or copied. To cancel a moving border, press ESC. N outline Worksheet data in which rows or columns of detail data are grouped so that you can create summary reports. The outline can summarize either an entire worksheet or a selected portion of it. outline symbols Symbols that you use to change the view of an outlined worksheet. You can show or hide detailed data by pressing the plus sign, minus sign, and the numbers 1, 2, 3, or 4, indicating the outline level. P page break Divider that breaks a worksheet into separate pages for printing. Excel inserts automatic page breaks based on the paper size, margin settings, scaling options, and the positions of any manual page breaks that you insert. name A word or string of characters that represents a cell, range of cells, formula, or constant value. Use easy-to-understand names, such as Products, to refer to hard-to-understand ranges, such as Sales!C20:C30. page break preview Worksheet view that displays the areas to be printed and the locations of page breaks. The area to be printed is displayed in white, automatic page breaks appear as dashed lines, and manual page breaks appear as solid lines. Name box Box at left end of the formula bar that identifies the selected cell, chart item, or drawing object. To name a cell or range, type the name in the Name box and press ENTER. To move to and select a named cell, click its name in the Name box. parameter In Excel, you can add, change, or remove parameters to specify cells that are editable in the viewable worksheet data of Excel Services. When you save the workbook, the changes are automatically reflected on the server. nonadjacent selection A selection of two or more cells or ranges that don’t touch each other. When plotting nonadjacent selections in a chart, make sure that the combined selections form a rectangular shape. O operator A sign or symbol that specifies the type of calculation to perform within an expression. There are mathematical, comparison, logical, and reference operators. 70 of 76 password A way to protect your worksheet or workbook. When you protect worksheet or workbook elements with a password, it is very important that you remember that password. Without it, there is no way to unprotect the workbook or worksheet. You should always use strong passwords that combine uppercase and lowercase letters, numbers, and symbols. Weak passwords don’t mix these elements. Strong password: Y6dh!et5. Weak password: House27. Use a strong password that you can remember so that you don’t have to write it down. paste area The target destination for data that’s been cut or copied by using the Office Clipboard. pivot area The worksheet area into which you drag PivotTable or PivotChart fields to change the layout of the report. On a new report, dashed blue outlines indicate the pivot area on the worksheet. PivotChart category field A field that is assigned a category orientation in a PivotChart report. In a chart, categories usually appear on the x-axis, or horizontal axis, of the chart. PivotChart report A chart that provides interactive analysis of data, like a PivotTable report. You can change views of data, see different levels of detail, or reorganize the chart layout by dragging fields and by showing or hiding items in fields. PivotChart series field A field that is assigned a series orientation in a PivotChart report. In a chart, series are represented in the legend. PivotTable data In a PivotTable report, the summarized data that’s calculated from the data fields of a source list or table. PivotTable grand totals Total values for all cells in a row or all cells in a column of a PivotTable report. Values in a grand total row or column are calculated by using the same summary function used in the data area of the PivotTable report. PivotTable list A Microsoft Office Web Component that allows you to create a structure similar to an Excel PivotTable report. Users can view the PivotTable list in a web browser and change its layout in a manner similar to an Excel PivotTable report. PivotTable report An interactive, cross-tabulated Excel report that summarizes and analyzes data, such
  • 71.
    100 Excel Tips Tricks as database records, from various sources, including ones that are external to Excel. PivotTable report An interactive, cross-tabulated Excel report that summarizes and analyzes data, such as database records, from various sources including ones external to Excel. PivotTable subtotal A row or column that uses a summary function to display the total of detail items in a PivotTable field. plot area In a 2-D chart, the area bounded by the axes, including all data series. In a 3-D chart, the area bounded by the axes, including the data series, category names, tick-mark labels, and axis titles. precedents Cells that are referred to by a formula in another cell. For example, if cell D10 contains the formula =B5, cell B5 is a precedent to cell D10. print area One or more ranges of cells that you designate to print when you don’t want to print the entire worksheet. If a worksheet includes a print area, only the print area is printed. print titles Row or column labels that are printed at the top of or on the left side of every page on a printed worksheet. protect To make settings for a worksheet or workbook that prevent users from viewing or gaining access to the specified worksheet or workbook elements. report filter A field that’s used to filter a subset of data in a PivotTable or PivotChart report into one page for further layout and analysis. You can either display a summary of all items in a report filter, or display one item at a time, which filters out the data for all other items. R S range Two or more cells on a sheet. The cells in a range can be adjacent or nonadjacent. scenario A named set of input values that you can substitute in a worksheet model. read-only A setting that allows a file to be read or copied but not changed or saved. scroll lock With scroll lock turned on, the arrow keys scroll the active sheet rather than make a different cell active. To turn scroll lock off or on, press the SCROLL LOCK key. refresh (external data range) To update data from an external data source. Each time you refresh data, you see the most recent version of the information in the database, including any changes that were made to the data. refresh (PivotTable report) To update the contents of a PivotTable or PivotChart report to reflect changes to the underlying source data. If the report is based on external data, refreshing runs the underlying query to retrieve new or changed data. relative reference In a formula, the address of a cell based on the relative position of the cell that contains the formula and the cell referred to. If you copy the formula, the reference automatically adjusts. A relative reference takes the form A1. report template An Excel template (.xlt file) that includes one or more queries or PivotTable reports that are based on external data. When you save a report template, Excel saves the query definition but doesn’t store the queried data in the template. row heading The numbered gray area to the left of each row. Click the row heading to select an entire row. To increase or decrease the height of a row, drag the line below the row heading. row label A field that’s assigned a row orientation in a PivotTable report. select To highlight a cell or range of cells on a worksheet. The selected cells will be affected by the next command or action. Select All button The gray rectangle in the upper-left corner of a datasheet where the row and column headings meet. Click this button to select all cells on a datasheet. series axis A chart axis that represents the depth dimension in a true 3-D chart. It displays the series names as arbitrary text values; it cannot display scaled numerical values. series field A field that’s displayed in the series area of a PivotChart report. Items in a series field are listed in the legend and provide the names of the individual data series. series lines In 2-D stacked bar and column charts, lines that connect the data markers in each data series that are used to emphasize the difference in measurement between each series. sort order A way to arrange data based on value or data type. You can sort data alphabetically, numerically, or by date. Sort orders use an ascending (1 to 9, A to Z) or descending (9 to 1, Z to A) order. 71 of 76
  • 72.
    100 Excel Tips Tricks source data The list or table that’s used to create a PivotTable or PivotChart report. Source data can be taken from an Excel table or range, an external database or cube, or another PivotTable report. summary data For automatic subtotals and worksheet outlines, all rows or columns that summarize detail data. Summary data usually is adjacent to and below the detail data. summary function A type of calculation that combines source data in a PivotTable report or a consolidation table, or when you are inserting automatic subtotals in a list or database. Examples of summary functions include Sum, Count, and Average. V values area The part of a PivotTable report that contains summary data. Values in each cell of the values area represent a summary of data from the source records or rows. value axis A chart axis that displays scaled numerical values. view A set of display and print settings that you can name and apply to a workbook. You can create more than one view of the same workbook without saving separate copies of the workbook. W T template A workbook that you create and use as the basis for other similar workbooks. You can create templates for workbooks and worksheets. The default template for workbooks is called Book.xlt. The default template for worksheets is called Sheet.xlt. text box A rectangular object on a worksheet or chart, in which you can type text. tick marks and tick-mark labels Tick marks are small lines of measurement, similar to divisions on a ruler, that intersect an axis. Tickmark labels identify the categories, values, or series in the chart. titles in charts Descriptive text that is automatically aligned to an axis or centered at the top of a chart. total row A special row in an Excel table that provides a selection of aggregate functions useful for working with numerical data. Web query A query that retrieves data stored on your intranet or the Internet. workbook A spreadsheet program file that you create in Excel. A workbook contains worksheets of rows and columns in which you can enter and calculate data. World Wide Web A system for navigating the Internet or through a collection of workbooks and other Office documents connected by hyperlinks and located on a network share, a company intranet or the Internet. When you use a web browser, the web appears as a collection of text, pictures, sounds, and digital movies. wrap In text, to break a line of text automatically on reaching a margin or object and continue the text on a new line. X XML Extensible Markup Language (XML): A condensed form of Standard Generalized Markup Language (SGML) that enables developers to create customized tags that offer flexibility in organizing and presenting information. 3 3-D reference A reference to a range that spans two or more worksheets in a workbook. worksheet The primary document that you use in Excel to store and work with data. Also called a spreadsheet. A worksheet consists of cells that are organized into columns and rows; a worksheet is always stored in a workbook. workspace file A file that saves display information about open workbooks, so that you can later resume work with the same window sizes, print areas, screen magnification, and display settings. A workspace file doesn’t contain the workbooks themselves. Thank you to the Microsoft Corporation for the detailed Glossary of Terms 72 of 76
  • 73.
    Sage Intelligence Make smarter,more confident business decisions more quickly than ever before. A robust, integrated report designer in a familiar Excel format. Sage Intelligence powered by Alchemex is an intelligent step forward for accounting and business professionals who are struggling with their current reporting needs. Use the familiar interface of Microsoft Excel to access critical business information. Make insightful decisions with customizable dashboards Transform data from multiple data sources into strategic decision-making intelligence Quickly identify and respond to trends and abnormalities, use multidimensional analysis, and perform “what if” scenarios that go beyond just transactional data Easily manage and consolidate data from multiple companies and gain a competitive edge to succeed in today’s fast-paced global market Sage Intelligence powered by Alchemex is integrated into many Sage accounting software solutions. For a complete listing of Sage products, or for further information about Sage North America, visit: www.SageNorthAmerica.com
  • 76.
    Sage North Americais part of The Sage Group plc, a leading global supplier of business management software and services. At Sage, we live and breathe business every day. We are passionate about helping our customers achieve their ambitions. Our range of business software and services is continually evolving as we innovate to answer our customers’ needs. Our solutions support accounting, operations, customer relationship management, human resources, time tracking, merchant services, and the specialized needs of the construction, distribution, healthcare, manufacturing, nonprofit, and real estate industries. Sage North America employs more than 5,000 people and supports nearly 2.9 million small and medium-size business customers. The Sage Group plc, formed in 1981, was floated on the London Stock Exchange in 1989 and now employs 14,800 people and supports 5.7 million customers worldwide. ©2011 Sage Software, Inc. All rights reserved. Sage, the Sage logos, and the Sage product and service names mentioned herein are registered trademarks or trademarks of Sage Software, Inc., or its affiliated 11-29061/0611 entities. All other trademarks are the property of their respective owners.