SlideShare a Scribd company logo
Hamid Ghorbani (ReactJs Basics) https://ir.linkedin.com/in/ghorbanihamid
Single page application
As many of you know, creating a simple web application today involves writing the HTML, CSS, and
JavaScript code. The reason we use three different technologies is because we want to separate three
different concerns, Content (HTML) , Styling (CSS), Logic (JavaScript). Today, we mostly don't think of
a website as a collection of web pages anymore. Instead, we build web applications that might have only
one web page, and that web page does not represent the layout for our content, it represents a container
for our web application. Such a web application with a single web page is called a Single Page Application
(SPA).
A single-page application (SPA) is a web application or web site that interacts with the user by
dynamically rewriting the current page rather than loading entire new pages from a server. The most
notable difference between a regular website and an SPA is the reduced amount of page refreshes. SPAs
have a heavier usage of AJAX to get data loaded into our application.
Popular JavaScript Frameworks for Building SPAs
There are a lot of open source JavaScript frameworks that help with building SPAs, such as:
- React - Angular
- Ember - Vue.js
- Backbone - Cycle.js
Hamid Ghorbani (ReactJs Basics) https://ir.linkedin.com/in/ghorbanihamid
ReactJs
React.js or ReactJS is a JavaScript library for building user interfaces specifically for single page
applications(SPA). It is maintained by Facebook, Instagram and a community of individual developers
and corporations. React allows developers to create large web-applications that use data and can change
over time without reloading the page. It aims primarily to provide speed, simplicity, and scalability.
React processes only user interfaces in applications. This corresponds to View in the Model-View-
Controller (MVC) pattern, and can be used in combination with other JavaScript libraries or frameworks
in MVC, such as AngularJS. React doesn’t handle backend logic or databases; it just creates a frontend
build pipeline, so you can use it with any backend you want.
Once you load your web page in a web browser, it creates a Document Object Model (DOM) of that web
page in a tree structure. In traditional web pages, you would finish creating your web page's layout, but
in SPA, you would need to manipulate the DOM and change page elements with JavaScript, because our
web applications are not static. ReactJS uses a different solution to find the minimum number of steps
to update the Real DOM, called the virtual DOM. The virtual DOM is a fast, in-memory representation
of the real DOM, and it's an abstraction that allows us to treat JavaScript and DOM as if they were
reactive. Whenever the state of your data model changes, the virtual DOM and React will rerender your
UI to a virtual DOM representation. React updates only what needs to be updated in the real DOM.
The process of finding a difference between the two representations of the virtual DOM and rerendering
only the updated patches in a real DOM is fast.
Hamid Ghorbani (ReactJs Basics) https://ir.linkedin.com/in/ghorbanihamid
ReactJS Features:
ECMAScript 6:
React uses some features from ECMAScript 6 (ES6), a recent version of JavaScript. ECMAScript is
a trademarked scripting-language specification standardized by Ecma International in ECMA-262. It
was created to standardize JavaScript. JavaScript has remained the best-known implementation of
ECMAScript.
JSX:
In React, instead of using regular JavaScript for templating, it uses JSX. JSX is a statically-typed, HTML-
like syntax and object-oriented programming language designed to run on modern web browsers. JSX
is simple JavaScript which allows HTML quoting and uses these HTML tag syntax to render
subcomponents. HTML syntax is processed into JavaScript calls of React Framework.
By using JSX and ES6 we can be more productive while working with React. But the JSX syntax and
ES6, are not supported in all the browsers. If we are using them in the React code, we need a tool to
translates them to the format that has been supported by the browsers. It's where Babel and Webpack
comes into the picture. Babel is a JavaScript compiler, Babel has support for the latest version of
JavaScript through syntax transformers. These plugins allow you to use new syntax, right now without
waiting for browser support. Webpack is a popular module bundling system for modern JavaScript
applications built on top of Node.js. It can handle not only combination and minification of JavaScript
and CSS files, but also other assets such as image files (spriting) through the use of plugins. webpack can
analyze your project's structure, find JavaScript modules and other assets to bundle and pack them for
the browser. The support of loaders in Webpack makes it a perfect fit for using it along with React. When
webpack processes your application, it recursively builds a dependency graph that includes every
module your application needs, then packages all of those modules into a small number of bundles -
often only one - to be loaded by the browser.
Hamid Ghorbani (ReactJs Basics) https://ir.linkedin.com/in/ghorbanihamid
React Native:
React has native libraries which were announced by Facebook in 2015, which provides the react
architecture to native applications like IOS, Android and UPD.
Single-Way data flow:
In React, a set of immutable values are passed to the components renderer as properties in its HTML
tags. Component cannot directly modify any properties but can pass a call back function with help of
which we can do modifications. This complete process is known as “properties flow down; actions flow
up”.
Lightweight Virtual Document Object Model:
React embraces a lightweight implementation of the events system and DOM. It doesn't use the browser,
but allows one to manipulate DOM version stored in the memory. This certainly delivers fast and
effective performance.
Components Support And Little Dependencies
The default JavaScript package manager (npm) has enticed several developers to implement the Node.js
platform with its amazingly useful features. Unlike, AngularJS that doesn't support Node.js, you can
easily use the Node.js platform in the front end while working with React. This is so because in React,
everything is treated as components. Therefore, you can easily import component by just writing the
below line.
Flux Library:
Like it has been said, React JS is actually a library made of Java scripts. Flux is one of the best libraries
that complement React JS and make it very easy for the programmers to manage data across the whole
application.
Hamid Ghorbani (ReactJs Basics) https://ir.linkedin.com/in/ghorbanihamid
Installing React:
To install React you need to download and install several small software packages, So the first thing to
install is a good package manager to install packages easily, without having to worry about dependencies.
We'll be using a popular package manager named npm.
Npm: npm is a great way to download, install, share, distribute code; manage dependencies and keep
track of JavaScript projects. You can install npm by installing Node.js. When you install Node.js, npm
will install automatically.
NodeJs: Node.js is an open-source, cross-platform JavaScript run-time environment for executing
JavaScript code server-side. Historically, JavaScript was used primarily for client-side scripting, in
which scripts written in JavaScript are embedded in a webpage's HTML, to be run client-side by a
JavaScript engine in the user's web browser. Node.js enables JavaScript to be used for server-side
scripting, and runs scripts server-side to produce dynamic web page content before the page is sent to
the user's web browser. To install Node.js on windows Simply download the Windows Installer directly
from the nodejs.org web site.
Note: Every time you make a new React app, you have to do the following steps, You don't have to
install Node.js and npm anymore, but you should start from here for every new React project
that you make.
1) Create a new folder 'react-hello-world' and initialize it with npm:
mkdir ReactHelloWorld
cd ReactHelloWorld
npm init
You will get some prompts! You can answer them, but it's also safe to Accept the default for all
the prompts (keep hitting return) and not worry about it.
Once the prompts are done, you will see that a new file named package.json
has been created!
The command npm init automatically creates a new file named package.json. package.json
contains metadata about your new project. Use your favorite text editor to open all of the files in
your project's root directory.
Hamid Ghorbani (ReactJs Basics) https://ir.linkedin.com/in/ghorbanihamid
2) Installing react module:
Type this command in the terminal:
npm install - - save react
install can be abbreviated as i, and --save can be abbreviated as -S, if you like to abbreviate:
npm i –save react
You just installed React!
3) Installing react-dom module:
Type this command in the terminal:
npm install - - save react-dom
or
npm i –save react-dom
Note: You can install both react and react-dom with one command:
npm i –save react react-dom
4) Installing Babel to enabe ES6 and JSX:
Babel is a JavaScript compiler that includes the ability to compile JSX into regular JavaScript.
ES6 is a set of modern JavaScript features that make development easier, and JSX is an
extension to the JavaScript language that works nicely with React. Installing Babel lets you use
ES6 and JSX in your JavaScript code.
Babel's npm module's name is babel-core.
npm i –save-dev babel-core
The -dev flag saves an npm module for development version only. With this flag Babel will
only be used in development mode. When a React app is shipped into production, it no longer
needs to make transformations, the transformations will be hard-coded in place.
Hamid Ghorbani (ReactJs Basics) https://ir.linkedin.com/in/ghorbanihamid
Note: --save-dev can be shortened to -D.
There are babel-related modules that you need to install them: babel-loader, babel-preset-
react and babel-preset-env.
npm i - -save-dev babel-core babel-loader babel-preset-react babel-preset-env
Without any configuration options, babel-preset-env behaves exactly the same as babel-preset-
latest (or babel-preset-es2015, babel-preset-es2016, and babel-preset-es2017 together)
Configuring babel:
In order to make Babel work, you need to write a babel configuration file.
In your root directory, create a new file named .babelrc. If you get prompted about starting a
filename with a period, go ahead and say that it's okay. Save the following code inside
of .babelrc:
{
"presets": ["react"]
}
5) Installing WebPack:
The main purpose of using webpack is to bundle JavaScript files for usage in a browser . There
are also two webpack-related modules named webpack-dev-server and html-webpack-plugin,
which are important to install. webpack should be saved in development mode, just like babel:
npm install --save-dev webpack webpack-dev-server html-webpack-plugin
Hamid Ghorbani (ReactJs Basics) https://ir.linkedin.com/in/ghorbanihamid
Configuring WebPack:
Webpack's job is to run your React code through various transformations. Webpack requires
some configuration settings in a configuration file to carry out its work. This file must be located
in the outermost layer of your root directory, and must be named webpack.config.js. webpack's
configuration file is a JavaScript file that exports an object. This object is then processed by
webpack based upon its defined properties. Depending on your usage of webpack there are two
ways to pass this configuration object, CLI and node.js API:
CLI:
module.exports = {
// configuration
};
Node.js :
webpack({
// configuration
}, callback);
A simple configuration object example(CLI):
The minimalist requirement of a Webpack config file is the presence of entry and output
properties.
var path = require('path');
var config = {
entry: '/mySample.jsx',
output: {
path: path.resolve(__dirname, 'src/dist'),
filename: 'bundle.js'
}
module : {
loaders : [
{
test : /.jsx?/,
include : /node_modules/,
loader : 'babel-loader'
}
]
}
};
module.exports = config;
Hamid Ghorbani (ReactJs Basics) https://ir.linkedin.com/in/ghorbanihamid
entry: As the name suggests, entry specifies the entry files using which the bundling process
starts. If you are coming from C# or Java, it's similar to the class that contains main method.
Webpack supports multiple entry points too. Here the mySample.jsx is the starting point of the
application. Entry's value can be a filepath, or an array of filepaths if you would like to have more
than one entry point.
output: The output instructs Webpack what to do after the bundling process has been
completed. Here, we are instructing it to use the src/dist directory to output the bundled file
with the name bundle.js.
module.loaders: You can tell webpack what to do with the code that it's grabbed by adding the
module property, containing loaders property. Loaders can transform files from a different
language like, CoffeeScript or ES6 to JavaScript, or inline images as data URLs. Loaders even
allow you to do things like require() css files right in your JavaScript. The loaders property can
takes an array of loaders. Each loader property should specify test, include or exclude and loader
properties.
test: The test property specifies what kind of files (specifies by file extension) will be
affected by the loader. For example the regular expression /.js$/ represents all strings
that end with the pattern, ".js". That means that this loader will perform a transformation
on all ".js" files.
include: The include property specifies what is the directory to be used to look for these
file extensions.
exclude: You can use "exclude" to specify files that match the "test" criteria, that
you don't want to be transformed.
loader: The loader property represents the name of the loader.
Hamid Ghorbani (ReactJs Basics) https://ir.linkedin.com/in/ghorbanihamid
Create-React-App command:
One of the major complaints that was always repeated about React was how difficult it was to get started
building an application. create-react-app command is an answer to the common complaints of the
difficulty of getting started in a common React environment, which usually involves configuring a
combination of things such as webpack, babel, and react to create single-page React applications.
You don’t need to install or configure tools like Webpack or Babel. They are preconfigured and hidden
so that you can focus on the code. If you already have node 4.x or higher installed, you can install create-
react-app, with running the following command in the terminal:
npm install -g create-react-app
To create a new app, run the following command:
create-react-app my_react_app
By running the above command, it will create a directory called my_react_app inside the current
folder.Inside that directory, it will generate the initial project structure and install the transitive
dependencies, you'll end up with a folder like this:
my_react_app/
│
├── README.md
├── package.json
├── .gitignore
│
├── public/
│ └── favicon.ico
│ └── index.html
│ └── manifest.json
├── src/
│ └── App.css
│ └── App.js
│ └── App.test.js
│ └── index.css
│ └── index.js
│ └── logo.svg
│ └── registerServiceWorker.js
├── node_modules/
│ └── .bin/
│ └── react/
│ └── webpack/
│ └── . . . .
To run the app in development mode, run the following command, inside of your application's folder, it
opens the 'http://localhost:3000' url in the browser:
npm start
To build an optimized bundle, run:
npm run build
Hamid Ghorbani (ReactJs Basics) https://ir.linkedin.com/in/ghorbanihamid
Note:
- All of the code you write will live under the src folder,you can organize into subfolders.
- For the project to build, these files must exist with exact filenames:
 public/index.html is the page template;
 src/index.js: is the JavaScript entry point.
- You can delete or rename the other files.
- You may create subdirectories inside src. For faster rebuilds, only files inside src are processed
by Webpack.
- You need to put any JS and CSS files inside src, otherwise Webpack won’t see them.
- Only files inside public can be used from public/index.html.
- You can, however, create more top-level directories. They will not be included in the production
build so you can use them for things like documentation.
Most react projects on Github organize project files by type, like this:
src/
│
├── App.js
├── index.js
│
├── actions/
│ └── userAction.js
│ └── loginAction.js
│ └── . . .
├── components/
│ └── button.js
│ └── inputText.js
│ └── . . .
├── containers/
│ └── homePage.js
│ └── loginPage.js
│ └── usersList.js
│ └── . . .
├── styles/
│ └── App.css
│ └── header.css
│ └── home.css
│ └── . . .
├── images/
│ └── logo.svg
│ └── . . .
├── utils/
│ └── testUtil.js
│ └── . . .
├── reducers/
│ └── login.js
│ └── . . .
Hamid Ghorbani (ReactJs Basics) https://ir.linkedin.com/in/ghorbanihamid
React Elements
Just like the DOM is a tree of nodes, React's virtual DOM is a tree of React nodes. One of the core types
in React is called ReactNode. It's a building block for a virtual DOM, and it can be any one of these core
types:
 ReactElement: Elements are the smallest building blocks of React apps. An element describes
what you want to see on the screen. It's a light, stateless, immutable, virtual representation of a
DOM Element.
 ReactText: This is a string or a number. It represents textual content and it's a virtual
representation of a Text Node in the DOM.
ReactElements and ReactTexts are ReactNodes. An array of ReactNodes is called a ReactFragment.
React object is the entry point to the React library. If you load React from a <script>tag, these top-
level APIs are available on the React global. JSX is not a requirement for using React but JSX makes
React a lot more elegant. anything you can do with JSX can also be done with just plain JavaScript. JSX
is just syntactic sugar for function calls and object construction.
createElement():
Create and return a new React element of the given type.
React.createElement(type, [props], [...children] )
Type Parameter:
The type argument can be either a HTML tag name (such as 'div' or 'span'), or a React component (a
class or a function). React supports all the common HTML tags and attributes.
Props parameter:
The props parameter is a JavaScript object passed from a parent element to a child element (and not
the other way around) with some properties that are considered immutable, that is, those that should
not be changed. While creating DOM elements with React, we can pass the props object with properties
that represent the HTML attributes such as class, style, and so on.
Example:
React.createElement("div", {id:"msg", className: 'header' }, "Hello World!");
// Or for shothand writing:
const elm = React.createElement;
elm("div", {id:"msg"}, "Hello World!");
Hamid Ghorbani (ReactJs Basics) https://ir.linkedin.com/in/ghorbanihamid
Children parameter
The children parameter describes what child elements this element should have. A child element can
be any type of ReactNode: a virtual DOM element represented by a ReactElement, a string or a number
represented by a ReactText, or an array of other ReactNodes, which is also called ReactFragment.
Example:
const elm = React.createElement;
var h1 = elm('h1', { className: 'header', key: 'header' }, "This is React");
var p = elm('p', { className: 'content', key: 'content' }, "And that's how it works.");
var reactFragment = [ h1, p ];
var section = elm('section', { className: 'container' }, reactFragment);
As a result of above code, we get the following HTML:
<section class="container" >
<h1 class="header" >This is React</h1>
<p class="content" >And that's how it works.</p>
</section>
isValidElement():
isValidElement Verifies the object is a React element. Returns true or false.
React.isValidElement(object)
createFactory(type):
createFactory creates a function that produces a ReactElement of a given type.
Example:
var React = require('react');
var ReactDOM = require('react-dom');
var createListItemElement = React.createFactory('li');
var listItemElement1 = createListItemElement({ className: 'item-1', key: 'item-1' }, 'Item 1');
var listItemElement2 = createListItemElement({ className: 'item-2', key: 'item-2' }, 'Item 2');
var reactFragment = [ listItemElement1, listItemElement2 ];
var listOfItems = React.createElement('ul', { className: 'list-of-items' }, reactFragment);
ReactDOM.render(listOfItems, document.getElementById('react-application'));
Hamid Ghorbani (ReactJs Basics) https://ir.linkedin.com/in/ghorbanihamid
In the preceding example, we're first calling the React.createFactory() function and passing a li HTML
tag name as a type parameter. Then, the React.createFactory() function returns a new function that we
can use as a convenient shorthand to create elements of type li. We store a reference to this function in
a variable called createListItemElement. Then, we call this function three times, and each time we only
pass the props and children parameters, which are unique for each element. Notice that
React.createElement() and React.createFactory() both expect the HTML tag name string (such as li) or
the ReactClass object as a type parameter.
React.DOM HTML functions:
React provides us with a number of built-in factory functions to create the common HTML tags. You can
call them from the React.DOM object; for example, React.DOM.li(), React.DOM.div(), and so on.
Using them, we can simplify our previous example even further:
var React = require('react');
var ReactDOM = require('react-dom');
var listItemElement1 = React.DOM.li({ className: 'item-1', key: 'item-1' }, 'Item 1');
var listItemElement2 = React.DOM.li({ className: 'item-2', key: 'item-2' }, 'Item 2');
var reactFragment = [ listItemElement1, listItemElement2 ];
var listOfItems = React.DOM.ul({ className: 'list-of-items' }, reactFragment);
ReactDOM.render(listOfItems, document.getElementById('react-application'));
Rendering Elements:
The ReactDOM.render() function can be used to render React elements to the DOM. The render()
method takes three parameters:
ReactDOM.render(ReactElement, DOMElement, [callback]);
 ReactElement is a root element in the tree of ReactNodes that you've created.
 A regular DOMElement is a container DOM node for that tree.
 If the optional parameter callback is provided, it will be executed after the component is
rendered or updated.
Example:
const element = <div>Hello world!</div>;
ReactDOM.render(element,document.getElementById('root') );
Hamid Ghorbani (ReactJs Basics) https://ir.linkedin.com/in/ghorbanihamid
React with JSX:
JSX is an XML/HTML-like syntax used by React that extends ECMAScript so that XML/HTML-like text
can co-exist with JavaScript/React code. The syntax is intended to be used by preprocessors (i.e.,
transpilers like Babel) to transform HTML-like text found in JavaScript files into standard JavaScript
objects that a JavaScript engine will parse. JSX is a separate thing from React itself. It is designed as an
ECMAScript feature and the similarity to XML/HTML is only at the surface.
By using JSX you can write concise HTML/XML-like structures (e.g., DOM like tree structures) in the
same file as you write JavaScript code, then Babel will transform these expressions into actual
JavaScript code. Unlike the past, instead of putting JavaScript into HTML, JSX allows us to put HTML
into JavaScript.
Each JSX element is just syntactic sugar for calling React.createElement. You will not typically
invoke React.createElement() directly if you are using JSX.
Example 1:
The following Javascript(React) code:
React.createElement ('div', { id: 'msg'}, " Hello World!");
Can be written in a more natural HTML-like syntax using JSX code:
<div id="msg">Hello World!</div>
Example 2:
The following JSX code:
var nav = (
<ul id="nav">
<li><a href="#">Home</a></li>
<li><a href="#">About</a></li>
</ul>
);
Will transform it into following Javascript/React code with Babel:
var nav = React.createElement(
"ul",
{ id: "nav" },
React.createElement("li",
null,
React.createElement("a",{ href: "#" },"Home")
),
React.createElement("li",
null,
React.createElement("a",{ href: "#" },"About")
)
);
Hamid Ghorbani (ReactJs Basics) https://ir.linkedin.com/in/ghorbanihamid
Notes:
 You can split JSX over multiple lines for readability and wrapping it in parentheses to avoid the
pitfalls of automatic semicolon insertion.
const element = ( <h1>
Hello World!
</h1> );
 The class attribute has to be written className in JSX.
 The tabindex attribute has to be written tabIndex in JSX.
 The for attribute has to be written htmlFor
 You may use quotes to specify string literals as attributes:
const element = <div tabIndex="0"></div>;
 You may also use curly brackets to embed a JavaScript expression in an attribute:
const element = <img src={user.avatarUrl}></img>;
 JavaScript expressions can be used inside of JSX. You just need to wrap it with curly brackets {}.
<h1>{1+1}</h1>
 We cannot use if else statements inside JSX, instead we can use conditional (ternary)
expressions.
<h1>{i == 1 ? 'True!' : 'False'}</h1>
 HTML tags always use lowercase tag names, while React components start with Uppercase,
so To represent HTML elements, ensure the HTML tag is lower-cased.
 You can place JavaScript comments anywhere in React/JSX you want except locations where
JSX might expect a React child node. In this situation you'll have to escape the comment using
{ } so that JSX knows to pass that on as actual JavaScript.
<div>
<h1>Header</h1>
{//End of the line Comment...}
{/*Multi line comment...*/}
</div>
Hamid Ghorbani (ReactJs Basics) https://ir.linkedin.com/in/ghorbanihamid
Some ECMAScript 6 new Features:
Number Truncation:
Truncate a floating point number to its integral part, completely dropping the fractional part.
console.log(Math.trunc(42.7)) // 42
console.log(Math.trunc( 0.1)) // 0
console.log(Math.trunc(-0.1)) // -0
New string repeating functionality:
" ".repeat(4 * depth);
"foo".repeat(3);
String Searching
New specific string functions to search for a sub-string.
"hello".startsWith("ello", 1); // true
"hello".endsWith("hell", 4); // true
"hello".includes("ell"); // true
"hello".includes("ell", 1); // true
"hello".includes("ell", 2); // false
Number Type Checking
New functions for checking for non-numbers and finite numbers.
Number.isNaN(42) === false;
Number.isNaN(NaN) === true;
Number.isFinite(Infinity) === false;
Number.isFinite(-Infinity) === false;
Number.isFinite(NaN) === false;
Number.isFinite(123) === true;
Number Safety Checking
Checking whether an integer number is in the safe range
Number.isSafeInteger(42) === true;
Number.isSafeInteger(9007199254740992) === false;
Hamid Ghorbani (ReactJs Basics) https://ir.linkedin.com/in/ghorbanihamid
Var, let and const in ES6:
In the pre-ES6 era, there was only one way of declaring variables in JavaScript — being the usage of var.
There is two new keywords that better represent the type of data in ES6:
Var: The keyword var has traditionally been how we’ve defined variables in JavaScript. a variable
being declared using var will be function scoped, meaning it will exist within the scope of the function
it’s declared inside of.
Example1:
function myFunc() {
var name = 'Luke'
console.log(name); // Result: 'Luke'
}
myFunc();
console.log(name); // Result: name is not defined
// the variable declared with var inside the function, is not
reachable from outside the function.
Example2:
function myFunc() {
if(true){
var name = 'Luke'
}
console.log(name); // Result: 'Luke'
// the variable name is available outside the if-statement it was
declared inside of. This is because they're in the same scope.
}
assigning the JSX blocks to a variable:
You can embed any JavaScript expression in JSX by wrapping it in curly braces. Adjacent Jsx elements
must be wrapped to an enclosing tag.
Example:
var HeaderTemplate = (
<div>
<h1>Application Title</h1>
<h2>Hello World</h2>
</div>
);
var username = {
name : 'Hamid',
family : 'Ghorbani',
age : 38
};
Hamid Ghorbani (ReactJs Basics) https://ir.linkedin.com/in/ghorbanihamid
Let : Use let to declare a variable when the data it’s holding may change, similarly to var. let is block
scoped, which just means it’s available inside the block (curly braces) it’s defined in (including inner
blocks), but not outside it. If you declare variables with same name in different blocks, ES6 treats them
as separate variables:
Example1:
let myAge = 39;
if (new Date().getFullYear == 2018){
myAge = 40
}
Example2:
if (true){ // new block
let myname = 'George'
}
console.log(myname) // syntax error, myname is undefined(out of block)
Const:
Use const to declare variables that will never change, such as the value of PI or the name of your brother.
const is similar to let in that it’s block scoped, making it only accessible within the block (curly braces)
it’s defined in. const unlike let must be initialized with a value at the time of definition. Furthermore, it
can’t be reassigned with another value afterwards but if the value of a const is an object or array, the
object’s properties themselves are still mutable, able to be modified:
const myobject = {name:'George', age:39}
myobject = {name: 'Ken', age:39} //syntax error, myobject is read-only
myobject.age = 40 // OK
const myarray = []
myarray[0] = 'Football' // OK
Hamid Ghorbani (ReactJs Basics) https://ir.linkedin.com/in/ghorbanihamid
ES6 Functions:
The function keyword can be used to define a function inside an expression. The function name can be
omitted, in which case the function is anonymous. The name is only local to the function body.
Syntax:
var myFunction = function [name](param1, param2, ..., paramN) {
statements;
};
Example:
var getRectArea = function(width, height) {
return width * height;
}
Default function parameters:
In the following example, number1 and number2 are assigned default values of ‘5’ and ‘10’ respectively.
function counts(number1 = 5, number2 = 10) {
// do anything here
}
NOTE1: If the value of ‘undefined’ is passed to a parameter with default argument, it is invalid and
the default parameter value is assigned. But if ‘null ‘is passed, it is considered as valid and the default
parameter is not used and null is assigned to that parameter.
NOTE2: The default parameters doesn’t necessarily have to be a primitive value, and we can also
execute a function to retrieve the default parameter value:
Example:
function getDefaultParam() {
return 10;
}
function multiply(first, second = getDefaultParam()) {
return first * second;
}
Hamid Ghorbani (ReactJs Basics) https://ir.linkedin.com/in/ghorbanihamid
Rest Parameters:
The rest parameter syntax allows us to represent an indefinite number of arguments as an array. Rest
parameters are indicated by three dots … preceding a parameter. This named parameter becomes an
array which contains rest of the parameters(i.e apart from the named parameters) passed during
function call. We can only have one rest parameter, and it has to be the last parameter. We can’t have a
named parameter after a rest parameter.
Example:
function sum(…numbers) {
var result = 0;
numbers.forEach(function (number) {
result += number;
});
return result;
}
ES6 Arrow Functions:
Arrow functions – also called “fat arrow” functions, introduce a new syntax for defining functions that is
very concise. We can avoid typing keywords like function keyword, return keyword and even curly
brackets { } and parentheses (). The syntax comes in different flavors, depending on our usage. All the
variations have one thing in common, i.e they begin with the arguments, followed by arrow ‘=>’,
followed by the function body. The arguments and the body can take different forms.
Example:
// ES6: var multiply = (x, y) => { return x * y };
// equivalent to ES5: var multiply = function(x, y) {
return x * y;
};
Example2: let getMessage = () => 'Hello World';
// equivalent to: let getMessage = function() {
return 'Hello World';
}
Hamid Ghorbani (ReactJs Basics) https://ir.linkedin.com/in/ghorbanihamid
NOTE:
 arrow functions can’t be called with new, can’t be used as constructors (and therefore lack
prototype as well)
 Arrow functions have their own scope, but there’s no ‘this’ of their own.
 No arguments object is available. You can use rest parameters however.
 For a function body with just a return statement, curly braces are optional. For a function body
having more than just a return statement, you need to wrap the body in curly braces just like
traditional functions.
let calculate = (no1, no2, operation) => {
let result;
switch (operation) {
case 'add':
result = no1 + no2;
break;
case 'subtract':
result = no1 - no2;
break;
}
return result;
};
 When there is only one argument, there’s no need for parentheses “( )” as well.
let result = param1 => param1;
// equivalent to:
let result = function(param1) {
return param1;
};
 If we have a function that simply returns an object, For preventing the compiler to get confused
whether the curly braces are of the object (()=>{id: number} ) or curly braces of the function
body, We must wrap the object in parentheses:
let getTempItem = number => ({ id: number});
// equivalent to:
let getTempItem = function(number) {
return { id: number};
};
Hamid Ghorbani (ReactJs Basics) https://ir.linkedin.com/in/ghorbanihamid
Classes:
ES6 also introduces the class ability to create traditional classes, similar to many other object-oriented
languages:
class Book {
constructor(title, pageCount) {
this.title = title;
this.pageCount = pageCount;
}
. . .
}
Destructuring:
Destructuring is a convenient way of extracting multiple values from data stored in (possibly nested)
objects and Arrays.
Example:
We have two simple functions, getBookArray and getBookObject, which both return a value type
indicated by their name:
function getBookArray() {
return ['The Hobbit', 320];
}
function getBookObject() {
return { title: 'The Hobbit', page_count: 320 };
}
Prior to ES6, if we wanted to assign variables to the underlying values returned by the array/object of
those functions, we’d have to create a temporary variable, assign that variable to the result of the function
in question, then declare our individual variables to grab the values from the new temporary object.
var tempBookArray = getBookArray();
title = tempBookArray[0];
page_count = tempBookArray[1];
var tempBookObject = getBookObject();
title = tempBookObject.title;
Hamid Ghorbani (ReactJs Basics) https://ir.linkedin.com/in/ghorbanihamid
page_count = tempBookObject.page_count;
ES6 introduces destructuring, which is simply syntactic sugar to perform the above steps with much less
code:
var [ title, page_count ] = getBookArray();
var { title, page_count } = getBookObject();
You can also combine the default value syntax with the new destructuring syntax.
var { title, author, page_count, language = 'English' } = getBookObject();
Creating Components in React:
Components let you split the UI into independent, reusable pieces, and think about each piece in
isolation. Components have one requirement; they must implement render, a function that tells the
component what to... render. There are three ways to create a React component:
createClass():
In React, you can create a component by calling React.createClass(). As of React 15.5, createClass
is deprecated.
Example:
var MyReactComponent = React.createClass({
render: function() {
return (React.createElement("p", null, "Hello, Universe"));
}
});
Using Javascript Function:
The simplest way to define a component is to write a JavaScript function. In the following example, the
function accepts a single “props” (which stands for properties) object argument with data and returns
a React element. We call such components “function component” or “stateless compnents”:
Example:
function Welcome(props) {
return <h1>'Hello World'</h1>;
}
Hamid Ghorbani (ReactJs Basics) https://ir.linkedin.com/in/ghorbanihamid
Using ES6 class to define a Component:
With ES6, we can use classes to create React components. A class component or stateful
component is a more featured way to define a React component. It also acts like a function that receives
props, but that function also considers a private internal state as additional input that controls the
returned JSX:
Example:
class Welcome extends React.Component {
render() {
return React.createElement('div', null, 'Hello World');
}
}
Component Props:
Most components can be customized when they are created, with different parameters. These creation
parameters are called props. In the other words, props are like input parameters of functions. For
example, one basic React Native component is the Image. When you create an image, you can use a prop
named source to control what image it shows. React philosophy is that props should be immutable
and top-down, which means they can only be passed from parent components, but the child
component cannot modify its props. So, if you try to edit the props as I did below, you will get the "Cannot
assign to read-only" TypeError.
Example:
class Welcome extends React.Component {
render() {
return React.createElement('div', null, 'Hello ${ this.props.name}');
}
}
Using name as a prop we customized the Welcome component, so we can reuse that component for each
of our greetings.
Hamid Ghorbani (ReactJs Basics) https://ir.linkedin.com/in/ghorbanihamid
defaultProps:
defaultProps can be defined as a property on the component class itself, to set the default props for the
class. This is used for undefined props, but not for null props.
Example:
class CustomButton extends React.Component {
// ...
}
CustomButton.defaultProps = {
color: 'blue'
};
If props.color is not provided, it will be set by default to 'blue':
<CustomButton /> ; // props.color will be set to blue
<CustomButton color={null} /> ; // props.color will remain null
Component State
In a React component the state holds up data. State object is owned by the component where it is
declared. Its scope is limited to the current component. A component can initialize its state and update
it whenever necessary. The state of the parent component usually ends up being props of the child
component. In general, you should initialize state in the constructor, and then call setState when you
want to change it. You might set state when you have new data arrive from the server, or from user
input. You can also use a state container like Redux to control your data flow.
Component Lifecycle:
Each component has several “lifecycle methods” that you can override to run code at particular times
in the process. Through lifecycle methods, we can then control what happens when each tiny section of
your UI renders, updates, thinks about re-rendering, and then disappears entirely. Methods prefixed
with will are called right before something happens, and methods prefixed with did are called right after
something happens.
Hamid Ghorbani (ReactJs Basics) https://ir.linkedin.com/in/ghorbanihamid
Mounting:
4 methods are called in mounting process(when an instance of a component is being created and inserted
into the DOM):
 constructor()
 componentWillMount()
 render()
 componentDidMount()
componentWillMount():
Your component is going to appear on the screen very shortly. componentWillMount() is invoked just
before mounting occurs. It is called before render(), therefore don’t call setState. Calling setState()
synchronously in this method will not trigger an extra rendering, use the constructor() method instead.
Also don’t use this method to start AJAX calls to load data for your components.
Rendering a Component:
Every component has a render() method which returns markup to render. A component doesn’t do
anything until it’s rendered. The render() method renders a React element into the DOM in the
supplied container and return a reference to the component (or returns null for stateless components).
If the React element was previously rendered into container, this will perform an update on it and only
mutate the DOM as necessary to reflect the latest React element. One of the aspects we need to be aware
of is how React decides when to re-render a component:
1. The component’s state changes:
A re-render can be triggered if a component’s state has changed. The state can change from
a props change, or from a direct setState change. The component gets the updated state and React
decides if it should re-render the component. Unfortunately, by default React is incredibly simplistic and
basically re-renders everything all the time.
2. forceUpdate method:
A re-render can be occured when the setTimeout() is invoked and this.forceUpdate() is called. Note that
simply updating the state (i.e., this.state.now = 'foo';) does not cause a re-render. I set the state using
this.state, and then I have to call this.forceUpdate() so the component will re-render with the new state.
Hamid Ghorbani (ReactJs Basics) https://ir.linkedin.com/in/ghorbanihamid
componentDidMount():
componentDidMount() is invoked immediately after a component is mounted. Initialization that
requires DOM nodes should go here. If you need to start AJAX calls to load data from a remote
endpoint, this is a good place to instantiate the network request.
Calling setState() in this method will trigger an extra rendering, but it will happen before the browser
updates the screen. This guarantees that even though the render() will be called twice in this case, the
user won’t see the intermediate state.
Example (Blink Component):
We want to make text that blinks all the time. The text itself gets set once when the blinking component
gets created, so the text itself is a prop.
class Blink extends Component {
constructor(props) {
super(props);
this.state = {showText: true};
// Toggle the state every second
setInterval(() => { this.setState({ showText: !this.state.showText }); },
1000);
}
render() {
let display = this.state.showText ? this.props.text : ' ';
return (<Text>{display}</Text>);
}
}
// Using the above component:
export default class App extends Component {
render() {
return (
<View>
<Blink text='I love to blink' />
<Blink text='Yes blinking is so great' />
<Blink text='Why did they ever take this out of HTML' />
<Blink text='Look at me look at me look at me' />
</View>
);
}
}
Hamid Ghorbani (ReactJs Basics) https://ir.linkedin.com/in/ghorbanihamid
Redux
As the requirements for JavaScript single-page applications have become increasingly complicated, our
code must manage more state than ever before. This state can include server responses and cached
data, as well as locally created data that has not yet been persisted to the server. UI state is also
increasing in complexity, as we need to manage active routes, selected tabs, spinners, pagination
controls, and so on. Following in the steps of Flux, Redux attempts to make state mutations predictable
by imposing certain restrictions on how and when updates can happen.
Redux is a predictable state container for JavaScript apps. It helps you write applications that
behave consistently, run in different environments (client, server, and native), and are easy to test. On
top of that, it provides a great developer experience, such as live code editing combined with a time
traveling debugger. You can use Redux together with React, or with any other view library.
Installating Redux:
React bindings are not included in Redux by default. To install the stable version of Redux with npm,
run the follosing command:
npm install --save react-redux
Redux parts:
Redux has four main parts: Store, Actions, Action creators and Reducers.
Hamid Ghorbani (ReactJs Basics) https://ir.linkedin.com/in/ghorbanihamid
Store:
The store is the central objects that holds the state of the application and is the source of truth for
components. The state of your whole application is stored in an object tree within a single store. By using
the store concept you do not need to synchronize state between components manually. Store has some
methods:
 getState(): Returns the current state tree of your application.
 dispatch(action): Dispatches an action. This is the only way to trigger a state change.
 subscribe(listener): Adds a change listener. It will be called any time an action is dispatched,
and some part of the state tree may potentially have changed.
 replaceReducer(nextReducer): Replaces the reducer currently used by the store to calculate
the state.
Actions:
Actions are a plain JavaScript object that are used to send data from the application to the store.
Sending data to the store is needed to change the application state after a user interaction, internal events
or API calls and the only way to change the state is to write an action. Actions have two properties, type
and payload.
Type: a constant to identify the type of action
Payload: the object which is assigned to this property contains the data which are sent to the store
An action will look like this:
{
type: 'ACTION_TYPE',
action_value: string
}
Example: {
type: LOGIN_USER,
payload: {username: ‘sebastian’, password: ‘123456’}
}
Hamid Ghorbani (ReactJs Basics) https://ir.linkedin.com/in/ghorbanihamid
Action creators:
Action objects are created by using functions, called action creators. This makes them portable and easy
to test. The only purpose of an action creator function is to return the action object:
Example:
function authUser(data) {
return {
type: LOGIN_USER,
payload: data
}
}
Reducers:
In order to tie state and actions together, we write a pure JavaScript function called a reducer that takes
two parameters: the current state and an action. This function applies the action to that state and returns
the desired next state.
Reducers specify how the application's state changes in response to actions sent to the store. Reducers
take the application current state and an action object and return a new application state, they
don’t modify any global state:
Example:
function counterReducer (state = 0 , action) {
switch (action.type) {
case 'INCREMENT':
return state + 1;
case 'DECREMENT':
return state - 1;
default:
return state
}
}
The important thing to notice here is that the state is not changed directly. Instead a new state object
(based on the old state) is created and the update is done to the new state.
Hamid Ghorbani (ReactJs Basics) https://ir.linkedin.com/in/ghorbanihamid
Creating Store:
Creates a Redux store that holds the complete state tree of your app. There should only be a single store
in your app: createStore(reducer, [preloadedState], [enhancer]);
Example:
import { createStore } from ‘redux’;
const store = createStore(reducer);
store.dispatch(authUser(data));
CreateStore Arguments:
 reducer (Function): A reducing function that returns the next state tree, given the current state
tree and an action to handle.
 [preloadedState] (any): The initial state. You may optionally specify it to hydrate the state from
the server in universal apps, or to restore a previously serialized user session. If you produced
reducer with combineReducers, this must be a plain object with the same shape as the keys
passed to it. Otherwise, you are free to pass anything that your reducer can understand.
 [enhancer] (Function): The store enhancer. You may optionally specify it to enhance the store
with third-party capabilities such as middleware, time travel, persistence, etc. The only store
enhancer that ships with Redux is applyMiddleware().
Example 1:
const store = createStore(counterReducer);
Example 2:
const store = createStore(combineReducers,{},applyMiddleware(reduxThunk));
Note: applyMiddleware(thunk) tells redux to accept and execute functions as return values. Redux
usually only accepts objects.
Middleware: Middleware can be used for a variety of things, including asynchronous API calls. People
also use Redux middleware for logging, crash reporting, routing, and more. Some redux middlewares
are:
Hamid Ghorbani (ReactJs Basics) https://ir.linkedin.com/in/ghorbanihamid
Redux-thunk:
A thunk is another word for a function. But it’s not just any old function. It’s a special (and uncommon)
name for a function that’s returned by another. Like this:
function not_a_thunk() {
// this one is a "thunk" because it defers work for later:
return function() {
console.log('do stuff now')
}
}
If you want to execute the “do stuff now” part, you have to call it like not_a_thunk()() – calling it
twice, basically.
Redux-Thunk is the most popular middleware used to handle asynchronous actions in Redux. Redux
Thunk middleware allows you to write action creators that return a function instead of an action.
The thunk can be used to delay the dispatch of an action, or to dispatch only if a certain condition is met.
The inner function receives the store methods dispatch and getState as parameters.
Hamid Ghorbani (ReactJs Basics) https://ir.linkedin.com/in/ghorbanihamid
Installation:
npm install --save redux-thunk
Then, to enable Redux Thunk, use applyMiddleware() in index.js:
import { createStore, applyMiddleware } from 'redux';
import reduxThunk from 'redux-thunk';
const store = createStore(rootReducer,applyMiddleware(reduxThunk));
ReactDOM.render(<Provider store={store}> <App /> </Provider>,
document.getElementById('root'));
Example:
As we Learned before, “actions” are just objects and they are expected to only be objects. They look like
this:
{
type: "USER_LOGGED_IN",
username: "dave"
}
And, since it’s kind of annoying to build objects by hand all the time, Redux has “action creators” that
build these things:
function userLoggedIn() {
return {
type: "USER_LOGGED_IN",
username: "dave"
};
}
Now you can “create” it by calling the userLoggedIn function. “actions” don’t actually do anything, they’re
just objects. It could be cool if we could actually make them do something, Like, making an AJAX call,
or trigger other actions. Because reducers are supposed to be “pure” (as in, they don’t change anything)
we couldn’t put that work inside a reducer. If you wanted an action to do something, that code would
need to live inside a function. So, it would be nice if an action creator could return that function instead
of an action object. Something like this:
function loginUser() {
return function() {
return axios.post('/loginUser');
}
}
Hamid Ghorbani (ReactJs Basics) https://ir.linkedin.com/in/ghorbanihamid
This is exactly what redux-thunk does. It is a middleware that looks at every action that passes through
the system, and if it’s a function, it calls that function. That’s all it does.The only difference is that, Redux
will pass two arguments to thunk functions: dispatch, so that they can dispatch new actions if they need
to; and getState, so they can access the current state, also the getState function can be useful for deciding
whether to fetch new data, or return a cached result, depending on the current state:
function loginUser() {
return function(dispatch, getState) {
return axios.post('/loginUser')
.then(
function() {
// suppose we action creator named ‘userLoggedIn’
dispatch(userLoggedIn());
}
);
}
}
Redux <Provider store>:
Makes the Redux store available to the connect() calls in the component hierarchy below. Normally,
you can’t use connect() without wrapping a parent or ancestor component in <Provider>.
Redux connect:
Connects a React component to a Redux store. As we know, there is no way to directly interact with the
store. We can either retrieve data by obtaining its current state, or change its state by dispatching an
action (we only have access to the top and bottom component of the redux flow diagram shown
previously). With “connect” we can map the stores state to our components and dispatch it to
the props of a component.
connect([mapStateToProps], [mapDispatchToProps], [mergeProps], [options])
mapStateToProps(state, [ownProps]): stateProps] (Function):
If this argument is specified, the new component will subscribe to Redux store updates. This means that
any time the store is updated, mapStateToProps will be called.
[mapDispatchToProps(dispatch, [ownProps]): dispatchProps] (Object or Function):
If an object is passed, each function inside it is assumed to be a Redux action creator. An object with the
same function names, but with every action creator wrapped into a dispatch call so they may be invoked
directly, will be merged into the component’s props.
Hamid Ghorbani (ReactJs Basics) https://ir.linkedin.com/in/ghorbanihamid
[mergeProps(stateProps, dispatchProps, ownProps): props] (Function):
MergeProps is a function which is used to select a slice of the props from state and dispatch. When the
third argument is not passed to connect, the default implementation of mergeProps combines the
ownProps, mapStateToProps and mapDispatchToProps. mergeProps is where you can filter the props
being passed to the component. Especially in situations where you intend to use properties from store
as parameters to dispatch actions, mergeProps is the cleanest choice.
Example:
import { connect } from 'react-redux';
import * as actionCreators from './actionCreators'
class LoginForm extends Component {
console.log('authData : '+ JSON.stringify(this.props.authData));
render(){
return(
<div>. . . </div>
)
}
}
function mapStateToProps({authData}){
return {authData};
}
export default connect(mapStateToProps, actionCreators)(LoginForm));
Example:
import * as actionCreators from './actionCreators'
import { bindActionCreators } from 'redux'
function mapStateToProps(state) {
return { authData: state.authData }
}
function mapDispatchToProps(dispatch) {
return { actions: bindActionCreators(actionCreators, dispatch) }
}
export default connect(mapStateToProps, mapDispatchToProps)(LoginForm)
Hamid Ghorbani (ReactJs Basics) https://ir.linkedin.com/in/ghorbanihamid
Redux-form:
redux-form works with React Redux to enable an html form in React to use Redux to store all of its state.
Installation:
npm install --save redux-form
To connect your React form components to your Redux store you'll need the following pieces from the
redux-form package:
 Redux Reducer(formReducer): function that tells how to update the Redux store based on
changes coming from the application; those changes are described by Redux actions
 reduxForm(): function that tells how to update the Redux store based on changes coming from
the application; those changes are described by Redux actions
 <Field/> component: component that lives inside your wrapped form component; use it to
connect the input components to the redux-form logic
Creates a decorator with which you use redux-form to connect your form component to Redux. It takes a config
parameter which lets you configure your form.
Hamid Ghorbani (ReactJs Basics) https://ir.linkedin.com/in/ghorbanihamid
React Router:
React Router is a collection of navigational components that compose declaratively with your
application. Whether you want to have bookmarkable URLs for your web app or a composable way to
navigate in React Native, React Router works wherever React is rendering--so take your pick!
Installation:
React Router has been broken into three packages: react-router, react-router-dom, and react-router-
native. react-router package provides the core routing functionality for React Router, but you might
not want to install it directly. If you are writing an application that will run in the browser, you
should instead install react-router-dom. Similarly, if you are writing a React Native
application, you should instead install react-router-native. Both of those will install react-
router as a dependency.
npm install --save react-router-dom // for browser
or
npm install --save react-router-navtive // for navtive applications
React Router components
React Router includes several components but for browser based projects, the most uasable components
are <BrowserRouter>, <withRouter>,<Route>, <Link> and <Redirect>.
BrowserRouter: The BrowserRouter should be used when you have a server that will handle dynamic
requests (knows how to respond to any possible URI).
Route: The Route component is the most important component in React Router. Its most basic
responsibility is to render some UI when a location matches the route's path. As soon as the app location
matches the route's path, your component will be rendered:
Example:
import { BrowserRouter, Route } from 'react-router-dom';
render(){
< BrowserRouter >
<div>
<Route exact path="/" component={PublicPage} />
<Route path="/login" component={LoginPage} />
</div>
</ BrowserRouter >
}
Hamid Ghorbani (ReactJs Basics) https://ir.linkedin.com/in/ghorbanihamid
Route props:
 path: This property holds the name of path(URL) to be matched.
 component: This property holds the name of the component to be rendered if the path is matched.
 exact: This property tells Route the path property must be exactly matched.
 strict: This property tells Route to match only a path that has a trailing slash.
 render: This property can replace the component property to tell the Route component what it
needs to render when there is a match, it is a function that return a React element. More useful
for inline rendering or for wraping rendered component.
 children: This property also can replace the component property, it is a function which renders a
React element. Except that this one will always render even if there is no path match.
Example:
import { BrowserRouter, Route } from 'react-router-dom';
render(){
< BrowserRouter >
<div>
<Route path="/user/:username" component={UserPage} />
<Route path="/home" render={() => <div>Home</div>} />
<Route path="/about/ " strict component={AboutPage} />
</div>
</ BrowserRouter >
}
Link:
Links which enable users to navigate between differenet pages of React apps. When clicking a <Link>,
the URL will be updated and the rendered content will change without reloading the page. The to
property of Link , tells React Router the destination to navigate to.
Example:
< BrowserRouter >
<div>
<ul>
<li><Link to="/public" >Public Page </Link></li>
<li><Link to="/protected" >Protected Page</Link></li>
</ul>
<Route path="/about/ " component={AboutPage} />
</div>
</ BrowserRouter >
Hamid Ghorbani (ReactJs Basics) https://ir.linkedin.com/in/ghorbanihamid
withRouter:
You can get access to the history object’s properties and the closest <Route>'s match via the withRouter
higher-order component. withRouter will pass updated match, location, and history props to the
wrapped component whenever it renders.
Using withRouter on your component will also allow you to access your dynamic segment values from
the URL, which can be very useful if you need to run some logic or make an API call based on the id(or
other info) within the URL. Check this.props.match.params.id or replace id with the name you gave to
your dynamic segment.
Example:
import React, { Component } from 'react';
import { Link, withRouter } from 'react-router-dom';
class DashboardForm extends Component {
componentWillMount() {
this.props.history.listen(() => {
console.log('New URL', this.props.history.location.pathname);
});
}
render(){
return(
div>
<Link to='/newUser'>Create New User</Link>
<Link to='/getUser/2'>Get User Info</Link>
<Link to='/getUsers'>View All users</Link>
</div>
)
}
}
export default withRouter(DashboardForm));
Redirect:
Rendering a <Redirect> will navigate to a new location. The new location will override the current
location in the history stack, like server-side redirects.
Example:
<Redirect to="/newLocation"/>
Hamid Ghorbani (ReactJs Basics) https://ir.linkedin.com/in/ghorbanihamid
Making AJAX requests in React
What's the React way to fetch data from the server? To answer your question, the biggest confusion is
rooted in the fact that React is often advertised as a framework, and people familiar with frameworks
such as AngularJS are used to making API calls with things like $http and similar helper libraries
provided by Angular itself. This is not the case in React as React is “just” a view library with some
state management and lifecycle methods, so, You are free to use any 3rd party library. Some simple
libraries for making AJAX calls in React are:
Fetch API:
The Fetch API is the new standardised API to interact with remote resources and in most modern React
tutorials you will find fetch being used. React Native provides the Fetch API for your networking needs.
It will seem familiar to anyone who has used XMLHttpRequest, but the new API provides a more
powerful and flexible feature set. You may refer to MDN's guide on Using Fetch for additional
information. Take a look at the Fetch Request docs for a full list of properties.
In order to fetch content from an arbitrary URL, just pass the URL to fetch:
Example:
fetch('https://mywebsite.com/mydata.json')
You may want to specify additional headers, or make a POST request:
fetch(url, {
method: "POST",
body: JSON.stringify(data),
headers: {
"Content-Type": "application/json"
},
credentials: "same-origin"
})
.then(function(response) {
response.status //=> number 100–599
response.statusText //=> String
response.headers //=> Headers
response.url //=> String
return response.text()
}, function(error) {
error.message //=> String
})
Hamid Ghorbani (ReactJs Basics) https://ir.linkedin.com/in/ghorbanihamid
Axios:
Axios is a Promise-based HTTP client for JavaScript which can be used in your front-end application
and in your Node.js backend. By using Axios it’s easy to send asynchronous HTTP request to REST
endpoints and perform CRUD (create, read, update, and delete) operations. The Axios library can be
used in your plain JavaScript application or can be used together with more advanced frameworks
like Vue.js. For installing Axios by through Node.js use the following command:
$ npm install axios
This downloads the library and installs it in the node_modules folder.
Example:
axios.get('http://example.com/posts/1')
.then(function (response) {
console.log(response);
})
axios.post('/user', {
firstName: 'Fred',
lastName: 'Flintstone'
})
.then(function (response) {
console.log(response);
})
.catch(function (error) {
console.log(error);
});
jQuery $.ajax:
This is a quick & dirty way to make AJAX calls. In the former, official React tutorial, they use jQuery to
fetch data from the server. However, jQuery is a big library with many functionalities, So, it doesn't make
sense to use it just for making API calls (Unless you are already using it for a bunch of other tasks).
loadCommentsFromServer: function() {
$.ajax({
url: this.props.url,
dataType: 'json',
cache: false,
success: function(data) {
this.setState({data: data});
}.bind(this),
error: function(xhr, status, err) {
console.error(this.props.url, status, err.toString());
}.bind(this)
});
}
Hamid Ghorbani (ReactJs Basics) https://ir.linkedin.com/in/ghorbanihamid
Superagent:
Superagent is a light weight AJAX API library created for better readability and flexibility. Superagent
also has a Node.js module with the same API. If you are building isomorphic apps using Node.js and
React, you can bundle superagent using something like webpack and make it available on the client side.
As the APIs for client and server are the same, no code change is required in order to make it work in the
browser.
request.get('this.props.url')
.end(function(err,res){
// perform setState here
});
request.post('/api/pet')
.send({ name: 'Manny', species: 'cat' })
.set('X-API-Key', 'foobar')
.set('Accept', 'application/json')
.end(function(err, res){
if (err || !res.ok) {
alert('Oh no! error');
} else {
alert('yay got ' + JSON.stringify(res.body));
}
});
Request:
Request is designed with simplicity in mind. With more that 12k GitHub stars, it's also one of the most
popular Node.js modules. You can find more about request module on their GitHub page.
request('http://www.google.com',
function (error, response, body) {
console.log('error:', error);
console.log('statusCode:', response && response.statusCode);
console.log('body:', body);
});
Hamid Ghorbani (ReactJs Basics) https://ir.linkedin.com/in/ghorbanihamid
Some UI Frameworks for ReactJS
MaterialUI
MaterialUI is a set of React Components that Implement the Google's Material Design Guidelines. There
are 2 projects in the examples folder. The first project uses browserify for module bundling and gulp for
JS task automation, while the second project uses webpack for module bundling and building. You can
include Material-UI in your project by simply running npm install material-ui from your project’s
directory, and then using the components of Material-UI that you need.
React Semantic UI
Semantic UI React is the official React integration for Semantic UI. Semantic UI treats words and classes
as exchangeable concepts. Semantic uses simple phrases called behaviors that trigger functionality.
React Toolbox
React Toolbox is a set of React components that implements Google Material Design specification.
Ant Design
Ant Design offers an enterprise-class UI design language for web applications with a set of high-quality
React components out of the box.
Website | GitHub
React Boostrap
Bootstrap is, a popular UI framework. It is a library of reusable front-end components. You'll get the
look-and-feel of Twitter Bootstrap, but with much cleaner code, via Facebook's React.js framework.
Website | Demo | GitHub
Other framworks:
Blueprint, Elemental UI, React MD, Office UI Fabric,React Desktop, Belle,
React-Foundation(Website | GitHub)
Hamid Ghorbani (ReactJs Basics) https://ir.linkedin.com/in/ghorbanihamid
Login Example With React + Spring Framework:
So, to put what I have learned into practice, I wrote a simple (Login/Logout) application with React. You
can download the example from the following URL:
https://github.com/ghorbanihamid/React_Login_Example
In order to run the React example, you have to install the following modules:
- react : npm install --save react
- react-dom : npm install --save react-dom
- react-redux : npm install --save react-redux
- react-redux-thunk: npm install --save redux-thunk
- react-router4 : npm install --save react-router-dom
- axios : npm install axios
As you have learned, React is only the V in MVC, So for a complete login process, we need another server
side application. I decided To write an application with Spring. You can download the
"SpringMVC5LoginExample" application from following URL:
https://github.com/ghorbanihamid/SpringMVC5LoginExample
To run this application you need to follow the instruction in the README file. This application is a
complete application and has it’s own view layer (Jsp files), but you can connect to this application from
React.
Hamid Ghorbani (ReactJs Basics) https://ir.linkedin.com/in/ghorbanihamid
Resources:
https://www.codecademy.com/articles/react-setup-i
https://www.codementor.io/tamizhvendan/beginner-guide-setup-reactjs-environment-npm-babel-6-
webpack-du107r9zr
https://www.codeproject.com/Articles/1188615/How-to-Structure-Your-React-Project
https://github.com/facebookincubator/create-react-app/blob/master/packages/react-
scripts/template/README.md
https://reactjs.org/docs/react-without-jsx.html
https://airbrake.io/blog/javascript/es6-javascript-whats-new-part-6
https://ourcodeworld.com/articles/read/497/top-10-best-ui-frameworks-for-reactjs
https://hashnode.com/post/5-best-libraries-for-making-ajax-calls-in-react-cis8x5f7k0jl7th53z68s41k1
https://medium.com/@baphemot/how-to-make-ajax-requests-in-react-a6a52bb5a8b1
https://medium.com/@ruthmpardee/passing-data-between-react-components-103ad82ebd17
https://medium.com/codingthesmartway-com-blog/learn-redux-introduction-to-state-management-with-react-
b87bc570b12a
https://facebook.github.io/react-native/docs/network.html
http://reactfa.ir/jsx-%D9%88-css/
https://www.sitepoint.com/es6-arrow-functions-new-fat-concise-syntax-javascript/
https://redux.js.org/docs/introduction/ThreePrinciples.html
https://scotch.io/tutorials/getting-to-know-flux-the-react-js-architecture
https://daveceddia.com/what-is-a-thunk/
http://jasonwatmore.com/post/2017/09/16/react-redux-user-registration-and-login-tutorial-example
https://github.com/reactjs/react-redux/blob/master/docs/api.md
React.js Essentials ebook by Artemij Fedosejev

More Related Content

What's hot

ReactJs
ReactJsReactJs
React js programming concept
React js programming conceptReact js programming concept
React js programming concept
Tariqul islam
 
ReactJS presentation.pptx
ReactJS presentation.pptxReactJS presentation.pptx
ReactJS presentation.pptx
DivyanshGupta922023
 
Introduction to React
Introduction to ReactIntroduction to React
Introduction to React
Rob Quick
 
Intro to React
Intro to ReactIntro to React
Intro to React
Eric Westfall
 
[Final] ReactJS presentation
[Final] ReactJS presentation[Final] ReactJS presentation
[Final] ReactJS presentation洪 鹏发
 
React js
React jsReact js
React js
Rajesh Kolla
 
Nodejs presentation
Nodejs presentationNodejs presentation
Nodejs presentation
Arvind Devaraj
 
Java Spring Framework
Java Spring FrameworkJava Spring Framework
Java Spring Framework
Mehul Jariwala
 
React workshop
React workshopReact workshop
React workshop
Imran Sayed
 
Spring boot
Spring bootSpring boot
Spring boot
sdeeg
 
Introduction to spring boot
Introduction to spring bootIntroduction to spring boot
Introduction to spring boot
Santosh Kumar Kar
 
Intro to React
Intro to ReactIntro to React
Intro to React
Justin Reock
 
Introduction to React JS
Introduction to React JSIntroduction to React JS
Introduction to React JS
Arno Lordkronos
 
Spring Boot Tutorial
Spring Boot TutorialSpring Boot Tutorial
Spring Boot Tutorial
Naphachara Rattanawilai
 
Angular Basics.pptx
Angular Basics.pptxAngular Basics.pptx
Angular Basics.pptx
AshokKumar616995
 
Spring boot jpa
Spring boot jpaSpring boot jpa
Spring boot jpa
Hamid Ghorbani
 
Learn react-js
Learn react-jsLearn react-js
Spring Boot
Spring BootSpring Boot
Spring Boot
Jaran Flaath
 
React lecture
React lectureReact lecture
React lecture
Christoffer Noring
 

What's hot (20)

ReactJs
ReactJsReactJs
ReactJs
 
React js programming concept
React js programming conceptReact js programming concept
React js programming concept
 
ReactJS presentation.pptx
ReactJS presentation.pptxReactJS presentation.pptx
ReactJS presentation.pptx
 
Introduction to React
Introduction to ReactIntroduction to React
Introduction to React
 
Intro to React
Intro to ReactIntro to React
Intro to React
 
[Final] ReactJS presentation
[Final] ReactJS presentation[Final] ReactJS presentation
[Final] ReactJS presentation
 
React js
React jsReact js
React js
 
Nodejs presentation
Nodejs presentationNodejs presentation
Nodejs presentation
 
Java Spring Framework
Java Spring FrameworkJava Spring Framework
Java Spring Framework
 
React workshop
React workshopReact workshop
React workshop
 
Spring boot
Spring bootSpring boot
Spring boot
 
Introduction to spring boot
Introduction to spring bootIntroduction to spring boot
Introduction to spring boot
 
Intro to React
Intro to ReactIntro to React
Intro to React
 
Introduction to React JS
Introduction to React JSIntroduction to React JS
Introduction to React JS
 
Spring Boot Tutorial
Spring Boot TutorialSpring Boot Tutorial
Spring Boot Tutorial
 
Angular Basics.pptx
Angular Basics.pptxAngular Basics.pptx
Angular Basics.pptx
 
Spring boot jpa
Spring boot jpaSpring boot jpa
Spring boot jpa
 
Learn react-js
Learn react-jsLearn react-js
Learn react-js
 
Spring Boot
Spring BootSpring Boot
Spring Boot
 
React lecture
React lectureReact lecture
React lecture
 

Similar to Reactjs Basics

React Js vs Node Js_ Which Framework to Choose for Your Next Web Application
React Js vs Node Js_ Which Framework to Choose for Your Next Web ApplicationReact Js vs Node Js_ Which Framework to Choose for Your Next Web Application
React Js vs Node Js_ Which Framework to Choose for Your Next Web Application
adityakumar2080
 
Skill practical javascript diy projects
Skill practical javascript diy projectsSkill practical javascript diy projects
Skill practical javascript diy projects
SkillPracticalEdTech
 
learning react
learning reactlearning react
learning react
Eueung Mulyana
 
Js frameworks
Js frameworksJs frameworks
Js frameworks
ParagKhalas
 
Beginning MEAN Stack
Beginning MEAN StackBeginning MEAN Stack
Beginning MEAN StackRob Davarnia
 
AFTAB AHMED.pptx
AFTAB AHMED.pptxAFTAB AHMED.pptx
AFTAB AHMED.pptx
AftabAhmed132116
 
9 Best JavaScript Frameworks To Choose
9 Best JavaScript Frameworks To Choose9 Best JavaScript Frameworks To Choose
9 Best JavaScript Frameworks To Choose
Albiorix Technology
 
Javascript frameworks
Javascript frameworksJavascript frameworks
Javascript frameworks
RajkumarJangid7
 
Web summit.pptx
Web summit.pptxWeb summit.pptx
Web summit.pptx
171SagnikRoy
 
Installing Webpack with React JS from Scratch.pdf
Installing Webpack with React JS from Scratch.pdfInstalling Webpack with React JS from Scratch.pdf
Installing Webpack with React JS from Scratch.pdf
Sufalam Technologies
 
React Js Simplified
React Js SimplifiedReact Js Simplified
React Js Simplified
Sunil Yadav
 
Top 10 Javascript Frameworks For Easy Web Development
Top 10 Javascript Frameworks For Easy Web DevelopmentTop 10 Javascript Frameworks For Easy Web Development
Top 10 Javascript Frameworks For Easy Web Development
Technostacks Infotech Pvt. Ltd.
 
How create react app help in creating a new react applications
How create react app help in creating a new react applications How create react app help in creating a new react applications
How create react app help in creating a new react applications
Concetto Labs
 
Node.js and the MEAN Stack Building Full-Stack Web Applications.pdf
Node.js and the MEAN Stack Building Full-Stack Web Applications.pdfNode.js and the MEAN Stack Building Full-Stack Web Applications.pdf
Node.js and the MEAN Stack Building Full-Stack Web Applications.pdf
lubnayasminsebl
 
Front End Development | Introduction
Front End Development | IntroductionFront End Development | Introduction
Front End Development | Introduction
JohnTaieb
 
COMP6210 Web Services And Design Methodologies.docx
COMP6210 Web Services And Design Methodologies.docxCOMP6210 Web Services And Design Methodologies.docx
COMP6210 Web Services And Design Methodologies.docx
write31
 
5 Powerful Backend Frameworks for Web App Development in 2022
5 Powerful Backend Frameworks for Web App Development in 20225 Powerful Backend Frameworks for Web App Development in 2022
5 Powerful Backend Frameworks for Web App Development in 2022
75waytechnologies
 
Reactjs notes.pptx for web development- tutorial and theory
Reactjs  notes.pptx for web development- tutorial and theoryReactjs  notes.pptx for web development- tutorial and theory
Reactjs notes.pptx for web development- tutorial and theory
jobinThomas54
 
Review on React JS
Review on React JSReview on React JS
Review on React JS
ijtsrd
 
Frontend Development Bootcamp - React [Online & Offline] In Bangla
Frontend Development Bootcamp - React [Online & Offline] In BanglaFrontend Development Bootcamp - React [Online & Offline] In Bangla
Frontend Development Bootcamp - React [Online & Offline] In Bangla
Stack Learner
 

Similar to Reactjs Basics (20)

React Js vs Node Js_ Which Framework to Choose for Your Next Web Application
React Js vs Node Js_ Which Framework to Choose for Your Next Web ApplicationReact Js vs Node Js_ Which Framework to Choose for Your Next Web Application
React Js vs Node Js_ Which Framework to Choose for Your Next Web Application
 
Skill practical javascript diy projects
Skill practical javascript diy projectsSkill practical javascript diy projects
Skill practical javascript diy projects
 
learning react
learning reactlearning react
learning react
 
Js frameworks
Js frameworksJs frameworks
Js frameworks
 
Beginning MEAN Stack
Beginning MEAN StackBeginning MEAN Stack
Beginning MEAN Stack
 
AFTAB AHMED.pptx
AFTAB AHMED.pptxAFTAB AHMED.pptx
AFTAB AHMED.pptx
 
9 Best JavaScript Frameworks To Choose
9 Best JavaScript Frameworks To Choose9 Best JavaScript Frameworks To Choose
9 Best JavaScript Frameworks To Choose
 
Javascript frameworks
Javascript frameworksJavascript frameworks
Javascript frameworks
 
Web summit.pptx
Web summit.pptxWeb summit.pptx
Web summit.pptx
 
Installing Webpack with React JS from Scratch.pdf
Installing Webpack with React JS from Scratch.pdfInstalling Webpack with React JS from Scratch.pdf
Installing Webpack with React JS from Scratch.pdf
 
React Js Simplified
React Js SimplifiedReact Js Simplified
React Js Simplified
 
Top 10 Javascript Frameworks For Easy Web Development
Top 10 Javascript Frameworks For Easy Web DevelopmentTop 10 Javascript Frameworks For Easy Web Development
Top 10 Javascript Frameworks For Easy Web Development
 
How create react app help in creating a new react applications
How create react app help in creating a new react applications How create react app help in creating a new react applications
How create react app help in creating a new react applications
 
Node.js and the MEAN Stack Building Full-Stack Web Applications.pdf
Node.js and the MEAN Stack Building Full-Stack Web Applications.pdfNode.js and the MEAN Stack Building Full-Stack Web Applications.pdf
Node.js and the MEAN Stack Building Full-Stack Web Applications.pdf
 
Front End Development | Introduction
Front End Development | IntroductionFront End Development | Introduction
Front End Development | Introduction
 
COMP6210 Web Services And Design Methodologies.docx
COMP6210 Web Services And Design Methodologies.docxCOMP6210 Web Services And Design Methodologies.docx
COMP6210 Web Services And Design Methodologies.docx
 
5 Powerful Backend Frameworks for Web App Development in 2022
5 Powerful Backend Frameworks for Web App Development in 20225 Powerful Backend Frameworks for Web App Development in 2022
5 Powerful Backend Frameworks for Web App Development in 2022
 
Reactjs notes.pptx for web development- tutorial and theory
Reactjs  notes.pptx for web development- tutorial and theoryReactjs  notes.pptx for web development- tutorial and theory
Reactjs notes.pptx for web development- tutorial and theory
 
Review on React JS
Review on React JSReview on React JS
Review on React JS
 
Frontend Development Bootcamp - React [Online & Offline] In Bangla
Frontend Development Bootcamp - React [Online & Offline] In BanglaFrontend Development Bootcamp - React [Online & Offline] In Bangla
Frontend Development Bootcamp - React [Online & Offline] In Bangla
 

More from Hamid Ghorbani

Spring aop
Spring aopSpring aop
Spring aop
Hamid Ghorbani
 
Spring mvc
Spring mvcSpring mvc
Spring mvc
Hamid Ghorbani
 
Payment Tokenization
Payment TokenizationPayment Tokenization
Payment Tokenization
Hamid Ghorbani
 
Rest web service
Rest web serviceRest web service
Rest web service
Hamid Ghorbani
 
Java inheritance
Java inheritanceJava inheritance
Java inheritance
Hamid Ghorbani
 
Java I/o streams
Java I/o streamsJava I/o streams
Java I/o streams
Hamid Ghorbani
 
Java Threads
Java ThreadsJava Threads
Java Threads
Hamid Ghorbani
 
Java Reflection
Java ReflectionJava Reflection
Java Reflection
Hamid Ghorbani
 
Java Generics
Java GenericsJava Generics
Java Generics
Hamid Ghorbani
 
Java collections
Java collectionsJava collections
Java collections
Hamid Ghorbani
 
Java programming basics
Java programming basicsJava programming basics
Java programming basics
Hamid Ghorbani
 
IBM Integeration Bus(IIB) Fundamentals
IBM Integeration Bus(IIB) FundamentalsIBM Integeration Bus(IIB) Fundamentals
IBM Integeration Bus(IIB) Fundamentals
Hamid Ghorbani
 
ESB Overview
ESB OverviewESB Overview
ESB Overview
Hamid Ghorbani
 
Spring security configuration
Spring security configurationSpring security configuration
Spring security configuration
Hamid Ghorbani
 
SOA & ESB in banking systems(Persian language)
SOA & ESB in banking systems(Persian language)SOA & ESB in banking systems(Persian language)
SOA & ESB in banking systems(Persian language)
Hamid Ghorbani
 

More from Hamid Ghorbani (15)

Spring aop
Spring aopSpring aop
Spring aop
 
Spring mvc
Spring mvcSpring mvc
Spring mvc
 
Payment Tokenization
Payment TokenizationPayment Tokenization
Payment Tokenization
 
Rest web service
Rest web serviceRest web service
Rest web service
 
Java inheritance
Java inheritanceJava inheritance
Java inheritance
 
Java I/o streams
Java I/o streamsJava I/o streams
Java I/o streams
 
Java Threads
Java ThreadsJava Threads
Java Threads
 
Java Reflection
Java ReflectionJava Reflection
Java Reflection
 
Java Generics
Java GenericsJava Generics
Java Generics
 
Java collections
Java collectionsJava collections
Java collections
 
Java programming basics
Java programming basicsJava programming basics
Java programming basics
 
IBM Integeration Bus(IIB) Fundamentals
IBM Integeration Bus(IIB) FundamentalsIBM Integeration Bus(IIB) Fundamentals
IBM Integeration Bus(IIB) Fundamentals
 
ESB Overview
ESB OverviewESB Overview
ESB Overview
 
Spring security configuration
Spring security configurationSpring security configuration
Spring security configuration
 
SOA & ESB in banking systems(Persian language)
SOA & ESB in banking systems(Persian language)SOA & ESB in banking systems(Persian language)
SOA & ESB in banking systems(Persian language)
 

Recently uploaded

Cyaniclab : Software Development Agency Portfolio.pdf
Cyaniclab : Software Development Agency Portfolio.pdfCyaniclab : Software Development Agency Portfolio.pdf
Cyaniclab : Software Development Agency Portfolio.pdf
Cyanic lab
 
2024 RoOUG Security model for the cloud.pptx
2024 RoOUG Security model for the cloud.pptx2024 RoOUG Security model for the cloud.pptx
2024 RoOUG Security model for the cloud.pptx
Georgi Kodinov
 
Globus Compute wth IRI Workflows - GlobusWorld 2024
Globus Compute wth IRI Workflows - GlobusWorld 2024Globus Compute wth IRI Workflows - GlobusWorld 2024
Globus Compute wth IRI Workflows - GlobusWorld 2024
Globus
 
Custom Healthcare Software for Managing Chronic Conditions and Remote Patient...
Custom Healthcare Software for Managing Chronic Conditions and Remote Patient...Custom Healthcare Software for Managing Chronic Conditions and Remote Patient...
Custom Healthcare Software for Managing Chronic Conditions and Remote Patient...
Mind IT Systems
 
How to Position Your Globus Data Portal for Success Ten Good Practices
How to Position Your Globus Data Portal for Success Ten Good PracticesHow to Position Your Globus Data Portal for Success Ten Good Practices
How to Position Your Globus Data Portal for Success Ten Good Practices
Globus
 
Using IESVE for Room Loads Analysis - Australia & New Zealand
Using IESVE for Room Loads Analysis - Australia & New ZealandUsing IESVE for Room Loads Analysis - Australia & New Zealand
Using IESVE for Room Loads Analysis - Australia & New Zealand
IES VE
 
Corporate Management | Session 3 of 3 | Tendenci AMS
Corporate Management | Session 3 of 3 | Tendenci AMSCorporate Management | Session 3 of 3 | Tendenci AMS
Corporate Management | Session 3 of 3 | Tendenci AMS
Tendenci - The Open Source AMS (Association Management Software)
 
Enterprise Resource Planning System in Telangana
Enterprise Resource Planning System in TelanganaEnterprise Resource Planning System in Telangana
Enterprise Resource Planning System in Telangana
NYGGS Automation Suite
 
Accelerate Enterprise Software Engineering with Platformless
Accelerate Enterprise Software Engineering with PlatformlessAccelerate Enterprise Software Engineering with Platformless
Accelerate Enterprise Software Engineering with Platformless
WSO2
 
Large Language Models and the End of Programming
Large Language Models and the End of ProgrammingLarge Language Models and the End of Programming
Large Language Models and the End of Programming
Matt Welsh
 
May Marketo Masterclass, London MUG May 22 2024.pdf
May Marketo Masterclass, London MUG May 22 2024.pdfMay Marketo Masterclass, London MUG May 22 2024.pdf
May Marketo Masterclass, London MUG May 22 2024.pdf
Adele Miller
 
Exploring Innovations in Data Repository Solutions - Insights from the U.S. G...
Exploring Innovations in Data Repository Solutions - Insights from the U.S. G...Exploring Innovations in Data Repository Solutions - Insights from the U.S. G...
Exploring Innovations in Data Repository Solutions - Insights from the U.S. G...
Globus
 
Lecture 1 Introduction to games development
Lecture 1 Introduction to games developmentLecture 1 Introduction to games development
Lecture 1 Introduction to games development
abdulrafaychaudhry
 
Navigating the Metaverse: A Journey into Virtual Evolution"
Navigating the Metaverse: A Journey into Virtual Evolution"Navigating the Metaverse: A Journey into Virtual Evolution"
Navigating the Metaverse: A Journey into Virtual Evolution"
Donna Lenk
 
Enhancing Project Management Efficiency_ Leveraging AI Tools like ChatGPT.pdf
Enhancing Project Management Efficiency_ Leveraging AI Tools like ChatGPT.pdfEnhancing Project Management Efficiency_ Leveraging AI Tools like ChatGPT.pdf
Enhancing Project Management Efficiency_ Leveraging AI Tools like ChatGPT.pdf
Jay Das
 
Climate Science Flows: Enabling Petabyte-Scale Climate Analysis with the Eart...
Climate Science Flows: Enabling Petabyte-Scale Climate Analysis with the Eart...Climate Science Flows: Enabling Petabyte-Scale Climate Analysis with the Eart...
Climate Science Flows: Enabling Petabyte-Scale Climate Analysis with the Eart...
Globus
 
Webinar: Salesforce Document Management 2.0 - Smarter, Faster, Better
Webinar: Salesforce Document Management 2.0 - Smarter, Faster, BetterWebinar: Salesforce Document Management 2.0 - Smarter, Faster, Better
Webinar: Salesforce Document Management 2.0 - Smarter, Faster, Better
XfilesPro
 
Cracking the code review at SpringIO 2024
Cracking the code review at SpringIO 2024Cracking the code review at SpringIO 2024
Cracking the code review at SpringIO 2024
Paco van Beckhoven
 
Innovating Inference - Remote Triggering of Large Language Models on HPC Clus...
Innovating Inference - Remote Triggering of Large Language Models on HPC Clus...Innovating Inference - Remote Triggering of Large Language Models on HPC Clus...
Innovating Inference - Remote Triggering of Large Language Models on HPC Clus...
Globus
 
Top Features to Include in Your Winzo Clone App for Business Growth (4).pptx
Top Features to Include in Your Winzo Clone App for Business Growth (4).pptxTop Features to Include in Your Winzo Clone App for Business Growth (4).pptx
Top Features to Include in Your Winzo Clone App for Business Growth (4).pptx
rickgrimesss22
 

Recently uploaded (20)

Cyaniclab : Software Development Agency Portfolio.pdf
Cyaniclab : Software Development Agency Portfolio.pdfCyaniclab : Software Development Agency Portfolio.pdf
Cyaniclab : Software Development Agency Portfolio.pdf
 
2024 RoOUG Security model for the cloud.pptx
2024 RoOUG Security model for the cloud.pptx2024 RoOUG Security model for the cloud.pptx
2024 RoOUG Security model for the cloud.pptx
 
Globus Compute wth IRI Workflows - GlobusWorld 2024
Globus Compute wth IRI Workflows - GlobusWorld 2024Globus Compute wth IRI Workflows - GlobusWorld 2024
Globus Compute wth IRI Workflows - GlobusWorld 2024
 
Custom Healthcare Software for Managing Chronic Conditions and Remote Patient...
Custom Healthcare Software for Managing Chronic Conditions and Remote Patient...Custom Healthcare Software for Managing Chronic Conditions and Remote Patient...
Custom Healthcare Software for Managing Chronic Conditions and Remote Patient...
 
How to Position Your Globus Data Portal for Success Ten Good Practices
How to Position Your Globus Data Portal for Success Ten Good PracticesHow to Position Your Globus Data Portal for Success Ten Good Practices
How to Position Your Globus Data Portal for Success Ten Good Practices
 
Using IESVE for Room Loads Analysis - Australia & New Zealand
Using IESVE for Room Loads Analysis - Australia & New ZealandUsing IESVE for Room Loads Analysis - Australia & New Zealand
Using IESVE for Room Loads Analysis - Australia & New Zealand
 
Corporate Management | Session 3 of 3 | Tendenci AMS
Corporate Management | Session 3 of 3 | Tendenci AMSCorporate Management | Session 3 of 3 | Tendenci AMS
Corporate Management | Session 3 of 3 | Tendenci AMS
 
Enterprise Resource Planning System in Telangana
Enterprise Resource Planning System in TelanganaEnterprise Resource Planning System in Telangana
Enterprise Resource Planning System in Telangana
 
Accelerate Enterprise Software Engineering with Platformless
Accelerate Enterprise Software Engineering with PlatformlessAccelerate Enterprise Software Engineering with Platformless
Accelerate Enterprise Software Engineering with Platformless
 
Large Language Models and the End of Programming
Large Language Models and the End of ProgrammingLarge Language Models and the End of Programming
Large Language Models and the End of Programming
 
May Marketo Masterclass, London MUG May 22 2024.pdf
May Marketo Masterclass, London MUG May 22 2024.pdfMay Marketo Masterclass, London MUG May 22 2024.pdf
May Marketo Masterclass, London MUG May 22 2024.pdf
 
Exploring Innovations in Data Repository Solutions - Insights from the U.S. G...
Exploring Innovations in Data Repository Solutions - Insights from the U.S. G...Exploring Innovations in Data Repository Solutions - Insights from the U.S. G...
Exploring Innovations in Data Repository Solutions - Insights from the U.S. G...
 
Lecture 1 Introduction to games development
Lecture 1 Introduction to games developmentLecture 1 Introduction to games development
Lecture 1 Introduction to games development
 
Navigating the Metaverse: A Journey into Virtual Evolution"
Navigating the Metaverse: A Journey into Virtual Evolution"Navigating the Metaverse: A Journey into Virtual Evolution"
Navigating the Metaverse: A Journey into Virtual Evolution"
 
Enhancing Project Management Efficiency_ Leveraging AI Tools like ChatGPT.pdf
Enhancing Project Management Efficiency_ Leveraging AI Tools like ChatGPT.pdfEnhancing Project Management Efficiency_ Leveraging AI Tools like ChatGPT.pdf
Enhancing Project Management Efficiency_ Leveraging AI Tools like ChatGPT.pdf
 
Climate Science Flows: Enabling Petabyte-Scale Climate Analysis with the Eart...
Climate Science Flows: Enabling Petabyte-Scale Climate Analysis with the Eart...Climate Science Flows: Enabling Petabyte-Scale Climate Analysis with the Eart...
Climate Science Flows: Enabling Petabyte-Scale Climate Analysis with the Eart...
 
Webinar: Salesforce Document Management 2.0 - Smarter, Faster, Better
Webinar: Salesforce Document Management 2.0 - Smarter, Faster, BetterWebinar: Salesforce Document Management 2.0 - Smarter, Faster, Better
Webinar: Salesforce Document Management 2.0 - Smarter, Faster, Better
 
Cracking the code review at SpringIO 2024
Cracking the code review at SpringIO 2024Cracking the code review at SpringIO 2024
Cracking the code review at SpringIO 2024
 
Innovating Inference - Remote Triggering of Large Language Models on HPC Clus...
Innovating Inference - Remote Triggering of Large Language Models on HPC Clus...Innovating Inference - Remote Triggering of Large Language Models on HPC Clus...
Innovating Inference - Remote Triggering of Large Language Models on HPC Clus...
 
Top Features to Include in Your Winzo Clone App for Business Growth (4).pptx
Top Features to Include in Your Winzo Clone App for Business Growth (4).pptxTop Features to Include in Your Winzo Clone App for Business Growth (4).pptx
Top Features to Include in Your Winzo Clone App for Business Growth (4).pptx
 

Reactjs Basics

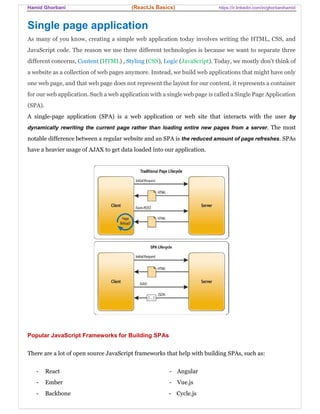
  • 1. Hamid Ghorbani (ReactJs Basics) https://ir.linkedin.com/in/ghorbanihamid Single page application As many of you know, creating a simple web application today involves writing the HTML, CSS, and JavaScript code. The reason we use three different technologies is because we want to separate three different concerns, Content (HTML) , Styling (CSS), Logic (JavaScript). Today, we mostly don't think of a website as a collection of web pages anymore. Instead, we build web applications that might have only one web page, and that web page does not represent the layout for our content, it represents a container for our web application. Such a web application with a single web page is called a Single Page Application (SPA). A single-page application (SPA) is a web application or web site that interacts with the user by dynamically rewriting the current page rather than loading entire new pages from a server. The most notable difference between a regular website and an SPA is the reduced amount of page refreshes. SPAs have a heavier usage of AJAX to get data loaded into our application. Popular JavaScript Frameworks for Building SPAs There are a lot of open source JavaScript frameworks that help with building SPAs, such as: - React - Angular - Ember - Vue.js - Backbone - Cycle.js
  • 2. Hamid Ghorbani (ReactJs Basics) https://ir.linkedin.com/in/ghorbanihamid ReactJs React.js or ReactJS is a JavaScript library for building user interfaces specifically for single page applications(SPA). It is maintained by Facebook, Instagram and a community of individual developers and corporations. React allows developers to create large web-applications that use data and can change over time without reloading the page. It aims primarily to provide speed, simplicity, and scalability. React processes only user interfaces in applications. This corresponds to View in the Model-View- Controller (MVC) pattern, and can be used in combination with other JavaScript libraries or frameworks in MVC, such as AngularJS. React doesn’t handle backend logic or databases; it just creates a frontend build pipeline, so you can use it with any backend you want. Once you load your web page in a web browser, it creates a Document Object Model (DOM) of that web page in a tree structure. In traditional web pages, you would finish creating your web page's layout, but in SPA, you would need to manipulate the DOM and change page elements with JavaScript, because our web applications are not static. ReactJS uses a different solution to find the minimum number of steps to update the Real DOM, called the virtual DOM. The virtual DOM is a fast, in-memory representation of the real DOM, and it's an abstraction that allows us to treat JavaScript and DOM as if they were reactive. Whenever the state of your data model changes, the virtual DOM and React will rerender your UI to a virtual DOM representation. React updates only what needs to be updated in the real DOM. The process of finding a difference between the two representations of the virtual DOM and rerendering only the updated patches in a real DOM is fast.
  • 3. Hamid Ghorbani (ReactJs Basics) https://ir.linkedin.com/in/ghorbanihamid ReactJS Features: ECMAScript 6: React uses some features from ECMAScript 6 (ES6), a recent version of JavaScript. ECMAScript is a trademarked scripting-language specification standardized by Ecma International in ECMA-262. It was created to standardize JavaScript. JavaScript has remained the best-known implementation of ECMAScript. JSX: In React, instead of using regular JavaScript for templating, it uses JSX. JSX is a statically-typed, HTML- like syntax and object-oriented programming language designed to run on modern web browsers. JSX is simple JavaScript which allows HTML quoting and uses these HTML tag syntax to render subcomponents. HTML syntax is processed into JavaScript calls of React Framework. By using JSX and ES6 we can be more productive while working with React. But the JSX syntax and ES6, are not supported in all the browsers. If we are using them in the React code, we need a tool to translates them to the format that has been supported by the browsers. It's where Babel and Webpack comes into the picture. Babel is a JavaScript compiler, Babel has support for the latest version of JavaScript through syntax transformers. These plugins allow you to use new syntax, right now without waiting for browser support. Webpack is a popular module bundling system for modern JavaScript applications built on top of Node.js. It can handle not only combination and minification of JavaScript and CSS files, but also other assets such as image files (spriting) through the use of plugins. webpack can analyze your project's structure, find JavaScript modules and other assets to bundle and pack them for the browser. The support of loaders in Webpack makes it a perfect fit for using it along with React. When webpack processes your application, it recursively builds a dependency graph that includes every module your application needs, then packages all of those modules into a small number of bundles - often only one - to be loaded by the browser.
  • 4. Hamid Ghorbani (ReactJs Basics) https://ir.linkedin.com/in/ghorbanihamid React Native: React has native libraries which were announced by Facebook in 2015, which provides the react architecture to native applications like IOS, Android and UPD. Single-Way data flow: In React, a set of immutable values are passed to the components renderer as properties in its HTML tags. Component cannot directly modify any properties but can pass a call back function with help of which we can do modifications. This complete process is known as “properties flow down; actions flow up”. Lightweight Virtual Document Object Model: React embraces a lightweight implementation of the events system and DOM. It doesn't use the browser, but allows one to manipulate DOM version stored in the memory. This certainly delivers fast and effective performance. Components Support And Little Dependencies The default JavaScript package manager (npm) has enticed several developers to implement the Node.js platform with its amazingly useful features. Unlike, AngularJS that doesn't support Node.js, you can easily use the Node.js platform in the front end while working with React. This is so because in React, everything is treated as components. Therefore, you can easily import component by just writing the below line. Flux Library: Like it has been said, React JS is actually a library made of Java scripts. Flux is one of the best libraries that complement React JS and make it very easy for the programmers to manage data across the whole application.
  • 5. Hamid Ghorbani (ReactJs Basics) https://ir.linkedin.com/in/ghorbanihamid Installing React: To install React you need to download and install several small software packages, So the first thing to install is a good package manager to install packages easily, without having to worry about dependencies. We'll be using a popular package manager named npm. Npm: npm is a great way to download, install, share, distribute code; manage dependencies and keep track of JavaScript projects. You can install npm by installing Node.js. When you install Node.js, npm will install automatically. NodeJs: Node.js is an open-source, cross-platform JavaScript run-time environment for executing JavaScript code server-side. Historically, JavaScript was used primarily for client-side scripting, in which scripts written in JavaScript are embedded in a webpage's HTML, to be run client-side by a JavaScript engine in the user's web browser. Node.js enables JavaScript to be used for server-side scripting, and runs scripts server-side to produce dynamic web page content before the page is sent to the user's web browser. To install Node.js on windows Simply download the Windows Installer directly from the nodejs.org web site. Note: Every time you make a new React app, you have to do the following steps, You don't have to install Node.js and npm anymore, but you should start from here for every new React project that you make. 1) Create a new folder 'react-hello-world' and initialize it with npm: mkdir ReactHelloWorld cd ReactHelloWorld npm init You will get some prompts! You can answer them, but it's also safe to Accept the default for all the prompts (keep hitting return) and not worry about it. Once the prompts are done, you will see that a new file named package.json has been created! The command npm init automatically creates a new file named package.json. package.json contains metadata about your new project. Use your favorite text editor to open all of the files in your project's root directory.
  • 6. Hamid Ghorbani (ReactJs Basics) https://ir.linkedin.com/in/ghorbanihamid 2) Installing react module: Type this command in the terminal: npm install - - save react install can be abbreviated as i, and --save can be abbreviated as -S, if you like to abbreviate: npm i –save react You just installed React! 3) Installing react-dom module: Type this command in the terminal: npm install - - save react-dom or npm i –save react-dom Note: You can install both react and react-dom with one command: npm i –save react react-dom 4) Installing Babel to enabe ES6 and JSX: Babel is a JavaScript compiler that includes the ability to compile JSX into regular JavaScript. ES6 is a set of modern JavaScript features that make development easier, and JSX is an extension to the JavaScript language that works nicely with React. Installing Babel lets you use ES6 and JSX in your JavaScript code. Babel's npm module's name is babel-core. npm i –save-dev babel-core The -dev flag saves an npm module for development version only. With this flag Babel will only be used in development mode. When a React app is shipped into production, it no longer needs to make transformations, the transformations will be hard-coded in place.
  • 7. Hamid Ghorbani (ReactJs Basics) https://ir.linkedin.com/in/ghorbanihamid Note: --save-dev can be shortened to -D. There are babel-related modules that you need to install them: babel-loader, babel-preset- react and babel-preset-env. npm i - -save-dev babel-core babel-loader babel-preset-react babel-preset-env Without any configuration options, babel-preset-env behaves exactly the same as babel-preset- latest (or babel-preset-es2015, babel-preset-es2016, and babel-preset-es2017 together) Configuring babel: In order to make Babel work, you need to write a babel configuration file. In your root directory, create a new file named .babelrc. If you get prompted about starting a filename with a period, go ahead and say that it's okay. Save the following code inside of .babelrc: { "presets": ["react"] } 5) Installing WebPack: The main purpose of using webpack is to bundle JavaScript files for usage in a browser . There are also two webpack-related modules named webpack-dev-server and html-webpack-plugin, which are important to install. webpack should be saved in development mode, just like babel: npm install --save-dev webpack webpack-dev-server html-webpack-plugin
  • 8. Hamid Ghorbani (ReactJs Basics) https://ir.linkedin.com/in/ghorbanihamid Configuring WebPack: Webpack's job is to run your React code through various transformations. Webpack requires some configuration settings in a configuration file to carry out its work. This file must be located in the outermost layer of your root directory, and must be named webpack.config.js. webpack's configuration file is a JavaScript file that exports an object. This object is then processed by webpack based upon its defined properties. Depending on your usage of webpack there are two ways to pass this configuration object, CLI and node.js API: CLI: module.exports = { // configuration }; Node.js : webpack({ // configuration }, callback); A simple configuration object example(CLI): The minimalist requirement of a Webpack config file is the presence of entry and output properties. var path = require('path'); var config = { entry: '/mySample.jsx', output: { path: path.resolve(__dirname, 'src/dist'), filename: 'bundle.js' } module : { loaders : [ { test : /.jsx?/, include : /node_modules/, loader : 'babel-loader' } ] } }; module.exports = config;
  • 9. Hamid Ghorbani (ReactJs Basics) https://ir.linkedin.com/in/ghorbanihamid entry: As the name suggests, entry specifies the entry files using which the bundling process starts. If you are coming from C# or Java, it's similar to the class that contains main method. Webpack supports multiple entry points too. Here the mySample.jsx is the starting point of the application. Entry's value can be a filepath, or an array of filepaths if you would like to have more than one entry point. output: The output instructs Webpack what to do after the bundling process has been completed. Here, we are instructing it to use the src/dist directory to output the bundled file with the name bundle.js. module.loaders: You can tell webpack what to do with the code that it's grabbed by adding the module property, containing loaders property. Loaders can transform files from a different language like, CoffeeScript or ES6 to JavaScript, or inline images as data URLs. Loaders even allow you to do things like require() css files right in your JavaScript. The loaders property can takes an array of loaders. Each loader property should specify test, include or exclude and loader properties. test: The test property specifies what kind of files (specifies by file extension) will be affected by the loader. For example the regular expression /.js$/ represents all strings that end with the pattern, ".js". That means that this loader will perform a transformation on all ".js" files. include: The include property specifies what is the directory to be used to look for these file extensions. exclude: You can use "exclude" to specify files that match the "test" criteria, that you don't want to be transformed. loader: The loader property represents the name of the loader.
  • 10. Hamid Ghorbani (ReactJs Basics) https://ir.linkedin.com/in/ghorbanihamid Create-React-App command: One of the major complaints that was always repeated about React was how difficult it was to get started building an application. create-react-app command is an answer to the common complaints of the difficulty of getting started in a common React environment, which usually involves configuring a combination of things such as webpack, babel, and react to create single-page React applications. You don’t need to install or configure tools like Webpack or Babel. They are preconfigured and hidden so that you can focus on the code. If you already have node 4.x or higher installed, you can install create- react-app, with running the following command in the terminal: npm install -g create-react-app To create a new app, run the following command: create-react-app my_react_app By running the above command, it will create a directory called my_react_app inside the current folder.Inside that directory, it will generate the initial project structure and install the transitive dependencies, you'll end up with a folder like this: my_react_app/ │ ├── README.md ├── package.json ├── .gitignore │ ├── public/ │ └── favicon.ico │ └── index.html │ └── manifest.json ├── src/ │ └── App.css │ └── App.js │ └── App.test.js │ └── index.css │ └── index.js │ └── logo.svg │ └── registerServiceWorker.js ├── node_modules/ │ └── .bin/ │ └── react/ │ └── webpack/ │ └── . . . . To run the app in development mode, run the following command, inside of your application's folder, it opens the 'http://localhost:3000' url in the browser: npm start To build an optimized bundle, run: npm run build
  • 11. Hamid Ghorbani (ReactJs Basics) https://ir.linkedin.com/in/ghorbanihamid Note: - All of the code you write will live under the src folder,you can organize into subfolders. - For the project to build, these files must exist with exact filenames:  public/index.html is the page template;  src/index.js: is the JavaScript entry point. - You can delete or rename the other files. - You may create subdirectories inside src. For faster rebuilds, only files inside src are processed by Webpack. - You need to put any JS and CSS files inside src, otherwise Webpack won’t see them. - Only files inside public can be used from public/index.html. - You can, however, create more top-level directories. They will not be included in the production build so you can use them for things like documentation. Most react projects on Github organize project files by type, like this: src/ │ ├── App.js ├── index.js │ ├── actions/ │ └── userAction.js │ └── loginAction.js │ └── . . . ├── components/ │ └── button.js │ └── inputText.js │ └── . . . ├── containers/ │ └── homePage.js │ └── loginPage.js │ └── usersList.js │ └── . . . ├── styles/ │ └── App.css │ └── header.css │ └── home.css │ └── . . . ├── images/ │ └── logo.svg │ └── . . . ├── utils/ │ └── testUtil.js │ └── . . . ├── reducers/ │ └── login.js │ └── . . .
  • 12. Hamid Ghorbani (ReactJs Basics) https://ir.linkedin.com/in/ghorbanihamid React Elements Just like the DOM is a tree of nodes, React's virtual DOM is a tree of React nodes. One of the core types in React is called ReactNode. It's a building block for a virtual DOM, and it can be any one of these core types:  ReactElement: Elements are the smallest building blocks of React apps. An element describes what you want to see on the screen. It's a light, stateless, immutable, virtual representation of a DOM Element.  ReactText: This is a string or a number. It represents textual content and it's a virtual representation of a Text Node in the DOM. ReactElements and ReactTexts are ReactNodes. An array of ReactNodes is called a ReactFragment. React object is the entry point to the React library. If you load React from a <script>tag, these top- level APIs are available on the React global. JSX is not a requirement for using React but JSX makes React a lot more elegant. anything you can do with JSX can also be done with just plain JavaScript. JSX is just syntactic sugar for function calls and object construction. createElement(): Create and return a new React element of the given type. React.createElement(type, [props], [...children] ) Type Parameter: The type argument can be either a HTML tag name (such as 'div' or 'span'), or a React component (a class or a function). React supports all the common HTML tags and attributes. Props parameter: The props parameter is a JavaScript object passed from a parent element to a child element (and not the other way around) with some properties that are considered immutable, that is, those that should not be changed. While creating DOM elements with React, we can pass the props object with properties that represent the HTML attributes such as class, style, and so on. Example: React.createElement("div", {id:"msg", className: 'header' }, "Hello World!"); // Or for shothand writing: const elm = React.createElement; elm("div", {id:"msg"}, "Hello World!");
  • 13. Hamid Ghorbani (ReactJs Basics) https://ir.linkedin.com/in/ghorbanihamid Children parameter The children parameter describes what child elements this element should have. A child element can be any type of ReactNode: a virtual DOM element represented by a ReactElement, a string or a number represented by a ReactText, or an array of other ReactNodes, which is also called ReactFragment. Example: const elm = React.createElement; var h1 = elm('h1', { className: 'header', key: 'header' }, "This is React"); var p = elm('p', { className: 'content', key: 'content' }, "And that's how it works."); var reactFragment = [ h1, p ]; var section = elm('section', { className: 'container' }, reactFragment); As a result of above code, we get the following HTML: <section class="container" > <h1 class="header" >This is React</h1> <p class="content" >And that's how it works.</p> </section> isValidElement(): isValidElement Verifies the object is a React element. Returns true or false. React.isValidElement(object) createFactory(type): createFactory creates a function that produces a ReactElement of a given type. Example: var React = require('react'); var ReactDOM = require('react-dom'); var createListItemElement = React.createFactory('li'); var listItemElement1 = createListItemElement({ className: 'item-1', key: 'item-1' }, 'Item 1'); var listItemElement2 = createListItemElement({ className: 'item-2', key: 'item-2' }, 'Item 2'); var reactFragment = [ listItemElement1, listItemElement2 ]; var listOfItems = React.createElement('ul', { className: 'list-of-items' }, reactFragment); ReactDOM.render(listOfItems, document.getElementById('react-application'));
  • 14. Hamid Ghorbani (ReactJs Basics) https://ir.linkedin.com/in/ghorbanihamid In the preceding example, we're first calling the React.createFactory() function and passing a li HTML tag name as a type parameter. Then, the React.createFactory() function returns a new function that we can use as a convenient shorthand to create elements of type li. We store a reference to this function in a variable called createListItemElement. Then, we call this function three times, and each time we only pass the props and children parameters, which are unique for each element. Notice that React.createElement() and React.createFactory() both expect the HTML tag name string (such as li) or the ReactClass object as a type parameter. React.DOM HTML functions: React provides us with a number of built-in factory functions to create the common HTML tags. You can call them from the React.DOM object; for example, React.DOM.li(), React.DOM.div(), and so on. Using them, we can simplify our previous example even further: var React = require('react'); var ReactDOM = require('react-dom'); var listItemElement1 = React.DOM.li({ className: 'item-1', key: 'item-1' }, 'Item 1'); var listItemElement2 = React.DOM.li({ className: 'item-2', key: 'item-2' }, 'Item 2'); var reactFragment = [ listItemElement1, listItemElement2 ]; var listOfItems = React.DOM.ul({ className: 'list-of-items' }, reactFragment); ReactDOM.render(listOfItems, document.getElementById('react-application')); Rendering Elements: The ReactDOM.render() function can be used to render React elements to the DOM. The render() method takes three parameters: ReactDOM.render(ReactElement, DOMElement, [callback]);  ReactElement is a root element in the tree of ReactNodes that you've created.  A regular DOMElement is a container DOM node for that tree.  If the optional parameter callback is provided, it will be executed after the component is rendered or updated. Example: const element = <div>Hello world!</div>; ReactDOM.render(element,document.getElementById('root') );
  • 15. Hamid Ghorbani (ReactJs Basics) https://ir.linkedin.com/in/ghorbanihamid React with JSX: JSX is an XML/HTML-like syntax used by React that extends ECMAScript so that XML/HTML-like text can co-exist with JavaScript/React code. The syntax is intended to be used by preprocessors (i.e., transpilers like Babel) to transform HTML-like text found in JavaScript files into standard JavaScript objects that a JavaScript engine will parse. JSX is a separate thing from React itself. It is designed as an ECMAScript feature and the similarity to XML/HTML is only at the surface. By using JSX you can write concise HTML/XML-like structures (e.g., DOM like tree structures) in the same file as you write JavaScript code, then Babel will transform these expressions into actual JavaScript code. Unlike the past, instead of putting JavaScript into HTML, JSX allows us to put HTML into JavaScript. Each JSX element is just syntactic sugar for calling React.createElement. You will not typically invoke React.createElement() directly if you are using JSX. Example 1: The following Javascript(React) code: React.createElement ('div', { id: 'msg'}, " Hello World!"); Can be written in a more natural HTML-like syntax using JSX code: <div id="msg">Hello World!</div> Example 2: The following JSX code: var nav = ( <ul id="nav"> <li><a href="#">Home</a></li> <li><a href="#">About</a></li> </ul> ); Will transform it into following Javascript/React code with Babel: var nav = React.createElement( "ul", { id: "nav" }, React.createElement("li", null, React.createElement("a",{ href: "#" },"Home") ), React.createElement("li", null, React.createElement("a",{ href: "#" },"About") ) );
  • 16. Hamid Ghorbani (ReactJs Basics) https://ir.linkedin.com/in/ghorbanihamid Notes:  You can split JSX over multiple lines for readability and wrapping it in parentheses to avoid the pitfalls of automatic semicolon insertion. const element = ( <h1> Hello World! </h1> );  The class attribute has to be written className in JSX.  The tabindex attribute has to be written tabIndex in JSX.  The for attribute has to be written htmlFor  You may use quotes to specify string literals as attributes: const element = <div tabIndex="0"></div>;  You may also use curly brackets to embed a JavaScript expression in an attribute: const element = <img src={user.avatarUrl}></img>;  JavaScript expressions can be used inside of JSX. You just need to wrap it with curly brackets {}. <h1>{1+1}</h1>  We cannot use if else statements inside JSX, instead we can use conditional (ternary) expressions. <h1>{i == 1 ? 'True!' : 'False'}</h1>  HTML tags always use lowercase tag names, while React components start with Uppercase, so To represent HTML elements, ensure the HTML tag is lower-cased.  You can place JavaScript comments anywhere in React/JSX you want except locations where JSX might expect a React child node. In this situation you'll have to escape the comment using { } so that JSX knows to pass that on as actual JavaScript. <div> <h1>Header</h1> {//End of the line Comment...} {/*Multi line comment...*/} </div>
  • 17. Hamid Ghorbani (ReactJs Basics) https://ir.linkedin.com/in/ghorbanihamid Some ECMAScript 6 new Features: Number Truncation: Truncate a floating point number to its integral part, completely dropping the fractional part. console.log(Math.trunc(42.7)) // 42 console.log(Math.trunc( 0.1)) // 0 console.log(Math.trunc(-0.1)) // -0 New string repeating functionality: " ".repeat(4 * depth); "foo".repeat(3); String Searching New specific string functions to search for a sub-string. "hello".startsWith("ello", 1); // true "hello".endsWith("hell", 4); // true "hello".includes("ell"); // true "hello".includes("ell", 1); // true "hello".includes("ell", 2); // false Number Type Checking New functions for checking for non-numbers and finite numbers. Number.isNaN(42) === false; Number.isNaN(NaN) === true; Number.isFinite(Infinity) === false; Number.isFinite(-Infinity) === false; Number.isFinite(NaN) === false; Number.isFinite(123) === true; Number Safety Checking Checking whether an integer number is in the safe range Number.isSafeInteger(42) === true; Number.isSafeInteger(9007199254740992) === false;
  • 18. Hamid Ghorbani (ReactJs Basics) https://ir.linkedin.com/in/ghorbanihamid Var, let and const in ES6: In the pre-ES6 era, there was only one way of declaring variables in JavaScript — being the usage of var. There is two new keywords that better represent the type of data in ES6: Var: The keyword var has traditionally been how we’ve defined variables in JavaScript. a variable being declared using var will be function scoped, meaning it will exist within the scope of the function it’s declared inside of. Example1: function myFunc() { var name = 'Luke' console.log(name); // Result: 'Luke' } myFunc(); console.log(name); // Result: name is not defined // the variable declared with var inside the function, is not reachable from outside the function. Example2: function myFunc() { if(true){ var name = 'Luke' } console.log(name); // Result: 'Luke' // the variable name is available outside the if-statement it was declared inside of. This is because they're in the same scope. } assigning the JSX blocks to a variable: You can embed any JavaScript expression in JSX by wrapping it in curly braces. Adjacent Jsx elements must be wrapped to an enclosing tag. Example: var HeaderTemplate = ( <div> <h1>Application Title</h1> <h2>Hello World</h2> </div> ); var username = { name : 'Hamid', family : 'Ghorbani', age : 38 };
  • 19. Hamid Ghorbani (ReactJs Basics) https://ir.linkedin.com/in/ghorbanihamid Let : Use let to declare a variable when the data it’s holding may change, similarly to var. let is block scoped, which just means it’s available inside the block (curly braces) it’s defined in (including inner blocks), but not outside it. If you declare variables with same name in different blocks, ES6 treats them as separate variables: Example1: let myAge = 39; if (new Date().getFullYear == 2018){ myAge = 40 } Example2: if (true){ // new block let myname = 'George' } console.log(myname) // syntax error, myname is undefined(out of block) Const: Use const to declare variables that will never change, such as the value of PI or the name of your brother. const is similar to let in that it’s block scoped, making it only accessible within the block (curly braces) it’s defined in. const unlike let must be initialized with a value at the time of definition. Furthermore, it can’t be reassigned with another value afterwards but if the value of a const is an object or array, the object’s properties themselves are still mutable, able to be modified: const myobject = {name:'George', age:39} myobject = {name: 'Ken', age:39} //syntax error, myobject is read-only myobject.age = 40 // OK const myarray = [] myarray[0] = 'Football' // OK
  • 20. Hamid Ghorbani (ReactJs Basics) https://ir.linkedin.com/in/ghorbanihamid ES6 Functions: The function keyword can be used to define a function inside an expression. The function name can be omitted, in which case the function is anonymous. The name is only local to the function body. Syntax: var myFunction = function [name](param1, param2, ..., paramN) { statements; }; Example: var getRectArea = function(width, height) { return width * height; } Default function parameters: In the following example, number1 and number2 are assigned default values of ‘5’ and ‘10’ respectively. function counts(number1 = 5, number2 = 10) { // do anything here } NOTE1: If the value of ‘undefined’ is passed to a parameter with default argument, it is invalid and the default parameter value is assigned. But if ‘null ‘is passed, it is considered as valid and the default parameter is not used and null is assigned to that parameter. NOTE2: The default parameters doesn’t necessarily have to be a primitive value, and we can also execute a function to retrieve the default parameter value: Example: function getDefaultParam() { return 10; } function multiply(first, second = getDefaultParam()) { return first * second; }
  • 21. Hamid Ghorbani (ReactJs Basics) https://ir.linkedin.com/in/ghorbanihamid Rest Parameters: The rest parameter syntax allows us to represent an indefinite number of arguments as an array. Rest parameters are indicated by three dots … preceding a parameter. This named parameter becomes an array which contains rest of the parameters(i.e apart from the named parameters) passed during function call. We can only have one rest parameter, and it has to be the last parameter. We can’t have a named parameter after a rest parameter. Example: function sum(…numbers) { var result = 0; numbers.forEach(function (number) { result += number; }); return result; } ES6 Arrow Functions: Arrow functions – also called “fat arrow” functions, introduce a new syntax for defining functions that is very concise. We can avoid typing keywords like function keyword, return keyword and even curly brackets { } and parentheses (). The syntax comes in different flavors, depending on our usage. All the variations have one thing in common, i.e they begin with the arguments, followed by arrow ‘=>’, followed by the function body. The arguments and the body can take different forms. Example: // ES6: var multiply = (x, y) => { return x * y }; // equivalent to ES5: var multiply = function(x, y) { return x * y; }; Example2: let getMessage = () => 'Hello World'; // equivalent to: let getMessage = function() { return 'Hello World'; }
  • 22. Hamid Ghorbani (ReactJs Basics) https://ir.linkedin.com/in/ghorbanihamid NOTE:  arrow functions can’t be called with new, can’t be used as constructors (and therefore lack prototype as well)  Arrow functions have their own scope, but there’s no ‘this’ of their own.  No arguments object is available. You can use rest parameters however.  For a function body with just a return statement, curly braces are optional. For a function body having more than just a return statement, you need to wrap the body in curly braces just like traditional functions. let calculate = (no1, no2, operation) => { let result; switch (operation) { case 'add': result = no1 + no2; break; case 'subtract': result = no1 - no2; break; } return result; };  When there is only one argument, there’s no need for parentheses “( )” as well. let result = param1 => param1; // equivalent to: let result = function(param1) { return param1; };  If we have a function that simply returns an object, For preventing the compiler to get confused whether the curly braces are of the object (()=>{id: number} ) or curly braces of the function body, We must wrap the object in parentheses: let getTempItem = number => ({ id: number}); // equivalent to: let getTempItem = function(number) { return { id: number}; };
  • 23. Hamid Ghorbani (ReactJs Basics) https://ir.linkedin.com/in/ghorbanihamid Classes: ES6 also introduces the class ability to create traditional classes, similar to many other object-oriented languages: class Book { constructor(title, pageCount) { this.title = title; this.pageCount = pageCount; } . . . } Destructuring: Destructuring is a convenient way of extracting multiple values from data stored in (possibly nested) objects and Arrays. Example: We have two simple functions, getBookArray and getBookObject, which both return a value type indicated by their name: function getBookArray() { return ['The Hobbit', 320]; } function getBookObject() { return { title: 'The Hobbit', page_count: 320 }; } Prior to ES6, if we wanted to assign variables to the underlying values returned by the array/object of those functions, we’d have to create a temporary variable, assign that variable to the result of the function in question, then declare our individual variables to grab the values from the new temporary object. var tempBookArray = getBookArray(); title = tempBookArray[0]; page_count = tempBookArray[1]; var tempBookObject = getBookObject(); title = tempBookObject.title;
  • 24. Hamid Ghorbani (ReactJs Basics) https://ir.linkedin.com/in/ghorbanihamid page_count = tempBookObject.page_count; ES6 introduces destructuring, which is simply syntactic sugar to perform the above steps with much less code: var [ title, page_count ] = getBookArray(); var { title, page_count } = getBookObject(); You can also combine the default value syntax with the new destructuring syntax. var { title, author, page_count, language = 'English' } = getBookObject(); Creating Components in React: Components let you split the UI into independent, reusable pieces, and think about each piece in isolation. Components have one requirement; they must implement render, a function that tells the component what to... render. There are three ways to create a React component: createClass(): In React, you can create a component by calling React.createClass(). As of React 15.5, createClass is deprecated. Example: var MyReactComponent = React.createClass({ render: function() { return (React.createElement("p", null, "Hello, Universe")); } }); Using Javascript Function: The simplest way to define a component is to write a JavaScript function. In the following example, the function accepts a single “props” (which stands for properties) object argument with data and returns a React element. We call such components “function component” or “stateless compnents”: Example: function Welcome(props) { return <h1>'Hello World'</h1>; }
  • 25. Hamid Ghorbani (ReactJs Basics) https://ir.linkedin.com/in/ghorbanihamid Using ES6 class to define a Component: With ES6, we can use classes to create React components. A class component or stateful component is a more featured way to define a React component. It also acts like a function that receives props, but that function also considers a private internal state as additional input that controls the returned JSX: Example: class Welcome extends React.Component { render() { return React.createElement('div', null, 'Hello World'); } } Component Props: Most components can be customized when they are created, with different parameters. These creation parameters are called props. In the other words, props are like input parameters of functions. For example, one basic React Native component is the Image. When you create an image, you can use a prop named source to control what image it shows. React philosophy is that props should be immutable and top-down, which means they can only be passed from parent components, but the child component cannot modify its props. So, if you try to edit the props as I did below, you will get the "Cannot assign to read-only" TypeError. Example: class Welcome extends React.Component { render() { return React.createElement('div', null, 'Hello ${ this.props.name}'); } } Using name as a prop we customized the Welcome component, so we can reuse that component for each of our greetings.
  • 26. Hamid Ghorbani (ReactJs Basics) https://ir.linkedin.com/in/ghorbanihamid defaultProps: defaultProps can be defined as a property on the component class itself, to set the default props for the class. This is used for undefined props, but not for null props. Example: class CustomButton extends React.Component { // ... } CustomButton.defaultProps = { color: 'blue' }; If props.color is not provided, it will be set by default to 'blue': <CustomButton /> ; // props.color will be set to blue <CustomButton color={null} /> ; // props.color will remain null Component State In a React component the state holds up data. State object is owned by the component where it is declared. Its scope is limited to the current component. A component can initialize its state and update it whenever necessary. The state of the parent component usually ends up being props of the child component. In general, you should initialize state in the constructor, and then call setState when you want to change it. You might set state when you have new data arrive from the server, or from user input. You can also use a state container like Redux to control your data flow. Component Lifecycle: Each component has several “lifecycle methods” that you can override to run code at particular times in the process. Through lifecycle methods, we can then control what happens when each tiny section of your UI renders, updates, thinks about re-rendering, and then disappears entirely. Methods prefixed with will are called right before something happens, and methods prefixed with did are called right after something happens.
  • 27. Hamid Ghorbani (ReactJs Basics) https://ir.linkedin.com/in/ghorbanihamid Mounting: 4 methods are called in mounting process(when an instance of a component is being created and inserted into the DOM):  constructor()  componentWillMount()  render()  componentDidMount() componentWillMount(): Your component is going to appear on the screen very shortly. componentWillMount() is invoked just before mounting occurs. It is called before render(), therefore don’t call setState. Calling setState() synchronously in this method will not trigger an extra rendering, use the constructor() method instead. Also don’t use this method to start AJAX calls to load data for your components. Rendering a Component: Every component has a render() method which returns markup to render. A component doesn’t do anything until it’s rendered. The render() method renders a React element into the DOM in the supplied container and return a reference to the component (or returns null for stateless components). If the React element was previously rendered into container, this will perform an update on it and only mutate the DOM as necessary to reflect the latest React element. One of the aspects we need to be aware of is how React decides when to re-render a component: 1. The component’s state changes: A re-render can be triggered if a component’s state has changed. The state can change from a props change, or from a direct setState change. The component gets the updated state and React decides if it should re-render the component. Unfortunately, by default React is incredibly simplistic and basically re-renders everything all the time. 2. forceUpdate method: A re-render can be occured when the setTimeout() is invoked and this.forceUpdate() is called. Note that simply updating the state (i.e., this.state.now = 'foo';) does not cause a re-render. I set the state using this.state, and then I have to call this.forceUpdate() so the component will re-render with the new state.
  • 28. Hamid Ghorbani (ReactJs Basics) https://ir.linkedin.com/in/ghorbanihamid componentDidMount(): componentDidMount() is invoked immediately after a component is mounted. Initialization that requires DOM nodes should go here. If you need to start AJAX calls to load data from a remote endpoint, this is a good place to instantiate the network request. Calling setState() in this method will trigger an extra rendering, but it will happen before the browser updates the screen. This guarantees that even though the render() will be called twice in this case, the user won’t see the intermediate state. Example (Blink Component): We want to make text that blinks all the time. The text itself gets set once when the blinking component gets created, so the text itself is a prop. class Blink extends Component { constructor(props) { super(props); this.state = {showText: true}; // Toggle the state every second setInterval(() => { this.setState({ showText: !this.state.showText }); }, 1000); } render() { let display = this.state.showText ? this.props.text : ' '; return (<Text>{display}</Text>); } } // Using the above component: export default class App extends Component { render() { return ( <View> <Blink text='I love to blink' /> <Blink text='Yes blinking is so great' /> <Blink text='Why did they ever take this out of HTML' /> <Blink text='Look at me look at me look at me' /> </View> ); } }
  • 29. Hamid Ghorbani (ReactJs Basics) https://ir.linkedin.com/in/ghorbanihamid Redux As the requirements for JavaScript single-page applications have become increasingly complicated, our code must manage more state than ever before. This state can include server responses and cached data, as well as locally created data that has not yet been persisted to the server. UI state is also increasing in complexity, as we need to manage active routes, selected tabs, spinners, pagination controls, and so on. Following in the steps of Flux, Redux attempts to make state mutations predictable by imposing certain restrictions on how and when updates can happen. Redux is a predictable state container for JavaScript apps. It helps you write applications that behave consistently, run in different environments (client, server, and native), and are easy to test. On top of that, it provides a great developer experience, such as live code editing combined with a time traveling debugger. You can use Redux together with React, or with any other view library. Installating Redux: React bindings are not included in Redux by default. To install the stable version of Redux with npm, run the follosing command: npm install --save react-redux Redux parts: Redux has four main parts: Store, Actions, Action creators and Reducers.
  • 30. Hamid Ghorbani (ReactJs Basics) https://ir.linkedin.com/in/ghorbanihamid Store: The store is the central objects that holds the state of the application and is the source of truth for components. The state of your whole application is stored in an object tree within a single store. By using the store concept you do not need to synchronize state between components manually. Store has some methods:  getState(): Returns the current state tree of your application.  dispatch(action): Dispatches an action. This is the only way to trigger a state change.  subscribe(listener): Adds a change listener. It will be called any time an action is dispatched, and some part of the state tree may potentially have changed.  replaceReducer(nextReducer): Replaces the reducer currently used by the store to calculate the state. Actions: Actions are a plain JavaScript object that are used to send data from the application to the store. Sending data to the store is needed to change the application state after a user interaction, internal events or API calls and the only way to change the state is to write an action. Actions have two properties, type and payload. Type: a constant to identify the type of action Payload: the object which is assigned to this property contains the data which are sent to the store An action will look like this: { type: 'ACTION_TYPE', action_value: string } Example: { type: LOGIN_USER, payload: {username: ‘sebastian’, password: ‘123456’} }
  • 31. Hamid Ghorbani (ReactJs Basics) https://ir.linkedin.com/in/ghorbanihamid Action creators: Action objects are created by using functions, called action creators. This makes them portable and easy to test. The only purpose of an action creator function is to return the action object: Example: function authUser(data) { return { type: LOGIN_USER, payload: data } } Reducers: In order to tie state and actions together, we write a pure JavaScript function called a reducer that takes two parameters: the current state and an action. This function applies the action to that state and returns the desired next state. Reducers specify how the application's state changes in response to actions sent to the store. Reducers take the application current state and an action object and return a new application state, they don’t modify any global state: Example: function counterReducer (state = 0 , action) { switch (action.type) { case 'INCREMENT': return state + 1; case 'DECREMENT': return state - 1; default: return state } } The important thing to notice here is that the state is not changed directly. Instead a new state object (based on the old state) is created and the update is done to the new state.
  • 32. Hamid Ghorbani (ReactJs Basics) https://ir.linkedin.com/in/ghorbanihamid Creating Store: Creates a Redux store that holds the complete state tree of your app. There should only be a single store in your app: createStore(reducer, [preloadedState], [enhancer]); Example: import { createStore } from ‘redux’; const store = createStore(reducer); store.dispatch(authUser(data)); CreateStore Arguments:  reducer (Function): A reducing function that returns the next state tree, given the current state tree and an action to handle.  [preloadedState] (any): The initial state. You may optionally specify it to hydrate the state from the server in universal apps, or to restore a previously serialized user session. If you produced reducer with combineReducers, this must be a plain object with the same shape as the keys passed to it. Otherwise, you are free to pass anything that your reducer can understand.  [enhancer] (Function): The store enhancer. You may optionally specify it to enhance the store with third-party capabilities such as middleware, time travel, persistence, etc. The only store enhancer that ships with Redux is applyMiddleware(). Example 1: const store = createStore(counterReducer); Example 2: const store = createStore(combineReducers,{},applyMiddleware(reduxThunk)); Note: applyMiddleware(thunk) tells redux to accept and execute functions as return values. Redux usually only accepts objects. Middleware: Middleware can be used for a variety of things, including asynchronous API calls. People also use Redux middleware for logging, crash reporting, routing, and more. Some redux middlewares are:
  • 33. Hamid Ghorbani (ReactJs Basics) https://ir.linkedin.com/in/ghorbanihamid Redux-thunk: A thunk is another word for a function. But it’s not just any old function. It’s a special (and uncommon) name for a function that’s returned by another. Like this: function not_a_thunk() { // this one is a "thunk" because it defers work for later: return function() { console.log('do stuff now') } } If you want to execute the “do stuff now” part, you have to call it like not_a_thunk()() – calling it twice, basically. Redux-Thunk is the most popular middleware used to handle asynchronous actions in Redux. Redux Thunk middleware allows you to write action creators that return a function instead of an action. The thunk can be used to delay the dispatch of an action, or to dispatch only if a certain condition is met. The inner function receives the store methods dispatch and getState as parameters.
  • 34. Hamid Ghorbani (ReactJs Basics) https://ir.linkedin.com/in/ghorbanihamid Installation: npm install --save redux-thunk Then, to enable Redux Thunk, use applyMiddleware() in index.js: import { createStore, applyMiddleware } from 'redux'; import reduxThunk from 'redux-thunk'; const store = createStore(rootReducer,applyMiddleware(reduxThunk)); ReactDOM.render(<Provider store={store}> <App /> </Provider>, document.getElementById('root')); Example: As we Learned before, “actions” are just objects and they are expected to only be objects. They look like this: { type: "USER_LOGGED_IN", username: "dave" } And, since it’s kind of annoying to build objects by hand all the time, Redux has “action creators” that build these things: function userLoggedIn() { return { type: "USER_LOGGED_IN", username: "dave" }; } Now you can “create” it by calling the userLoggedIn function. “actions” don’t actually do anything, they’re just objects. It could be cool if we could actually make them do something, Like, making an AJAX call, or trigger other actions. Because reducers are supposed to be “pure” (as in, they don’t change anything) we couldn’t put that work inside a reducer. If you wanted an action to do something, that code would need to live inside a function. So, it would be nice if an action creator could return that function instead of an action object. Something like this: function loginUser() { return function() { return axios.post('/loginUser'); } }
  • 35. Hamid Ghorbani (ReactJs Basics) https://ir.linkedin.com/in/ghorbanihamid This is exactly what redux-thunk does. It is a middleware that looks at every action that passes through the system, and if it’s a function, it calls that function. That’s all it does.The only difference is that, Redux will pass two arguments to thunk functions: dispatch, so that they can dispatch new actions if they need to; and getState, so they can access the current state, also the getState function can be useful for deciding whether to fetch new data, or return a cached result, depending on the current state: function loginUser() { return function(dispatch, getState) { return axios.post('/loginUser') .then( function() { // suppose we action creator named ‘userLoggedIn’ dispatch(userLoggedIn()); } ); } } Redux <Provider store>: Makes the Redux store available to the connect() calls in the component hierarchy below. Normally, you can’t use connect() without wrapping a parent or ancestor component in <Provider>. Redux connect: Connects a React component to a Redux store. As we know, there is no way to directly interact with the store. We can either retrieve data by obtaining its current state, or change its state by dispatching an action (we only have access to the top and bottom component of the redux flow diagram shown previously). With “connect” we can map the stores state to our components and dispatch it to the props of a component. connect([mapStateToProps], [mapDispatchToProps], [mergeProps], [options]) mapStateToProps(state, [ownProps]): stateProps] (Function): If this argument is specified, the new component will subscribe to Redux store updates. This means that any time the store is updated, mapStateToProps will be called. [mapDispatchToProps(dispatch, [ownProps]): dispatchProps] (Object or Function): If an object is passed, each function inside it is assumed to be a Redux action creator. An object with the same function names, but with every action creator wrapped into a dispatch call so they may be invoked directly, will be merged into the component’s props.
  • 36. Hamid Ghorbani (ReactJs Basics) https://ir.linkedin.com/in/ghorbanihamid [mergeProps(stateProps, dispatchProps, ownProps): props] (Function): MergeProps is a function which is used to select a slice of the props from state and dispatch. When the third argument is not passed to connect, the default implementation of mergeProps combines the ownProps, mapStateToProps and mapDispatchToProps. mergeProps is where you can filter the props being passed to the component. Especially in situations where you intend to use properties from store as parameters to dispatch actions, mergeProps is the cleanest choice. Example: import { connect } from 'react-redux'; import * as actionCreators from './actionCreators' class LoginForm extends Component { console.log('authData : '+ JSON.stringify(this.props.authData)); render(){ return( <div>. . . </div> ) } } function mapStateToProps({authData}){ return {authData}; } export default connect(mapStateToProps, actionCreators)(LoginForm)); Example: import * as actionCreators from './actionCreators' import { bindActionCreators } from 'redux' function mapStateToProps(state) { return { authData: state.authData } } function mapDispatchToProps(dispatch) { return { actions: bindActionCreators(actionCreators, dispatch) } } export default connect(mapStateToProps, mapDispatchToProps)(LoginForm)
  • 37. Hamid Ghorbani (ReactJs Basics) https://ir.linkedin.com/in/ghorbanihamid Redux-form: redux-form works with React Redux to enable an html form in React to use Redux to store all of its state. Installation: npm install --save redux-form To connect your React form components to your Redux store you'll need the following pieces from the redux-form package:  Redux Reducer(formReducer): function that tells how to update the Redux store based on changes coming from the application; those changes are described by Redux actions  reduxForm(): function that tells how to update the Redux store based on changes coming from the application; those changes are described by Redux actions  <Field/> component: component that lives inside your wrapped form component; use it to connect the input components to the redux-form logic Creates a decorator with which you use redux-form to connect your form component to Redux. It takes a config parameter which lets you configure your form.
  • 38. Hamid Ghorbani (ReactJs Basics) https://ir.linkedin.com/in/ghorbanihamid React Router: React Router is a collection of navigational components that compose declaratively with your application. Whether you want to have bookmarkable URLs for your web app or a composable way to navigate in React Native, React Router works wherever React is rendering--so take your pick! Installation: React Router has been broken into three packages: react-router, react-router-dom, and react-router- native. react-router package provides the core routing functionality for React Router, but you might not want to install it directly. If you are writing an application that will run in the browser, you should instead install react-router-dom. Similarly, if you are writing a React Native application, you should instead install react-router-native. Both of those will install react- router as a dependency. npm install --save react-router-dom // for browser or npm install --save react-router-navtive // for navtive applications React Router components React Router includes several components but for browser based projects, the most uasable components are <BrowserRouter>, <withRouter>,<Route>, <Link> and <Redirect>. BrowserRouter: The BrowserRouter should be used when you have a server that will handle dynamic requests (knows how to respond to any possible URI). Route: The Route component is the most important component in React Router. Its most basic responsibility is to render some UI when a location matches the route's path. As soon as the app location matches the route's path, your component will be rendered: Example: import { BrowserRouter, Route } from 'react-router-dom'; render(){ < BrowserRouter > <div> <Route exact path="/" component={PublicPage} /> <Route path="/login" component={LoginPage} /> </div> </ BrowserRouter > }
  • 39. Hamid Ghorbani (ReactJs Basics) https://ir.linkedin.com/in/ghorbanihamid Route props:  path: This property holds the name of path(URL) to be matched.  component: This property holds the name of the component to be rendered if the path is matched.  exact: This property tells Route the path property must be exactly matched.  strict: This property tells Route to match only a path that has a trailing slash.  render: This property can replace the component property to tell the Route component what it needs to render when there is a match, it is a function that return a React element. More useful for inline rendering or for wraping rendered component.  children: This property also can replace the component property, it is a function which renders a React element. Except that this one will always render even if there is no path match. Example: import { BrowserRouter, Route } from 'react-router-dom'; render(){ < BrowserRouter > <div> <Route path="/user/:username" component={UserPage} /> <Route path="/home" render={() => <div>Home</div>} /> <Route path="/about/ " strict component={AboutPage} /> </div> </ BrowserRouter > } Link: Links which enable users to navigate between differenet pages of React apps. When clicking a <Link>, the URL will be updated and the rendered content will change without reloading the page. The to property of Link , tells React Router the destination to navigate to. Example: < BrowserRouter > <div> <ul> <li><Link to="/public" >Public Page </Link></li> <li><Link to="/protected" >Protected Page</Link></li> </ul> <Route path="/about/ " component={AboutPage} /> </div> </ BrowserRouter >
  • 40. Hamid Ghorbani (ReactJs Basics) https://ir.linkedin.com/in/ghorbanihamid withRouter: You can get access to the history object’s properties and the closest <Route>'s match via the withRouter higher-order component. withRouter will pass updated match, location, and history props to the wrapped component whenever it renders. Using withRouter on your component will also allow you to access your dynamic segment values from the URL, which can be very useful if you need to run some logic or make an API call based on the id(or other info) within the URL. Check this.props.match.params.id or replace id with the name you gave to your dynamic segment. Example: import React, { Component } from 'react'; import { Link, withRouter } from 'react-router-dom'; class DashboardForm extends Component { componentWillMount() { this.props.history.listen(() => { console.log('New URL', this.props.history.location.pathname); }); } render(){ return( div> <Link to='/newUser'>Create New User</Link> <Link to='/getUser/2'>Get User Info</Link> <Link to='/getUsers'>View All users</Link> </div> ) } } export default withRouter(DashboardForm)); Redirect: Rendering a <Redirect> will navigate to a new location. The new location will override the current location in the history stack, like server-side redirects. Example: <Redirect to="/newLocation"/>
  • 41. Hamid Ghorbani (ReactJs Basics) https://ir.linkedin.com/in/ghorbanihamid Making AJAX requests in React What's the React way to fetch data from the server? To answer your question, the biggest confusion is rooted in the fact that React is often advertised as a framework, and people familiar with frameworks such as AngularJS are used to making API calls with things like $http and similar helper libraries provided by Angular itself. This is not the case in React as React is “just” a view library with some state management and lifecycle methods, so, You are free to use any 3rd party library. Some simple libraries for making AJAX calls in React are: Fetch API: The Fetch API is the new standardised API to interact with remote resources and in most modern React tutorials you will find fetch being used. React Native provides the Fetch API for your networking needs. It will seem familiar to anyone who has used XMLHttpRequest, but the new API provides a more powerful and flexible feature set. You may refer to MDN's guide on Using Fetch for additional information. Take a look at the Fetch Request docs for a full list of properties. In order to fetch content from an arbitrary URL, just pass the URL to fetch: Example: fetch('https://mywebsite.com/mydata.json') You may want to specify additional headers, or make a POST request: fetch(url, { method: "POST", body: JSON.stringify(data), headers: { "Content-Type": "application/json" }, credentials: "same-origin" }) .then(function(response) { response.status //=> number 100–599 response.statusText //=> String response.headers //=> Headers response.url //=> String return response.text() }, function(error) { error.message //=> String })
  • 42. Hamid Ghorbani (ReactJs Basics) https://ir.linkedin.com/in/ghorbanihamid Axios: Axios is a Promise-based HTTP client for JavaScript which can be used in your front-end application and in your Node.js backend. By using Axios it’s easy to send asynchronous HTTP request to REST endpoints and perform CRUD (create, read, update, and delete) operations. The Axios library can be used in your plain JavaScript application or can be used together with more advanced frameworks like Vue.js. For installing Axios by through Node.js use the following command: $ npm install axios This downloads the library and installs it in the node_modules folder. Example: axios.get('http://example.com/posts/1') .then(function (response) { console.log(response); }) axios.post('/user', { firstName: 'Fred', lastName: 'Flintstone' }) .then(function (response) { console.log(response); }) .catch(function (error) { console.log(error); }); jQuery $.ajax: This is a quick & dirty way to make AJAX calls. In the former, official React tutorial, they use jQuery to fetch data from the server. However, jQuery is a big library with many functionalities, So, it doesn't make sense to use it just for making API calls (Unless you are already using it for a bunch of other tasks). loadCommentsFromServer: function() { $.ajax({ url: this.props.url, dataType: 'json', cache: false, success: function(data) { this.setState({data: data}); }.bind(this), error: function(xhr, status, err) { console.error(this.props.url, status, err.toString()); }.bind(this) }); }
  • 43. Hamid Ghorbani (ReactJs Basics) https://ir.linkedin.com/in/ghorbanihamid Superagent: Superagent is a light weight AJAX API library created for better readability and flexibility. Superagent also has a Node.js module with the same API. If you are building isomorphic apps using Node.js and React, you can bundle superagent using something like webpack and make it available on the client side. As the APIs for client and server are the same, no code change is required in order to make it work in the browser. request.get('this.props.url') .end(function(err,res){ // perform setState here }); request.post('/api/pet') .send({ name: 'Manny', species: 'cat' }) .set('X-API-Key', 'foobar') .set('Accept', 'application/json') .end(function(err, res){ if (err || !res.ok) { alert('Oh no! error'); } else { alert('yay got ' + JSON.stringify(res.body)); } }); Request: Request is designed with simplicity in mind. With more that 12k GitHub stars, it's also one of the most popular Node.js modules. You can find more about request module on their GitHub page. request('http://www.google.com', function (error, response, body) { console.log('error:', error); console.log('statusCode:', response && response.statusCode); console.log('body:', body); });
  • 44. Hamid Ghorbani (ReactJs Basics) https://ir.linkedin.com/in/ghorbanihamid Some UI Frameworks for ReactJS MaterialUI MaterialUI is a set of React Components that Implement the Google's Material Design Guidelines. There are 2 projects in the examples folder. The first project uses browserify for module bundling and gulp for JS task automation, while the second project uses webpack for module bundling and building. You can include Material-UI in your project by simply running npm install material-ui from your project’s directory, and then using the components of Material-UI that you need. React Semantic UI Semantic UI React is the official React integration for Semantic UI. Semantic UI treats words and classes as exchangeable concepts. Semantic uses simple phrases called behaviors that trigger functionality. React Toolbox React Toolbox is a set of React components that implements Google Material Design specification. Ant Design Ant Design offers an enterprise-class UI design language for web applications with a set of high-quality React components out of the box. Website | GitHub React Boostrap Bootstrap is, a popular UI framework. It is a library of reusable front-end components. You'll get the look-and-feel of Twitter Bootstrap, but with much cleaner code, via Facebook's React.js framework. Website | Demo | GitHub Other framworks: Blueprint, Elemental UI, React MD, Office UI Fabric,React Desktop, Belle, React-Foundation(Website | GitHub)
  • 45. Hamid Ghorbani (ReactJs Basics) https://ir.linkedin.com/in/ghorbanihamid Login Example With React + Spring Framework: So, to put what I have learned into practice, I wrote a simple (Login/Logout) application with React. You can download the example from the following URL: https://github.com/ghorbanihamid/React_Login_Example In order to run the React example, you have to install the following modules: - react : npm install --save react - react-dom : npm install --save react-dom - react-redux : npm install --save react-redux - react-redux-thunk: npm install --save redux-thunk - react-router4 : npm install --save react-router-dom - axios : npm install axios As you have learned, React is only the V in MVC, So for a complete login process, we need another server side application. I decided To write an application with Spring. You can download the "SpringMVC5LoginExample" application from following URL: https://github.com/ghorbanihamid/SpringMVC5LoginExample To run this application you need to follow the instruction in the README file. This application is a complete application and has it’s own view layer (Jsp files), but you can connect to this application from React.
  • 46. Hamid Ghorbani (ReactJs Basics) https://ir.linkedin.com/in/ghorbanihamid Resources: https://www.codecademy.com/articles/react-setup-i https://www.codementor.io/tamizhvendan/beginner-guide-setup-reactjs-environment-npm-babel-6- webpack-du107r9zr https://www.codeproject.com/Articles/1188615/How-to-Structure-Your-React-Project https://github.com/facebookincubator/create-react-app/blob/master/packages/react- scripts/template/README.md https://reactjs.org/docs/react-without-jsx.html https://airbrake.io/blog/javascript/es6-javascript-whats-new-part-6 https://ourcodeworld.com/articles/read/497/top-10-best-ui-frameworks-for-reactjs https://hashnode.com/post/5-best-libraries-for-making-ajax-calls-in-react-cis8x5f7k0jl7th53z68s41k1 https://medium.com/@baphemot/how-to-make-ajax-requests-in-react-a6a52bb5a8b1 https://medium.com/@ruthmpardee/passing-data-between-react-components-103ad82ebd17 https://medium.com/codingthesmartway-com-blog/learn-redux-introduction-to-state-management-with-react- b87bc570b12a https://facebook.github.io/react-native/docs/network.html http://reactfa.ir/jsx-%D9%88-css/ https://www.sitepoint.com/es6-arrow-functions-new-fat-concise-syntax-javascript/ https://redux.js.org/docs/introduction/ThreePrinciples.html https://scotch.io/tutorials/getting-to-know-flux-the-react-js-architecture https://daveceddia.com/what-is-a-thunk/ http://jasonwatmore.com/post/2017/09/16/react-redux-user-registration-and-login-tutorial-example https://github.com/reactjs/react-redux/blob/master/docs/api.md React.js Essentials ebook by Artemij Fedosejev