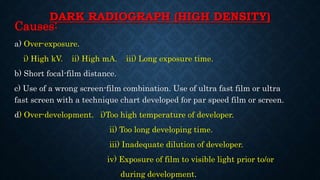
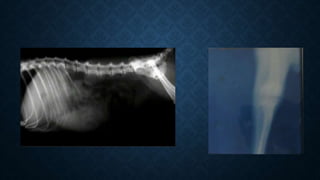
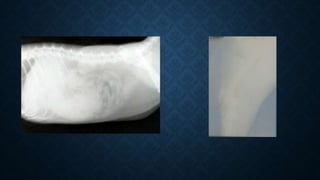
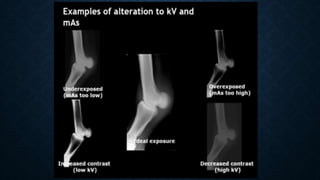
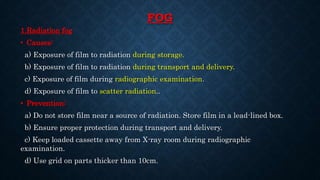
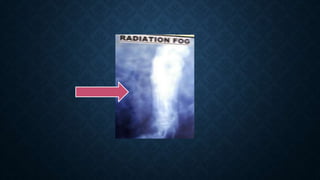
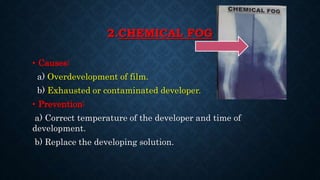
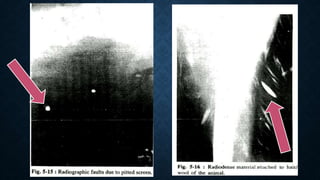
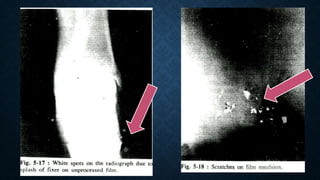
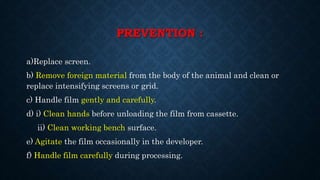
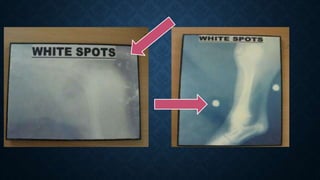
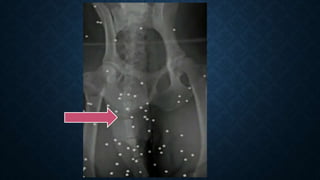
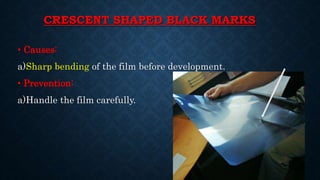
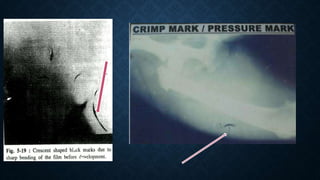
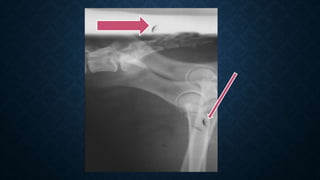
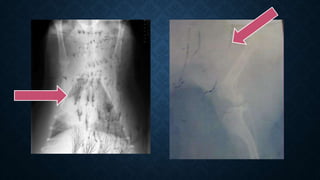
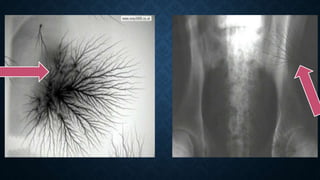
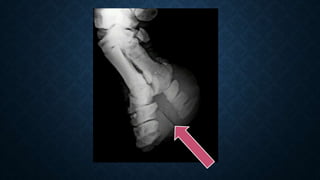
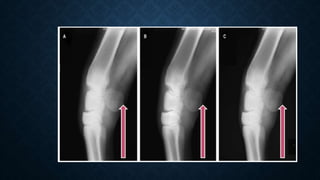
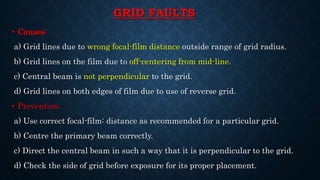
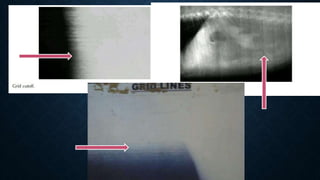
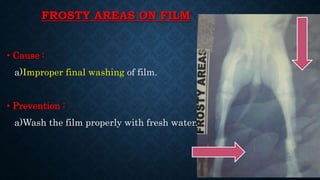
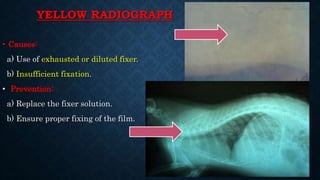
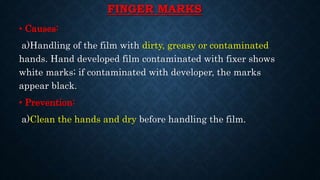
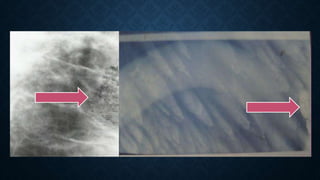
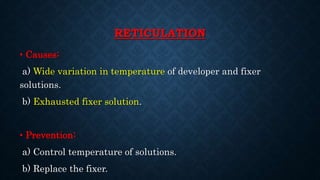
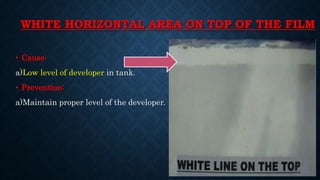
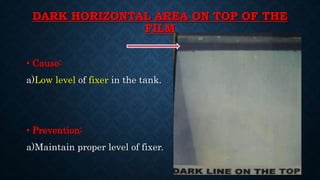
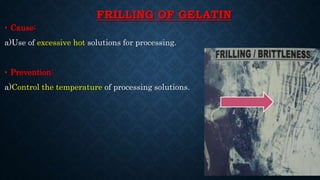
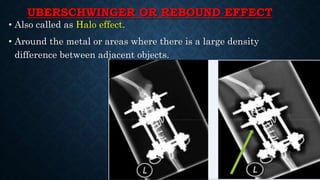
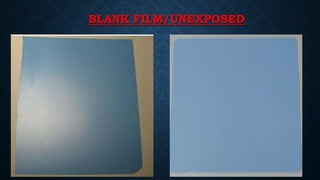
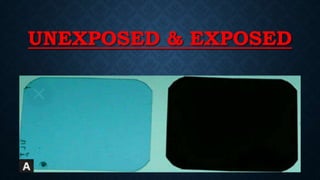
RADIOGRAPHIC FAULTS
It is often thought that good equipment, proper positioning and correct exposure are all that required to make a quality diagnostic radiograph.
To avoid radiographic faults and artifacts, proper care of the accessory equipment's and a thorough understanding of the radiographic and processing techniques are necessary.
These are least if the animal is prepared properly, correct positioning is done, correct exposure factors are used, care is exercised while loading and unloading the film in a cassette and finally the film is processed properly.
2. RADIOGRAPHIC FAULTS
• It is often thought that good equipment, proper positioning and
correct exposure are all that required to make a quality
diagnostic radiograph.
• To avoid radiographic faults and artifacts, proper care of the
accessory equipment's and a thorough understanding of the
radiographic and processing techniques are necessary.
• These are least if the animal is prepared properly, correct
positioning is done, correct exposure factors are used, care is
exercised while loading and unloading the film in a cassette
and finally the film is processed properly.
3. DARK RADIOGRAPH (HIGH DENSITY)
Causes:
a) Over-exposure.
i) High kV. ii) High mA. iii) Long exposure time.
b) Short focal-film distance.
c) Use of a wrong screen-film combination. Use of ultra fast film or ultra
fast screen with a technique chart developed for par speed film or screen.
d) Over-development. i)Too high temperature of developer.
ii) Too long developing time.
iii) Inadequate dilution of developer.
iv) Exposure of film to visible light prior to/or
during development.
4.
5. PREVENTION:
a) Reduce kV, mA or exposure time.
b) Use recommended focal-film distance.
c) Use proper screen-film combination.
d) Avoid over-development.
i) Adjust the temperature of developer.
ii) Use correct developing time.
iii) Use properly mixed and diluted developer.
iv) Avoid exposure of film to visible light.
6. WHITE OR LIGHT RADIOGRAPH (LOW DENSITY)
Causes:
a) Under-exposure . i) Low kVp.
ii) Low mA.
iii) Shorter exposure time.
b) Increased focal-film distance.
c) Wrong screen-film combination.
d) Under-development. i) Too low temperature of developer.
ii) Short development time. iii) Developer is exhausted.
iv) Developer is diluted. v) Inadequate mixing of developer.
e) Two films placed in the same cassette.
7.
8. PREVENTION:
a) Use proper kVp, mA or exposure time.
b) Reduce focal-film combination.
c) Use proper screen-film combination.
d) Avoid under-development.
i) Adjust temperature of developer.
ii) Correct the developing time.
iii) Change the developer.
iv) Ensure adequate mixing of developer.
e) Ensure proper loading of the cassette.
9.
10. FOG
1.Radiation fog
• Causes:
a) Exposure of film to radiation during storage.
b) Exposure of film to radiation during transport and delivery.
c) Exposure of film during radiographic examination.
d) Exposure of film to scatter radiation..
• Prevention:
a) Do not store film near a source of radiation. Store film in a lead-lined box.
b) Ensure proper protection during transport and delivery.
c) Keep loaded cassette away from X-ray room during radiographic
examination.
d) Use grid on parts thicker than 10cm.
11.
12. 2.CHEMICAL FOG
• Causes:
a) Overdevelopment of film.
b) Exhausted or contaminated developer.
• Prevention:
a) Correct temperature of the developer and time of
development.
b) Replace the developing solution.
13. 3.LIGHT FOG
• Causes:
a) Light leakage into the dark room.
b) Light leakage through cassette and transfer box.
c) Light leakage through broken lead film storage box.
d) Faulty safe light. i) Bulb too bright.
ii) Cracked or faded filter.
e) Prolonged inspection of film during development.
f) Turning light 'on' before proper fixation of the film.
14. PREVENTION:
a) Ensure perfect light leak proof processing room.
b) Use light leak proof cassette and transfer box.
c) Replace the broken lead film storage box.
d) i) Use proper wattage bulb.
ii) Replace cracked or faded filter.
e) Avoid frequent and prolonged inspection of film during
development.
f) Allow adequate time for fixation of film before turning on
the light.
15. 4.FILM FOG
• Causes:
a) Expired or old film.
b) Films stored under too high temperature and/or humidity.
c) Presence of ammonia or other fumes in processing room.
d) Excessive pressure on film during storage or handling in dark room.
• Prevention:
a) Do not use expired film.
b) Store film in proper storage conditions.
c) Remove source of fumes from the processing room.
d) Avoid pressure on film during storage and handle the film gently in
dark room.
16.
17. BLACK SPOTS
• Causes:
a) Two films stuck together during fixation.
b) Splash of developer on film before processing.
c) Dust or liquid on the processed film.
d) Linear scratches on film.
e) Light leakage into film storage box or into poorly fitting cassette.
f) Dropping of water droplets from hangers on the processed film
during drying process.
g) Sharp pressure on film or bending of film before development.
18. • Prevention:
a) Keep proper distance between two films during fixation.
b) Handle the film with clean and dry hands and clean the
working bench surface in dark room.
c) Protect film from dust or liquid.
d) Handle film gently and carefully.
e) Repair or replace storage box or cassette.
f) Remove all the water droplets from the hanger.
g) Handle film carefully and avoid its folding.
19. WHITE SPOTS
• Causes:
a) Pitted screen.
b) Dust, grit or any other material with radiopaque base present on film,
screens, grid or the animal.
c) Crescent marks due to folding of film before exposure.
d) Splash of water or fixer on film before processing.
e) Trapping of air bubbles on film's surface (air bells) during development.
f) Scratches on emulsion.
20.
21.
22. PREVENTION :
a)Replace screen.
b) Remove foreign material from the body of the animal and clean or
replace intensifying screens or grid.
c) Handle film gently and carefully.
d) i) Clean hands before unloading the film from cassette.
ii) Clean working bench surface.
e) Agitate the film occasionally in the developer.
f) Handle film carefully during processing.
23.
24.
25. CRESCENT SHAPED BLACK MARKS
• Causes:
a)Sharp bending of the film before development.
• Prevention:
a)Handle the film carefully.
26.
27.
28. BLACK STATIC MARKS (ARBORESCENT
STREAKS)
• Causes:
a) The marks develop due to static improper handling of the film
during its removal from the box or interleaving paper and
electricity discharge as a result of during loading and unloading of
the cassette.
b) Low humidity in the room.
• Prevention:
a) Handle the film carefully and avoid its friction with other
surfaces ie. Interleaving paper, intensifying screen etc.
b) Maintain correct humidity.
29.
30.
31. STREAKS ON FILM
1)Chemical streaks
• Causes:
a) Insufficient film agitation during processing.
b) Dirty film hangers.
c) Insufficient rinsing.
d) Running down of water drops on semi-dried film.
e) Water splashes.
f) Dirty water used for washing film.
32. •Prevention:
a)Ensure proper agitation of developer and fixer solutions and of film.
b) Use clean film hangers.
c) Do proper rinsing.
d) Remove water droplets from film or use film drier.
e) Replace washing water and increase flow rate in washing tank.
33. II) MECHANICAL STREAKS
• Causes:
a) Dark scratches occur on film while loading or unloading the
cassette.
b) White scratches occur during processing when hanger of a
film scratches across the surface of another film.
• Prevention:
a) Handle the film carefully
during loading or unloading.
34. DISTORTED OR BLURRED RADIOGRAPHIC
IMAGE
• Causes:
a) Blurred image due to motion of patient, X-ray tube or cassette during
exposure.
b) Distorted image due to i) poor film-screen contact, ii) improper centering of
the primary beam, and iii) central beam being not perpendicular to the cassette.
• Prevention:
a) Avoid motion.
b) i) Clean intensifying screen.
ii) Correct inadequately moulded screen.
iii)Check proper centering of the central beam.
35.
36.
37. GRID FAULTS
• Causes:
a) Grid lines due to wrong focal-film distance outside range of grid radius.
b) Grid lines on the film due to off-centering from mid-line.
c) Central beam is not perpendicular to the grid.
d) Grid lines on both edges of film due to use of reverse grid.
• Prevention:
a) Use correct focal-film: distance as recommended for a particular grid.
b) Centre the primary beam correctly.
c) Direct the central beam in such a way that it is perpendicular to the grid.
d) Check the side of grid before exposure for its proper placement.
38.
39. FROSTY AREAS ON FILM
• Cause :
a)Improper final washing of film.
• Prevention :
a)Wash the film properly with fresh water.
40. YELLOW RADIOGRAPH
• Causes:
a) Use of exhausted or diluted fixer.
b) Insufficient fixation.
• Prevention:
a) Replace the fixer solution.
b) Ensure proper fixing of the film.
41. BRITTLENESS OF PROCESSED FILM
• Causes:
a) Excessive drying temperature or prolonged drying time.
b) Excessive fixation.
• Prevention:
a) Use proper temperature and time,
if film is dried in a film dryer.
b) Fix the film properly.
42. FINGER MARKS
• Causes:
a)Handling of the film with dirty, greasy or contaminated
hands. Hand developed film contaminated with fixer shows
white marks; if contaminated with developer, the marks
appear black.
• Prevention:
a)Clean the hands and dry before handling the film.
43.
44. RETICULATION
• Causes:
a) Wide variation in temperature of developer and fixer
solutions.
b) Exhausted fixer solution.
• Prevention:
a) Control temperature of solutions.
b) Replace the fixer.
45. WHITE HORIZONTAL AREA ON TOP OF THE FILM
• Cause:
a)Low level of developer in tank.
• Prevention:
a)Maintain proper level of the developer.
46. DARK HORIZONTAL AREA ON TOP OF THE
FILM
• Cause:
a)Low level of fixer in the tank.
• Prevention:
a)Maintain proper level of fixer.
47. FRILLING OF GELATIN
• Cause:
a)Use of excessive hot solutions for processing.
• Prevention:
a)Control the temperature of processing solutions.
48.
49. UBERSCHWINGER OR REBOUND EFFECT
• Also called as Halo effect.
• Around the metal or areas where there is a large density
difference between adjacent objects.
50. BLANK FILM
• Causes:
a) Film not exposed.
b) Central beam not properly directed and centred on the
cassette.
• Prevention:
a) Check exposure switch and X-ray machine.
b) Ensure proper centering of the X-ray beam.