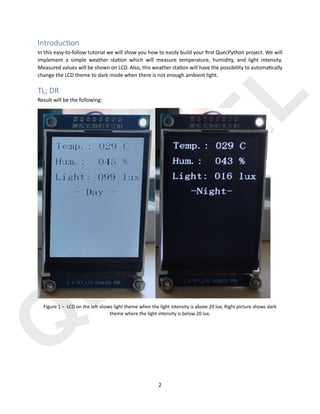
Q
U
E
C
T
E
L
QuecPython
Weather Station
Demo Tutorial
Q
U
E
C
T
E
L
QuecPython Weather Station Demo Tutorial
Contents
Introduc)on..................................................................................................................................................2
TL; DR ...........................................................................................................................................................2
So3ware .......................................................................................................................................................7
Impor)ng libraries....................................................................................................................................7
Handling bu@on press ..............................................................................................................................7
Sensor ini)aliza)on ..................................................................................................................................7
Prin)ng debug informa)on in terminal....................................................................................................8
Unit handling............................................................................................................................................8
Switching logic..........................................................................................................................................9
Hardware....................................................................................................................................................10
LCD ILI9341 connec)on table.................................................................................................................10
B-LUX-V40B ambient light sensor connec)on table...............................................................................10
Uploading and running...............................................................................................................................10
Driver installa)on ...................................................................................................................................10
Turning on the EVB.................................................................................................................................10
QPYcom ..................................................................................................................................................12
Choosing COM port ............................................................................................................................13
Uploading and running source code...................................................................................................14
Q
U
E
C
T
E
L
2
Introduc-on
In this easy-to-follow tutorial we will show you how to easily build your first QuecPython project. We will
implement a simple weather sta)on which will measure temperature, humidity, and light intensity.
Measured values will be shown on LCD. Also, this weather sta)on will have the possibility to automa)cally
change the LCD theme to dark mode when there is not enough ambient light.
TL; DR
Result will be the following:
Figure 1 – LCD on the le2 shows light theme when the light intensity is above 20 lux; Right picture shows dark
theme where the light intensity is below 20 lux.
Q
U
E
C
T
E
L
3
Parts you will need:
• QuecPython U235 EVB with the EC600U module
• B-LUX-V40B ambient light sensor
• ZJY_TFT240_8P_CS LCD with the ILI9341 driver
• Jumper wires
• USB Type-C cable
Connect sensors to the EVB using jumper wires according to the following tables:
LCD ILI9341 connec)on table
Num. ILI9341 LCD
pin name
EVB pin name
1 GND GND
2 VCC 3V3
3 SCL TCN
4 SDA TDN1
5 RES 3V3
6 DC TCP
7 CS TDP1
8 BLK Not connected
B-LUX-V40B ambient light sensor connec)on table
Num. B-LUX-V40B
pin name
EVB pin name
1 VCC 3V3
2 SCL I2C_SCL
3 SDA I2C_SDA
4 GND GND
5 INT Not connected
6 ADDR Not connected
Upload sensor libraries for this demo, as far as the following code on EVB:
1 | from usr import opt3001 # Light sensor
2 | from usr import aht # Temperature and humidity sensors
3 | from usr import ili9341 # LCD
4 | from usr import buttons # External interrupts
5 |
6 | from machine import I2C
7 | import utime
8 |
Q
U
E
C
T
E
L
4
9 | # The following two global variables are mandatory, and users can modify
the values of the following two global variables according to their actual
projects.
10| # The values of these two variables are printed before the user code is
executed.
11| PROJECT_NAME = "QuecPython Tutorial"
12| PROJECT_VERSION = "1.0.0"
13|
14| def alternateTempUnit():
15| while True:
16| for i in ("C", "F"):
17| yield i
18|
19| def callbackIO10_override(args):
20| global alternateT
21| global tempUnit
22| if (args[1] == 1):
23| tempUnit = str(next(alternateT))
24| print("User changed temperature unit to",tempUnit)
25|
26| def checkTheme(lux):
27| if (lux<20):
28| bc = 0x0000
29| fc = 0xffff
30| return fc, bc, 1, 0x0000
31| elif(lux>=20):
32| fc = 0x0000
33| bc = 0xffff
34| return fc, bc, 2, 0xFFFF
35| else:
36| print("Error in checkTeheme()")
37|
38| def main():
39| global tempUnit
40| tempUnit = "F"
41| opt = opt3001.Opt3001() # Init light sensor with default values
42|
43| aht10 = aht.Aht10()
44| aht10.init()
45|
46| btn = buttons.Buttons(1,0,0,0,0)
47| btn.callbackIO10 = callbackIO10_override
48|
49| # Common Color Definitions
50| red = 0xF800
51| green = 0x07E0
Q
U
E
C
T
E
L
5
52| blue = 0x001F
53| white = 0xFFFF
54| black = 0x0000
55| purple = 0xF81F
56|
57| fc = 0x0000 # The font color black can be modified as required
58| bc= 0xffff # Background color white can be modified as required
59| lcd = ili9341.ILI9341(240, 320)
60|
61| whiteTheme = 1
62| blackTheme = 0
63|
64| global alternateT
65| alternateT = alternateTempUnit()
66|
67| lcd.lcd_show_ascii_str(60, 130, 16, 24, "- Day -", fc,bc)
68|
69| start = utime.ticks_ms()
70|
71| while 1:
72|
73| lux = opt.read()
74| tempTH = aht10.read()
75|
76| print("Temperature: {0} °C".format(round(tempTH[0])))
77| print("Relative humidity: {0} %".format(round(tempTH[1])))
78| print("Light intensity: {0} lux.".format(round(lux)))
79|
80| if (tempUnit=="C"):
81| celsius = "{0:03d}".format(round(tempTH[0]))
82| lcd.lcd_show_ascii_str(10, 10, 16, 24, "Temp.: "+celsius+"
"+tempUnit, fc, bc)
83| elif (tempUnit=="F"):
84| fahrenheit = round((tempTH[0] * 1.8) + 32)
85| fahrenheit = "{0:03d}".format(fahrenheit)
86| lcd.lcd_show_ascii_str(10, 10, 16, 24, "Temp.: "+fahrenheit+"
"+tempUnit, fc, bc)
87| else:
88| lcd.lcd_show_ascii_str(10, 10, 16, 24, "Unit error", fc, bc)
89|
90| humS = "{0:03d}".format(round(tempTH[1]))
91| lcd.lcd_show_ascii_str(10, 50, 16, 24, "Hum.: "+humS+" %", fc, bc)
92|
93| if (lux < 1000):
94| luxS = "{0:03d}".format(round(lux))
95| luxUnit = "lux"
Q
U
E
C
T
E
L
6
96| else:
97| luxS = "{0:03d}".format(round(lux/1000))
98| luxUnit = "klx"
99| lcd.lcd_show_ascii_str(10, 90, 16, 24, "Light: "+luxS+" "+luxUnit,
fc, bc)
100|
101| # Check the light intensity and choose appropriate theme
102| only once per lux<>20 condition change
103| if (lux<20 and blackTheme == 0):
104| lcd.lcd_show_clear(black)
105| blackTheme = 1
106| whiteTheme = 0
107| bc = 0x0000
108| fc = 0xffff
109| lcd.lcd_show_ascii_str(60, 130, 16, 24, "-Night-", fc,bc)
110| elif(lux>=20 and whiteTheme == 0):
111| lcd.lcd_show_clear(white)
112| blackTheme = 0
113| whiteTheme = 1
114| fc = 0x0000
115| bc = 0xffff
116| lcd.lcd_show_ascii_str(60, 130, 16, 24, "- Day -", fc,bc)
117|
118| if utime.ticks_diff(utime.ticks_ms(), start) > 60000:
119| start = utime.ticks_ms()
120| lcd = ili9341.ILI9341(240, 320)
121| theme = checkTheme(lux)
122| fc = theme[0]
123| bc = theme[1]
124| state = theme[2]
125| lcd.lcd_show_clear(theme[3])
126| if (state==2):
127| lcd.lcd_show_ascii_str(60, 130, 16, 24, "- Day -", fc,bc)
128| else:
129| lcd.lcd_show_ascii_str(60, 130, 16, 24, "-Night-", fc,bc)
130|
131| if __name__ == "__main__":
132| utime.sleep_ms(900) # At least 800ms
133| main()
134|
Save this code as main.py and run it to start demo.
Q
U
E
C
T
E
L
7
So4ware
Impor&ng libraries
First, we must import sensor libraries, as well as the I2C library and the bu@ons library. Sensor libraries are
imported from the usr folder because that is the folder name containing scripts in QuecPython.
1 | from usr import opt3001 # Light sensor
2 | from usr import aht # Temperature and humidity sensors
3 | from usr import ili9341 # LCD
4 | from usr import buttons # External interrupts
5 |
6 | from machine import I2C
7 | import utime
Handling bu3on press
Next, we want to handle bu@on press as the external interrupt. We will use
callbackIO10_override bu@on press callback func)on to change temperature unit from Celsius
to Fahrenheit shown on the LCD and vice versa. When we define a callback func)on which will be used to
manage external interrupt, we must a@ach it to the bu@on object callback. So, when a user presses bu@on
on the EVB, this func)on will be called, and the unit of the temperature will be changed (using generator
func)on). Also, the user will be informed of the unit change via terminal.
19| def callbackIO10_override(args):
20| global alternateT
21| global tempUnit
22| if (args[1] == 1):
23| tempUnit = str(next(alternateT))
24| print("User changed temperature unit to",tempUnit)
Sensor ini&aliza&on
To use readings from our temperature, humidity, and light intensity sensors, we must first ini)alize them.
Let’s first ini)alize light sensor with the default selngs:
38| def main():
39| global tempUnit
40| tempUnit = "F"
41| opt = opt3001.Opt3001() # Init light sensor with default
values
Similarly, we ini)alize temperature and humidity sensor using default values:
43| aht10 = aht.Aht10()
44| aht10.init()
Q
U
E
C
T
E
L
8
We will ini)alize the bu@on object by enabling external interrupt only on KEY1 pushbu@on (IO10). That’s
why we ini)alize it with the first parameter equal to 1 and other bu@ons with 0 (meaning they are inac)ve).
Next, we a@ach the EVB bu@on to the callback func)on callbackIO10_override we described
before.
46| btn = buttons.Buttons(1,0,0,0,0)
47| btn.callbackIO10 = callbackIO10_override
Now is )me to define what will our module do in the while loop. First we want to receive current readings
from the light sensor (variable named lux) and temperature & humidity sensor (variable named tempTH).
73| lux = opt.read()
74| tempTH = aht10.read()
Prin&ng debug informa&on in terminal
Also, we want to have live sensor readings printed in the terminal.
76| print("Temperature: {0} °C".format(round(tempTH[0])))
77| print("Relative humidity: {0} %".format(round(tempTH[1])))
78| print("Light intensity: {0} lux.".format(round(lux)))
Unit handling
Because LCD only shows strings in one row, we must take care of the huge reading values. First, we will
round all readings to the single digit and for the light intensity we will define small if condi)on. If the light
intensity is more than 1000 lux, it will be shown on the LCD as kilo lux (klx). This way, we will always write
measured physical quan)ty per line.
80| if (tempUnit=="C"):
81| celsius = "{0:03d}".format(round(tempTH[0]))
82| lcd.lcd_show_ascii_str(10, 10, 16, 24, "Temp.: "+celsius+"
"+tempUnit, fc, bc)
83| elif (tempUnit=="F"):
84| fahrenheit = round((tempTH[0] * 1.8) + 32)
85| fahrenheit = "{0:03d}".format(fahrenheit)
86| lcd.lcd_show_ascii_str(10, 10, 16, 24, "Temp.:
"+fahrenheit+" "+tempUnit, fc, bc)
87| else:
88| lcd.lcd_show_ascii_str(10, 10, 16, 24, "Unit error", fc,
bc)
89|
90| humS = "{0:03d}".format(round(tempTH[1]))
91| lcd.lcd_show_ascii_str(10, 50, 16, 24, "Hum.: "+humS+" %",
fc, bc)
92|
93| if (lux < 1000):
94| luxS = "{0:03d}".format(round(lux))
Q
U
E
C
T
E
L
9
95| luxUnit = "lux"
96| else:
97| luxS = "{0:03d}".format(round(lux/1000))
98| luxUnit = "klx"
99| lcd.lcd_show_ascii_str(10, 90, 16, 24, "Light: "+luxS+"
"+luxUnit, fc, bc)
How do we write strings on the LCD? We use lcd_show_ascii_str func)on. Let’s see what we
instructed LCD to do with the line 99:
lcd.lcd_show_ascii_str(10, 90, 16, 24, "Light: "+luxS+" "+luxUnit,
fc, bc)
First two parameters (10, 90) tell LCD to write string in the x (10) and y (90) posi)on, x-axis, and y-axis,
respec)vely. Next two parameters (16, 24) define font width and height. Next is the string to be wri@en.
In the end, the last two parameters (fc, bc) define font color and background color using RGB565 color
format.
Switching logic
Now the only thing that is le3 to be done is to define switching logic and accordingly change light to dark
theme and vice versa. If the lux variable is less than 20 and the theme wasn’t black, we instruct LCD to
switch to dark theme and to write string “Night”. Similarly, if the light intensity (lux) is above 20, and the
theme wasn’t white, we instruct LCD to switch to white theme and to write string “Day”.
101| # Check the light intensity and choose appropriate theme
102| only once per lux<>20 condition change
103| if (lux<20 and blackTheme == 0):
104| lcd.lcd_show_clear(black)
105| blackTheme = 1
106| whiteTheme = 0
107| bc = 0x0000
108| fc = 0xffff
109| lcd.lcd_show_ascii_str(60, 130, 16, 24, "-Night-", fc,bc)
110| elif(lux>=20 and whiteTheme == 0):
111| lcd.lcd_show_clear(white)
112| blackTheme = 0
113| whiteTheme = 1
114| fc = 0x0000
115| bc = 0xffff
116| lcd.lcd_show_ascii_str(60, 130, 16, 24, "- Day -", fc,bc)
Q
U
E
C
T
E
L
10
Hardware
LCD ILI9341 connec&on table
To connect LCD with the EVB, use this table:
Num. ILI9341 LCD
pin name
EVB pin name
1 GND GND
2 VCC 3V3
3 SCL TCN
4 SDA TDN1
5 RES 3V3
6 DC TCP
7 CS TDP1
8 BLK Not connected
B-LUX-V40B ambient light sensor connec&on table
To connect light sensor with the EVB, use this table:
Num. B-LUX-V40B
pin name
EVB pin name
1 VCC 3V3
2 SCL I2C_SCL
3 SDA I2C_SDA
4 GND GND
5 INT Not connected
6 ADDR Not connected
Uploading and running
Driver installa&on
Before we upload the code to the module, we must first install the appropriate driver. You can find all
necessary informa)on and drivers in QuecPython official webpage in sec)on Drivers.
Turning on the EVB
To turn on the EVB, plug USB in PC and EVB and change switch <<5V USB>> to the USB posi)on. Blue PWR
LED should turn on.
Q
U
E
C
T
E
L
11
Figure 2 – To turn on the EVB change switch posiHon to the USB
Press the PWR bu@on and keep it pressed for a short )me to start boo)ng EVB. When the system finishes
boo)ng, green LED NET should start slowly blinking.
Figure 3 - Press PWR bu#on and keep it pressed for a short Hme to start booHng EVB.
Q
U
E
C
T
E
L
12
Figure 4 – When EVB finishes booHng, green LED NET will start to slowly blink.
QPYcom
To communicate with the module, we must use QPYcom so3ware. This so3ware allows us to upload code
to the device, to use interac)ve Python terminal and to get the device output. When we start QPYcom, we
are presented with the following:
Figure 5 – First startup of QPYcom.
Let’s have a look at it briefly. Frist tab, “REPL”, is used as a Python terminal. You can write and execute code
in it and use it as the standard out. The second tab “File” is used to show us a tree-like module where we
can add, delete, and run source code.
Q
U
E
C
T
E
L
13
Figure 6 – File tab with a tree-like module filesystem (on the right)
Choosing COM port
Now, when we have briefly met the basic QPYcom func)onali)es, it is )me to connect to the module COM
port. To do that, we need to choose Quectel USB NMEA port from the COM Port drop down and then press
bu@on Open Port.
Figure 7 – Choosing the appropriate COM port so we can upload and run our source code.
Q
U
E
C
T
E
L
14
Figure 8 – Last step to finish connecHng to our module. When we press the bu^on Open port, if everything goes
fine, the bu^on label will change to Close Port with a red circle, indicaHng that we have made the connecHon.
Because I had already uploaded source code, I immediately got the readings from the device.
Uploading and running source code
To upload our source code, we need to switch to the “File” tab. Then press the + bu@on and upload all the
scripts necessary for the project (you can find all of them at the end of the tutorial). Now, to run code,
simply select main.py and press the play bu@on.
Figure 9 – First press + bu^on (blue circle) to upload all the necessary project files. Next, press the play bu^on (red
circle) to run it.
You will be immediately returned to the “REPL” tab, and you will see sensor readings. Also, at the same
)me, LCD will turn on and show the same readings. And, of course, when you press KEY1 push bu@on on
the EVB, you will change Celsius unit to Fahrenheit and vice versa on the LCD. Also, the user will be
informed of such changes on the terminal.
Q
U
E
C
T
E
L
15
Figure 10 - Press KEY1 pushbu^on on the EVB to switch between Celsius and Fahrenheit units.
Figure 11 – Finished project. On the le2 picture we can see Python terminal with the current temperature,
humidity, and light intensity readings. On the two pictures right, we can see light theme (light intensity > 20lux) and
dark theme (light intensity < 20lux)
If you would like to know more about QuecPython, you can find all the necessary informa)on and
documenta)on on the official QuecPython documenta)on page and QuecPython webpage.
Happy coding!
Q
U
E
C
T
E
L
For more information on Quectel's wide
range of IoT modules, antennas,
connectivity and certification services,
visit our website:
www.quectel.com

QuecPython_Weather_Station_Demo_Tutorial.pdf

  • 1.
  • 2.
    Q U E C T E L QuecPython Weather StationDemo Tutorial Contents Introduc)on..................................................................................................................................................2 TL; DR ...........................................................................................................................................................2 So3ware .......................................................................................................................................................7 Impor)ng libraries....................................................................................................................................7 Handling bu@on press ..............................................................................................................................7 Sensor ini)aliza)on ..................................................................................................................................7 Prin)ng debug informa)on in terminal....................................................................................................8 Unit handling............................................................................................................................................8 Switching logic..........................................................................................................................................9 Hardware....................................................................................................................................................10 LCD ILI9341 connec)on table.................................................................................................................10 B-LUX-V40B ambient light sensor connec)on table...............................................................................10 Uploading and running...............................................................................................................................10 Driver installa)on ...................................................................................................................................10 Turning on the EVB.................................................................................................................................10 QPYcom ..................................................................................................................................................12 Choosing COM port ............................................................................................................................13 Uploading and running source code...................................................................................................14
  • 3.
    Q U E C T E L 2 Introduc-on In this easy-to-followtutorial we will show you how to easily build your first QuecPython project. We will implement a simple weather sta)on which will measure temperature, humidity, and light intensity. Measured values will be shown on LCD. Also, this weather sta)on will have the possibility to automa)cally change the LCD theme to dark mode when there is not enough ambient light. TL; DR Result will be the following: Figure 1 – LCD on the le2 shows light theme when the light intensity is above 20 lux; Right picture shows dark theme where the light intensity is below 20 lux.
  • 4.
    Q U E C T E L 3 Parts you willneed: • QuecPython U235 EVB with the EC600U module • B-LUX-V40B ambient light sensor • ZJY_TFT240_8P_CS LCD with the ILI9341 driver • Jumper wires • USB Type-C cable Connect sensors to the EVB using jumper wires according to the following tables: LCD ILI9341 connec)on table Num. ILI9341 LCD pin name EVB pin name 1 GND GND 2 VCC 3V3 3 SCL TCN 4 SDA TDN1 5 RES 3V3 6 DC TCP 7 CS TDP1 8 BLK Not connected B-LUX-V40B ambient light sensor connec)on table Num. B-LUX-V40B pin name EVB pin name 1 VCC 3V3 2 SCL I2C_SCL 3 SDA I2C_SDA 4 GND GND 5 INT Not connected 6 ADDR Not connected Upload sensor libraries for this demo, as far as the following code on EVB: 1 | from usr import opt3001 # Light sensor 2 | from usr import aht # Temperature and humidity sensors 3 | from usr import ili9341 # LCD 4 | from usr import buttons # External interrupts 5 | 6 | from machine import I2C 7 | import utime 8 |
  • 5.
    Q U E C T E L 4 9 | #The following two global variables are mandatory, and users can modify the values of the following two global variables according to their actual projects. 10| # The values of these two variables are printed before the user code is executed. 11| PROJECT_NAME = "QuecPython Tutorial" 12| PROJECT_VERSION = "1.0.0" 13| 14| def alternateTempUnit(): 15| while True: 16| for i in ("C", "F"): 17| yield i 18| 19| def callbackIO10_override(args): 20| global alternateT 21| global tempUnit 22| if (args[1] == 1): 23| tempUnit = str(next(alternateT)) 24| print("User changed temperature unit to",tempUnit) 25| 26| def checkTheme(lux): 27| if (lux<20): 28| bc = 0x0000 29| fc = 0xffff 30| return fc, bc, 1, 0x0000 31| elif(lux>=20): 32| fc = 0x0000 33| bc = 0xffff 34| return fc, bc, 2, 0xFFFF 35| else: 36| print("Error in checkTeheme()") 37| 38| def main(): 39| global tempUnit 40| tempUnit = "F" 41| opt = opt3001.Opt3001() # Init light sensor with default values 42| 43| aht10 = aht.Aht10() 44| aht10.init() 45| 46| btn = buttons.Buttons(1,0,0,0,0) 47| btn.callbackIO10 = callbackIO10_override 48| 49| # Common Color Definitions 50| red = 0xF800 51| green = 0x07E0
  • 6.
    Q U E C T E L 5 52| blue =0x001F 53| white = 0xFFFF 54| black = 0x0000 55| purple = 0xF81F 56| 57| fc = 0x0000 # The font color black can be modified as required 58| bc= 0xffff # Background color white can be modified as required 59| lcd = ili9341.ILI9341(240, 320) 60| 61| whiteTheme = 1 62| blackTheme = 0 63| 64| global alternateT 65| alternateT = alternateTempUnit() 66| 67| lcd.lcd_show_ascii_str(60, 130, 16, 24, "- Day -", fc,bc) 68| 69| start = utime.ticks_ms() 70| 71| while 1: 72| 73| lux = opt.read() 74| tempTH = aht10.read() 75| 76| print("Temperature: {0} °C".format(round(tempTH[0]))) 77| print("Relative humidity: {0} %".format(round(tempTH[1]))) 78| print("Light intensity: {0} lux.".format(round(lux))) 79| 80| if (tempUnit=="C"): 81| celsius = "{0:03d}".format(round(tempTH[0])) 82| lcd.lcd_show_ascii_str(10, 10, 16, 24, "Temp.: "+celsius+" "+tempUnit, fc, bc) 83| elif (tempUnit=="F"): 84| fahrenheit = round((tempTH[0] * 1.8) + 32) 85| fahrenheit = "{0:03d}".format(fahrenheit) 86| lcd.lcd_show_ascii_str(10, 10, 16, 24, "Temp.: "+fahrenheit+" "+tempUnit, fc, bc) 87| else: 88| lcd.lcd_show_ascii_str(10, 10, 16, 24, "Unit error", fc, bc) 89| 90| humS = "{0:03d}".format(round(tempTH[1])) 91| lcd.lcd_show_ascii_str(10, 50, 16, 24, "Hum.: "+humS+" %", fc, bc) 92| 93| if (lux < 1000): 94| luxS = "{0:03d}".format(round(lux)) 95| luxUnit = "lux"
  • 7.
    Q U E C T E L 6 96| else: 97| luxS= "{0:03d}".format(round(lux/1000)) 98| luxUnit = "klx" 99| lcd.lcd_show_ascii_str(10, 90, 16, 24, "Light: "+luxS+" "+luxUnit, fc, bc) 100| 101| # Check the light intensity and choose appropriate theme 102| only once per lux<>20 condition change 103| if (lux<20 and blackTheme == 0): 104| lcd.lcd_show_clear(black) 105| blackTheme = 1 106| whiteTheme = 0 107| bc = 0x0000 108| fc = 0xffff 109| lcd.lcd_show_ascii_str(60, 130, 16, 24, "-Night-", fc,bc) 110| elif(lux>=20 and whiteTheme == 0): 111| lcd.lcd_show_clear(white) 112| blackTheme = 0 113| whiteTheme = 1 114| fc = 0x0000 115| bc = 0xffff 116| lcd.lcd_show_ascii_str(60, 130, 16, 24, "- Day -", fc,bc) 117| 118| if utime.ticks_diff(utime.ticks_ms(), start) > 60000: 119| start = utime.ticks_ms() 120| lcd = ili9341.ILI9341(240, 320) 121| theme = checkTheme(lux) 122| fc = theme[0] 123| bc = theme[1] 124| state = theme[2] 125| lcd.lcd_show_clear(theme[3]) 126| if (state==2): 127| lcd.lcd_show_ascii_str(60, 130, 16, 24, "- Day -", fc,bc) 128| else: 129| lcd.lcd_show_ascii_str(60, 130, 16, 24, "-Night-", fc,bc) 130| 131| if __name__ == "__main__": 132| utime.sleep_ms(900) # At least 800ms 133| main() 134| Save this code as main.py and run it to start demo.
  • 8.
    Q U E C T E L 7 So4ware Impor&ng libraries First, wemust import sensor libraries, as well as the I2C library and the bu@ons library. Sensor libraries are imported from the usr folder because that is the folder name containing scripts in QuecPython. 1 | from usr import opt3001 # Light sensor 2 | from usr import aht # Temperature and humidity sensors 3 | from usr import ili9341 # LCD 4 | from usr import buttons # External interrupts 5 | 6 | from machine import I2C 7 | import utime Handling bu3on press Next, we want to handle bu@on press as the external interrupt. We will use callbackIO10_override bu@on press callback func)on to change temperature unit from Celsius to Fahrenheit shown on the LCD and vice versa. When we define a callback func)on which will be used to manage external interrupt, we must a@ach it to the bu@on object callback. So, when a user presses bu@on on the EVB, this func)on will be called, and the unit of the temperature will be changed (using generator func)on). Also, the user will be informed of the unit change via terminal. 19| def callbackIO10_override(args): 20| global alternateT 21| global tempUnit 22| if (args[1] == 1): 23| tempUnit = str(next(alternateT)) 24| print("User changed temperature unit to",tempUnit) Sensor ini&aliza&on To use readings from our temperature, humidity, and light intensity sensors, we must first ini)alize them. Let’s first ini)alize light sensor with the default selngs: 38| def main(): 39| global tempUnit 40| tempUnit = "F" 41| opt = opt3001.Opt3001() # Init light sensor with default values Similarly, we ini)alize temperature and humidity sensor using default values: 43| aht10 = aht.Aht10() 44| aht10.init()
  • 9.
    Q U E C T E L 8 We will ini)alizethe bu@on object by enabling external interrupt only on KEY1 pushbu@on (IO10). That’s why we ini)alize it with the first parameter equal to 1 and other bu@ons with 0 (meaning they are inac)ve). Next, we a@ach the EVB bu@on to the callback func)on callbackIO10_override we described before. 46| btn = buttons.Buttons(1,0,0,0,0) 47| btn.callbackIO10 = callbackIO10_override Now is )me to define what will our module do in the while loop. First we want to receive current readings from the light sensor (variable named lux) and temperature & humidity sensor (variable named tempTH). 73| lux = opt.read() 74| tempTH = aht10.read() Prin&ng debug informa&on in terminal Also, we want to have live sensor readings printed in the terminal. 76| print("Temperature: {0} °C".format(round(tempTH[0]))) 77| print("Relative humidity: {0} %".format(round(tempTH[1]))) 78| print("Light intensity: {0} lux.".format(round(lux))) Unit handling Because LCD only shows strings in one row, we must take care of the huge reading values. First, we will round all readings to the single digit and for the light intensity we will define small if condi)on. If the light intensity is more than 1000 lux, it will be shown on the LCD as kilo lux (klx). This way, we will always write measured physical quan)ty per line. 80| if (tempUnit=="C"): 81| celsius = "{0:03d}".format(round(tempTH[0])) 82| lcd.lcd_show_ascii_str(10, 10, 16, 24, "Temp.: "+celsius+" "+tempUnit, fc, bc) 83| elif (tempUnit=="F"): 84| fahrenheit = round((tempTH[0] * 1.8) + 32) 85| fahrenheit = "{0:03d}".format(fahrenheit) 86| lcd.lcd_show_ascii_str(10, 10, 16, 24, "Temp.: "+fahrenheit+" "+tempUnit, fc, bc) 87| else: 88| lcd.lcd_show_ascii_str(10, 10, 16, 24, "Unit error", fc, bc) 89| 90| humS = "{0:03d}".format(round(tempTH[1])) 91| lcd.lcd_show_ascii_str(10, 50, 16, 24, "Hum.: "+humS+" %", fc, bc) 92| 93| if (lux < 1000): 94| luxS = "{0:03d}".format(round(lux))
  • 10.
    Q U E C T E L 9 95| luxUnit ="lux" 96| else: 97| luxS = "{0:03d}".format(round(lux/1000)) 98| luxUnit = "klx" 99| lcd.lcd_show_ascii_str(10, 90, 16, 24, "Light: "+luxS+" "+luxUnit, fc, bc) How do we write strings on the LCD? We use lcd_show_ascii_str func)on. Let’s see what we instructed LCD to do with the line 99: lcd.lcd_show_ascii_str(10, 90, 16, 24, "Light: "+luxS+" "+luxUnit, fc, bc) First two parameters (10, 90) tell LCD to write string in the x (10) and y (90) posi)on, x-axis, and y-axis, respec)vely. Next two parameters (16, 24) define font width and height. Next is the string to be wri@en. In the end, the last two parameters (fc, bc) define font color and background color using RGB565 color format. Switching logic Now the only thing that is le3 to be done is to define switching logic and accordingly change light to dark theme and vice versa. If the lux variable is less than 20 and the theme wasn’t black, we instruct LCD to switch to dark theme and to write string “Night”. Similarly, if the light intensity (lux) is above 20, and the theme wasn’t white, we instruct LCD to switch to white theme and to write string “Day”. 101| # Check the light intensity and choose appropriate theme 102| only once per lux<>20 condition change 103| if (lux<20 and blackTheme == 0): 104| lcd.lcd_show_clear(black) 105| blackTheme = 1 106| whiteTheme = 0 107| bc = 0x0000 108| fc = 0xffff 109| lcd.lcd_show_ascii_str(60, 130, 16, 24, "-Night-", fc,bc) 110| elif(lux>=20 and whiteTheme == 0): 111| lcd.lcd_show_clear(white) 112| blackTheme = 0 113| whiteTheme = 1 114| fc = 0x0000 115| bc = 0xffff 116| lcd.lcd_show_ascii_str(60, 130, 16, 24, "- Day -", fc,bc)
  • 11.
    Q U E C T E L 10 Hardware LCD ILI9341 connec&ontable To connect LCD with the EVB, use this table: Num. ILI9341 LCD pin name EVB pin name 1 GND GND 2 VCC 3V3 3 SCL TCN 4 SDA TDN1 5 RES 3V3 6 DC TCP 7 CS TDP1 8 BLK Not connected B-LUX-V40B ambient light sensor connec&on table To connect light sensor with the EVB, use this table: Num. B-LUX-V40B pin name EVB pin name 1 VCC 3V3 2 SCL I2C_SCL 3 SDA I2C_SDA 4 GND GND 5 INT Not connected 6 ADDR Not connected Uploading and running Driver installa&on Before we upload the code to the module, we must first install the appropriate driver. You can find all necessary informa)on and drivers in QuecPython official webpage in sec)on Drivers. Turning on the EVB To turn on the EVB, plug USB in PC and EVB and change switch <<5V USB>> to the USB posi)on. Blue PWR LED should turn on.
  • 12.
    Q U E C T E L 11 Figure 2 –To turn on the EVB change switch posiHon to the USB Press the PWR bu@on and keep it pressed for a short )me to start boo)ng EVB. When the system finishes boo)ng, green LED NET should start slowly blinking. Figure 3 - Press PWR bu#on and keep it pressed for a short Hme to start booHng EVB.
  • 13.
    Q U E C T E L 12 Figure 4 –When EVB finishes booHng, green LED NET will start to slowly blink. QPYcom To communicate with the module, we must use QPYcom so3ware. This so3ware allows us to upload code to the device, to use interac)ve Python terminal and to get the device output. When we start QPYcom, we are presented with the following: Figure 5 – First startup of QPYcom. Let’s have a look at it briefly. Frist tab, “REPL”, is used as a Python terminal. You can write and execute code in it and use it as the standard out. The second tab “File” is used to show us a tree-like module where we can add, delete, and run source code.
  • 14.
    Q U E C T E L 13 Figure 6 –File tab with a tree-like module filesystem (on the right) Choosing COM port Now, when we have briefly met the basic QPYcom func)onali)es, it is )me to connect to the module COM port. To do that, we need to choose Quectel USB NMEA port from the COM Port drop down and then press bu@on Open Port. Figure 7 – Choosing the appropriate COM port so we can upload and run our source code.
  • 15.
    Q U E C T E L 14 Figure 8 –Last step to finish connecHng to our module. When we press the bu^on Open port, if everything goes fine, the bu^on label will change to Close Port with a red circle, indicaHng that we have made the connecHon. Because I had already uploaded source code, I immediately got the readings from the device. Uploading and running source code To upload our source code, we need to switch to the “File” tab. Then press the + bu@on and upload all the scripts necessary for the project (you can find all of them at the end of the tutorial). Now, to run code, simply select main.py and press the play bu@on. Figure 9 – First press + bu^on (blue circle) to upload all the necessary project files. Next, press the play bu^on (red circle) to run it. You will be immediately returned to the “REPL” tab, and you will see sensor readings. Also, at the same )me, LCD will turn on and show the same readings. And, of course, when you press KEY1 push bu@on on the EVB, you will change Celsius unit to Fahrenheit and vice versa on the LCD. Also, the user will be informed of such changes on the terminal.
  • 16.
    Q U E C T E L 15 Figure 10 -Press KEY1 pushbu^on on the EVB to switch between Celsius and Fahrenheit units. Figure 11 – Finished project. On the le2 picture we can see Python terminal with the current temperature, humidity, and light intensity readings. On the two pictures right, we can see light theme (light intensity > 20lux) and dark theme (light intensity < 20lux) If you would like to know more about QuecPython, you can find all the necessary informa)on and documenta)on on the official QuecPython documenta)on page and QuecPython webpage. Happy coding!
  • 17.
    Q U E C T E L For more informationon Quectel's wide range of IoT modules, antennas, connectivity and certification services, visit our website: www.quectel.com