SlideShare a Scribd company logo
PWCT 1.9 Art Documentation ( http://doublesvsoop.sourceforge.net )
2006-2013, Mahmoud Fayed ( msfclipper@users.sourceforge.net )
_____________________________________________________________________________________
Table of contents
1 - Introduction
2 - Implementation steps
3 - Final Steps Tree
4 - Application during the runtime
1 – Introduction
In this lesson we are going to learn how to create the telephone database application
2 - Implementation Steps
Fig. (1) Goal Desginer - Steps Tree
Select the step (The First Step)
We will start now new interaction process to generate new steps to our steps tree.
The slow way (Using Mouse):
1 - Click Interact to open the components browser
2 - Select the domain (Structure Programming)
3 - Select the component (Call Procedure)
The fast way (Using Keyboard shortcuts):
1 - Get the component using its name by typing (Call Procedure)
Note : Stop typing when you see the required component is selected
Fig. (2) Component Browser – Select the component (Call Procedure)
After selecting the component click Ok or press ENTER
Fig. (3) Interaction page - Set the properties and enter the required data as in the image above
Afer entering data , Click OK or press CTRL+W
Fig. (4) Goal Desginer - Steps Tree
Select the step (The First Step)
We will start now new interaction process to generate new steps to our steps tree.
The slow way (Using Mouse):
1 - Click Interact to open the components browser
2 - Select the domain (Control Structure)
3 - Select the component (While Loop)
The fast way (Using Keyboard shortcuts):
1 - Get the component using its name by typing (While Loop)
Note : Stop typing when you see the required component is selected
Fig. (5) Component Browser – Select the component (While Loop)
After selecting the component click Ok or press ENTER
Fig. (6) Interaction page - Set the properties and enter the required data as in the image above
Afer entering data , Click OK or press CTRL+W
Fig. (7) Goal Desginer - Steps Tree
Select the step (Start Here)
We will start now new interaction process to generate new steps to our steps tree.
The slow way (Using Mouse):
1 - Click Interact to open the components browser
2 - Select the domain (Console Application)
3 - Select the component (Set Color)
The fast way (Using Keyboard shortcuts):
1 - Get the component using its name by typing (Set Color)
Note : Stop typing when you see the required component is selected
Fig. (8) Component Browser – Select the component (Set Color)
After selecting the component click Ok or press ENTER
Fig. (9) Interaction page - Set the properties and enter the required data as in the image above
Afer entering data , Click OK or press CTRL+W
Fig. (10) Goal Desginer - Steps Tree
Select the step (Start Here)
We will start now new interaction process to generate new steps to our steps tree.
The slow way (Using Mouse):
1 - Click Interact to open the components browser
2 - Select the domain (Console Application)
3 - Select the component (Basic Input/Output)
The fast way (Using Keyboard shortcuts):
1 - Get the component using its name by typing (Basic Input/Output)
Note : Stop typing when you see the required component is selected
Fig. (11) Component Browser – Select the component (Basic Input/Output)
After selecting the component click Ok or press ENTER
Fig. (12) Interaction page - Set the properties and enter the required data as in the image above
Afer entering data , Click OK or press CTRL+W
Fig. (13) Goal Desginer - Steps Tree
Select the step (Start Here)
We will start now new interaction process to generate new steps to our steps tree.
The slow way (Using Mouse):
1 - Click Interact to open the components browser
2 - Select the domain (Console Application)
3 - Select the component (Basic Input/Output)
The fast way (Using Keyboard shortcuts):
1 - Get the component using its name by typing (Basic Input/Output)
Note : Stop typing when you see the required component is selected
Fig. (14) Component Browser – Select the component (Basic Input/Output)
After selecting the component click Ok or press ENTER
Fig. (15) Interaction page - Set the properties and enter the required data as in the image above
Afer entering data , Click OK or press CTRL+W
Fig. (16) Goal Desginer - Steps Tree
Select the step (Start Here)
We will start now new interaction process to generate new steps to our steps tree.
The slow way (Using Mouse):
1 - Click Interact to open the components browser
2 - Select the domain (Console Application)
3 - Select the component (Basic Input/Output)
The fast way (Using Keyboard shortcuts):
1 - Get the component using its name by typing (Basic Input/Output)
Note : Stop typing when you see the required component is selected
Fig. (17) Component Browser – Select the component (Basic Input/Output)
After selecting the component click Ok or press ENTER
Fig. (18) Interaction page - Set the properties and enter the required data as in the image above
Afer entering data , Click OK or press CTRL+W
Fig. (19) Goal Desginer - Steps Tree
Select the step (Start Here)
We will start now new interaction process to generate new steps to our steps tree.
The slow way (Using Mouse):
1 - Click Interact to open the components browser
2 - Select the domain (Console Application)
3 - Select the component (Basic Input/Output)
The fast way (Using Keyboard shortcuts):
1 - Get the component using its name by typing (Basic Input/Output)
Note : Stop typing when you see the required component is selected
Fig. (20) Component Browser – Select the component (Basic Input/Output)
After selecting the component click Ok or press ENTER
Fig. (21) Interaction page - Set the properties and enter the required data as in the image above
Afer entering data , Click OK or press CTRL+W
Fig. (22) Goal Desginer - Steps Tree
Select the step (Start Here)
We will start now new interaction process to generate new steps to our steps tree.
The slow way (Using Mouse):
1 - Click Interact to open the components browser
2 - Select the domain (Console Application)
3 - Select the component (Basic Input/Output)
The fast way (Using Keyboard shortcuts):
1 - Get the component using its name by typing (Basic Input/Output)
Note : Stop typing when you see the required component is selected
Fig. (23) Component Browser – Select the component (Basic Input/Output)
After selecting the component click Ok or press ENTER
Fig. (24) Interaction page - Set the properties and enter the required data as in the image above
Afer entering data , Click OK or press CTRL+W
Fig. (25) Goal Desginer - Steps Tree
Select the step (Start Here)
We will start now new interaction process to generate new steps to our steps tree.
The slow way (Using Mouse):
1 - Click Interact to open the components browser
2 - Select the domain (xBase)
3 - Select the component (Get Information)
The fast way (Using Keyboard shortcuts):
1 - Get the component using its name by typing (Get Information)
Note : Stop typing when you see the required component is selected
Fig. (26) Component Browser – Select the component (Get Information)
After selecting the component click Ok or press ENTER
Fig. (27) Interaction page - Set the properties and enter the required data as in the image above
Afer entering data , Click OK or press CTRL+W
Fig. (28) Goal Desginer - Steps Tree
Select the step (Start Here)
We will start now new interaction process to generate new steps to our steps tree.
The slow way (Using Mouse):
1 - Click Interact to open the components browser
2 - Select the domain (Variables)
3 - Select the component (Numeric To String)
The fast way (Using Keyboard shortcuts):
1 - Get the component using its name by typing (Numeric To String)
Note : Stop typing when you see the required component is selected
Fig. (29) Component Browser – Select the component (Numeric To String)
After selecting the component click Ok or press ENTER
Fig. (30) Interaction page - Set the properties and enter the required data as in the image above
Afer entering data , Click OK or press CTRL+W
Fig. (31) Goal Desginer - Steps Tree
Select the step (Start Here)
We will start now new interaction process to generate new steps to our steps tree.
The slow way (Using Mouse):
1 - Click Interact to open the components browser
2 - Select the domain (Console Application)
3 - Select the component (Basic Input/Output)
The fast way (Using Keyboard shortcuts):
1 - Get the component using its name by typing (Basic Input/Output)
Note : Stop typing when you see the required component is selected
Fig. (32) Component Browser – Select the component (Basic Input/Output)
After selecting the component click Ok or press ENTER
Fig. (33) Interaction page - Set the properties and enter the required data as in the image above
Afer entering data , Click OK or press CTRL+W
Fig. (34) Interaction page - Set the properties and enter the required data as in the image above
Afer entering data , Click OK or press CTRL+W
Fig. (35) Goal Desginer - Steps Tree
Select the step (Start Here)
We will start now new interaction process to generate new steps to our steps tree.
The slow way (Using Mouse):
1 - Click Interact to open the components browser
2 - Select the domain (Console Application)
3 - Select the component (Basic Input/Output)
The fast way (Using Keyboard shortcuts):
1 - Get the component using its name by typing (Basic Input/Output)
Note : Stop typing when you see the required component is selected
Fig. (36) Component Browser – Select the component (Basic Input/Output)
After selecting the component click Ok or press ENTER
Fig. (37) Interaction page - Set the properties and enter the required data as in the image above
Afer entering data , Click OK or press CTRL+W
Fig. (38) Goal Desginer - Steps Tree
Select the step (Start Here)
We will start now new interaction process to generate new steps to our steps tree.
The slow way (Using Mouse):
1 - Click Interact to open the components browser
2 - Select the domain (Console Application)
3 - Select the component (Basic Input/Output)
The fast way (Using Keyboard shortcuts):
1 - Get the component using its name by typing (Basic Input/Output)
Note : Stop typing when you see the required component is selected
Fig. (39) Component Browser – Select the component (Basic Input/Output)
After selecting the component click Ok or press ENTER
Fig. (40) Interaction page - Set the properties and enter the required data as in the image above
Afer entering data , Click OK or press CTRL+W
Fig. (41) Goal Desginer - Steps Tree
Select the step (Start Here)
We will start now new interaction process to generate new steps to our steps tree.
The slow way (Using Mouse):
1 - Click Interact to open the components browser
2 - Select the domain (Console Application)
3 - Select the component (Basic Input/Output)
The fast way (Using Keyboard shortcuts):
1 - Get the component using its name by typing (Basic Input/Output)
Note : Stop typing when you see the required component is selected
Fig. (42) Component Browser – Select the component (Basic Input/Output)
After selecting the component click Ok or press ENTER
Fig. (43) Interaction page - Set the properties and enter the required data as in the image above
Afer entering data , Click OK or press CTRL+W
Fig. (44) Goal Desginer - Steps Tree
Select the step (Start Here)
We will start now new interaction process to generate new steps to our steps tree.
The slow way (Using Mouse):
1 - Click Interact to open the components browser
2 - Select the domain (Console Application)
3 - Select the component (Basic Input/Output)
The fast way (Using Keyboard shortcuts):
1 - Get the component using its name by typing (Basic Input/Output)
Note : Stop typing when you see the required component is selected
Fig. (45) Component Browser – Select the component (Basic Input/Output)
After selecting the component click Ok or press ENTER
Fig. (46) Interaction page - Set the properties and enter the required data as in the image above
Afer entering data , Click OK or press CTRL+W
Fig. (47) Goal Desginer - Steps Tree
Select the step (Start Here)
We will start now new interaction process to generate new steps to our steps tree.
The slow way (Using Mouse):
1 - Click Interact to open the components browser
2 - Select the domain (Control Structure)
3 - Select the component (IF Statement)
The fast way (Using Keyboard shortcuts):
1 - Get the component using its name by typing (IF Statement)
Note : Stop typing when you see the required component is selected
Fig. (48) Component Browser – Select the component (IF Statement)
After selecting the component click Ok or press ENTER
Fig. (49) Interaction page - Set the properties and enter the required data as in the image above
Afer entering data , Click OK or press CTRL+W
Fig. (50) Goal Desginer - Steps Tree
Select the step (Start Here)
We will start now new interaction process to generate new steps to our steps tree.
The slow way (Using Mouse):
1 - Click Interact to open the components browser
2 - Select the domain (Structure Programming)
3 - Select the component (Call Procedure)
The fast way (Using Keyboard shortcuts):
1 - Get the component using its name by typing (Call Procedure)
Note : Stop typing when you see the required component is selected
Fig. (51) Component Browser – Select the component (Call Procedure)
After selecting the component click Ok or press ENTER
Fig. (52) Interaction page - Set the properties and enter the required data as in the image above
Afer entering data , Click OK or press CTRL+W
Fig. (53) Goal Desginer - Steps Tree
Select the step (IF ( mymenu == 1 ))
We will start now new interaction process to generate new steps to our steps tree.
The slow way (Using Mouse):
1 - Click Interact to open the components browser
2 - Select the domain (Control Structure)
3 - Select the component (IF Statement)
The fast way (Using Keyboard shortcuts):
1 - Get the component using its name by typing (IF Statement)
Note : Stop typing when you see the required component is selected
Fig. (54) Component Browser – Select the component (IF Statement)
After selecting the component click Ok or press ENTER
Fig. (55) Interaction page - Set the properties and enter the required data as in the image above
Afer entering data , Click OK or press CTRL+W
Fig. (56) Goal Desginer - Steps Tree
Select the step (Start Here)
We will start now new interaction process to generate new steps to our steps tree.
The slow way (Using Mouse):
1 - Click Interact to open the components browser
2 - Select the domain (Structure Programming)
3 - Select the component (Call Procedure)
The fast way (Using Keyboard shortcuts):
1 - Get the component using its name by typing (Call Procedure)
Note : Stop typing when you see the required component is selected
Fig. (57) Component Browser – Select the component (Call Procedure)
After selecting the component click Ok or press ENTER
Fig. (58) Interaction page - Set the properties and enter the required data as in the image above
Afer entering data , Click OK or press CTRL+W
Fig. (59) Goal Desginer - Steps Tree
Select the step (IF ( mymenu == 1 ))
We will start now new interaction process to generate new steps to our steps tree.
The slow way (Using Mouse):
1 - Click Interact to open the components browser
2 - Select the domain (Control Structure)
3 - Select the component (IF Statement)
The fast way (Using Keyboard shortcuts):
1 - Get the component using its name by typing (IF Statement)
Note : Stop typing when you see the required component is selected
Fig. (60) Component Browser – Select the component (IF Statement)
After selecting the component click Ok or press ENTER
Fig. (61) Interaction page - Set the properties and enter the required data as in the image above
Afer entering data , Click OK or press CTRL+W
Fig. (62) Goal Desginer - Steps Tree
Select the step (Start Here)
We will start now new interaction process to generate new steps to our steps tree.
The slow way (Using Mouse):
1 - Click Interact to open the components browser
2 - Select the domain (Structure Programming)
3 - Select the component (Call Procedure)
The fast way (Using Keyboard shortcuts):
1 - Get the component using its name by typing (Call Procedure)
Note : Stop typing when you see the required component is selected
Fig. (63) Component Browser – Select the component (Call Procedure)
After selecting the component click Ok or press ENTER
Fig. (64) Interaction page - Set the properties and enter the required data as in the image above
Afer entering data , Click OK or press CTRL+W
Fig. (65) Goal Desginer - Steps Tree
Select the step (IF ( mymenu == 1 ))
We will start now new interaction process to generate new steps to our steps tree.
The slow way (Using Mouse):
1 - Click Interact to open the components browser
2 - Select the domain (Control Structure)
3 - Select the component (IF Statement)
The fast way (Using Keyboard shortcuts):
1 - Get the component using its name by typing (IF Statement)
Note : Stop typing when you see the required component is selected
Fig. (66) Component Browser – Select the component (IF Statement)
After selecting the component click Ok or press ENTER
Fig. (67) Interaction page - Set the properties and enter the required data as in the image above
Afer entering data , Click OK or press CTRL+W
Fig. (68) Goal Desginer - Steps Tree
Select the step (Start Here)
We will start now new interaction process to generate new steps to our steps tree.
The slow way (Using Mouse):
1 - Click Interact to open the components browser
2 - Select the domain (Control Structure)
3 - Select the component (Exit)
The fast way (Using Keyboard shortcuts):
1 - Get the component using its name by typing (Exit)
Note : Stop typing when you see the required component is selected
Fig. (69) Component Browser – Select the component (Exit)
After selecting the component click Ok or press ENTER
Fig. (70) Goal Desginer - Steps Tree
Select the step (The First Step)
We will start now new interaction process to generate new steps to our steps tree.
The slow way (Using Mouse):
1 - Click Interact to open the components browser
2 - Select the domain (Structure Programming)
3 - Select the component (Call Procedure)
The fast way (Using Keyboard shortcuts):
1 - Get the component using its name by typing (Call Procedure)
Note : Stop typing when you see the required component is selected
Fig. (71) Component Browser – Select the component (Call Procedure)
After selecting the component click Ok or press ENTER
Fig. (72) Interaction page - Set the properties and enter the required data as in the image above
Afer entering data , Click OK or press CTRL+W
Fig. (73) Goal Desginer - Steps Tree
Select the step (Procedures)
We will start now new interaction process to generate new steps to our steps tree.
The slow way (Using Mouse):
1 - Click Interact to open the components browser
2 - Select the domain (Structure Programming)
3 - Select the component (Define Procedure)
The fast way (Using Keyboard shortcuts):
1 - Get the component using its name by typing (Define Procedure)
Note : Stop typing when you see the required component is selected
Fig. (74) Component Browser – Select the component (Define Procedure)
After selecting the component click Ok or press ENTER
Fig. (75) Interaction page - Set the properties and enter the required data as in the image above
Afer entering data , Click OK or press CTRL+W
Fig. (76) Goal Desginer - Steps Tree
Select the step (Start Here)
We will start now new interaction process to generate new steps to our steps tree.
The slow way (Using Mouse):
1 - Click Interact to open the components browser
2 - Select the domain (xBase)
3 - Select the component (Select Area)
The fast way (Using Keyboard shortcuts):
1 - Get the component using its name by typing (Select Area)
Note : Stop typing when you see the required component is selected
Fig. (77) Component Browser – Select the component (Select Area)
After selecting the component click Ok or press ENTER
Fig. (78) Interaction page - Set the properties and enter the required data as in the image above
Afer entering data , Click OK or press CTRL+W
Fig. (79) Goal Desginer - Steps Tree
Select the step (Start Here)
We will start now new interaction process to generate new steps to our steps tree.
The slow way (Using Mouse):
1 - Click Interact to open the components browser
2 - Select the domain (xBase)
3 - Select the component (Open Table)
The fast way (Using Keyboard shortcuts):
1 - Get the component using its name by typing (Open Table)
Note : Stop typing when you see the required component is selected
Fig. (80) Component Browser – Select the component (Open Table)
After selecting the component click Ok or press ENTER
Fig. (81) Interaction page - Set the properties and enter the required data as in the image above
Afer entering data , Click OK or press CTRL+W
Fig. (82) Goal Desginer - Steps Tree
Select the step (Procedures)
We will start now new interaction process to generate new steps to our steps tree.
The slow way (Using Mouse):
1 - Click Interact to open the components browser
2 - Select the domain (Structure Programming)
3 - Select the component (Define Procedure)
The fast way (Using Keyboard shortcuts):
1 - Get the component using its name by typing (Define Procedure)
Note : Stop typing when you see the required component is selected
Fig. (83) Component Browser – Select the component (Define Procedure)
After selecting the component click Ok or press ENTER
Fig. (84) Interaction page - Set the properties and enter the required data as in the image above
Afer entering data , Click OK or press CTRL+W
Fig. (85) Goal Desginer - Steps Tree
Select the step (Start Here)
We will start now new interaction process to generate new steps to our steps tree.
The slow way (Using Mouse):
1 - Click Interact to open the components browser
2 - Select the domain (Console Application)
3 - Select the component (Basic Input/Output)
The fast way (Using Keyboard shortcuts):
1 - Get the component using its name by typing (Basic Input/Output)
Note : Stop typing when you see the required component is selected
Fig. (86) Component Browser – Select the component (Basic Input/Output)
After selecting the component click Ok or press ENTER
Fig. (87) Interaction page - Set the properties and enter the required data as in the image above
Afer entering data , Click OK or press CTRL+W
Fig. (88) Goal Desginer - Steps Tree
Select the step (Start Here)
We will start now new interaction process to generate new steps to our steps tree.
The slow way (Using Mouse):
1 - Click Interact to open the components browser
2 - Select the domain (Console Application)
3 - Select the component (Basic Input/Output)
The fast way (Using Keyboard shortcuts):
1 - Get the component using its name by typing (Basic Input/Output)
Note : Stop typing when you see the required component is selected
Fig. (89) Component Browser – Select the component (Basic Input/Output)
After selecting the component click Ok or press ENTER
Fig. (90) Interaction page - Set the properties and enter the required data as in the image above
Afer entering data , Click OK or press CTRL+W
Fig. (91) Goal Desginer - Steps Tree
Select the step (Start Here)
We will start now new interaction process to generate new steps to our steps tree.
The slow way (Using Mouse):
1 - Click Interact to open the components browser
2 - Select the domain (Console Application)
3 - Select the component (Basic Input/Output)
The fast way (Using Keyboard shortcuts):
1 - Get the component using its name by typing (Basic Input/Output)
Note : Stop typing when you see the required component is selected
Fig. (92) Component Browser – Select the component (Basic Input/Output)
After selecting the component click Ok or press ENTER
Fig. (93) Interaction page - Set the properties and enter the required data as in the image above
Afer entering data , Click OK or press CTRL+W
Fig. (94) Goal Desginer - Steps Tree
Select the step (Start Here)
We will start now new interaction process to generate new steps to our steps tree.
The slow way (Using Mouse):
1 - Click Interact to open the components browser
2 - Select the domain (Console Application)
3 - Select the component (Basic Input/Output)
The fast way (Using Keyboard shortcuts):
1 - Get the component using its name by typing (Basic Input/Output)
Note : Stop typing when you see the required component is selected
Fig. (95) Component Browser – Select the component (Basic Input/Output)
After selecting the component click Ok or press ENTER
Fig. (96) Interaction page - Set the properties and enter the required data as in the image above
Afer entering data , Click OK or press CTRL+W
Fig. (97) Goal Desginer - Steps Tree
Select the step (Start Here)
We will start now new interaction process to generate new steps to our steps tree.
The slow way (Using Mouse):
1 - Click Interact to open the components browser
2 - Select the domain (Variables)
3 - Select the component (Assignment)
The fast way (Using Keyboard shortcuts):
1 - Get the component using its name by typing (Assignment)
Note : Stop typing when you see the required component is selected
Fig. (98) Component Browser – Select the component (Assignment)
After selecting the component click Ok or press ENTER
Fig. (99) Interaction page - Set the properties and enter the required data as in the image above
Afer entering data , Click OK or press CTRL+W
Fig. (100) Goal Desginer - Steps Tree
Select the step (Start Here)
We will start now new interaction process to generate new steps to our steps tree.
The slow way (Using Mouse):
1 - Click Interact to open the components browser
2 - Select the domain (Variables)
3 - Select the component (Assignment)
The fast way (Using Keyboard shortcuts):
1 - Get the component using its name by typing (Assignment)
Note : Stop typing when you see the required component is selected
Fig. (101) Component Browser – Select the component (Assignment)
After selecting the component click Ok or press ENTER
Fig. (102) Interaction page - Set the properties and enter the required data as in the image above
Afer entering data , Click OK or press CTRL+W
Fig. (103) Goal Desginer - Steps Tree
Select the step (Start Here)
We will start now new interaction process to generate new steps to our steps tree.
The slow way (Using Mouse):
1 - Click Interact to open the components browser
2 - Select the domain (Variables)
3 - Select the component (Assignment)
The fast way (Using Keyboard shortcuts):
1 - Get the component using its name by typing (Assignment)
Note : Stop typing when you see the required component is selected
Fig. (104) Component Browser – Select the component (Assignment)
After selecting the component click Ok or press ENTER
Fig. (105) Interaction page - Set the properties and enter the required data as in the image above
Afer entering data , Click OK or press CTRL+W
Fig. (106) Goal Desginer - Steps Tree
Select the step (Start Here)
We will start now new interaction process to generate new steps to our steps tree.
The slow way (Using Mouse):
1 - Click Interact to open the components browser
2 - Select the domain (Console Application)
3 - Select the component (Basic Input/Output)
The fast way (Using Keyboard shortcuts):
1 - Get the component using its name by typing (Basic Input/Output)
Note : Stop typing when you see the required component is selected
Fig. (107) Component Browser – Select the component (Basic Input/Output)
After selecting the component click Ok or press ENTER
Fig. (108) Interaction page - Set the properties and enter the required data as in the image above
Afer entering data , Click OK or press CTRL+W
Fig. (109) Goal Desginer - Steps Tree
Select the step (Start Here)
We will start now new interaction process to generate new steps to our steps tree.
The slow way (Using Mouse):
1 - Click Interact to open the components browser
2 - Select the domain (Console Application)
3 - Select the component (Basic Input/Output)
The fast way (Using Keyboard shortcuts):
1 - Get the component using its name by typing (Basic Input/Output)
Note : Stop typing when you see the required component is selected
Fig. (110) Component Browser – Select the component (Basic Input/Output)
After selecting the component click Ok or press ENTER
Fig. (111) Interaction page - Set the properties and enter the required data as in the image above
Afer entering data , Click OK or press CTRL+W
Fig. (112) Goal Desginer - Steps Tree
Select the step (Start Here)
We will start now new interaction process to generate new steps to our steps tree.
The slow way (Using Mouse):
1 - Click Interact to open the components browser
2 - Select the domain (Console Application)
3 - Select the component (Basic Input/Output)
The fast way (Using Keyboard shortcuts):
1 - Get the component using its name by typing (Basic Input/Output)
Note : Stop typing when you see the required component is selected
Fig. (113) Component Browser – Select the component (Basic Input/Output)
After selecting the component click Ok or press ENTER
Fig. (114) Interaction page - Set the properties and enter the required data as in the image above
Afer entering data , Click OK or press CTRL+W
Fig. (115) Goal Desginer - Steps Tree
Select the step (Start Here)
We will start now new interaction process to generate new steps to our steps tree.
The slow way (Using Mouse):
1 - Click Interact to open the components browser
2 - Select the domain (Console Application)
3 - Select the component (Basic Input/Output)
The fast way (Using Keyboard shortcuts):
1 - Get the component using its name by typing (Basic Input/Output)
Note : Stop typing when you see the required component is selected
Fig. (116) Component Browser – Select the component (Basic Input/Output)
After selecting the component click Ok or press ENTER
Fig. (117) Interaction page - Set the properties and enter the required data as in the image above
Afer entering data , Click OK or press CTRL+W
Fig. (118) Goal Desginer - Steps Tree
Select the step (Start Here)
We will start now new interaction process to generate new steps to our steps tree.
The slow way (Using Mouse):
1 - Click Interact to open the components browser
2 - Select the domain (Console Application)
3 - Select the component (Basic Input/Output)
The fast way (Using Keyboard shortcuts):
1 - Get the component using its name by typing (Basic Input/Output)
Note : Stop typing when you see the required component is selected
Fig. (119) Component Browser – Select the component (Basic Input/Output)
After selecting the component click Ok or press ENTER
Fig. (120) Interaction page - Set the properties and enter the required data as in the image above
Afer entering data , Click OK or press CTRL+W
Fig. (121) Goal Desginer - Steps Tree
Select the step (Start Here)
We will start now new interaction process to generate new steps to our steps tree.
The slow way (Using Mouse):
1 - Click Interact to open the components browser
2 - Select the domain (Console Application)
3 - Select the component (Basic Input/Output)
The fast way (Using Keyboard shortcuts):
1 - Get the component using its name by typing (Basic Input/Output)
Note : Stop typing when you see the required component is selected
Fig. (122) Component Browser – Select the component (Basic Input/Output)
After selecting the component click Ok or press ENTER
Fig. (123) Interaction page - Set the properties and enter the required data as in the image above
Afer entering data , Click OK or press CTRL+W
Fig. (124) Goal Desginer - Steps Tree
Select the step (Start Here)
We will start now new interaction process to generate new steps to our steps tree.
The slow way (Using Mouse):
1 - Click Interact to open the components browser
2 - Select the domain (Console Application)
3 - Select the component (Basic Input/Output)
The fast way (Using Keyboard shortcuts):
1 - Get the component using its name by typing (Basic Input/Output)
Note : Stop typing when you see the required component is selected
Fig. (125) Component Browser – Select the component (Basic Input/Output)
After selecting the component click Ok or press ENTER
Fig. (126) Interaction page - Set the properties and enter the required data as in the image above
Afer entering data , Click OK or press CTRL+W
Fig. (127) Goal Desginer - Steps Tree
Select the step (Start Here)
We will start now new interaction process to generate new steps to our steps tree.
The slow way (Using Mouse):
1 - Click Interact to open the components browser
2 - Select the domain (Control Structure)
3 - Select the component (IF Statement)
The fast way (Using Keyboard shortcuts):
1 - Get the component using its name by typing (IF Statement)
Note : Stop typing when you see the required component is selected
Fig. (128) Component Browser – Select the component (IF Statement)
After selecting the component click Ok or press ENTER
Fig. (129) Interaction page - Set the properties and enter the required data as in the image above
Afer entering data , Click OK or press CTRL+W
Fig. (130) Goal Desginer - Steps Tree
Select the step (Start Here)
We will start now new interaction process to generate new steps to our steps tree.
The slow way (Using Mouse):
1 - Click Interact to open the components browser
2 - Select the domain (xBase)
3 - Select the component (Add New Record)
The fast way (Using Keyboard shortcuts):
1 - Get the component using its name by typing (Add New Record)
Note : Stop typing when you see the required component is selected
Fig. (131) Component Browser – Select the component (Add New Record)
After selecting the component click Ok or press ENTER
Fig. (132) Goal Desginer - Steps Tree
Select the step (Start Here)
We will start now new interaction process to generate new steps to our steps tree.
The slow way (Using Mouse):
1 - Click Interact to open the components browser
2 - Select the domain (xBase)
3 - Select the component (Replace)
The fast way (Using Keyboard shortcuts):
1 - Get the component using its name by typing (Replace)
Note : Stop typing when you see the required component is selected
Fig. (133) Component Browser – Select the component (Replace)
After selecting the component click Ok or press ENTER
Fig. (134) Interaction page - Set the properties and enter the required data as in the image above
Afer entering data , Click OK or press CTRL+W
Fig. (135) Goal Desginer - Steps Tree
Select the step (Start Here)
We will start now new interaction process to generate new steps to our steps tree.
The slow way (Using Mouse):
1 - Click Interact to open the components browser
2 - Select the domain (xBase)
3 - Select the component (Replace)
The fast way (Using Keyboard shortcuts):
1 - Get the component using its name by typing (Replace)
Note : Stop typing when you see the required component is selected
Fig. (136) Component Browser – Select the component (Replace)
After selecting the component click Ok or press ENTER
Fig. (137) Interaction page - Set the properties and enter the required data as in the image above
Afer entering data , Click OK or press CTRL+W
Fig. (138) Goal Desginer - Steps Tree
Select the step (Start Here)
We will start now new interaction process to generate new steps to our steps tree.
The slow way (Using Mouse):
1 - Click Interact to open the components browser
2 - Select the domain (xBase)
3 - Select the component (Replace)
The fast way (Using Keyboard shortcuts):
1 - Get the component using its name by typing (Replace)
Note : Stop typing when you see the required component is selected
Fig. (139) Component Browser – Select the component (Replace)
After selecting the component click Ok or press ENTER
Fig. (140) Interaction page - Set the properties and enter the required data as in the image above
Afer entering data , Click OK or press CTRL+W
Fig. (141) Goal Desginer - Steps Tree
Select the step (Procedures)
We will start now new interaction process to generate new steps to our steps tree.
The slow way (Using Mouse):
1 - Click Interact to open the components browser
2 - Select the domain (Structure Programming)
3 - Select the component (Define Procedure)
The fast way (Using Keyboard shortcuts):
1 - Get the component using its name by typing (Define Procedure)
Note : Stop typing when you see the required component is selected
Fig. (142) Component Browser – Select the component (Define Procedure)
After selecting the component click Ok or press ENTER
Fig. (143) Interaction page - Set the properties and enter the required data as in the image above
Afer entering data , Click OK or press CTRL+W
Fig. (144) Goal Desginer - Steps Tree
Select the step (Start Here)
We will start now new interaction process to generate new steps to our steps tree.
The slow way (Using Mouse):
1 - Click Interact to open the components browser
2 - Select the domain (xBase)
3 - Select the component (Get Information)
The fast way (Using Keyboard shortcuts):
1 - Get the component using its name by typing (Get Information)
Note : Stop typing when you see the required component is selected
Fig. (145) Component Browser – Select the component (Get Information)
After selecting the component click Ok or press ENTER
Fig. (146) Interaction page - Set the properties and enter the required data as in the image above
Afer entering data , Click OK or press CTRL+W
Fig. (147) Goal Desginer - Steps Tree
Select the step (Start Here)
We will start now new interaction process to generate new steps to our steps tree.
The slow way (Using Mouse):
1 - Click Interact to open the components browser
2 - Select the domain (Console Application)
3 - Select the component (Basic Input/Output)
The fast way (Using Keyboard shortcuts):
1 - Get the component using its name by typing (Basic Input/Output)
Note : Stop typing when you see the required component is selected
Fig. (148) Component Browser – Select the component (Basic Input/Output)
After selecting the component click Ok or press ENTER
Fig. (149) Interaction page - Set the properties and enter the required data as in the image above
Afer entering data , Click OK or press CTRL+W
Fig. (150) Goal Desginer - Steps Tree
Select the step (Start Here)
We will start now new interaction process to generate new steps to our steps tree.
The slow way (Using Mouse):
1 - Click Interact to open the components browser
2 - Select the domain (Control Structure)
3 - Select the component (For Loop)
The fast way (Using Keyboard shortcuts):
1 - Get the component using its name by typing (For Loop)
Note : Stop typing when you see the required component is selected
Fig. (151) Component Browser – Select the component (For Loop)
After selecting the component click Ok or press ENTER
Fig. (152) Interaction page - Set the properties and enter the required data as in the image above
Afer entering data , Click OK or press CTRL+W
Fig. (153) Goal Desginer - Steps Tree
Select the step (Start Here)
We will start now new interaction process to generate new steps to our steps tree.
The slow way (Using Mouse):
1 - Click Interact to open the components browser
2 - Select the domain (xBase)
3 - Select the component (Goto)
The fast way (Using Keyboard shortcuts):
1 - Get the component using its name by typing (Goto)
Note : Stop typing when you see the required component is selected
Fig. (154) Component Browser – Select the component (Goto)
After selecting the component click Ok or press ENTER
Fig. (155) Interaction page - Set the properties and enter the required data as in the image above
Afer entering data , Click OK or press CTRL+W
Fig. (156) Goal Desginer - Steps Tree
Select the step (Start Here)
We will start now new interaction process to generate new steps to our steps tree.
The slow way (Using Mouse):
1 - Click Interact to open the components browser
2 - Select the domain (Print Text)
3 - Select the component (Print Text To Console)
The fast way (Using Keyboard shortcuts):
1 - Get the component using its name by typing (Print Text To Console)
Note : Stop typing when you see the required component is selected
Fig. (157) Component Browser – Select the component (Print Text To Console)
After selecting the component click Ok or press ENTER
Fig. (158) Interaction page - Set the properties and enter the required data as in the image above
Afer entering data , Click OK or press CTRL+W
Fig. (159) Goal Desginer - Steps Tree
Select the step (Start Here)
We will start now new interaction process to generate new steps to our steps tree.
The slow way (Using Mouse):
1 - Click Interact to open the components browser
2 - Select the domain (Print Text)
3 - Select the component (Print Text To Console)
The fast way (Using Keyboard shortcuts):
1 - Get the component using its name by typing (Print Text To Console)
Note : Stop typing when you see the required component is selected
Fig. (160) Component Browser – Select the component (Print Text To Console)
After selecting the component click Ok or press ENTER
Fig. (161) Interaction page - Set the properties and enter the required data as in the image above
Afer entering data , Click OK or press CTRL+W
Fig. (162) Goal Desginer - Steps Tree
Select the step (Start Here)
We will start now new interaction process to generate new steps to our steps tree.
The slow way (Using Mouse):
1 - Click Interact to open the components browser
2 - Select the domain (Print Text)
3 - Select the component (Print Text To Console)
The fast way (Using Keyboard shortcuts):
1 - Get the component using its name by typing (Print Text To Console)
Note : Stop typing when you see the required component is selected
Fig. (163) Component Browser – Select the component (Print Text To Console)
After selecting the component click Ok or press ENTER
Fig. (164) Interaction page - Set the properties and enter the required data as in the image above
Afer entering data , Click OK or press CTRL+W
Fig. (165) Goal Desginer - Steps Tree
Select the step (Start Here)
We will start now new interaction process to generate new steps to our steps tree.
The slow way (Using Mouse):
1 - Click Interact to open the components browser
2 - Select the domain (Console Application)
3 - Select the component (Wait (Key/Seconds))
The fast way (Using Keyboard shortcuts):
1 - Get the component using its name by typing (Wait (Key/Seconds))
Note : Stop typing when you see the required component is selected
Fig. (166) Component Browser – Select the component (Wait (Key/Seconds))
After selecting the component click Ok or press ENTER
Fig. (167) Interaction page - Set the properties and enter the required data as in the image above
Afer entering data , Click OK or press CTRL+W
Fig. (168) Goal Desginer - Steps Tree
Select the step (Start Here)
We will start now new interaction process to generate new steps to our steps tree.
The slow way (Using Mouse):
1 - Click Interact to open the components browser
2 - Select the domain (Control Structure)
3 - Select the component (IF Statement)
The fast way (Using Keyboard shortcuts):
1 - Get the component using its name by typing (IF Statement)
Note : Stop typing when you see the required component is selected
Fig. (169) Component Browser – Select the component (IF Statement)
After selecting the component click Ok or press ENTER
Fig. (170) Interaction page - Set the properties and enter the required data as in the image above
Afer entering data , Click OK or press CTRL+W
Fig. (171) Goal Desginer - Steps Tree
Select the step (Start Here)
We will start now new interaction process to generate new steps to our steps tree.
The slow way (Using Mouse):
1 - Click Interact to open the components browser
2 - Select the domain (Console Application)
3 - Select the component (Basic Input/Output)
The fast way (Using Keyboard shortcuts):
1 - Get the component using its name by typing (Basic Input/Output)
Note : Stop typing when you see the required component is selected
Fig. (172) Component Browser – Select the component (Basic Input/Output)
After selecting the component click Ok or press ENTER
Fig. (173) Interaction page - Set the properties and enter the required data as in the image above
Afer entering data , Click OK or press CTRL+W
Fig. (174) Goal Desginer - Steps Tree
Select the step (Start Here)
We will start now new interaction process to generate new steps to our steps tree.
The slow way (Using Mouse):
1 - Click Interact to open the components browser
2 - Select the domain (Print Text)
3 - Select the component (Print Text To Console)
The fast way (Using Keyboard shortcuts):
1 - Get the component using its name by typing (Print Text To Console)
Note : Stop typing when you see the required component is selected
Fig. (175) Component Browser – Select the component (Print Text To Console)
After selecting the component click Ok or press ENTER
Fig. (176) Interaction page - Set the properties and enter the required data as in the image above
Afer entering data , Click OK or press CTRL+W
Fig. (177) Goal Desginer - Steps Tree
Select the step (Start Here)
We will start now new interaction process to generate new steps to our steps tree.
The slow way (Using Mouse):
1 - Click Interact to open the components browser
2 - Select the domain (Console Application)
3 - Select the component (Wait (Key/Seconds))
The fast way (Using Keyboard shortcuts):
1 - Get the component using its name by typing (Wait (Key/Seconds))
Note : Stop typing when you see the required component is selected
Fig. (178) Component Browser – Select the component (Wait (Key/Seconds))
After selecting the component click Ok or press ENTER
Fig. (179) Interaction page - Set the properties and enter the required data as in the image above
Afer entering data , Click OK or press CTRL+W
Fig. (180) Goal Desginer - Steps Tree
Select the step (Procedures)
We will start now new interaction process to generate new steps to our steps tree.
The slow way (Using Mouse):
1 - Click Interact to open the components browser
2 - Select the domain (Structure Programming)
3 - Select the component (Define Procedure)
The fast way (Using Keyboard shortcuts):
1 - Get the component using its name by typing (Define Procedure)
Note : Stop typing when you see the required component is selected
Fig. (181) Component Browser – Select the component (Define Procedure)
After selecting the component click Ok or press ENTER
Fig. (182) Interaction page - Set the properties and enter the required data as in the image above
Afer entering data , Click OK or press CTRL+W
Fig. (183) Goal Desginer - Steps Tree
Select the step (Start Here)
We will start now new interaction process to generate new steps to our steps tree.
The slow way (Using Mouse):
1 - Click Interact to open the components browser
2 - Select the domain (xBase)
3 - Select the component (Get Information)
The fast way (Using Keyboard shortcuts):
1 - Get the component using its name by typing (Get Information)
Note : Stop typing when you see the required component is selected
Fig. (184) Component Browser – Select the component (Get Information)
After selecting the component click Ok or press ENTER
Fig. (185) Interaction page - Set the properties and enter the required data as in the image above
Afer entering data , Click OK or press CTRL+W
Fig. (186) Goal Desginer - Steps Tree
Select the step (Start Here)
We will start now new interaction process to generate new steps to our steps tree.
The slow way (Using Mouse):
1 - Click Interact to open the components browser
2 - Select the domain (Control Structure)
3 - Select the component (IF Statement)
The fast way (Using Keyboard shortcuts):
1 - Get the component using its name by typing (IF Statement)
Note : Stop typing when you see the required component is selected
Fig. (187) Component Browser – Select the component (IF Statement)
After selecting the component click Ok or press ENTER
Fig. (188) Interaction page - Set the properties and enter the required data as in the image above
Afer entering data , Click OK or press CTRL+W
Fig. (189) Goal Desginer - Steps Tree
Select the step (Start Here)
We will start now new interaction process to generate new steps to our steps tree.
The slow way (Using Mouse):
1 - Click Interact to open the components browser
2 - Select the domain (Console Application)
3 - Select the component (Basic Input/Output)
The fast way (Using Keyboard shortcuts):
1 - Get the component using its name by typing (Basic Input/Output)
Note : Stop typing when you see the required component is selected
Fig. (190) Component Browser – Select the component (Basic Input/Output)
After selecting the component click Ok or press ENTER
Fig. (191) Interaction page - Set the properties and enter the required data as in the image above
Afer entering data , Click OK or press CTRL+W
Fig. (192) Goal Desginer - Steps Tree
Select the step (Start Here)
We will start now new interaction process to generate new steps to our steps tree.
The slow way (Using Mouse):
1 - Click Interact to open the components browser
2 - Select the domain (Print Text)
3 - Select the component (Print Text To Console)
The fast way (Using Keyboard shortcuts):
1 - Get the component using its name by typing (Print Text To Console)
Note : Stop typing when you see the required component is selected
Fig. (193) Component Browser – Select the component (Print Text To Console)
After selecting the component click Ok or press ENTER
Fig. (194) Interaction page - Set the properties and enter the required data as in the image above
Afer entering data , Click OK or press CTRL+W
Fig. (195) Goal Desginer - Steps Tree
Select the step (Start Here)
We will start now new interaction process to generate new steps to our steps tree.
The slow way (Using Mouse):
1 - Click Interact to open the components browser
2 - Select the domain (Console Application)
3 - Select the component (Wait (Key/Seconds))
The fast way (Using Keyboard shortcuts):
1 - Get the component using its name by typing (Wait (Key/Seconds))
Note : Stop typing when you see the required component is selected
Fig. (196) Component Browser – Select the component (Wait (Key/Seconds))
After selecting the component click Ok or press ENTER
Fig. (197) Interaction page - Set the properties and enter the required data as in the image above
Afer entering data , Click OK or press CTRL+W
Fig. (198) Goal Desginer - Steps Tree
Select the step (Start Here)
We will start now new interaction process to generate new steps to our steps tree.
The slow way (Using Mouse):
1 - Click Interact to open the components browser
2 - Select the domain (Structure Programming)
3 - Select the component (Return Value)
The fast way (Using Keyboard shortcuts):
1 - Get the component using its name by typing (Return Value)
Note : Stop typing when you see the required component is selected
Fig. (199) Component Browser – Select the component (Return Value)
After selecting the component click Ok or press ENTER
Fig. (200) Interaction page - Set the properties and enter the required data as in the image above
Afer entering data , Click OK or press CTRL+W
Fig. (201) Goal Desginer - Steps Tree
Select the step (Start Here)
We will start now new interaction process to generate new steps to our steps tree.
The slow way (Using Mouse):
1 - Click Interact to open the components browser
2 - Select the domain (Console Application)
3 - Select the component (Basic Input/Output)
The fast way (Using Keyboard shortcuts):
1 - Get the component using its name by typing (Basic Input/Output)
Note : Stop typing when you see the required component is selected
Fig. (202) Component Browser – Select the component (Basic Input/Output)
After selecting the component click Ok or press ENTER
Fig. (203) Interaction page - Set the properties and enter the required data as in the image above
Afer entering data , Click OK or press CTRL+W
Fig. (204) Goal Desginer - Steps Tree
Select the step (Start Here)
We will start now new interaction process to generate new steps to our steps tree.
The slow way (Using Mouse):
1 - Click Interact to open the components browser
2 - Select the domain (Variables)
3 - Select the component (Assignment)
The fast way (Using Keyboard shortcuts):
1 - Get the component using its name by typing (Assignment)
Note : Stop typing when you see the required component is selected
Fig. (205) Component Browser – Select the component (Assignment)
After selecting the component click Ok or press ENTER
Fig. (206) Interaction page - Set the properties and enter the required data as in the image above
Afer entering data , Click OK or press CTRL+W
Fig. (207) Goal Desginer - Steps Tree
Select the step (Start Here)
We will start now new interaction process to generate new steps to our steps tree.
The slow way (Using Mouse):
1 - Click Interact to open the components browser
2 - Select the domain (Console Application)
3 - Select the component (Basic Input/Output)
The fast way (Using Keyboard shortcuts):
1 - Get the component using its name by typing (Basic Input/Output)
Note : Stop typing when you see the required component is selected
Fig. (208) Component Browser – Select the component (Basic Input/Output)
After selecting the component click Ok or press ENTER
Fig. (209) Interaction page - Set the properties and enter the required data as in the image above
Afer entering data , Click OK or press CTRL+W
Fig. (210) Goal Desginer - Steps Tree
Select the step (Start Here)
We will start now new interaction process to generate new steps to our steps tree.
The slow way (Using Mouse):
1 - Click Interact to open the components browser
2 - Select the domain (Console Application)
3 - Select the component (Basic Input/Output)
The fast way (Using Keyboard shortcuts):
1 - Get the component using its name by typing (Basic Input/Output)
Note : Stop typing when you see the required component is selected
Fig. (211) Component Browser – Select the component (Basic Input/Output)
After selecting the component click Ok or press ENTER
Fig. (212) Interaction page - Set the properties and enter the required data as in the image above
Afer entering data , Click OK or press CTRL+W
Fig. (213) Goal Desginer - Steps Tree
Select the step (Start Here)
We will start now new interaction process to generate new steps to our steps tree.
The slow way (Using Mouse):
1 - Click Interact to open the components browser
2 - Select the domain (Console Application)
3 - Select the component (Basic Input/Output)
The fast way (Using Keyboard shortcuts):
1 - Get the component using its name by typing (Basic Input/Output)
Note : Stop typing when you see the required component is selected
Fig. (214) Component Browser – Select the component (Basic Input/Output)
After selecting the component click Ok or press ENTER
Fig. (215) Interaction page - Set the properties and enter the required data as in the image above
Afer entering data , Click OK or press CTRL+W
Fig. (216) Goal Desginer - Steps Tree
Select the step (Start Here)
We will start now new interaction process to generate new steps to our steps tree.
The slow way (Using Mouse):
1 - Click Interact to open the components browser
2 - Select the domain (Variables)
3 - Select the component (ALL Trim)
The fast way (Using Keyboard shortcuts):
1 - Get the component using its name by typing (ALL Trim)
Note : Stop typing when you see the required component is selected
Fig. (217) Component Browser – Select the component (ALL Trim)
After selecting the component click Ok or press ENTER
Fig. (218) Interaction page - Set the properties and enter the required data as in the image above
Afer entering data , Click OK or press CTRL+W
Fig. (219) Goal Desginer - Steps Tree
Select the step (Start Here)
We will start now new interaction process to generate new steps to our steps tree.
The slow way (Using Mouse):
1 - Click Interact to open the components browser
2 - Select the domain (xBase)
3 - Select the component (Locate For)
The fast way (Using Keyboard shortcuts):
1 - Get the component using its name by typing (Locate For)
Note : Stop typing when you see the required component is selected
Fig. (220) Component Browser – Select the component (Locate For)
After selecting the component click Ok or press ENTER
Fig. (221) Interaction page - Set the properties and enter the required data as in the image above
Afer entering data , Click OK or press CTRL+W
Fig. (222) Goal Desginer - Steps Tree
Select the step (Start Here)
We will start now new interaction process to generate new steps to our steps tree.
The slow way (Using Mouse):
1 - Click Interact to open the components browser
2 - Select the domain (xBase)
3 - Select the component (Get Information)
The fast way (Using Keyboard shortcuts):
1 - Get the component using its name by typing (Get Information)
Note : Stop typing when you see the required component is selected
Fig. (223) Component Browser – Select the component (Get Information)
After selecting the component click Ok or press ENTER
Fig. (224) Interaction page - Set the properties and enter the required data as in the image above
Afer entering data , Click OK or press CTRL+W
Fig. (225) Goal Desginer - Steps Tree
Select the step (Start Here)
We will start now new interaction process to generate new steps to our steps tree.
The slow way (Using Mouse):
1 - Click Interact to open the components browser
2 - Select the domain (Control Structure)
3 - Select the component (IF Statement)
The fast way (Using Keyboard shortcuts):
1 - Get the component using its name by typing (IF Statement)
Note : Stop typing when you see the required component is selected
Fig. (226) Component Browser – Select the component (IF Statement)
After selecting the component click Ok or press ENTER
Fig. (227) Interaction page - Set the properties and enter the required data as in the image above
Afer entering data , Click OK or press CTRL+W
Fig. (228) Goal Desginer - Steps Tree
Select the step (Start Here)
We will start now new interaction process to generate new steps to our steps tree.
The slow way (Using Mouse):
1 - Click Interact to open the components browser
2 - Select the domain (Console Application)
3 - Select the component (Basic Input/Output)
The fast way (Using Keyboard shortcuts):
1 - Get the component using its name by typing (Basic Input/Output)
Note : Stop typing when you see the required component is selected
Fig. (229) Component Browser – Select the component (Basic Input/Output)
After selecting the component click Ok or press ENTER
Fig. (230) Interaction page - Set the properties and enter the required data as in the image above
Afer entering data , Click OK or press CTRL+W
Fig. (231) Goal Desginer - Steps Tree
Select the step (Show record)
We will start now new interaction process to generate new steps to our steps tree.
The slow way (Using Mouse):
1 - Click Interact to open the components browser
2 - Select the domain (Print Text)
3 - Select the component (Print Text To Console)
The fast way (Using Keyboard shortcuts):
1 - Get the component using its name by typing (Print Text To Console)
Note : Stop typing when you see the required component is selected
Fig. (232) Component Browser – Select the component (Print Text To Console)
After selecting the component click Ok or press ENTER
Fig. (233) Interaction page - Set the properties and enter the required data as in the image above
Afer entering data , Click OK or press CTRL+W
Fig. (234) Goal Desginer - Steps Tree
Select the step (Show record)
We will start now new interaction process to generate new steps to our steps tree.
The slow way (Using Mouse):
1 - Click Interact to open the components browser
2 - Select the domain (Print Text)
3 - Select the component (Print Text To Console)
The fast way (Using Keyboard shortcuts):
1 - Get the component using its name by typing (Print Text To Console)
Note : Stop typing when you see the required component is selected
Fig. (235) Component Browser – Select the component (Print Text To Console)
After selecting the component click Ok or press ENTER
Fig. (236) Interaction page - Set the properties and enter the required data as in the image above
Afer entering data , Click OK or press CTRL+W
Fig. (237) Goal Desginer - Steps Tree
Select the step (Show record)
We will start now new interaction process to generate new steps to our steps tree.
The slow way (Using Mouse):
1 - Click Interact to open the components browser
2 - Select the domain (Print Text)
3 - Select the component (Print Text To Console)
The fast way (Using Keyboard shortcuts):
1 - Get the component using its name by typing (Print Text To Console)
Note : Stop typing when you see the required component is selected
Fig. (238) Component Browser – Select the component (Print Text To Console)
After selecting the component click Ok or press ENTER
Fig. (239) Interaction page - Set the properties and enter the required data as in the image above
Afer entering data , Click OK or press CTRL+W
Fig. (240) Goal Desginer - Steps Tree
Select the step (show menu)
We will start now new interaction process to generate new steps to our steps tree.
The slow way (Using Mouse):
1 - Click Interact to open the components browser
2 - Select the domain (Console Application)
3 - Select the component (Basic Input/Output)
The fast way (Using Keyboard shortcuts):
1 - Get the component using its name by typing (Basic Input/Output)
Note : Stop typing when you see the required component is selected
Fig. (241) Component Browser – Select the component (Basic Input/Output)
After selecting the component click Ok or press ENTER
Fig. (242) Interaction page - Set the properties and enter the required data as in the image above
Afer entering data , Click OK or press CTRL+W
Fig. (243) Goal Desginer - Steps Tree
Select the step (show menu)
We will start now new interaction process to generate new steps to our steps tree.
The slow way (Using Mouse):
1 - Click Interact to open the components browser
2 - Select the domain (Console Application)
3 - Select the component (Basic Input/Output)
The fast way (Using Keyboard shortcuts):
1 - Get the component using its name by typing (Basic Input/Output)
Note : Stop typing when you see the required component is selected
Fig. (244) Component Browser – Select the component (Basic Input/Output)
After selecting the component click Ok or press ENTER
Fig. (245) Interaction page - Set the properties and enter the required data as in the image above
Afer entering data , Click OK or press CTRL+W
Fig. (246) Goal Desginer - Steps Tree
Select the step (show menu)
We will start now new interaction process to generate new steps to our steps tree.
The slow way (Using Mouse):
1 - Click Interact to open the components browser
2 - Select the domain (Console Application)
3 - Select the component (Basic Input/Output)
The fast way (Using Keyboard shortcuts):
1 - Get the component using its name by typing (Basic Input/Output)
Note : Stop typing when you see the required component is selected
Fig. (247) Component Browser – Select the component (Basic Input/Output)
After selecting the component click Ok or press ENTER
Fig. (248) Interaction page - Set the properties and enter the required data as in the image above
Afer entering data , Click OK or press CTRL+W
Fig. (249) Goal Desginer - Steps Tree
Select the step (show menu)
We will start now new interaction process to generate new steps to our steps tree.
The slow way (Using Mouse):
1 - Click Interact to open the components browser
2 - Select the domain (Control Structure)
3 - Select the component (IF Statement)
The fast way (Using Keyboard shortcuts):
1 - Get the component using its name by typing (IF Statement)
Note : Stop typing when you see the required component is selected
Fig. (250) Component Browser – Select the component (IF Statement)
After selecting the component click Ok or press ENTER
Fig. (251) Interaction page - Set the properties and enter the required data as in the image above
Afer entering data , Click OK or press CTRL+W
Fig. (252) Goal Desginer - Steps Tree
Select the step (Start Here)
We will start now new interaction process to generate new steps to our steps tree.
The slow way (Using Mouse):
1 - Click Interact to open the components browser
2 - Select the domain (Structure Programming)
3 - Select the component (Call Procedure)
The fast way (Using Keyboard shortcuts):
1 - Get the component using its name by typing (Call Procedure)
Note : Stop typing when you see the required component is selected
Fig. (253) Component Browser – Select the component (Call Procedure)
After selecting the component click Ok or press ENTER
Fig. (254) Interaction page - Set the properties and enter the required data as in the image above
Afer entering data , Click OK or press CTRL+W
Fig. (255) Goal Desginer - Steps Tree
Select the step (IF ( mymenu3 == 2 ))
We will start now new interaction process to generate new steps to our steps tree.
The slow way (Using Mouse):
1 - Click Interact to open the components browser
2 - Select the domain (Control Structure)
3 - Select the component (IF Statement)
The fast way (Using Keyboard shortcuts):
1 - Get the component using its name by typing (IF Statement)
Note : Stop typing when you see the required component is selected
Fig. (256) Component Browser – Select the component (IF Statement)
After selecting the component click Ok or press ENTER
Fig. (257) Interaction page - Set the properties and enter the required data as in the image above
Afer entering data , Click OK or press CTRL+W
Fig. (258) Goal Desginer - Steps Tree
Select the step (Start Here)
We will start now new interaction process to generate new steps to our steps tree.
The slow way (Using Mouse):
1 - Click Interact to open the components browser
2 - Select the domain (Structure Programming)
3 - Select the component (Call Procedure)
The fast way (Using Keyboard shortcuts):
1 - Get the component using its name by typing (Call Procedure)
Note : Stop typing when you see the required component is selected
Fig. (259) Component Browser – Select the component (Call Procedure)
After selecting the component click Ok or press ENTER
Fig. (260) Interaction page - Set the properties and enter the required data as in the image above
Afer entering data , Click OK or press CTRL+W
Fig. (261) Goal Desginer - Steps Tree
Select the step (Start Here)
We will start now new interaction process to generate new steps to our steps tree.
The slow way (Using Mouse):
1 - Click Interact to open the components browser
2 - Select the domain (Console Application)
3 - Select the component (Basic Input/Output)
The fast way (Using Keyboard shortcuts):
1 - Get the component using its name by typing (Basic Input/Output)
Note : Stop typing when you see the required component is selected
Fig. (262) Component Browser – Select the component (Basic Input/Output)
After selecting the component click Ok or press ENTER
Fig. (263) Interaction page - Set the properties and enter the required data as in the image above
Afer entering data , Click OK or press CTRL+W
Fig. (264) Goal Desginer - Steps Tree
Select the step (Start Here)
We will start now new interaction process to generate new steps to our steps tree.
The slow way (Using Mouse):
1 - Click Interact to open the components browser
2 - Select the domain (Print Text)
3 - Select the component (Print Text To Console)
The fast way (Using Keyboard shortcuts):
1 - Get the component using its name by typing (Print Text To Console)
Note : Stop typing when you see the required component is selected
Fig. (265) Component Browser – Select the component (Print Text To Console)
After selecting the component click Ok or press ENTER
Fig. (266) Interaction page - Set the properties and enter the required data as in the image above
Afer entering data , Click OK or press CTRL+W
Fig. (267) Goal Desginer - Steps Tree
Select the step (Start Here)
We will start now new interaction process to generate new steps to our steps tree.
The slow way (Using Mouse):
1 - Click Interact to open the components browser
2 - Select the domain (Console Application)
3 - Select the component (Wait (Key/Seconds))
The fast way (Using Keyboard shortcuts):
1 - Get the component using its name by typing (Wait (Key/Seconds))
Note : Stop typing when you see the required component is selected
Fig. (268) Component Browser – Select the component (Wait (Key/Seconds))
After selecting the component click Ok or press ENTER
Fig. (269) Interaction page - Set the properties and enter the required data as in the image above
Afer entering data , Click OK or press CTRL+W
Fig. (270) Goal Desginer - Steps Tree
Select the step (Procedures)
We will start now new interaction process to generate new steps to our steps tree.
The slow way (Using Mouse):
1 - Click Interact to open the components browser
2 - Select the domain (Structure Programming)
3 - Select the component (Define Procedure)
The fast way (Using Keyboard shortcuts):
1 - Get the component using its name by typing (Define Procedure)
Note : Stop typing when you see the required component is selected
Fig. (271) Component Browser – Select the component (Define Procedure)
After selecting the component click Ok or press ENTER
Fig. (272) Interaction page - Set the properties and enter the required data as in the image above
Afer entering data , Click OK or press CTRL+W
Fig. (273) Goal Desginer - Steps Tree
Select the step (Start Here)
We will start now new interaction process to generate new steps to our steps tree.
The slow way (Using Mouse):
1 - Click Interact to open the components browser
2 - Select the domain (xBase)
3 - Select the component (Select Area)
The fast way (Using Keyboard shortcuts):
1 - Get the component using its name by typing (Select Area)
Note : Stop typing when you see the required component is selected
Fig. (274) Component Browser – Select the component (Select Area)
After selecting the component click Ok or press ENTER
Fig. (275) Interaction page - Set the properties and enter the required data as in the image above
Afer entering data , Click OK or press CTRL+W
Fig. (276) Goal Desginer - Steps Tree
Select the step (Start Here)
We will start now new interaction process to generate new steps to our steps tree.
The slow way (Using Mouse):
1 - Click Interact to open the components browser
2 - Select the domain (xBase)
3 - Select the component (Close Table)
The fast way (Using Keyboard shortcuts):
1 - Get the component using its name by typing (Close Table)
Note : Stop typing when you see the required component is selected
Fig. (277) Component Browser – Select the component (Close Table)
After selecting the component click Ok or press ENTER
Fig. (278) Goal Desginer - Steps Tree
Select the step (Procedures)
We will start now new interaction process to generate new steps to our steps tree.
The slow way (Using Mouse):
1 - Click Interact to open the components browser
2 - Select the domain (Structure Programming)
3 - Select the component (Define Procedure)
The fast way (Using Keyboard shortcuts):
1 - Get the component using its name by typing (Define Procedure)
Note : Stop typing when you see the required component is selected
Fig. (279) Component Browser – Select the component (Define Procedure)
After selecting the component click Ok or press ENTER
Fig. (280) Interaction page - Set the properties and enter the required data as in the image above
Afer entering data , Click OK or press CTRL+W
Fig. (281) Goal Desginer - Steps Tree
Select the step (Start Here)
We will start now new interaction process to generate new steps to our steps tree.
The slow way (Using Mouse):
1 - Click Interact to open the components browser
2 - Select the domain (Console Application)
3 - Select the component (Basic Input/Output)
The fast way (Using Keyboard shortcuts):
1 - Get the component using its name by typing (Basic Input/Output)
Note : Stop typing when you see the required component is selected
Fig. (282) Component Browser – Select the component (Basic Input/Output)
After selecting the component click Ok or press ENTER
Fig. (283) Interaction page - Set the properties and enter the required data as in the image above
Afer entering data , Click OK or press CTRL+W
Fig. (284) Goal Desginer - Steps Tree
Select the step (Start Here)
We will start now new interaction process to generate new steps to our steps tree.
The slow way (Using Mouse):
1 - Click Interact to open the components browser
2 - Select the domain (Console Application)
3 - Select the component (Basic Input/Output)
The fast way (Using Keyboard shortcuts):
1 - Get the component using its name by typing (Basic Input/Output)
Note : Stop typing when you see the required component is selected
Fig. (285) Component Browser – Select the component (Basic Input/Output)
After selecting the component click Ok or press ENTER
Fig. (286) Interaction page - Set the properties and enter the required data as in the image above
Afer entering data , Click OK or press CTRL+W
Fig. (287) Goal Desginer - Steps Tree
Select the step (Start Here)
We will start now new interaction process to generate new steps to our steps tree.
The slow way (Using Mouse):
1 - Click Interact to open the components browser
2 - Select the domain (Console Application)
3 - Select the component (Basic Input/Output)
The fast way (Using Keyboard shortcuts):
1 - Get the component using its name by typing (Basic Input/Output)
Note : Stop typing when you see the required component is selected
Fig. (288) Component Browser – Select the component (Basic Input/Output)
After selecting the component click Ok or press ENTER
Fig. (289) Interaction page - Set the properties and enter the required data as in the image above
Afer entering data , Click OK or press CTRL+W
Fig. (290) Goal Desginer - Steps Tree
Select the step (Start Here)
We will start now new interaction process to generate new steps to our steps tree.
The slow way (Using Mouse):
1 - Click Interact to open the components browser
2 - Select the domain (Console Application)
3 - Select the component (Basic Input/Output)
The fast way (Using Keyboard shortcuts):
1 - Get the component using its name by typing (Basic Input/Output)
Note : Stop typing when you see the required component is selected
Fig. (291) Component Browser – Select the component (Basic Input/Output)
After selecting the component click Ok or press ENTER
Fig. (292) Interaction page - Set the properties and enter the required data as in the image above
Afer entering data , Click OK or press CTRL+W
Fig. (293) Goal Desginer - Steps Tree
Select the step (Start Here)
We will start now new interaction process to generate new steps to our steps tree.
The slow way (Using Mouse):
1 - Click Interact to open the components browser
2 - Select the domain (Variables)
3 - Select the component (Assignment)
The fast way (Using Keyboard shortcuts):
1 - Get the component using its name by typing (Assignment)
Note : Stop typing when you see the required component is selected
Fig. (294) Component Browser – Select the component (Assignment)
After selecting the component click Ok or press ENTER
Fig. (295) Interaction page - Set the properties and enter the required data as in the image above
Afer entering data , Click OK or press CTRL+W
Fig. (296) Goal Desginer - Steps Tree
Select the step (Start Here)
We will start now new interaction process to generate new steps to our steps tree.
The slow way (Using Mouse):
1 - Click Interact to open the components browser
2 - Select the domain (Variables)
3 - Select the component (Assignment)
The fast way (Using Keyboard shortcuts):
1 - Get the component using its name by typing (Assignment)
Note : Stop typing when you see the required component is selected
Fig. (297) Component Browser – Select the component (Assignment)
After selecting the component click Ok or press ENTER
Fig. (298) Interaction page - Set the properties and enter the required data as in the image above
Afer entering data , Click OK or press CTRL+W
Fig. (299) Goal Desginer - Steps Tree
Select the step (Start Here)
We will start now new interaction process to generate new steps to our steps tree.
The slow way (Using Mouse):
1 - Click Interact to open the components browser
2 - Select the domain (Variables)
3 - Select the component (Assignment)
The fast way (Using Keyboard shortcuts):
1 - Get the component using its name by typing (Assignment)
Note : Stop typing when you see the required component is selected
Fig. (300) Component Browser – Select the component (Assignment)
After selecting the component click Ok or press ENTER
Fig. (301) Interaction page - Set the properties and enter the required data as in the image above
Afer entering data , Click OK or press CTRL+W
Fig. (302) Goal Desginer - Steps Tree
Select the step (Start Here)
We will start now new interaction process to generate new steps to our steps tree.
The slow way (Using Mouse):
1 - Click Interact to open the components browser
2 - Select the domain (Console Application)
3 - Select the component (Basic Input/Output)
The fast way (Using Keyboard shortcuts):
1 - Get the component using its name by typing (Basic Input/Output)
Note : Stop typing when you see the required component is selected
Fig. (303) Component Browser – Select the component (Basic Input/Output)
After selecting the component click Ok or press ENTER
Fig. (304) Interaction page - Set the properties and enter the required data as in the image above
Afer entering data , Click OK or press CTRL+W
Fig. (305) Goal Desginer - Steps Tree
Select the step (Start Here)
We will start now new interaction process to generate new steps to our steps tree.
The slow way (Using Mouse):
1 - Click Interact to open the components browser
2 - Select the domain (Console Application)
3 - Select the component (Basic Input/Output)
The fast way (Using Keyboard shortcuts):
1 - Get the component using its name by typing (Basic Input/Output)
Note : Stop typing when you see the required component is selected
Fig. (306) Component Browser – Select the component (Basic Input/Output)
After selecting the component click Ok or press ENTER
Fig. (307) Interaction page - Set the properties and enter the required data as in the image above
Afer entering data , Click OK or press CTRL+W
Fig. (308) Goal Desginer - Steps Tree
Select the step (Start Here)
We will start now new interaction process to generate new steps to our steps tree.
The slow way (Using Mouse):
1 - Click Interact to open the components browser
2 - Select the domain (Console Application)
3 - Select the component (Basic Input/Output)
The fast way (Using Keyboard shortcuts):
1 - Get the component using its name by typing (Basic Input/Output)
Note : Stop typing when you see the required component is selected
Fig. (309) Component Browser – Select the component (Basic Input/Output)
After selecting the component click Ok or press ENTER
Fig. (310) Interaction page - Set the properties and enter the required data as in the image above
Afer entering data , Click OK or press CTRL+W
Fig. (311) Goal Desginer - Steps Tree
Select the step (Start Here)
We will start now new interaction process to generate new steps to our steps tree.
The slow way (Using Mouse):
1 - Click Interact to open the components browser
2 - Select the domain (Console Application)
3 - Select the component (Basic Input/Output)
The fast way (Using Keyboard shortcuts):
1 - Get the component using its name by typing (Basic Input/Output)
Note : Stop typing when you see the required component is selected
Fig. (312) Component Browser – Select the component (Basic Input/Output)
After selecting the component click Ok or press ENTER
Fig. (313) Interaction page - Set the properties and enter the required data as in the image above
Afer entering data , Click OK or press CTRL+W
Fig. (314) Goal Desginer - Steps Tree
Select the step (Start Here)
We will start now new interaction process to generate new steps to our steps tree.
The slow way (Using Mouse):
1 - Click Interact to open the components browser
2 - Select the domain (Console Application)
3 - Select the component (Basic Input/Output)
The fast way (Using Keyboard shortcuts):
1 - Get the component using its name by typing (Basic Input/Output)
Note : Stop typing when you see the required component is selected
Fig. (315) Component Browser – Select the component (Basic Input/Output)
After selecting the component click Ok or press ENTER
Fig. (316) Interaction page - Set the properties and enter the required data as in the image above
Afer entering data , Click OK or press CTRL+W
Fig. (317) Goal Desginer - Steps Tree
Select the step (Start Here)
We will start now new interaction process to generate new steps to our steps tree.
The slow way (Using Mouse):
1 - Click Interact to open the components browser
2 - Select the domain (Console Application)
3 - Select the component (Basic Input/Output)
The fast way (Using Keyboard shortcuts):
1 - Get the component using its name by typing (Basic Input/Output)
Note : Stop typing when you see the required component is selected
Fig. (318) Component Browser – Select the component (Basic Input/Output)
After selecting the component click Ok or press ENTER
Fig. (319) Interaction page - Set the properties and enter the required data as in the image above
Afer entering data , Click OK or press CTRL+W
Fig. (320) Goal Desginer - Steps Tree
Select the step (Start Here)
We will start now new interaction process to generate new steps to our steps tree.
The slow way (Using Mouse):
1 - Click Interact to open the components browser
2 - Select the domain (Console Application)
3 - Select the component (Basic Input/Output)
The fast way (Using Keyboard shortcuts):
1 - Get the component using its name by typing (Basic Input/Output)
Note : Stop typing when you see the required component is selected
Fig. (321) Component Browser – Select the component (Basic Input/Output)
After selecting the component click Ok or press ENTER
Fig. (322) Interaction page - Set the properties and enter the required data as in the image above
Afer entering data , Click OK or press CTRL+W
Fig. (323) Goal Desginer - Steps Tree
Select the step (Start Here)
We will start now new interaction process to generate new steps to our steps tree.
The slow way (Using Mouse):
1 - Click Interact to open the components browser
2 - Select the domain (Control Structure)
3 - Select the component (IF Statement)
The fast way (Using Keyboard shortcuts):
1 - Get the component using its name by typing (IF Statement)
Note : Stop typing when you see the required component is selected
Fig. (324) Component Browser – Select the component (IF Statement)
After selecting the component click Ok or press ENTER
Fig. (325) Interaction page - Set the properties and enter the required data as in the image above
Afer entering data , Click OK or press CTRL+W
Fig. (326) Goal Desginer - Steps Tree
Select the step (Start Here)
We will start now new interaction process to generate new steps to our steps tree.
The slow way (Using Mouse):
1 - Click Interact to open the components browser
2 - Select the domain (xBase)
3 - Select the component (Replace)
The fast way (Using Keyboard shortcuts):
1 - Get the component using its name by typing (Replace)
Note : Stop typing when you see the required component is selected
Fig. (327) Component Browser – Select the component (Replace)
After selecting the component click Ok or press ENTER
Fig. (328) Interaction page - Set the properties and enter the required data as in the image above
Afer entering data , Click OK or press CTRL+W
Fig. (329) Goal Desginer - Steps Tree
Select the step (Start Here)
We will start now new interaction process to generate new steps to our steps tree.
The slow way (Using Mouse):
1 - Click Interact to open the components browser
2 - Select the domain (xBase)
3 - Select the component (Replace)
The fast way (Using Keyboard shortcuts):
1 - Get the component using its name by typing (Replace)
Note : Stop typing when you see the required component is selected
Fig. (330) Component Browser – Select the component (Replace)
After selecting the component click Ok or press ENTER
Fig. (331) Interaction page - Set the properties and enter the required data as in the image above
Afer entering data , Click OK or press CTRL+W
Fig. (332) Goal Desginer - Steps Tree
Select the step (Start Here)
We will start now new interaction process to generate new steps to our steps tree.
The slow way (Using Mouse):
1 - Click Interact to open the components browser
2 - Select the domain (xBase)
3 - Select the component (Replace)
The fast way (Using Keyboard shortcuts):
1 - Get the component using its name by typing (Replace)
Note : Stop typing when you see the required component is selected
Fig. (333) Component Browser – Select the component (Replace)
After selecting the component click Ok or press ENTER
Fig. (334) Interaction page - Set the properties and enter the required data as in the image above
Afer entering data , Click OK or press CTRL+W
Fig. (335) Goal Desginer - Steps Tree
Select the step (Procedures)
We will start now new interaction process to generate new steps to our steps tree.
The slow way (Using Mouse):
1 - Click Interact to open the components browser
2 - Select the domain (Structure Programming)
3 - Select the component (Define Procedure)
The fast way (Using Keyboard shortcuts):
1 - Get the component using its name by typing (Define Procedure)
Note : Stop typing when you see the required component is selected
Fig. (336) Component Browser – Select the component (Define Procedure)
After selecting the component click Ok or press ENTER
Fig. (337) Interaction page - Set the properties and enter the required data as in the image above
Afer entering data , Click OK or press CTRL+W
Fig. (338) Goal Desginer - Steps Tree
Select the step (Start Here)
We will start now new interaction process to generate new steps to our steps tree.
The slow way (Using Mouse):
1 - Click Interact to open the components browser
2 - Select the domain (xBase)
3 - Select the component (Delete Current Record (Mark for deletion))
The fast way (Using Keyboard shortcuts):
1 - Get the component using its name by typing (Delete Current Record (Mark for deletion))
Note : Stop typing when you see the required component is selected
Fig. (339) Component Browser – Select the component (Delete Current Record (Mark for deletion))
After selecting the component click Ok or press ENTER
Fig. (340) Goal Desginer - Steps Tree
Select the step (Start Here)
We will start now new interaction process to generate new steps to our steps tree.
The slow way (Using Mouse):
1 - Click Interact to open the components browser
2 - Select the domain (xBase)
3 - Select the component (Pack)
The fast way (Using Keyboard shortcuts):
1 - Get the component using its name by typing (Pack)
Note : Stop typing when you see the required component is selected
Fig. (341) Component Browser – Select the component (Pack)
After selecting the component click Ok or press ENTER
Fig. (342) Goal Desginer - Final Steps Tree
3 - Final Steps Tree
The First Step
Call Procedure open_database
WHILE ( True )
Start Here
Set Color Standard( White , Blue ) Enhanced ( Yellow , Black ) Unselected ( Black , White )
Clear Screen
Print Text "Telephone Database" - AT ROW 3 & COLUMN 3
Draw Box from 2 , 2 to 4 , 23
Draw Box from 6 , 2 to 8 , 50
Draw Box from 9 , 2 to 21 , 50
mycount = Get Records Count
mycount = CONVERT mycount TO STRING
Print Text "Records Count" + mycount - AT ROW 7 & COLUMN 5
PROMPT "Add New Record" - AT ROW 12 & COLUMN 15
PROMPT "List Records" - AT ROW 14 & COLUMN 15
PROMPT "Search" - AT ROW 16 & COLUMN 15
PROMPT "Exit" - AT ROW 18 & COLUMN 15
Activate Menu mymenu
IF ( mymenu == 1 )
Start Here
Call Procedure add_proc
ELSEIF ( mymenu == 2 )
Start Here
Call Procedure list_proc
ELSEIF ( mymenu == 3 )
Start Here
Call Procedure search_proc
ELSEIF ( mymenu == 4 )
Start Here
Exit
END OF IF STATEMENT
END OF While Loop
Call Procedure close_database
Procedures
Define Procedure open_database
Start Here
SELECT AREA 0
Open Table Tel
End of Procedure
Define Procedure add_proc
Start Here
Clear Screen
Print Text "Add New Record" - AT ROW 3 & COLUMN 28
Draw Box from 2 , 25 to 4 , 48
Draw Box from 9 , 2 to 21 , 77
v_name = String, length = 50
v_address = String, length = 50
v_phone = String, length = 20
Print Text "Name" - AT ROW 12 & COLUMN 10
Get Input v_name - AT ROW 12 & COLUMN 20
Print Text "Address" - AT ROW 14 & COLUMN 10
Get Input v_address - AT ROW 14 & COLUMN 20
Print Text "Phone" - AT ROW 16 & COLUMN 10
Get Input v_phone - AT ROW 16 & COLUMN 20
READ INPUT
PROMPT "Save" - AT ROW 19 & COLUMN 54
PROMPT "Cancel" - AT ROW 19 & COLUMN 64
Draw Box from 18 , 3 to 18 , 76
Print Text "" - AT ROW 0 & COLUMN 0
Activate Menu mymenu2
IF ( mymenu2 == 1 )
Start Here
Add New Record
Replace Field name with v_name
Replace Field address with v_address
Replace Field phone with v_phone
END OF IF STATEMENT
End of Procedure
Define Procedure list_proc
Start Here
mymax = Get Records Count
Clear Screen
FOR LOOP ( From x = 1 To mymax Step 1)
Start Here
Goto Record Number x
Print text ("Name : " + name) to console
Print text ("Address : " + address) to console
Print text ("Phone : " + phone) to console
Wait (KEY) Message : "Press any key to continue..."
End of For Loop
IF ( mymax == 0 )
Start Here
Clear Screen
Print text ("No records") to console
WAIT ( 3 SECONDS)
END OF IF STATEMENT
End of Procedure
Define Procedure search_proc
Start Here
mymax = Get Records Count
IF ( mymax == 0 )
Start Here
Clear Screen
Print text ("No records") to console
WAIT ( 3 SECONDS)
Return false
END OF IF STATEMENT
Clear Screen
v_name = String, length = 50
Draw Box from 9 , 2 to 21 , 77
Print Text "Name" - AT ROW 12 & COLUMN 10
Get Input v_name - AT ROW 12 & COLUMN 20
READ INPUT
v_name = All Trim v_name
Locate For name = v_name
myresult = Check- Record Found (Locate)
IF ( myresult )
Start Here
Clear Screen
Show record
Print text ("Name : " + name) to console
Print text ("Address : " + address) to console
Print text ("Phone : " + phone) to console
show menu
PROMPT " Ok " - AT ROW 10 & COLUMN 10
PROMPT " Edit " - AT ROW 12 & COLUMN 10
PROMPT " Delete " - AT ROW 14 & COLUMN 10
Activate Menu mymenu3
IF ( mymenu3 == 2 )
Start Here
Call Procedure edit_proc
ELSEIF ( mymenu3 == 3 )
Start Here
Call Procedure del_proc
END OF IF STATEMENT
ELSE
Start Here
Clear Screen
Print text ("Record not found") to console
WAIT ( 3 SECONDS)
END OF IF STATEMENT
End of Procedure
Define Procedure close_database
Start Here
SELECT AREA Tel
Close Table
End of Procedure
Define Procedure edit_proc
Start Here
Clear Screen
Print Text "Edit Record" - AT ROW 3 & COLUMN 28
Draw Box from 2 , 25 to 4 , 48
Draw Box from 9 , 2 to 21 , 77
v_name = name
v_address = address
v_phone = phone
Print Text "Name" - AT ROW 12 & COLUMN 10
Get Input v_name - AT ROW 12 & COLUMN 20
Print Text "Address" - AT ROW 14 & COLUMN 10
Get Input v_address - AT ROW 14 & COLUMN 20
Print Text "Phone" - AT ROW 16 & COLUMN 10
Get Input v_phone - AT ROW 16 & COLUMN 20
READ INPUT
PROMPT "Save" - AT ROW 19 & COLUMN 54
PROMPT "Cancel" - AT ROW 19 & COLUMN 64
Draw Box from 18 , 3 to 18 , 76
Print Text "" - AT ROW 0 & COLUMN 0
Activate Menu mymenu2
IF ( mymenu2 == 1 )
Start Here
Replace Field name with v_name
Replace Field address with v_address
Replace Field phone with v_phone
END OF IF STATEMENT
End of Procedure
Define Procedure del_proc
Start Here
Delete Record (Mark for deletion)
Pack
End of Procedure
4 - Application during the runtime
Fig. (343) Application during the runtime
Fig. (344) Application during the runtime
Fig. (345) Application during the runtime
Fig. (346) Application during the runtime
Fig. (347) Application during the runtime

More Related Content

What's hot

Programming Without Coding Technology (PWCT) - How to deal with Arrays
Programming Without Coding Technology (PWCT) - How to deal with ArraysProgramming Without Coding Technology (PWCT) - How to deal with Arrays
Programming Without Coding Technology (PWCT) - How to deal with Arrays
Mahmoud Samir Fayed
 
Programming Without Coding Technology (PWCT) - Crystal Reports 10
Programming Without Coding Technology (PWCT) - Crystal Reports 10Programming Without Coding Technology (PWCT) - Crystal Reports 10
Programming Without Coding Technology (PWCT) - Crystal Reports 10
Mahmoud Samir Fayed
 
Programming Without Coding Technology (PWCT) - Adding controls to windows.
Programming Without Coding Technology (PWCT) - Adding controls to windows.Programming Without Coding Technology (PWCT) - Adding controls to windows.
Programming Without Coding Technology (PWCT) - Adding controls to windows.
Mahmoud Samir Fayed
 
Programming Without Coding Technology (PWCT) - Hello Lily Sample
Programming Without Coding Technology (PWCT) - Hello Lily SampleProgramming Without Coding Technology (PWCT) - Hello Lily Sample
Programming Without Coding Technology (PWCT) - Hello Lily Sample
Mahmoud Samir Fayed
 
Programming Without Coding Technology (PWCT) - ActiveSkin ActiveX Control
Programming Without Coding Technology (PWCT) - ActiveSkin ActiveX ControlProgramming Without Coding Technology (PWCT) - ActiveSkin ActiveX Control
Programming Without Coding Technology (PWCT) - ActiveSkin ActiveX Control
Mahmoud Samir Fayed
 
Programming Without Coding Technology (PWCT) - Compress Files using PolarZipL...
Programming Without Coding Technology (PWCT) - Compress Files using PolarZipL...Programming Without Coding Technology (PWCT) - Compress Files using PolarZipL...
Programming Without Coding Technology (PWCT) - Compress Files using PolarZipL...
Mahmoud Samir Fayed
 
Programming Without Coding Technology (PWCT) - Encrypt/Decrypt Files using Po...
Programming Without Coding Technology (PWCT) - Encrypt/Decrypt Files using Po...Programming Without Coding Technology (PWCT) - Encrypt/Decrypt Files using Po...
Programming Without Coding Technology (PWCT) - Encrypt/Decrypt Files using Po...
Mahmoud Samir Fayed
 
Programming Without Coding Technology (PWCT) - Expressions
Programming Without Coding Technology (PWCT) - ExpressionsProgramming Without Coding Technology (PWCT) - Expressions
Programming Without Coding Technology (PWCT) - Expressions
Mahmoud Samir Fayed
 
Programming Without Coding Technology (PWCT) - PolarCryptoLight ActiveX
Programming Without Coding Technology (PWCT) - PolarCryptoLight ActiveXProgramming Without Coding Technology (PWCT) - PolarCryptoLight ActiveX
Programming Without Coding Technology (PWCT) - PolarCryptoLight ActiveX
Mahmoud Samir Fayed
 
Programming Without Coding Technology (PWCT) - Add toolbar to the window
Programming Without Coding Technology (PWCT) - Add toolbar to the windowProgramming Without Coding Technology (PWCT) - Add toolbar to the window
Programming Without Coding Technology (PWCT) - Add toolbar to the window
Mahmoud Samir Fayed
 
Programming Without Coding Technology (PWCT) - Play Flash Movie
Programming Without Coding Technology (PWCT) - Play Flash MovieProgramming Without Coding Technology (PWCT) - Play Flash Movie
Programming Without Coding Technology (PWCT) - Play Flash Movie
Mahmoud Samir Fayed
 
Programming Without Coding Technology (PWCT) - Center Window
Programming Without Coding Technology (PWCT) - Center WindowProgramming Without Coding Technology (PWCT) - Center Window
Programming Without Coding Technology (PWCT) - Center Window
Mahmoud Samir Fayed
 
Programming Without Coding Technology (PWCT) - Functions and Procedures
Programming Without Coding Technology (PWCT) - Functions and ProceduresProgramming Without Coding Technology (PWCT) - Functions and Procedures
Programming Without Coding Technology (PWCT) - Functions and Procedures
Mahmoud Samir Fayed
 
Programming Without Coding Technology (PWCT) - Create Database Files (*.DBF)
Programming Without Coding Technology (PWCT) - Create Database Files (*.DBF)Programming Without Coding Technology (PWCT) - Create Database Files (*.DBF)
Programming Without Coding Technology (PWCT) - Create Database Files (*.DBF)
Mahmoud Samir Fayed
 
Programming Without Coding Technology (PWCT) - Variables
Programming Without Coding Technology (PWCT) - VariablesProgramming Without Coding Technology (PWCT) - Variables
Programming Without Coding Technology (PWCT) - Variables
Mahmoud Samir Fayed
 
Programming Without Coding Technology (PWCT) - RMChart ActiveX
Programming Without Coding Technology (PWCT) - RMChart ActiveXProgramming Without Coding Technology (PWCT) - RMChart ActiveX
Programming Without Coding Technology (PWCT) - RMChart ActiveX
Mahmoud Samir Fayed
 
Programming Without Coding Technology (PWCT) - Tab control
Programming Without Coding Technology (PWCT) - Tab controlProgramming Without Coding Technology (PWCT) - Tab control
Programming Without Coding Technology (PWCT) - Tab control
Mahmoud Samir Fayed
 
Programming Without Coding Technology (PWCT) - Error Handling (Try/Catch)
Programming Without Coding Technology (PWCT) - Error Handling (Try/Catch)Programming Without Coding Technology (PWCT) - Error Handling (Try/Catch)
Programming Without Coding Technology (PWCT) - Error Handling (Try/Catch)
Mahmoud Samir Fayed
 
Programming Without Coding Technology (PWCT) - Timer control
Programming Without Coding Technology (PWCT) - Timer controlProgramming Without Coding Technology (PWCT) - Timer control
Programming Without Coding Technology (PWCT) - Timer control
Mahmoud Samir Fayed
 
Programming Without Coding Technology (PWCT) - Simple GUI Application
Programming Without Coding Technology (PWCT) - Simple GUI ApplicationProgramming Without Coding Technology (PWCT) - Simple GUI Application
Programming Without Coding Technology (PWCT) - Simple GUI Application
Mahmoud Samir Fayed
 

What's hot (20)

Programming Without Coding Technology (PWCT) - How to deal with Arrays
Programming Without Coding Technology (PWCT) - How to deal with ArraysProgramming Without Coding Technology (PWCT) - How to deal with Arrays
Programming Without Coding Technology (PWCT) - How to deal with Arrays
 
Programming Without Coding Technology (PWCT) - Crystal Reports 10
Programming Without Coding Technology (PWCT) - Crystal Reports 10Programming Without Coding Technology (PWCT) - Crystal Reports 10
Programming Without Coding Technology (PWCT) - Crystal Reports 10
 
Programming Without Coding Technology (PWCT) - Adding controls to windows.
Programming Without Coding Technology (PWCT) - Adding controls to windows.Programming Without Coding Technology (PWCT) - Adding controls to windows.
Programming Without Coding Technology (PWCT) - Adding controls to windows.
 
Programming Without Coding Technology (PWCT) - Hello Lily Sample
Programming Without Coding Technology (PWCT) - Hello Lily SampleProgramming Without Coding Technology (PWCT) - Hello Lily Sample
Programming Without Coding Technology (PWCT) - Hello Lily Sample
 
Programming Without Coding Technology (PWCT) - ActiveSkin ActiveX Control
Programming Without Coding Technology (PWCT) - ActiveSkin ActiveX ControlProgramming Without Coding Technology (PWCT) - ActiveSkin ActiveX Control
Programming Without Coding Technology (PWCT) - ActiveSkin ActiveX Control
 
Programming Without Coding Technology (PWCT) - Compress Files using PolarZipL...
Programming Without Coding Technology (PWCT) - Compress Files using PolarZipL...Programming Without Coding Technology (PWCT) - Compress Files using PolarZipL...
Programming Without Coding Technology (PWCT) - Compress Files using PolarZipL...
 
Programming Without Coding Technology (PWCT) - Encrypt/Decrypt Files using Po...
Programming Without Coding Technology (PWCT) - Encrypt/Decrypt Files using Po...Programming Without Coding Technology (PWCT) - Encrypt/Decrypt Files using Po...
Programming Without Coding Technology (PWCT) - Encrypt/Decrypt Files using Po...
 
Programming Without Coding Technology (PWCT) - Expressions
Programming Without Coding Technology (PWCT) - ExpressionsProgramming Without Coding Technology (PWCT) - Expressions
Programming Without Coding Technology (PWCT) - Expressions
 
Programming Without Coding Technology (PWCT) - PolarCryptoLight ActiveX
Programming Without Coding Technology (PWCT) - PolarCryptoLight ActiveXProgramming Without Coding Technology (PWCT) - PolarCryptoLight ActiveX
Programming Without Coding Technology (PWCT) - PolarCryptoLight ActiveX
 
Programming Without Coding Technology (PWCT) - Add toolbar to the window
Programming Without Coding Technology (PWCT) - Add toolbar to the windowProgramming Without Coding Technology (PWCT) - Add toolbar to the window
Programming Without Coding Technology (PWCT) - Add toolbar to the window
 
Programming Without Coding Technology (PWCT) - Play Flash Movie
Programming Without Coding Technology (PWCT) - Play Flash MovieProgramming Without Coding Technology (PWCT) - Play Flash Movie
Programming Without Coding Technology (PWCT) - Play Flash Movie
 
Programming Without Coding Technology (PWCT) - Center Window
Programming Without Coding Technology (PWCT) - Center WindowProgramming Without Coding Technology (PWCT) - Center Window
Programming Without Coding Technology (PWCT) - Center Window
 
Programming Without Coding Technology (PWCT) - Functions and Procedures
Programming Without Coding Technology (PWCT) - Functions and ProceduresProgramming Without Coding Technology (PWCT) - Functions and Procedures
Programming Without Coding Technology (PWCT) - Functions and Procedures
 
Programming Without Coding Technology (PWCT) - Create Database Files (*.DBF)
Programming Without Coding Technology (PWCT) - Create Database Files (*.DBF)Programming Without Coding Technology (PWCT) - Create Database Files (*.DBF)
Programming Without Coding Technology (PWCT) - Create Database Files (*.DBF)
 
Programming Without Coding Technology (PWCT) - Variables
Programming Without Coding Technology (PWCT) - VariablesProgramming Without Coding Technology (PWCT) - Variables
Programming Without Coding Technology (PWCT) - Variables
 
Programming Without Coding Technology (PWCT) - RMChart ActiveX
Programming Without Coding Technology (PWCT) - RMChart ActiveXProgramming Without Coding Technology (PWCT) - RMChart ActiveX
Programming Without Coding Technology (PWCT) - RMChart ActiveX
 
Programming Without Coding Technology (PWCT) - Tab control
Programming Without Coding Technology (PWCT) - Tab controlProgramming Without Coding Technology (PWCT) - Tab control
Programming Without Coding Technology (PWCT) - Tab control
 
Programming Without Coding Technology (PWCT) - Error Handling (Try/Catch)
Programming Without Coding Technology (PWCT) - Error Handling (Try/Catch)Programming Without Coding Technology (PWCT) - Error Handling (Try/Catch)
Programming Without Coding Technology (PWCT) - Error Handling (Try/Catch)
 
Programming Without Coding Technology (PWCT) - Timer control
Programming Without Coding Technology (PWCT) - Timer controlProgramming Without Coding Technology (PWCT) - Timer control
Programming Without Coding Technology (PWCT) - Timer control
 
Programming Without Coding Technology (PWCT) - Simple GUI Application
Programming Without Coding Technology (PWCT) - Simple GUI ApplicationProgramming Without Coding Technology (PWCT) - Simple GUI Application
Programming Without Coding Technology (PWCT) - Simple GUI Application
 

Viewers also liked

Programming Without Coding Technology (PWCT) - Using the For Loop component.
Programming Without Coding Technology (PWCT) - Using the For Loop component.Programming Without Coding Technology (PWCT) - Using the For Loop component.
Programming Without Coding Technology (PWCT) - Using the For Loop component.
Mahmoud Samir Fayed
 
Programming Without Coding Technology (PWCT) Getting Started - The Time Machine
Programming Without Coding Technology (PWCT)  Getting Started - The Time MachineProgramming Without Coding Technology (PWCT)  Getting Started - The Time Machine
Programming Without Coding Technology (PWCT) Getting Started - The Time Machine
Mahmoud Samir Fayed
 
Programming Without Coding Technology (PWCT) - Listbox control
Programming Without Coding Technology (PWCT) - Listbox controlProgramming Without Coding Technology (PWCT) - Listbox control
Programming Without Coding Technology (PWCT) - Listbox control
Mahmoud Samir Fayed
 
Programming Without Coding Technology (PWCT) - Combobox control
Programming Without Coding Technology (PWCT) - Combobox controlProgramming Without Coding Technology (PWCT) - Combobox control
Programming Without Coding Technology (PWCT) - Combobox control
Mahmoud Samir Fayed
 
Programming Without Coding Technology (PWCT) - Animatebox control
Programming Without Coding Technology (PWCT) - Animatebox controlProgramming Without Coding Technology (PWCT) - Animatebox control
Programming Without Coding Technology (PWCT) - Animatebox control
Mahmoud Samir Fayed
 
Programming Without Coding Technology (PWCT) - Create Files
Programming Without Coding Technology (PWCT) - Create FilesProgramming Without Coding Technology (PWCT) - Create Files
Programming Without Coding Technology (PWCT) - Create Files
Mahmoud Samir Fayed
 
Programming Without Coding Technology (PWCT) - While Loop component
Programming Without Coding Technology (PWCT) - While Loop componentProgramming Without Coding Technology (PWCT) - While Loop component
Programming Without Coding Technology (PWCT) - While Loop component
Mahmoud Samir Fayed
 
Programming Without Coding Technology (PWCT) - How to deal with Memo Variables.
Programming Without Coding Technology (PWCT) - How to deal with Memo Variables.Programming Without Coding Technology (PWCT) - How to deal with Memo Variables.
Programming Without Coding Technology (PWCT) - How to deal with Memo Variables.
Mahmoud Samir Fayed
 
Programming Without Coding Technology (PWCT) Features - Programming Paradigm
Programming Without Coding Technology (PWCT) Features - Programming ParadigmProgramming Without Coding Technology (PWCT) Features - Programming Paradigm
Programming Without Coding Technology (PWCT) Features - Programming Paradigm
Mahmoud Samir Fayed
 
Programming Without Coding Technology (PWCT) - Date Picker control
Programming Without Coding Technology (PWCT) - Date Picker controlProgramming Without Coding Technology (PWCT) - Date Picker control
Programming Without Coding Technology (PWCT) - Date Picker control
Mahmoud Samir Fayed
 
Programming Without Coding Technology (PWCT) - Hello World - GUI
Programming Without Coding Technology (PWCT) - Hello World - GUIProgramming Without Coding Technology (PWCT) - Hello World - GUI
Programming Without Coding Technology (PWCT) - Hello World - GUI
Mahmoud Samir Fayed
 
Programming Without Coding Technology (PWCT) - Gif89 ActiveX Control
Programming Without Coding Technology (PWCT) - Gif89 ActiveX ControlProgramming Without Coding Technology (PWCT) - Gif89 ActiveX Control
Programming Without Coding Technology (PWCT) - Gif89 ActiveX Control
Mahmoud Samir Fayed
 

Viewers also liked (12)

Programming Without Coding Technology (PWCT) - Using the For Loop component.
Programming Without Coding Technology (PWCT) - Using the For Loop component.Programming Without Coding Technology (PWCT) - Using the For Loop component.
Programming Without Coding Technology (PWCT) - Using the For Loop component.
 
Programming Without Coding Technology (PWCT) Getting Started - The Time Machine
Programming Without Coding Technology (PWCT)  Getting Started - The Time MachineProgramming Without Coding Technology (PWCT)  Getting Started - The Time Machine
Programming Without Coding Technology (PWCT) Getting Started - The Time Machine
 
Programming Without Coding Technology (PWCT) - Listbox control
Programming Without Coding Technology (PWCT) - Listbox controlProgramming Without Coding Technology (PWCT) - Listbox control
Programming Without Coding Technology (PWCT) - Listbox control
 
Programming Without Coding Technology (PWCT) - Combobox control
Programming Without Coding Technology (PWCT) - Combobox controlProgramming Without Coding Technology (PWCT) - Combobox control
Programming Without Coding Technology (PWCT) - Combobox control
 
Programming Without Coding Technology (PWCT) - Animatebox control
Programming Without Coding Technology (PWCT) - Animatebox controlProgramming Without Coding Technology (PWCT) - Animatebox control
Programming Without Coding Technology (PWCT) - Animatebox control
 
Programming Without Coding Technology (PWCT) - Create Files
Programming Without Coding Technology (PWCT) - Create FilesProgramming Without Coding Technology (PWCT) - Create Files
Programming Without Coding Technology (PWCT) - Create Files
 
Programming Without Coding Technology (PWCT) - While Loop component
Programming Without Coding Technology (PWCT) - While Loop componentProgramming Without Coding Technology (PWCT) - While Loop component
Programming Without Coding Technology (PWCT) - While Loop component
 
Programming Without Coding Technology (PWCT) - How to deal with Memo Variables.
Programming Without Coding Technology (PWCT) - How to deal with Memo Variables.Programming Without Coding Technology (PWCT) - How to deal with Memo Variables.
Programming Without Coding Technology (PWCT) - How to deal with Memo Variables.
 
Programming Without Coding Technology (PWCT) Features - Programming Paradigm
Programming Without Coding Technology (PWCT) Features - Programming ParadigmProgramming Without Coding Technology (PWCT) Features - Programming Paradigm
Programming Without Coding Technology (PWCT) Features - Programming Paradigm
 
Programming Without Coding Technology (PWCT) - Date Picker control
Programming Without Coding Technology (PWCT) - Date Picker controlProgramming Without Coding Technology (PWCT) - Date Picker control
Programming Without Coding Technology (PWCT) - Date Picker control
 
Programming Without Coding Technology (PWCT) - Hello World - GUI
Programming Without Coding Technology (PWCT) - Hello World - GUIProgramming Without Coding Technology (PWCT) - Hello World - GUI
Programming Without Coding Technology (PWCT) - Hello World - GUI
 
Programming Without Coding Technology (PWCT) - Gif89 ActiveX Control
Programming Without Coding Technology (PWCT) - Gif89 ActiveX ControlProgramming Without Coding Technology (PWCT) - Gif89 ActiveX Control
Programming Without Coding Technology (PWCT) - Gif89 ActiveX Control
 

Similar to Programming Without Coding Technology (PWCT) - Telephone Database

Programming Without Coding Technology (PWCT) - ShellExplorer Sample
Programming Without Coding Technology (PWCT) - ShellExplorer SampleProgramming Without Coding Technology (PWCT) - ShellExplorer Sample
Programming Without Coding Technology (PWCT) - ShellExplorer Sample
Mahmoud Samir Fayed
 
Programming Without Coding Technology (PWCT) - Show PDF using InternetExplore...
Programming Without Coding Technology (PWCT) - Show PDF using InternetExplore...Programming Without Coding Technology (PWCT) - Show PDF using InternetExplore...
Programming Without Coding Technology (PWCT) - Show PDF using InternetExplore...
Mahmoud Samir Fayed
 
Programming Without Coding Technology (PWCT) - IF Statement Component
Programming Without Coding Technology (PWCT) - IF Statement ComponentProgramming Without Coding Technology (PWCT) - IF Statement Component
Programming Without Coding Technology (PWCT) - IF Statement Component
Mahmoud Samir Fayed
 
Programming Without Coding Technology (PWCT) - ASCII Code
Programming Without Coding Technology (PWCT) - ASCII CodeProgramming Without Coding Technology (PWCT) - ASCII Code
Programming Without Coding Technology (PWCT) - ASCII Code
Mahmoud Samir Fayed
 
Programming Without Coding Technology (PWCT) - Browse control
Programming Without Coding Technology (PWCT) - Browse controlProgramming Without Coding Technology (PWCT) - Browse control
Programming Without Coding Technology (PWCT) - Browse control
Mahmoud Samir Fayed
 
Programming Without Coding Technology (PWCT) - Internet Explorer ActiveX Control
Programming Without Coding Technology (PWCT) - Internet Explorer ActiveX ControlProgramming Without Coding Technology (PWCT) - Internet Explorer ActiveX Control
Programming Without Coding Technology (PWCT) - Internet Explorer ActiveX Control
Mahmoud Samir Fayed
 
Programming Without Coding Technology (PWCT) - HTTP Get Component
Programming Without Coding Technology (PWCT) - HTTP Get ComponentProgramming Without Coding Technology (PWCT) - HTTP Get Component
Programming Without Coding Technology (PWCT) - HTTP Get Component
Mahmoud Samir Fayed
 
Programming Without Coding Technology (PWCT) - Treeview control
Programming Without Coding Technology (PWCT) - Treeview controlProgramming Without Coding Technology (PWCT) - Treeview control
Programming Without Coding Technology (PWCT) - Treeview control
Mahmoud Samir Fayed
 

Similar to Programming Without Coding Technology (PWCT) - Telephone Database (8)

Programming Without Coding Technology (PWCT) - ShellExplorer Sample
Programming Without Coding Technology (PWCT) - ShellExplorer SampleProgramming Without Coding Technology (PWCT) - ShellExplorer Sample
Programming Without Coding Technology (PWCT) - ShellExplorer Sample
 
Programming Without Coding Technology (PWCT) - Show PDF using InternetExplore...
Programming Without Coding Technology (PWCT) - Show PDF using InternetExplore...Programming Without Coding Technology (PWCT) - Show PDF using InternetExplore...
Programming Without Coding Technology (PWCT) - Show PDF using InternetExplore...
 
Programming Without Coding Technology (PWCT) - IF Statement Component
Programming Without Coding Technology (PWCT) - IF Statement ComponentProgramming Without Coding Technology (PWCT) - IF Statement Component
Programming Without Coding Technology (PWCT) - IF Statement Component
 
Programming Without Coding Technology (PWCT) - ASCII Code
Programming Without Coding Technology (PWCT) - ASCII CodeProgramming Without Coding Technology (PWCT) - ASCII Code
Programming Without Coding Technology (PWCT) - ASCII Code
 
Programming Without Coding Technology (PWCT) - Browse control
Programming Without Coding Technology (PWCT) - Browse controlProgramming Without Coding Technology (PWCT) - Browse control
Programming Without Coding Technology (PWCT) - Browse control
 
Programming Without Coding Technology (PWCT) - Internet Explorer ActiveX Control
Programming Without Coding Technology (PWCT) - Internet Explorer ActiveX ControlProgramming Without Coding Technology (PWCT) - Internet Explorer ActiveX Control
Programming Without Coding Technology (PWCT) - Internet Explorer ActiveX Control
 
Programming Without Coding Technology (PWCT) - HTTP Get Component
Programming Without Coding Technology (PWCT) - HTTP Get ComponentProgramming Without Coding Technology (PWCT) - HTTP Get Component
Programming Without Coding Technology (PWCT) - HTTP Get Component
 
Programming Without Coding Technology (PWCT) - Treeview control
Programming Without Coding Technology (PWCT) - Treeview controlProgramming Without Coding Technology (PWCT) - Treeview control
Programming Without Coding Technology (PWCT) - Treeview control
 

More from Mahmoud Samir Fayed

The Ring programming language version 1.10 book - Part 212 of 212
The Ring programming language version 1.10 book - Part 212 of 212The Ring programming language version 1.10 book - Part 212 of 212
The Ring programming language version 1.10 book - Part 212 of 212
Mahmoud Samir Fayed
 
The Ring programming language version 1.10 book - Part 211 of 212
The Ring programming language version 1.10 book - Part 211 of 212The Ring programming language version 1.10 book - Part 211 of 212
The Ring programming language version 1.10 book - Part 211 of 212
Mahmoud Samir Fayed
 
The Ring programming language version 1.10 book - Part 210 of 212
The Ring programming language version 1.10 book - Part 210 of 212The Ring programming language version 1.10 book - Part 210 of 212
The Ring programming language version 1.10 book - Part 210 of 212
Mahmoud Samir Fayed
 
The Ring programming language version 1.10 book - Part 208 of 212
The Ring programming language version 1.10 book - Part 208 of 212The Ring programming language version 1.10 book - Part 208 of 212
The Ring programming language version 1.10 book - Part 208 of 212
Mahmoud Samir Fayed
 
The Ring programming language version 1.10 book - Part 207 of 212
The Ring programming language version 1.10 book - Part 207 of 212The Ring programming language version 1.10 book - Part 207 of 212
The Ring programming language version 1.10 book - Part 207 of 212
Mahmoud Samir Fayed
 
The Ring programming language version 1.10 book - Part 205 of 212
The Ring programming language version 1.10 book - Part 205 of 212The Ring programming language version 1.10 book - Part 205 of 212
The Ring programming language version 1.10 book - Part 205 of 212
Mahmoud Samir Fayed
 
The Ring programming language version 1.10 book - Part 206 of 212
The Ring programming language version 1.10 book - Part 206 of 212The Ring programming language version 1.10 book - Part 206 of 212
The Ring programming language version 1.10 book - Part 206 of 212
Mahmoud Samir Fayed
 
The Ring programming language version 1.10 book - Part 204 of 212
The Ring programming language version 1.10 book - Part 204 of 212The Ring programming language version 1.10 book - Part 204 of 212
The Ring programming language version 1.10 book - Part 204 of 212
Mahmoud Samir Fayed
 
The Ring programming language version 1.10 book - Part 203 of 212
The Ring programming language version 1.10 book - Part 203 of 212The Ring programming language version 1.10 book - Part 203 of 212
The Ring programming language version 1.10 book - Part 203 of 212
Mahmoud Samir Fayed
 
The Ring programming language version 1.10 book - Part 202 of 212
The Ring programming language version 1.10 book - Part 202 of 212The Ring programming language version 1.10 book - Part 202 of 212
The Ring programming language version 1.10 book - Part 202 of 212
Mahmoud Samir Fayed
 
The Ring programming language version 1.10 book - Part 201 of 212
The Ring programming language version 1.10 book - Part 201 of 212The Ring programming language version 1.10 book - Part 201 of 212
The Ring programming language version 1.10 book - Part 201 of 212
Mahmoud Samir Fayed
 
The Ring programming language version 1.10 book - Part 200 of 212
The Ring programming language version 1.10 book - Part 200 of 212The Ring programming language version 1.10 book - Part 200 of 212
The Ring programming language version 1.10 book - Part 200 of 212
Mahmoud Samir Fayed
 
The Ring programming language version 1.10 book - Part 199 of 212
The Ring programming language version 1.10 book - Part 199 of 212The Ring programming language version 1.10 book - Part 199 of 212
The Ring programming language version 1.10 book - Part 199 of 212
Mahmoud Samir Fayed
 
The Ring programming language version 1.10 book - Part 198 of 212
The Ring programming language version 1.10 book - Part 198 of 212The Ring programming language version 1.10 book - Part 198 of 212
The Ring programming language version 1.10 book - Part 198 of 212
Mahmoud Samir Fayed
 
The Ring programming language version 1.10 book - Part 197 of 212
The Ring programming language version 1.10 book - Part 197 of 212The Ring programming language version 1.10 book - Part 197 of 212
The Ring programming language version 1.10 book - Part 197 of 212
Mahmoud Samir Fayed
 
The Ring programming language version 1.10 book - Part 196 of 212
The Ring programming language version 1.10 book - Part 196 of 212The Ring programming language version 1.10 book - Part 196 of 212
The Ring programming language version 1.10 book - Part 196 of 212
Mahmoud Samir Fayed
 
The Ring programming language version 1.10 book - Part 195 of 212
The Ring programming language version 1.10 book - Part 195 of 212The Ring programming language version 1.10 book - Part 195 of 212
The Ring programming language version 1.10 book - Part 195 of 212
Mahmoud Samir Fayed
 
The Ring programming language version 1.10 book - Part 194 of 212
The Ring programming language version 1.10 book - Part 194 of 212The Ring programming language version 1.10 book - Part 194 of 212
The Ring programming language version 1.10 book - Part 194 of 212
Mahmoud Samir Fayed
 
The Ring programming language version 1.10 book - Part 193 of 212
The Ring programming language version 1.10 book - Part 193 of 212The Ring programming language version 1.10 book - Part 193 of 212
The Ring programming language version 1.10 book - Part 193 of 212
Mahmoud Samir Fayed
 
The Ring programming language version 1.10 book - Part 192 of 212
The Ring programming language version 1.10 book - Part 192 of 212The Ring programming language version 1.10 book - Part 192 of 212
The Ring programming language version 1.10 book - Part 192 of 212
Mahmoud Samir Fayed
 

More from Mahmoud Samir Fayed (20)

The Ring programming language version 1.10 book - Part 212 of 212
The Ring programming language version 1.10 book - Part 212 of 212The Ring programming language version 1.10 book - Part 212 of 212
The Ring programming language version 1.10 book - Part 212 of 212
 
The Ring programming language version 1.10 book - Part 211 of 212
The Ring programming language version 1.10 book - Part 211 of 212The Ring programming language version 1.10 book - Part 211 of 212
The Ring programming language version 1.10 book - Part 211 of 212
 
The Ring programming language version 1.10 book - Part 210 of 212
The Ring programming language version 1.10 book - Part 210 of 212The Ring programming language version 1.10 book - Part 210 of 212
The Ring programming language version 1.10 book - Part 210 of 212
 
The Ring programming language version 1.10 book - Part 208 of 212
The Ring programming language version 1.10 book - Part 208 of 212The Ring programming language version 1.10 book - Part 208 of 212
The Ring programming language version 1.10 book - Part 208 of 212
 
The Ring programming language version 1.10 book - Part 207 of 212
The Ring programming language version 1.10 book - Part 207 of 212The Ring programming language version 1.10 book - Part 207 of 212
The Ring programming language version 1.10 book - Part 207 of 212
 
The Ring programming language version 1.10 book - Part 205 of 212
The Ring programming language version 1.10 book - Part 205 of 212The Ring programming language version 1.10 book - Part 205 of 212
The Ring programming language version 1.10 book - Part 205 of 212
 
The Ring programming language version 1.10 book - Part 206 of 212
The Ring programming language version 1.10 book - Part 206 of 212The Ring programming language version 1.10 book - Part 206 of 212
The Ring programming language version 1.10 book - Part 206 of 212
 
The Ring programming language version 1.10 book - Part 204 of 212
The Ring programming language version 1.10 book - Part 204 of 212The Ring programming language version 1.10 book - Part 204 of 212
The Ring programming language version 1.10 book - Part 204 of 212
 
The Ring programming language version 1.10 book - Part 203 of 212
The Ring programming language version 1.10 book - Part 203 of 212The Ring programming language version 1.10 book - Part 203 of 212
The Ring programming language version 1.10 book - Part 203 of 212
 
The Ring programming language version 1.10 book - Part 202 of 212
The Ring programming language version 1.10 book - Part 202 of 212The Ring programming language version 1.10 book - Part 202 of 212
The Ring programming language version 1.10 book - Part 202 of 212
 
The Ring programming language version 1.10 book - Part 201 of 212
The Ring programming language version 1.10 book - Part 201 of 212The Ring programming language version 1.10 book - Part 201 of 212
The Ring programming language version 1.10 book - Part 201 of 212
 
The Ring programming language version 1.10 book - Part 200 of 212
The Ring programming language version 1.10 book - Part 200 of 212The Ring programming language version 1.10 book - Part 200 of 212
The Ring programming language version 1.10 book - Part 200 of 212
 
The Ring programming language version 1.10 book - Part 199 of 212
The Ring programming language version 1.10 book - Part 199 of 212The Ring programming language version 1.10 book - Part 199 of 212
The Ring programming language version 1.10 book - Part 199 of 212
 
The Ring programming language version 1.10 book - Part 198 of 212
The Ring programming language version 1.10 book - Part 198 of 212The Ring programming language version 1.10 book - Part 198 of 212
The Ring programming language version 1.10 book - Part 198 of 212
 
The Ring programming language version 1.10 book - Part 197 of 212
The Ring programming language version 1.10 book - Part 197 of 212The Ring programming language version 1.10 book - Part 197 of 212
The Ring programming language version 1.10 book - Part 197 of 212
 
The Ring programming language version 1.10 book - Part 196 of 212
The Ring programming language version 1.10 book - Part 196 of 212The Ring programming language version 1.10 book - Part 196 of 212
The Ring programming language version 1.10 book - Part 196 of 212
 
The Ring programming language version 1.10 book - Part 195 of 212
The Ring programming language version 1.10 book - Part 195 of 212The Ring programming language version 1.10 book - Part 195 of 212
The Ring programming language version 1.10 book - Part 195 of 212
 
The Ring programming language version 1.10 book - Part 194 of 212
The Ring programming language version 1.10 book - Part 194 of 212The Ring programming language version 1.10 book - Part 194 of 212
The Ring programming language version 1.10 book - Part 194 of 212
 
The Ring programming language version 1.10 book - Part 193 of 212
The Ring programming language version 1.10 book - Part 193 of 212The Ring programming language version 1.10 book - Part 193 of 212
The Ring programming language version 1.10 book - Part 193 of 212
 
The Ring programming language version 1.10 book - Part 192 of 212
The Ring programming language version 1.10 book - Part 192 of 212The Ring programming language version 1.10 book - Part 192 of 212
The Ring programming language version 1.10 book - Part 192 of 212
 

Recently uploaded

Enterprise Resource Planning System in Telangana
Enterprise Resource Planning System in TelanganaEnterprise Resource Planning System in Telangana
Enterprise Resource Planning System in Telangana
NYGGS Automation Suite
 
Automated software refactoring with OpenRewrite and Generative AI.pptx.pdf
Automated software refactoring with OpenRewrite and Generative AI.pptx.pdfAutomated software refactoring with OpenRewrite and Generative AI.pptx.pdf
Automated software refactoring with OpenRewrite and Generative AI.pptx.pdf
timtebeek1
 
E-commerce Application Development Company.pdf
E-commerce Application Development Company.pdfE-commerce Application Development Company.pdf
E-commerce Application Development Company.pdf
Hornet Dynamics
 
Mobile App Development Company In Noida | Drona Infotech
Mobile App Development Company In Noida | Drona InfotechMobile App Development Company In Noida | Drona Infotech
Mobile App Development Company In Noida | Drona Infotech
Drona Infotech
 
Essentials of Automations: The Art of Triggers and Actions in FME
Essentials of Automations: The Art of Triggers and Actions in FMEEssentials of Automations: The Art of Triggers and Actions in FME
Essentials of Automations: The Art of Triggers and Actions in FME
Safe Software
 
Enhancing Research Orchestration Capabilities at ORNL.pdf
Enhancing Research Orchestration Capabilities at ORNL.pdfEnhancing Research Orchestration Capabilities at ORNL.pdf
Enhancing Research Orchestration Capabilities at ORNL.pdf
Globus
 
Nidhi Software Price. Fact , Costs, Tips
Nidhi Software Price. Fact , Costs, TipsNidhi Software Price. Fact , Costs, Tips
Nidhi Software Price. Fact , Costs, Tips
vrstrong314
 
BoxLang: Review our Visionary Licenses of 2024
BoxLang: Review our Visionary Licenses of 2024BoxLang: Review our Visionary Licenses of 2024
BoxLang: Review our Visionary Licenses of 2024
Ortus Solutions, Corp
 
openEuler Case Study - The Journey to Supply Chain Security
openEuler Case Study - The Journey to Supply Chain SecurityopenEuler Case Study - The Journey to Supply Chain Security
openEuler Case Study - The Journey to Supply Chain Security
Shane Coughlan
 
Navigating the Metaverse: A Journey into Virtual Evolution"
Navigating the Metaverse: A Journey into Virtual Evolution"Navigating the Metaverse: A Journey into Virtual Evolution"
Navigating the Metaverse: A Journey into Virtual Evolution"
Donna Lenk
 
LORRAINE ANDREI_LEQUIGAN_HOW TO USE ZOOM
LORRAINE ANDREI_LEQUIGAN_HOW TO USE ZOOMLORRAINE ANDREI_LEQUIGAN_HOW TO USE ZOOM
LORRAINE ANDREI_LEQUIGAN_HOW TO USE ZOOM
lorraineandreiamcidl
 
Globus Compute Introduction - GlobusWorld 2024
Globus Compute Introduction - GlobusWorld 2024Globus Compute Introduction - GlobusWorld 2024
Globus Compute Introduction - GlobusWorld 2024
Globus
 
Empowering Growth with Best Software Development Company in Noida - Deuglo
Empowering Growth with Best Software  Development Company in Noida - DeugloEmpowering Growth with Best Software  Development Company in Noida - Deuglo
Empowering Growth with Best Software Development Company in Noida - Deuglo
Deuglo Infosystem Pvt Ltd
 
First Steps with Globus Compute Multi-User Endpoints
First Steps with Globus Compute Multi-User EndpointsFirst Steps with Globus Compute Multi-User Endpoints
First Steps with Globus Compute Multi-User Endpoints
Globus
 
Graspan: A Big Data System for Big Code Analysis
Graspan: A Big Data System for Big Code AnalysisGraspan: A Big Data System for Big Code Analysis
Graspan: A Big Data System for Big Code Analysis
Aftab Hussain
 
In 2015, I used to write extensions for Joomla, WordPress, phpBB3, etc and I ...
In 2015, I used to write extensions for Joomla, WordPress, phpBB3, etc and I ...In 2015, I used to write extensions for Joomla, WordPress, phpBB3, etc and I ...
In 2015, I used to write extensions for Joomla, WordPress, phpBB3, etc and I ...
Juraj Vysvader
 
Introduction to Pygame (Lecture 7 Python Game Development)
Introduction to Pygame (Lecture 7 Python Game Development)Introduction to Pygame (Lecture 7 Python Game Development)
Introduction to Pygame (Lecture 7 Python Game Development)
abdulrafaychaudhry
 
AI Fusion Buddy Review: Brand New, Groundbreaking Gemini-Powered AI App
AI Fusion Buddy Review: Brand New, Groundbreaking Gemini-Powered AI AppAI Fusion Buddy Review: Brand New, Groundbreaking Gemini-Powered AI App
AI Fusion Buddy Review: Brand New, Groundbreaking Gemini-Powered AI App
Google
 
GOING AOT WITH GRAALVM FOR SPRING BOOT (SPRING IO)
GOING AOT WITH GRAALVM FOR  SPRING BOOT (SPRING IO)GOING AOT WITH GRAALVM FOR  SPRING BOOT (SPRING IO)
GOING AOT WITH GRAALVM FOR SPRING BOOT (SPRING IO)
Alina Yurenko
 
OpenMetadata Community Meeting - 5th June 2024
OpenMetadata Community Meeting - 5th June 2024OpenMetadata Community Meeting - 5th June 2024
OpenMetadata Community Meeting - 5th June 2024
OpenMetadata
 

Recently uploaded (20)

Enterprise Resource Planning System in Telangana
Enterprise Resource Planning System in TelanganaEnterprise Resource Planning System in Telangana
Enterprise Resource Planning System in Telangana
 
Automated software refactoring with OpenRewrite and Generative AI.pptx.pdf
Automated software refactoring with OpenRewrite and Generative AI.pptx.pdfAutomated software refactoring with OpenRewrite and Generative AI.pptx.pdf
Automated software refactoring with OpenRewrite and Generative AI.pptx.pdf
 
E-commerce Application Development Company.pdf
E-commerce Application Development Company.pdfE-commerce Application Development Company.pdf
E-commerce Application Development Company.pdf
 
Mobile App Development Company In Noida | Drona Infotech
Mobile App Development Company In Noida | Drona InfotechMobile App Development Company In Noida | Drona Infotech
Mobile App Development Company In Noida | Drona Infotech
 
Essentials of Automations: The Art of Triggers and Actions in FME
Essentials of Automations: The Art of Triggers and Actions in FMEEssentials of Automations: The Art of Triggers and Actions in FME
Essentials of Automations: The Art of Triggers and Actions in FME
 
Enhancing Research Orchestration Capabilities at ORNL.pdf
Enhancing Research Orchestration Capabilities at ORNL.pdfEnhancing Research Orchestration Capabilities at ORNL.pdf
Enhancing Research Orchestration Capabilities at ORNL.pdf
 
Nidhi Software Price. Fact , Costs, Tips
Nidhi Software Price. Fact , Costs, TipsNidhi Software Price. Fact , Costs, Tips
Nidhi Software Price. Fact , Costs, Tips
 
BoxLang: Review our Visionary Licenses of 2024
BoxLang: Review our Visionary Licenses of 2024BoxLang: Review our Visionary Licenses of 2024
BoxLang: Review our Visionary Licenses of 2024
 
openEuler Case Study - The Journey to Supply Chain Security
openEuler Case Study - The Journey to Supply Chain SecurityopenEuler Case Study - The Journey to Supply Chain Security
openEuler Case Study - The Journey to Supply Chain Security
 
Navigating the Metaverse: A Journey into Virtual Evolution"
Navigating the Metaverse: A Journey into Virtual Evolution"Navigating the Metaverse: A Journey into Virtual Evolution"
Navigating the Metaverse: A Journey into Virtual Evolution"
 
LORRAINE ANDREI_LEQUIGAN_HOW TO USE ZOOM
LORRAINE ANDREI_LEQUIGAN_HOW TO USE ZOOMLORRAINE ANDREI_LEQUIGAN_HOW TO USE ZOOM
LORRAINE ANDREI_LEQUIGAN_HOW TO USE ZOOM
 
Globus Compute Introduction - GlobusWorld 2024
Globus Compute Introduction - GlobusWorld 2024Globus Compute Introduction - GlobusWorld 2024
Globus Compute Introduction - GlobusWorld 2024
 
Empowering Growth with Best Software Development Company in Noida - Deuglo
Empowering Growth with Best Software  Development Company in Noida - DeugloEmpowering Growth with Best Software  Development Company in Noida - Deuglo
Empowering Growth with Best Software Development Company in Noida - Deuglo
 
First Steps with Globus Compute Multi-User Endpoints
First Steps with Globus Compute Multi-User EndpointsFirst Steps with Globus Compute Multi-User Endpoints
First Steps with Globus Compute Multi-User Endpoints
 
Graspan: A Big Data System for Big Code Analysis
Graspan: A Big Data System for Big Code AnalysisGraspan: A Big Data System for Big Code Analysis
Graspan: A Big Data System for Big Code Analysis
 
In 2015, I used to write extensions for Joomla, WordPress, phpBB3, etc and I ...
In 2015, I used to write extensions for Joomla, WordPress, phpBB3, etc and I ...In 2015, I used to write extensions for Joomla, WordPress, phpBB3, etc and I ...
In 2015, I used to write extensions for Joomla, WordPress, phpBB3, etc and I ...
 
Introduction to Pygame (Lecture 7 Python Game Development)
Introduction to Pygame (Lecture 7 Python Game Development)Introduction to Pygame (Lecture 7 Python Game Development)
Introduction to Pygame (Lecture 7 Python Game Development)
 
AI Fusion Buddy Review: Brand New, Groundbreaking Gemini-Powered AI App
AI Fusion Buddy Review: Brand New, Groundbreaking Gemini-Powered AI AppAI Fusion Buddy Review: Brand New, Groundbreaking Gemini-Powered AI App
AI Fusion Buddy Review: Brand New, Groundbreaking Gemini-Powered AI App
 
GOING AOT WITH GRAALVM FOR SPRING BOOT (SPRING IO)
GOING AOT WITH GRAALVM FOR  SPRING BOOT (SPRING IO)GOING AOT WITH GRAALVM FOR  SPRING BOOT (SPRING IO)
GOING AOT WITH GRAALVM FOR SPRING BOOT (SPRING IO)
 
OpenMetadata Community Meeting - 5th June 2024
OpenMetadata Community Meeting - 5th June 2024OpenMetadata Community Meeting - 5th June 2024
OpenMetadata Community Meeting - 5th June 2024
 

Programming Without Coding Technology (PWCT) - Telephone Database

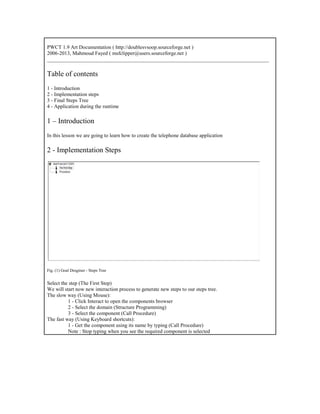
  • 1. PWCT 1.9 Art Documentation ( http://doublesvsoop.sourceforge.net ) 2006-2013, Mahmoud Fayed ( msfclipper@users.sourceforge.net ) _____________________________________________________________________________________ Table of contents 1 - Introduction 2 - Implementation steps 3 - Final Steps Tree 4 - Application during the runtime 1 – Introduction In this lesson we are going to learn how to create the telephone database application 2 - Implementation Steps Fig. (1) Goal Desginer - Steps Tree Select the step (The First Step) We will start now new interaction process to generate new steps to our steps tree. The slow way (Using Mouse): 1 - Click Interact to open the components browser 2 - Select the domain (Structure Programming) 3 - Select the component (Call Procedure) The fast way (Using Keyboard shortcuts): 1 - Get the component using its name by typing (Call Procedure) Note : Stop typing when you see the required component is selected
  • 2. Fig. (2) Component Browser – Select the component (Call Procedure) After selecting the component click Ok or press ENTER Fig. (3) Interaction page - Set the properties and enter the required data as in the image above Afer entering data , Click OK or press CTRL+W
  • 3. Fig. (4) Goal Desginer - Steps Tree Select the step (The First Step) We will start now new interaction process to generate new steps to our steps tree. The slow way (Using Mouse): 1 - Click Interact to open the components browser 2 - Select the domain (Control Structure) 3 - Select the component (While Loop) The fast way (Using Keyboard shortcuts): 1 - Get the component using its name by typing (While Loop) Note : Stop typing when you see the required component is selected Fig. (5) Component Browser – Select the component (While Loop) After selecting the component click Ok or press ENTER
  • 4. Fig. (6) Interaction page - Set the properties and enter the required data as in the image above Afer entering data , Click OK or press CTRL+W Fig. (7) Goal Desginer - Steps Tree Select the step (Start Here) We will start now new interaction process to generate new steps to our steps tree. The slow way (Using Mouse): 1 - Click Interact to open the components browser 2 - Select the domain (Console Application) 3 - Select the component (Set Color) The fast way (Using Keyboard shortcuts): 1 - Get the component using its name by typing (Set Color) Note : Stop typing when you see the required component is selected
  • 5. Fig. (8) Component Browser – Select the component (Set Color) After selecting the component click Ok or press ENTER Fig. (9) Interaction page - Set the properties and enter the required data as in the image above Afer entering data , Click OK or press CTRL+W
  • 6. Fig. (10) Goal Desginer - Steps Tree Select the step (Start Here) We will start now new interaction process to generate new steps to our steps tree. The slow way (Using Mouse): 1 - Click Interact to open the components browser 2 - Select the domain (Console Application) 3 - Select the component (Basic Input/Output) The fast way (Using Keyboard shortcuts): 1 - Get the component using its name by typing (Basic Input/Output) Note : Stop typing when you see the required component is selected Fig. (11) Component Browser – Select the component (Basic Input/Output) After selecting the component click Ok or press ENTER
  • 7. Fig. (12) Interaction page - Set the properties and enter the required data as in the image above Afer entering data , Click OK or press CTRL+W Fig. (13) Goal Desginer - Steps Tree Select the step (Start Here) We will start now new interaction process to generate new steps to our steps tree. The slow way (Using Mouse): 1 - Click Interact to open the components browser 2 - Select the domain (Console Application) 3 - Select the component (Basic Input/Output) The fast way (Using Keyboard shortcuts): 1 - Get the component using its name by typing (Basic Input/Output) Note : Stop typing when you see the required component is selected
  • 8. Fig. (14) Component Browser – Select the component (Basic Input/Output) After selecting the component click Ok or press ENTER Fig. (15) Interaction page - Set the properties and enter the required data as in the image above Afer entering data , Click OK or press CTRL+W
  • 9. Fig. (16) Goal Desginer - Steps Tree Select the step (Start Here) We will start now new interaction process to generate new steps to our steps tree. The slow way (Using Mouse): 1 - Click Interact to open the components browser 2 - Select the domain (Console Application) 3 - Select the component (Basic Input/Output) The fast way (Using Keyboard shortcuts): 1 - Get the component using its name by typing (Basic Input/Output) Note : Stop typing when you see the required component is selected Fig. (17) Component Browser – Select the component (Basic Input/Output) After selecting the component click Ok or press ENTER
  • 10. Fig. (18) Interaction page - Set the properties and enter the required data as in the image above Afer entering data , Click OK or press CTRL+W Fig. (19) Goal Desginer - Steps Tree Select the step (Start Here) We will start now new interaction process to generate new steps to our steps tree. The slow way (Using Mouse): 1 - Click Interact to open the components browser 2 - Select the domain (Console Application) 3 - Select the component (Basic Input/Output) The fast way (Using Keyboard shortcuts): 1 - Get the component using its name by typing (Basic Input/Output) Note : Stop typing when you see the required component is selected
  • 11. Fig. (20) Component Browser – Select the component (Basic Input/Output) After selecting the component click Ok or press ENTER Fig. (21) Interaction page - Set the properties and enter the required data as in the image above Afer entering data , Click OK or press CTRL+W
  • 12. Fig. (22) Goal Desginer - Steps Tree Select the step (Start Here) We will start now new interaction process to generate new steps to our steps tree. The slow way (Using Mouse): 1 - Click Interact to open the components browser 2 - Select the domain (Console Application) 3 - Select the component (Basic Input/Output) The fast way (Using Keyboard shortcuts): 1 - Get the component using its name by typing (Basic Input/Output) Note : Stop typing when you see the required component is selected Fig. (23) Component Browser – Select the component (Basic Input/Output) After selecting the component click Ok or press ENTER
  • 13. Fig. (24) Interaction page - Set the properties and enter the required data as in the image above Afer entering data , Click OK or press CTRL+W Fig. (25) Goal Desginer - Steps Tree Select the step (Start Here) We will start now new interaction process to generate new steps to our steps tree. The slow way (Using Mouse): 1 - Click Interact to open the components browser 2 - Select the domain (xBase) 3 - Select the component (Get Information) The fast way (Using Keyboard shortcuts): 1 - Get the component using its name by typing (Get Information) Note : Stop typing when you see the required component is selected
  • 14. Fig. (26) Component Browser – Select the component (Get Information) After selecting the component click Ok or press ENTER Fig. (27) Interaction page - Set the properties and enter the required data as in the image above Afer entering data , Click OK or press CTRL+W
  • 15. Fig. (28) Goal Desginer - Steps Tree Select the step (Start Here) We will start now new interaction process to generate new steps to our steps tree. The slow way (Using Mouse): 1 - Click Interact to open the components browser 2 - Select the domain (Variables) 3 - Select the component (Numeric To String) The fast way (Using Keyboard shortcuts): 1 - Get the component using its name by typing (Numeric To String) Note : Stop typing when you see the required component is selected Fig. (29) Component Browser – Select the component (Numeric To String) After selecting the component click Ok or press ENTER
  • 16. Fig. (30) Interaction page - Set the properties and enter the required data as in the image above Afer entering data , Click OK or press CTRL+W Fig. (31) Goal Desginer - Steps Tree Select the step (Start Here) We will start now new interaction process to generate new steps to our steps tree. The slow way (Using Mouse): 1 - Click Interact to open the components browser 2 - Select the domain (Console Application) 3 - Select the component (Basic Input/Output) The fast way (Using Keyboard shortcuts): 1 - Get the component using its name by typing (Basic Input/Output) Note : Stop typing when you see the required component is selected
  • 17. Fig. (32) Component Browser – Select the component (Basic Input/Output) After selecting the component click Ok or press ENTER Fig. (33) Interaction page - Set the properties and enter the required data as in the image above Afer entering data , Click OK or press CTRL+W
  • 18. Fig. (34) Interaction page - Set the properties and enter the required data as in the image above Afer entering data , Click OK or press CTRL+W Fig. (35) Goal Desginer - Steps Tree Select the step (Start Here) We will start now new interaction process to generate new steps to our steps tree. The slow way (Using Mouse): 1 - Click Interact to open the components browser 2 - Select the domain (Console Application) 3 - Select the component (Basic Input/Output) The fast way (Using Keyboard shortcuts): 1 - Get the component using its name by typing (Basic Input/Output) Note : Stop typing when you see the required component is selected
  • 19. Fig. (36) Component Browser – Select the component (Basic Input/Output) After selecting the component click Ok or press ENTER Fig. (37) Interaction page - Set the properties and enter the required data as in the image above Afer entering data , Click OK or press CTRL+W
  • 20. Fig. (38) Goal Desginer - Steps Tree Select the step (Start Here) We will start now new interaction process to generate new steps to our steps tree. The slow way (Using Mouse): 1 - Click Interact to open the components browser 2 - Select the domain (Console Application) 3 - Select the component (Basic Input/Output) The fast way (Using Keyboard shortcuts): 1 - Get the component using its name by typing (Basic Input/Output) Note : Stop typing when you see the required component is selected Fig. (39) Component Browser – Select the component (Basic Input/Output) After selecting the component click Ok or press ENTER
  • 21. Fig. (40) Interaction page - Set the properties and enter the required data as in the image above Afer entering data , Click OK or press CTRL+W Fig. (41) Goal Desginer - Steps Tree Select the step (Start Here) We will start now new interaction process to generate new steps to our steps tree. The slow way (Using Mouse): 1 - Click Interact to open the components browser 2 - Select the domain (Console Application) 3 - Select the component (Basic Input/Output) The fast way (Using Keyboard shortcuts): 1 - Get the component using its name by typing (Basic Input/Output) Note : Stop typing when you see the required component is selected
  • 22. Fig. (42) Component Browser – Select the component (Basic Input/Output) After selecting the component click Ok or press ENTER Fig. (43) Interaction page - Set the properties and enter the required data as in the image above Afer entering data , Click OK or press CTRL+W
  • 23. Fig. (44) Goal Desginer - Steps Tree Select the step (Start Here) We will start now new interaction process to generate new steps to our steps tree. The slow way (Using Mouse): 1 - Click Interact to open the components browser 2 - Select the domain (Console Application) 3 - Select the component (Basic Input/Output) The fast way (Using Keyboard shortcuts): 1 - Get the component using its name by typing (Basic Input/Output) Note : Stop typing when you see the required component is selected Fig. (45) Component Browser – Select the component (Basic Input/Output) After selecting the component click Ok or press ENTER
  • 24. Fig. (46) Interaction page - Set the properties and enter the required data as in the image above Afer entering data , Click OK or press CTRL+W Fig. (47) Goal Desginer - Steps Tree Select the step (Start Here) We will start now new interaction process to generate new steps to our steps tree. The slow way (Using Mouse): 1 - Click Interact to open the components browser 2 - Select the domain (Control Structure) 3 - Select the component (IF Statement) The fast way (Using Keyboard shortcuts): 1 - Get the component using its name by typing (IF Statement) Note : Stop typing when you see the required component is selected
  • 25. Fig. (48) Component Browser – Select the component (IF Statement) After selecting the component click Ok or press ENTER Fig. (49) Interaction page - Set the properties and enter the required data as in the image above Afer entering data , Click OK or press CTRL+W
  • 26. Fig. (50) Goal Desginer - Steps Tree Select the step (Start Here) We will start now new interaction process to generate new steps to our steps tree. The slow way (Using Mouse): 1 - Click Interact to open the components browser 2 - Select the domain (Structure Programming) 3 - Select the component (Call Procedure) The fast way (Using Keyboard shortcuts): 1 - Get the component using its name by typing (Call Procedure) Note : Stop typing when you see the required component is selected Fig. (51) Component Browser – Select the component (Call Procedure) After selecting the component click Ok or press ENTER
  • 27. Fig. (52) Interaction page - Set the properties and enter the required data as in the image above Afer entering data , Click OK or press CTRL+W Fig. (53) Goal Desginer - Steps Tree Select the step (IF ( mymenu == 1 )) We will start now new interaction process to generate new steps to our steps tree. The slow way (Using Mouse): 1 - Click Interact to open the components browser 2 - Select the domain (Control Structure) 3 - Select the component (IF Statement) The fast way (Using Keyboard shortcuts): 1 - Get the component using its name by typing (IF Statement) Note : Stop typing when you see the required component is selected
  • 28. Fig. (54) Component Browser – Select the component (IF Statement) After selecting the component click Ok or press ENTER Fig. (55) Interaction page - Set the properties and enter the required data as in the image above Afer entering data , Click OK or press CTRL+W
  • 29. Fig. (56) Goal Desginer - Steps Tree Select the step (Start Here) We will start now new interaction process to generate new steps to our steps tree. The slow way (Using Mouse): 1 - Click Interact to open the components browser 2 - Select the domain (Structure Programming) 3 - Select the component (Call Procedure) The fast way (Using Keyboard shortcuts): 1 - Get the component using its name by typing (Call Procedure) Note : Stop typing when you see the required component is selected Fig. (57) Component Browser – Select the component (Call Procedure) After selecting the component click Ok or press ENTER
  • 30. Fig. (58) Interaction page - Set the properties and enter the required data as in the image above Afer entering data , Click OK or press CTRL+W Fig. (59) Goal Desginer - Steps Tree Select the step (IF ( mymenu == 1 )) We will start now new interaction process to generate new steps to our steps tree. The slow way (Using Mouse): 1 - Click Interact to open the components browser 2 - Select the domain (Control Structure) 3 - Select the component (IF Statement) The fast way (Using Keyboard shortcuts): 1 - Get the component using its name by typing (IF Statement) Note : Stop typing when you see the required component is selected
  • 31. Fig. (60) Component Browser – Select the component (IF Statement) After selecting the component click Ok or press ENTER Fig. (61) Interaction page - Set the properties and enter the required data as in the image above Afer entering data , Click OK or press CTRL+W
  • 32. Fig. (62) Goal Desginer - Steps Tree Select the step (Start Here) We will start now new interaction process to generate new steps to our steps tree. The slow way (Using Mouse): 1 - Click Interact to open the components browser 2 - Select the domain (Structure Programming) 3 - Select the component (Call Procedure) The fast way (Using Keyboard shortcuts): 1 - Get the component using its name by typing (Call Procedure) Note : Stop typing when you see the required component is selected Fig. (63) Component Browser – Select the component (Call Procedure) After selecting the component click Ok or press ENTER
  • 33. Fig. (64) Interaction page - Set the properties and enter the required data as in the image above Afer entering data , Click OK or press CTRL+W Fig. (65) Goal Desginer - Steps Tree Select the step (IF ( mymenu == 1 )) We will start now new interaction process to generate new steps to our steps tree. The slow way (Using Mouse): 1 - Click Interact to open the components browser 2 - Select the domain (Control Structure) 3 - Select the component (IF Statement) The fast way (Using Keyboard shortcuts): 1 - Get the component using its name by typing (IF Statement) Note : Stop typing when you see the required component is selected
  • 34. Fig. (66) Component Browser – Select the component (IF Statement) After selecting the component click Ok or press ENTER Fig. (67) Interaction page - Set the properties and enter the required data as in the image above Afer entering data , Click OK or press CTRL+W
  • 35. Fig. (68) Goal Desginer - Steps Tree Select the step (Start Here) We will start now new interaction process to generate new steps to our steps tree. The slow way (Using Mouse): 1 - Click Interact to open the components browser 2 - Select the domain (Control Structure) 3 - Select the component (Exit) The fast way (Using Keyboard shortcuts): 1 - Get the component using its name by typing (Exit) Note : Stop typing when you see the required component is selected Fig. (69) Component Browser – Select the component (Exit) After selecting the component click Ok or press ENTER
  • 36. Fig. (70) Goal Desginer - Steps Tree Select the step (The First Step) We will start now new interaction process to generate new steps to our steps tree. The slow way (Using Mouse): 1 - Click Interact to open the components browser 2 - Select the domain (Structure Programming) 3 - Select the component (Call Procedure) The fast way (Using Keyboard shortcuts): 1 - Get the component using its name by typing (Call Procedure) Note : Stop typing when you see the required component is selected Fig. (71) Component Browser – Select the component (Call Procedure) After selecting the component click Ok or press ENTER
  • 37. Fig. (72) Interaction page - Set the properties and enter the required data as in the image above Afer entering data , Click OK or press CTRL+W Fig. (73) Goal Desginer - Steps Tree Select the step (Procedures) We will start now new interaction process to generate new steps to our steps tree. The slow way (Using Mouse): 1 - Click Interact to open the components browser 2 - Select the domain (Structure Programming) 3 - Select the component (Define Procedure) The fast way (Using Keyboard shortcuts): 1 - Get the component using its name by typing (Define Procedure) Note : Stop typing when you see the required component is selected
  • 38. Fig. (74) Component Browser – Select the component (Define Procedure) After selecting the component click Ok or press ENTER Fig. (75) Interaction page - Set the properties and enter the required data as in the image above Afer entering data , Click OK or press CTRL+W
  • 39. Fig. (76) Goal Desginer - Steps Tree Select the step (Start Here) We will start now new interaction process to generate new steps to our steps tree. The slow way (Using Mouse): 1 - Click Interact to open the components browser 2 - Select the domain (xBase) 3 - Select the component (Select Area) The fast way (Using Keyboard shortcuts): 1 - Get the component using its name by typing (Select Area) Note : Stop typing when you see the required component is selected Fig. (77) Component Browser – Select the component (Select Area) After selecting the component click Ok or press ENTER
  • 40. Fig. (78) Interaction page - Set the properties and enter the required data as in the image above Afer entering data , Click OK or press CTRL+W Fig. (79) Goal Desginer - Steps Tree Select the step (Start Here) We will start now new interaction process to generate new steps to our steps tree. The slow way (Using Mouse): 1 - Click Interact to open the components browser 2 - Select the domain (xBase) 3 - Select the component (Open Table) The fast way (Using Keyboard shortcuts): 1 - Get the component using its name by typing (Open Table) Note : Stop typing when you see the required component is selected
  • 41. Fig. (80) Component Browser – Select the component (Open Table) After selecting the component click Ok or press ENTER Fig. (81) Interaction page - Set the properties and enter the required data as in the image above Afer entering data , Click OK or press CTRL+W
  • 42. Fig. (82) Goal Desginer - Steps Tree Select the step (Procedures) We will start now new interaction process to generate new steps to our steps tree. The slow way (Using Mouse): 1 - Click Interact to open the components browser 2 - Select the domain (Structure Programming) 3 - Select the component (Define Procedure) The fast way (Using Keyboard shortcuts): 1 - Get the component using its name by typing (Define Procedure) Note : Stop typing when you see the required component is selected Fig. (83) Component Browser – Select the component (Define Procedure) After selecting the component click Ok or press ENTER
  • 43. Fig. (84) Interaction page - Set the properties and enter the required data as in the image above Afer entering data , Click OK or press CTRL+W Fig. (85) Goal Desginer - Steps Tree Select the step (Start Here) We will start now new interaction process to generate new steps to our steps tree. The slow way (Using Mouse): 1 - Click Interact to open the components browser 2 - Select the domain (Console Application) 3 - Select the component (Basic Input/Output) The fast way (Using Keyboard shortcuts): 1 - Get the component using its name by typing (Basic Input/Output) Note : Stop typing when you see the required component is selected
  • 44. Fig. (86) Component Browser – Select the component (Basic Input/Output) After selecting the component click Ok or press ENTER Fig. (87) Interaction page - Set the properties and enter the required data as in the image above Afer entering data , Click OK or press CTRL+W
  • 45. Fig. (88) Goal Desginer - Steps Tree Select the step (Start Here) We will start now new interaction process to generate new steps to our steps tree. The slow way (Using Mouse): 1 - Click Interact to open the components browser 2 - Select the domain (Console Application) 3 - Select the component (Basic Input/Output) The fast way (Using Keyboard shortcuts): 1 - Get the component using its name by typing (Basic Input/Output) Note : Stop typing when you see the required component is selected Fig. (89) Component Browser – Select the component (Basic Input/Output) After selecting the component click Ok or press ENTER
  • 46. Fig. (90) Interaction page - Set the properties and enter the required data as in the image above Afer entering data , Click OK or press CTRL+W Fig. (91) Goal Desginer - Steps Tree Select the step (Start Here) We will start now new interaction process to generate new steps to our steps tree. The slow way (Using Mouse): 1 - Click Interact to open the components browser 2 - Select the domain (Console Application) 3 - Select the component (Basic Input/Output) The fast way (Using Keyboard shortcuts): 1 - Get the component using its name by typing (Basic Input/Output) Note : Stop typing when you see the required component is selected
  • 47. Fig. (92) Component Browser – Select the component (Basic Input/Output) After selecting the component click Ok or press ENTER Fig. (93) Interaction page - Set the properties and enter the required data as in the image above Afer entering data , Click OK or press CTRL+W
  • 48. Fig. (94) Goal Desginer - Steps Tree Select the step (Start Here) We will start now new interaction process to generate new steps to our steps tree. The slow way (Using Mouse): 1 - Click Interact to open the components browser 2 - Select the domain (Console Application) 3 - Select the component (Basic Input/Output) The fast way (Using Keyboard shortcuts): 1 - Get the component using its name by typing (Basic Input/Output) Note : Stop typing when you see the required component is selected Fig. (95) Component Browser – Select the component (Basic Input/Output) After selecting the component click Ok or press ENTER
  • 49. Fig. (96) Interaction page - Set the properties and enter the required data as in the image above Afer entering data , Click OK or press CTRL+W Fig. (97) Goal Desginer - Steps Tree Select the step (Start Here) We will start now new interaction process to generate new steps to our steps tree. The slow way (Using Mouse): 1 - Click Interact to open the components browser 2 - Select the domain (Variables) 3 - Select the component (Assignment) The fast way (Using Keyboard shortcuts): 1 - Get the component using its name by typing (Assignment) Note : Stop typing when you see the required component is selected
  • 50. Fig. (98) Component Browser – Select the component (Assignment) After selecting the component click Ok or press ENTER Fig. (99) Interaction page - Set the properties and enter the required data as in the image above Afer entering data , Click OK or press CTRL+W
  • 51. Fig. (100) Goal Desginer - Steps Tree Select the step (Start Here) We will start now new interaction process to generate new steps to our steps tree. The slow way (Using Mouse): 1 - Click Interact to open the components browser 2 - Select the domain (Variables) 3 - Select the component (Assignment) The fast way (Using Keyboard shortcuts): 1 - Get the component using its name by typing (Assignment) Note : Stop typing when you see the required component is selected Fig. (101) Component Browser – Select the component (Assignment) After selecting the component click Ok or press ENTER
  • 52. Fig. (102) Interaction page - Set the properties and enter the required data as in the image above Afer entering data , Click OK or press CTRL+W Fig. (103) Goal Desginer - Steps Tree Select the step (Start Here) We will start now new interaction process to generate new steps to our steps tree. The slow way (Using Mouse): 1 - Click Interact to open the components browser 2 - Select the domain (Variables) 3 - Select the component (Assignment) The fast way (Using Keyboard shortcuts): 1 - Get the component using its name by typing (Assignment) Note : Stop typing when you see the required component is selected
  • 53. Fig. (104) Component Browser – Select the component (Assignment) After selecting the component click Ok or press ENTER Fig. (105) Interaction page - Set the properties and enter the required data as in the image above Afer entering data , Click OK or press CTRL+W
  • 54. Fig. (106) Goal Desginer - Steps Tree Select the step (Start Here) We will start now new interaction process to generate new steps to our steps tree. The slow way (Using Mouse): 1 - Click Interact to open the components browser 2 - Select the domain (Console Application) 3 - Select the component (Basic Input/Output) The fast way (Using Keyboard shortcuts): 1 - Get the component using its name by typing (Basic Input/Output) Note : Stop typing when you see the required component is selected Fig. (107) Component Browser – Select the component (Basic Input/Output) After selecting the component click Ok or press ENTER
  • 55. Fig. (108) Interaction page - Set the properties and enter the required data as in the image above Afer entering data , Click OK or press CTRL+W Fig. (109) Goal Desginer - Steps Tree Select the step (Start Here) We will start now new interaction process to generate new steps to our steps tree. The slow way (Using Mouse): 1 - Click Interact to open the components browser 2 - Select the domain (Console Application) 3 - Select the component (Basic Input/Output) The fast way (Using Keyboard shortcuts): 1 - Get the component using its name by typing (Basic Input/Output) Note : Stop typing when you see the required component is selected
  • 56. Fig. (110) Component Browser – Select the component (Basic Input/Output) After selecting the component click Ok or press ENTER Fig. (111) Interaction page - Set the properties and enter the required data as in the image above Afer entering data , Click OK or press CTRL+W
  • 57. Fig. (112) Goal Desginer - Steps Tree Select the step (Start Here) We will start now new interaction process to generate new steps to our steps tree. The slow way (Using Mouse): 1 - Click Interact to open the components browser 2 - Select the domain (Console Application) 3 - Select the component (Basic Input/Output) The fast way (Using Keyboard shortcuts): 1 - Get the component using its name by typing (Basic Input/Output) Note : Stop typing when you see the required component is selected Fig. (113) Component Browser – Select the component (Basic Input/Output) After selecting the component click Ok or press ENTER
  • 58. Fig. (114) Interaction page - Set the properties and enter the required data as in the image above Afer entering data , Click OK or press CTRL+W Fig. (115) Goal Desginer - Steps Tree Select the step (Start Here) We will start now new interaction process to generate new steps to our steps tree. The slow way (Using Mouse): 1 - Click Interact to open the components browser 2 - Select the domain (Console Application) 3 - Select the component (Basic Input/Output) The fast way (Using Keyboard shortcuts): 1 - Get the component using its name by typing (Basic Input/Output) Note : Stop typing when you see the required component is selected
  • 59. Fig. (116) Component Browser – Select the component (Basic Input/Output) After selecting the component click Ok or press ENTER Fig. (117) Interaction page - Set the properties and enter the required data as in the image above Afer entering data , Click OK or press CTRL+W
  • 60. Fig. (118) Goal Desginer - Steps Tree Select the step (Start Here) We will start now new interaction process to generate new steps to our steps tree. The slow way (Using Mouse): 1 - Click Interact to open the components browser 2 - Select the domain (Console Application) 3 - Select the component (Basic Input/Output) The fast way (Using Keyboard shortcuts): 1 - Get the component using its name by typing (Basic Input/Output) Note : Stop typing when you see the required component is selected Fig. (119) Component Browser – Select the component (Basic Input/Output) After selecting the component click Ok or press ENTER
  • 61. Fig. (120) Interaction page - Set the properties and enter the required data as in the image above Afer entering data , Click OK or press CTRL+W Fig. (121) Goal Desginer - Steps Tree Select the step (Start Here) We will start now new interaction process to generate new steps to our steps tree. The slow way (Using Mouse): 1 - Click Interact to open the components browser 2 - Select the domain (Console Application) 3 - Select the component (Basic Input/Output) The fast way (Using Keyboard shortcuts): 1 - Get the component using its name by typing (Basic Input/Output) Note : Stop typing when you see the required component is selected
  • 62. Fig. (122) Component Browser – Select the component (Basic Input/Output) After selecting the component click Ok or press ENTER Fig. (123) Interaction page - Set the properties and enter the required data as in the image above Afer entering data , Click OK or press CTRL+W
  • 63. Fig. (124) Goal Desginer - Steps Tree Select the step (Start Here) We will start now new interaction process to generate new steps to our steps tree. The slow way (Using Mouse): 1 - Click Interact to open the components browser 2 - Select the domain (Console Application) 3 - Select the component (Basic Input/Output) The fast way (Using Keyboard shortcuts): 1 - Get the component using its name by typing (Basic Input/Output) Note : Stop typing when you see the required component is selected Fig. (125) Component Browser – Select the component (Basic Input/Output) After selecting the component click Ok or press ENTER
  • 64. Fig. (126) Interaction page - Set the properties and enter the required data as in the image above Afer entering data , Click OK or press CTRL+W Fig. (127) Goal Desginer - Steps Tree Select the step (Start Here) We will start now new interaction process to generate new steps to our steps tree. The slow way (Using Mouse): 1 - Click Interact to open the components browser 2 - Select the domain (Control Structure) 3 - Select the component (IF Statement) The fast way (Using Keyboard shortcuts): 1 - Get the component using its name by typing (IF Statement) Note : Stop typing when you see the required component is selected
  • 65. Fig. (128) Component Browser – Select the component (IF Statement) After selecting the component click Ok or press ENTER Fig. (129) Interaction page - Set the properties and enter the required data as in the image above Afer entering data , Click OK or press CTRL+W
  • 66. Fig. (130) Goal Desginer - Steps Tree Select the step (Start Here) We will start now new interaction process to generate new steps to our steps tree. The slow way (Using Mouse): 1 - Click Interact to open the components browser 2 - Select the domain (xBase) 3 - Select the component (Add New Record) The fast way (Using Keyboard shortcuts): 1 - Get the component using its name by typing (Add New Record) Note : Stop typing when you see the required component is selected Fig. (131) Component Browser – Select the component (Add New Record) After selecting the component click Ok or press ENTER
  • 67. Fig. (132) Goal Desginer - Steps Tree Select the step (Start Here) We will start now new interaction process to generate new steps to our steps tree. The slow way (Using Mouse): 1 - Click Interact to open the components browser 2 - Select the domain (xBase) 3 - Select the component (Replace) The fast way (Using Keyboard shortcuts): 1 - Get the component using its name by typing (Replace) Note : Stop typing when you see the required component is selected Fig. (133) Component Browser – Select the component (Replace) After selecting the component click Ok or press ENTER
  • 68. Fig. (134) Interaction page - Set the properties and enter the required data as in the image above Afer entering data , Click OK or press CTRL+W Fig. (135) Goal Desginer - Steps Tree Select the step (Start Here) We will start now new interaction process to generate new steps to our steps tree. The slow way (Using Mouse): 1 - Click Interact to open the components browser 2 - Select the domain (xBase) 3 - Select the component (Replace) The fast way (Using Keyboard shortcuts): 1 - Get the component using its name by typing (Replace) Note : Stop typing when you see the required component is selected
  • 69. Fig. (136) Component Browser – Select the component (Replace) After selecting the component click Ok or press ENTER Fig. (137) Interaction page - Set the properties and enter the required data as in the image above Afer entering data , Click OK or press CTRL+W
  • 70. Fig. (138) Goal Desginer - Steps Tree Select the step (Start Here) We will start now new interaction process to generate new steps to our steps tree. The slow way (Using Mouse): 1 - Click Interact to open the components browser 2 - Select the domain (xBase) 3 - Select the component (Replace) The fast way (Using Keyboard shortcuts): 1 - Get the component using its name by typing (Replace) Note : Stop typing when you see the required component is selected Fig. (139) Component Browser – Select the component (Replace) After selecting the component click Ok or press ENTER
  • 71. Fig. (140) Interaction page - Set the properties and enter the required data as in the image above Afer entering data , Click OK or press CTRL+W Fig. (141) Goal Desginer - Steps Tree Select the step (Procedures) We will start now new interaction process to generate new steps to our steps tree. The slow way (Using Mouse): 1 - Click Interact to open the components browser 2 - Select the domain (Structure Programming) 3 - Select the component (Define Procedure) The fast way (Using Keyboard shortcuts): 1 - Get the component using its name by typing (Define Procedure) Note : Stop typing when you see the required component is selected
  • 72. Fig. (142) Component Browser – Select the component (Define Procedure) After selecting the component click Ok or press ENTER Fig. (143) Interaction page - Set the properties and enter the required data as in the image above Afer entering data , Click OK or press CTRL+W
  • 73. Fig. (144) Goal Desginer - Steps Tree Select the step (Start Here) We will start now new interaction process to generate new steps to our steps tree. The slow way (Using Mouse): 1 - Click Interact to open the components browser 2 - Select the domain (xBase) 3 - Select the component (Get Information) The fast way (Using Keyboard shortcuts): 1 - Get the component using its name by typing (Get Information) Note : Stop typing when you see the required component is selected Fig. (145) Component Browser – Select the component (Get Information) After selecting the component click Ok or press ENTER
  • 74. Fig. (146) Interaction page - Set the properties and enter the required data as in the image above Afer entering data , Click OK or press CTRL+W Fig. (147) Goal Desginer - Steps Tree Select the step (Start Here) We will start now new interaction process to generate new steps to our steps tree. The slow way (Using Mouse): 1 - Click Interact to open the components browser 2 - Select the domain (Console Application) 3 - Select the component (Basic Input/Output) The fast way (Using Keyboard shortcuts): 1 - Get the component using its name by typing (Basic Input/Output) Note : Stop typing when you see the required component is selected
  • 75. Fig. (148) Component Browser – Select the component (Basic Input/Output) After selecting the component click Ok or press ENTER Fig. (149) Interaction page - Set the properties and enter the required data as in the image above Afer entering data , Click OK or press CTRL+W
  • 76. Fig. (150) Goal Desginer - Steps Tree Select the step (Start Here) We will start now new interaction process to generate new steps to our steps tree. The slow way (Using Mouse): 1 - Click Interact to open the components browser 2 - Select the domain (Control Structure) 3 - Select the component (For Loop) The fast way (Using Keyboard shortcuts): 1 - Get the component using its name by typing (For Loop) Note : Stop typing when you see the required component is selected Fig. (151) Component Browser – Select the component (For Loop) After selecting the component click Ok or press ENTER
  • 77. Fig. (152) Interaction page - Set the properties and enter the required data as in the image above Afer entering data , Click OK or press CTRL+W Fig. (153) Goal Desginer - Steps Tree Select the step (Start Here) We will start now new interaction process to generate new steps to our steps tree. The slow way (Using Mouse): 1 - Click Interact to open the components browser 2 - Select the domain (xBase) 3 - Select the component (Goto) The fast way (Using Keyboard shortcuts): 1 - Get the component using its name by typing (Goto) Note : Stop typing when you see the required component is selected
  • 78. Fig. (154) Component Browser – Select the component (Goto) After selecting the component click Ok or press ENTER Fig. (155) Interaction page - Set the properties and enter the required data as in the image above Afer entering data , Click OK or press CTRL+W
  • 79. Fig. (156) Goal Desginer - Steps Tree Select the step (Start Here) We will start now new interaction process to generate new steps to our steps tree. The slow way (Using Mouse): 1 - Click Interact to open the components browser 2 - Select the domain (Print Text) 3 - Select the component (Print Text To Console) The fast way (Using Keyboard shortcuts): 1 - Get the component using its name by typing (Print Text To Console) Note : Stop typing when you see the required component is selected Fig. (157) Component Browser – Select the component (Print Text To Console) After selecting the component click Ok or press ENTER
  • 80. Fig. (158) Interaction page - Set the properties and enter the required data as in the image above Afer entering data , Click OK or press CTRL+W Fig. (159) Goal Desginer - Steps Tree Select the step (Start Here) We will start now new interaction process to generate new steps to our steps tree. The slow way (Using Mouse): 1 - Click Interact to open the components browser 2 - Select the domain (Print Text) 3 - Select the component (Print Text To Console) The fast way (Using Keyboard shortcuts): 1 - Get the component using its name by typing (Print Text To Console) Note : Stop typing when you see the required component is selected
  • 81. Fig. (160) Component Browser – Select the component (Print Text To Console) After selecting the component click Ok or press ENTER Fig. (161) Interaction page - Set the properties and enter the required data as in the image above Afer entering data , Click OK or press CTRL+W
  • 82. Fig. (162) Goal Desginer - Steps Tree Select the step (Start Here) We will start now new interaction process to generate new steps to our steps tree. The slow way (Using Mouse): 1 - Click Interact to open the components browser 2 - Select the domain (Print Text) 3 - Select the component (Print Text To Console) The fast way (Using Keyboard shortcuts): 1 - Get the component using its name by typing (Print Text To Console) Note : Stop typing when you see the required component is selected Fig. (163) Component Browser – Select the component (Print Text To Console) After selecting the component click Ok or press ENTER
  • 83. Fig. (164) Interaction page - Set the properties and enter the required data as in the image above Afer entering data , Click OK or press CTRL+W Fig. (165) Goal Desginer - Steps Tree Select the step (Start Here) We will start now new interaction process to generate new steps to our steps tree. The slow way (Using Mouse): 1 - Click Interact to open the components browser 2 - Select the domain (Console Application) 3 - Select the component (Wait (Key/Seconds)) The fast way (Using Keyboard shortcuts): 1 - Get the component using its name by typing (Wait (Key/Seconds)) Note : Stop typing when you see the required component is selected
  • 84. Fig. (166) Component Browser – Select the component (Wait (Key/Seconds)) After selecting the component click Ok or press ENTER Fig. (167) Interaction page - Set the properties and enter the required data as in the image above Afer entering data , Click OK or press CTRL+W
  • 85. Fig. (168) Goal Desginer - Steps Tree Select the step (Start Here) We will start now new interaction process to generate new steps to our steps tree. The slow way (Using Mouse): 1 - Click Interact to open the components browser 2 - Select the domain (Control Structure) 3 - Select the component (IF Statement) The fast way (Using Keyboard shortcuts): 1 - Get the component using its name by typing (IF Statement) Note : Stop typing when you see the required component is selected Fig. (169) Component Browser – Select the component (IF Statement) After selecting the component click Ok or press ENTER
  • 86. Fig. (170) Interaction page - Set the properties and enter the required data as in the image above Afer entering data , Click OK or press CTRL+W Fig. (171) Goal Desginer - Steps Tree Select the step (Start Here) We will start now new interaction process to generate new steps to our steps tree. The slow way (Using Mouse): 1 - Click Interact to open the components browser 2 - Select the domain (Console Application) 3 - Select the component (Basic Input/Output) The fast way (Using Keyboard shortcuts): 1 - Get the component using its name by typing (Basic Input/Output) Note : Stop typing when you see the required component is selected
  • 87. Fig. (172) Component Browser – Select the component (Basic Input/Output) After selecting the component click Ok or press ENTER Fig. (173) Interaction page - Set the properties and enter the required data as in the image above Afer entering data , Click OK or press CTRL+W
  • 88. Fig. (174) Goal Desginer - Steps Tree Select the step (Start Here) We will start now new interaction process to generate new steps to our steps tree. The slow way (Using Mouse): 1 - Click Interact to open the components browser 2 - Select the domain (Print Text) 3 - Select the component (Print Text To Console) The fast way (Using Keyboard shortcuts): 1 - Get the component using its name by typing (Print Text To Console) Note : Stop typing when you see the required component is selected Fig. (175) Component Browser – Select the component (Print Text To Console) After selecting the component click Ok or press ENTER
  • 89. Fig. (176) Interaction page - Set the properties and enter the required data as in the image above Afer entering data , Click OK or press CTRL+W Fig. (177) Goal Desginer - Steps Tree Select the step (Start Here) We will start now new interaction process to generate new steps to our steps tree. The slow way (Using Mouse): 1 - Click Interact to open the components browser 2 - Select the domain (Console Application) 3 - Select the component (Wait (Key/Seconds)) The fast way (Using Keyboard shortcuts): 1 - Get the component using its name by typing (Wait (Key/Seconds)) Note : Stop typing when you see the required component is selected
  • 90. Fig. (178) Component Browser – Select the component (Wait (Key/Seconds)) After selecting the component click Ok or press ENTER Fig. (179) Interaction page - Set the properties and enter the required data as in the image above Afer entering data , Click OK or press CTRL+W
  • 91. Fig. (180) Goal Desginer - Steps Tree Select the step (Procedures) We will start now new interaction process to generate new steps to our steps tree. The slow way (Using Mouse): 1 - Click Interact to open the components browser 2 - Select the domain (Structure Programming) 3 - Select the component (Define Procedure) The fast way (Using Keyboard shortcuts): 1 - Get the component using its name by typing (Define Procedure) Note : Stop typing when you see the required component is selected Fig. (181) Component Browser – Select the component (Define Procedure) After selecting the component click Ok or press ENTER
  • 92. Fig. (182) Interaction page - Set the properties and enter the required data as in the image above Afer entering data , Click OK or press CTRL+W Fig. (183) Goal Desginer - Steps Tree Select the step (Start Here) We will start now new interaction process to generate new steps to our steps tree. The slow way (Using Mouse): 1 - Click Interact to open the components browser 2 - Select the domain (xBase) 3 - Select the component (Get Information) The fast way (Using Keyboard shortcuts): 1 - Get the component using its name by typing (Get Information) Note : Stop typing when you see the required component is selected
  • 93. Fig. (184) Component Browser – Select the component (Get Information) After selecting the component click Ok or press ENTER Fig. (185) Interaction page - Set the properties and enter the required data as in the image above Afer entering data , Click OK or press CTRL+W
  • 94. Fig. (186) Goal Desginer - Steps Tree Select the step (Start Here) We will start now new interaction process to generate new steps to our steps tree. The slow way (Using Mouse): 1 - Click Interact to open the components browser 2 - Select the domain (Control Structure) 3 - Select the component (IF Statement) The fast way (Using Keyboard shortcuts): 1 - Get the component using its name by typing (IF Statement) Note : Stop typing when you see the required component is selected Fig. (187) Component Browser – Select the component (IF Statement) After selecting the component click Ok or press ENTER
  • 95. Fig. (188) Interaction page - Set the properties and enter the required data as in the image above Afer entering data , Click OK or press CTRL+W Fig. (189) Goal Desginer - Steps Tree Select the step (Start Here) We will start now new interaction process to generate new steps to our steps tree. The slow way (Using Mouse): 1 - Click Interact to open the components browser 2 - Select the domain (Console Application) 3 - Select the component (Basic Input/Output) The fast way (Using Keyboard shortcuts): 1 - Get the component using its name by typing (Basic Input/Output) Note : Stop typing when you see the required component is selected
  • 96. Fig. (190) Component Browser – Select the component (Basic Input/Output) After selecting the component click Ok or press ENTER Fig. (191) Interaction page - Set the properties and enter the required data as in the image above Afer entering data , Click OK or press CTRL+W
  • 97. Fig. (192) Goal Desginer - Steps Tree Select the step (Start Here) We will start now new interaction process to generate new steps to our steps tree. The slow way (Using Mouse): 1 - Click Interact to open the components browser 2 - Select the domain (Print Text) 3 - Select the component (Print Text To Console) The fast way (Using Keyboard shortcuts): 1 - Get the component using its name by typing (Print Text To Console) Note : Stop typing when you see the required component is selected Fig. (193) Component Browser – Select the component (Print Text To Console) After selecting the component click Ok or press ENTER
  • 98. Fig. (194) Interaction page - Set the properties and enter the required data as in the image above Afer entering data , Click OK or press CTRL+W Fig. (195) Goal Desginer - Steps Tree Select the step (Start Here) We will start now new interaction process to generate new steps to our steps tree. The slow way (Using Mouse): 1 - Click Interact to open the components browser 2 - Select the domain (Console Application) 3 - Select the component (Wait (Key/Seconds)) The fast way (Using Keyboard shortcuts): 1 - Get the component using its name by typing (Wait (Key/Seconds)) Note : Stop typing when you see the required component is selected
  • 99. Fig. (196) Component Browser – Select the component (Wait (Key/Seconds)) After selecting the component click Ok or press ENTER Fig. (197) Interaction page - Set the properties and enter the required data as in the image above Afer entering data , Click OK or press CTRL+W
  • 100. Fig. (198) Goal Desginer - Steps Tree Select the step (Start Here) We will start now new interaction process to generate new steps to our steps tree. The slow way (Using Mouse): 1 - Click Interact to open the components browser 2 - Select the domain (Structure Programming) 3 - Select the component (Return Value) The fast way (Using Keyboard shortcuts): 1 - Get the component using its name by typing (Return Value) Note : Stop typing when you see the required component is selected Fig. (199) Component Browser – Select the component (Return Value) After selecting the component click Ok or press ENTER
  • 101. Fig. (200) Interaction page - Set the properties and enter the required data as in the image above Afer entering data , Click OK or press CTRL+W Fig. (201) Goal Desginer - Steps Tree Select the step (Start Here) We will start now new interaction process to generate new steps to our steps tree. The slow way (Using Mouse): 1 - Click Interact to open the components browser 2 - Select the domain (Console Application) 3 - Select the component (Basic Input/Output) The fast way (Using Keyboard shortcuts): 1 - Get the component using its name by typing (Basic Input/Output) Note : Stop typing when you see the required component is selected
  • 102. Fig. (202) Component Browser – Select the component (Basic Input/Output) After selecting the component click Ok or press ENTER Fig. (203) Interaction page - Set the properties and enter the required data as in the image above Afer entering data , Click OK or press CTRL+W
  • 103. Fig. (204) Goal Desginer - Steps Tree Select the step (Start Here) We will start now new interaction process to generate new steps to our steps tree. The slow way (Using Mouse): 1 - Click Interact to open the components browser 2 - Select the domain (Variables) 3 - Select the component (Assignment) The fast way (Using Keyboard shortcuts): 1 - Get the component using its name by typing (Assignment) Note : Stop typing when you see the required component is selected Fig. (205) Component Browser – Select the component (Assignment) After selecting the component click Ok or press ENTER
  • 104. Fig. (206) Interaction page - Set the properties and enter the required data as in the image above Afer entering data , Click OK or press CTRL+W Fig. (207) Goal Desginer - Steps Tree Select the step (Start Here) We will start now new interaction process to generate new steps to our steps tree. The slow way (Using Mouse): 1 - Click Interact to open the components browser 2 - Select the domain (Console Application) 3 - Select the component (Basic Input/Output) The fast way (Using Keyboard shortcuts): 1 - Get the component using its name by typing (Basic Input/Output) Note : Stop typing when you see the required component is selected
  • 105. Fig. (208) Component Browser – Select the component (Basic Input/Output) After selecting the component click Ok or press ENTER Fig. (209) Interaction page - Set the properties and enter the required data as in the image above Afer entering data , Click OK or press CTRL+W
  • 106. Fig. (210) Goal Desginer - Steps Tree Select the step (Start Here) We will start now new interaction process to generate new steps to our steps tree. The slow way (Using Mouse): 1 - Click Interact to open the components browser 2 - Select the domain (Console Application) 3 - Select the component (Basic Input/Output) The fast way (Using Keyboard shortcuts): 1 - Get the component using its name by typing (Basic Input/Output) Note : Stop typing when you see the required component is selected Fig. (211) Component Browser – Select the component (Basic Input/Output) After selecting the component click Ok or press ENTER
  • 107. Fig. (212) Interaction page - Set the properties and enter the required data as in the image above Afer entering data , Click OK or press CTRL+W Fig. (213) Goal Desginer - Steps Tree Select the step (Start Here) We will start now new interaction process to generate new steps to our steps tree. The slow way (Using Mouse): 1 - Click Interact to open the components browser 2 - Select the domain (Console Application) 3 - Select the component (Basic Input/Output) The fast way (Using Keyboard shortcuts): 1 - Get the component using its name by typing (Basic Input/Output) Note : Stop typing when you see the required component is selected
  • 108. Fig. (214) Component Browser – Select the component (Basic Input/Output) After selecting the component click Ok or press ENTER Fig. (215) Interaction page - Set the properties and enter the required data as in the image above Afer entering data , Click OK or press CTRL+W
  • 109. Fig. (216) Goal Desginer - Steps Tree Select the step (Start Here) We will start now new interaction process to generate new steps to our steps tree. The slow way (Using Mouse): 1 - Click Interact to open the components browser 2 - Select the domain (Variables) 3 - Select the component (ALL Trim) The fast way (Using Keyboard shortcuts): 1 - Get the component using its name by typing (ALL Trim) Note : Stop typing when you see the required component is selected Fig. (217) Component Browser – Select the component (ALL Trim) After selecting the component click Ok or press ENTER
  • 110. Fig. (218) Interaction page - Set the properties and enter the required data as in the image above Afer entering data , Click OK or press CTRL+W Fig. (219) Goal Desginer - Steps Tree Select the step (Start Here) We will start now new interaction process to generate new steps to our steps tree. The slow way (Using Mouse): 1 - Click Interact to open the components browser 2 - Select the domain (xBase) 3 - Select the component (Locate For) The fast way (Using Keyboard shortcuts): 1 - Get the component using its name by typing (Locate For) Note : Stop typing when you see the required component is selected
  • 111. Fig. (220) Component Browser – Select the component (Locate For) After selecting the component click Ok or press ENTER Fig. (221) Interaction page - Set the properties and enter the required data as in the image above Afer entering data , Click OK or press CTRL+W
  • 112. Fig. (222) Goal Desginer - Steps Tree Select the step (Start Here) We will start now new interaction process to generate new steps to our steps tree. The slow way (Using Mouse): 1 - Click Interact to open the components browser 2 - Select the domain (xBase) 3 - Select the component (Get Information) The fast way (Using Keyboard shortcuts): 1 - Get the component using its name by typing (Get Information) Note : Stop typing when you see the required component is selected Fig. (223) Component Browser – Select the component (Get Information) After selecting the component click Ok or press ENTER
  • 113. Fig. (224) Interaction page - Set the properties and enter the required data as in the image above Afer entering data , Click OK or press CTRL+W Fig. (225) Goal Desginer - Steps Tree Select the step (Start Here) We will start now new interaction process to generate new steps to our steps tree. The slow way (Using Mouse): 1 - Click Interact to open the components browser 2 - Select the domain (Control Structure) 3 - Select the component (IF Statement) The fast way (Using Keyboard shortcuts): 1 - Get the component using its name by typing (IF Statement) Note : Stop typing when you see the required component is selected
  • 114. Fig. (226) Component Browser – Select the component (IF Statement) After selecting the component click Ok or press ENTER Fig. (227) Interaction page - Set the properties and enter the required data as in the image above Afer entering data , Click OK or press CTRL+W
  • 115. Fig. (228) Goal Desginer - Steps Tree Select the step (Start Here) We will start now new interaction process to generate new steps to our steps tree. The slow way (Using Mouse): 1 - Click Interact to open the components browser 2 - Select the domain (Console Application) 3 - Select the component (Basic Input/Output) The fast way (Using Keyboard shortcuts): 1 - Get the component using its name by typing (Basic Input/Output) Note : Stop typing when you see the required component is selected Fig. (229) Component Browser – Select the component (Basic Input/Output) After selecting the component click Ok or press ENTER
  • 116. Fig. (230) Interaction page - Set the properties and enter the required data as in the image above Afer entering data , Click OK or press CTRL+W Fig. (231) Goal Desginer - Steps Tree Select the step (Show record) We will start now new interaction process to generate new steps to our steps tree. The slow way (Using Mouse): 1 - Click Interact to open the components browser 2 - Select the domain (Print Text) 3 - Select the component (Print Text To Console) The fast way (Using Keyboard shortcuts): 1 - Get the component using its name by typing (Print Text To Console) Note : Stop typing when you see the required component is selected
  • 117. Fig. (232) Component Browser – Select the component (Print Text To Console) After selecting the component click Ok or press ENTER Fig. (233) Interaction page - Set the properties and enter the required data as in the image above Afer entering data , Click OK or press CTRL+W
  • 118. Fig. (234) Goal Desginer - Steps Tree Select the step (Show record) We will start now new interaction process to generate new steps to our steps tree. The slow way (Using Mouse): 1 - Click Interact to open the components browser 2 - Select the domain (Print Text) 3 - Select the component (Print Text To Console) The fast way (Using Keyboard shortcuts): 1 - Get the component using its name by typing (Print Text To Console) Note : Stop typing when you see the required component is selected Fig. (235) Component Browser – Select the component (Print Text To Console) After selecting the component click Ok or press ENTER
  • 119. Fig. (236) Interaction page - Set the properties and enter the required data as in the image above Afer entering data , Click OK or press CTRL+W Fig. (237) Goal Desginer - Steps Tree Select the step (Show record) We will start now new interaction process to generate new steps to our steps tree. The slow way (Using Mouse): 1 - Click Interact to open the components browser 2 - Select the domain (Print Text) 3 - Select the component (Print Text To Console) The fast way (Using Keyboard shortcuts): 1 - Get the component using its name by typing (Print Text To Console) Note : Stop typing when you see the required component is selected
  • 120. Fig. (238) Component Browser – Select the component (Print Text To Console) After selecting the component click Ok or press ENTER Fig. (239) Interaction page - Set the properties and enter the required data as in the image above Afer entering data , Click OK or press CTRL+W
  • 121. Fig. (240) Goal Desginer - Steps Tree Select the step (show menu) We will start now new interaction process to generate new steps to our steps tree. The slow way (Using Mouse): 1 - Click Interact to open the components browser 2 - Select the domain (Console Application) 3 - Select the component (Basic Input/Output) The fast way (Using Keyboard shortcuts): 1 - Get the component using its name by typing (Basic Input/Output) Note : Stop typing when you see the required component is selected Fig. (241) Component Browser – Select the component (Basic Input/Output) After selecting the component click Ok or press ENTER
  • 122. Fig. (242) Interaction page - Set the properties and enter the required data as in the image above Afer entering data , Click OK or press CTRL+W Fig. (243) Goal Desginer - Steps Tree Select the step (show menu) We will start now new interaction process to generate new steps to our steps tree. The slow way (Using Mouse): 1 - Click Interact to open the components browser 2 - Select the domain (Console Application) 3 - Select the component (Basic Input/Output) The fast way (Using Keyboard shortcuts): 1 - Get the component using its name by typing (Basic Input/Output) Note : Stop typing when you see the required component is selected
  • 123. Fig. (244) Component Browser – Select the component (Basic Input/Output) After selecting the component click Ok or press ENTER Fig. (245) Interaction page - Set the properties and enter the required data as in the image above Afer entering data , Click OK or press CTRL+W
  • 124. Fig. (246) Goal Desginer - Steps Tree Select the step (show menu) We will start now new interaction process to generate new steps to our steps tree. The slow way (Using Mouse): 1 - Click Interact to open the components browser 2 - Select the domain (Console Application) 3 - Select the component (Basic Input/Output) The fast way (Using Keyboard shortcuts): 1 - Get the component using its name by typing (Basic Input/Output) Note : Stop typing when you see the required component is selected Fig. (247) Component Browser – Select the component (Basic Input/Output) After selecting the component click Ok or press ENTER
  • 125. Fig. (248) Interaction page - Set the properties and enter the required data as in the image above Afer entering data , Click OK or press CTRL+W Fig. (249) Goal Desginer - Steps Tree Select the step (show menu) We will start now new interaction process to generate new steps to our steps tree. The slow way (Using Mouse): 1 - Click Interact to open the components browser 2 - Select the domain (Control Structure) 3 - Select the component (IF Statement) The fast way (Using Keyboard shortcuts): 1 - Get the component using its name by typing (IF Statement) Note : Stop typing when you see the required component is selected
  • 126. Fig. (250) Component Browser – Select the component (IF Statement) After selecting the component click Ok or press ENTER Fig. (251) Interaction page - Set the properties and enter the required data as in the image above Afer entering data , Click OK or press CTRL+W
  • 127. Fig. (252) Goal Desginer - Steps Tree Select the step (Start Here) We will start now new interaction process to generate new steps to our steps tree. The slow way (Using Mouse): 1 - Click Interact to open the components browser 2 - Select the domain (Structure Programming) 3 - Select the component (Call Procedure) The fast way (Using Keyboard shortcuts): 1 - Get the component using its name by typing (Call Procedure) Note : Stop typing when you see the required component is selected Fig. (253) Component Browser – Select the component (Call Procedure) After selecting the component click Ok or press ENTER
  • 128. Fig. (254) Interaction page - Set the properties and enter the required data as in the image above Afer entering data , Click OK or press CTRL+W Fig. (255) Goal Desginer - Steps Tree Select the step (IF ( mymenu3 == 2 )) We will start now new interaction process to generate new steps to our steps tree. The slow way (Using Mouse): 1 - Click Interact to open the components browser 2 - Select the domain (Control Structure) 3 - Select the component (IF Statement) The fast way (Using Keyboard shortcuts): 1 - Get the component using its name by typing (IF Statement) Note : Stop typing when you see the required component is selected
  • 129. Fig. (256) Component Browser – Select the component (IF Statement) After selecting the component click Ok or press ENTER Fig. (257) Interaction page - Set the properties and enter the required data as in the image above Afer entering data , Click OK or press CTRL+W
  • 130. Fig. (258) Goal Desginer - Steps Tree Select the step (Start Here) We will start now new interaction process to generate new steps to our steps tree. The slow way (Using Mouse): 1 - Click Interact to open the components browser 2 - Select the domain (Structure Programming) 3 - Select the component (Call Procedure) The fast way (Using Keyboard shortcuts): 1 - Get the component using its name by typing (Call Procedure) Note : Stop typing when you see the required component is selected Fig. (259) Component Browser – Select the component (Call Procedure) After selecting the component click Ok or press ENTER
  • 131. Fig. (260) Interaction page - Set the properties and enter the required data as in the image above Afer entering data , Click OK or press CTRL+W Fig. (261) Goal Desginer - Steps Tree Select the step (Start Here) We will start now new interaction process to generate new steps to our steps tree. The slow way (Using Mouse): 1 - Click Interact to open the components browser 2 - Select the domain (Console Application) 3 - Select the component (Basic Input/Output) The fast way (Using Keyboard shortcuts): 1 - Get the component using its name by typing (Basic Input/Output) Note : Stop typing when you see the required component is selected
  • 132. Fig. (262) Component Browser – Select the component (Basic Input/Output) After selecting the component click Ok or press ENTER Fig. (263) Interaction page - Set the properties and enter the required data as in the image above Afer entering data , Click OK or press CTRL+W
  • 133. Fig. (264) Goal Desginer - Steps Tree Select the step (Start Here) We will start now new interaction process to generate new steps to our steps tree. The slow way (Using Mouse): 1 - Click Interact to open the components browser 2 - Select the domain (Print Text) 3 - Select the component (Print Text To Console) The fast way (Using Keyboard shortcuts): 1 - Get the component using its name by typing (Print Text To Console) Note : Stop typing when you see the required component is selected Fig. (265) Component Browser – Select the component (Print Text To Console) After selecting the component click Ok or press ENTER
  • 134. Fig. (266) Interaction page - Set the properties and enter the required data as in the image above Afer entering data , Click OK or press CTRL+W Fig. (267) Goal Desginer - Steps Tree Select the step (Start Here) We will start now new interaction process to generate new steps to our steps tree. The slow way (Using Mouse): 1 - Click Interact to open the components browser 2 - Select the domain (Console Application) 3 - Select the component (Wait (Key/Seconds)) The fast way (Using Keyboard shortcuts): 1 - Get the component using its name by typing (Wait (Key/Seconds)) Note : Stop typing when you see the required component is selected
  • 135. Fig. (268) Component Browser – Select the component (Wait (Key/Seconds)) After selecting the component click Ok or press ENTER Fig. (269) Interaction page - Set the properties and enter the required data as in the image above Afer entering data , Click OK or press CTRL+W
  • 136. Fig. (270) Goal Desginer - Steps Tree Select the step (Procedures) We will start now new interaction process to generate new steps to our steps tree. The slow way (Using Mouse): 1 - Click Interact to open the components browser 2 - Select the domain (Structure Programming) 3 - Select the component (Define Procedure) The fast way (Using Keyboard shortcuts): 1 - Get the component using its name by typing (Define Procedure) Note : Stop typing when you see the required component is selected Fig. (271) Component Browser – Select the component (Define Procedure) After selecting the component click Ok or press ENTER
  • 137. Fig. (272) Interaction page - Set the properties and enter the required data as in the image above Afer entering data , Click OK or press CTRL+W Fig. (273) Goal Desginer - Steps Tree Select the step (Start Here) We will start now new interaction process to generate new steps to our steps tree. The slow way (Using Mouse): 1 - Click Interact to open the components browser 2 - Select the domain (xBase) 3 - Select the component (Select Area) The fast way (Using Keyboard shortcuts): 1 - Get the component using its name by typing (Select Area) Note : Stop typing when you see the required component is selected
  • 138. Fig. (274) Component Browser – Select the component (Select Area) After selecting the component click Ok or press ENTER Fig. (275) Interaction page - Set the properties and enter the required data as in the image above Afer entering data , Click OK or press CTRL+W
  • 139. Fig. (276) Goal Desginer - Steps Tree Select the step (Start Here) We will start now new interaction process to generate new steps to our steps tree. The slow way (Using Mouse): 1 - Click Interact to open the components browser 2 - Select the domain (xBase) 3 - Select the component (Close Table) The fast way (Using Keyboard shortcuts): 1 - Get the component using its name by typing (Close Table) Note : Stop typing when you see the required component is selected Fig. (277) Component Browser – Select the component (Close Table) After selecting the component click Ok or press ENTER
  • 140. Fig. (278) Goal Desginer - Steps Tree Select the step (Procedures) We will start now new interaction process to generate new steps to our steps tree. The slow way (Using Mouse): 1 - Click Interact to open the components browser 2 - Select the domain (Structure Programming) 3 - Select the component (Define Procedure) The fast way (Using Keyboard shortcuts): 1 - Get the component using its name by typing (Define Procedure) Note : Stop typing when you see the required component is selected Fig. (279) Component Browser – Select the component (Define Procedure) After selecting the component click Ok or press ENTER
  • 141. Fig. (280) Interaction page - Set the properties and enter the required data as in the image above Afer entering data , Click OK or press CTRL+W Fig. (281) Goal Desginer - Steps Tree Select the step (Start Here) We will start now new interaction process to generate new steps to our steps tree. The slow way (Using Mouse): 1 - Click Interact to open the components browser 2 - Select the domain (Console Application) 3 - Select the component (Basic Input/Output) The fast way (Using Keyboard shortcuts): 1 - Get the component using its name by typing (Basic Input/Output) Note : Stop typing when you see the required component is selected
  • 142. Fig. (282) Component Browser – Select the component (Basic Input/Output) After selecting the component click Ok or press ENTER Fig. (283) Interaction page - Set the properties and enter the required data as in the image above Afer entering data , Click OK or press CTRL+W
  • 143. Fig. (284) Goal Desginer - Steps Tree Select the step (Start Here) We will start now new interaction process to generate new steps to our steps tree. The slow way (Using Mouse): 1 - Click Interact to open the components browser 2 - Select the domain (Console Application) 3 - Select the component (Basic Input/Output) The fast way (Using Keyboard shortcuts): 1 - Get the component using its name by typing (Basic Input/Output) Note : Stop typing when you see the required component is selected Fig. (285) Component Browser – Select the component (Basic Input/Output) After selecting the component click Ok or press ENTER
  • 144. Fig. (286) Interaction page - Set the properties and enter the required data as in the image above Afer entering data , Click OK or press CTRL+W Fig. (287) Goal Desginer - Steps Tree Select the step (Start Here) We will start now new interaction process to generate new steps to our steps tree. The slow way (Using Mouse): 1 - Click Interact to open the components browser 2 - Select the domain (Console Application) 3 - Select the component (Basic Input/Output) The fast way (Using Keyboard shortcuts): 1 - Get the component using its name by typing (Basic Input/Output) Note : Stop typing when you see the required component is selected
  • 145. Fig. (288) Component Browser – Select the component (Basic Input/Output) After selecting the component click Ok or press ENTER Fig. (289) Interaction page - Set the properties and enter the required data as in the image above Afer entering data , Click OK or press CTRL+W
  • 146. Fig. (290) Goal Desginer - Steps Tree Select the step (Start Here) We will start now new interaction process to generate new steps to our steps tree. The slow way (Using Mouse): 1 - Click Interact to open the components browser 2 - Select the domain (Console Application) 3 - Select the component (Basic Input/Output) The fast way (Using Keyboard shortcuts): 1 - Get the component using its name by typing (Basic Input/Output) Note : Stop typing when you see the required component is selected Fig. (291) Component Browser – Select the component (Basic Input/Output) After selecting the component click Ok or press ENTER
  • 147. Fig. (292) Interaction page - Set the properties and enter the required data as in the image above Afer entering data , Click OK or press CTRL+W Fig. (293) Goal Desginer - Steps Tree Select the step (Start Here) We will start now new interaction process to generate new steps to our steps tree. The slow way (Using Mouse): 1 - Click Interact to open the components browser 2 - Select the domain (Variables) 3 - Select the component (Assignment) The fast way (Using Keyboard shortcuts): 1 - Get the component using its name by typing (Assignment) Note : Stop typing when you see the required component is selected
  • 148. Fig. (294) Component Browser – Select the component (Assignment) After selecting the component click Ok or press ENTER Fig. (295) Interaction page - Set the properties and enter the required data as in the image above Afer entering data , Click OK or press CTRL+W
  • 149. Fig. (296) Goal Desginer - Steps Tree Select the step (Start Here) We will start now new interaction process to generate new steps to our steps tree. The slow way (Using Mouse): 1 - Click Interact to open the components browser 2 - Select the domain (Variables) 3 - Select the component (Assignment) The fast way (Using Keyboard shortcuts): 1 - Get the component using its name by typing (Assignment) Note : Stop typing when you see the required component is selected Fig. (297) Component Browser – Select the component (Assignment) After selecting the component click Ok or press ENTER
  • 150. Fig. (298) Interaction page - Set the properties and enter the required data as in the image above Afer entering data , Click OK or press CTRL+W Fig. (299) Goal Desginer - Steps Tree Select the step (Start Here) We will start now new interaction process to generate new steps to our steps tree. The slow way (Using Mouse): 1 - Click Interact to open the components browser 2 - Select the domain (Variables) 3 - Select the component (Assignment) The fast way (Using Keyboard shortcuts): 1 - Get the component using its name by typing (Assignment) Note : Stop typing when you see the required component is selected
  • 151. Fig. (300) Component Browser – Select the component (Assignment) After selecting the component click Ok or press ENTER Fig. (301) Interaction page - Set the properties and enter the required data as in the image above Afer entering data , Click OK or press CTRL+W
  • 152. Fig. (302) Goal Desginer - Steps Tree Select the step (Start Here) We will start now new interaction process to generate new steps to our steps tree. The slow way (Using Mouse): 1 - Click Interact to open the components browser 2 - Select the domain (Console Application) 3 - Select the component (Basic Input/Output) The fast way (Using Keyboard shortcuts): 1 - Get the component using its name by typing (Basic Input/Output) Note : Stop typing when you see the required component is selected Fig. (303) Component Browser – Select the component (Basic Input/Output) After selecting the component click Ok or press ENTER
  • 153. Fig. (304) Interaction page - Set the properties and enter the required data as in the image above Afer entering data , Click OK or press CTRL+W Fig. (305) Goal Desginer - Steps Tree Select the step (Start Here) We will start now new interaction process to generate new steps to our steps tree. The slow way (Using Mouse): 1 - Click Interact to open the components browser 2 - Select the domain (Console Application) 3 - Select the component (Basic Input/Output) The fast way (Using Keyboard shortcuts): 1 - Get the component using its name by typing (Basic Input/Output) Note : Stop typing when you see the required component is selected
  • 154. Fig. (306) Component Browser – Select the component (Basic Input/Output) After selecting the component click Ok or press ENTER Fig. (307) Interaction page - Set the properties and enter the required data as in the image above Afer entering data , Click OK or press CTRL+W
  • 155. Fig. (308) Goal Desginer - Steps Tree Select the step (Start Here) We will start now new interaction process to generate new steps to our steps tree. The slow way (Using Mouse): 1 - Click Interact to open the components browser 2 - Select the domain (Console Application) 3 - Select the component (Basic Input/Output) The fast way (Using Keyboard shortcuts): 1 - Get the component using its name by typing (Basic Input/Output) Note : Stop typing when you see the required component is selected Fig. (309) Component Browser – Select the component (Basic Input/Output) After selecting the component click Ok or press ENTER
  • 156. Fig. (310) Interaction page - Set the properties and enter the required data as in the image above Afer entering data , Click OK or press CTRL+W Fig. (311) Goal Desginer - Steps Tree Select the step (Start Here) We will start now new interaction process to generate new steps to our steps tree. The slow way (Using Mouse): 1 - Click Interact to open the components browser 2 - Select the domain (Console Application) 3 - Select the component (Basic Input/Output) The fast way (Using Keyboard shortcuts): 1 - Get the component using its name by typing (Basic Input/Output) Note : Stop typing when you see the required component is selected
  • 157. Fig. (312) Component Browser – Select the component (Basic Input/Output) After selecting the component click Ok or press ENTER Fig. (313) Interaction page - Set the properties and enter the required data as in the image above Afer entering data , Click OK or press CTRL+W
  • 158. Fig. (314) Goal Desginer - Steps Tree Select the step (Start Here) We will start now new interaction process to generate new steps to our steps tree. The slow way (Using Mouse): 1 - Click Interact to open the components browser 2 - Select the domain (Console Application) 3 - Select the component (Basic Input/Output) The fast way (Using Keyboard shortcuts): 1 - Get the component using its name by typing (Basic Input/Output) Note : Stop typing when you see the required component is selected Fig. (315) Component Browser – Select the component (Basic Input/Output) After selecting the component click Ok or press ENTER
  • 159. Fig. (316) Interaction page - Set the properties and enter the required data as in the image above Afer entering data , Click OK or press CTRL+W Fig. (317) Goal Desginer - Steps Tree Select the step (Start Here) We will start now new interaction process to generate new steps to our steps tree. The slow way (Using Mouse): 1 - Click Interact to open the components browser 2 - Select the domain (Console Application) 3 - Select the component (Basic Input/Output) The fast way (Using Keyboard shortcuts): 1 - Get the component using its name by typing (Basic Input/Output) Note : Stop typing when you see the required component is selected
  • 160. Fig. (318) Component Browser – Select the component (Basic Input/Output) After selecting the component click Ok or press ENTER Fig. (319) Interaction page - Set the properties and enter the required data as in the image above Afer entering data , Click OK or press CTRL+W
  • 161. Fig. (320) Goal Desginer - Steps Tree Select the step (Start Here) We will start now new interaction process to generate new steps to our steps tree. The slow way (Using Mouse): 1 - Click Interact to open the components browser 2 - Select the domain (Console Application) 3 - Select the component (Basic Input/Output) The fast way (Using Keyboard shortcuts): 1 - Get the component using its name by typing (Basic Input/Output) Note : Stop typing when you see the required component is selected Fig. (321) Component Browser – Select the component (Basic Input/Output) After selecting the component click Ok or press ENTER
  • 162. Fig. (322) Interaction page - Set the properties and enter the required data as in the image above Afer entering data , Click OK or press CTRL+W Fig. (323) Goal Desginer - Steps Tree Select the step (Start Here) We will start now new interaction process to generate new steps to our steps tree. The slow way (Using Mouse): 1 - Click Interact to open the components browser 2 - Select the domain (Control Structure) 3 - Select the component (IF Statement) The fast way (Using Keyboard shortcuts): 1 - Get the component using its name by typing (IF Statement) Note : Stop typing when you see the required component is selected
  • 163. Fig. (324) Component Browser – Select the component (IF Statement) After selecting the component click Ok or press ENTER Fig. (325) Interaction page - Set the properties and enter the required data as in the image above Afer entering data , Click OK or press CTRL+W
  • 164. Fig. (326) Goal Desginer - Steps Tree Select the step (Start Here) We will start now new interaction process to generate new steps to our steps tree. The slow way (Using Mouse): 1 - Click Interact to open the components browser 2 - Select the domain (xBase) 3 - Select the component (Replace) The fast way (Using Keyboard shortcuts): 1 - Get the component using its name by typing (Replace) Note : Stop typing when you see the required component is selected Fig. (327) Component Browser – Select the component (Replace) After selecting the component click Ok or press ENTER
  • 165. Fig. (328) Interaction page - Set the properties and enter the required data as in the image above Afer entering data , Click OK or press CTRL+W Fig. (329) Goal Desginer - Steps Tree Select the step (Start Here) We will start now new interaction process to generate new steps to our steps tree. The slow way (Using Mouse): 1 - Click Interact to open the components browser 2 - Select the domain (xBase) 3 - Select the component (Replace) The fast way (Using Keyboard shortcuts): 1 - Get the component using its name by typing (Replace) Note : Stop typing when you see the required component is selected
  • 166. Fig. (330) Component Browser – Select the component (Replace) After selecting the component click Ok or press ENTER Fig. (331) Interaction page - Set the properties and enter the required data as in the image above Afer entering data , Click OK or press CTRL+W
  • 167. Fig. (332) Goal Desginer - Steps Tree Select the step (Start Here) We will start now new interaction process to generate new steps to our steps tree. The slow way (Using Mouse): 1 - Click Interact to open the components browser 2 - Select the domain (xBase) 3 - Select the component (Replace) The fast way (Using Keyboard shortcuts): 1 - Get the component using its name by typing (Replace) Note : Stop typing when you see the required component is selected Fig. (333) Component Browser – Select the component (Replace) After selecting the component click Ok or press ENTER
  • 168. Fig. (334) Interaction page - Set the properties and enter the required data as in the image above Afer entering data , Click OK or press CTRL+W Fig. (335) Goal Desginer - Steps Tree Select the step (Procedures) We will start now new interaction process to generate new steps to our steps tree. The slow way (Using Mouse): 1 - Click Interact to open the components browser 2 - Select the domain (Structure Programming) 3 - Select the component (Define Procedure) The fast way (Using Keyboard shortcuts): 1 - Get the component using its name by typing (Define Procedure) Note : Stop typing when you see the required component is selected
  • 169. Fig. (336) Component Browser – Select the component (Define Procedure) After selecting the component click Ok or press ENTER Fig. (337) Interaction page - Set the properties and enter the required data as in the image above Afer entering data , Click OK or press CTRL+W
  • 170. Fig. (338) Goal Desginer - Steps Tree Select the step (Start Here) We will start now new interaction process to generate new steps to our steps tree. The slow way (Using Mouse): 1 - Click Interact to open the components browser 2 - Select the domain (xBase) 3 - Select the component (Delete Current Record (Mark for deletion)) The fast way (Using Keyboard shortcuts): 1 - Get the component using its name by typing (Delete Current Record (Mark for deletion)) Note : Stop typing when you see the required component is selected Fig. (339) Component Browser – Select the component (Delete Current Record (Mark for deletion)) After selecting the component click Ok or press ENTER
  • 171. Fig. (340) Goal Desginer - Steps Tree Select the step (Start Here) We will start now new interaction process to generate new steps to our steps tree. The slow way (Using Mouse): 1 - Click Interact to open the components browser 2 - Select the domain (xBase) 3 - Select the component (Pack) The fast way (Using Keyboard shortcuts): 1 - Get the component using its name by typing (Pack) Note : Stop typing when you see the required component is selected Fig. (341) Component Browser – Select the component (Pack) After selecting the component click Ok or press ENTER
  • 172. Fig. (342) Goal Desginer - Final Steps Tree 3 - Final Steps Tree The First Step Call Procedure open_database WHILE ( True ) Start Here Set Color Standard( White , Blue ) Enhanced ( Yellow , Black ) Unselected ( Black , White ) Clear Screen Print Text "Telephone Database" - AT ROW 3 & COLUMN 3 Draw Box from 2 , 2 to 4 , 23 Draw Box from 6 , 2 to 8 , 50 Draw Box from 9 , 2 to 21 , 50 mycount = Get Records Count mycount = CONVERT mycount TO STRING Print Text "Records Count" + mycount - AT ROW 7 & COLUMN 5 PROMPT "Add New Record" - AT ROW 12 & COLUMN 15 PROMPT "List Records" - AT ROW 14 & COLUMN 15 PROMPT "Search" - AT ROW 16 & COLUMN 15 PROMPT "Exit" - AT ROW 18 & COLUMN 15 Activate Menu mymenu IF ( mymenu == 1 ) Start Here Call Procedure add_proc ELSEIF ( mymenu == 2 ) Start Here Call Procedure list_proc ELSEIF ( mymenu == 3 ) Start Here Call Procedure search_proc ELSEIF ( mymenu == 4 ) Start Here Exit END OF IF STATEMENT END OF While Loop Call Procedure close_database Procedures Define Procedure open_database Start Here SELECT AREA 0 Open Table Tel End of Procedure Define Procedure add_proc
  • 173. Start Here Clear Screen Print Text "Add New Record" - AT ROW 3 & COLUMN 28 Draw Box from 2 , 25 to 4 , 48 Draw Box from 9 , 2 to 21 , 77 v_name = String, length = 50 v_address = String, length = 50 v_phone = String, length = 20 Print Text "Name" - AT ROW 12 & COLUMN 10 Get Input v_name - AT ROW 12 & COLUMN 20 Print Text "Address" - AT ROW 14 & COLUMN 10 Get Input v_address - AT ROW 14 & COLUMN 20 Print Text "Phone" - AT ROW 16 & COLUMN 10 Get Input v_phone - AT ROW 16 & COLUMN 20 READ INPUT PROMPT "Save" - AT ROW 19 & COLUMN 54 PROMPT "Cancel" - AT ROW 19 & COLUMN 64 Draw Box from 18 , 3 to 18 , 76 Print Text "" - AT ROW 0 & COLUMN 0 Activate Menu mymenu2 IF ( mymenu2 == 1 ) Start Here Add New Record Replace Field name with v_name Replace Field address with v_address Replace Field phone with v_phone END OF IF STATEMENT End of Procedure Define Procedure list_proc Start Here mymax = Get Records Count Clear Screen FOR LOOP ( From x = 1 To mymax Step 1) Start Here Goto Record Number x Print text ("Name : " + name) to console Print text ("Address : " + address) to console Print text ("Phone : " + phone) to console Wait (KEY) Message : "Press any key to continue..." End of For Loop IF ( mymax == 0 ) Start Here Clear Screen Print text ("No records") to console WAIT ( 3 SECONDS) END OF IF STATEMENT End of Procedure Define Procedure search_proc Start Here mymax = Get Records Count IF ( mymax == 0 ) Start Here Clear Screen Print text ("No records") to console WAIT ( 3 SECONDS) Return false END OF IF STATEMENT Clear Screen v_name = String, length = 50 Draw Box from 9 , 2 to 21 , 77 Print Text "Name" - AT ROW 12 & COLUMN 10 Get Input v_name - AT ROW 12 & COLUMN 20 READ INPUT v_name = All Trim v_name Locate For name = v_name myresult = Check- Record Found (Locate) IF ( myresult ) Start Here Clear Screen Show record
  • 174. Print text ("Name : " + name) to console Print text ("Address : " + address) to console Print text ("Phone : " + phone) to console show menu PROMPT " Ok " - AT ROW 10 & COLUMN 10 PROMPT " Edit " - AT ROW 12 & COLUMN 10 PROMPT " Delete " - AT ROW 14 & COLUMN 10 Activate Menu mymenu3 IF ( mymenu3 == 2 ) Start Here Call Procedure edit_proc ELSEIF ( mymenu3 == 3 ) Start Here Call Procedure del_proc END OF IF STATEMENT ELSE Start Here Clear Screen Print text ("Record not found") to console WAIT ( 3 SECONDS) END OF IF STATEMENT End of Procedure Define Procedure close_database Start Here SELECT AREA Tel Close Table End of Procedure Define Procedure edit_proc Start Here Clear Screen Print Text "Edit Record" - AT ROW 3 & COLUMN 28 Draw Box from 2 , 25 to 4 , 48 Draw Box from 9 , 2 to 21 , 77 v_name = name v_address = address v_phone = phone Print Text "Name" - AT ROW 12 & COLUMN 10 Get Input v_name - AT ROW 12 & COLUMN 20 Print Text "Address" - AT ROW 14 & COLUMN 10 Get Input v_address - AT ROW 14 & COLUMN 20 Print Text "Phone" - AT ROW 16 & COLUMN 10 Get Input v_phone - AT ROW 16 & COLUMN 20 READ INPUT PROMPT "Save" - AT ROW 19 & COLUMN 54 PROMPT "Cancel" - AT ROW 19 & COLUMN 64 Draw Box from 18 , 3 to 18 , 76 Print Text "" - AT ROW 0 & COLUMN 0 Activate Menu mymenu2 IF ( mymenu2 == 1 ) Start Here Replace Field name with v_name Replace Field address with v_address Replace Field phone with v_phone END OF IF STATEMENT End of Procedure Define Procedure del_proc Start Here Delete Record (Mark for deletion) Pack End of Procedure 4 - Application during the runtime
  • 175. Fig. (343) Application during the runtime Fig. (344) Application during the runtime
  • 176. Fig. (345) Application during the runtime Fig. (346) Application during the runtime
  • 177. Fig. (347) Application during the runtime