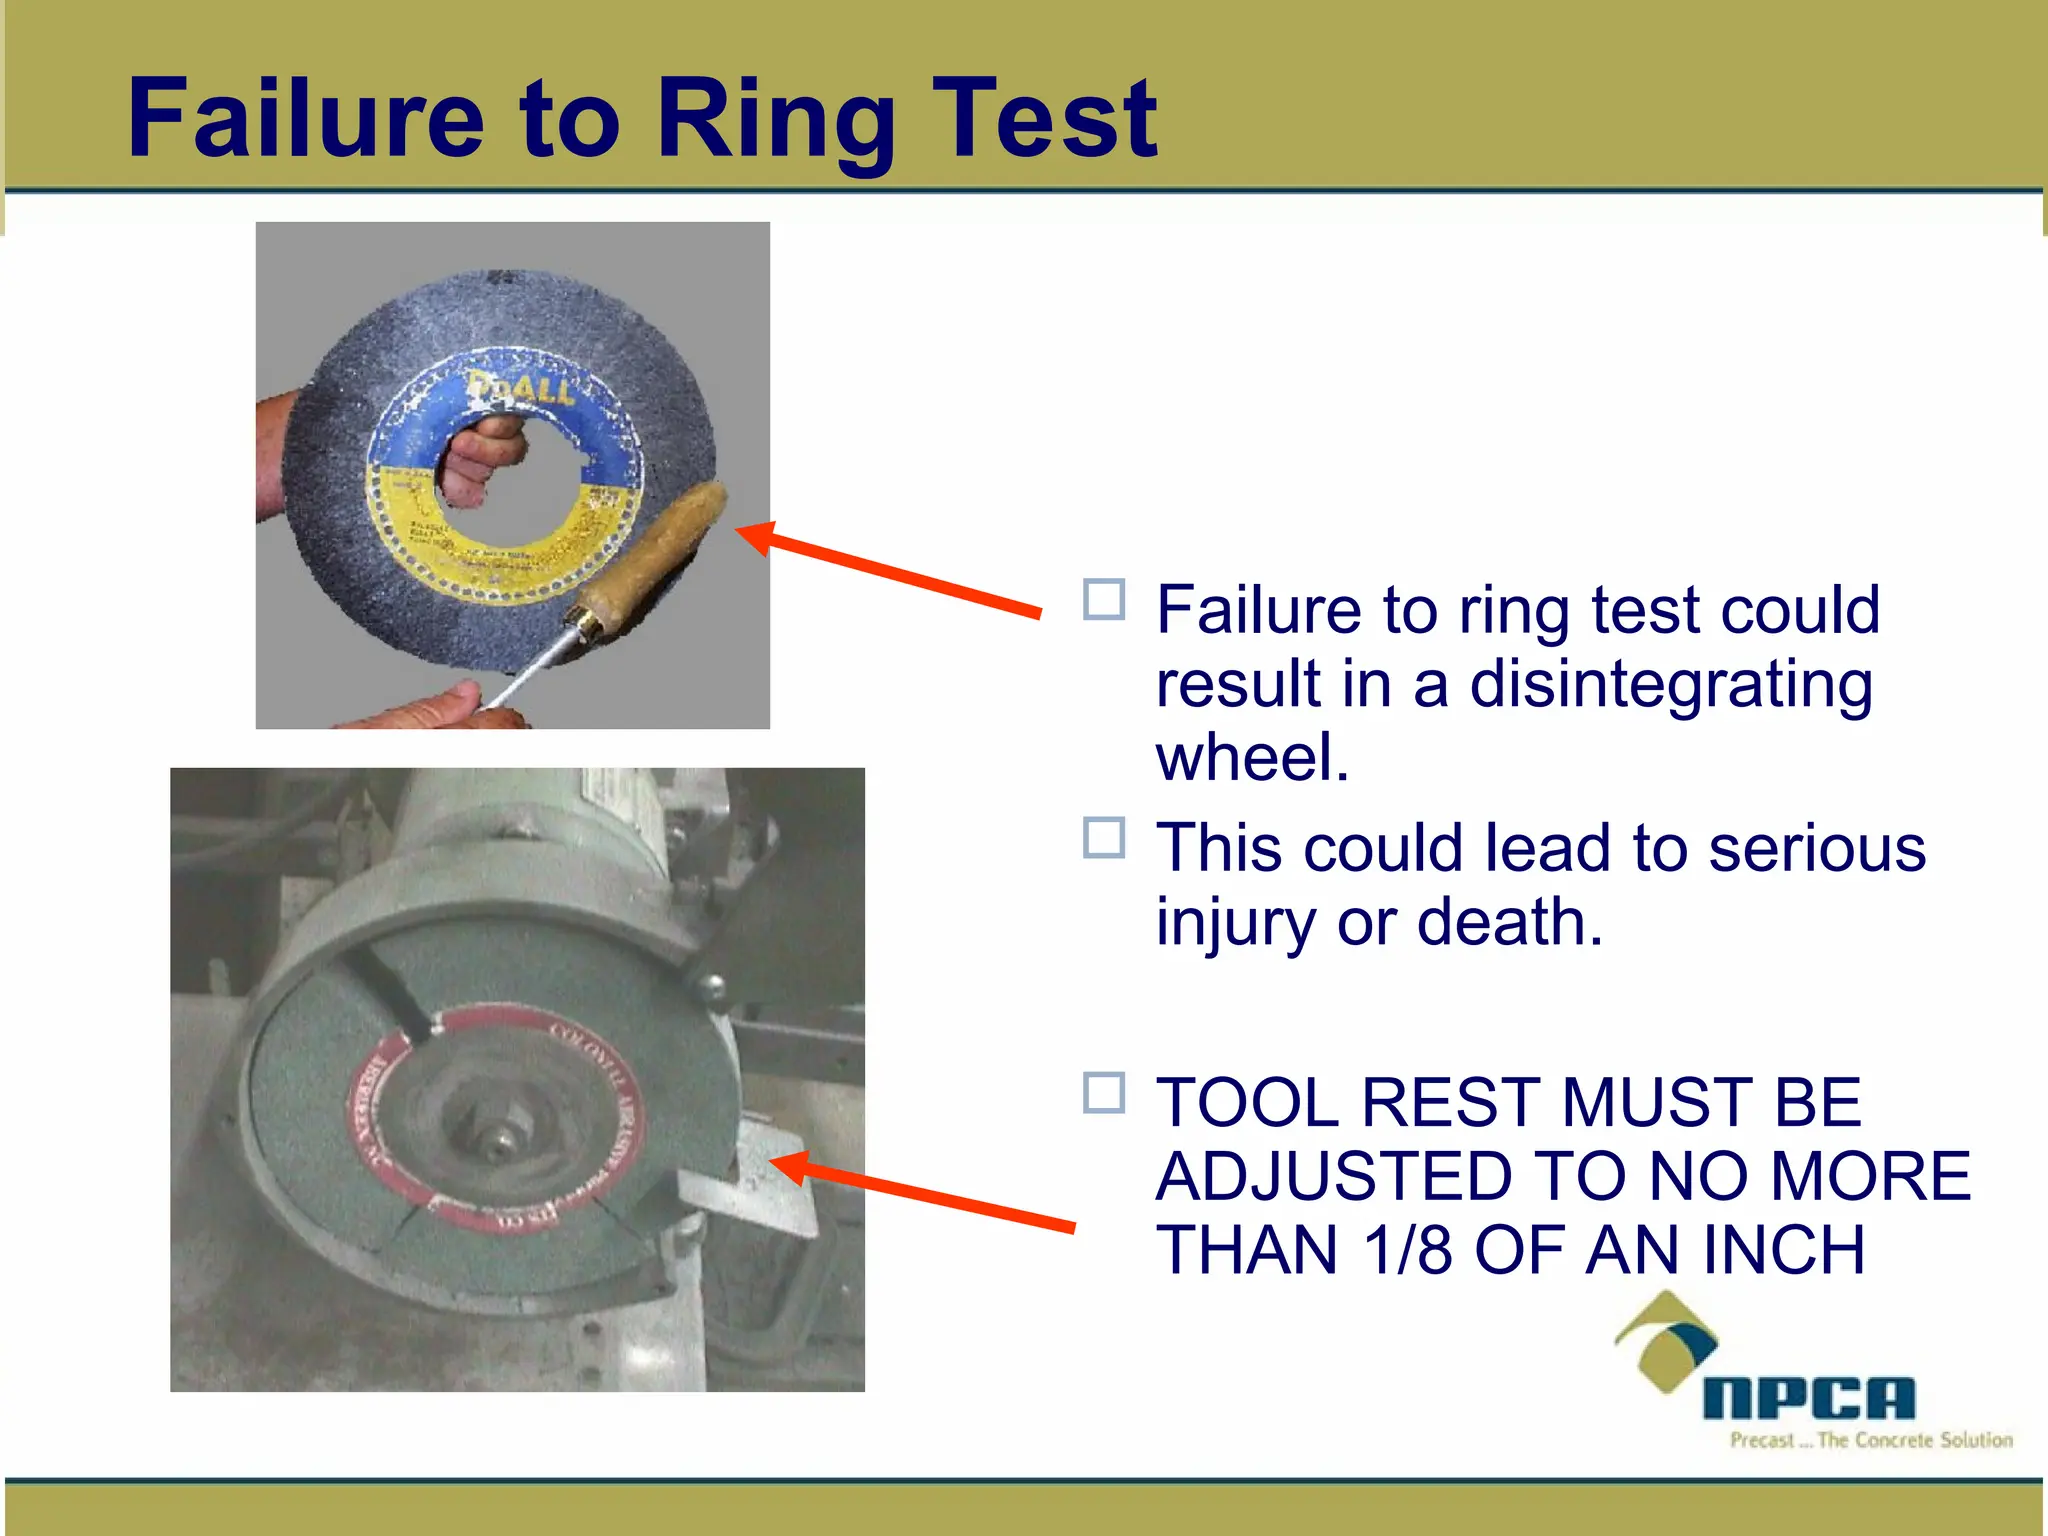
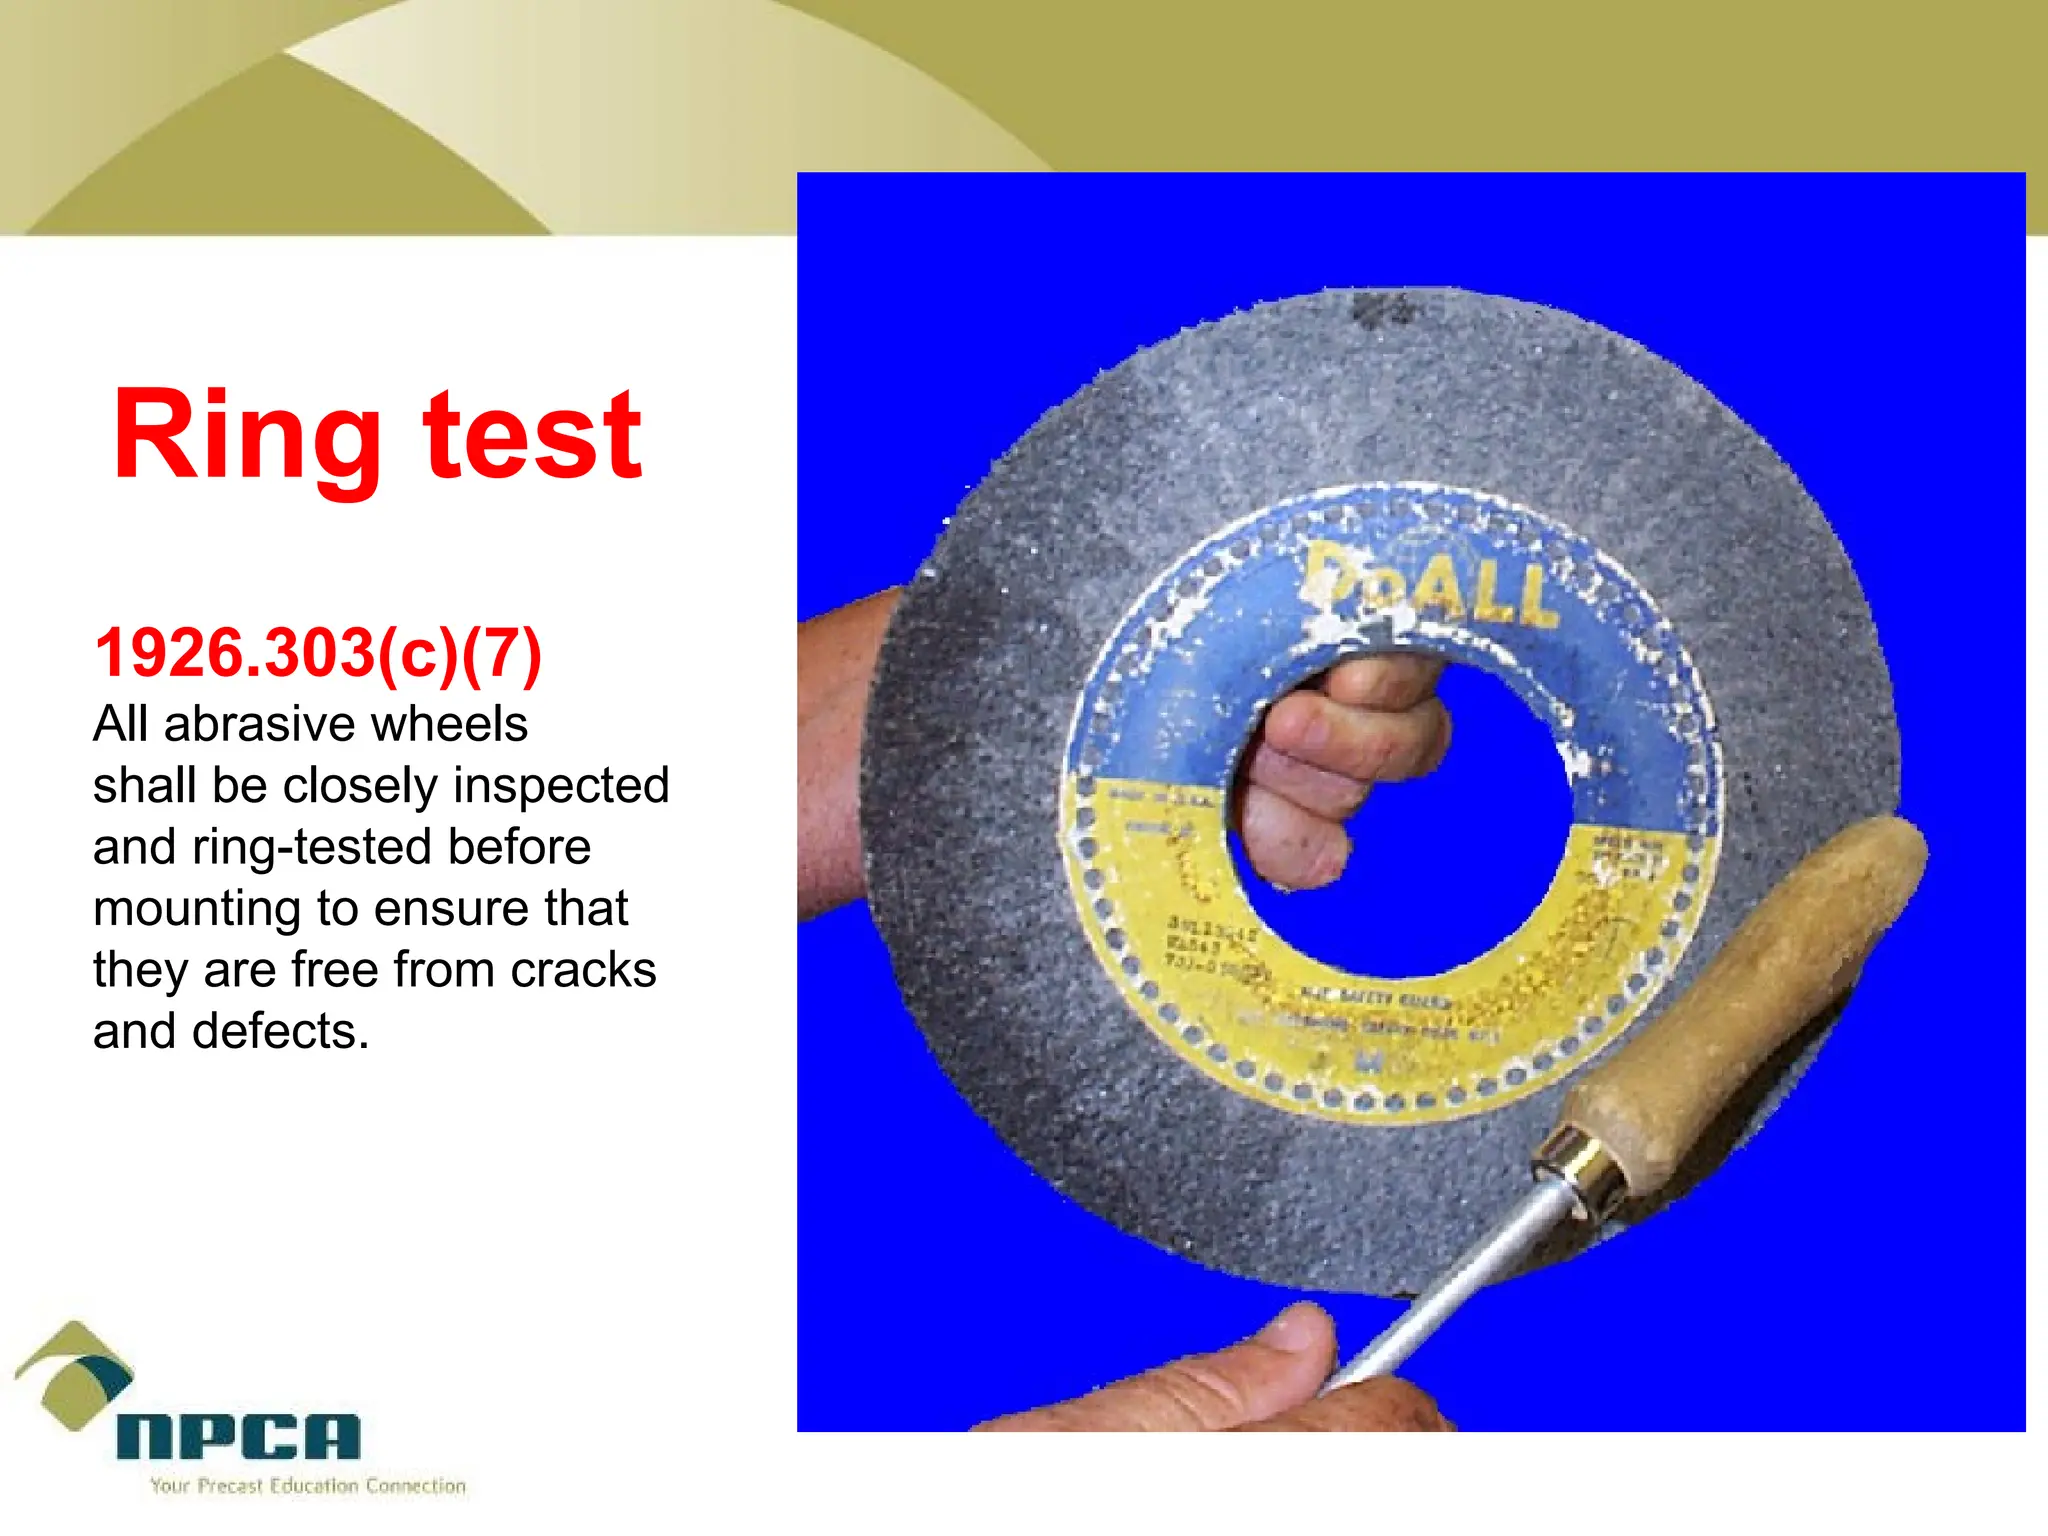
POWER TOOL SAFETY
TOOL HAZARDS
Loss of eye/vision
 using striking tools without eye protection.
Puncture wounds
 using a screwdriver with a loose handle which causes the hand
to slip.
Severed fingers, tendons and arteries
 using a dull knife requires so much force that your hand may slip
down the blade.
Broken bones
 using the wrong hammer for the job and smashing a finger.
Contusions
 using a small wrench for a big job and bruising a knuckle.
3
POWERED HANDTOOLS ACCIDENTS
LACK OF GUARDING
IMPROPER TOOL USAGE
EYE PROTECTION
These resulted in lacerations,
amputations and loss of sight
BASIC SAFETY RULES
Perform regular maintenance
Use right tool for the job
Inspect all tools before use
Use the right personal protective
equipment (PPE)
Report to your supervisor any unsafe tool.
TOOL SAFETY
Do not use defective tools
Use tied-off containers to keep tools from
falling off of molds or work platforms.
Keep all cutting tools sharp.
Carry all sharp tools in a sheath or holster.
Return tools to their storage places after
use.
TOOL SAFETY
Floors should be kept as clean and dry as
possible to prevent accidental slips with or
around dangerous tools.
The greatest hazards posed by tools result from
misuse and improper maintenance.
Employees have the responsibility for properly
using and maintaining tools.
Keep tools away from aisle areas and other
employees working in close proximity.
TOOL SAFETY
Do not perform "make-shift" repairs to
tools.
Do not carry tools in your hand when
climbing, or by the cord.
Do not throw tools from one location to
another, from one employee to another,
from scaffolds or other elevated platforms.
Do not remove or bypass guards
TOOL SAFETY
Watch your hands and fingers.
Keep your mind on your work.
Grip tools firmly.
Operate according to the manufacturer's
instructions.
Never carry a tool by the cord or hose.
Never yank the cord or the hose to disconnect it
from the receptacle.
Disconnect tools when not in use, before
servicing, and when changing accessories such
as blades, bits and cutters.
TOOL SAFETY
Ground all tools unless double insulated.
Avoid dangerous environments. Do not use
power tools in a damp, wet and/or explosive
atmosphere -- fumes, dust or flammable
materials.
All observers should be kept at a safe distance
away from the work area.
Secure work with clamps or a vise, freeing both
hands to operate the tool.
Do not hold a finger on the switch button while
carrying a plugged-in tool.
TOOL SAFETY
Be sure to keep good footing and maintain good
balance.
The proper apparel should be worn. Loose
clothing, or jewelry can become caught in
moving parts.
Don't use an accessory or attachment unless the
power tool manufacturer recommends its use on
the product
Keep cords and hoses away from heat, oil, and
sharp edges.
Ring Test
A ring test should be performed before mounting an
abrasive wheel to help determine if the wheel is cracked.
The wheel has to be dry and free of sawdust when
applying the ring test, otherwise the sound may be
deadened.
The ring test doesn’t work with certain wheels because
of their shape or size.
 Wheels 4 inches diameter and smaller
 Plugs and Cones
 Mounted Wheels
 Segments
 Plate-Mounted Wheels
 Inserted Nut and Projecting Stud Disc Wheels
How to do the Ring Test
 Suspend the wheel by putting a small pin or
your finger through the arbor hole in the
wheel. Heavier wheels may be allowed to rest
in a vertical position on a clean hard floor (See
Illustration 1).
 Tap the flat side of the wheel with a light non-
metallic implement, such as the handle of a
screw driver, at a point
 45 degrees from the vertical center line on
each side of the wheel (See Illustration 2)
and
 1 – 2 inches from the edge of the wheel.
Large, thick wheels may be struck on the
periphery rather than the side of the wheel.
 Rotate the wheel 45 degrees and repeat the
test until the entire wheel has been checked.
Illustration 1
Illustration 2
How to use ring test results
The ring test depends on the fact that a crack in
the wheel will normally change the sound
emitted when the wheel is lightly tapped. An
undamaged wheel will give a clear tone. If
cracked, there will be a dead sound and not a
clear ring.
Comparison of the sound with other wheels of
the same lot and specification will allow rejection
of any wheel with a suspiciously different ring.
14
Failure to Ring Test
 Failure to ring test could
result in a disintegrating
wheel.
 This could lead to serious
injury or death.
 TOOL REST MUST BE
ADJUSTED TO NO MORE
THAN 1/8 OF AN INCH
1926.300 (b)(7) General
requirements
“Tongue guard”
The distance between the wheel
periphery and the adjustable tongue or
the end of the peripheral member at the
top shall never exceed 1/4 inch.
1926.303 (c)(2)
“Work rests”
On floor and bench mounted grinders, shall
be provided with work rests which are rigidly
supported and readily adjustable. Such work
rests shall be kept at a distance not to
exceed one-eighth inch from the surface of
the wheel.
Work Rest
1/8 in.
Tongue
Guard
1/4 in.
Grinder Safety
The angular exposure of the grinding wheel periphery and sides for safety
guards used on machines known as bench and floor stands should not exceed
90 deg. or one-fourth of the periphery.
90 deg. guard
Adjustable tongue
Work rest
1/4”
1/8”
Safety Guard – 1926.300(b)(8)
1926. 303(a)
“Speeds”
All grinding machines
shall be supplied with
sufficient power to
to maintain the spindle
speed at safe levels under
all conditions of normal
operation.
Wheel shall be compatible with the size
motor of the grinder
Hazard - flying abrasive wheel parts
Max RPM
Grinder Safety
Ring test
1926.303(c)(7)
All abrasive wheels
shall be closely inspected
and ring-tested before
mounting to ensure that
they are free from cracks
and defects.
Abrasive wheel
grinders must
be properly
guarded
Grinder Safety
1926.300(b)(9)
“Cylinder grinders”
The maximum angular exposure of the grinding wheel periphery and
sides for safety guards used on cylindrical grinding machines shall not
exceed 180 deg.
180 deg
Grinder Safety
1926.300(d)(1) “Controls”
All hand-held powered platen sanders, grinders with wheels 2-
inch diameter or less, routers, planers, laminate trimmers,
nibblers, shears, scroll saws, and jigsaws with blade shanks
one-fourth of an inch wide or less may be equipped with only a
positive "on-off" control.
positive "on-off" control
Grinder Safety
1926.300(d)(2)
“On-Off switches”
All hand-held powered drills,
tappers, fastener drivers,
horizontal, vertical, and angle
grinders with wheels greater than
2 inches in diameter, disc
sanders, belt sanders,
reciprocating saws, saber saws,
and other similar operating
powered tools shall be equipped
with a momentary contact "on-off"
control and may have a lock-on
control provided that turnoff can
be accomplished by a single
motion of the same finger or
fingers that turn it on.
on- off control
Grinder Safety
1926.300(d)(3) “Switches”
All other hand-held powered tools, such as circular saws, chain
saws, and percussion tools without positive accessory holding
means, shall be equipped with a constant pressure switch
that will shut off the power when the pressure is released.
ON POSITION OFF POSITION
Grinder Safety
ON POSITION
1926.302(a)(2)
“Electric tools”
The use of electric
cords for hoisting or
lowering tools shall
not be permitted.
Strain relief
device
required
where cord is
pulled away
from plug due
to misuse
Grinder Safety
Safety guards used on machines known as right angle
head or vertical portable grinders shall have a
maximum exposure angle of 180 deg.
1910.243(c)(3) Vertical portable grinders
180 deg
HAND GRINDERS
Portable grinding tools must be equipped
with safety guards to protect workers not
only from the moving wheel surface, but
also from flying fragments in case of
breakage.
Always use safety glasses and a face shield.
Turn off the power when not in use.
Never clamp a hand-held grinder in a vise.
PORTABLE CIRCULAR AND TABLE SAW
Always wear safety glasses and a full face
shield when needed. Use a respirator in dusty
work conditions. Wear hearing protection if
noise level is 80 decibels or above.
Be sure the switch actuates properly.
Use the correct blade for the application.
Use sharp blades.
PORTABLE CIRCULAR AND TABLE SAW
Check often to ensure that guards return to their
normal position quickly.
Never defeat the guard to expose the blade by,
for example, tying it back or removing it.
Before starting a circular saw, be sure the power
cord and extension cord are
out of the blade path
long enough to freely complete the cut.
Keep aware of the cord location.
PORTABLE CIRCULAR AND TABLE SAW
For maximum control, hold the saw firmly with
both hands. Clamp work pieces.
Avoid cutting small pieces that can't be properly
secured and material on which the saw shoe
can't properly rest.
When you start the saw, allow the blade to reach
full speed before contacting the workpiece.
When making a partial cut, or if power is
interrupted, release the trigger and don't remove
the saw until the blade has come to a complete
stop.
PORTABLE DRILL
Check carefully for loose power cord
connections and frays or damage to the
cord.
Be sure the chuck is tightly secured to the
spindle. This is especially important on
reversible type drills.
Tighten the bit securely. The chuck key
must be removed from the chuck before
starting the drill.
PORTABLE DRILL
Check handles. Be sure they are securely
installed. Always use the auxiliary drill handle
when provided. It gives you more control of the
drill, especially if stalled conditions occur.
Always hold or brace the tool securely. Brace
against stationary objects for maximum control.
Don't force a drill. Apply enough pressure to
keep the drill bit cutting smoothly. If the drill
slows down, relieve the pressure.
MITER BOX SAWS
Stay alert to keeping hands and fingers away
from the blade's path.
Be sure all guards are in place and working.
Use only recommended size and rpm rated
blades.
When installing or changing a blade, be sure the
blade and related washers and fasteners are
correctly positioned and secured on the saw
arbor.
PNEUMATIC TOOLS
Pneumatic tools are powered by compressed air
and include
Chippers
Drills
Hammers
Sanders.
The main danger is getting hit by one of the
tool's attachments or by some kind of fastener
the worker is using with the tool.
Eye protection is required and face protection is
recommended for employees working with
pneumatic tools
PNEUMATIC TOOLS
Tool retainer
A tool retainer shall be installed on each piece
of utilization equipment which, without such a
retainer, may eject the tool.
Air hose
Hose and hose connections used for
conducting compressed air to utilization
equipment shall be designed for the pressure
and service to which they are subjected.
COMPRESSED AIR
1. Before making or breaking any air connection,
always turn off the air supply. Use the valve to
turn off the air - never kink the hose as a
shortcut kinking the hose may damage or even
rupture the air hose.
2. Protect the air hose from damage. Move it out of
the way of vehicles so that it isn't run over. Also,
be sure not to drag hoses around sharp corners.
3. Be sure to use the proper size air hose and
fittings to keep air pressure at a maximum
throughout the entire line. Most manufacturers
recommend 90 psi at the tool.
COMPRESSED AIR
4. To ensure the best connection, clear any dirt
off the nipple before connecting the air hose to
the tool.
5. When the tool is connected, check the hose
and all connections for leaks or damage before
using the tool.
6. Maintain a clean, dry, regulated source of air to
operate air tools at peak performance.
7. Do not use compressed air to blow your
clothes.
Summary
Power tools are very common to any
production facility. They can expose
employees to multiple hazards if they are
not maintained and used properly.
It is critical that you know how to maintain,
test and operate any power tool you intend
to use.
Power-Tool-Safety and precautions presentation.ppt

Power-Tool-Safety and precautions presentation.ppt

  • 1.
  • 2.
    TOOL HAZARDS Loss ofeye/vision  using striking tools without eye protection. Puncture wounds  using a screwdriver with a loose handle which causes the hand to slip. Severed fingers, tendons and arteries  using a dull knife requires so much force that your hand may slip down the blade. Broken bones  using the wrong hammer for the job and smashing a finger. Contusions  using a small wrench for a big job and bruising a knuckle.
  • 3.
    3 POWERED HANDTOOLS ACCIDENTS LACKOF GUARDING IMPROPER TOOL USAGE EYE PROTECTION These resulted in lacerations, amputations and loss of sight
  • 4.
    BASIC SAFETY RULES Performregular maintenance Use right tool for the job Inspect all tools before use Use the right personal protective equipment (PPE) Report to your supervisor any unsafe tool.
  • 5.
    TOOL SAFETY Do notuse defective tools Use tied-off containers to keep tools from falling off of molds or work platforms. Keep all cutting tools sharp. Carry all sharp tools in a sheath or holster. Return tools to their storage places after use.
  • 6.
    TOOL SAFETY Floors shouldbe kept as clean and dry as possible to prevent accidental slips with or around dangerous tools. The greatest hazards posed by tools result from misuse and improper maintenance. Employees have the responsibility for properly using and maintaining tools. Keep tools away from aisle areas and other employees working in close proximity.
  • 7.
    TOOL SAFETY Do notperform "make-shift" repairs to tools. Do not carry tools in your hand when climbing, or by the cord. Do not throw tools from one location to another, from one employee to another, from scaffolds or other elevated platforms. Do not remove or bypass guards
  • 8.
    TOOL SAFETY Watch yourhands and fingers. Keep your mind on your work. Grip tools firmly. Operate according to the manufacturer's instructions. Never carry a tool by the cord or hose. Never yank the cord or the hose to disconnect it from the receptacle. Disconnect tools when not in use, before servicing, and when changing accessories such as blades, bits and cutters.
  • 9.
    TOOL SAFETY Ground alltools unless double insulated. Avoid dangerous environments. Do not use power tools in a damp, wet and/or explosive atmosphere -- fumes, dust or flammable materials. All observers should be kept at a safe distance away from the work area. Secure work with clamps or a vise, freeing both hands to operate the tool. Do not hold a finger on the switch button while carrying a plugged-in tool.
  • 10.
    TOOL SAFETY Be sureto keep good footing and maintain good balance. The proper apparel should be worn. Loose clothing, or jewelry can become caught in moving parts. Don't use an accessory or attachment unless the power tool manufacturer recommends its use on the product Keep cords and hoses away from heat, oil, and sharp edges.
  • 11.
    Ring Test A ringtest should be performed before mounting an abrasive wheel to help determine if the wheel is cracked. The wheel has to be dry and free of sawdust when applying the ring test, otherwise the sound may be deadened. The ring test doesn’t work with certain wheels because of their shape or size.  Wheels 4 inches diameter and smaller  Plugs and Cones  Mounted Wheels  Segments  Plate-Mounted Wheels  Inserted Nut and Projecting Stud Disc Wheels
  • 12.
    How to dothe Ring Test  Suspend the wheel by putting a small pin or your finger through the arbor hole in the wheel. Heavier wheels may be allowed to rest in a vertical position on a clean hard floor (See Illustration 1).  Tap the flat side of the wheel with a light non- metallic implement, such as the handle of a screw driver, at a point  45 degrees from the vertical center line on each side of the wheel (See Illustration 2) and  1 – 2 inches from the edge of the wheel. Large, thick wheels may be struck on the periphery rather than the side of the wheel.  Rotate the wheel 45 degrees and repeat the test until the entire wheel has been checked. Illustration 1 Illustration 2
  • 13.
    How to usering test results The ring test depends on the fact that a crack in the wheel will normally change the sound emitted when the wheel is lightly tapped. An undamaged wheel will give a clear tone. If cracked, there will be a dead sound and not a clear ring. Comparison of the sound with other wheels of the same lot and specification will allow rejection of any wheel with a suspiciously different ring.
  • 14.
    14 Failure to RingTest  Failure to ring test could result in a disintegrating wheel.  This could lead to serious injury or death.  TOOL REST MUST BE ADJUSTED TO NO MORE THAN 1/8 OF AN INCH
  • 15.
    1926.300 (b)(7) General requirements “Tongueguard” The distance between the wheel periphery and the adjustable tongue or the end of the peripheral member at the top shall never exceed 1/4 inch. 1926.303 (c)(2) “Work rests” On floor and bench mounted grinders, shall be provided with work rests which are rigidly supported and readily adjustable. Such work rests shall be kept at a distance not to exceed one-eighth inch from the surface of the wheel. Work Rest 1/8 in. Tongue Guard 1/4 in. Grinder Safety
  • 16.
    The angular exposureof the grinding wheel periphery and sides for safety guards used on machines known as bench and floor stands should not exceed 90 deg. or one-fourth of the periphery. 90 deg. guard Adjustable tongue Work rest 1/4” 1/8” Safety Guard – 1926.300(b)(8)
  • 17.
    1926. 303(a) “Speeds” All grindingmachines shall be supplied with sufficient power to to maintain the spindle speed at safe levels under all conditions of normal operation. Wheel shall be compatible with the size motor of the grinder Hazard - flying abrasive wheel parts Max RPM Grinder Safety
  • 18.
    Ring test 1926.303(c)(7) All abrasivewheels shall be closely inspected and ring-tested before mounting to ensure that they are free from cracks and defects.
  • 19.
    Abrasive wheel grinders must beproperly guarded Grinder Safety
  • 20.
    1926.300(b)(9) “Cylinder grinders” The maximumangular exposure of the grinding wheel periphery and sides for safety guards used on cylindrical grinding machines shall not exceed 180 deg. 180 deg Grinder Safety
  • 21.
    1926.300(d)(1) “Controls” All hand-heldpowered platen sanders, grinders with wheels 2- inch diameter or less, routers, planers, laminate trimmers, nibblers, shears, scroll saws, and jigsaws with blade shanks one-fourth of an inch wide or less may be equipped with only a positive "on-off" control. positive "on-off" control Grinder Safety
  • 22.
    1926.300(d)(2) “On-Off switches” All hand-heldpowered drills, tappers, fastener drivers, horizontal, vertical, and angle grinders with wheels greater than 2 inches in diameter, disc sanders, belt sanders, reciprocating saws, saber saws, and other similar operating powered tools shall be equipped with a momentary contact "on-off" control and may have a lock-on control provided that turnoff can be accomplished by a single motion of the same finger or fingers that turn it on. on- off control Grinder Safety
  • 23.
    1926.300(d)(3) “Switches” All otherhand-held powered tools, such as circular saws, chain saws, and percussion tools without positive accessory holding means, shall be equipped with a constant pressure switch that will shut off the power when the pressure is released. ON POSITION OFF POSITION Grinder Safety ON POSITION
  • 24.
    1926.302(a)(2) “Electric tools” The useof electric cords for hoisting or lowering tools shall not be permitted. Strain relief device required where cord is pulled away from plug due to misuse Grinder Safety
  • 25.
    Safety guards usedon machines known as right angle head or vertical portable grinders shall have a maximum exposure angle of 180 deg. 1910.243(c)(3) Vertical portable grinders 180 deg
  • 26.
    HAND GRINDERS Portable grindingtools must be equipped with safety guards to protect workers not only from the moving wheel surface, but also from flying fragments in case of breakage. Always use safety glasses and a face shield. Turn off the power when not in use. Never clamp a hand-held grinder in a vise.
  • 27.
    PORTABLE CIRCULAR ANDTABLE SAW Always wear safety glasses and a full face shield when needed. Use a respirator in dusty work conditions. Wear hearing protection if noise level is 80 decibels or above. Be sure the switch actuates properly. Use the correct blade for the application. Use sharp blades.
  • 28.
    PORTABLE CIRCULAR ANDTABLE SAW Check often to ensure that guards return to their normal position quickly. Never defeat the guard to expose the blade by, for example, tying it back or removing it. Before starting a circular saw, be sure the power cord and extension cord are out of the blade path long enough to freely complete the cut. Keep aware of the cord location.
  • 29.
    PORTABLE CIRCULAR ANDTABLE SAW For maximum control, hold the saw firmly with both hands. Clamp work pieces. Avoid cutting small pieces that can't be properly secured and material on which the saw shoe can't properly rest. When you start the saw, allow the blade to reach full speed before contacting the workpiece. When making a partial cut, or if power is interrupted, release the trigger and don't remove the saw until the blade has come to a complete stop.
  • 30.
    PORTABLE DRILL Check carefullyfor loose power cord connections and frays or damage to the cord. Be sure the chuck is tightly secured to the spindle. This is especially important on reversible type drills. Tighten the bit securely. The chuck key must be removed from the chuck before starting the drill.
  • 31.
    PORTABLE DRILL Check handles.Be sure they are securely installed. Always use the auxiliary drill handle when provided. It gives you more control of the drill, especially if stalled conditions occur. Always hold or brace the tool securely. Brace against stationary objects for maximum control. Don't force a drill. Apply enough pressure to keep the drill bit cutting smoothly. If the drill slows down, relieve the pressure.
  • 32.
    MITER BOX SAWS Stayalert to keeping hands and fingers away from the blade's path. Be sure all guards are in place and working. Use only recommended size and rpm rated blades. When installing or changing a blade, be sure the blade and related washers and fasteners are correctly positioned and secured on the saw arbor.
  • 33.
    PNEUMATIC TOOLS Pneumatic toolsare powered by compressed air and include Chippers Drills Hammers Sanders. The main danger is getting hit by one of the tool's attachments or by some kind of fastener the worker is using with the tool. Eye protection is required and face protection is recommended for employees working with pneumatic tools
  • 34.
    PNEUMATIC TOOLS Tool retainer Atool retainer shall be installed on each piece of utilization equipment which, without such a retainer, may eject the tool. Air hose Hose and hose connections used for conducting compressed air to utilization equipment shall be designed for the pressure and service to which they are subjected.
  • 35.
    COMPRESSED AIR 1. Beforemaking or breaking any air connection, always turn off the air supply. Use the valve to turn off the air - never kink the hose as a shortcut kinking the hose may damage or even rupture the air hose. 2. Protect the air hose from damage. Move it out of the way of vehicles so that it isn't run over. Also, be sure not to drag hoses around sharp corners. 3. Be sure to use the proper size air hose and fittings to keep air pressure at a maximum throughout the entire line. Most manufacturers recommend 90 psi at the tool.
  • 36.
    COMPRESSED AIR 4. Toensure the best connection, clear any dirt off the nipple before connecting the air hose to the tool. 5. When the tool is connected, check the hose and all connections for leaks or damage before using the tool. 6. Maintain a clean, dry, regulated source of air to operate air tools at peak performance. 7. Do not use compressed air to blow your clothes.
  • 37.
    Summary Power tools arevery common to any production facility. They can expose employees to multiple hazards if they are not maintained and used properly. It is critical that you know how to maintain, test and operate any power tool you intend to use.