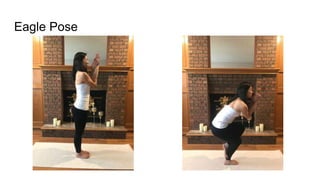
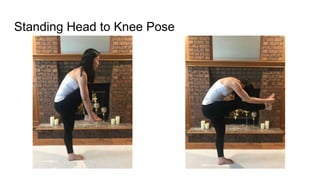
Eagle Pose
Yoga with Meridian for Self Healing
Eagle Pose
Eagle Pose
Stand tall with feet together.
Inhale, arms over your head sideways.
Exhale, cross right arm under your left arm, palms face each other. Cross your arms at your elbows and at
your wrists. Bring your hands in front of your face, palms together fingers interlaced or in namaskar.
Pull your elbows down toward the floor, fingertips below your nose. Chin down, parallel to floor.
Take a deep breath.Stomach in.Exhale,sit down halfway on the chair, chest up, upper body back.
Lift your right leg up high as possible, crossing over your left leg, as high up on the leg a possible.
Eagle Pose
Squeeze, twist your legs together. Put your right foot behind your left calf muscle. Sit down more. Slide
your foot down towards the ankle. No gap between the ankle and the calf muscle, no gap between the
knees. Arch your upper body back.
Bring your knees to the right, upper body to the left, keeping feet, knees, elbows and wrists in a vertical
line below your nose.
Right hip back and down. If your foot is coming out, sit down more. If you’re losing the balance, upper
body back more.
Suck your stomach in. Sit down more. Pull your elbows down more. Upper body back more at the end.
Inhale breathing, come up. Other side.
Eagle Pose
Additional Instructions:
- If you are unable to bring your palms together, interlace your fingers, or hold on to your wrist.
- Turn your wrists in to each other to get your wrists straight.
- Sit down, keep chest lifting up. Open up 14 of the largest joints in the body. Scapulae, shoulders,
elbows, wrists, hips, knees and ankles.
Benefits:
The eagle supplies fresh blood to the sexual organs and the kidneys, increasing sexual power and control.
It helps firm calves, thighs, hips, abdomen, and upper arms. It also improves the flexibility of the hip, knee
and ankle joints and strengthens the latissimus dorsi, trapezius, and deltoid muscles.
Standing Head to Knee
Pose
Yoga with Meridian for Self Healing
Standing Head to Knee Pose
Heels and toes together. Raise the right leg, knee bent at 90 degrees. foot flexed. Engage the bandhas.
Interlace your fingers, reach arms forward, hold your right foot in front of you, from underneath, at the ball
of the foot. Arms straight and relaxed. Chin down parallel to floor.
Distribute the weight all over the left foot, equally. Don’t bring it to the side. Big toe mound, and outside
edge of heel.(Pada bandha) Contract the thigh muscles, standing leg solid, straight. The whole kneecap
lifts up.
Stomach in, find your core, protect your back. If your standing leg is bending, come back to the
foundation.
Standing Head to Knee Pose
Inhale breathing, slowly, gently, lift your chest up, the upper spine straightened,right leg heel
lift up stretch forward, until the leg is parallel to the floor. No higher , no lower.
Heel same level as your hip joint. Arms straight, chest up. Standing leg solid concrete post.
Take a deep breath, continuously kick your right leg-heel forward, turn your right foot in from
the ankle towards the face, flex all five toes back towards your face. Flexing your foot,
stretches achilles tendon. Kick your heel forward until both legs are straight.
Standing Head to Knee Pose
Both legs straight, then only, bend your elbows down towards the floor until your elbows
touch the calf muscle.Eventually your elbows touch below the calf muscle.
Slowly bring your chin to the chest, head down, look at your stomach, forehead touches the
knee.
Change, come up the reverse way you went in, head up, arms straight, leg down, feet
together.
Standing Head to Knee Pose
Additional Instruction:
- Look forward at the knee. Keep core engaged. Falling backward, not kicking the heel forward
enough, falling forward, lost the core contraction.
- For those with a tender, or tweaky lower back, hold leg up at 90 degree angle, stay in first position.
Just work on building the hip strength required to hold the leg in that bent up position. Not pulling
with the arm.
Benefits:
The standing head to knee helps develop concentration, patience, and determination. Physically, it
tightens abdominal and thigh muscles, improves flexibility of the sciatic nerves, and strengthens the
tendons, biceps of the thigh muscles, and hamstrings in the legs, in addition to the deltoid, trapezius,
latissimus dorsi, scapula, biceps, and triceps.
Standing Bow Pulling Pose
Yoga with Meridian for Self Healing
Standing Bow Pulling Pose
Stand with feet together. Bring your right hand out, palm facing up, point of the elbow touching your body.
Open the arm to the side of the room. Elbow in your back pocket.
Without turning or twisting your hand, keep your palm towards the side, thumb towards the back wall. Pick
up your right foot behind you. Hold from the inside at the ankle. Five fingers together.
Bring your left arm up in front of you, stretch up towards the ceiling.
Shoulder close to the chin, head straight. Bring your knees together to start. Hips even. Point the right
toes.Keep left leg strong and straight throughout the poster.
Inhale breathing, kick your right leg back and up towards the ceiling. Stretch your left arm forward.
Standing Bow Pulling Pose
Bring your body down from the lower spine, abdomen, belly button facing the floor. Standing leg locked.
Continuously keep kicking your right leg up as hard as possible. Two feet in one line from the side.
Kick back, so your right shoulder is behind your left shoulder. Stretch your left fingertips forward. Palm
facing the floor. Shoulder to your chin. Your two shoulders should be in one line.
Kicking and stretching should be equal and simultaneous, 50/50. Do both to stay upright.
Body down more. Stretch forward more. Kick back more, kick harder.
Body down. Kick up. Keep stretching arm up, keep kicking up. Change, other side.
Standing Bow Pulling Pose
Additional Instructions:
- Make sure the right knee disappears behind your hip, not coming out to the side. Hips do not twist
out of line.
- There should be a twist in your middle and upper spine. Two shoulders are stretching apart.
Benefits:
The Standing Bow Pulling is a perfect example of the “tourniquet” or “damming “effect in Yoga, because it
transfers the circulation from one side of the body to the other, and then equalizes it-circulating fresh blood
to each internal organ and gland to keep them healthy.
This pose helps develop concentration, patience, and determination. Physically, it firms the abdominal wall
and upper thighs, and tightens upper arms, hips, and buttocks. It increases the size and elasticity of the
ribcage and the lungs and improves the flexibility and strength of the lower spine and of most of the
body’s muscles.
Balancing Stick Pose
Yoga with Meridian for Self Healing
Balancing Stick Pose
Arms over your head sideways bring your palms together, interlock the fingers, release the index fingers,
thumbs crossed. Arms/elbows straight.
Stretch up towards the ceiling, try to touch the ceiling. Arms always touching with your ears.
Chin up. Upper body back. Engage the bandhas.
Inhale breathing, take a big step forward with your right leg.
Left toes off the floor, balance on one leg. Both legs absolutely straight. Knees locked, left toes pointed.
Balancing Stick Pose
Take a deep breath. Inhale breathing. Stretch up towards the ceiling. Suck your stomach in.
Come down until your whole body, arms, head, leg, everything is parallel to the floor. From the side your
body looks like a T. Arms and head stay together.
Continuously stretch your body forward, stretch your left leg back, pointed toes, leg straight. Left hip down
toward the floor. Hips level.
Chin forward, away from the chest. Keep your arms right next to your ears. Press your palms together
more.
Stretch the whole body in opposite directions. Body down, leg up.Chest down, arms up.
Inhale breathing come up, arms and head together. Keep your arms there. Other side.
Balancing Stick Pose
Additional Instruction
- Get your leg up, pointed toes.
- No gap between arms and head.
- Keep the elbows and knees straight. Keep hips square. Stomach in. Squeeze the hands together.
Benefits:
The Balancing Stick perfects control and balance by improve physical, psychological, and mental powers.
In addition, it firms hips, buttocks, and upper thighs, as well as providing the same benefits for the legs as
the Standing Head to Knee. It increases the circulation, strengthens the heart muscle, and stretches the
capacity of the lungs.
It is one of the best exercises for bad posture, it strengthens the flexibility of latissimus dorsi,deltoid, and
trapezius muscles.It improves the flexibility, strength, and muscle tone of shoulders, upper arms, spine
and hip joints.
Standing Separate Leg
Stretching Pose
Yoga with Meridian for Self Healing
Standing Separate Leg Stretching Pose
Feet together. Arms over the head sideways.
Right leg step to the right, four feet minimum. At the same time, arms down parallel to the floor. Palms
facing the floor. Heels in one line, feet slightly pigeon toed. Hips forward, chest up. Take a deep breath.
Exhale breathing, suck your stomach in and slowly stretch your upper body down towards the floor.
Keep your chin forward, looking forward in front of the feet, spine straight, legs straight, thighs contracted.
Grab your heels from the outside, five fingers together, thumbs with the index finger. As a beginner, if you
can’t grab the heels yet, grab the outsides of your feet or slide hands down the legs towards feet.
Standing Separate Leg Stretching Pose
Once you have the grip, pull on your heels as hard as possible, stretching your body down from the lower
spine towards the floor. Keep the spine straight. Aim your chest towards the floor. Look in front of your
feet.
Try to touch your forehead on the floor. If you cannot touch your forehead on the floor, open your legs
more.
Chin away form your chest, look forward, roll forward. Body weight forwards towards the toes.
Bend your elbows towards your shins. Shoulders away from the ears. Straighten your legs. Lock the
knees.
Inhale breathing, slowly come up. Right leg back to the left. Exhale, arms down by your side.
Standing Separate Leg Stretching Pose
Additional Instructions:
- If your forehead is easily touching the floor, bring your feet closer to each other, only as much as you
need, to touch your forehead more in the centre, between the feet. Do not rest your forehead on
floor.
- Your hips are over your toes instead of your heels, you are almost falling forward.
- One day your spine should be perfectly straight from the coccyx to the neck, forehead touching the
floor between the feet.
- The front of the thighs should be fully contracted, kneecaps lifting up. This protects the knees and
helps the hamstrings lengthen more.
Standing Separate Leg Stretching Pose
Benefits:
The Standing Separate Leg Stretching cures and prevents sciatica by stretching and and strengthening
the sciatic nerves and the tendons of the legs. It helps the functioning of most of the internal abdominal
organs, especially the small and large intestine, and improve the muscle tone and flexibility of thighs and
calves and the flexibility of the pelvis, ankles, and hip joints, and of the last five vertebrate of the spine.

Poses 6 10

  • 1.
    Eagle Pose Yoga withMeridian for Self Healing
  • 2.
  • 3.
    Eagle Pose Stand tallwith feet together. Inhale, arms over your head sideways. Exhale, cross right arm under your left arm, palms face each other. Cross your arms at your elbows and at your wrists. Bring your hands in front of your face, palms together fingers interlaced or in namaskar. Pull your elbows down toward the floor, fingertips below your nose. Chin down, parallel to floor. Take a deep breath.Stomach in.Exhale,sit down halfway on the chair, chest up, upper body back. Lift your right leg up high as possible, crossing over your left leg, as high up on the leg a possible.
  • 4.
    Eagle Pose Squeeze, twistyour legs together. Put your right foot behind your left calf muscle. Sit down more. Slide your foot down towards the ankle. No gap between the ankle and the calf muscle, no gap between the knees. Arch your upper body back. Bring your knees to the right, upper body to the left, keeping feet, knees, elbows and wrists in a vertical line below your nose. Right hip back and down. If your foot is coming out, sit down more. If you’re losing the balance, upper body back more. Suck your stomach in. Sit down more. Pull your elbows down more. Upper body back more at the end. Inhale breathing, come up. Other side.
  • 5.
    Eagle Pose Additional Instructions: -If you are unable to bring your palms together, interlace your fingers, or hold on to your wrist. - Turn your wrists in to each other to get your wrists straight. - Sit down, keep chest lifting up. Open up 14 of the largest joints in the body. Scapulae, shoulders, elbows, wrists, hips, knees and ankles. Benefits: The eagle supplies fresh blood to the sexual organs and the kidneys, increasing sexual power and control. It helps firm calves, thighs, hips, abdomen, and upper arms. It also improves the flexibility of the hip, knee and ankle joints and strengthens the latissimus dorsi, trapezius, and deltoid muscles.
  • 6.
    Standing Head toKnee Pose Yoga with Meridian for Self Healing
  • 7.
  • 8.
    Standing Head toKnee Pose Heels and toes together. Raise the right leg, knee bent at 90 degrees. foot flexed. Engage the bandhas. Interlace your fingers, reach arms forward, hold your right foot in front of you, from underneath, at the ball of the foot. Arms straight and relaxed. Chin down parallel to floor. Distribute the weight all over the left foot, equally. Don’t bring it to the side. Big toe mound, and outside edge of heel.(Pada bandha) Contract the thigh muscles, standing leg solid, straight. The whole kneecap lifts up. Stomach in, find your core, protect your back. If your standing leg is bending, come back to the foundation.
  • 9.
    Standing Head toKnee Pose Inhale breathing, slowly, gently, lift your chest up, the upper spine straightened,right leg heel lift up stretch forward, until the leg is parallel to the floor. No higher , no lower. Heel same level as your hip joint. Arms straight, chest up. Standing leg solid concrete post. Take a deep breath, continuously kick your right leg-heel forward, turn your right foot in from the ankle towards the face, flex all five toes back towards your face. Flexing your foot, stretches achilles tendon. Kick your heel forward until both legs are straight.
  • 10.
    Standing Head toKnee Pose Both legs straight, then only, bend your elbows down towards the floor until your elbows touch the calf muscle.Eventually your elbows touch below the calf muscle. Slowly bring your chin to the chest, head down, look at your stomach, forehead touches the knee. Change, come up the reverse way you went in, head up, arms straight, leg down, feet together.
  • 11.
    Standing Head toKnee Pose Additional Instruction: - Look forward at the knee. Keep core engaged. Falling backward, not kicking the heel forward enough, falling forward, lost the core contraction. - For those with a tender, or tweaky lower back, hold leg up at 90 degree angle, stay in first position. Just work on building the hip strength required to hold the leg in that bent up position. Not pulling with the arm. Benefits: The standing head to knee helps develop concentration, patience, and determination. Physically, it tightens abdominal and thigh muscles, improves flexibility of the sciatic nerves, and strengthens the tendons, biceps of the thigh muscles, and hamstrings in the legs, in addition to the deltoid, trapezius, latissimus dorsi, scapula, biceps, and triceps.
  • 12.
    Standing Bow PullingPose Yoga with Meridian for Self Healing
  • 13.
  • 14.
    Standing Bow PullingPose Stand with feet together. Bring your right hand out, palm facing up, point of the elbow touching your body. Open the arm to the side of the room. Elbow in your back pocket. Without turning or twisting your hand, keep your palm towards the side, thumb towards the back wall. Pick up your right foot behind you. Hold from the inside at the ankle. Five fingers together. Bring your left arm up in front of you, stretch up towards the ceiling. Shoulder close to the chin, head straight. Bring your knees together to start. Hips even. Point the right toes.Keep left leg strong and straight throughout the poster. Inhale breathing, kick your right leg back and up towards the ceiling. Stretch your left arm forward.
  • 15.
    Standing Bow PullingPose Bring your body down from the lower spine, abdomen, belly button facing the floor. Standing leg locked. Continuously keep kicking your right leg up as hard as possible. Two feet in one line from the side. Kick back, so your right shoulder is behind your left shoulder. Stretch your left fingertips forward. Palm facing the floor. Shoulder to your chin. Your two shoulders should be in one line. Kicking and stretching should be equal and simultaneous, 50/50. Do both to stay upright. Body down more. Stretch forward more. Kick back more, kick harder. Body down. Kick up. Keep stretching arm up, keep kicking up. Change, other side.
  • 16.
    Standing Bow PullingPose Additional Instructions: - Make sure the right knee disappears behind your hip, not coming out to the side. Hips do not twist out of line. - There should be a twist in your middle and upper spine. Two shoulders are stretching apart. Benefits: The Standing Bow Pulling is a perfect example of the “tourniquet” or “damming “effect in Yoga, because it transfers the circulation from one side of the body to the other, and then equalizes it-circulating fresh blood to each internal organ and gland to keep them healthy. This pose helps develop concentration, patience, and determination. Physically, it firms the abdominal wall and upper thighs, and tightens upper arms, hips, and buttocks. It increases the size and elasticity of the ribcage and the lungs and improves the flexibility and strength of the lower spine and of most of the body’s muscles.
  • 17.
    Balancing Stick Pose Yogawith Meridian for Self Healing
  • 18.
  • 19.
    Balancing Stick Pose Armsover your head sideways bring your palms together, interlock the fingers, release the index fingers, thumbs crossed. Arms/elbows straight. Stretch up towards the ceiling, try to touch the ceiling. Arms always touching with your ears. Chin up. Upper body back. Engage the bandhas. Inhale breathing, take a big step forward with your right leg. Left toes off the floor, balance on one leg. Both legs absolutely straight. Knees locked, left toes pointed.
  • 20.
    Balancing Stick Pose Takea deep breath. Inhale breathing. Stretch up towards the ceiling. Suck your stomach in. Come down until your whole body, arms, head, leg, everything is parallel to the floor. From the side your body looks like a T. Arms and head stay together. Continuously stretch your body forward, stretch your left leg back, pointed toes, leg straight. Left hip down toward the floor. Hips level. Chin forward, away from the chest. Keep your arms right next to your ears. Press your palms together more. Stretch the whole body in opposite directions. Body down, leg up.Chest down, arms up. Inhale breathing come up, arms and head together. Keep your arms there. Other side.
  • 21.
    Balancing Stick Pose AdditionalInstruction - Get your leg up, pointed toes. - No gap between arms and head. - Keep the elbows and knees straight. Keep hips square. Stomach in. Squeeze the hands together. Benefits: The Balancing Stick perfects control and balance by improve physical, psychological, and mental powers. In addition, it firms hips, buttocks, and upper thighs, as well as providing the same benefits for the legs as the Standing Head to Knee. It increases the circulation, strengthens the heart muscle, and stretches the capacity of the lungs. It is one of the best exercises for bad posture, it strengthens the flexibility of latissimus dorsi,deltoid, and trapezius muscles.It improves the flexibility, strength, and muscle tone of shoulders, upper arms, spine and hip joints.
  • 22.
    Standing Separate Leg StretchingPose Yoga with Meridian for Self Healing
  • 23.
    Standing Separate LegStretching Pose
  • 24.
    Standing Separate LegStretching Pose Feet together. Arms over the head sideways. Right leg step to the right, four feet minimum. At the same time, arms down parallel to the floor. Palms facing the floor. Heels in one line, feet slightly pigeon toed. Hips forward, chest up. Take a deep breath. Exhale breathing, suck your stomach in and slowly stretch your upper body down towards the floor. Keep your chin forward, looking forward in front of the feet, spine straight, legs straight, thighs contracted. Grab your heels from the outside, five fingers together, thumbs with the index finger. As a beginner, if you can’t grab the heels yet, grab the outsides of your feet or slide hands down the legs towards feet.
  • 25.
    Standing Separate LegStretching Pose Once you have the grip, pull on your heels as hard as possible, stretching your body down from the lower spine towards the floor. Keep the spine straight. Aim your chest towards the floor. Look in front of your feet. Try to touch your forehead on the floor. If you cannot touch your forehead on the floor, open your legs more. Chin away form your chest, look forward, roll forward. Body weight forwards towards the toes. Bend your elbows towards your shins. Shoulders away from the ears. Straighten your legs. Lock the knees. Inhale breathing, slowly come up. Right leg back to the left. Exhale, arms down by your side.
  • 26.
    Standing Separate LegStretching Pose Additional Instructions: - If your forehead is easily touching the floor, bring your feet closer to each other, only as much as you need, to touch your forehead more in the centre, between the feet. Do not rest your forehead on floor. - Your hips are over your toes instead of your heels, you are almost falling forward. - One day your spine should be perfectly straight from the coccyx to the neck, forehead touching the floor between the feet. - The front of the thighs should be fully contracted, kneecaps lifting up. This protects the knees and helps the hamstrings lengthen more.
  • 27.
    Standing Separate LegStretching Pose Benefits: The Standing Separate Leg Stretching cures and prevents sciatica by stretching and and strengthening the sciatic nerves and the tendons of the legs. It helps the functioning of most of the internal abdominal organs, especially the small and large intestine, and improve the muscle tone and flexibility of thighs and calves and the flexibility of the pelvis, ankles, and hip joints, and of the last five vertebrate of the spine.