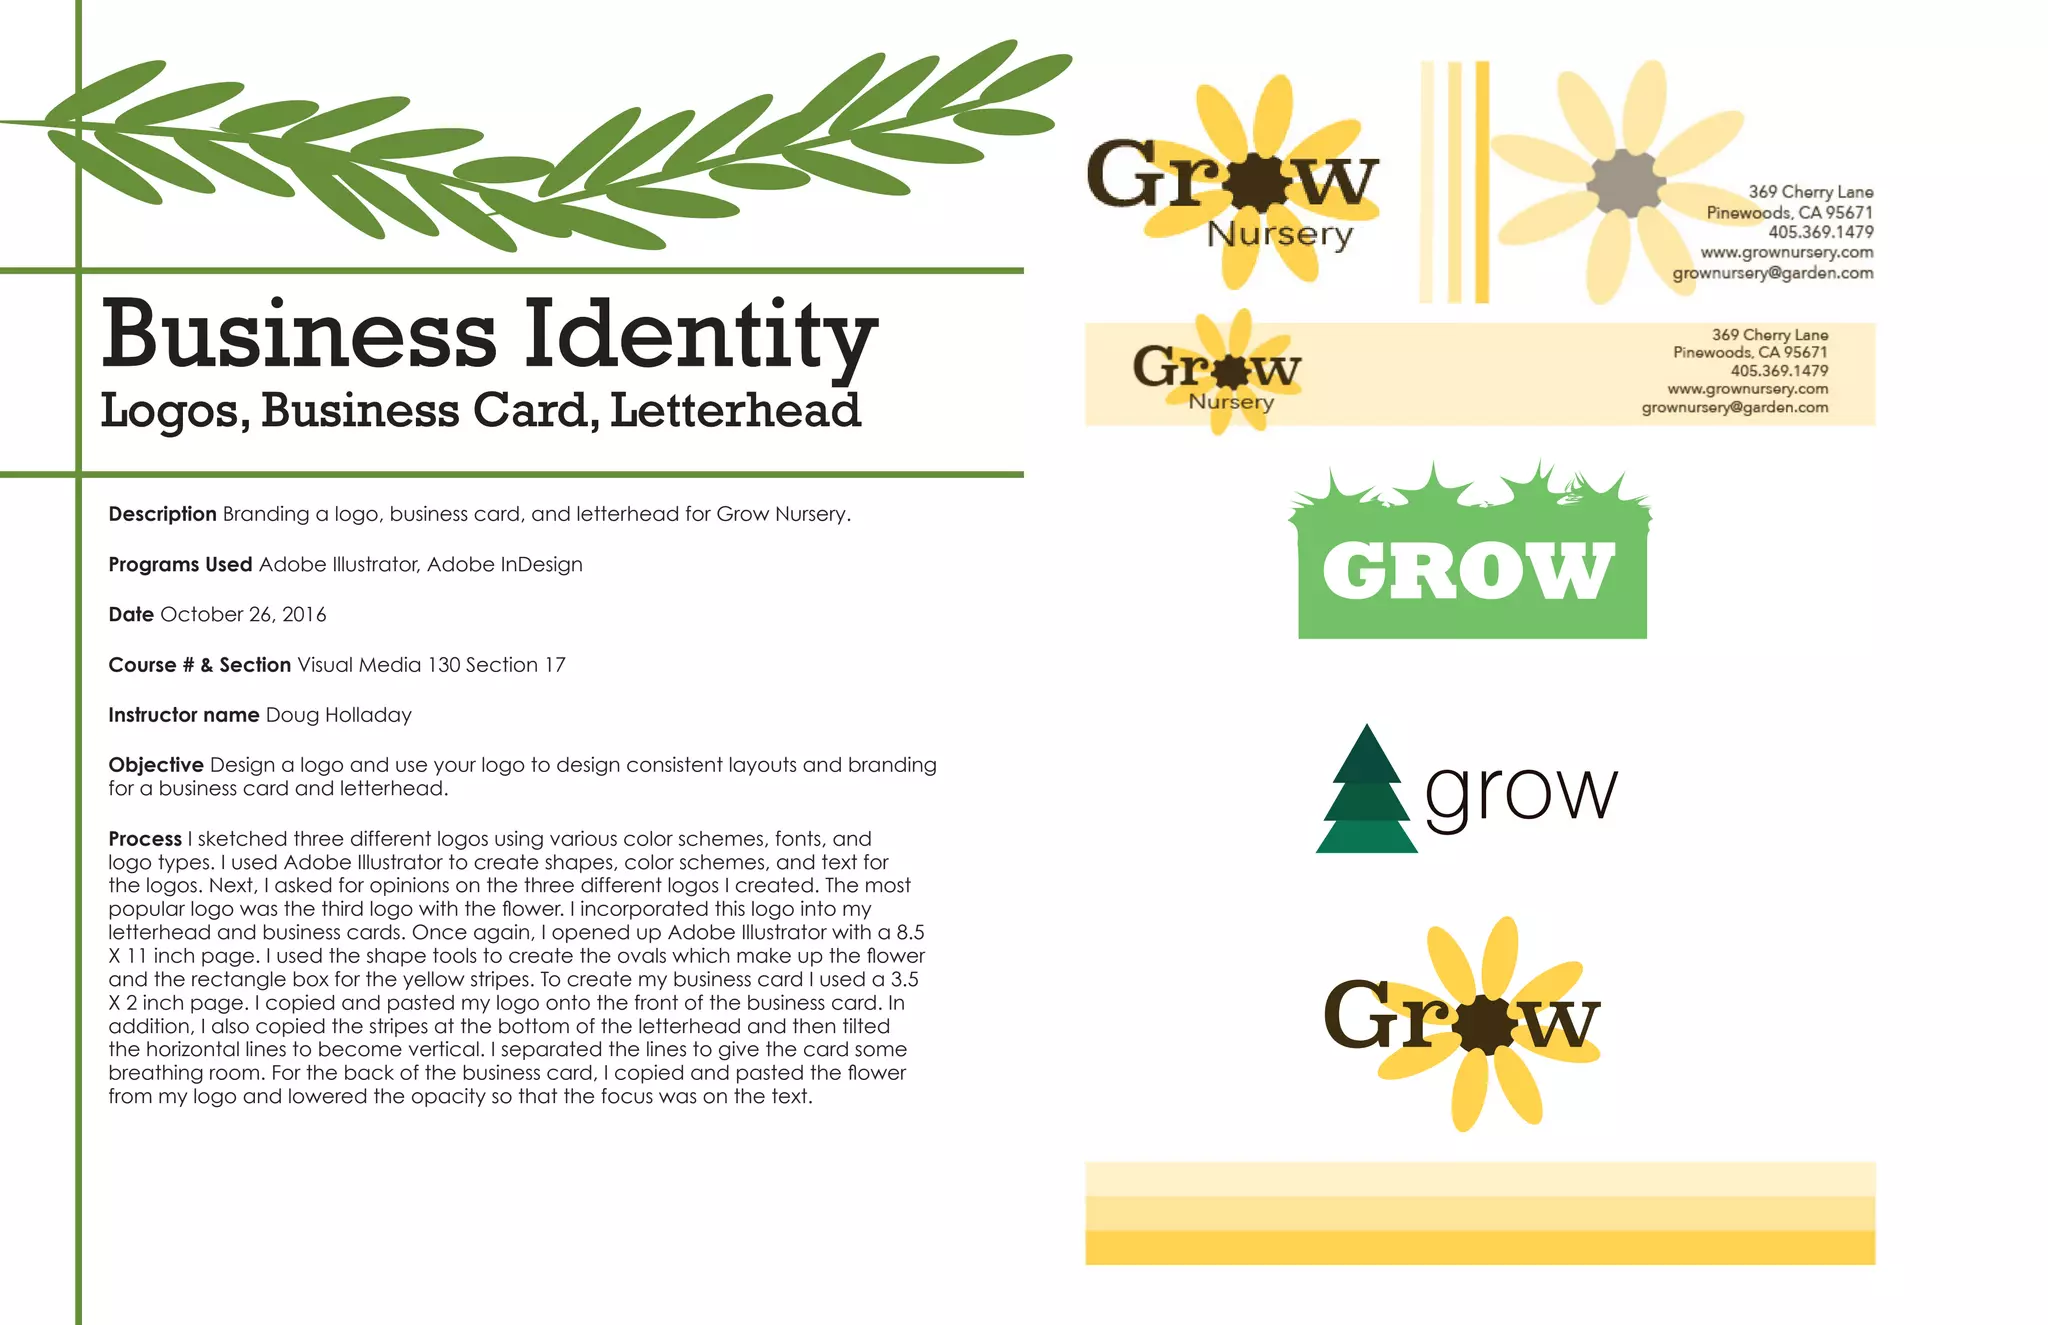
PORTFOLIO
McKenzie Taggart
Table of Contents
1	 Web Page Mockup
2	Brochure
3	 Magazine Cover
4	Montage
5	 Photo Design
6	Infographic
7	 Business Identity - Logos, Business Card, Letterhead
8	Prezi
9	Coding
Contact
Name: 	 McKenzie Taggart
Address: 	 4500 The Woods Dr Apt. 2727 San Jose, CA 95136
Phone: 	 801.643.9309
Email: 	 mckenzietaggart@gmail.com
Web Page Mockup
Description Website for mens and womens leather bags.
Programs Used Adobe Photoshop
Date November 16, 2016
Course # & Section Visual Media 130 Section 17
Instructor name Doug Holladay
Objective Your full color, high definition, accurate prototype will serve as the blueprint
for the new website. The web developer has requested wireframe (aka: shape map)
and a .psd with layers (Photoshop native document) based on the 960 web design
grid for accurate sizing and precise coding
Process First, I sketched out my ideas for the website on a piece of paper. I included
all of the details for the website. Next, I opened up Adobe Photoshop and created
a layout/wireframe of my website. I used a 16-column grid background to help me
align all of the elements. I used the shape tool to create boxes for my text and image
placement. Finally, I added the actual text using the text box tool. Then came the
images. I added layers and used”create clipping mask” to put the images in the
shapes I had previously made.
Brochure
Description An informational travel brochure about things to see in San Francisco.
Programs Used Adobe Photoshop, Adobe Illustrator, Adobe InDesign
Date November 30, 2016
Course # & Section Visual Media 130 Section 17
Instructor name Doug Holladay
Objective Design a full-color, folding brochure to help promote the company prod-
uct, service or location.
Process I sketched out a draft of my brochure. Then, I opened InDesign and created
a layout using text boxes and rectangle frame tools. Next, I added the pictures to my
layout from a file that I collected the pictures in. In addition, I added filler text that I
would later fill with original text. I used the shape tool to make rectangles that would
go behind the titles on the front and back. I copied these rectangles to use for the
stripes on the back. I used the color dropper tool to find an exact match for the color
of the rectangles. To make sure that the brochure was aligned and folded correctly,
I used many ruler alignments. I cropped the photos to line up when the brochure was
folded together. In Adobe Photoshop, I clipped the check box picture to remove the
white square background. Finally, I made the bay bucketlist logo in Adobe Illustrator
and I added in the photo from Photoshop. Last of all, I exported the file as a jpg and
printed our my brochure. I grouped the elements and exported my logo into Adobe
InDesign. Last of all, I exported the file as a jpg and printed our my brochure.
Description Design a magazine cover that intorduces you to the world.
Programs Used Adobe Photoshop, Adobe InDesign
Date September 29, 2016
Course # & Section Visual Media 130 Section 17
Instructor name Doug Holladay
Objective Combine good typography skills with the design process to create an
engaging piece that will communicate your message to the target audience.
Process After researching many different magazine cover articles online, I got a few
ideas of what it really takes to create a magazine cover. I sketched four different
ideas on paper. The ideas I sketched include a bridal magazine with articles about
fashion and organizing a wedding. Of course, I drew out a classic headshot cover
with the theme being “get to know McKenzie.” While thinking about these ideas, I
made a shape map using InDesign. Next, I found a quality picture. Using Photoshop,
I created a hexagon and fit my picture inside of the shape. I copied the newly
shaped photo into InDesign and started forming a hexagon pattern around my
photo to create a focal point. Then I added the title and article text boxes. To find a
good color scheme, I used the eye dropper tool and found colors in my photo.
Magazine Cover
Montage
Description We seek after what we read in the scriptures.
Programs Used Adobe Photoshop
Date October 19, 2016
Course # & Section Visual Media 130 Section 17
Instructor name Doug Holladay
Objective Create a spiritual poster montage using the layer mask and at least two
photos and type.
Process First I decided on a quote to use and then I picked multiple photos from
unsplash.com that related to the quote. In Photoshop, I opened up a white
background that was 1650×1275 pixels. I opened up the photos I decided to use
separately in new tabs. I edited the photos a little bit and added a sharpen filter on
the photo of the little boy. Next, I used the move tool to move both photos onto the
white background page. The photos were layered on top of each other. I added
a mask to each photo to ensure non-destructive editing. I clicked the mask on the
little boy’s photo and used the brush tool to erase the world background from the
his face and hands, the book, and the white blanket. Also, I changed the opacity of
the different layers. Last of all, I added a text box for the title.
Description Capturing a boy who loves the mountains.
Programs Used Adobe Photoshop
Date October 12, 2016
Course # & Section Visual Media 130 Section 17
Instructor name Doug Holladay
Objective Using Photoshop create a full-bleed, 8.5 by 11, photodesign project
that includes an original, new (since the activity) quality image, a consistent color
scheme based on that image, some text, and a few design elements.
Process To begin this project, I brainstormed a message and an audience to create
purpose behind my photo. Next, I sketched out two photo ideas with color schemes
so that I could try to capture the colors in my photo. After taking a picture, I used
Photoshop to edit the photo. I increased the levels and vibrance of the photo to
create a good balance of light and shadows. Then, I applied selective color to
sharpen the colors in the photo. The last edit I used was the sharpen tool to create
high definition on the face and hair. In Photoshop, I resized the photo to fit an
8.5 X 11 inch document and put the edited photo on a new blank background
in Photoshop. I layered the photo with triangle shapes and text boxes I created
in Photoshop. All of the colors I used came directly from the photo using the eye
dropper tool.
Photo Design
Infographic
Description Illustract the calorie amounts in Cafe Rio and Costa Vida in an
informational brochure.
Programs Used Adobe Illustrator
Date November 2, 2016
Course # & Section Visual Media 130 Section 17
Instructor name Doug Holladay
Objective Create any type of inforgraphic to be shared on pinterest and the
company’s blog.
Process I chose a topic for a compare and contrast infographic. I checked out
Chipotle and Cafe Rio’s websites to find the nutrition information to compare similar
menu items (Chicken Salad and Chicken Tostada). Next, I doodled different pictures
I could add to the infographic like the lights, ingredients, etc. Then, I sketched 2
different layouts for the infographic on a sheet of paper. I opened a new page in
Illustrator and found a wooden and metallic backgrounds from Textures.com. Then,
I found a vector image of the Cafe Rio and Chipotle logos on brandsoftheword.
com which I copied onto the wooden background. The most tedious process came
next, I created all of the ingredients using the shape tool in Illustrator. I went back to
the the restaurant websites and found the exact calorie amount for each ingredient
and added text boxes corresponding to the ingredient. I grabbed the ruler lines from
the edges of the page to align all of my text. Last of all, I created a column graph in
Adobe Illustrator to compare the total calorie amounts between a Cafe Rio chicken
salad and a Chipotle Chicken Salad.
Business Identity
Logos, Business Card, Letterhead
Description Branding a logo, business card, and letterhead for Grow Nursery.
Programs Used Adobe Illustrator, Adobe InDesign
Date October 26, 2016
Course # & Section Visual Media 130 Section 17
Instructor name Doug Holladay
Objective Design a logo and use your logo to design consistent layouts and branding
for a business card and letterhead.
Process I sketched three different logos using various color schemes, fonts, and
logo types. I used Adobe Illustrator to create shapes, color schemes, and text for
the logos. Next, I asked for opinions on the three different logos I created. The most
popular logo was the third logo with the flower. I incorporated this logo into my
letterhead and business cards. Once again, I opened up Adobe Illustrator with a 8.5
X 11 inch page. I used the shape tools to create the ovals which make up the flower
and the rectangle box for the yellow stripes. To create my business card I used a 3.5
X 2 inch page. I copied and pasted my logo onto the front of the business card. In
addition, I also copied the stripes at the bottom of the letterhead and then tilted
the horizontal lines to become vertical. I separated the lines to give the card some
breathing room. For the back of the business card, I copied and pasted the flower
from my logo and lowered the opacity so that the focus was on the text.
GROW
grow
Gr w
Company Name: Grow Nursery
Prezi
Description My Prezi teaches past generations how to use Instagram.
Programs Used Prezi
Date October 5, 2016
Course # & Section Visual Media 130 Section 17
Instructor name Doug Holladay
Objective Choose a topic you are interested in to create an instructional
presentation with 10-15 frames.
Process Recently, I was thinking about how my grandparents would love keeping up
with their grandkids on Instagram. So for this project, I made an informational video
about the basics of Instagram. I sketched out two ideas for a background. The first
is an Instagram profile that would move along the different features of Instagram.
My second idea was use a camera as the background and have the slides as
little flashes of light. I started with a crumpled paper texture from textures.com
and set it as the background in the customize tab. I used this texture to represent
new ideas and the frustration that comes with it. Next, I added new slides, created
text boxes, and placed stickers, shapes, and images in Prezi to illustrate my text. In
addition, I used photo examples from Lindsey Christensen’s Instagram profile. As the
finishing touch, I added a picture of my grandma and husband trying to figure out
technology.
Coding
Description A website I created with my logo Grow Nursery.
Programs Used Text Wrangler, Adobe Illustrator
Date November 11, 2016
Course # & Section Visual Media 130 Section 17
Instructor name Doug Holladay
Objective Use your logo from the Business Identity Project to showcase and create a
webpage layout using what you know about HTML and CSS.
Process I opened up Text Wrangler which is a text and code editor. I used basic CSS
coding to make the background color green, the header yellow with white text, the
yellow border around the edge white box, and I changed the font to brown. I also
added an image into the html file to include my logo. I used header tags for the
different levels of text. Lastly, I included a bulleted list and a link on my website.

Portfolio Project

  • 1.
  • 2.
    Table of Contents 1 Web Page Mockup 2 Brochure 3 Magazine Cover 4 Montage 5 Photo Design 6 Infographic 7 Business Identity - Logos, Business Card, Letterhead 8 Prezi 9 Coding Contact Name: McKenzie Taggart Address: 4500 The Woods Dr Apt. 2727 San Jose, CA 95136 Phone: 801.643.9309 Email: mckenzietaggart@gmail.com
  • 3.
    Web Page Mockup DescriptionWebsite for mens and womens leather bags. Programs Used Adobe Photoshop Date November 16, 2016 Course # & Section Visual Media 130 Section 17 Instructor name Doug Holladay Objective Your full color, high definition, accurate prototype will serve as the blueprint for the new website. The web developer has requested wireframe (aka: shape map) and a .psd with layers (Photoshop native document) based on the 960 web design grid for accurate sizing and precise coding Process First, I sketched out my ideas for the website on a piece of paper. I included all of the details for the website. Next, I opened up Adobe Photoshop and created a layout/wireframe of my website. I used a 16-column grid background to help me align all of the elements. I used the shape tool to create boxes for my text and image placement. Finally, I added the actual text using the text box tool. Then came the images. I added layers and used”create clipping mask” to put the images in the shapes I had previously made.
  • 4.
    Brochure Description An informationaltravel brochure about things to see in San Francisco. Programs Used Adobe Photoshop, Adobe Illustrator, Adobe InDesign Date November 30, 2016 Course # & Section Visual Media 130 Section 17 Instructor name Doug Holladay Objective Design a full-color, folding brochure to help promote the company prod- uct, service or location. Process I sketched out a draft of my brochure. Then, I opened InDesign and created a layout using text boxes and rectangle frame tools. Next, I added the pictures to my layout from a file that I collected the pictures in. In addition, I added filler text that I would later fill with original text. I used the shape tool to make rectangles that would go behind the titles on the front and back. I copied these rectangles to use for the stripes on the back. I used the color dropper tool to find an exact match for the color of the rectangles. To make sure that the brochure was aligned and folded correctly, I used many ruler alignments. I cropped the photos to line up when the brochure was folded together. In Adobe Photoshop, I clipped the check box picture to remove the white square background. Finally, I made the bay bucketlist logo in Adobe Illustrator and I added in the photo from Photoshop. Last of all, I exported the file as a jpg and printed our my brochure. I grouped the elements and exported my logo into Adobe InDesign. Last of all, I exported the file as a jpg and printed our my brochure.
  • 5.
    Description Design amagazine cover that intorduces you to the world. Programs Used Adobe Photoshop, Adobe InDesign Date September 29, 2016 Course # & Section Visual Media 130 Section 17 Instructor name Doug Holladay Objective Combine good typography skills with the design process to create an engaging piece that will communicate your message to the target audience. Process After researching many different magazine cover articles online, I got a few ideas of what it really takes to create a magazine cover. I sketched four different ideas on paper. The ideas I sketched include a bridal magazine with articles about fashion and organizing a wedding. Of course, I drew out a classic headshot cover with the theme being “get to know McKenzie.” While thinking about these ideas, I made a shape map using InDesign. Next, I found a quality picture. Using Photoshop, I created a hexagon and fit my picture inside of the shape. I copied the newly shaped photo into InDesign and started forming a hexagon pattern around my photo to create a focal point. Then I added the title and article text boxes. To find a good color scheme, I used the eye dropper tool and found colors in my photo. Magazine Cover
  • 6.
    Montage Description We seekafter what we read in the scriptures. Programs Used Adobe Photoshop Date October 19, 2016 Course # & Section Visual Media 130 Section 17 Instructor name Doug Holladay Objective Create a spiritual poster montage using the layer mask and at least two photos and type. Process First I decided on a quote to use and then I picked multiple photos from unsplash.com that related to the quote. In Photoshop, I opened up a white background that was 1650×1275 pixels. I opened up the photos I decided to use separately in new tabs. I edited the photos a little bit and added a sharpen filter on the photo of the little boy. Next, I used the move tool to move both photos onto the white background page. The photos were layered on top of each other. I added a mask to each photo to ensure non-destructive editing. I clicked the mask on the little boy’s photo and used the brush tool to erase the world background from the his face and hands, the book, and the white blanket. Also, I changed the opacity of the different layers. Last of all, I added a text box for the title.
  • 7.
    Description Capturing aboy who loves the mountains. Programs Used Adobe Photoshop Date October 12, 2016 Course # & Section Visual Media 130 Section 17 Instructor name Doug Holladay Objective Using Photoshop create a full-bleed, 8.5 by 11, photodesign project that includes an original, new (since the activity) quality image, a consistent color scheme based on that image, some text, and a few design elements. Process To begin this project, I brainstormed a message and an audience to create purpose behind my photo. Next, I sketched out two photo ideas with color schemes so that I could try to capture the colors in my photo. After taking a picture, I used Photoshop to edit the photo. I increased the levels and vibrance of the photo to create a good balance of light and shadows. Then, I applied selective color to sharpen the colors in the photo. The last edit I used was the sharpen tool to create high definition on the face and hair. In Photoshop, I resized the photo to fit an 8.5 X 11 inch document and put the edited photo on a new blank background in Photoshop. I layered the photo with triangle shapes and text boxes I created in Photoshop. All of the colors I used came directly from the photo using the eye dropper tool. Photo Design
  • 8.
    Infographic Description Illustract thecalorie amounts in Cafe Rio and Costa Vida in an informational brochure. Programs Used Adobe Illustrator Date November 2, 2016 Course # & Section Visual Media 130 Section 17 Instructor name Doug Holladay Objective Create any type of inforgraphic to be shared on pinterest and the company’s blog. Process I chose a topic for a compare and contrast infographic. I checked out Chipotle and Cafe Rio’s websites to find the nutrition information to compare similar menu items (Chicken Salad and Chicken Tostada). Next, I doodled different pictures I could add to the infographic like the lights, ingredients, etc. Then, I sketched 2 different layouts for the infographic on a sheet of paper. I opened a new page in Illustrator and found a wooden and metallic backgrounds from Textures.com. Then, I found a vector image of the Cafe Rio and Chipotle logos on brandsoftheword. com which I copied onto the wooden background. The most tedious process came next, I created all of the ingredients using the shape tool in Illustrator. I went back to the the restaurant websites and found the exact calorie amount for each ingredient and added text boxes corresponding to the ingredient. I grabbed the ruler lines from the edges of the page to align all of my text. Last of all, I created a column graph in Adobe Illustrator to compare the total calorie amounts between a Cafe Rio chicken salad and a Chipotle Chicken Salad.
  • 9.
    Business Identity Logos, BusinessCard, Letterhead Description Branding a logo, business card, and letterhead for Grow Nursery. Programs Used Adobe Illustrator, Adobe InDesign Date October 26, 2016 Course # & Section Visual Media 130 Section 17 Instructor name Doug Holladay Objective Design a logo and use your logo to design consistent layouts and branding for a business card and letterhead. Process I sketched three different logos using various color schemes, fonts, and logo types. I used Adobe Illustrator to create shapes, color schemes, and text for the logos. Next, I asked for opinions on the three different logos I created. The most popular logo was the third logo with the flower. I incorporated this logo into my letterhead and business cards. Once again, I opened up Adobe Illustrator with a 8.5 X 11 inch page. I used the shape tools to create the ovals which make up the flower and the rectangle box for the yellow stripes. To create my business card I used a 3.5 X 2 inch page. I copied and pasted my logo onto the front of the business card. In addition, I also copied the stripes at the bottom of the letterhead and then tilted the horizontal lines to become vertical. I separated the lines to give the card some breathing room. For the back of the business card, I copied and pasted the flower from my logo and lowered the opacity so that the focus was on the text. GROW grow Gr w Company Name: Grow Nursery
  • 10.
    Prezi Description My Preziteaches past generations how to use Instagram. Programs Used Prezi Date October 5, 2016 Course # & Section Visual Media 130 Section 17 Instructor name Doug Holladay Objective Choose a topic you are interested in to create an instructional presentation with 10-15 frames. Process Recently, I was thinking about how my grandparents would love keeping up with their grandkids on Instagram. So for this project, I made an informational video about the basics of Instagram. I sketched out two ideas for a background. The first is an Instagram profile that would move along the different features of Instagram. My second idea was use a camera as the background and have the slides as little flashes of light. I started with a crumpled paper texture from textures.com and set it as the background in the customize tab. I used this texture to represent new ideas and the frustration that comes with it. Next, I added new slides, created text boxes, and placed stickers, shapes, and images in Prezi to illustrate my text. In addition, I used photo examples from Lindsey Christensen’s Instagram profile. As the finishing touch, I added a picture of my grandma and husband trying to figure out technology.
  • 11.
    Coding Description A websiteI created with my logo Grow Nursery. Programs Used Text Wrangler, Adobe Illustrator Date November 11, 2016 Course # & Section Visual Media 130 Section 17 Instructor name Doug Holladay Objective Use your logo from the Business Identity Project to showcase and create a webpage layout using what you know about HTML and CSS. Process I opened up Text Wrangler which is a text and code editor. I used basic CSS coding to make the background color green, the header yellow with white text, the yellow border around the edge white box, and I changed the font to brown. I also added an image into the html file to include my logo. I used header tags for the different levels of text. Lastly, I included a bulleted list and a link on my website.