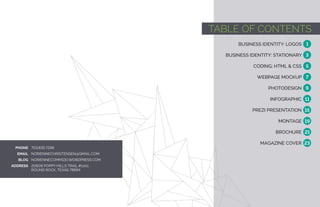
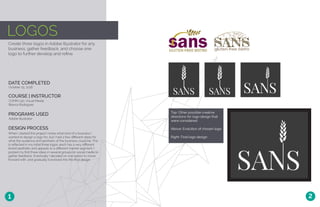
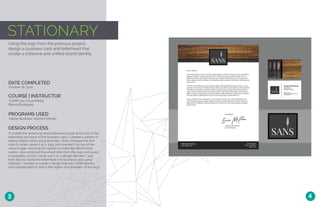
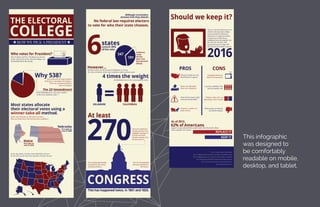
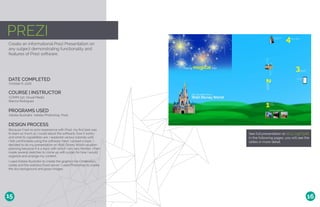
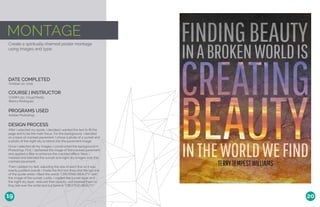
PORTFOLIO
NORIENNE CHRISTENSEN
TABLE OF CONTENTS
PHOTODESIGN
PREZI PRESENTATION
BUSINESS IDENTITY: LOGOS
BUSINESS IDENTITY: STATIONARY
CODING: HTML & CSS
WEBPAGE MOCKUP
INFOGRAPHIC
MONTAGE
MAGAZINE COVER
BROCHURE
703.835.7296
NORIENNECHRISTENSEN@GMAIL.COM
NORIENNECOMM130.WORDPRESS.COM
20609 POPPY HILLS TRAIL #1001
ROUND ROCK, TEXAS 78664
PHONE
EMAIL
BLOG
ADDRESS
1
3
5
7
9
11
15
19
21
23
LOGOS
Create three logos in Adobe Illustrator for any
business, gather feedback, and choose one
logo to further develop and refine.
DATE COMPLETED
COURSE | INSTRUCTOR
October 25, 2016
COMM 130: Visual Media
Bianca Rodriguez
PROGRAMS USED
Adobe Illustrator
DESIGN PROCESS
When I started this project I knew what kind of a business I
wanted to design a logo for, but I had a few different ideas for
what the audience and aesthetic of the business could be. This
is reflected in my initial three logos: each has a very different
brand aesthetic and appeals to a different market segment. I
posted my first three ideas in several groups on social media to
gather feedback. Eventually I decided on one option to move
forward with, and gradually it evolved into the final design.
1 2
Top: Other possible creative
directions for logo design that
were considered
Above: Evolution of chosen logo
Right: Final logo design
STATIONARY
Using the logo from the previous project,
design a business card and letterhead that
create a cohesive and unified brand identity.
DATE COMPLETED
COURSE | INSTRUCTOR
October 26, 2016
COMM 130: Visual Media
Bianca Rodriguez
PROGRAMS USED
Adobe Illustrator, Adobe InDesign
DESIGN PROCESS
To create the wood and word patterned image at the top of the
letterhead and back of the business card, I created a pattern of
eating-related verbs using Illustrator. I then changed the font
color to white, saved it as a .png, and overlaid it on top of the
wood image, reducing the opacity to make the effect more
subtle. I also extracted the wheat stalk from the logo and saved
it separately so that I could use it as a design element. I was
then able to create the letterhead and business card using
InDesign. I wanted to create a design that was contemporary
and sophisticated to match the higher-end aesthetic of the logo.
3 4
HTML & CSS
See the live version at bit.ly/2gdfC4e
Create an attractive and well-coded webpage
to showcase the previously-created logo and
its creation process.
DATE COMPLETED
COURSE | INSTRUCTOR
November 10, 2016
COMM 130: Visual Media
Bianca Rodriguez
PROGRAMS USED
Adobe Illustrator, Adobe InDesign, Notepad++
DESIGN PROCESS
First, I wrote out my body copy. Next, I went to my raw files from
the Business Identity project and created, adapted, and resized
the necessary graphics for this webpage. After that, I laid out
my HTML the way I wanted it to be. I then wrote my CSS from
scratch, Finally, I checked my HTML and CSS pages with a
validator.
5 6
WEBPAGE
Create a webpage layout for a business using a
960-px grid system.
DATE COMPLETED
COURSE | INSTRUCTOR
November 17, 2016
COMM 130: Visual Media
Bianca Rodriguez
PROGRAMS USED
Adobe Illustrator, Adobe Photoshop
DESIGN PROCESS
First, I decided on the subject for my website. I decided to use
the same fictional restaurant I used for the Business Identity
project and coding project. Next, I sketched out some layout
sketches. After that, I opened up a 16-column grid template in
Photoshop and created my wireframe shape map. From there,
I created the full website design in Photoshop. I used fonts and
images from the past projects for this brand to keep things
cohesive.
7 8
Visit bit.ly/2hixfzR to see how I
removed the background but still
preserved the fur and whiskers.
PHOTODESIGN
Create a full-bleed 8.5 x 11” image using an
original photo, a color scheme derived from the
photo, text, and design elements.
DATE COMPLETED
COURSE | INSTRUCTOR
October 12, 2016
COMM 130: Visual Media
Bianca Rodriguez
PROGRAMS USED
Adobe Photoshop
DESIGN PROCESS
Before I began my design and photography process, I
considered potential subjects for my photo and color schemes
that could be derived from them. I decided to use my cat as
the subject of my photo, because her black and white coloring
with yellow eyes would allow for a striking image and lend itself
to a distinct color scheme. The most time-intensive part of my
project was digitally removing the background from the photo
of my cat using Photoshop while maintaining the whiskers
and furry texture around the perimeter. When I was satisfied
with the clipped image, I used Photoshop to create a neutral
background. At this point, I was free to arrange text and design
elements. After a number of iterations, I came up with a design I
was satisfied with.
9 10
INFOGRAPHIC
See full infographic at bit.ly/2h899op
In the following pages, you will see the
infographic in more detail.
Create an infographic on any topic that
organizes data in a visually pleasing manner.
DATE COMPLETED
COURSE | INSTRUCTOR
November 3, 2016, updated December 7, 2016
COMM 130: Visual Media
Bianca Rodriguez
PROGRAMS USED
Adobe Illustrator
DESIGN PROCESS
First, I brainstormed to come up with a topic. Since it is election
season in the United States, I decided to create an explanatory
infographic on the Electoral College. Next, I did research to
make sure I understood the topic thoroughly and came up with
the facts and data that I wanted to present in my infographic.
I then did some sketches to come up with a layout as well as
general ideas for how to visually present the information I had
gathered.
I used Adobe Illustrator for all graphics, charts, and icons. I used
a limited color scheme to keep it clean, simple, and easy to
decipher. I tried to add visual interest by varying the scale of the
typography.
11 12
This infographic
was designed to
be comfortably
readable on mobile,
desktop, and tablet.
PREZI
Create an informational Prezi Presentation on
any subject demonstrating functionality and
features of Prezi software.
DATE COMPLETED
COURSE | INSTRUCTOR
October 6, 2016
COMM 130: Visual Media
Bianca Rodriguez
PROGRAMS USED
Adobe Illustrator, Adobe Photoshop, Prezi
DESIGN PROCESS
Because I had no prior experience with Prezi, my first task was
to learn as much as I could about the software, how it works,
and what its capabilities are. I explored various tutorials until
I felt comfortable using the software. Next, I picked a topic. I
decided to do my presentation on Walt Disney World vacation
planning because it is a topic with which I am very familiar. I then
made several sketches to come up with a plan for how I would
organize and arrange my content.
I used Adobe Illustrator to create the graphics for Cinderella’s
castle and the waitress/food server. I used Photoshop to create
the sky background and grass images.
See full presentation at bit.ly/2gbT92B
In the following pages, you will see the
slides in more detail.
15 16
1
2
3
4
5
6
7
8
9
10
11
MONTAGE
Create a spiritually-themed poster montage
using images and type.
DATE COMPLETED
COURSE | INSTRUCTOR
October 20, 2016
COMM 130: Visual Media
Bianca Rodriguez
PROGRAMS USED
Adobe Photoshop
DESIGN PROCESS
After I selected my quote, I decided I wanted the text to fill the
page and to be the main focus. For the background, I decided
on a base of cracked pavement. I chose a photo of a sunset and
a photo of the night sky to blend into the pavement image..
Once I selected all my images, I constructed the background in
Photoshop. First, I darkened the image of the cracked pavement
and applied a filter to enhance the crackled effect. Next, I
masked and blended the sunset and night sky images over the
cracked pavement.
Then I added my text, adjusting the size of each line so it was
evenly justified overall. I made the first two lines and the last line
of the quote white; I filled the words “CREATING BEAUTY” with
the image of the sunset. Lastly, I copied the sunset layer and
the night sky layer, reduced their opacity, and layered them so
they fell over the white text but behind “CREATING BEAUTY.”
19 20
BROCHURE
Create a brochure on any topic with duplex
printing and at least one fold.
DATE COMPLETED
COURSE | INSTRUCTOR
December 3, 2016
COMM 130: Visual Media
Bianca Rodriguez
PROGRAMS USED
Adobe Illustrator, Adobe Photoshop, Adobe InDesign
DESIGN PROCESS
First, I came up with the idea to do a brochure as an advertorial
insert for a fictional magazine. I knew I wanted to create a
layered effect with the folds, so I sketched out what I wanted it
to look like when folded completely. I then cut out small pieces
of paper in the shape of each of the layers and taped them
together to figure out how the layout needed to be organized.
Next, I took photographs of my holiday place settings. I used
Photoshop for cropping and enhancement. I then created a
title of the brochure and a logo for the fictional magazine using
Photoshopa and Illustrator. I found products to advertise in my
brochure and gathered information and photos of them.
The preliminary phase complete, I created my initial draft in
InDesign using placeholder text. I printed a half-size draft to
make sure everything aligned correctly. Then I added in the
correct text and made all remaining adjustments.
21 22
This is a digital approximation of the
front of the brochure when folded.
The following pages show the
ready-to-print spread on both sides,
including bleed and margins.
Once printed, the
white space should be
removed and the place
setting elements cut
out carefuly so that they
layer on top of each
other, visually creating a
complete place setting.
MAGAZINE
Create a magazine cover featuring a portrait
and articles about yourself.
DATE COMPLETED
COURSE | INSTRUCTOR
September 29, 2016
COMM 130: Visual Media
Bianca Rodriguez
PROGRAMS USED
Adobe Photoshop, Adobe InDesign
DESIGN PROCESS
First, I selected an image of myself to use and sketched
out a layout. Next, I used Photoshop to digitally remove the
background of the photo and create a neutral one. I added
in the name of the magazine, creating a layered effect with
the image of myself. I also used Photoshop to remove the
background of the photo of the monogram succulent.
In InDesign, I added the article names. I decided to use crafting,
travel, and gluten-free cooking as the subjects of my articles. I
chose to use Century Gothic for all of the text to keep the look
clean, modern, and cohesive. I used variations in color and
weight to differentiate title, headings, and body.
23 24

Portfolio - Norienne Christensen

  • 1.
  • 2.
    TABLE OF CONTENTS PHOTODESIGN PREZIPRESENTATION BUSINESS IDENTITY: LOGOS BUSINESS IDENTITY: STATIONARY CODING: HTML & CSS WEBPAGE MOCKUP INFOGRAPHIC MONTAGE MAGAZINE COVER BROCHURE 703.835.7296 NORIENNECHRISTENSEN@GMAIL.COM NORIENNECOMM130.WORDPRESS.COM 20609 POPPY HILLS TRAIL #1001 ROUND ROCK, TEXAS 78664 PHONE EMAIL BLOG ADDRESS 1 3 5 7 9 11 15 19 21 23
  • 3.
    LOGOS Create three logosin Adobe Illustrator for any business, gather feedback, and choose one logo to further develop and refine. DATE COMPLETED COURSE | INSTRUCTOR October 25, 2016 COMM 130: Visual Media Bianca Rodriguez PROGRAMS USED Adobe Illustrator DESIGN PROCESS When I started this project I knew what kind of a business I wanted to design a logo for, but I had a few different ideas for what the audience and aesthetic of the business could be. This is reflected in my initial three logos: each has a very different brand aesthetic and appeals to a different market segment. I posted my first three ideas in several groups on social media to gather feedback. Eventually I decided on one option to move forward with, and gradually it evolved into the final design. 1 2 Top: Other possible creative directions for logo design that were considered Above: Evolution of chosen logo Right: Final logo design
  • 4.
    STATIONARY Using the logofrom the previous project, design a business card and letterhead that create a cohesive and unified brand identity. DATE COMPLETED COURSE | INSTRUCTOR October 26, 2016 COMM 130: Visual Media Bianca Rodriguez PROGRAMS USED Adobe Illustrator, Adobe InDesign DESIGN PROCESS To create the wood and word patterned image at the top of the letterhead and back of the business card, I created a pattern of eating-related verbs using Illustrator. I then changed the font color to white, saved it as a .png, and overlaid it on top of the wood image, reducing the opacity to make the effect more subtle. I also extracted the wheat stalk from the logo and saved it separately so that I could use it as a design element. I was then able to create the letterhead and business card using InDesign. I wanted to create a design that was contemporary and sophisticated to match the higher-end aesthetic of the logo. 3 4
  • 5.
    HTML & CSS Seethe live version at bit.ly/2gdfC4e Create an attractive and well-coded webpage to showcase the previously-created logo and its creation process. DATE COMPLETED COURSE | INSTRUCTOR November 10, 2016 COMM 130: Visual Media Bianca Rodriguez PROGRAMS USED Adobe Illustrator, Adobe InDesign, Notepad++ DESIGN PROCESS First, I wrote out my body copy. Next, I went to my raw files from the Business Identity project and created, adapted, and resized the necessary graphics for this webpage. After that, I laid out my HTML the way I wanted it to be. I then wrote my CSS from scratch, Finally, I checked my HTML and CSS pages with a validator. 5 6
  • 6.
    WEBPAGE Create a webpagelayout for a business using a 960-px grid system. DATE COMPLETED COURSE | INSTRUCTOR November 17, 2016 COMM 130: Visual Media Bianca Rodriguez PROGRAMS USED Adobe Illustrator, Adobe Photoshop DESIGN PROCESS First, I decided on the subject for my website. I decided to use the same fictional restaurant I used for the Business Identity project and coding project. Next, I sketched out some layout sketches. After that, I opened up a 16-column grid template in Photoshop and created my wireframe shape map. From there, I created the full website design in Photoshop. I used fonts and images from the past projects for this brand to keep things cohesive. 7 8
  • 7.
    Visit bit.ly/2hixfzR tosee how I removed the background but still preserved the fur and whiskers. PHOTODESIGN Create a full-bleed 8.5 x 11” image using an original photo, a color scheme derived from the photo, text, and design elements. DATE COMPLETED COURSE | INSTRUCTOR October 12, 2016 COMM 130: Visual Media Bianca Rodriguez PROGRAMS USED Adobe Photoshop DESIGN PROCESS Before I began my design and photography process, I considered potential subjects for my photo and color schemes that could be derived from them. I decided to use my cat as the subject of my photo, because her black and white coloring with yellow eyes would allow for a striking image and lend itself to a distinct color scheme. The most time-intensive part of my project was digitally removing the background from the photo of my cat using Photoshop while maintaining the whiskers and furry texture around the perimeter. When I was satisfied with the clipped image, I used Photoshop to create a neutral background. At this point, I was free to arrange text and design elements. After a number of iterations, I came up with a design I was satisfied with. 9 10
  • 8.
    INFOGRAPHIC See full infographicat bit.ly/2h899op In the following pages, you will see the infographic in more detail. Create an infographic on any topic that organizes data in a visually pleasing manner. DATE COMPLETED COURSE | INSTRUCTOR November 3, 2016, updated December 7, 2016 COMM 130: Visual Media Bianca Rodriguez PROGRAMS USED Adobe Illustrator DESIGN PROCESS First, I brainstormed to come up with a topic. Since it is election season in the United States, I decided to create an explanatory infographic on the Electoral College. Next, I did research to make sure I understood the topic thoroughly and came up with the facts and data that I wanted to present in my infographic. I then did some sketches to come up with a layout as well as general ideas for how to visually present the information I had gathered. I used Adobe Illustrator for all graphics, charts, and icons. I used a limited color scheme to keep it clean, simple, and easy to decipher. I tried to add visual interest by varying the scale of the typography. 11 12
  • 9.
    This infographic was designedto be comfortably readable on mobile, desktop, and tablet.
  • 10.
    PREZI Create an informationalPrezi Presentation on any subject demonstrating functionality and features of Prezi software. DATE COMPLETED COURSE | INSTRUCTOR October 6, 2016 COMM 130: Visual Media Bianca Rodriguez PROGRAMS USED Adobe Illustrator, Adobe Photoshop, Prezi DESIGN PROCESS Because I had no prior experience with Prezi, my first task was to learn as much as I could about the software, how it works, and what its capabilities are. I explored various tutorials until I felt comfortable using the software. Next, I picked a topic. I decided to do my presentation on Walt Disney World vacation planning because it is a topic with which I am very familiar. I then made several sketches to come up with a plan for how I would organize and arrange my content. I used Adobe Illustrator to create the graphics for Cinderella’s castle and the waitress/food server. I used Photoshop to create the sky background and grass images. See full presentation at bit.ly/2gbT92B In the following pages, you will see the slides in more detail. 15 16
  • 11.
  • 12.
    MONTAGE Create a spiritually-themedposter montage using images and type. DATE COMPLETED COURSE | INSTRUCTOR October 20, 2016 COMM 130: Visual Media Bianca Rodriguez PROGRAMS USED Adobe Photoshop DESIGN PROCESS After I selected my quote, I decided I wanted the text to fill the page and to be the main focus. For the background, I decided on a base of cracked pavement. I chose a photo of a sunset and a photo of the night sky to blend into the pavement image.. Once I selected all my images, I constructed the background in Photoshop. First, I darkened the image of the cracked pavement and applied a filter to enhance the crackled effect. Next, I masked and blended the sunset and night sky images over the cracked pavement. Then I added my text, adjusting the size of each line so it was evenly justified overall. I made the first two lines and the last line of the quote white; I filled the words “CREATING BEAUTY” with the image of the sunset. Lastly, I copied the sunset layer and the night sky layer, reduced their opacity, and layered them so they fell over the white text but behind “CREATING BEAUTY.” 19 20
  • 13.
    BROCHURE Create a brochureon any topic with duplex printing and at least one fold. DATE COMPLETED COURSE | INSTRUCTOR December 3, 2016 COMM 130: Visual Media Bianca Rodriguez PROGRAMS USED Adobe Illustrator, Adobe Photoshop, Adobe InDesign DESIGN PROCESS First, I came up with the idea to do a brochure as an advertorial insert for a fictional magazine. I knew I wanted to create a layered effect with the folds, so I sketched out what I wanted it to look like when folded completely. I then cut out small pieces of paper in the shape of each of the layers and taped them together to figure out how the layout needed to be organized. Next, I took photographs of my holiday place settings. I used Photoshop for cropping and enhancement. I then created a title of the brochure and a logo for the fictional magazine using Photoshopa and Illustrator. I found products to advertise in my brochure and gathered information and photos of them. The preliminary phase complete, I created my initial draft in InDesign using placeholder text. I printed a half-size draft to make sure everything aligned correctly. Then I added in the correct text and made all remaining adjustments. 21 22 This is a digital approximation of the front of the brochure when folded. The following pages show the ready-to-print spread on both sides, including bleed and margins.
  • 14.
    Once printed, the whitespace should be removed and the place setting elements cut out carefuly so that they layer on top of each other, visually creating a complete place setting.
  • 15.
    MAGAZINE Create a magazinecover featuring a portrait and articles about yourself. DATE COMPLETED COURSE | INSTRUCTOR September 29, 2016 COMM 130: Visual Media Bianca Rodriguez PROGRAMS USED Adobe Photoshop, Adobe InDesign DESIGN PROCESS First, I selected an image of myself to use and sketched out a layout. Next, I used Photoshop to digitally remove the background of the photo and create a neutral one. I added in the name of the magazine, creating a layered effect with the image of myself. I also used Photoshop to remove the background of the photo of the monogram succulent. In InDesign, I added the article names. I decided to use crafting, travel, and gluten-free cooking as the subjects of my articles. I chose to use Century Gothic for all of the text to keep the look clean, modern, and cohesive. I used variations in color and weight to differentiate title, headings, and body. 23 24