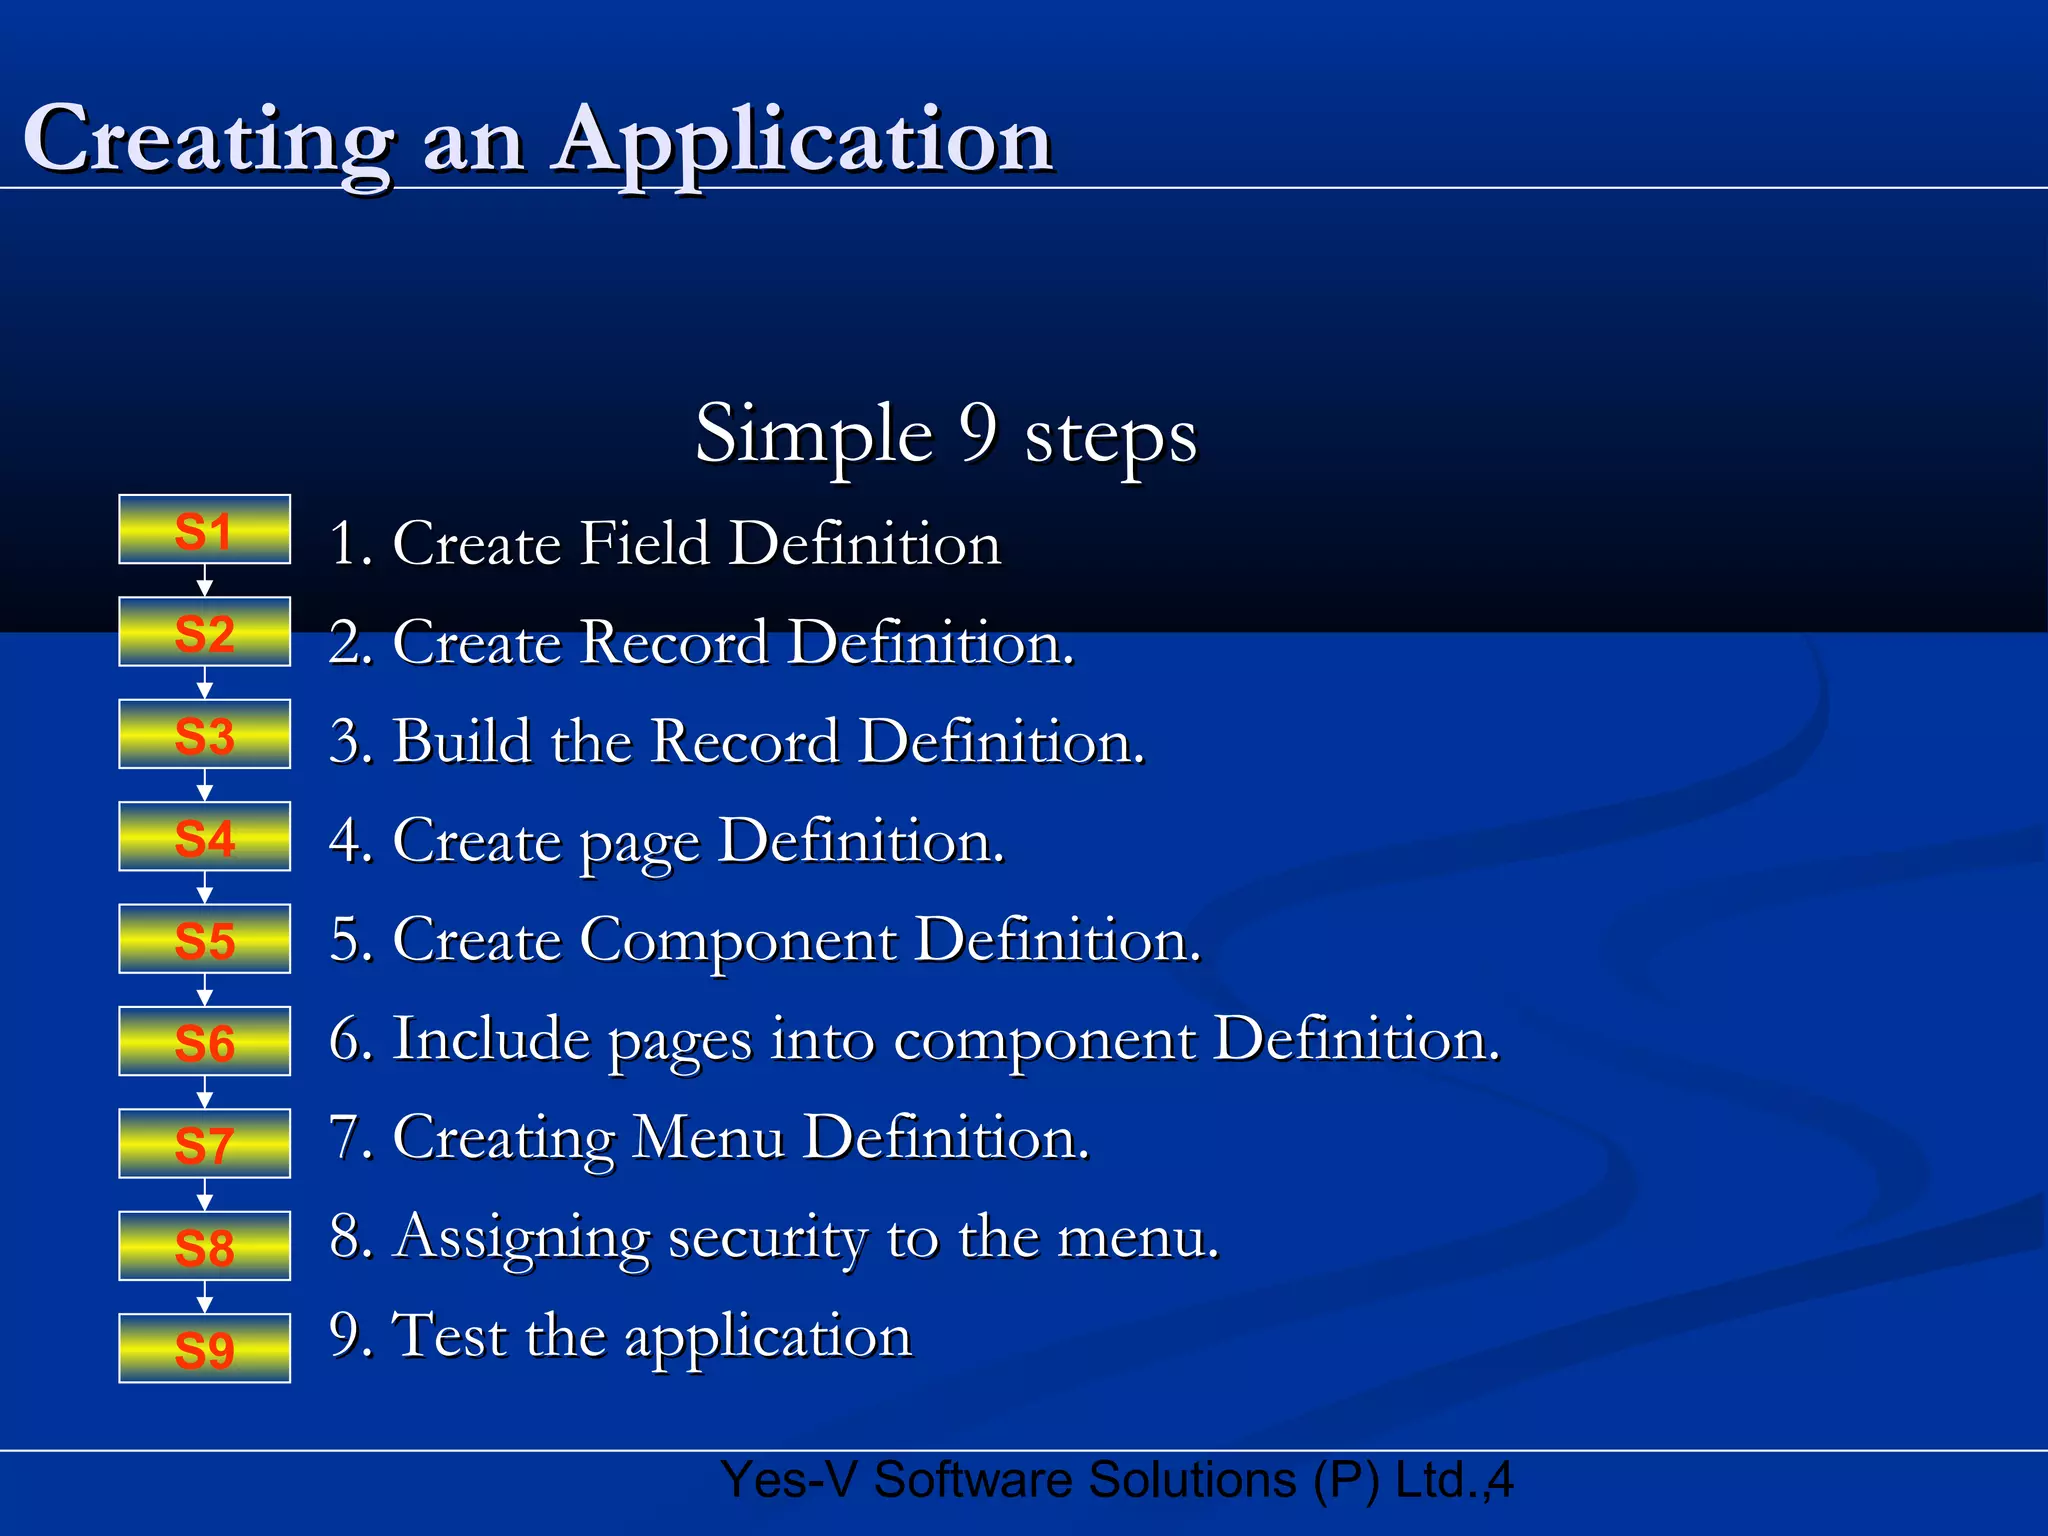
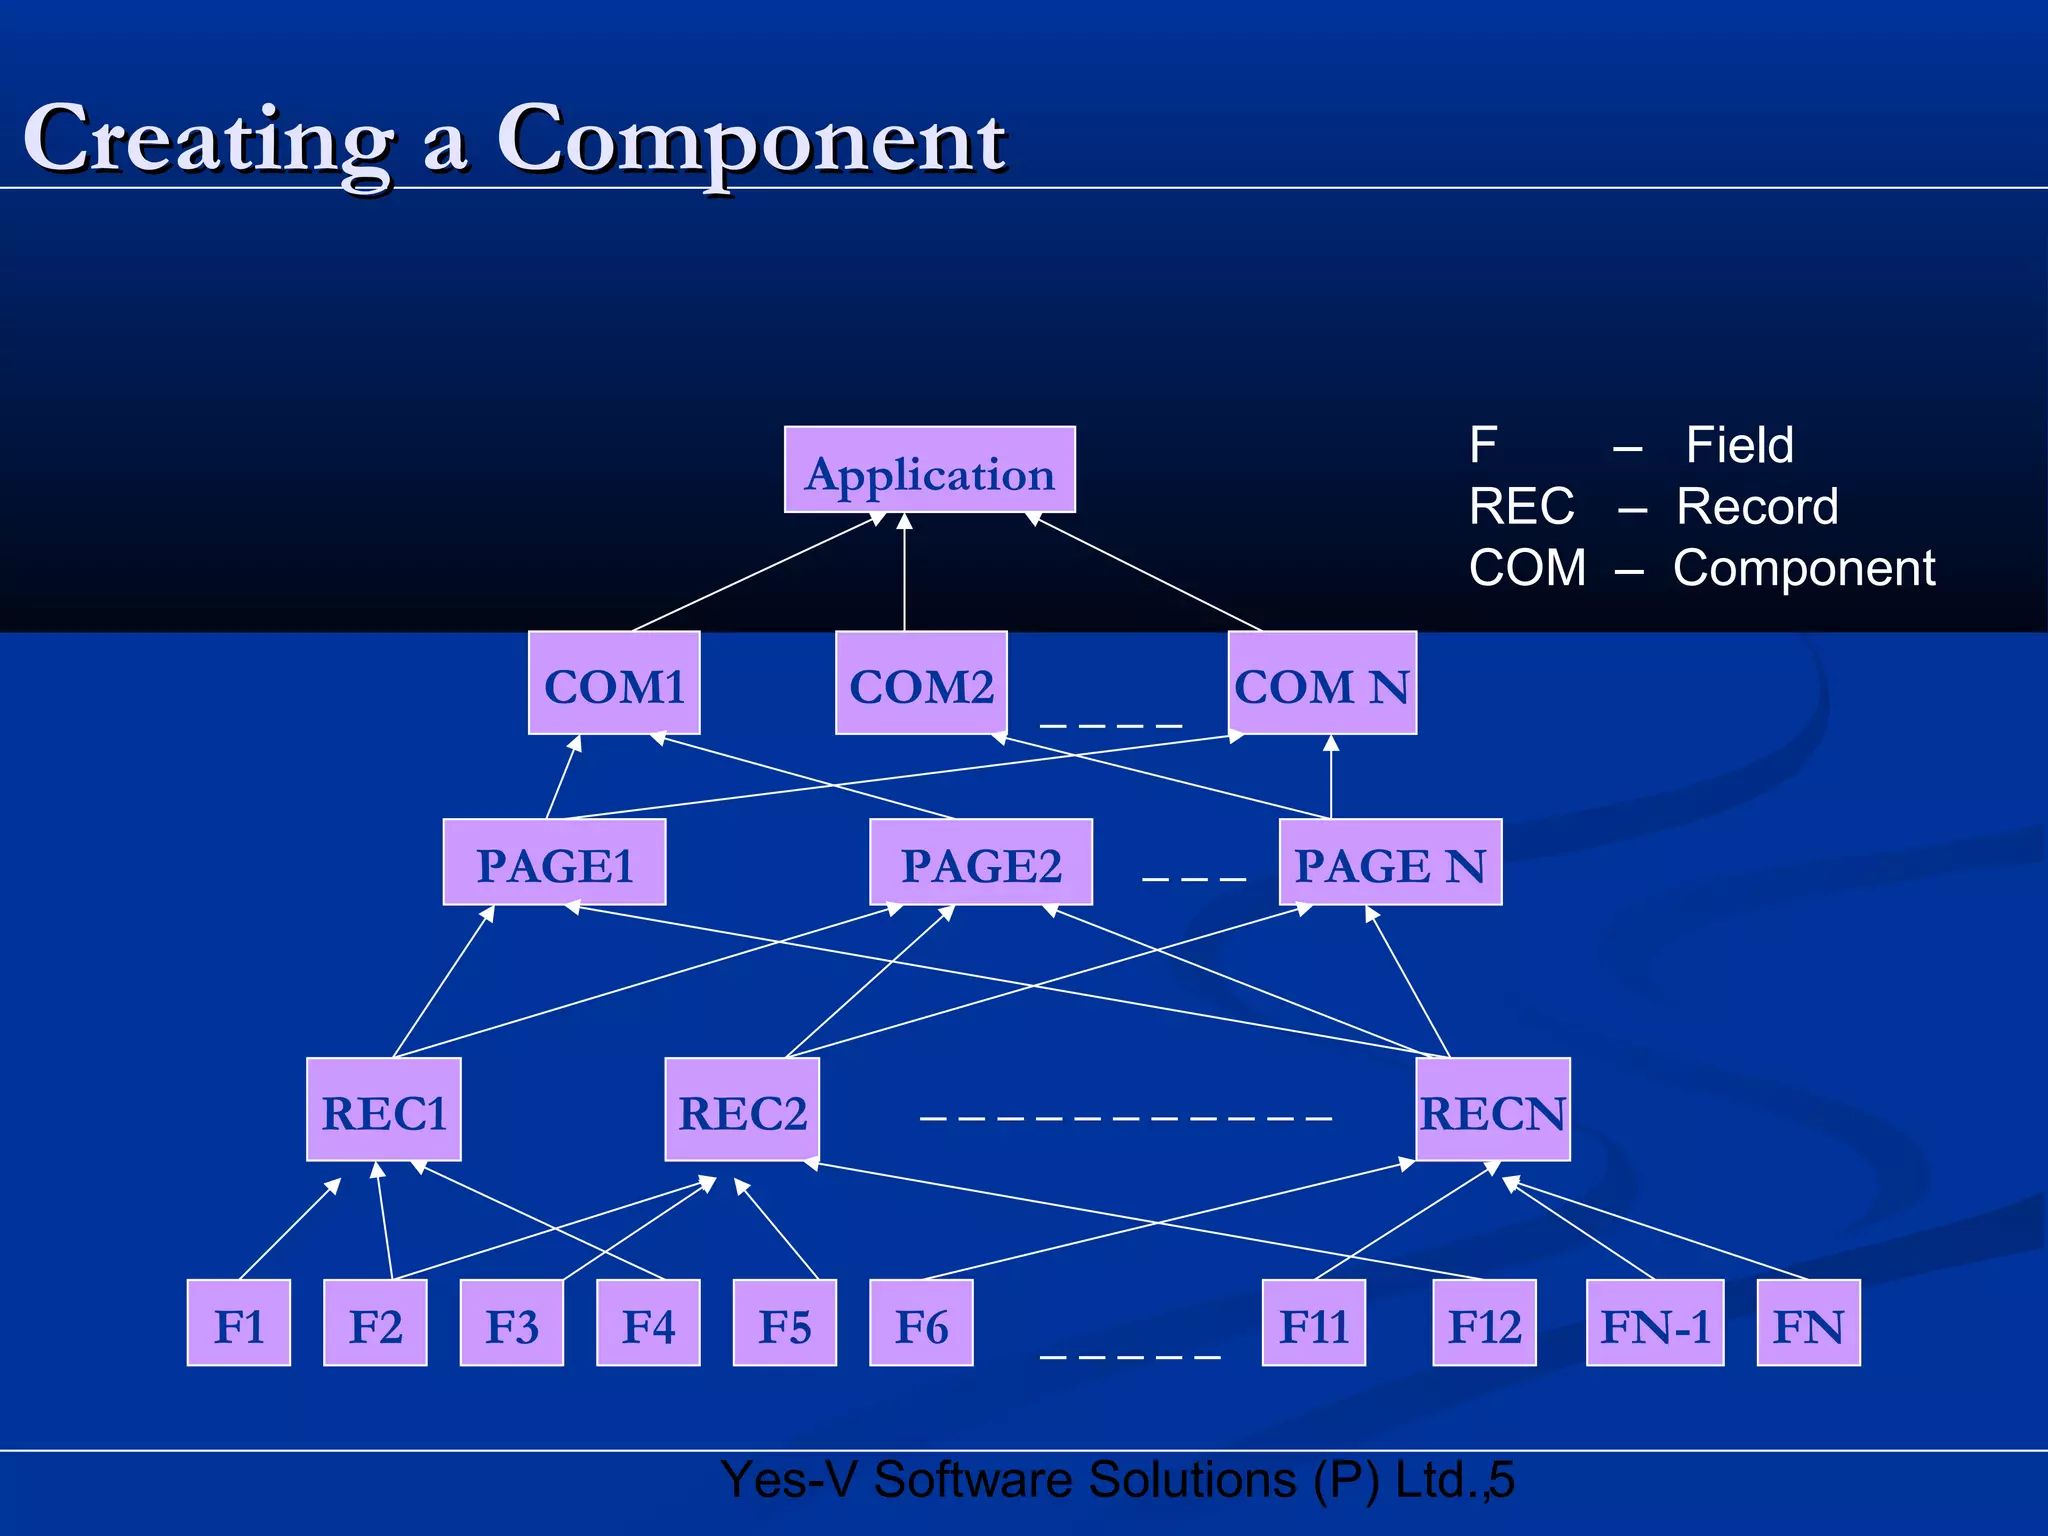
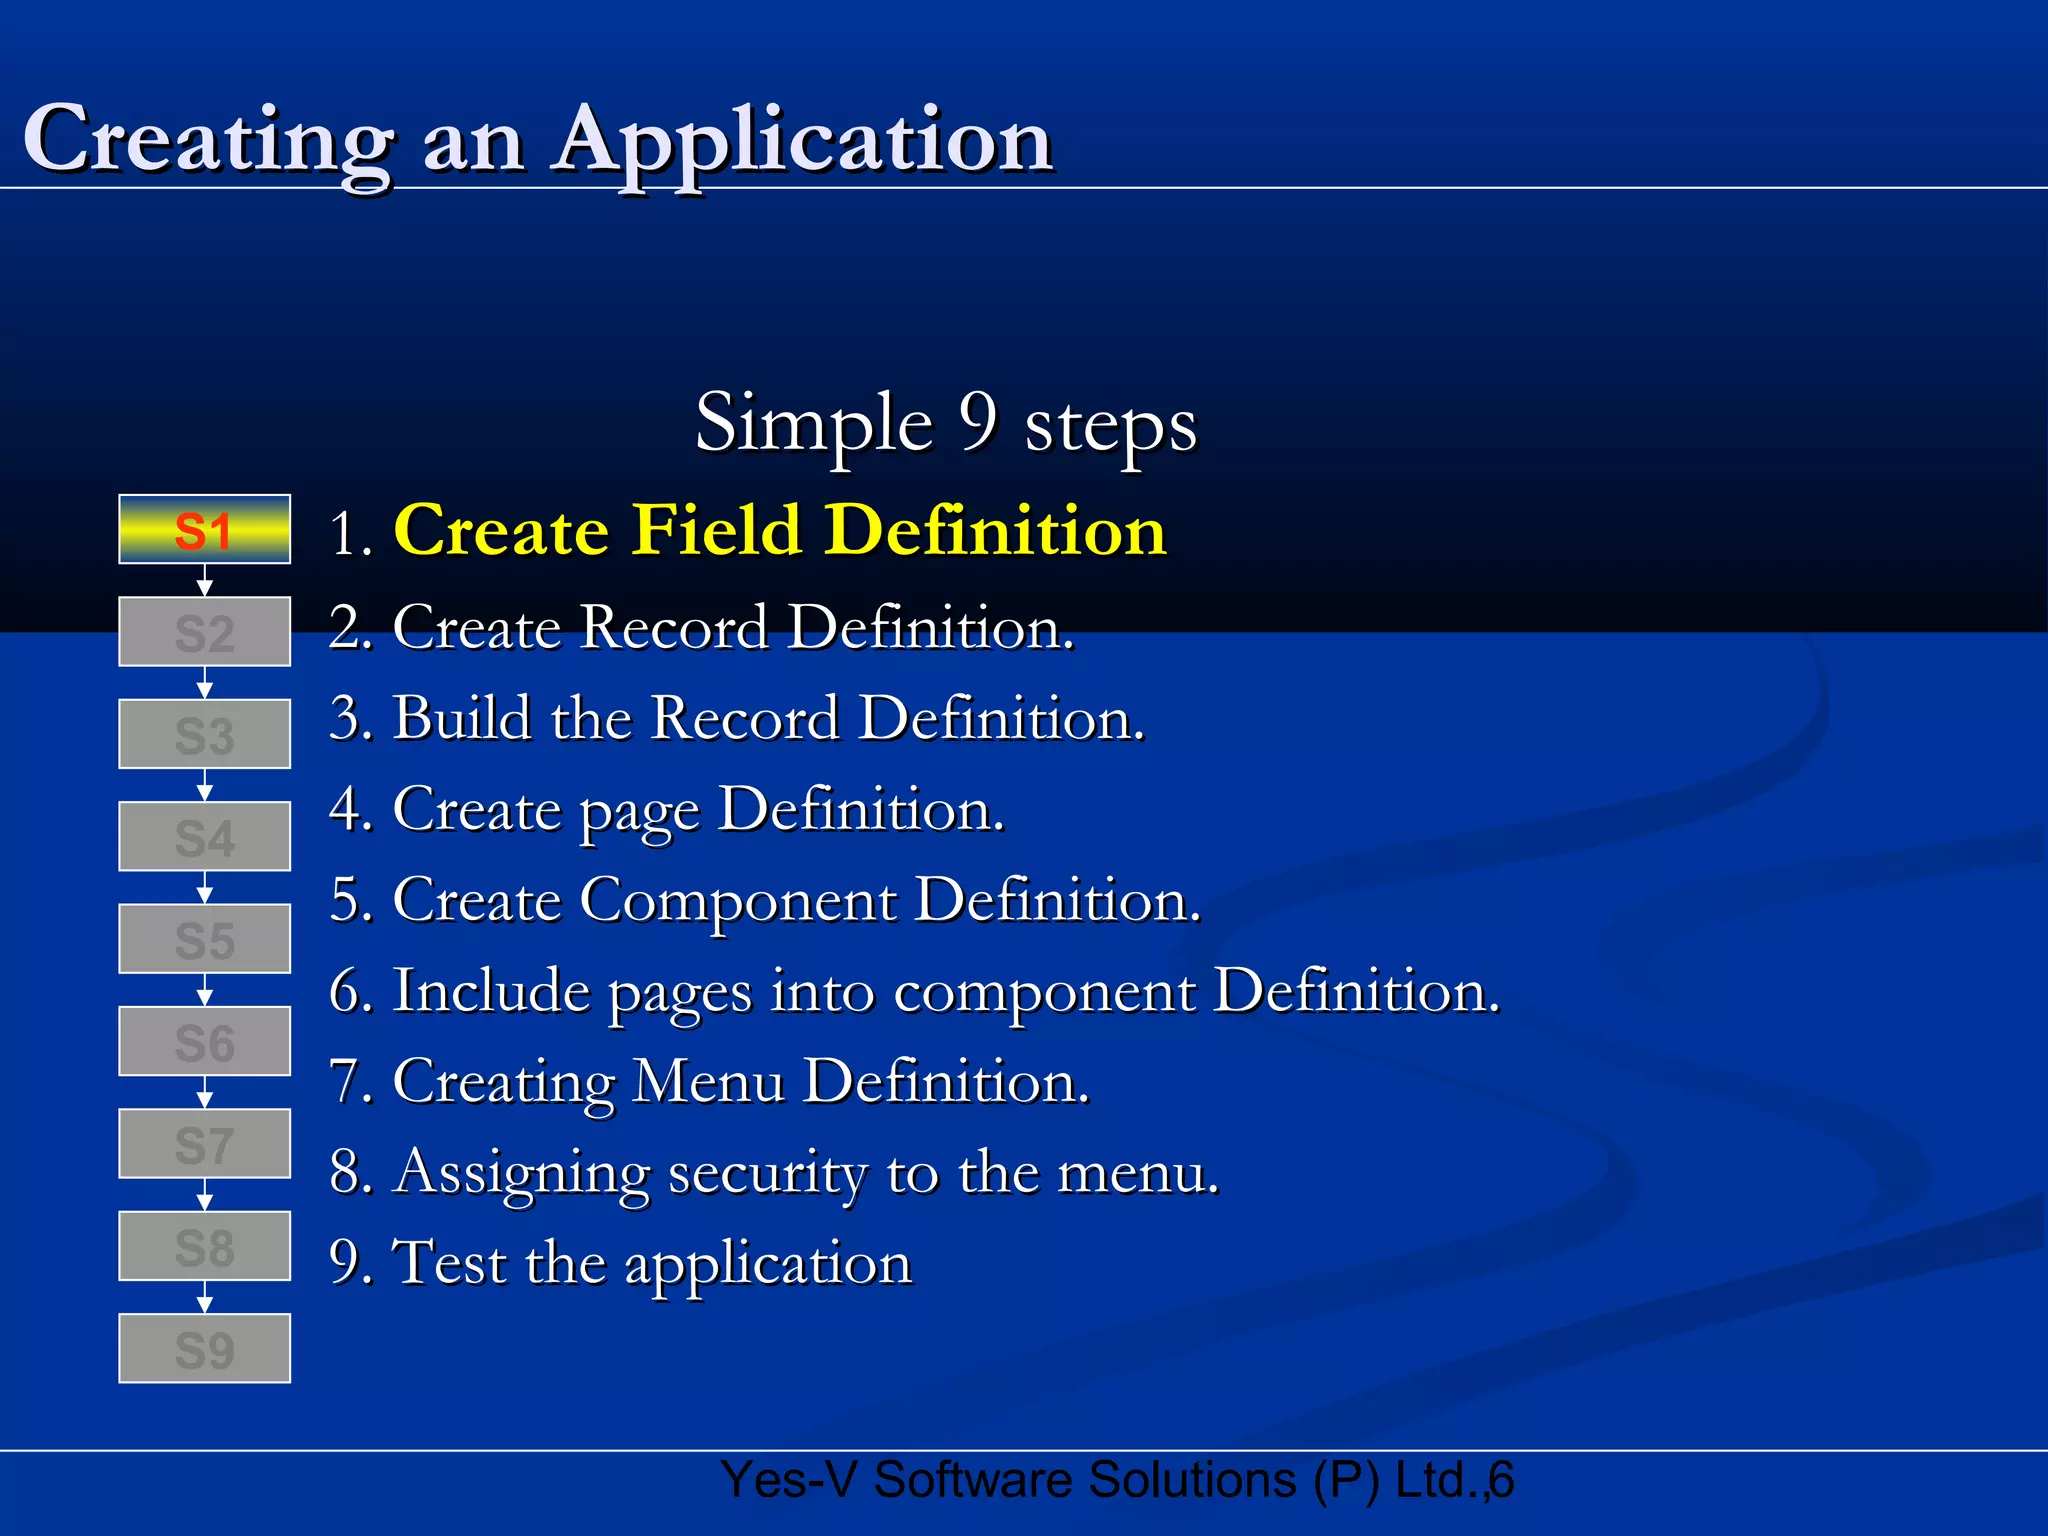
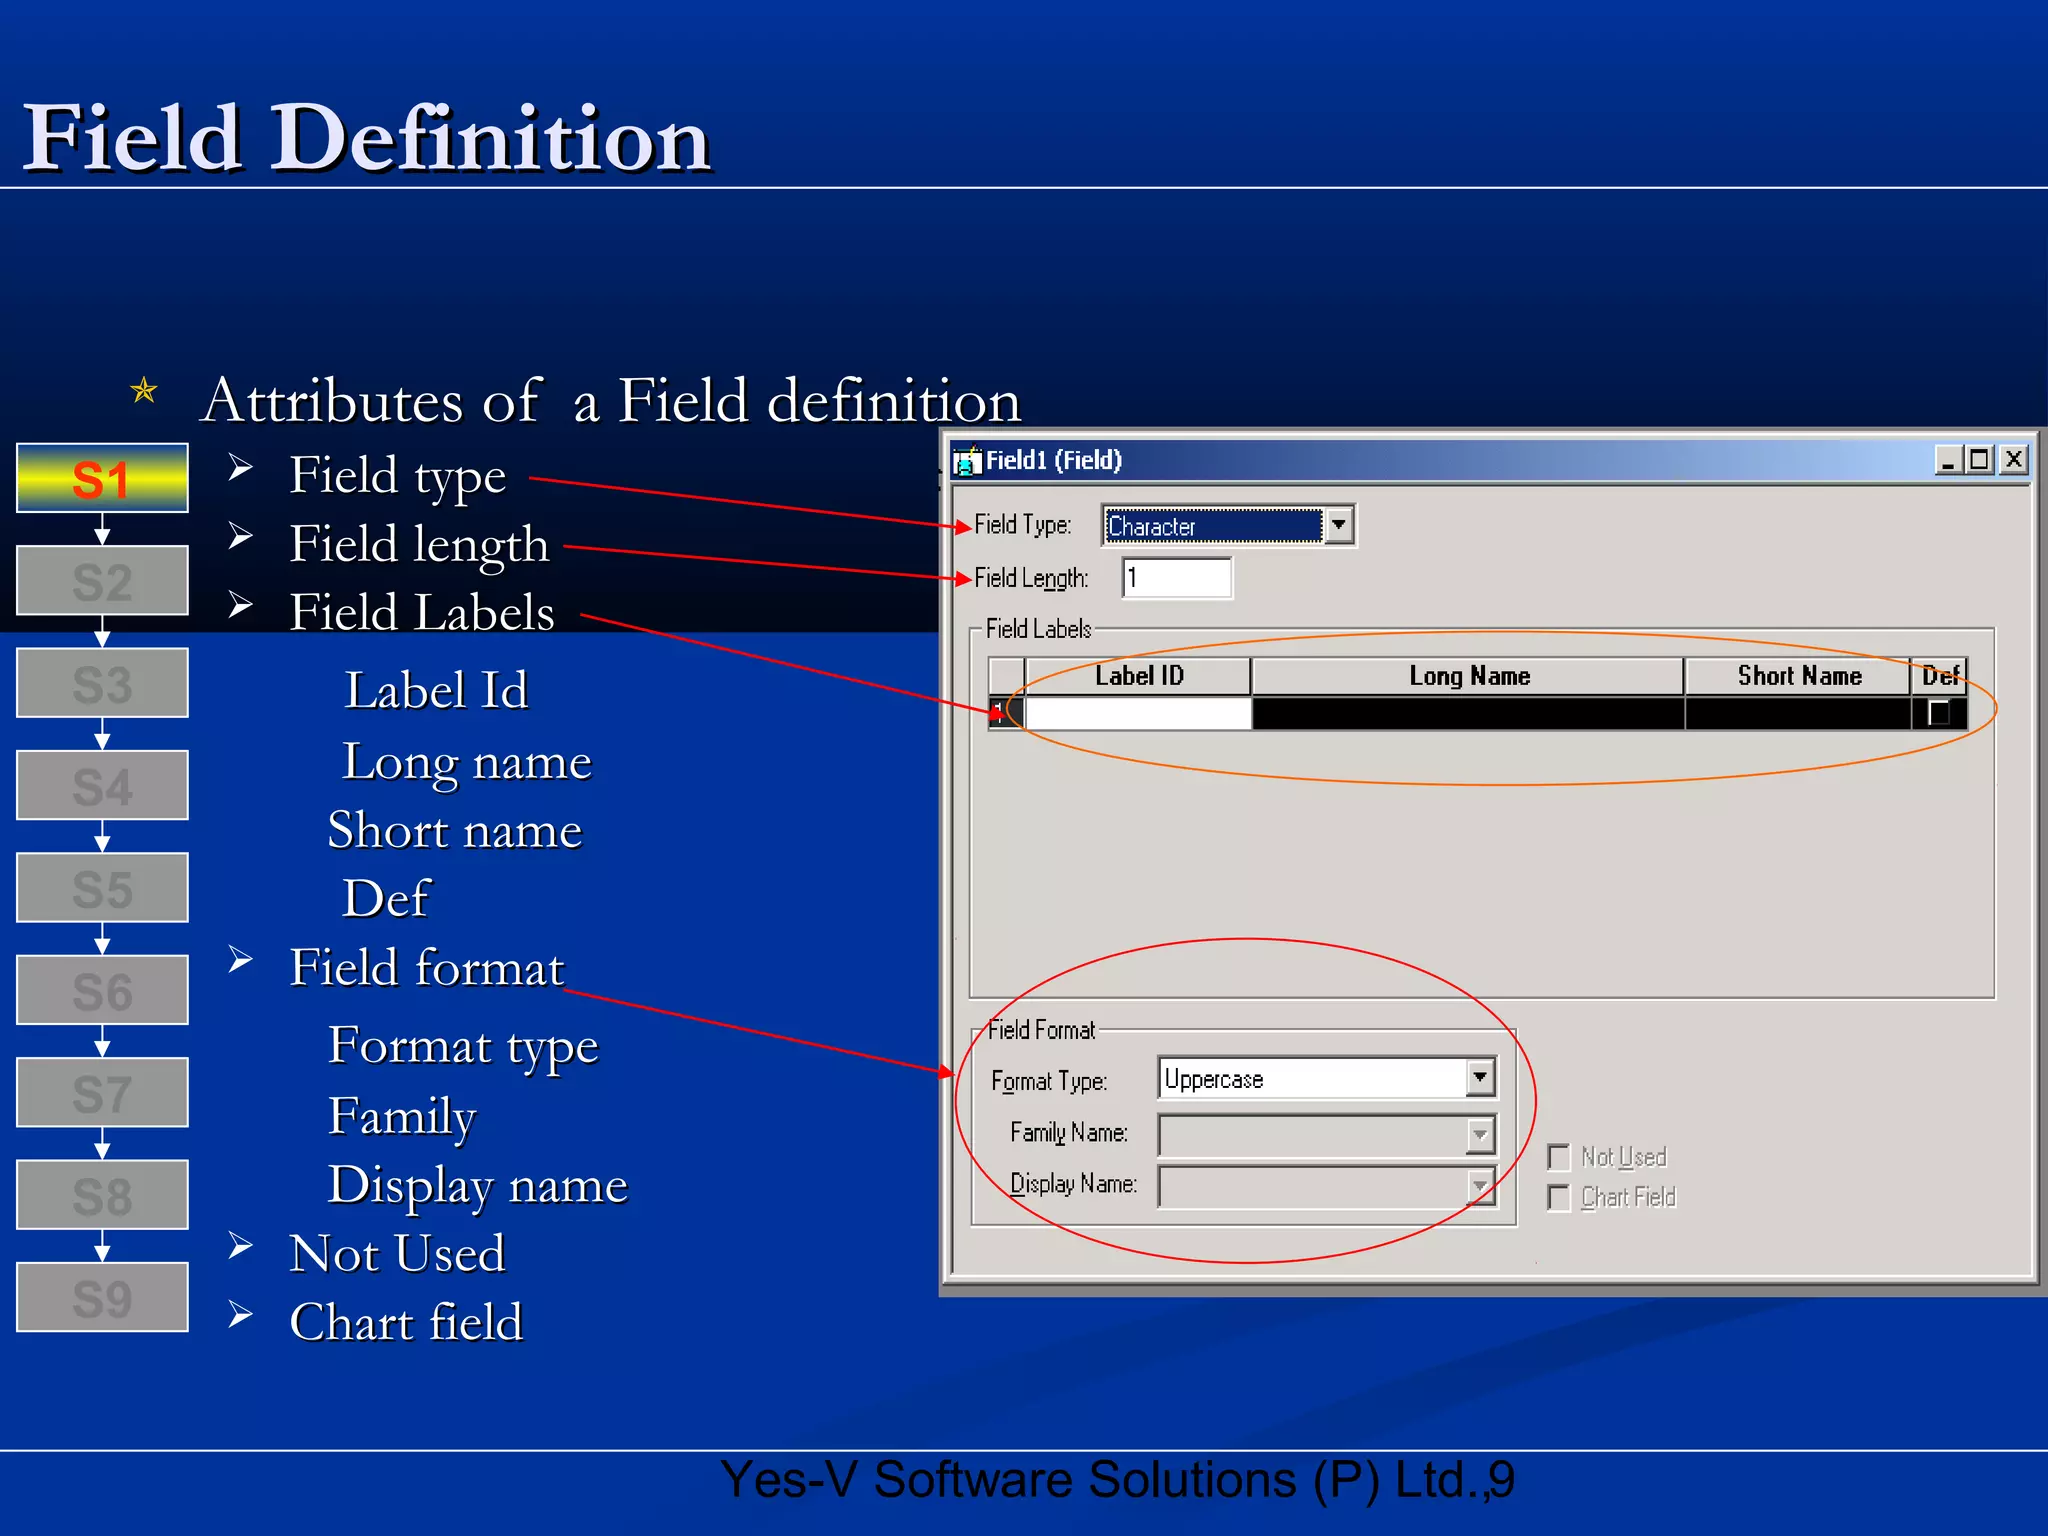
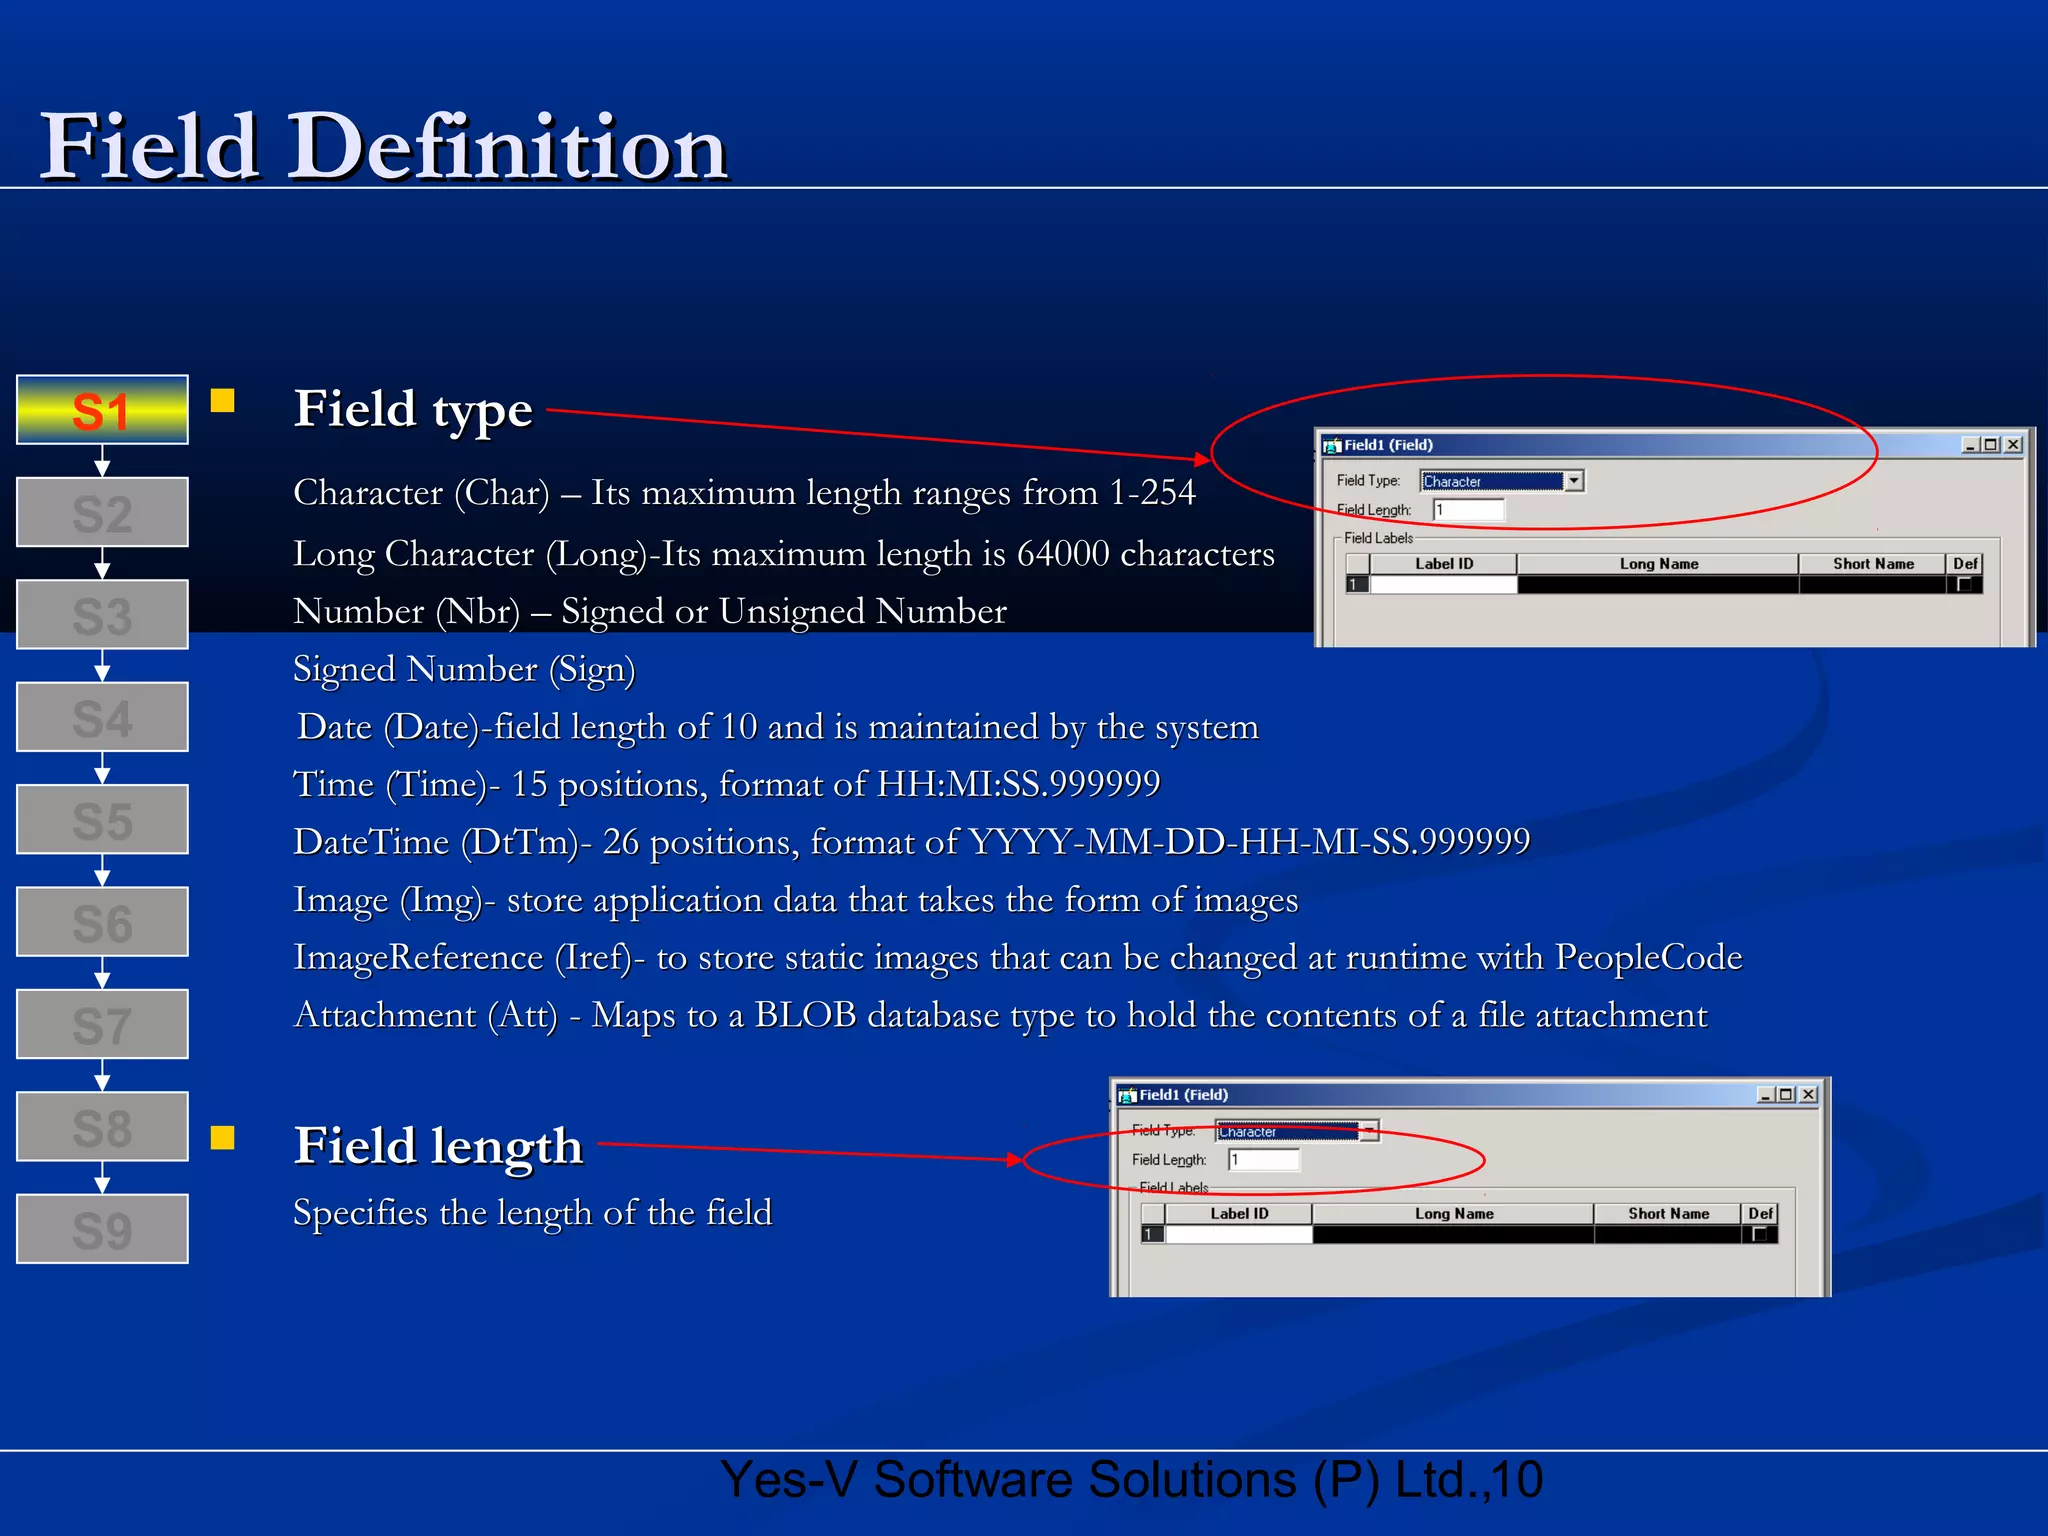
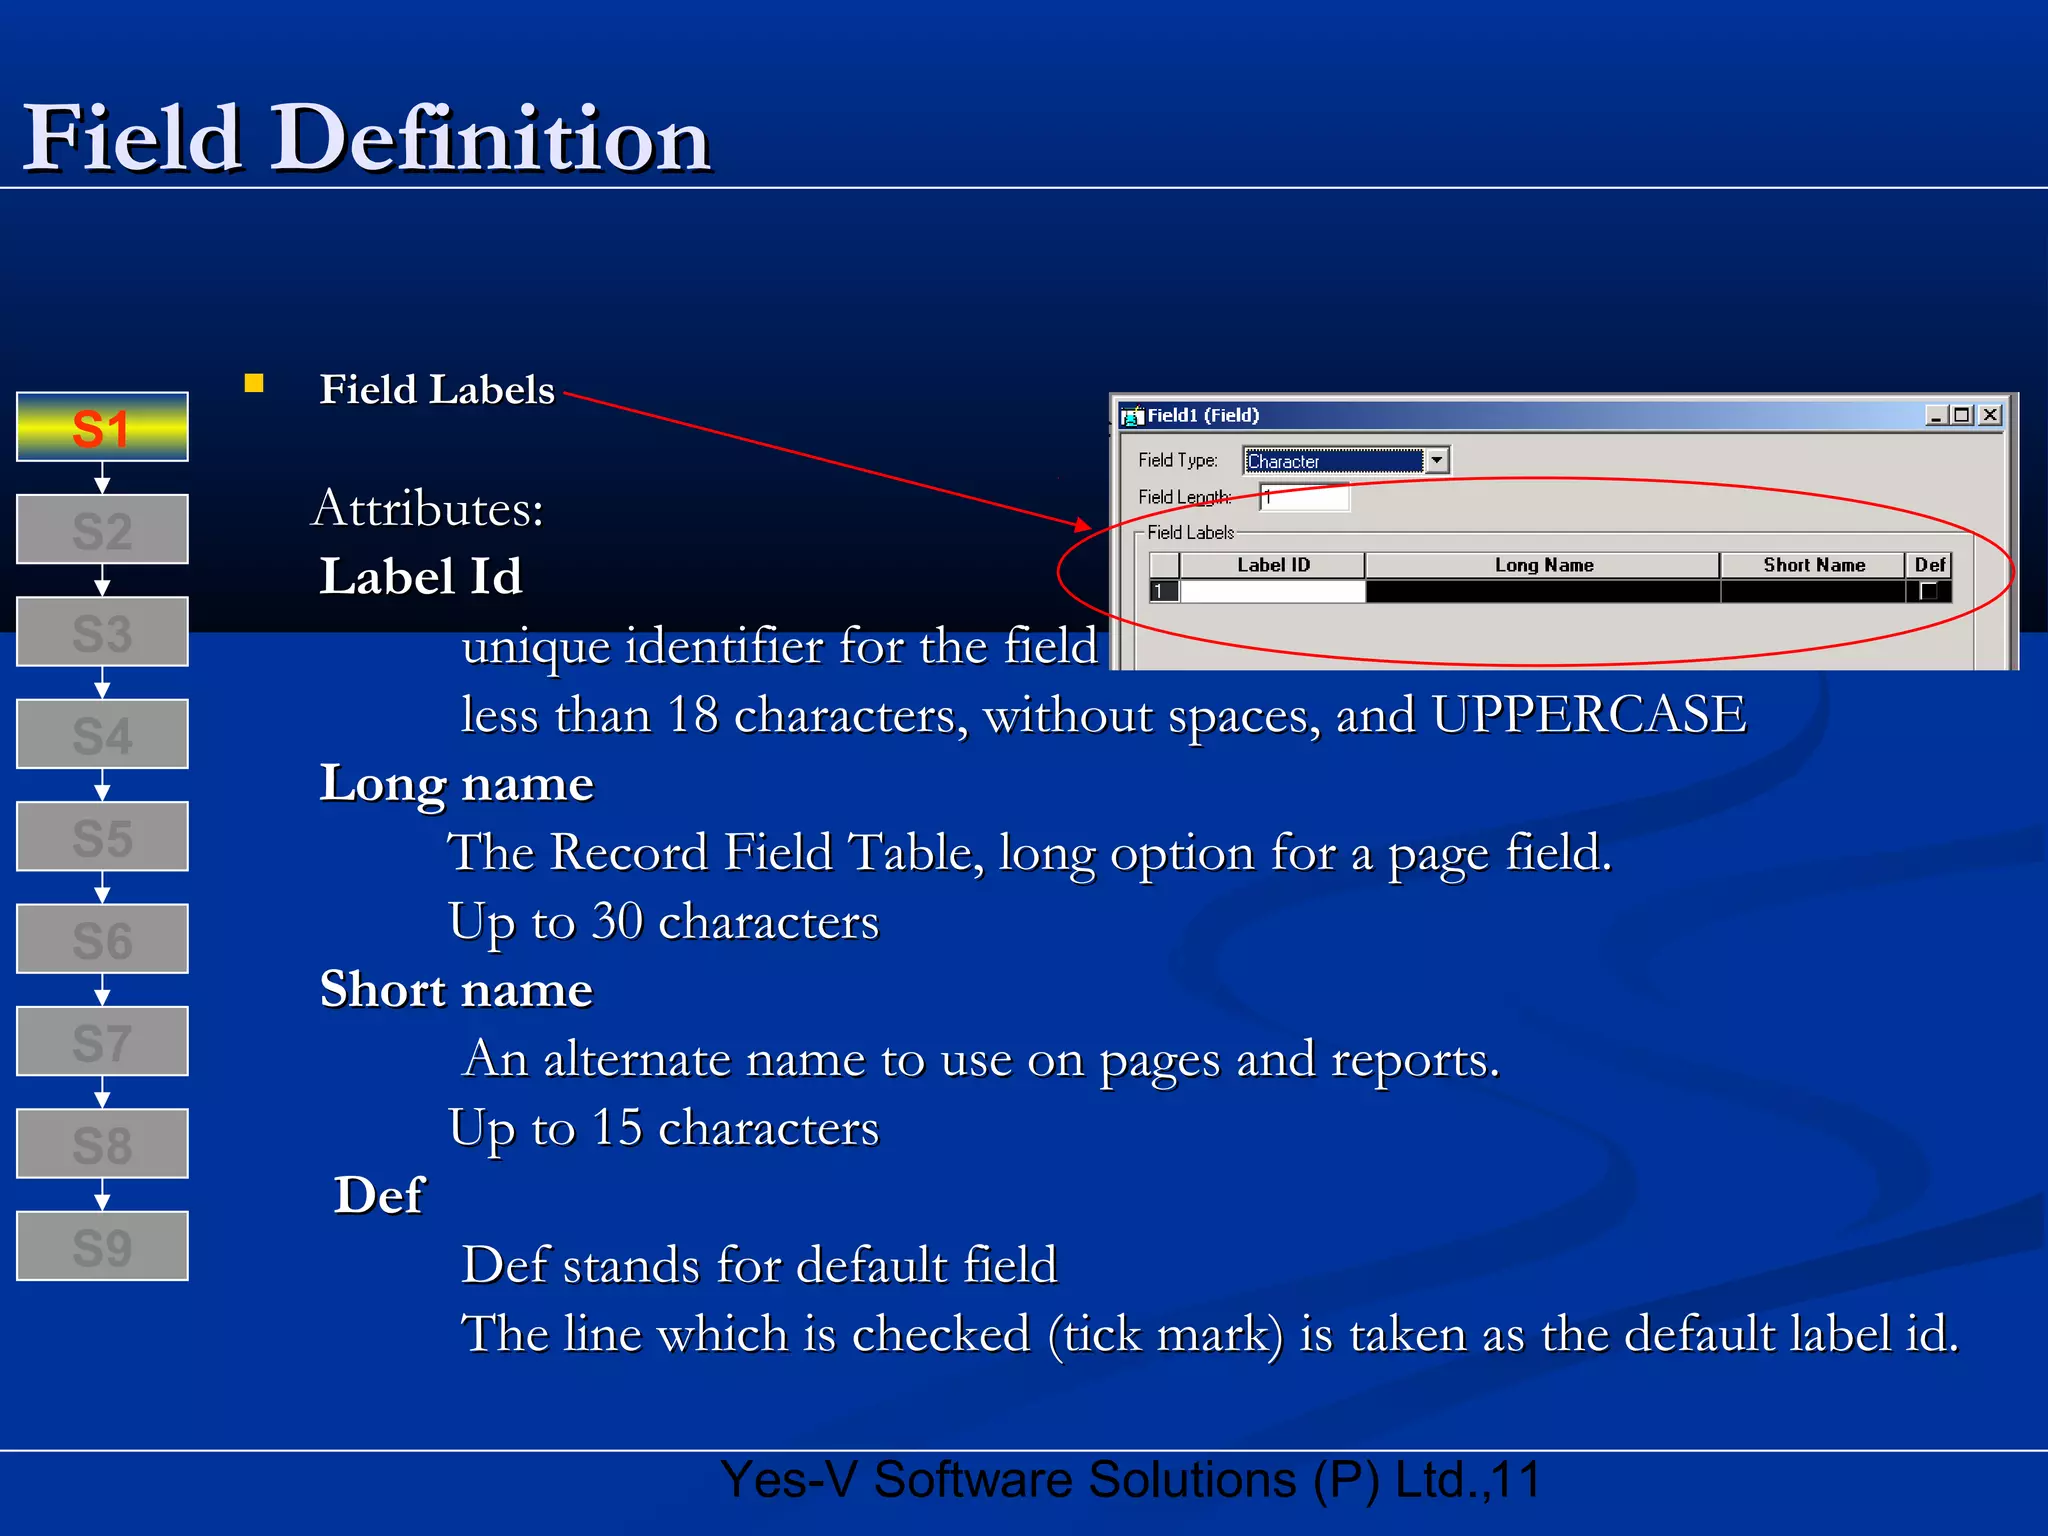
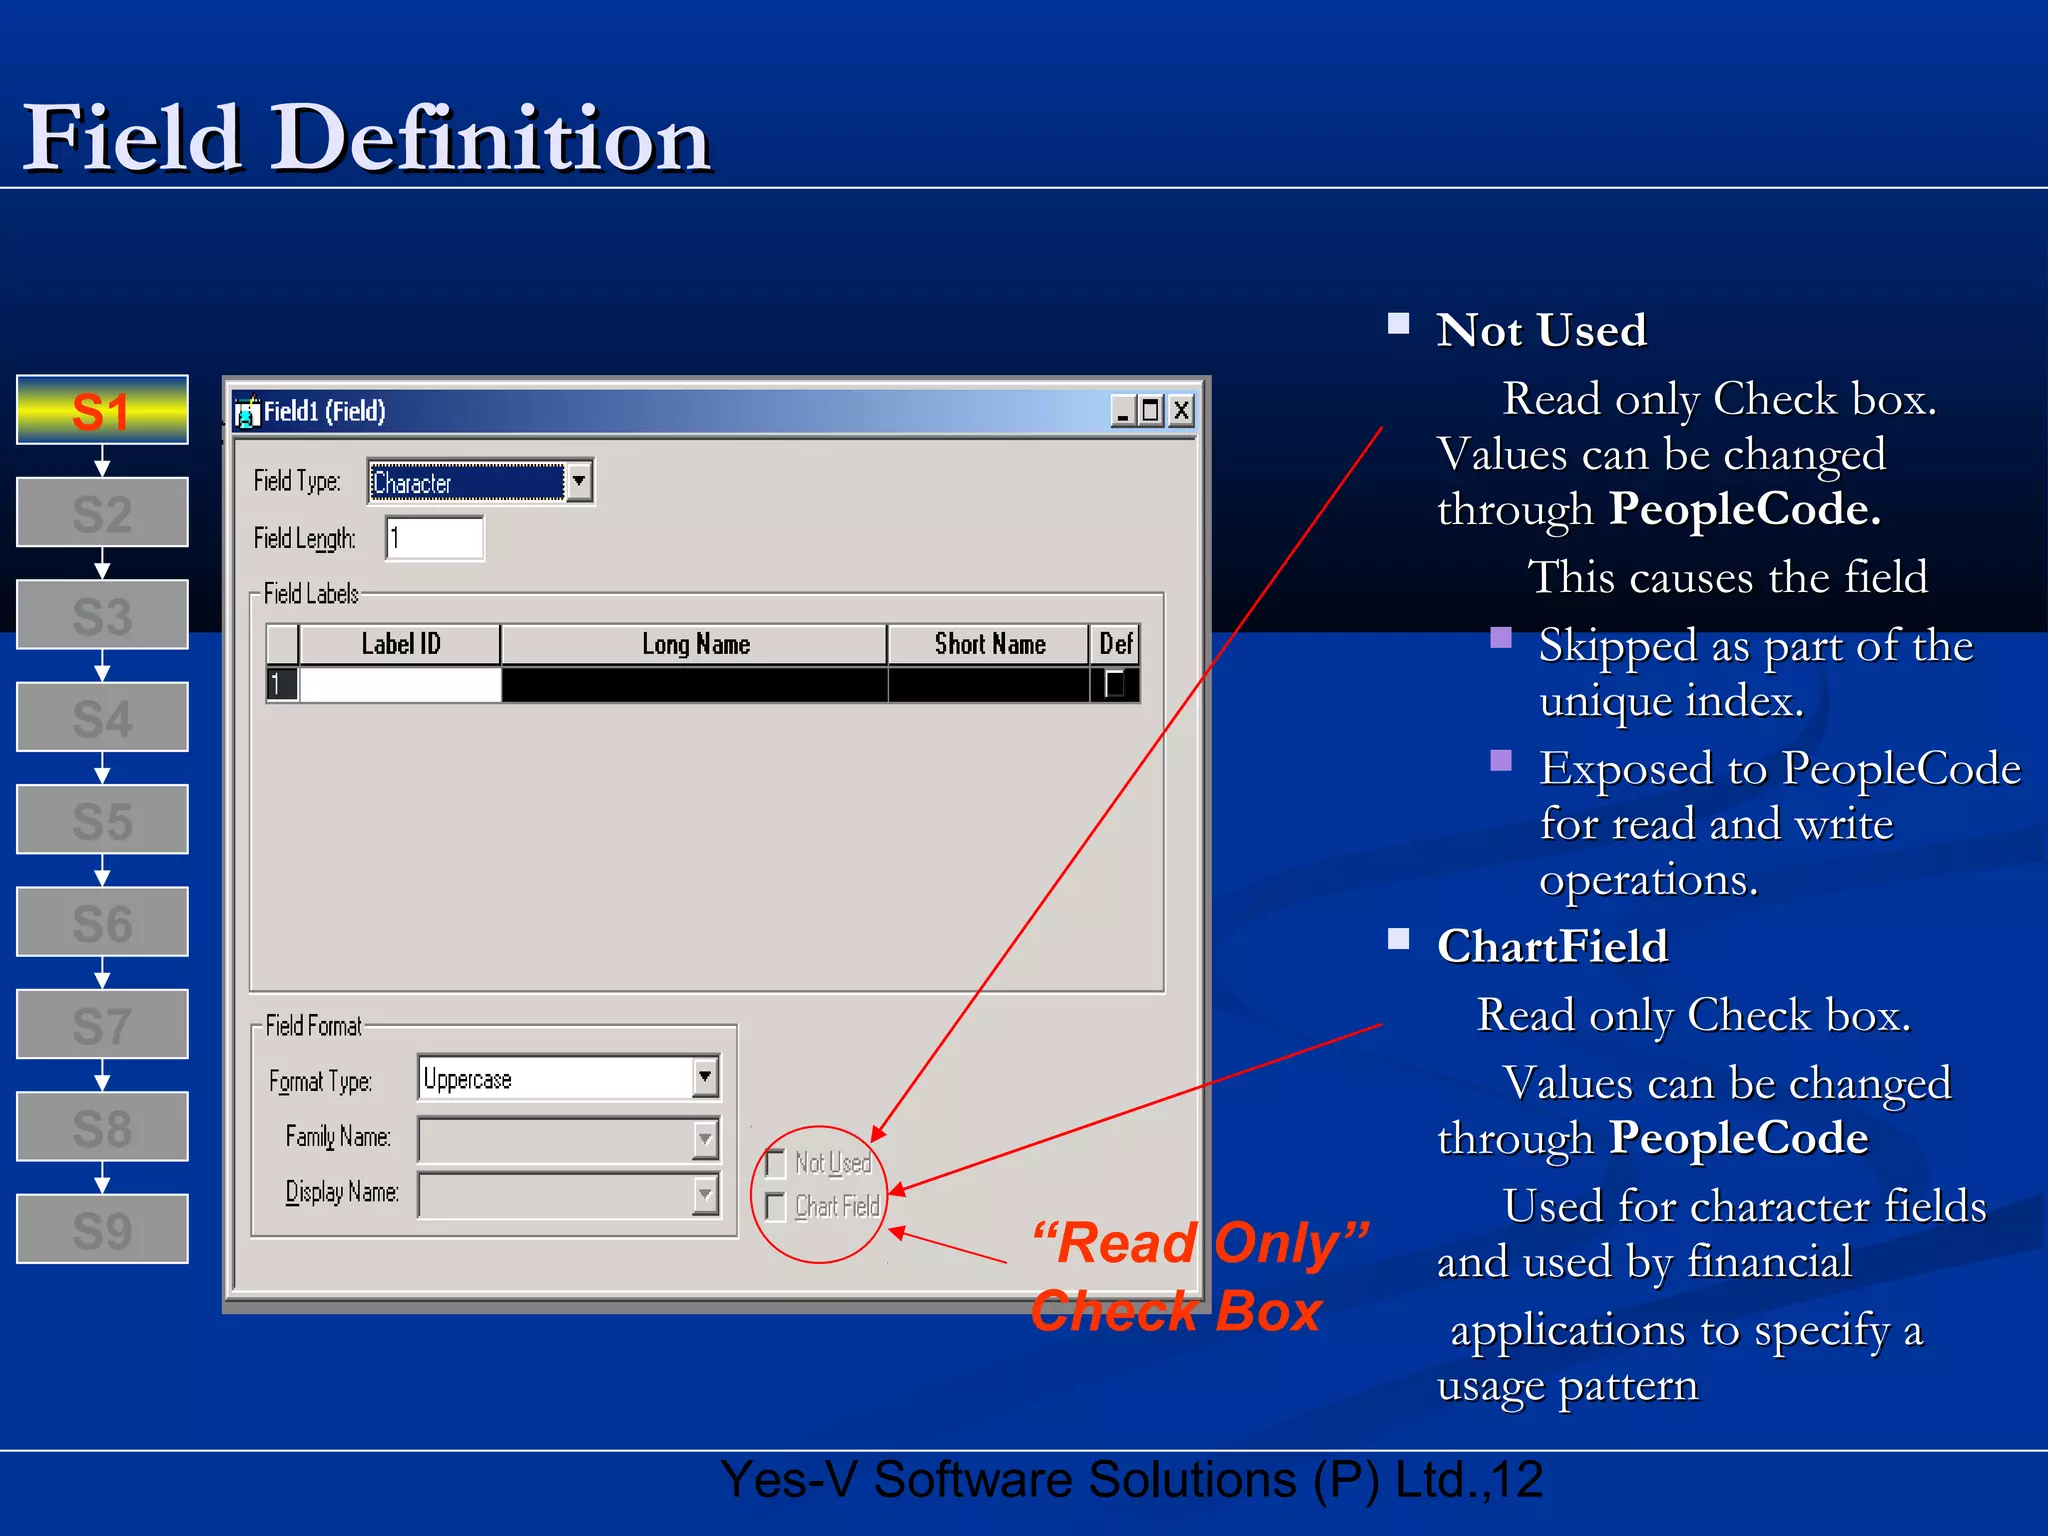
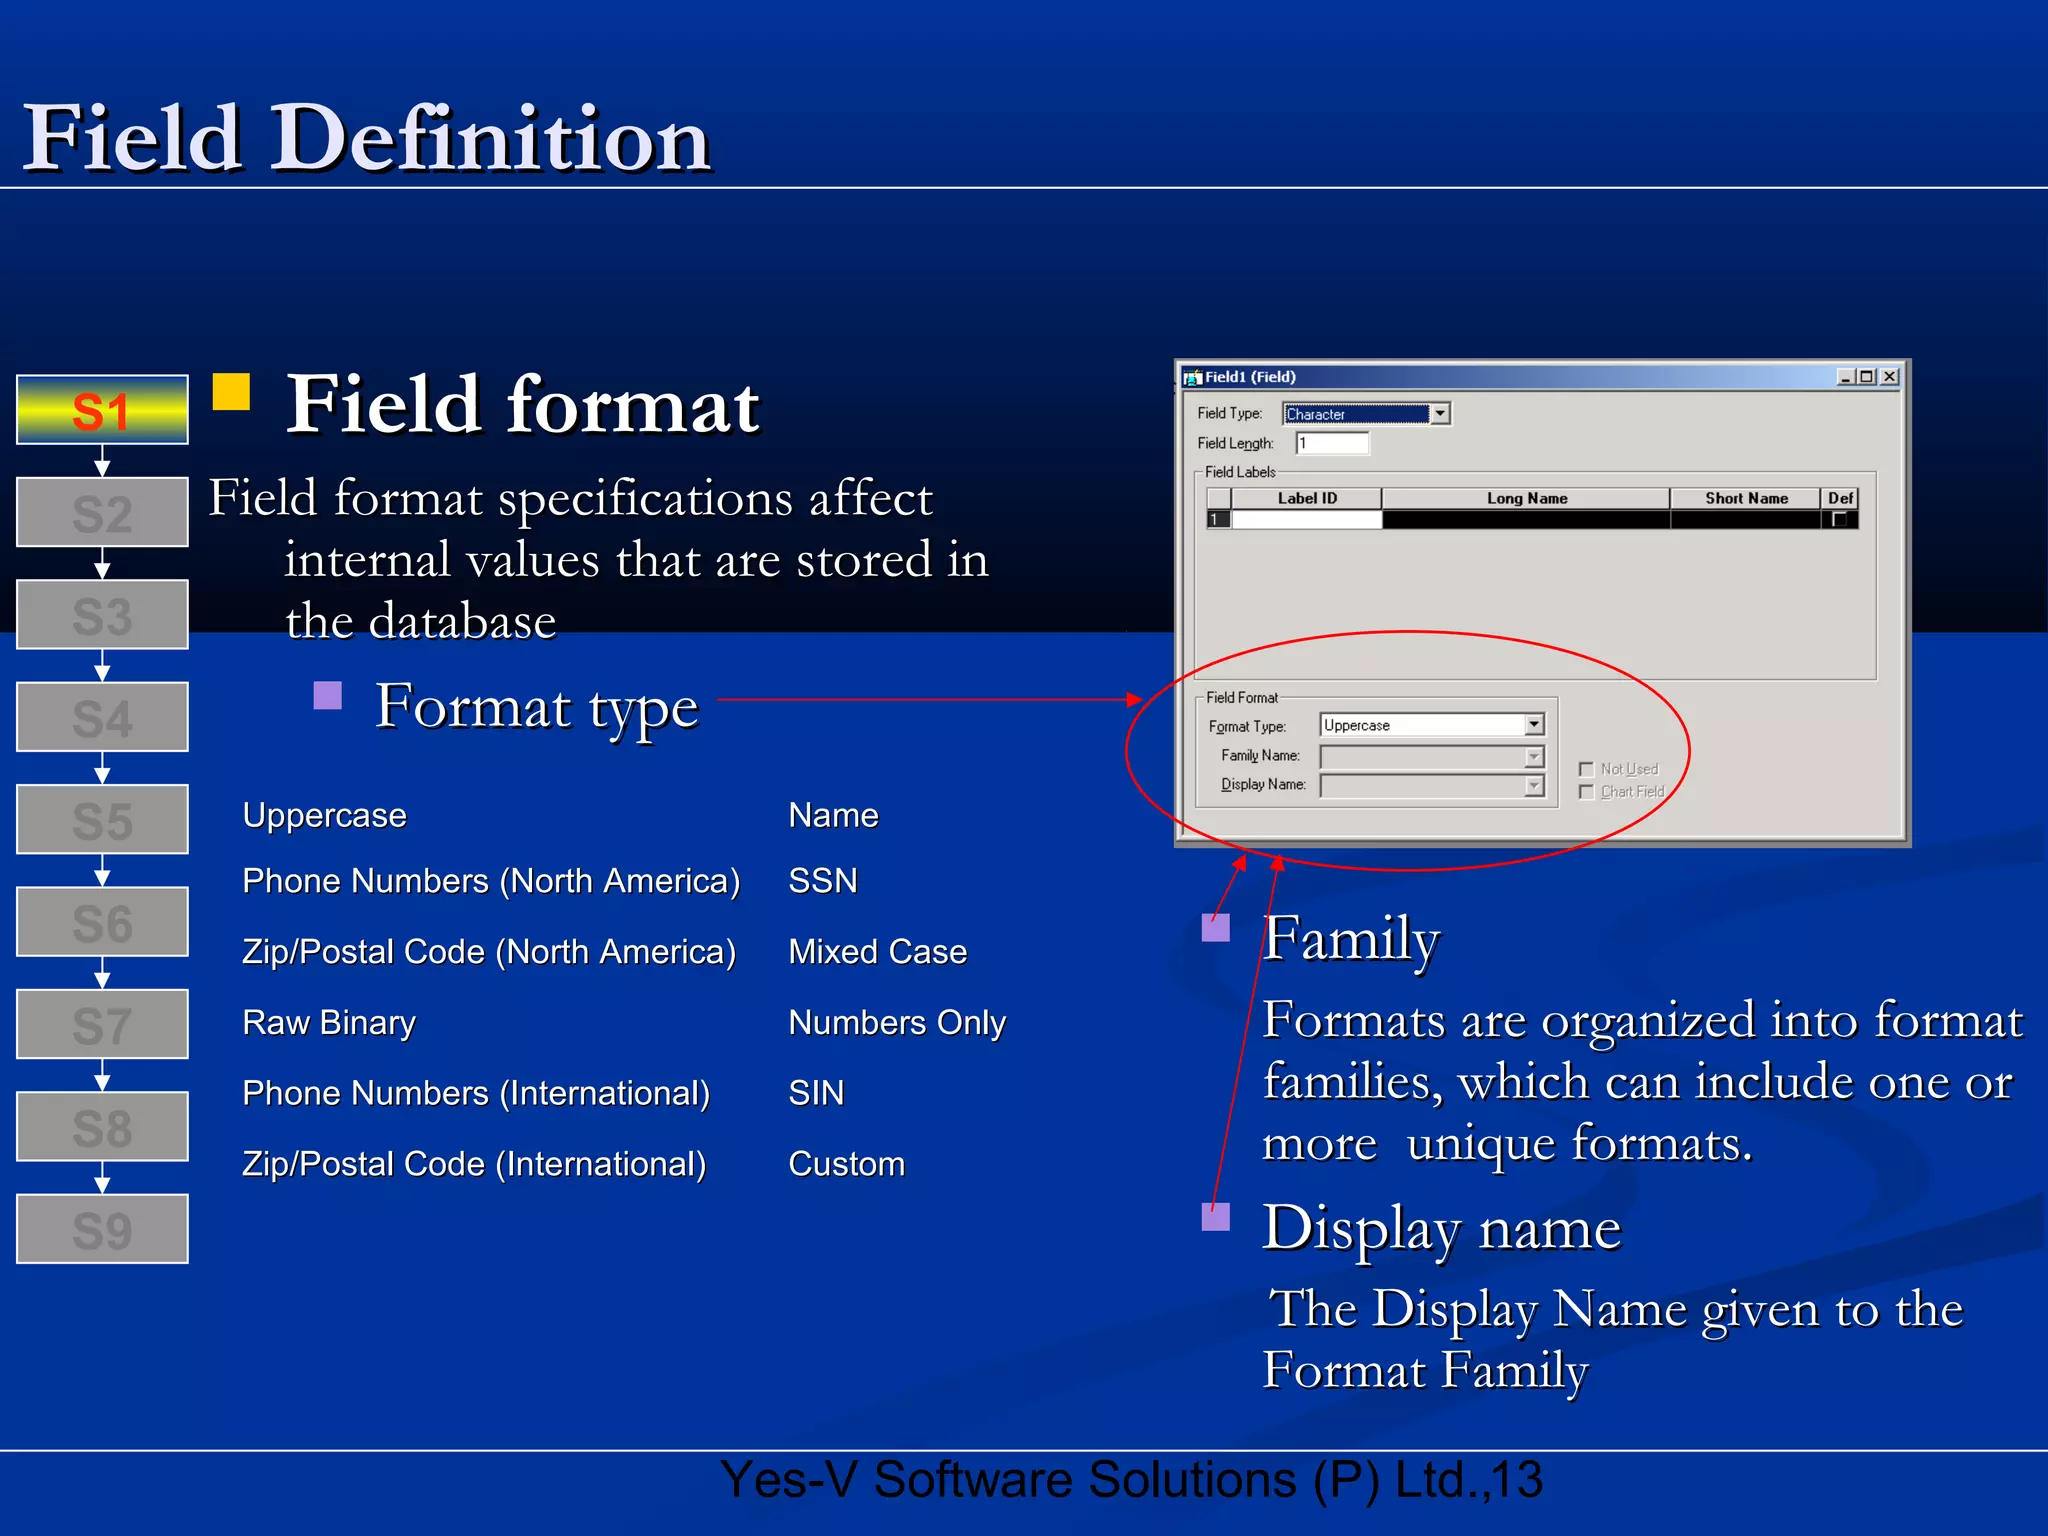
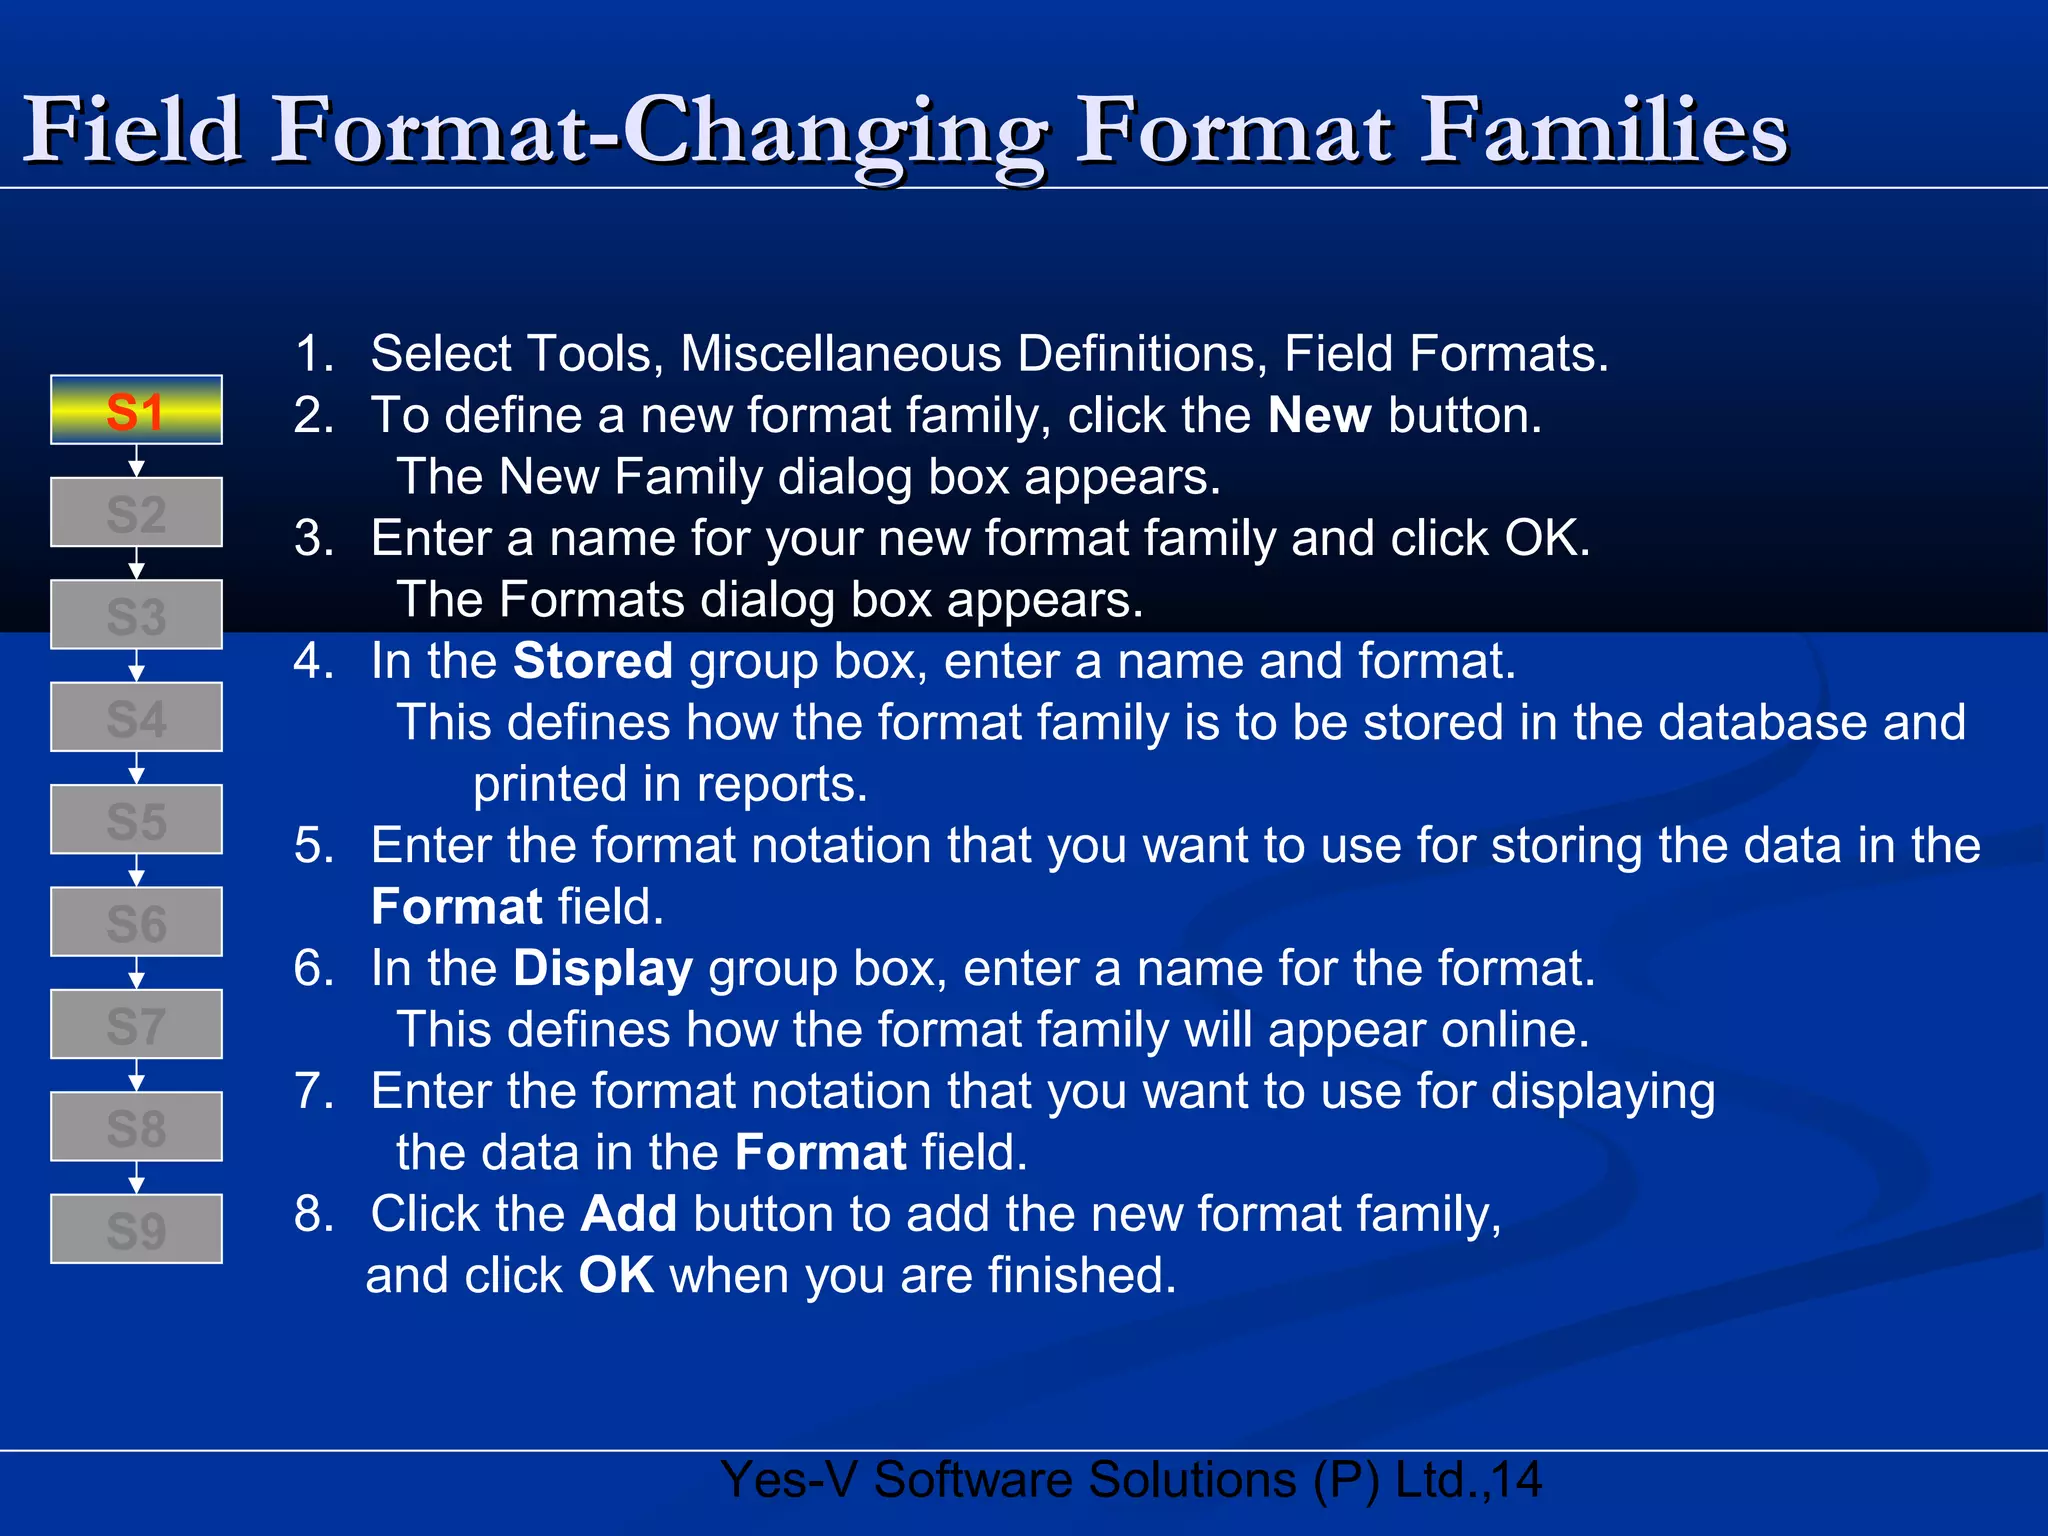
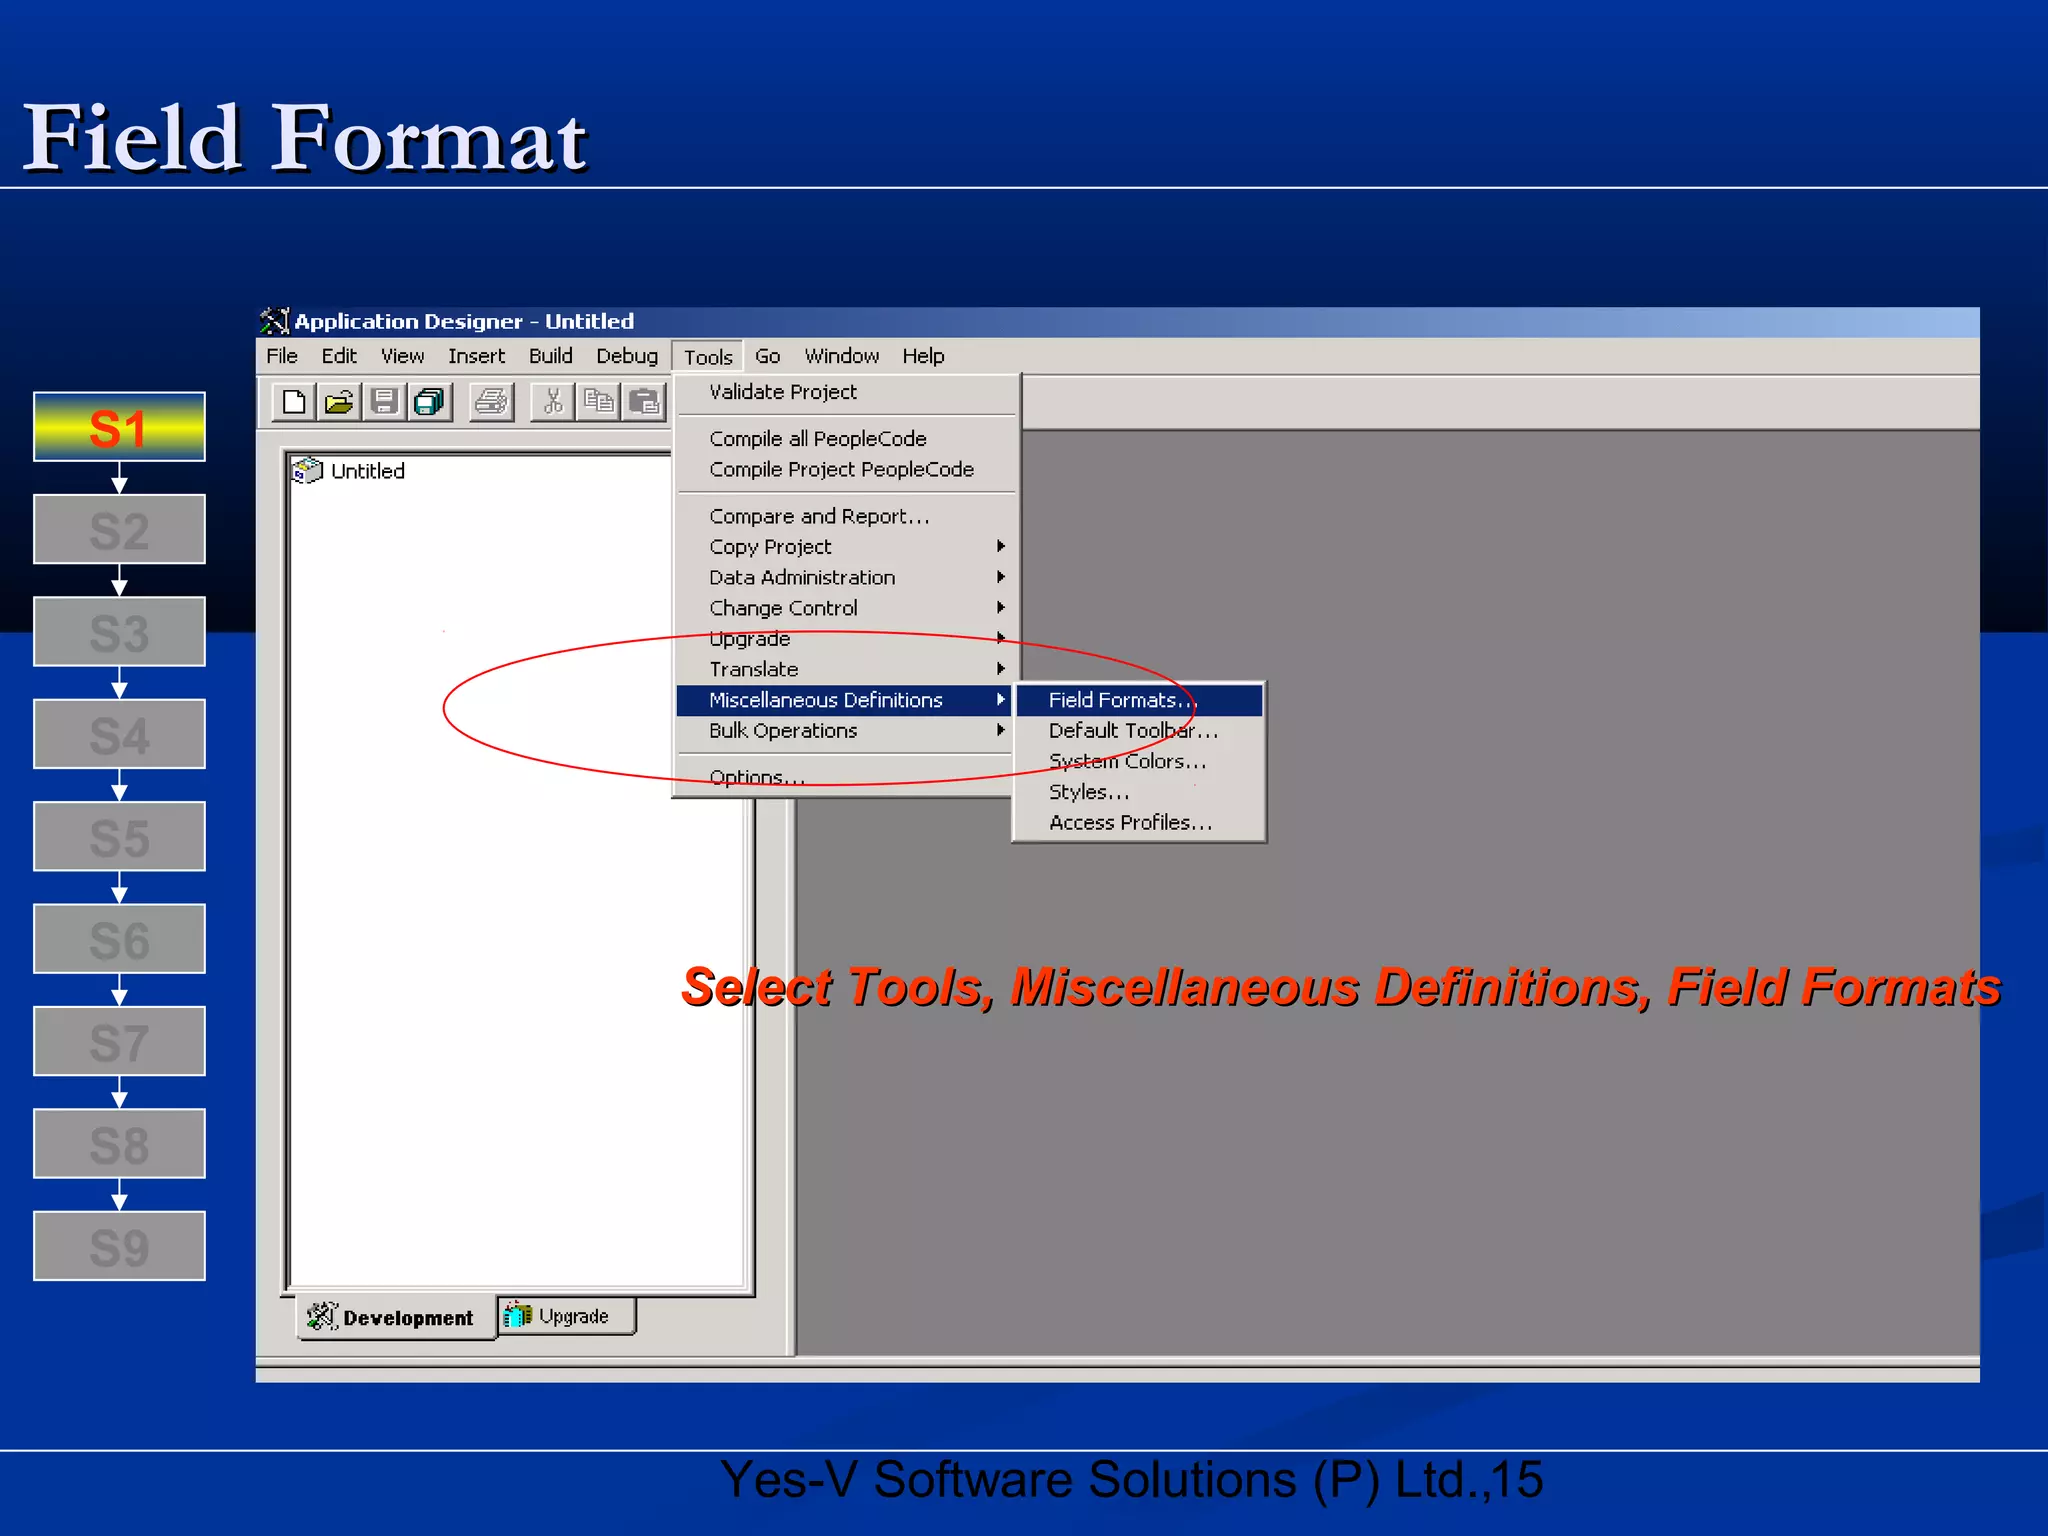
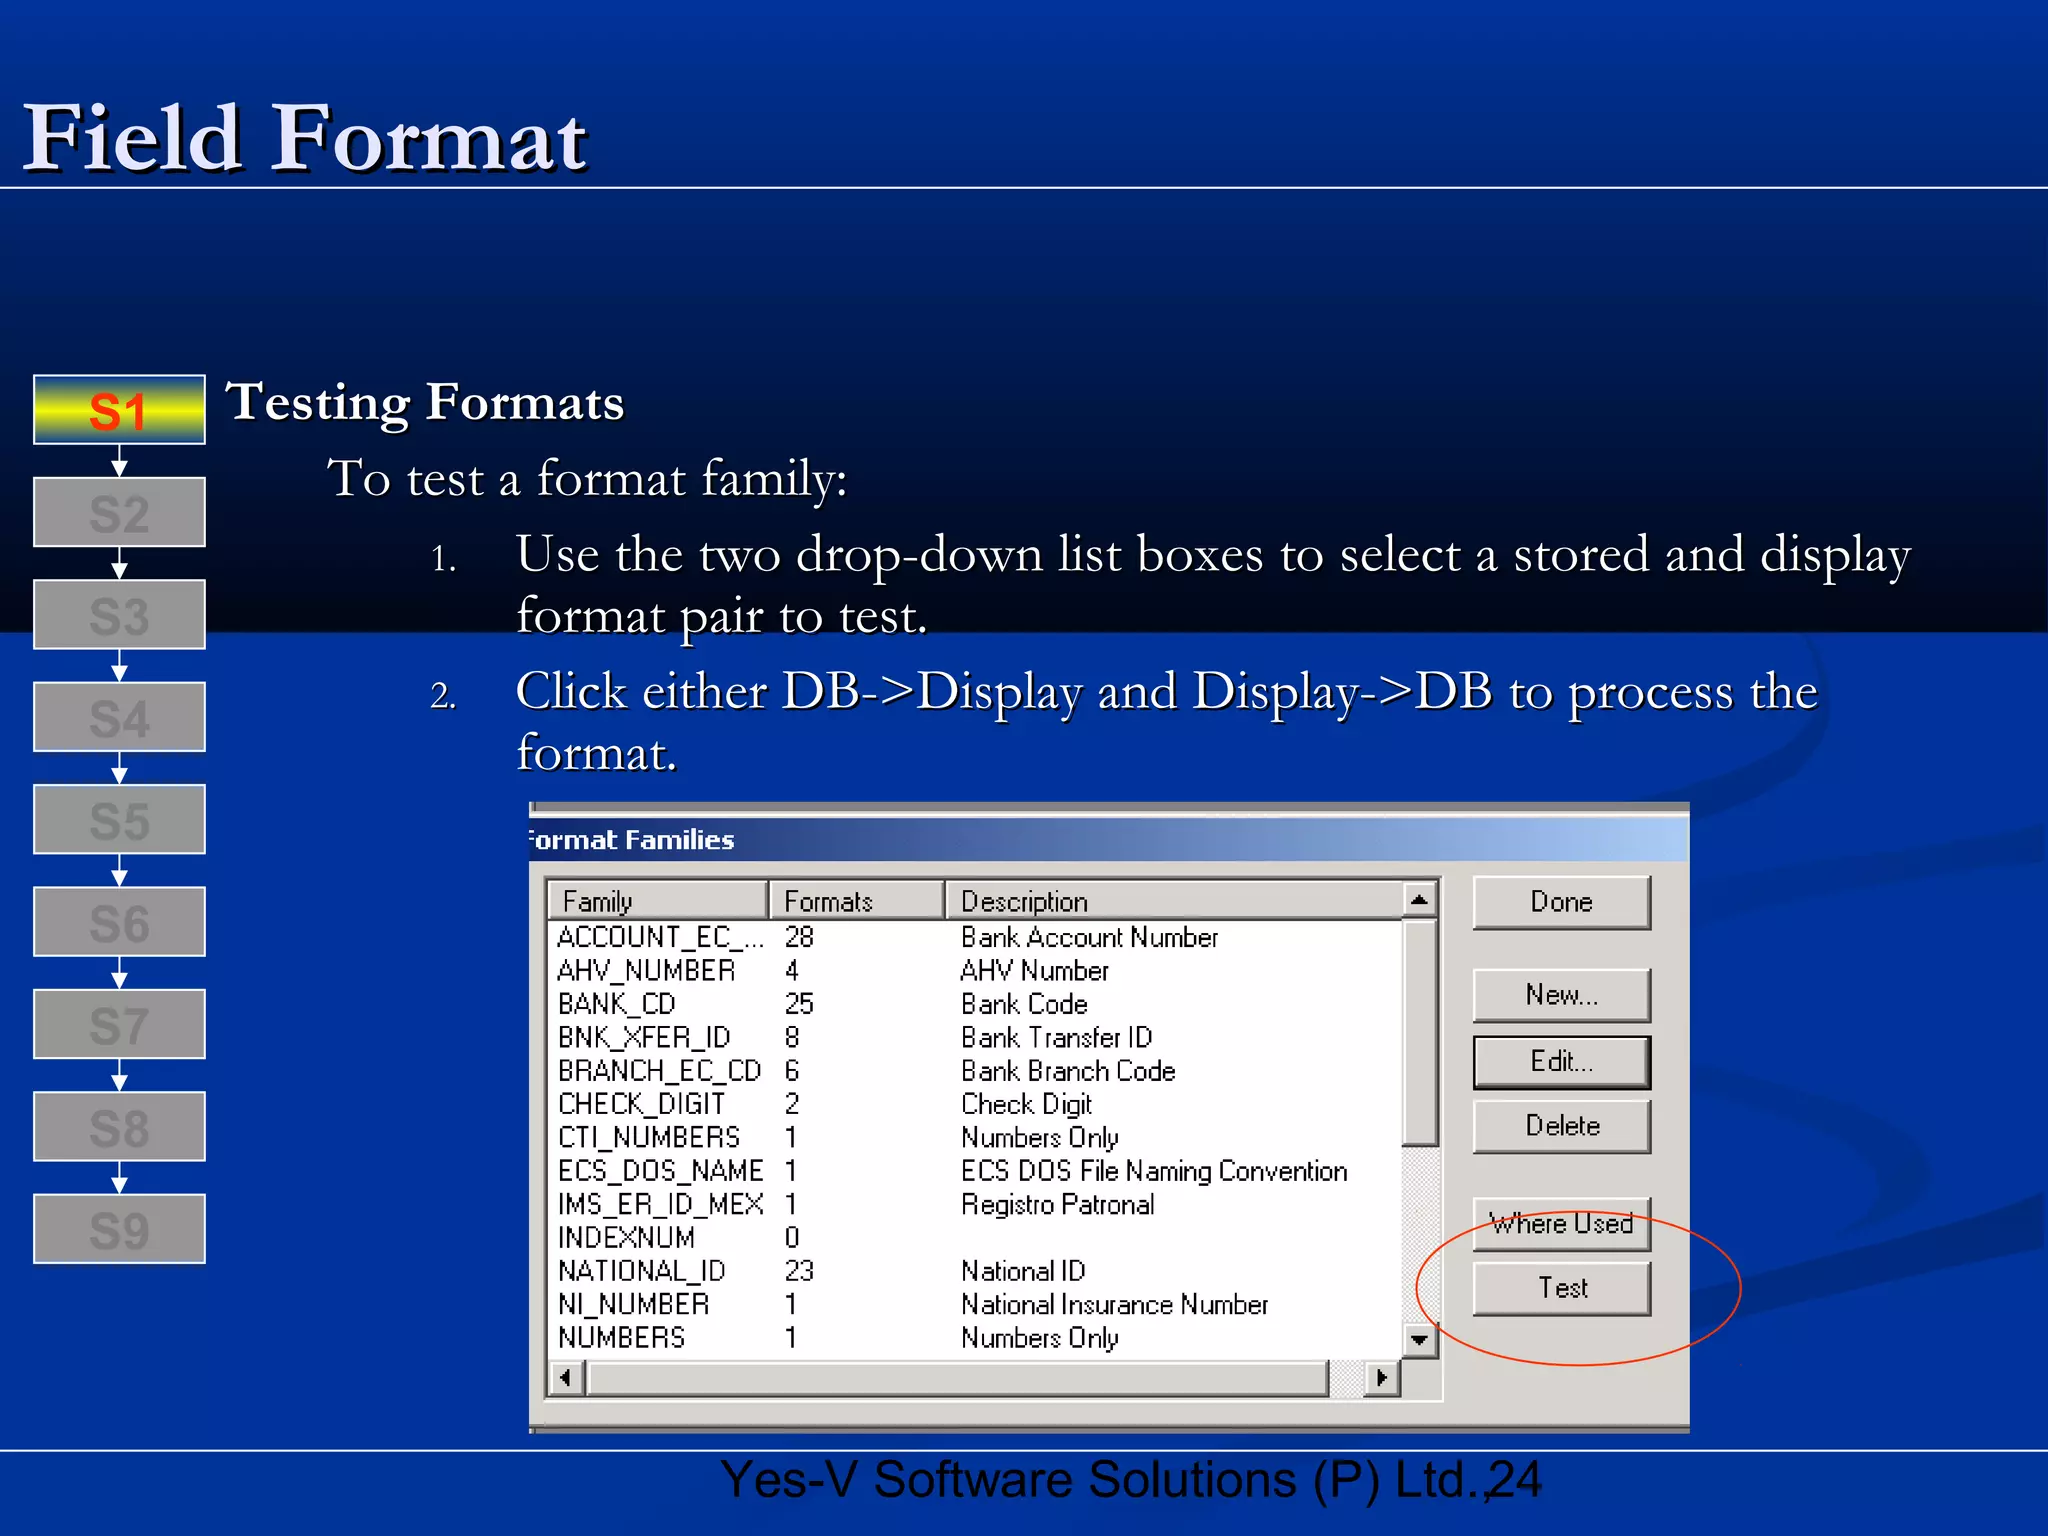
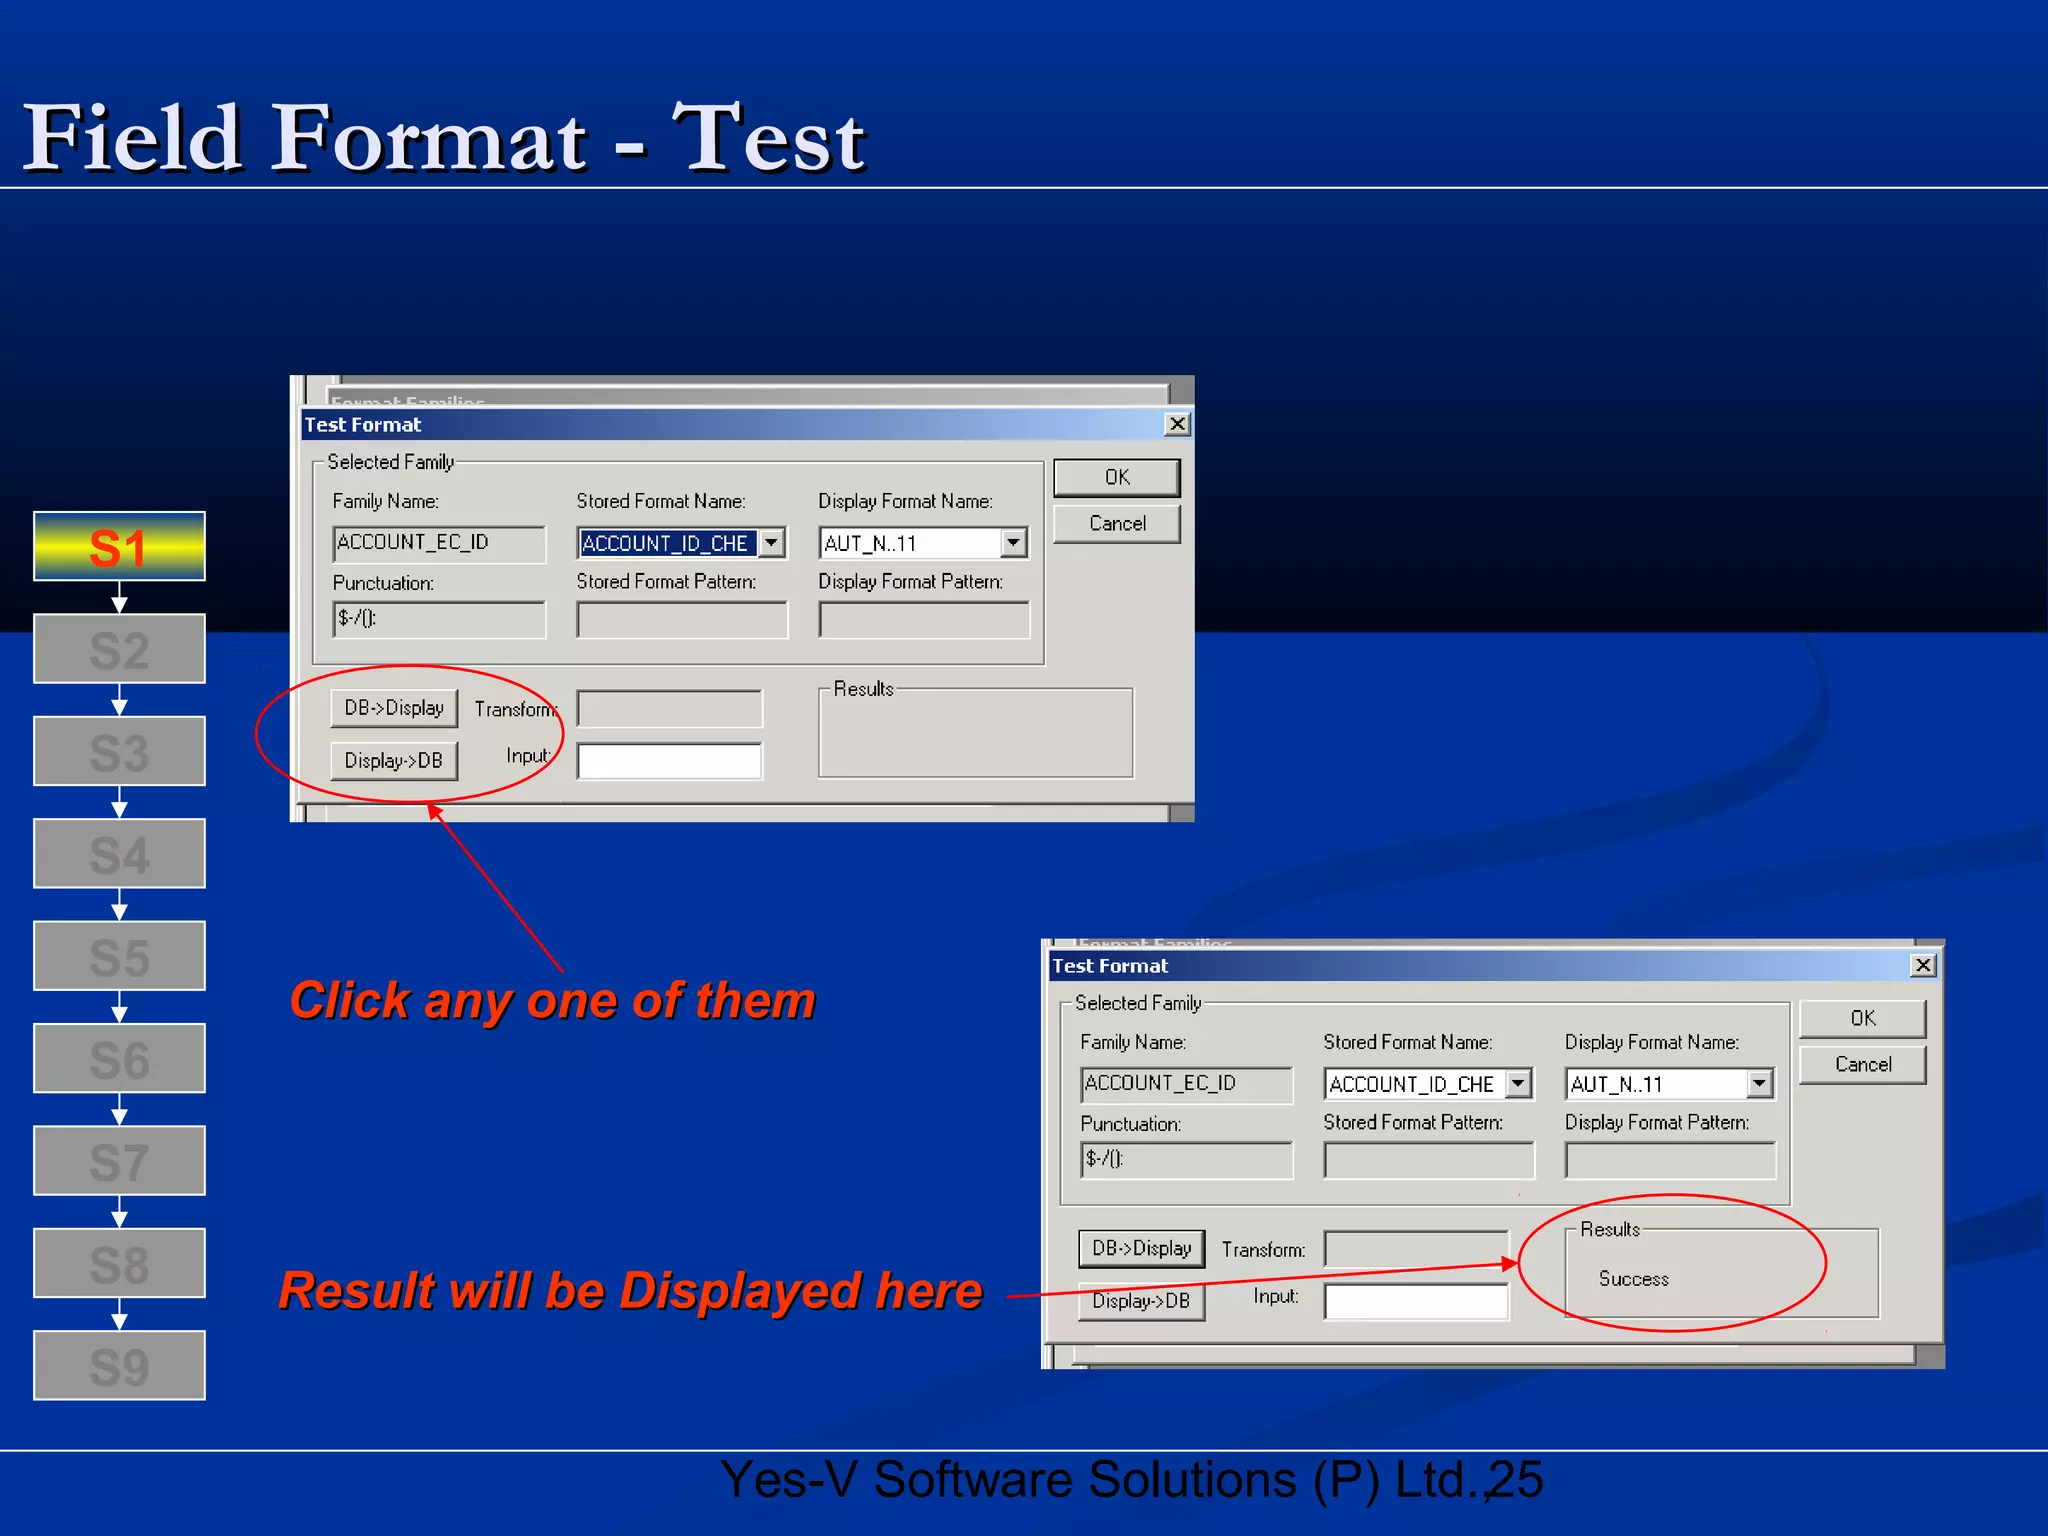
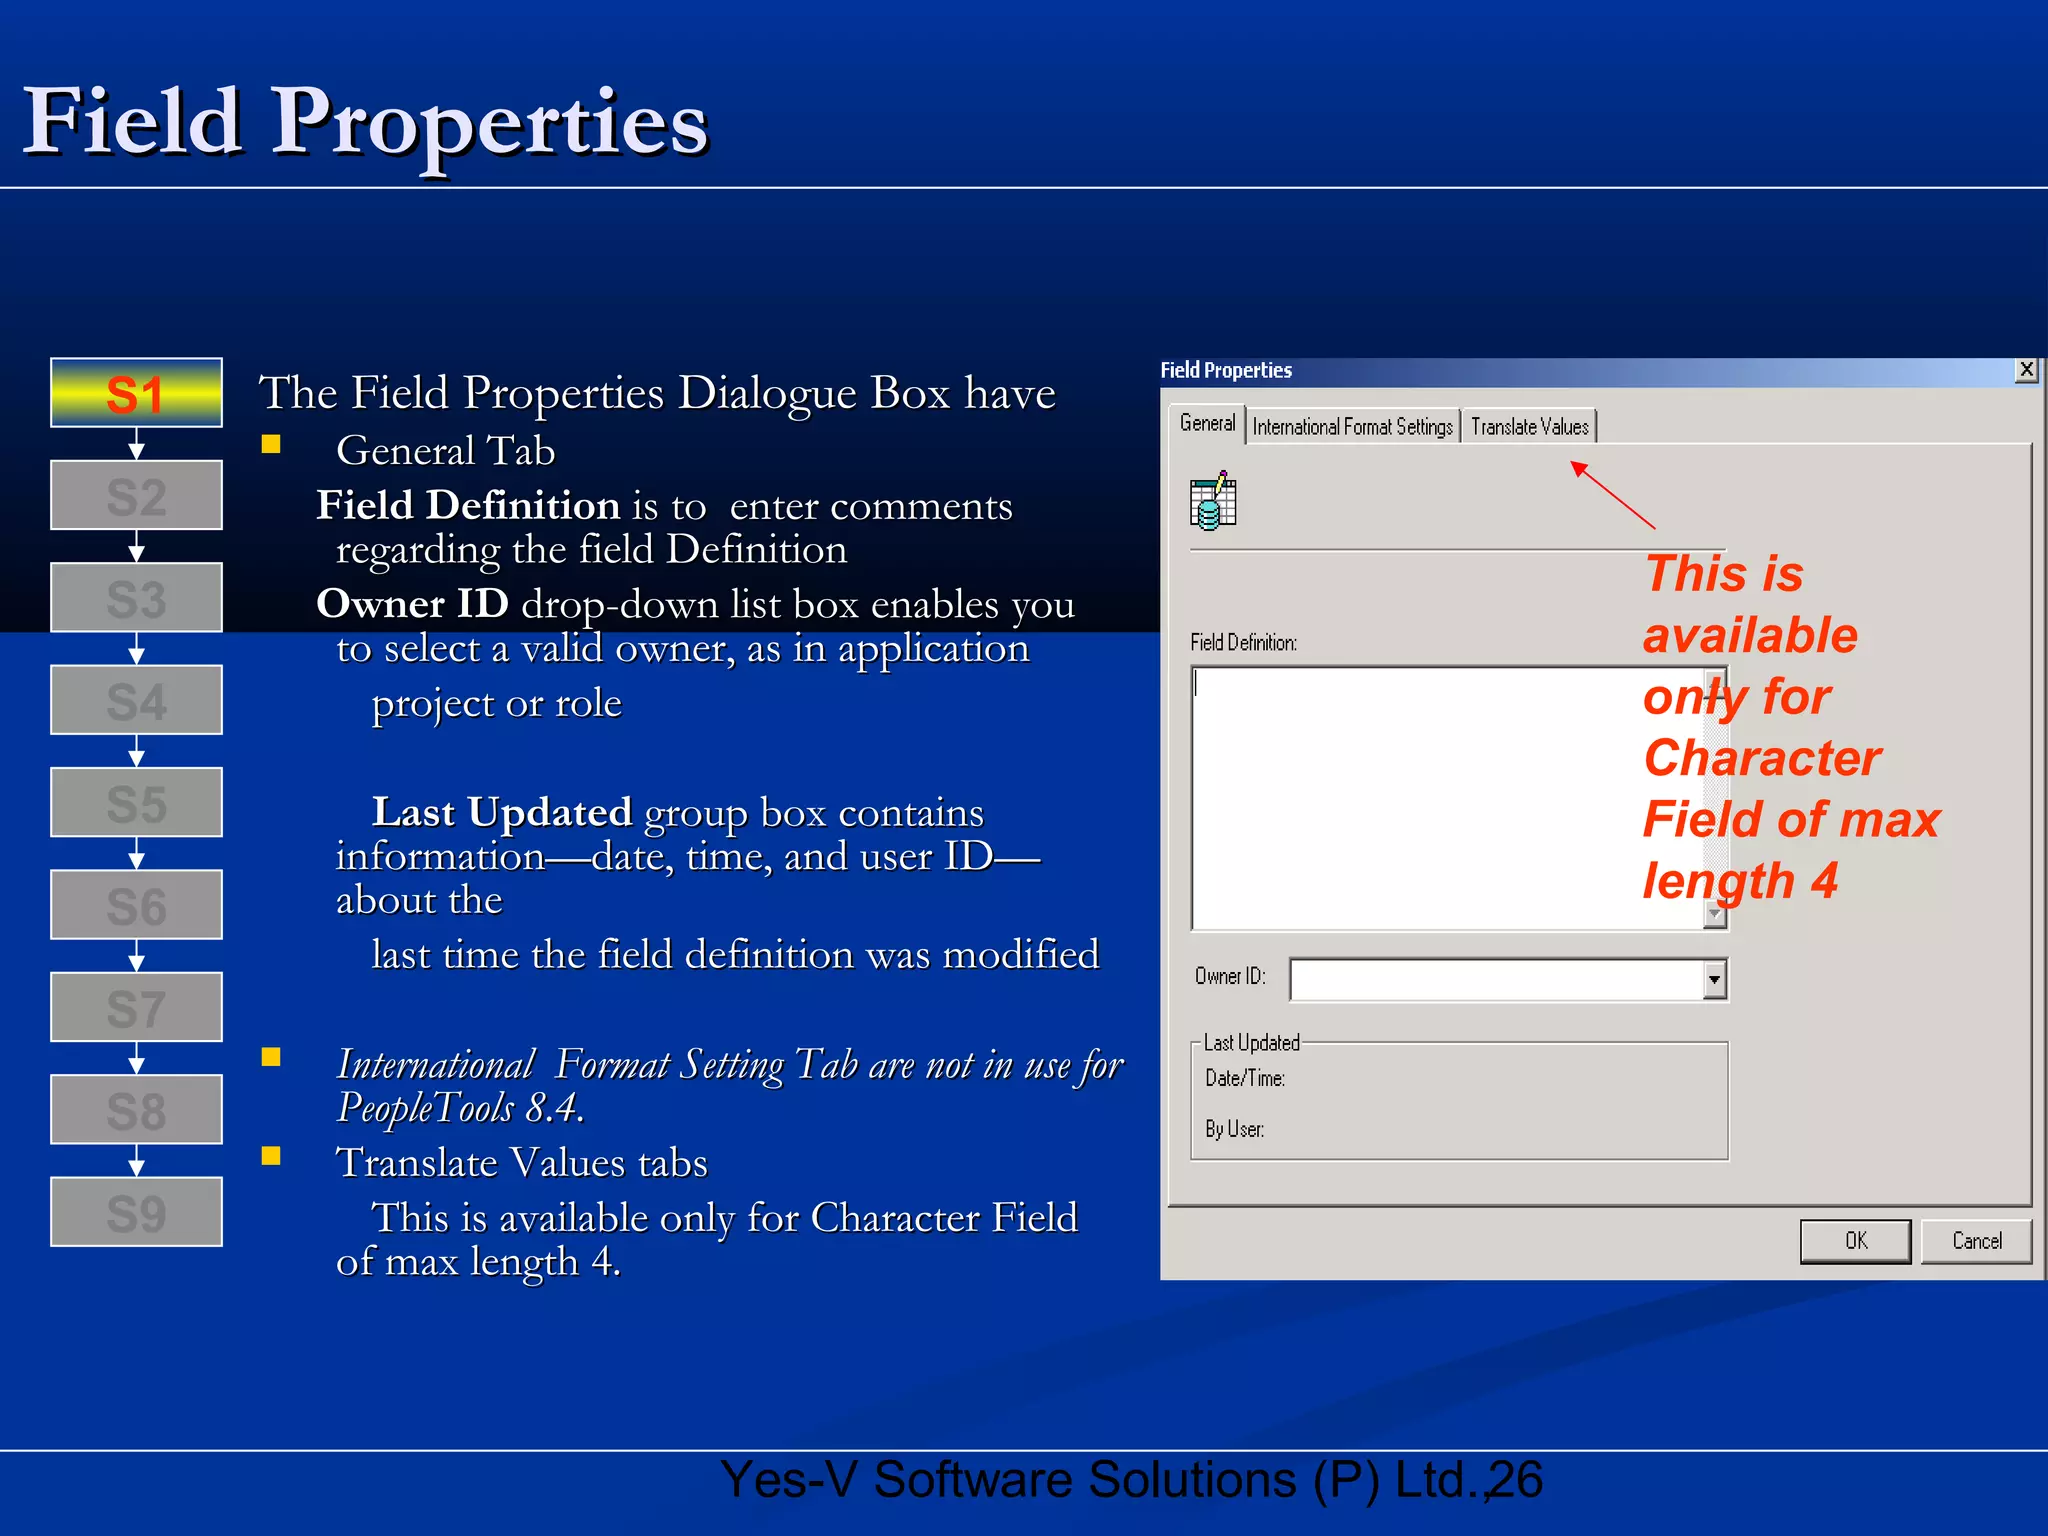
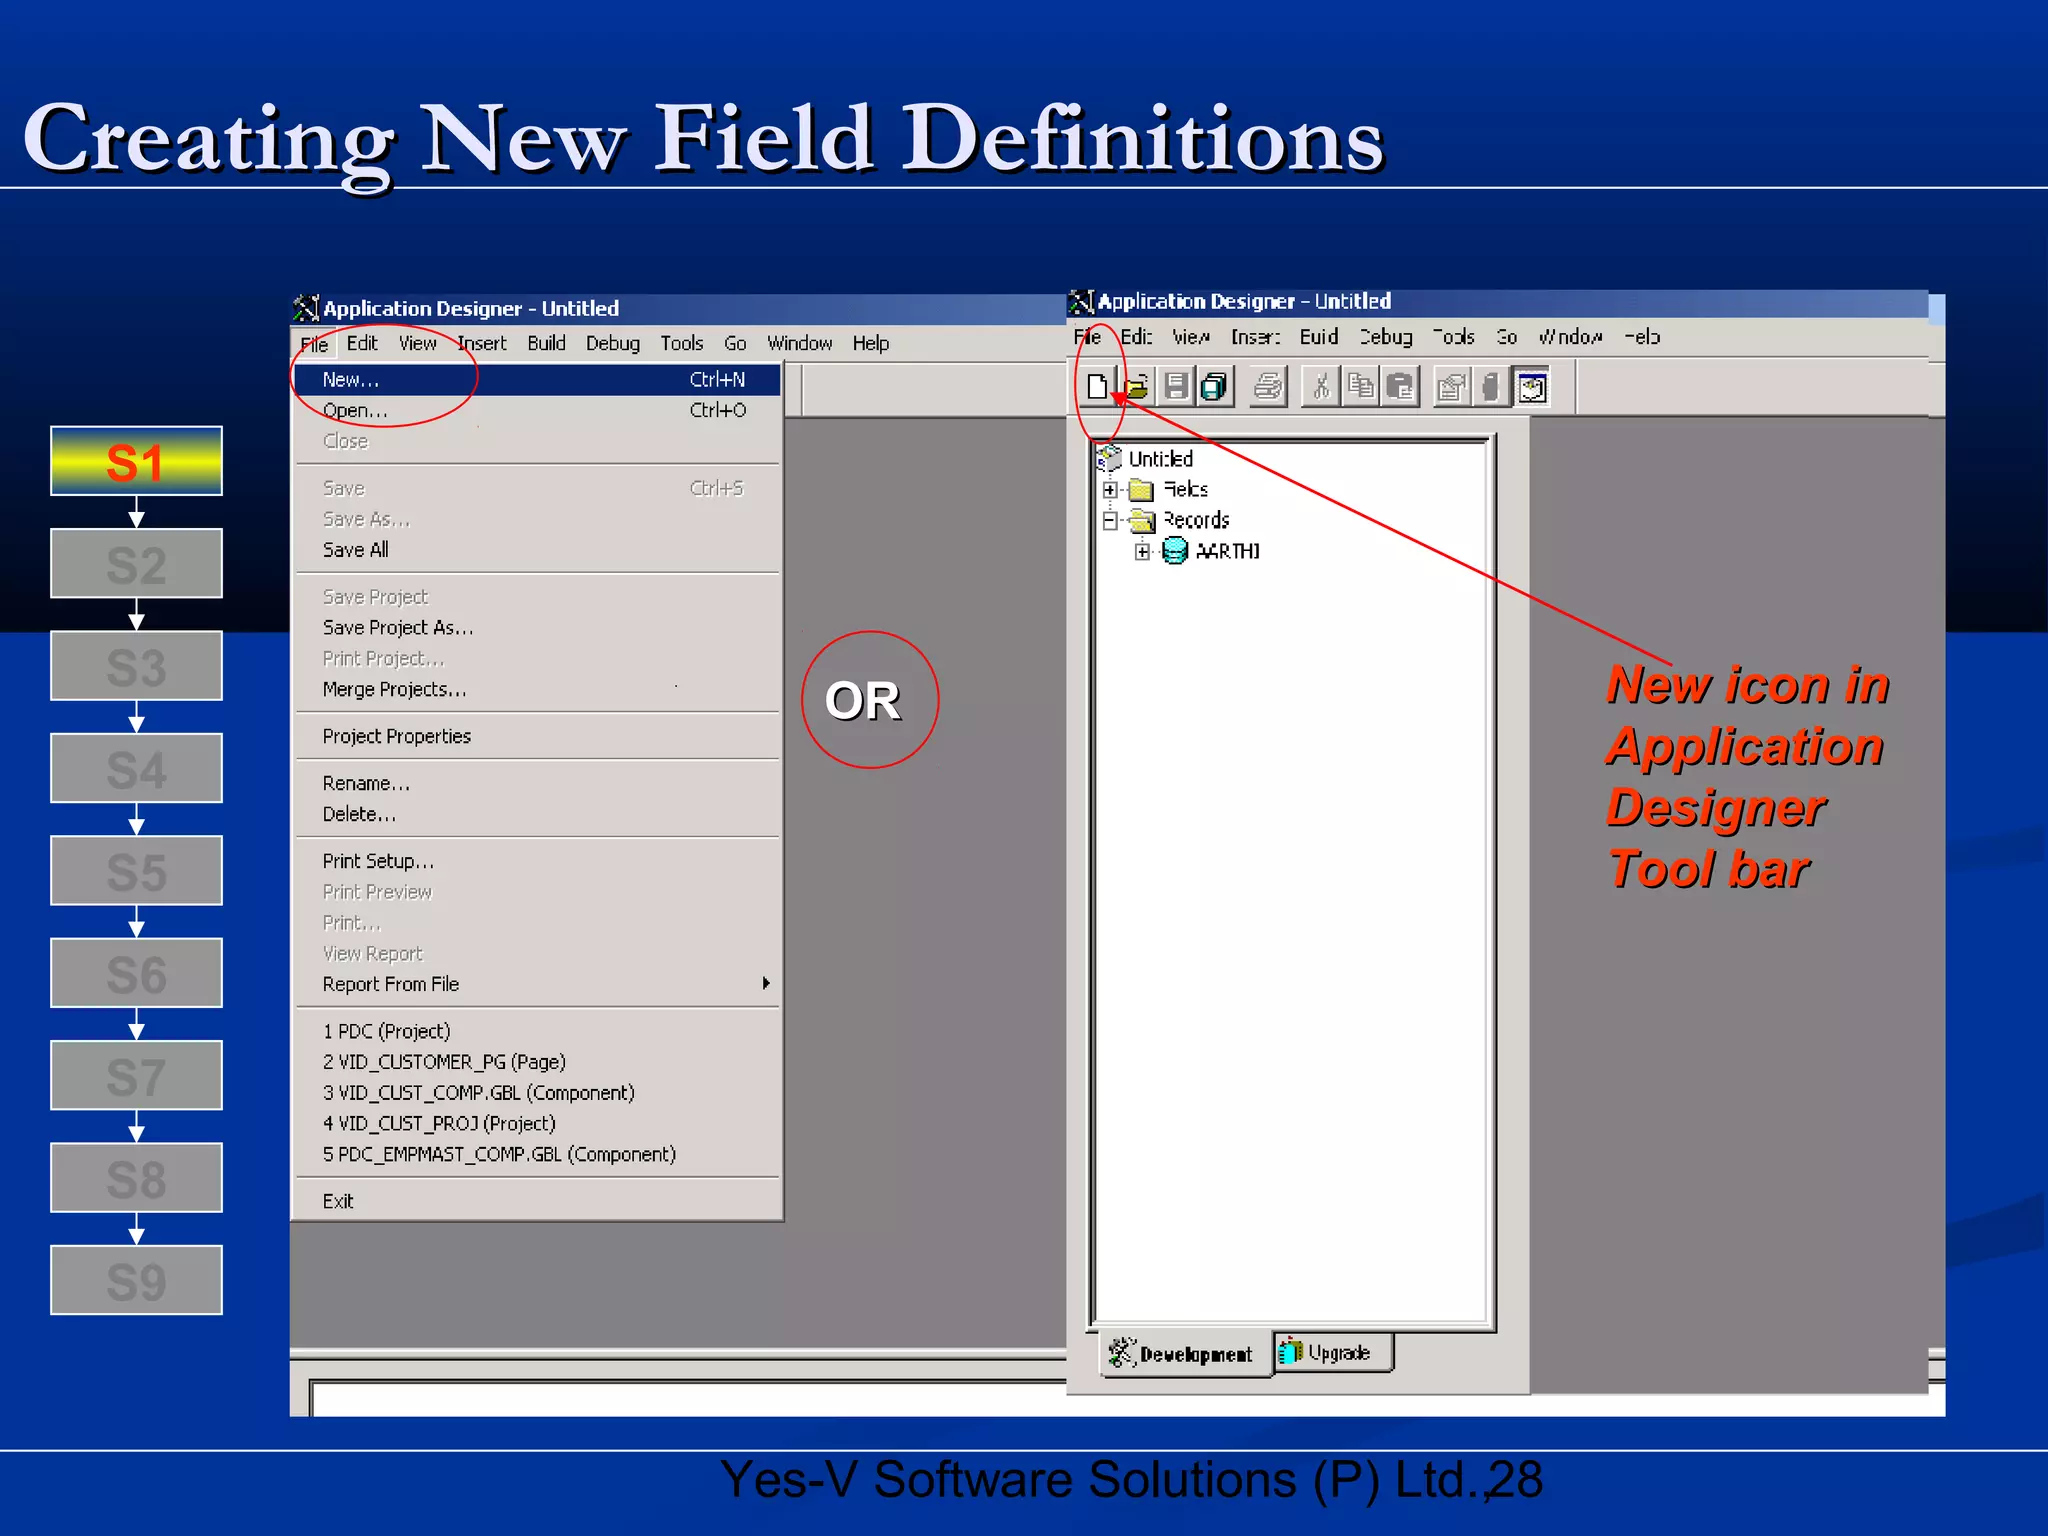
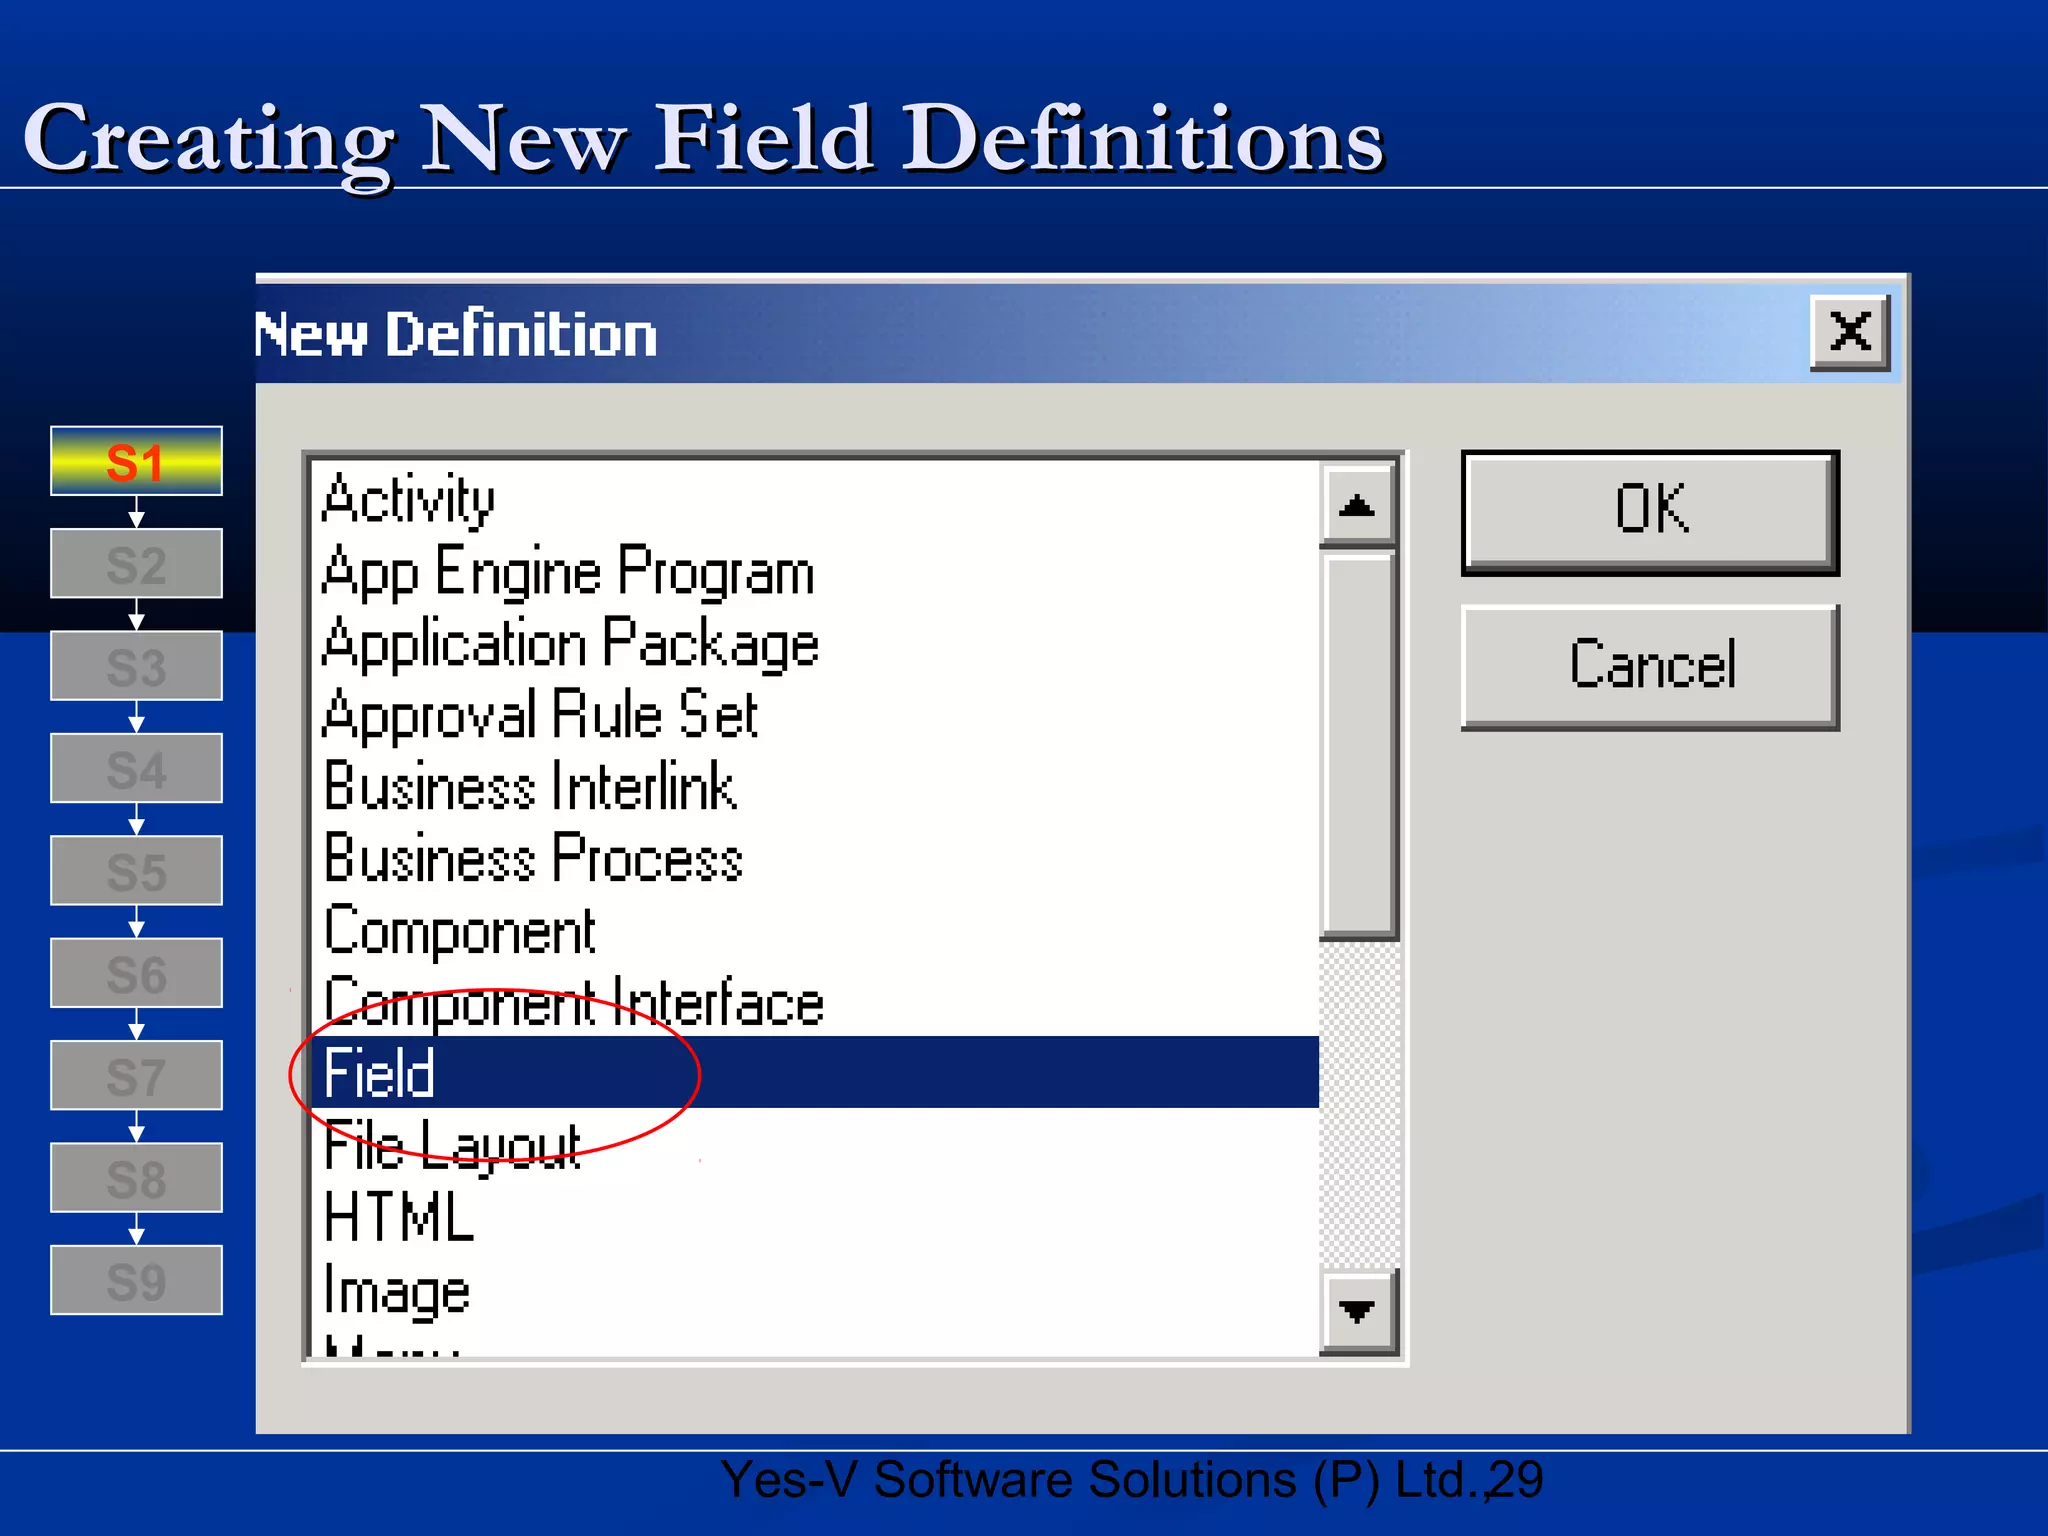
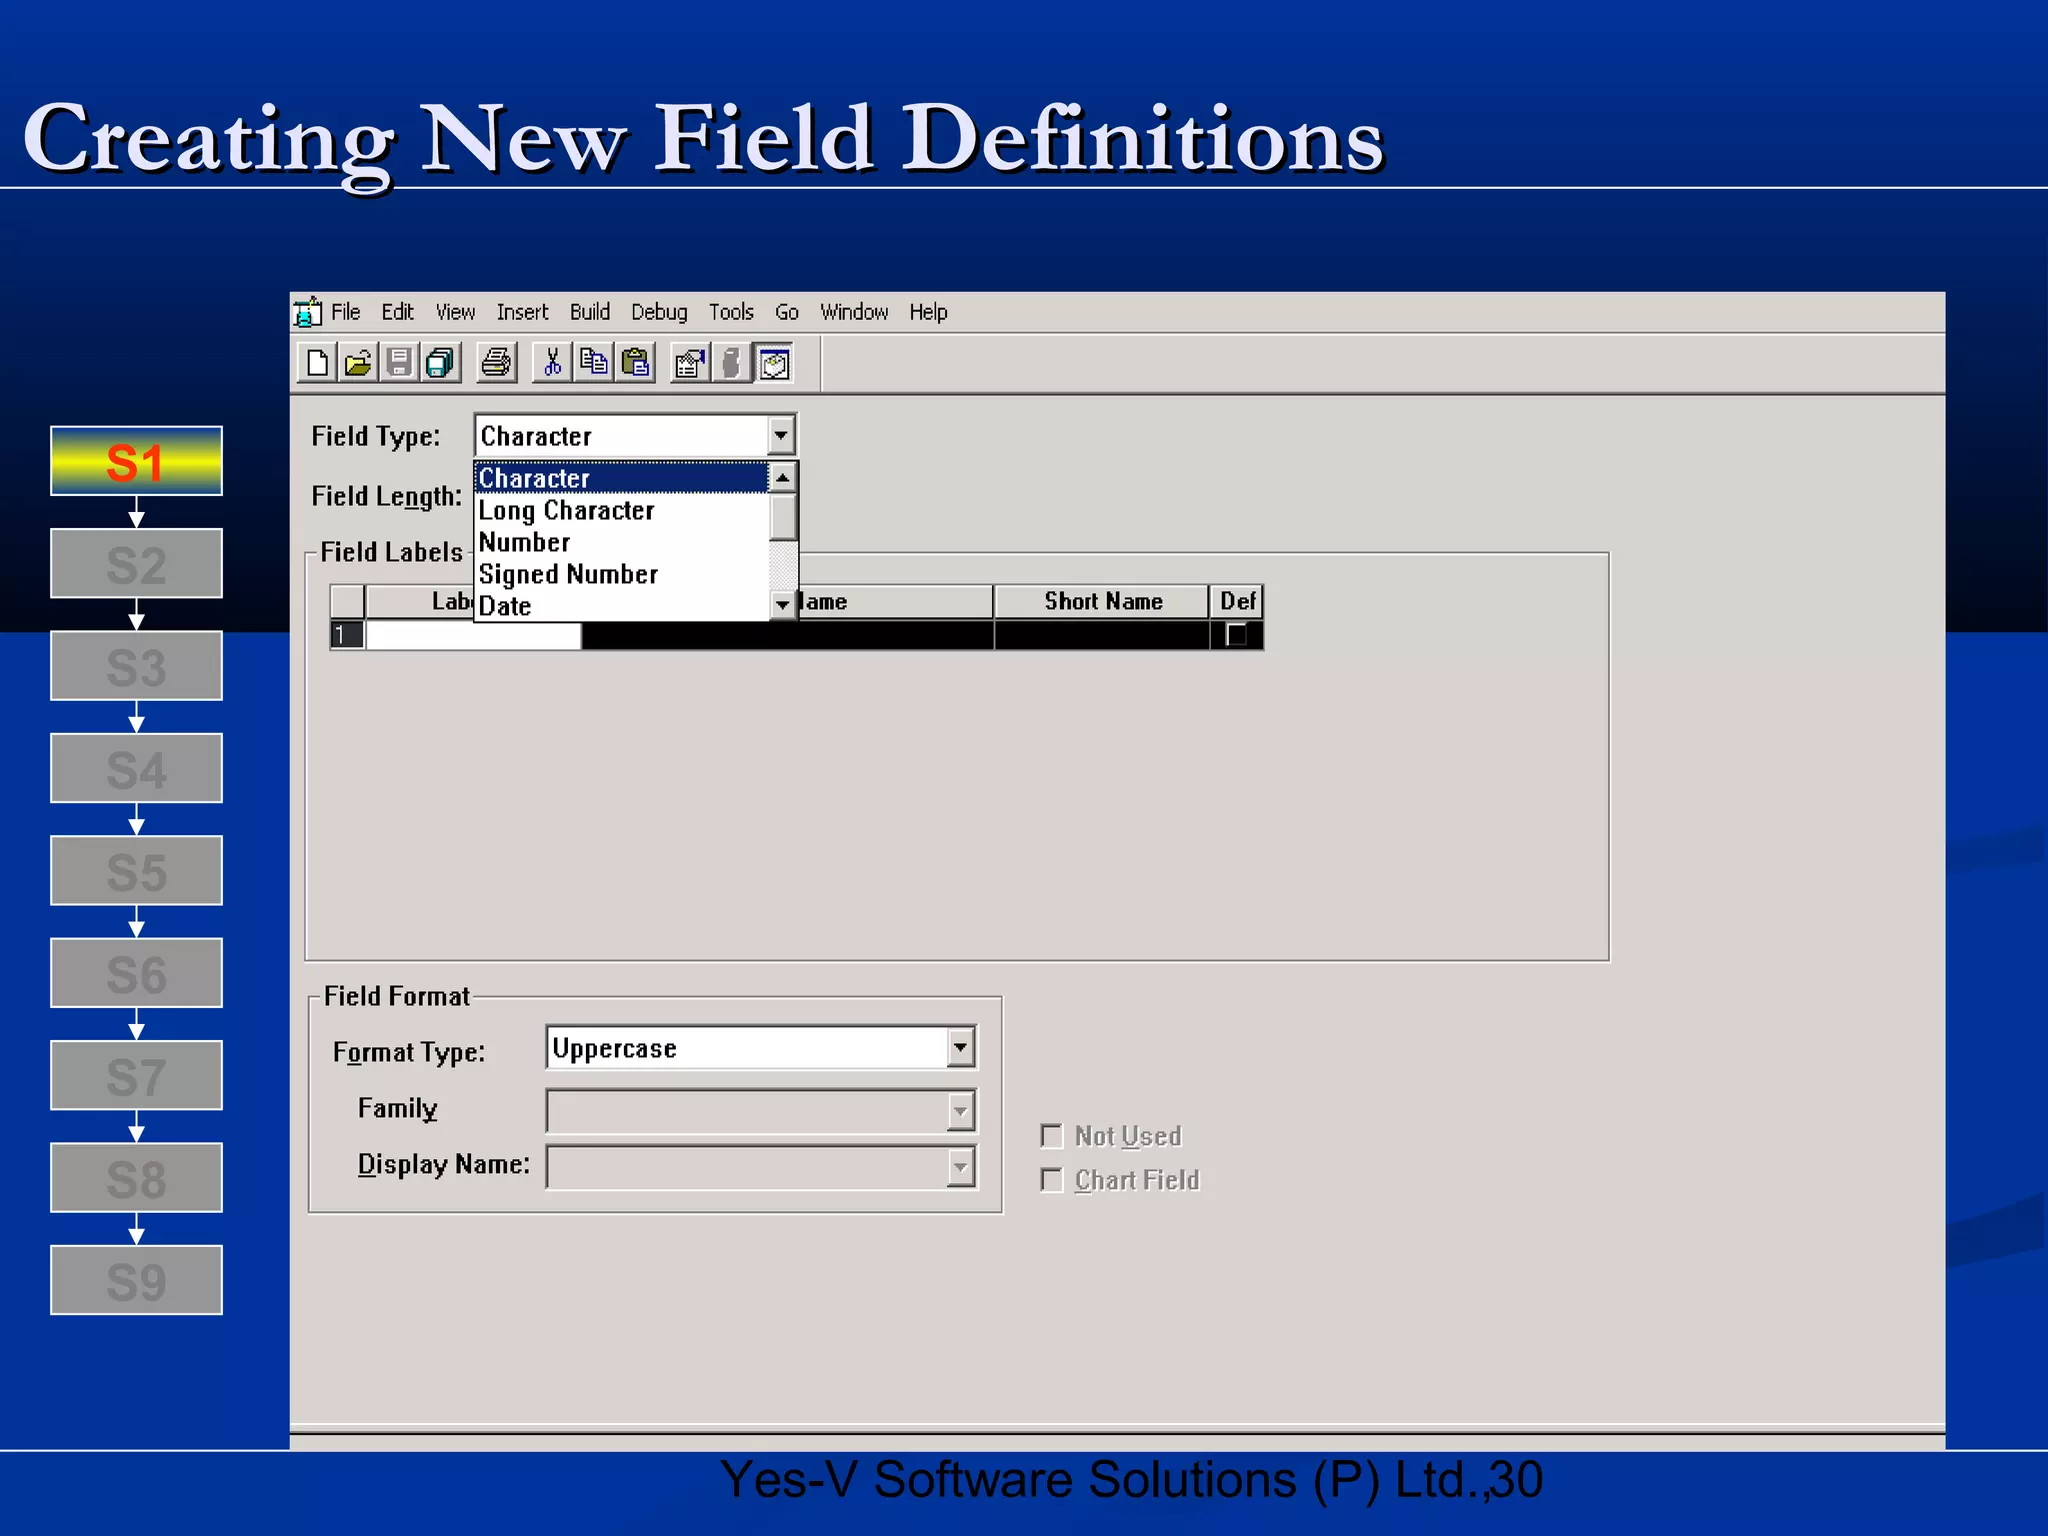
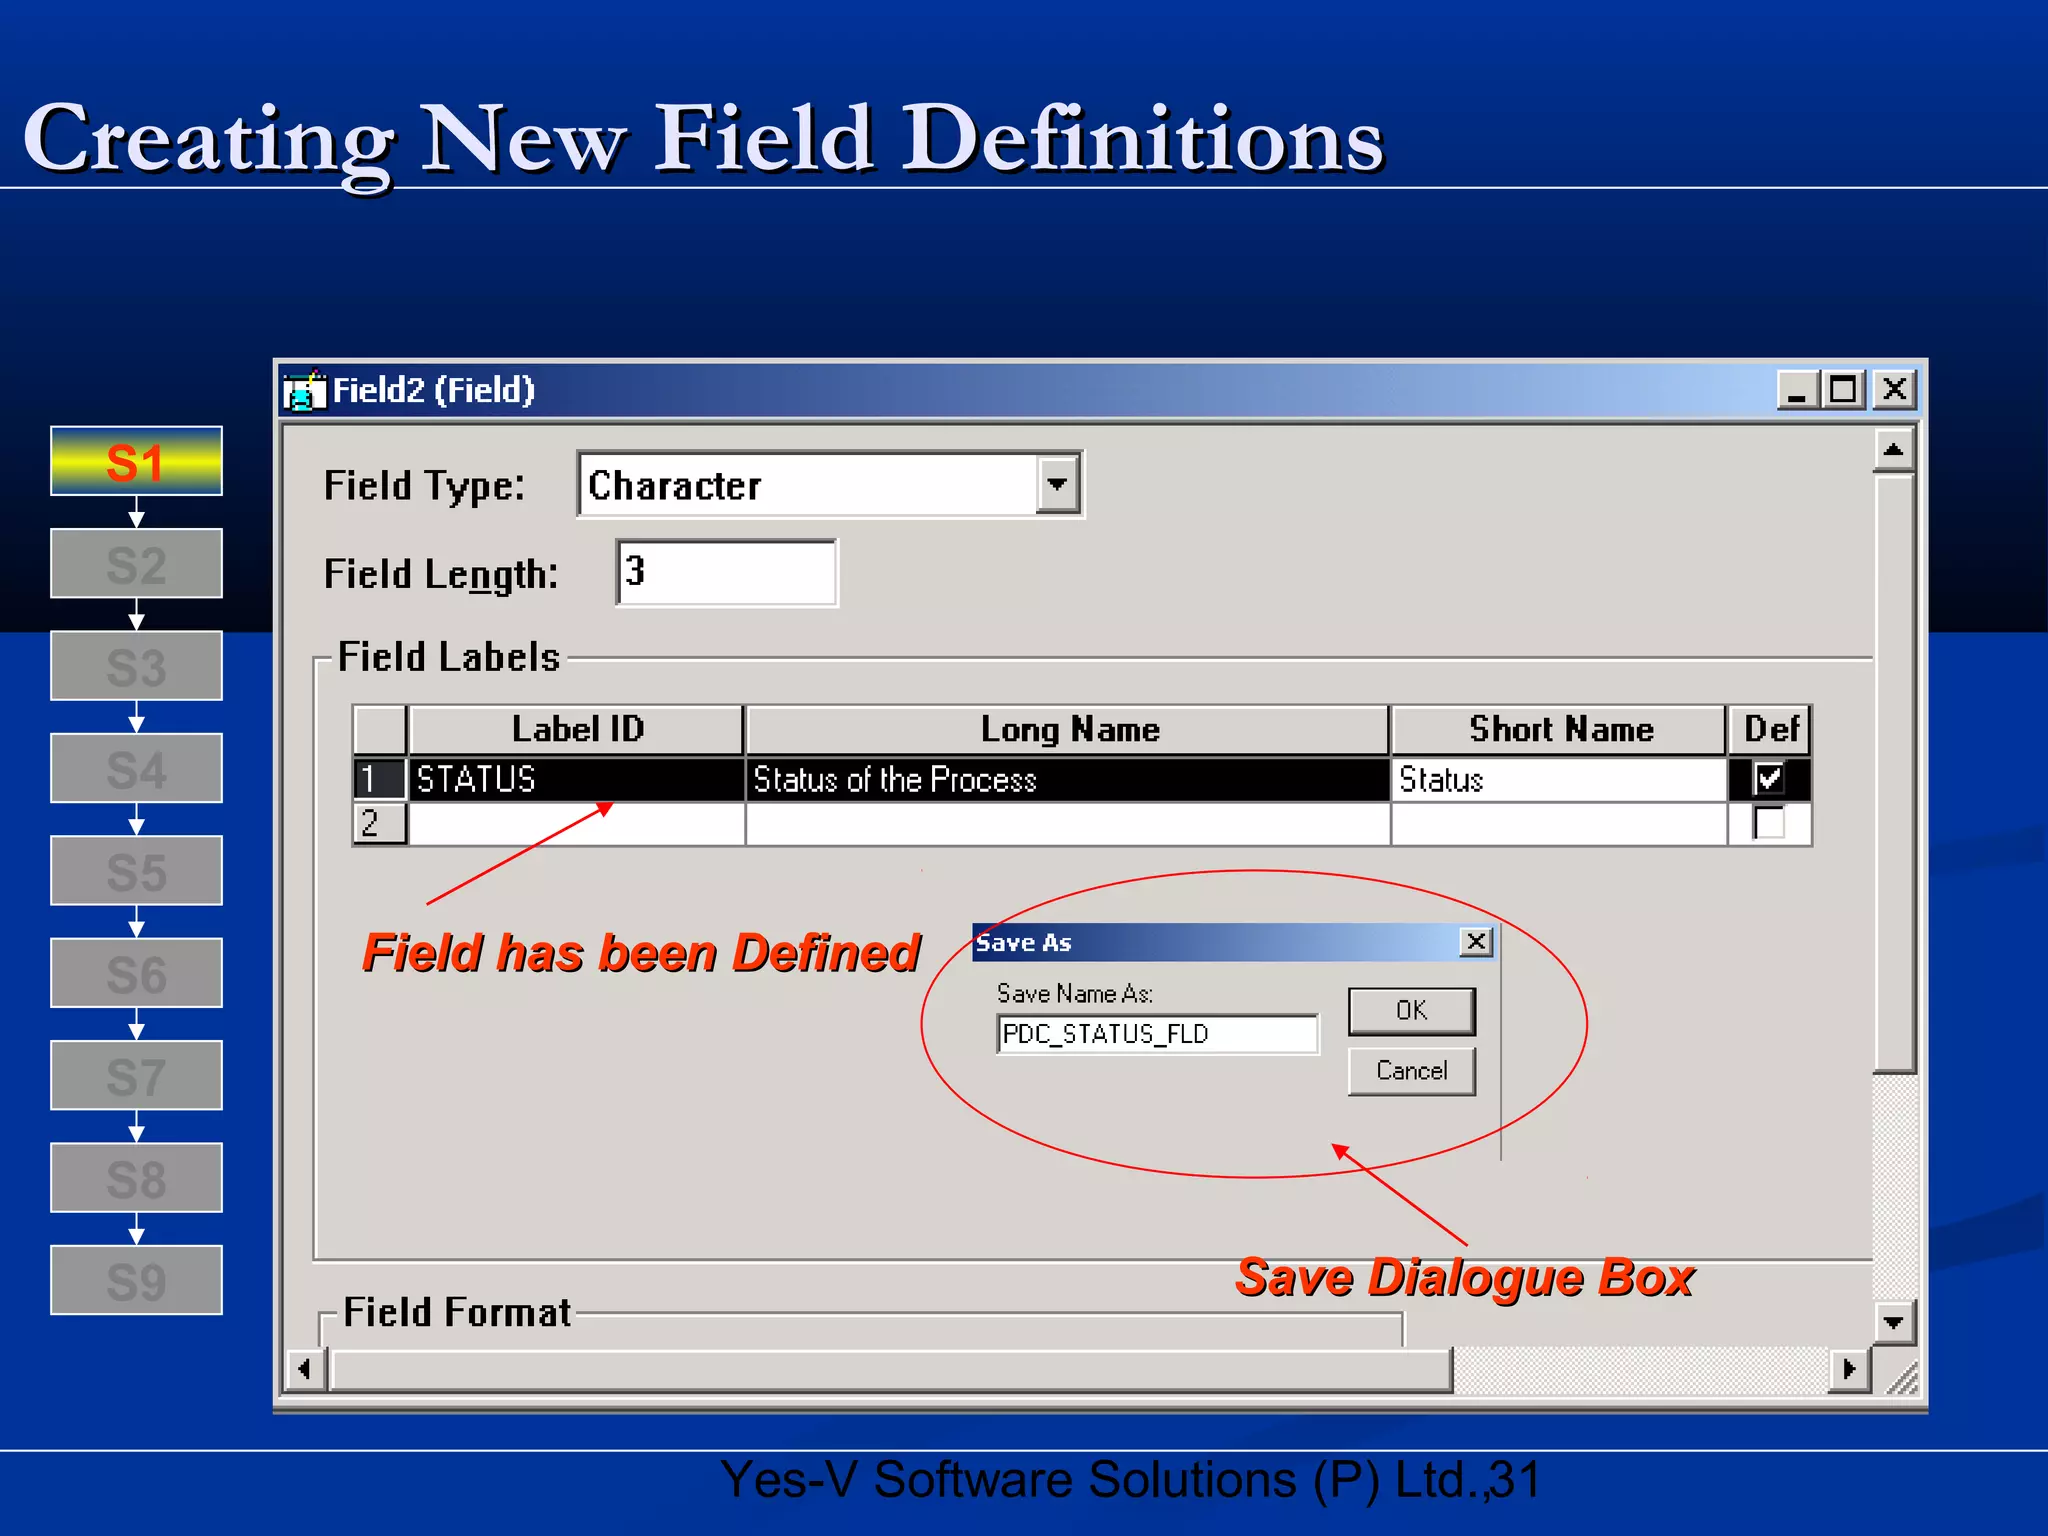
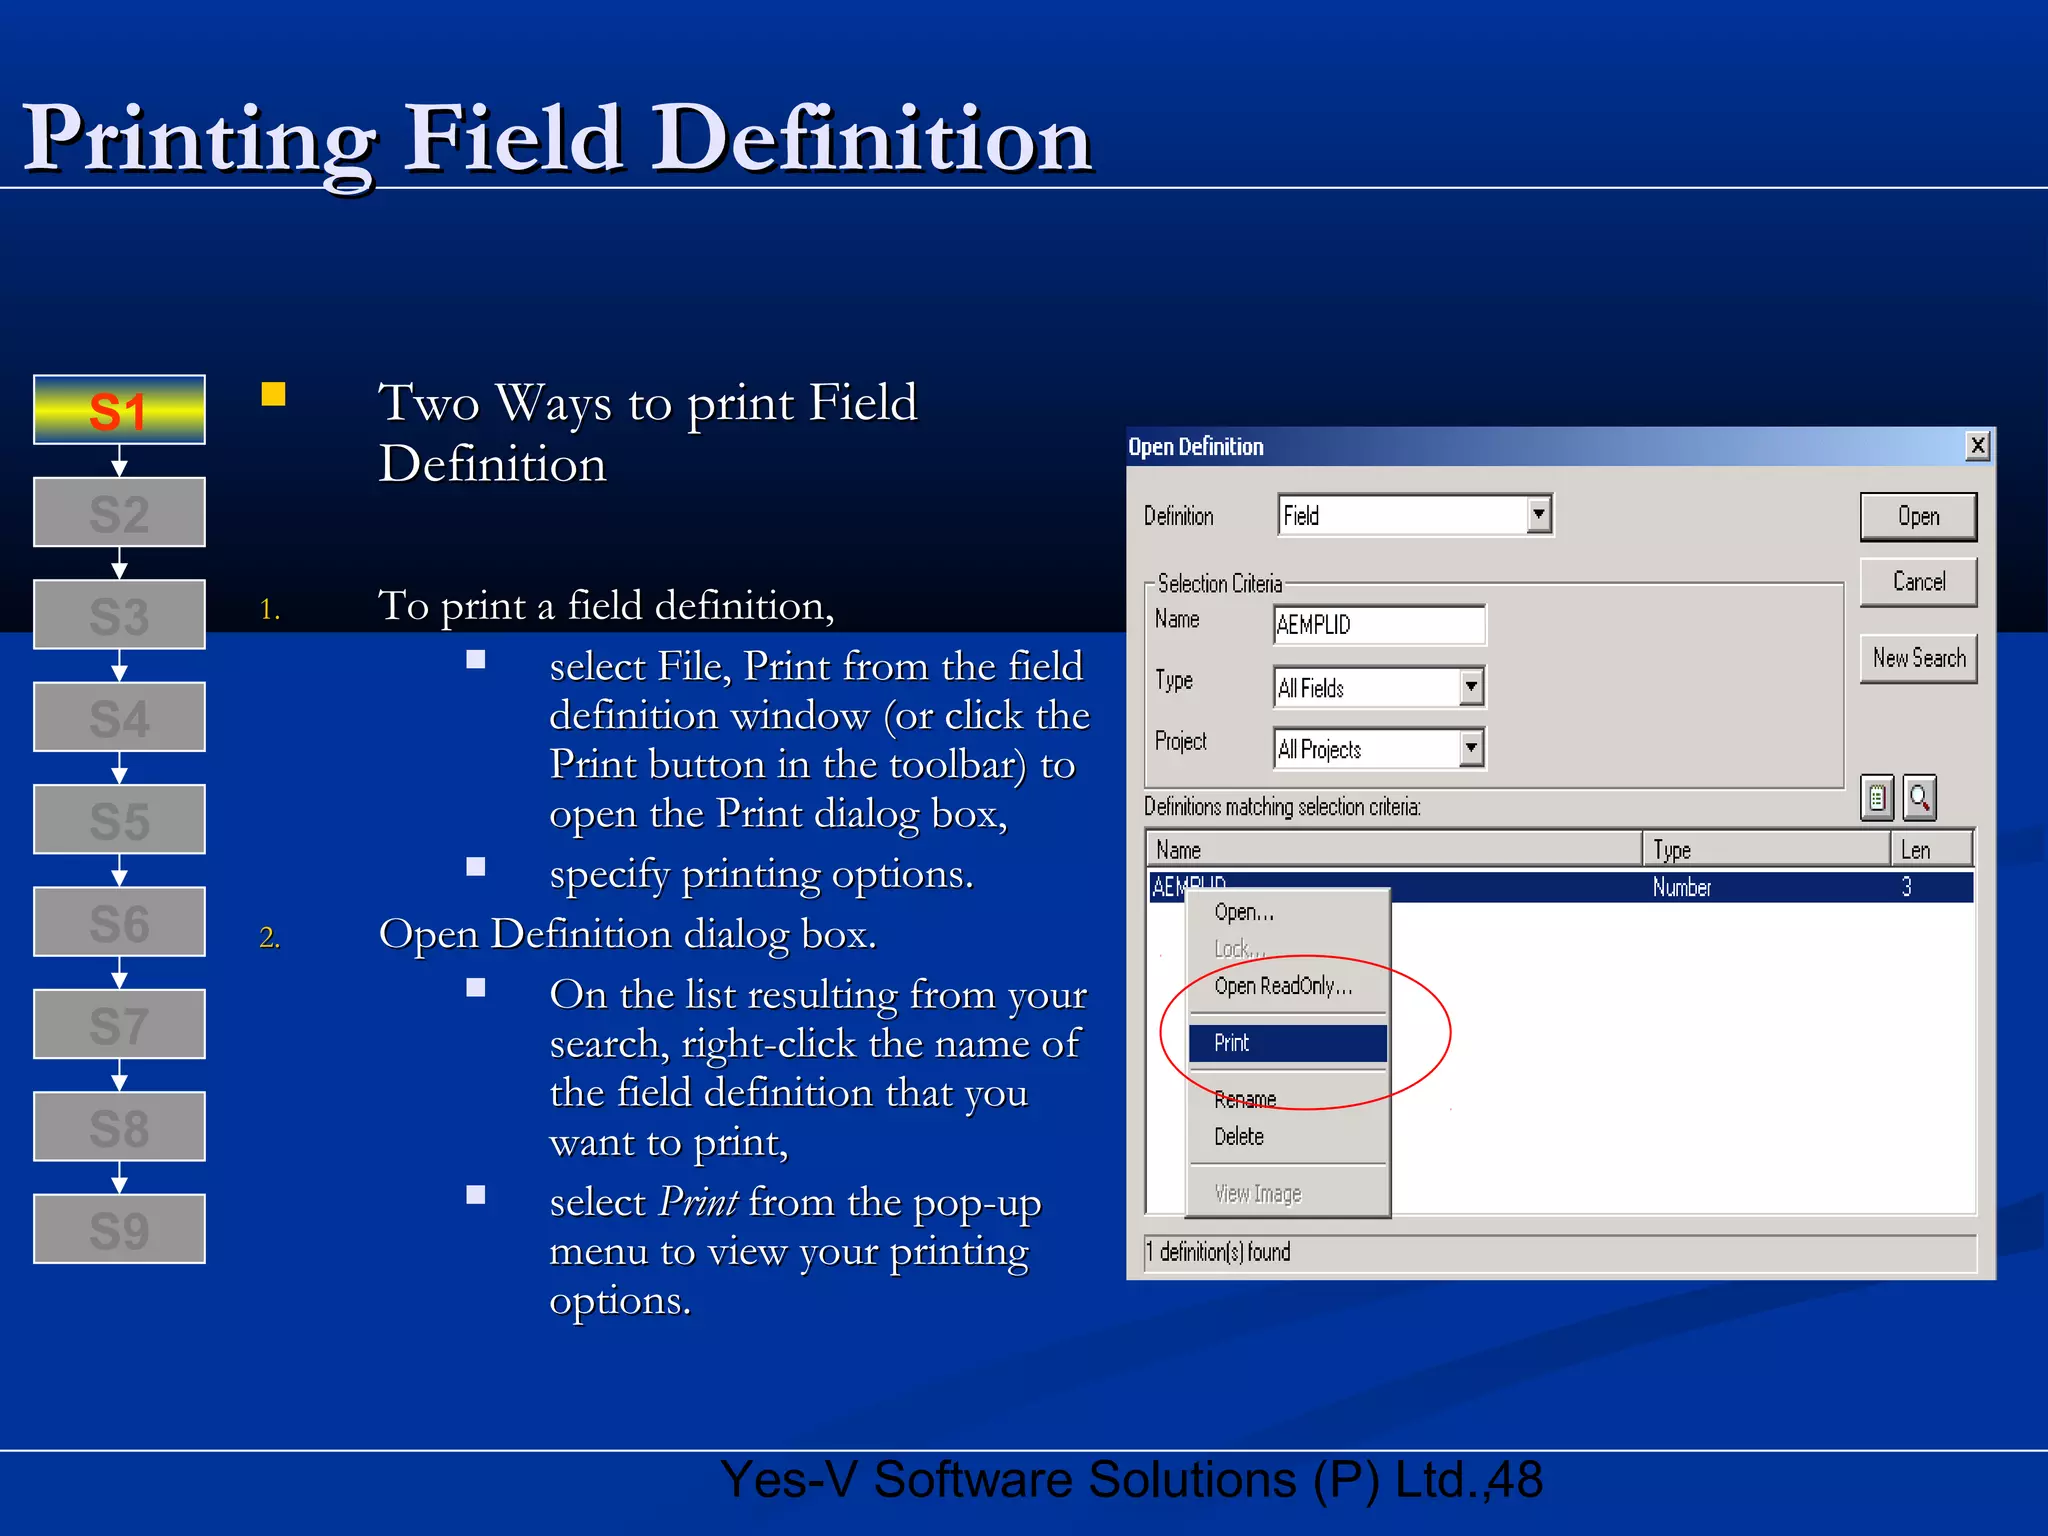
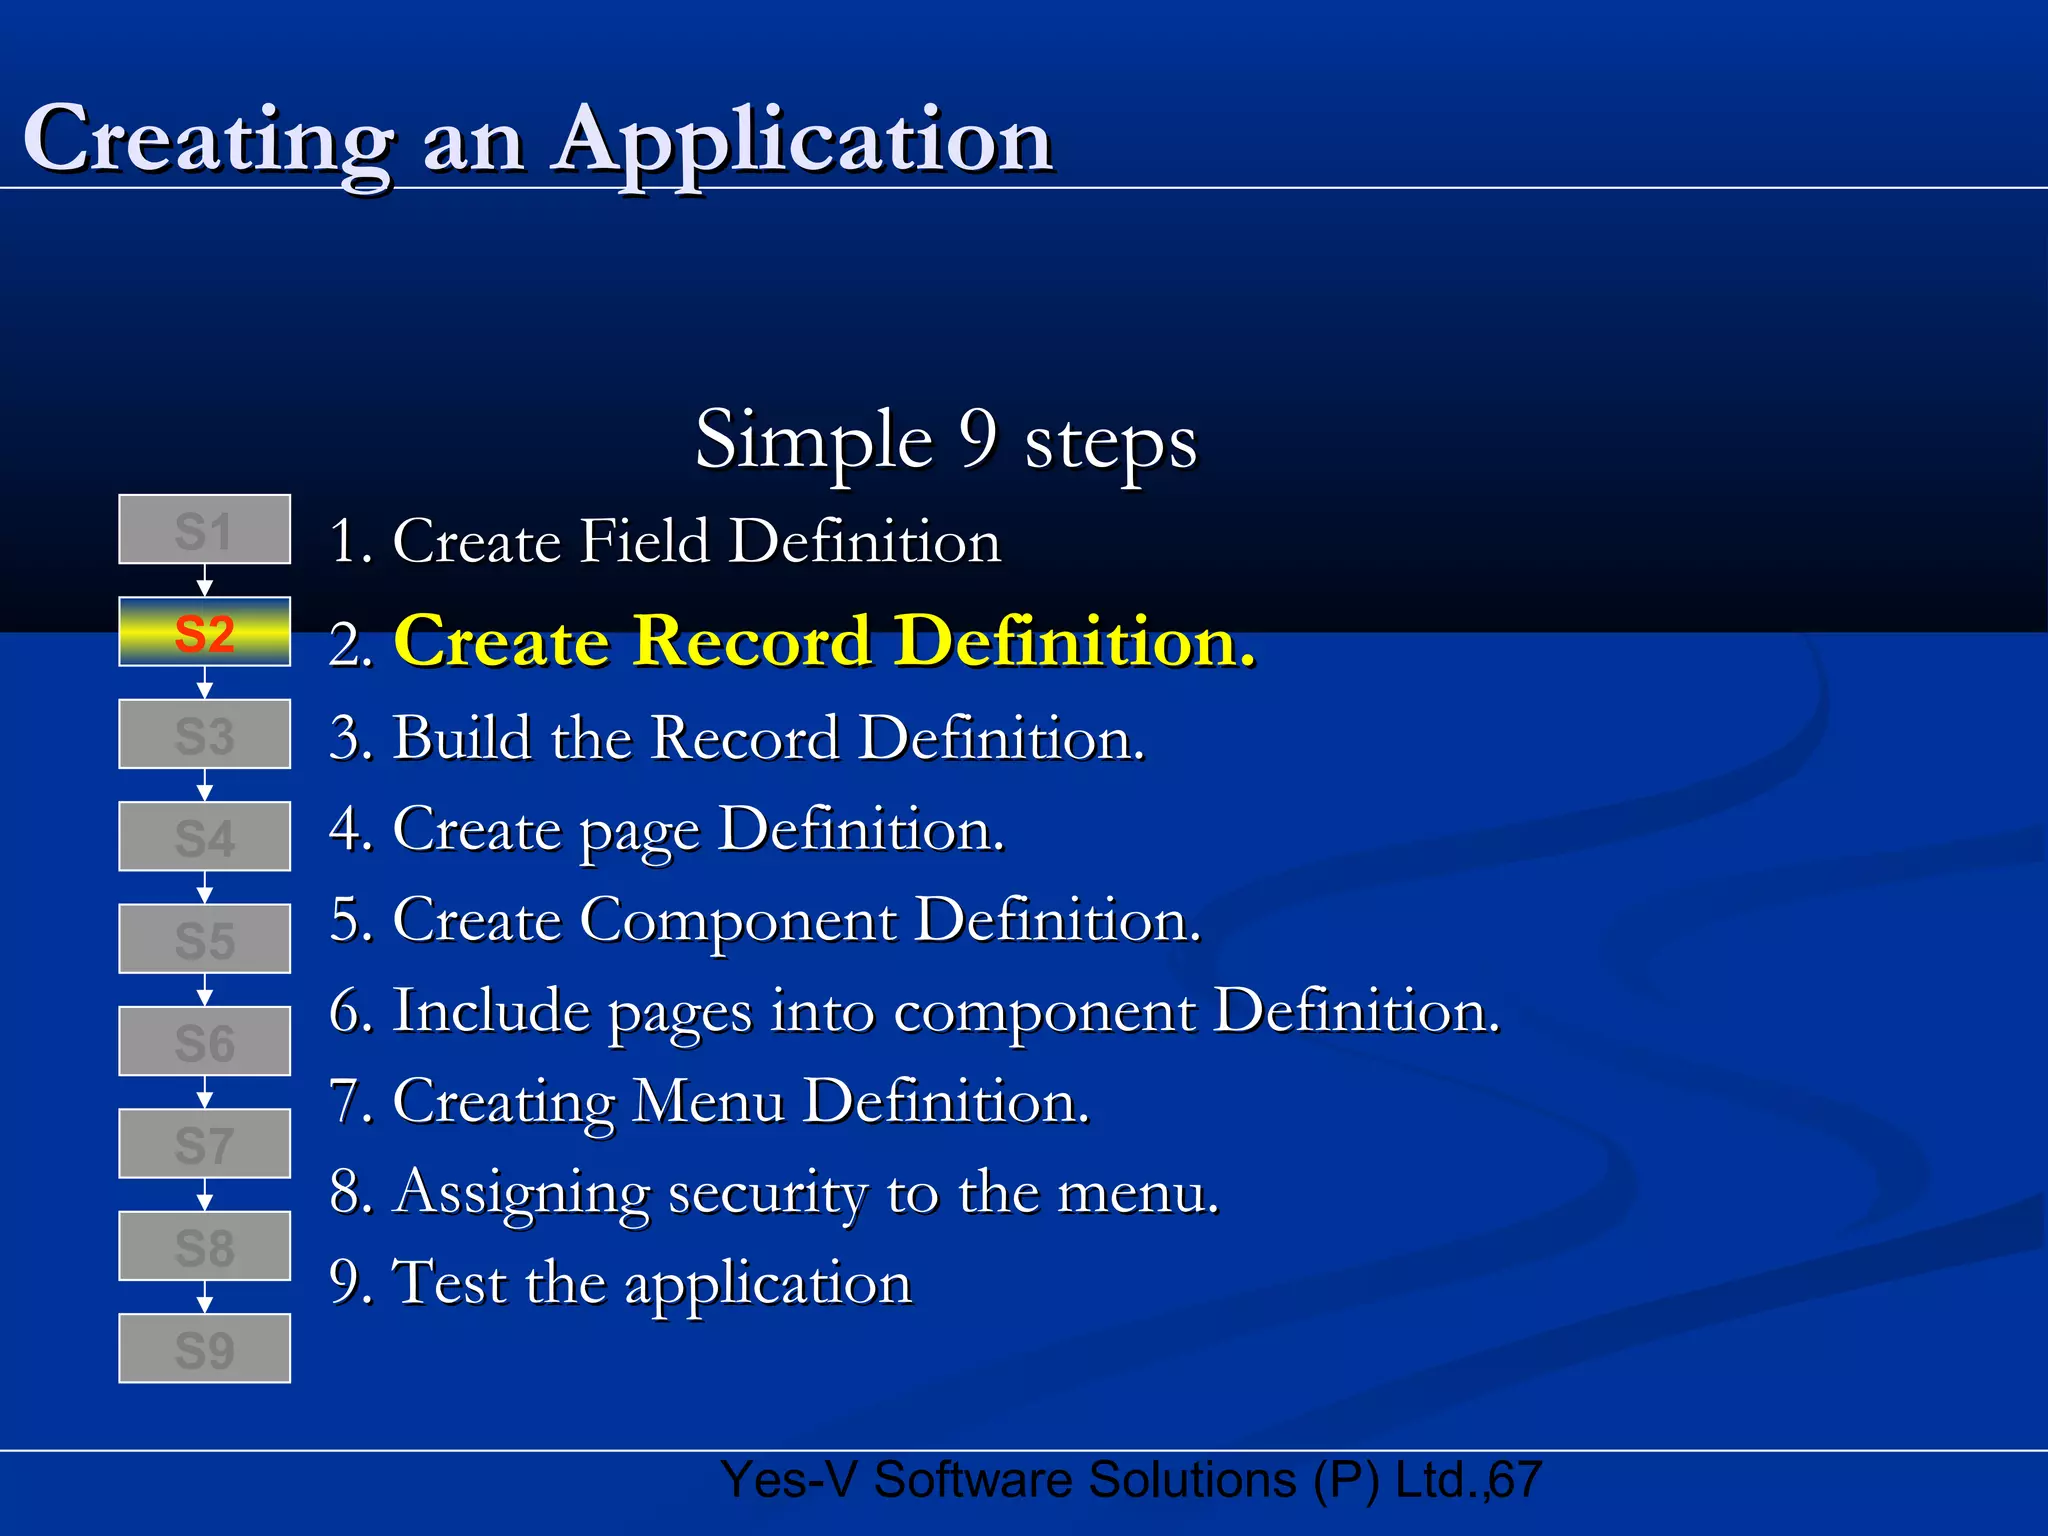
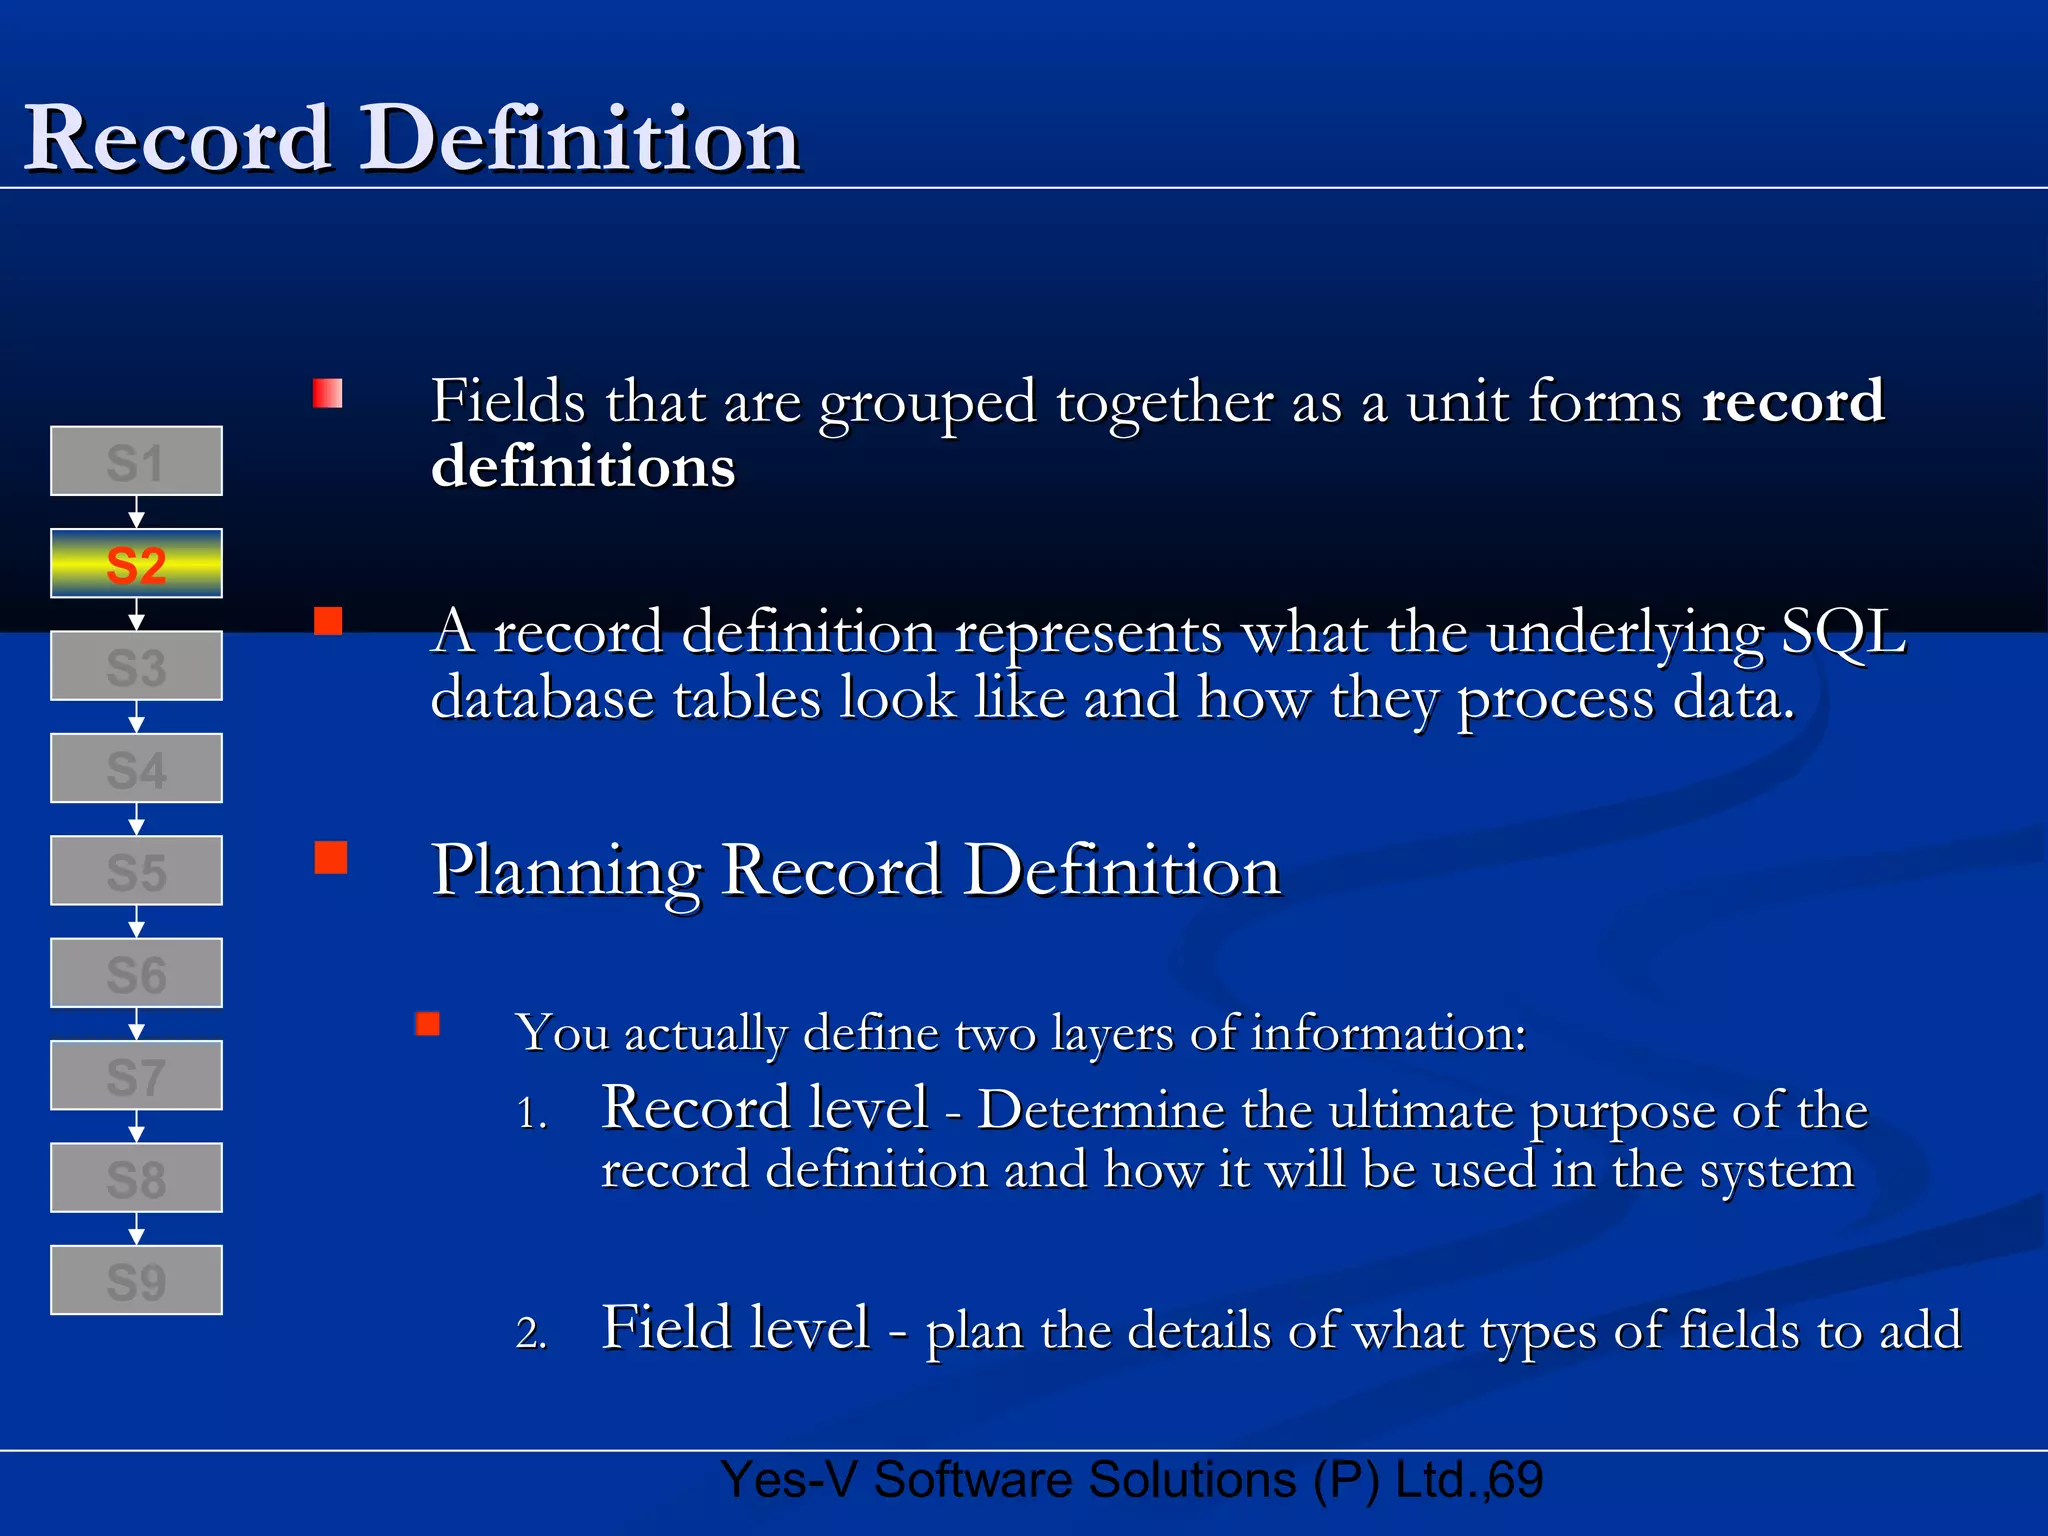
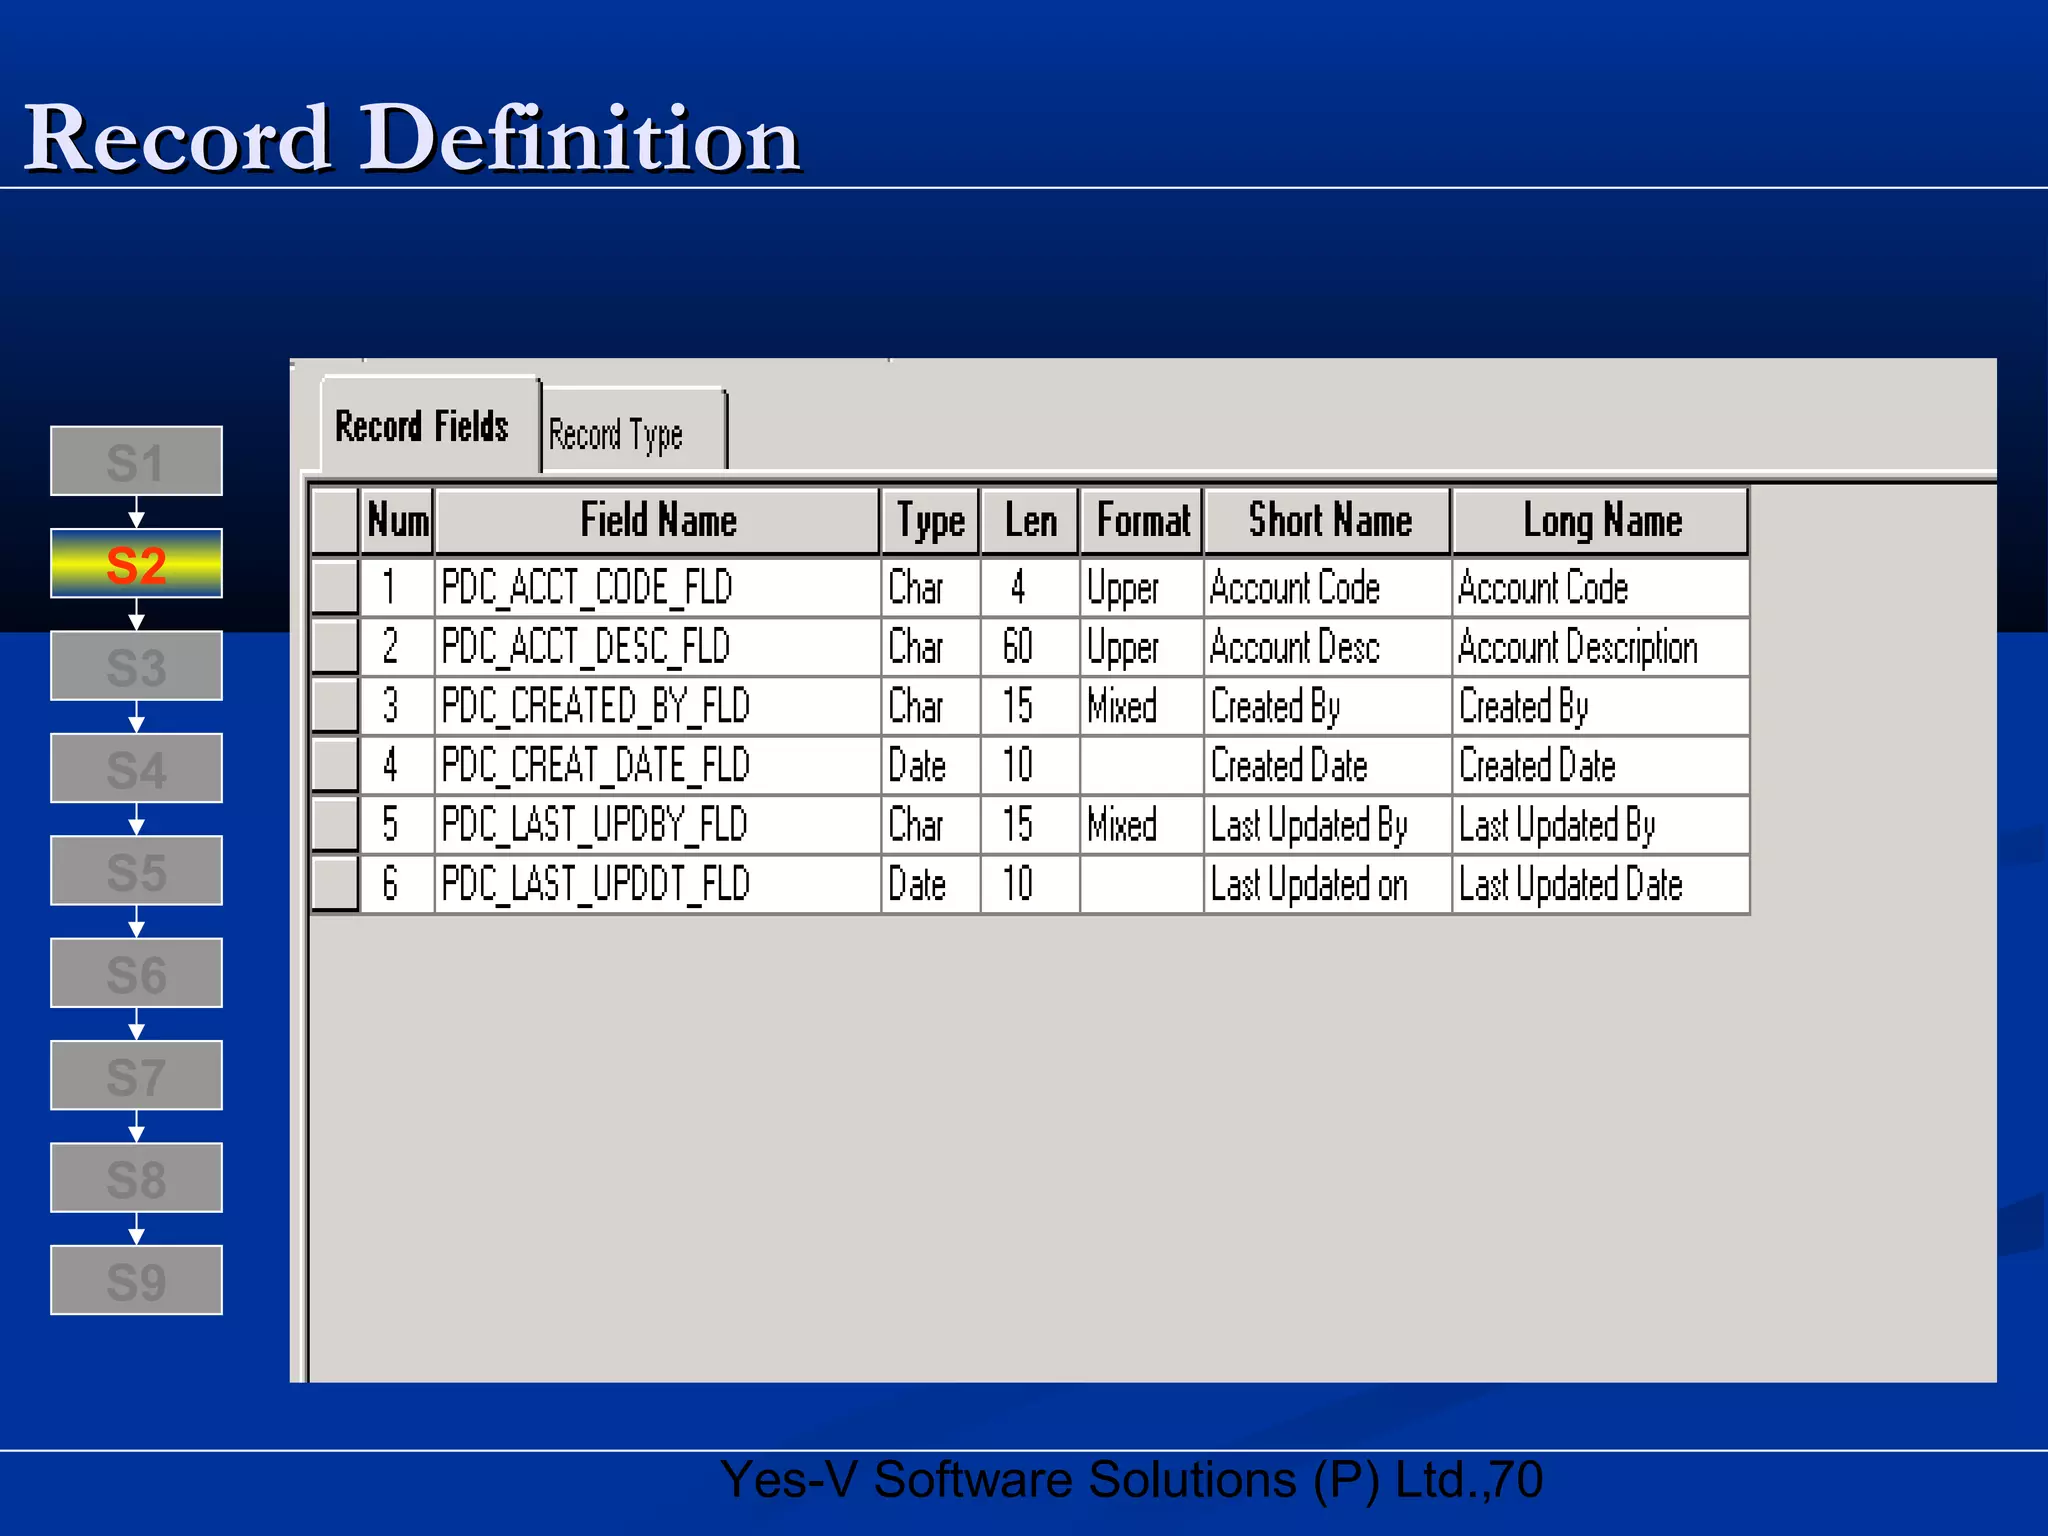
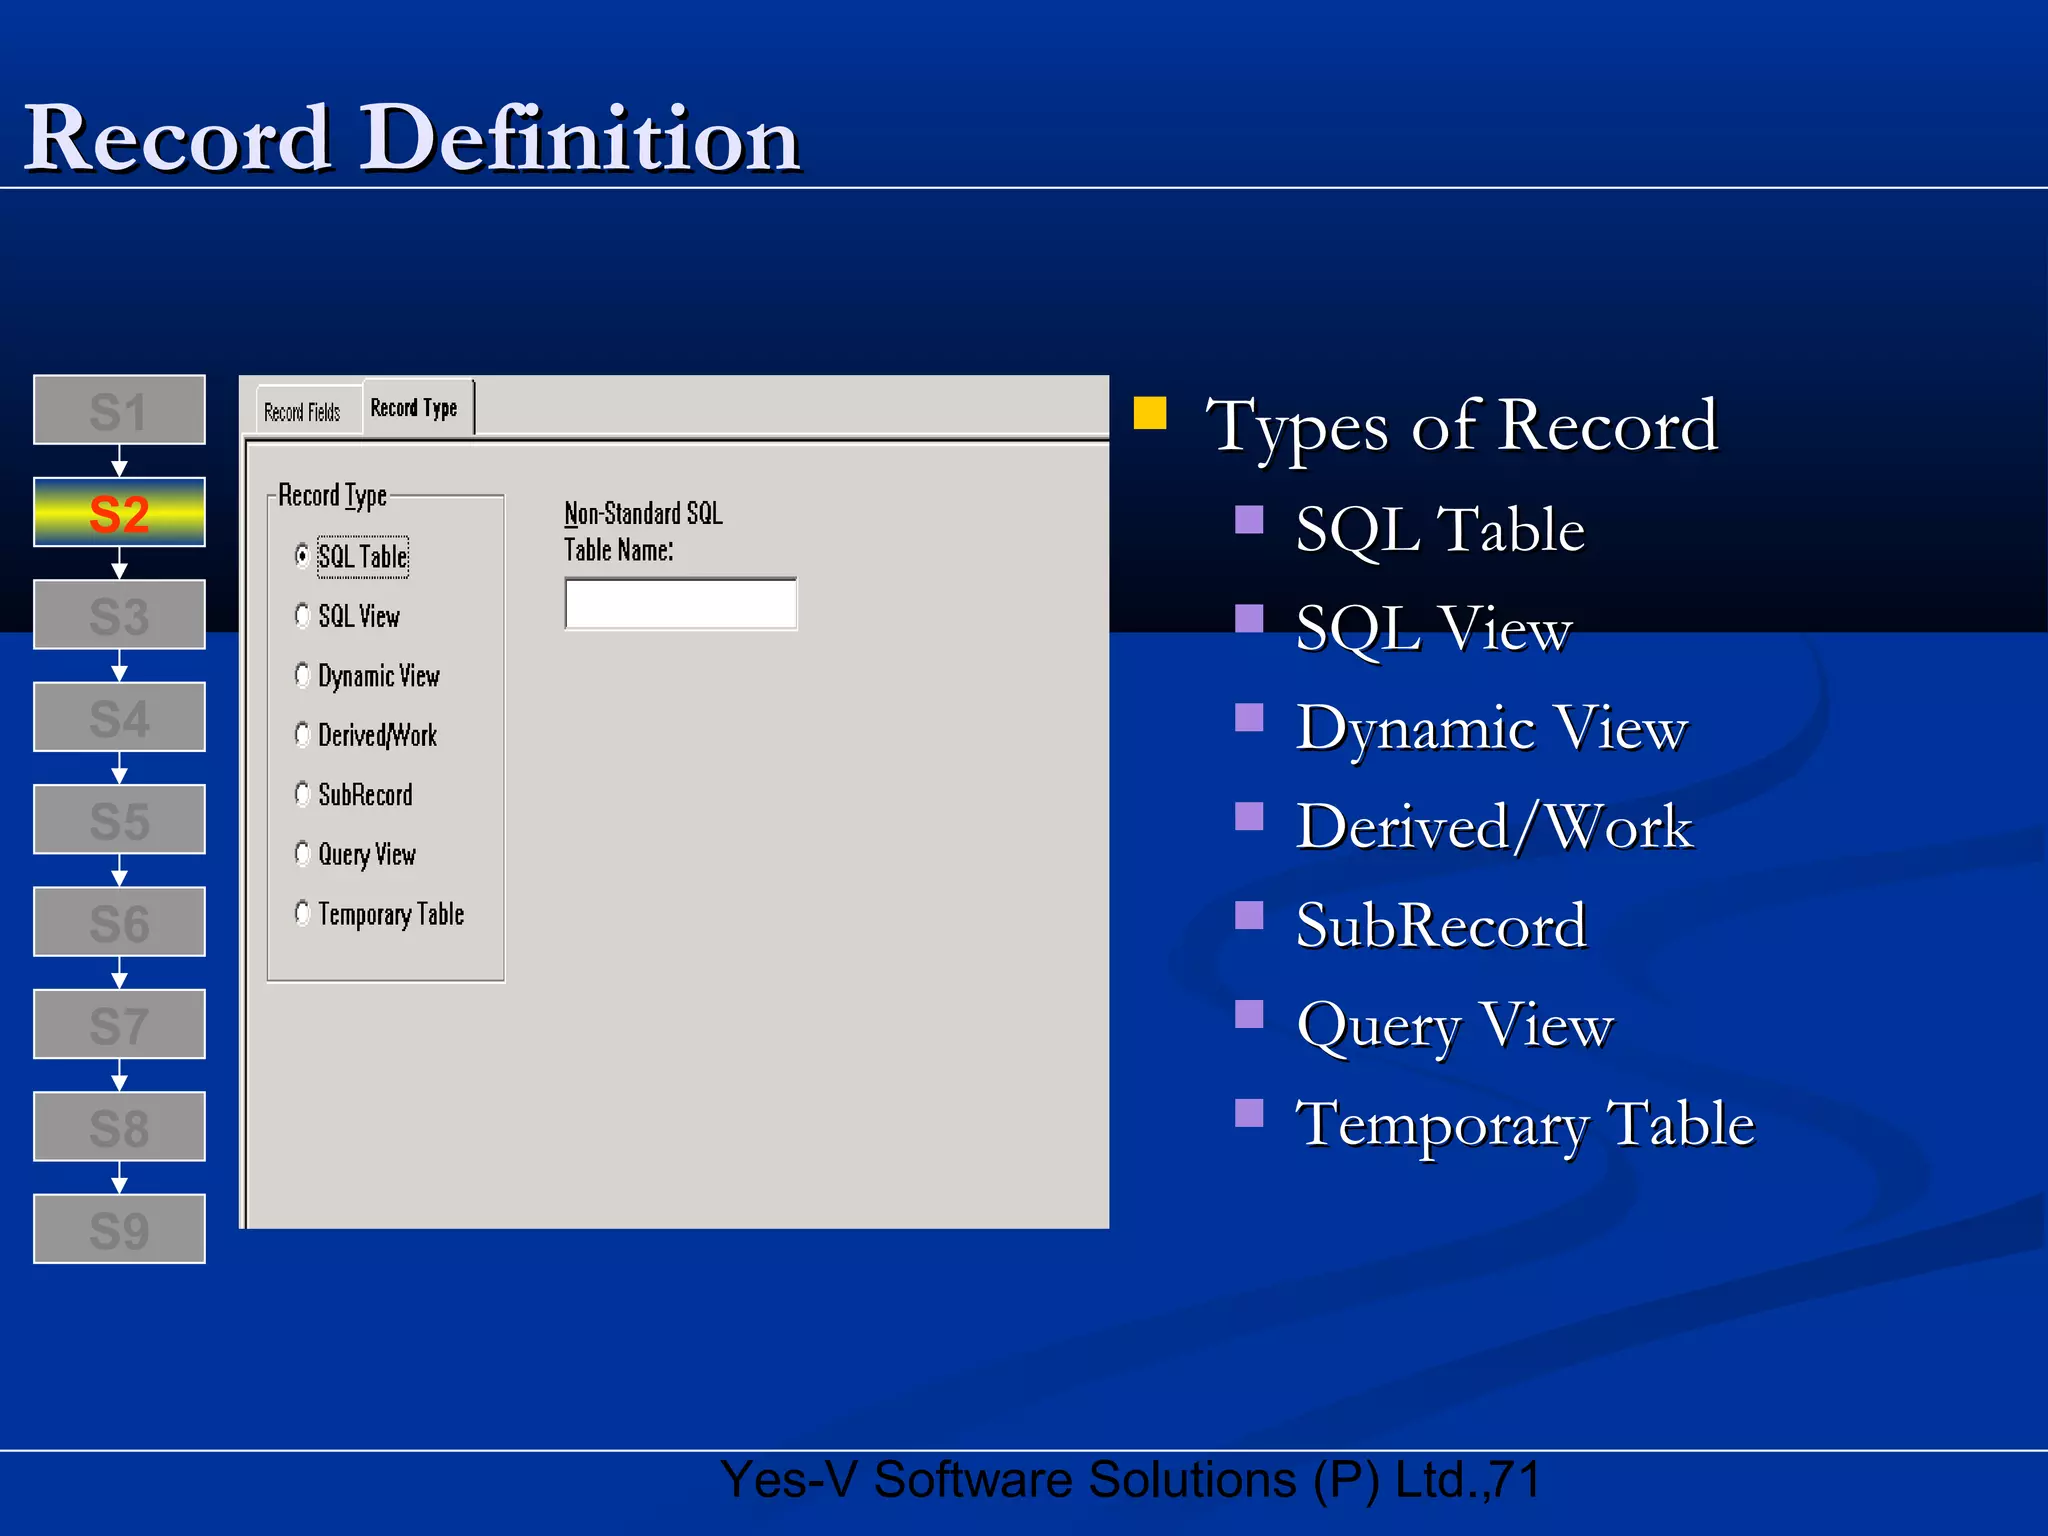
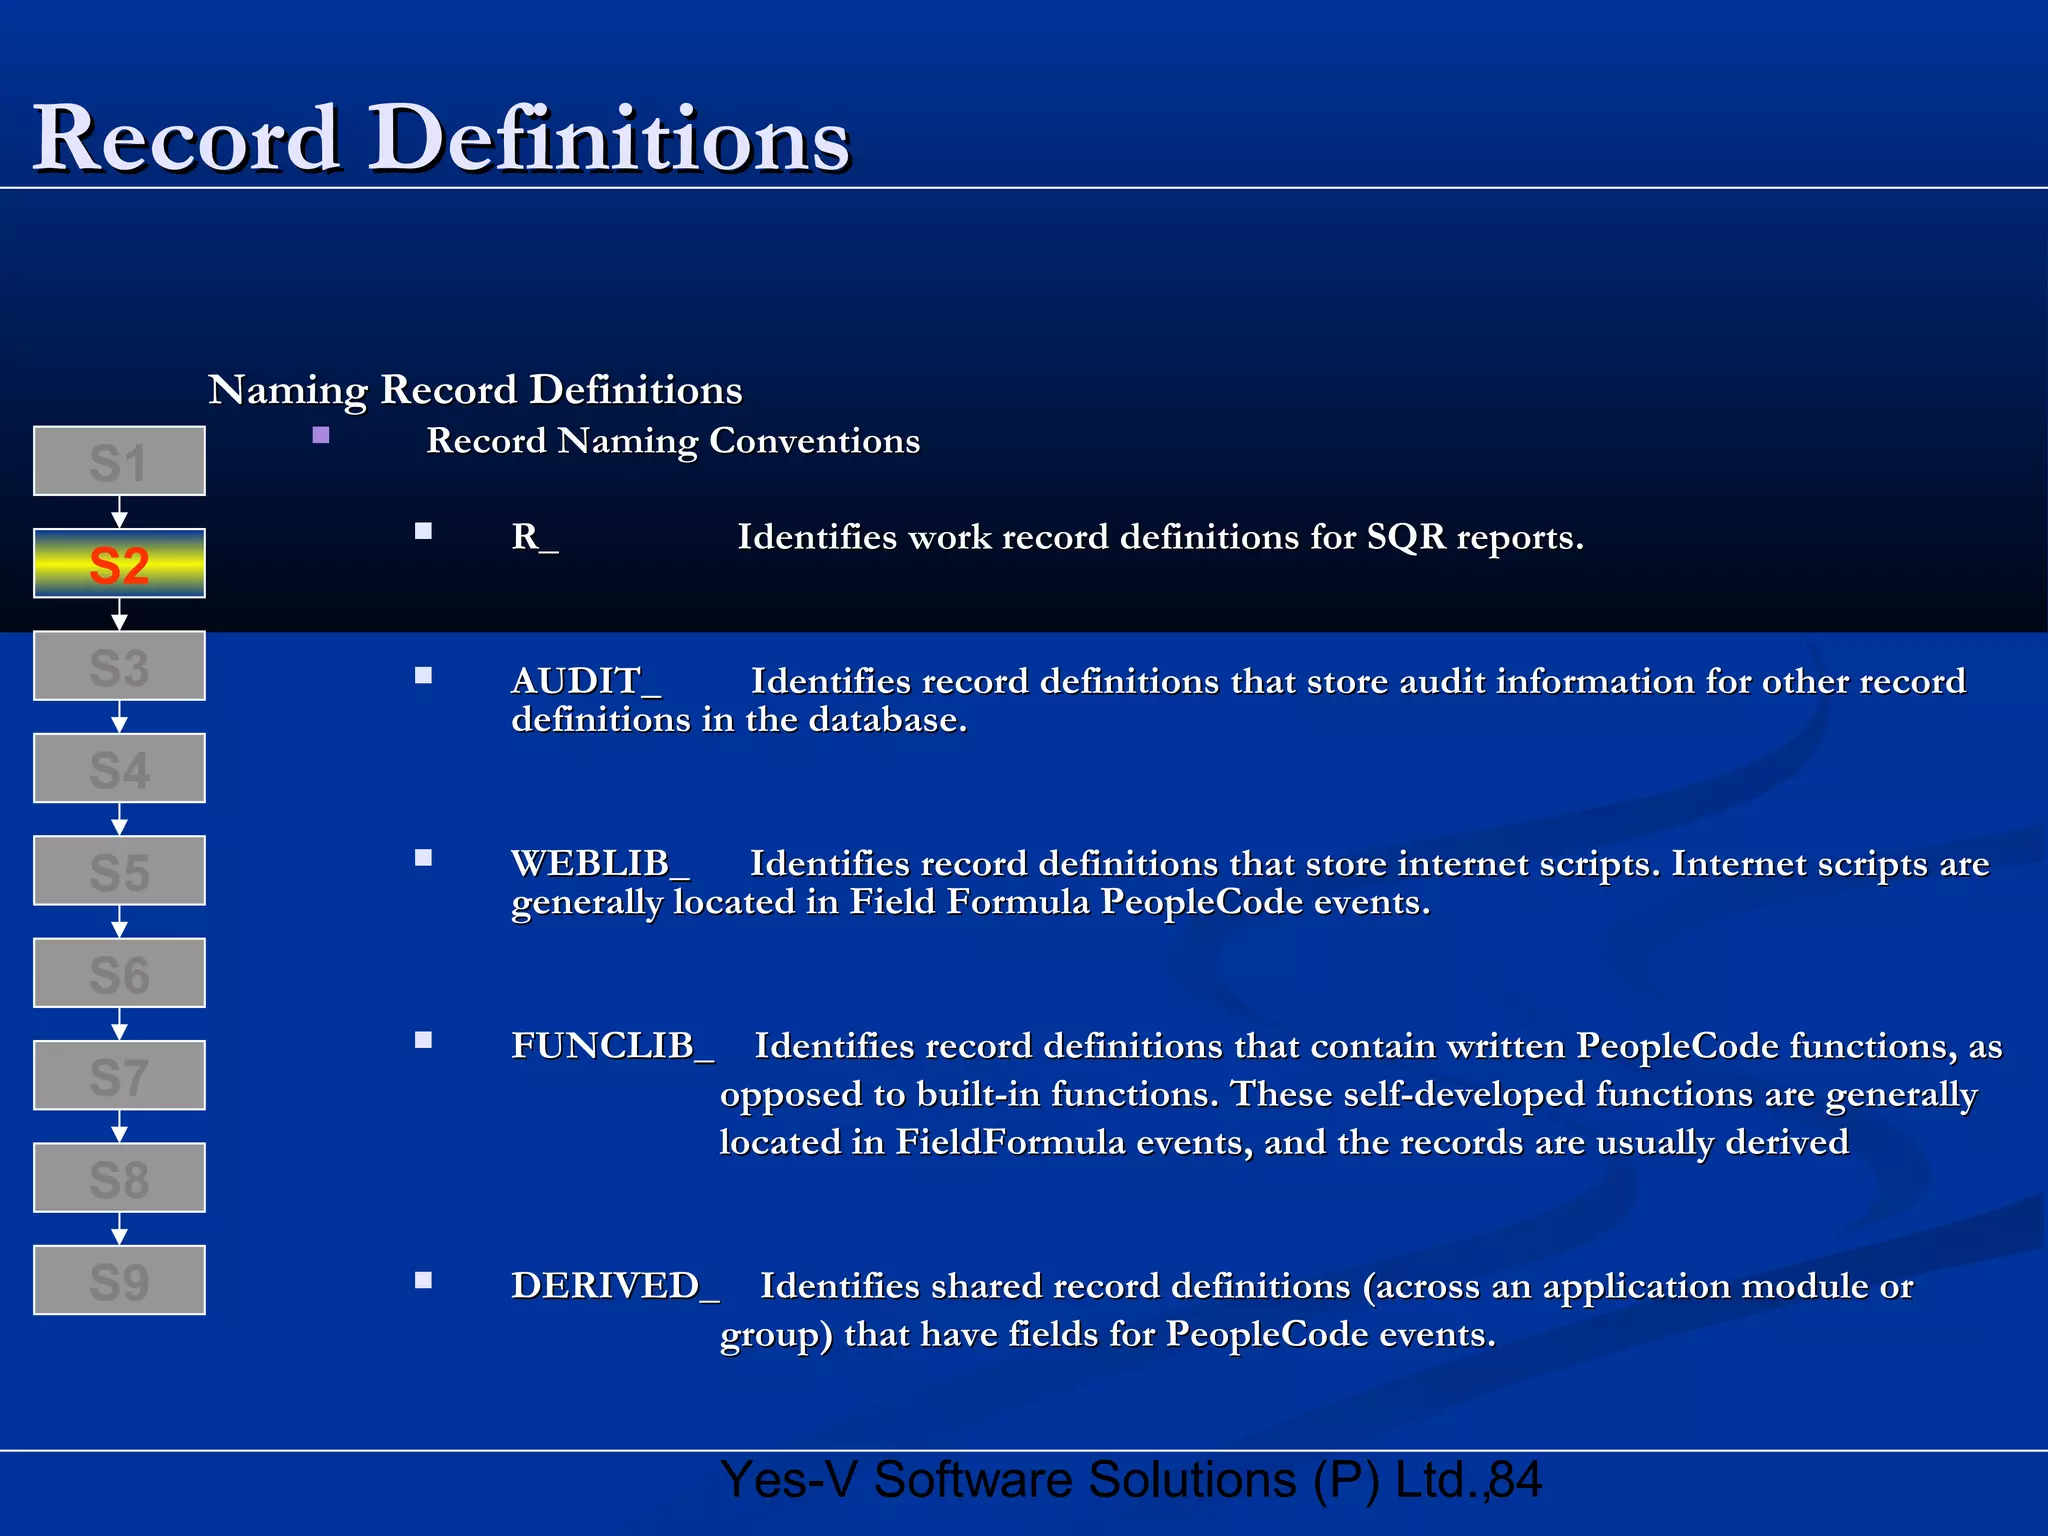
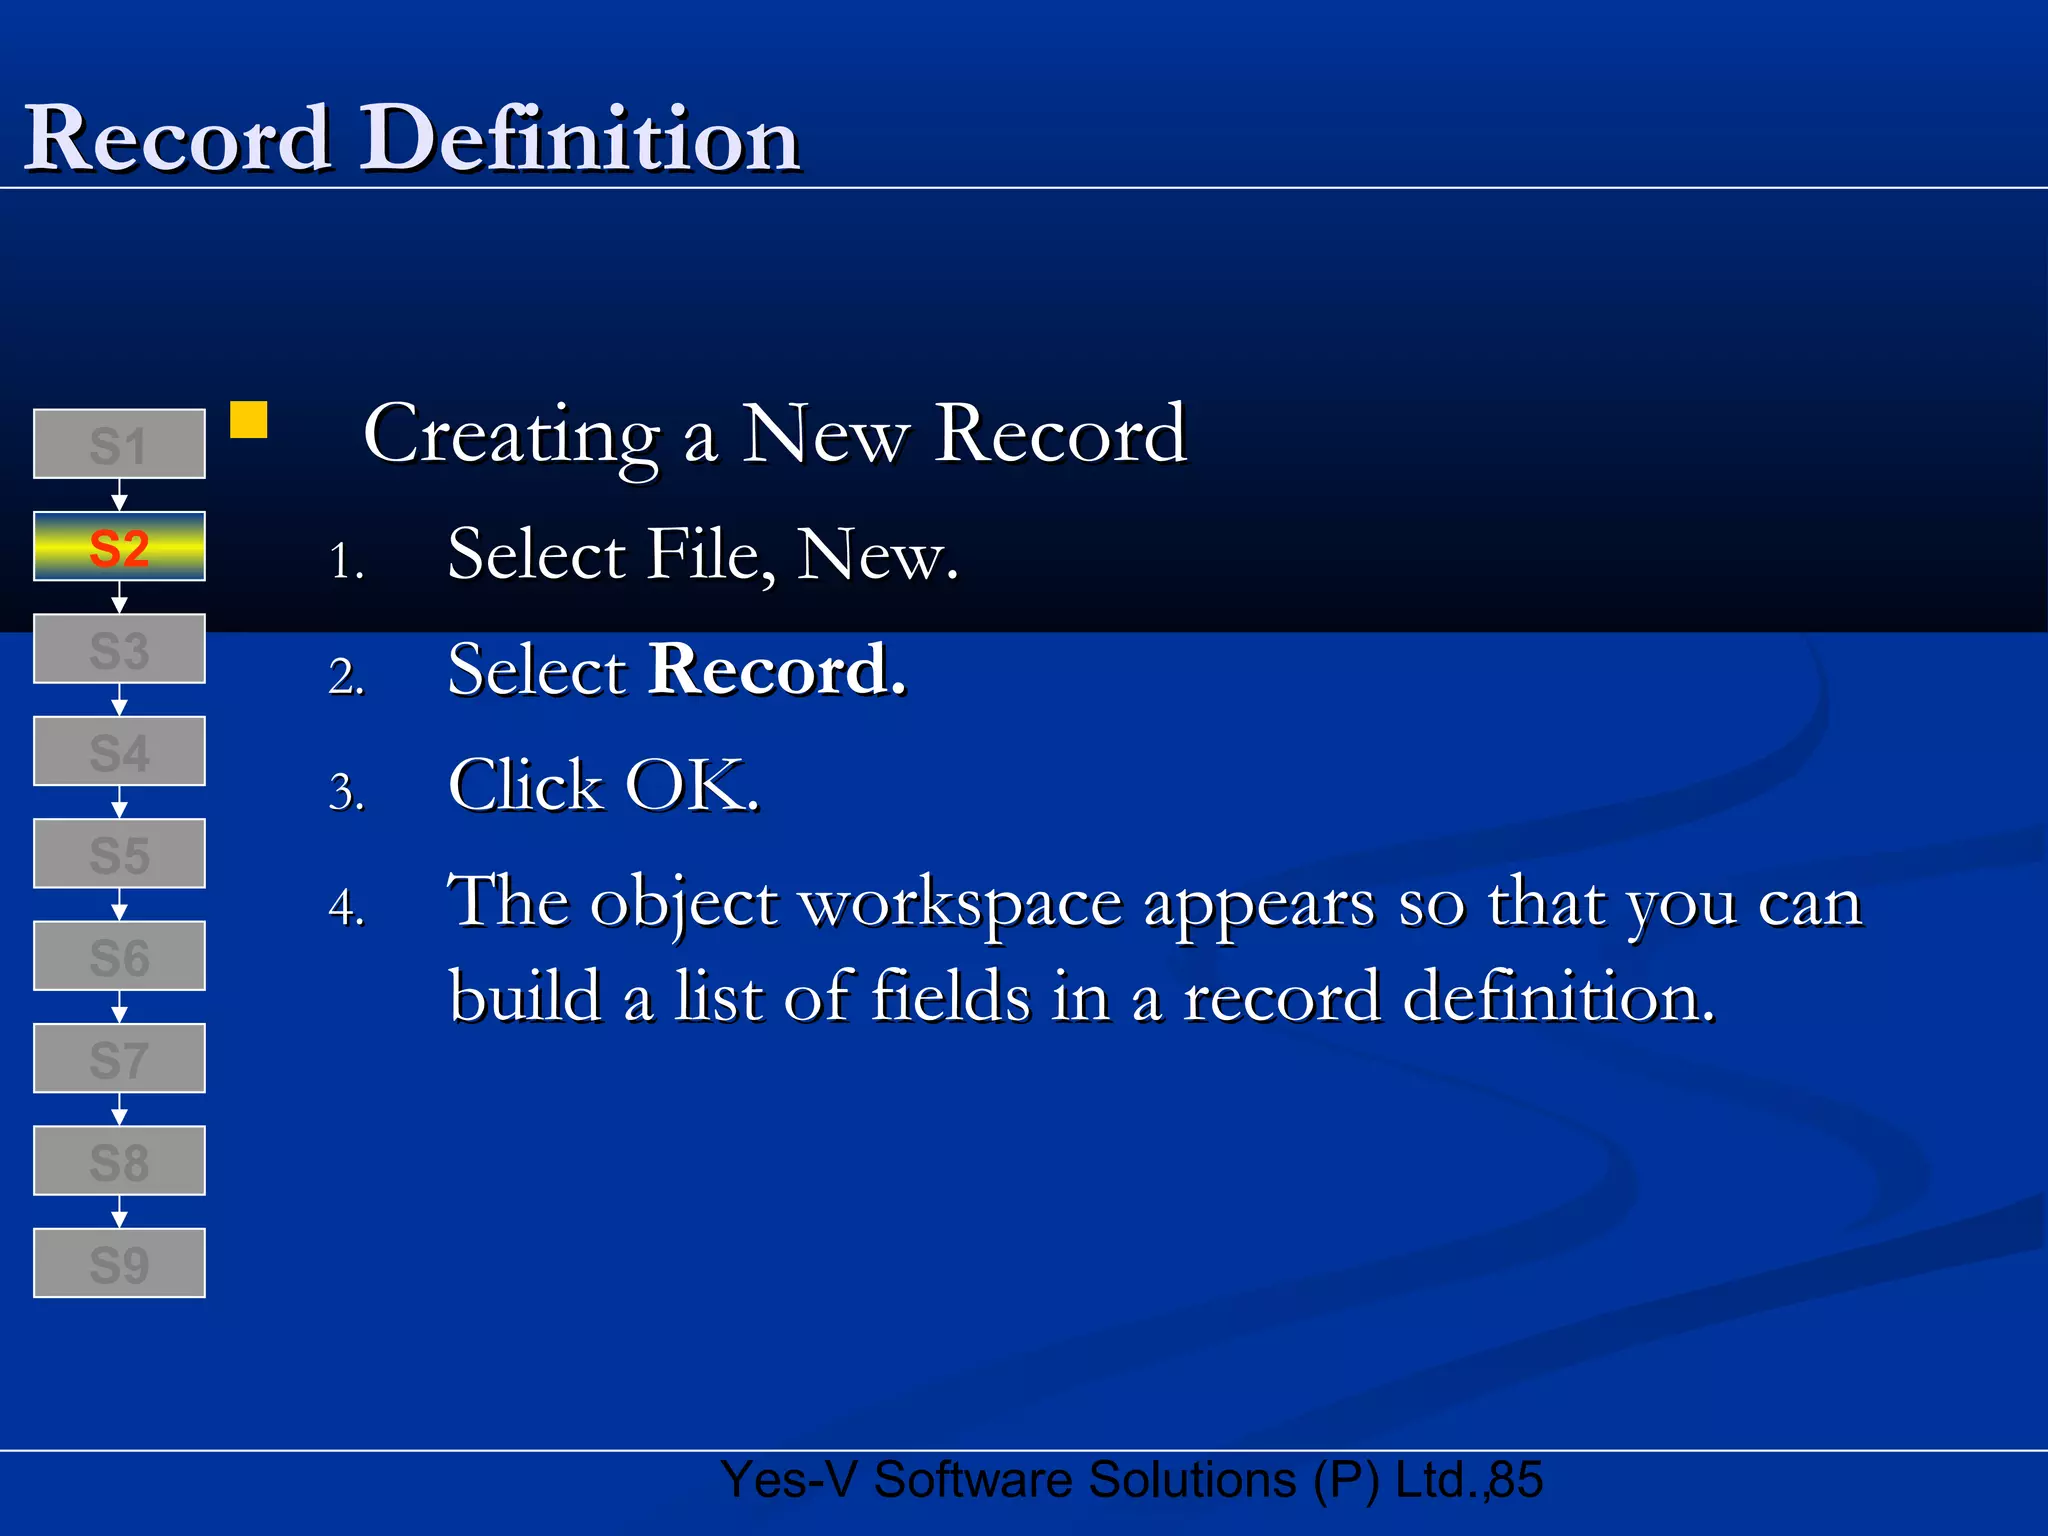
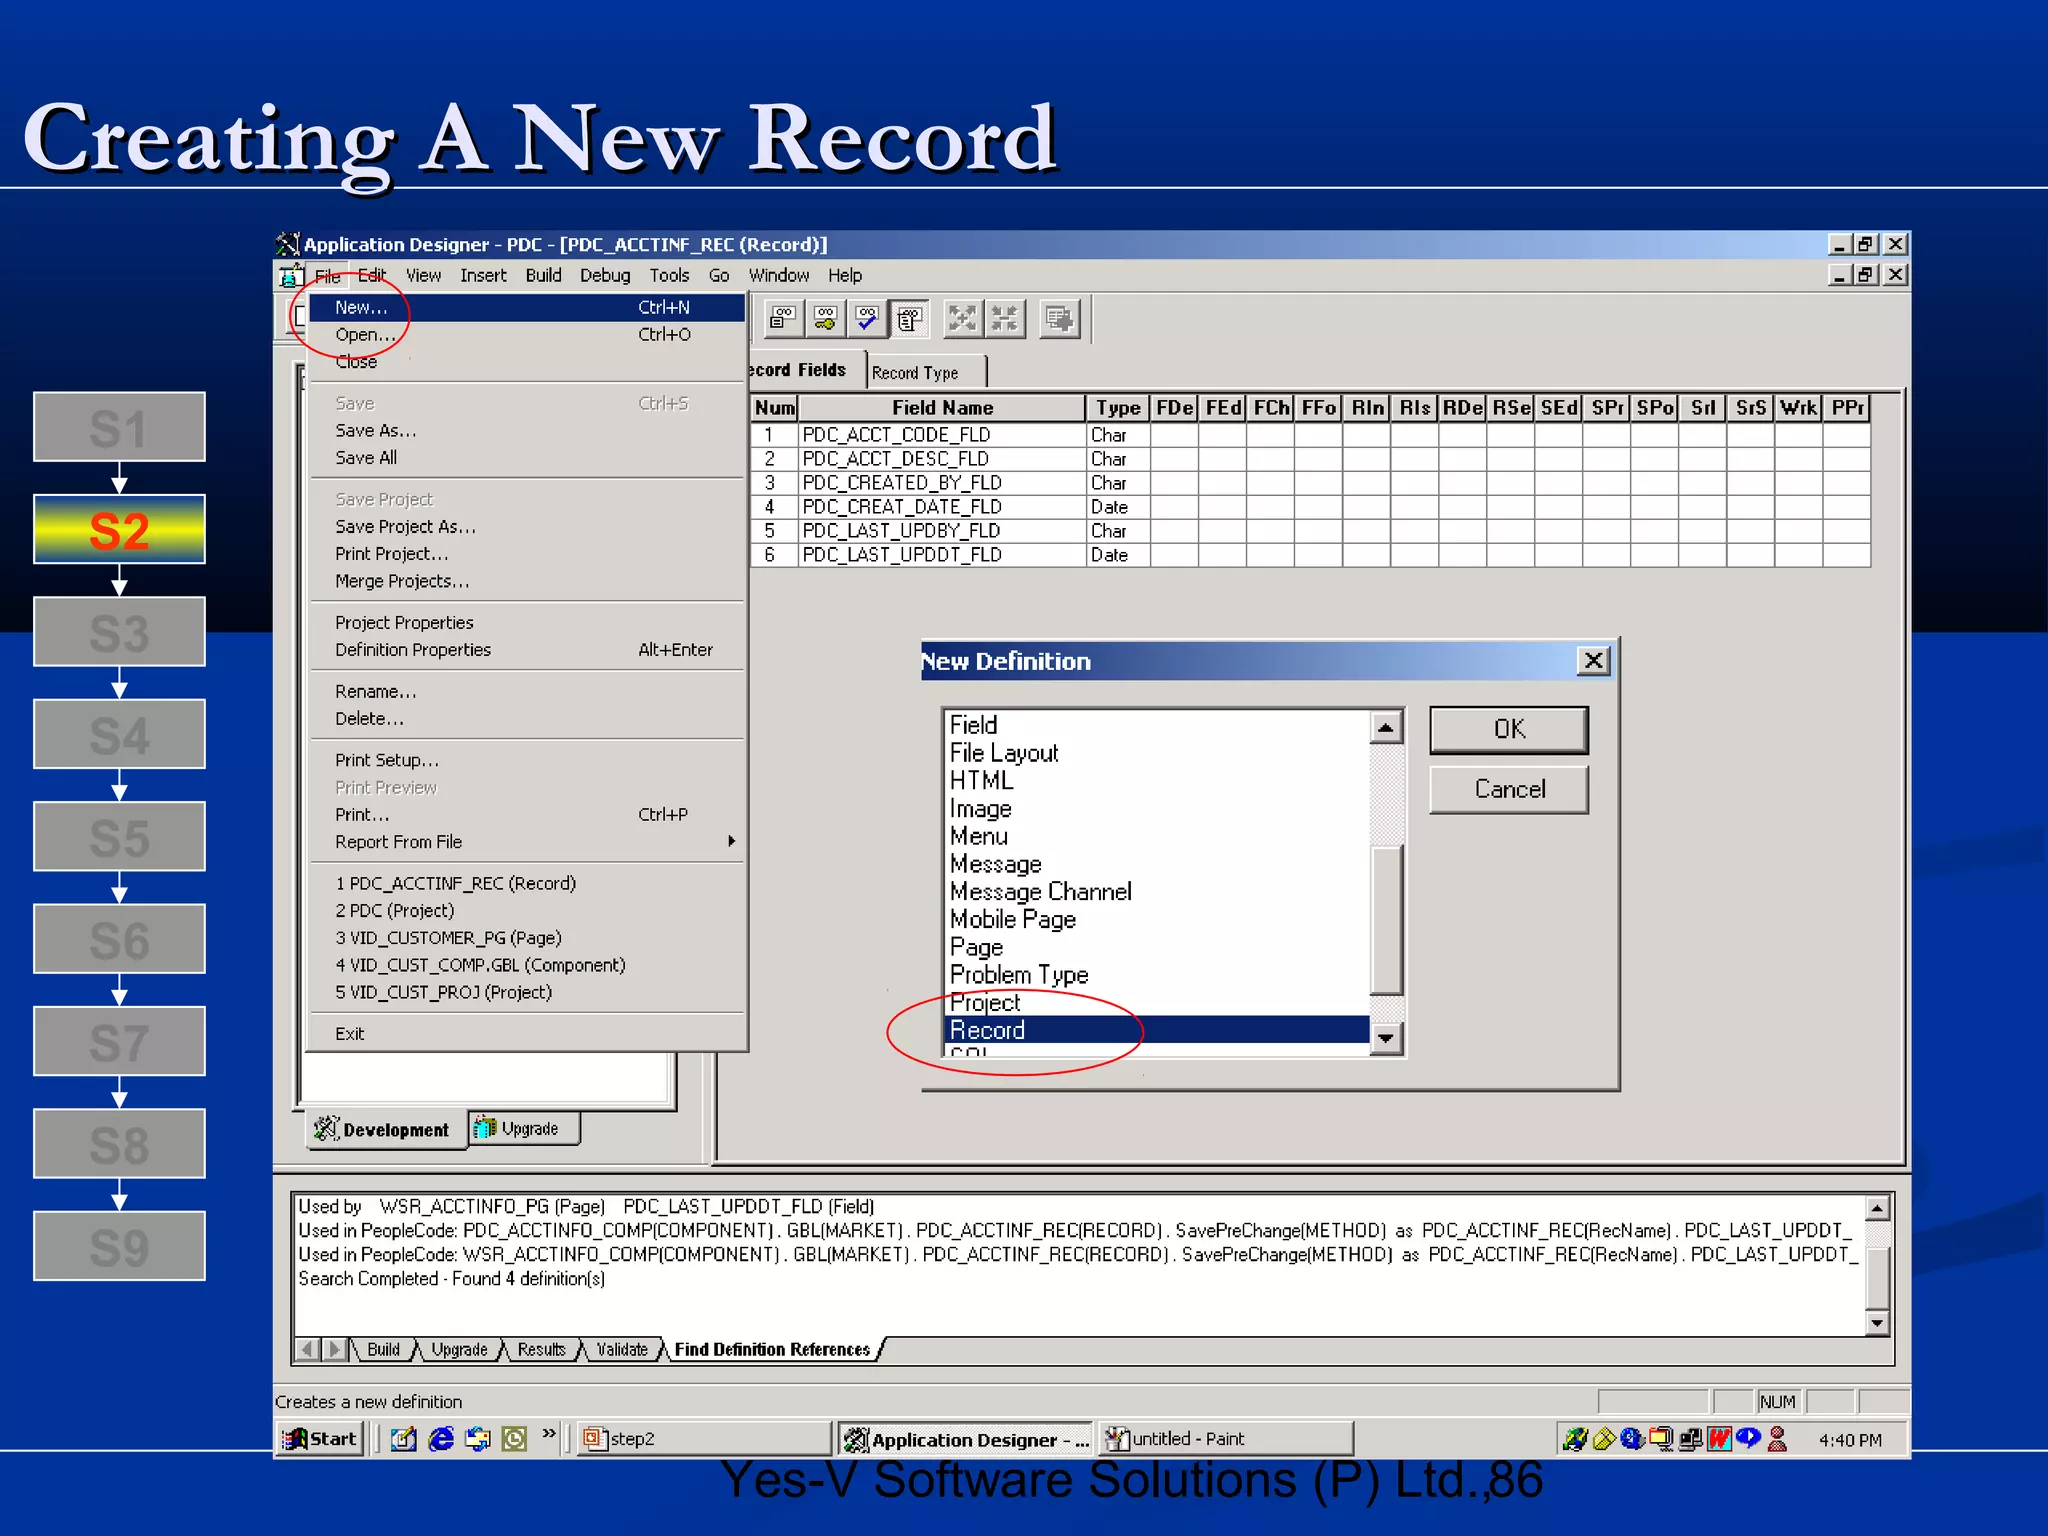
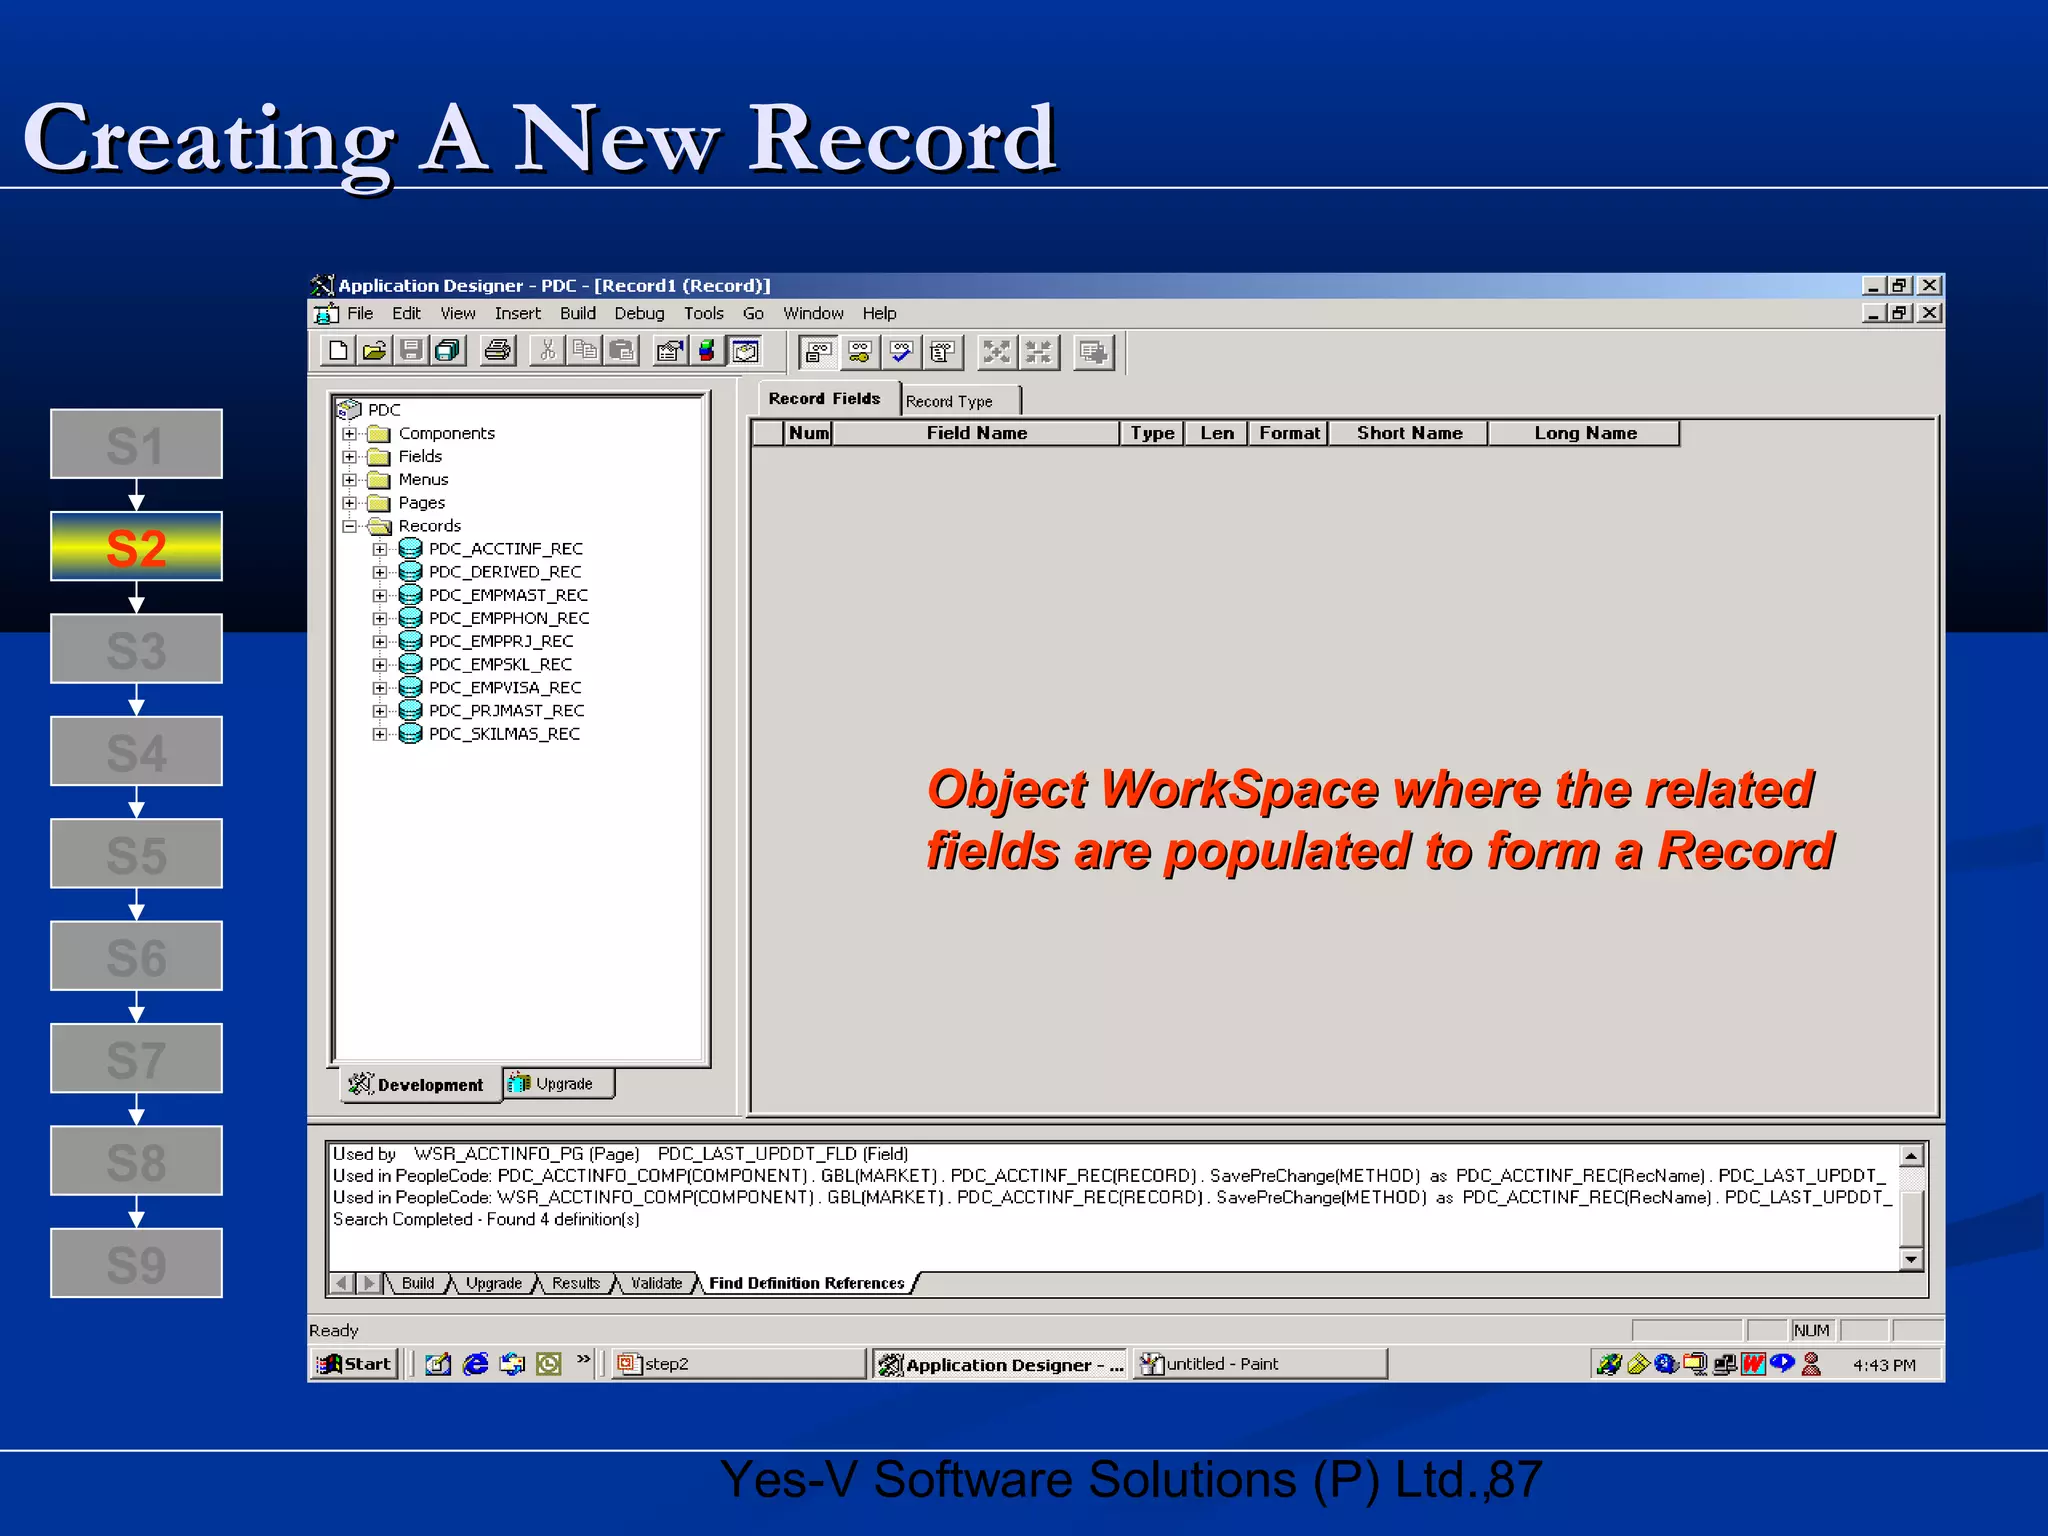
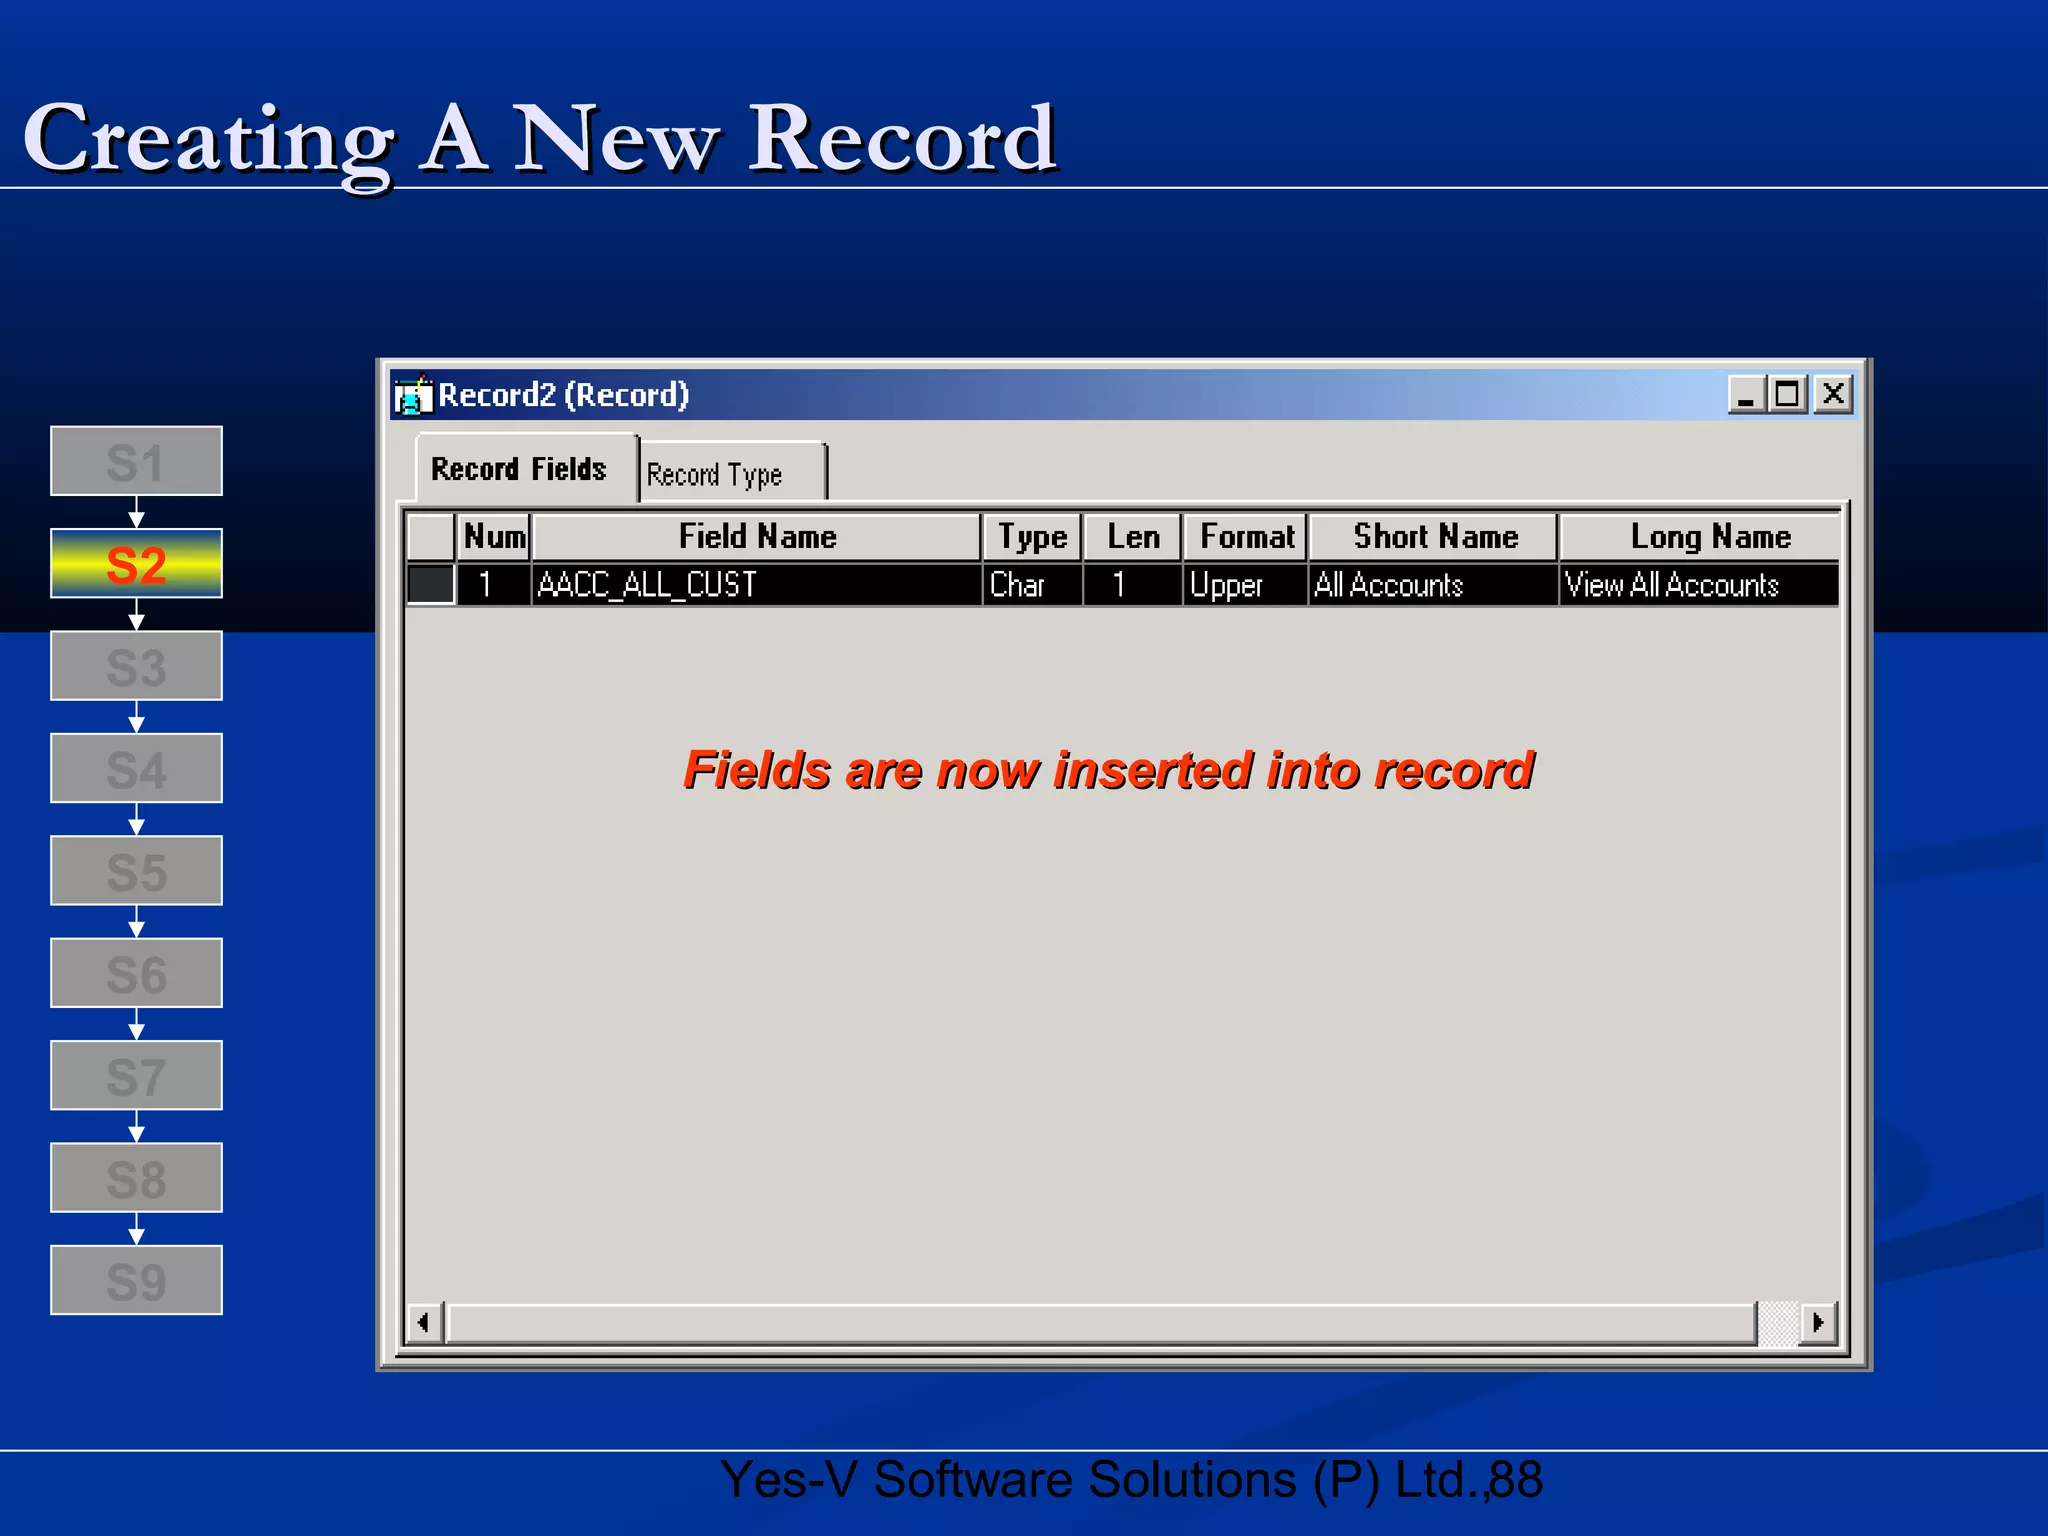
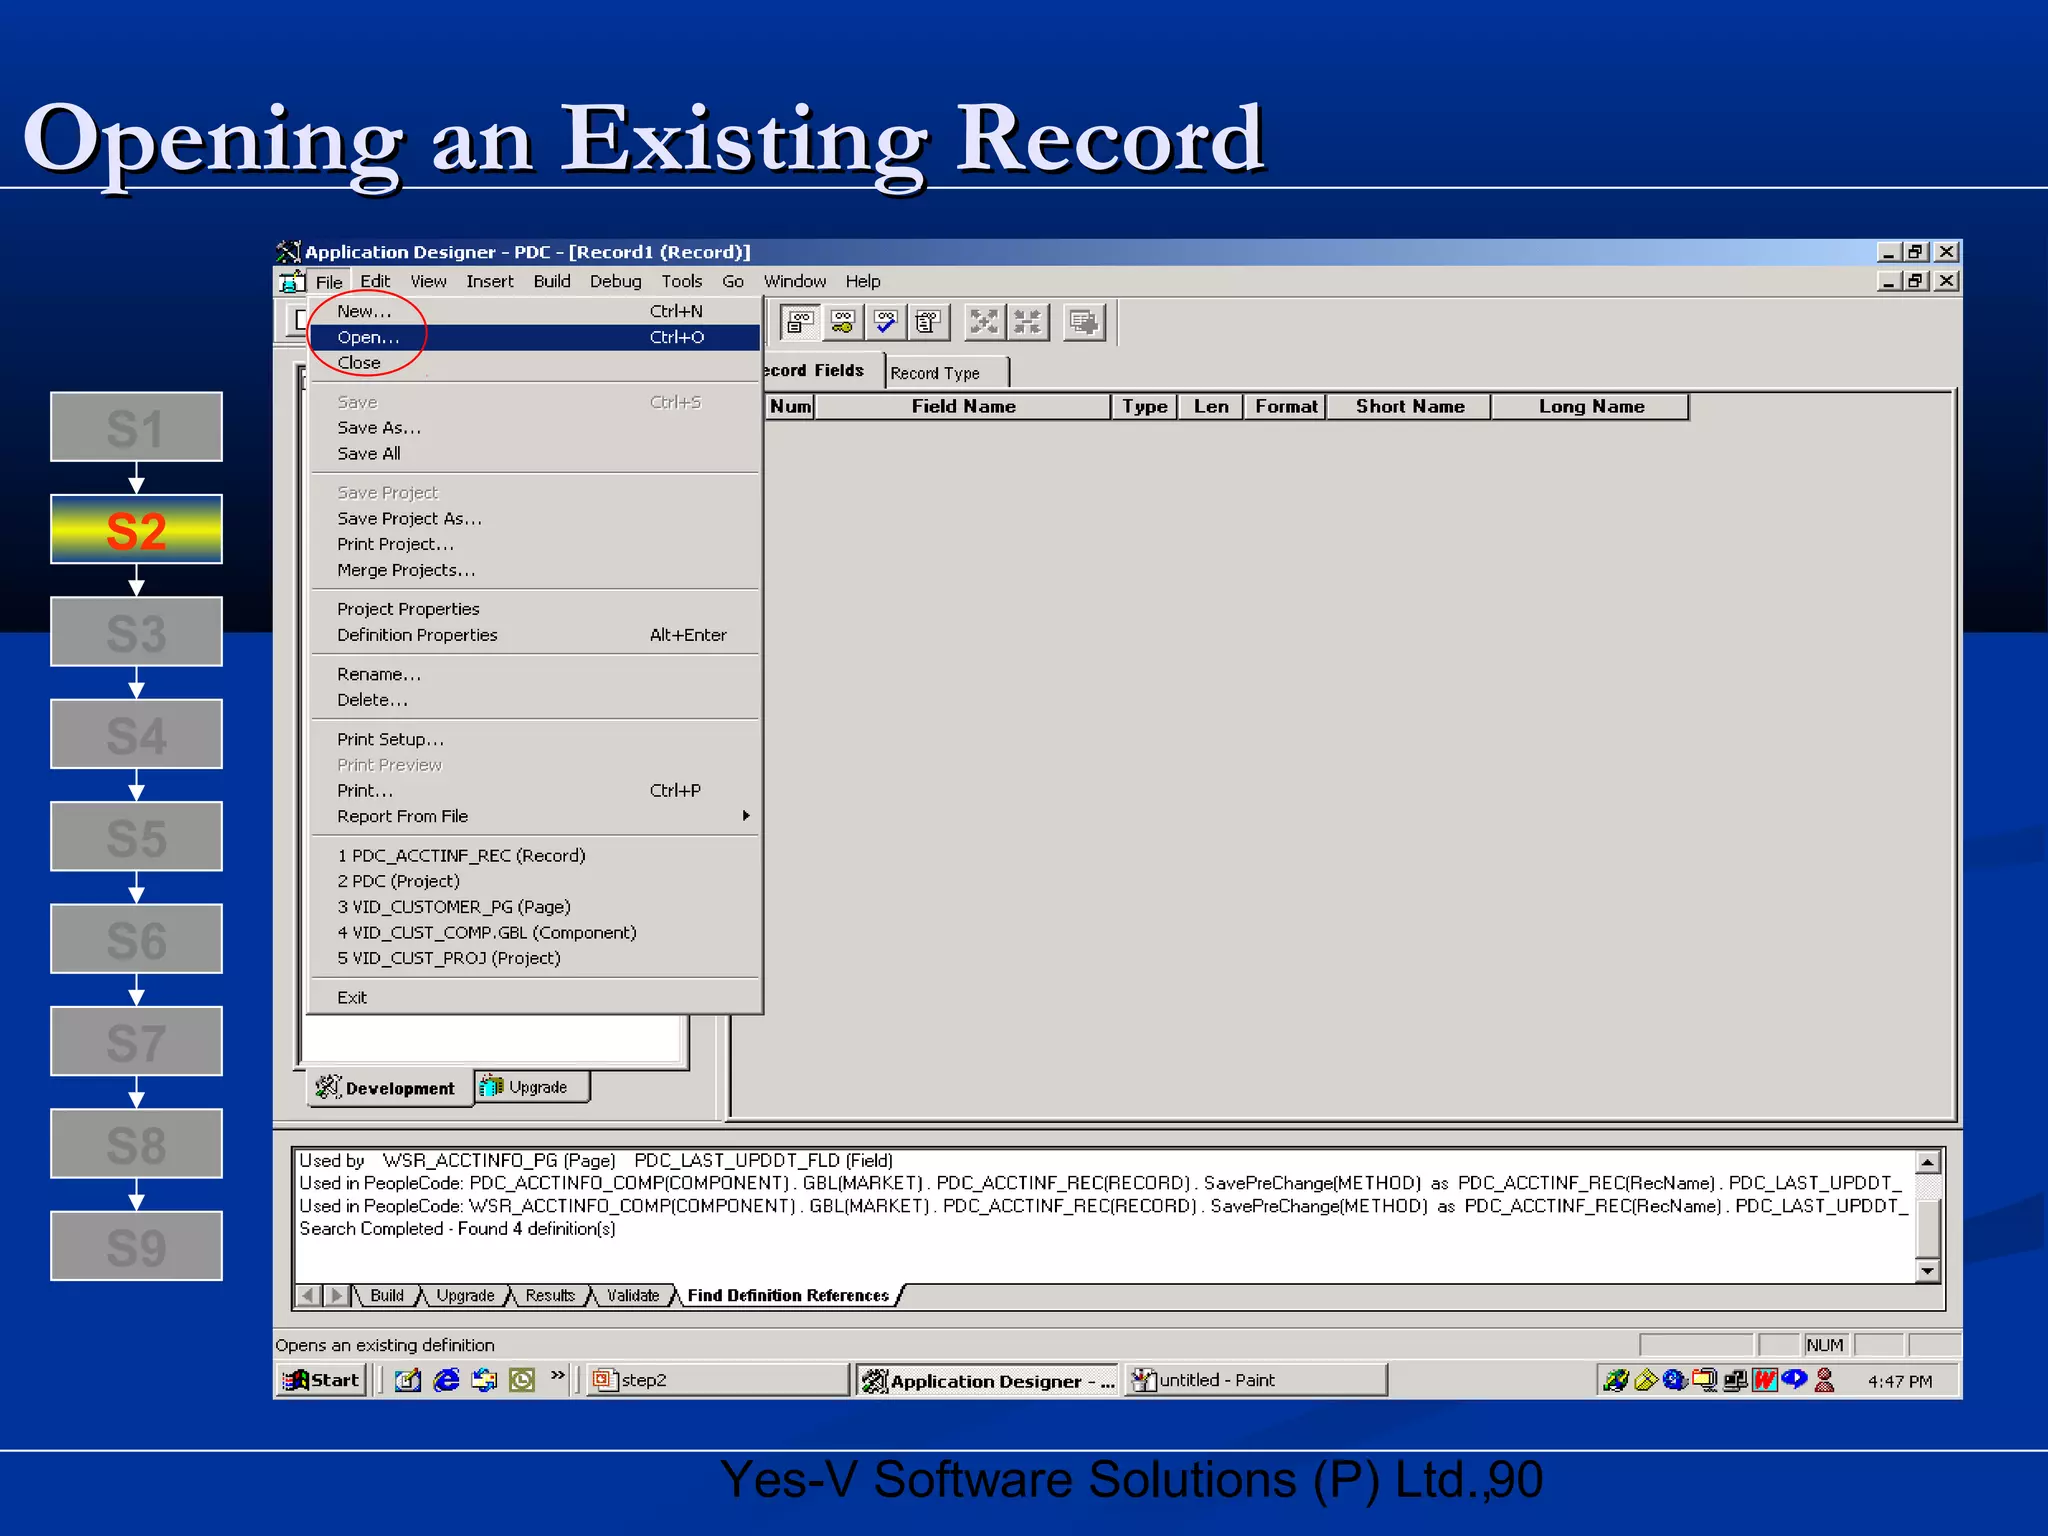
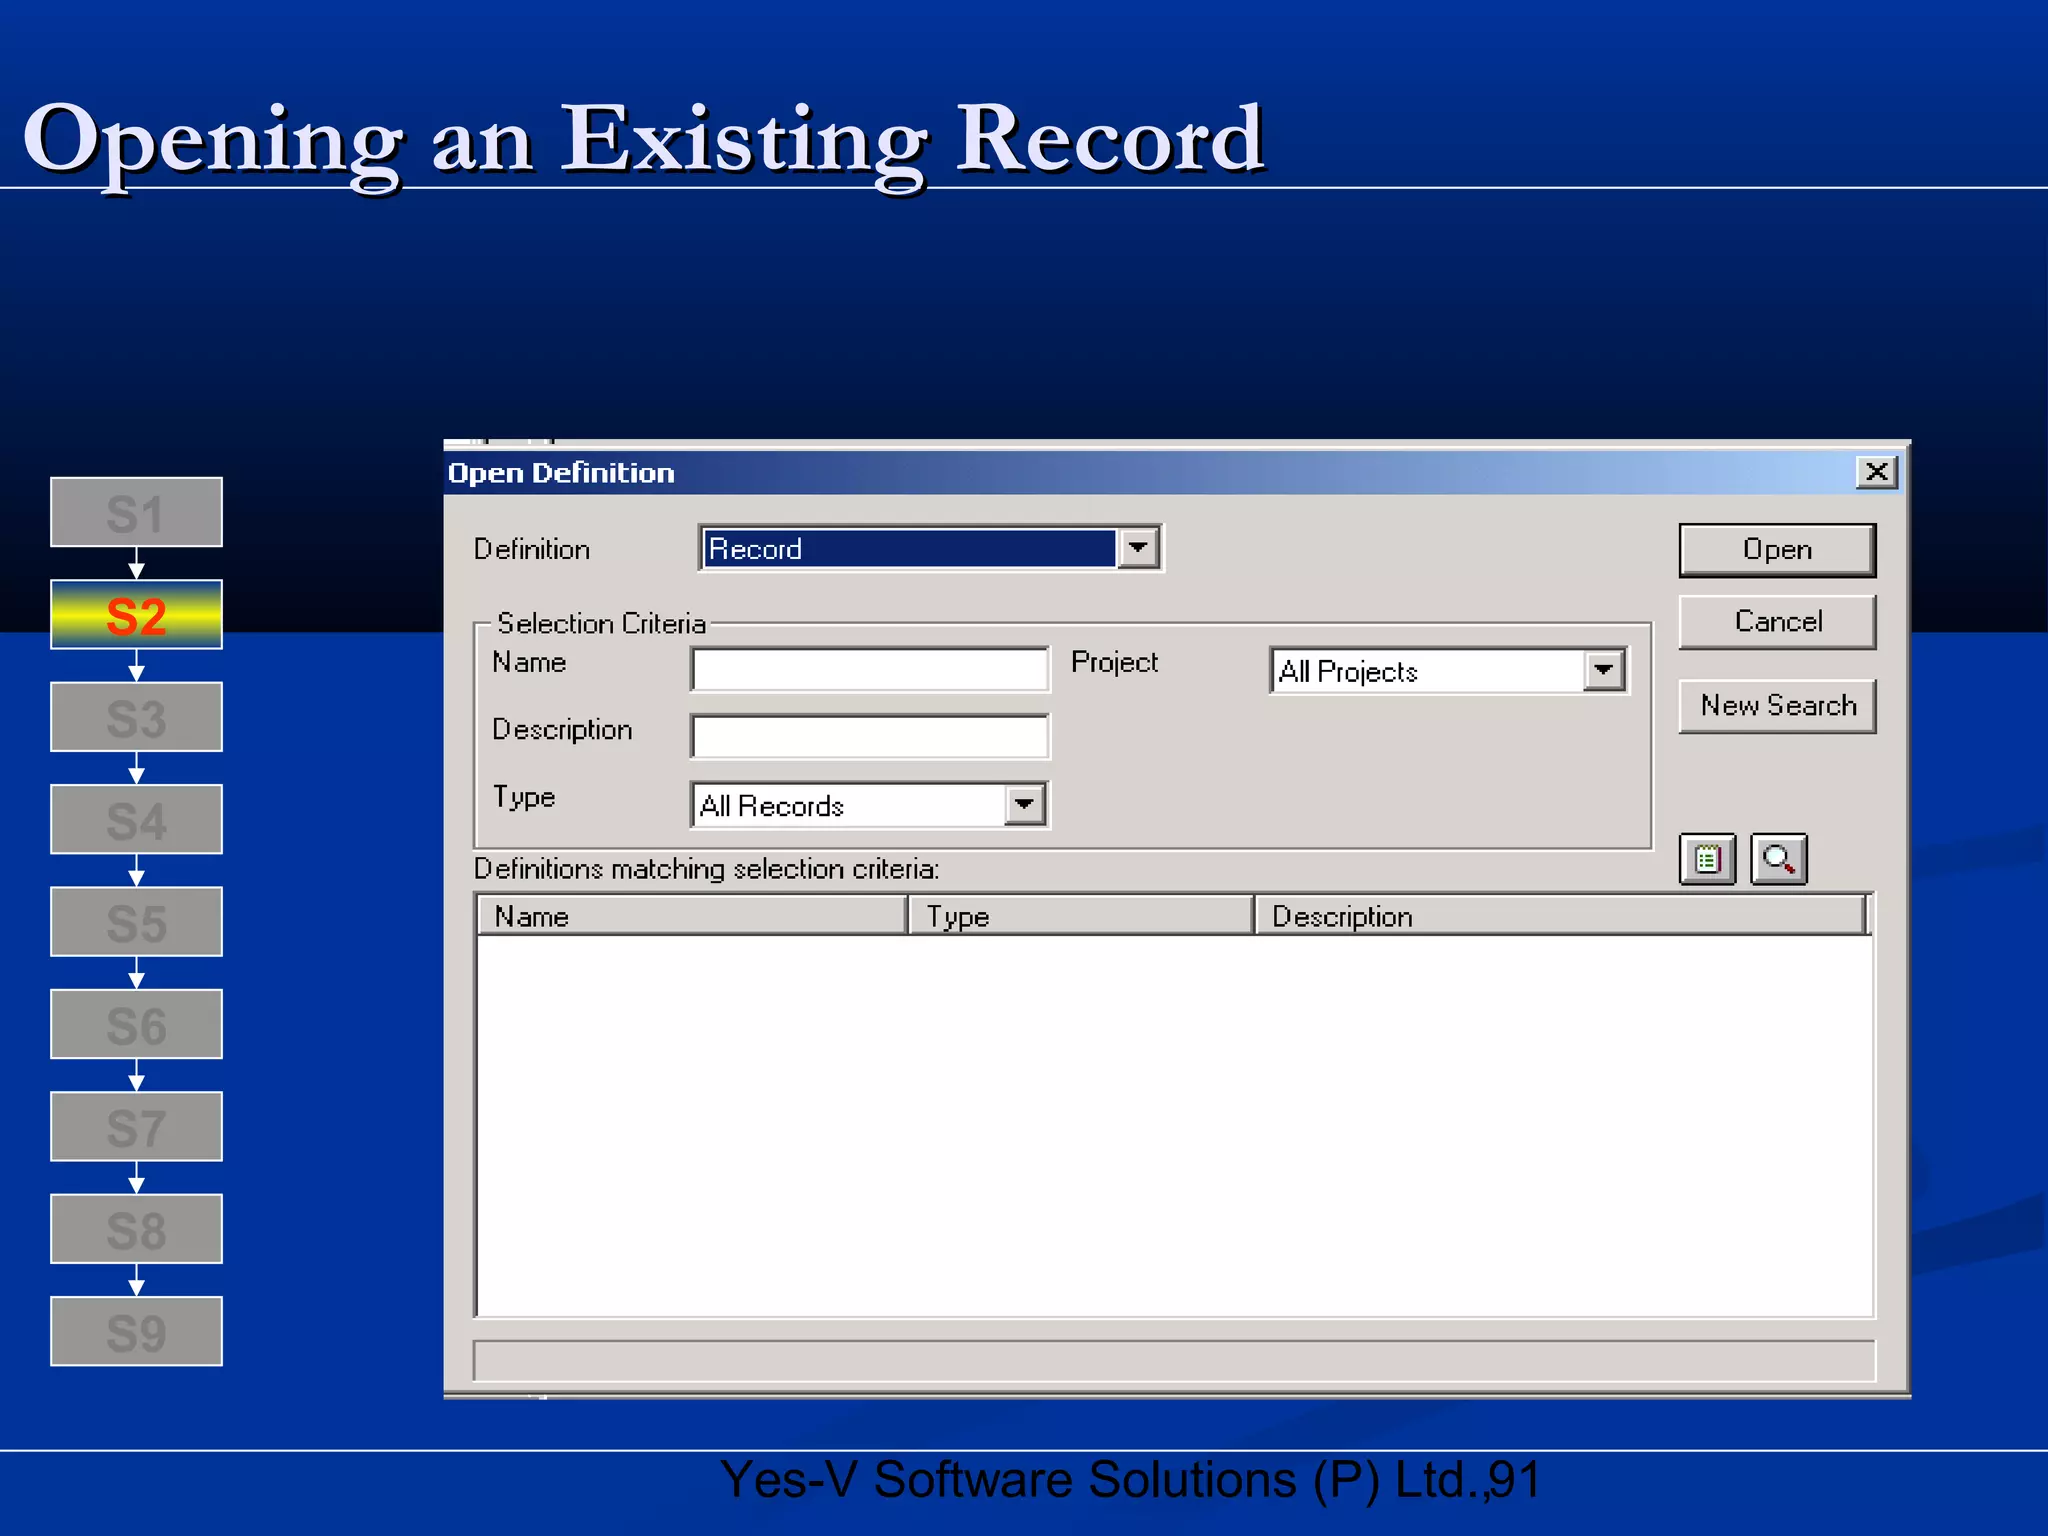
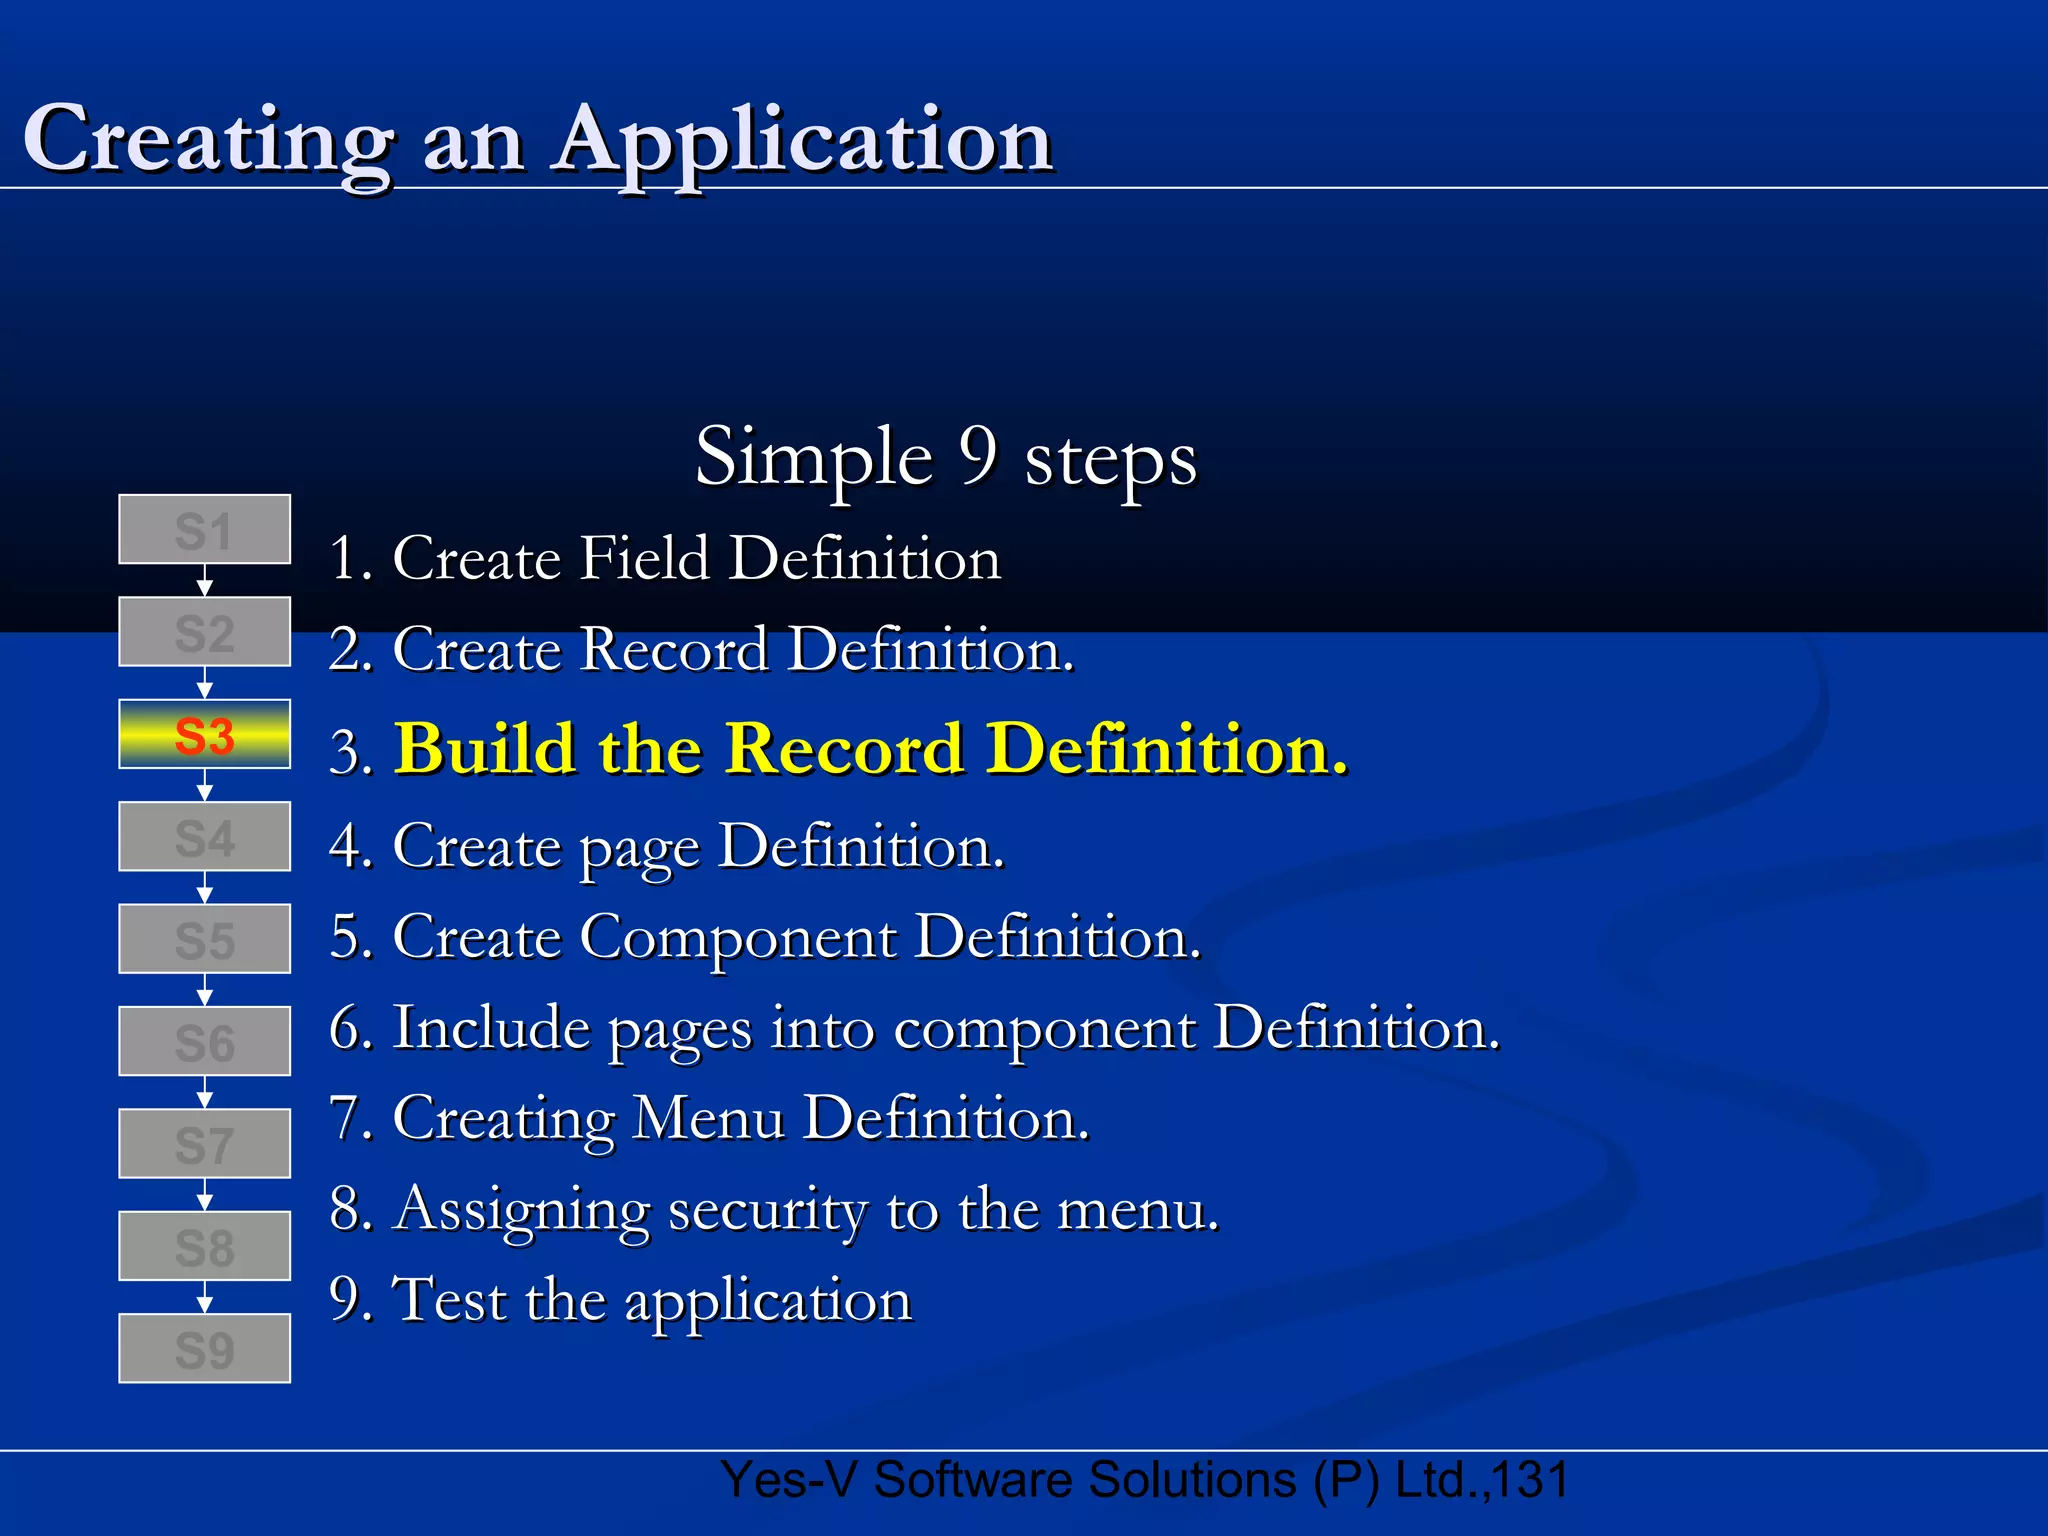
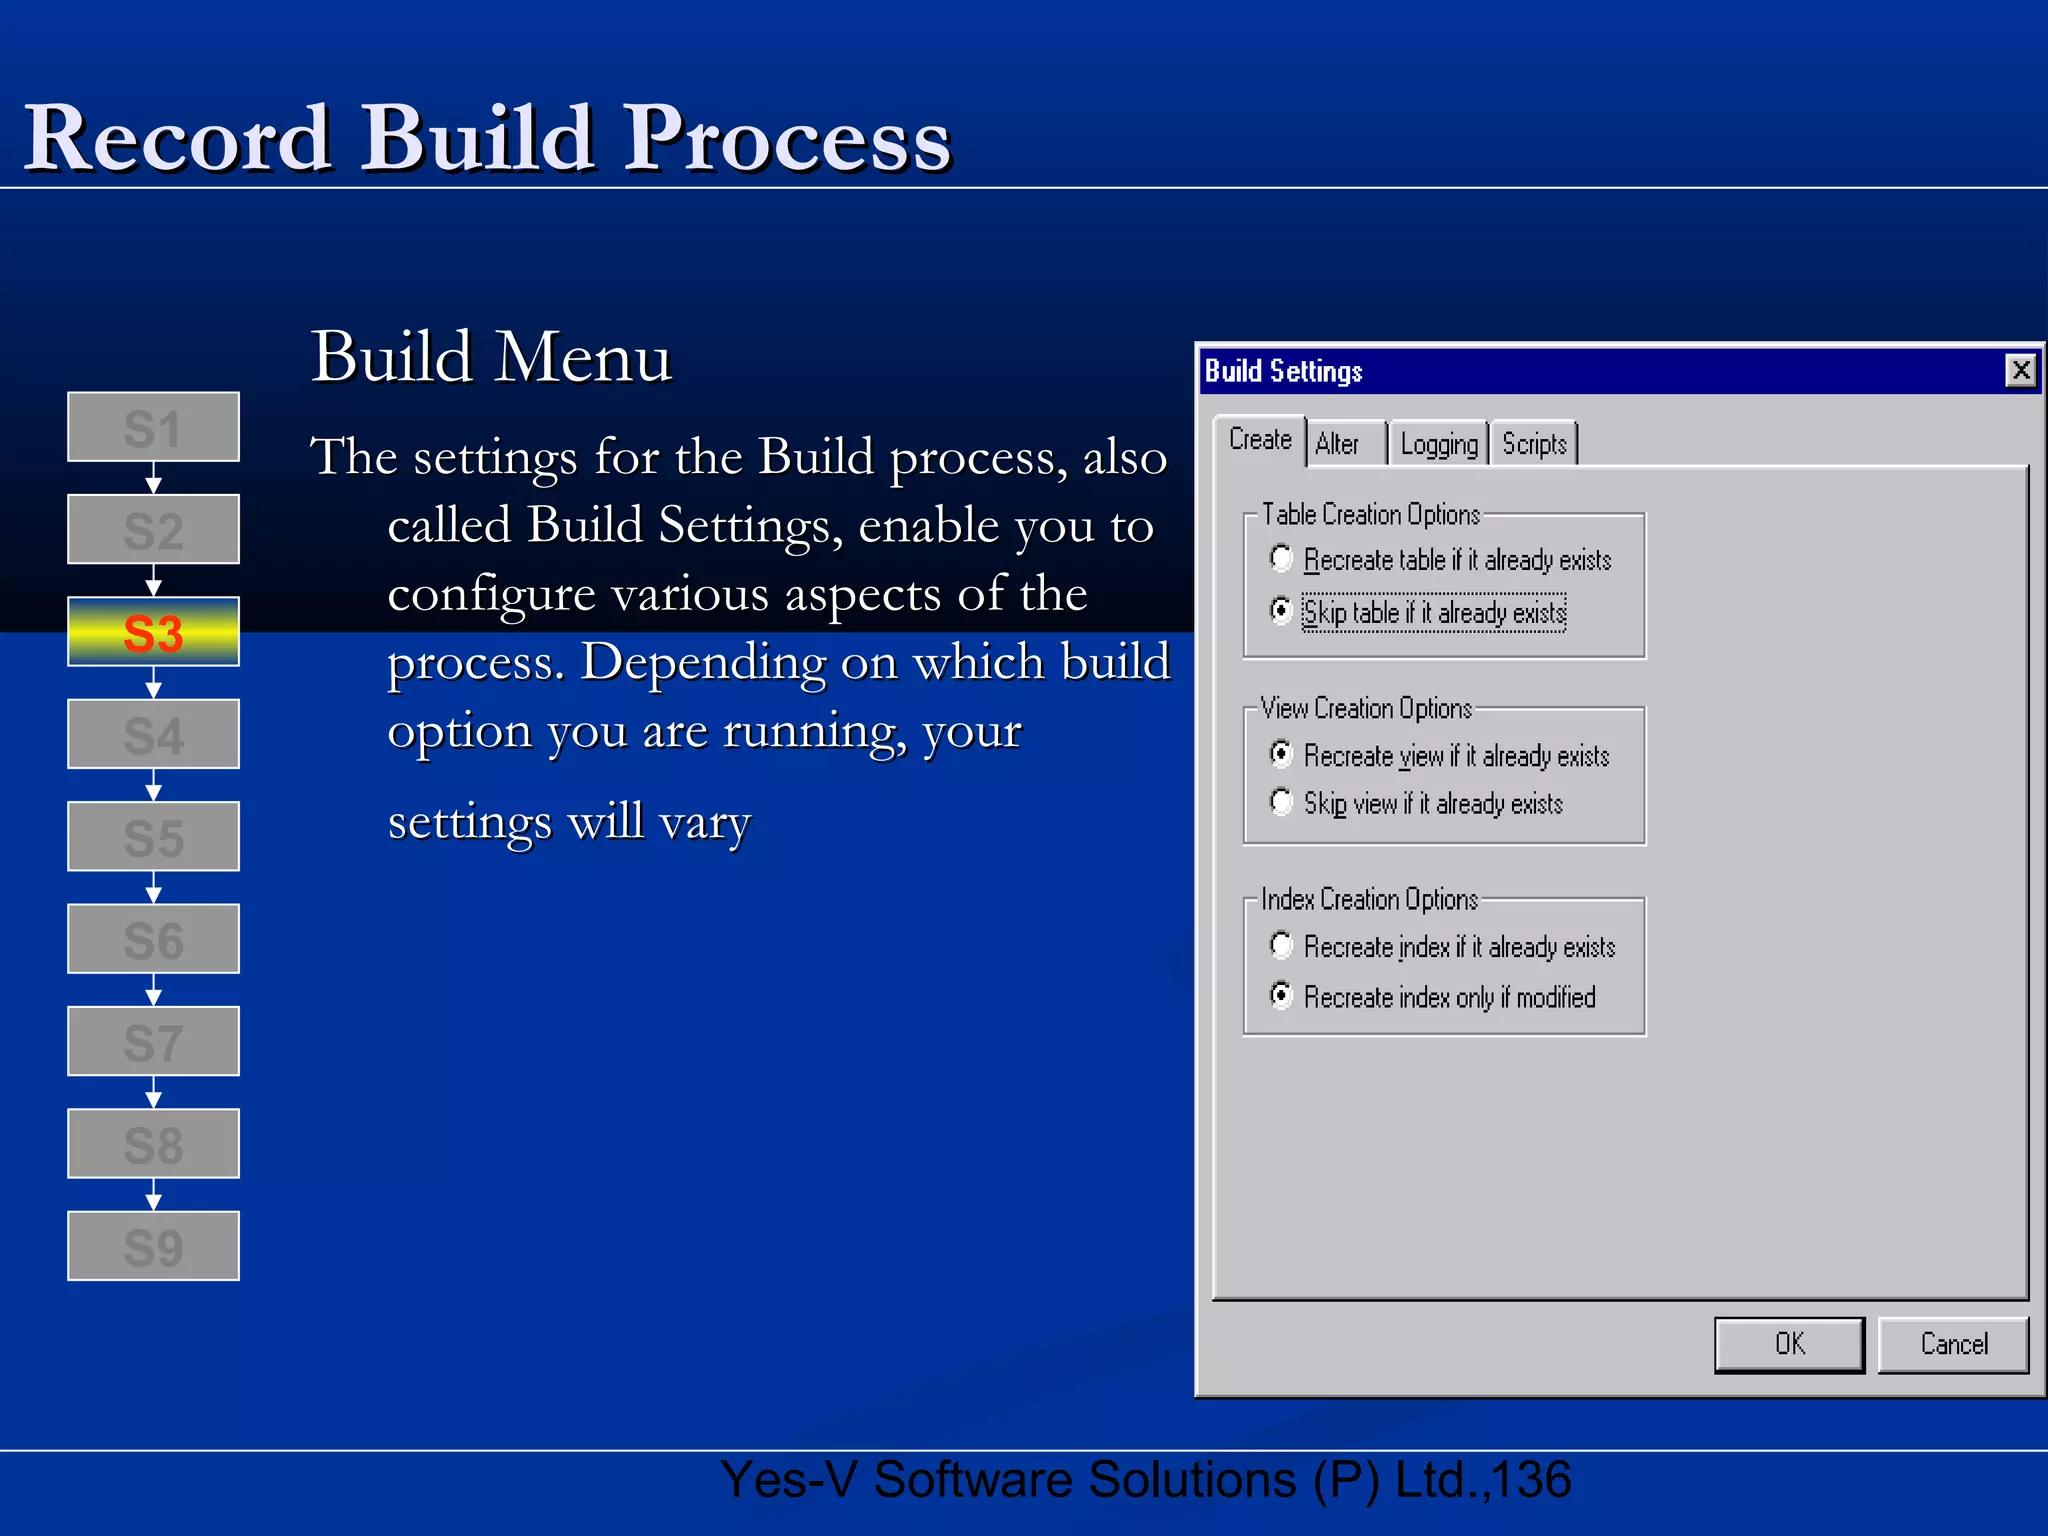
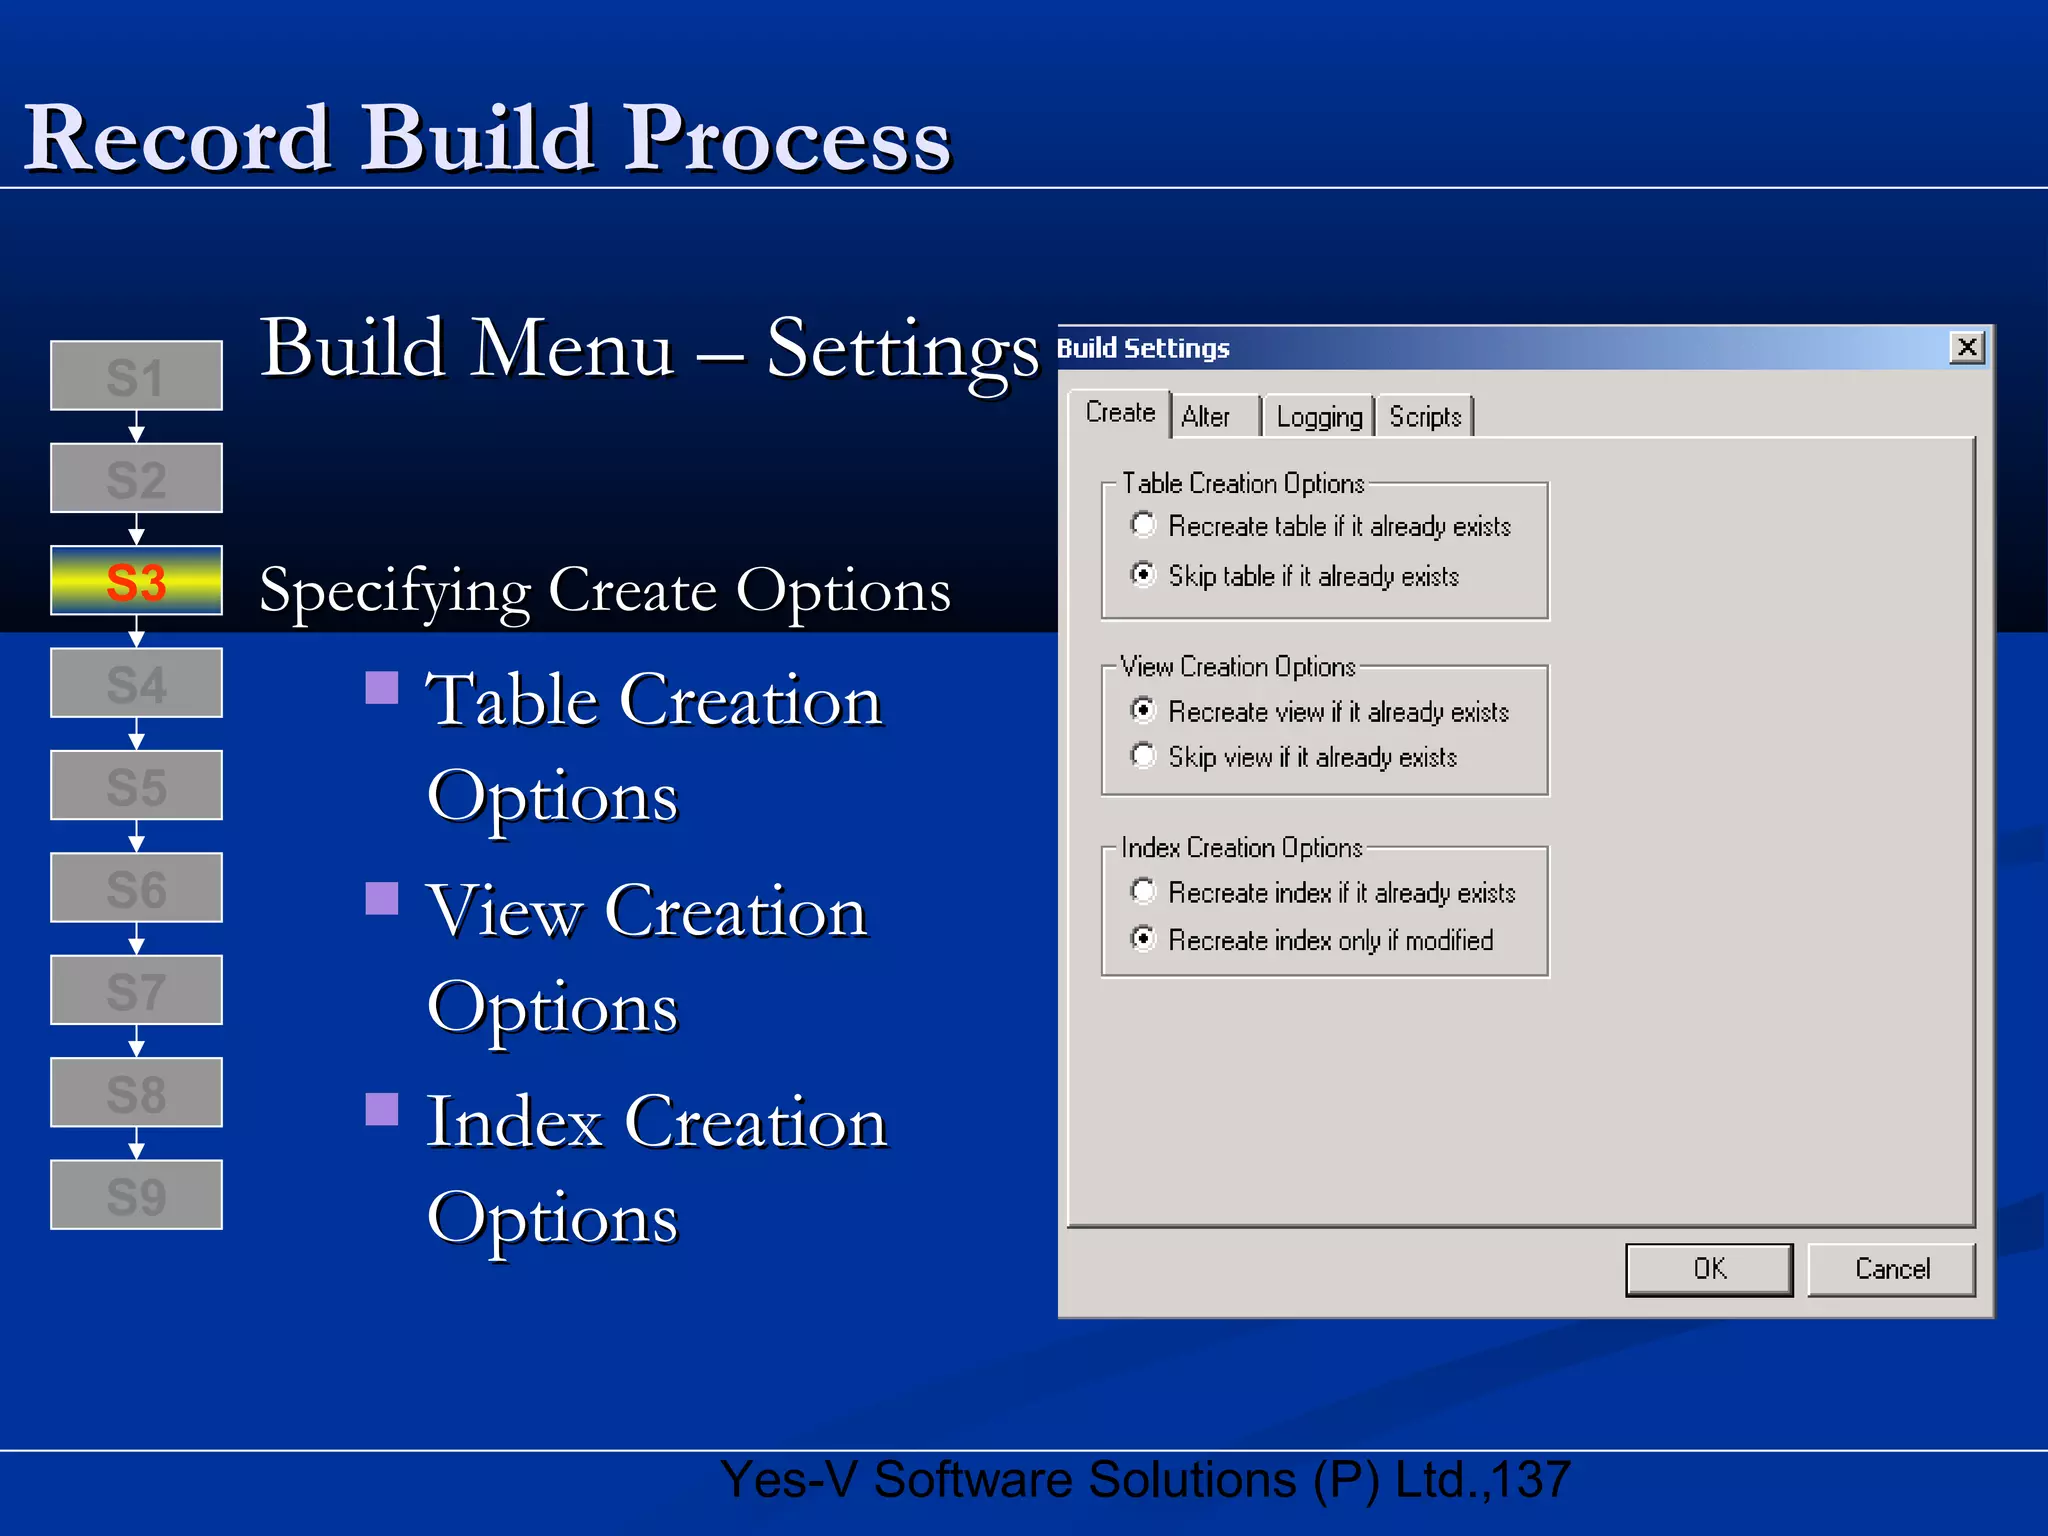
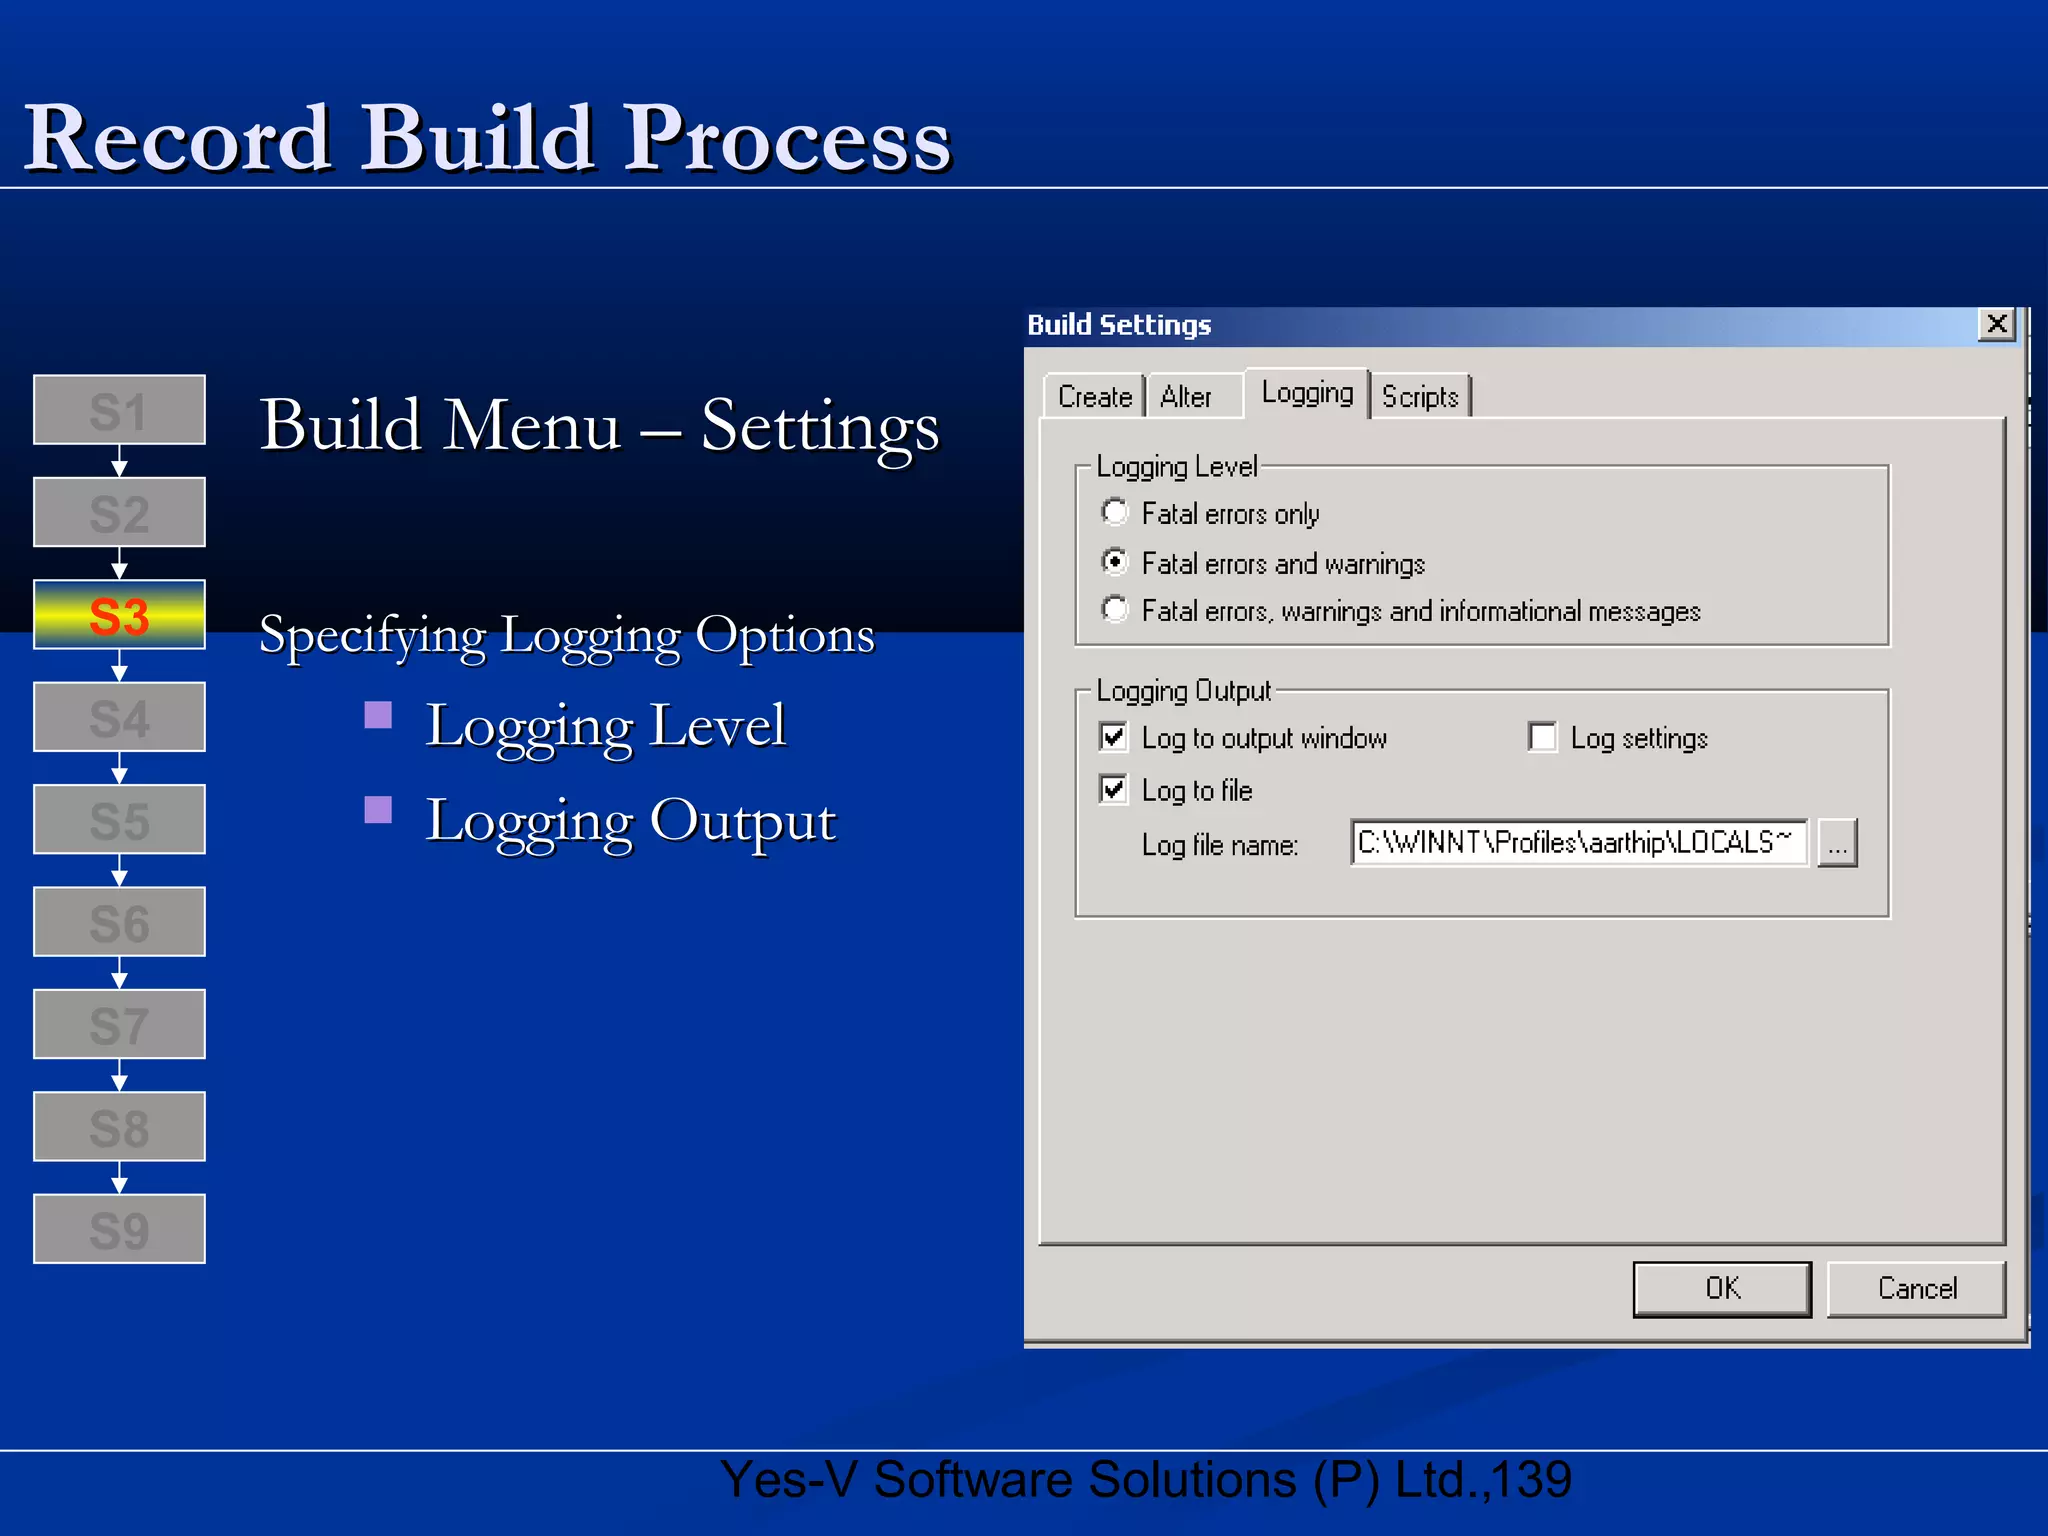
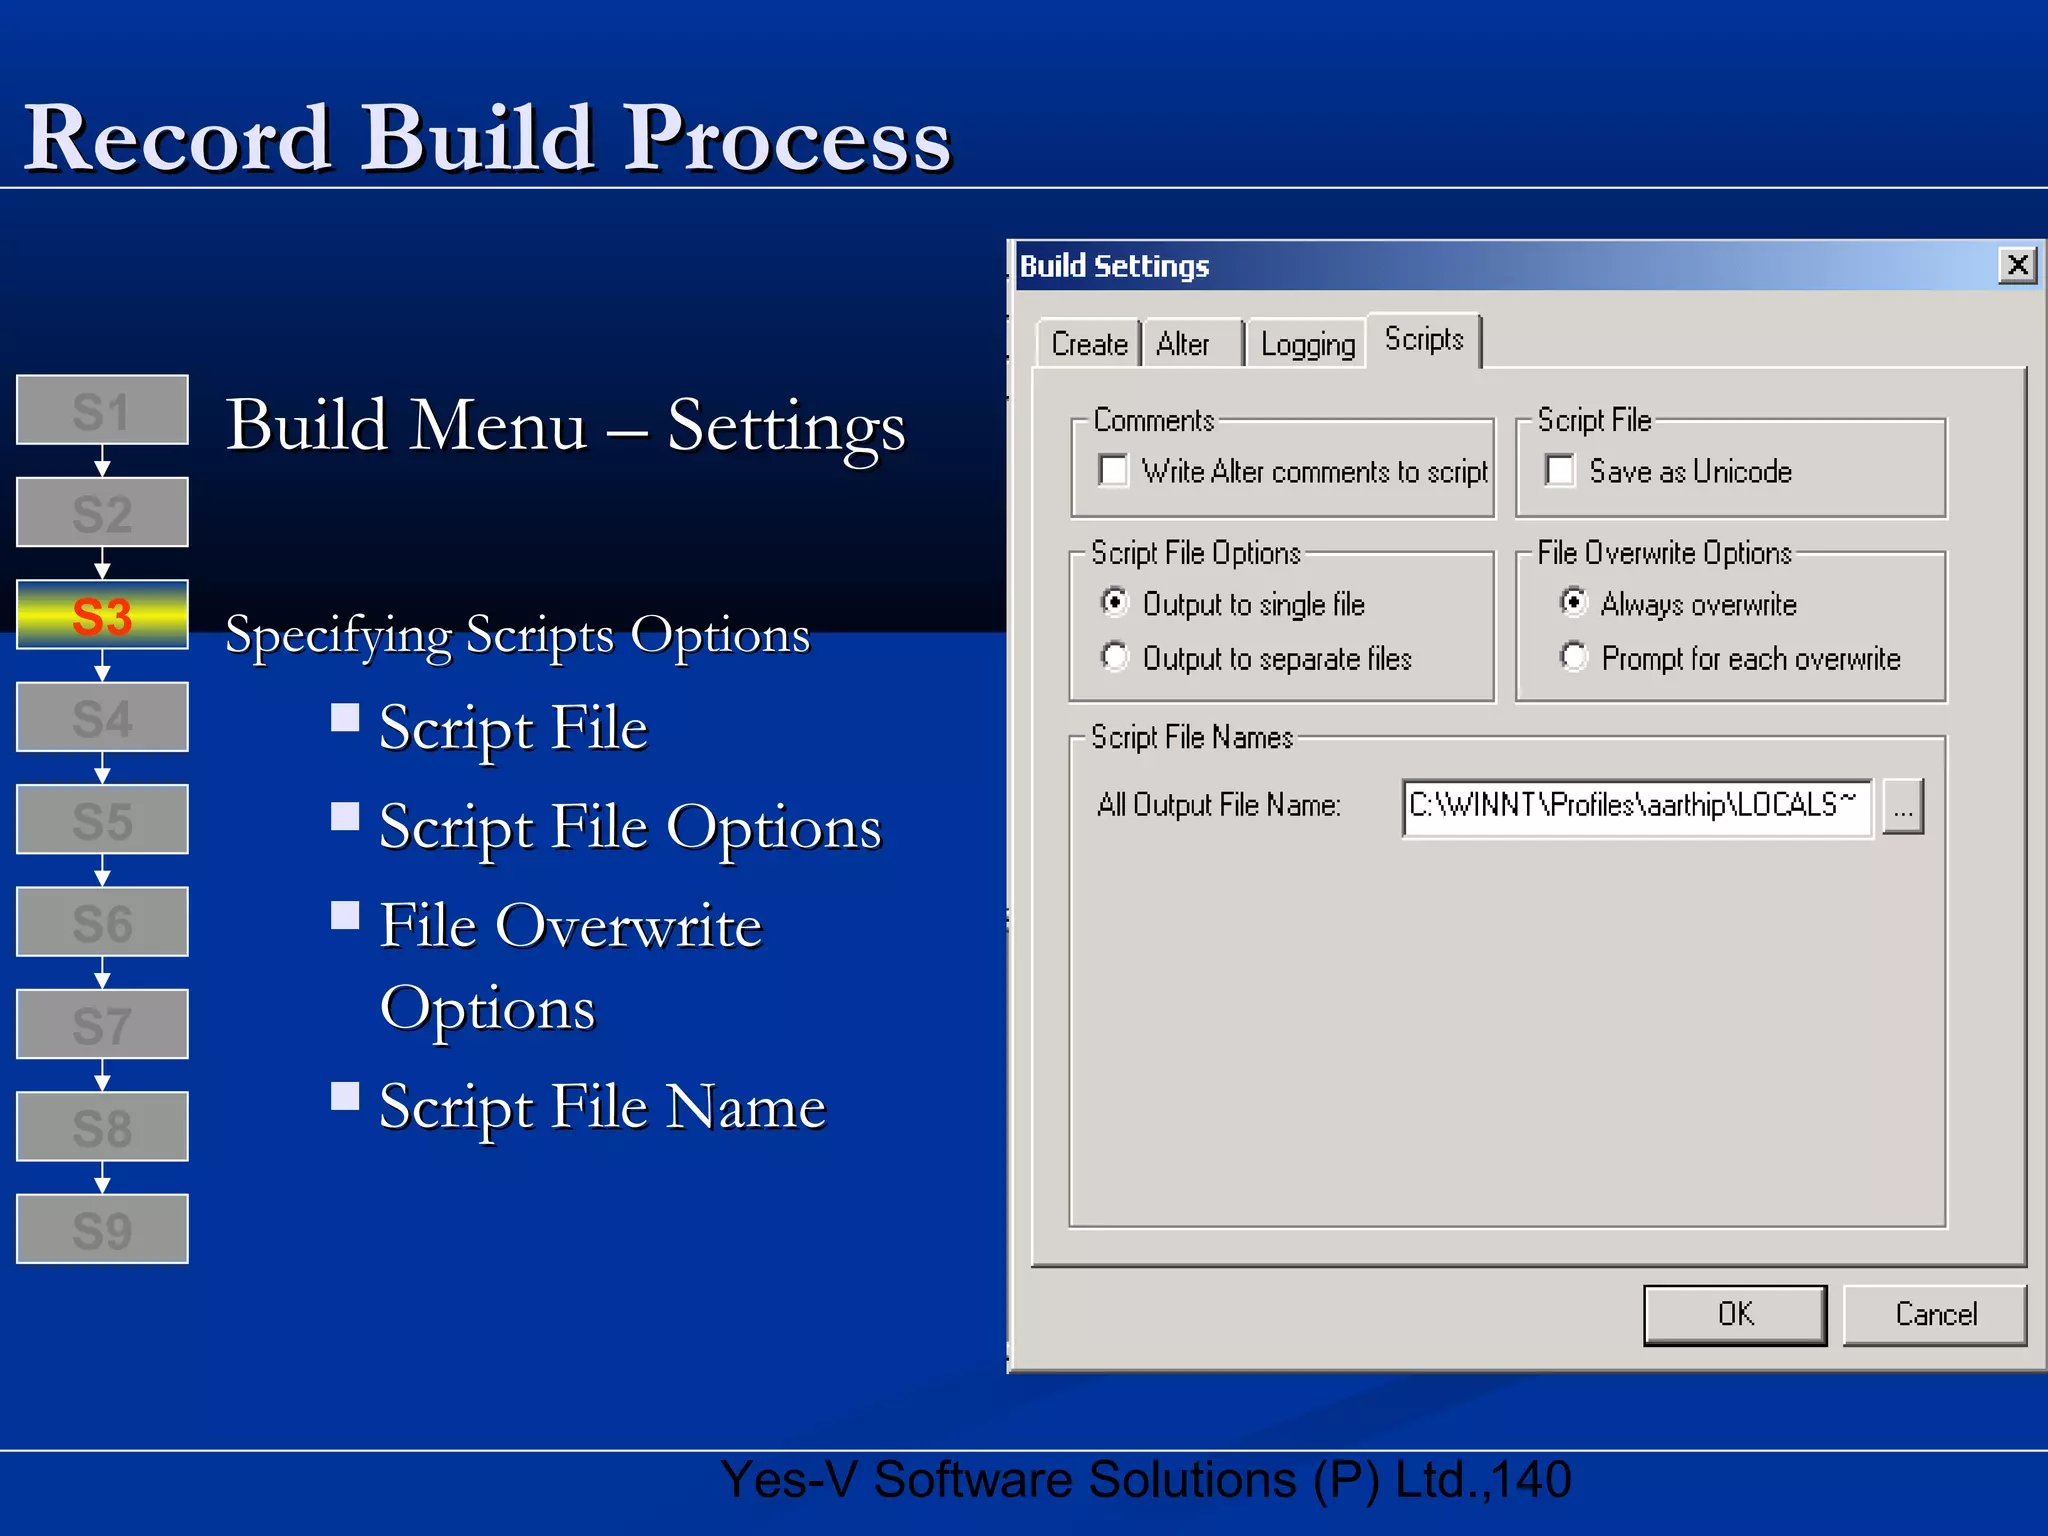
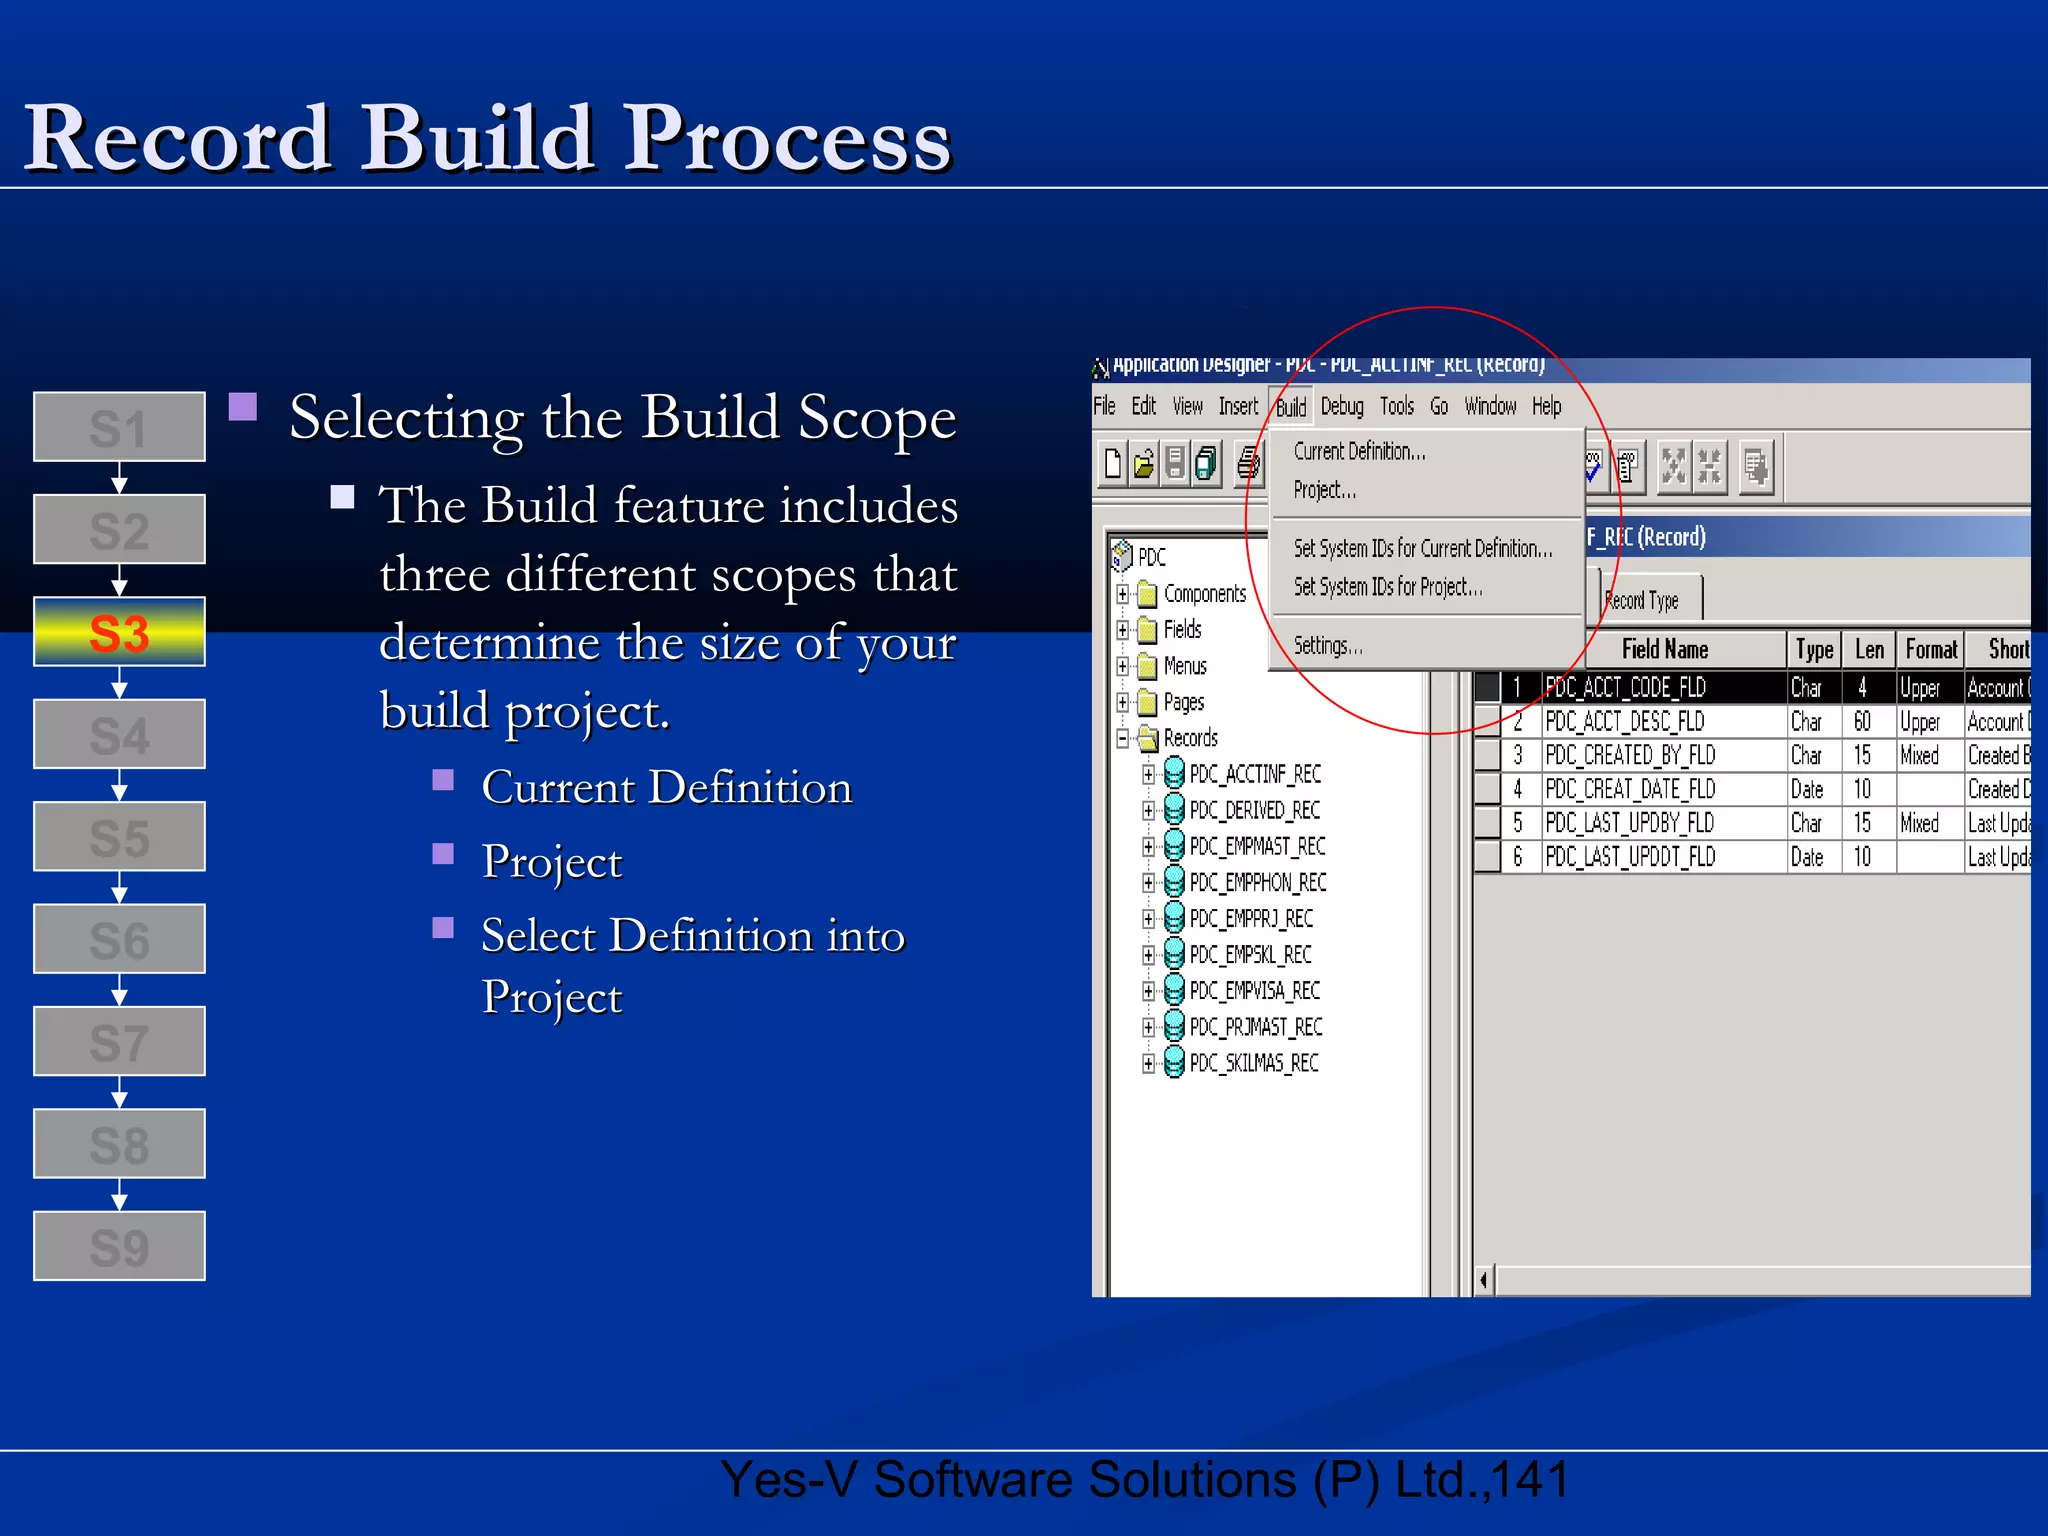
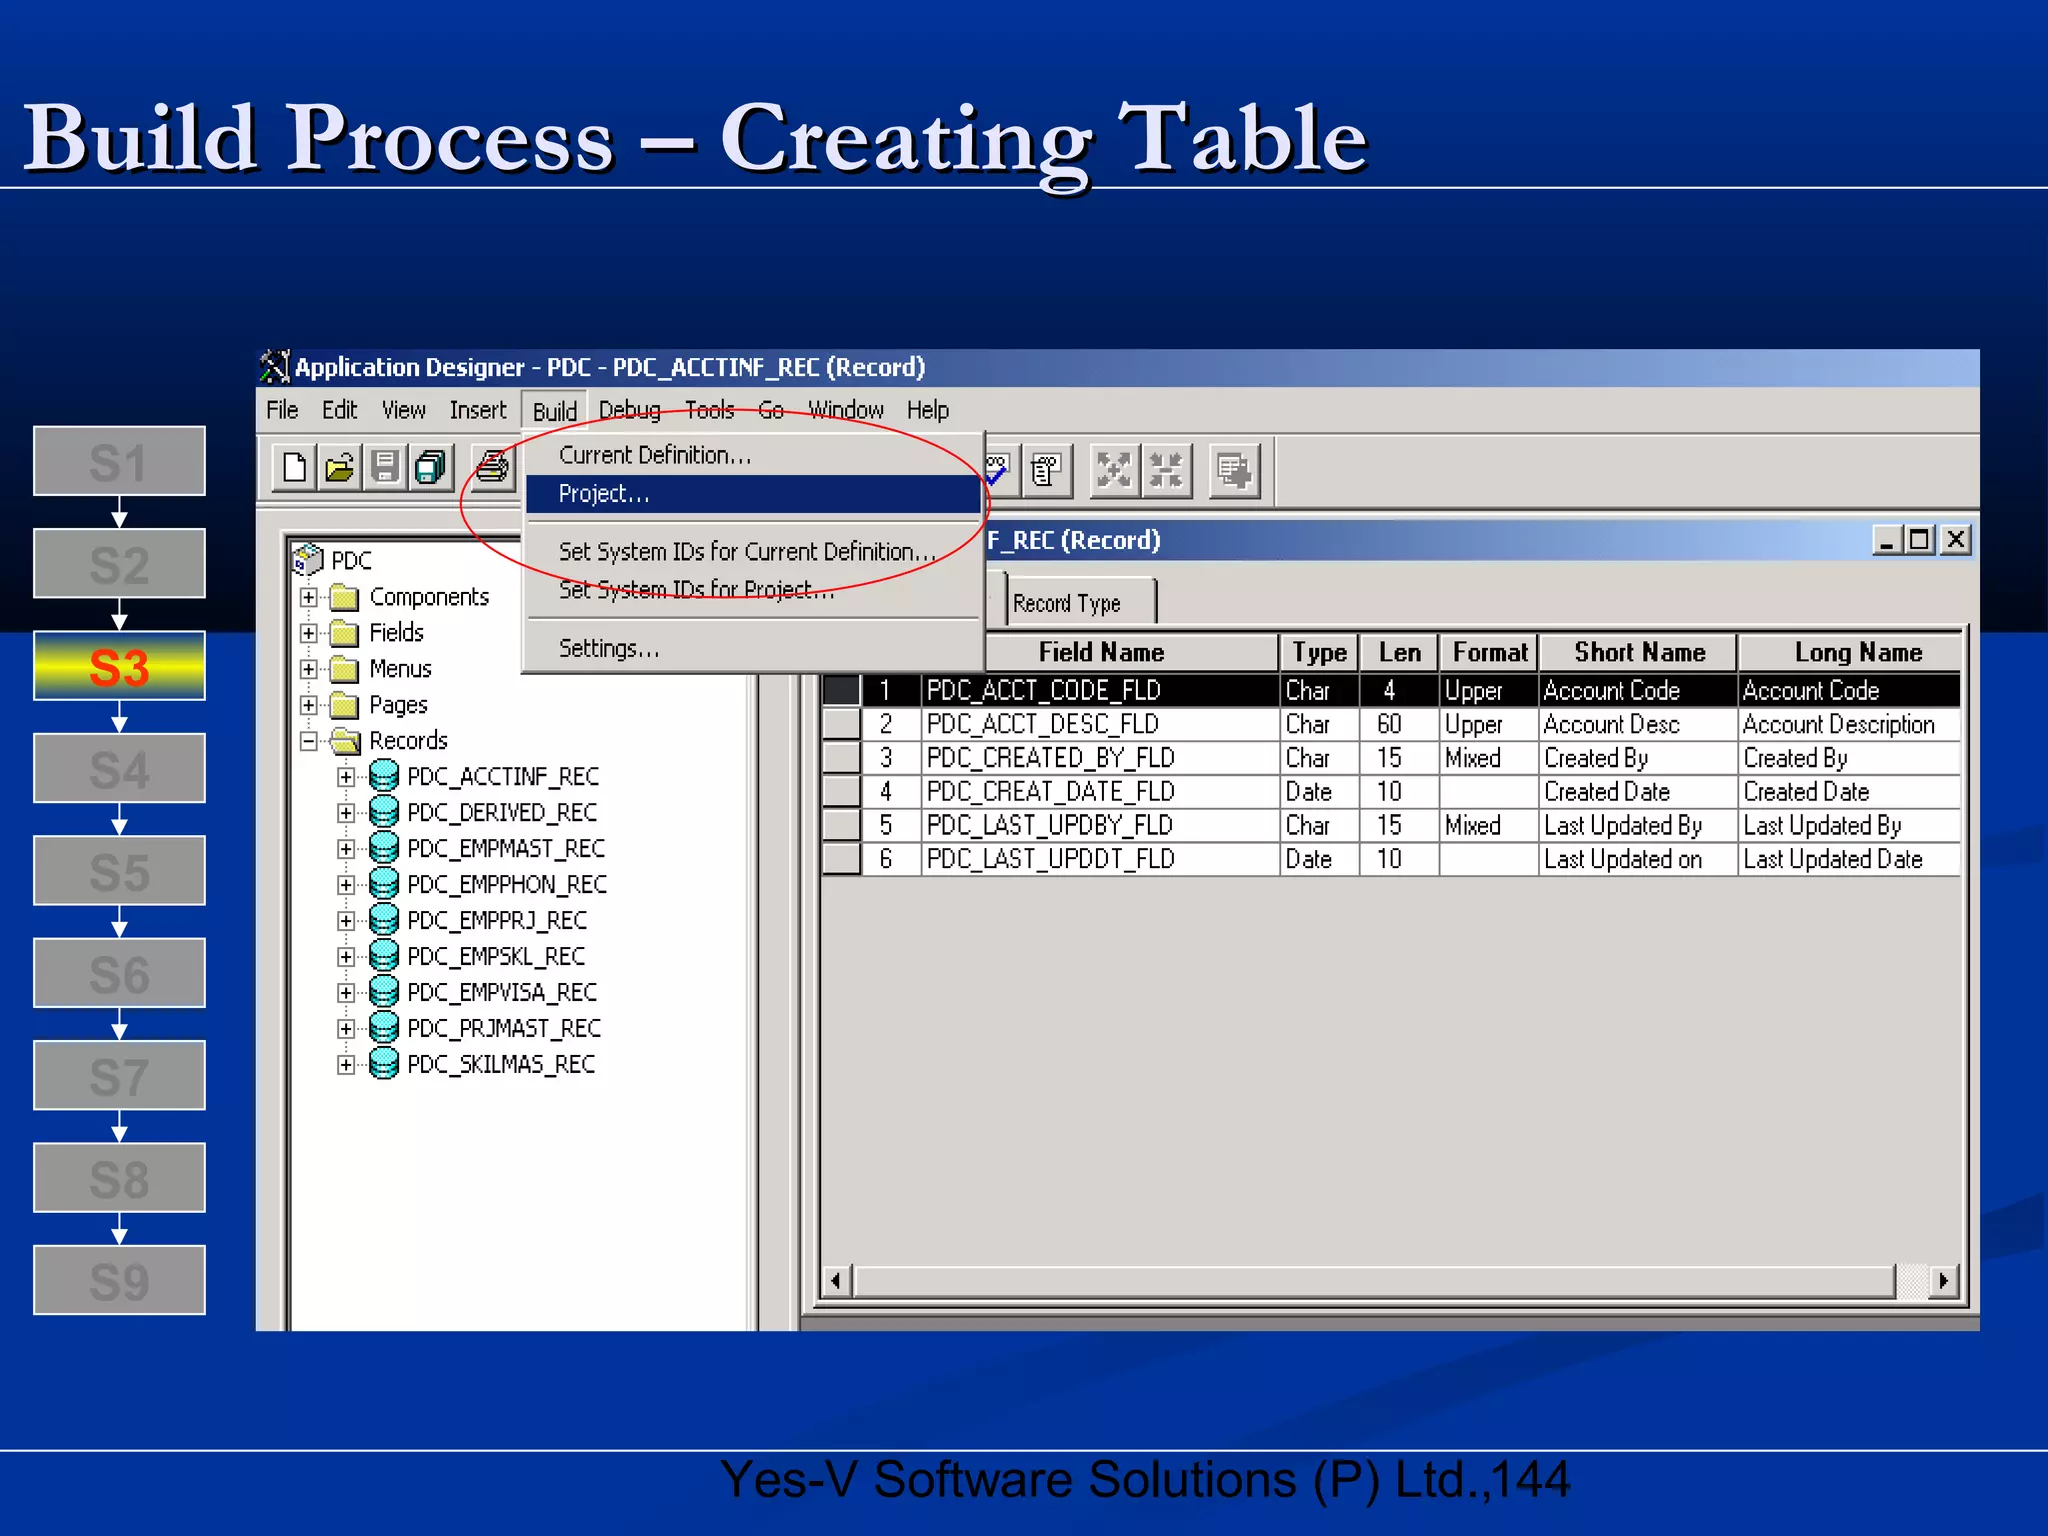
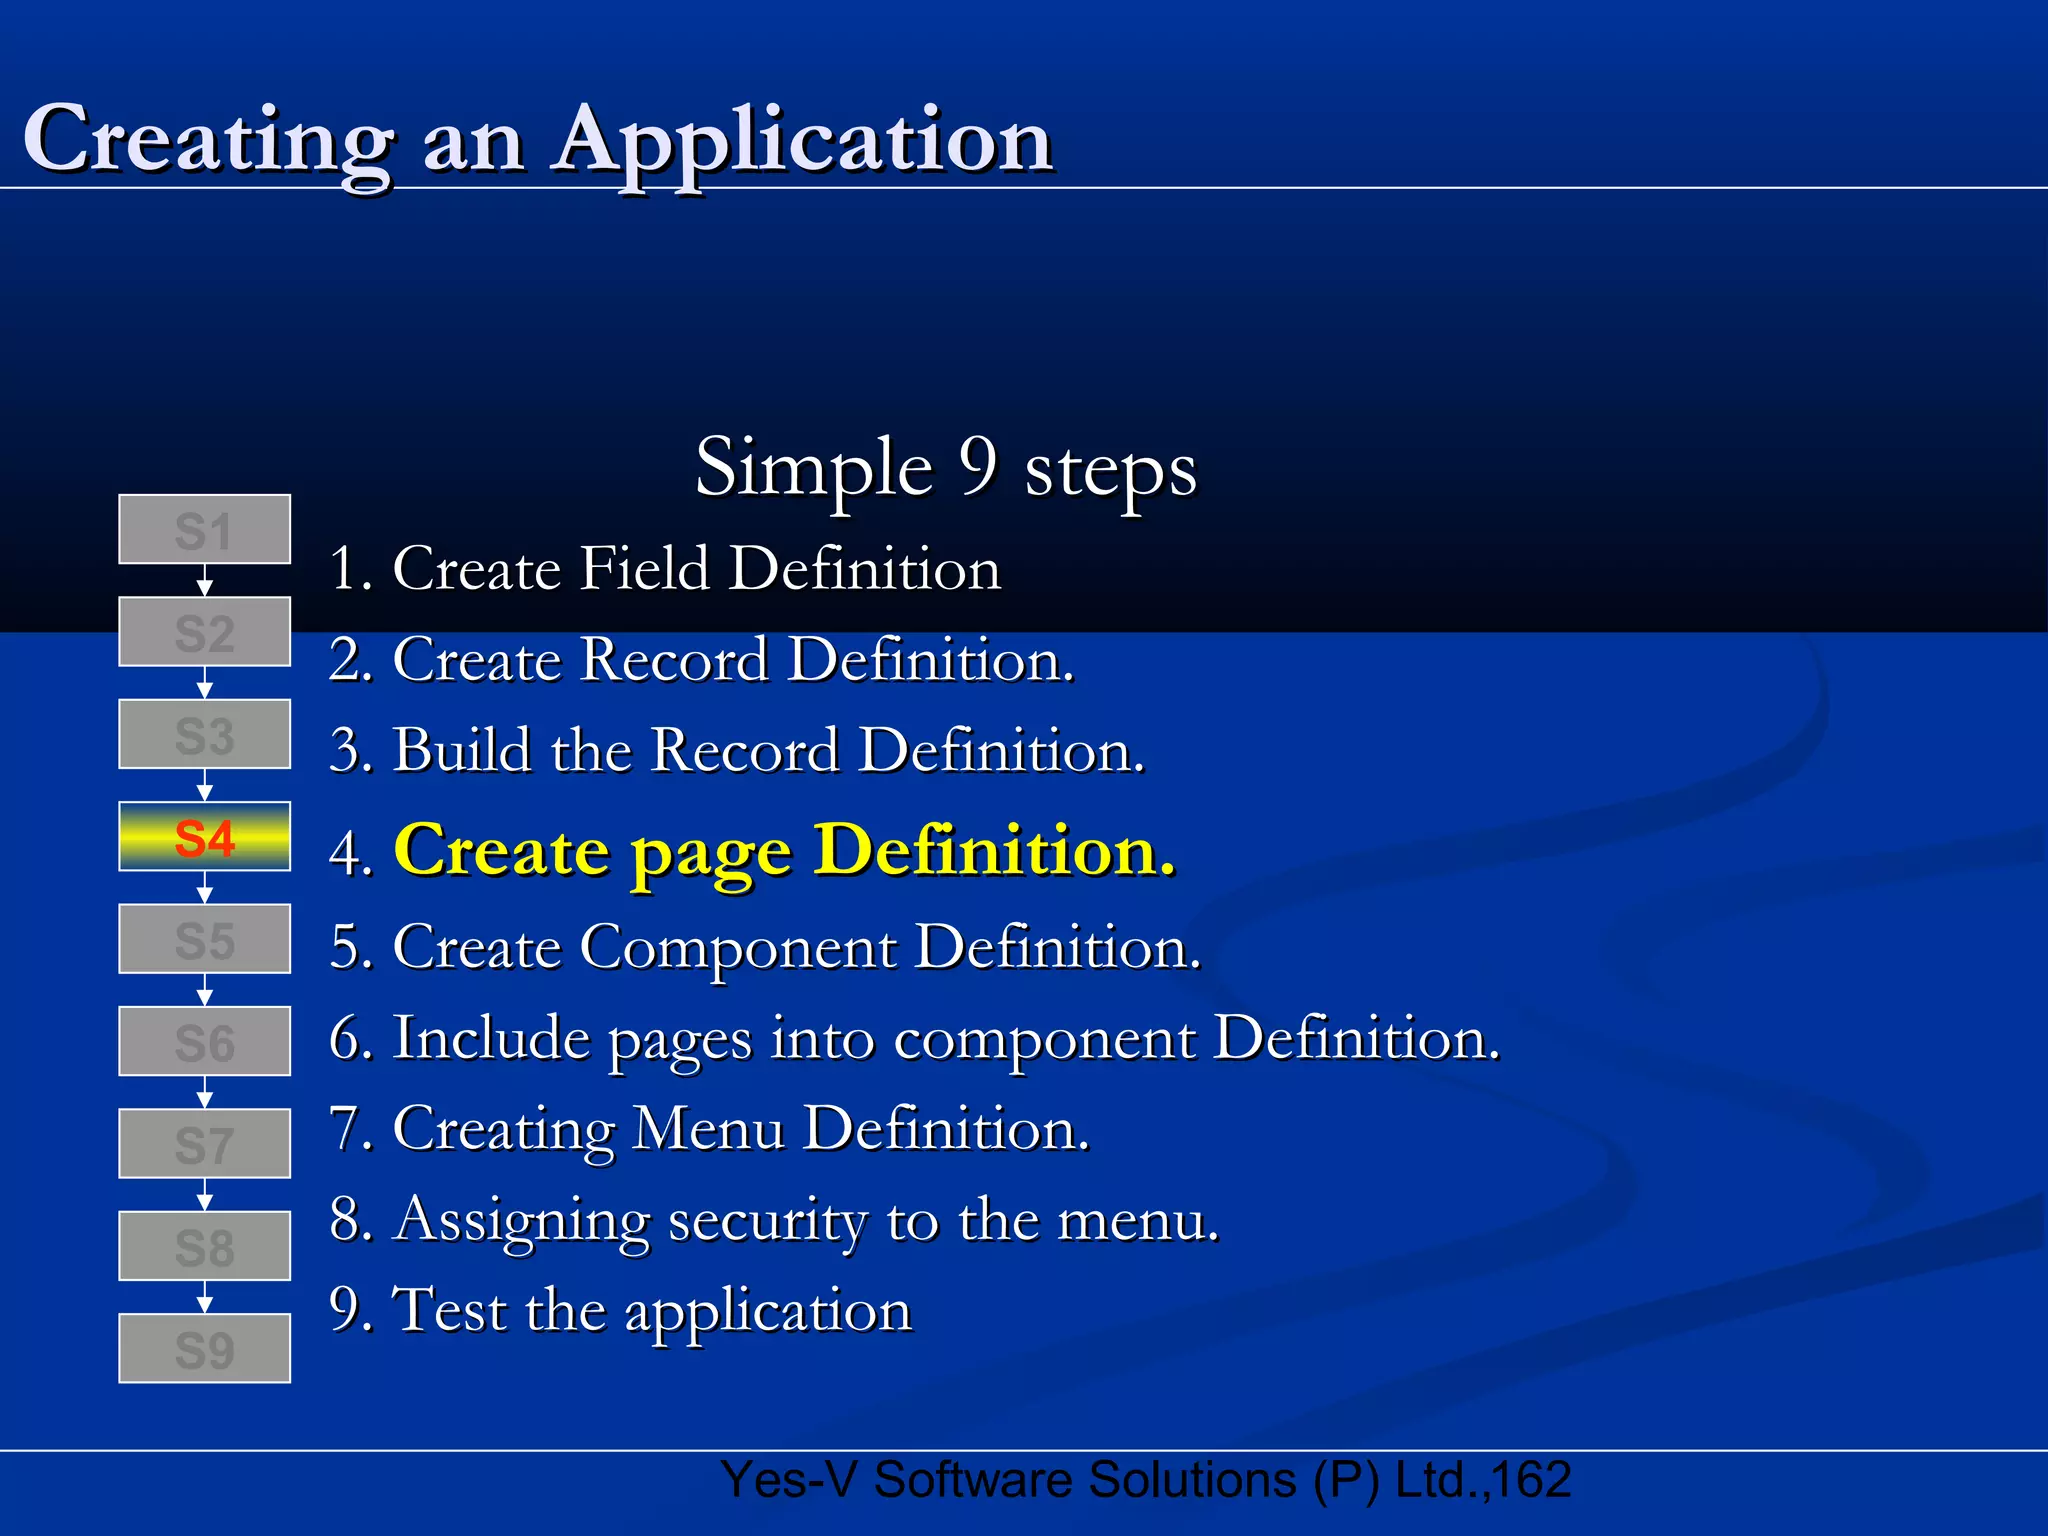
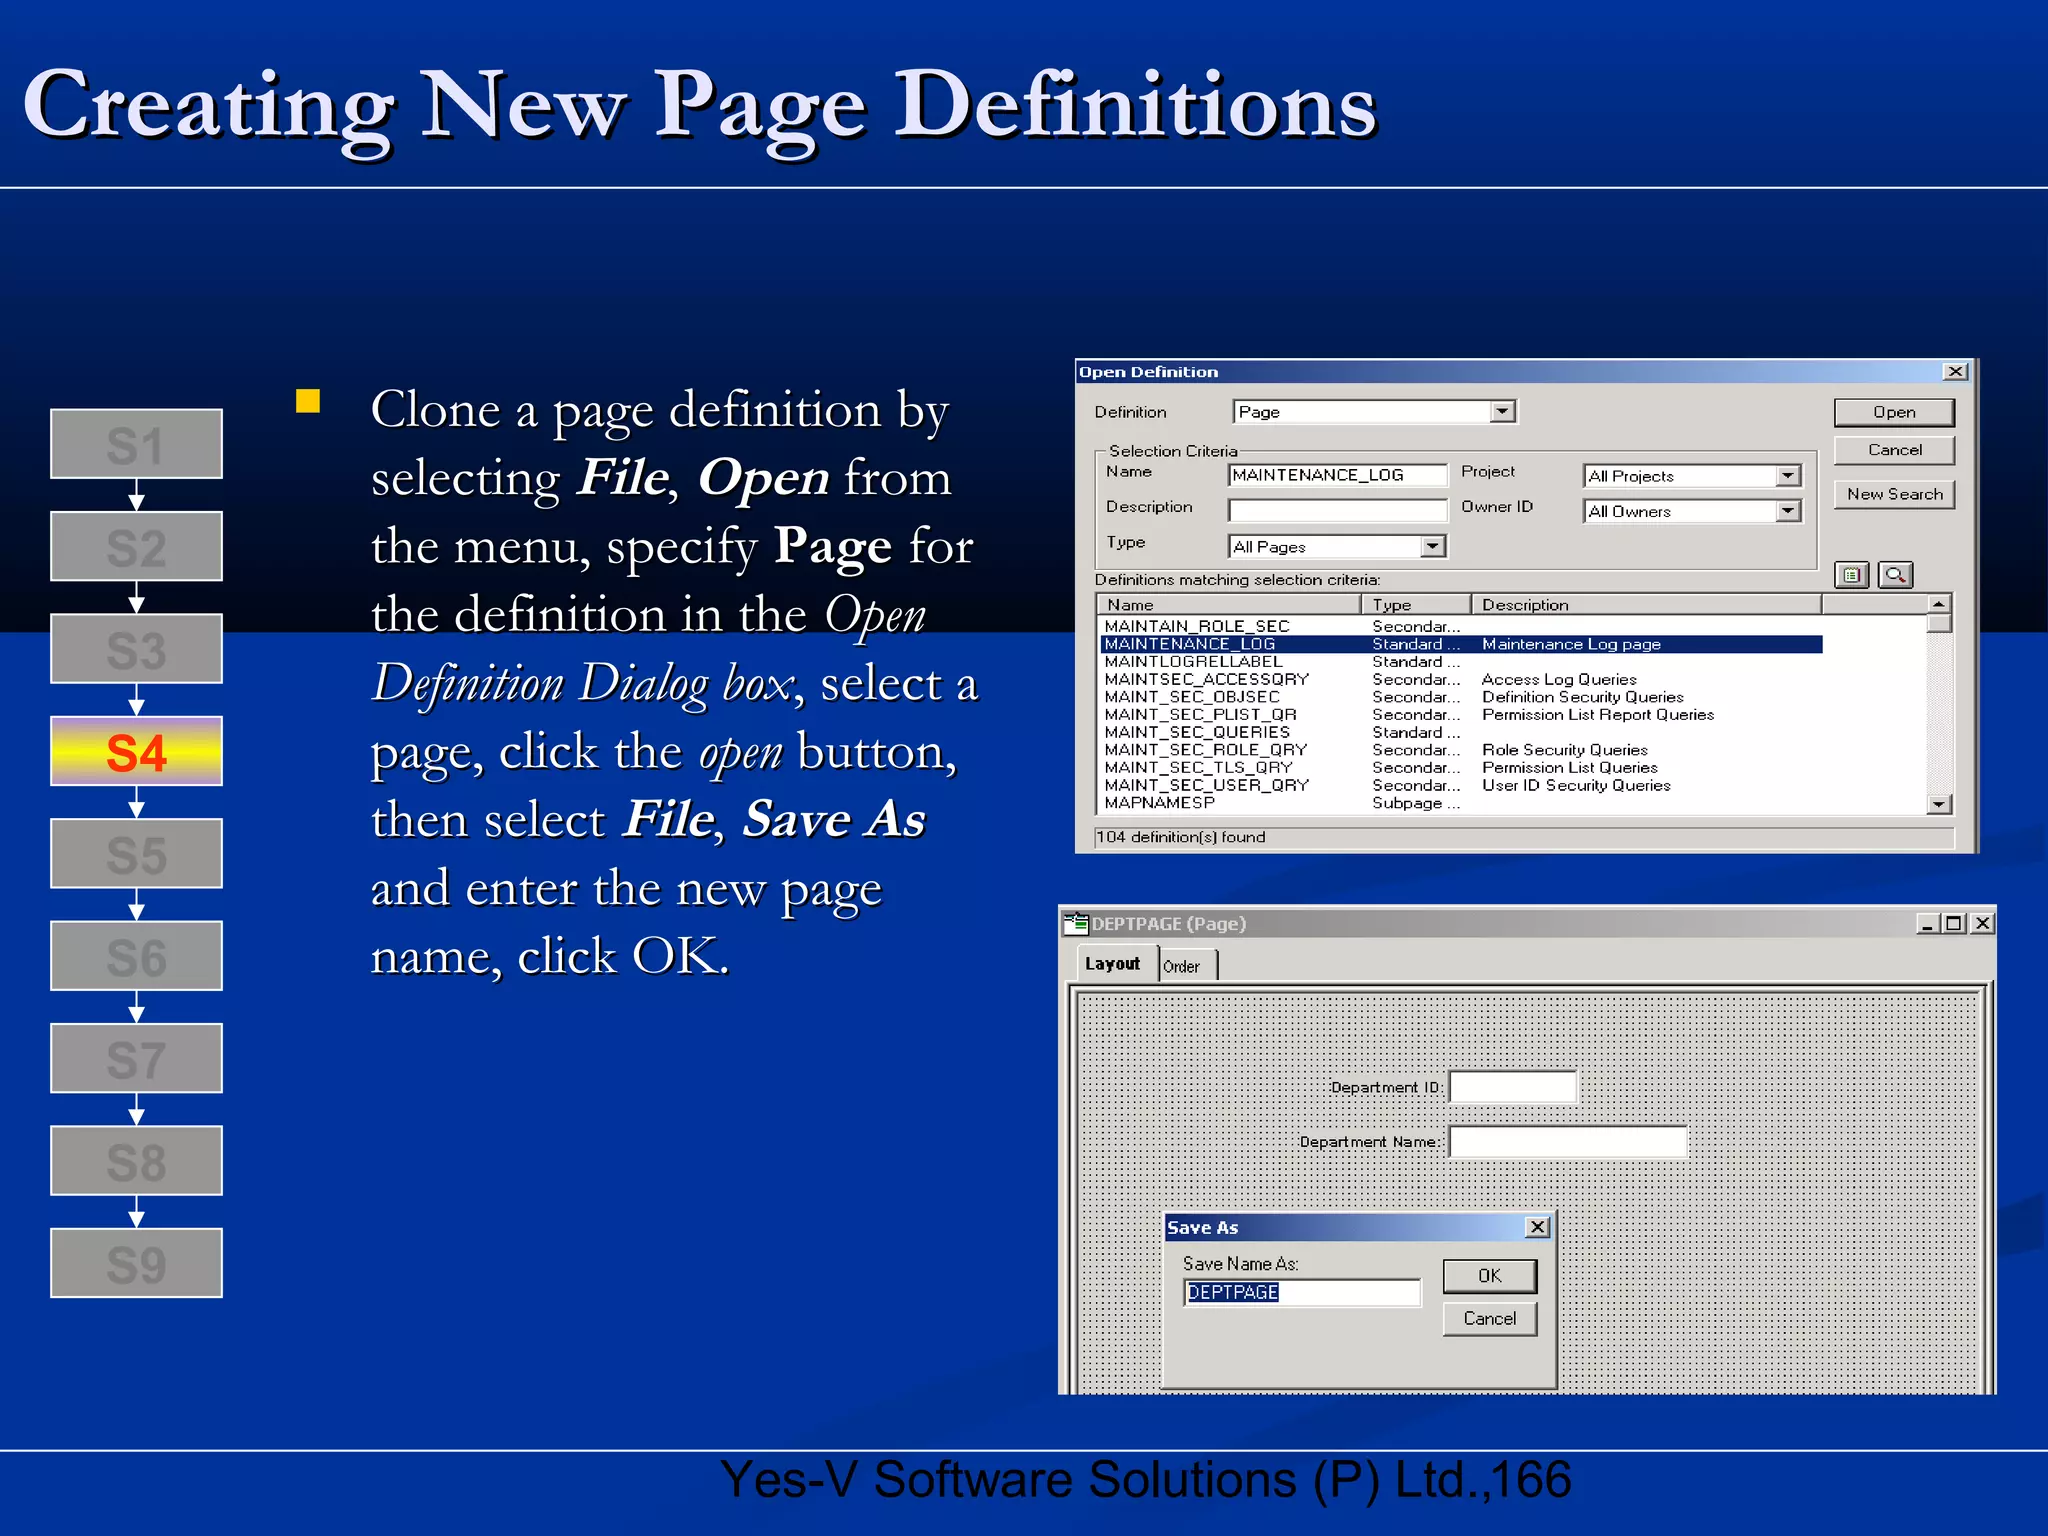
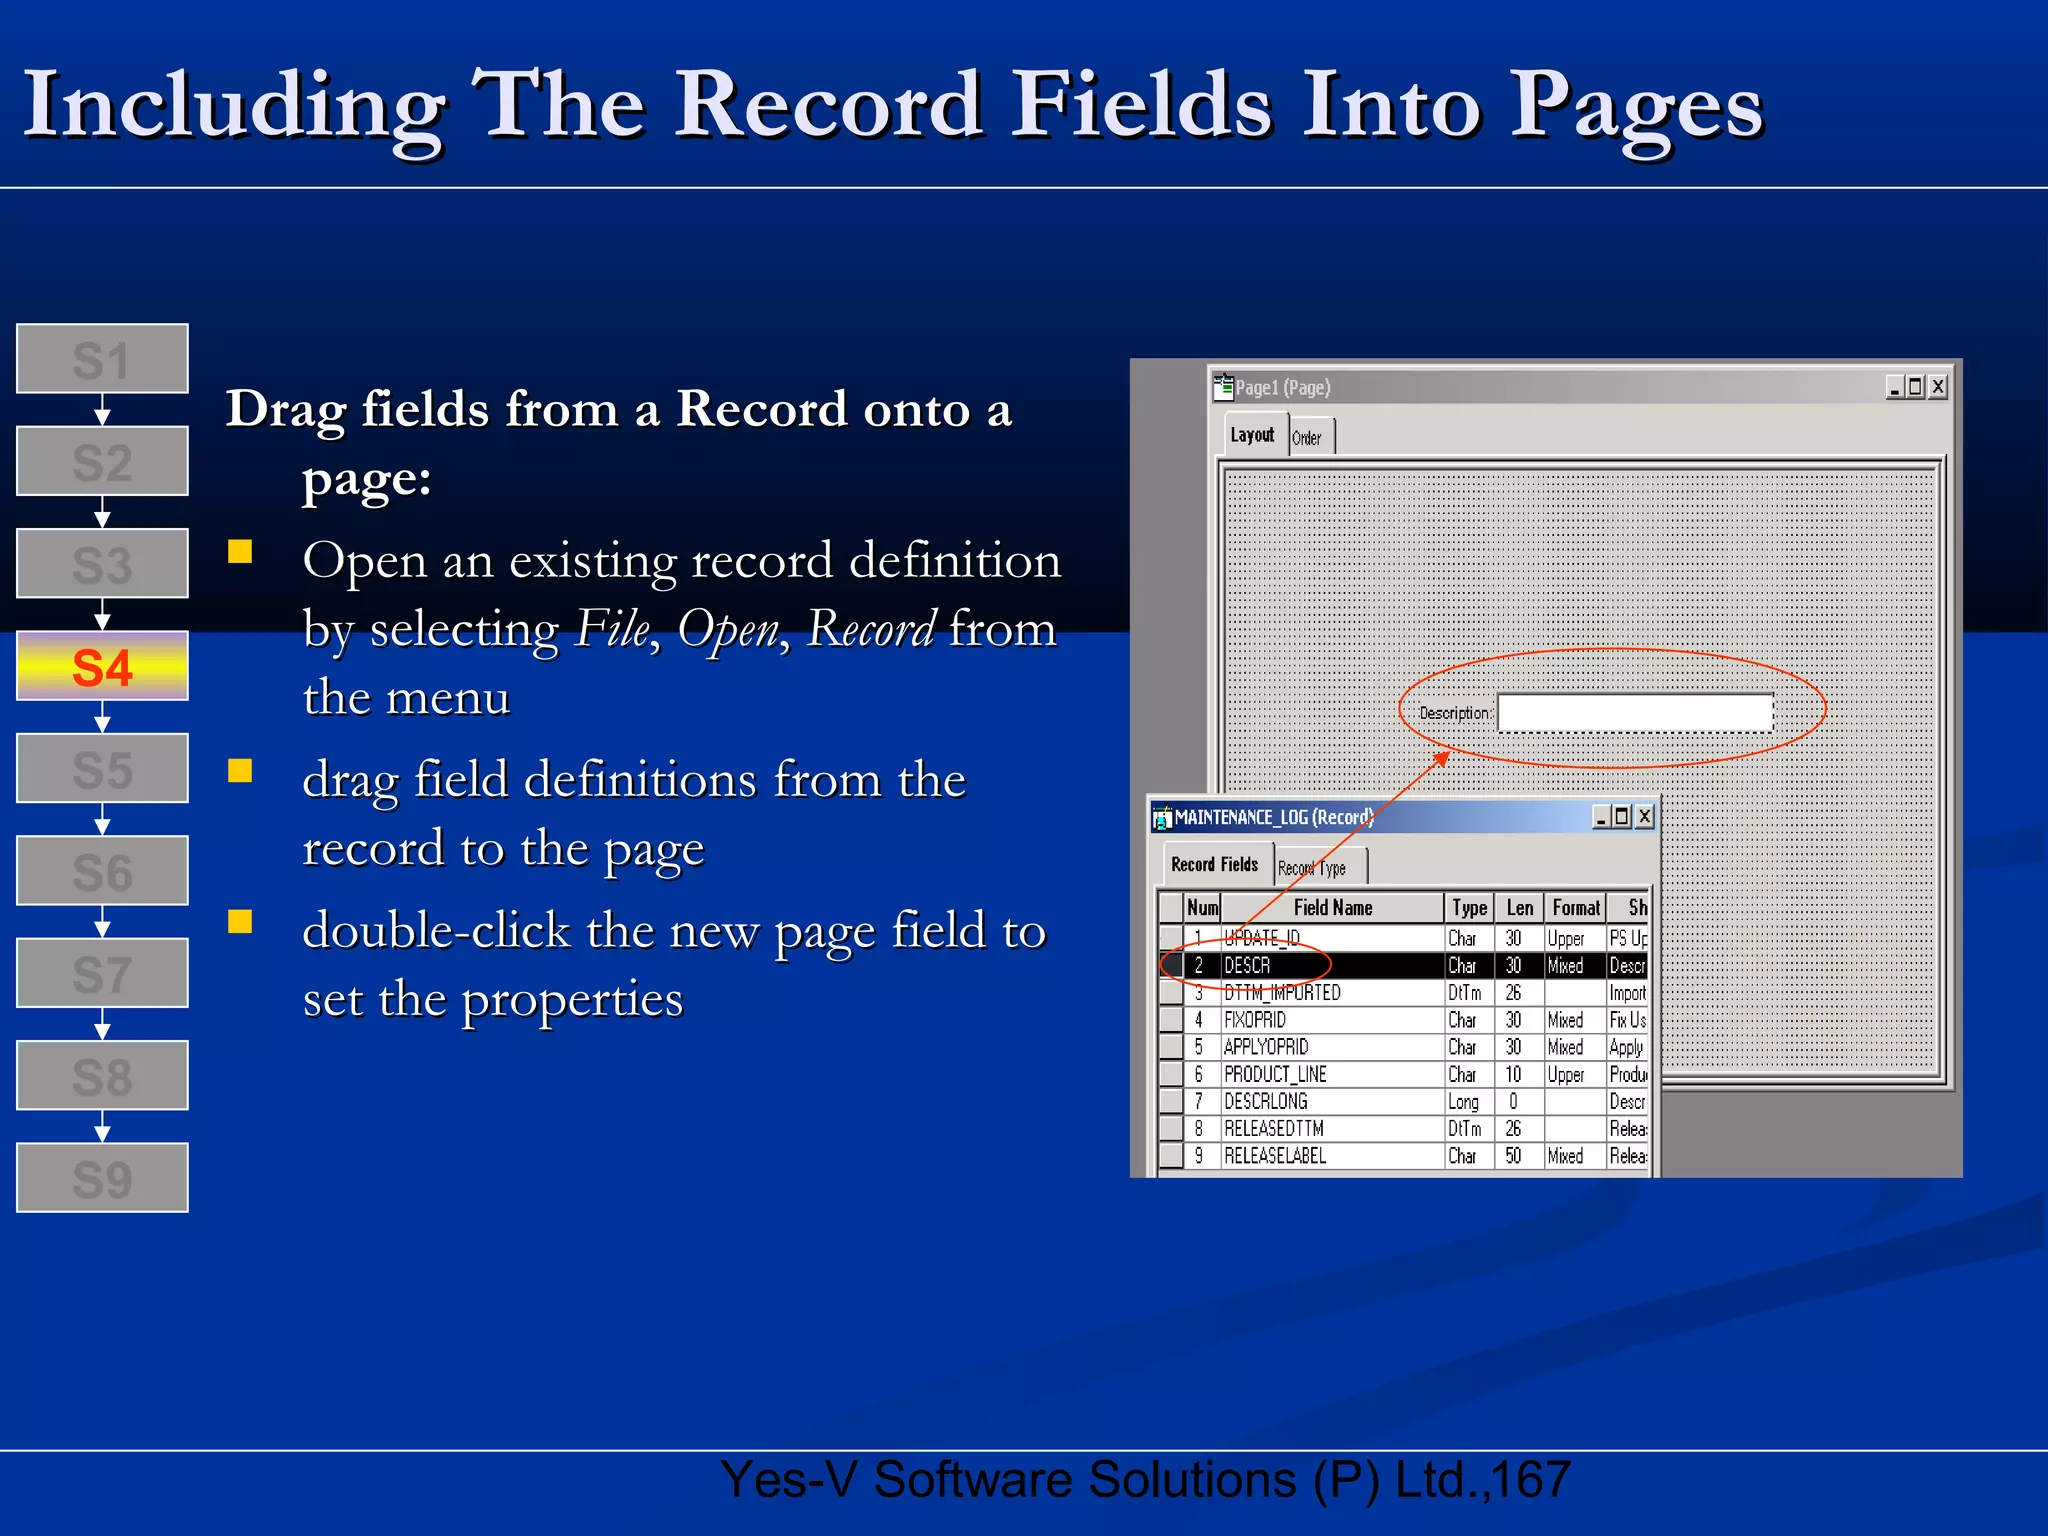
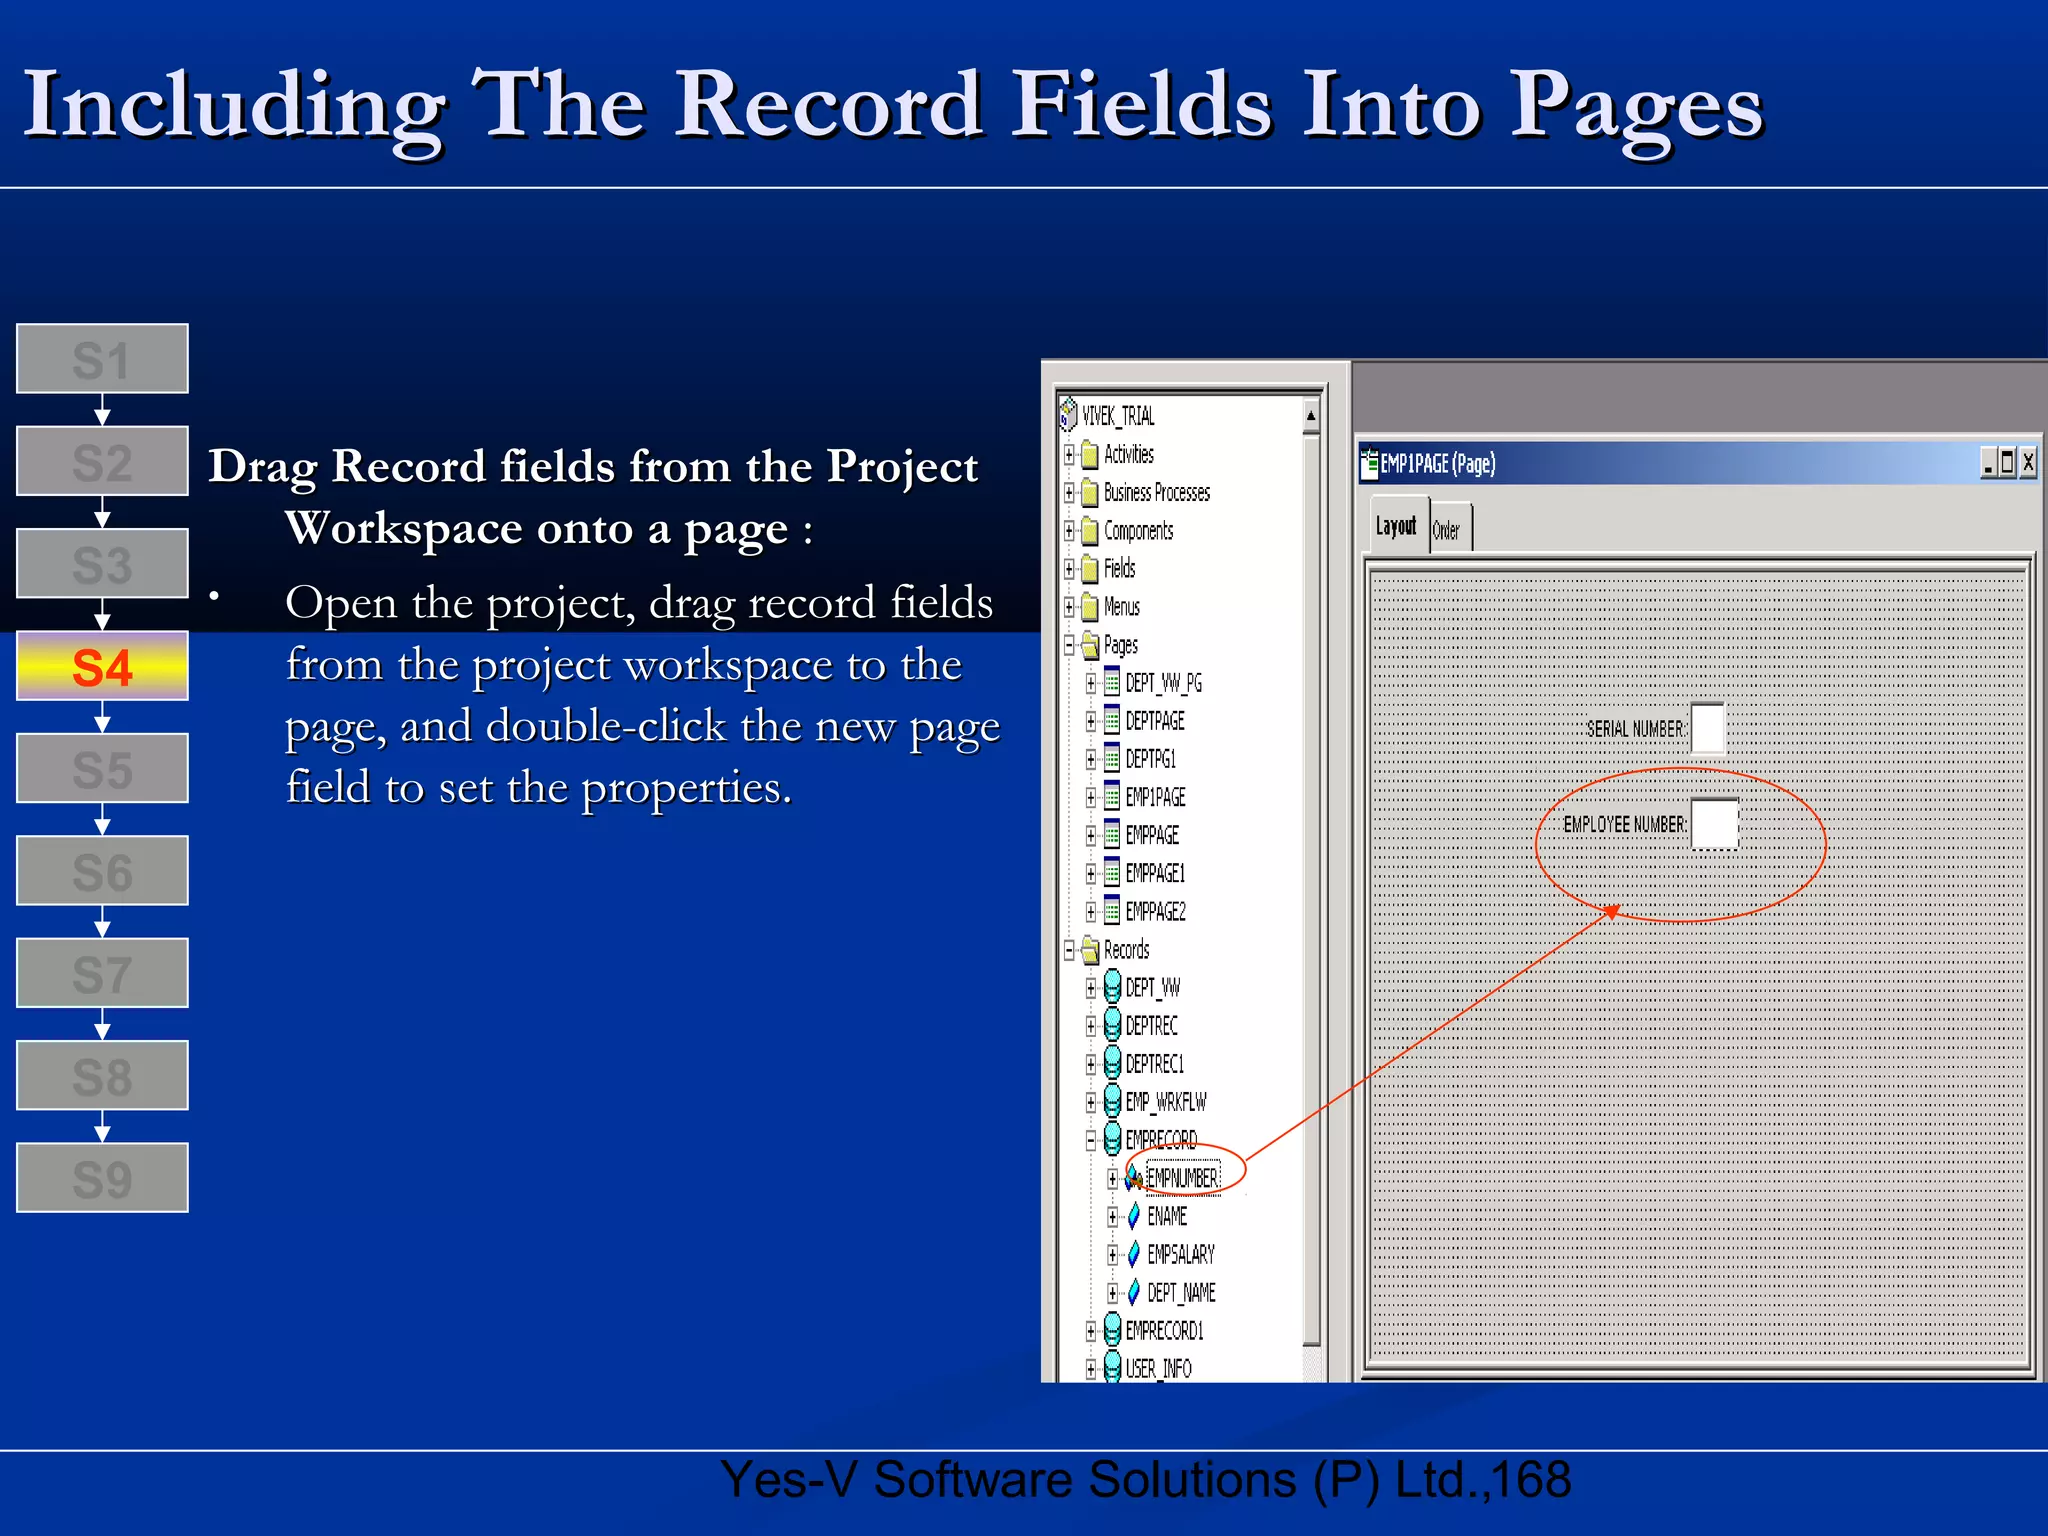
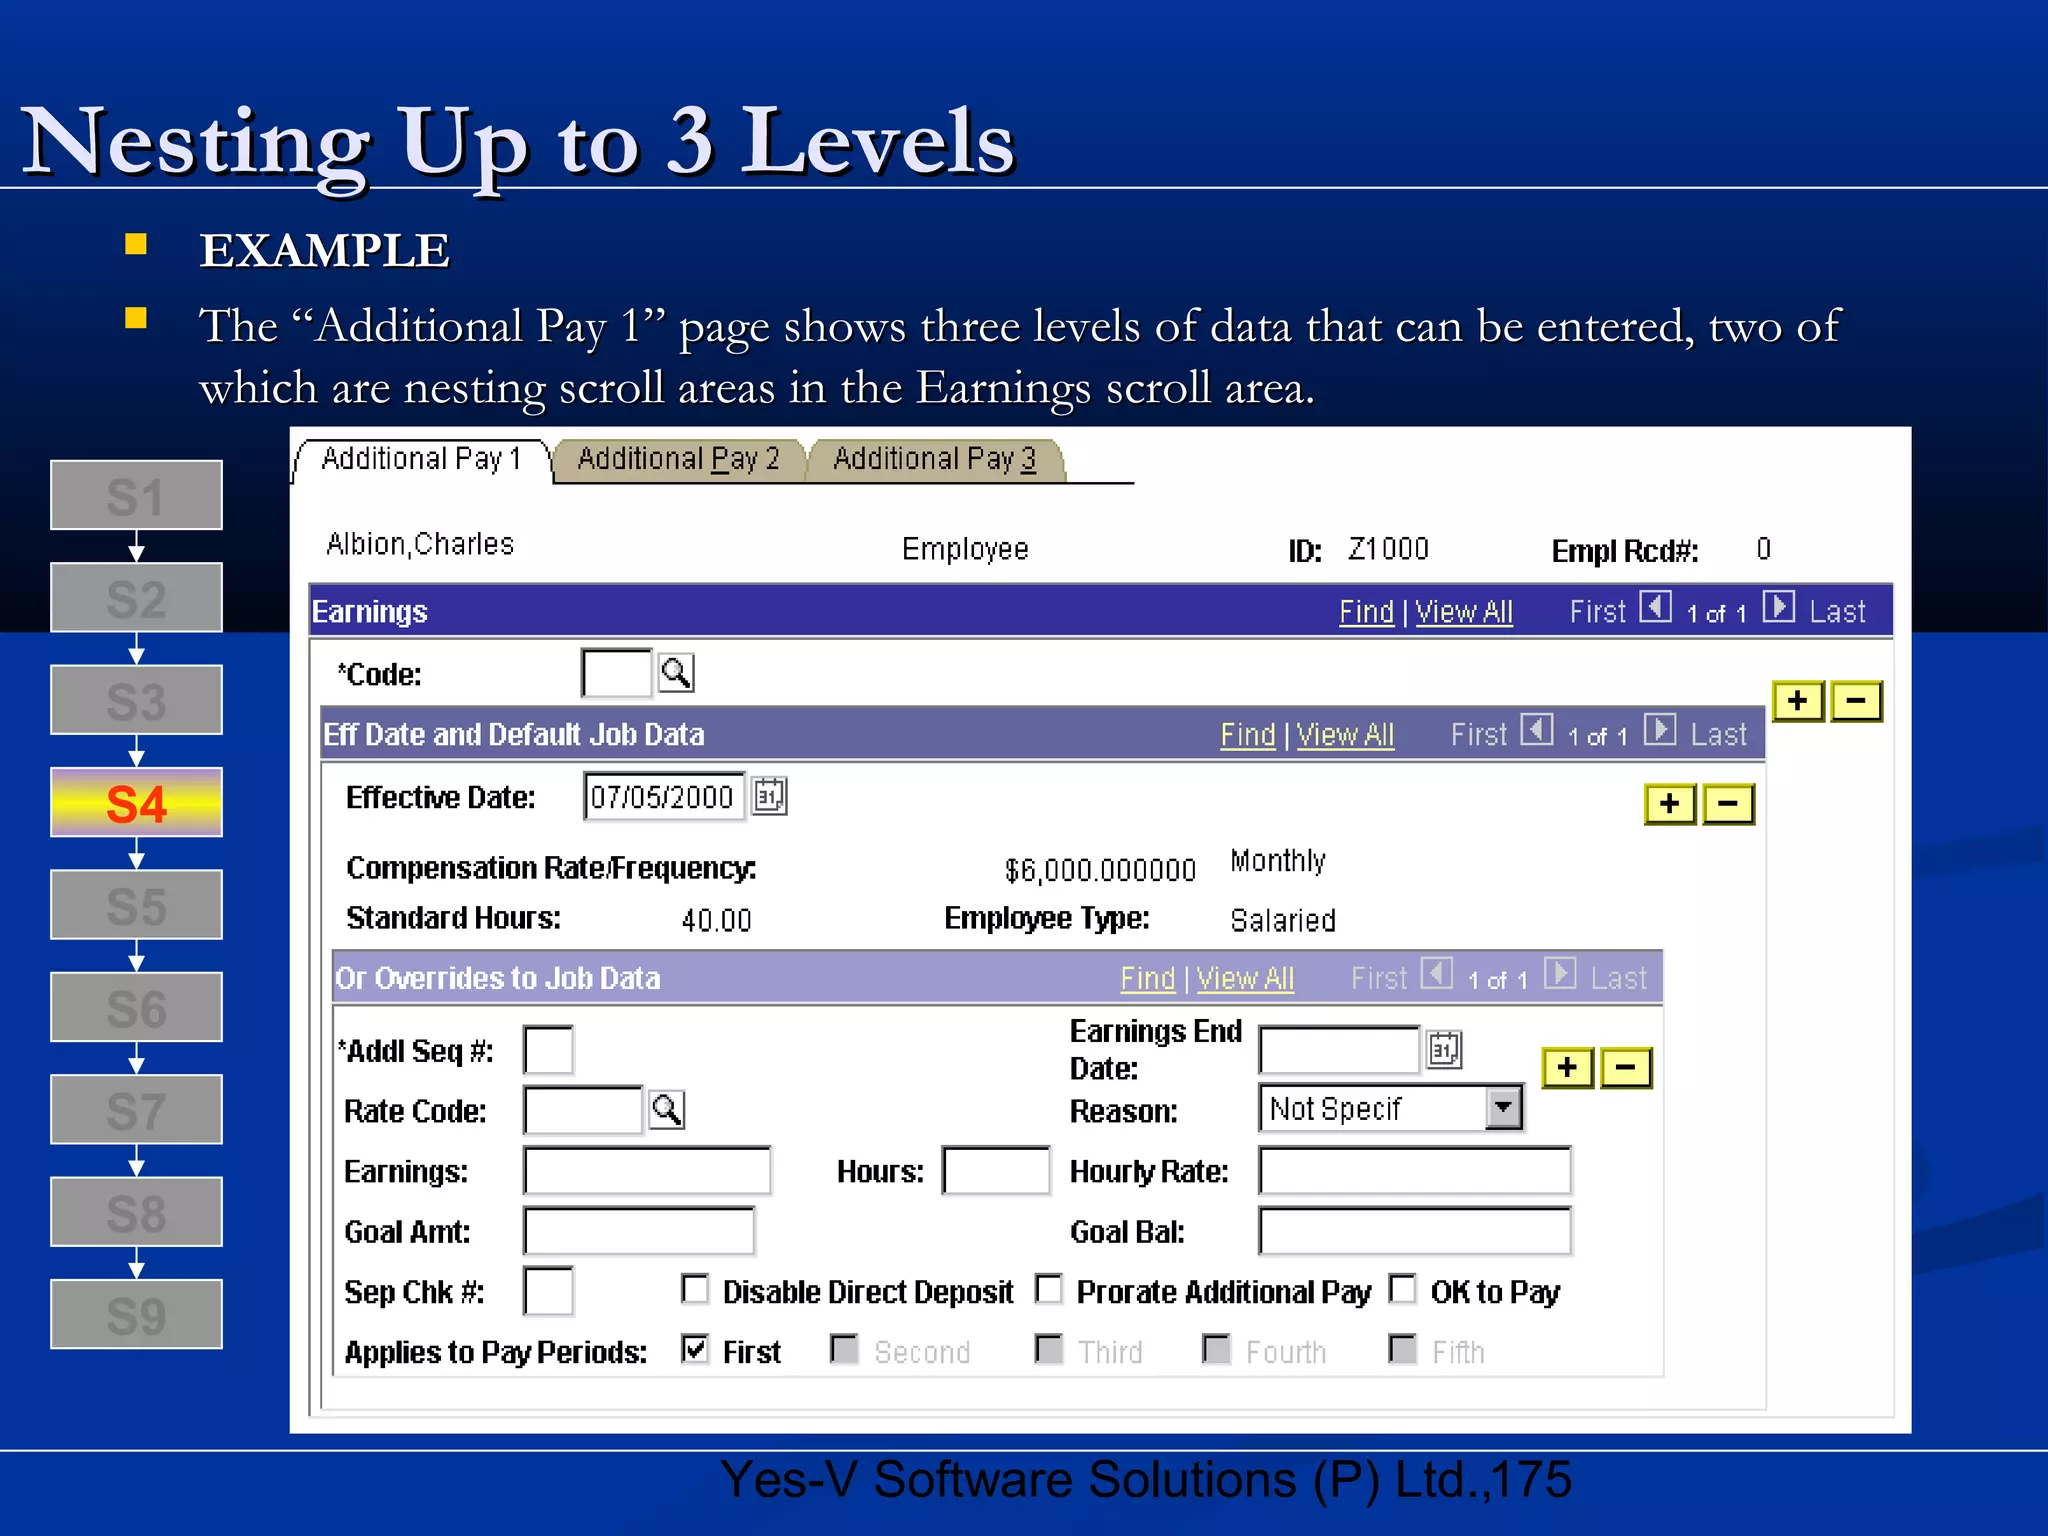
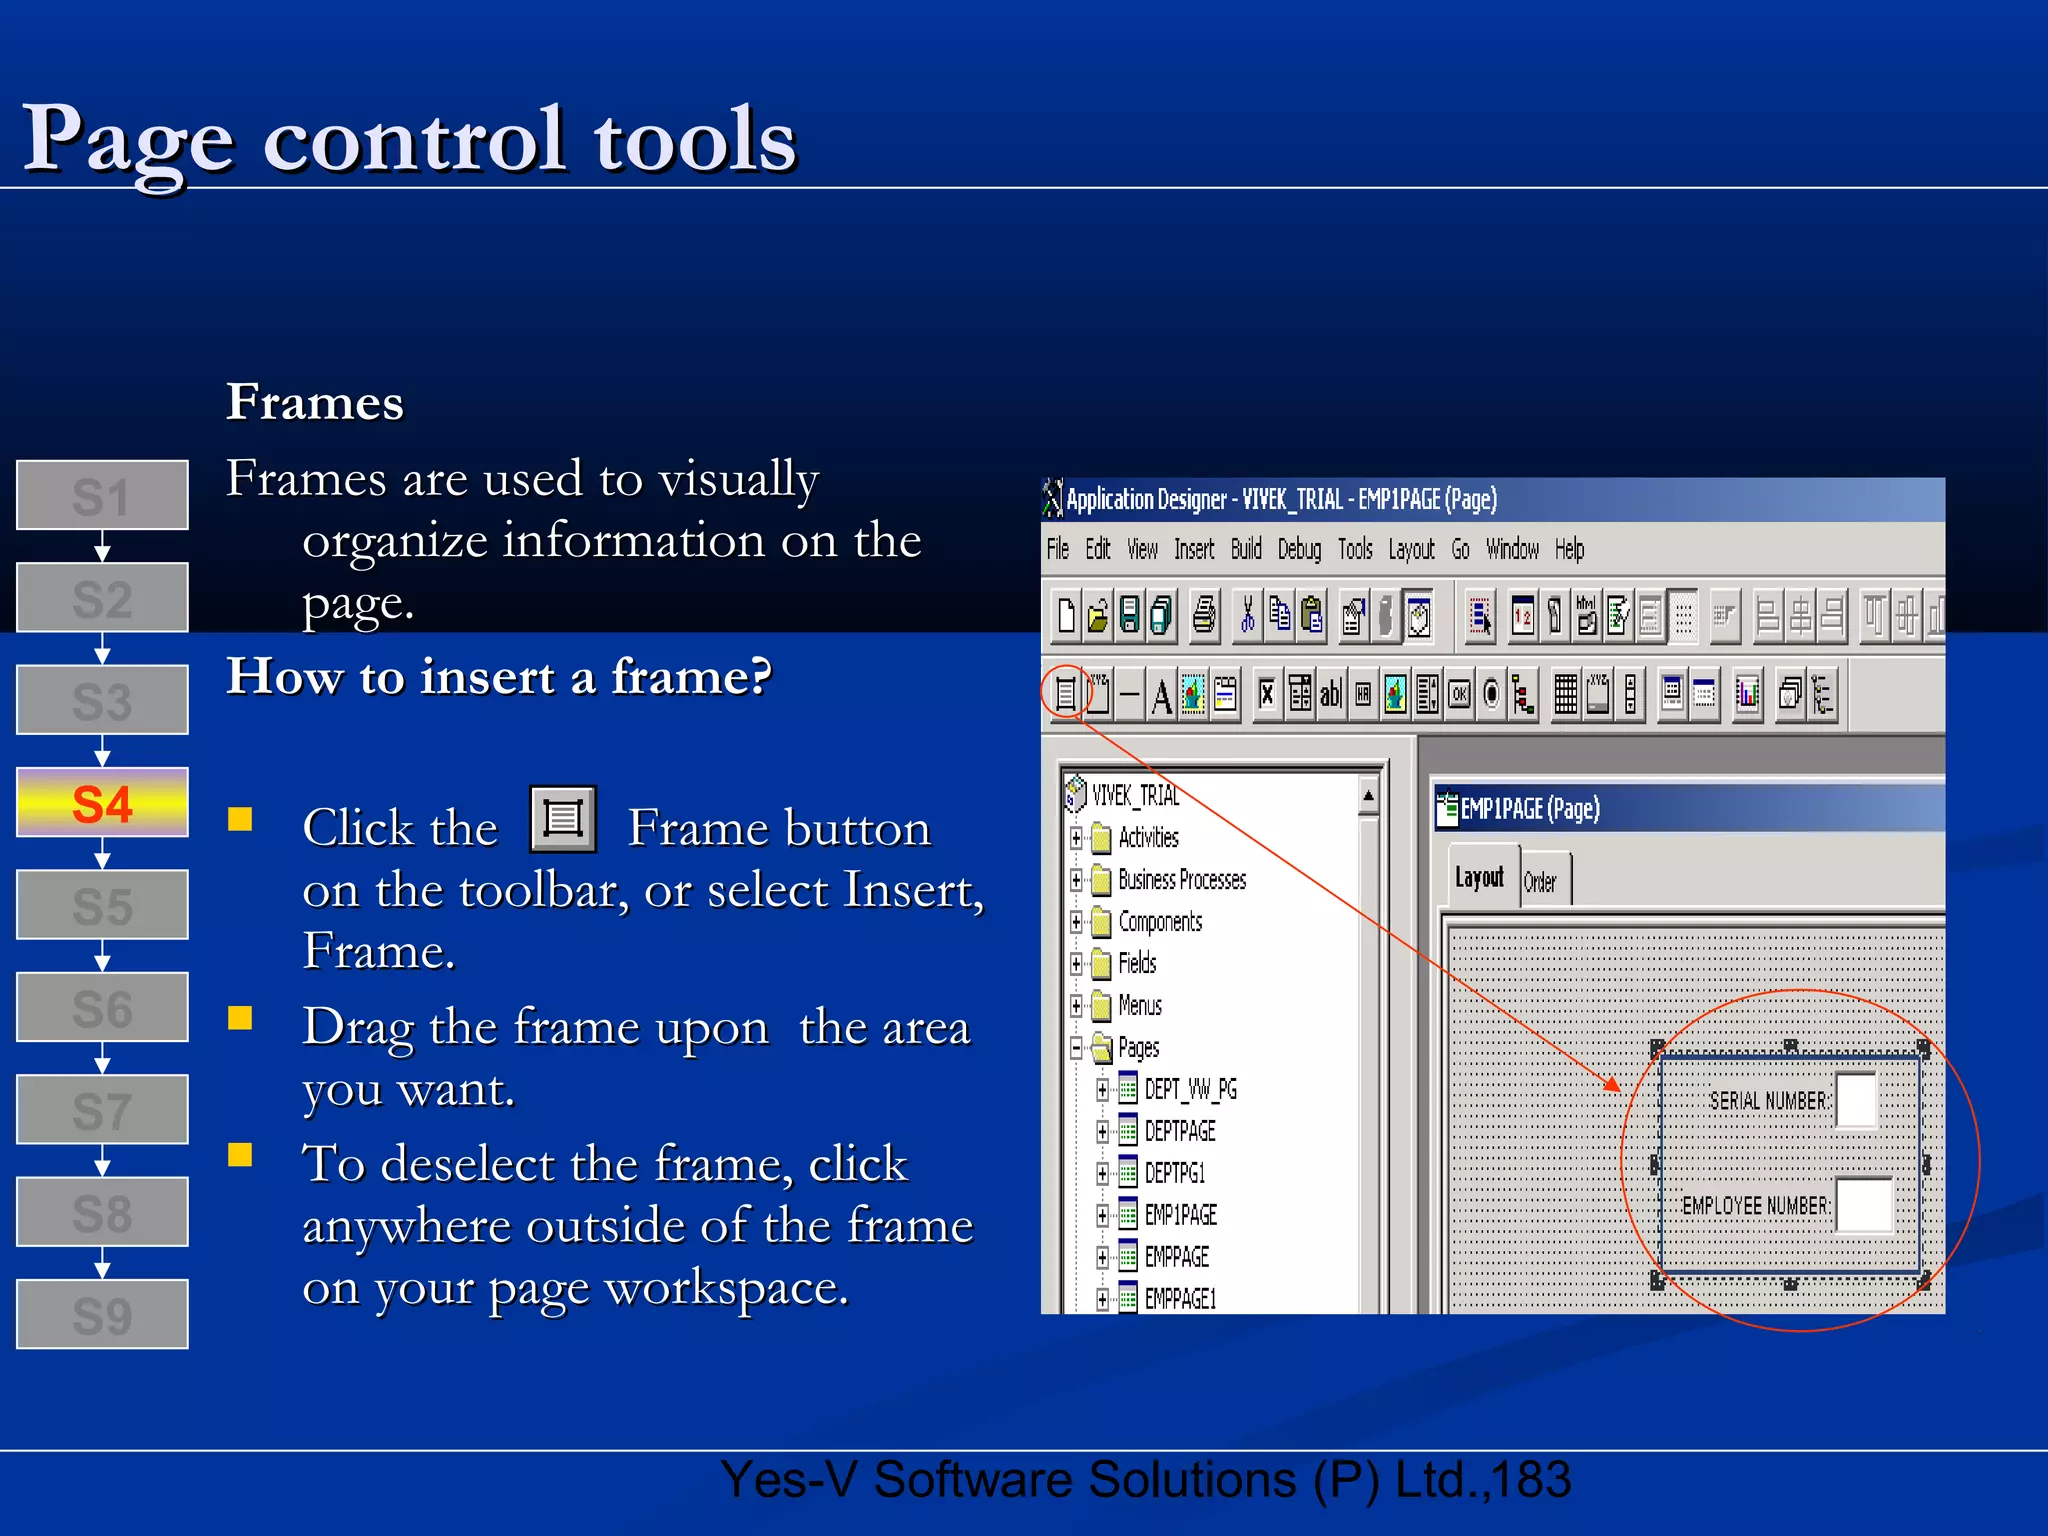
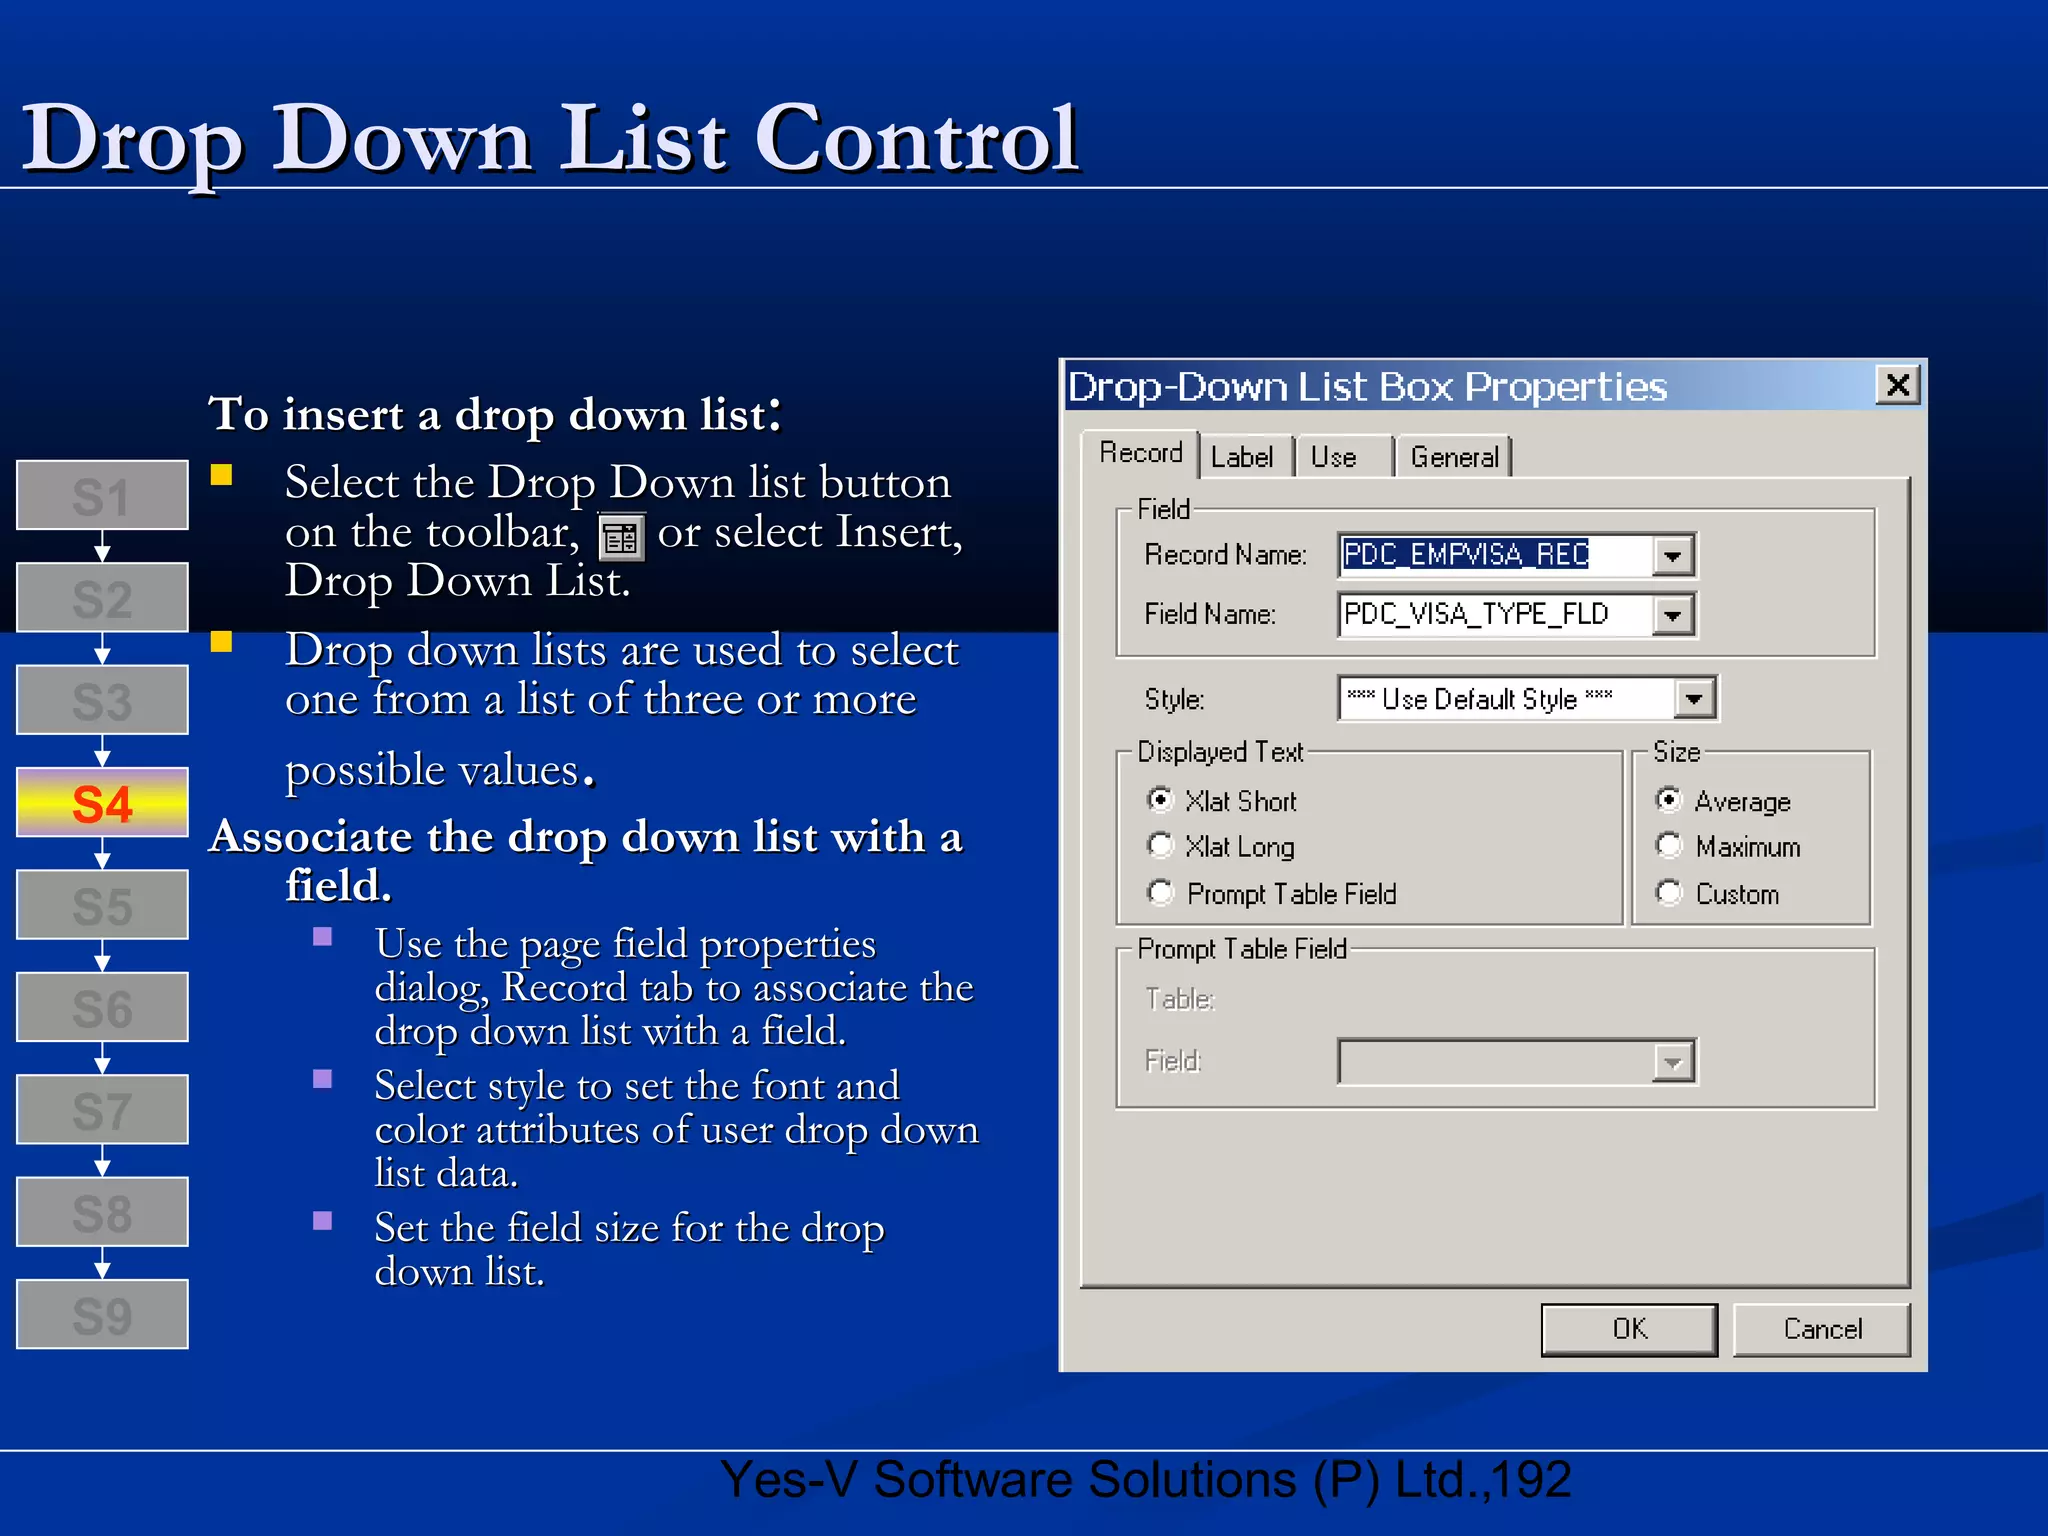
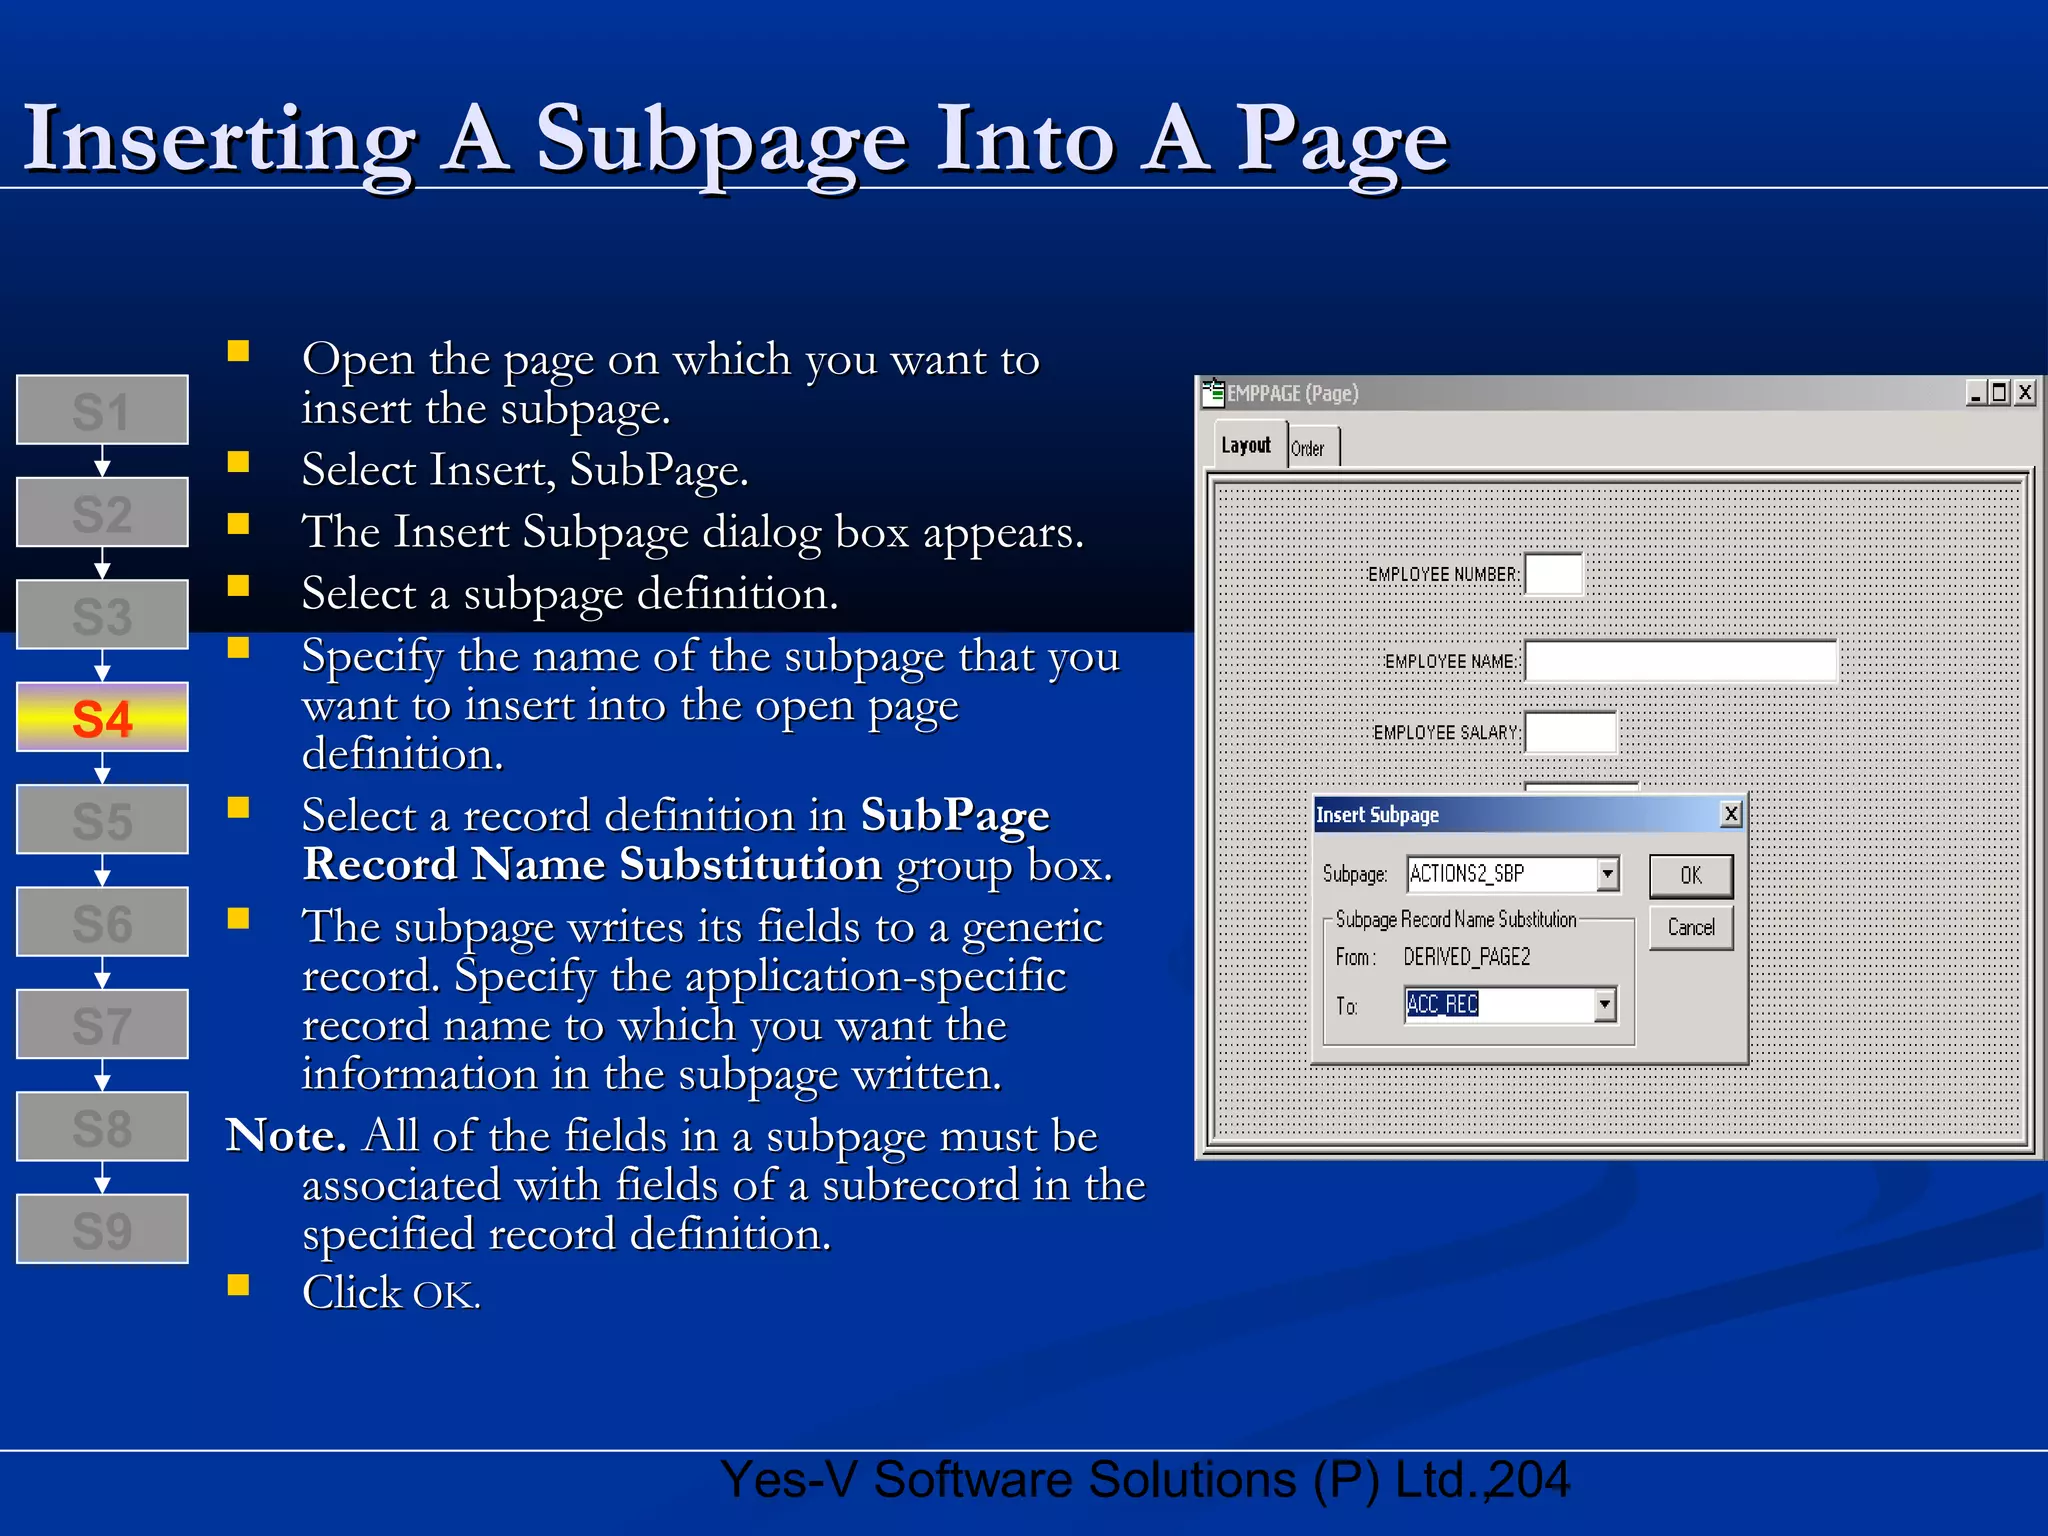
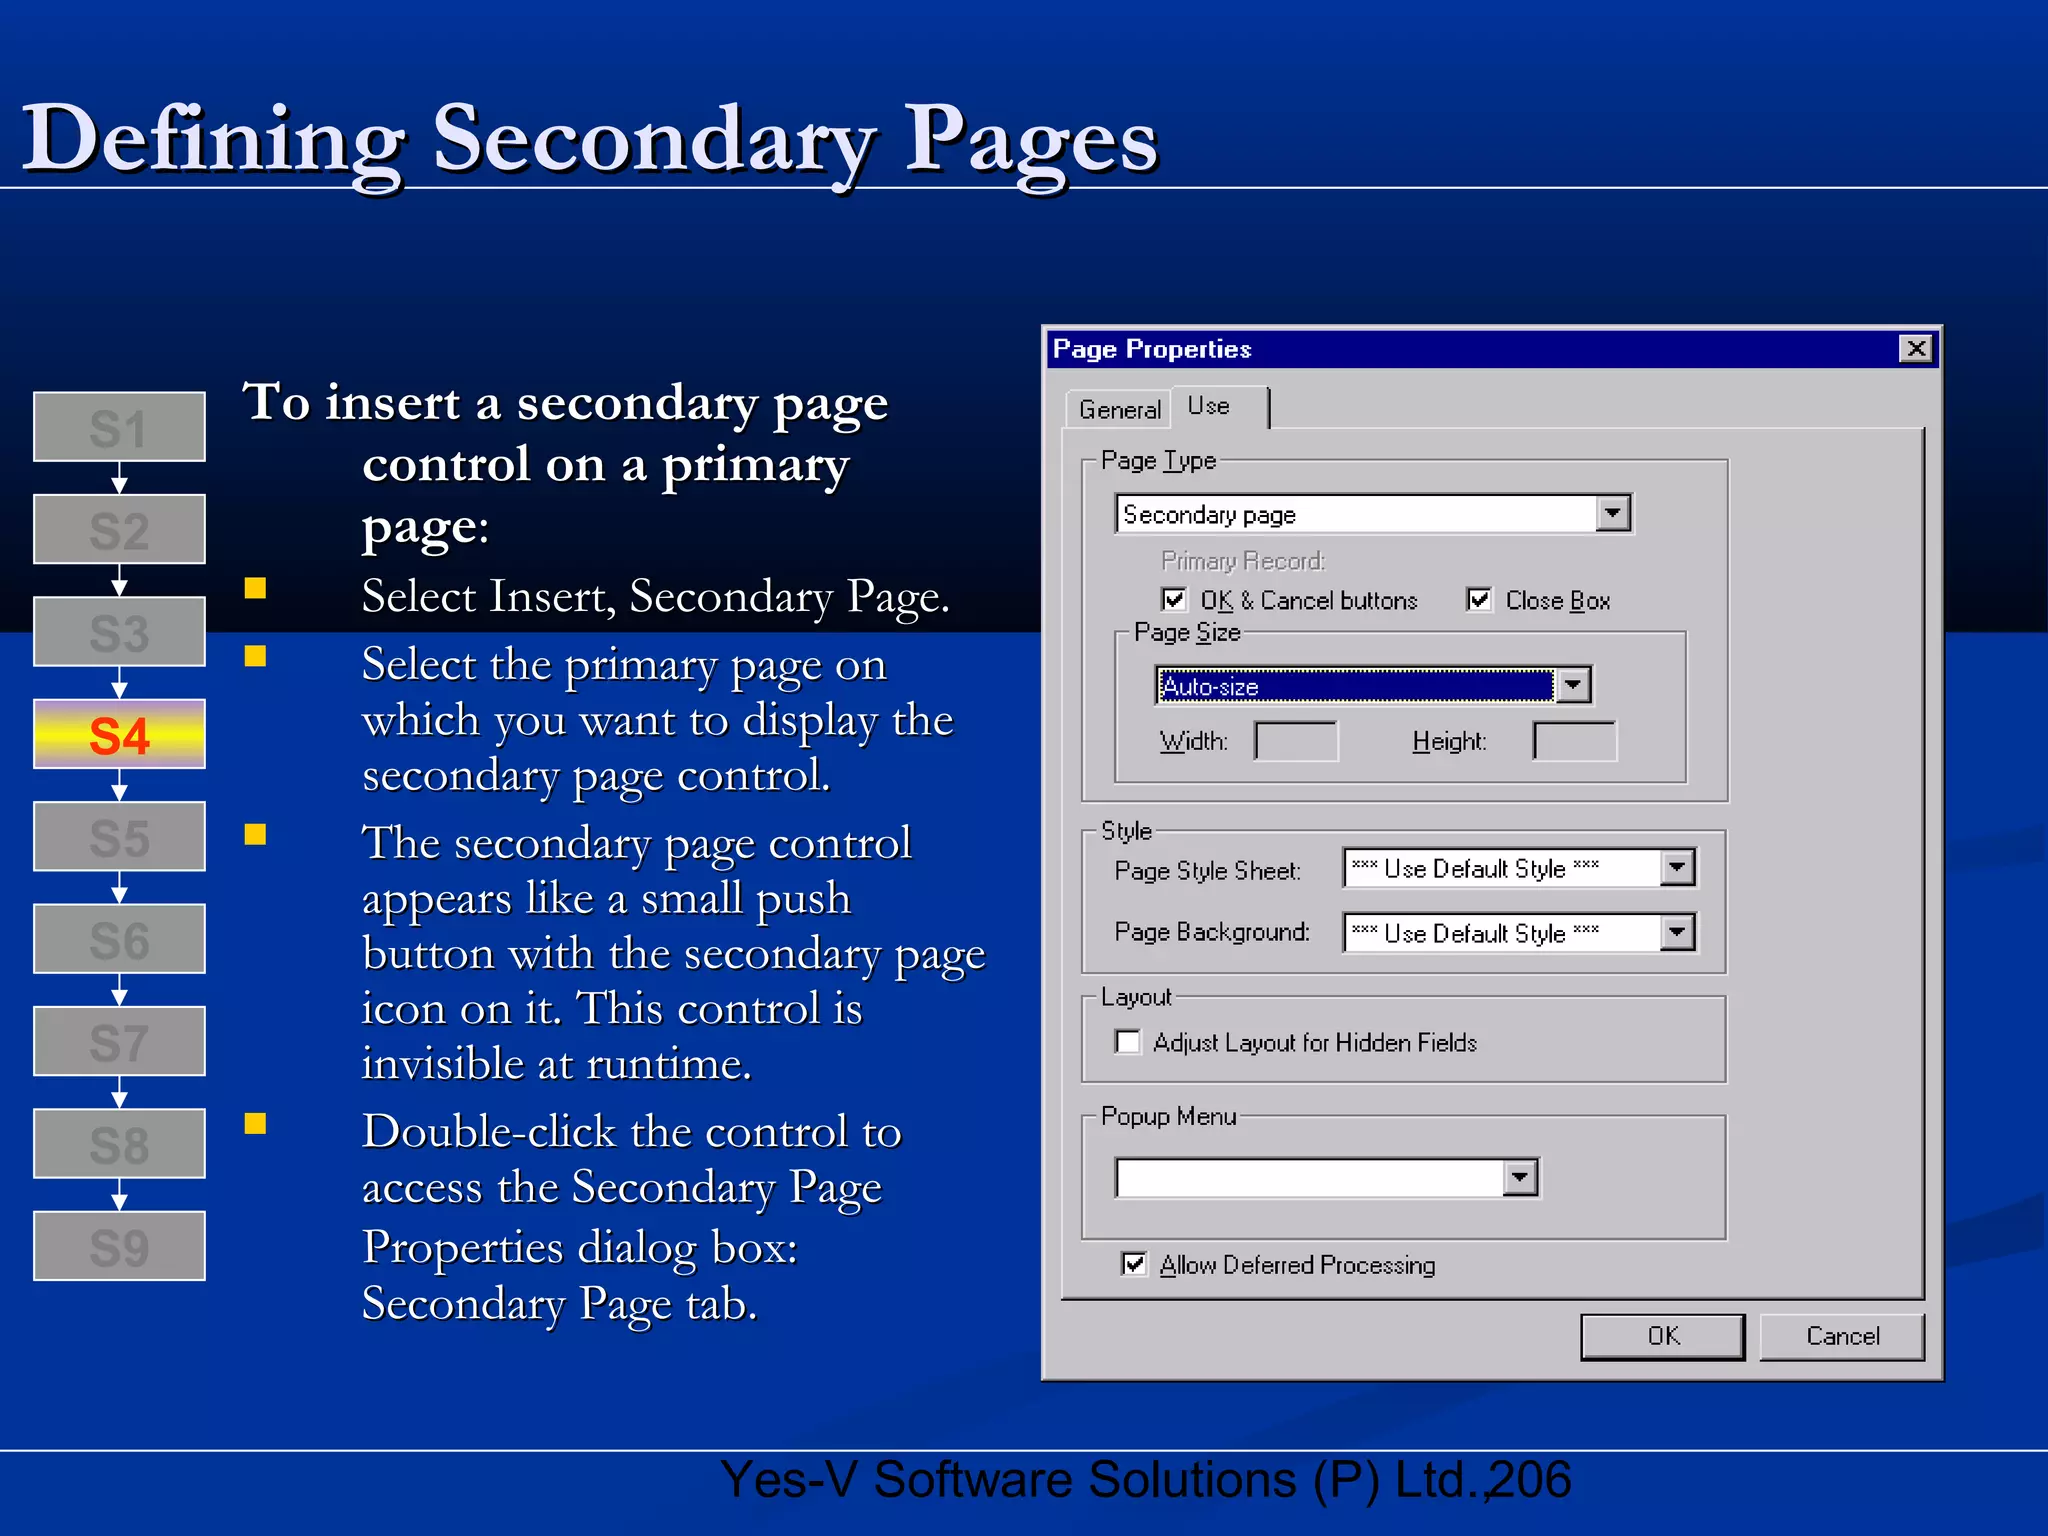
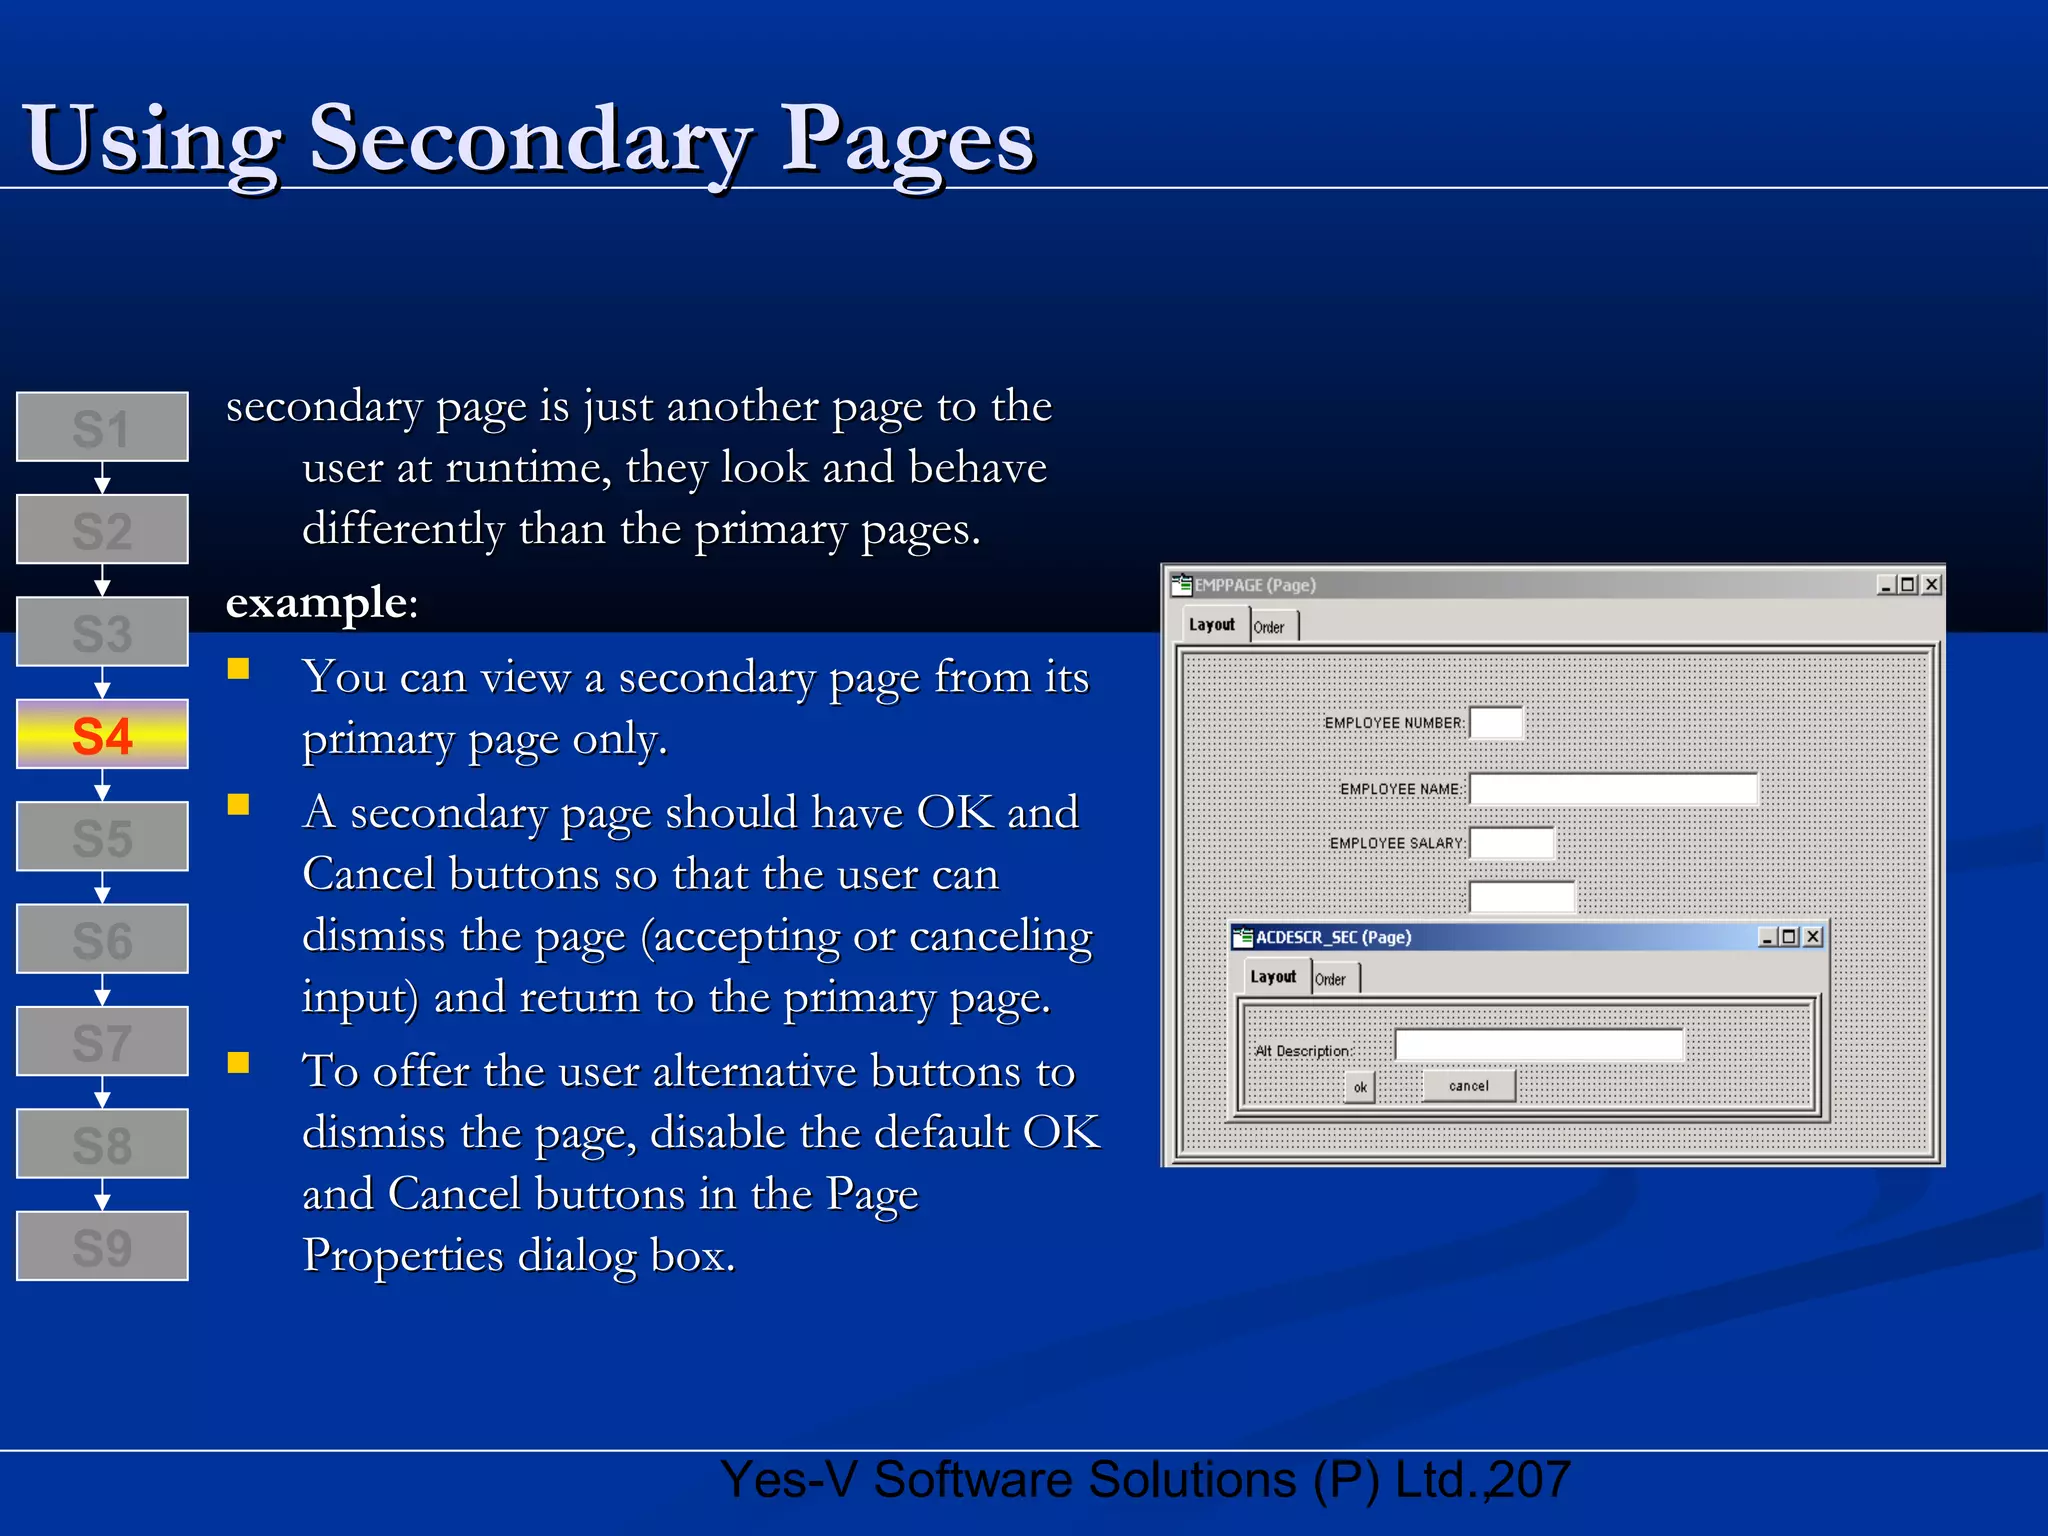
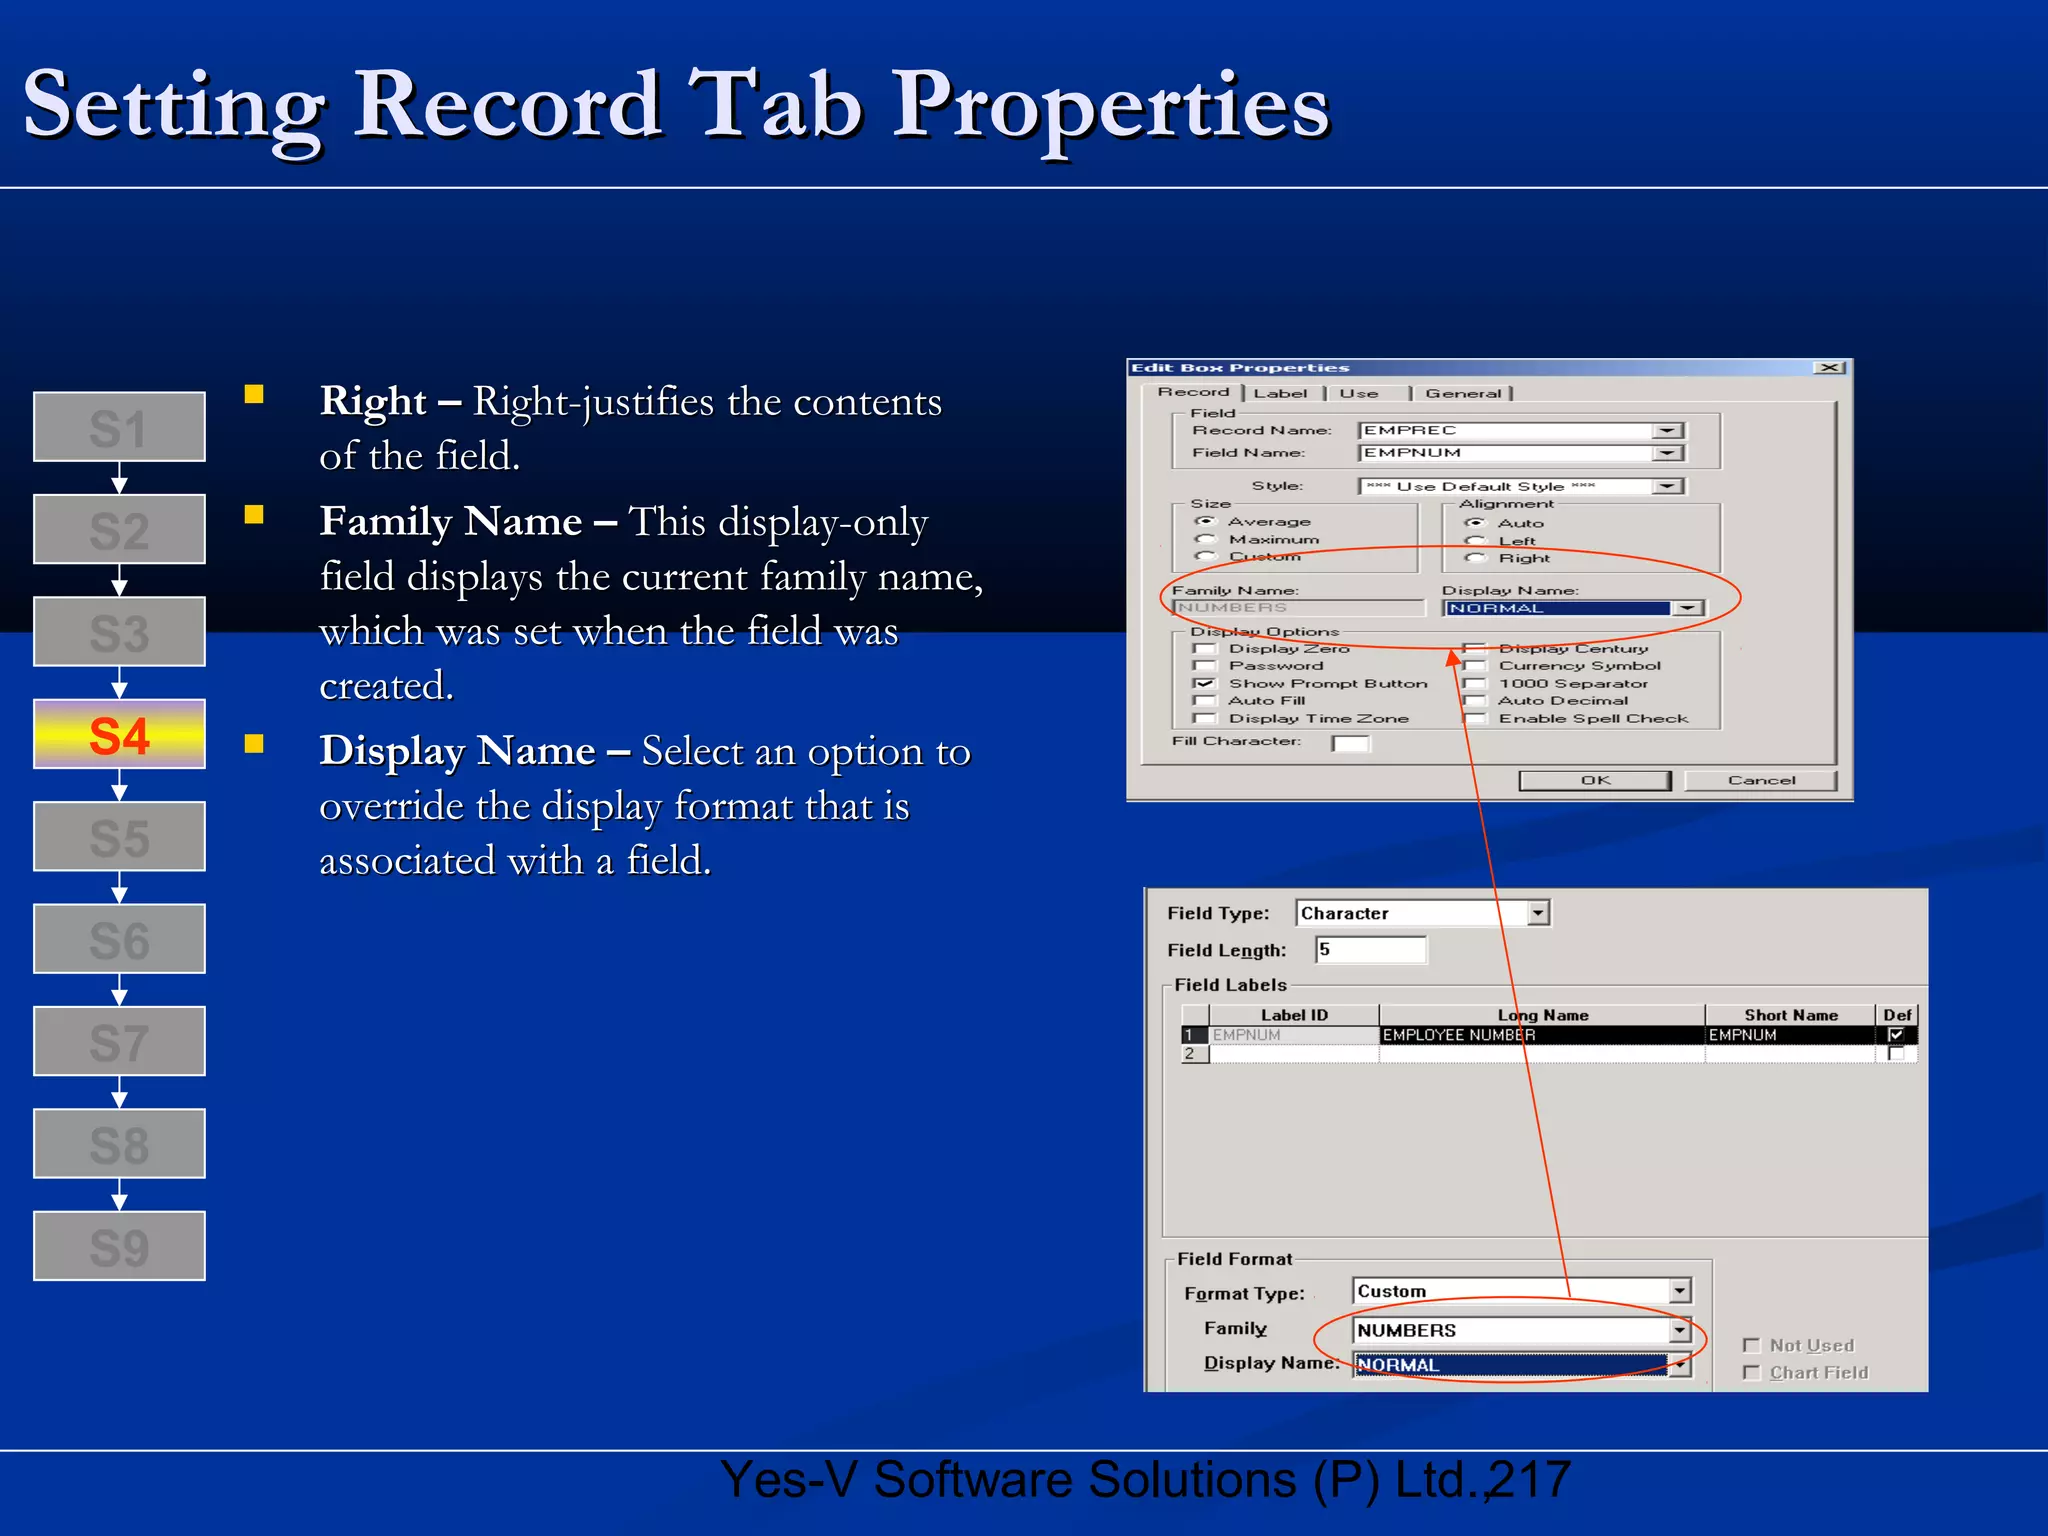
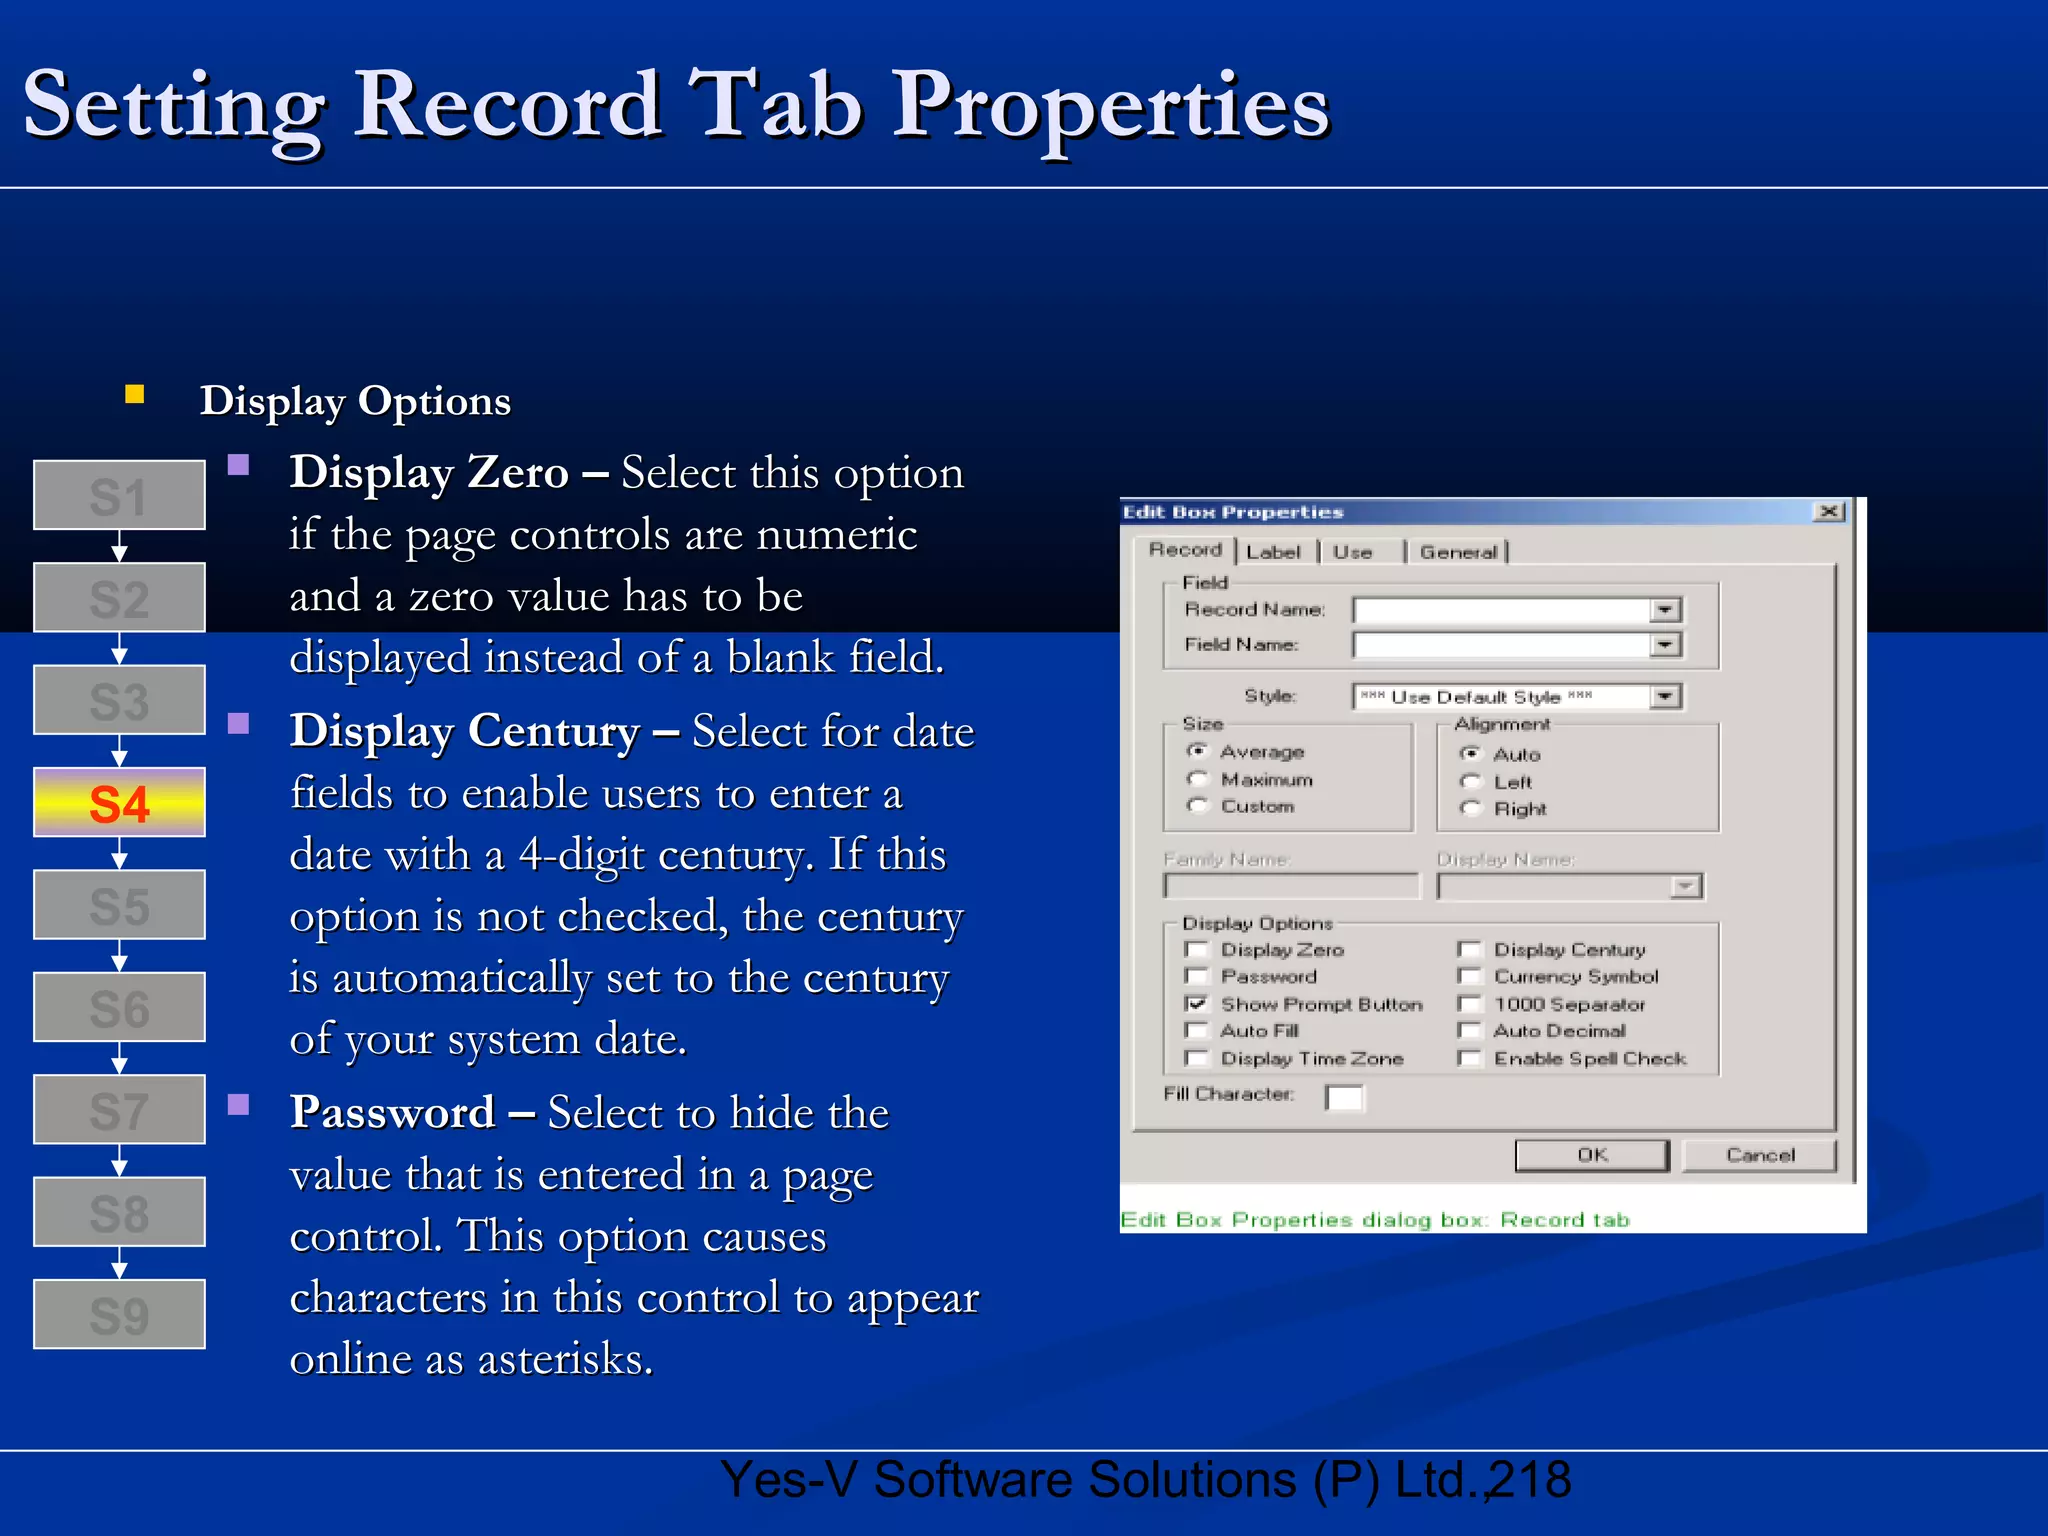
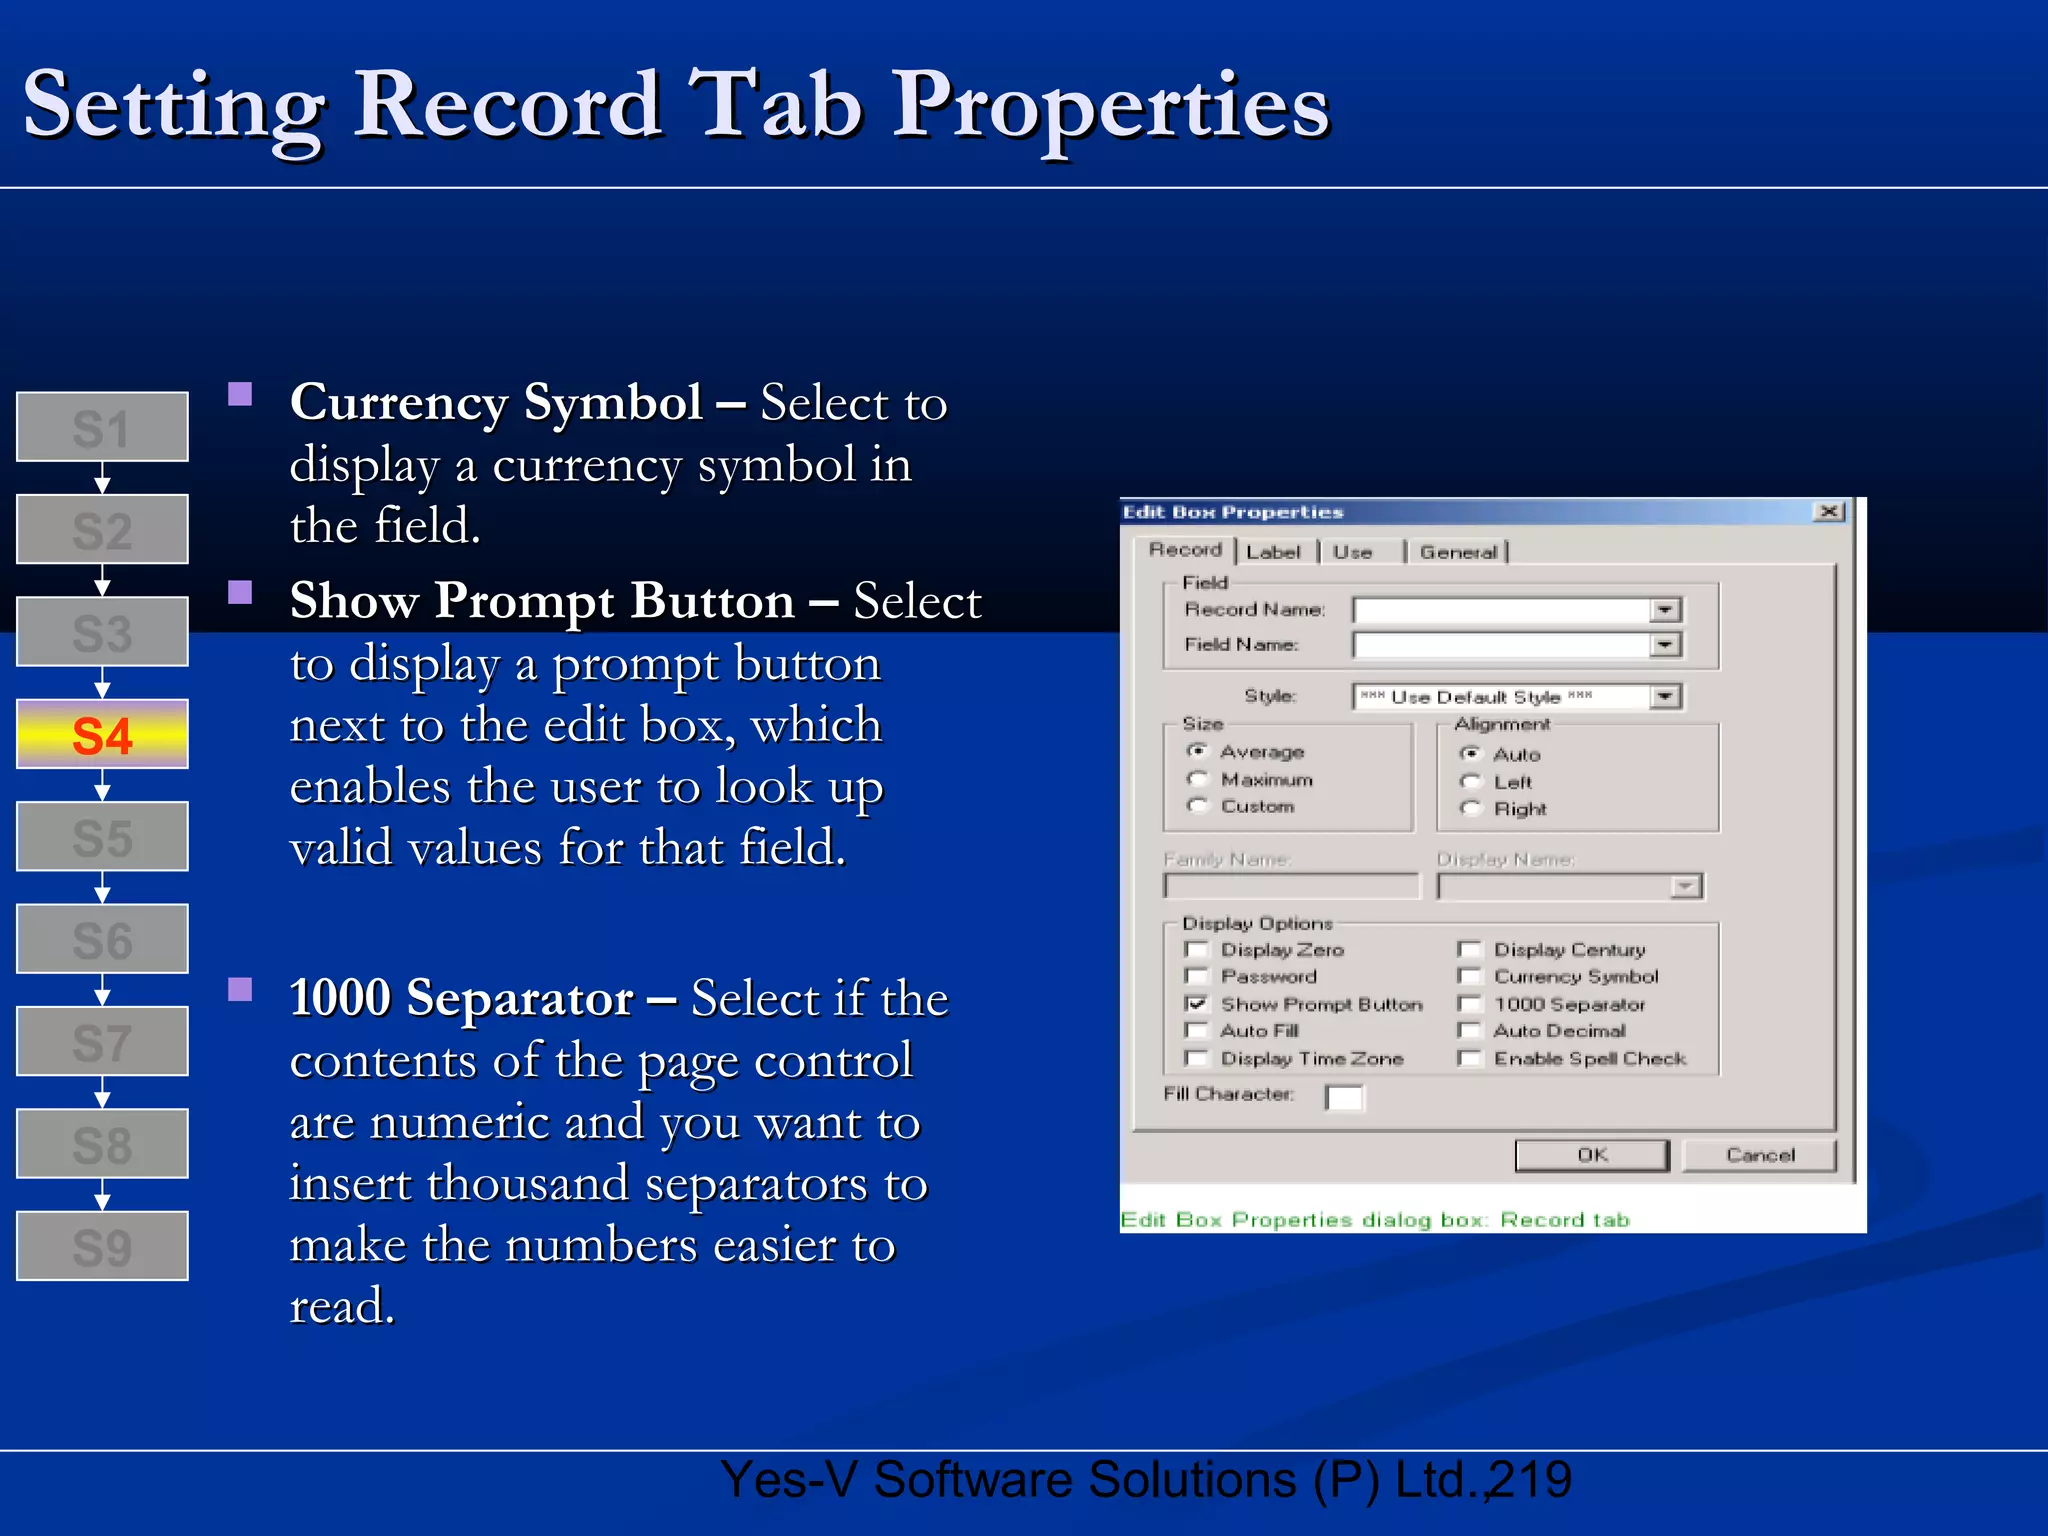
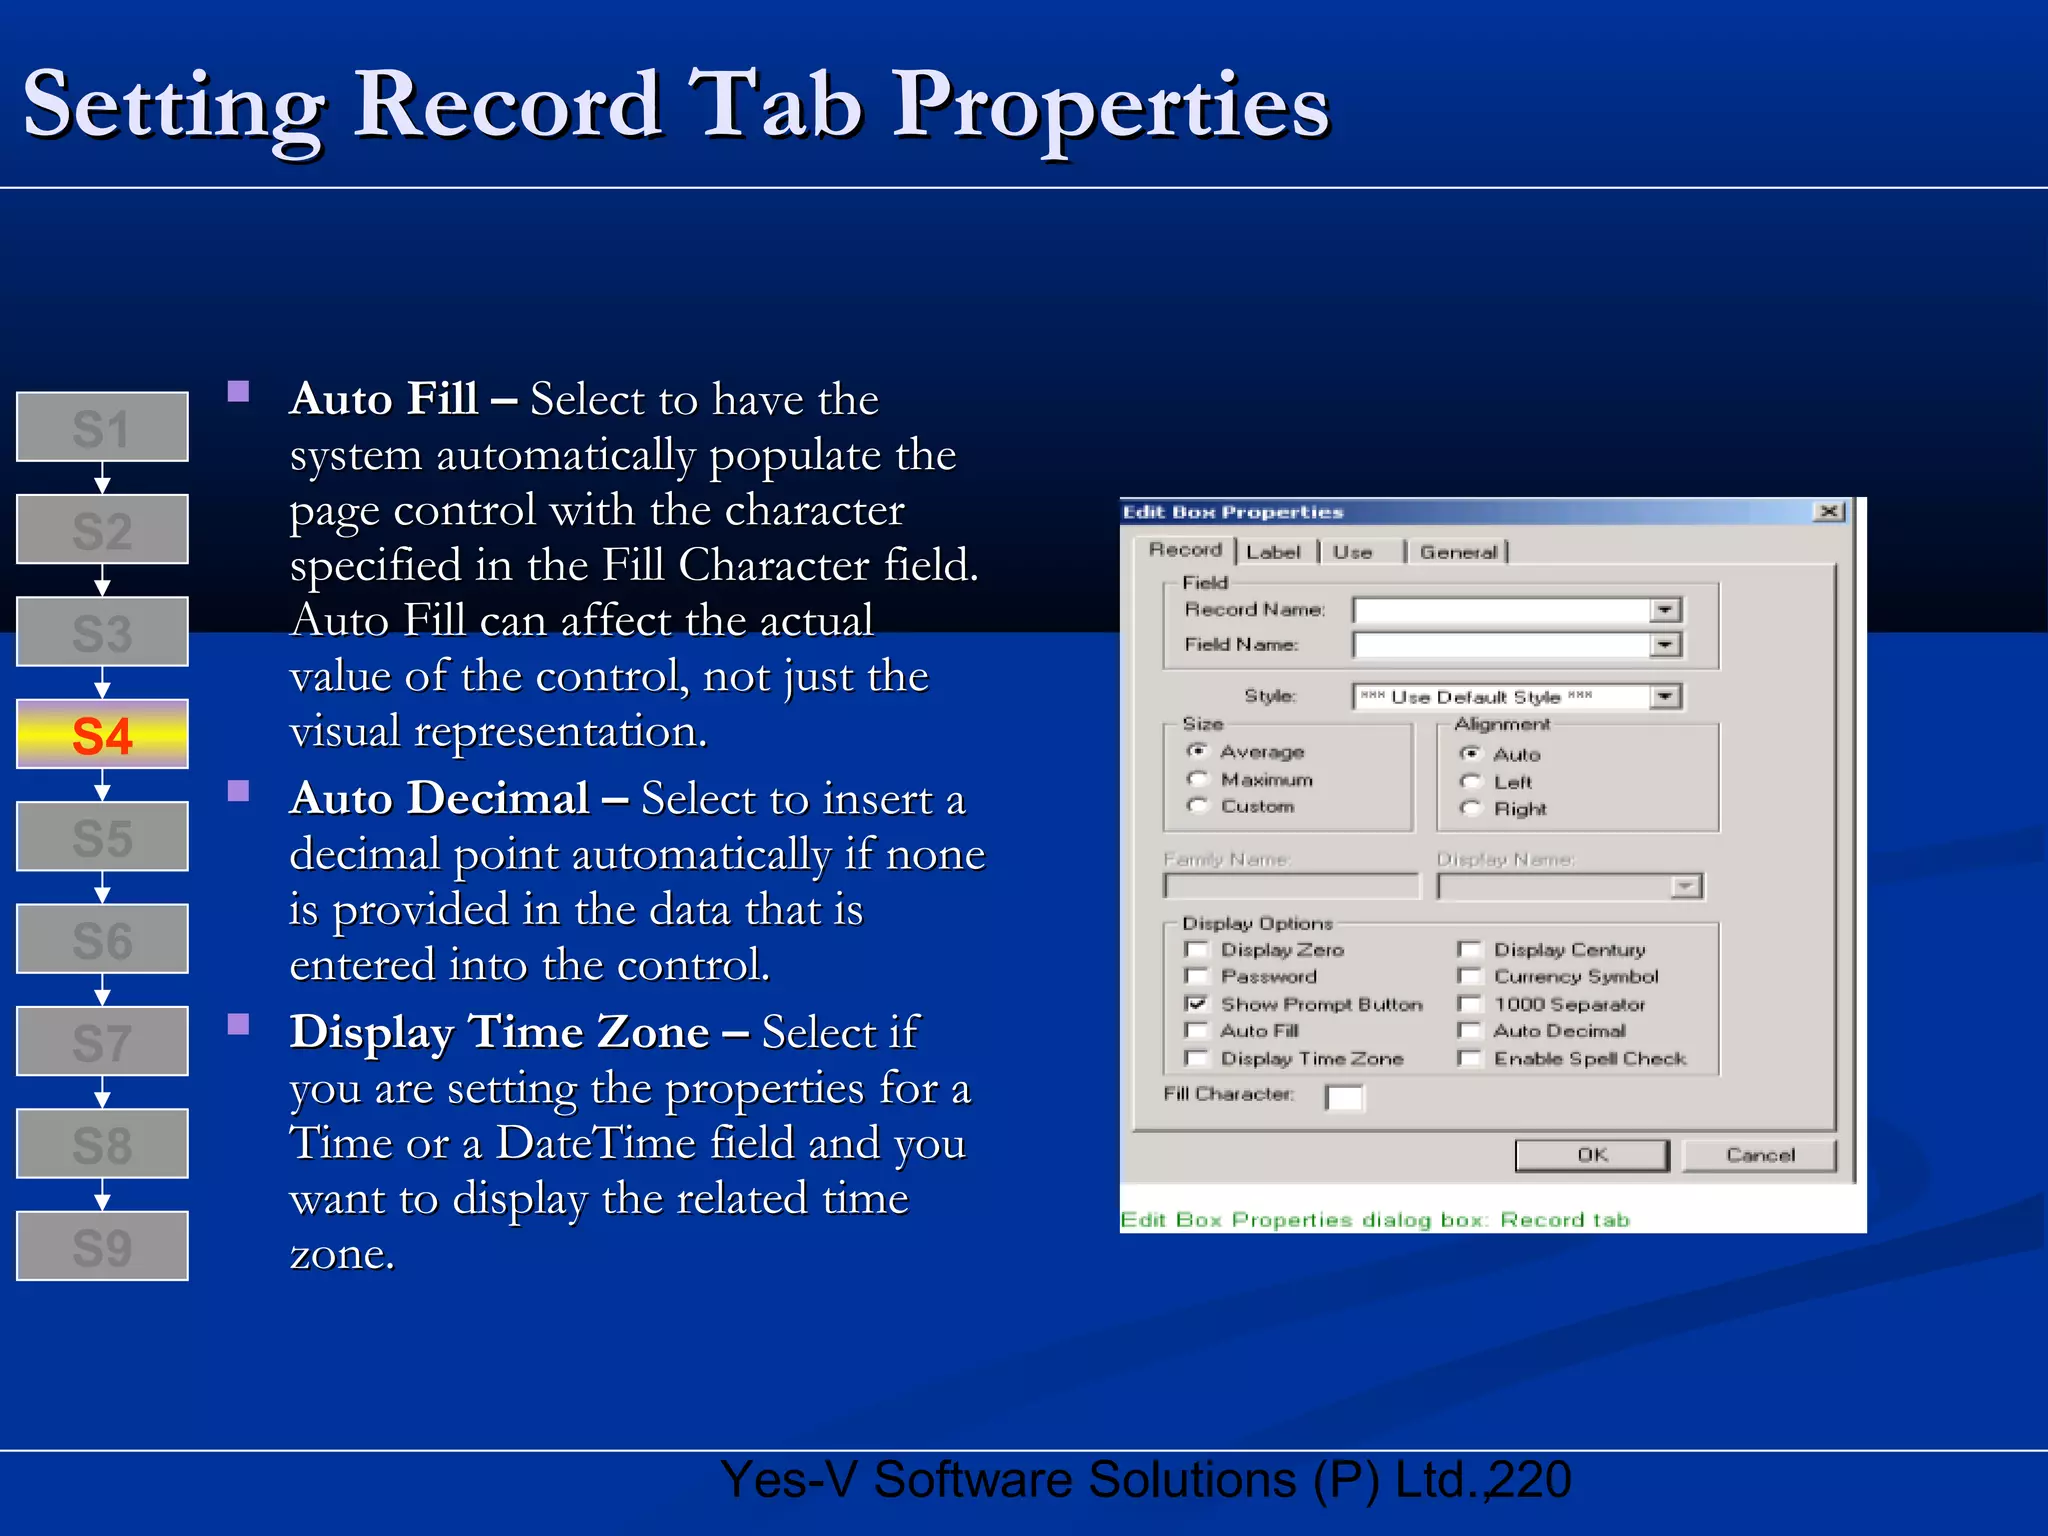
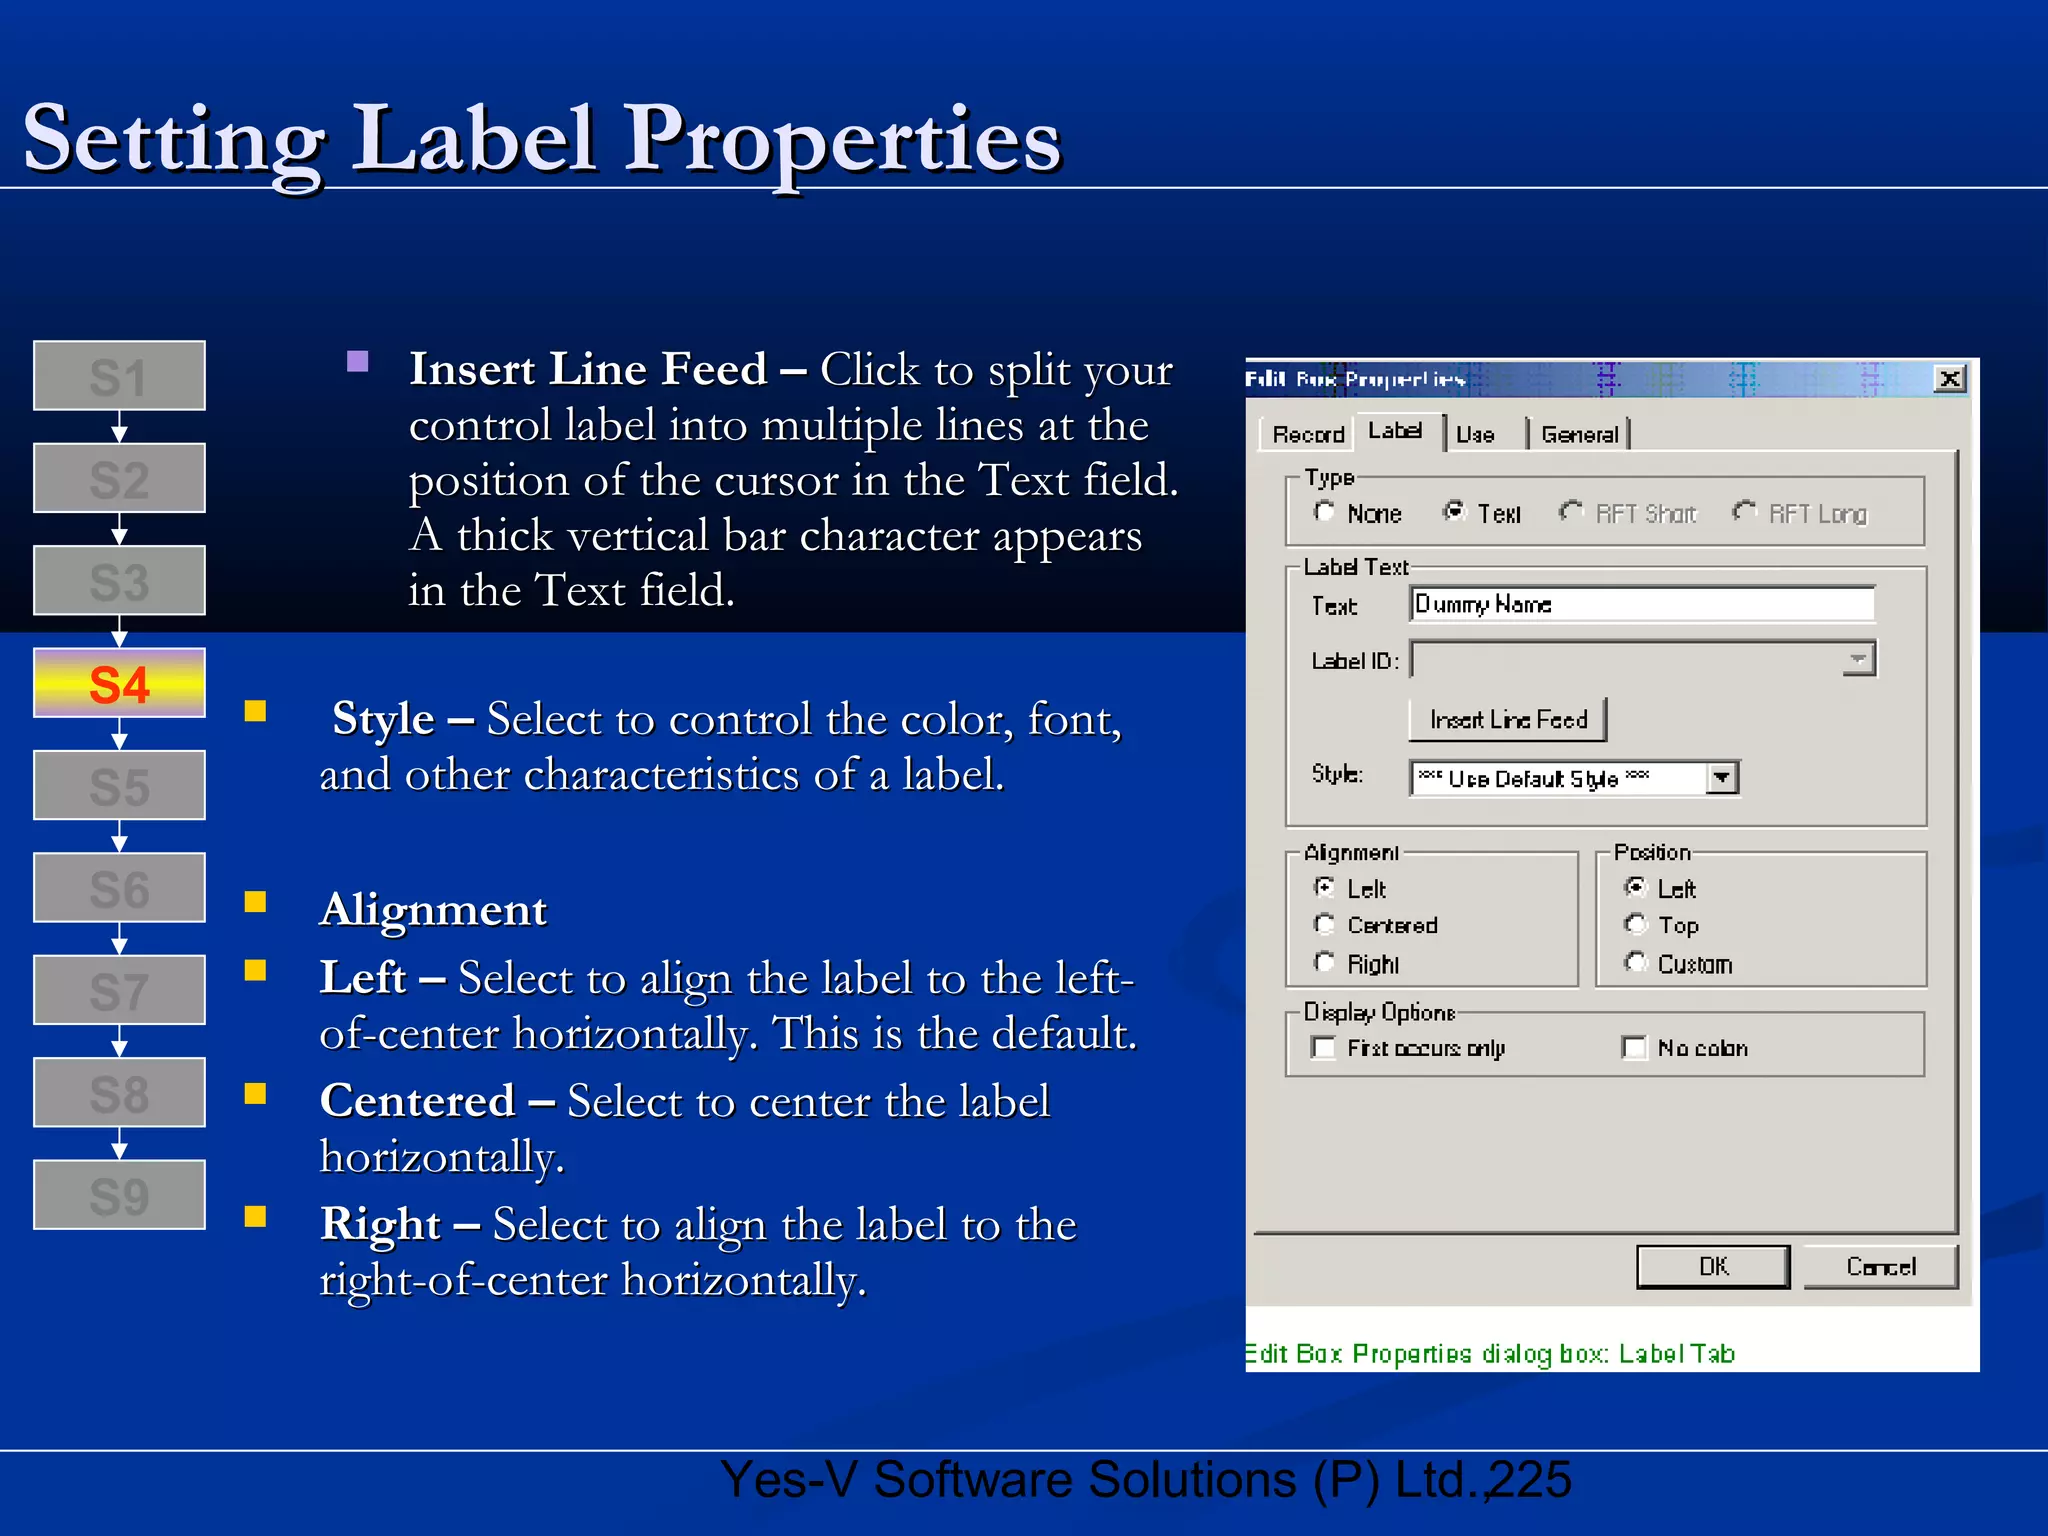
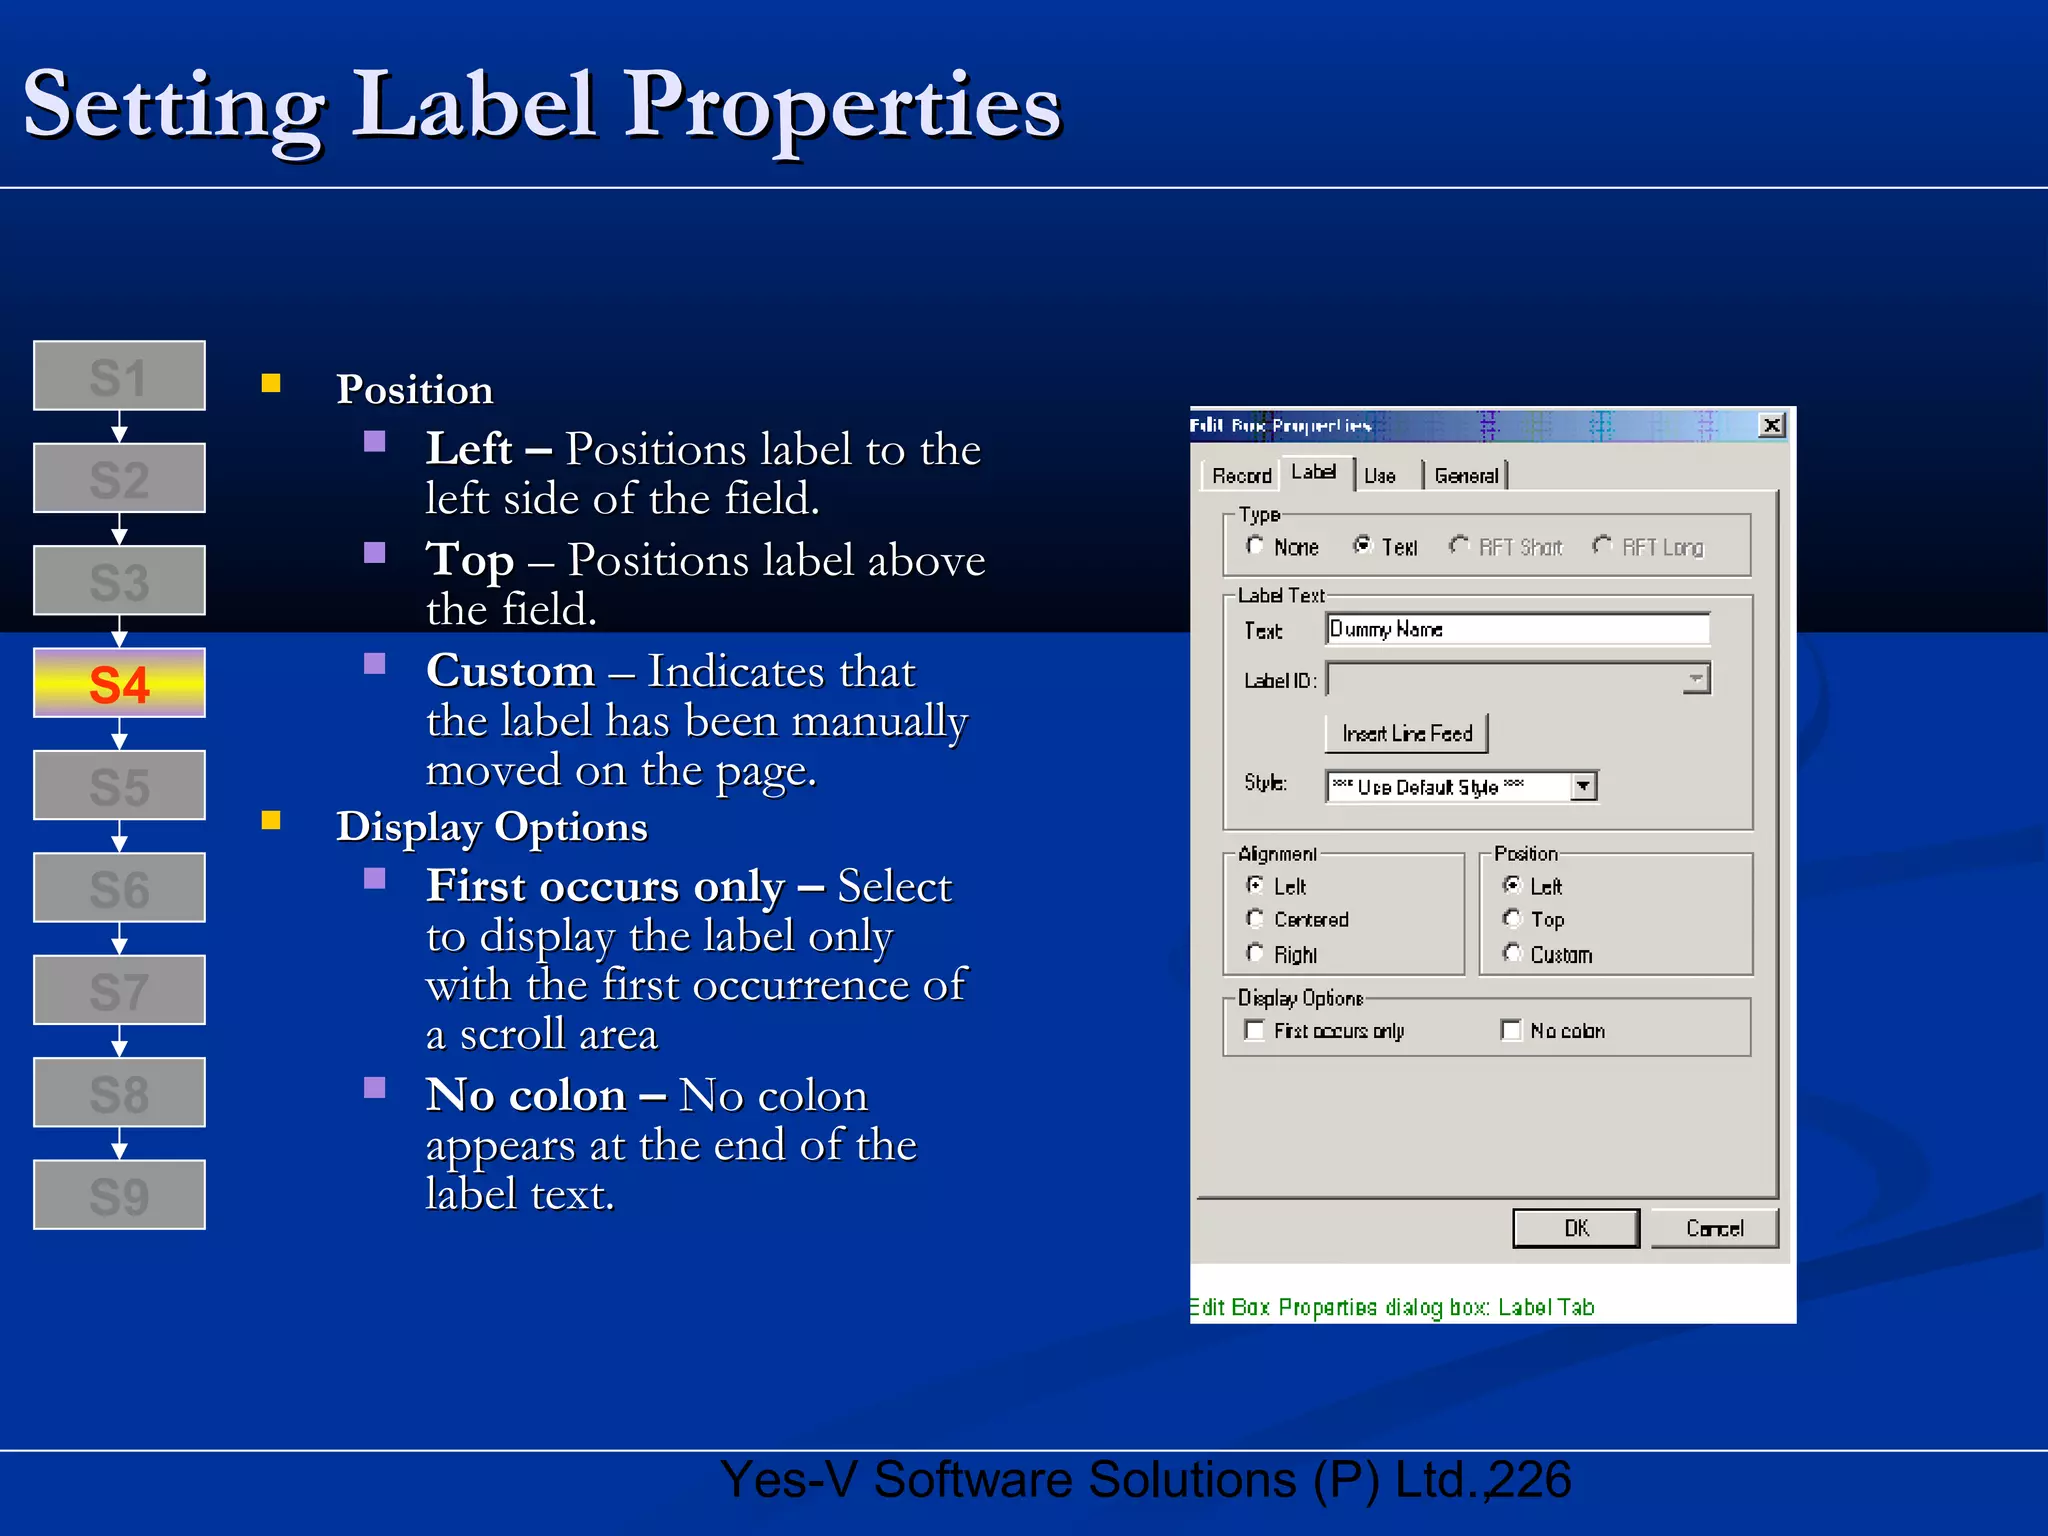
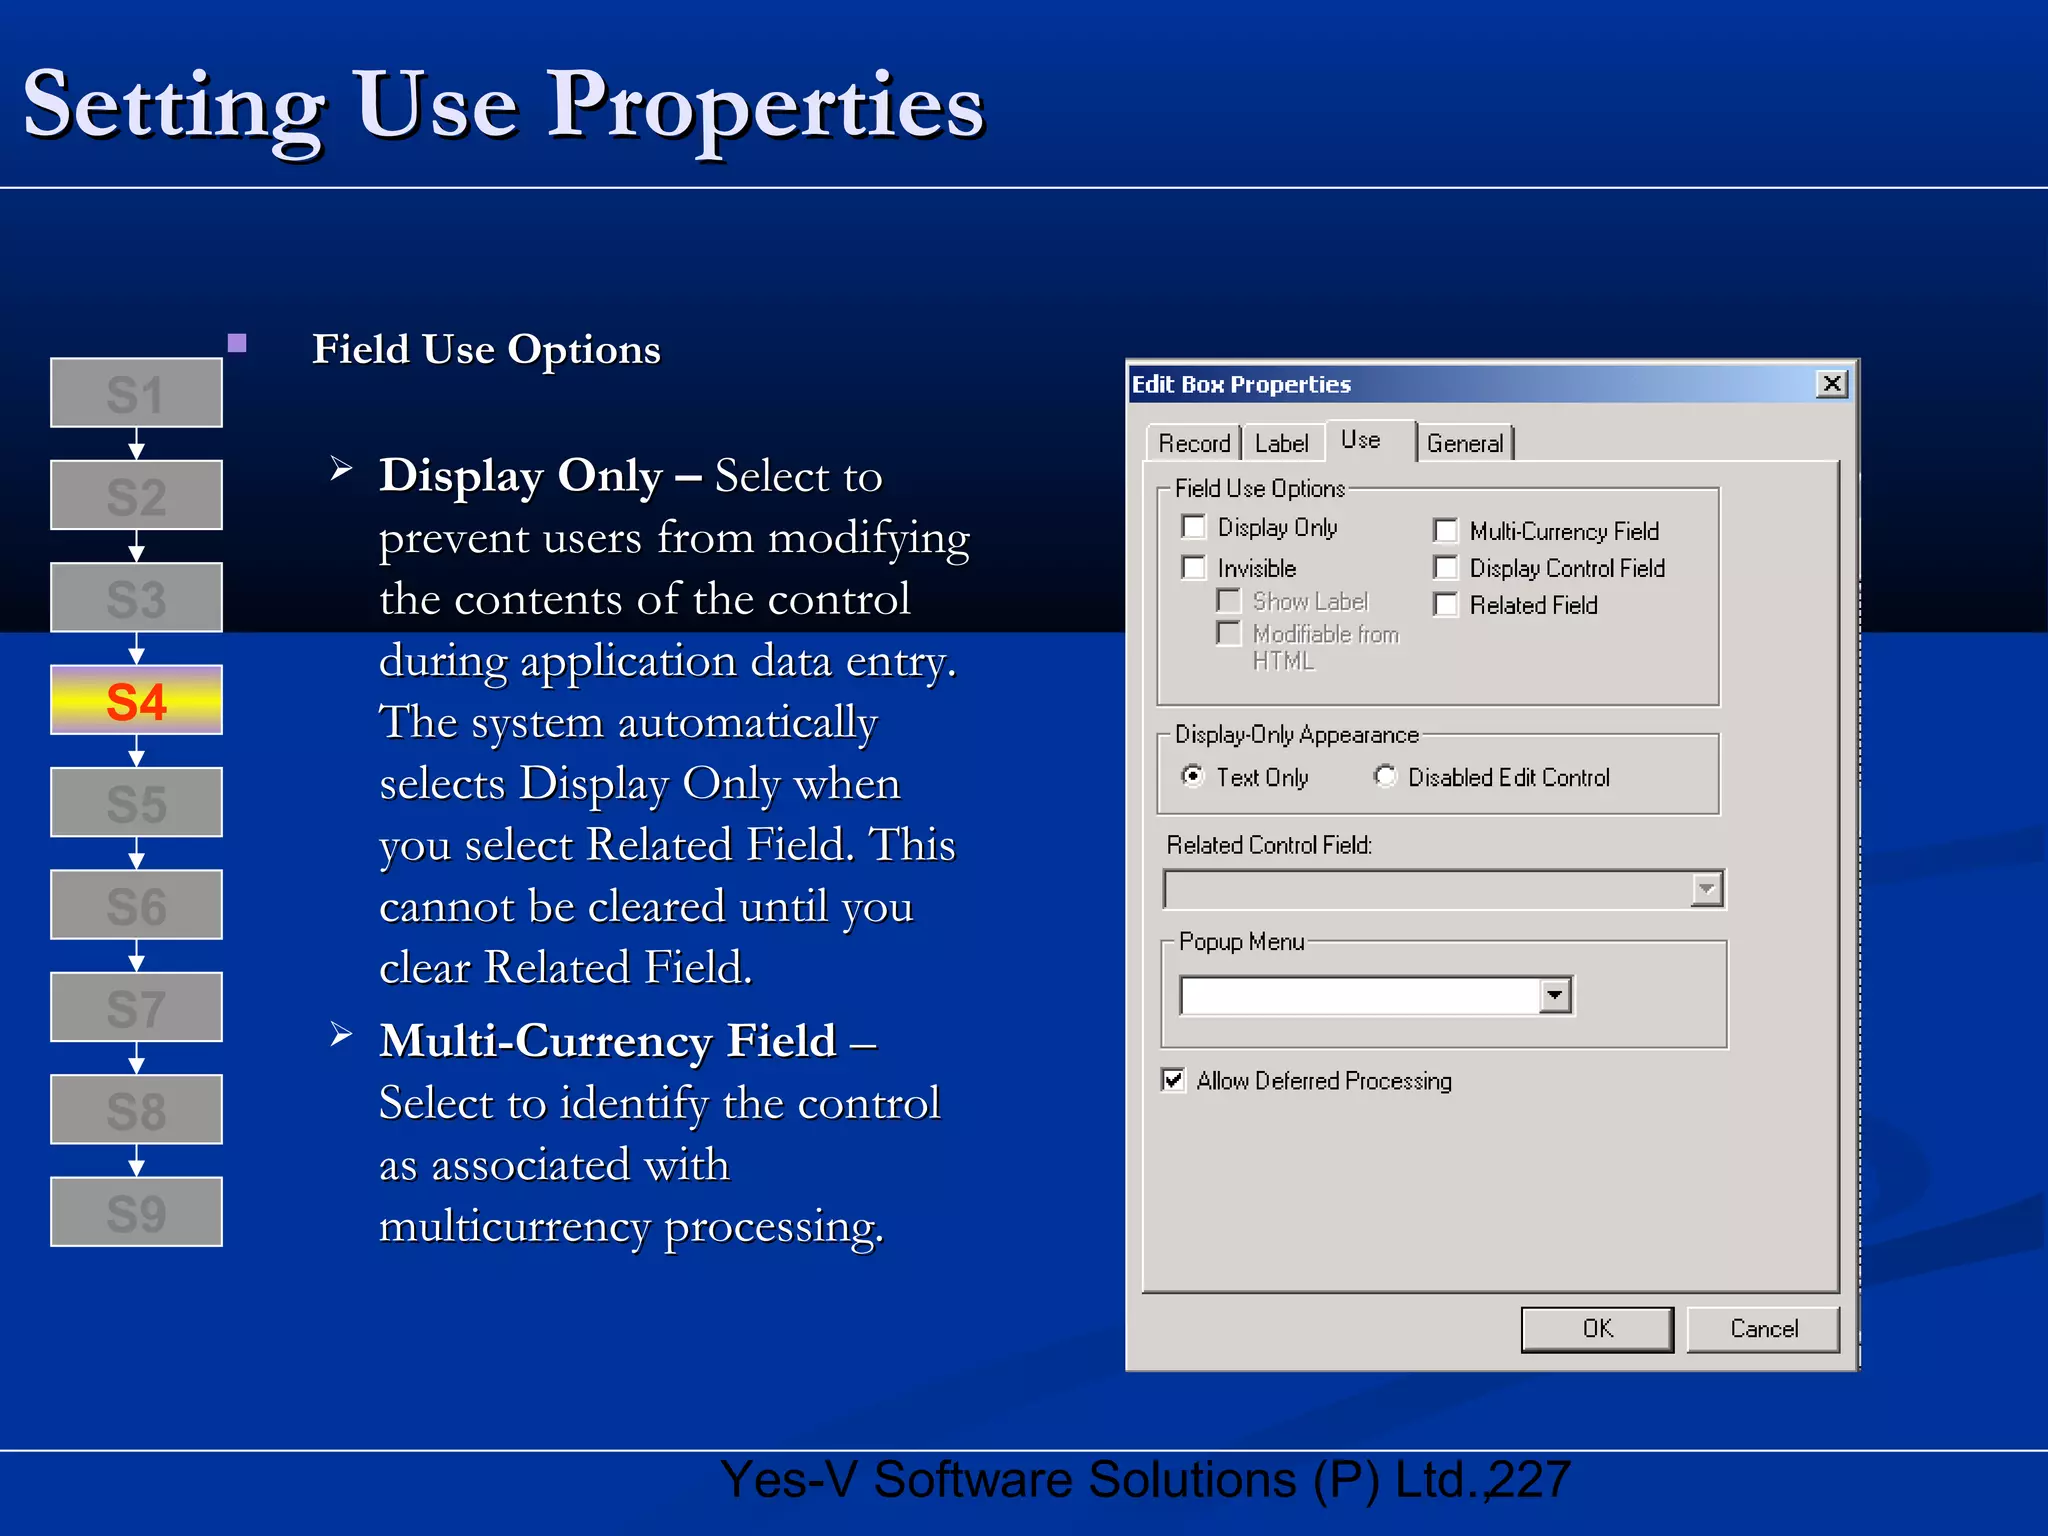
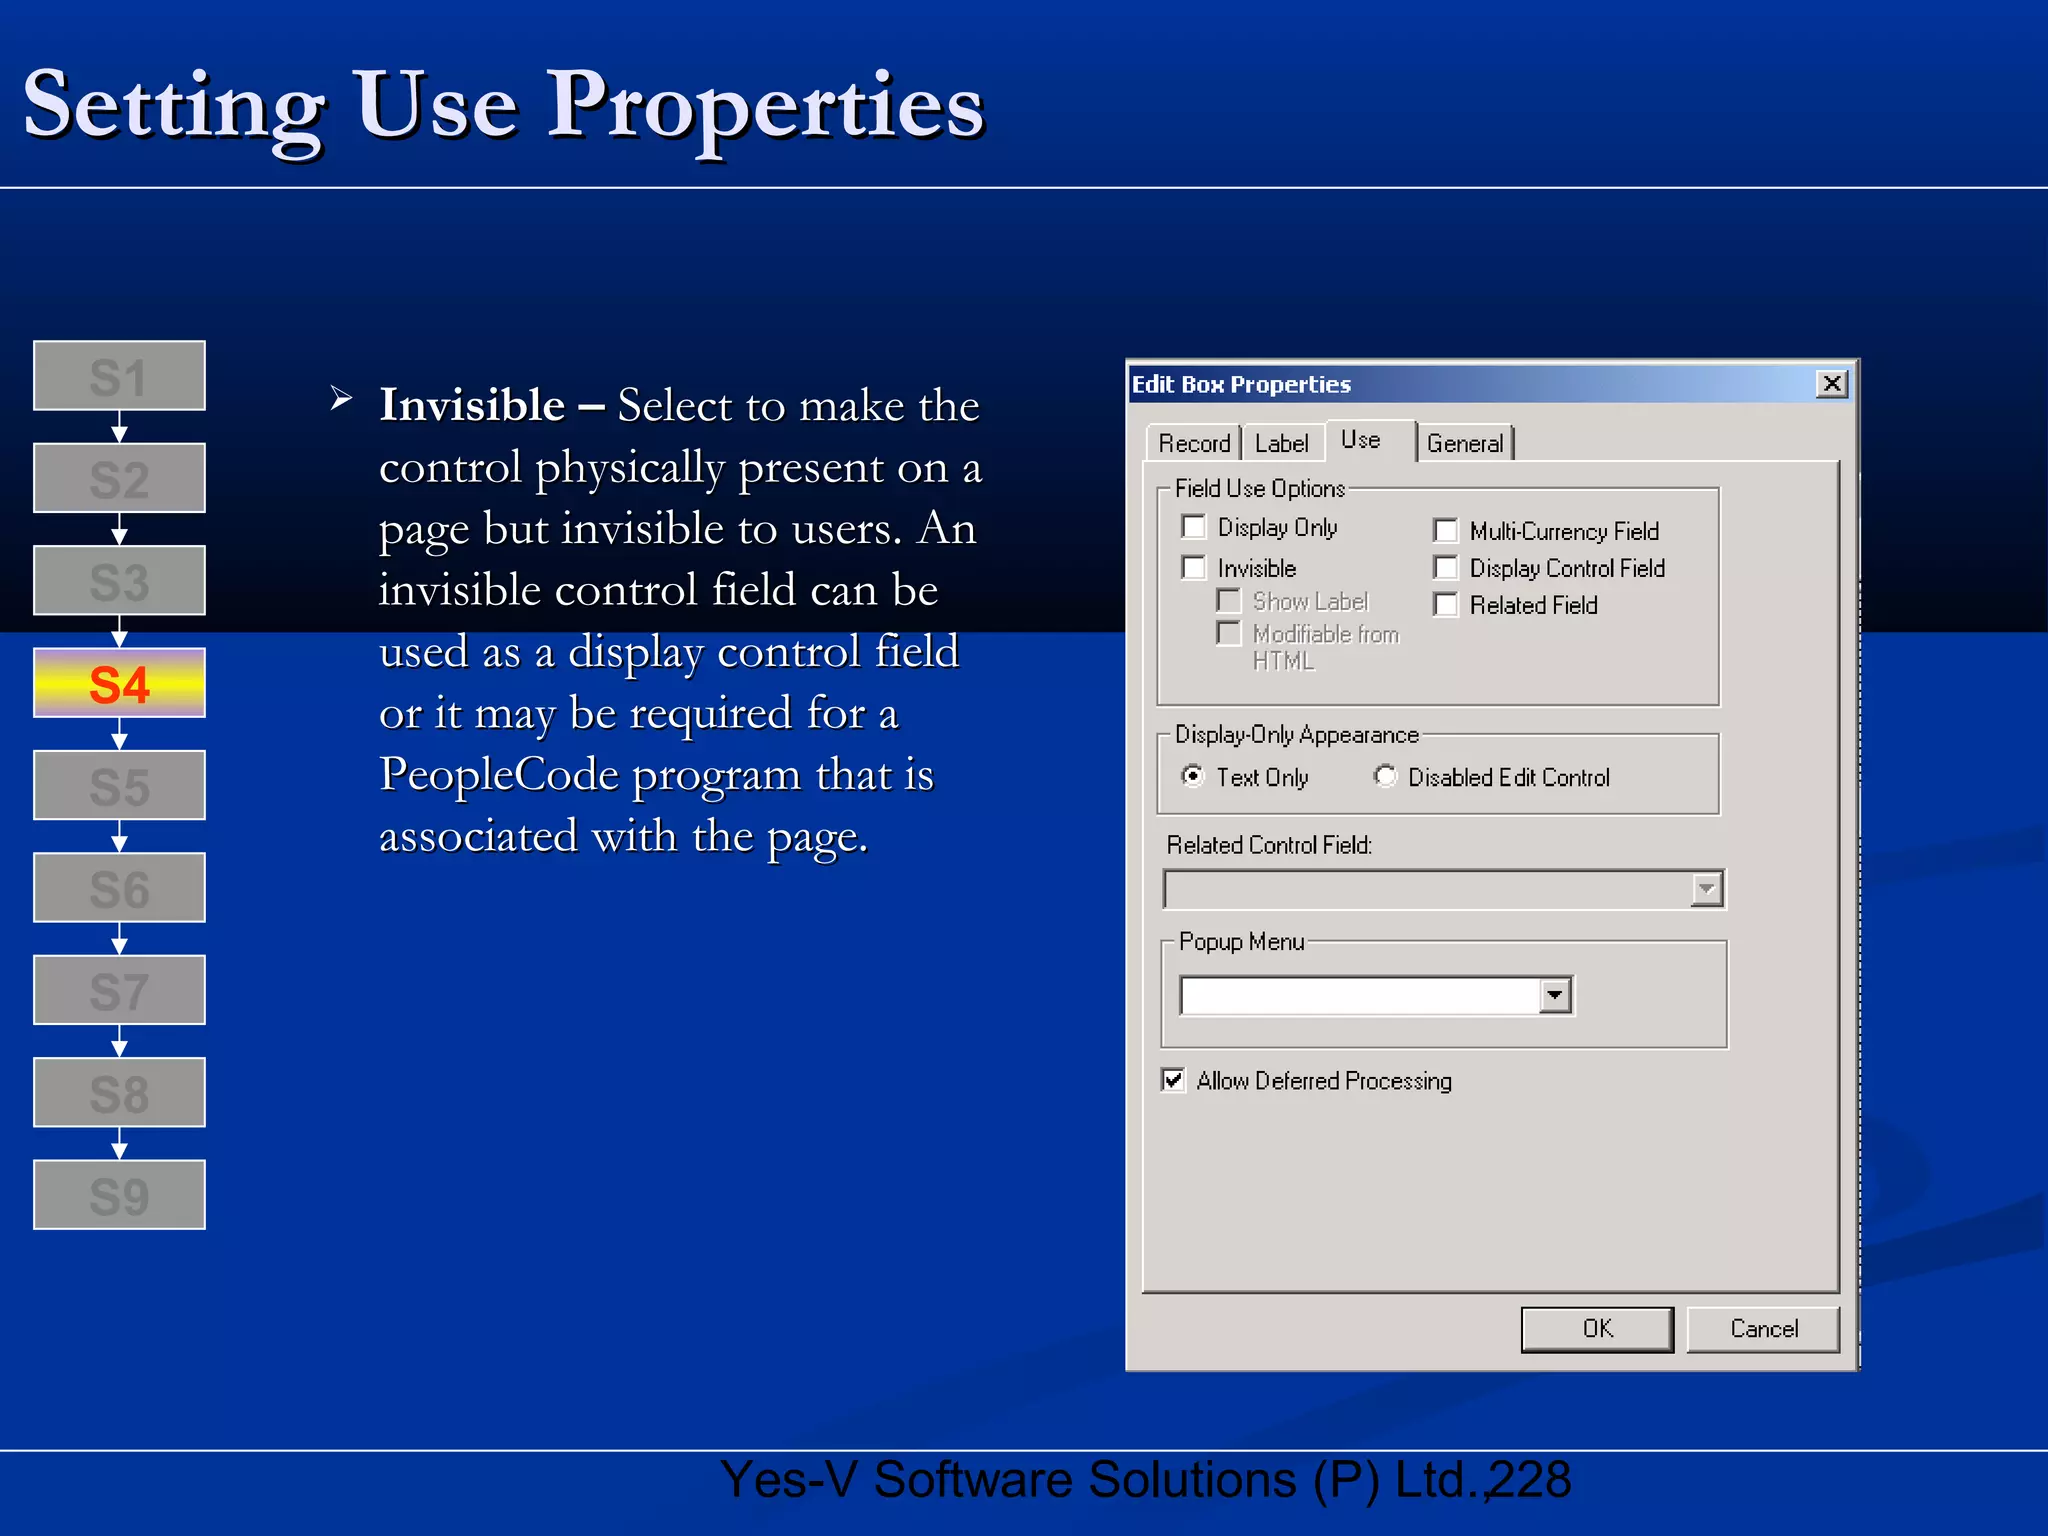
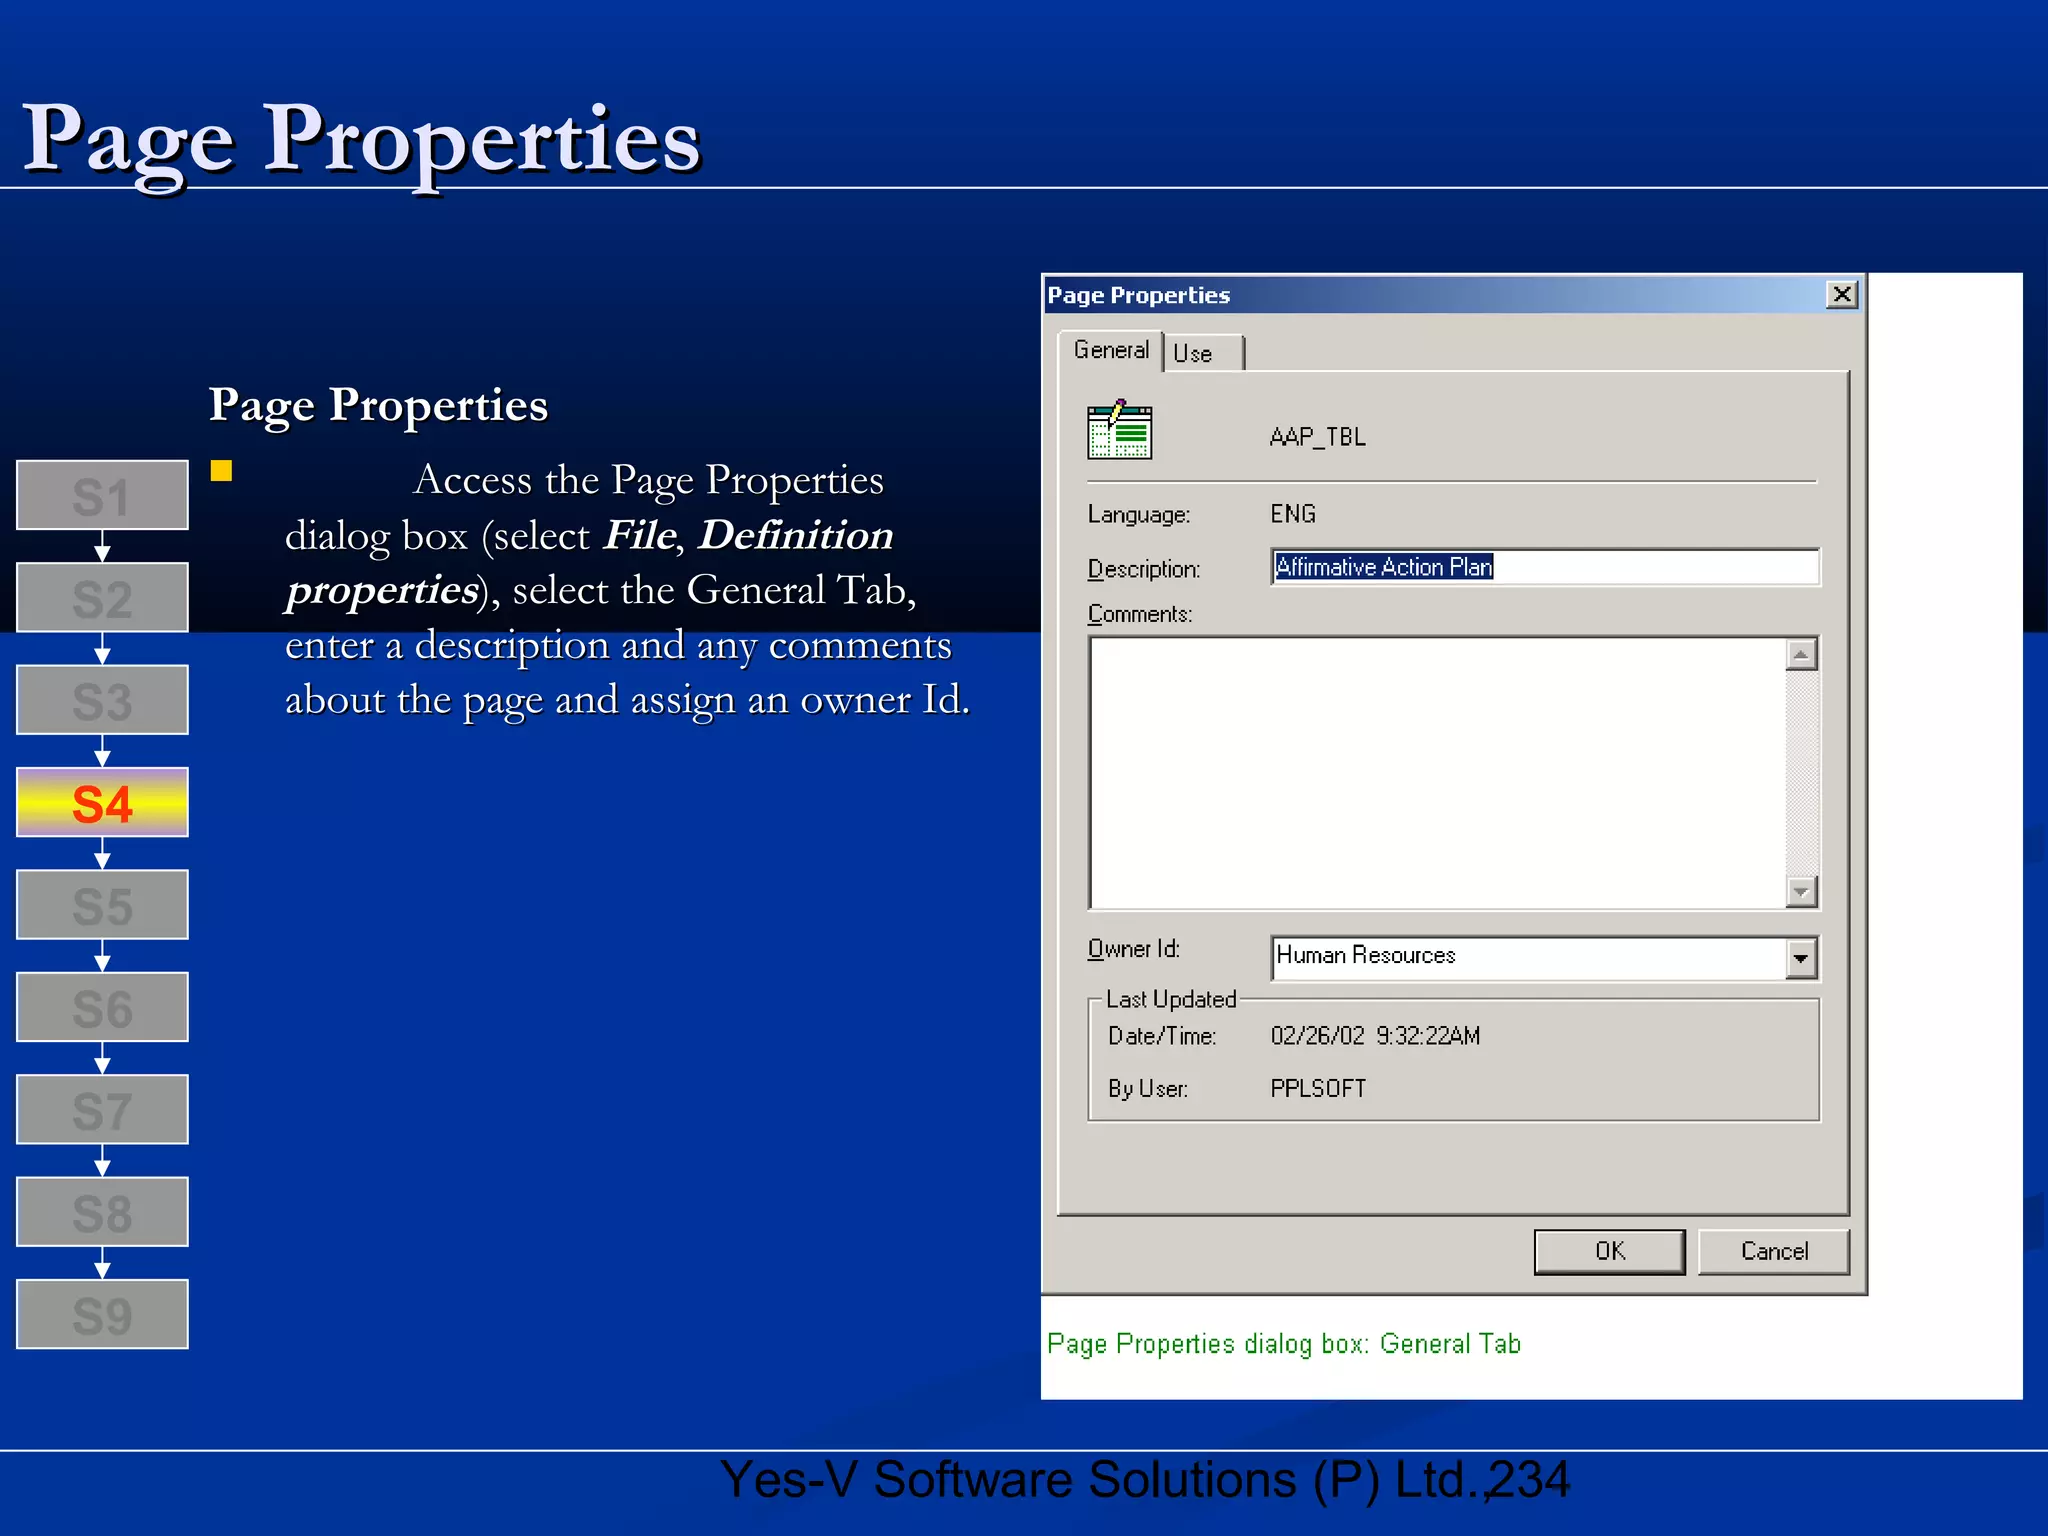
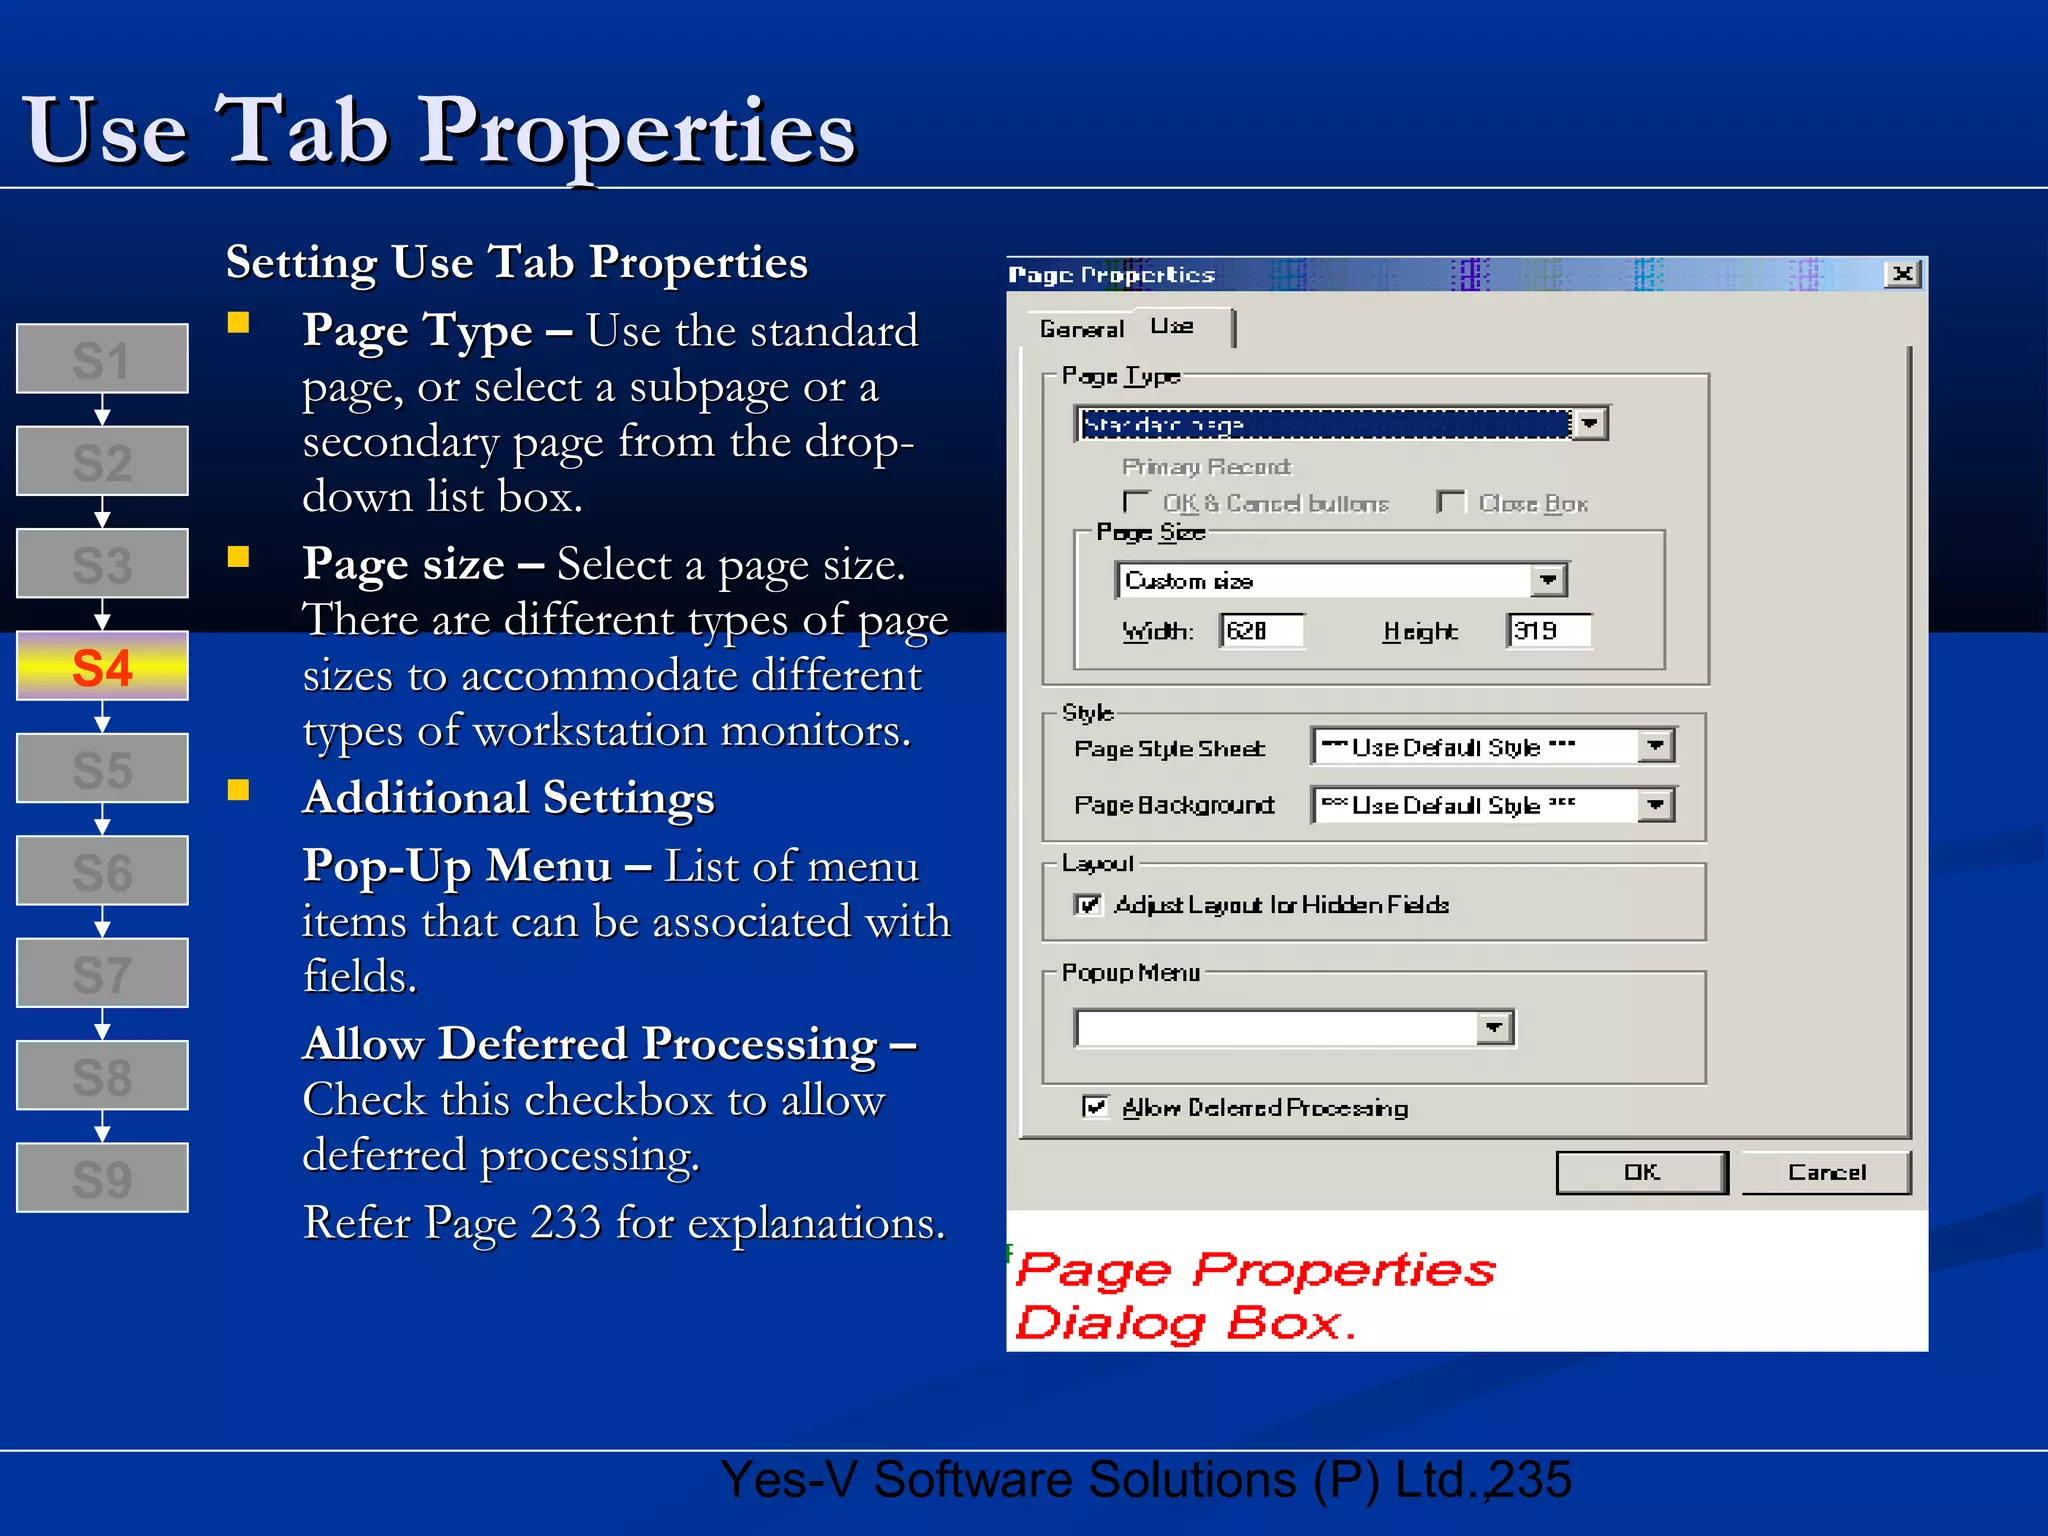
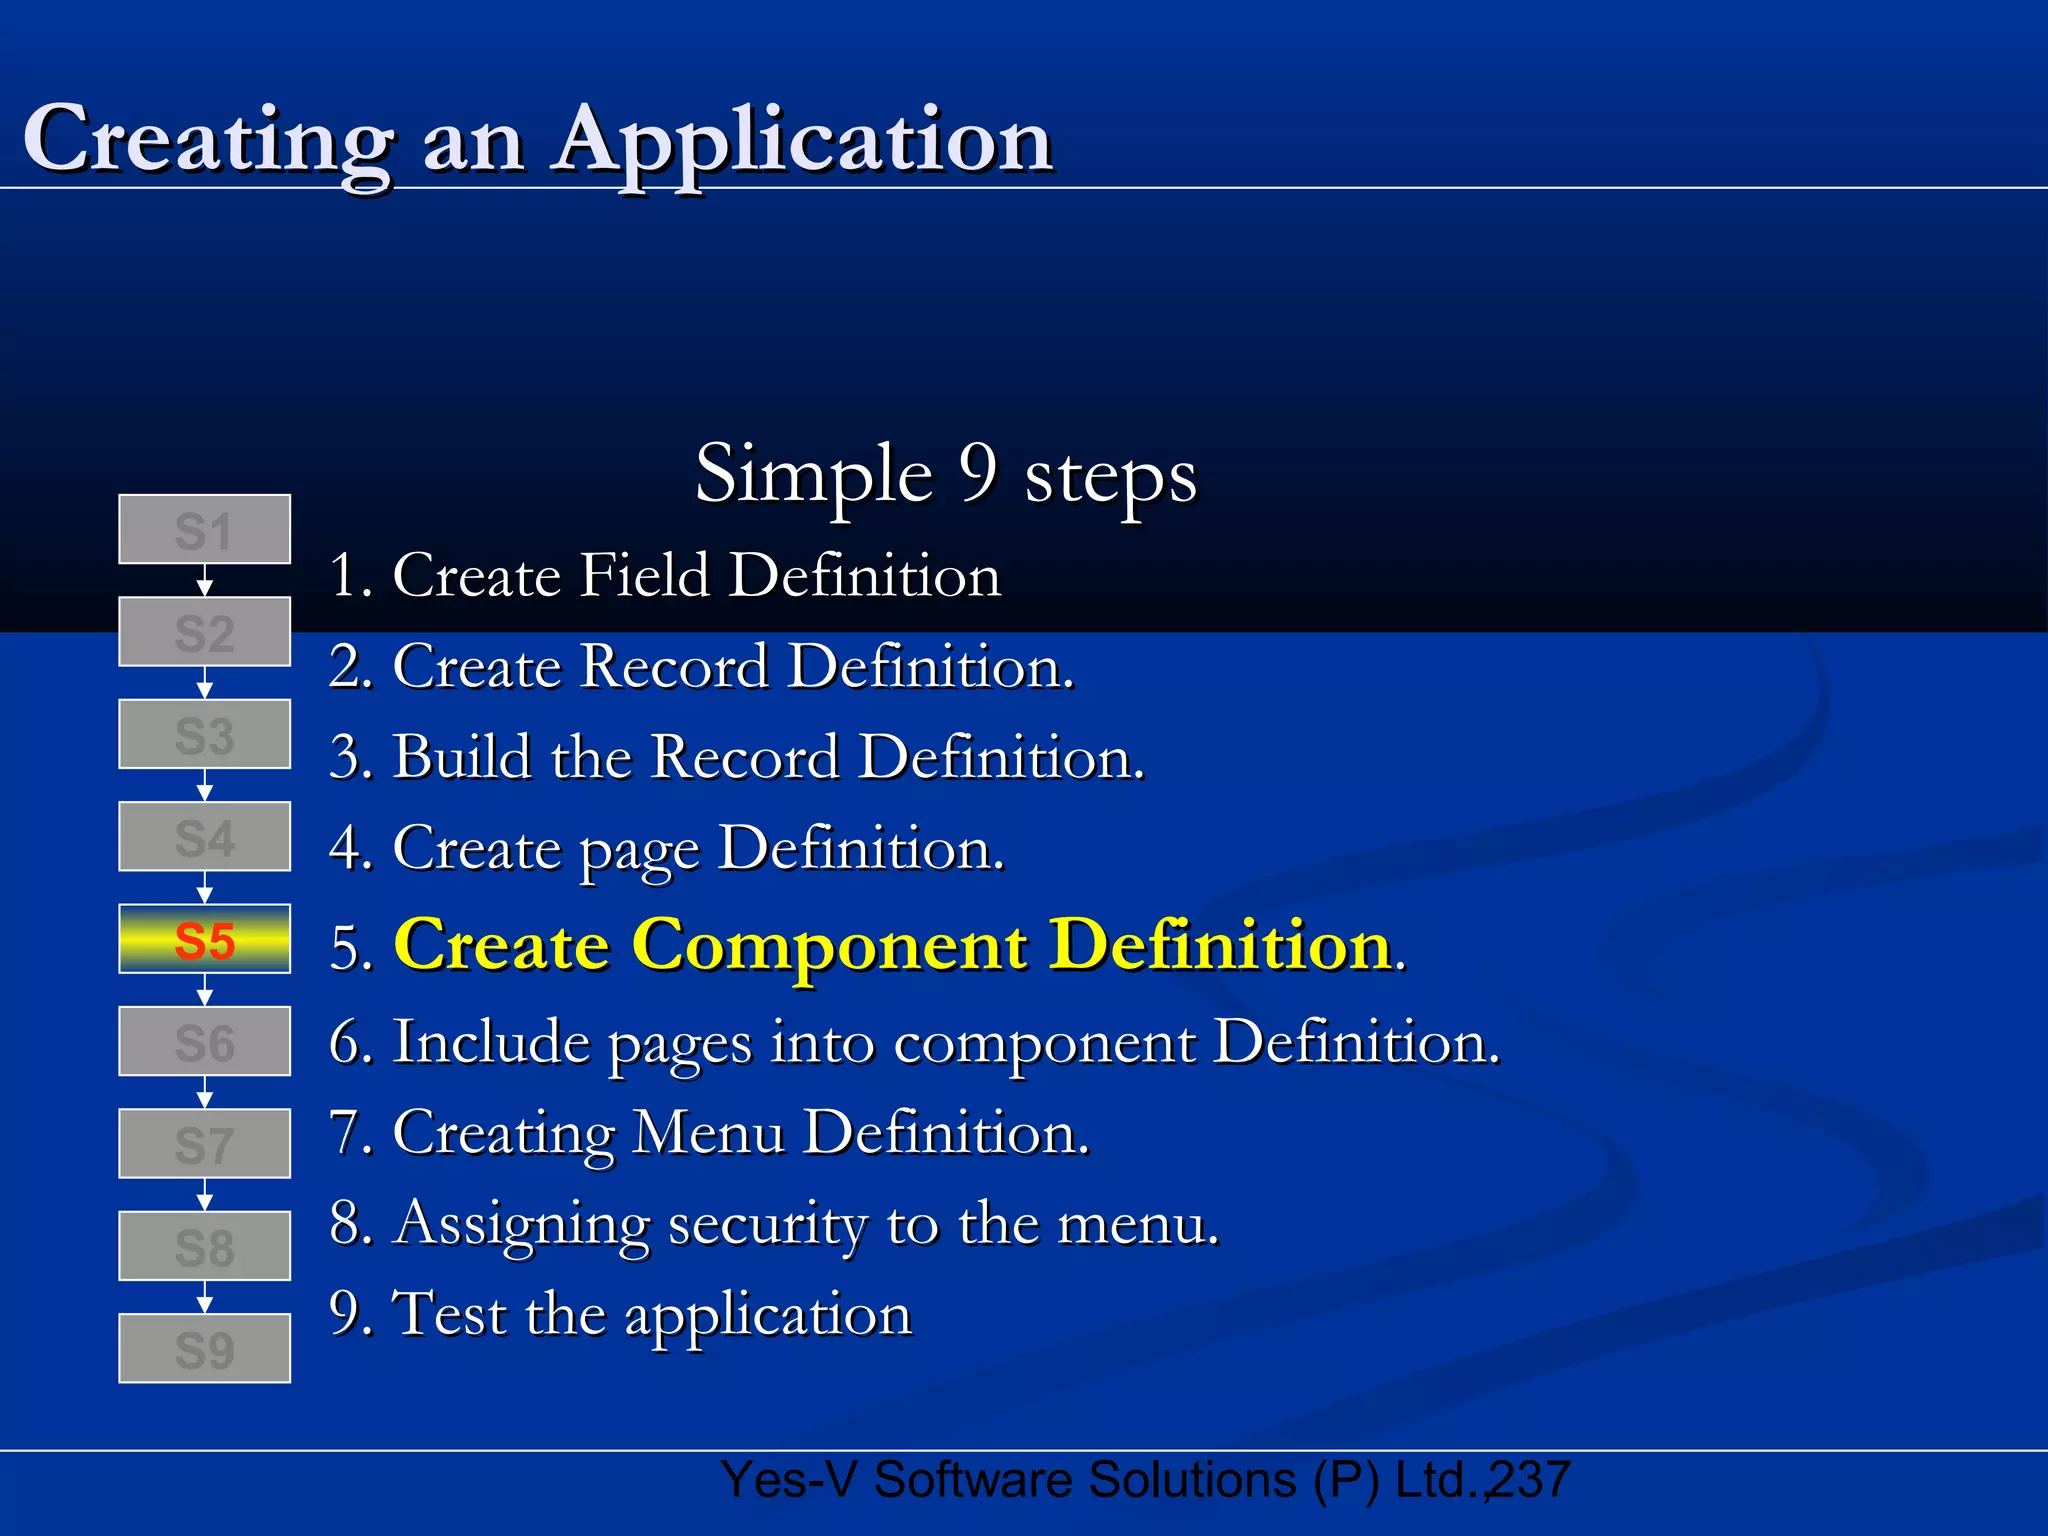
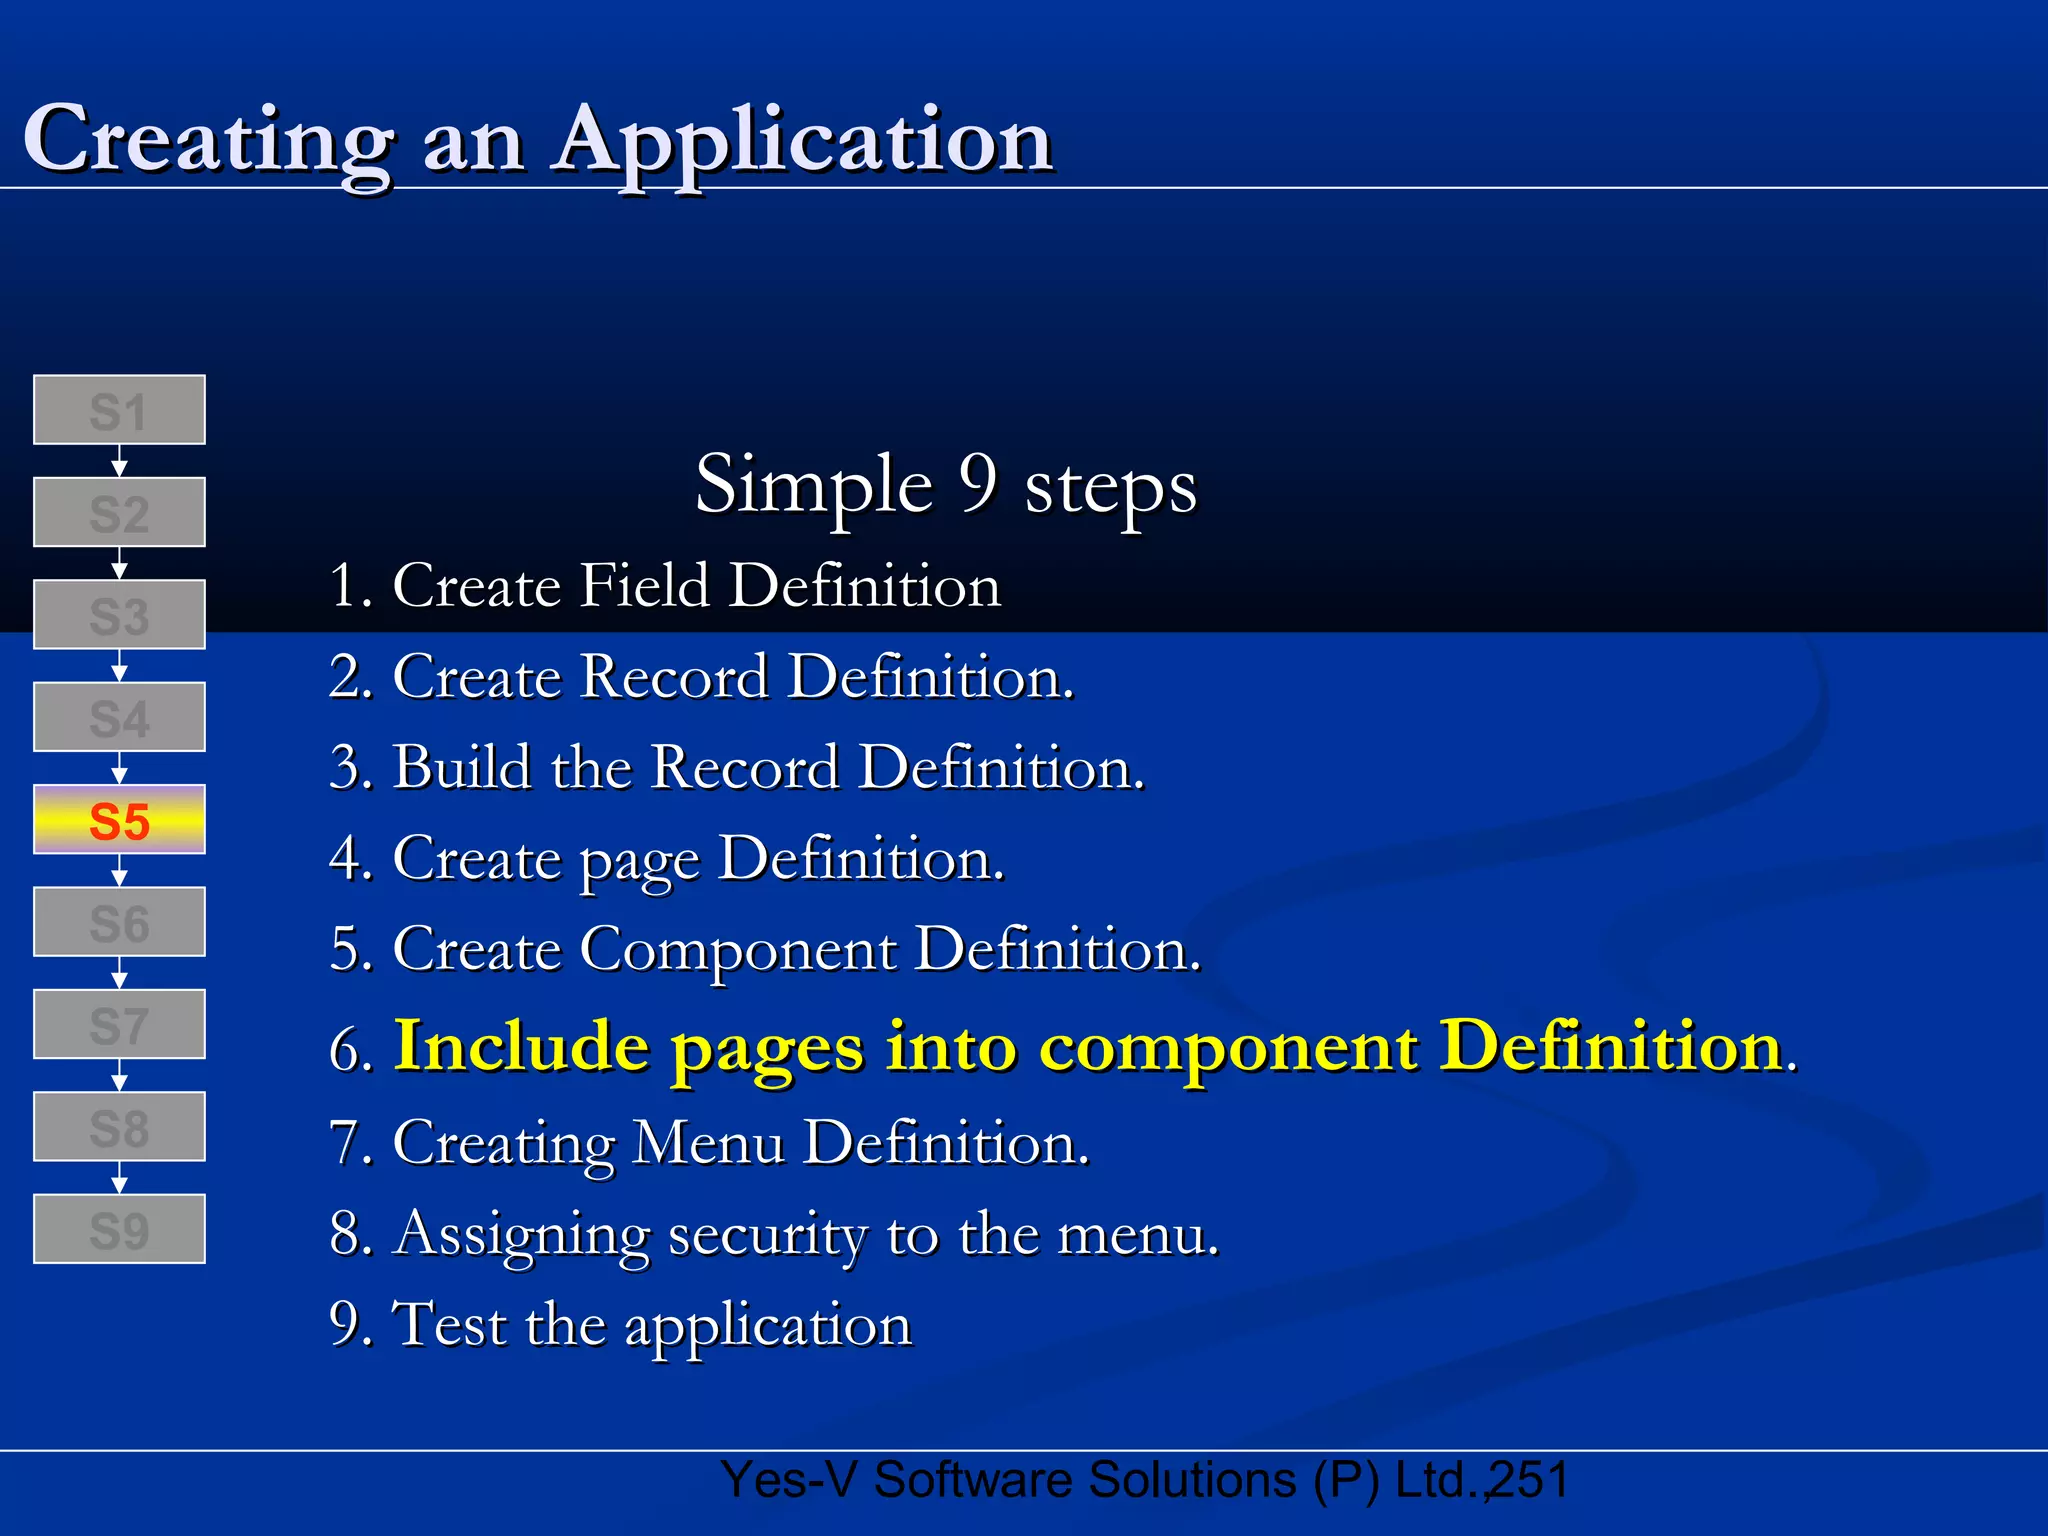
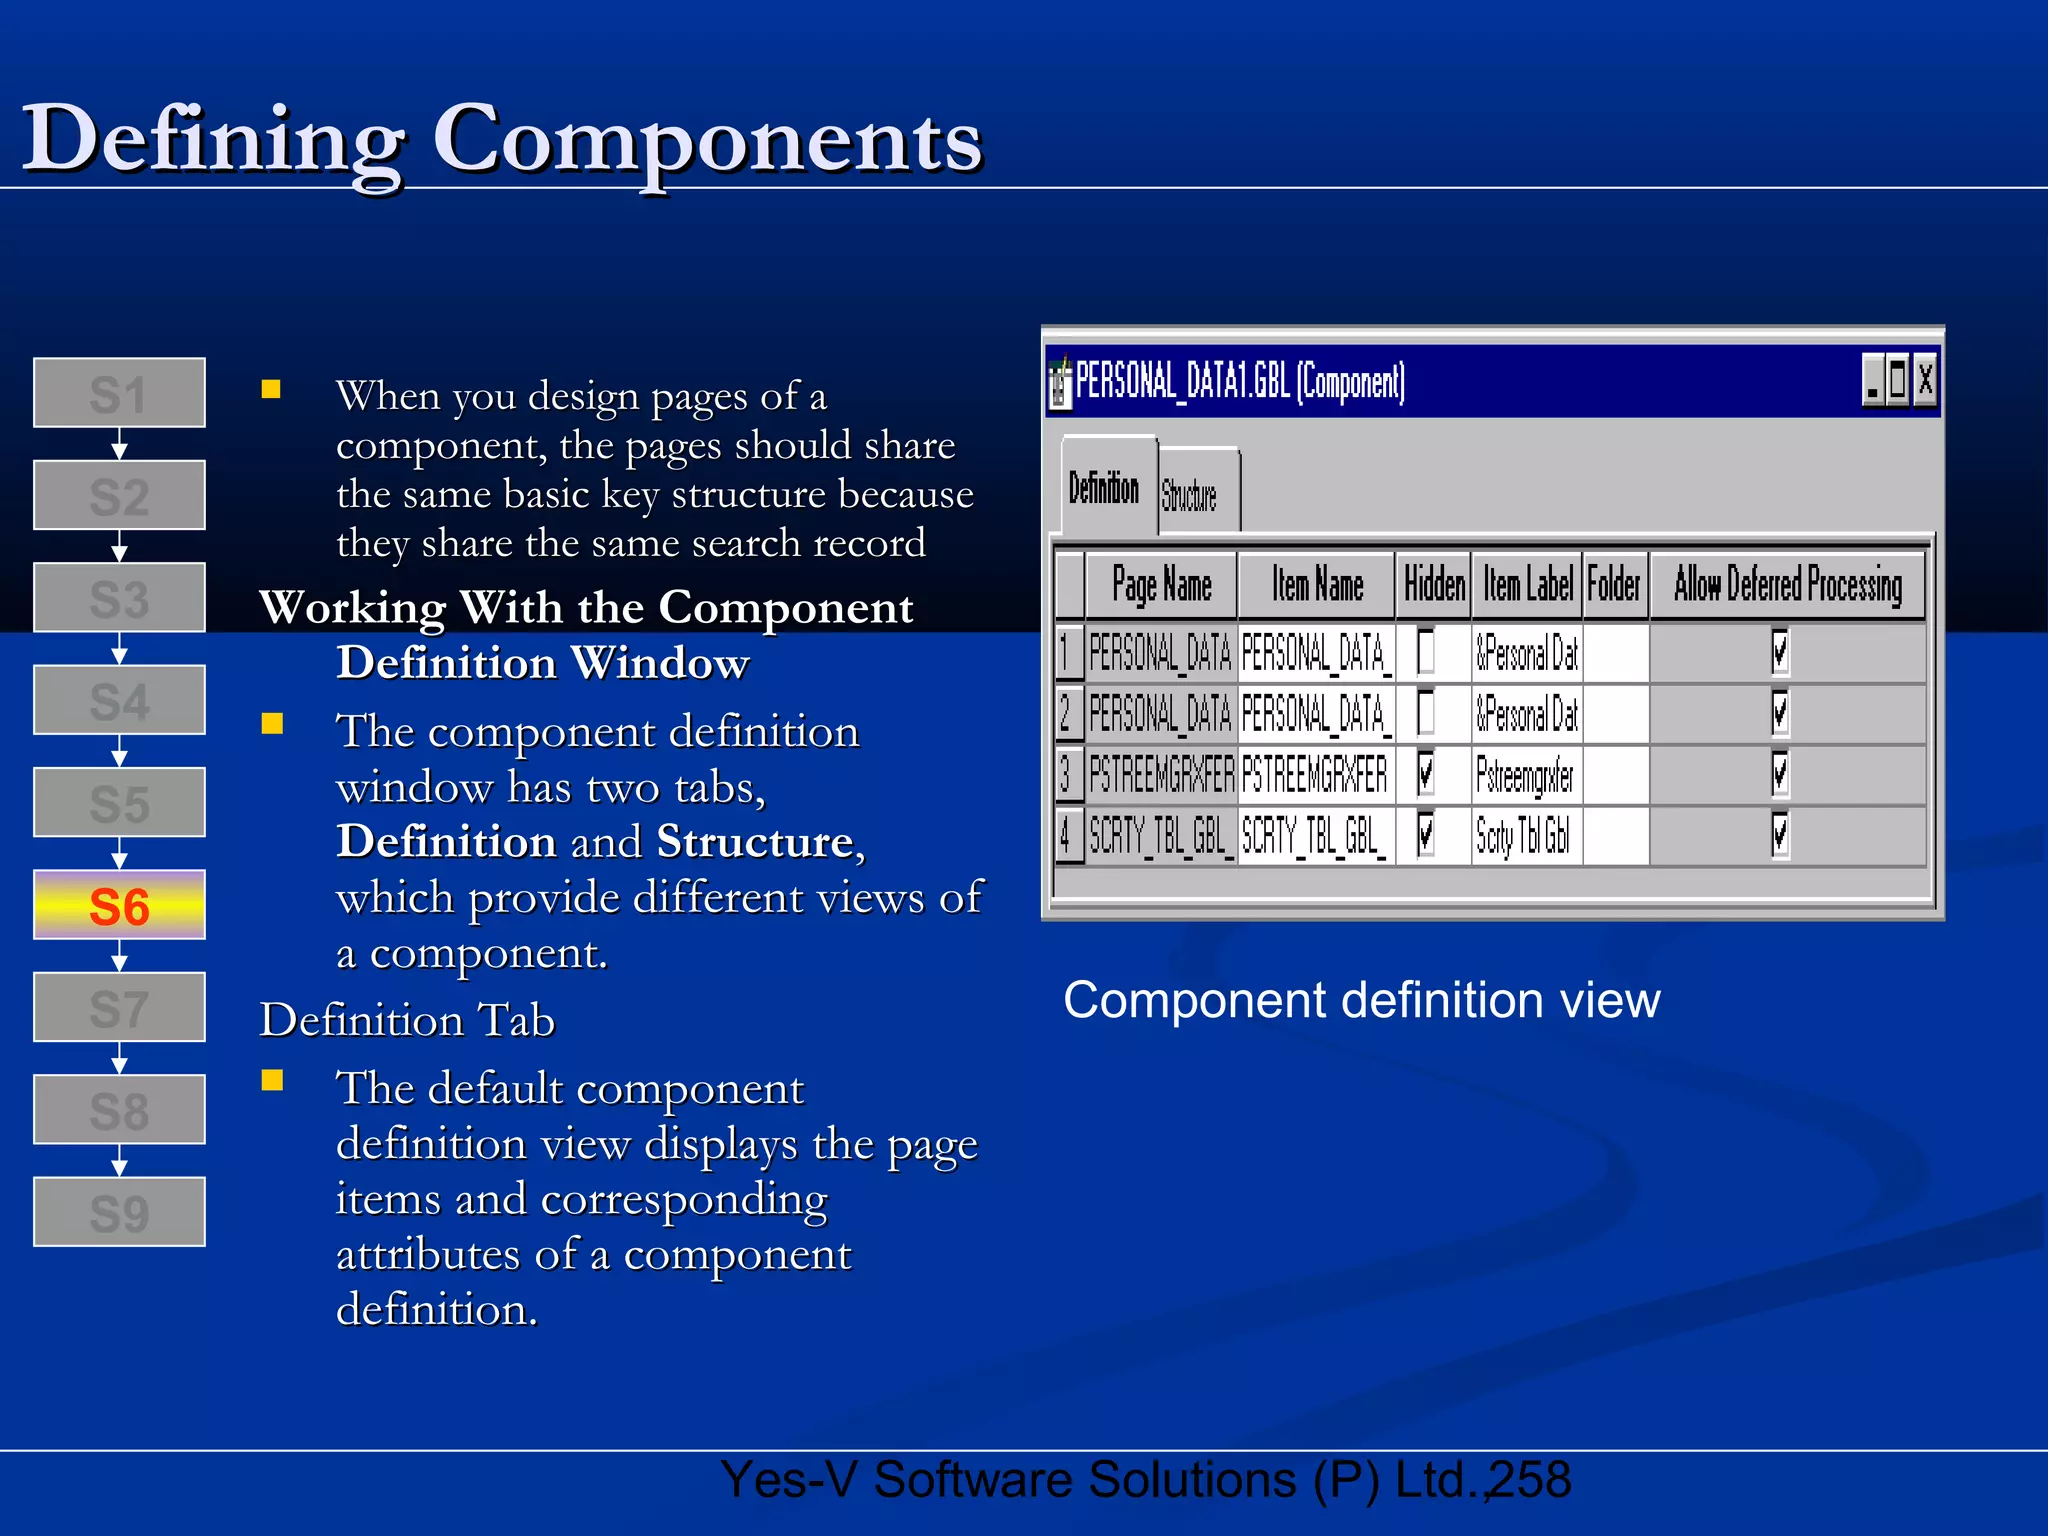
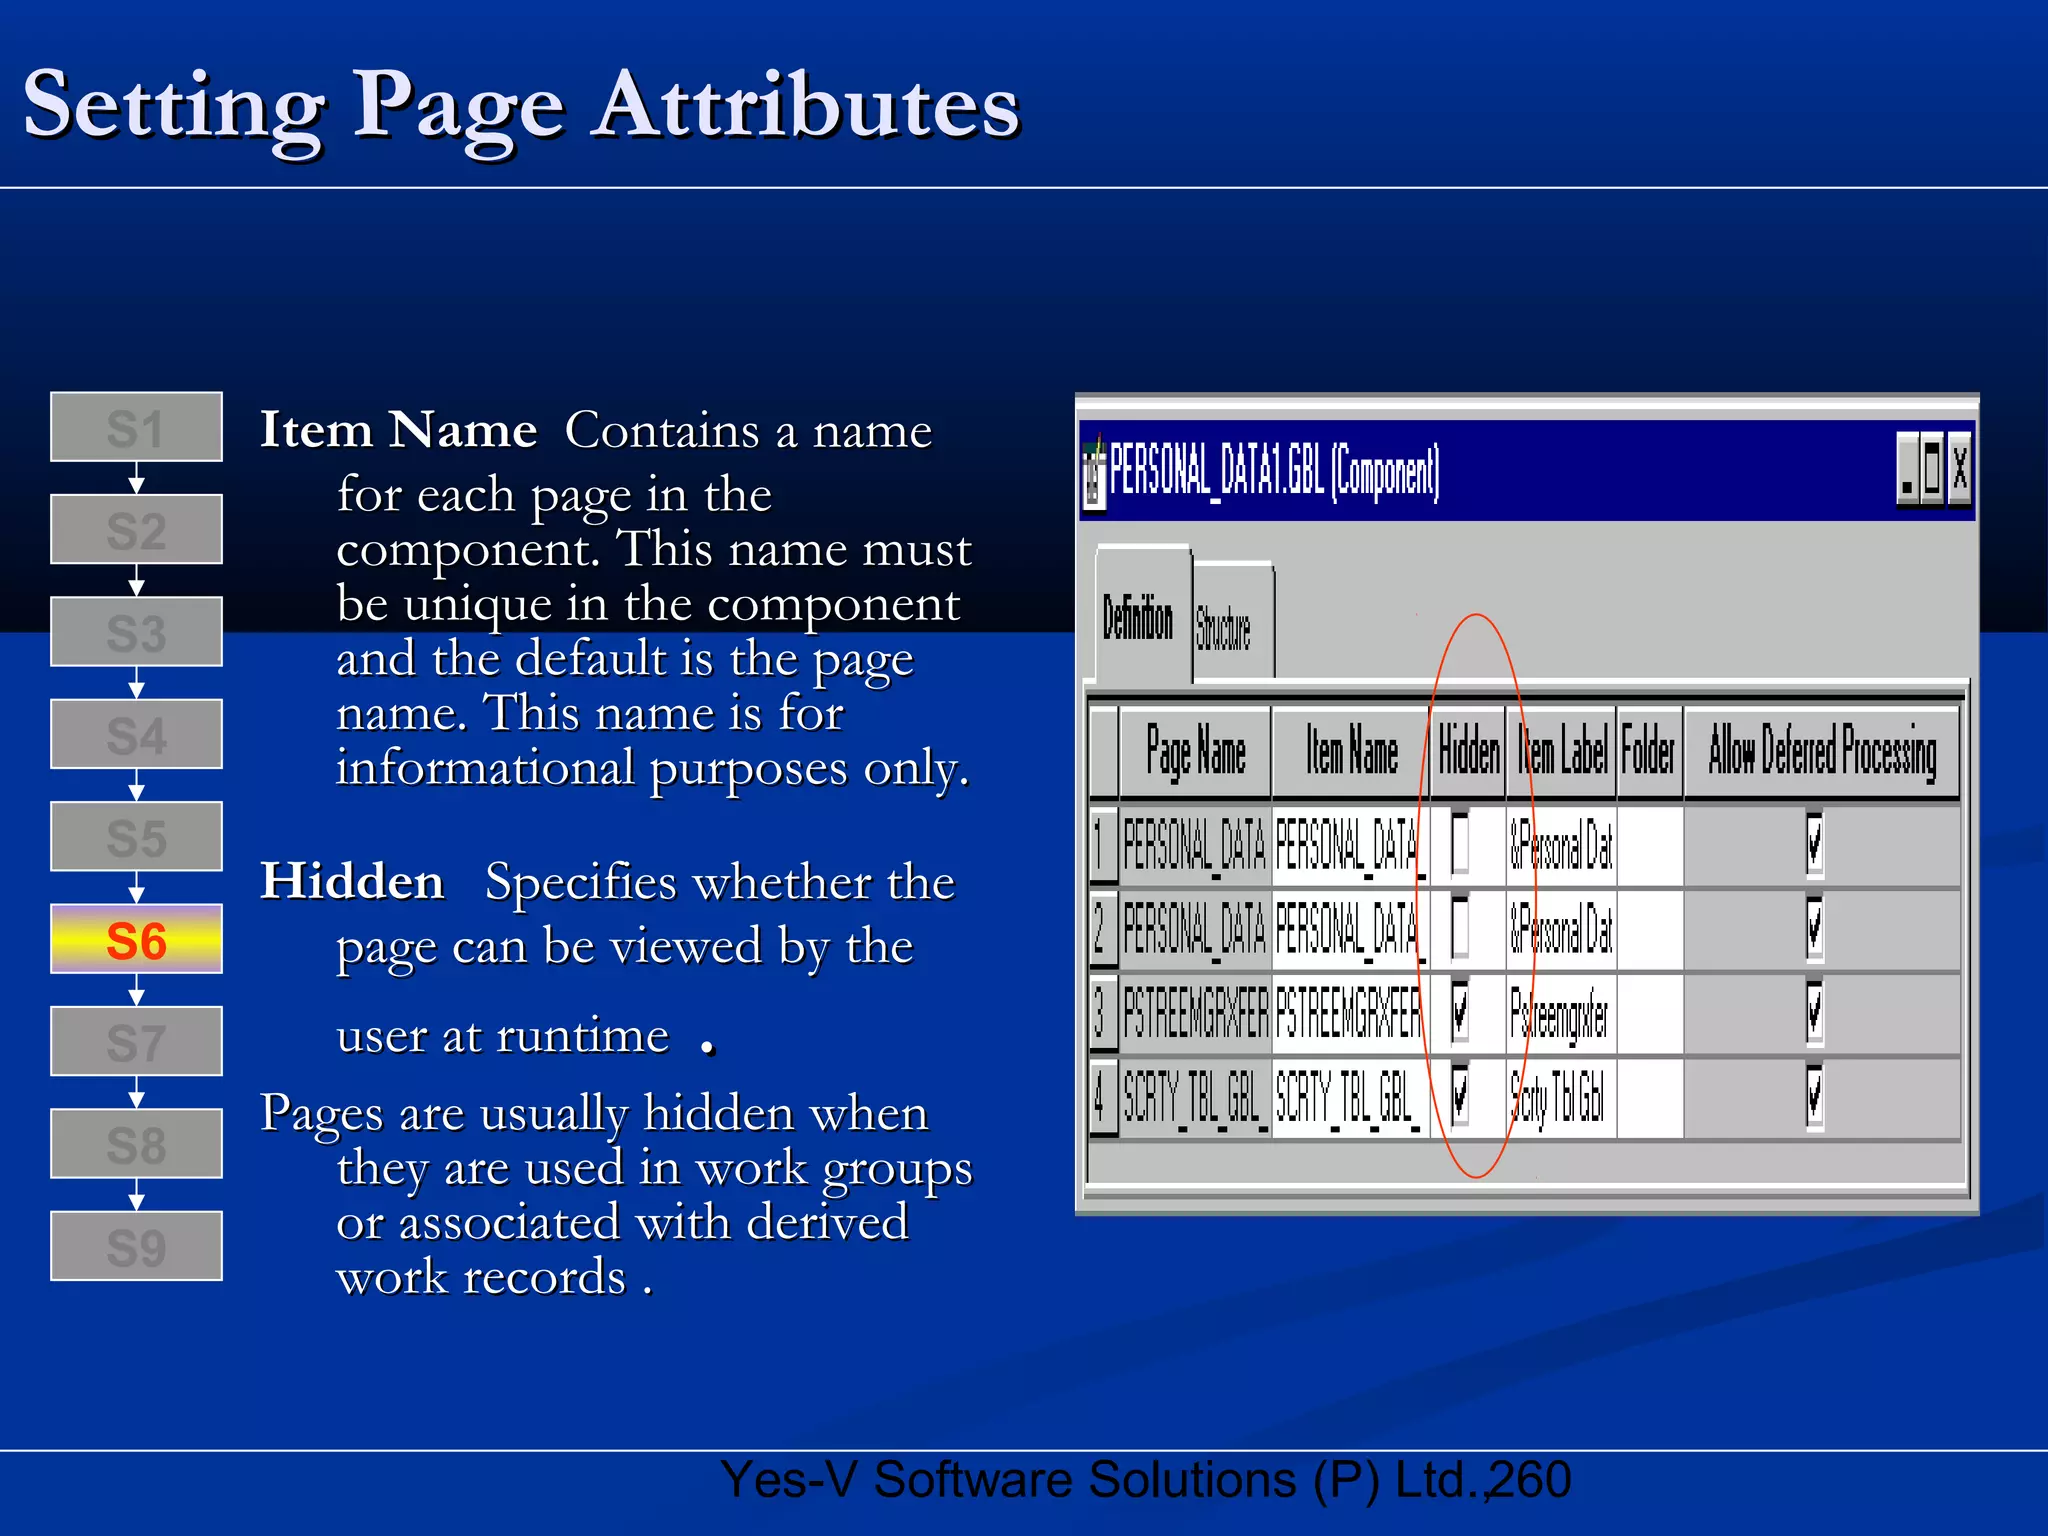
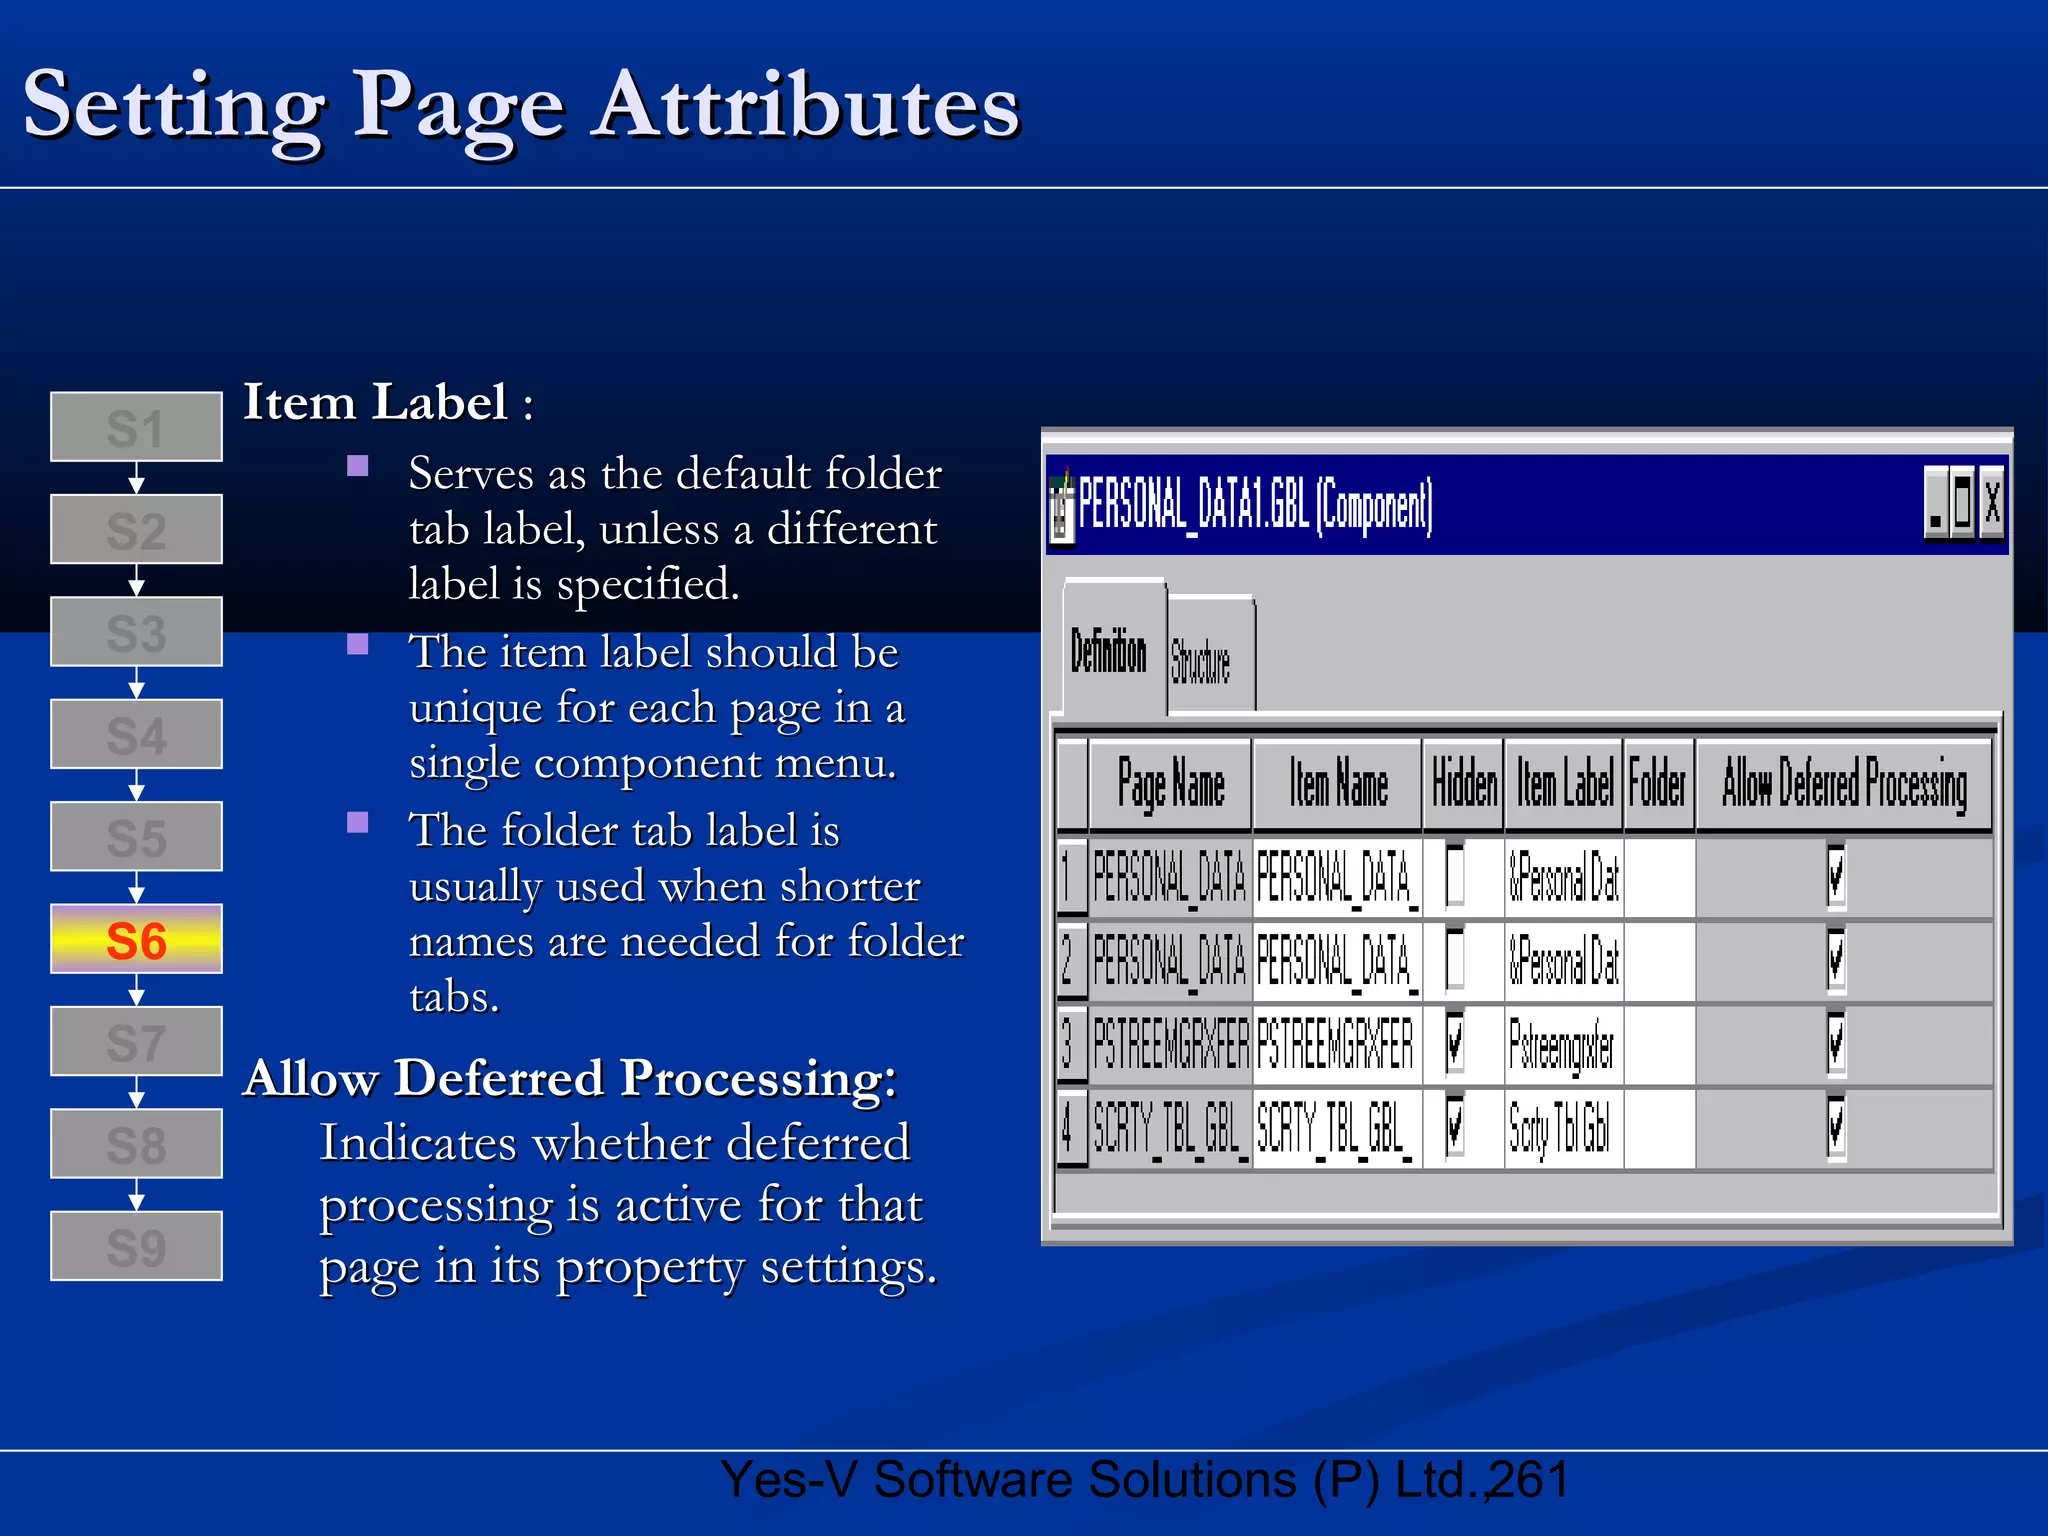
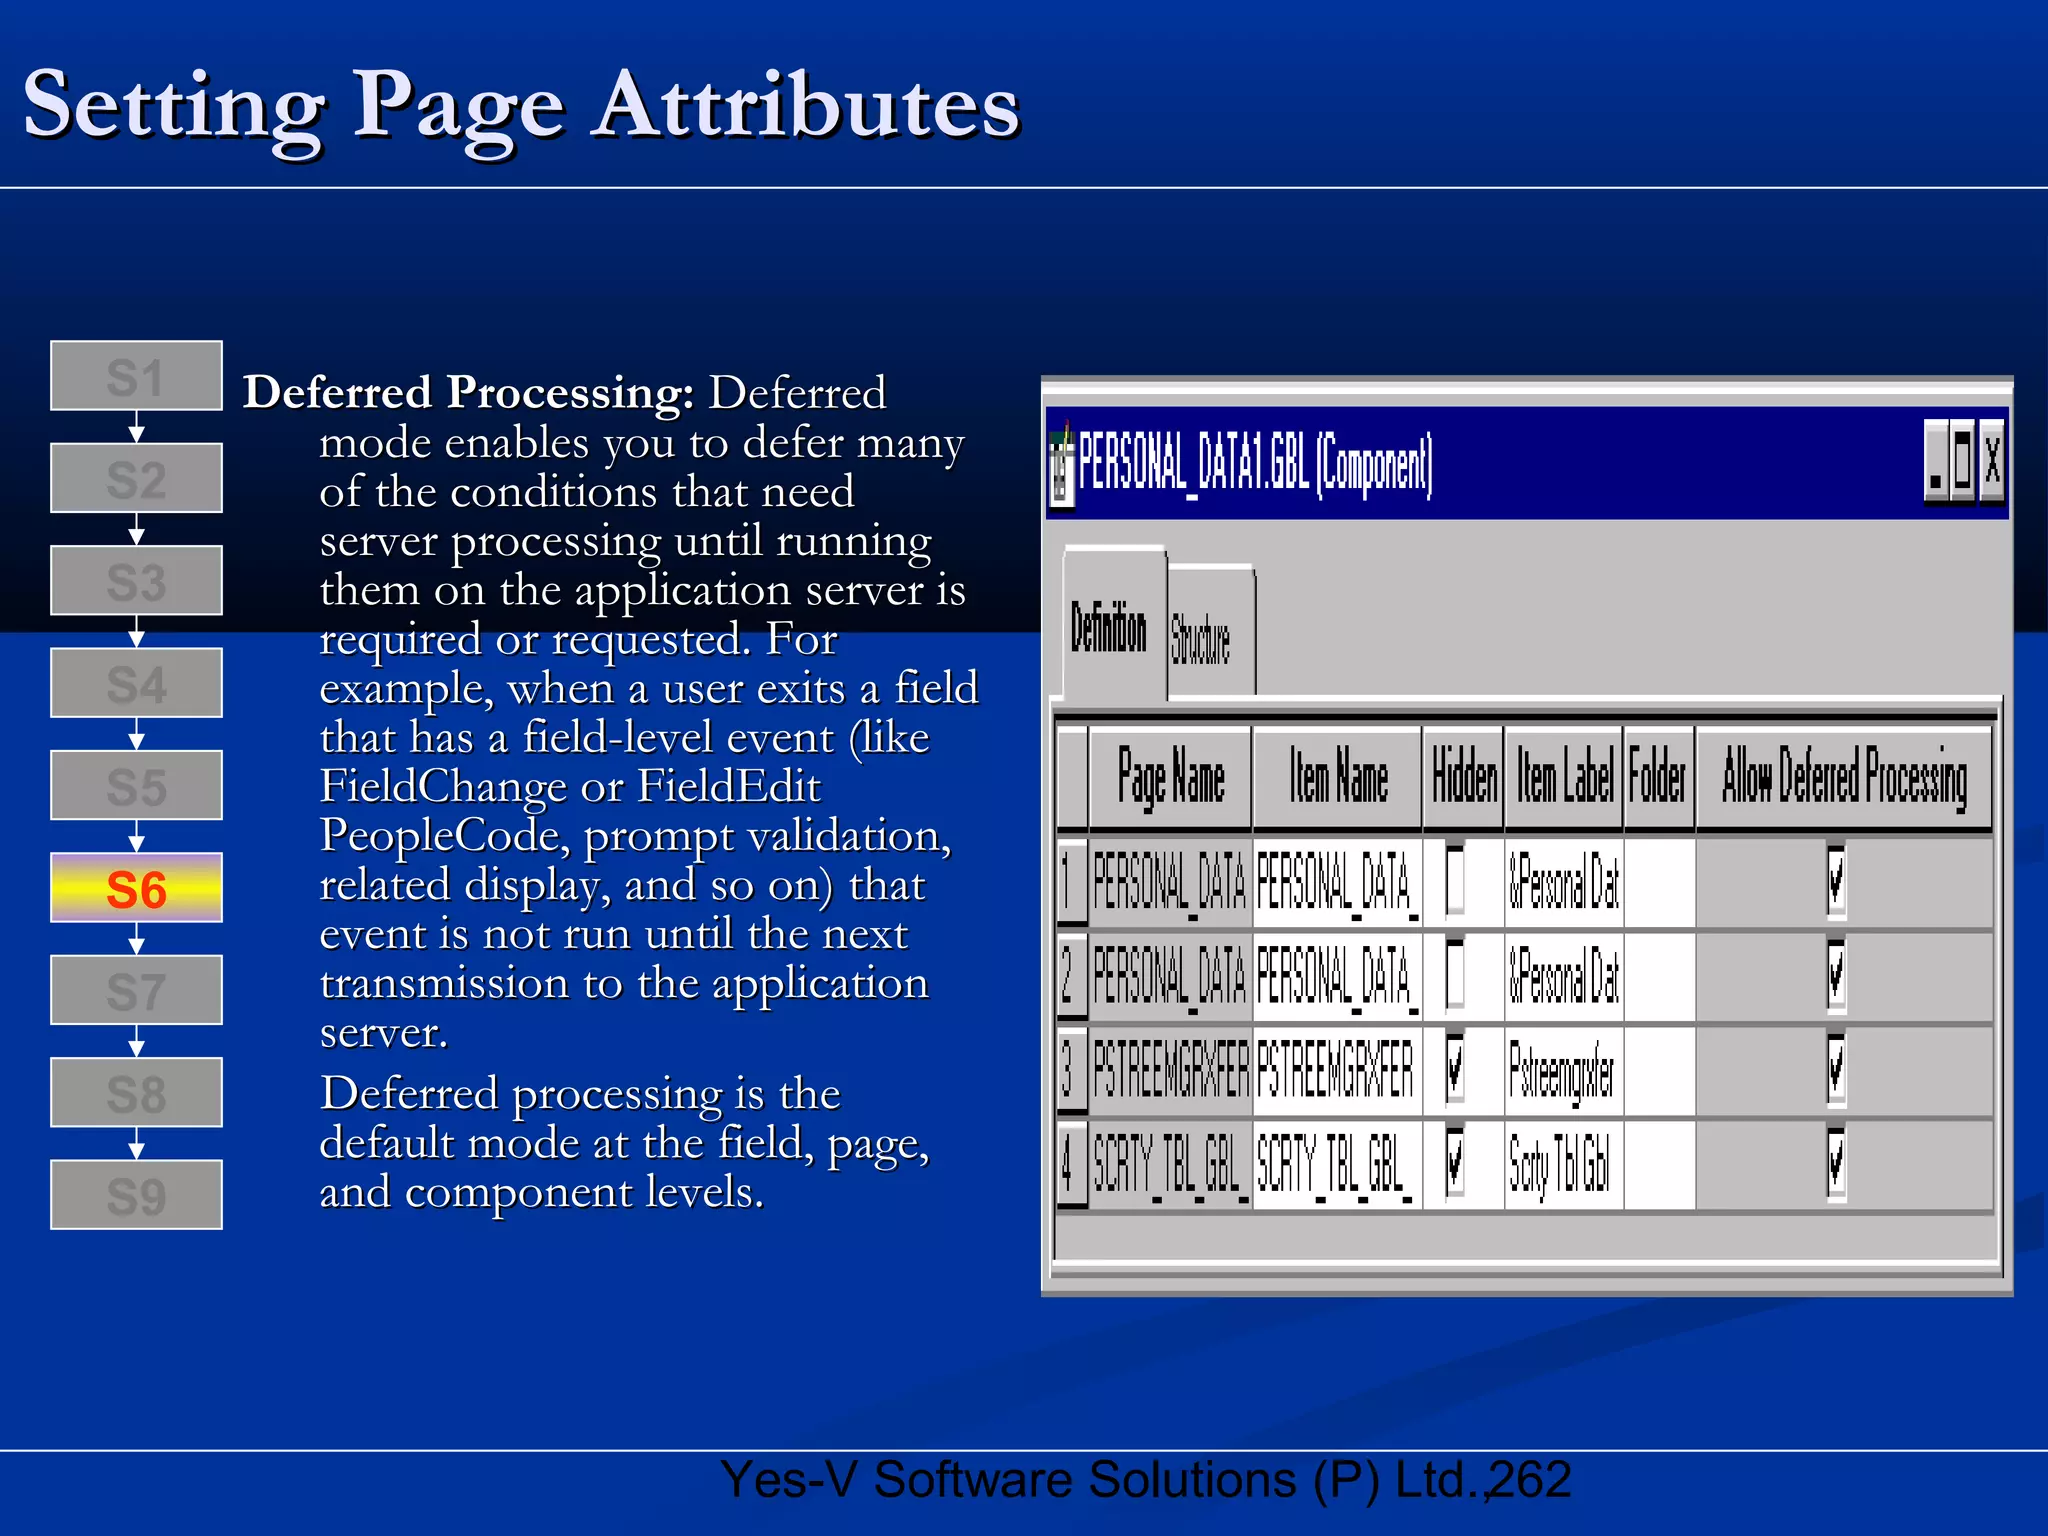
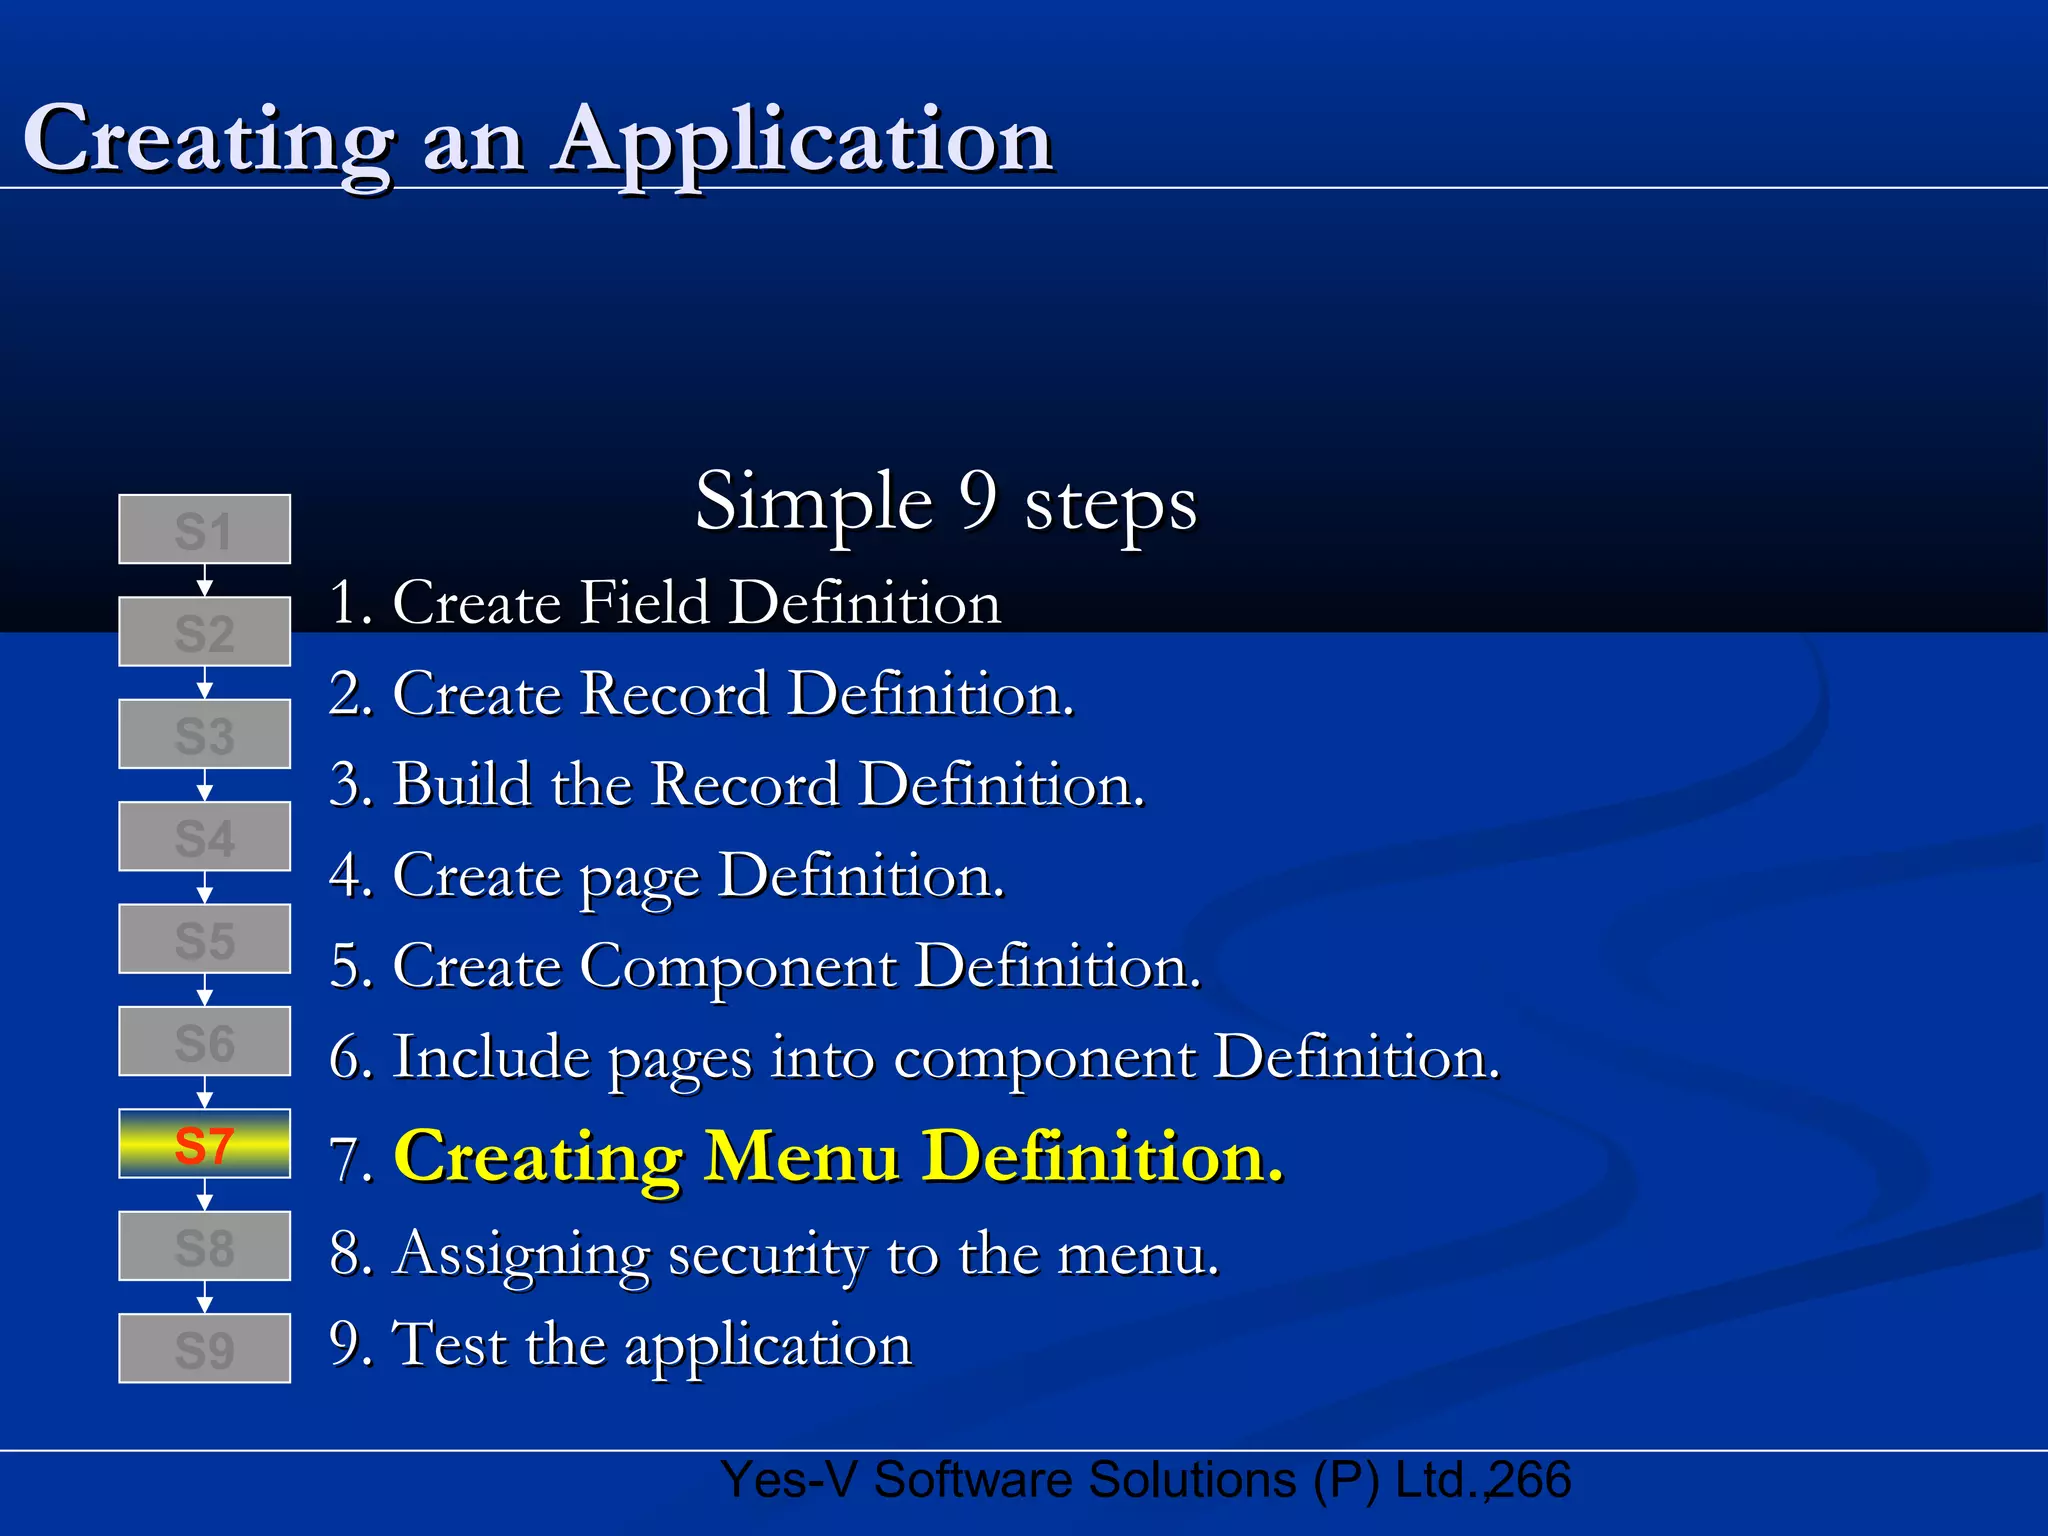
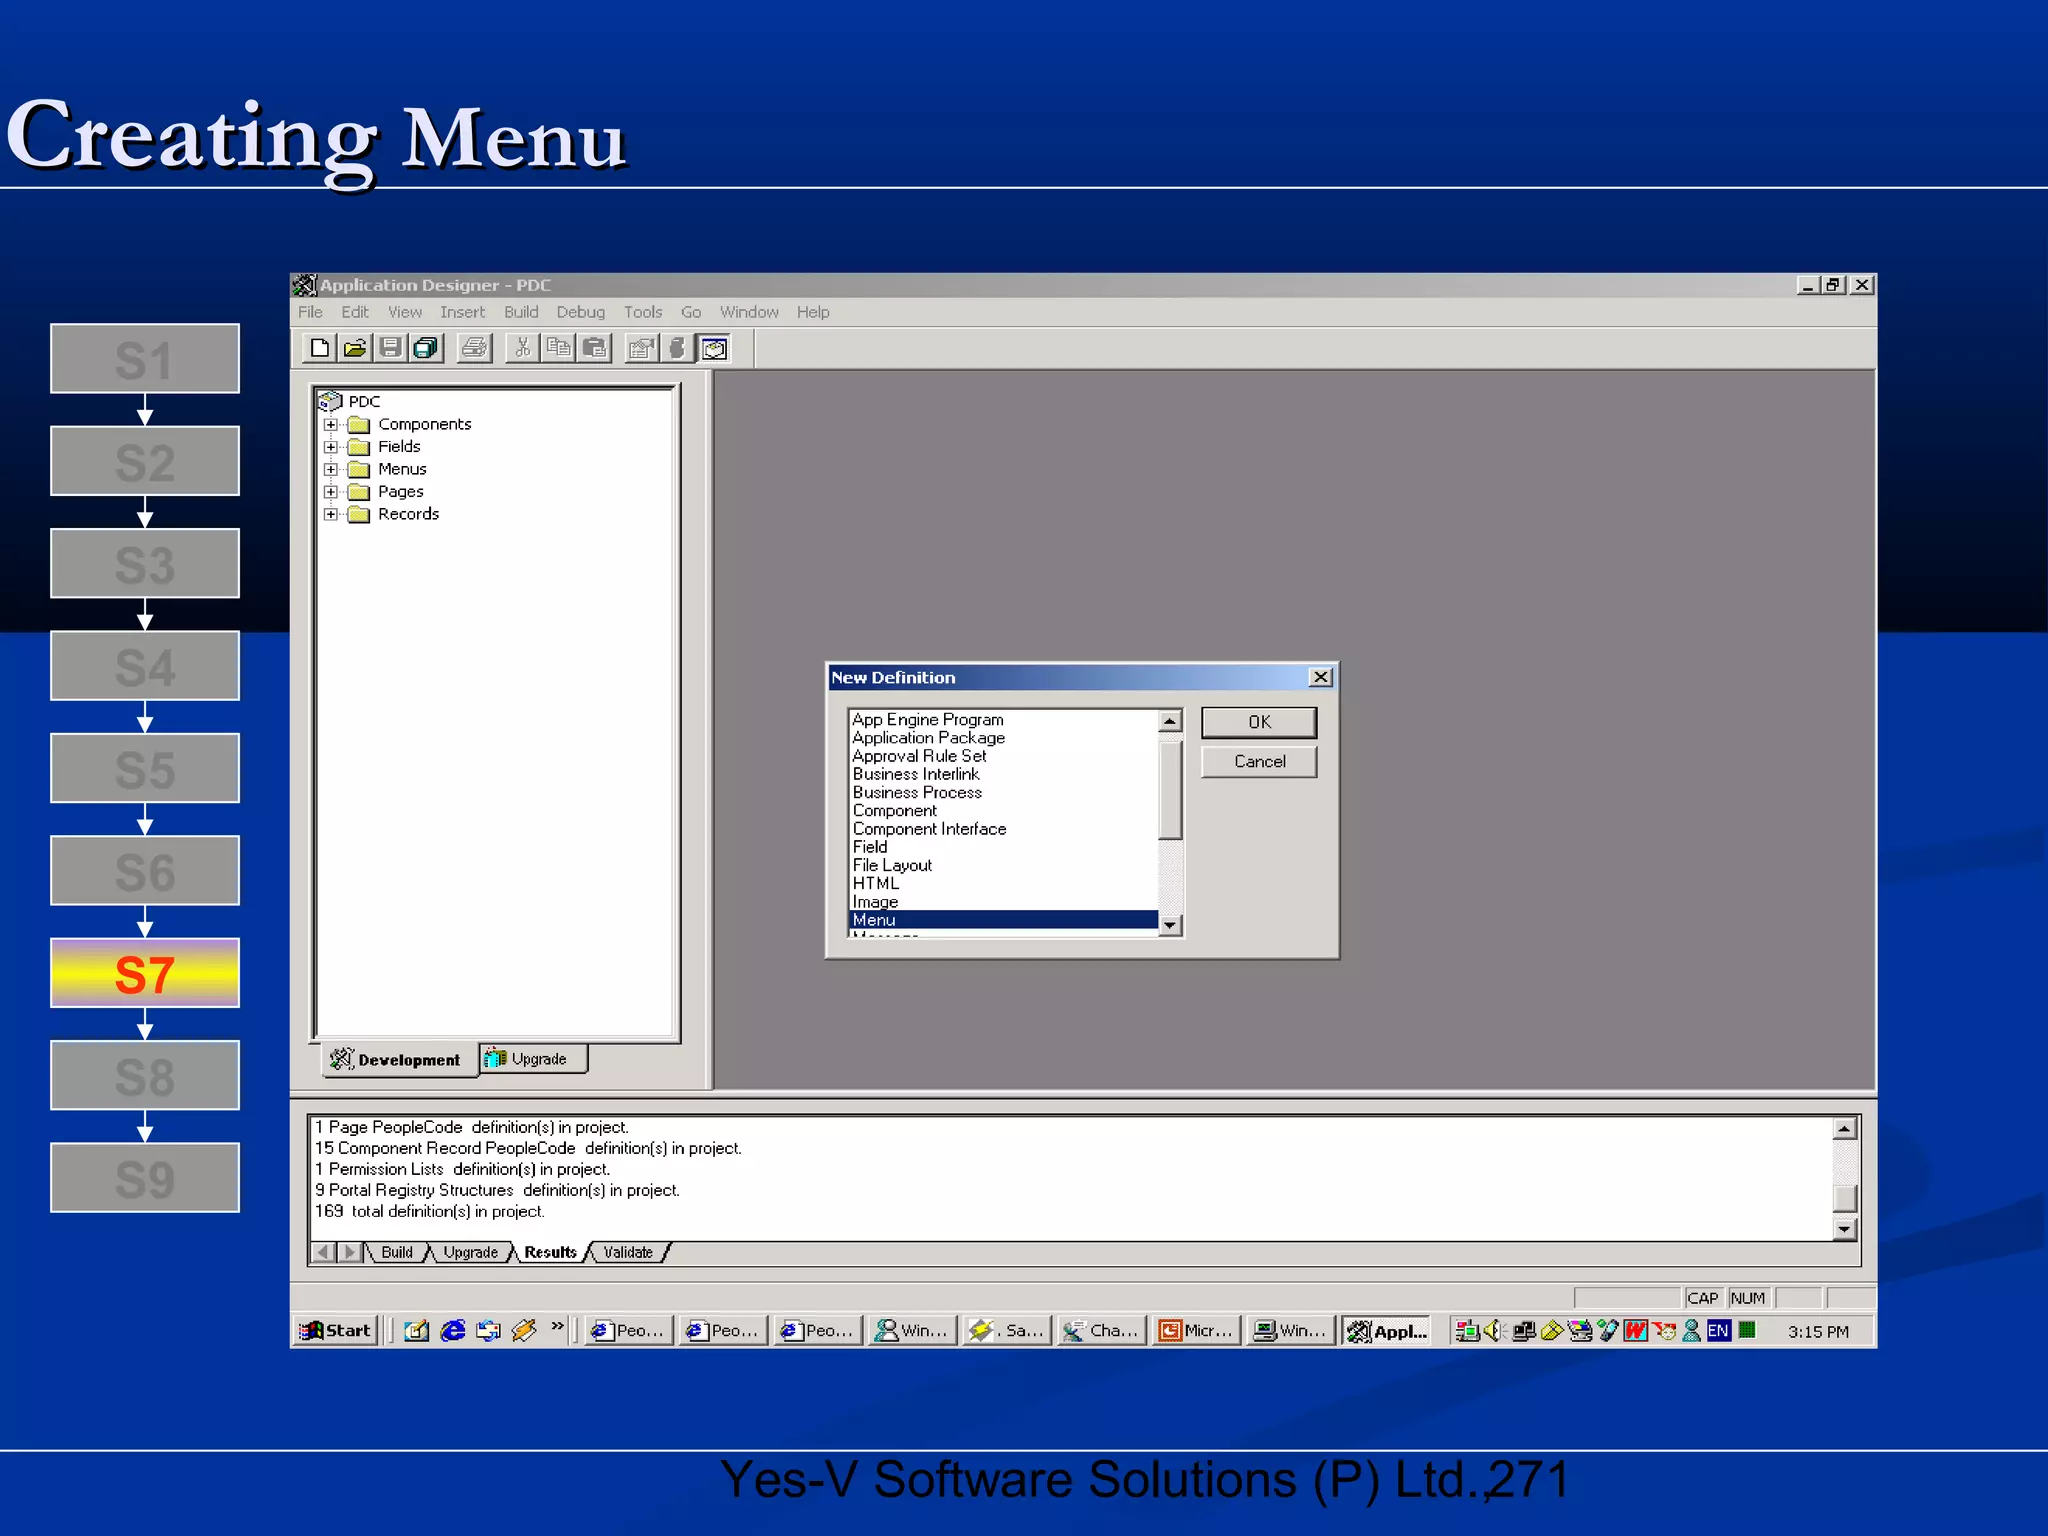
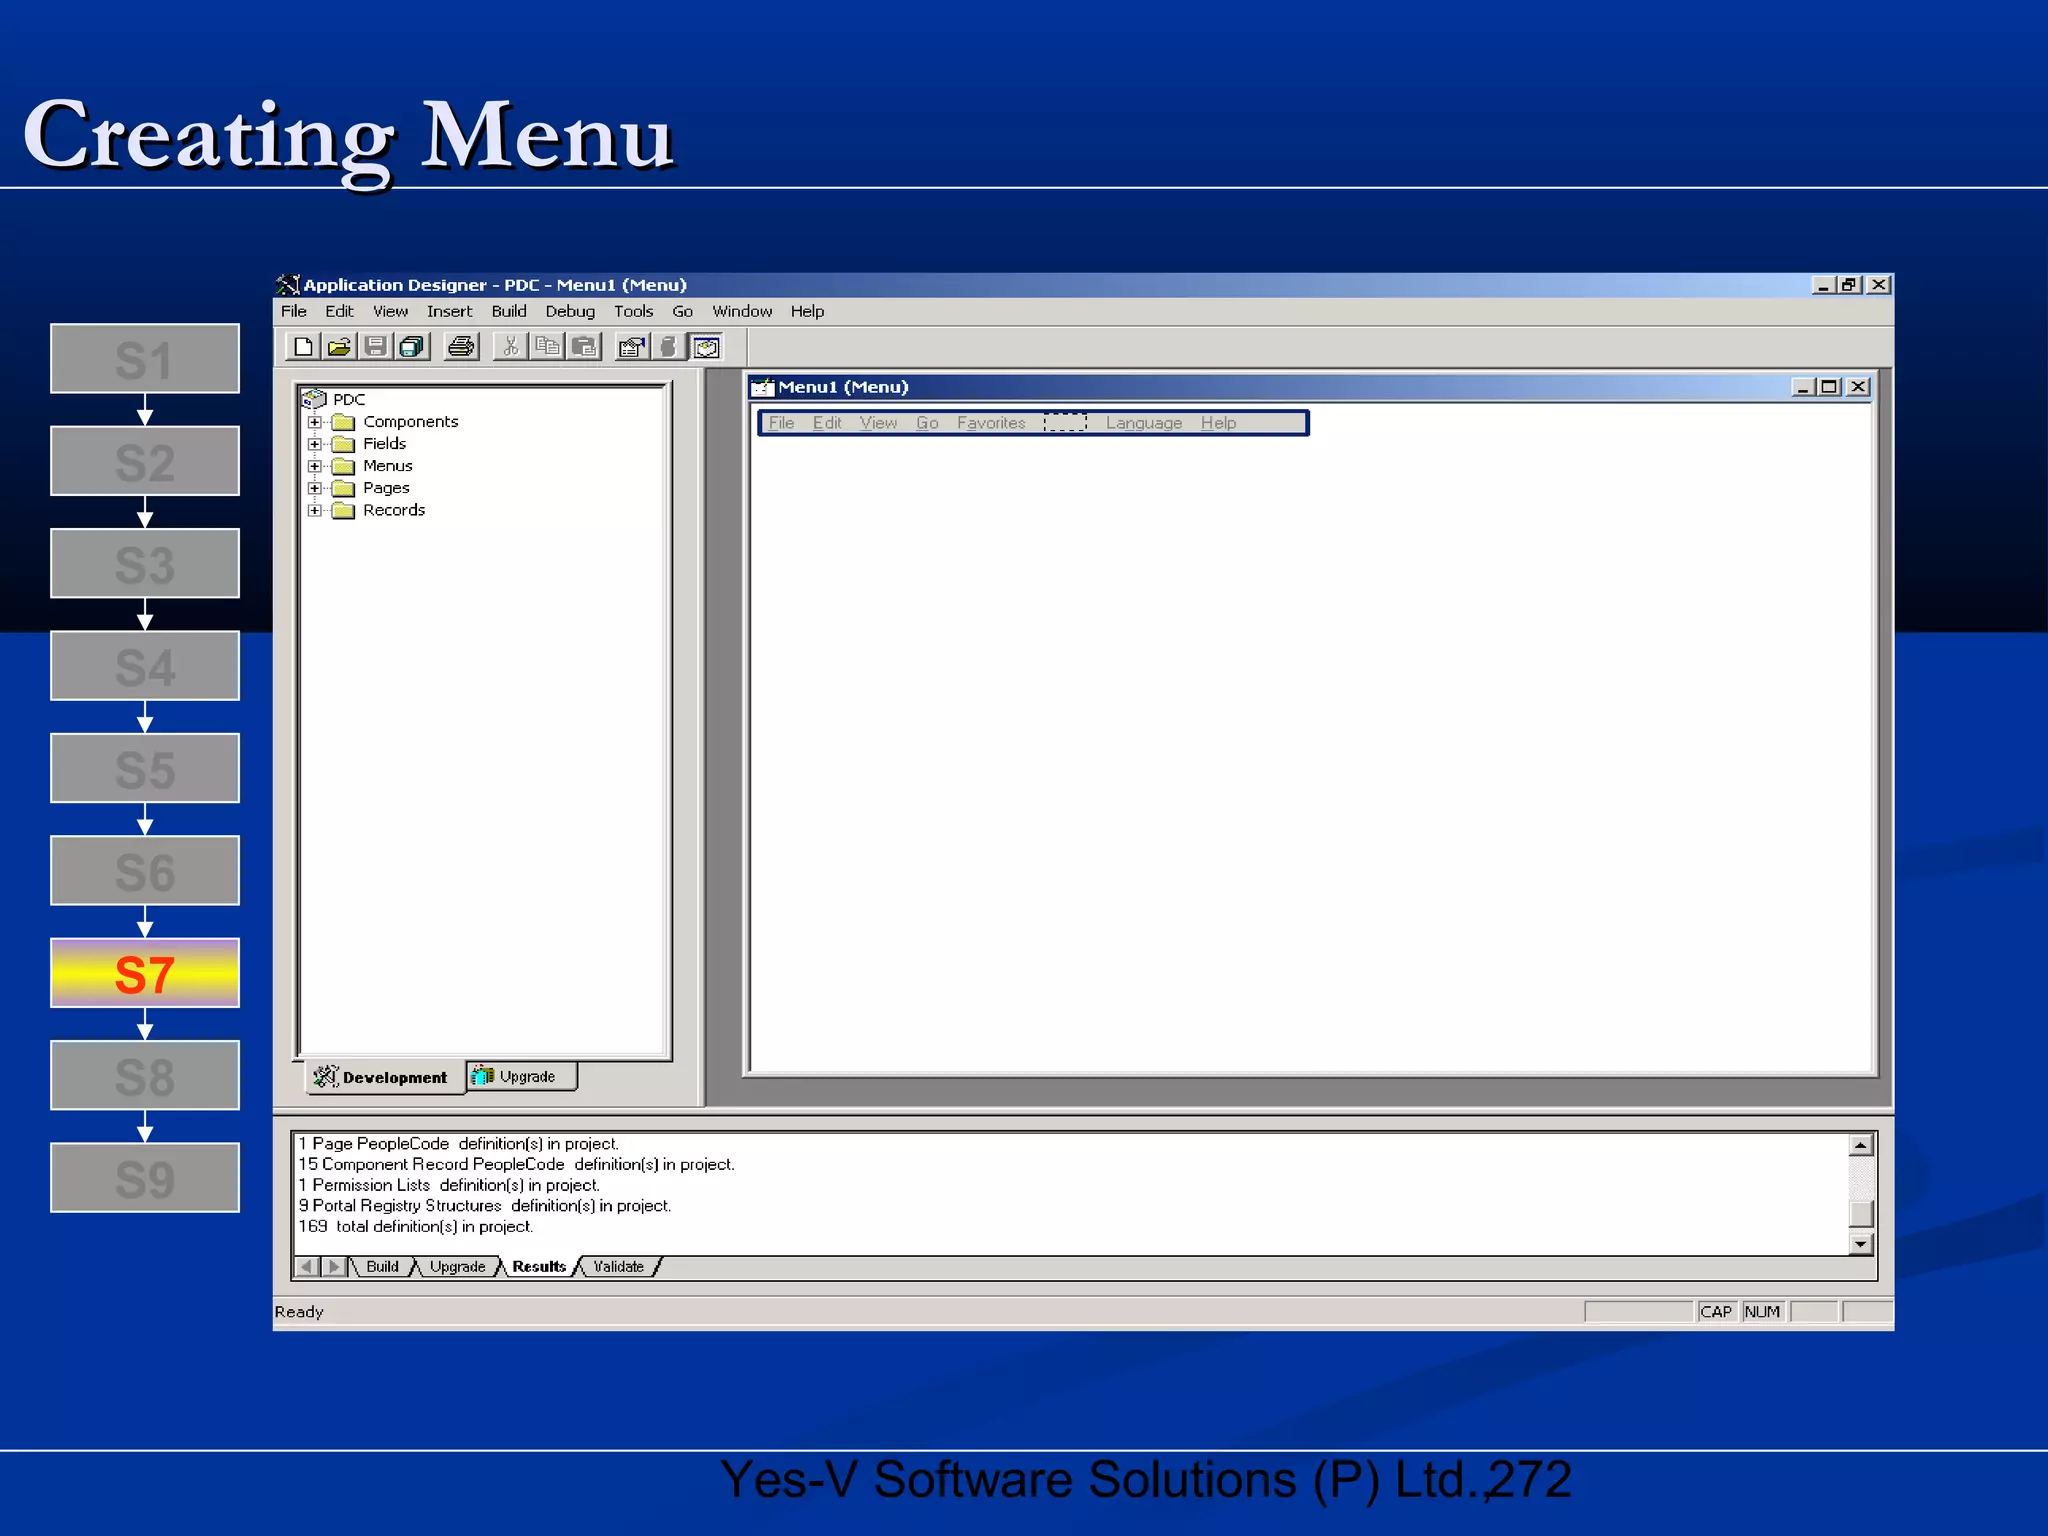
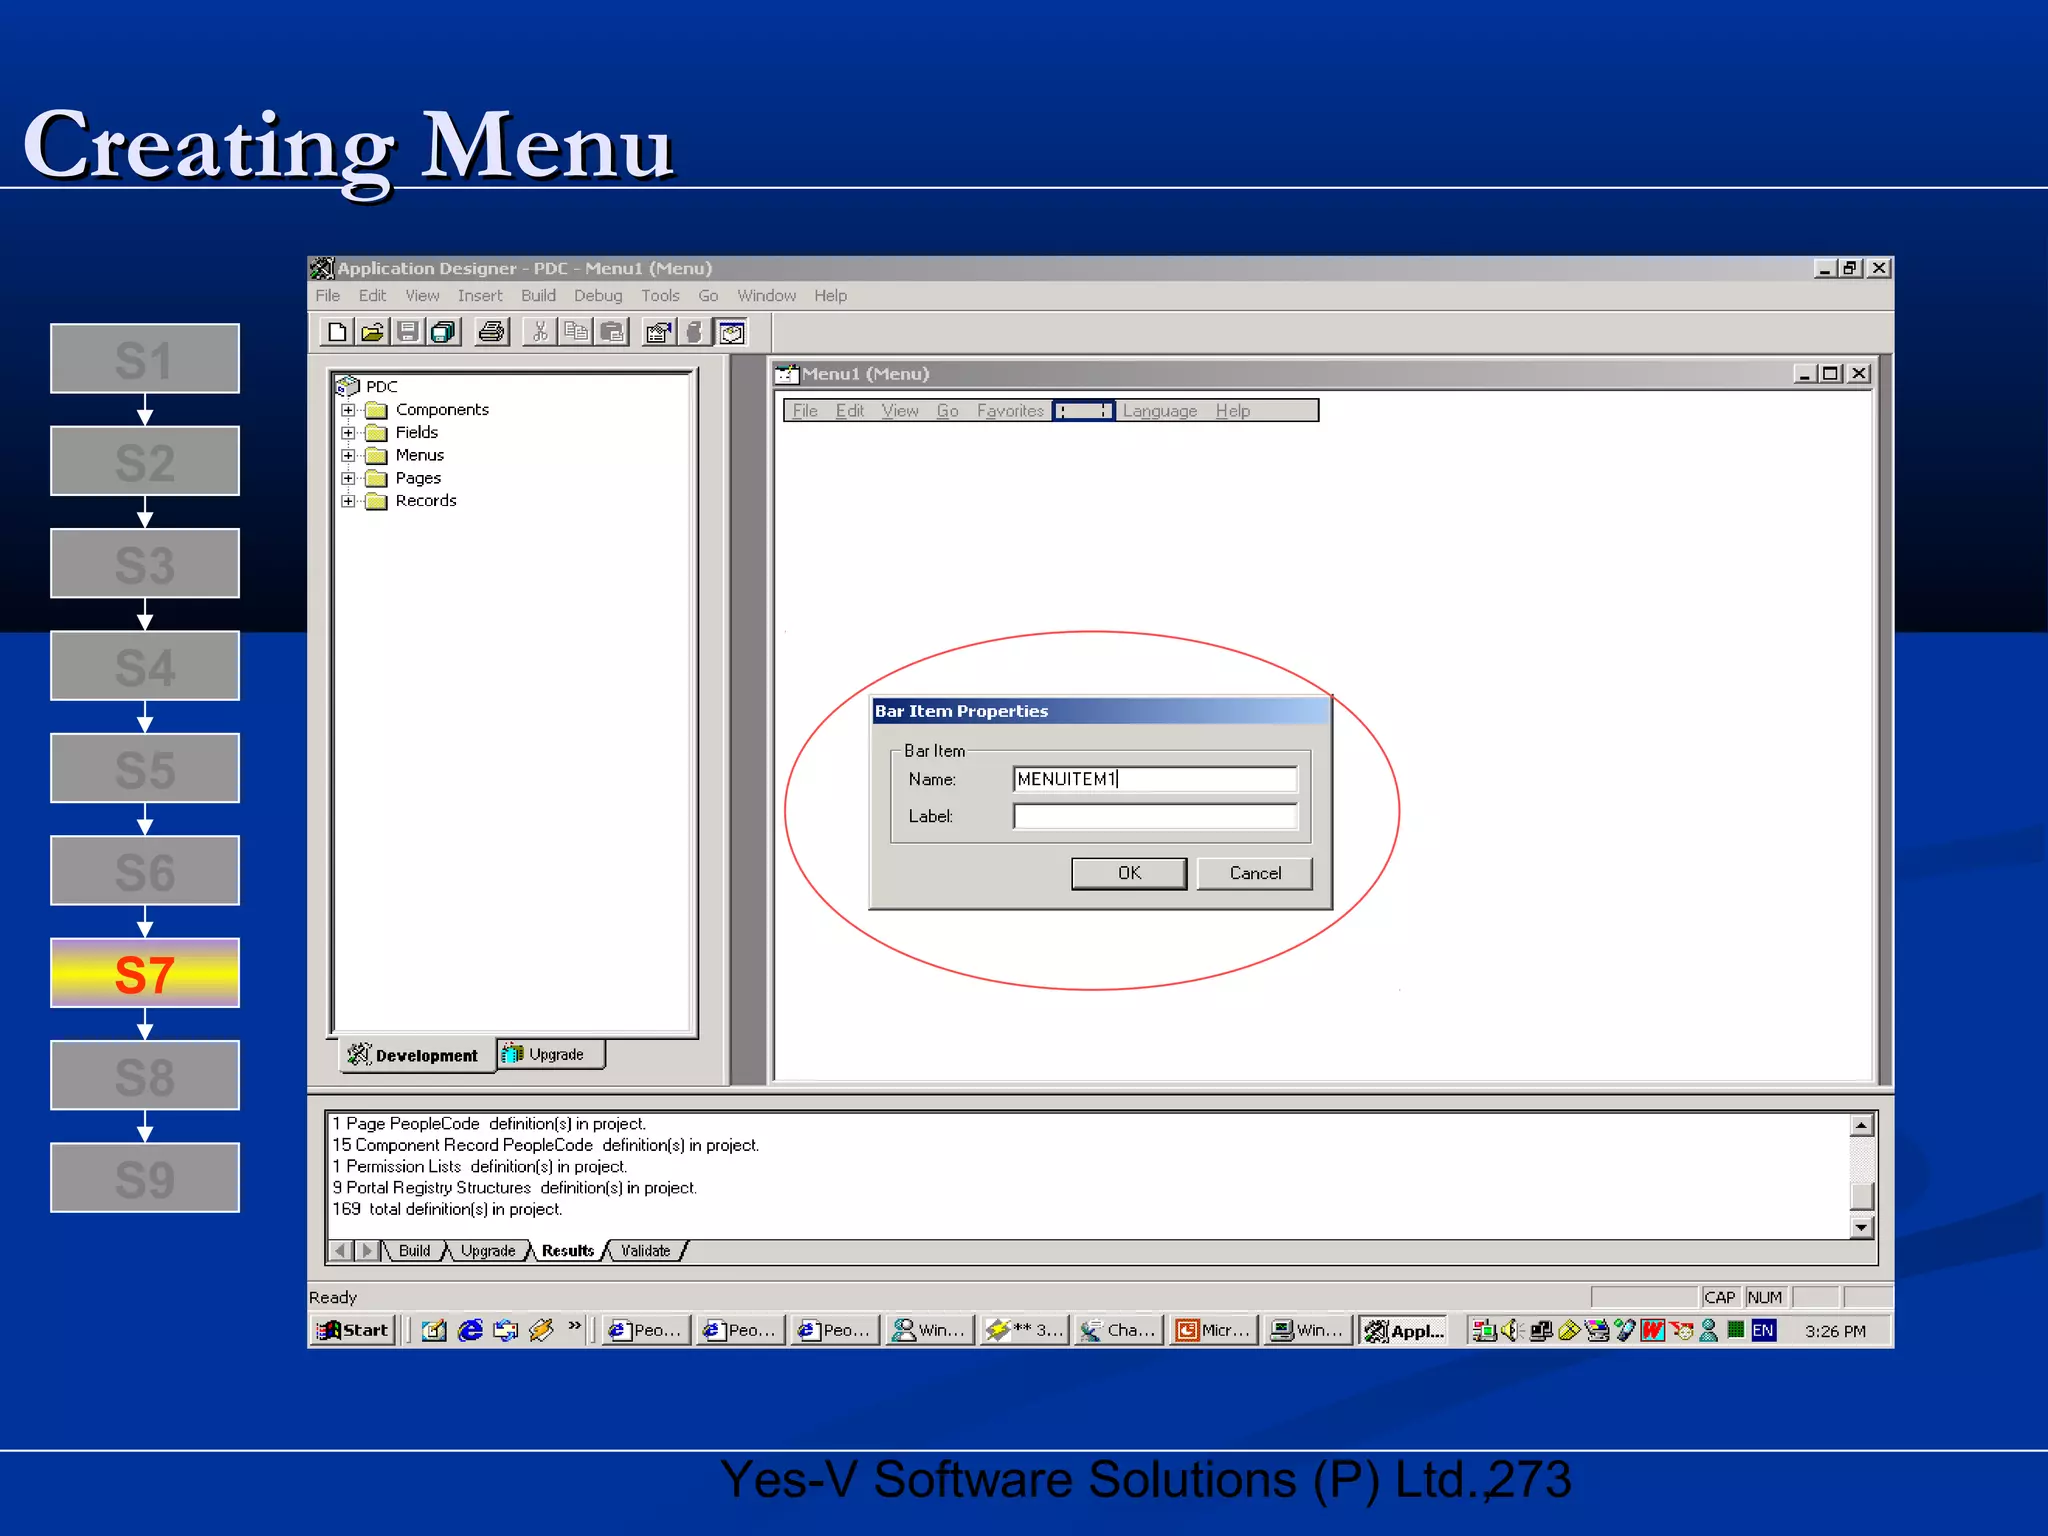
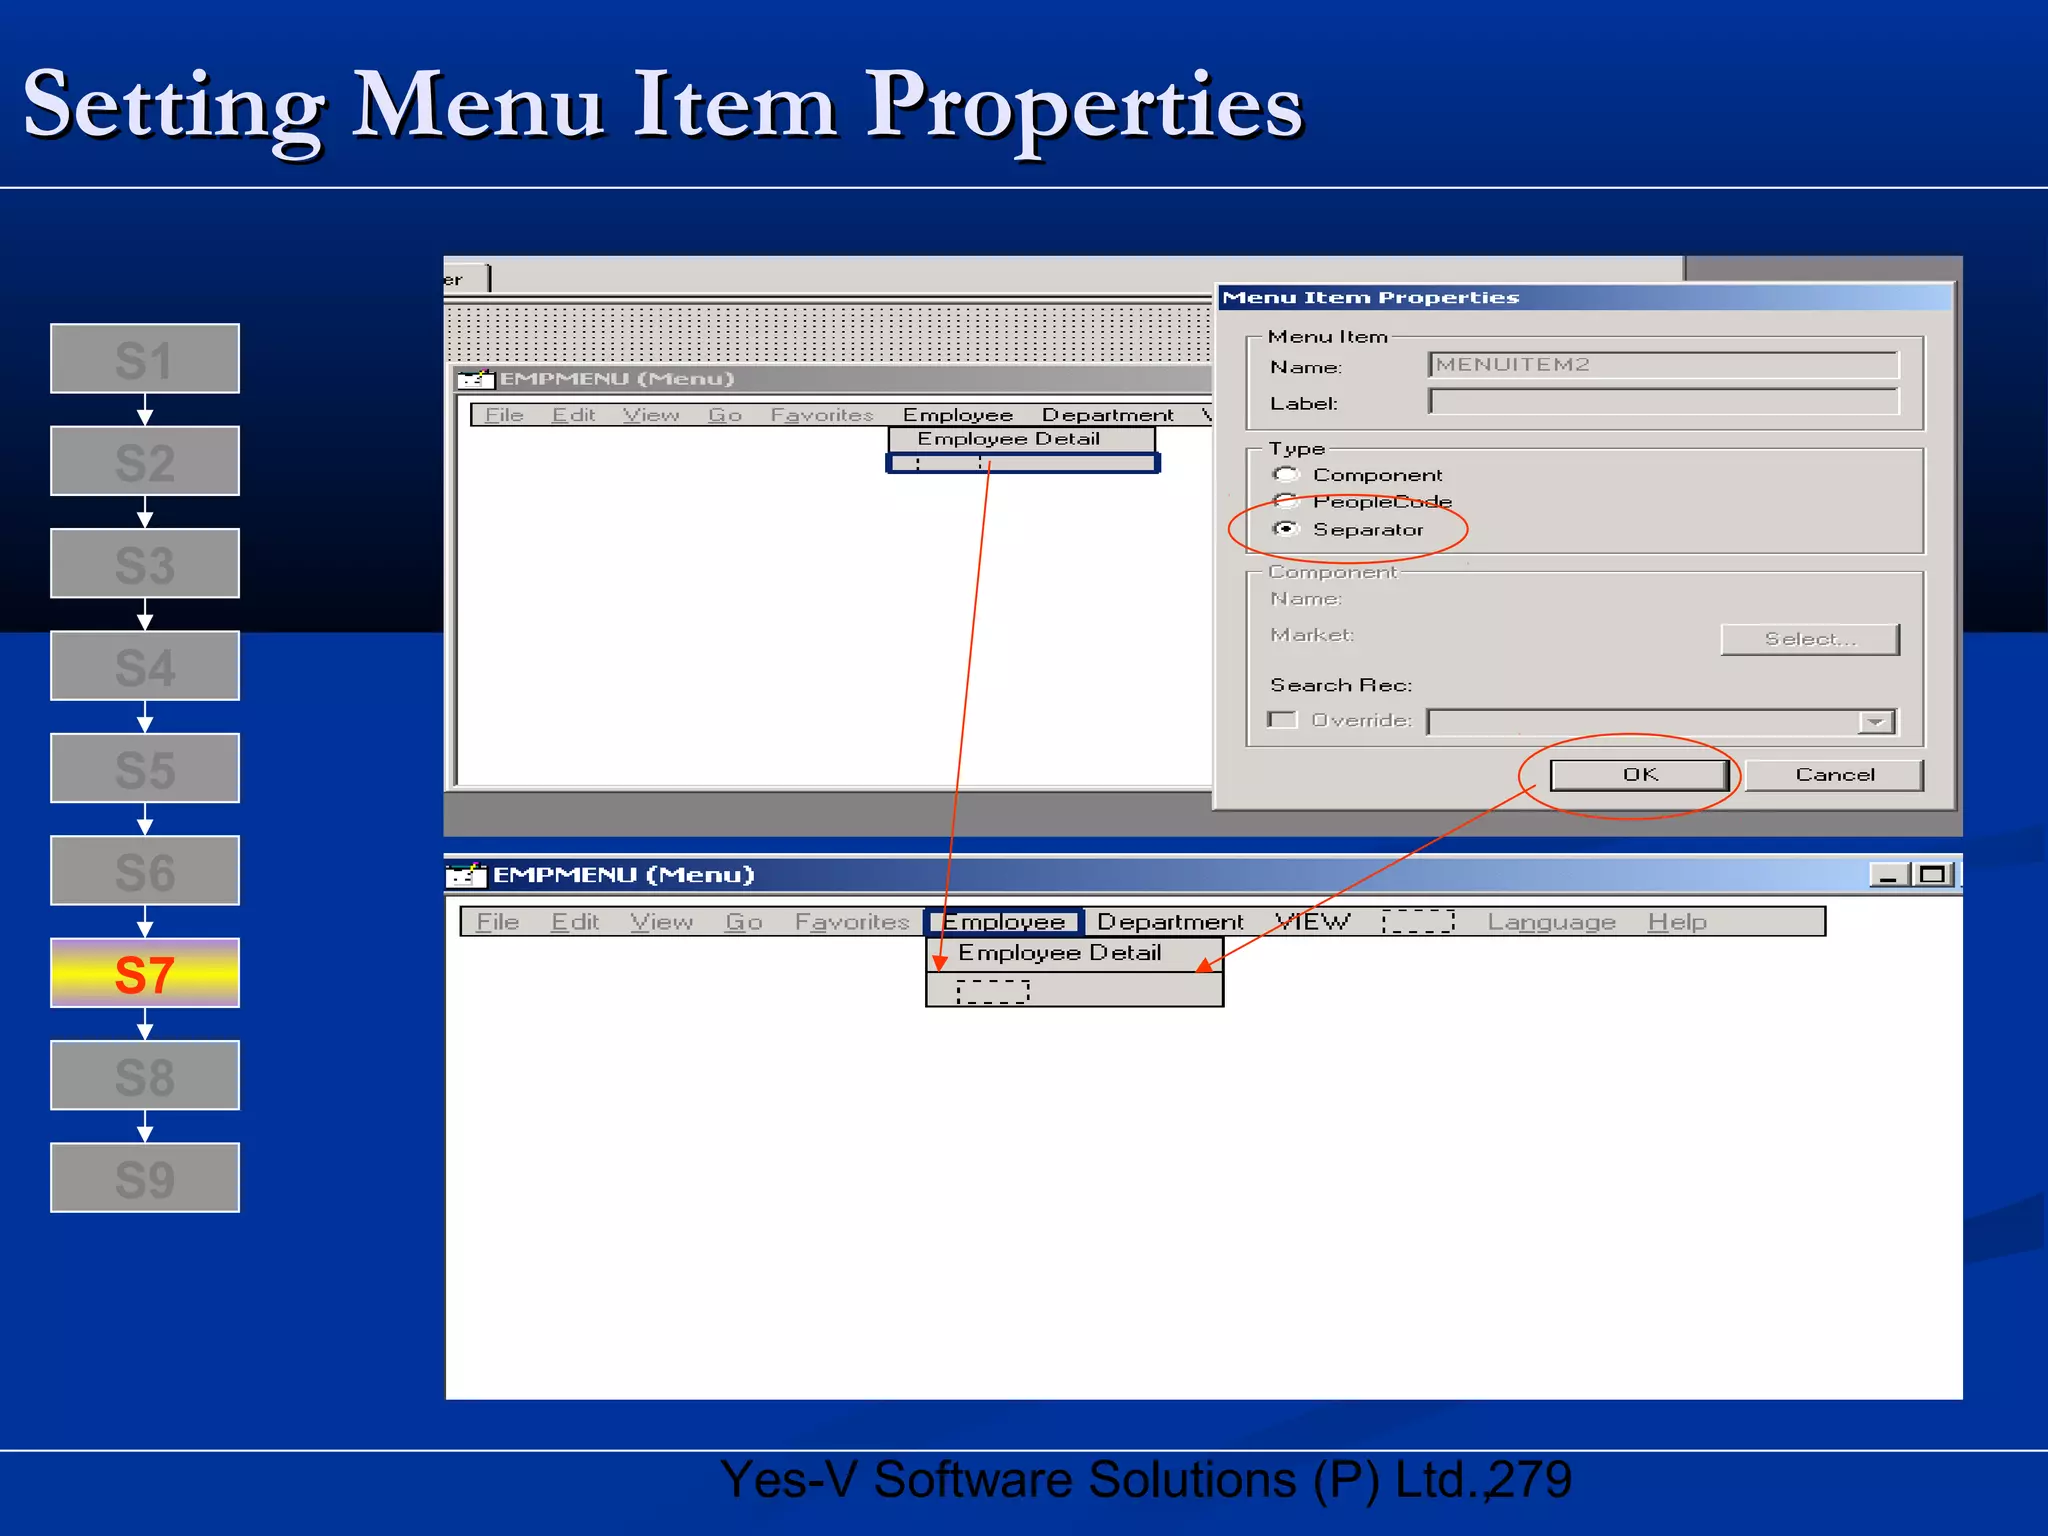
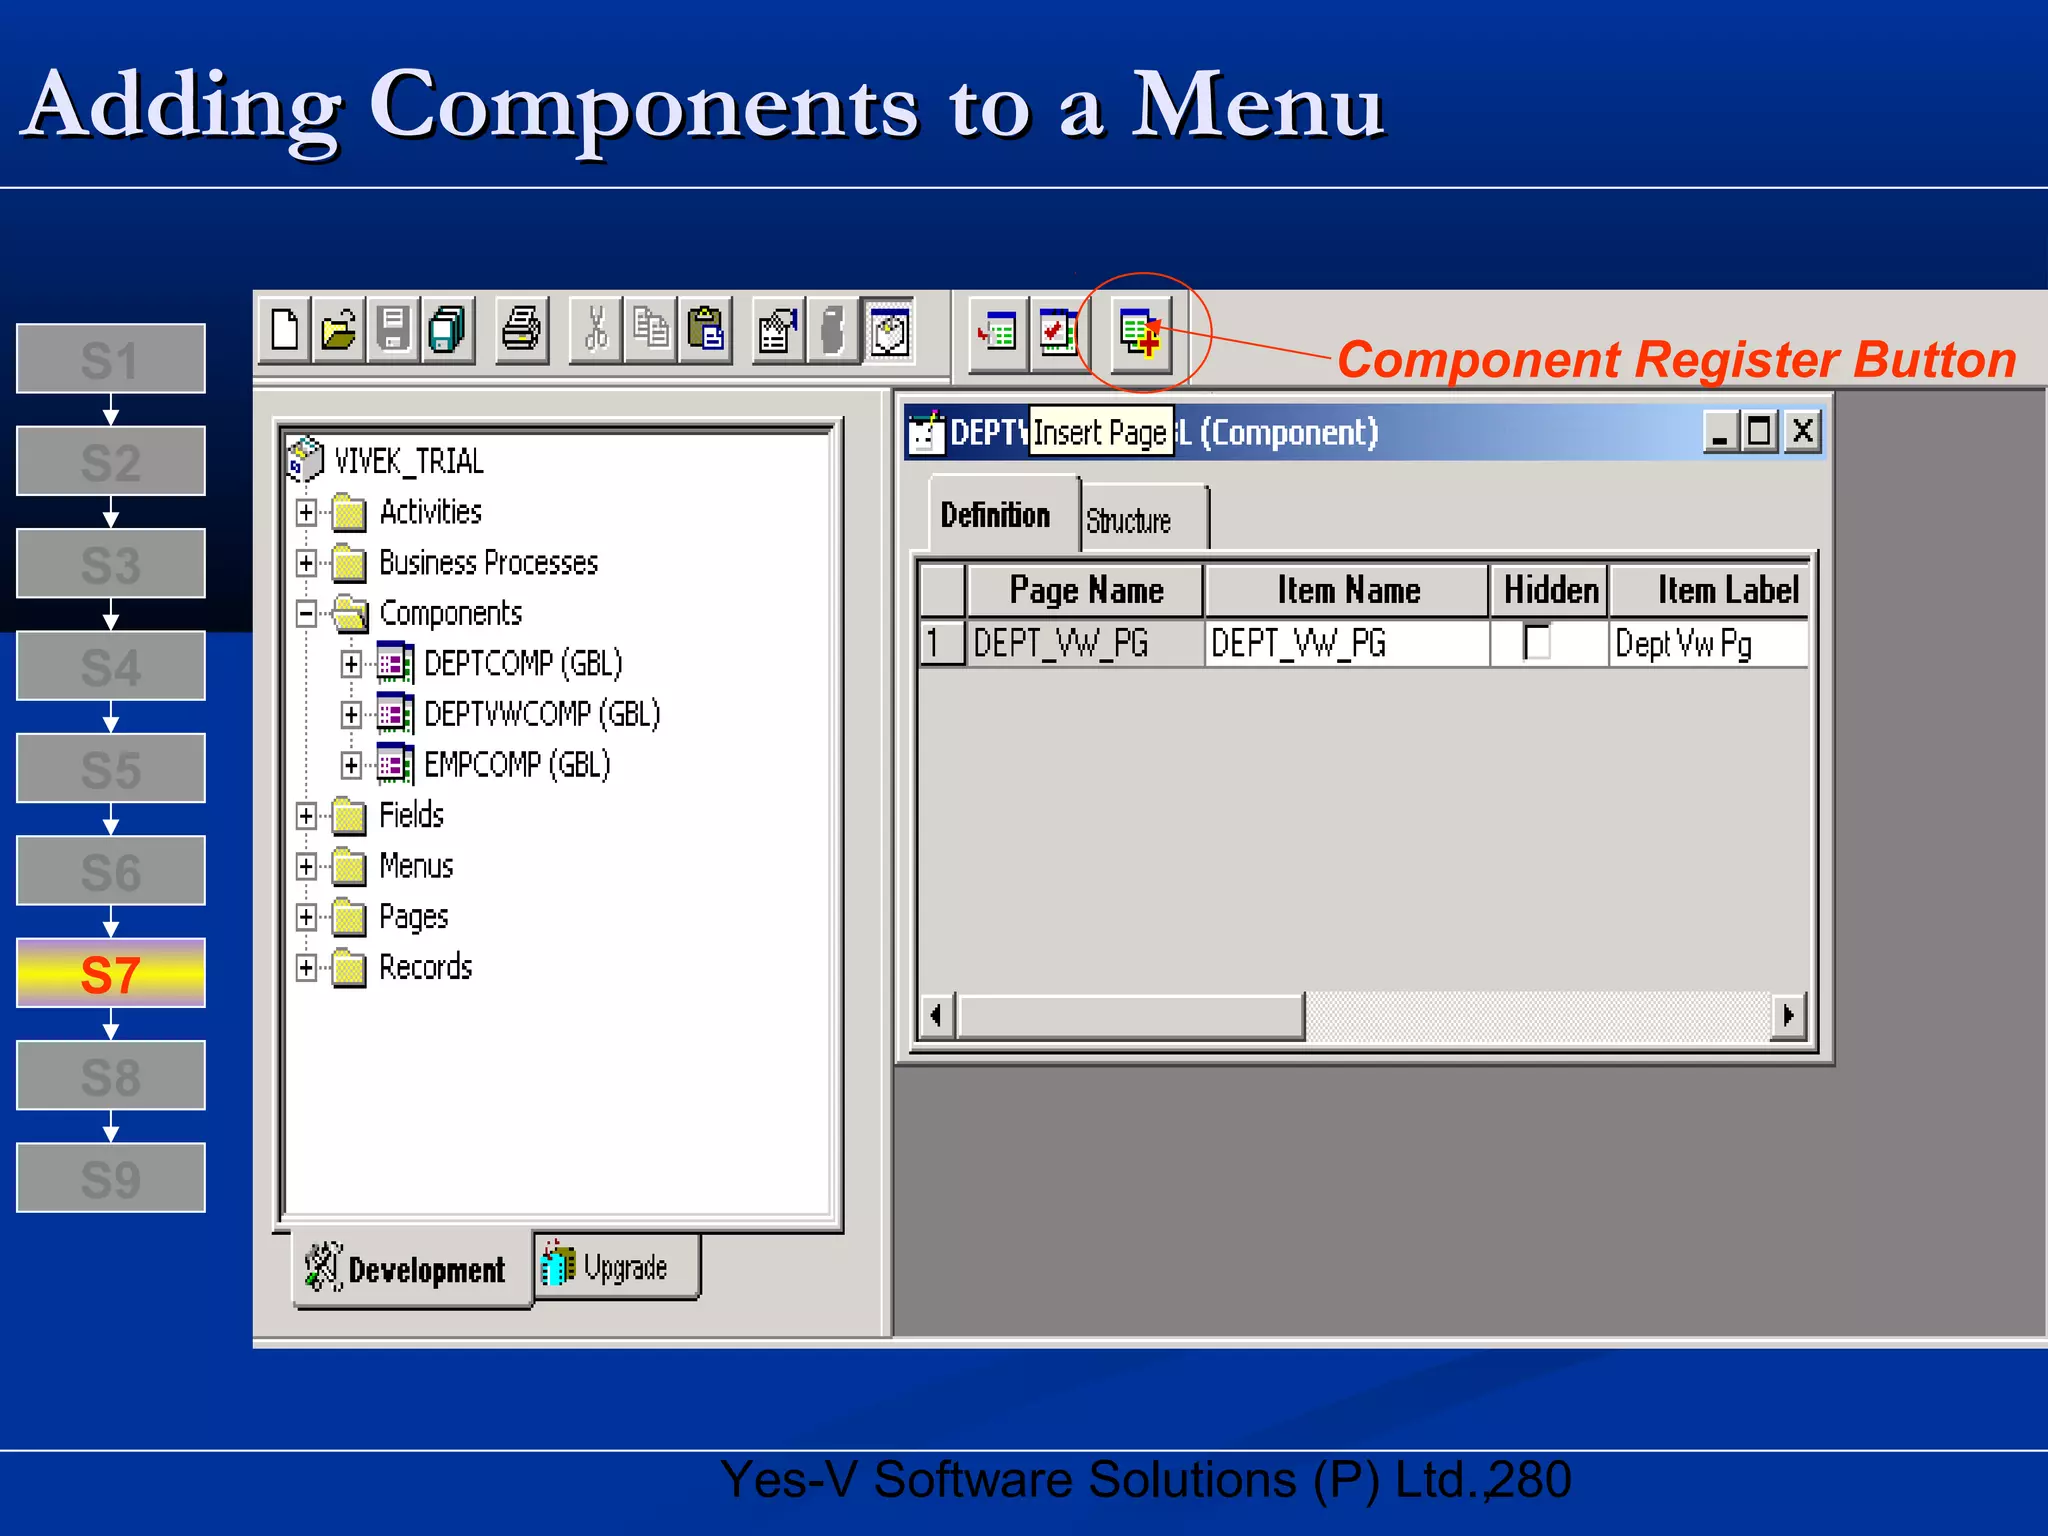
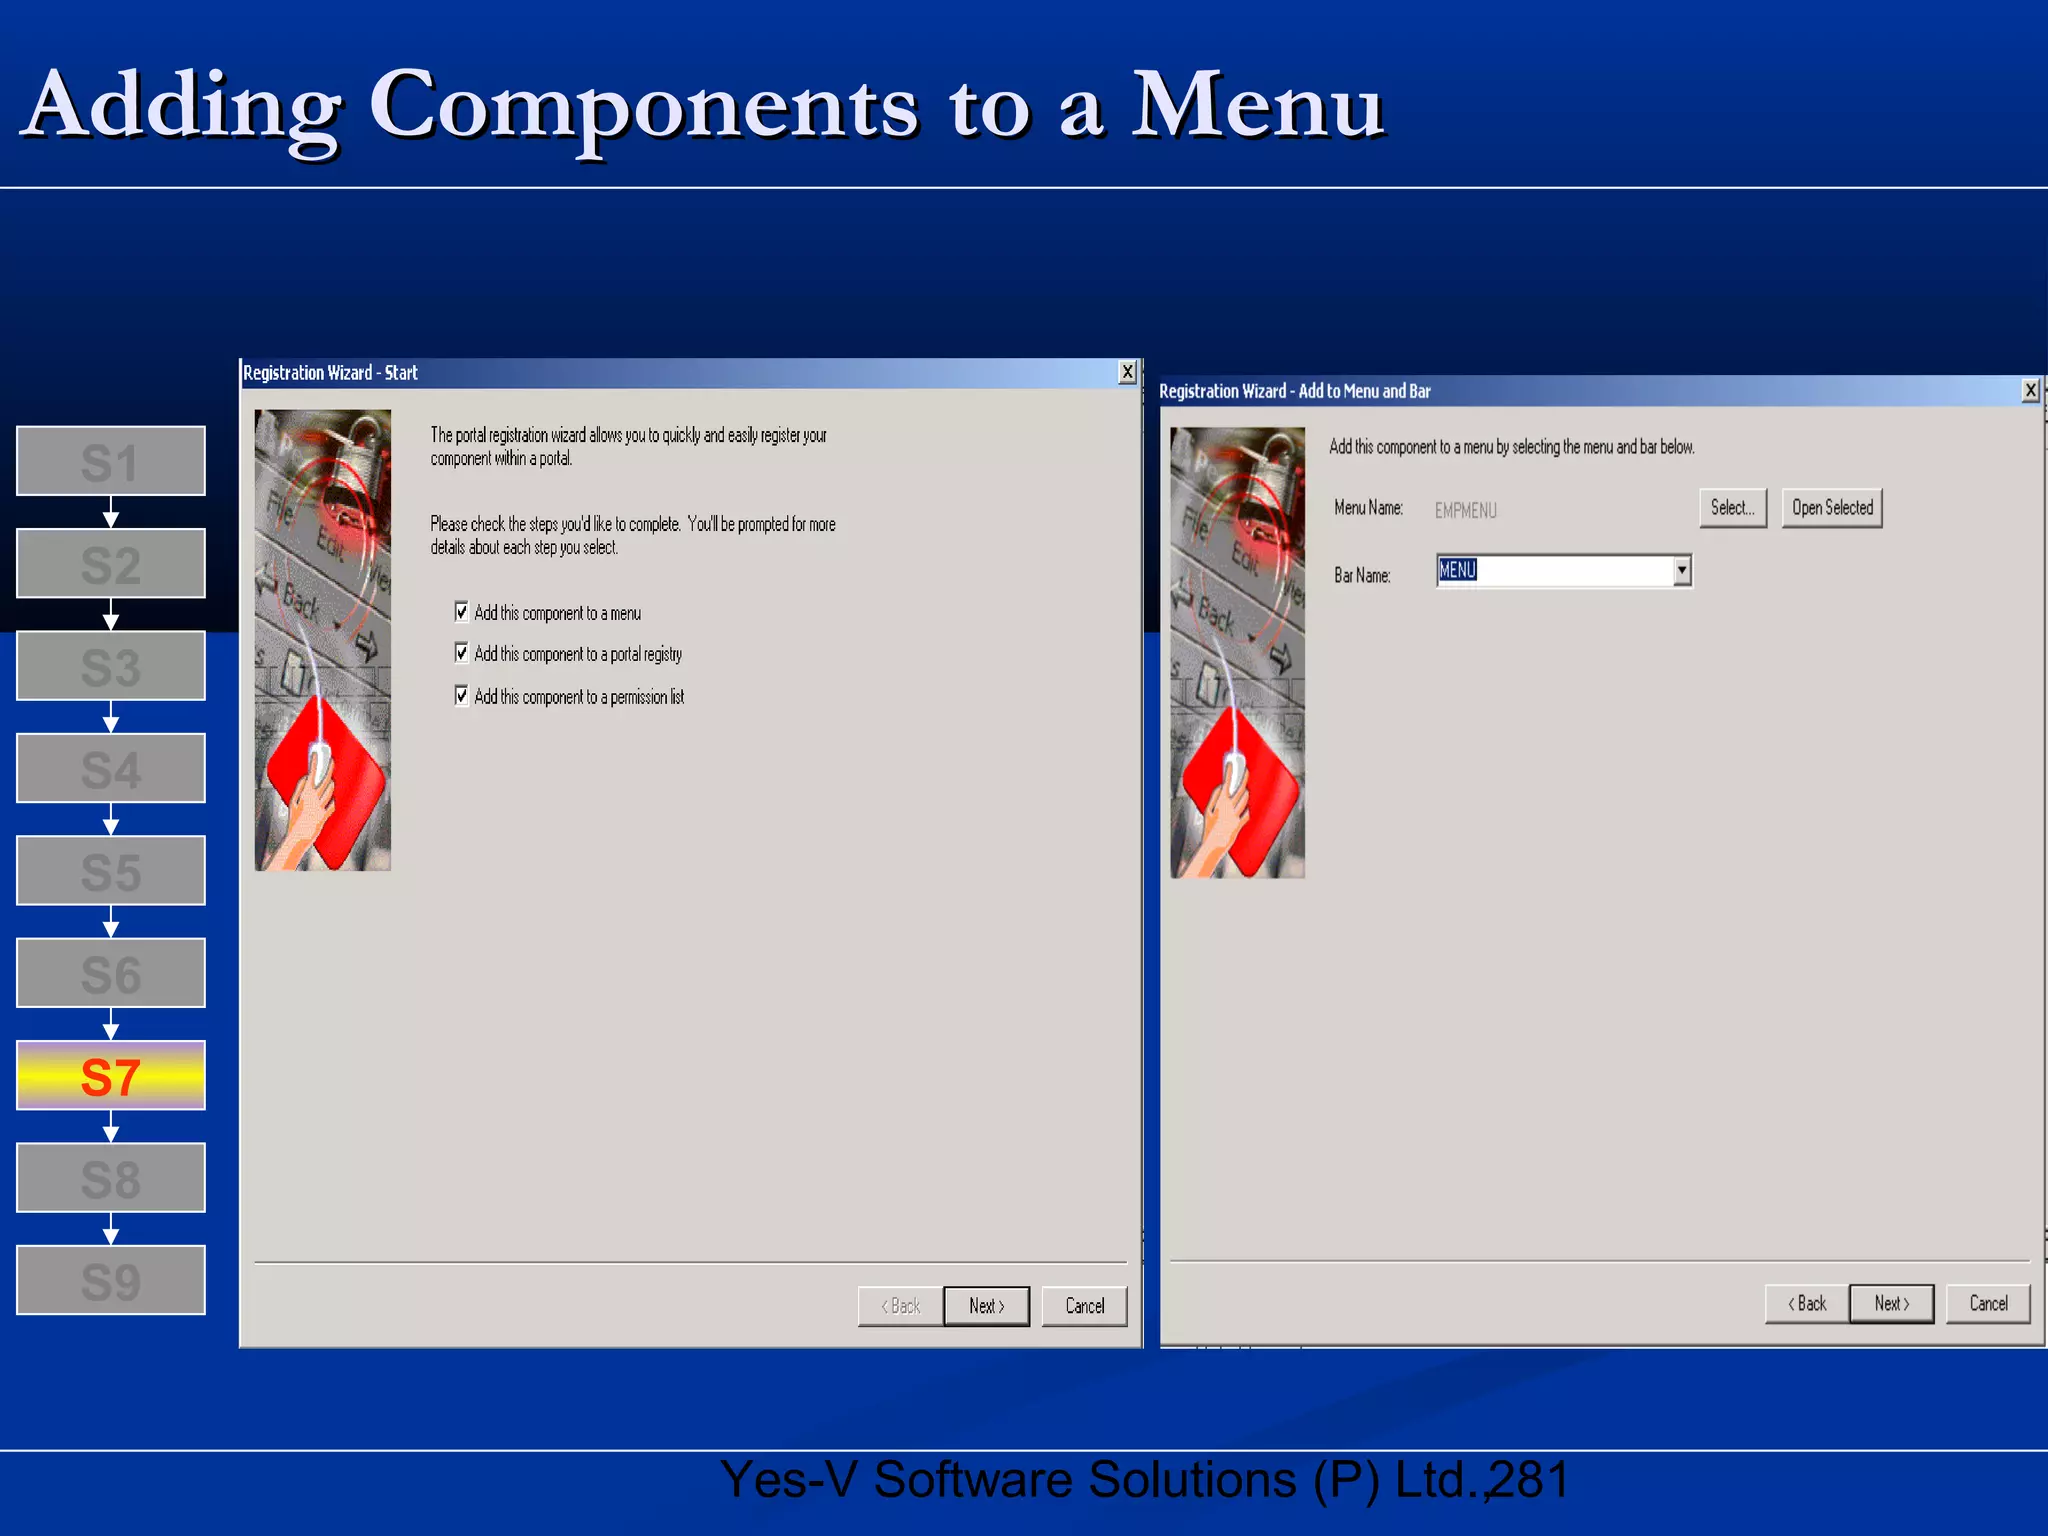
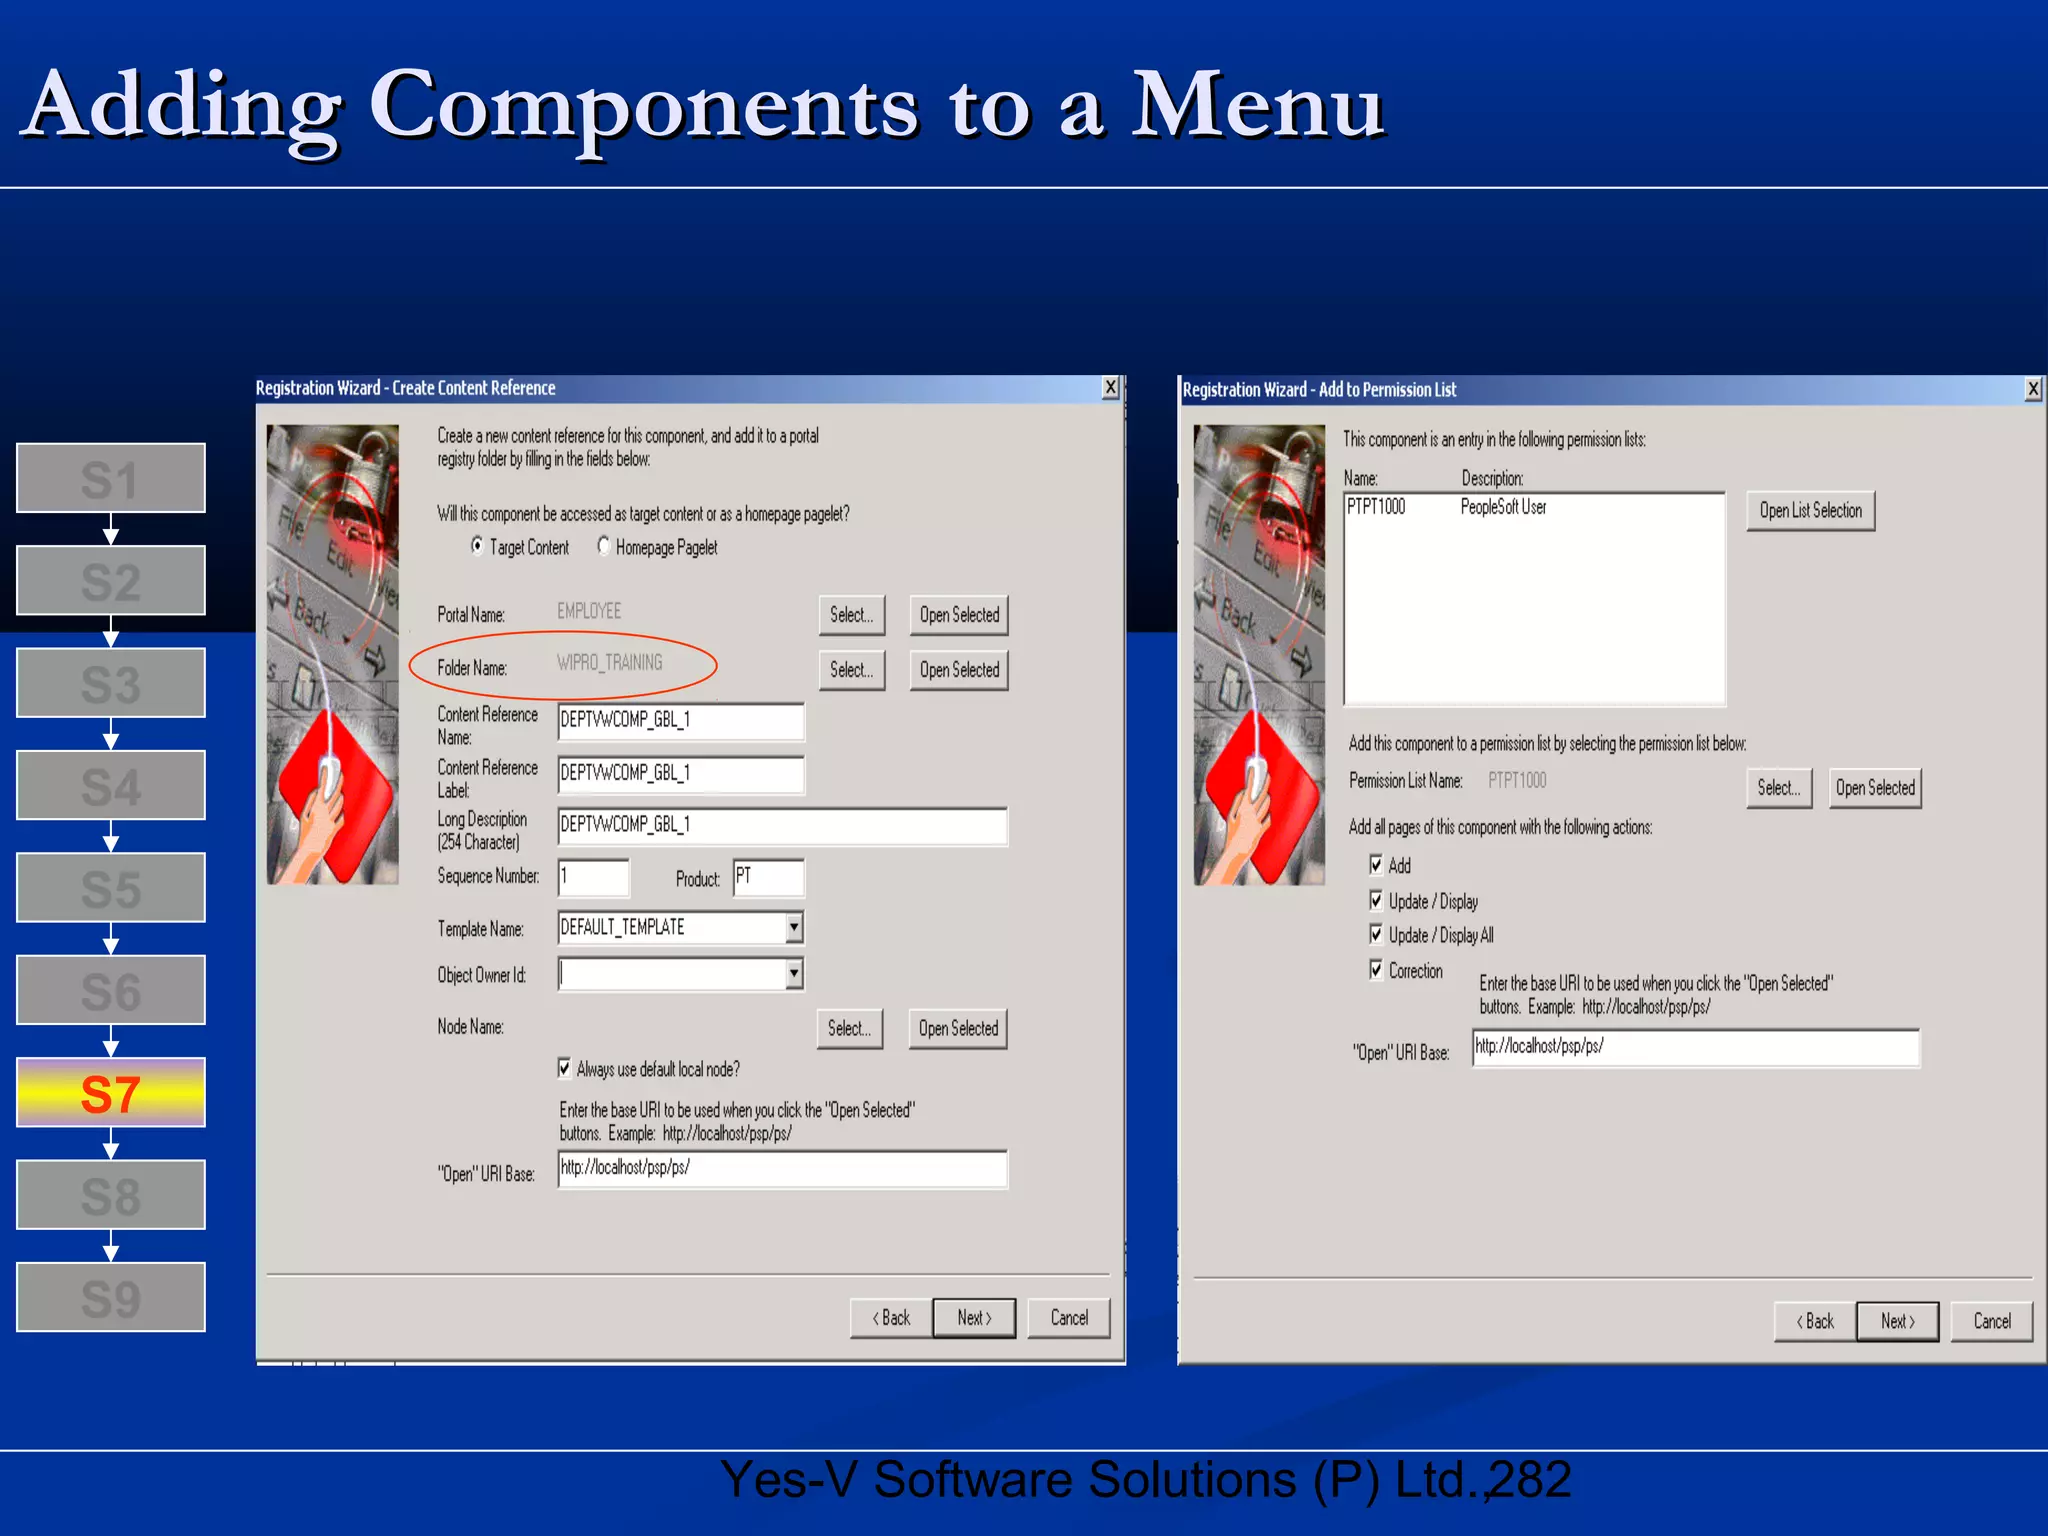
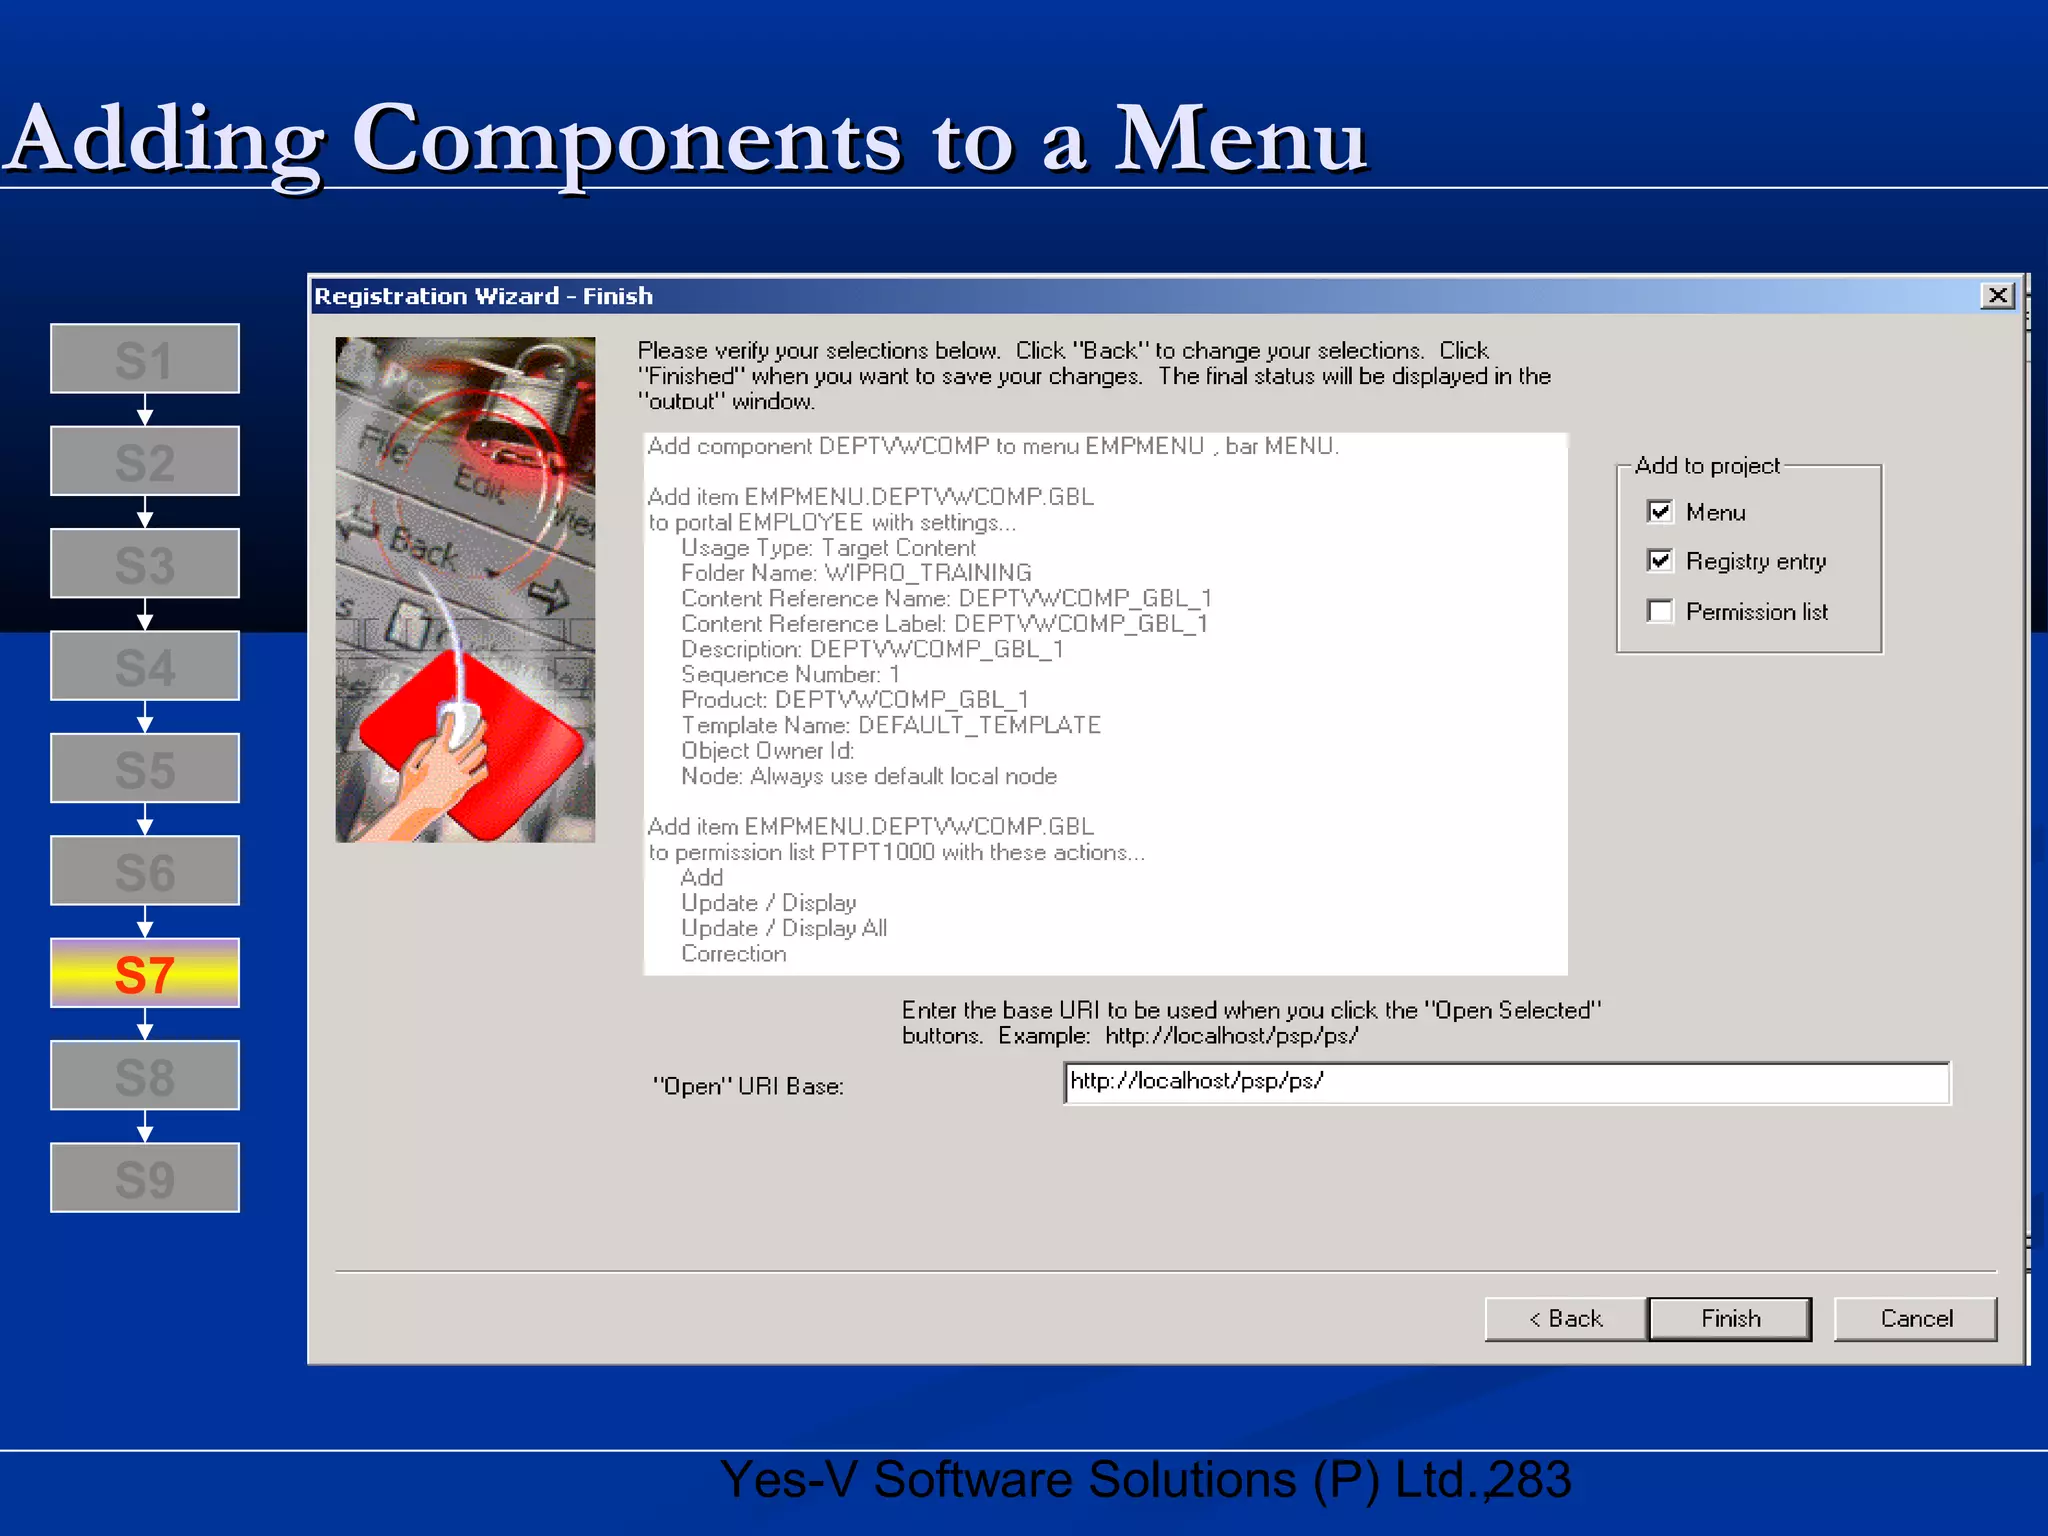
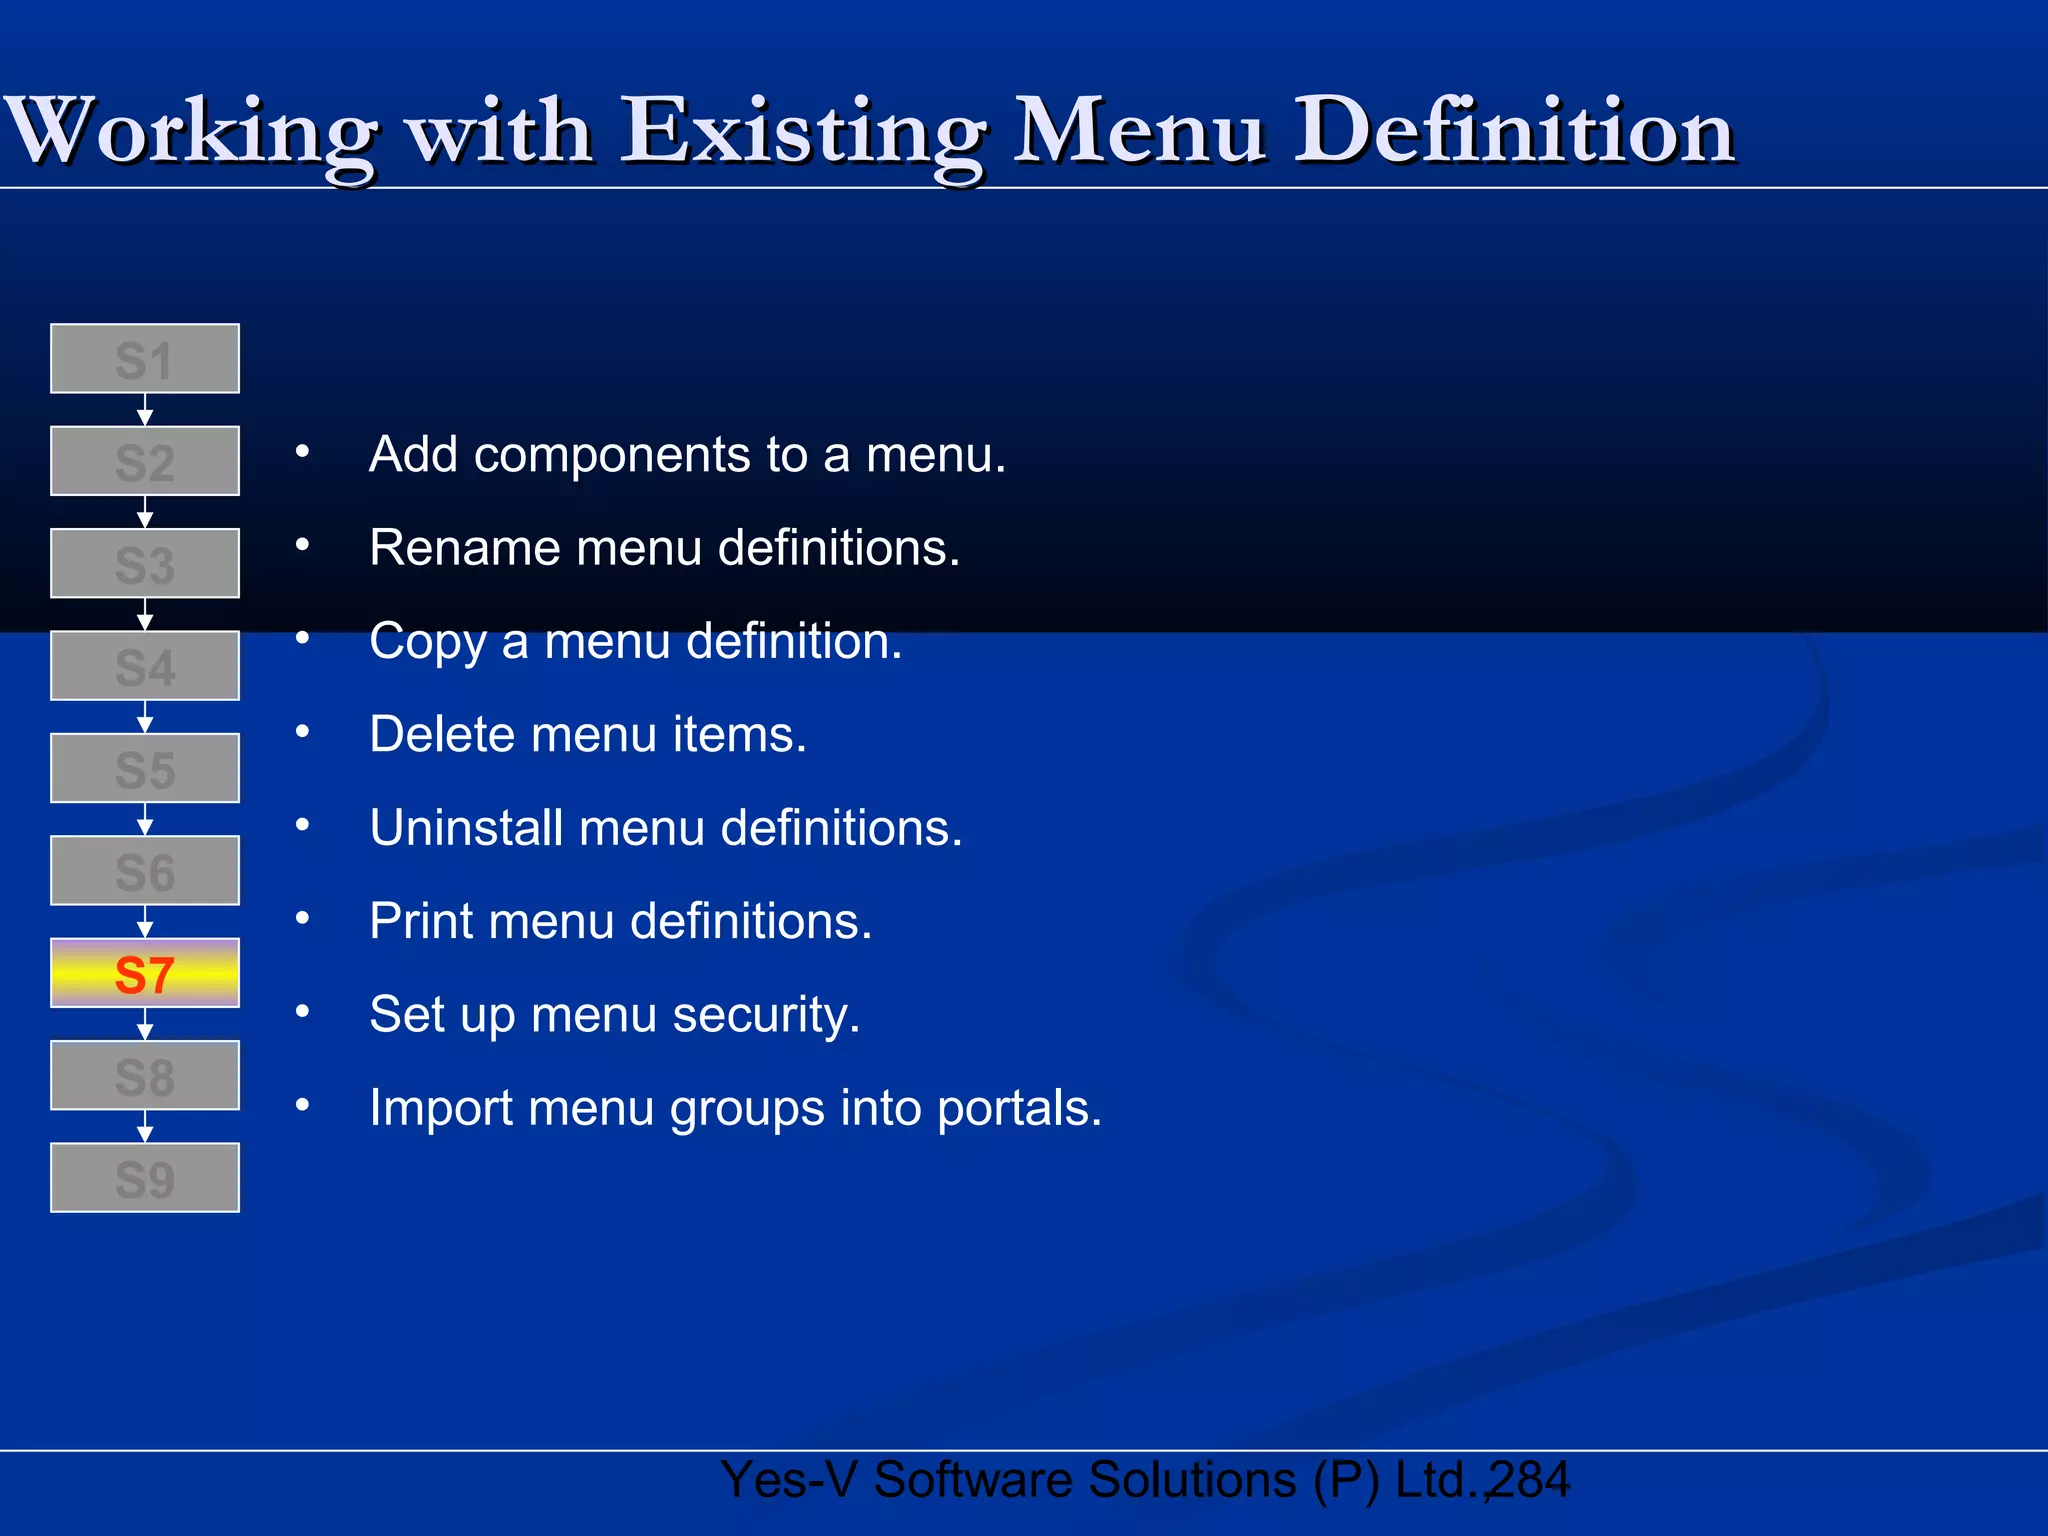
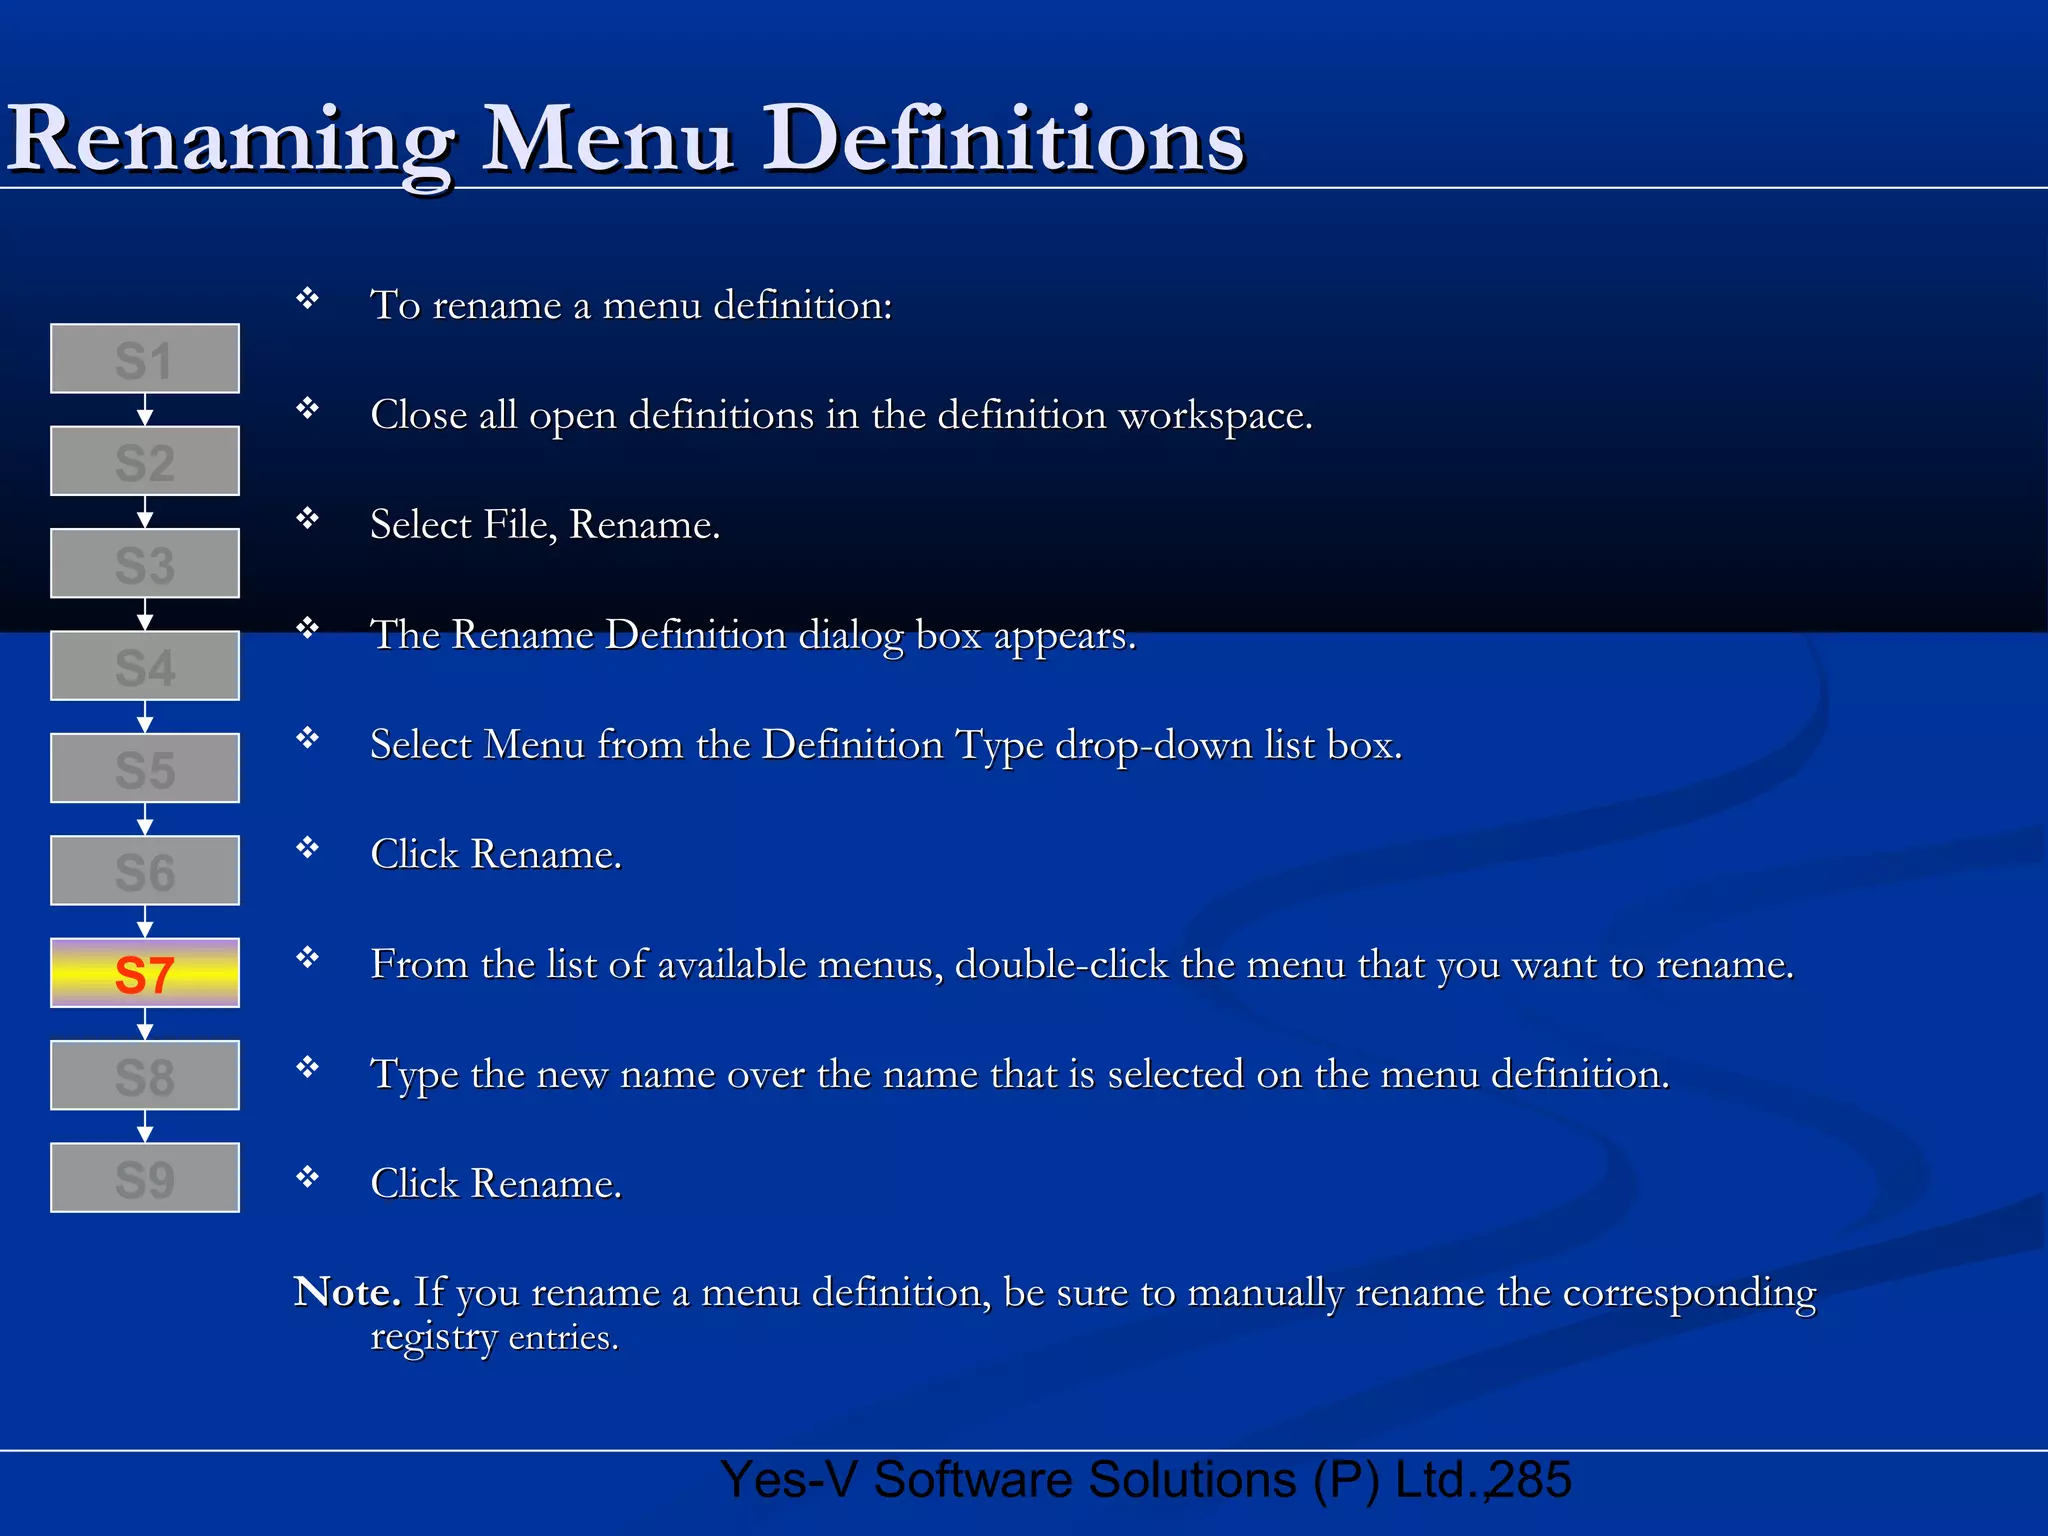
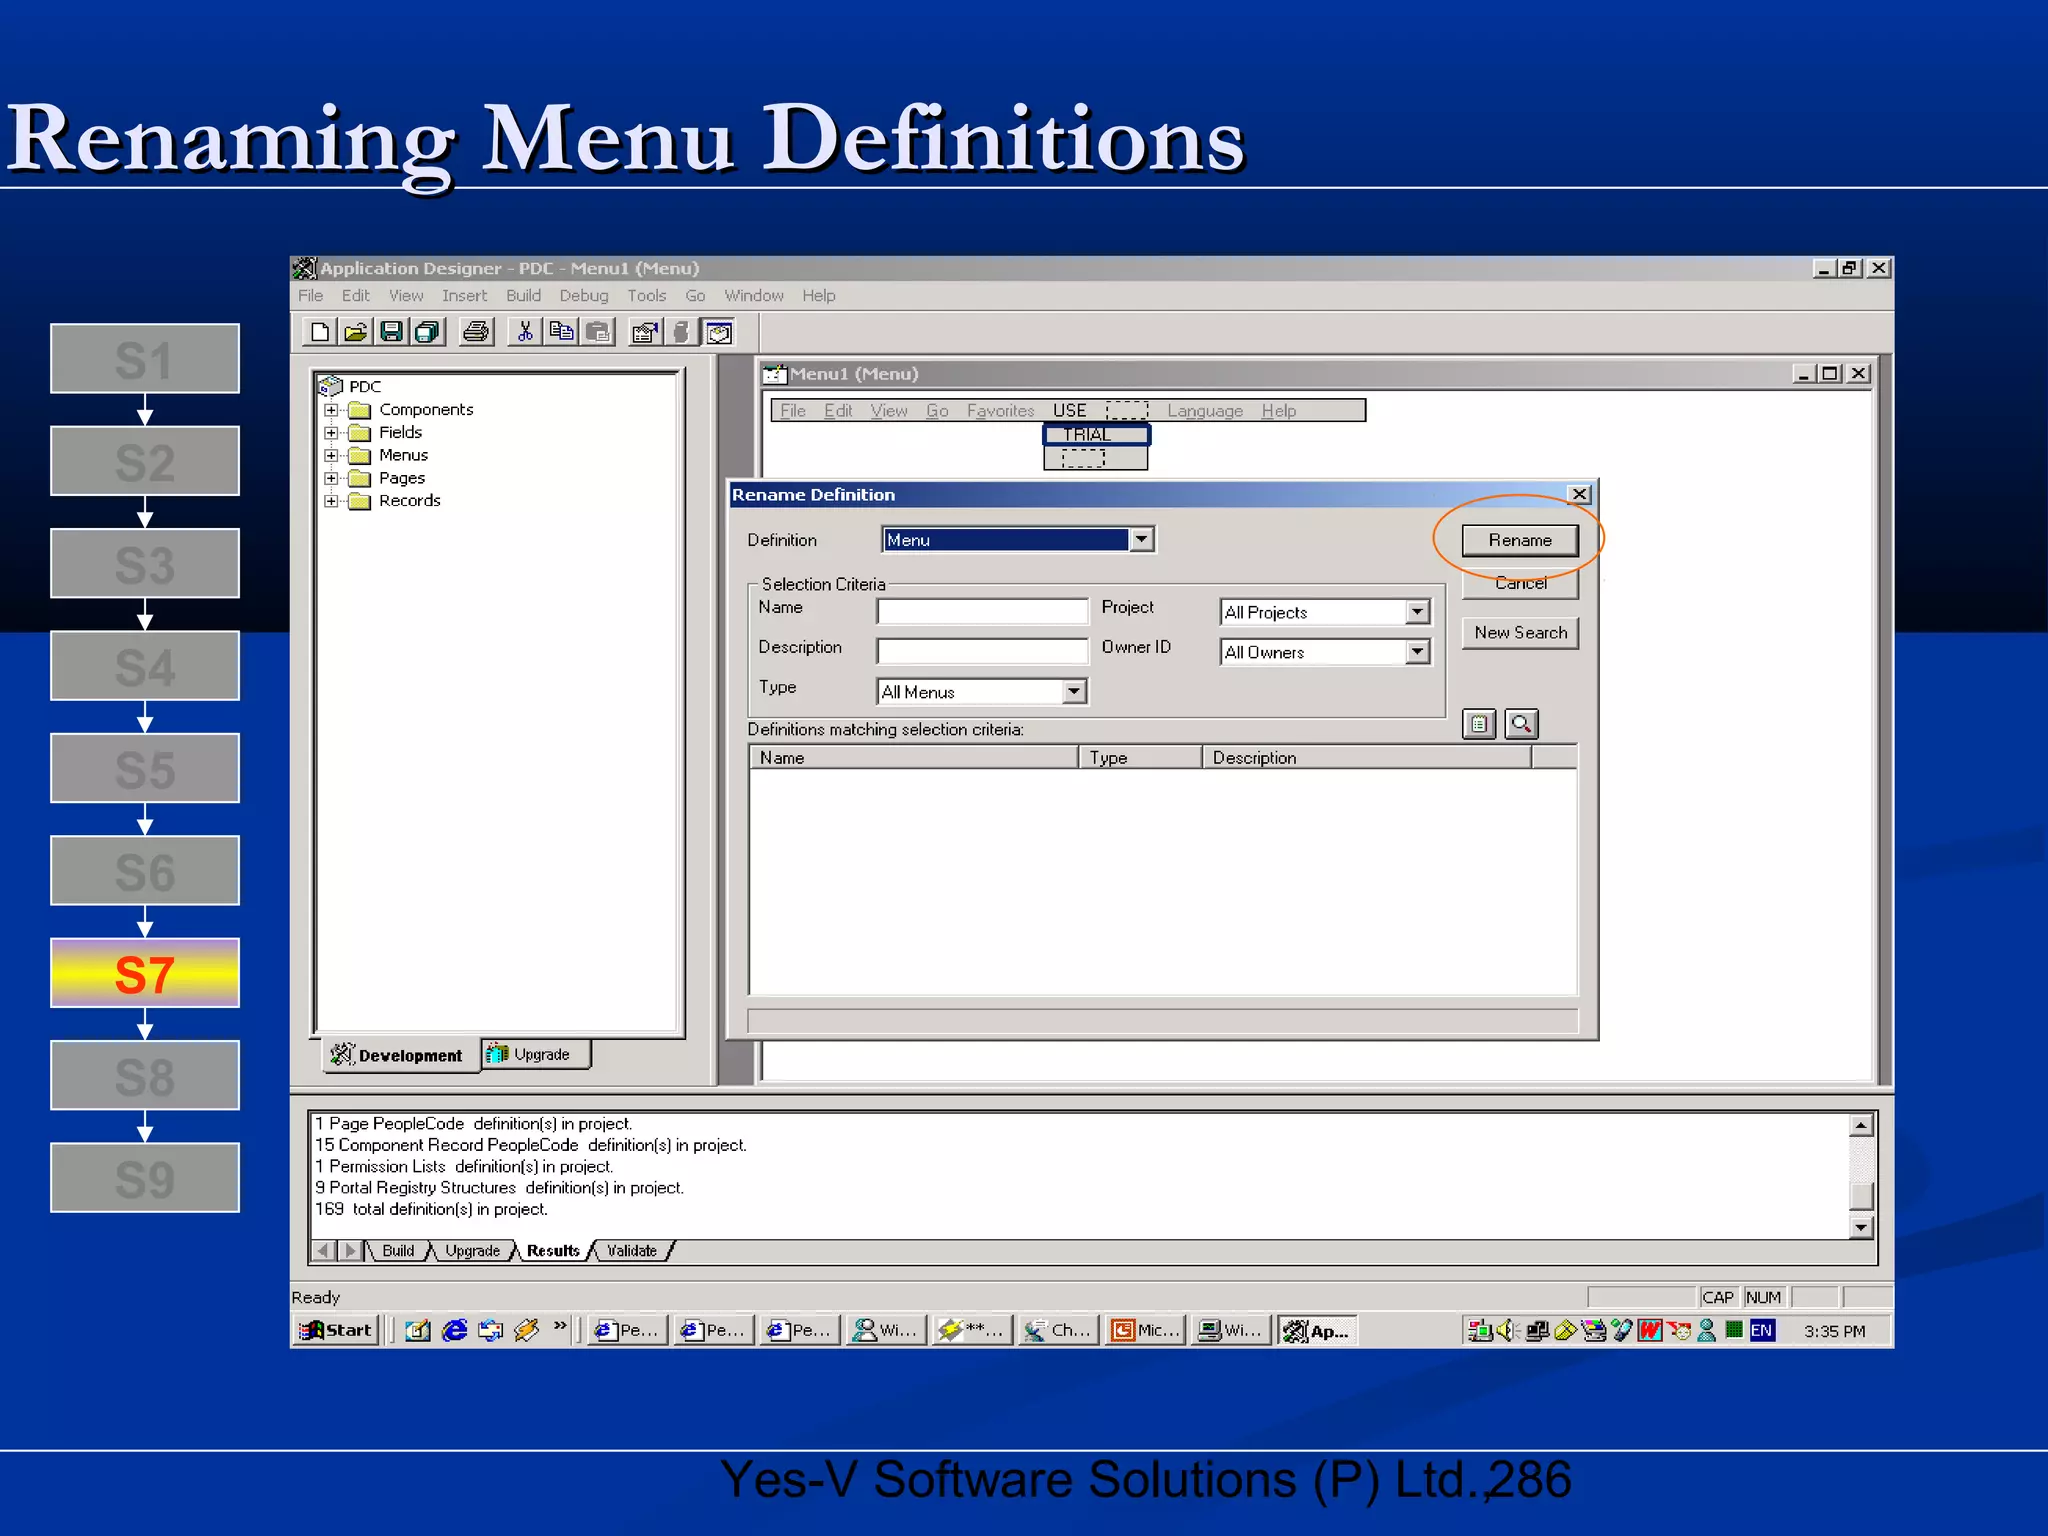
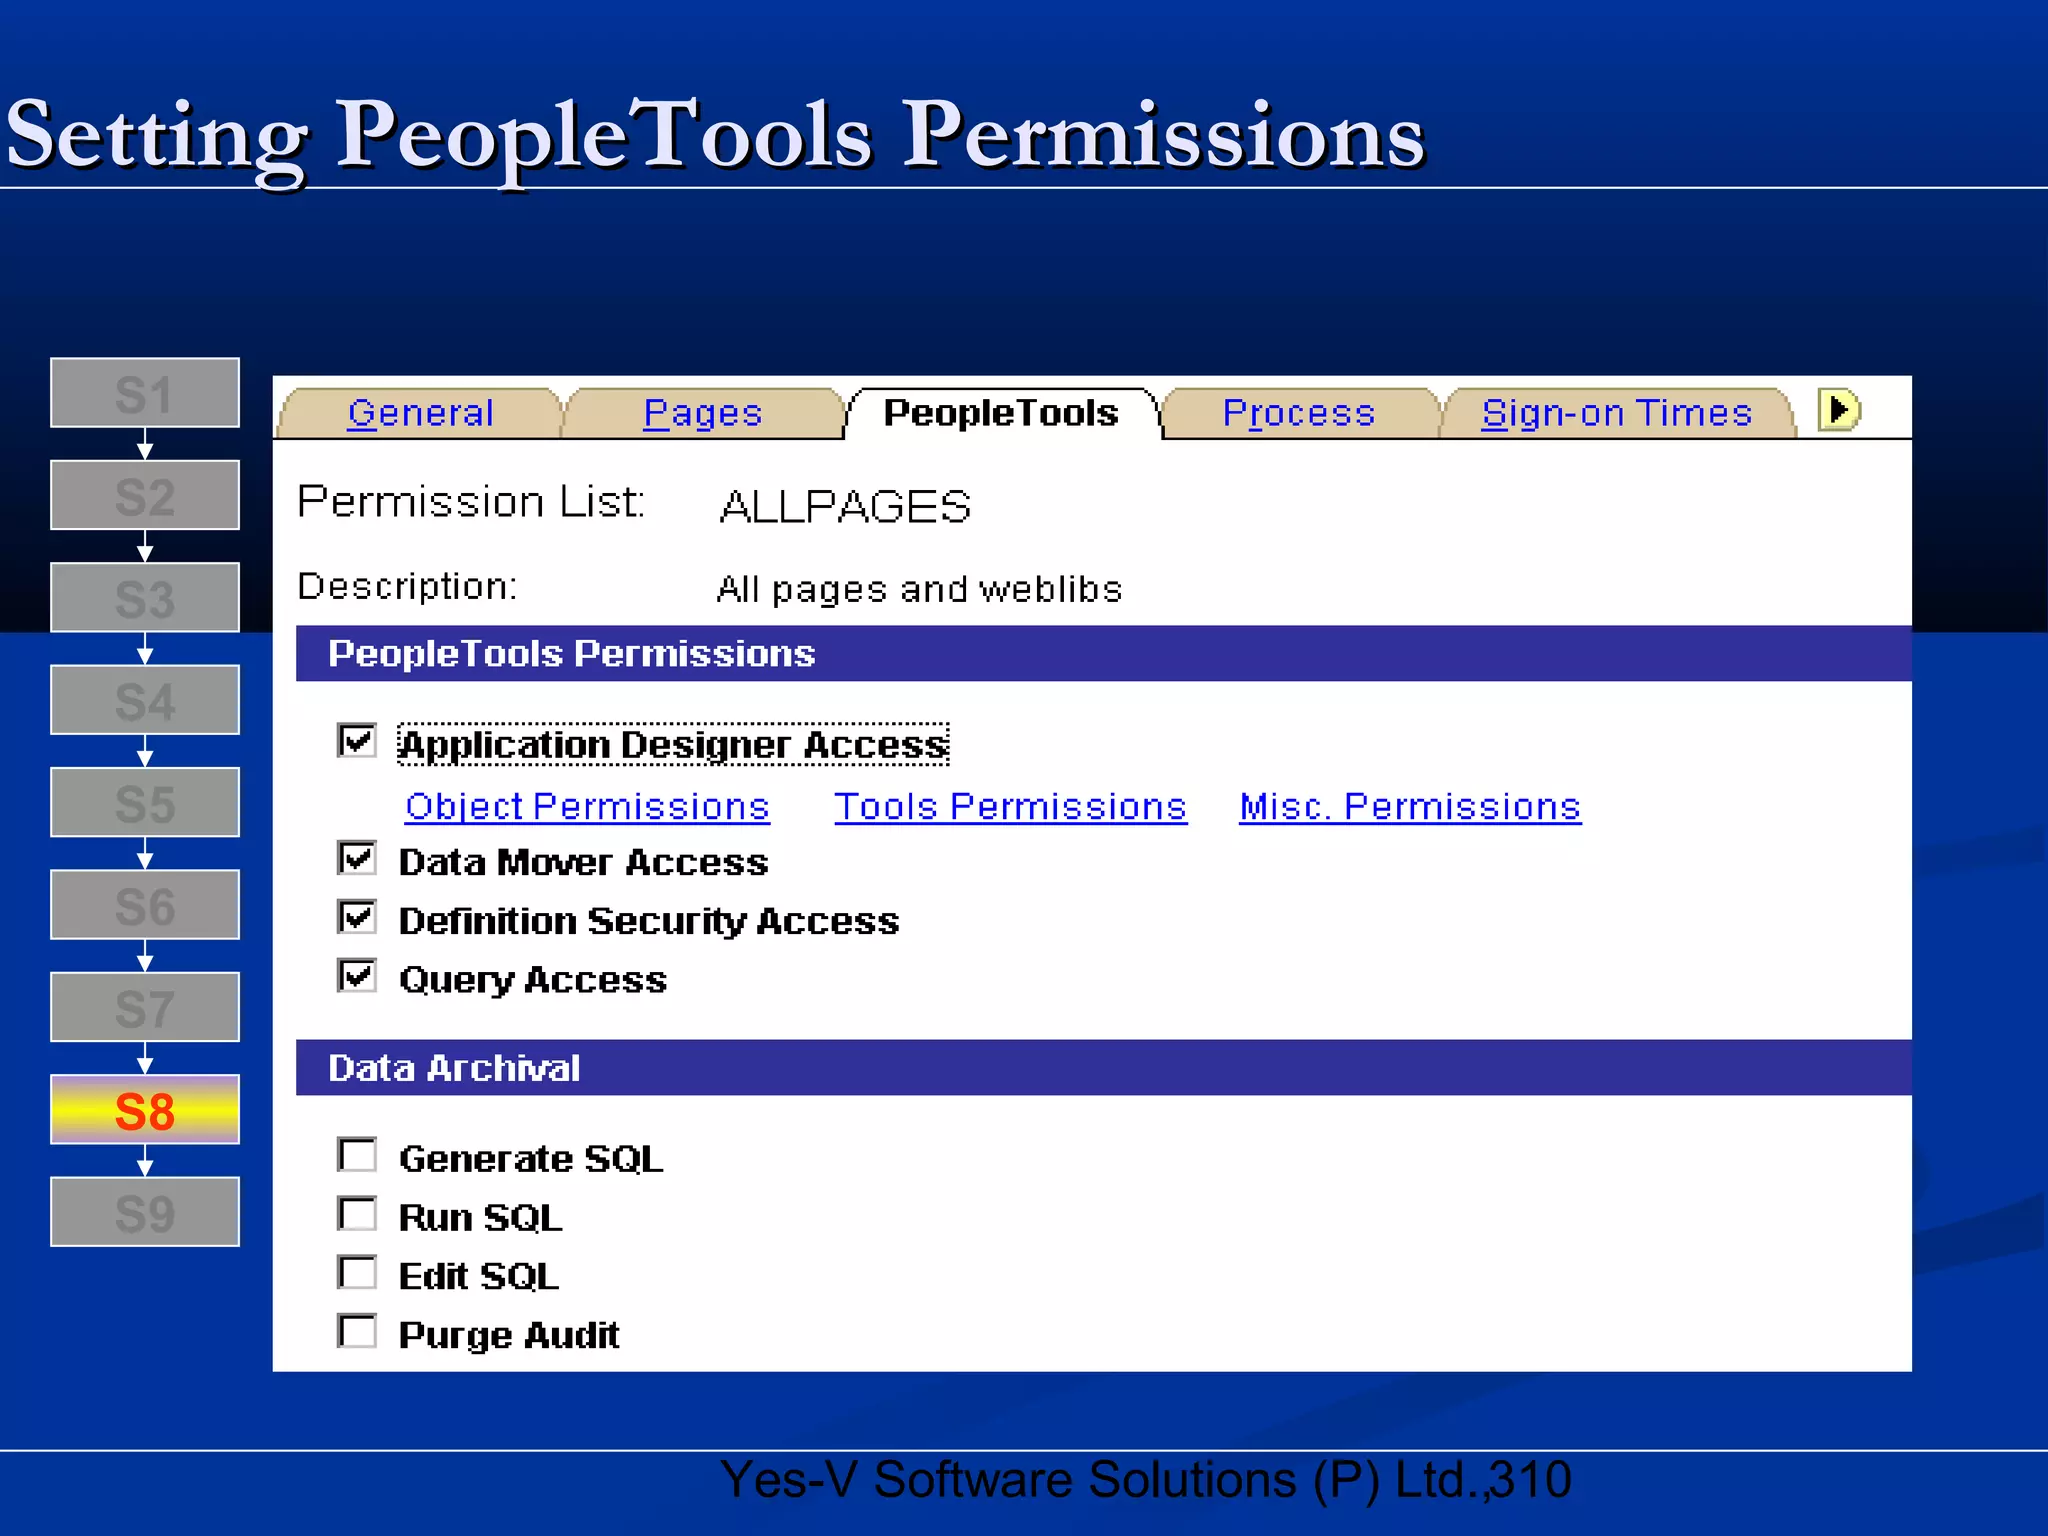
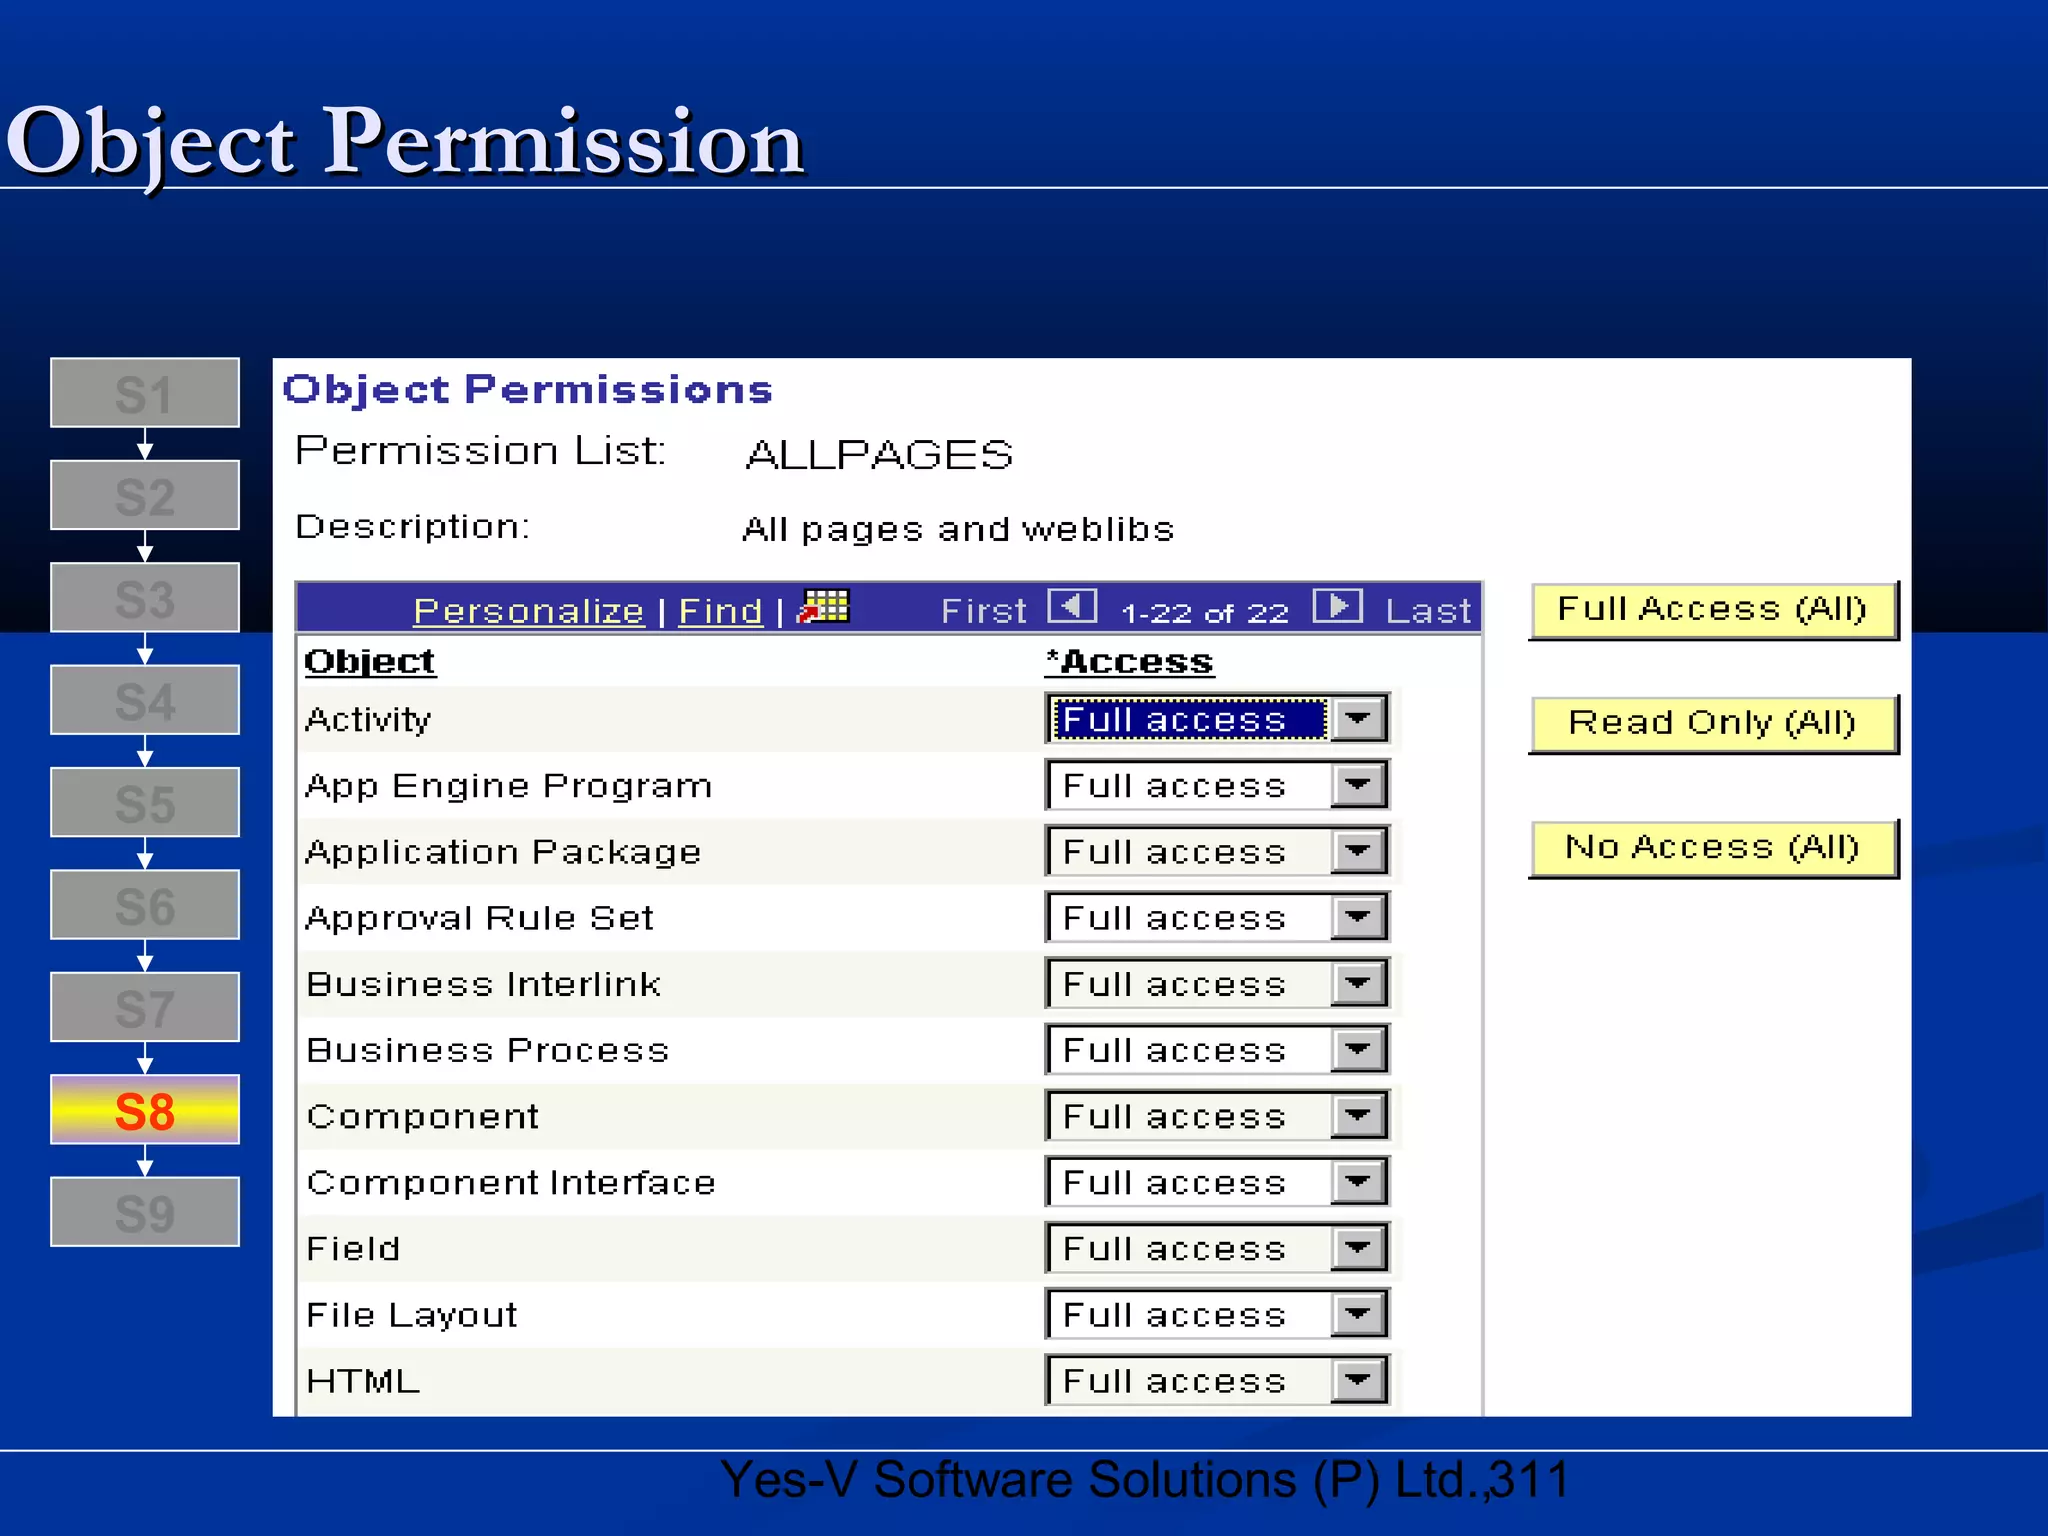
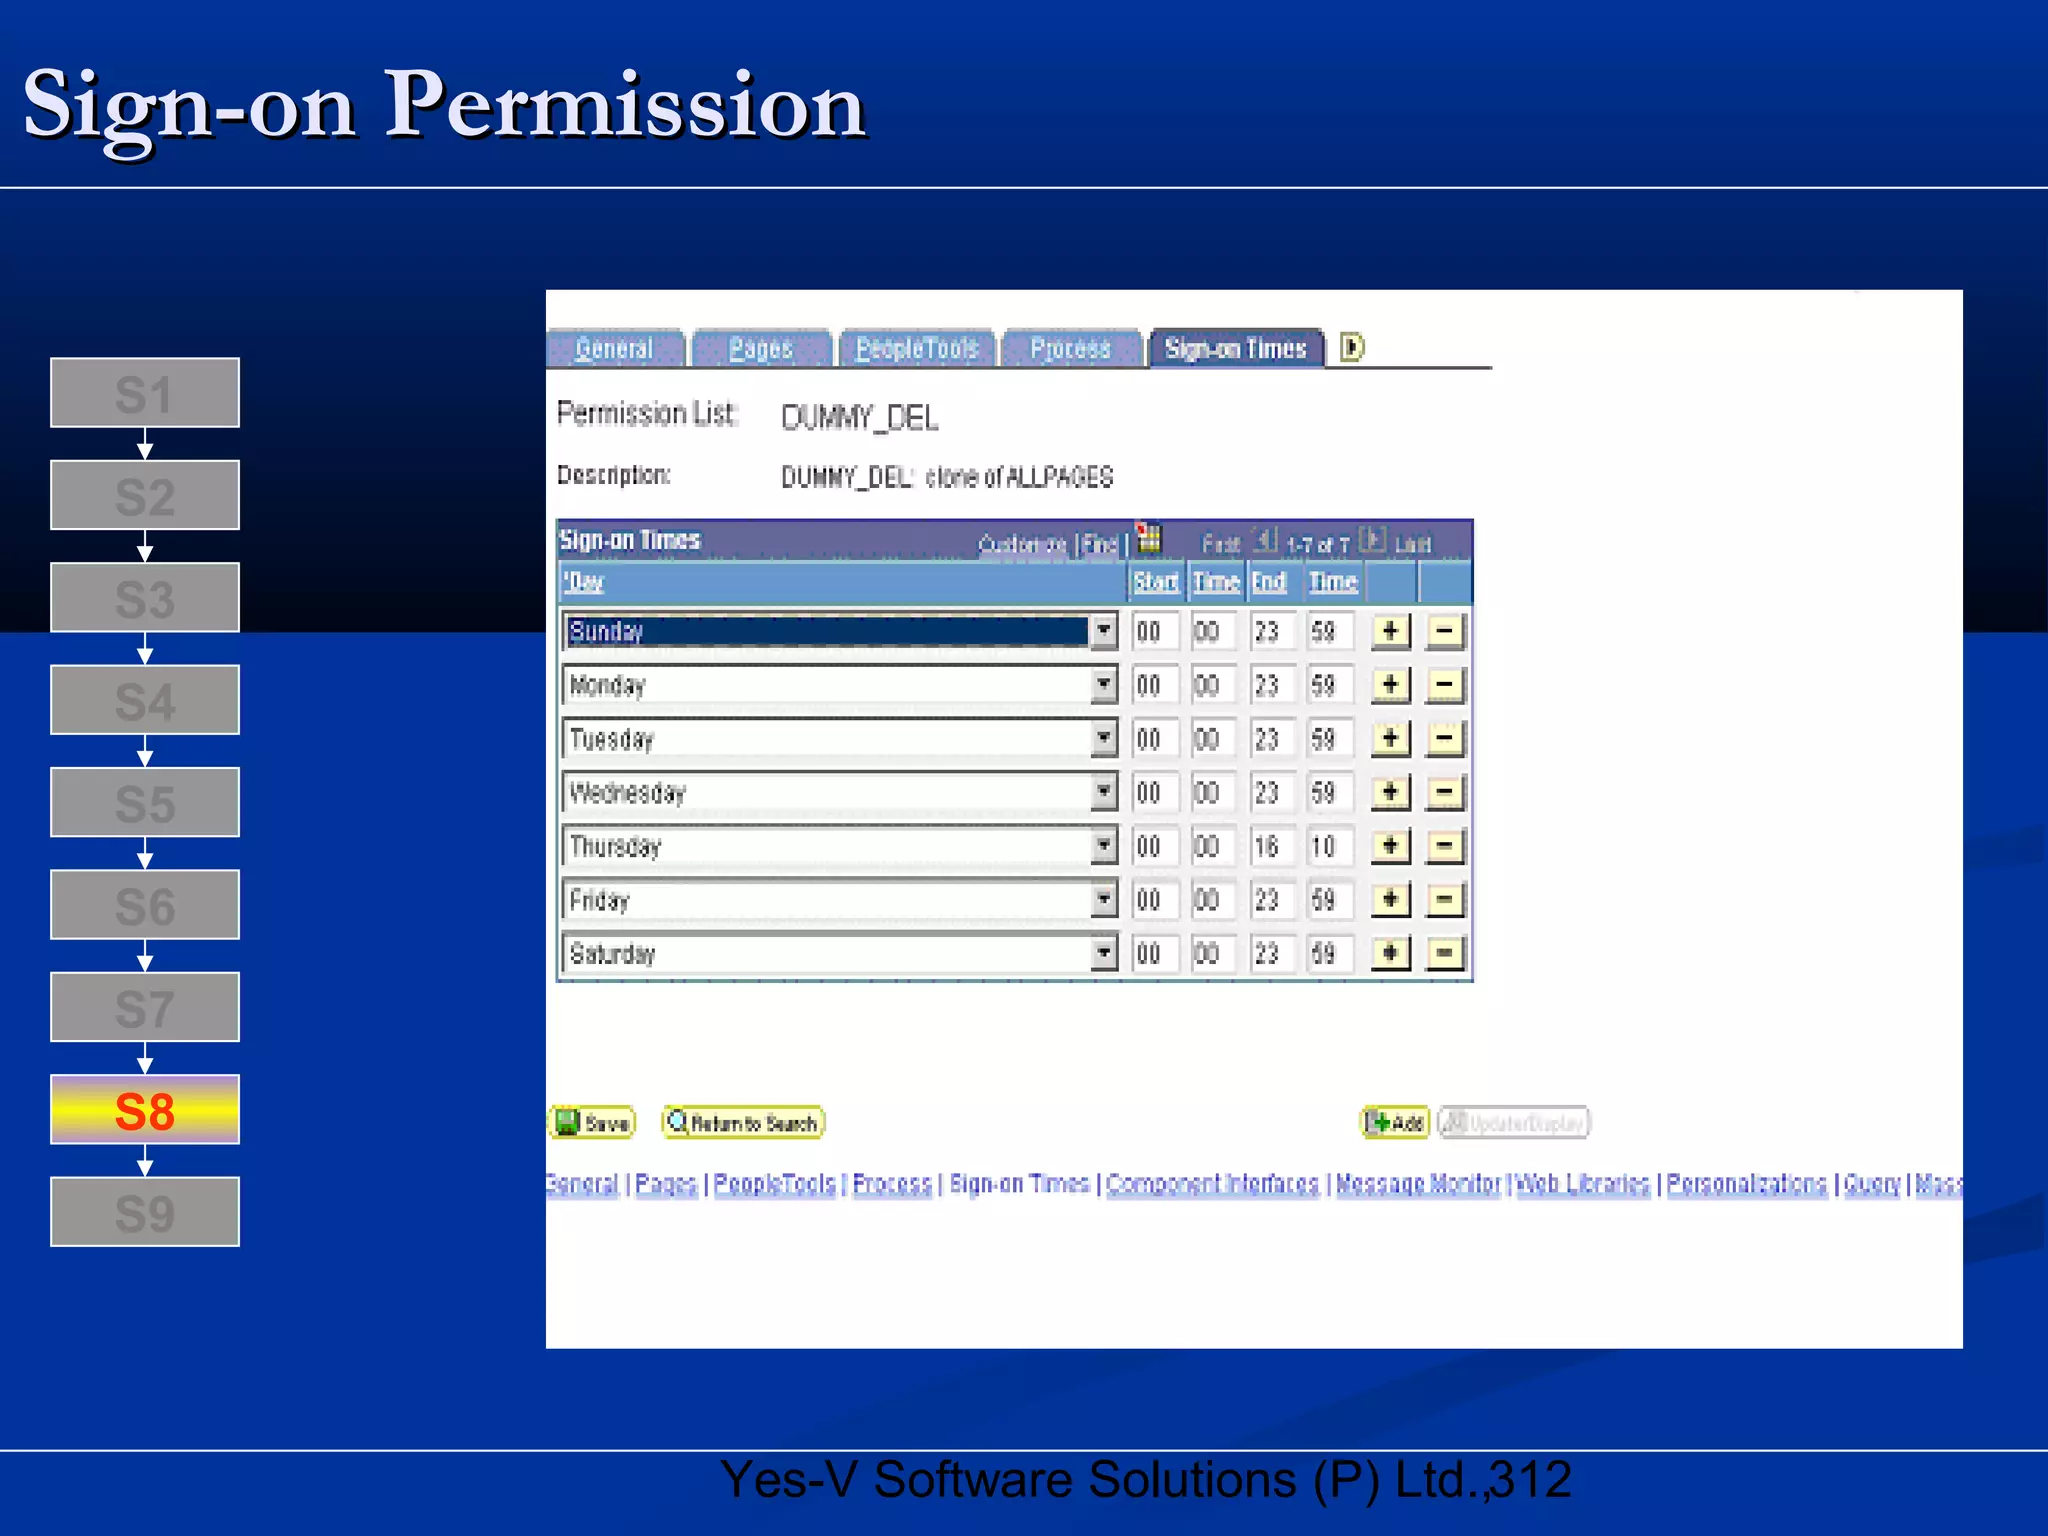
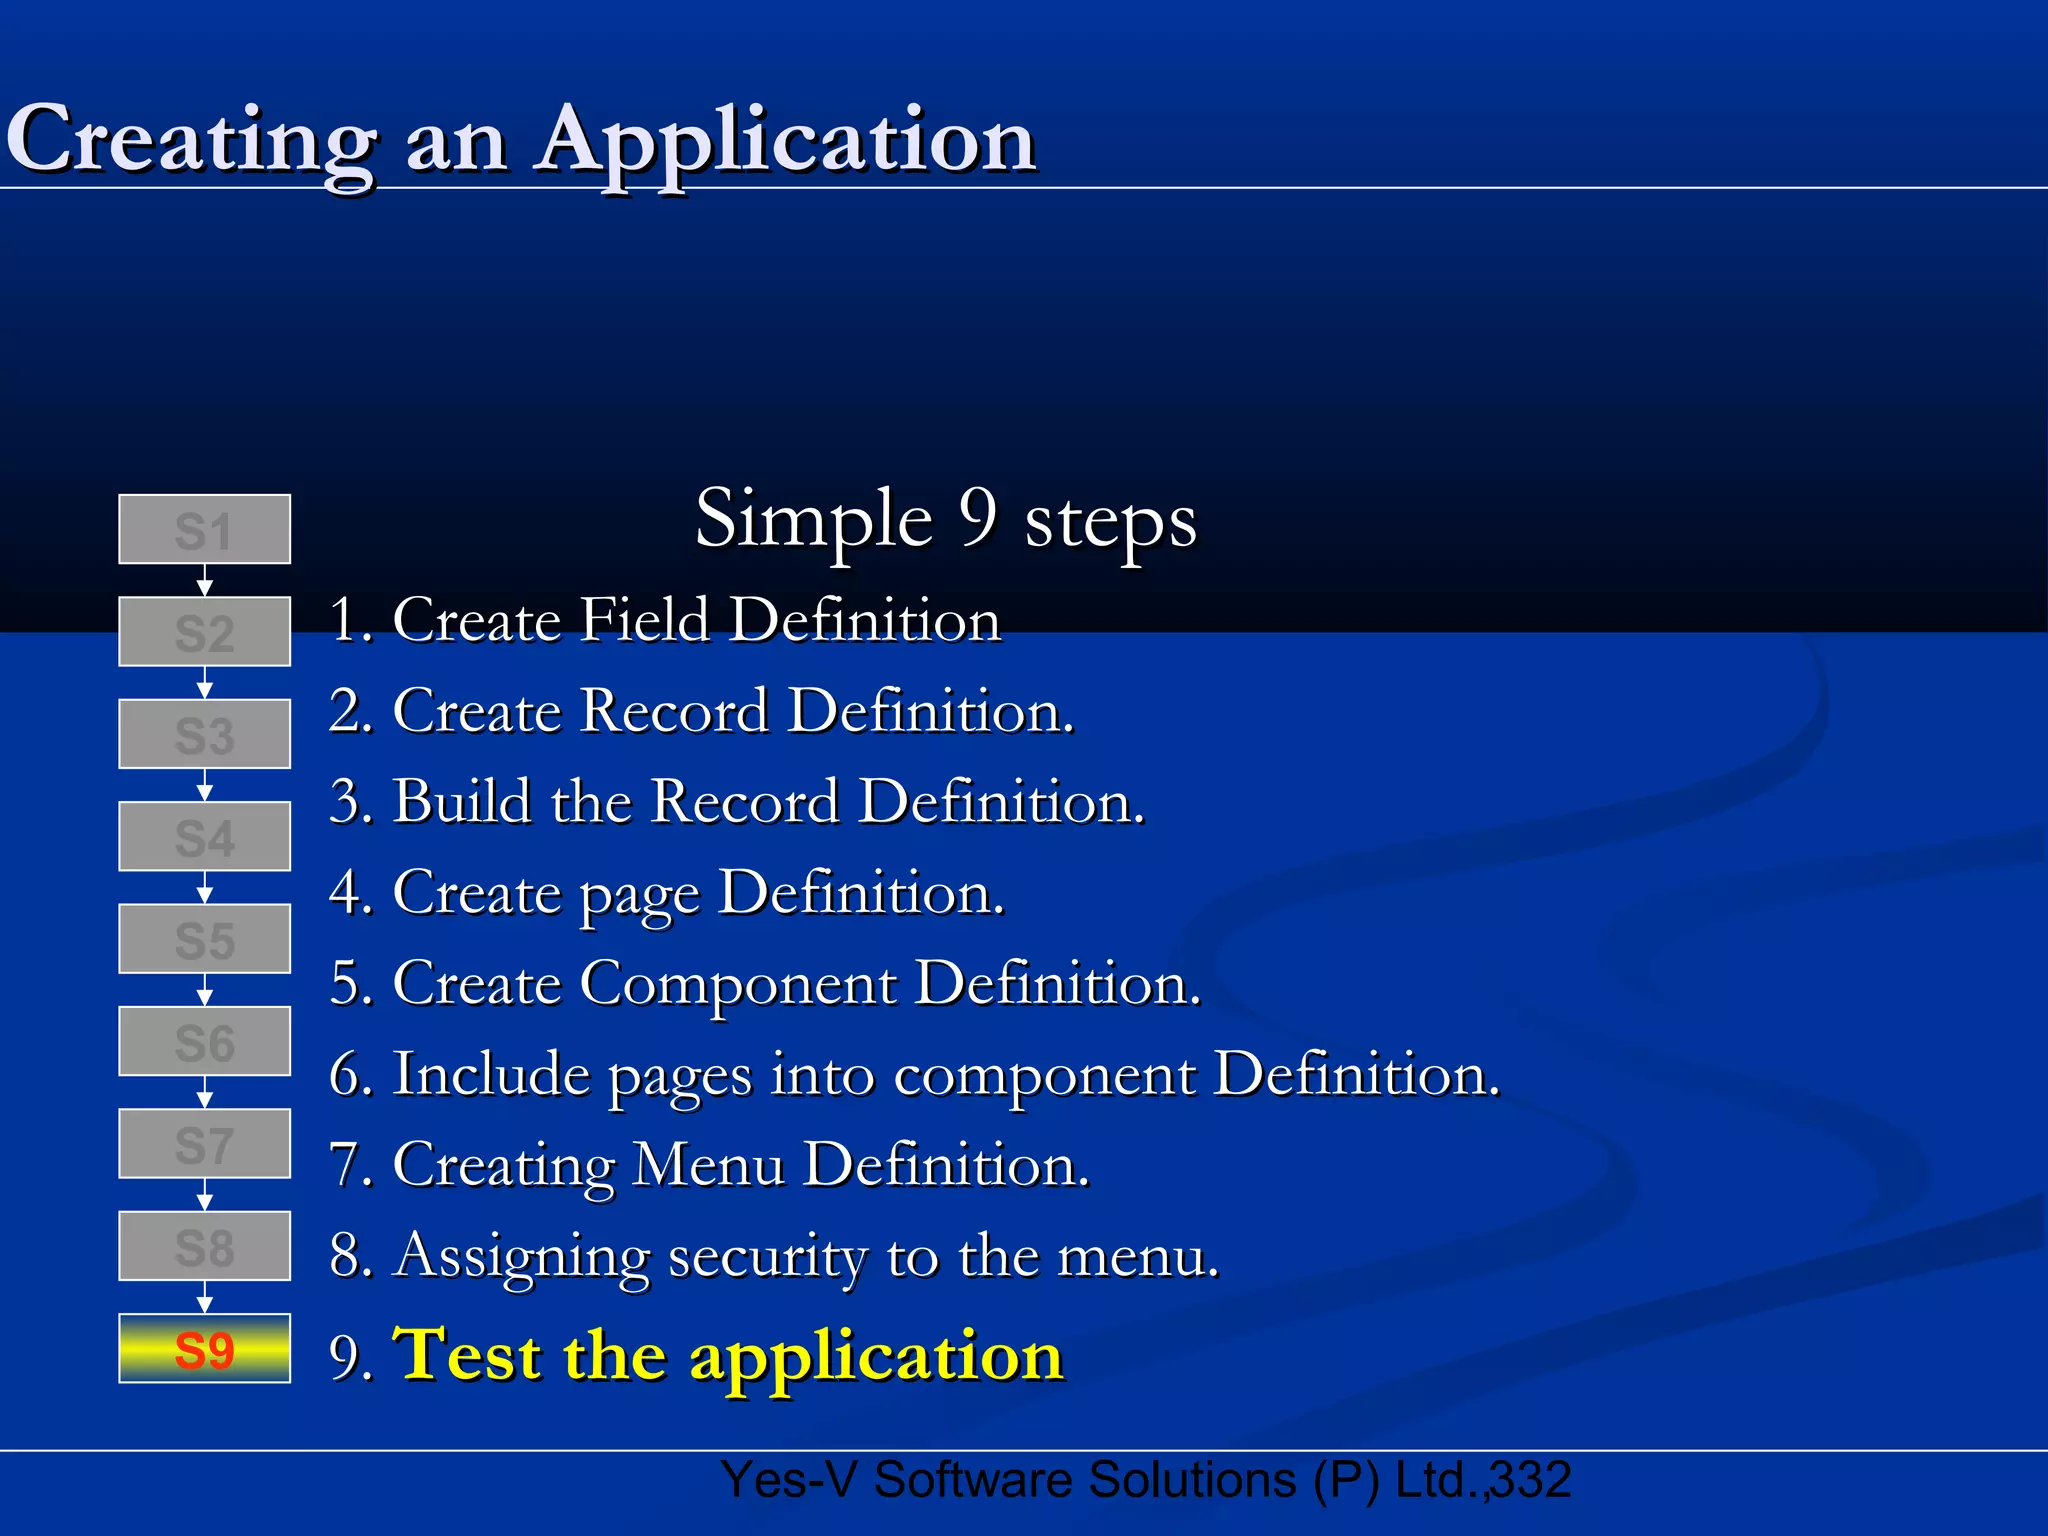
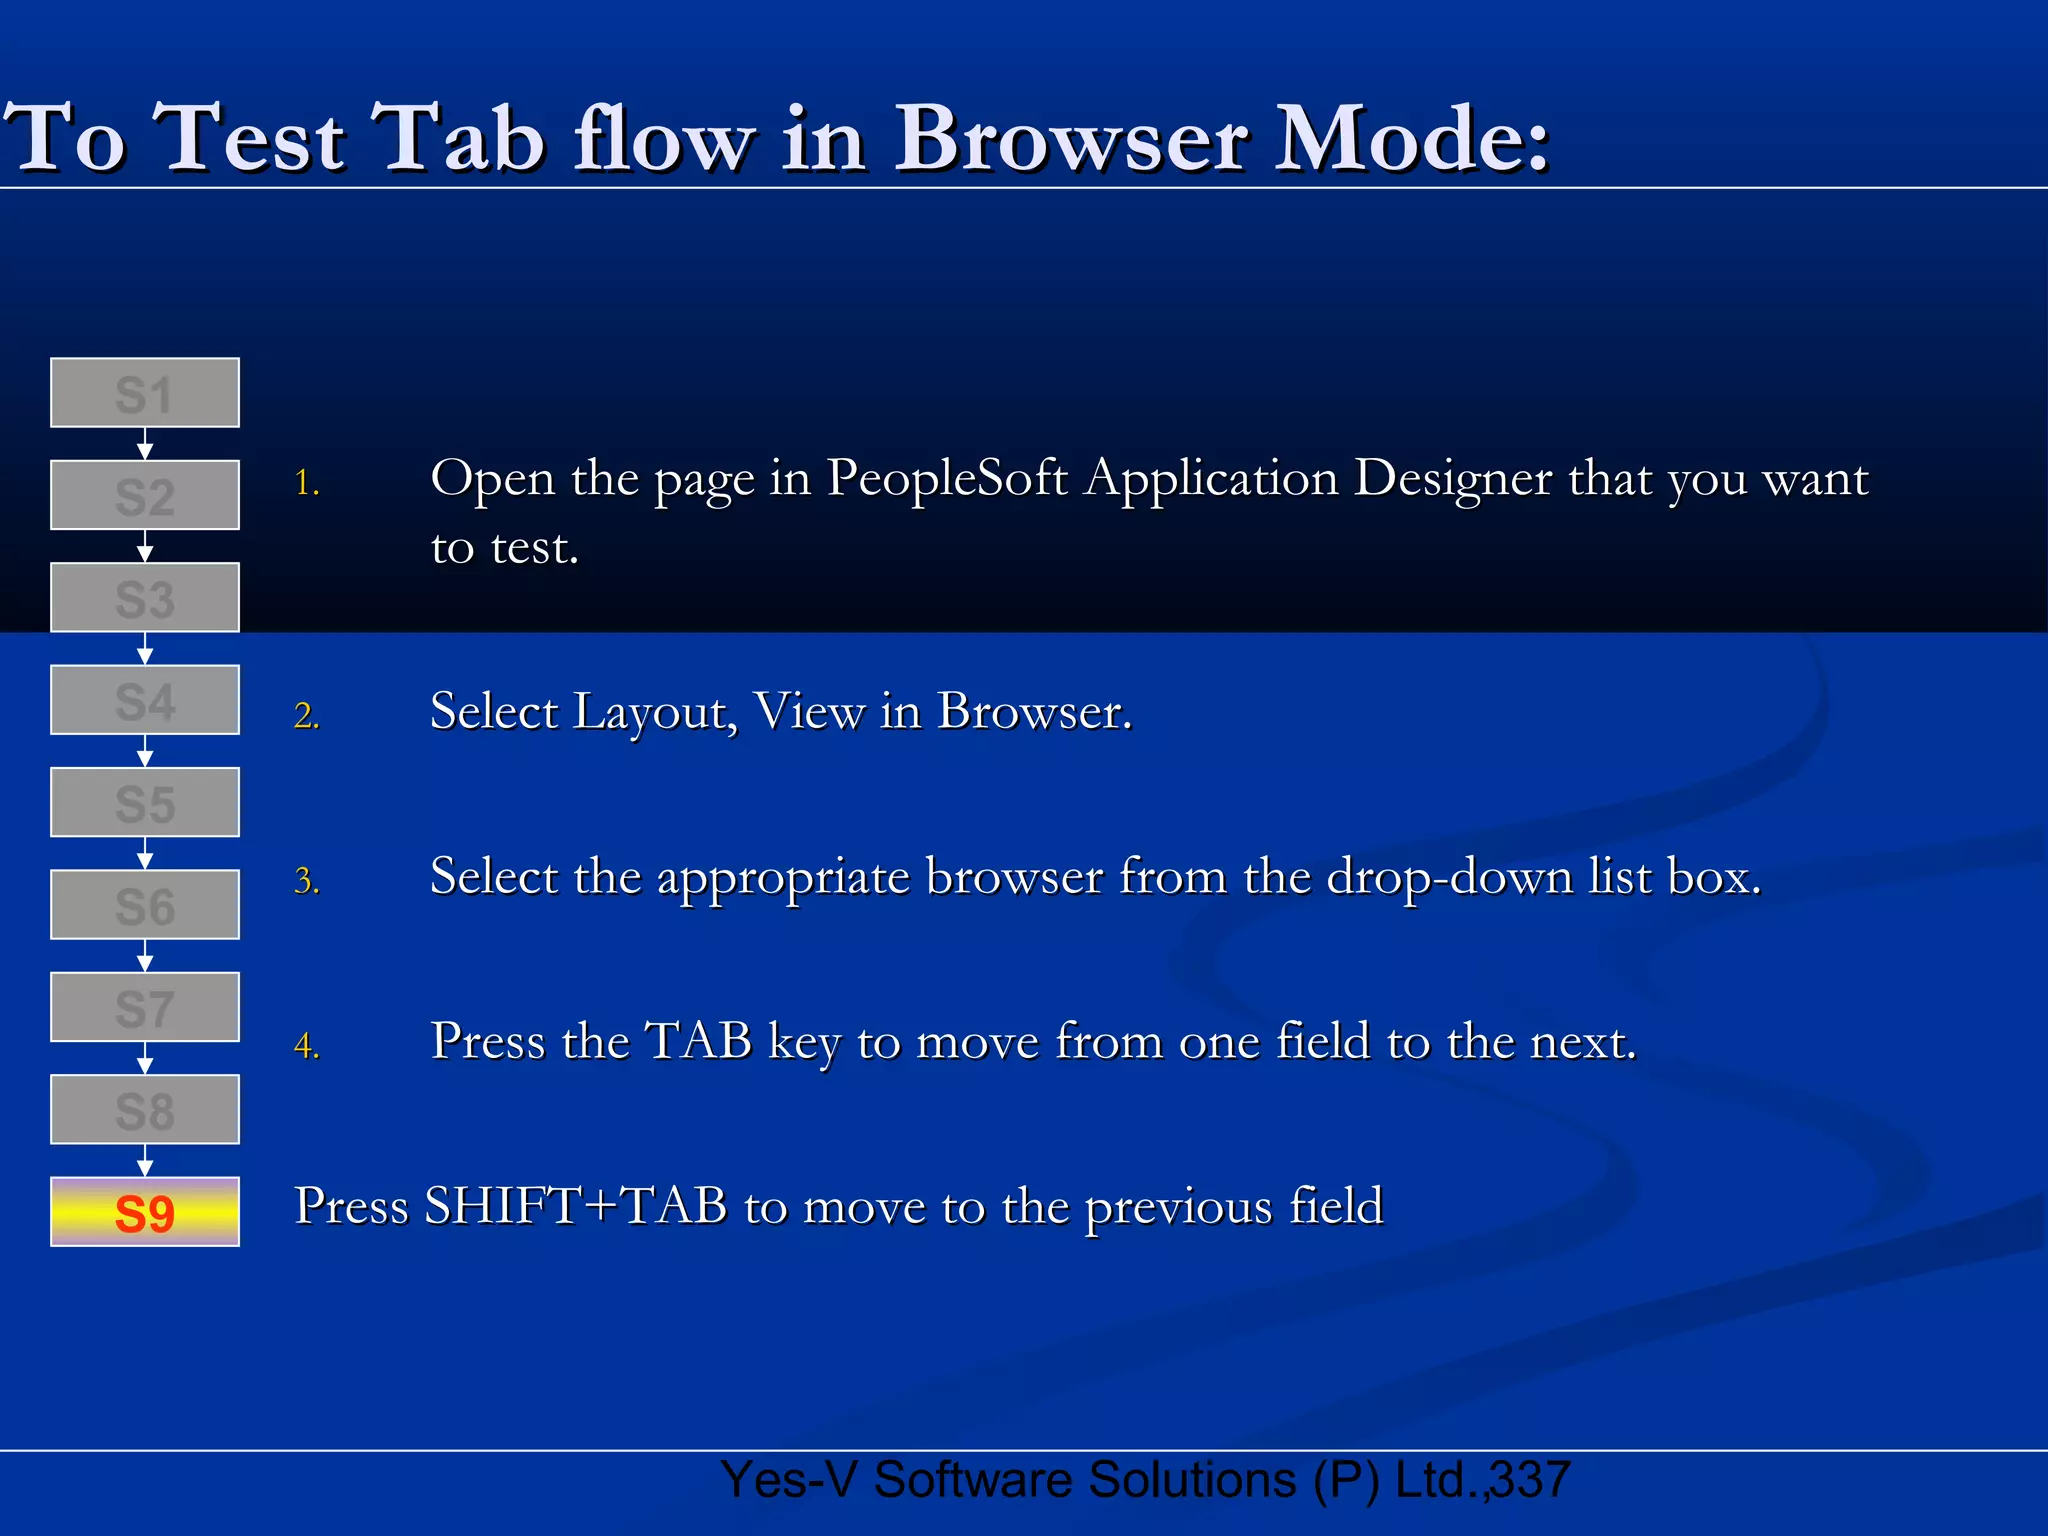
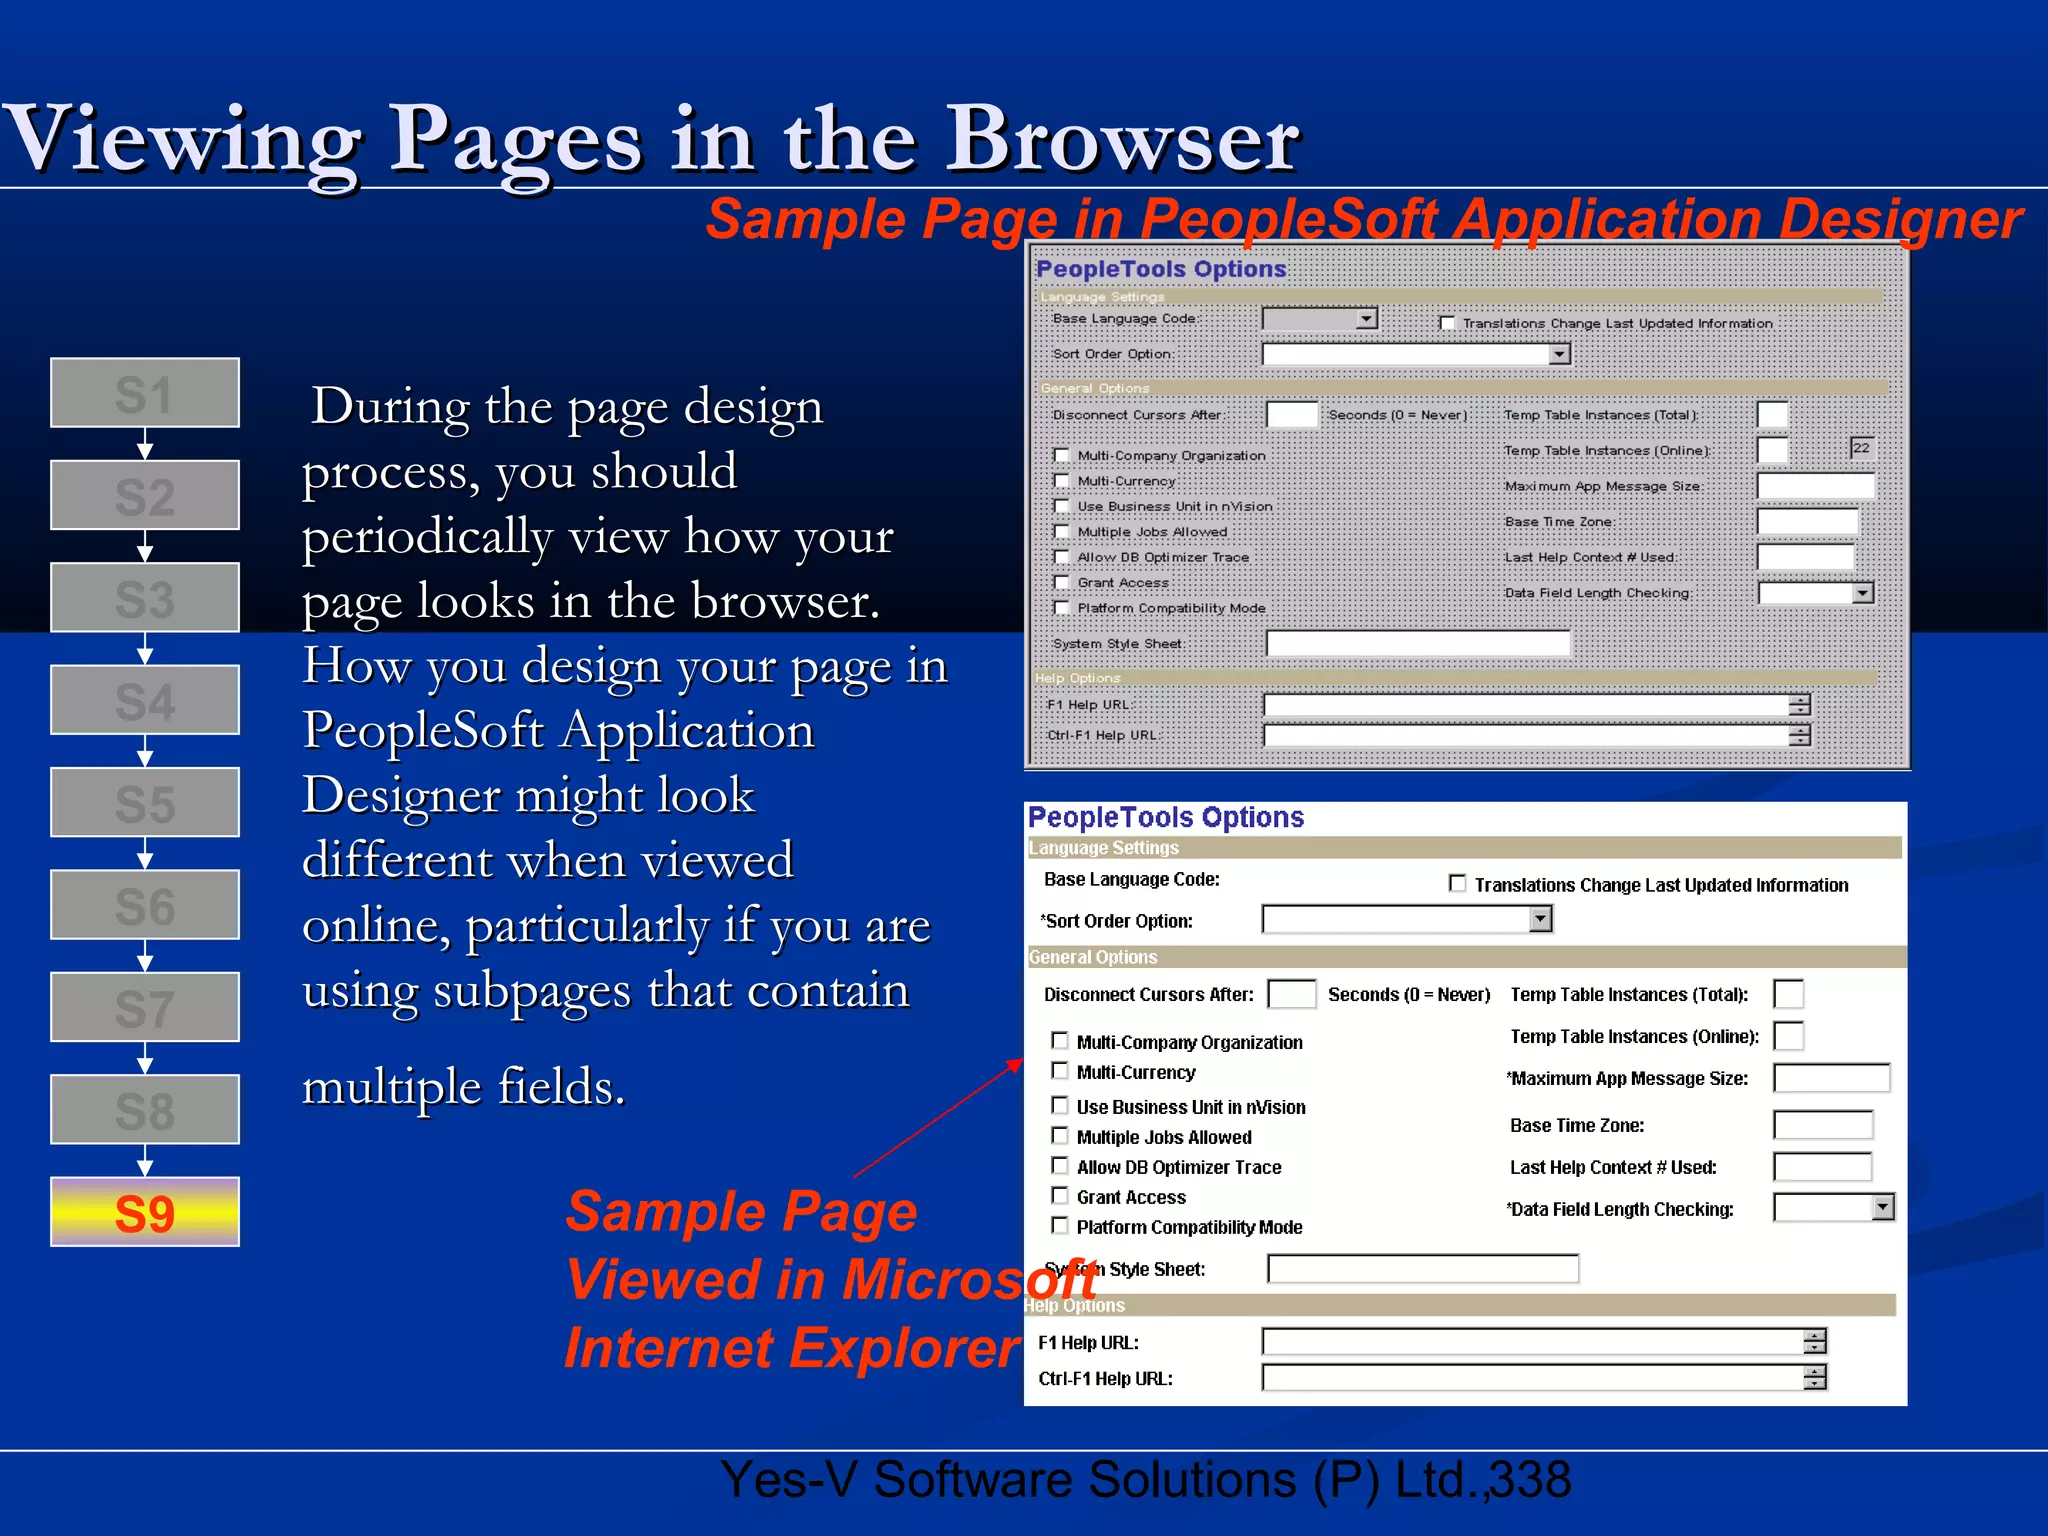
Yes-V Software Solutions (P) Ltd., 1
PeopleSoftPeopleSoft
PracticePractice
Application DesignerApplication Designer
2Yes-V Software Solutions (P) Ltd.,
AgendaAgenda
 PeopleSoft Application DesignerPeopleSoft Application Designer
 Steps involved in creating aSteps involved in creating a
ComponentComponent
Yes-V Software Solutions (P) Ltd., 3
Application DesignerApplication Designer
PeopleSoft Application designer(8.43)PeopleSoft Application designer(8.43)
is a tool for developing web enabledis a tool for developing web enabled
PeopleSoft applicationsPeopleSoft applications
4Yes-V Software Solutions (P) Ltd.,
Creating an ApplicationCreating an Application
Simple 9 stepsSimple 9 steps
1. Create Field Definition1. Create Field Definition
2. Create Record Definition.2. Create Record Definition.
3. Build the Record Definition.3. Build the Record Definition.
4. Create page Definition.4. Create page Definition.
5. Create Component Definition.5. Create Component Definition.
6. Include pages into component Definition.6. Include pages into component Definition.
7. Creating Menu Definition.7. Creating Menu Definition.
8. Assigning security to the menu.8. Assigning security to the menu.
9. Test the application9. Test the application
S8
S9
S7
S6
S5
S4
S3
S2
S1
5Yes-V Software Solutions (P) Ltd.,
Creating a ComponentCreating a Component
F1 F5F2 F3 F4 FNFN-1F12F11F6 _ _ _ _ _
REC1 REC2 RECN
PAGE1 PAGE2 PAGE N
COM1 COM NCOM2
Application
_ _ _ _ _ _ _ _ _ _ _
_ _ _
_ _ _ _
F – Field
REC – Record
COM – Component
6Yes-V Software Solutions (P) Ltd.,
Creating an ApplicationCreating an Application
Simple 9 stepsSimple 9 steps
1.1. Create Field DefinitionCreate Field Definition
2. Create Record Definition.2. Create Record Definition.
3. Build the Record Definition.3. Build the Record Definition.
4. Create page Definition.4. Create page Definition.
5. Create Component Definition.5. Create Component Definition.
6. Include pages into component Definition.6. Include pages into component Definition.
7. Creating Menu Definition.7. Creating Menu Definition.
8. Assigning security to the menu.8. Assigning security to the menu.
9. Test the application9. Test the applicationS8
S9
S7
S6
S5
S4
S3
S2
S1
Yes-V Software Solutions (P) Ltd., 7
Field DefinitionField Definition
8Yes-V Software Solutions (P) Ltd.,
Field DefinitionField Definition
 Fields are the basic Building BlocksFields are the basic Building Blocks
 There are two types of FieldsThere are two types of Fields
1.1. FieldField
2.2. Record FieldRecord Field
 Fields that are grouped together as a unit are called recordFields that are grouped together as a unit are called record
definitionsdefinitions
 Additional Characteristics are defined to the Record FieldAdditional Characteristics are defined to the Record Field
which is specific to that record, called Record Fieldwhich is specific to that record, called Record Field
Properties.Properties.
 Record field properties areRecord field properties are notnot shared with other records inshared with other records in
which the field is used. Where as Field Properties are sharedwhich the field is used. Where as Field Properties are shared
with other records in which the field is usedwith other records in which the field is used
S8
S9
S7
S6
S5
S4
S3
S2
S1
9Yes-V Software Solutions (P) Ltd.,
Field DefinitionField Definition
 Attributes of a Field definitionAttributes of a Field definition
 Field typeField type
 Field lengthField length
 Field LabelsField Labels
Label IdLabel Id
Long nameLong name
Short nameShort name
DefDef
 Field formatField format
Format typeFormat type
FamilyFamily
Display nameDisplay name
 Not UsedNot Used
 Chart fieldChart field
S8
S9
S7
S6
S5
S4
S3
S2
S1
10Yes-V Software Solutions (P) Ltd.,
Field DefinitionField Definition
 Field typeField type
Character (Char) – Its maximum length ranges from 1-254Character (Char) – Its maximum length ranges from 1-254
Long Character (Long)-Its maximum length is 64000 charactersLong Character (Long)-Its maximum length is 64000 characters
Number (Nbr) – Signed or Unsigned NumberNumber (Nbr) – Signed or Unsigned Number
Signed Number (Sign)Signed Number (Sign)
Date (Date)-field length of 10 and is maintained by the systemDate (Date)-field length of 10 and is maintained by the system
Time (Time)- 15 positions, format of HH:MI:SS.999999Time (Time)- 15 positions, format of HH:MI:SS.999999
DateTime (DtTm)- 26 positions, format of YYYY-MM-DD-HH-MI-SS.999999DateTime (DtTm)- 26 positions, format of YYYY-MM-DD-HH-MI-SS.999999
Image (Img)- store application data that takes the form of imagesImage (Img)- store application data that takes the form of images
ImageReference (Iref)- to store static images that can be changed at runtime with PeopleCodeImageReference (Iref)- to store static images that can be changed at runtime with PeopleCode
Attachment (Att) - Maps to a BLOB database type to hold the contents of a file attachmentAttachment (Att) - Maps to a BLOB database type to hold the contents of a file attachment
 Field lengthField length
Specifies the length of the fieldSpecifies the length of the field
S8
S9
S7
S6
S5
S4
S3
S2
S1
11Yes-V Software Solutions (P) Ltd.,
Field DefinitionField Definition
 Field LabelsField Labels
Attributes:Attributes:
Label IdLabel Id
unique identifier for the field .unique identifier for the field .
less than 18 characters, without spaces, and UPPERCASEless than 18 characters, without spaces, and UPPERCASE
Long nameLong name
The Record Field Table, long option for a page field.The Record Field Table, long option for a page field.
Up to 30 charactersUp to 30 characters
Short nameShort name
An alternate name to use on pages and reports.An alternate name to use on pages and reports.
Up to 15 charactersUp to 15 characters
DefDef
Def stands for default fieldDef stands for default field
The line which is checked (tick mark) is taken as the default label id.The line which is checked (tick mark) is taken as the default label id.
S8
S9
S7
S6
S5
S4
S3
S2
S1
12Yes-V Software Solutions (P) Ltd.,
Field DefinitionField Definition
 Not UsedNot Used
Read only Check box.Read only Check box.
Values can be changedValues can be changed
throughthrough PeopleCode.PeopleCode.
This causes the fieldThis causes the field
 Skipped as part of theSkipped as part of the
unique index.unique index.
 Exposed to PeopleCodeExposed to PeopleCode
for read and writefor read and write
operations.operations.
 ChartFieldChartField
Read only Check box.Read only Check box.
Values can be changedValues can be changed
throughthrough PeopleCodePeopleCode
Used for character fieldsUsed for character fields
and used by financialand used by financial
applications to specify aapplications to specify a
usage patternusage pattern
S8
S9
S7
S6
S5
S4
S3
S2
S1
“Read Only”
Check Box
13Yes-V Software Solutions (P) Ltd.,
Field DefinitionField Definition
 Field formatField format
Field format specifications affectField format specifications affect
internal values that are stored ininternal values that are stored in
the databasethe database
 Format typeFormat type
S8
S9
S7
S6
S5
S4
S3
S2
S1
UppercaseUppercase NameName
Phone Numbers (North America)Phone Numbers (North America) SSNSSN
Zip/Postal Code (North America)Zip/Postal Code (North America) Mixed CaseMixed Case
Raw BinaryRaw Binary Numbers OnlyNumbers Only
Phone Numbers (International)Phone Numbers (International) SINSIN
Zip/Postal Code (International)Zip/Postal Code (International) CustomCustom
 FamilyFamily
Formats are organized into formatFormats are organized into format
families, which can include one orfamilies, which can include one or
more unique formats.more unique formats.
 Display nameDisplay name
The Display Name given to theThe Display Name given to the
Format FamilyFormat Family
14Yes-V Software Solutions (P) Ltd.,
Field Format-Changing Format FamiliesField Format-Changing Format Families
1. Select Tools, Miscellaneous Definitions, Field Formats.
2. To define a new format family, click the New button.
The New Family dialog box appears.
3. Enter a name for your new format family and click OK.
The Formats dialog box appears.
4. In the Stored group box, enter a name and format.
This defines how the format family is to be stored in the database and
printed in reports.
5. Enter the format notation that you want to use for storing the data in the
Format field.
6. In the Display group box, enter a name for the format.
This defines how the format family will appear online.
7. Enter the format notation that you want to use for displaying
the data in the Format field.
8. Click the Add button to add the new format family,
and click OK when you are finished.
S8
S9
S7
S6
S5
S4
S3
S2
S1
15Yes-V Software Solutions (P) Ltd.,
Field FormatField Format
Select Tools, Miscellaneous Definitions, Field FormatsSelect Tools, Miscellaneous Definitions, Field Formats
S8
S9
S7
S6
S5
S4
S3
S2
S1
16Yes-V Software Solutions (P) Ltd.,
Field FormatField Format
Click New ButtonClick New Button
New Dialogue BoxNew Dialogue Box
S8
S9
S7
S6
S5
S4
S3
S2
S1
17Yes-V Software Solutions (P) Ltd.,
Field FormatField Format
Enter values in Stored and DisplayEnter values in Stored and Display
Group Boxes and Click AddGroup Boxes and Click Add
S8
S9
S7
S6
S5
S4
S3
S2
S1
18Yes-V Software Solutions (P) Ltd.,
Field Formats – Editing FormatsField Formats – Editing Formats
 The Edit Formats dialog box presents a tree control whereThe Edit Formats dialog box presents a tree control where
you define the stored and display formats for a family and allyou define the stored and display formats for a family and all
options and attributes. This dialog box enables you to:options and attributes. This dialog box enables you to:
 Add, update, and delete stored and display formats.Add, update, and delete stored and display formats.
 Enter a description for the family.Enter a description for the family.
 Specify options, such as uppercase and smart punctuation, forSpecify options, such as uppercase and smart punctuation, for
the family.the family.
 Changes are saved when you click OK.Changes are saved when you click OK.
S8
S9
S7
S6
S5
S4
S3
S2
S1
19Yes-V Software Solutions (P) Ltd.,
Field Formats – Editing FormatsField Formats – Editing Formats
This following slides show how to:This following slides show how to:
 Add a new stored format.Add a new stored format.
 Add a new display format to a stored format.Add a new display format to a stored format.
 Update a display format.Update a display format.
 Delete stored formats.Delete stored formats.
S8
S9
S7
S6
S5
S4
S3
S2
S1
20Yes-V Software Solutions (P) Ltd.,
Field FormatField Format
Adding a New Stored FormatAdding a New Stored Format
1.1. Open the format family to which you want to add a format.Open the format family to which you want to add a format.
2.2. Select the format family name.Select the format family name.
3.3. Enter the stored and display names and format notation.Enter the stored and display names and format notation.
4.4. ClickClick Add.Add.
5.5. The new format appears in the tree below the existing formats.The new format appears in the tree below the existing formats.
Adding a New Display Format to a Stored FormatAdding a New Display Format to a Stored Format
1.1. In the tree, select the stored format name to which you want to add aIn the tree, select the stored format name to which you want to add a
display format.display format.
2.2. In theIn the DisplayDisplay group box, enter a new name and format notation.group box, enter a new name and format notation.
3.3. Click theClick the AddAdd button to add the display format.button to add the display format.
4.4. The new display format appears in the tree, attached to the storedThe new display format appears in the tree, attached to the stored
format to which it belongs.format to which it belongs.
S8
S9
S7
S6
S5
S4
S3
S2
S1
21Yes-V Software Solutions (P) Ltd.,
Field Format - EditingField Format - Editing
To add New FormatTo add New Format
To Existing one.To Existing one.
Select a Format Family and Click Edit.Select a Format Family and Click Edit.
The Edit dialogue Box appears.The Edit dialogue Box appears.
S8
S9
S7
S6
S5
S4
S3
S2
S1
22Yes-V Software Solutions (P) Ltd.,
Field FormatField Format
Updating a Display FormatUpdating a Display Format
1.1. To update a display format:To update a display format:
2.2. Select the display format in the tree view.Select the display format in the tree view.
3.3. Select a display format and enter the enabled fields.Select a display format and enter the enabled fields.
4.4. ClickClick UpdateUpdate to update the display.to update the display.
Deleting Stored FormatsDeleting Stored Formats
1.1. To delete a stored format:To delete a stored format:
2.2. Select the display format.Select the display format.
3.3. Click theClick the DeleteDelete button.button.
4.4. PeopleSoft Application Designer displays a warningPeopleSoft Application Designer displays a warning
message indicating that deleting a display format mightmessage indicating that deleting a display format might
strand stored data. Selectstrand stored data. Select YesYes to continue with the delete.to continue with the delete.
S8
S9
S7
S6
S5
S4
S3
S2
S1
23Yes-V Software Solutions (P) Ltd.,
Field Format - EditingField Format - Editing
Select the Display Format in the Tree viewSelect the Display Format in the Tree view
Update the FormatUpdate the Format
Delete the FormatDelete the Format
S8
S9
S7
S6
S5
S4
S3
S2
S1
24Yes-V Software Solutions (P) Ltd.,
Field FormatField Format
Testing FormatsTesting Formats
To test a format family:To test a format family:
1.1. Use the two drop-down list boxes to select a stored and displayUse the two drop-down list boxes to select a stored and display
format pair to test.format pair to test.
2.2. Click either DB->Display and Display->DB to process theClick either DB->Display and Display->DB to process the
format.format.
S8
S9
S7
S6
S5
S4
S3
S2
S1
25Yes-V Software Solutions (P) Ltd.,
Field Format - TestField Format - Test
Click any one of themClick any one of them
S8
S9
S7
S6
S5
S4
S3
S2
S1
Result will be Displayed hereResult will be Displayed here
26Yes-V Software Solutions (P) Ltd.,
Field PropertiesField Properties
The Field Properties Dialogue Box haveThe Field Properties Dialogue Box have
 General TabGeneral Tab
Field DefinitionField Definition is to enter commentsis to enter comments
regarding the field Definitionregarding the field Definition
Owner IDOwner ID drop-down list box enables youdrop-down list box enables you
to select a valid owner, as in applicationto select a valid owner, as in application
project or roleproject or role
Last UpdatedLast Updated group box containsgroup box contains
information—date, time, and user ID—information—date, time, and user ID—
about theabout the
last time the field definition was modifiedlast time the field definition was modified
 International Format Setting Tab are not in use forInternational Format Setting Tab are not in use for
PeopleTools 8.4.PeopleTools 8.4.
 Translate Values tabsTranslate Values tabs
This is available only for Character FieldThis is available only for Character Field
of max length 4.of max length 4.
S8
S9
S7
S6
S5
S4
S3
S2
S1
This is
available
only for
Character
Field of max
length 4
27Yes-V Software Solutions (P) Ltd.,
Creating New Field DefinitionsCreating New Field Definitions
 To create a new field definition:To create a new field definition:
1.1. Click theClick the NewNew button on the PeopleSoft Applicationbutton on the PeopleSoft Application
Designer toolbar.Designer toolbar.
2.2. The New dialog box appears.The New dialog box appears.
3.3. SelectSelect Field.Field.
4.4. Click OK.Click OK.
5.5. Select one of the following field types from the FieldSelect one of the following field types from the Field
Type drop-down list box.Type drop-down list box.
6.6. Then specify the required attributes for that field Type.Then specify the required attributes for that field Type.
7.7. And Save the Field Definition.And Save the Field Definition.
S8
S9
S7
S6
S5
S4
S3
S2
S1
28Yes-V Software Solutions (P) Ltd.,
Creating New Field DefinitionsCreating New Field Definitions
New icon inNew icon in
ApplicationApplication
DesignerDesigner
Tool barTool bar
OROR
S8
S9
S7
S6
S5
S4
S3
S2
S1
29Yes-V Software Solutions (P) Ltd.,
Creating New Field DefinitionsCreating New Field Definitions
S8
S9
S7
S6
S5
S4
S3
S2
S1
30Yes-V Software Solutions (P) Ltd.,
Creating New Field DefinitionsCreating New Field Definitions
S8
S9
S7
S6
S5
S4
S3
S2
S1
31Yes-V Software Solutions (P) Ltd.,
Creating New Field DefinitionsCreating New Field Definitions
Field has been DefinedField has been Defined
Save Dialogue BoxSave Dialogue Box
S8
S9
S7
S6
S5
S4
S3
S2
S1
32Yes-V Software Solutions (P) Ltd.,
Opening an Existing Field DefinitionOpening an Existing Field Definition
 Select File, Open from the menuSelect File, Open from the menu

From this dialog box, you canFrom this dialog box, you can
view all available fields in theview all available fields in the
database. You can open all fieldsdatabase. You can open all fields
of a certain type or from a specificof a certain type or from a specific
project, or you can open a specificproject, or you can open a specific
field or set of fields.field or set of fields.
 Clone an existing definitionClone an existing definition
 To create a field definition withTo create a field definition with
attributes similar to an existingattributes similar to an existing
one:one:
 Open an existing fieldOpen an existing field
definition.definition.
 Select File, Save As.Select File, Save As.
 Enter a new name.Enter a new name.
Select a FieldSelect a Field
And Click OpenAnd Click Open
S8
S9
S7
S6
S5
S4
S3
S2
S1
33Yes-V Software Solutions (P) Ltd.,
Viewing Field PropertiesViewing Field Properties
 There are several ways to view fieldThere are several ways to view field
properties.properties.
 While in the field definitionWhile in the field definition
workspace, click the Propertiesworkspace, click the Properties
button.button.
 Select Field, Definition Properties.Select Field, Definition Properties.
 While in a record definition:While in a record definition:
 Select the field.Select the field.
 Right-click the field name.Right-click the field name.
 SelectSelect View Field PropertiesView Field Properties
from the pop-up menu.from the pop-up menu.S8
S9
S7
S6
S5
S4
S3
S2
S1
34Yes-V Software Solutions (P) Ltd.,
Changing Field DefinitionChanging Field Definition
 Changing a field Definition has the followingChanging a field Definition has the following
effectseffects
 We might need to change the Field PropertiesWe might need to change the Field Properties
and attributesand attributes
 The change affects every occurrence of theThe change affects every occurrence of the
field in every record definitionfield in every record definition
S8
S9
S7
S6
S5
S4
S3
S2
S1
35Yes-V Software Solutions (P) Ltd.,
Changing Field DefinitionChanging Field Definition
Changing Field TypeChanging Field Type
 Change a field type by opening a field and selecting anotherChange a field type by opening a field and selecting another
field type from the drop-down list boxfield type from the drop-down list box
Renaming Field DefinitionRenaming Field Definition
 There are two ways to rename a field definition:There are two ways to rename a field definition:
Using the Rename Definition dialog box.Using the Rename Definition dialog box.
Using the Open Definition dialog box.Using the Open Definition dialog box.
S8
S9
S7
S6
S5
S4
S3
S2
S1
36Yes-V Software Solutions (P) Ltd.,
Changing Field DefinitionChanging Field Definition
Renaming Field DefinitionRenaming Field Definition
Using the Rename Definition Dialog BoxUsing the Rename Definition Dialog Box
To rename a field definition from the Rename Definition dialog box:To rename a field definition from the Rename Definition dialog box:
1.1. Select File, Rename to open the Rename Definition dialog box.Select File, Rename to open the Rename Definition dialog box.
2.2. SelectSelect FieldField as the definition type.as the definition type.
3.3. Enter the name of the field.Enter the name of the field.
4.4. If you aren’t sure of the name or the correct spelling, use the search criteriaIf you aren’t sure of the name or the correct spelling, use the search criteria
fields to locate the field to rename. The list displays field names that matchfields to locate the field to rename. The list displays field names that match
your search criteria.your search criteria.
5.5. To rename a field in the list, select the field and clickTo rename a field in the list, select the field and click Rename,Rename, or double-or double-
click the field.click the field.
6.6. The field name becomes available for entry, and you can type the newThe field name becomes available for entry, and you can type the new
name.name.
7.7. When you finish typing the new name, press ENTER or click theWhen you finish typing the new name, press ENTER or click the RenameRename
button.button.
8.8. The Rename Field dialog box appears. Select the records in which youThe Rename Field dialog box appears. Select the records in which you
want the field to be renamed. Thewant the field to be renamed. The De-select AllDe-select All button toggles tobutton toggles to SelectSelect
All.All.
9.9. Click OK.Click OK.
S8
S9
S7
S6
S5
S4
S3
S2
S1
37Yes-V Software Solutions (P) Ltd.,
Rename FieldRename Field
Select a FieldSelect a Field
Click RenameClick Rename
S8
S9
S7
S6
S5
S4
S3
S2
S1
38Yes-V Software Solutions (P) Ltd.,
Rename FieldRename Field
Now you canNow you can
rename the fieldrename the field
S8
S9
S7
S6
S5
S4
S3
S2
S1
39Yes-V Software Solutions (P) Ltd.,
Rename FieldRename Field
Click OKClick OK
S8
S9
S7
S6
S5
S4
S3
S2
S1
40Yes-V Software Solutions (P) Ltd.,
Rename FieldRename Field-Effects in Record Definition-Effects in Record Definition
Before Renaming the FieldBefore Renaming the Field
After Renaming the FieldAfter Renaming the Field
S8
S9
S7
S6
S5
S4
S3
S2
S1
41Yes-V Software Solutions (P) Ltd.,
Changing Field DefinitionChanging Field Definition
Renaming Field DefinitionRenaming Field Definition
Using the Open Definition Dialog BoxUsing the Open Definition Dialog Box
To rename a field definition from the Open Definition dialog box:To rename a field definition from the Open Definition dialog box:
1.1. To display the Open Definition dialog box, select File, Open.To display the Open Definition dialog box, select File, Open.
2.2. This dialog box enables you to set up search criteria for locating fieldThis dialog box enables you to set up search criteria for locating field
names.names.
3.3. Select Field as the definition type.Select Field as the definition type.
4.4. If you have additional information, use theIf you have additional information, use the NameName field. You can furtherfield. You can further
narrow your search criteria by selecting a field type or the name of thenarrow your search criteria by selecting a field type or the name of the
project that contains the field to delete.project that contains the field to delete.
5.5. Click theClick the OpenOpen button or press ENTER when you have completed yourbutton or press ENTER when you have completed your
search criteria.search criteria.
6.6. You can rename a field in the Open Definition dialog box by selecting theYou can rename a field in the Open Definition dialog box by selecting the
field, right-clicking the field name, and selectingfield, right-clicking the field name, and selecting Rename.Rename.
7.7. You can also select the field name and click it a second time. The fieldYou can also select the field name and click it a second time. The field
name becomes available for entry and you can enter a new name.name becomes available for entry and you can enter a new name.
8.8. When you finish typing the new name, press ENTER or click theWhen you finish typing the new name, press ENTER or click the RenameRename
button.button.
S8
S9
S7
S6
S5
S4
S3
S2
S1
42Yes-V Software Solutions (P) Ltd.,
Rename FieldRename Field
S8
S9
S7
S6
S5
S4
S3
S2
S1
43Yes-V Software Solutions (P) Ltd.,
Deleting Field DefinitionDeleting Field Definition
This section discusses two ways to delete a field definition:This section discusses two ways to delete a field definition:
1.1. Using the Delete Definition dialog box.Using the Delete Definition dialog box.
2.2. Using the Open Definition dialog box.Using the Open Definition dialog box.
The important thing to be noted is that you cannot delete a field that is currentlyThe important thing to be noted is that you cannot delete a field that is currently
used in any recordused in any record
Using the Delete Definition Dialog BoxUsing the Delete Definition Dialog Box
1.1. To delete field definitions from the Delete Definition dialog box:To delete field definitions from the Delete Definition dialog box:
2.2. Select File, Delete to open the Delete Definition dialog box.Select File, Delete to open the Delete Definition dialog box.
3.3. In the Delete Definition dialog box, set up search criteria for locating fieldIn the Delete Definition dialog box, set up search criteria for locating field
names.names.
4.4. SelectSelect FieldField as the definition type.as the definition type.
5.5. If you have additional information, use theIf you have additional information, use the NameName field.field.
6.6. Select a field type or the name of the project that contains the field thatSelect a field type or the name of the project that contains the field that
you want to delete.you want to delete.
7.7. This further narrows your search criteria.This further narrows your search criteria.
8.8. When your search results appear in the output window, delete the fieldWhen your search results appear in the output window, delete the field
definition by selecting the field and clicking thedefinition by selecting the field and clicking the DeleteDelete button or double-button or double-
clicking the field nameclicking the field name..
S8
S9
S7
S6
S5
S4
S3
S2
S1
44Yes-V Software Solutions (P) Ltd.,
Deleting Field DefinitionDeleting Field Definition
S8
S9
S7
S6
S5
S4
S3
S2
S1
45Yes-V Software Solutions (P) Ltd.,
Deleting Field DefinitionDeleting Field Definition
A Field cannot be deleted if it is used on a recordA Field cannot be deleted if it is used on a record
S8
S9
S7
S6
S5
S4
S3
S2
S1
46Yes-V Software Solutions (P) Ltd.,
Deleting Field DefinitionDeleting Field Definition
Using the Open Definition Dialog BoxUsing the Open Definition Dialog Box
1.1. To delete field definitions from the Open Definition dialog box:To delete field definitions from the Open Definition dialog box:
2.2. Select File, Open to display the Open Definition dialog box.Select File, Open to display the Open Definition dialog box.
3.3. This dialog box enables you to set up search criteria for locating fieldThis dialog box enables you to set up search criteria for locating field
names.names.
4.4. SelectSelect FieldField as the definition type.as the definition type.
5.5. Enter theEnter the NameName field if you have additional information.field if you have additional information.
6.6. You can further narrow your search criteria by selecting a field type orYou can further narrow your search criteria by selecting a field type or
the name of the project that contains the field that you want to delete.the name of the project that contains the field that you want to delete.
7.7. When you have completed your search criteria, clickWhen you have completed your search criteria, click OpenOpen or pressor press
ENTER.ENTER.
8.8. Right-click the field that you want to delete from the list of field namesRight-click the field that you want to delete from the list of field names
displayed.displayed.
9.9. SelectSelect DeleteDelete from the pop-up menu.from the pop-up menu.
S8
S9
S7
S6
S5
S4
S3
S2
S1
47Yes-V Software Solutions (P) Ltd.,
Deleting Field DefinitionDeleting Field Definition
S8
S9
S7
S6
S5
S4
S3
S2
S1
48Yes-V Software Solutions (P) Ltd.,
Printing Field DefinitionPrinting Field Definition
 Two Ways to print FieldTwo Ways to print Field
DefinitionDefinition
1.1. To print a field definition,To print a field definition,
 select File, Print from the fieldselect File, Print from the field
definition window (or click thedefinition window (or click the
Print button in the toolbar) toPrint button in the toolbar) to
open the Print dialog box,open the Print dialog box,
 specify printing options.specify printing options.
2.2. Open Definition dialog box.Open Definition dialog box.
 On the list resulting from yourOn the list resulting from your
search, right-click the name ofsearch, right-click the name of
the field definition that youthe field definition that you
want to print,want to print,
 selectselect PrintPrint from the pop-upfrom the pop-up
menu to view your printingmenu to view your printing
options.options.
S8
S9
S7
S6
S5
S4
S3
S2
S1
49Yes-V Software Solutions (P) Ltd.,
Translate TableTranslate Table
 It is a Prompt Table to store values for fields that don’tIt is a Prompt Table to store values for fields that don’t
need individual prompt tables of their ownneed individual prompt tables of their own
 Criteria for Prompt TableCriteria for Prompt Table
 Field type isField type is Character.Character.
 Field length is 1 to 4 characters.Field length is 1 to 4 characters.
 Field values consist of a relatively small, static setField values consist of a relatively small, static set
of values that are not maintained by the user.of values that are not maintained by the user.
 No other fields relate to this field.No other fields relate to this field.
S8
S9
S7
S6
S5
S4
S3
S2
S1
50Yes-V Software Solutions (P) Ltd.,
Translate TableTranslate Table
Field length is 1 to 4 charactersField length is 1 to 4 characters..
Translate Value Tab appearsTranslate Value Tab appears
S8
S9
S7
S6
S5
S4
S3
S2
S1
51Yes-V Software Solutions (P) Ltd.,
Translate TableTranslate Table
 Attributes of Prompt TableAttributes of Prompt Table
 FIELD NAME Field name, such as ABSENCE_TYPEFIELD NAME Field name, such as ABSENCE_TYPE
 LANGUAGE_CD Language codeLANGUAGE_CD Language code
 FIELD VALUE Value for the fieldFIELD VALUE Value for the field
 EFFDT Effective dateEFFDT Effective date
 VERSION Internal version number (system-maintained)VERSION Internal version number (system-maintained)
 EFF_STATUS Status—active or inactiveEFF_STATUS Status—active or inactive
 XLATLONGNAME 30-character description; used as a label on pages andXLATLONGNAME 30-character description; used as a label on pages and
reportsreports
 XLATSHORTNAME 10-character description; used as a label on pages andXLATSHORTNAME 10-character description; used as a label on pages and
reportsreports
 LASTUPDDTTM DateTime field showing the last time that a field wasLASTUPDDTTM DateTime field showing the last time that a field was
updatedupdated
 LASTUPDOPRID User ID of the user who most recently updated theLASTUPDOPRID User ID of the user who most recently updated the
fieldfield
S8
S9
S7
S6
S5
S4
S3
S2
S1
52Yes-V Software Solutions (P) Ltd.,
Translate TableTranslate Table
Adding Translate ValuesAdding Translate Values
To add translate values to the Translate TableTo add translate values to the Translate Table::
1.1. From a field definition window, select File, Definition Properties.From a field definition window, select File, Definition Properties.
You can also right-click and selectYou can also right-click and select Field Properties,Field Properties, or press ALT-or press ALT-
ENTER.ENTER.
2.2. From a record field definition window, right-click the field, and selectFrom a record field definition window, right-click the field, and select ViewView
TranslatesTranslates from the pop-up menu.from the pop-up menu.
3.3. Select the Translate Values tab.Select the Translate Values tab.
The Translate Values dialog box displays existing values for the field and enables youThe Translate Values dialog box displays existing values for the field and enables you
to add, change, or delete values. In theto add, change, or delete values. In the Last UpdatedLast Updated box, you see informationbox, you see information
—date, time, and user ID—about the last update for the selected translate value.—date, time, and user ID—about the last update for the selected translate value.
4.4. ClickClick AddAdd to define a new value.to define a new value.
5.5. Enter the field value, effective date, long name, and short name that your usersEnter the field value, effective date, long name, and short name that your users
enter on the page.enter on the page.
S8
S9
S7
S6
S5
S4
S3
S2
S1
53Yes-V Software Solutions (P) Ltd.,
Translate TableTranslate Table
S8
S9
S7
S6
S5
S4
S3
S2
S1
54Yes-V Software Solutions (P) Ltd.,
Translate TableTranslate Table
S8
S9
S7
S6
S5
S4
S3
S2
S1
55Yes-V Software Solutions (P) Ltd.,
Translate TableTranslate Table
Changing Translate ValuesChanging Translate Values
 To change an existing translate value, select the value andTo change an existing translate value, select the value and
clickclick Change,Change, or double-click the value. The system displaysor double-click the value. The system displays
the Change Translate Table dialog box in which you canthe Change Translate Table dialog box in which you can
make the necessary changes.make the necessary changes.
Deleting Translate ValuesDeleting Translate Values
 To delete the value, select it and click theTo delete the value, select it and click the DeleteDelete button. Thebutton. The
row disappears.row disappears.
 Deleting should be the last option. If you don’t want theDeleting should be the last option. If you don’t want the
value, deactivate it by changing the status to Inactivevalue, deactivate it by changing the status to Inactive
S8
S9
S7
S6
S5
S4
S3
S2
S1
56Yes-V Software Solutions (P) Ltd.,
Translate TableTranslate Table
Changing translate
value
Deleting translate
value
Saving translate
value
S8
S9
S7
S6
S5
S4
S3
S2
S1
57Yes-V Software Solutions (P) Ltd.,
Translate TableTranslate Table
Saving Translate ValueSaving Translate Value
 After you have made all of your changes to theAfter you have made all of your changes to the
Translate Table, you must save theTranslate Table, you must save the entire fieldentire field
definition.definition.
 There is no save option specifically for translateThere is no save option specifically for translate
values. Clickvalues. Click OKOK from the Field Properties dialogfrom the Field Properties dialog
boxbox
 save the field definition by clicking thesave the field definition by clicking the SaveSave buttonbutton
or selecting File, Save.or selecting File, Save.
S8
S9
S7
S6
S5
S4
S3
S2
S1
58Yes-V Software Solutions (P) Ltd.,
Effective DateEffective Date
 The Effective Date Field has special propertiesThe Effective Date Field has special properties
related to the processing of effective dates on rowsrelated to the processing of effective dates on rows
and should be used when neededand should be used when needed
 Effective date is used for maintaining Data History –Effective date is used for maintaining Data History –
Past, Current & Future.Past, Current & Future.
 Only one current data and multiple occurrences ofOnly one current data and multiple occurrences of
future and history.future and history.
 The information helps to look at what’s happenedThe information helps to look at what’s happened
up to now and plan for the future.up to now and plan for the future.
S8
S9
S7
S6
S5
S4
S3
S2
S1
59Yes-V Software Solutions (P) Ltd.,
Effective DateEffective Date
 Three Types of Effective DateThree Types of Effective Date
FutureFuture Data rows that have effective dates greaterData rows that have effective dates greater
than the system date-usually today’s datethan the system date-usually today’s date
CurrentCurrent The data row with the most recent effectiveThe data row with the most recent effective
date closest to today’s (system) date .but notdate closest to today’s (system) date .but not
a future date.a future date.
HistoryHistory Data rows that have effective dates less thanData rows that have effective dates less than
the current data rowthe current data rowS8
S9
S7
S6
S5
S4
S3
S2
S1
60Yes-V Software Solutions (P) Ltd.,
Effective DateEffective Date
 Effective Date Impact on different Action TypeEffective Date Impact on different Action Type
Action TypeAction Type viewview ChangeChange Insert New RowsInsert New Rows
Update/DisplayUpdate/Display Current, FutureCurrent, Future Future OnlyFuture Only Effective DateEffective Date
Greater than theGreater than the
Current RowCurrent Row
Update/DisplayUpdate/Display
AllAll
History,History,
Current, FutureCurrent, Future
Future OnlyFuture Only Effective DateEffective Date
Greater than theGreater than the
Current RowCurrent Row
CorrectionCorrection History,History,
Current, FutureCurrent, Future
All ExistingAll Existing
RowsRows
Add new RowsAdd new Rows
with no Effectivewith no Effective
Date RestrictionsDate Restrictions
S8
S9
S7
S6
S5
S4
S3
S2
S1
61Yes-V Software Solutions (P) Ltd.,
Effective Date - ExampleEffective Date - Example
S8
S9
S7
S6
S5
S4
S3
S2
S1
62Yes-V Software Solutions (P) Ltd.,
Effective Date - ExampleEffective Date - Example
S8
S9
S7
S6
S5
S4
S3
S2
S1
63Yes-V Software Solutions (P) Ltd.,
Effective Date - ExampleEffective Date - Example
Update Display Mode change Future Only
Update All Mode Change Future Only
Correction Mode all Existing Rows
S8
S9
S7
S6
S5
S4
S3
S2
S1
64Yes-V Software Solutions (P) Ltd.,
Effective Date – ExampleEffective Date – Example
Current mode is Update/Display
We cannot change current or history records
unless in correction mode
S8
S9
S7
S6
S5
S4
S3
S2
S1
65Yes-V Software Solutions (P) Ltd.,
Effective StatusEffective Status
 Used with Effective Date, enables the system toUsed with Effective Date, enables the system to
select the appropriate effective-Dated rowsselect the appropriate effective-Dated rows
 It takes two translate valuesIt takes two translate values
 ActiveActive
 InactiveInactive
S8
S9
S7
S6
S5
S4
S3
S2
S1
66Yes-V Software Solutions (P) Ltd.,
Effective SequenceEffective Sequence
 The Effective Sequence field serves differentThe Effective Sequence field serves different
purposes depending on whether or not it’spurposes depending on whether or not it’s
paired with Effective Date.paired with Effective Date.
 When Effective sequence is paired withWhen Effective sequence is paired with
Effective Date, we can assign a uniqueEffective Date, we can assign a unique
sequence number to each row that has thesequence number to each row that has the
same effective datesame effective dateS8
S9
S7
S6
S5
S4
S3
S2
S1
67Yes-V Software Solutions (P) Ltd.,
Creating an ApplicationCreating an Application
Simple 9 stepsSimple 9 steps
1. Create Field Definition1. Create Field Definition
2.2. Create Record Definition.Create Record Definition.
3. Build the Record Definition.3. Build the Record Definition.
4. Create page Definition.4. Create page Definition.
5. Create Component Definition.5. Create Component Definition.
6. Include pages into component Definition.6. Include pages into component Definition.
7. Creating Menu Definition.7. Creating Menu Definition.
8. Assigning security to the menu.8. Assigning security to the menu.
9. Test the application9. Test the application
S8
S9
S7
S6
S5
S4
S3
S2
S1
Yes-V Software Solutions (P) Ltd., 68
Record DefinitionRecord Definition
69Yes-V Software Solutions (P) Ltd.,
Record DefinitionRecord Definition
Fields that are grouped together as a unit formsFields that are grouped together as a unit forms recordrecord
definitionsdefinitions
 A record definition represents what the underlying SQLA record definition represents what the underlying SQL
database tables look like and how they process data.database tables look like and how they process data.
 Planning Record DefinitionPlanning Record Definition
 You actually define two layers of information:You actually define two layers of information:
1.1. Record levelRecord level - Determine the ultimate purpose of the- Determine the ultimate purpose of the
record definition and how it will be used in the systemrecord definition and how it will be used in the system
2.2. Field level -Field level - plan the details of what types of fields to addplan the details of what types of fields to add
S8
S9
S7
S6
S5
S4
S3
S2
S1
70Yes-V Software Solutions (P) Ltd.,
Record DefinitionRecord Definition
S8
S9
S7
S6
S5
S4
S3
S2
S1
71Yes-V Software Solutions (P) Ltd.,
Record DefinitionRecord Definition
 Types of RecordTypes of Record
 SQL TableSQL Table
 SQL ViewSQL View
 Dynamic ViewDynamic View
 Derived/WorkDerived/Work
 SubRecordSubRecord
 Query ViewQuery View
 Temporary TableTemporary TableS8
S9
S7
S6
S5
S4
S3
S2
S1
72Yes-V Software Solutions (P) Ltd.,
Record DefinitionRecord Definition
Viewing Record DefinitionsViewing Record Definitions
 The Purpose of Record Definition View is :The Purpose of Record Definition View is :
 View basic field definition characteristics.View basic field definition characteristics.
 View key-related characteristics and default values.View key-related characteristics and default values.
 View editing options.View editing options.
 View PeopleCode program types.View PeopleCode program types.
 Reorder fields.Reorder fields.
 Identify PeopleCode that is attached to fields.Identify PeopleCode that is attached to fields.
 Size and sort columnsSize and sort columns
S8
S9
S7
S6
S5
S4
S3
S2
S1
73Yes-V Software Solutions (P) Ltd.,
Record DefinitionsRecord Definitions
Viewing Record DefinitionsViewing Record Definitions
 The four Views of the Record areThe four Views of the Record are
1.1. Field DisplayField Display
2.2. Use DisplayUse Display
3.3. Edits DisplayEdits Display
4.4. PeopleCode Display.PeopleCode Display.
S8
S9
S7
S6
S5
S4
S3
S2
S1
74Yes-V Software Solutions (P) Ltd.,
Record DefinitionsRecord Definitions
Viewing Record DefinitionsViewing Record Definitions
Field DisplayField Display
 shows the basic field definition characteristics for fields in the recordshows the basic field definition characteristics for fields in the record
definitiondefinition..
 Field definition characteristics are global—they affect all record definitionsField definition characteristics are global—they affect all record definitions
in which the field is used.in which the field is used.
Use DisplayUse Display
 Use Display mode shows key-related characteristics and default values forUse Display mode shows key-related characteristics and default values for
fields that determine how fields are used in a recordfields that determine how fields are used in a record
 The use characteristics might differ for fields that are used on more thanThe use characteristics might differ for fields that are used on more than
one record definitionone record definition
S8
S9
S7
S6
S5
S4
S3
S2
S1
75Yes-V Software Solutions (P) Ltd.,
Viewing Record Definitions – Field DisplayViewing Record Definitions – Field Display
Field DisplayField Display
Shows basic field definition characteristics
S8
S9
S7
S6
S5
S4
S3
S2
S1
76Yes-V Software Solutions (P) Ltd.,
Viewing Record Definitions – Use DisplayViewing Record Definitions – Use Display
Use DisplayUse Display
Shows key-related characteristics and default values
for fields that determine how fields are used in a record
S8
S9
S7
S6
S5
S4
S3
S2
S1
77Yes-V Software Solutions (P) Ltd.,
Record DefinitionsRecord Definitions
Viewing Record DefinitionsViewing Record Definitions
Edit DisplayEdit Display
 shows all editing options (edit as a validationshows all editing options (edit as a validation
rule) that are available for fields in a record .rule) that are available for fields in a record .
 Edits on a field vary from one record definitionEdits on a field vary from one record definition
to another .to another .
PeopleCode DisplayPeopleCode Display
 contains a column for each PeopleCode programcontains a column for each PeopleCode program
type and specifies whether a program exists.type and specifies whether a program exists.
S8
S9
S7
S6
S5
S4
S3
S2
S1
78Yes-V Software Solutions (P) Ltd.,
Viewing Record Definitions – Edit DisplayViewing Record Definitions – Edit Display
Edit DisplayEdit Display
Shows all editing optionsShows all editing options
That are available for fields in a recordThat are available for fields in a record
S8
S9
S7
S6
S5
S4
S3
S2
S1
79Yes-V Software Solutions (P) Ltd.,
Viewing Record DefinitionsViewing Record Definitions – PeopleCode Display– PeopleCode Display
Indicates PeopleCode has beenIndicates PeopleCode has been
written for the Eventwritten for the Event
PeopleCode DisplayPeopleCode Display
S8
S9
S7
S6
S5
S4
S3
S2
S1
80Yes-V Software Solutions (P) Ltd.,
Record DefinitionsRecord Definitions
Saving Record DefinitionsSaving Record Definitions
 After adding or changing one element in the new definition,After adding or changing one element in the new definition,
save the work and name the record.save the work and name the record.
 PeopleCode cannot be added to a field until you save thePeopleCode cannot be added to a field until you save the
record definition.record definition.
 To save a new record definition:To save a new record definition:
 select File, Save orselect File, Save or
 File, Save As.File, Save As.
S8
S9
S7
S6
S5
S4
S3
S2
S1
81Yes-V Software Solutions (P) Ltd.,
Saving Record DefinitionSaving Record Definition
Save Dialogue BoxSave Dialogue Box
S8
S9
S7
S6
S5
S4
S3
S2
S1
82Yes-V Software Solutions (P) Ltd.,
Record DefinitionsRecord Definitions
Naming Record DefinitionsNaming Record Definitions
 The name length can be up to 15 characters, with theThe name length can be up to 15 characters, with the
exception of theexception of the Temporary Table typeTemporary Table type, which has a, which has a
maximum length of 13maximum length of 13..
 The name must begin with a letter and can containThe name must begin with a letter and can contain
underscores to make it more readable.underscores to make it more readable.
 Avoid special characters, such asAvoid special characters, such as ## oror $,$, which can causewhich can cause
problems in some database environmentsproblems in some database environments
S8
S9
S7
S6
S5
S4
S3
S2
S1
83Yes-V Software Solutions (P) Ltd.,
Record DefinitionsRecord Definitions
Naming Record DefinitionsNaming Record Definitions
 Record Naming ConventionsRecord Naming Conventions
 _TBL_TBL Identifies an edit or prompt table that contains dataIdentifies an edit or prompt table that contains data
that is used for validationthat is used for validation
 _VW_VW Identifies a record definition that is physicallyIdentifies a record definition that is physically
implemented by defining a SQL view.implemented by defining a SQL view.
 _DVW_DVW Identifies a dynamic view.Identifies a dynamic view.
 _WRK_WRK Identifies derived work records.Identifies derived work records.
 _SBR_SBR Identifies subrecords.Identifies subrecords.
 _QVW_QVW Identifies a query view.Identifies a query view.
 _WL_WL Identifies the record as a worklist record definition.Identifies the record as a worklist record definition.
S8
S9
S7
S6
S5
S4
S3
S2
S1
84Yes-V Software Solutions (P) Ltd.,
Record DefinitionsRecord Definitions
Naming Record DefinitionsNaming Record Definitions
 Record Naming ConventionsRecord Naming Conventions
 R_R_ Identifies work record definitions for SQR reports.Identifies work record definitions for SQR reports.
 AUDIT_AUDIT_ Identifies record definitions that store audit information for other recordIdentifies record definitions that store audit information for other record
definitions in the database.definitions in the database.
 WEBLIB_WEBLIB_ Identifies record definitions that store internet scripts. Internet scripts areIdentifies record definitions that store internet scripts. Internet scripts are
generally located in Field Formula PeopleCode events.generally located in Field Formula PeopleCode events.
 FUNCLIB_FUNCLIB_ Identifies record definitions that contain written PeopleCode functions, asIdentifies record definitions that contain written PeopleCode functions, as
opposed to built-in functions. These self-developed functions are generallyopposed to built-in functions. These self-developed functions are generally
located in FieldFormula events, and the records are usually derivedlocated in FieldFormula events, and the records are usually derived
 DERIVED_DERIVED_ Identifies shared record definitions (across an application module orIdentifies shared record definitions (across an application module or
group) that have fields for PeopleCode events.group) that have fields for PeopleCode events.
S8
S9
S7
S6
S5
S4
S3
S2
S1
85Yes-V Software Solutions (P) Ltd.,
Record DefinitionRecord Definition
 Creating a New RecordCreating a New Record
1.1. Select File, New.Select File, New.
2.2. SelectSelect Record.Record.
3.3. Click OK.Click OK.
4.4. The object workspace appears so that you canThe object workspace appears so that you can
build a list of fields in a record definition.build a list of fields in a record definition.
S8
S9
S7
S6
S5
S4
S3
S2
S1
86Yes-V Software Solutions (P) Ltd.,
Creating A New RecordCreating A New Record
S8
S9
S7
S6
S5
S4
S3
S2
S1
87Yes-V Software Solutions (P) Ltd.,
Creating A New RecordCreating A New Record
Object WorkSpace where the relatedObject WorkSpace where the related
fields are populated to form a Recordfields are populated to form a Record
S8
S9
S7
S6
S5
S4
S3
S2
S1
88Yes-V Software Solutions (P) Ltd.,
Creating A New RecordCreating A New Record
Fields are now inserted into recordFields are now inserted into record
S8
S9
S7
S6
S5
S4
S3
S2
S1
89Yes-V Software Solutions (P) Ltd.,
Record DefinitionRecord Definition
 Opening an Existing RecordOpening an Existing Record
1.1. Select File, Open.Select File, Open.
2.2. SelectSelect RecordRecord from thefrom the Definition TypeDefinition Type list.list.
3.3. ClickClick Open.Open.
4.4. In the Open Definition dialog box, enter the first letterIn the Open Definition dialog box, enter the first letter
of the record for which you are searching.of the record for which you are searching.
5.5. ClickClick OpenOpen
S8
S9
S7
S6
S5
S4
S3
S2
S1
90Yes-V Software Solutions (P) Ltd.,
Opening an Existing RecordOpening an Existing Record
S8
S9
S7
S6
S5
S4
S3
S2
S1
91Yes-V Software Solutions (P) Ltd.,
Opening an Existing RecordOpening an Existing Record
S8
S9
S7
S6
S5
S4
S3
S2
S1
92Yes-V Software Solutions (P) Ltd.,
Record DefinitionRecord Definition
 Manipulating Fields in Record DefinitionManipulating Fields in Record Definition
1.1. Add fieldsAdd fields
2.2. Reorder fieldsReorder fields
3.3. Move fieldsMove fields
4.4. Delete fieldsDelete fields
5.5. Rename fieldsRename fields
S8
S9
S7
S6
S5
S4
S3
S2
S1
93Yes-V Software Solutions (P) Ltd.,
Record DefinitionRecord Definition
 Manipulating Fields in Record DefinitionManipulating Fields in Record Definition
1.1. Inserting Fields into RecordsInserting Fields into Records
Inserting can be done in three Ways:Inserting can be done in three Ways:
1.1. Using the project workspace tree.Using the project workspace tree.
2.2. Using the Insert menu (Insert, Field).Using the Insert menu (Insert, Field).
3.3. Dragging fields from existing records.Dragging fields from existing records.S8
S9
S7
S6
S5
S4
S3
S2
S1
94Yes-V Software Solutions (P) Ltd.,
Inserting Fields into RecordsInserting Fields into Records
Inserting through Insert MenuInserting through Insert Menu
S8
S9
S7
S6
S5
S4
S3
S2
S1
95Yes-V Software Solutions (P) Ltd.,
Record DefinitionRecord Definition
 Manipulating Fields in Record DefinitionManipulating Fields in Record Definition
1.1. Inserting SubRecord into RecordsInserting SubRecord into Records
 Select Insert, SubRecord to search, select, and insert subrecords into aSelect Insert, SubRecord to search, select, and insert subrecords into a
record.record.
 A subrecord enables you to add a group of fields that are commonly used inA subrecord enables you to add a group of fields that are commonly used in
multiple record definitions.multiple record definitions.
 A subrecord must be defined before it can be inserted into a recordA subrecord must be defined before it can be inserted into a record
definitiondefinition..
S8
S9
S7
S6
S5
S4
S3
S2
S1
96Yes-V Software Solutions (P) Ltd.,
Inserting SubRecord into RecordsInserting SubRecord into Records
Inserting through Insert MenuInserting through Insert Menu
S8
S9
S7
S6
S5
S4
S3
S2
S1
97Yes-V Software Solutions (P) Ltd.,
Record DefinitionRecord Definition
 Manipulating Fields in Record DefinitionManipulating Fields in Record Definition
2. Reordering Fields2. Reordering Fields
• You can reorder the display of fields in the record definition by double-You can reorder the display of fields in the record definition by double-
clicking the attribute name.clicking the attribute name.
• To actually reorder the fields in the records, you must cut and paste orTo actually reorder the fields in the records, you must cut and paste or
select the field and move it.select the field and move it.
S8
S9
S7
S6
S5
S4
S3
S2
S1
98Yes-V Software Solutions (P) Ltd.,
Record DefinitionRecord Definition
 Manipulating Fields in Record DefinitionManipulating Fields in Record Definition
3.Moving Fields3.Moving Fields
 Moving Fields in the Same RecordMoving Fields in the Same Record
 Moving Fields Another Record DefinitionMoving Fields Another Record Definition
S8
S9
S7
S6
S5
S4
S3
S2
S1
99Yes-V Software Solutions (P) Ltd.,
Moving Fields Another Record DefinitionMoving Fields Another Record Definition
Selecting a Field to MoveSelecting a Field to Move
Moving into this RecordMoving into this Record
S8
S9
S7
S6
S5
S4
S3
S2
S1
100Yes-V Software Solutions (P) Ltd.,
Moving Fields Another Record DefinitionMoving Fields Another Record Definition
PeopleSoft System will ask
for confirmation to
move from one record
to another record
S8
S9
S7
S6
S5
S4
S3
S2
S1
101Yes-V Software Solutions (P) Ltd.,
Moving Fields Another Record DefinitionMoving Fields Another Record Definition
S8
S9
S7
S6
S5
S4
S3
S2
S1
102Yes-V Software Solutions (P) Ltd.,
Moving Fields Another Record DefinitionMoving Fields Another Record Definition
Pasting into Another RecordPasting into Another Record
S8
S9
S7
S6
S5
S4
S3
S2
S1
103Yes-V Software Solutions (P) Ltd.,
Moving Fields Another Record DefinitionMoving Fields Another Record Definition
Moved the Field to Another RecordMoved the Field to Another Record
S8
S9
S7
S6
S5
S4
S3
S2
S1
104Yes-V Software Solutions (P) Ltd.,
Record DefinitionRecord Definition
 Manipulating Fields in Record DefinitionManipulating Fields in Record Definition
4. Deleting Fields4. Deleting Fields
 Select the field that you want to remove and press the DEL (delete) key. .Select the field that you want to remove and press the DEL (delete) key. .
 When the system prompts you to confirm the deletion, clickWhen the system prompts you to confirm the deletion, click Yes.Yes.
 if you delete a field from a record definition, you must also delete it fromif you delete a field from a record definition, you must also delete it from
any pages on which it appearsany pages on which it appears
 Modify or remove PeopleCode when you find references to the deletedModify or remove PeopleCode when you find references to the deleted
field.field.
5.5. Renaming FieldsRenaming Fields
Discussed in earlier slidesDiscussed in earlier slides
S8
S9
S7
S6
S5
S4
S3
S2
S1
105Yes-V Software Solutions (P) Ltd.,
Deleting a Field from Record DefinitionDeleting a Field from Record Definition
S8
S9
S7
S6
S5
S4
S3
S2
S1
106Yes-V Software Solutions (P) Ltd.,
Deleting a Field from Record DefinitionDeleting a Field from Record Definition
Asking for Confirmation
S9
S8
S9
S7
S6
S5
S4
S3
S2
S1
107Yes-V Software Solutions (P) Ltd.,
Deleting a Field from Record DefinitionDeleting a Field from Record Definition
Once you Click yes, the Field will be deleted.Once you Click yes, the Field will be deleted.
After that save the recordAfter that save the record
S8
S9
S7
S6
S5
S4
S3
S2
S1
108Yes-V Software Solutions (P) Ltd.,
Record DefinitionRecord Definition
 Renaming Record DefinitionRenaming Record Definition
1.1. To rename a record definition:To rename a record definition:
2.2. Select File, Rename.Select File, Rename.
3.3. The Rename Definition dialog box appears.The Rename Definition dialog box appears.
4.4. SelectSelect RecordRecord fromfrom Definition Type.Definition Type.
5.5. ClickClick Rename.Rename.
6.6. Select the record and clickSelect the record and click Rename.Rename.
7.7. A rectangular box appears around the name.A rectangular box appears around the name.
8.8. Enter the new name and press ENTER.Enter the new name and press ENTER.
S8
S9
S7
S6
S5
S4
S3
S2
S1
109Yes-V Software Solutions (P) Ltd.,
Renaming Record DefinitionRenaming Record Definition
S8
S9
S7
S6
S5
S4
S3
S2
S1
110Yes-V Software Solutions (P) Ltd.,
Renaming Record DefinitionRenaming Record Definition
S8
S9
S7
S6
S5
S4
S3
S2
S1
111Yes-V Software Solutions (P) Ltd.,
Renaming Record DefinitionRenaming Record Definition
Allowing you toAllowing you to
Rename the RecordRename the Record
S8
S9
S7
S6
S5
S4
S3
S2
S1
112Yes-V Software Solutions (P) Ltd.,
Renaming Record DefinitionRenaming Record Definition
Close the records before renamingClose the records before renaming
S8
S9
S7
S6
S5
S4
S3
S2
S1
113Yes-V Software Solutions (P) Ltd.,
Renaming Record DefinitionRenaming Record Definition
Click Yes to Confirm RenameClick Yes to Confirm Rename
Record has been renamedRecord has been renamed
S8
S9
S7
S6
S5
S4
S3
S2
S1
114Yes-V Software Solutions (P) Ltd.,
Record DefinitionRecord Definition
 Deleting Record DefinitionDeleting Record Definition
1.1. Select File, Delete.Select File, Delete.
2.2. Select the record definition to delete.Select the record definition to delete.
3.3. ClickClick Delete.Delete.
4.4. Warning!Warning! When you delete a record definition, theWhen you delete a record definition, the
system automatically deletes any PeopleCode that issystem automatically deletes any PeopleCode that is
associated with the recordassociated with the record..
5.5. ClickClick YesYes if you really want to delete the recordif you really want to delete the record
definition.definition.S8
S9
S7
S6
S5
S4
S3
S2
S1
115Yes-V Software Solutions (P) Ltd.,
Deleting Record DefinitionDeleting Record Definition
S8
S9
S7
S6
S5
S4
S3
S2
S1
116Yes-V Software Solutions (P) Ltd.,
Deleting Record DefinitionDeleting Record Definition
Select a Record and Press Delete.Select a Record and Press Delete.
It will ask for confirmation. Click YesIt will ask for confirmation. Click Yes
S8
S9
S7
S6
S5
S4
S3
S2
S1
117Yes-V Software Solutions (P) Ltd.,
Deleting Record DefinitionDeleting Record Definition
close the record
prior performing the
deletion operation
Confirm Deletion by clicking yesS8
S9
S7
S6
S5
S4
S3
S2
S1
118Yes-V Software Solutions (P) Ltd.,
Record DefinitionRecord Definition
 Printing Record DefinitionPrinting Record Definition
 Select File, Page Setup to changeSelect File, Page Setup to change
any of the print record defaults.any of the print record defaults.
The system retains your changes untilThe system retains your changes until
you reset them again. The Pageyou reset them again. The Page
Setup dialog box appears.Setup dialog box appears.
 Select the options for print.Select the options for print.
 DefinitionDefinition
 PeopleCodePeopleCode
 GraphicsGraphics
 MarginsMargins
 HeaderHeader
 FooterFooter
 BorderBorder
 Border SpaceBorder Space
 Click OK when you are done toClick OK when you are done to
close the Print Setup dialog boxclose the Print Setup dialog box
and save your settings.and save your settings.
 Select File, Print.Select File, Print.
S8
S9
S7
S6
S5
S4
S3
S2
S1
119Yes-V Software Solutions (P) Ltd.,
Record DefinitionRecord Definition
 PropertiesProperties
1.1. Record PropertiesRecord Properties
2.2. Record Field PropertiesRecord Field Properties
1.1. Record PropertiesRecord Properties
Record Properties has two tabsRecord Properties has two tabs
1.1. General TabGeneral Tab
2.2. Use TabUse TabS8
S9
S7
S6
S5
S4
S3
S2
S1
120Yes-V Software Solutions (P) Ltd.,
Record PropertiesRecord Properties
S8
S9
S7
S6
S5
S4
S3
S2
S1
121Yes-V Software Solutions (P) Ltd.,
Record Properties – General TabRecord Properties – General Tab
S8
S9
S7
S6
S5
S4
S3
S2
S1
122Yes-V Software Solutions (P) Ltd.,
Record Properties – Use TabRecord Properties – Use Tab
S8
S9
S7
S6
S5
S4
S3
S2
S1
123Yes-V Software Solutions (P) Ltd.,
Record DefinitionRecord Definition
2. Record Field Properties2. Record Field Properties
 They are specific to a single record definition andThey are specific to a single record definition and
are stored with the recordare stored with the record
 To edit record field properties from a recordTo edit record field properties from a record
definition, select Edit, Record Field Propertiesdefinition, select Edit, Record Field Properties
from the PeopleSoft Application Designer menu.from the PeopleSoft Application Designer menu.
S8
S9
S7
S6
S5
S4
S3
S2
S1
124Yes-V Software Solutions (P) Ltd.,
Record DefinitionRecord Definition
2. Record Field Properties2. Record Field Properties
 Record Field Properties has Two TabsRecord Field Properties has Two Tabs
 Use TabUse Tab
 Edit TabEdit Tab
S8
S9
S7
S6
S5
S4
S3
S2
S1
125Yes-V Software Solutions (P) Ltd.,
Record Field PropertiesRecord Field Properties
S8
S9
S7
S6
S5
S4
S3
S2
S1
126Yes-V Software Solutions (P) Ltd.,
Record Field Properties – Use TabRecord Field Properties – Use Tab
S8
S9
S7
S6
S5
S4
S3
S2
S1
127Yes-V Software Solutions (P) Ltd.,
Record Field Properties – Edit TabRecord Field Properties – Edit Tab
Prompt Table
S8
S9
S7
S6
S5
S4
S3
S2
S1
128Yes-V Software Solutions (P) Ltd.,
Prompt TablePrompt Table
 Prompt Table are used to provide users with look upPrompt Table are used to provide users with look up
that shows the valid values for the Fieldthat shows the valid values for the Field
 Three types of Prompt TableThree types of Prompt Table
 Drop-Down List BoxDrop-Down List Box
 Calendar Drop-DownCalendar Drop-Down
 Prompt ButtonPrompt Button
S8
S9
S7
S6
S5
S4
S3
S2
S1
129Yes-V Software Solutions (P) Ltd.,
Prompt Table - ExamplePrompt Table - Example
S8
S9
S7
S6
S5
S4
S3
S2
S1
130Yes-V Software Solutions (P) Ltd.,
Prompt Table – Required PropertiesPrompt Table – Required Properties
S8
S9
S7
S6
S5
S4
S3
S2
S1
Now the values from the specified table
will become the Valid values for the
field in this table
131Yes-V Software Solutions (P) Ltd.,
Creating an ApplicationCreating an Application
Simple 9 stepsSimple 9 steps
1. Create Field Definition1. Create Field Definition
2. Create Record Definition.2. Create Record Definition.
3.3. Build the Record Definition.Build the Record Definition.
4. Create page Definition.4. Create page Definition.
5. Create Component Definition.5. Create Component Definition.
6. Include pages into component Definition.6. Include pages into component Definition.
7. Creating Menu Definition.7. Creating Menu Definition.
8. Assigning security to the menu.8. Assigning security to the menu.
9. Test the application9. Test the application
S8
S9
S7
S6
S5
S4
S3
S2
S1
Yes-V Software Solutions (P) Ltd., 132
Building SQL Tables and ViewsBuilding SQL Tables and Views
133Yes-V Software Solutions (P) Ltd.,
Build ProcessBuild Process
 The Build process uses Data Definition LanguageThe Build process uses Data Definition Language
(DDL) to construct a physical database component(DDL) to construct a physical database component
that is based on the associated record and fieldthat is based on the associated record and field
definitions that you created. With the Build feature,definitions that you created. With the Build feature,
you can create the following:you can create the following:
 TablesTables
 IndexesIndexes
 ViewsViews
 TriggersTriggers
S8
S9
S7
S6
S5
S4
S3
S2
S1
134Yes-V Software Solutions (P) Ltd.,
Record Build ProcessRecord Build Process
Build MenuBuild Menu
 Once the Record Definition has been created ,it isOnce the Record Definition has been created ,it is
Build using the Build Menu.Build using the Build Menu.
 When you choose to build a item from the BuildWhen you choose to build a item from the Build
menu, the tasks for creating or running SQL scriptsmenu, the tasks for creating or running SQL scripts
that define the underlying database components arethat define the underlying database components are
included in the Build dialog box.included in the Build dialog box.
S8
S9
S7
S6
S5
S4
S3
S2
S1
135Yes-V Software Solutions (P) Ltd.,
Record Build ProcessRecord Build Process
Build Menu – Build Dialogue BoxBuild Menu – Build Dialogue Box
S8
S9
S7
S6
S5
S4
S3
S2
S1
136Yes-V Software Solutions (P) Ltd.,
Record Build ProcessRecord Build Process
Build MenuBuild Menu
The settings for the Build process, alsoThe settings for the Build process, also
called Build Settings, enable you tocalled Build Settings, enable you to
configure various aspects of theconfigure various aspects of the
process. Depending on which buildprocess. Depending on which build
option you are running, youroption you are running, your
settings will varysettings will vary
S8
S9
S7
S6
S5
S4
S3
S2
S1
137Yes-V Software Solutions (P) Ltd.,
Record Build ProcessRecord Build Process
Build Menu – SettingsBuild Menu – Settings
Specifying Create OptionsSpecifying Create Options
 Table CreationTable Creation
OptionsOptions
 View CreationView Creation
OptionsOptions
 Index CreationIndex Creation
OptionsOptions
S8
S9
S7
S6
S5
S4
S3
S2
S1
138Yes-V Software Solutions (P) Ltd.,
Record Build ProcessRecord Build Process
Build Menu – SettingsBuild Menu – Settings
Specifying Alter OptionsSpecifying Alter Options
 Drop ColumnDrop Column
OptionsOptions
 Change ColumnChange Column
Length OptionsLength Options
 Alter AnyAlter Any
 Alter Table OptionsAlter Table OptionsS8
S9
S7
S6
S5
S4
S3
S2
S1
139Yes-V Software Solutions (P) Ltd.,
Record Build ProcessRecord Build Process
Build Menu – SettingsBuild Menu – Settings
Specifying Logging OptionsSpecifying Logging Options
 Logging LevelLogging Level
 Logging OutputLogging Output
S8
S9
S7
S6
S5
S4
S3
S2
S1
140Yes-V Software Solutions (P) Ltd.,
Record Build ProcessRecord Build Process
Build Menu – SettingsBuild Menu – Settings
Specifying Scripts OptionsSpecifying Scripts Options
 Script FileScript File
 Script File OptionsScript File Options
 File OverwriteFile Overwrite
OptionsOptions
 Script File NameScript File NameS8
S9
S7
S6
S5
S4
S3
S2
S1
141Yes-V Software Solutions (P) Ltd.,
Record Build ProcessRecord Build Process
 Selecting the Build ScopeSelecting the Build Scope
 The Build feature includesThe Build feature includes
three different scopes thatthree different scopes that
determine the size of yourdetermine the size of your
build project.build project.
 Current DefinitionCurrent Definition
 ProjectProject
 Select Definition intoSelect Definition into
ProjectProject
S8
S9
S7
S6
S5
S4
S3
S2
S1
142Yes-V Software Solutions (P) Ltd.,
Record Build ProcessRecord Build Process
 Creating TablesCreating Tables
 It prefaces each new application SQL table withIt prefaces each new application SQL table with PS_PS_ toto
identify it as an application that was built usingidentify it as an application that was built using
PeopleTools.PeopleTools.
 The Create Table process creates a new applicationThe Create Table process creates a new application
table based on parameters defined in the recordtable based on parameters defined in the record
definition. When a new table is created, the DBMSdefinition. When a new table is created, the DBMS
updates the System Catalog tables to reflect theupdates the System Catalog tables to reflect the
attributes of the new tableattributes of the new table..S8
S9
S7
S6
S5
S4
S3
S2
S1
143Yes-V Software Solutions (P) Ltd.,
Build Process – Creating TableBuild Process – Creating Table
 Open the project for which you want to build SQL tables.Open the project for which you want to build SQL tables.
 Select Build, Project.Select Build, Project.
 From the Build menu, select the appropriate scope of your build.From the Build menu, select the appropriate scope of your build.
 Select Create Tables in the Build Options group box.Select Create Tables in the Build Options group box.
 Select one of the Build Execute options.Select one of the Build Execute options.
 Click the Settings button in the Build dialog box to set user-definedClick the Settings button in the Build dialog box to set user-defined
defaults.defaults.
 Select the appropriate settings on the Create tab.Select the appropriate settings on the Create tab.
 Select the Logging tab.Select the Logging tab.
 Set your logging levels and associated optionsSet your logging levels and associated options
 Select the Scripts tab.Select the Scripts tab.
 Specify your script file options.Specify your script file options.
 Click OK to close the Build Settings dialog box.Click OK to close the Build Settings dialog box.
 In the Build dialog box, click the Build button to run your build option.In the Build dialog box, click the Build button to run your build option.
S8
S9
S7
S6
S5
S4
S3
S2
S1
144Yes-V Software Solutions (P) Ltd.,
Build Process – Creating TableBuild Process – Creating Table
S8
S9
S7
S6
S5
S4
S3
S2
S1
145Yes-V Software Solutions (P) Ltd.,
Build Process – Creating TableBuild Process – Creating Table
All the Tables in theAll the Tables in the
Project are listedProject are listed
S8
S9
S7
S6
S5
S4
S3
S2
S1
146Yes-V Software Solutions (P) Ltd.,
Build Process – Creating TableBuild Process – Creating Table
Specify all the Required OptionsSpecify all the Required Options
S8
S9
S7
S6
S5
S4
S3
S2
S1
147Yes-V Software Solutions (P) Ltd.,
Build Process – Creating ViewsBuild Process – Creating Views
 Clone a record definition.Clone a record definition.
 Open an existing record definition.Open an existing record definition.
 Select File, Save As.Select File, Save As.
 Specify the name of the view that you want to create.Specify the name of the view that you want to create.
 Delete and add the appropriate fields.Delete and add the appropriate fields.
 All columns that are selected in your view should have a corresponding field in theAll columns that are selected in your view should have a corresponding field in the
record definition.record definition.
 Set the record type to SQL View.Set the record type to SQL View.
 Select the Record Type tab for the record definition.Select the Record Type tab for the record definition.
 Select SQL View in the Record Type group box.Select SQL View in the Record Type group box.
 Click the Click to open SQL Editor button.Click the Click to open SQL Editor button.
 The order in which you list the columns in your SQL SELECT statement shouldThe order in which you list the columns in your SQL SELECT statement should
match the order that you specified in the record definition.match the order that you specified in the record definition.
 Save the record definition.Save the record definition.
 Select Build, Current Definition to create the view in the database.Select Build, Current Definition to create the view in the database.
 Select the Create Views check box under Build Options.Select the Create Views check box under Build Options.
 Click Build.Click Build.
S8
S9
S7
S6
S5
S4
S3
S2
S1
148Yes-V Software Solutions (P) Ltd.,
Build Process – Creating ViewsBuild Process – Creating Views
S8
S9
S7
S6
S5
S4
S3
S2
S1
Select SQL View
Click SQL Editor to write SQL Query
149Yes-V Software Solutions (P) Ltd.,
Build Process – Creating ViewsBuild Process – Creating Views
Write the SQL Query and Save the ViewWrite the SQL Query and Save the View
S8
S9
S7
S6
S5
S4
S3
S2
S1
150Yes-V Software Solutions (P) Ltd.,
Build Process – Creating ViewsBuild Process – Creating Views
Click BuildClick Build
S8
S9
S7
S6
S5
S4
S3
S2
S1
151Yes-V Software Solutions (P) Ltd.,
Build Process – Alter TableBuild Process – Alter Table
When to Alter TablesWhen to Alter Tables
 The following record definition changes affectThe following record definition changes affect
synchronization with the application table and require ansynchronization with the application table and require an
Alter process:Alter process:
 Add or delete a field on the record.Add or delete a field on the record.
 Modify the length of a field.Modify the length of a field.
 Change the required status of a field that is Date, Time,Change the required status of a field that is Date, Time,
DateTime, or Long.DateTime, or Long.
 The Alter Table process is similar to the Create TableThe Alter Table process is similar to the Create Table
process, except that it does not drop existing applicationprocess, except that it does not drop existing application
data tables and the data that they contain.data tables and the data that they contain.
 You can select both Alter Tables and Create Tables to runYou can select both Alter Tables and Create Tables to run
concurrently, as long asconcurrently, as long as the Skip table if it already existsthe Skip table if it already exists
option is enabledoption is enabled on the Create tab in the Build Settingson the Create tab in the Build Settings
dialog boxdialog box..
S8
S9
S7
S6
S5
S4
S3
S2
S1
152Yes-V Software Solutions (P) Ltd.,
Build Process – Alter TableBuild Process – Alter Table
Altering a TableAltering a Table
 To alter a table:To alter a table:
1.1. Open the project for which you must perform an alter.Open the project for which you must perform an alter.
2.2. From the Build menu, select the appropriate scope of your build.From the Build menu, select the appropriate scope of your build.
The Build dialog box appears.The Build dialog box appears.
1.1. SelectSelect Alter TablesAlter Tables from the Build Options group box.from the Build Options group box.
Selecting the Alter Tables option automatically selects and disables theSelecting the Alter Tables option automatically selects and disables the
Create Indexes and Create Trigger (only if triggers are needed) option.Create Indexes and Create Trigger (only if triggers are needed) option.
In the Build Execute Options group box, only theIn the Build Execute Options group box, only the Build script fileBuild script file
option is enabled.option is enabled.
1.1. Click the Settings button in the Build dialog box to set user-definedClick the Settings button in the Build dialog box to set user-defined
defaults.defaults.
Select the appropriate alter, logging, and scripts settings.Select the appropriate alter, logging, and scripts settings.
1.1. In the Build dialog box, click Build to run the Alter Tables processIn the Build dialog box, click Build to run the Alter Tables process.. WhenWhen
the process completes, check any errors listed in the log filethe process completes, check any errors listed in the log file..
S8
S9
S7
S6
S5
S4
S3
S2
S1
153Yes-V Software Solutions (P) Ltd.,
Build Process – Alter TableBuild Process – Alter Table
 Confirming Your Table AlterConfirming Your Table Alter
To confirm your table alter:To confirm your table alter:
1.1. Review the SQL script that was generated by the Alter process.Review the SQL script that was generated by the Alter process.
2.2. Use your native SQL command processor to open the SQLUse your native SQL command processor to open the SQL
script. The script is located where you specified on the Scriptsscript. The script is located where you specified on the Scripts
tab of the Build Settings dialog box.tab of the Build Settings dialog box.
3.3. Run the script against your database.Run the script against your database.
4.4. Use your query tool and SQL Select statements to confirm thatUse your query tool and SQL Select statements to confirm that
the Alter Tables process has created an application table thatthe Alter Tables process has created an application table that
corresponds to your record definition and has updated thecorresponds to your record definition and has updated the
system catalog tables.system catalog tables.
S8
S9
S7
S6
S5
S4
S3
S2
S1
154Yes-V Software Solutions (P) Ltd.,
S8
S9
S7
S6
S5
S4
S3
S2
S1
Build Process – Alter TableBuild Process – Alter Table
Click BuildClick Build
155Yes-V Software Solutions (P) Ltd.,
S8
S9
S7
S6
S5
S4
S3
S2
S1
Build Process – Alter TableBuild Process – Alter Table
156Yes-V Software Solutions (P) Ltd.,
SQL FILESQL FILE
---- Start the TransactionStart the Transaction
---- Create temporary tableCreate temporary table
CREATE TABLE PSYDEPTREC1 (DEPT_NAME VARCHAR2(10) NOT NULL,CREATE TABLE PSYDEPTREC1 (DEPT_NAME VARCHAR2(10) NOT NULL,
EDEPT VARCHAR2(20) NOT NULL,EDEPT VARCHAR2(20) NOT NULL,
HDT_LASTUPDATED_BY VARCHAR2(25) NOT NULL,HDT_LASTUPDATED_BY VARCHAR2(25) NOT NULL,
V_DATE DATE) TABLESPACE TLLARGE STORAGE (INITIAL 40000 NEXT 100000V_DATE DATE) TABLESPACE TLLARGE STORAGE (INITIAL 40000 NEXT 100000
MAXEXTENTS UNLIMITED PCTINCREASE 0) PCTFREE 10 PCTUSED 80MAXEXTENTS UNLIMITED PCTINCREASE 0) PCTFREE 10 PCTUSED 80
//
---- Copy from source to temp tableCopy from source to temp table
INSERT INTO PSYDEPTREC1 (INSERT INTO PSYDEPTREC1 (
DEPT_NAME,DEPT_NAME,
EDEPT,EDEPT,
HDT_LASTUPDATED_BY,HDT_LASTUPDATED_BY,
V_DATE)V_DATE)
SELECTSELECT
DEPT_NAME,DEPT_NAME,
EDEPT,EDEPT,
HDT_LASTUPDATED_BY,HDT_LASTUPDATED_BY,
V_DATEV_DATE
FROM PS_DEPTREC1FROM PS_DEPTREC1
//
S8
S9
S7
S6
S5
S4
S3
S2
S1
157Yes-V Software Solutions (P) Ltd.,
SQL FILESQL FILE
---- CAUTION:CAUTION: Drop Original TableDrop Original Table
DROP TABLE PS_DEPTREC1DROP TABLE PS_DEPTREC1
//
---- Rename TableRename Table
RENAME PSYDEPTREC1 TO PS_DEPTREC1RENAME PSYDEPTREC1 TO PS_DEPTREC1
//
COMMITCOMMIT
//
-- Done-- Done
CREATE UNIQUE INDEX PS_DEPTREC1 ON PS_DEPTREC1 (DEPT_NAME,CREATE UNIQUE INDEX PS_DEPTREC1 ON PS_DEPTREC1 (DEPT_NAME,
EDEPT) TABLESPACE PSINDEX STORAGE (INITIAL 40000 NEXT 100000EDEPT) TABLESPACE PSINDEX STORAGE (INITIAL 40000 NEXT 100000
MAXEXTENTS UNLIMITED PCTINCREASE 0) PCTFREE 10MAXEXTENTS UNLIMITED PCTINCREASE 0) PCTFREE 10
//
COMMITCOMMIT
//
S8
S9
S7
S6
S5
S4
S3
S2
S1
158Yes-V Software Solutions (P) Ltd.,
S8
S9
S7
S6
S5
S4
S3
S2
S1
Click BuildClick Build
Build Process – Alter TableBuild Process – Alter Table
159Yes-V Software Solutions (P) Ltd.,
S8
S9
S7
S6
S5
S4
S3
S2
S1
Build Process – Alter TableBuild Process – Alter Table
160Yes-V Software Solutions (P) Ltd.,
Build Process – Alter TableBuild Process – Alter Table
S8
S9
S7
S6
S5
S4
S3
S2
S1
5 Columns are there
161Yes-V Software Solutions (P) Ltd.,
S8
S9
S7
S6
S5
S4
S3
S2
S1
4 Columns are there
Build Process – Alter TableBuild Process – Alter Table
162Yes-V Software Solutions (P) Ltd.,
Creating an ApplicationCreating an Application
Simple 9 stepsSimple 9 steps
1. Create Field Definition1. Create Field Definition
2. Create Record Definition.2. Create Record Definition.
3. Build the Record Definition.3. Build the Record Definition.
4.4. Create page Definition.Create page Definition.
5. Create Component Definition.5. Create Component Definition.
6. Include pages into component Definition.6. Include pages into component Definition.
7. Creating Menu Definition.7. Creating Menu Definition.
8. Assigning security to the menu.8. Assigning security to the menu.
9. Test the application9. Test the application
S8
S9
S7
S6
S5
S4
S3
S2
S1
Yes-V Software Solutions (P) Ltd., 163
Page DefinitionPage Definition
164Yes-V Software Solutions (P) Ltd.,
Page DefinitionPage Definition
 Pages are thePages are the graphical interfacegraphical interface between users and yourbetween users and your
application databaseapplication database
 Using PeopleSoft Application Designer, you can create, modify,Using PeopleSoft Application Designer, you can create, modify,
and delete page definitions in your PeopleSoft system.and delete page definitions in your PeopleSoft system.
 Page design depends on the type of data that the user plan to accessPage design depends on the type of data that the user plan to access
and maintain.i.e,and maintain.i.e,
 page may refer a single record definitionpage may refer a single record definition
 It may refer multiple recordsIt may refer multiple records
S8
S9
S7
S6
S5
S4
S3
S2
S1
165Yes-V Software Solutions (P) Ltd.,
Creating New Page DefinitionsCreating New Page Definitions
Creating new page definitions canCreating new page definitions can
be done by the following twobe done by the following two
ways:ways:
 Create a blank page byCreate a blank page by
selectingselecting FileFile,, NewNew, and, and PagePage
from the menufrom the menu
S8
S9
S7
S6
S5
S4
S3
S2
S1
166Yes-V Software Solutions (P) Ltd.,
Creating New Page DefinitionsCreating New Page Definitions
 Clone a page definition byClone a page definition by
selectingselecting FileFile,, OpenOpen fromfrom
the menu, specifythe menu, specify PagePage forfor
the definition in thethe definition in the OpenOpen
Definition Dialog boxDefinition Dialog box, select a, select a
page, click thepage, click the openopen button,button,
then selectthen select FileFile,, Save AsSave As
and enter the new pageand enter the new page
name, click OK.name, click OK.
S8
S9
S7
S6
S5
S4
S3
S2
S1
167Yes-V Software Solutions (P) Ltd.,
Including The Record Fields Into PagesIncluding The Record Fields Into Pages
Drag fields from a Record onto aDrag fields from a Record onto a
page:page:
 Open an existing record definitionOpen an existing record definition
by selectingby selecting FileFile,, OpenOpen,, RecordRecord fromfrom
the menuthe menu
 drag field definitions from thedrag field definitions from the
record to the pagerecord to the page
 double-click the new page field todouble-click the new page field to
set the propertiesset the properties
S8
S9
S7
S6
S5
S4
S3
S2
S1
168Yes-V Software Solutions (P) Ltd.,
Including The Record Fields Into PagesIncluding The Record Fields Into Pages
Drag Record fields from the ProjectDrag Record fields from the Project
Workspace onto a pageWorkspace onto a page ::
• Open the project, drag record fieldsOpen the project, drag record fields
from the project workspace to thefrom the project workspace to the
page, and double-click the new pagepage, and double-click the new page
field to set the properties.field to set the properties.
S8
S9
S7
S6
S5
S4
S3
S2
S1
169Yes-V Software Solutions (P) Ltd.,
Level-based ControlsLevel-based Controls
To accommodate a variety of page designs, PeopleSoft created threeTo accommodate a variety of page designs, PeopleSoft created three level-basedlevel-based
controls.controls.
 TheThe threethree level-based controls are:level-based controls are:
 GridsGrids
 Scroll areasScroll areas
 Scroll barsScroll bars
Why level-based controls?Why level-based controls?
 We some times need few of the field controls to display multiple rowsWe some times need few of the field controls to display multiple rows
or occurrences of dataor occurrences of data
 To do this, we add a level-based control—a scroll area, a grid, or a scrollTo do this, we add a level-based control—a scroll area, a grid, or a scroll
bar.bar.
 We can then add, edit, delete, find, and scroll through multipleWe can then add, edit, delete, find, and scroll through multiple
occurrences of data in a page control or group of controls.occurrences of data in a page control or group of controls.S8
S9
S7
S6
S5
S4
S3
S2
S1
170Yes-V Software Solutions (P) Ltd.,
LevelsLevels
Levels and Runtime ProcessingLevels and Runtime Processing
 Levels play an important role in runtime processing. The componentLevels play an important role in runtime processing. The component
processor relies on the level at which you place a field on a page to determineprocessor relies on the level at which you place a field on a page to determine
how tohow to process any PeopleCodeprocess any PeopleCode attached to the field in the recordattached to the field in the record
definition.definition.
 These levels are referenced asThese levels are referenced as occurs levelsoccurs levels on the “Record tab” in theon the “Record tab” in the
“properties” dialog box for the level-based control that you are setting.“properties” dialog box for the level-based control that you are setting.
Level 0Level 0
 This is the first occurs level on a page.This is the first occurs level on a page.
 This level is reserved for the primary key fields that are used to search forThis level is reserved for the primary key fields that are used to search for
pagespages
 This is the nonscrolling area that directly relates to the key information of theThis is the nonscrolling area that directly relates to the key information of the
underlying record.underlying record.
 Level 0 information is usually display-only with data that the user entered onLevel 0 information is usually display-only with data that the user entered on
the initial search page.the initial search page.
 There areThere are four levelsfour levels in each level-based controlin each level-based control
S8
S9
S7
S6
S5
S4
S3
S2
S1
171Yes-V Software Solutions (P) Ltd.,
LevelsLevels
Levels 1–3Levels 1–3
 These levels include the scrolling data that is related to the Level 0, nonscrollingThese levels include the scrolling data that is related to the Level 0, nonscrolling
data.data.
 Level 1 is subordinate to Level 0; Level 2 is subordinate to and nested in Level 1.Level 1 is subordinate to Level 0; Level 2 is subordinate to and nested in Level 1.
 Level 3 is subordinate to and nested in Level 2. User can nest level-based controlsLevel 3 is subordinate to and nested in Level 2. User can nest level-based controls
up to 3 levels.up to 3 levels.
 It is possible to have a page that contains no level-based controls, making all fieldsIt is possible to have a page that contains no level-based controls, making all fields
set to Level 0.set to Level 0.
 This is particularly true for secondary or subpages that contain few data entryThis is particularly true for secondary or subpages that contain few data entry
fields.fields.
 The default occurs level for a control is set to 1 in the properties dialog box.The default occurs level for a control is set to 1 in the properties dialog box.
 If you place a field in or below that control, it is also set to Level 1 in the OrderIf you place a field in or below that control, it is also set to Level 1 in the Order
grid, even if it is another level-based control.grid, even if it is another level-based control.
 Use Set to Level 0 feature of the horizontal rule control to restart the occurs levelUse Set to Level 0 feature of the horizontal rule control to restart the occurs level
count on your page.count on your page.
 User can also add any number of level-based controls at the same levelUser can also add any number of level-based controls at the same level
 We can nest up to three levels of scrolls or grids on the page.We can nest up to three levels of scrolls or grids on the page.S8
S9
S7
S6
S5
S4
S3
S2
S1
172Yes-V Software Solutions (P) Ltd.,
Various Page Controls In A PageVarious Page Controls In A Page
S8
S9
S7
S6
S5
S4
S3
S2
S1
173Yes-V Software Solutions (P) Ltd.,
Level-based Controls At Same LevelLevel-based Controls At Same Level
 Any number of level-based controls (scroll areas or grids) can be present at the sameAny number of level-based controls (scroll areas or grids) can be present at the same
level.level.
Example:Example: scroll area and a grid, both at Level 1.scroll area and a grid, both at Level 1.
S8
S9
S7
S6
S5
S4
S3
S2
S1
174Yes-V Software Solutions (P) Ltd.,
Nesting Level-Based ControlsNesting Level-Based Controls
Compensation page: There are 2 rate codes for each compensation
action in the Level scroll area.
S8
S9
S7
S6
S5
S4
S3
S2
S1
175Yes-V Software Solutions (P) Ltd.,
Nesting Up to 3 LevelsNesting Up to 3 Levels
 EXAMPLEEXAMPLE
 The “Additional Pay 1” page shows three levels of data that can be entered, two ofThe “Additional Pay 1” page shows three levels of data that can be entered, two of
which are nesting scroll areas in the Earnings scroll area.which are nesting scroll areas in the Earnings scroll area.
S8
S9
S7
S6
S5
S4
S3
S2
S1
176Yes-V Software Solutions (P) Ltd.,
Keys for Accessing PagesKeys for Accessing Pages
Prompt Fields:Prompt Fields:
At runtime, you might want to enable your users to look up the valid values that they canAt runtime, you might want to enable your users to look up the valid values that they can
enter in a field. For this, PeopleSoft provides prompts or look up buttons.enter in a field. For this, PeopleSoft provides prompts or look up buttons.
There areThere are threethree types of prompts:types of prompts:
 Drop-down list boxDrop-down list box..
 This is a small list that opens below a field in the current page.This is a small list that opens below a field in the current page.
 To use a drop-down list box, click the down arrow inside the field and select the requiredTo use a drop-down list box, click the down arrow inside the field and select the required
value.value.
 Calendar drop-down promptCalendar drop-down prompt
 A calendar drop-down prompt opens a small calendar next to a date field to enable theA calendar drop-down prompt opens a small calendar next to a date field to enable the
user to easily scan for the correct date.user to easily scan for the correct date.
 Prompt buttonPrompt button
 A prompt or lookup button opens a lookup page in the user’s browser populated with upA prompt or lookup button opens a lookup page in the user’s browser populated with up
toto 300300 available values for that field.available values for that field.
 In PeopleSoft Application Designer, associate a prompt with a page control by selectingIn PeopleSoft Application Designer, associate a prompt with a page control by selecting
the “the “Show Prompt ButtonShow Prompt Button” check box from the” check box from the DisplayDisplay Options on theOptions on the Record tab ofRecord tab of
the properties dialog boxthe properties dialog box
 The record field with which the user associate the page control must list values in theThe record field with which the user associate the page control must list values in the
Translate Table or prompt table for the system to display the prompt buttonTranslate Table or prompt table for the system to display the prompt button..
S8
S9
S7
S6
S5
S4
S3
S2
S1
177Yes-V Software Solutions (P) Ltd.,
Prompt FieldsPrompt Fields
S8
S9
S7
S6
S5
S4
S3
S2
S1
178Yes-V Software Solutions (P) Ltd.,
Derived Records And Associated PagesDerived Records And Associated Pages
Derived and Work FieldsDerived and Work Fields
 A field from a derived or work record can be used to store a temporary value thatA field from a derived or work record can be used to store a temporary value that
PeopleCode uses to determine the values of other field controls on the page.PeopleCode uses to determine the values of other field controls on the page.
Hidden PagesHidden Pages
 Hidden pages are work pages that are associated with derived or work recordsHidden pages are work pages that are associated with derived or work records
and are often used in work groups.and are often used in work groups.
 These pages are created when calculations need to be performed in theThese pages are created when calculations need to be performed in the
background by PeopleCode that the user does not need to see.background by PeopleCode that the user does not need to see.
HowHow
 A page can be made Hidden by selecting the Hidden check box in theA page can be made Hidden by selecting the Hidden check box in the
component grid as you set the component definition.component grid as you set the component definition.
S8
S9
S7
S6
S5
S4
S3
S2
S1
179Yes-V Software Solutions (P) Ltd.,
Page Definition ToolbarPage Definition Toolbar
Click the Properties button to open the Page Properties dialog box
(ALT+ENTER).
Click the Select Group button to select several
controls at once
Click the Project Workspace button to display or hide the project
workspace (View, Project Workspace
or ALT+0).
Click the Toggle Grid button to display or hide the page grid (View,
Show Grid or CTRL+G).
S8
S9
S7
S6
S5
S4
S3
S2
S1
180Yes-V Software Solutions (P) Ltd.,
Page control toolsPage control tools
Frame
Group box
Horizontal rule
Static text
Tab separator
Check box
Drop-down list box
Edit box
Long edit box
Push button or link
Radio button
Grid
Scroll area
Scroll bar
Secondary page Subpage
S8
S9
S7
S6
S5
S4
S3
S2
S1
181Yes-V Software Solutions (P) Ltd.,
Adding Page ControlsAdding Page Controls
Using the Page Control ToolbarUsing the Page Control Toolbar
Page controls can be added by usingPage controls can be added by using
the page control portion of thethe page control portion of the
page definition toolbarpage definition toolbar
• When a Page Control ToolbarWhen a Page Control Toolbar
button is clicked, the cursorbutton is clicked, the cursor
changes to a cross-shaped iconchanges to a cross-shaped icon
or hand depending on the pageor hand depending on the page
control type selected and movecontrol type selected and move
the cursor to a position on thethe cursor to a position on the
page and click once.page and click once.
S8
S9
S7
S6
S5
S4
S3
S2
S1
182Yes-V Software Solutions (P) Ltd.,
Adding page controlsAdding page controls
Using the Insert MenuUsing the Insert Menu
• Select the control from theSelect the control from the
InsertInsert menu, the cursormenu, the cursor
changes to a cross-shapedchanges to a cross-shaped
icon or a hand, depending onicon or a hand, depending on
the control type selected,the control type selected,
move the cursor to amove the cursor to a
position on the page andposition on the page and
click once.click once.
S8
S9
S7
S6
S5
S4
S3
S2
S1
183Yes-V Software Solutions (P) Ltd.,
Page control toolsPage control tools
FramesFrames
Frames are used to visuallyFrames are used to visually
organize information on theorganize information on the
page.page.
How to insert a frame?How to insert a frame?
 Click the Frame buttonClick the Frame button
on the toolbar, or select Insert,on the toolbar, or select Insert,
Frame.Frame.
 Drag the frame upon the areaDrag the frame upon the area
you want.you want.
 To deselect the frame, clickTo deselect the frame, click
anywhere outside of the frameanywhere outside of the frame
on your page workspace.on your page workspace.
S8
S9
S7
S6
S5
S4
S3
S2
S1
184Yes-V Software Solutions (P) Ltd.,
Page control toolsPage control tools
Setting Frame Label and DisplaySetting Frame Label and Display
optionsoptions
 Select the frame and double-click,Select the frame and double-click,
or right-click on the frame andor right-click on the frame and
select page Field properties fromselect page Field properties from
the popup menu.the popup menu.
 Access the page field propertiesAccess the page field properties
dialog box, label tab.dialog box, label tab.
 Enter a briefEnter a brief TextText description ofdescription of
the function of the control withinthe function of the control within
the framethe frame
185Yes-V Software Solutions (P) Ltd.,
Page control toolsPage control tools
Frames:Frames:
Select theSelect the stylestyle for the framefor the frame
 You can control the color and line thickness ofYou can control the color and line thickness of
a frame by specifying the style.a frame by specifying the style.
Select theSelect the Hide BorderHide Border CheckboxCheckbox
 Select this check box if you want to hide theSelect this check box if you want to hide the
frame’s border.frame’s border.
 Use this, if you want to use the style to shadeUse this, if you want to use the style to shade
only the background of the framed area or toonly the background of the framed area or to
apply other styles.apply other styles.
 If you select this option, it will override anyIf you select this option, it will override any
border option specified in a style.border option specified in a style.
Select theSelect the Adjust layout for Hidden FieldsAdjust layout for Hidden Fields checkcheck
boxbox
 This option enables automatic verticalThis option enables automatic vertical
adjustments to the frame size when hiddenadjustments to the frame size when hidden
fields are present.fields are present.
..
S8
S9
S7
S6
S5
S4
S3
S2
S1
186Yes-V Software Solutions (P) Ltd.,
Page control toolsPage control tools
Group Box Control:Group Box Control:
 To arrange related fields on a page.To arrange related fields on a page.
 We use a group box to surround andWe use a group box to surround and
identify a group of related radio buttonsidentify a group of related radio buttons
..
 Like a frame, you can resize a groupLike a frame, you can resize a group
box.box.
To link group boxes to recordTo link group boxes to record
definitionsdefinitions
 Open the page field properties dialog,Open the page field properties dialog,
Record tab.Record tab.
 Select a record name and a field name.Select a record name and a field name.
Check Box ControlCheck Box Control
Used if a data entry fields have one of theUsed if a data entry fields have one of the
two values (yes or no).two values (yes or no).
S8
S9
S7
S6
S5
S4
S3
S2
S1
187Yes-V Software Solutions (P) Ltd.,
Page control toolsPage control tools
To link Check Box withTo link Check Box with
associated record definitionsassociated record definitions
 Open the Page field PropertiesOpen the Page field Properties
dialog, Record tab.dialog, Record tab.
 Select the record name and fieldSelect the record name and field
name from the drop downname from the drop down
boxes.boxes.
 Enter the “On value” and “OffEnter the “On value” and “Off
value” for the check box.value” for the check box.
S8
S9
S7
S6
S5
S4
S3
S2
S1
188Yes-V Software Solutions (P) Ltd.,
Page control toolsPage control tools
Radio Button ControlRadio Button Control
Represent one value for a controlRepresent one value for a control
with multiple defined values.with multiple defined values.
You can add radio button in groups.You can add radio button in groups.
Only one button in a group can beOnly one button in a group can be
turned on at one time.turned on at one time.
S8
S9
S7
S6
S5
S4
S3
S2
S1
189Yes-V Software Solutions (P) Ltd.,
Horizontal Rule ControlHorizontal Rule Control
Used:Used:
 To add horizontal lines to userTo add horizontal lines to user
page.page.
 As a visual break betweenAs a visual break between
controls.controls.
To draw a horizontal rule and setTo draw a horizontal rule and set
label Propertieslabel Properties::
 Click the horizontal Rule button,Click the horizontal Rule button,
 Or select Insert, Horizontal Rule.Or select Insert, Horizontal Rule.
 Draw a horizontal line to theDraw a horizontal line to the
desired length on the page.desired length on the page.
 Open the Page Field PropertiesOpen the Page Field Properties
dialog box, label , select the styledialog box, label , select the style
to control the line color and lineto control the line color and line
thickness of a horizontal rule.thickness of a horizontal rule.
S8
S9
S7
S6
S5
S4
S3
S2
S1
190Yes-V Software Solutions (P) Ltd.,
Horizontal Rule ControlHorizontal Rule Control
 The horizontal rule also serves asThe horizontal rule also serves as
functional separator of fields andfunctional separator of fields and
levels in the order tab of the pagelevels in the order tab of the page
definition.definition.
 Check the “ Set to Level 0”Check the “ Set to Level 0”
option if user want to add stand-option if user want to add stand-
alone fields, such as push buttonsalone fields, such as push buttons
or hyperlinks below a level-basedor hyperlinks below a level-based
control, such as a scroll area.control, such as a scroll area.
 Select the Set to Level 0 to forceSelect the Set to Level 0 to force
the horizontal rule to be listed atthe horizontal rule to be listed at
level 0 in the Order tab.level 0 in the Order tab.
 Select the Multi-Currency FieldSelect the Multi-Currency Field
option if the field is associatedoption if the field is associated
with multi-currency processing.with multi-currency processing.
S8
S9
S7
S6
S5
S4
S3
S2
S1
191Yes-V Software Solutions (P) Ltd.,
Static Text ControlStatic Text Control
Used:Used:
To add text to the page.To add text to the page.
To describe a control, page or group of controls.To describe a control, page or group of controls.
This is a display-only alphanumeric field with a maximum length of 30 characters.This is a display-only alphanumeric field with a maximum length of 30 characters.
To insert a static text field:To insert a static text field:
Click the Static Text button on the toolbar, or select Insert, Static text.Click the Static Text button on the toolbar, or select Insert, Static text.
Position the text field button on the page.Position the text field button on the page.
S8
S9
S7
S6
S5
S4
S3
S2
S1
192Yes-V Software Solutions (P) Ltd.,
Drop Down List ControlDrop Down List Control
To insert a drop down listTo insert a drop down list::
 Select the Drop Down list buttonSelect the Drop Down list button
on the toolbar, or select Insert,on the toolbar, or select Insert,
Drop Down List.Drop Down List.
 Drop down lists are used to selectDrop down lists are used to select
one from a list of three or moreone from a list of three or more
possible valuespossible values..
Associate the drop down list with aAssociate the drop down list with a
field.field.
 Use the page field propertiesUse the page field properties
dialog, Record tab to associate thedialog, Record tab to associate the
drop down list with a field.drop down list with a field.
 Select style to set the font andSelect style to set the font and
color attributes of user drop downcolor attributes of user drop down
list data.list data.
 Set the field size for the dropSet the field size for the drop
down list.down list.
S8
S9
S7
S6
S5
S4
S3
S2
S1
193Yes-V Software Solutions (P) Ltd.,
Scroll ControlsScroll Controls
 Scroll Controls include Scroll areas and scroll bars.Scroll Controls include Scroll areas and scroll bars.
 Scrolls, Record Relationships, and Page Processing :Scrolls, Record Relationships, and Page Processing :
 When you have more than one record definition on a page, the Scroll ControlsWhen you have more than one record definition on a page, the Scroll Controls
in page processing is very important.in page processing is very important.
 Scrolls define Parent/child record definition relationships on a page.Scrolls define Parent/child record definition relationships on a page.
 The Occur Level to each scroll indicates the relationship among the recordThe Occur Level to each scroll indicates the relationship among the record
definitions.definitions.
 The primary record on the page is at Level 0 and no scroll or Occurs LevelThe primary record on the page is at Level 0 and no scroll or Occurs Level
associated with it.associated with it.
 The subordinate record to the primary table will be at level 1.The subordinate record to the primary table will be at level 1.
 A table subordinate to level 2 record has a scroll area with an Occurs Level of 2.A table subordinate to level 2 record has a scroll area with an Occurs Level of 2.
 Nesting cant be beyond 3 levelsNesting cant be beyond 3 levels
S8
S9
S7
S6
S5
S4
S3
S2
S1
194Yes-V Software Solutions (P) Ltd.,
Scroll Area ControlScroll Area Control
The scroll area is some thing like group box filled with various controls.The scroll area is some thing like group box filled with various controls.
S8
S9
S7
S6
S5
S4
S3
S2
S1
195Yes-V Software Solutions (P) Ltd.,
Scroll Area ControlScroll Area Control
To Insert a scroll area:To Insert a scroll area:
 Click the Scroll Area button ,Click the Scroll Area button ,
on the toolbar or select Insert,on the toolbar or select Insert,
Scroll Area.Scroll Area.
 Drag the Scroll area to repositionDrag the Scroll area to reposition
it on the page as desired.it on the page as desired.
To assign general properties to aTo assign general properties to a
Scroll area:Scroll area:
 Double click on the scroll area,Double click on the scroll area,
or right-click to access the pageor right-click to access the page
field properties dialog box,field properties dialog box,
General tab.General tab.
 Type in the page Field Name ofType in the page Field Name of
the page in which you havethe page in which you have
placed the Scrollplaced the Scroll area.area.
S8
S9
S7
S6
S5
S4
S3
S2
S1
196Yes-V Software Solutions (P) Ltd.,
Scroll Area ControlScroll Area Control
To assign general properties to a Scroll area:To assign general properties to a Scroll area:
 Set the Occur Level for the Scroll AreaSet the Occur Level for the Scroll Area
 The occur level indicates the relationship among the record definition and theThe occur level indicates the relationship among the record definition and the
controls on the page .controls on the page .
 It determines how the data is processed.It determines how the data is processed.
 Set the Occur count or select Unlimited Occur count if desired.Set the Occur count or select Unlimited Occur count if desired.
S8
S9
S7
S6
S5
S4
S3
S2
S1
197Yes-V Software Solutions (P) Ltd.,
Scroll BarScroll Bar
To Insert a Scroll bar:To Insert a Scroll bar:
 Click the Scroll Bar button on the toolbar, or select Insert, Scroll Bar.Click the Scroll Bar button on the toolbar, or select Insert, Scroll Bar.
 When a hand-shaped icon appears, position the pointer where the user wantWhen a hand-shaped icon appears, position the pointer where the user want
the upper left corner of the scroll bar to begin.the upper left corner of the scroll bar to begin.
 Press and hold down the left mouse button as user drag the hand diagonallyPress and hold down the left mouse button as user drag the hand diagonally
downward to where the lower right corner of the scroll bar should be.downward to where the lower right corner of the scroll bar should be.
 Release the mouse button.Release the mouse button.
 Position and size the length of your scroll bar so that all the fields controlledPosition and size the length of your scroll bar so that all the fields controlled
by the scroll bar are located to the left of it.by the scroll bar are located to the left of it.
S8
S9
S7
S6
S5
S4
S3
S2
S1
198Yes-V Software Solutions (P) Ltd.,
Scroll BarScroll Bar
S8
S9
S7
S6
S5
S4
S3
S2
S1
199Yes-V Software Solutions (P) Ltd.,
Scroll BarScroll Bar
Scroll BarScroll Bar useuse
 Click the Use tab or select theClick the Use tab or select the
scroll bar and double-click toscroll bar and double-click to
access the page Field Propertiesaccess the page Field Properties
dialog, Use tab.dialog, Use tab.
 Set Scroll Attributes:Set Scroll Attributes:
 Set the Occur Level and theSet the Occur Level and the
Occurs Count.Occurs Count.
 In the page control order list,In the page control order list,
controls beneath the Scroll barcontrols beneath the Scroll bar
will repeat as many times as thewill repeat as many times as the
Occur Count on the scroll barOccur Count on the scroll bar
above them.above them.
 When the Application ProcessorWhen the Application Processor
encounters another scroll area,encounters another scroll area,
scroll bar, or push button, itscroll bar, or push button, it
stops repeating the controls.stops repeating the controls.
S8
S9
S7
S6
S5
S4
S3
S2
S1
Properties of the
selected scroll Bar
200Yes-V Software Solutions (P) Ltd.,
Grid controlGrid control
 Grids are tables consisting ofGrids are tables consisting of
navigation bars, columns, columnnavigation bars, columns, column
headings, rows and row headings.headings, rows and row headings.
 User can use gird instead of scrollUser can use gird instead of scroll
area or scroll bar to manage multi-area or scroll bar to manage multi-
row set of data.row set of data.
 Each row in grid corresponds toEach row in grid corresponds to
set of controls in a scrollset of controls in a scroll
occurrence.occurrence.
To Insert a grid control on a page:To Insert a grid control on a page:
Click the Grid button on theClick the Grid button on the
toolbar, or select Insert, Grid.toolbar, or select Insert, Grid.S8
S9
S7
S6
S5
S4
S3
S2
S1
201Yes-V Software Solutions (P) Ltd.,
Grid controlGrid control
Grid General PropertiesGrid General Properties
 ThiThis is used to associate thes is used to associate the
record containing most of therecord containing most of the
fields you will use in the grid andfields you will use in the grid and
the occurs level.the occurs level.
 Enter the main record associatedEnter the main record associated
with the grid control i.e., recordwith the grid control i.e., record
that contains most of the fieldsthat contains most of the fields
that you want to use in the grid.that you want to use in the grid.
Note:Note: Any field you display in theAny field you display in the
grid that are not from Maingrid that are not from Main
Record should be display only orRecord should be display only or
related fieldsrelated fields
S8
S9
S7
S6
S5
S4
S3
S2
S1
202Yes-V Software Solutions (P) Ltd.,
Grid controlGrid control
 Enter the page Field Name.Enter the page Field Name.
 Enter the Occurs Level toEnter the Occurs Level to
designate the hierarchical parentdesignate the hierarchical parent
child relationship.child relationship.
 Set the Occurs count value toSet the Occurs count value to
control the number of rows tocontrol the number of rows to
display to the user.display to the user.
 Select the Unlimited OccursSelect the Unlimited Occurs
Count check box, if desired.Count check box, if desired.
S8
S9
S7
S6
S5
S4
S3
S2
S1
203Yes-V Software Solutions (P) Ltd.,
Adding page controlsAdding page controls
subpage controlsubpage control
 A subpage is a predefined, presized group ofA subpage is a predefined, presized group of
controls.controls.
 Subpages are a powerful means of factoringSubpages are a powerful means of factoring
out commonly used page functionality inout commonly used page functionality in
your applicationyour application
Example: A address control is defined on aExample: A address control is defined on a
separate subpage definition that you mightseparate subpage definition that you might
use on many different pages.use on many different pages.
Defining a Subpage:Defining a Subpage:
How to define a Subpage?How to define a Subpage?
 Select File, New, Page.Select File, New, Page.
 Select File, Object properties or press Alt-Select File, Object properties or press Alt-
Enter to access the page properties dialog.Enter to access the page properties dialog.
 Select subpage in the page Type drop downSelect subpage in the page Type drop down
list.list.
 Select the size of the page.Select the size of the page.
 Set the “Adjust Layout for Hidden Fields” ifSet the “Adjust Layout for Hidden Fields” if
necessary.necessary.
 Set Deferred Processing Mode if desired.Set Deferred Processing Mode if desired.
S8
S9
S7
S6
S5
S4
S3
S2
S1
204Yes-V Software Solutions (P) Ltd.,
Inserting A Subpage Into A PageInserting A Subpage Into A Page
 Open the page on which you want toOpen the page on which you want to
insert the subpage.insert the subpage.
 Select Insert, SubPage.Select Insert, SubPage.
 The Insert Subpage dialog box appears.The Insert Subpage dialog box appears.
 Select a subpage definition.Select a subpage definition.
 Specify the name of the subpage that youSpecify the name of the subpage that you
want to insert into the open pagewant to insert into the open page
definition.definition.
 Select a record definition inSelect a record definition in SubPageSubPage
Record Name SubstitutionRecord Name Substitution group box.group box.
 The subpage writes its fields to a genericThe subpage writes its fields to a generic
record. Specify the application-specificrecord. Specify the application-specific
record name to which you want therecord name to which you want the
information in the subpage written.information in the subpage written.
Note.Note. All of the fields in a subpage must beAll of the fields in a subpage must be
associated with fields of a subrecord in theassociated with fields of a subrecord in the
specified record definition.specified record definition.
 ClickClick OK.OK.
S8
S9
S7
S6
S5
S4
S3
S2
S1
205Yes-V Software Solutions (P) Ltd.,
Changing Informational SubpageChanging Informational Subpage LabelsLabels
 Open the Subpage Properties dialog box.Open the Subpage Properties dialog box.
 Note that the Subpage tab displays the information you entered on theNote that the Subpage tab displays the information you entered on the
Insert Subpage dialog box.Insert Subpage dialog box.
 On the Label tab, enter your informational text label.On the Label tab, enter your informational text label.
 Enter the Page Field Name in the General tab.Enter the Page Field Name in the General tab.
S8
S9
S7
S6
S5
S4
S3
S2
S1
206Yes-V Software Solutions (P) Ltd.,
Defining Secondary PagesDefining Secondary Pages
To insert a secondary pageTo insert a secondary page
control on a primarycontrol on a primary
pagepage::
 Select Insert, Secondary Page.Select Insert, Secondary Page.
 Select the primary page onSelect the primary page on
which you want to display thewhich you want to display the
secondary page control.secondary page control.
 The secondary page controlThe secondary page control
appears like a small pushappears like a small push
button with the secondary pagebutton with the secondary page
icon on it. This control isicon on it. This control is
invisible at runtime.invisible at runtime.
 Double-click the control toDouble-click the control to
access the Secondary Pageaccess the Secondary Page
Properties dialogProperties dialog box:box:
Secondary Page tab.Secondary Page tab.
S8
S9
S7
S6
S5
S4
S3
S2
S1
207Yes-V Software Solutions (P) Ltd.,
Using Secondary PagesUsing Secondary Pages
secondary page is just another page to thesecondary page is just another page to the
user at runtime, they look and behaveuser at runtime, they look and behave
differently than the primary pages.differently than the primary pages.
exampleexample::
 You can view a secondary page from itsYou can view a secondary page from its
primary page only.primary page only.
 A secondary page should have OK andA secondary page should have OK and
Cancel buttons so that the user canCancel buttons so that the user can
dismiss the page (accepting or cancelingdismiss the page (accepting or canceling
input) and return to the primary page.input) and return to the primary page.
 To offer the user alternative buttons toTo offer the user alternative buttons to
dismiss the page, disable the default OKdismiss the page, disable the default OK
and Cancel buttons in the Pageand Cancel buttons in the Page
Properties dialog box.Properties dialog box.
S8
S9
S7
S6
S5
S4
S3
S2
S1
208Yes-V Software Solutions (P) Ltd.,
Including Secondary Pages Into Primary PageIncluding Secondary Pages Into Primary Page
Secondary Page or a Push Button?Secondary Page or a Push Button?
 There are two ways to associate a secondary page with a primary page:There are two ways to associate a secondary page with a primary page:
 Insert a push button or link and associate it with your secondary page.Insert a push button or link and associate it with your secondary page.
 This automatically displays the secondary page when the user presses the button orThis automatically displays the secondary page when the user presses the button or
clicks the link and is the preferred method. Use this method when:clicks the link and is the preferred method. Use this method when:
 No procedural PeopleCode logic is necessary before the secondary page is displayedNo procedural PeopleCode logic is necessary before the secondary page is displayed
(PeopleCode can be used on the secondary page just like any other page).(PeopleCode can be used on the secondary page just like any other page).
 You want to control the formatting of the information (therefore you want to use a page,You want to control the formatting of the information (therefore you want to use a page,
and not use the Prompt function).and not use the Prompt function).
 The secondary page is used more than once.The secondary page is used more than once.
 Insert a secondary page control.Insert a secondary page control.
 This control looks like a command push button, but it is invisible at runtime.This control looks like a command push button, but it is invisible at runtime.
the Address page contains an Email link at the bottom of the scroll area. This linkthe Address page contains an Email link at the bottom of the scroll area. This link
opens the Email Addresses page, enabling the user to enter email addressopens the Email Addresses page, enabling the user to enter email address
information.information.
S8
S9
S7
S6
S5
S4
S3
S2
S1
209Yes-V Software Solutions (P) Ltd.,
Including Secondary Pages Into Primary PageIncluding Secondary Pages Into Primary Page
If destination is secondary page,If destination is secondary page,
Secondary page groupbox will beSecondary page groupbox will be
enabled.enabled.
S8
S9
S7
S6
S5
S4
S3
S2
S1
210Yes-V Software Solutions (P) Ltd.,
Example Of Secondary PageExample Of Secondary Page
The Address page contains an Email link at the bottom of the scroll area. This link
opens the Email Addresses page, enabling the user to enter email address
information.
S8
S9
S7
S6
S5
S4
S3
S2
S1
211Yes-V Software Solutions (P) Ltd.,
Setting Page Field Properties for ControlsSetting Page Field Properties for Controls
The page field properties of a page control determine how the page control lookThe page field properties of a page control determine how the page control look
and function in your application pageand function in your application page
The page field properties dialog box of a page control is obtained byThe page field properties dialog box of a page control is obtained by
1.1. Double-clicking the controlDouble-clicking the control
2.2. Selecting theSelecting the Page Field PropertiesPage Field Properties from thefrom the EditEdit menumenu
3.3. By the pop-up menu, which is activated by a right-click on the control .By the pop-up menu, which is activated by a right-click on the control .
S8
S9
S7
S6
S5
S4
S3
S2
S1
212Yes-V Software Solutions (P) Ltd.,
Setting page field properties for controlSetting page field properties for control
The page control properties dialogThe page control properties dialog
boxes have the following tabs:boxes have the following tabs:
 LabelLabel – Sets the label that– Sets the label that
appears on the control.appears on the control.
 UseUse – Defines how to use the– Defines how to use the
control on the page, such ascontrol on the page, such as
display-only, invisible, ordisplay-only, invisible, or
hidden. This is also used tohidden. This is also used to
manipulate controls onmanipulate controls on
multiple level pages, to definemultiple level pages, to define
display and related controldisplay and related control
fields, the processing of thefields, the processing of the
control.control.
 GeneralGeneral – Specifies an optional– Specifies an optional
internal page field name that isinternal page field name that is
referenced by the page .referenced by the page .
S8
S9
S7
S6
S5
S4
S3
S2
S1
213Yes-V Software Solutions (P) Ltd.,
Setting Page Field PropertiesSetting Page Field Properties
 Right Click on a particularRight Click on a particular
record field, it displays arecord field, it displays a
popup menu from where youpopup menu from where you
can select Page Fieldcan select Page Field
Properties.Properties.
S8
S9
S7
S6
S5
S4
S3
S2
S1
214Yes-V Software Solutions (P) Ltd.,
Setting Record Tab PropertiesSetting Record Tab Properties
Setting Record PropertiesSetting Record Properties
Record NameRecord Name – Select the name of– Select the name of
the record definition where thethe record definition where the
field is located. If the field isfield is located. If the field is
dragged from a record in thedragged from a record in the
project workspace, that recordproject workspace, that record
name gets selected.name gets selected.
Field NameField Name – Select the name of– Select the name of
the field from the list of fields ofthe field from the list of fields of
the selected record, to which thethe selected record, to which the
page control has to bepage control has to be
associated.associated.
S8
S9
S7
S6
S5
S4
S3
S2
S1
If the field is dragged from aIf the field is dragged from a
record in the projectrecord in the project
workspace, that record nameworkspace, that record name
gets selected.gets selected.
215Yes-V Software Solutions (P) Ltd.,
Setting Record Tab PropertiesSetting Record Tab Properties
Setting Record PropertiesSetting Record Properties
 StyleStyle – Set the font and color– Set the font and color
attributes of your control data. Eachattributes of your control data. Each
page control has a default style classpage control has a default style class
associated with it, which controls howassociated with it, which controls how
the page control appears. The defaultthe page control appears. The default
style class for an edit box isstyle class for an edit box is
PSEDITBOX.PSEDITBOX.
 SizeSize – After the control is linked with– After the control is linked with
a record name and field, the systema record name and field, the system
automatically calculates the pageautomatically calculates the page
control size. Three size options arecontrol size. Three size options are
available:available:
 AverageAverage – Provides sufficient size to– Provides sufficient size to
display the field control length indisplay the field control length in
average-width characters.average-width characters.
S8
S9
S7
S6
S5
S4
S3
S2
S1
216Yes-V Software Solutions (P) Ltd.,
Setting Record Tab PropertiesSetting Record Tab Properties
 MaximumMaximum - Provides sufficient- Provides sufficient
size to display the field controlsize to display the field control
length in maximum-widthlength in maximum-width
characters.characters.
 CustomCustom – Enables you to define– Enables you to define
a custom size for edit boxes thata custom size for edit boxes that
are not display-only.are not display-only.
AlignmentAlignment
 Auto –Auto – Left-justifies the contentsLeft-justifies the contents
of character fields and right-of character fields and right-
justifies the contents of numberjustifies the contents of number
and signed number fields.and signed number fields.
 Left –Left – Left-justifies the contentsLeft-justifies the contents
of the field. If the field is notof the field. If the field is not
display-only, the alignment isdisplay-only, the alignment is
always left-justified and if the fieldalways left-justified and if the field
is display-only, the system usesis display-only, the system uses
the alignment that you specify.the alignment that you specify.
S8
S9
S7
S6
S5
S4
S3
S2
S1
217Yes-V Software Solutions (P) Ltd.,
Setting Record Tab PropertiesSetting Record Tab Properties
 Right –Right – Right-justifies the contentsRight-justifies the contents
of the field.of the field.
 Family Name –Family Name – This display-onlyThis display-only
field displays the current family name,field displays the current family name,
which was set when the field waswhich was set when the field was
created.created.
 Display Name –Display Name – Select an option toSelect an option to
override the display format that isoverride the display format that is
associated with a field.associated with a field.
S8
S9
S7
S6
S5
S4
S3
S2
S1
218Yes-V Software Solutions (P) Ltd.,
Setting Record Tab PropertiesSetting Record Tab Properties
 Display OptionsDisplay Options
 Display Zero –Display Zero – Select this optionSelect this option
if the page controls are numericif the page controls are numeric
and a zero value has to beand a zero value has to be
displayed instead of a blank field.displayed instead of a blank field.
 Display Century –Display Century – Select for dateSelect for date
fields to enable users to enter afields to enable users to enter a
date with a 4-digit century. If thisdate with a 4-digit century. If this
option is not checked, the centuryoption is not checked, the century
is automatically set to the centuryis automatically set to the century
of your system date.of your system date.
 Password –Password – Select to hide theSelect to hide the
value that is entered in a pagevalue that is entered in a page
control. This option causescontrol. This option causes
characters in this control to appearcharacters in this control to appear
online as asterisks.online as asterisks.
S8
S9
S7
S6
S5
S4
S3
S2
S1
219Yes-V Software Solutions (P) Ltd.,
Setting Record Tab PropertiesSetting Record Tab Properties
 Currency Symbol –Currency Symbol – Select toSelect to
display a currency symbol indisplay a currency symbol in
the field.the field.
 Show Prompt Button –Show Prompt Button – SelectSelect
to display a prompt buttonto display a prompt button
next to the edit box, whichnext to the edit box, which
enables the user to look upenables the user to look up
valid values for that field.valid values for that field.
 1000 Separator –1000 Separator – Select if theSelect if the
contents of the page controlcontents of the page control
are numeric and you want toare numeric and you want to
insert thousand separators toinsert thousand separators to
make the numbers easier tomake the numbers easier to
read.read.
S8
S9
S7
S6
S5
S4
S3
S2
S1
220Yes-V Software Solutions (P) Ltd.,
Setting Record Tab PropertiesSetting Record Tab Properties
 Auto Fill –Auto Fill – Select to have theSelect to have the
system automatically populate thesystem automatically populate the
page control with the characterpage control with the character
specified in the Fill Character field.specified in the Fill Character field.
Auto Fill can affect the actualAuto Fill can affect the actual
value of the control, not just thevalue of the control, not just the
visual representation.visual representation.
 Auto Decimal –Auto Decimal – Select to insert aSelect to insert a
decimal point automatically if nonedecimal point automatically if none
is provided in the data that isis provided in the data that is
entered into the control.entered into the control.
 Display Time Zone –Display Time Zone – Select ifSelect if
you are setting the properties for ayou are setting the properties for a
Time or a DateTime field and youTime or a DateTime field and you
want to display the related timewant to display the related time
zone.zone.
S8
S9
S7
S6
S5
S4
S3
S2
S1
221Yes-V Software Solutions (P) Ltd.,
Setting Record Tab PropertiesSetting Record Tab Properties
 Enable Spell Check –Enable Spell Check –
This option is for edit orThis option is for edit or
long edit boxes only, tolong edit boxes only, to
enable the user to checkenable the user to check
spelling on field content.spelling on field content.
 Fill Character –Fill Character – Enter aEnter a
character to replace blankcharacter to replace blank
spaces in an edit boxspaces in an edit box
when the contents of thewhen the contents of the
field are displayed. Youfield are displayed. You
can use any character as acan use any character as a
fill character.fill character.
S8
S9
S7
S6
S5
S4
S3
S2
S1
222Yes-V Software Solutions (P) Ltd.,
Setting Label PropertiesSetting Label Properties
 Type –Type – Select the type of label.Select the type of label.
The following options are available:The following options are available:
 NoneNone – Select to display no– Select to display no
control label on your page. Usedcontrol label on your page. Used
for related displays or invisiblefor related displays or invisible
controls.controls.
 TextText – Select to display text that– Select to display text that
you enter in the Text field. Theyou enter in the Text field. The
default text is the long name fordefault text is the long name for
the field from the associatedthe field from the associated
record definition.record definition.
 RFT Short (Record FieldRFT Short (Record Field
Table short)Table short) – Select to display– Select to display
the RFT short name for the fieldthe RFT short name for the field
from the associated recordfrom the associated record
definition.definition.
S8
S9
S7
S6
S5
S4
S3
S2
S1
223Yes-V Software Solutions (P) Ltd.,
Setting Label PropertiesSetting Label Properties
 RFT LongRFT Long – Select to– Select to
display the RFT long namedisplay the RFT long name
for the field from thefor the field from the
associated record definition.associated record definition.
This is the default.This is the default.
 Label TextLabel Text
 Text –Text – Enter the text exactly asEnter the text exactly as
it should appear on the page.it should appear on the page.
The default isThe default is Dummy NameDummy Name
until you assign a record anduntil you assign a record and
field to the control.field to the control.
S8
S9
S7
S6
S5
S4
S3
S2
S1
224Yes-V Software Solutions (P) Ltd.,
Setting Label PropertiesSetting Label Properties
 Label ID –Label ID – The systemThe system
automatically inserts the longautomatically inserts the long
name or short name from thename or short name from the
record definition dependingrecord definition depending
on the type of option selectedon the type of option selected
inin TypeType options (RFT Longoptions (RFT Long
or RFT Short). Ifor RFT Short). If TextText isis
selected from theselected from the TypeType
options, this option becomesoptions, this option becomes
display only and the user isdisplay only and the user is
allowed to enter a value in theallowed to enter a value in the
TextText
S8
S9
S7
S6
S5
S4
S3
S2
S1
225Yes-V Software Solutions (P) Ltd.,
Setting Label PropertiesSetting Label Properties
 Insert Line Feed –Insert Line Feed – Click to split yourClick to split your
control label into multiple lines at thecontrol label into multiple lines at the
position of the cursor in the Text field.position of the cursor in the Text field.
A thick vertical bar character appearsA thick vertical bar character appears
in the Text field.in the Text field.
 Style –Style – Select to control the color, font,Select to control the color, font,
and other characteristics of a label.and other characteristics of a label.
 AlignmentAlignment
 Left –Left – Select to align the label to the left-Select to align the label to the left-
of-center horizontally. This is the default.of-center horizontally. This is the default.
 Centered –Centered – Select to center the labelSelect to center the label
horizontally.horizontally.
 Right –Right – Select to align the label to theSelect to align the label to the
right-of-center horizontally.right-of-center horizontally.
S8
S9
S7
S6
S5
S4
S3
S2
S1
226Yes-V Software Solutions (P) Ltd.,
Setting Label PropertiesSetting Label Properties
 PositionPosition
 Left –Left – Positions label to thePositions label to the
left side of the field.left side of the field.
 TopTop – Positions label above– Positions label above
the field.the field.
 CustomCustom – Indicates that– Indicates that
the label has been manuallythe label has been manually
moved on the page.moved on the page.
 Display OptionsDisplay Options
 First occurs only –First occurs only – SelectSelect
to display the label onlyto display the label only
with the first occurrence ofwith the first occurrence of
a scroll areaa scroll area
 No colon –No colon – No colonNo colon
appears at the end of theappears at the end of the
label text.label text.
S8
S9
S7
S6
S5
S4
S3
S2
S1
227Yes-V Software Solutions (P) Ltd.,
Setting Use PropertiesSetting Use Properties
 Field Use OptionsField Use Options
 Display Only –Display Only – Select toSelect to
prevent users from modifyingprevent users from modifying
the contents of the controlthe contents of the control
during application data entry.during application data entry.
The system automaticallyThe system automatically
selects Display Only whenselects Display Only when
you select Related Field. Thisyou select Related Field. This
cannot be cleared until youcannot be cleared until you
clear Related Field.clear Related Field.
 Multi-Currency FieldMulti-Currency Field ––
Select to identify the controlSelect to identify the control
as associated withas associated with
multicurrency processing.multicurrency processing.
S8
S9
S7
S6
S5
S4
S3
S2
S1
228Yes-V Software Solutions (P) Ltd.,
Setting Use PropertiesSetting Use Properties
 Invisible –Invisible – Select to make theSelect to make the
control physically present on acontrol physically present on a
page but invisible to users. Anpage but invisible to users. An
invisible control field can beinvisible control field can be
used as a display control fieldused as a display control field
or it may be required for aor it may be required for a
PeopleCode program that isPeopleCode program that is
associated with the page.associated with the page.
S8
S9
S7
S6
S5
S4
S3
S2
S1
229Yes-V Software Solutions (P) Ltd.,
Setting Use PropertiesSetting Use Properties
 Display Control Field –Display Control Field – Select toSelect to
indicate that the field controlsindicate that the field controls
another field on the same pageanother field on the same page
level. The controlled field is alevel. The controlled field is a
related field.related field.
 Show Label –Show Label – Select to make theSelect to make the
control label visible while thecontrol label visible while the
control itself is invisible. This iscontrol itself is invisible. This is
selected only if Invisible isselected only if Invisible is
selected.selected.
 Related Field –Related Field – Select toSelect to
specify that the contents ofspecify that the contents of
this control are ruled bythis control are ruled by
another control on the sameanother control on the same
page level, a display controlpage level, a display control
field.field.
S8
S9
S7
S6
S5
S4
S3
S2
S1
230Yes-V Software Solutions (P) Ltd.,
Setting Use PropertiesSetting Use Properties
WhenWhen Related FieldRelated Field isis
selected,selected,
Display OnlyDisplay Only option isoption is
automatically selected. It alsoautomatically selected. It also
makes themakes the Related ControlRelated Control
FieldField drop-down list boxdrop-down list box
available for you to select theavailable for you to select the
related control fieldrelated control field
 Related Control Field –Related Control Field – WhenWhen
you select Related Field, a list ofyou select Related Field, a list of
all controls on the page that areall controls on the page that are
marked as display control fieldsmarked as display control fields
appears in a drop-down list box.appears in a drop-down list box.
Select the field to which thisSelect the field to which this
control is related.control is related.
..
S8
S9
S7
S6
S5
S4
S3
S2
S1
231Yes-V Software Solutions (P) Ltd.,
Setting Use PropertiesSetting Use Properties
 Display-Only AppearanceDisplay-Only Appearance
 Text Only andText Only and
Disabled Edit ControlDisabled Edit Control appliesapplies
to edit boxes and drop-downto edit boxes and drop-down
list boxes only.list boxes only.
 Pop-up Menu – Pop-upPop-up Menu – Pop-up
menus are lists of menu itemsmenus are lists of menu items
that you can associate with athat you can associate with a
field on a page. At runtime, thefield on a page. At runtime, the
menu appears on a separatemenu appears on a separate
page as a list of links to relatedpage as a list of links to related
pages.pages.
 Allow Deferred ProcessingAllow Deferred Processing
–– Check this check box toCheck this check box to
allow deferred processingallow deferred processing
S8
S9
S7
S6
S5
S4
S3
S2
S1
232Yes-V Software Solutions (P) Ltd.,
General Tab PropertiesGeneral Tab Properties
 Setting General PropertiesSetting General Properties
 Page Field Name –Page Field Name – Enter a nameEnter a name
for the page field that you arefor the page field that you are
creating. It does not appear as thecreating. It does not appear as the
label for the page field.label for the page field.
 Enable as Page AnchorEnable as Page Anchor – Select– Select
this to apply an “anchor” tag tothis to apply an “anchor” tag to
the current page field on the page.the current page field on the page.
 This check box is cleared, byThis check box is cleared, by
defaultdefault
 the General tab contains only thethe General tab contains only the
Page Field Name and Enable asPage Field Name and Enable as
Page Anchor settings (If it isPage Anchor settings (If it is
checked)checked)S8
S9
S7
S6
S5
S4
S3
S2
S1
233Yes-V Software Solutions (P) Ltd.,
View Record PeopleCodeView Record PeopleCode
 Page fields are associated with aPage fields are associated with a
specific record field. You canspecific record field. You can
access the PeopleCode for thataccess the PeopleCode for that
record field from the page field inrecord field from the page field in
the page definition.the page definition.
 To edit or add the record fieldTo edit or add the record field
PeopleCode,PeopleCode,
 selectselect ViewView,, View RecordView Record
PeopleCodePeopleCode from a page.from a page.
 Select the PeopleCode eventSelect the PeopleCode event
type from the drop-down listtype from the drop-down list
box in the PeopleCode editor,box in the PeopleCode editor,
edit or add PeopleCode andedit or add PeopleCode and
save the changes.save the changes.S8
S9
S7
S6
S5
S4
S3
S2
S1
234Yes-V Software Solutions (P) Ltd.,
Page PropertiesPage Properties
 Access the Page PropertiesAccess the Page Properties
dialog box (selectdialog box (select FileFile,, DefinitionDefinition
propertiesproperties), select the General Tab,), select the General Tab,
enter a description and any commentsenter a description and any comments
about the page and assign an owner Id.about the page and assign an owner Id.
S8
S9
S7
S6
S5
S4
S3
S2
S1
235Yes-V Software Solutions (P) Ltd.,
Use Tab PropertiesUse Tab Properties
Setting Use Tab PropertiesSetting Use Tab Properties
 Page Type –Page Type – Use the standardUse the standard
page, or select a subpage or apage, or select a subpage or a
secondary page from the drop-secondary page from the drop-
down list box.down list box.
 Page size –Page size – Select a page size.Select a page size.
There are different types of pageThere are different types of page
sizes to accommodate differentsizes to accommodate different
types of workstation monitors.types of workstation monitors.
 Additional SettingsAdditional Settings
Pop-Up Menu –Pop-Up Menu – List of menuList of menu
items that can be associated withitems that can be associated with
fields.fields.
Allow Deferred Processing –Allow Deferred Processing –
Check this checkbox to allowCheck this checkbox to allow
deferred processing.deferred processing.
Refer Page 233 for explanations.Refer Page 233 for explanations.
S8
S9
S7
S6
S5
S4
S3
S2
S1
236Yes-V Software Solutions (P) Ltd.,
Saving PageSaving Page
 To save your work, selectTo save your work, select FileFile,, SaveSave oror FileFile,, Save As.Save As.
S8
S9
S7
S6
S5
S4
S3
S2
S1
237Yes-V Software Solutions (P) Ltd.,
Creating an ApplicationCreating an Application
Simple 9 stepsSimple 9 steps
1. Create Field Definition1. Create Field Definition
2. Create Record Definition.2. Create Record Definition.
3. Build the Record Definition.3. Build the Record Definition.
4. Create page Definition.4. Create page Definition.
5.5. Create Component DefinitionCreate Component Definition..
6. Include pages into component Definition.6. Include pages into component Definition.
7. Creating Menu Definition.7. Creating Menu Definition.
8. Assigning security to the menu.8. Assigning security to the menu.
9. Test the application9. Test the application
S8
S9
S7
S6
S5
S4
S3
S2
S1
Yes-V Software Solutions (P) Ltd., 238
Creating Component DefinitionCreating Component Definition
239Yes-V Software Solutions (P) Ltd.,
ComponentComponent
 A component represents a complete business transaction.A component represents a complete business transaction.
 It comprises either a single page or a set of pages that areIt comprises either a single page or a set of pages that are
meant to be processed as one.meant to be processed as one.
 After you create pages, you add them to one or moreAfter you create pages, you add them to one or more
components to access them through menus or in businesscomponents to access them through menus or in business
processes.processes.
S8
S9
S7
S6
S5
S4
S3
S2
S1
240Yes-V Software Solutions (P) Ltd.,
Creating a New Component DefinitionCreating a New Component Definition
To create a new component definition:To create a new component definition:
 With a new or existing project open in PeopleSoft Application Designer,With a new or existing project open in PeopleSoft Application Designer,
select File, New.select File, New.
 Double-clickDouble-click Component.Component.
 The new component definition appears in the workspace.The new component definition appears in the workspace.
To open an existing component definition:To open an existing component definition:
 Select File, Open.Select File, Open.
 SelectSelect ComponentComponent as the type.as the type.
 Specify the selection criteria.Specify the selection criteria.
 The component definition appears in the workspace.The component definition appears in the workspace.
S8
S9
S7
S6
S5
S4
S3
S2
S1
241Yes-V Software Solutions (P) Ltd.,
Setting Component PropertiesSetting Component Properties
To open the Component Properties dialog box:To open the Component Properties dialog box:
 Open the component definition.Open the component definition.
 Select File, Definition Properties.Select File, Definition Properties.
 The Component Properties dialog box appears with the GeneralThe Component Properties dialog box appears with the General
tab active.tab active.
It contains 3 tabsIt contains 3 tabs
 generalgeneral
 useuse
 internet .internet .
S8
S9
S7
S6
S5
S4
S3
S2
S1
242Yes-V Software Solutions (P) Ltd.,
New Component DefinitionNew Component Definition
S8
S9
S7
S6
S5
S4
S3
S2
S1
243Yes-V Software Solutions (P) Ltd.,
Setting Component PropertiesSetting Component Properties
Setting General PropertiesSetting General Properties
DescriptionDescription Enter a descriptive name forEnter a descriptive name for
the componentthe component
Owner IDOwner ID
 View a list of applications with whichView a list of applications with which
this component is used. This list isthis component is used. This list is
helpful to identify the applicationshelpful to identify the applications
that are associated with thethat are associated with the
component during the applicationcomponent during the application
development phase.development phase.
Last UpdatedLast Updated View the date and time ofView the date and time of
the last modification made to thethe last modification made to the
component and the name of the usercomponent and the name of the user
who made the modificationwho made the modification
S8
S9
S7
S6
S5
S4
S3
S2
S1
244Yes-V Software Solutions (P) Ltd.,
Setting Use PropertiesSetting Use Properties
Access the Component PropertiesAccess the Component Properties
dialog box. Select the Use tab.dialog box. Select the Use tab.
Search recordSearch record Specify the searchSpecify the search
record for this component .record for this component .
Add search recordAdd search record Specify if youSpecify if you
want a different search recordwant a different search record
specifically for add actions.specifically for add actions.
Force Search ProcessingForce Search Processing Select toSelect to
always run search logic (SearchInitalways run search logic (SearchInit
PeopleCode) for this component.PeopleCode) for this component.
The default is clearThe default is clear
Detail pageDetail page Specify the page that youSpecify the page that you
want for details.want for details.
S8
S9
S7
S6
S5
S4
S3
S2
S1
245Yes-V Software Solutions (P) Ltd.,
Setting Use PropertiesSetting Use Properties
ActionsActions
AddAdd
 To add a new high-level key, such asTo add a new high-level key, such as
a new employee ID or customer.a new employee ID or customer.
 used to insert a new current row orused to insert a new current row or
to update future rows.to update future rows.
Update/DisplayUpdate/Display to update existing rowsto update existing rows
only.only.
Update/Display AllUpdate/Display All
 Select to update current and futureSelect to update current and future
rows in an effective-dated record .rows in an effective-dated record .
 Use only with effective-dated records.Use only with effective-dated records.
 Do not use these actions unless theDo not use these actions unless the
main record that is associated withmain record that is associated with
the page definitions is effective-dated.the page definitions is effective-dated.
 This is translated to include history atThis is translated to include history at
runtimeruntime..
S8
S9
S7
S6
S5
S4
S3
S2
S1
246Yes-V Software Solutions (P) Ltd.,
Setting Use PropertiesSetting Use Properties
CorrectionCorrection
 Select to update anySelect to update any
rows (history, current,rows (history, current,
and future) in anand future) in an
effective-dated recordeffective-dated record
 Use only with effective-Use only with effective-
dated records.dated records.
 This is translated toThis is translated to
correct history atcorrect history at
runtimeruntime
S8
S9
S7
S6
S5
S4
S3
S2
S1
247Yes-V Software Solutions (P) Ltd.,
Setting Use PropertiesSetting Use Properties
Disable Saving PageDisable Saving Page
 Select when you want to hide theSelect when you want to hide the
Save button in the toolbar andSave button in the toolbar and
disable the Alt+1 (Save) hot key.disable the Alt+1 (Save) hot key.
 This prevents the user from beingThis prevents the user from being
prompted to save when exiting aprompted to save when exiting a
pagepage ..
 Used in which the user isn’tUsed in which the user isn’t
making database changes andmaking database changes and
doesn’t need to be prompted todoesn’t need to be prompted to
save.save.
 RestrictionRestriction
 it doesn’t prevent usingit doesn’t prevent using
PeopleCode to save aPeopleCode to save a
page with the DoSave()page with the DoSave()
or DoSaveNow()or DoSaveNow()
functionsfunctions..
S8
S9
S7
S6
S5
S4
S3
S2
S1
248Yes-V Software Solutions (P) Ltd.,
Setting Use PropertiesSetting Use Properties
Include in NavigationInclude in Navigation
 Select to include theSelect to include the
component in the menucomponent in the menu
navigation at runtime .navigation at runtime .
 The default is selected .The default is selected .
Mandatory Spell CheckMandatory Spell Check
Select to ensure that spellSelect to ensure that spell
check is run on allcheck is run on all
eligible spell checkeligible spell check
enabled fields in theenabled fields in the
component when thecomponent when the
user saves the pageuser saves the page
S8
S9
S7
S6
S5
S4
S3
S2
S1
249Yes-V Software Solutions (P) Ltd.,
Setting Use PropertiesSetting Use Properties
3-Tier Execution Location3-Tier Execution Location
This section applies to WindowsThis section applies to Windows
client applications only.client applications only.
Component BuildComponent Build
 Specify where you want allSpecify where you want all
processing to occur after the keyprocessing to occur after the key
list of a page is selected andlist of a page is selected and
before the user can interact withbefore the user can interact with
the page.the page.
 This includes buildingThis includes building
component buffers and runningcomponent buffers and running
many types of PeopleCodemany types of PeopleCode..
S8
S9
S7
S6
S5
S4
S3
S2
S1
250Yes-V Software Solutions (P) Ltd.,
Setting Use PropertiesSetting Use Properties
Component SaveComponent Save
 Specify where you want allSpecify where you want all
processing to occur after theprocessing to occur after the
user saves the componentuser saves the component
and SaveEdit PeopleCodeand SaveEdit PeopleCode
validations have succeeded.validations have succeeded.
 It includes SavePreChange,It includes SavePreChange,
WorkFlow, andWorkFlow, and
SavePostChangeSavePostChange
PeopleCode and updates toPeopleCode and updates to
the databasethe database..S8
S9
S7
S6
S5
S4
S3
S2
S1
251Yes-V Software Solutions (P) Ltd.,
Creating an ApplicationCreating an Application
Simple 9 stepsSimple 9 steps
1. Create Field Definition1. Create Field Definition
2. Create Record Definition.2. Create Record Definition.
3. Build the Record Definition.3. Build the Record Definition.
4. Create page Definition.4. Create page Definition.
5. Create Component Definition.5. Create Component Definition.
6.6. Include pages into component DefinitionInclude pages into component Definition..
7. Creating Menu Definition.7. Creating Menu Definition.
8. Assigning security to the menu.8. Assigning security to the menu.
9. Test the application9. Test the application
S8
S9
S7
S6
S5
S4
S3
S2
S1
Yes-V Software Solutions (P) Ltd., 252
Including Pages into ComponentIncluding Pages into Component
253Yes-V Software Solutions (P) Ltd.,
Adding Pages to ComponentsAdding Pages to Components
Pages can be added to components inPages can be added to components in 22 waysways
1.Using the1.Using the InsertInsert MenuMenu to Add a Pageto Add a Page
 Open a new or existing component in the workspace and make theOpen a new or existing component in the workspace and make the
definition active.definition active.
 Select Insert, Page into Component.Select Insert, Page into Component.
 ClickClick Insert.Insert.
 A list of available pages matching your search criteria appears.A list of available pages matching your search criteria appears.
 Select the page that you want to add to the component.Select the page that you want to add to the component.
 ClickClick Insert.Insert.
 The page that you selected appears in the component in the workspace.The page that you selected appears in the component in the workspace.
 When you are finished adding pages to your component, clickWhen you are finished adding pages to your component, click Close.Close.
 Save your component.Save your component.
 Component names can be up to 18 characters in length.Component names can be up to 18 characters in length.
S8
S9
S7
S6
S5
S4
S3
S2
S1
254Yes-V Software Solutions (P) Ltd.,
ComponentComponent
S8
S9
S7
S6
S5
S4
S3
S2
S1
255Yes-V Software Solutions (P) Ltd.,
Adding Pages to ComponentsAdding Pages to Components
22.. Dragging a Page Into aDragging a Page Into a
ComponentComponent
 To drag a page into aTo drag a page into a
component:component:
 Open the project andOpen the project and
component.component.
 DragDrag pagespages from thefrom the
project workspace to theproject workspace to the
componentcomponent
S8
S9
S7
S6
S5
S4
S3
S2
S1
256Yes-V Software Solutions (P) Ltd.,
Re-ordering PagesRe-ordering Pages
Reordering Pages in a ComponentReordering Pages in a Component
 After you add pages to your component, you can change the order in whichAfter you add pages to your component, you can change the order in which
they appear in the componentthey appear in the component..
Steps:Steps:
 Select a row number on the left-hand side of the component definition.Select a row number on the left-hand side of the component definition.
 Drag the row to the correct position.Drag the row to the correct position.
 The page is inserted immediately below the highlighted line.The page is inserted immediately below the highlighted line.
Moving a page in a component
S8
S9
S7
S6
S5
S4
S3
S2
S1
257Yes-V Software Solutions (P) Ltd.,
Component With Multiple PagesComponent With Multiple Pages
Component
Multiple Pages in
a Component
S8
S9
S7
S6
S5
S4
S3
S2
S1
258Yes-V Software Solutions (P) Ltd.,
Defining ComponentsDefining Components
 When you design pages of aWhen you design pages of a
component, the pages should sharecomponent, the pages should share
the same basic key structure becausethe same basic key structure because
they share the same search recordthey share the same search record
Working With the ComponentWorking With the Component
Definition WindowDefinition Window
 The component definitionThe component definition
window has two tabs,window has two tabs,
DefinitionDefinition andand StructureStructure,,
which provide different views ofwhich provide different views of
a component.a component.
Definition TabDefinition Tab
 The default componentThe default component
definition view displays the pagedefinition view displays the page
items and correspondingitems and corresponding
attributes of a componentattributes of a component
definition.definition.
Component definition view
S8
S9
S7
S6
S5
S4
S3
S2
S1
259Yes-V Software Solutions (P) Ltd.,
Setting Page AttributesSetting Page Attributes
Each page in a componentEach page in a component
has attributes. Eachhas attributes. Each
attribute is representedattribute is represented
by a column in theby a column in the
component definition.component definition.
Page NamePage Name Contains theContains the
read-only name of theread-only name of the
page definition. If youpage definition. If you
rename the page, thisrename the page, this
column is updatedcolumn is updated
automaticallyautomatically..
S8
S9
S7
S6
S5
S4
S3
S2
S1
260Yes-V Software Solutions (P) Ltd.,
Setting Page AttributesSetting Page Attributes
Item NameItem Name Contains a nameContains a name
for each page in thefor each page in the
component. This name mustcomponent. This name must
be unique in the componentbe unique in the component
and the default is the pageand the default is the page
name. This name is forname. This name is for
informational purposes only.informational purposes only.
HiddenHidden Specifies whether theSpecifies whether the
page can be viewed by thepage can be viewed by the
user at runtimeuser at runtime ..
Pages are usually hidden whenPages are usually hidden when
they are used in work groupsthey are used in work groups
or associated with derivedor associated with derived
work records .work records .
S8
S9
S7
S6
S5
S4
S3
S2
S1
261Yes-V Software Solutions (P) Ltd.,
Setting Page AttributesSetting Page Attributes
Item LabelItem Label ::
 Serves as the default folderServes as the default folder
tab label, unless a differenttab label, unless a different
label is specified.label is specified.
 The item label should beThe item label should be
unique for each page in aunique for each page in a
single component menu.single component menu.
 The folder tab label isThe folder tab label is
usually used when shorterusually used when shorter
names are needed for foldernames are needed for folder
tabs.tabs.
Allow Deferred ProcessingAllow Deferred Processing::
Indicates whether deferredIndicates whether deferred
processing is active for thatprocessing is active for that
page in its property settings.page in its property settings.
S8
S9
S7
S6
S5
S4
S3
S2
S1
262Yes-V Software Solutions (P) Ltd.,
Setting Page AttributesSetting Page Attributes
Deferred Processing:Deferred Processing: DeferredDeferred
mode enables you to defer manymode enables you to defer many
of the conditions that needof the conditions that need
server processing until runningserver processing until running
them on the application server isthem on the application server is
required or requested. Forrequired or requested. For
example, when a user exits a fieldexample, when a user exits a field
that has a field-level event (likethat has a field-level event (like
FieldChange or FieldEditFieldChange or FieldEdit
PeopleCode, prompt validation,PeopleCode, prompt validation,
related display, and so on) thatrelated display, and so on) that
event is not run until the nextevent is not run until the next
transmission to the applicationtransmission to the application
server.server.
Deferred processing is theDeferred processing is the
default mode at the field, page,default mode at the field, page,
and component levels.and component levels.
S8
S9
S7
S6
S5
S4
S3
S2
S1
263Yes-V Software Solutions (P) Ltd.,
Setting Access KeysSetting Access Keys
 We can setWe can set access keysaccess keys by placing an ampersand (by placing an ampersand (&&) in the text of each item) in the text of each item
label. Put the ampersand in front of the letter that you want to be underlinedlabel. Put the ampersand in front of the letter that you want to be underlined
on the folder tab at runtime.on the folder tab at runtime.
Item labels with ampersands (&)S8
S9
S7
S6
S5
S4
S3
S2
S1
264Yes-V Software Solutions (P) Ltd.,
Structure TabStructure Tab
Structure tab:Structure tab:
 The structure view showsThe structure view shows
records and scrolls in a treerecords and scrolls in a tree
representation. Double-click therepresentation. Double-click the
components in this view andcomponents in this view and
open their definitionsopen their definitions
 You can view the PeopleCodeYou can view the PeopleCode
that is attached to any of thethat is attached to any of the
components by right-clicking andcomponents by right-clicking and
selecting the “selecting the “View PeopleCode”View PeopleCode”
menu option.menu option.
 The Component PeopleCodeThe Component PeopleCode
seen here is different from theseen here is different from the
RecordRecord
PeopleCodePeopleCode
S8
S9
S7
S6
S5
S4
S3
S2
S1
265Yes-V Software Solutions (P) Ltd.,
Component Structure TabComponent Structure Tab
A key icon appears next
to all key and alternative
search key fields in the
component structure
view.
An asterisks icon
appears next to all fields
that are required.S8
S9
S7
S6
S5
S4
S3
S2
S1
266Yes-V Software Solutions (P) Ltd.,
Creating an ApplicationCreating an Application
Simple 9 stepsSimple 9 steps
1. Create Field Definition1. Create Field Definition
2. Create Record Definition.2. Create Record Definition.
3. Build the Record Definition.3. Build the Record Definition.
4. Create page Definition.4. Create page Definition.
5. Create Component Definition.5. Create Component Definition.
6. Include pages into component Definition.6. Include pages into component Definition.
7.7. Creating Menu Definition.Creating Menu Definition.
8. Assigning security to the menu.8. Assigning security to the menu.
9. Test the application9. Test the application
S8
S9
S7
S6
S5
S4
S3
S2
S1
Yes-V Software Solutions (P) Ltd., 267
Menu DefinitionMenu Definition
268Yes-V Software Solutions (P) Ltd.,
MenuMenu
A menu is a logical grouping for assigning security to your system.
You create a menu as a placeholder for components.
Once you save your menu, use the Registration Wizard to assign
components and security.
You can create two types of menus using PeopleSoft Application
Designer:
Standard (custom) menus provide an internal reference for
components and pages. They are grouped logically into menu
groups to assign security. They are not used for navigational
purposes.
Pop-up menus appear when a user clicks a pop-up button.
S8
S9
S7
S6
S5
S4
S3
S2
S1
269Yes-V Software Solutions (P) Ltd.,
To create a new menu definition:
1. From the PeopleSoft Application Designer toolbar, select File, New.
2. Select Menu from the list.
3. Click OK.
4. Select the Standard option for the menu type.
5. Click OK.
The thick rectangle surrounding the bar item indicates that this
element in the
menu definition is currently selected.
The empty, dashed rectangle is a placeholder for a new bar item
label
6. Assign a bar name and label.
You can define multiple menu bars for the menu. Double-click the
rectangle to display the Bar Item Properties dialog box.
S8
S9
S7
S6
S5
S4
S3
S2
S1
Creating MenuCreating Menu
270Yes-V Software Solutions (P) Ltd.,
CreatingCreating MenuMenu
7.7. Enter the bar item name and label.Enter the bar item name and label.
The most commonly used bar item name is “Use.”The most commonly used bar item name is “Use.”
8. Click OK to accept the Bar Item Properties settings.8. Click OK to accept the Bar Item Properties settings.
9. Set the menu properties.9. Set the menu properties.
10. Save the menu definition10. Save the menu definition
S8
S9
S7
S6
S5
S4
S3
S2
S1
271Yes-V Software Solutions (P) Ltd.,
S8
S9
S7
S6
S5
S4
S3
S2
S1
CreatingCreating MenuMenu
272Yes-V Software Solutions (P) Ltd.,
Creating MenuCreating Menu
S8
S9
S7
S6
S5
S4
S3
S2
S1
273Yes-V Software Solutions (P) Ltd.,
Creating MenuCreating Menu
S8
S9
S7
S6
S5
S4
S3
S2
S1
274Yes-V Software Solutions (P) Ltd.,
Setting Menu Item PropertiesSetting Menu Item Properties
To set the general and use properties for the menuTo set the general and use properties for the menu
definition.definition.
To define a menu item:
1. In a standard menu definition, double click a menu item to access it
properties.
2. Specify the menu item.
3. Select the Menu Item
Component
PeopleCode
Separator
S8
S9
S7
S6
S5
S4
S3
S2
S1
275Yes-V Software Solutions (P) Ltd.,
 44 Click the Select ButtonClick the Select Button
 5. Select an enabling component in the Open dialog box.5. Select an enabling component in the Open dialog box.
 6. Save the menu item if it has not been saved.6. Save the menu item if it has not been saved.
 7. In the menu definition, right-click the menu item, then select7. In the menu definition, right-click the menu item, then select
 View PeopleCodeView PeopleCode
 8. Add a PeopleCode program in the menu item's ItemSelected8. Add a PeopleCode program in the menu item's ItemSelected
 eventevent
 9. When you have finished typing the program, save the9. When you have finished typing the program, save the
 PeopleCode program and close the PeopleCode editorPeopleCode program and close the PeopleCode editor
 10. Override the component search record.10. Override the component search record.
 11. Click OK to accept the settings.11. Click OK to accept the settings.
 12. Save the menu definition.12. Save the menu definition.
S8
S9
S7
S6
S5
S4
S3
S2
S1
Setting Menu Item PropertiesSetting Menu Item Properties
276Yes-V Software Solutions (P) Ltd.,
Setting Menu PropertiesSetting Menu Properties
S8
S9
S7
S6
S5
S4
S3
S2
S1
277Yes-V Software Solutions (P) Ltd.,
Setting Menu PropertiesSetting Menu Properties
S8
S9
S7
S6
S5
S4
S3
S2
S1
278Yes-V Software Solutions (P) Ltd.,
Setting Menu Item PropertiesSetting Menu Item Properties
S8
S9
S7
S6
S5
S4
S3
S2
S1
279Yes-V Software Solutions (P) Ltd.,
Setting Menu Item PropertiesSetting Menu Item Properties
S8
S9
S7
S6
S5
S4
S3
S2
S1
280Yes-V Software Solutions (P) Ltd.,
Adding Components toAdding Components to a Menua Menu
S8
S9
S7
S6
S5
S4
S3
S2
S1 Component Register Button
281Yes-V Software Solutions (P) Ltd.,
Adding Components toAdding Components to a Menua Menu
S8
S9
S7
S6
S5
S4
S3
S2
S1
282Yes-V Software Solutions (P) Ltd.,
Adding Components toAdding Components to a Menua Menu
S8
S9
S7
S6
S5
S4
S3
S2
S1
283Yes-V Software Solutions (P) Ltd.,
Adding Components toAdding Components to a Menua Menu
S8
S9
S7
S6
S5
S4
S3
S2
S1
284Yes-V Software Solutions (P) Ltd.,
Working with Existing Menu DefinitionWorking with Existing Menu Definition
• Add components to a menu.
• Rename menu definitions.
• Copy a menu definition.
• Delete menu items.
• Uninstall menu definitions.
• Print menu definitions.
• Set up menu security.
• Import menu groups into portals.
S8
S9
S7
S6
S5
S4
S3
S2
S1
285Yes-V Software Solutions (P) Ltd.,
Renaming Menu DefinitionsRenaming Menu Definitions
 To rename a menu definition:To rename a menu definition:
 Close all open definitions in the definition workspace.Close all open definitions in the definition workspace.
 Select File, Rename.Select File, Rename.
 The Rename Definition dialog box appears.The Rename Definition dialog box appears.
 Select Menu from the Definition Type drop-down list box.Select Menu from the Definition Type drop-down list box.
 Click Rename.Click Rename.
 From the list of available menus, double-click the menu that you want to rename.From the list of available menus, double-click the menu that you want to rename.
 Type the new name over the name that is selected on the menu definition.Type the new name over the name that is selected on the menu definition.
 Click Rename.Click Rename.
Note.Note. If you rename a menu definition, be sure to manually rename the correspondingIf you rename a menu definition, be sure to manually rename the corresponding
registryregistry entries.entries.
S8
S9
S7
S6
S5
S4
S3
S2
S1
286Yes-V Software Solutions (P) Ltd.,
Renaming Menu DefinitionsRenaming Menu Definitions
S8
S9
S7
S6
S5
S4
S3
S2
S1
287Yes-V Software Solutions (P) Ltd.,
Copying a Menu DefinitionCopying a Menu Definition
To copy a menu definition:To copy a menu definition:
 Open the menu definition that you want to copy.Open the menu definition that you want to copy.
 Select File, Save As.Select File, Save As.
 The Save As dialog box appears.The Save As dialog box appears.
 Type a new name for the copy of the menu definition.Type a new name for the copy of the menu definition.
 ClickClick OK.OK.
 You are prompted to save a copy of any PeopleCode that you haveYou are prompted to save a copy of any PeopleCode that you have
associated with the menu definitionassociated with the menu definition
S8
S9
S7
S6
S5
S4
S3
S2
S1
288Yes-V Software Solutions (P) Ltd.,
Copying a Menu DefinitionCopying a Menu Definition
S8
S9
S7
S6
S5
S4
S3
S2
S1
289Yes-V Software Solutions (P) Ltd.,
Deleting Menu ItemsDeleting Menu Items
To delete a menu item:To delete a menu item:
 Select the menu item that you want to delete.Select the menu item that you want to delete.
 Select Edit, delete.Select Edit, delete.
 If you attempt to delete a menu item that is linked to PeopleCode, the system issuesIf you attempt to delete a menu item that is linked to PeopleCode, the system issues
a warning.a warning.
 If you proceed to delete it, the linked PeopleCode menu items are also deleted.If you proceed to delete it, the linked PeopleCode menu items are also deleted.
 If you delete an item by mistake, before you perform any additional edits or saves,If you delete an item by mistake, before you perform any additional edits or saves,
select Edit, Undo to restore the menu item.select Edit, Undo to restore the menu item.
Note. When deleting menu items, remember to delete any corresponding registry entriesNote. When deleting menu items, remember to delete any corresponding registry entries..
S8
S9
S7
S6
S5
S4
S3
S2
S1
290Yes-V Software Solutions (P) Ltd.,
Deleting Menu ItemsDeleting Menu Items
S8
S9
S7
S6
S5
S4
S3
S2
S1
291Yes-V Software Solutions (P) Ltd.,
Understanding Pop-up MenusUnderstanding Pop-up Menus
Pop-up menus define the transition to another page—either a system-defined pagePop-up menus define the transition to another page—either a system-defined page
containing a set of standard commands or a pop-up menu page that wascontaining a set of standard commands or a pop-up menu page that was
created and associated with the pop-up button by an application developer.created and associated with the pop-up button by an application developer.
You can also use pop-up menus to run a PeopleCode program. PeopleCode inYou can also use pop-up menus to run a PeopleCode program. PeopleCode in
pop-up menus do not share the same limitations as PeopleCode in standardpop-up menus do not share the same limitations as PeopleCode in standard
menus, so pop-up transition menus provide an effective alternative to usingmenus, so pop-up transition menus provide an effective alternative to using
command push buttons on pages. Pop-up menu PeopleCode programs can becommand push buttons on pages. Pop-up menu PeopleCode programs can be
used for any number of purposes, for example:used for any number of purposes, for example:
To perform a modal transfer.To perform a modal transfer.
To recalculate a field value.To recalculate a field value.
To trigger a PeopleSoft Workflow business event.To trigger a PeopleSoft Workflow business event.
S8
S9
S7
S6
S5
S4
S3
S2
S1
292Yes-V Software Solutions (P) Ltd.,
 Behavior of Pop-up Menus in PagesBehavior of Pop-up Menus in Pages
 The following standard icons appear on the page at runtime when a pop-up menu is defined for aThe following standard icons appear on the page at runtime when a pop-up menu is defined for a
page field.page field.

 When a user clicks the pop-up icon (PT_POPUP) on a page, aWhen a user clicks the pop-up icon (PT_POPUP) on a page, a
 screenscreen
 appears with a list of menu items from which to select.appears with a list of menu items from which to select.
 This pop-up icon (PT_POPUP_SKIP) appears if a pop-upThis pop-up icon (PT_POPUP_SKIP) appears if a pop-up
 menu hasmenu has
 only one menu item. When a user clicks this icon, the targetonly one menu item. When a user clicks this icon, the target
 transaction page appears immediately, skipping an intermediate page containing atransaction page appears immediately, skipping an intermediate page containing a
list with one menu itemlist with one menu item..
S8
S9
S7
S6
S5
S4
S3
S2
S1
Understanding Pop-up MenusUnderstanding Pop-up Menus
293Yes-V Software Solutions (P) Ltd.,
Creating Pop-up MenusCreating Pop-up Menus
• Select File, New.Select File, New.
The New dialog box appears.The New dialog box appears.
• Select Menu.Select Menu.
• Click OK.Click OK.
The New Menu dialog boxThe New Menu dialog box
appears.appears.
• Select the PoSelect the Popup option forup option for
the menu type.the menu type.
• Click OK.Click OK.
A new pop-up menuA new pop-up menu
definition appears.definition appears.
S8
S9
S7
S6
S5
S4
S3
S2
S1
294Yes-V Software Solutions (P) Ltd.,
• Define the menu items for the pop-up menu.Define the menu items for the pop-up menu.
• Set the Menu Properties.Set the Menu Properties.
Add a Description and Comments about your pop-up menu.Add a Description and Comments about your pop-up menu.
On the Use tab, type the menu label you want to appear for thatOn the Use tab, type the menu label you want to appear for that
pop-up.pop-up.
• Save the pop-up menu definition.Save the pop-up menu definition.
• To provide users with access to the pop-up menu, associate it with aTo provide users with access to the pop-up menu, associate it with a
pagepage fieldfield
S8
S9
S7
S6
S5
S4
S3
S2
S1
Creating Pop-up MenusCreating Pop-up Menus
295Yes-V Software Solutions (P) Ltd.,
Menu PropertiesMenu Properties
S8
S9
S7
S6
S5
S4
S3
S2
S1
296Yes-V Software Solutions (P) Ltd.,
Associating a Pop-up Menu With a Page Field
• Open the page definition that contains the page field to which you wantOpen the page definition that contains the page field to which you want
to associate the pop-up menu.to associate the pop-up menu.
• Right-click the page field, then select Page Field Properties.Right-click the page field, then select Page Field Properties.
• When the properties dialog box appears, select the Use tab.When the properties dialog box appears, select the Use tab.
• In the Popup Menu group box, select from the available pop-up menusIn the Popup Menu group box, select from the available pop-up menus
in the drop-down list box.in the drop-down list box.
• Click OK.Click OK.
• Save the page definitionSave the page definition
S8
S9
S7
S6
S5
S4
S3
S2
S1
297Yes-V Software Solutions (P) Ltd.,
Creating an ApplicationCreating an Application
Simple 9 stepsSimple 9 steps
1. Create Field Definition1. Create Field Definition
2. Create Record Definition.2. Create Record Definition.
3. Build the Record Definition.3. Build the Record Definition.
4. Create page Definition.4. Create page Definition.
5. Create Component Definition.5. Create Component Definition.
6. Include pages into component Definition.6. Include pages into component Definition.
7. Creating Menu Definition.7. Creating Menu Definition.
8.8. Assigning security to the menu.Assigning security to the menu.
9. Test the application9. Test the application
S8
S9
S7
S6
S5
S4
S3
S2
S1
Yes-V Software Solutions (P) Ltd., 298
Assigning SecuritiesAssigning Securities
To The MenuTo The Menu
299Yes-V Software Solutions (P) Ltd.,
Permission ListsPermission Lists
 PermissionPermission Lists are the building blocks of your end user securityare the building blocks of your end user security
authorizationsauthorizations..
 A Permission List may contain any number of the following permissions,A Permission List may contain any number of the following permissions,
includingincluding signon timessignon times,, page permissionspage permissions,, component interfacecomponent interface
permissionspermissions, and so on., and so on.
 A Permission List may contain one or more permissions, and the smaller theA Permission List may contain one or more permissions, and the smaller the
number of permissions within a particular Permission List the more flexiblenumber of permissions within a particular Permission List the more flexible
and scaleable that Permission List is.and scaleable that Permission List is.
S8
S9
S7
S6
S5
S4
S3
S2
S1
300Yes-V Software Solutions (P) Ltd.,
Assigning Permission ListsAssigning Permission Lists
 Theoretically, you could create a Permission List tailored forTheoretically, you could create a Permission List tailored for
each and every Role, and that Permission List could contain aeach and every Role, and that Permission List could contain a
permission of every category from General to Web Librariespermission of every category from General to Web Libraries
 you can use a more modular or "mix-and-match" approach. Thisyou can use a more modular or "mix-and-match" approach. This
approach involves numerous, specific Permission Lists that youapproach involves numerous, specific Permission Lists that you
can add and remove to Role definitions.can add and remove to Role definitions.
S8
S9
S7
S6
S5
S4
S3
S2
S1
301Yes-V Software Solutions (P) Ltd.,
Working With Permission ListsWorking With Permission Lists
 Create a new permission list.Create a new permission list.
 Copy permission lists.Copy permission lists.
 Delete permission lists.Delete permission lists.
S8
S9
S7
S6
S5
S4
S3
S2
S1
302Yes-V Software Solutions (P) Ltd.,
Creating a New Permission ListCreating a New Permission List
1.1. Select PeopleTools, Security, Permissions & Roles, PermissionSelect PeopleTools, Security, Permissions & Roles, Permission
Lists.Lists.
2.2. On the search page click Add a New Value.On the search page click Add a New Value.
3.3. In the Permission List edit box, enter the name of PermissionIn the Permission List edit box, enter the name of Permission
List you want to create.List you want to create.
4.4. From the pages in the Permission List component, select theFrom the pages in the Permission List component, select the
appropriate permissions.appropriate permissions.
5.5. Save your work.Save your work.
S8
S9
S7
S6
S5
S4
S3
S2
S1
303Yes-V Software Solutions (P) Ltd.,
Copying Permission ListsCopying Permission Lists
 To clone a permission list:To clone a permission list:
1.1. Select PeopleTools, Security, Permissions & Roles, Copy Permission Lists.Select PeopleTools, Security, Permissions & Roles, Copy Permission Lists.
2.2. In the search page, search for the Permission List that you want to copy (clone), andIn the search page, search for the Permission List that you want to copy (clone), and
click it.click it.
3.3. The Permission List Save As page appears.The Permission List Save As page appears.
4.4. On the Permission List Save As page, enter a new name in the To: edit box for theOn the Permission List Save As page, enter a new name in the To: edit box for the
Permission List that you want to copy.Permission List that you want to copy.
5.5. Click Save.Click Save.
 Note. This copies content reference permissions.Note. This copies content reference permissions.
S8
S9
S7
S6
S5
S4
S3
S2
S1
304Yes-V Software Solutions (P) Ltd.,
Copying a Permission ListCopying a Permission List
Click the Save Button
S8
S9
S7
S6
S5
S4
S3
S2
S1
305Yes-V Software Solutions (P) Ltd.,
Deleting Permission ListsDeleting Permission Lists
 To delete a permission list:To delete a permission list:
1.1. Select PeopleTools, Security, Permissions & Roles, Delete PermissionSelect PeopleTools, Security, Permissions & Roles, Delete Permission
Lists.Lists.
2.2. On the search page, locate the Permission List that you want to delete andOn the search page, locate the Permission List that you want to delete and
click it.click it.
3.3. The Delete Permission List page appears.The Delete Permission List page appears.
4.4. Click Delete Permission List.Click Delete Permission List.
5.5. Click OK to confirm the deletion, or click Cancel to end without deleting.Click OK to confirm the deletion, or click Cancel to end without deleting.
S8
S9
S7
S6
S5
S4
S3
S2
S1
306Yes-V Software Solutions (P) Ltd.,
Deleting a Permission ListDeleting a Permission List
Press the Delete Button
S8
S9
S7
S6
S5
S4
S3
S2
S1
307Yes-V Software Solutions (P) Ltd.,
Defining Permission ListsDefining Permission Lists
 Set general permissions.Set general permissions.
 Set page permissions.Set page permissions.
 Set PeopleTools permissions.Set PeopleTools permissions.
 Set process permissions.Set process permissions.
 Set signon times permissions.Set signon times permissions.
 Set component interface permissions.Set component interface permissions.
 Set message monitor permissionsSet message monitor permissions
S8
S9
S7
S6
S5
S4
S3
S2
S1
308Yes-V Software Solutions (P) Ltd.,
Defining Permission ListsDefining Permission Lists
 Set web library permissions.Set web library permissions.
 Set mass change permissions.Set mass change permissions.
 Set personalization permissions.Set personalization permissions.
 Add additional links.Add additional links.
 Run permission list queriesRun permission list queries
S8
S9
S7
S6
S5
S4
S3
S2
S1
309Yes-V Software Solutions (P) Ltd.,
Setting General PermissionsSetting General Permissions
S8
S9
S7
S6
S5
S4
S3
S2
S1
310Yes-V Software Solutions (P) Ltd.,
Setting PeopleTools PermissionsSetting PeopleTools Permissions
S8
S9
S7
S6
S5
S4
S3
S2
S1
311Yes-V Software Solutions (P) Ltd.,
Object PermissionObject Permission
S8
S9
S7
S6
S5
S4
S3
S2
S1
312Yes-V Software Solutions (P) Ltd.,
Sign-on PermissionSign-on Permission
S8
S9
S7
S6
S5
S4
S3
S2
S1
313Yes-V Software Solutions (P) Ltd.,
RolesRoles
 Roles are an intermediate object that exist between permission lists and userRoles are an intermediate object that exist between permission lists and user
profiles.profiles.
 They are designed to aggregate permission lists so that you can arrangeThey are designed to aggregate permission lists so that you can arrange
permissions into meaningful collections. If you implement dynamic roles,permissions into meaningful collections. If you implement dynamic roles,
then roles enable you to add permissions to users dynamically, which reducesthen roles enable you to add permissions to users dynamically, which reduces
administration tasks.administration tasks.
 Role users are the User Profiles or users that have membership to a particularRole users are the User Profiles or users that have membership to a particular
role.role.
 The dynamic role assignment is how to make your security system scale toThe dynamic role assignment is how to make your security system scale to
meet the demand of an ever-increasing user populationmeet the demand of an ever-increasing user population
S8
S9
S7
S6
S5
S4
S3
S2
S1
314Yes-V Software Solutions (P) Ltd.,
Working With RolesWorking With Roles
1.1. Create a new role.Create a new role.
2.2. Copy a role.Copy a role.
3.3. Delete a role.Delete a role.
S8
S9
S7
S6
S5
S4
S3
S2
S1
315Yes-V Software Solutions (P) Ltd.,
Creating a New RoleCreating a New Role
1.1. Select PeopleTools, Security, Permissions & Roles, Roles.Select PeopleTools, Security, Permissions & Roles, Roles.
2.2. On the search page click Add a New Value.On the search page click Add a New Value.
3.3. In the Role Name edit box, enter the name of role you want toIn the Role Name edit box, enter the name of role you want to
create, and click Add.create, and click Add.
4.4. From the pages in the Roles component select the appropriate roleFrom the pages in the Roles component select the appropriate role
options.options.
5.5. Save your work.Save your work.
S8
S9
S7
S6
S5
S4
S3
S2
S1
316Yes-V Software Solutions (P) Ltd.,
Copying RolesCopying Roles
1.1. Select PeopleTools, Security, Permissions & Roles, Copy Roles.Select PeopleTools, Security, Permissions & Roles, Copy Roles.
2.2. On the search page, search for the role that you want to copyOn the search page, search for the role that you want to copy
(clone), and click it.(clone), and click it.
3.3. The Role Save As page appears.The Role Save As page appears.
4.4. On the Role Save As page, enter a new name in the as: edit box.On the Role Save As page, enter a new name in the as: edit box.
5.5. Click Save.Click Save.
S8
S9
S7
S6
S5
S4
S3
S2
S1
317Yes-V Software Solutions (P) Ltd.,
Copying a RoleCopying a Role
Click Save ButtonS8
S9
S7
S6
S5
S4
S3
S2
S1
318Yes-V Software Solutions (P) Ltd.,
Deleting RolesDeleting Roles
1.1. Select PeopleTools, Security, Permissions & Roles, Delete Roles.Select PeopleTools, Security, Permissions & Roles, Delete Roles.
2.2. On the search page, locate the Permission List that you want to delete andOn the search page, locate the Permission List that you want to delete and
click it.click it.
3.3. The Delete Permission List page appears.The Delete Permission List page appears.
4.4. Click Delete Permission List.Click Delete Permission List.
5.5. Click OK to confirm the deletion, or click Cancel to abort.Click OK to confirm the deletion, or click Cancel to abort.S8
S9
S7
S6
S5
S4
S3
S2
S1
319Yes-V Software Solutions (P) Ltd.,
Deleting a RoleDeleting a Role
S8
S9
S7
S6
S5
S4
S3
S2
S1
320Yes-V Software Solutions (P) Ltd.,
Defining Role OptionsDefining Role Options
 Describe the role.Describe the role.
 Assign permissions to roles.Assign permissions to roles.
 Display list of members for a role.Display list of members for a role.
 Display list of members who belong to a current role dynamically.Display list of members who belong to a current role dynamically.
 Set routing options for users.Set routing options for users.
 Decentralize the administration of roles.Decentralize the administration of roles.
 Display any additional links for user profiles.Display any additional links for user profiles.
 Run role queries.Run role queries.
 Inquire when a permission list was last updated.Inquire when a permission list was last updated.
S8
S9
S7
S6
S5
S4
S3
S2
S1
321Yes-V Software Solutions (P) Ltd.,
Describing the RoleDescribing the Role
S8
S9
S7
S6
S5
S4
S3
S2
S1
322Yes-V Software Solutions (P) Ltd.,
Assigning Permissions to RolesAssigning Permissions to Roles
S8
S9
S7
S6
S5
S4
S3
S2
S1
323Yes-V Software Solutions (P) Ltd.,
Displaying List of Members for a RoleDisplaying List of Members for a Role
S8
S9
S7
S6
S5
S4
S3
S2
S1
324Yes-V Software Solutions (P) Ltd.,
User ProfilesUser Profiles
 User Profiles define individual PeopleSoft users. You define User Profiles andUser Profiles define individual PeopleSoft users. You define User Profiles and
then link them to one or more Roles.then link them to one or more Roles.
 You define User Profiles by entering the appropriate values in the User ProfileYou define User Profiles by entering the appropriate values in the User Profile
pagespages
 The User Profile contains values that are specific to a user such as a user password,The User Profile contains values that are specific to a user such as a user password,
an email address, an employee ID, and so onan email address, an employee ID, and so on
 At the top of each page there is the User ID and the Description to help you recallAt the top of each page there is the User ID and the Description to help you recall
which User Profile you are viewing or modifying as you move through the pages.which User Profile you are viewing or modifying as you move through the pages.S8
S9
S7
S6
S5
S4
S3
S2
S1
325Yes-V Software Solutions (P) Ltd.,
Working With User ProfilesWorking With User Profiles
1.1. Create a new User Profile.Create a new User Profile.
2.2. Copy a User Profile.Copy a User Profile.
3.3. Delete a User Profile.Delete a User Profile.
S8
S9
S7
S6
S5
S4
S3
S2
S1
326Yes-V Software Solutions (P) Ltd.,
Creating a New User ProfileCreating a New User Profile
1.1. Select PeopleTools, Security, User Profiles, User Profiles.Select PeopleTools, Security, User Profiles, User Profiles.
2.2. On the Find Existing Values page, click Add a New Value.On the Find Existing Values page, click Add a New Value.
3.3. On the Add a New Value page, enter the new User ID in the User ID editOn the Add a New Value page, enter the new User ID in the User ID edit
box, and click Add.box, and click Add.
4.4. The User ID can contain up to 30 characters. The name you use can'tThe User ID can contain up to 30 characters. The name you use can't
contain a comma (,) or a space. Also, you can't create a User ID namedcontain a comma (,) or a space. Also, you can't create a User ID named
PPLSOFT; this ID is a reserved user ID used within PeopleTools.PPLSOFT; this ID is a reserved user ID used within PeopleTools.
5.5. Specify the appropriate values from the pages in the User ProfilesSpecify the appropriate values from the pages in the User Profiles
component, and click Save.component, and click Save.
S8
S9
S7
S6
S5
S4
S3
S2
S1
327Yes-V Software Solutions (P) Ltd.,
Copying a User ProfileCopying a User Profile
1.1. Select PeopleTools, Security, User Profiles, Copy User Profiles.Select PeopleTools, Security, User Profiles, Copy User Profiles.
2.2. On the Find an Existing Value search page, select the User ID you want toOn the Find an Existing Value search page, select the User ID you want to
clone.clone.
3.3. On the User Profile Save As page, enter the New User ID, description, andOn the User Profile Save As page, enter the New User ID, description, and
the password that the new user ID should use to signon to the system.the password that the new user ID should use to signon to the system.
S8
S9
S7
S6
S5
S4
S3
S2
S1
328Yes-V Software Solutions (P) Ltd.,
Deleting a User ProfileDeleting a User Profile
1.1. Select PeopleTools, Security, User Profiles, Delete User Profiles.Select PeopleTools, Security, User Profiles, Delete User Profiles.
2.2. On the Delete User Profile page, make sure you have selected the correctOn the Delete User Profile page, make sure you have selected the correct
user profile.user profile.
3.3. Click Delete User Profile.Click Delete User Profile.
The Delete User Profile removes information related to this particular user profileThe Delete User Profile removes information related to this particular user profile
that appears in every security table in the system, PeopleTools, andthat appears in every security table in the system, PeopleTools, and
application tables. If you want to prevent any of the information fromapplication tables. If you want to prevent any of the information from
being deleted you can specify tables that the delete user process bypasses.being deleted you can specify tables that the delete user process bypasses.
S8
S9
S7
S6
S5
S4
S3
S2
S1
329Yes-V Software Solutions (P) Ltd.,
Specifying User Profile AttributesSpecifying User Profile Attributes
 Set general user profile attributes.Set general user profile attributes.
 Set ID Type and Attribute Value.Set ID Type and Attribute Value.
 Set roles.Set roles.
 Specify workflow settings.Specify workflow settings.
 Inquire on role audit information.Inquire on role audit information.
 Display additional links added.Display additional links added.
 Run queries about a user profileRun queries about a user profile
S8
S9
S7
S6
S5
S4
S3
S2
S1
330Yes-V Software Solutions (P) Ltd.,
Setting General User Profile AttributesSetting General User Profile Attributes
S8
S9
S7
S6
S5
S4
S3
S2
S1
331Yes-V Software Solutions (P) Ltd.,
Setting Roles to User ProfileSetting Roles to User Profile
S8
S9
S7
S6
S5
S4
S3
S2
S1
332Yes-V Software Solutions (P) Ltd.,
Creating an ApplicationCreating an Application
Simple 9 stepsSimple 9 steps
1. Create Field Definition1. Create Field Definition
2. Create Record Definition.2. Create Record Definition.
3. Build the Record Definition.3. Build the Record Definition.
4. Create page Definition.4. Create page Definition.
5. Create Component Definition.5. Create Component Definition.
6. Include pages into component Definition.6. Include pages into component Definition.
7. Creating Menu Definition.7. Creating Menu Definition.
8. Assigning security to the menu.8. Assigning security to the menu.
9.9. Test the applicationTest the application
S8
S9
S7
S6
S5
S4
S3
S2
S1
Yes-V Software Solutions (P) Ltd., 333
Testing The ApplicationTesting The Application
334Yes-V Software Solutions (P) Ltd.,
Validating ProjectsValidating Projects
 To validate a project:To validate a project:
1.1. Close all active component definitions in the definition workspace.Close all active component definitions in the definition workspace.
2.2. Otherwise, the validation occurs on the component, rather than the project.Otherwise, the validation occurs on the component, rather than the project.
3.3. Select Tools, Options.Select Tools, Options.
4.4. Select the Validate tab in the Options dialog box.Select the Validate tab in the Options dialog box.
5.5. Select Validate project integrity.Select Validate project integrity.
6.6. Click OK.Click OK.
7.7. Select Tools, Validate ProjectSelect Tools, Validate Project
S8
S9
S7
S6
S5
S4
S3
S2
S1
335Yes-V Software Solutions (P) Ltd.,
Validating ProjectsValidating Projects
 The validate utility runs a series of tests on the project or components and sends itsThe validate utility runs a series of tests on the project or components and sends its
results to the Validate tab in the output window. If errors are found, they are listed onresults to the Validate tab in the output window. If errors are found, they are listed on
this tabthis tab
S8
S9
S7
S6
S5
S4
S3
S2
S1
336Yes-V Software Solutions (P) Ltd.,
Testing Page Control OrderTesting Page Control Order
After you have placed all of the controls on your page, you should testAfter you have placed all of the controls on your page, you should test
the tab order. You can do this using either the test mode or by viewingthe tab order. You can do this using either the test mode or by viewing
the page in the browser. Using the View Page in Browser mode isthe page in the browser. Using the View Page in Browser mode is
more useful because you can also check the placement of controls andmore useful because you can also check the placement of controls and
subfields on your page. In these testing modes, you can enter data intosubfields on your page. In these testing modes, you can enter data into
edit boxes and select radio buttons and check boxes. However, youedit boxes and select radio buttons and check boxes. However, you
cannot save data that you enter, and push buttons and links do notcannot save data that you enter, and push buttons and links do not
functionfunction
S8
S9
S7
S6
S5
S4
S3
S2
S1
337Yes-V Software Solutions (P) Ltd.,
To Test Tab flow in Browser Mode:To Test Tab flow in Browser Mode:
1.1. Open the page in PeopleSoft Application Designer that you wantOpen the page in PeopleSoft Application Designer that you want
to test.to test.
2.2. Select Layout, View in Browser.Select Layout, View in Browser.
3.3. Select the appropriate browser from the drop-down list box.Select the appropriate browser from the drop-down list box.
4.4. Press the TAB key to move from one field to the next.Press the TAB key to move from one field to the next.
Press SHIFT+TAB to move to the previous fieldPress SHIFT+TAB to move to the previous field
S8
S9
S7
S6
S5
S4
S3
S2
S1
338Yes-V Software Solutions (P) Ltd.,
Viewing Pages in the BrowserViewing Pages in the Browser
During the page designDuring the page design
process, you shouldprocess, you should
periodically view how yourperiodically view how your
page looks in the browser.page looks in the browser.
How you design your page inHow you design your page in
PeopleSoft ApplicationPeopleSoft Application
Designer might lookDesigner might look
different when vieweddifferent when viewed
online, particularly if you areonline, particularly if you are
using subpages that containusing subpages that contain
multiple fields.multiple fields.S8
S9
S7
S6
S5
S4
S3
S2
S1
Sample Page
Viewed in Microsoft
Internet Explorer
Sample Page in PeopleSoft Application Designer

People soft application-designer-practice-8.43

  • 1.
    Yes-V Software Solutions(P) Ltd., 1 PeopleSoftPeopleSoft PracticePractice Application DesignerApplication Designer
  • 2.
    2Yes-V Software Solutions(P) Ltd., AgendaAgenda  PeopleSoft Application DesignerPeopleSoft Application Designer  Steps involved in creating aSteps involved in creating a ComponentComponent
  • 3.
    Yes-V Software Solutions(P) Ltd., 3 Application DesignerApplication Designer PeopleSoft Application designer(8.43)PeopleSoft Application designer(8.43) is a tool for developing web enabledis a tool for developing web enabled PeopleSoft applicationsPeopleSoft applications
  • 4.
    4Yes-V Software Solutions(P) Ltd., Creating an ApplicationCreating an Application Simple 9 stepsSimple 9 steps 1. Create Field Definition1. Create Field Definition 2. Create Record Definition.2. Create Record Definition. 3. Build the Record Definition.3. Build the Record Definition. 4. Create page Definition.4. Create page Definition. 5. Create Component Definition.5. Create Component Definition. 6. Include pages into component Definition.6. Include pages into component Definition. 7. Creating Menu Definition.7. Creating Menu Definition. 8. Assigning security to the menu.8. Assigning security to the menu. 9. Test the application9. Test the application S8 S9 S7 S6 S5 S4 S3 S2 S1
  • 5.
    5Yes-V Software Solutions(P) Ltd., Creating a ComponentCreating a Component F1 F5F2 F3 F4 FNFN-1F12F11F6 _ _ _ _ _ REC1 REC2 RECN PAGE1 PAGE2 PAGE N COM1 COM NCOM2 Application _ _ _ _ _ _ _ _ _ _ _ _ _ _ _ _ _ _ F – Field REC – Record COM – Component
  • 6.
    6Yes-V Software Solutions(P) Ltd., Creating an ApplicationCreating an Application Simple 9 stepsSimple 9 steps 1.1. Create Field DefinitionCreate Field Definition 2. Create Record Definition.2. Create Record Definition. 3. Build the Record Definition.3. Build the Record Definition. 4. Create page Definition.4. Create page Definition. 5. Create Component Definition.5. Create Component Definition. 6. Include pages into component Definition.6. Include pages into component Definition. 7. Creating Menu Definition.7. Creating Menu Definition. 8. Assigning security to the menu.8. Assigning security to the menu. 9. Test the application9. Test the applicationS8 S9 S7 S6 S5 S4 S3 S2 S1
  • 7.
    Yes-V Software Solutions(P) Ltd., 7 Field DefinitionField Definition
  • 8.
    8Yes-V Software Solutions(P) Ltd., Field DefinitionField Definition  Fields are the basic Building BlocksFields are the basic Building Blocks  There are two types of FieldsThere are two types of Fields 1.1. FieldField 2.2. Record FieldRecord Field  Fields that are grouped together as a unit are called recordFields that are grouped together as a unit are called record definitionsdefinitions  Additional Characteristics are defined to the Record FieldAdditional Characteristics are defined to the Record Field which is specific to that record, called Record Fieldwhich is specific to that record, called Record Field Properties.Properties.  Record field properties areRecord field properties are notnot shared with other records inshared with other records in which the field is used. Where as Field Properties are sharedwhich the field is used. Where as Field Properties are shared with other records in which the field is usedwith other records in which the field is used S8 S9 S7 S6 S5 S4 S3 S2 S1
  • 9.
    9Yes-V Software Solutions(P) Ltd., Field DefinitionField Definition  Attributes of a Field definitionAttributes of a Field definition  Field typeField type  Field lengthField length  Field LabelsField Labels Label IdLabel Id Long nameLong name Short nameShort name DefDef  Field formatField format Format typeFormat type FamilyFamily Display nameDisplay name  Not UsedNot Used  Chart fieldChart field S8 S9 S7 S6 S5 S4 S3 S2 S1
  • 10.
    10Yes-V Software Solutions(P) Ltd., Field DefinitionField Definition  Field typeField type Character (Char) – Its maximum length ranges from 1-254Character (Char) – Its maximum length ranges from 1-254 Long Character (Long)-Its maximum length is 64000 charactersLong Character (Long)-Its maximum length is 64000 characters Number (Nbr) – Signed or Unsigned NumberNumber (Nbr) – Signed or Unsigned Number Signed Number (Sign)Signed Number (Sign) Date (Date)-field length of 10 and is maintained by the systemDate (Date)-field length of 10 and is maintained by the system Time (Time)- 15 positions, format of HH:MI:SS.999999Time (Time)- 15 positions, format of HH:MI:SS.999999 DateTime (DtTm)- 26 positions, format of YYYY-MM-DD-HH-MI-SS.999999DateTime (DtTm)- 26 positions, format of YYYY-MM-DD-HH-MI-SS.999999 Image (Img)- store application data that takes the form of imagesImage (Img)- store application data that takes the form of images ImageReference (Iref)- to store static images that can be changed at runtime with PeopleCodeImageReference (Iref)- to store static images that can be changed at runtime with PeopleCode Attachment (Att) - Maps to a BLOB database type to hold the contents of a file attachmentAttachment (Att) - Maps to a BLOB database type to hold the contents of a file attachment  Field lengthField length Specifies the length of the fieldSpecifies the length of the field S8 S9 S7 S6 S5 S4 S3 S2 S1
  • 11.
    11Yes-V Software Solutions(P) Ltd., Field DefinitionField Definition  Field LabelsField Labels Attributes:Attributes: Label IdLabel Id unique identifier for the field .unique identifier for the field . less than 18 characters, without spaces, and UPPERCASEless than 18 characters, without spaces, and UPPERCASE Long nameLong name The Record Field Table, long option for a page field.The Record Field Table, long option for a page field. Up to 30 charactersUp to 30 characters Short nameShort name An alternate name to use on pages and reports.An alternate name to use on pages and reports. Up to 15 charactersUp to 15 characters DefDef Def stands for default fieldDef stands for default field The line which is checked (tick mark) is taken as the default label id.The line which is checked (tick mark) is taken as the default label id. S8 S9 S7 S6 S5 S4 S3 S2 S1
  • 12.
    12Yes-V Software Solutions(P) Ltd., Field DefinitionField Definition  Not UsedNot Used Read only Check box.Read only Check box. Values can be changedValues can be changed throughthrough PeopleCode.PeopleCode. This causes the fieldThis causes the field  Skipped as part of theSkipped as part of the unique index.unique index.  Exposed to PeopleCodeExposed to PeopleCode for read and writefor read and write operations.operations.  ChartFieldChartField Read only Check box.Read only Check box. Values can be changedValues can be changed throughthrough PeopleCodePeopleCode Used for character fieldsUsed for character fields and used by financialand used by financial applications to specify aapplications to specify a usage patternusage pattern S8 S9 S7 S6 S5 S4 S3 S2 S1 “Read Only” Check Box
  • 13.
    13Yes-V Software Solutions(P) Ltd., Field DefinitionField Definition  Field formatField format Field format specifications affectField format specifications affect internal values that are stored ininternal values that are stored in the databasethe database  Format typeFormat type S8 S9 S7 S6 S5 S4 S3 S2 S1 UppercaseUppercase NameName Phone Numbers (North America)Phone Numbers (North America) SSNSSN Zip/Postal Code (North America)Zip/Postal Code (North America) Mixed CaseMixed Case Raw BinaryRaw Binary Numbers OnlyNumbers Only Phone Numbers (International)Phone Numbers (International) SINSIN Zip/Postal Code (International)Zip/Postal Code (International) CustomCustom  FamilyFamily Formats are organized into formatFormats are organized into format families, which can include one orfamilies, which can include one or more unique formats.more unique formats.  Display nameDisplay name The Display Name given to theThe Display Name given to the Format FamilyFormat Family
  • 14.
    14Yes-V Software Solutions(P) Ltd., Field Format-Changing Format FamiliesField Format-Changing Format Families 1. Select Tools, Miscellaneous Definitions, Field Formats. 2. To define a new format family, click the New button. The New Family dialog box appears. 3. Enter a name for your new format family and click OK. The Formats dialog box appears. 4. In the Stored group box, enter a name and format. This defines how the format family is to be stored in the database and printed in reports. 5. Enter the format notation that you want to use for storing the data in the Format field. 6. In the Display group box, enter a name for the format. This defines how the format family will appear online. 7. Enter the format notation that you want to use for displaying the data in the Format field. 8. Click the Add button to add the new format family, and click OK when you are finished. S8 S9 S7 S6 S5 S4 S3 S2 S1
  • 15.
    15Yes-V Software Solutions(P) Ltd., Field FormatField Format Select Tools, Miscellaneous Definitions, Field FormatsSelect Tools, Miscellaneous Definitions, Field Formats S8 S9 S7 S6 S5 S4 S3 S2 S1
  • 16.
    16Yes-V Software Solutions(P) Ltd., Field FormatField Format Click New ButtonClick New Button New Dialogue BoxNew Dialogue Box S8 S9 S7 S6 S5 S4 S3 S2 S1
  • 17.
    17Yes-V Software Solutions(P) Ltd., Field FormatField Format Enter values in Stored and DisplayEnter values in Stored and Display Group Boxes and Click AddGroup Boxes and Click Add S8 S9 S7 S6 S5 S4 S3 S2 S1
  • 18.
    18Yes-V Software Solutions(P) Ltd., Field Formats – Editing FormatsField Formats – Editing Formats  The Edit Formats dialog box presents a tree control whereThe Edit Formats dialog box presents a tree control where you define the stored and display formats for a family and allyou define the stored and display formats for a family and all options and attributes. This dialog box enables you to:options and attributes. This dialog box enables you to:  Add, update, and delete stored and display formats.Add, update, and delete stored and display formats.  Enter a description for the family.Enter a description for the family.  Specify options, such as uppercase and smart punctuation, forSpecify options, such as uppercase and smart punctuation, for the family.the family.  Changes are saved when you click OK.Changes are saved when you click OK. S8 S9 S7 S6 S5 S4 S3 S2 S1
  • 19.
    19Yes-V Software Solutions(P) Ltd., Field Formats – Editing FormatsField Formats – Editing Formats This following slides show how to:This following slides show how to:  Add a new stored format.Add a new stored format.  Add a new display format to a stored format.Add a new display format to a stored format.  Update a display format.Update a display format.  Delete stored formats.Delete stored formats. S8 S9 S7 S6 S5 S4 S3 S2 S1
  • 20.
    20Yes-V Software Solutions(P) Ltd., Field FormatField Format Adding a New Stored FormatAdding a New Stored Format 1.1. Open the format family to which you want to add a format.Open the format family to which you want to add a format. 2.2. Select the format family name.Select the format family name. 3.3. Enter the stored and display names and format notation.Enter the stored and display names and format notation. 4.4. ClickClick Add.Add. 5.5. The new format appears in the tree below the existing formats.The new format appears in the tree below the existing formats. Adding a New Display Format to a Stored FormatAdding a New Display Format to a Stored Format 1.1. In the tree, select the stored format name to which you want to add aIn the tree, select the stored format name to which you want to add a display format.display format. 2.2. In theIn the DisplayDisplay group box, enter a new name and format notation.group box, enter a new name and format notation. 3.3. Click theClick the AddAdd button to add the display format.button to add the display format. 4.4. The new display format appears in the tree, attached to the storedThe new display format appears in the tree, attached to the stored format to which it belongs.format to which it belongs. S8 S9 S7 S6 S5 S4 S3 S2 S1
  • 21.
    21Yes-V Software Solutions(P) Ltd., Field Format - EditingField Format - Editing To add New FormatTo add New Format To Existing one.To Existing one. Select a Format Family and Click Edit.Select a Format Family and Click Edit. The Edit dialogue Box appears.The Edit dialogue Box appears. S8 S9 S7 S6 S5 S4 S3 S2 S1
  • 22.
    22Yes-V Software Solutions(P) Ltd., Field FormatField Format Updating a Display FormatUpdating a Display Format 1.1. To update a display format:To update a display format: 2.2. Select the display format in the tree view.Select the display format in the tree view. 3.3. Select a display format and enter the enabled fields.Select a display format and enter the enabled fields. 4.4. ClickClick UpdateUpdate to update the display.to update the display. Deleting Stored FormatsDeleting Stored Formats 1.1. To delete a stored format:To delete a stored format: 2.2. Select the display format.Select the display format. 3.3. Click theClick the DeleteDelete button.button. 4.4. PeopleSoft Application Designer displays a warningPeopleSoft Application Designer displays a warning message indicating that deleting a display format mightmessage indicating that deleting a display format might strand stored data. Selectstrand stored data. Select YesYes to continue with the delete.to continue with the delete. S8 S9 S7 S6 S5 S4 S3 S2 S1
  • 23.
    23Yes-V Software Solutions(P) Ltd., Field Format - EditingField Format - Editing Select the Display Format in the Tree viewSelect the Display Format in the Tree view Update the FormatUpdate the Format Delete the FormatDelete the Format S8 S9 S7 S6 S5 S4 S3 S2 S1
  • 24.
    24Yes-V Software Solutions(P) Ltd., Field FormatField Format Testing FormatsTesting Formats To test a format family:To test a format family: 1.1. Use the two drop-down list boxes to select a stored and displayUse the two drop-down list boxes to select a stored and display format pair to test.format pair to test. 2.2. Click either DB->Display and Display->DB to process theClick either DB->Display and Display->DB to process the format.format. S8 S9 S7 S6 S5 S4 S3 S2 S1
  • 25.
    25Yes-V Software Solutions(P) Ltd., Field Format - TestField Format - Test Click any one of themClick any one of them S8 S9 S7 S6 S5 S4 S3 S2 S1 Result will be Displayed hereResult will be Displayed here
  • 26.
    26Yes-V Software Solutions(P) Ltd., Field PropertiesField Properties The Field Properties Dialogue Box haveThe Field Properties Dialogue Box have  General TabGeneral Tab Field DefinitionField Definition is to enter commentsis to enter comments regarding the field Definitionregarding the field Definition Owner IDOwner ID drop-down list box enables youdrop-down list box enables you to select a valid owner, as in applicationto select a valid owner, as in application project or roleproject or role Last UpdatedLast Updated group box containsgroup box contains information—date, time, and user ID—information—date, time, and user ID— about theabout the last time the field definition was modifiedlast time the field definition was modified  International Format Setting Tab are not in use forInternational Format Setting Tab are not in use for PeopleTools 8.4.PeopleTools 8.4.  Translate Values tabsTranslate Values tabs This is available only for Character FieldThis is available only for Character Field of max length 4.of max length 4. S8 S9 S7 S6 S5 S4 S3 S2 S1 This is available only for Character Field of max length 4
  • 27.
    27Yes-V Software Solutions(P) Ltd., Creating New Field DefinitionsCreating New Field Definitions  To create a new field definition:To create a new field definition: 1.1. Click theClick the NewNew button on the PeopleSoft Applicationbutton on the PeopleSoft Application Designer toolbar.Designer toolbar. 2.2. The New dialog box appears.The New dialog box appears. 3.3. SelectSelect Field.Field. 4.4. Click OK.Click OK. 5.5. Select one of the following field types from the FieldSelect one of the following field types from the Field Type drop-down list box.Type drop-down list box. 6.6. Then specify the required attributes for that field Type.Then specify the required attributes for that field Type. 7.7. And Save the Field Definition.And Save the Field Definition. S8 S9 S7 S6 S5 S4 S3 S2 S1
  • 28.
    28Yes-V Software Solutions(P) Ltd., Creating New Field DefinitionsCreating New Field Definitions New icon inNew icon in ApplicationApplication DesignerDesigner Tool barTool bar OROR S8 S9 S7 S6 S5 S4 S3 S2 S1
  • 29.
    29Yes-V Software Solutions(P) Ltd., Creating New Field DefinitionsCreating New Field Definitions S8 S9 S7 S6 S5 S4 S3 S2 S1
  • 30.
    30Yes-V Software Solutions(P) Ltd., Creating New Field DefinitionsCreating New Field Definitions S8 S9 S7 S6 S5 S4 S3 S2 S1
  • 31.
    31Yes-V Software Solutions(P) Ltd., Creating New Field DefinitionsCreating New Field Definitions Field has been DefinedField has been Defined Save Dialogue BoxSave Dialogue Box S8 S9 S7 S6 S5 S4 S3 S2 S1
  • 32.
    32Yes-V Software Solutions(P) Ltd., Opening an Existing Field DefinitionOpening an Existing Field Definition  Select File, Open from the menuSelect File, Open from the menu  From this dialog box, you canFrom this dialog box, you can view all available fields in theview all available fields in the database. You can open all fieldsdatabase. You can open all fields of a certain type or from a specificof a certain type or from a specific project, or you can open a specificproject, or you can open a specific field or set of fields.field or set of fields.  Clone an existing definitionClone an existing definition  To create a field definition withTo create a field definition with attributes similar to an existingattributes similar to an existing one:one:  Open an existing fieldOpen an existing field definition.definition.  Select File, Save As.Select File, Save As.  Enter a new name.Enter a new name. Select a FieldSelect a Field And Click OpenAnd Click Open S8 S9 S7 S6 S5 S4 S3 S2 S1
  • 33.
    33Yes-V Software Solutions(P) Ltd., Viewing Field PropertiesViewing Field Properties  There are several ways to view fieldThere are several ways to view field properties.properties.  While in the field definitionWhile in the field definition workspace, click the Propertiesworkspace, click the Properties button.button.  Select Field, Definition Properties.Select Field, Definition Properties.  While in a record definition:While in a record definition:  Select the field.Select the field.  Right-click the field name.Right-click the field name.  SelectSelect View Field PropertiesView Field Properties from the pop-up menu.from the pop-up menu.S8 S9 S7 S6 S5 S4 S3 S2 S1
  • 34.
    34Yes-V Software Solutions(P) Ltd., Changing Field DefinitionChanging Field Definition  Changing a field Definition has the followingChanging a field Definition has the following effectseffects  We might need to change the Field PropertiesWe might need to change the Field Properties and attributesand attributes  The change affects every occurrence of theThe change affects every occurrence of the field in every record definitionfield in every record definition S8 S9 S7 S6 S5 S4 S3 S2 S1
  • 35.
    35Yes-V Software Solutions(P) Ltd., Changing Field DefinitionChanging Field Definition Changing Field TypeChanging Field Type  Change a field type by opening a field and selecting anotherChange a field type by opening a field and selecting another field type from the drop-down list boxfield type from the drop-down list box Renaming Field DefinitionRenaming Field Definition  There are two ways to rename a field definition:There are two ways to rename a field definition: Using the Rename Definition dialog box.Using the Rename Definition dialog box. Using the Open Definition dialog box.Using the Open Definition dialog box. S8 S9 S7 S6 S5 S4 S3 S2 S1
  • 36.
    36Yes-V Software Solutions(P) Ltd., Changing Field DefinitionChanging Field Definition Renaming Field DefinitionRenaming Field Definition Using the Rename Definition Dialog BoxUsing the Rename Definition Dialog Box To rename a field definition from the Rename Definition dialog box:To rename a field definition from the Rename Definition dialog box: 1.1. Select File, Rename to open the Rename Definition dialog box.Select File, Rename to open the Rename Definition dialog box. 2.2. SelectSelect FieldField as the definition type.as the definition type. 3.3. Enter the name of the field.Enter the name of the field. 4.4. If you aren’t sure of the name or the correct spelling, use the search criteriaIf you aren’t sure of the name or the correct spelling, use the search criteria fields to locate the field to rename. The list displays field names that matchfields to locate the field to rename. The list displays field names that match your search criteria.your search criteria. 5.5. To rename a field in the list, select the field and clickTo rename a field in the list, select the field and click Rename,Rename, or double-or double- click the field.click the field. 6.6. The field name becomes available for entry, and you can type the newThe field name becomes available for entry, and you can type the new name.name. 7.7. When you finish typing the new name, press ENTER or click theWhen you finish typing the new name, press ENTER or click the RenameRename button.button. 8.8. The Rename Field dialog box appears. Select the records in which youThe Rename Field dialog box appears. Select the records in which you want the field to be renamed. Thewant the field to be renamed. The De-select AllDe-select All button toggles tobutton toggles to SelectSelect All.All. 9.9. Click OK.Click OK. S8 S9 S7 S6 S5 S4 S3 S2 S1
  • 37.
    37Yes-V Software Solutions(P) Ltd., Rename FieldRename Field Select a FieldSelect a Field Click RenameClick Rename S8 S9 S7 S6 S5 S4 S3 S2 S1
  • 38.
    38Yes-V Software Solutions(P) Ltd., Rename FieldRename Field Now you canNow you can rename the fieldrename the field S8 S9 S7 S6 S5 S4 S3 S2 S1
  • 39.
    39Yes-V Software Solutions(P) Ltd., Rename FieldRename Field Click OKClick OK S8 S9 S7 S6 S5 S4 S3 S2 S1
  • 40.
    40Yes-V Software Solutions(P) Ltd., Rename FieldRename Field-Effects in Record Definition-Effects in Record Definition Before Renaming the FieldBefore Renaming the Field After Renaming the FieldAfter Renaming the Field S8 S9 S7 S6 S5 S4 S3 S2 S1
  • 41.
    41Yes-V Software Solutions(P) Ltd., Changing Field DefinitionChanging Field Definition Renaming Field DefinitionRenaming Field Definition Using the Open Definition Dialog BoxUsing the Open Definition Dialog Box To rename a field definition from the Open Definition dialog box:To rename a field definition from the Open Definition dialog box: 1.1. To display the Open Definition dialog box, select File, Open.To display the Open Definition dialog box, select File, Open. 2.2. This dialog box enables you to set up search criteria for locating fieldThis dialog box enables you to set up search criteria for locating field names.names. 3.3. Select Field as the definition type.Select Field as the definition type. 4.4. If you have additional information, use theIf you have additional information, use the NameName field. You can furtherfield. You can further narrow your search criteria by selecting a field type or the name of thenarrow your search criteria by selecting a field type or the name of the project that contains the field to delete.project that contains the field to delete. 5.5. Click theClick the OpenOpen button or press ENTER when you have completed yourbutton or press ENTER when you have completed your search criteria.search criteria. 6.6. You can rename a field in the Open Definition dialog box by selecting theYou can rename a field in the Open Definition dialog box by selecting the field, right-clicking the field name, and selectingfield, right-clicking the field name, and selecting Rename.Rename. 7.7. You can also select the field name and click it a second time. The fieldYou can also select the field name and click it a second time. The field name becomes available for entry and you can enter a new name.name becomes available for entry and you can enter a new name. 8.8. When you finish typing the new name, press ENTER or click theWhen you finish typing the new name, press ENTER or click the RenameRename button.button. S8 S9 S7 S6 S5 S4 S3 S2 S1
  • 42.
    42Yes-V Software Solutions(P) Ltd., Rename FieldRename Field S8 S9 S7 S6 S5 S4 S3 S2 S1
  • 43.
    43Yes-V Software Solutions(P) Ltd., Deleting Field DefinitionDeleting Field Definition This section discusses two ways to delete a field definition:This section discusses two ways to delete a field definition: 1.1. Using the Delete Definition dialog box.Using the Delete Definition dialog box. 2.2. Using the Open Definition dialog box.Using the Open Definition dialog box. The important thing to be noted is that you cannot delete a field that is currentlyThe important thing to be noted is that you cannot delete a field that is currently used in any recordused in any record Using the Delete Definition Dialog BoxUsing the Delete Definition Dialog Box 1.1. To delete field definitions from the Delete Definition dialog box:To delete field definitions from the Delete Definition dialog box: 2.2. Select File, Delete to open the Delete Definition dialog box.Select File, Delete to open the Delete Definition dialog box. 3.3. In the Delete Definition dialog box, set up search criteria for locating fieldIn the Delete Definition dialog box, set up search criteria for locating field names.names. 4.4. SelectSelect FieldField as the definition type.as the definition type. 5.5. If you have additional information, use theIf you have additional information, use the NameName field.field. 6.6. Select a field type or the name of the project that contains the field thatSelect a field type or the name of the project that contains the field that you want to delete.you want to delete. 7.7. This further narrows your search criteria.This further narrows your search criteria. 8.8. When your search results appear in the output window, delete the fieldWhen your search results appear in the output window, delete the field definition by selecting the field and clicking thedefinition by selecting the field and clicking the DeleteDelete button or double-button or double- clicking the field nameclicking the field name.. S8 S9 S7 S6 S5 S4 S3 S2 S1
  • 44.
    44Yes-V Software Solutions(P) Ltd., Deleting Field DefinitionDeleting Field Definition S8 S9 S7 S6 S5 S4 S3 S2 S1
  • 45.
    45Yes-V Software Solutions(P) Ltd., Deleting Field DefinitionDeleting Field Definition A Field cannot be deleted if it is used on a recordA Field cannot be deleted if it is used on a record S8 S9 S7 S6 S5 S4 S3 S2 S1
  • 46.
    46Yes-V Software Solutions(P) Ltd., Deleting Field DefinitionDeleting Field Definition Using the Open Definition Dialog BoxUsing the Open Definition Dialog Box 1.1. To delete field definitions from the Open Definition dialog box:To delete field definitions from the Open Definition dialog box: 2.2. Select File, Open to display the Open Definition dialog box.Select File, Open to display the Open Definition dialog box. 3.3. This dialog box enables you to set up search criteria for locating fieldThis dialog box enables you to set up search criteria for locating field names.names. 4.4. SelectSelect FieldField as the definition type.as the definition type. 5.5. Enter theEnter the NameName field if you have additional information.field if you have additional information. 6.6. You can further narrow your search criteria by selecting a field type orYou can further narrow your search criteria by selecting a field type or the name of the project that contains the field that you want to delete.the name of the project that contains the field that you want to delete. 7.7. When you have completed your search criteria, clickWhen you have completed your search criteria, click OpenOpen or pressor press ENTER.ENTER. 8.8. Right-click the field that you want to delete from the list of field namesRight-click the field that you want to delete from the list of field names displayed.displayed. 9.9. SelectSelect DeleteDelete from the pop-up menu.from the pop-up menu. S8 S9 S7 S6 S5 S4 S3 S2 S1
  • 47.
    47Yes-V Software Solutions(P) Ltd., Deleting Field DefinitionDeleting Field Definition S8 S9 S7 S6 S5 S4 S3 S2 S1
  • 48.
    48Yes-V Software Solutions(P) Ltd., Printing Field DefinitionPrinting Field Definition  Two Ways to print FieldTwo Ways to print Field DefinitionDefinition 1.1. To print a field definition,To print a field definition,  select File, Print from the fieldselect File, Print from the field definition window (or click thedefinition window (or click the Print button in the toolbar) toPrint button in the toolbar) to open the Print dialog box,open the Print dialog box,  specify printing options.specify printing options. 2.2. Open Definition dialog box.Open Definition dialog box.  On the list resulting from yourOn the list resulting from your search, right-click the name ofsearch, right-click the name of the field definition that youthe field definition that you want to print,want to print,  selectselect PrintPrint from the pop-upfrom the pop-up menu to view your printingmenu to view your printing options.options. S8 S9 S7 S6 S5 S4 S3 S2 S1
  • 49.
    49Yes-V Software Solutions(P) Ltd., Translate TableTranslate Table  It is a Prompt Table to store values for fields that don’tIt is a Prompt Table to store values for fields that don’t need individual prompt tables of their ownneed individual prompt tables of their own  Criteria for Prompt TableCriteria for Prompt Table  Field type isField type is Character.Character.  Field length is 1 to 4 characters.Field length is 1 to 4 characters.  Field values consist of a relatively small, static setField values consist of a relatively small, static set of values that are not maintained by the user.of values that are not maintained by the user.  No other fields relate to this field.No other fields relate to this field. S8 S9 S7 S6 S5 S4 S3 S2 S1
  • 50.
    50Yes-V Software Solutions(P) Ltd., Translate TableTranslate Table Field length is 1 to 4 charactersField length is 1 to 4 characters.. Translate Value Tab appearsTranslate Value Tab appears S8 S9 S7 S6 S5 S4 S3 S2 S1
  • 51.
    51Yes-V Software Solutions(P) Ltd., Translate TableTranslate Table  Attributes of Prompt TableAttributes of Prompt Table  FIELD NAME Field name, such as ABSENCE_TYPEFIELD NAME Field name, such as ABSENCE_TYPE  LANGUAGE_CD Language codeLANGUAGE_CD Language code  FIELD VALUE Value for the fieldFIELD VALUE Value for the field  EFFDT Effective dateEFFDT Effective date  VERSION Internal version number (system-maintained)VERSION Internal version number (system-maintained)  EFF_STATUS Status—active or inactiveEFF_STATUS Status—active or inactive  XLATLONGNAME 30-character description; used as a label on pages andXLATLONGNAME 30-character description; used as a label on pages and reportsreports  XLATSHORTNAME 10-character description; used as a label on pages andXLATSHORTNAME 10-character description; used as a label on pages and reportsreports  LASTUPDDTTM DateTime field showing the last time that a field wasLASTUPDDTTM DateTime field showing the last time that a field was updatedupdated  LASTUPDOPRID User ID of the user who most recently updated theLASTUPDOPRID User ID of the user who most recently updated the fieldfield S8 S9 S7 S6 S5 S4 S3 S2 S1
  • 52.
    52Yes-V Software Solutions(P) Ltd., Translate TableTranslate Table Adding Translate ValuesAdding Translate Values To add translate values to the Translate TableTo add translate values to the Translate Table:: 1.1. From a field definition window, select File, Definition Properties.From a field definition window, select File, Definition Properties. You can also right-click and selectYou can also right-click and select Field Properties,Field Properties, or press ALT-or press ALT- ENTER.ENTER. 2.2. From a record field definition window, right-click the field, and selectFrom a record field definition window, right-click the field, and select ViewView TranslatesTranslates from the pop-up menu.from the pop-up menu. 3.3. Select the Translate Values tab.Select the Translate Values tab. The Translate Values dialog box displays existing values for the field and enables youThe Translate Values dialog box displays existing values for the field and enables you to add, change, or delete values. In theto add, change, or delete values. In the Last UpdatedLast Updated box, you see informationbox, you see information —date, time, and user ID—about the last update for the selected translate value.—date, time, and user ID—about the last update for the selected translate value. 4.4. ClickClick AddAdd to define a new value.to define a new value. 5.5. Enter the field value, effective date, long name, and short name that your usersEnter the field value, effective date, long name, and short name that your users enter on the page.enter on the page. S8 S9 S7 S6 S5 S4 S3 S2 S1
  • 53.
    53Yes-V Software Solutions(P) Ltd., Translate TableTranslate Table S8 S9 S7 S6 S5 S4 S3 S2 S1
  • 54.
    54Yes-V Software Solutions(P) Ltd., Translate TableTranslate Table S8 S9 S7 S6 S5 S4 S3 S2 S1
  • 55.
    55Yes-V Software Solutions(P) Ltd., Translate TableTranslate Table Changing Translate ValuesChanging Translate Values  To change an existing translate value, select the value andTo change an existing translate value, select the value and clickclick Change,Change, or double-click the value. The system displaysor double-click the value. The system displays the Change Translate Table dialog box in which you canthe Change Translate Table dialog box in which you can make the necessary changes.make the necessary changes. Deleting Translate ValuesDeleting Translate Values  To delete the value, select it and click theTo delete the value, select it and click the DeleteDelete button. Thebutton. The row disappears.row disappears.  Deleting should be the last option. If you don’t want theDeleting should be the last option. If you don’t want the value, deactivate it by changing the status to Inactivevalue, deactivate it by changing the status to Inactive S8 S9 S7 S6 S5 S4 S3 S2 S1
  • 56.
    56Yes-V Software Solutions(P) Ltd., Translate TableTranslate Table Changing translate value Deleting translate value Saving translate value S8 S9 S7 S6 S5 S4 S3 S2 S1
  • 57.
    57Yes-V Software Solutions(P) Ltd., Translate TableTranslate Table Saving Translate ValueSaving Translate Value  After you have made all of your changes to theAfter you have made all of your changes to the Translate Table, you must save theTranslate Table, you must save the entire fieldentire field definition.definition.  There is no save option specifically for translateThere is no save option specifically for translate values. Clickvalues. Click OKOK from the Field Properties dialogfrom the Field Properties dialog boxbox  save the field definition by clicking thesave the field definition by clicking the SaveSave buttonbutton or selecting File, Save.or selecting File, Save. S8 S9 S7 S6 S5 S4 S3 S2 S1
  • 58.
    58Yes-V Software Solutions(P) Ltd., Effective DateEffective Date  The Effective Date Field has special propertiesThe Effective Date Field has special properties related to the processing of effective dates on rowsrelated to the processing of effective dates on rows and should be used when neededand should be used when needed  Effective date is used for maintaining Data History –Effective date is used for maintaining Data History – Past, Current & Future.Past, Current & Future.  Only one current data and multiple occurrences ofOnly one current data and multiple occurrences of future and history.future and history.  The information helps to look at what’s happenedThe information helps to look at what’s happened up to now and plan for the future.up to now and plan for the future. S8 S9 S7 S6 S5 S4 S3 S2 S1
  • 59.
    59Yes-V Software Solutions(P) Ltd., Effective DateEffective Date  Three Types of Effective DateThree Types of Effective Date FutureFuture Data rows that have effective dates greaterData rows that have effective dates greater than the system date-usually today’s datethan the system date-usually today’s date CurrentCurrent The data row with the most recent effectiveThe data row with the most recent effective date closest to today’s (system) date .but notdate closest to today’s (system) date .but not a future date.a future date. HistoryHistory Data rows that have effective dates less thanData rows that have effective dates less than the current data rowthe current data rowS8 S9 S7 S6 S5 S4 S3 S2 S1
  • 60.
    60Yes-V Software Solutions(P) Ltd., Effective DateEffective Date  Effective Date Impact on different Action TypeEffective Date Impact on different Action Type Action TypeAction Type viewview ChangeChange Insert New RowsInsert New Rows Update/DisplayUpdate/Display Current, FutureCurrent, Future Future OnlyFuture Only Effective DateEffective Date Greater than theGreater than the Current RowCurrent Row Update/DisplayUpdate/Display AllAll History,History, Current, FutureCurrent, Future Future OnlyFuture Only Effective DateEffective Date Greater than theGreater than the Current RowCurrent Row CorrectionCorrection History,History, Current, FutureCurrent, Future All ExistingAll Existing RowsRows Add new RowsAdd new Rows with no Effectivewith no Effective Date RestrictionsDate Restrictions S8 S9 S7 S6 S5 S4 S3 S2 S1
  • 61.
    61Yes-V Software Solutions(P) Ltd., Effective Date - ExampleEffective Date - Example S8 S9 S7 S6 S5 S4 S3 S2 S1
  • 62.
    62Yes-V Software Solutions(P) Ltd., Effective Date - ExampleEffective Date - Example S8 S9 S7 S6 S5 S4 S3 S2 S1
  • 63.
    63Yes-V Software Solutions(P) Ltd., Effective Date - ExampleEffective Date - Example Update Display Mode change Future Only Update All Mode Change Future Only Correction Mode all Existing Rows S8 S9 S7 S6 S5 S4 S3 S2 S1
  • 64.
    64Yes-V Software Solutions(P) Ltd., Effective Date – ExampleEffective Date – Example Current mode is Update/Display We cannot change current or history records unless in correction mode S8 S9 S7 S6 S5 S4 S3 S2 S1
  • 65.
    65Yes-V Software Solutions(P) Ltd., Effective StatusEffective Status  Used with Effective Date, enables the system toUsed with Effective Date, enables the system to select the appropriate effective-Dated rowsselect the appropriate effective-Dated rows  It takes two translate valuesIt takes two translate values  ActiveActive  InactiveInactive S8 S9 S7 S6 S5 S4 S3 S2 S1
  • 66.
    66Yes-V Software Solutions(P) Ltd., Effective SequenceEffective Sequence  The Effective Sequence field serves differentThe Effective Sequence field serves different purposes depending on whether or not it’spurposes depending on whether or not it’s paired with Effective Date.paired with Effective Date.  When Effective sequence is paired withWhen Effective sequence is paired with Effective Date, we can assign a uniqueEffective Date, we can assign a unique sequence number to each row that has thesequence number to each row that has the same effective datesame effective dateS8 S9 S7 S6 S5 S4 S3 S2 S1
  • 67.
    67Yes-V Software Solutions(P) Ltd., Creating an ApplicationCreating an Application Simple 9 stepsSimple 9 steps 1. Create Field Definition1. Create Field Definition 2.2. Create Record Definition.Create Record Definition. 3. Build the Record Definition.3. Build the Record Definition. 4. Create page Definition.4. Create page Definition. 5. Create Component Definition.5. Create Component Definition. 6. Include pages into component Definition.6. Include pages into component Definition. 7. Creating Menu Definition.7. Creating Menu Definition. 8. Assigning security to the menu.8. Assigning security to the menu. 9. Test the application9. Test the application S8 S9 S7 S6 S5 S4 S3 S2 S1
  • 68.
    Yes-V Software Solutions(P) Ltd., 68 Record DefinitionRecord Definition
  • 69.
    69Yes-V Software Solutions(P) Ltd., Record DefinitionRecord Definition Fields that are grouped together as a unit formsFields that are grouped together as a unit forms recordrecord definitionsdefinitions  A record definition represents what the underlying SQLA record definition represents what the underlying SQL database tables look like and how they process data.database tables look like and how they process data.  Planning Record DefinitionPlanning Record Definition  You actually define two layers of information:You actually define two layers of information: 1.1. Record levelRecord level - Determine the ultimate purpose of the- Determine the ultimate purpose of the record definition and how it will be used in the systemrecord definition and how it will be used in the system 2.2. Field level -Field level - plan the details of what types of fields to addplan the details of what types of fields to add S8 S9 S7 S6 S5 S4 S3 S2 S1
  • 70.
    70Yes-V Software Solutions(P) Ltd., Record DefinitionRecord Definition S8 S9 S7 S6 S5 S4 S3 S2 S1
  • 71.
    71Yes-V Software Solutions(P) Ltd., Record DefinitionRecord Definition  Types of RecordTypes of Record  SQL TableSQL Table  SQL ViewSQL View  Dynamic ViewDynamic View  Derived/WorkDerived/Work  SubRecordSubRecord  Query ViewQuery View  Temporary TableTemporary TableS8 S9 S7 S6 S5 S4 S3 S2 S1
  • 72.
    72Yes-V Software Solutions(P) Ltd., Record DefinitionRecord Definition Viewing Record DefinitionsViewing Record Definitions  The Purpose of Record Definition View is :The Purpose of Record Definition View is :  View basic field definition characteristics.View basic field definition characteristics.  View key-related characteristics and default values.View key-related characteristics and default values.  View editing options.View editing options.  View PeopleCode program types.View PeopleCode program types.  Reorder fields.Reorder fields.  Identify PeopleCode that is attached to fields.Identify PeopleCode that is attached to fields.  Size and sort columnsSize and sort columns S8 S9 S7 S6 S5 S4 S3 S2 S1
  • 73.
    73Yes-V Software Solutions(P) Ltd., Record DefinitionsRecord Definitions Viewing Record DefinitionsViewing Record Definitions  The four Views of the Record areThe four Views of the Record are 1.1. Field DisplayField Display 2.2. Use DisplayUse Display 3.3. Edits DisplayEdits Display 4.4. PeopleCode Display.PeopleCode Display. S8 S9 S7 S6 S5 S4 S3 S2 S1
  • 74.
    74Yes-V Software Solutions(P) Ltd., Record DefinitionsRecord Definitions Viewing Record DefinitionsViewing Record Definitions Field DisplayField Display  shows the basic field definition characteristics for fields in the recordshows the basic field definition characteristics for fields in the record definitiondefinition..  Field definition characteristics are global—they affect all record definitionsField definition characteristics are global—they affect all record definitions in which the field is used.in which the field is used. Use DisplayUse Display  Use Display mode shows key-related characteristics and default values forUse Display mode shows key-related characteristics and default values for fields that determine how fields are used in a recordfields that determine how fields are used in a record  The use characteristics might differ for fields that are used on more thanThe use characteristics might differ for fields that are used on more than one record definitionone record definition S8 S9 S7 S6 S5 S4 S3 S2 S1
  • 75.
    75Yes-V Software Solutions(P) Ltd., Viewing Record Definitions – Field DisplayViewing Record Definitions – Field Display Field DisplayField Display Shows basic field definition characteristics S8 S9 S7 S6 S5 S4 S3 S2 S1
  • 76.
    76Yes-V Software Solutions(P) Ltd., Viewing Record Definitions – Use DisplayViewing Record Definitions – Use Display Use DisplayUse Display Shows key-related characteristics and default values for fields that determine how fields are used in a record S8 S9 S7 S6 S5 S4 S3 S2 S1
  • 77.
    77Yes-V Software Solutions(P) Ltd., Record DefinitionsRecord Definitions Viewing Record DefinitionsViewing Record Definitions Edit DisplayEdit Display  shows all editing options (edit as a validationshows all editing options (edit as a validation rule) that are available for fields in a record .rule) that are available for fields in a record .  Edits on a field vary from one record definitionEdits on a field vary from one record definition to another .to another . PeopleCode DisplayPeopleCode Display  contains a column for each PeopleCode programcontains a column for each PeopleCode program type and specifies whether a program exists.type and specifies whether a program exists. S8 S9 S7 S6 S5 S4 S3 S2 S1
  • 78.
    78Yes-V Software Solutions(P) Ltd., Viewing Record Definitions – Edit DisplayViewing Record Definitions – Edit Display Edit DisplayEdit Display Shows all editing optionsShows all editing options That are available for fields in a recordThat are available for fields in a record S8 S9 S7 S6 S5 S4 S3 S2 S1
  • 79.
    79Yes-V Software Solutions(P) Ltd., Viewing Record DefinitionsViewing Record Definitions – PeopleCode Display– PeopleCode Display Indicates PeopleCode has beenIndicates PeopleCode has been written for the Eventwritten for the Event PeopleCode DisplayPeopleCode Display S8 S9 S7 S6 S5 S4 S3 S2 S1
  • 80.
    80Yes-V Software Solutions(P) Ltd., Record DefinitionsRecord Definitions Saving Record DefinitionsSaving Record Definitions  After adding or changing one element in the new definition,After adding or changing one element in the new definition, save the work and name the record.save the work and name the record.  PeopleCode cannot be added to a field until you save thePeopleCode cannot be added to a field until you save the record definition.record definition.  To save a new record definition:To save a new record definition:  select File, Save orselect File, Save or  File, Save As.File, Save As. S8 S9 S7 S6 S5 S4 S3 S2 S1
  • 81.
    81Yes-V Software Solutions(P) Ltd., Saving Record DefinitionSaving Record Definition Save Dialogue BoxSave Dialogue Box S8 S9 S7 S6 S5 S4 S3 S2 S1
  • 82.
    82Yes-V Software Solutions(P) Ltd., Record DefinitionsRecord Definitions Naming Record DefinitionsNaming Record Definitions  The name length can be up to 15 characters, with theThe name length can be up to 15 characters, with the exception of theexception of the Temporary Table typeTemporary Table type, which has a, which has a maximum length of 13maximum length of 13..  The name must begin with a letter and can containThe name must begin with a letter and can contain underscores to make it more readable.underscores to make it more readable.  Avoid special characters, such asAvoid special characters, such as ## oror $,$, which can causewhich can cause problems in some database environmentsproblems in some database environments S8 S9 S7 S6 S5 S4 S3 S2 S1
  • 83.
    83Yes-V Software Solutions(P) Ltd., Record DefinitionsRecord Definitions Naming Record DefinitionsNaming Record Definitions  Record Naming ConventionsRecord Naming Conventions  _TBL_TBL Identifies an edit or prompt table that contains dataIdentifies an edit or prompt table that contains data that is used for validationthat is used for validation  _VW_VW Identifies a record definition that is physicallyIdentifies a record definition that is physically implemented by defining a SQL view.implemented by defining a SQL view.  _DVW_DVW Identifies a dynamic view.Identifies a dynamic view.  _WRK_WRK Identifies derived work records.Identifies derived work records.  _SBR_SBR Identifies subrecords.Identifies subrecords.  _QVW_QVW Identifies a query view.Identifies a query view.  _WL_WL Identifies the record as a worklist record definition.Identifies the record as a worklist record definition. S8 S9 S7 S6 S5 S4 S3 S2 S1
  • 84.
    84Yes-V Software Solutions(P) Ltd., Record DefinitionsRecord Definitions Naming Record DefinitionsNaming Record Definitions  Record Naming ConventionsRecord Naming Conventions  R_R_ Identifies work record definitions for SQR reports.Identifies work record definitions for SQR reports.  AUDIT_AUDIT_ Identifies record definitions that store audit information for other recordIdentifies record definitions that store audit information for other record definitions in the database.definitions in the database.  WEBLIB_WEBLIB_ Identifies record definitions that store internet scripts. Internet scripts areIdentifies record definitions that store internet scripts. Internet scripts are generally located in Field Formula PeopleCode events.generally located in Field Formula PeopleCode events.  FUNCLIB_FUNCLIB_ Identifies record definitions that contain written PeopleCode functions, asIdentifies record definitions that contain written PeopleCode functions, as opposed to built-in functions. These self-developed functions are generallyopposed to built-in functions. These self-developed functions are generally located in FieldFormula events, and the records are usually derivedlocated in FieldFormula events, and the records are usually derived  DERIVED_DERIVED_ Identifies shared record definitions (across an application module orIdentifies shared record definitions (across an application module or group) that have fields for PeopleCode events.group) that have fields for PeopleCode events. S8 S9 S7 S6 S5 S4 S3 S2 S1
  • 85.
    85Yes-V Software Solutions(P) Ltd., Record DefinitionRecord Definition  Creating a New RecordCreating a New Record 1.1. Select File, New.Select File, New. 2.2. SelectSelect Record.Record. 3.3. Click OK.Click OK. 4.4. The object workspace appears so that you canThe object workspace appears so that you can build a list of fields in a record definition.build a list of fields in a record definition. S8 S9 S7 S6 S5 S4 S3 S2 S1
  • 86.
    86Yes-V Software Solutions(P) Ltd., Creating A New RecordCreating A New Record S8 S9 S7 S6 S5 S4 S3 S2 S1
  • 87.
    87Yes-V Software Solutions(P) Ltd., Creating A New RecordCreating A New Record Object WorkSpace where the relatedObject WorkSpace where the related fields are populated to form a Recordfields are populated to form a Record S8 S9 S7 S6 S5 S4 S3 S2 S1
  • 88.
    88Yes-V Software Solutions(P) Ltd., Creating A New RecordCreating A New Record Fields are now inserted into recordFields are now inserted into record S8 S9 S7 S6 S5 S4 S3 S2 S1
  • 89.
    89Yes-V Software Solutions(P) Ltd., Record DefinitionRecord Definition  Opening an Existing RecordOpening an Existing Record 1.1. Select File, Open.Select File, Open. 2.2. SelectSelect RecordRecord from thefrom the Definition TypeDefinition Type list.list. 3.3. ClickClick Open.Open. 4.4. In the Open Definition dialog box, enter the first letterIn the Open Definition dialog box, enter the first letter of the record for which you are searching.of the record for which you are searching. 5.5. ClickClick OpenOpen S8 S9 S7 S6 S5 S4 S3 S2 S1
  • 90.
    90Yes-V Software Solutions(P) Ltd., Opening an Existing RecordOpening an Existing Record S8 S9 S7 S6 S5 S4 S3 S2 S1
  • 91.
    91Yes-V Software Solutions(P) Ltd., Opening an Existing RecordOpening an Existing Record S8 S9 S7 S6 S5 S4 S3 S2 S1
  • 92.
    92Yes-V Software Solutions(P) Ltd., Record DefinitionRecord Definition  Manipulating Fields in Record DefinitionManipulating Fields in Record Definition 1.1. Add fieldsAdd fields 2.2. Reorder fieldsReorder fields 3.3. Move fieldsMove fields 4.4. Delete fieldsDelete fields 5.5. Rename fieldsRename fields S8 S9 S7 S6 S5 S4 S3 S2 S1
  • 93.
    93Yes-V Software Solutions(P) Ltd., Record DefinitionRecord Definition  Manipulating Fields in Record DefinitionManipulating Fields in Record Definition 1.1. Inserting Fields into RecordsInserting Fields into Records Inserting can be done in three Ways:Inserting can be done in three Ways: 1.1. Using the project workspace tree.Using the project workspace tree. 2.2. Using the Insert menu (Insert, Field).Using the Insert menu (Insert, Field). 3.3. Dragging fields from existing records.Dragging fields from existing records.S8 S9 S7 S6 S5 S4 S3 S2 S1
  • 94.
    94Yes-V Software Solutions(P) Ltd., Inserting Fields into RecordsInserting Fields into Records Inserting through Insert MenuInserting through Insert Menu S8 S9 S7 S6 S5 S4 S3 S2 S1
  • 95.
    95Yes-V Software Solutions(P) Ltd., Record DefinitionRecord Definition  Manipulating Fields in Record DefinitionManipulating Fields in Record Definition 1.1. Inserting SubRecord into RecordsInserting SubRecord into Records  Select Insert, SubRecord to search, select, and insert subrecords into aSelect Insert, SubRecord to search, select, and insert subrecords into a record.record.  A subrecord enables you to add a group of fields that are commonly used inA subrecord enables you to add a group of fields that are commonly used in multiple record definitions.multiple record definitions.  A subrecord must be defined before it can be inserted into a recordA subrecord must be defined before it can be inserted into a record definitiondefinition.. S8 S9 S7 S6 S5 S4 S3 S2 S1
  • 96.
    96Yes-V Software Solutions(P) Ltd., Inserting SubRecord into RecordsInserting SubRecord into Records Inserting through Insert MenuInserting through Insert Menu S8 S9 S7 S6 S5 S4 S3 S2 S1
  • 97.
    97Yes-V Software Solutions(P) Ltd., Record DefinitionRecord Definition  Manipulating Fields in Record DefinitionManipulating Fields in Record Definition 2. Reordering Fields2. Reordering Fields • You can reorder the display of fields in the record definition by double-You can reorder the display of fields in the record definition by double- clicking the attribute name.clicking the attribute name. • To actually reorder the fields in the records, you must cut and paste orTo actually reorder the fields in the records, you must cut and paste or select the field and move it.select the field and move it. S8 S9 S7 S6 S5 S4 S3 S2 S1
  • 98.
    98Yes-V Software Solutions(P) Ltd., Record DefinitionRecord Definition  Manipulating Fields in Record DefinitionManipulating Fields in Record Definition 3.Moving Fields3.Moving Fields  Moving Fields in the Same RecordMoving Fields in the Same Record  Moving Fields Another Record DefinitionMoving Fields Another Record Definition S8 S9 S7 S6 S5 S4 S3 S2 S1
  • 99.
    99Yes-V Software Solutions(P) Ltd., Moving Fields Another Record DefinitionMoving Fields Another Record Definition Selecting a Field to MoveSelecting a Field to Move Moving into this RecordMoving into this Record S8 S9 S7 S6 S5 S4 S3 S2 S1
  • 100.
    100Yes-V Software Solutions(P) Ltd., Moving Fields Another Record DefinitionMoving Fields Another Record Definition PeopleSoft System will ask for confirmation to move from one record to another record S8 S9 S7 S6 S5 S4 S3 S2 S1
  • 101.
    101Yes-V Software Solutions(P) Ltd., Moving Fields Another Record DefinitionMoving Fields Another Record Definition S8 S9 S7 S6 S5 S4 S3 S2 S1
  • 102.
    102Yes-V Software Solutions(P) Ltd., Moving Fields Another Record DefinitionMoving Fields Another Record Definition Pasting into Another RecordPasting into Another Record S8 S9 S7 S6 S5 S4 S3 S2 S1
  • 103.
    103Yes-V Software Solutions(P) Ltd., Moving Fields Another Record DefinitionMoving Fields Another Record Definition Moved the Field to Another RecordMoved the Field to Another Record S8 S9 S7 S6 S5 S4 S3 S2 S1
  • 104.
    104Yes-V Software Solutions(P) Ltd., Record DefinitionRecord Definition  Manipulating Fields in Record DefinitionManipulating Fields in Record Definition 4. Deleting Fields4. Deleting Fields  Select the field that you want to remove and press the DEL (delete) key. .Select the field that you want to remove and press the DEL (delete) key. .  When the system prompts you to confirm the deletion, clickWhen the system prompts you to confirm the deletion, click Yes.Yes.  if you delete a field from a record definition, you must also delete it fromif you delete a field from a record definition, you must also delete it from any pages on which it appearsany pages on which it appears  Modify or remove PeopleCode when you find references to the deletedModify or remove PeopleCode when you find references to the deleted field.field. 5.5. Renaming FieldsRenaming Fields Discussed in earlier slidesDiscussed in earlier slides S8 S9 S7 S6 S5 S4 S3 S2 S1
  • 105.
    105Yes-V Software Solutions(P) Ltd., Deleting a Field from Record DefinitionDeleting a Field from Record Definition S8 S9 S7 S6 S5 S4 S3 S2 S1
  • 106.
    106Yes-V Software Solutions(P) Ltd., Deleting a Field from Record DefinitionDeleting a Field from Record Definition Asking for Confirmation S9 S8 S9 S7 S6 S5 S4 S3 S2 S1
  • 107.
    107Yes-V Software Solutions(P) Ltd., Deleting a Field from Record DefinitionDeleting a Field from Record Definition Once you Click yes, the Field will be deleted.Once you Click yes, the Field will be deleted. After that save the recordAfter that save the record S8 S9 S7 S6 S5 S4 S3 S2 S1
  • 108.
    108Yes-V Software Solutions(P) Ltd., Record DefinitionRecord Definition  Renaming Record DefinitionRenaming Record Definition 1.1. To rename a record definition:To rename a record definition: 2.2. Select File, Rename.Select File, Rename. 3.3. The Rename Definition dialog box appears.The Rename Definition dialog box appears. 4.4. SelectSelect RecordRecord fromfrom Definition Type.Definition Type. 5.5. ClickClick Rename.Rename. 6.6. Select the record and clickSelect the record and click Rename.Rename. 7.7. A rectangular box appears around the name.A rectangular box appears around the name. 8.8. Enter the new name and press ENTER.Enter the new name and press ENTER. S8 S9 S7 S6 S5 S4 S3 S2 S1
  • 109.
    109Yes-V Software Solutions(P) Ltd., Renaming Record DefinitionRenaming Record Definition S8 S9 S7 S6 S5 S4 S3 S2 S1
  • 110.
    110Yes-V Software Solutions(P) Ltd., Renaming Record DefinitionRenaming Record Definition S8 S9 S7 S6 S5 S4 S3 S2 S1
  • 111.
    111Yes-V Software Solutions(P) Ltd., Renaming Record DefinitionRenaming Record Definition Allowing you toAllowing you to Rename the RecordRename the Record S8 S9 S7 S6 S5 S4 S3 S2 S1
  • 112.
    112Yes-V Software Solutions(P) Ltd., Renaming Record DefinitionRenaming Record Definition Close the records before renamingClose the records before renaming S8 S9 S7 S6 S5 S4 S3 S2 S1
  • 113.
    113Yes-V Software Solutions(P) Ltd., Renaming Record DefinitionRenaming Record Definition Click Yes to Confirm RenameClick Yes to Confirm Rename Record has been renamedRecord has been renamed S8 S9 S7 S6 S5 S4 S3 S2 S1
  • 114.
    114Yes-V Software Solutions(P) Ltd., Record DefinitionRecord Definition  Deleting Record DefinitionDeleting Record Definition 1.1. Select File, Delete.Select File, Delete. 2.2. Select the record definition to delete.Select the record definition to delete. 3.3. ClickClick Delete.Delete. 4.4. Warning!Warning! When you delete a record definition, theWhen you delete a record definition, the system automatically deletes any PeopleCode that issystem automatically deletes any PeopleCode that is associated with the recordassociated with the record.. 5.5. ClickClick YesYes if you really want to delete the recordif you really want to delete the record definition.definition.S8 S9 S7 S6 S5 S4 S3 S2 S1
  • 115.
    115Yes-V Software Solutions(P) Ltd., Deleting Record DefinitionDeleting Record Definition S8 S9 S7 S6 S5 S4 S3 S2 S1
  • 116.
    116Yes-V Software Solutions(P) Ltd., Deleting Record DefinitionDeleting Record Definition Select a Record and Press Delete.Select a Record and Press Delete. It will ask for confirmation. Click YesIt will ask for confirmation. Click Yes S8 S9 S7 S6 S5 S4 S3 S2 S1
  • 117.
    117Yes-V Software Solutions(P) Ltd., Deleting Record DefinitionDeleting Record Definition close the record prior performing the deletion operation Confirm Deletion by clicking yesS8 S9 S7 S6 S5 S4 S3 S2 S1
  • 118.
    118Yes-V Software Solutions(P) Ltd., Record DefinitionRecord Definition  Printing Record DefinitionPrinting Record Definition  Select File, Page Setup to changeSelect File, Page Setup to change any of the print record defaults.any of the print record defaults. The system retains your changes untilThe system retains your changes until you reset them again. The Pageyou reset them again. The Page Setup dialog box appears.Setup dialog box appears.  Select the options for print.Select the options for print.  DefinitionDefinition  PeopleCodePeopleCode  GraphicsGraphics  MarginsMargins  HeaderHeader  FooterFooter  BorderBorder  Border SpaceBorder Space  Click OK when you are done toClick OK when you are done to close the Print Setup dialog boxclose the Print Setup dialog box and save your settings.and save your settings.  Select File, Print.Select File, Print. S8 S9 S7 S6 S5 S4 S3 S2 S1
  • 119.
    119Yes-V Software Solutions(P) Ltd., Record DefinitionRecord Definition  PropertiesProperties 1.1. Record PropertiesRecord Properties 2.2. Record Field PropertiesRecord Field Properties 1.1. Record PropertiesRecord Properties Record Properties has two tabsRecord Properties has two tabs 1.1. General TabGeneral Tab 2.2. Use TabUse TabS8 S9 S7 S6 S5 S4 S3 S2 S1
  • 120.
    120Yes-V Software Solutions(P) Ltd., Record PropertiesRecord Properties Record PropertiesRecord Properties S8 S9 S7 S6 S5 S4 S3 S2 S1
  • 121.
    121Yes-V Software Solutions(P) Ltd., Record Properties – General TabRecord Properties – General Tab S8 S9 S7 S6 S5 S4 S3 S2 S1
  • 122.
    122Yes-V Software Solutions(P) Ltd., Record Properties – Use TabRecord Properties – Use Tab S8 S9 S7 S6 S5 S4 S3 S2 S1
  • 123.
    123Yes-V Software Solutions(P) Ltd., Record DefinitionRecord Definition 2. Record Field Properties2. Record Field Properties  They are specific to a single record definition andThey are specific to a single record definition and are stored with the recordare stored with the record  To edit record field properties from a recordTo edit record field properties from a record definition, select Edit, Record Field Propertiesdefinition, select Edit, Record Field Properties from the PeopleSoft Application Designer menu.from the PeopleSoft Application Designer menu. S8 S9 S7 S6 S5 S4 S3 S2 S1
  • 124.
    124Yes-V Software Solutions(P) Ltd., Record DefinitionRecord Definition 2. Record Field Properties2. Record Field Properties  Record Field Properties has Two TabsRecord Field Properties has Two Tabs  Use TabUse Tab  Edit TabEdit Tab S8 S9 S7 S6 S5 S4 S3 S2 S1
  • 125.
    125Yes-V Software Solutions(P) Ltd., Record Field PropertiesRecord Field Properties S8 S9 S7 S6 S5 S4 S3 S2 S1
  • 126.
    126Yes-V Software Solutions(P) Ltd., Record Field Properties – Use TabRecord Field Properties – Use Tab S8 S9 S7 S6 S5 S4 S3 S2 S1
  • 127.
    127Yes-V Software Solutions(P) Ltd., Record Field Properties – Edit TabRecord Field Properties – Edit Tab Prompt Table S8 S9 S7 S6 S5 S4 S3 S2 S1
  • 128.
    128Yes-V Software Solutions(P) Ltd., Prompt TablePrompt Table  Prompt Table are used to provide users with look upPrompt Table are used to provide users with look up that shows the valid values for the Fieldthat shows the valid values for the Field  Three types of Prompt TableThree types of Prompt Table  Drop-Down List BoxDrop-Down List Box  Calendar Drop-DownCalendar Drop-Down  Prompt ButtonPrompt Button S8 S9 S7 S6 S5 S4 S3 S2 S1
  • 129.
    129Yes-V Software Solutions(P) Ltd., Prompt Table - ExamplePrompt Table - Example S8 S9 S7 S6 S5 S4 S3 S2 S1
  • 130.
    130Yes-V Software Solutions(P) Ltd., Prompt Table – Required PropertiesPrompt Table – Required Properties S8 S9 S7 S6 S5 S4 S3 S2 S1 Now the values from the specified table will become the Valid values for the field in this table
  • 131.
    131Yes-V Software Solutions(P) Ltd., Creating an ApplicationCreating an Application Simple 9 stepsSimple 9 steps 1. Create Field Definition1. Create Field Definition 2. Create Record Definition.2. Create Record Definition. 3.3. Build the Record Definition.Build the Record Definition. 4. Create page Definition.4. Create page Definition. 5. Create Component Definition.5. Create Component Definition. 6. Include pages into component Definition.6. Include pages into component Definition. 7. Creating Menu Definition.7. Creating Menu Definition. 8. Assigning security to the menu.8. Assigning security to the menu. 9. Test the application9. Test the application S8 S9 S7 S6 S5 S4 S3 S2 S1
  • 132.
    Yes-V Software Solutions(P) Ltd., 132 Building SQL Tables and ViewsBuilding SQL Tables and Views
  • 133.
    133Yes-V Software Solutions(P) Ltd., Build ProcessBuild Process  The Build process uses Data Definition LanguageThe Build process uses Data Definition Language (DDL) to construct a physical database component(DDL) to construct a physical database component that is based on the associated record and fieldthat is based on the associated record and field definitions that you created. With the Build feature,definitions that you created. With the Build feature, you can create the following:you can create the following:  TablesTables  IndexesIndexes  ViewsViews  TriggersTriggers S8 S9 S7 S6 S5 S4 S3 S2 S1
  • 134.
    134Yes-V Software Solutions(P) Ltd., Record Build ProcessRecord Build Process Build MenuBuild Menu  Once the Record Definition has been created ,it isOnce the Record Definition has been created ,it is Build using the Build Menu.Build using the Build Menu.  When you choose to build a item from the BuildWhen you choose to build a item from the Build menu, the tasks for creating or running SQL scriptsmenu, the tasks for creating or running SQL scripts that define the underlying database components arethat define the underlying database components are included in the Build dialog box.included in the Build dialog box. S8 S9 S7 S6 S5 S4 S3 S2 S1
  • 135.
    135Yes-V Software Solutions(P) Ltd., Record Build ProcessRecord Build Process Build Menu – Build Dialogue BoxBuild Menu – Build Dialogue Box S8 S9 S7 S6 S5 S4 S3 S2 S1
  • 136.
    136Yes-V Software Solutions(P) Ltd., Record Build ProcessRecord Build Process Build MenuBuild Menu The settings for the Build process, alsoThe settings for the Build process, also called Build Settings, enable you tocalled Build Settings, enable you to configure various aspects of theconfigure various aspects of the process. Depending on which buildprocess. Depending on which build option you are running, youroption you are running, your settings will varysettings will vary S8 S9 S7 S6 S5 S4 S3 S2 S1
  • 137.
    137Yes-V Software Solutions(P) Ltd., Record Build ProcessRecord Build Process Build Menu – SettingsBuild Menu – Settings Specifying Create OptionsSpecifying Create Options  Table CreationTable Creation OptionsOptions  View CreationView Creation OptionsOptions  Index CreationIndex Creation OptionsOptions S8 S9 S7 S6 S5 S4 S3 S2 S1
  • 138.
    138Yes-V Software Solutions(P) Ltd., Record Build ProcessRecord Build Process Build Menu – SettingsBuild Menu – Settings Specifying Alter OptionsSpecifying Alter Options  Drop ColumnDrop Column OptionsOptions  Change ColumnChange Column Length OptionsLength Options  Alter AnyAlter Any  Alter Table OptionsAlter Table OptionsS8 S9 S7 S6 S5 S4 S3 S2 S1
  • 139.
    139Yes-V Software Solutions(P) Ltd., Record Build ProcessRecord Build Process Build Menu – SettingsBuild Menu – Settings Specifying Logging OptionsSpecifying Logging Options  Logging LevelLogging Level  Logging OutputLogging Output S8 S9 S7 S6 S5 S4 S3 S2 S1
  • 140.
    140Yes-V Software Solutions(P) Ltd., Record Build ProcessRecord Build Process Build Menu – SettingsBuild Menu – Settings Specifying Scripts OptionsSpecifying Scripts Options  Script FileScript File  Script File OptionsScript File Options  File OverwriteFile Overwrite OptionsOptions  Script File NameScript File NameS8 S9 S7 S6 S5 S4 S3 S2 S1
  • 141.
    141Yes-V Software Solutions(P) Ltd., Record Build ProcessRecord Build Process  Selecting the Build ScopeSelecting the Build Scope  The Build feature includesThe Build feature includes three different scopes thatthree different scopes that determine the size of yourdetermine the size of your build project.build project.  Current DefinitionCurrent Definition  ProjectProject  Select Definition intoSelect Definition into ProjectProject S8 S9 S7 S6 S5 S4 S3 S2 S1
  • 142.
    142Yes-V Software Solutions(P) Ltd., Record Build ProcessRecord Build Process  Creating TablesCreating Tables  It prefaces each new application SQL table withIt prefaces each new application SQL table with PS_PS_ toto identify it as an application that was built usingidentify it as an application that was built using PeopleTools.PeopleTools.  The Create Table process creates a new applicationThe Create Table process creates a new application table based on parameters defined in the recordtable based on parameters defined in the record definition. When a new table is created, the DBMSdefinition. When a new table is created, the DBMS updates the System Catalog tables to reflect theupdates the System Catalog tables to reflect the attributes of the new tableattributes of the new table..S8 S9 S7 S6 S5 S4 S3 S2 S1
  • 143.
    143Yes-V Software Solutions(P) Ltd., Build Process – Creating TableBuild Process – Creating Table  Open the project for which you want to build SQL tables.Open the project for which you want to build SQL tables.  Select Build, Project.Select Build, Project.  From the Build menu, select the appropriate scope of your build.From the Build menu, select the appropriate scope of your build.  Select Create Tables in the Build Options group box.Select Create Tables in the Build Options group box.  Select one of the Build Execute options.Select one of the Build Execute options.  Click the Settings button in the Build dialog box to set user-definedClick the Settings button in the Build dialog box to set user-defined defaults.defaults.  Select the appropriate settings on the Create tab.Select the appropriate settings on the Create tab.  Select the Logging tab.Select the Logging tab.  Set your logging levels and associated optionsSet your logging levels and associated options  Select the Scripts tab.Select the Scripts tab.  Specify your script file options.Specify your script file options.  Click OK to close the Build Settings dialog box.Click OK to close the Build Settings dialog box.  In the Build dialog box, click the Build button to run your build option.In the Build dialog box, click the Build button to run your build option. S8 S9 S7 S6 S5 S4 S3 S2 S1
  • 144.
    144Yes-V Software Solutions(P) Ltd., Build Process – Creating TableBuild Process – Creating Table S8 S9 S7 S6 S5 S4 S3 S2 S1
  • 145.
    145Yes-V Software Solutions(P) Ltd., Build Process – Creating TableBuild Process – Creating Table All the Tables in theAll the Tables in the Project are listedProject are listed S8 S9 S7 S6 S5 S4 S3 S2 S1
  • 146.
    146Yes-V Software Solutions(P) Ltd., Build Process – Creating TableBuild Process – Creating Table Specify all the Required OptionsSpecify all the Required Options S8 S9 S7 S6 S5 S4 S3 S2 S1
  • 147.
    147Yes-V Software Solutions(P) Ltd., Build Process – Creating ViewsBuild Process – Creating Views  Clone a record definition.Clone a record definition.  Open an existing record definition.Open an existing record definition.  Select File, Save As.Select File, Save As.  Specify the name of the view that you want to create.Specify the name of the view that you want to create.  Delete and add the appropriate fields.Delete and add the appropriate fields.  All columns that are selected in your view should have a corresponding field in theAll columns that are selected in your view should have a corresponding field in the record definition.record definition.  Set the record type to SQL View.Set the record type to SQL View.  Select the Record Type tab for the record definition.Select the Record Type tab for the record definition.  Select SQL View in the Record Type group box.Select SQL View in the Record Type group box.  Click the Click to open SQL Editor button.Click the Click to open SQL Editor button.  The order in which you list the columns in your SQL SELECT statement shouldThe order in which you list the columns in your SQL SELECT statement should match the order that you specified in the record definition.match the order that you specified in the record definition.  Save the record definition.Save the record definition.  Select Build, Current Definition to create the view in the database.Select Build, Current Definition to create the view in the database.  Select the Create Views check box under Build Options.Select the Create Views check box under Build Options.  Click Build.Click Build. S8 S9 S7 S6 S5 S4 S3 S2 S1
  • 148.
    148Yes-V Software Solutions(P) Ltd., Build Process – Creating ViewsBuild Process – Creating Views S8 S9 S7 S6 S5 S4 S3 S2 S1 Select SQL View Click SQL Editor to write SQL Query
  • 149.
    149Yes-V Software Solutions(P) Ltd., Build Process – Creating ViewsBuild Process – Creating Views Write the SQL Query and Save the ViewWrite the SQL Query and Save the View S8 S9 S7 S6 S5 S4 S3 S2 S1
  • 150.
    150Yes-V Software Solutions(P) Ltd., Build Process – Creating ViewsBuild Process – Creating Views Click BuildClick Build S8 S9 S7 S6 S5 S4 S3 S2 S1
  • 151.
    151Yes-V Software Solutions(P) Ltd., Build Process – Alter TableBuild Process – Alter Table When to Alter TablesWhen to Alter Tables  The following record definition changes affectThe following record definition changes affect synchronization with the application table and require ansynchronization with the application table and require an Alter process:Alter process:  Add or delete a field on the record.Add or delete a field on the record.  Modify the length of a field.Modify the length of a field.  Change the required status of a field that is Date, Time,Change the required status of a field that is Date, Time, DateTime, or Long.DateTime, or Long.  The Alter Table process is similar to the Create TableThe Alter Table process is similar to the Create Table process, except that it does not drop existing applicationprocess, except that it does not drop existing application data tables and the data that they contain.data tables and the data that they contain.  You can select both Alter Tables and Create Tables to runYou can select both Alter Tables and Create Tables to run concurrently, as long asconcurrently, as long as the Skip table if it already existsthe Skip table if it already exists option is enabledoption is enabled on the Create tab in the Build Settingson the Create tab in the Build Settings dialog boxdialog box.. S8 S9 S7 S6 S5 S4 S3 S2 S1
  • 152.
    152Yes-V Software Solutions(P) Ltd., Build Process – Alter TableBuild Process – Alter Table Altering a TableAltering a Table  To alter a table:To alter a table: 1.1. Open the project for which you must perform an alter.Open the project for which you must perform an alter. 2.2. From the Build menu, select the appropriate scope of your build.From the Build menu, select the appropriate scope of your build. The Build dialog box appears.The Build dialog box appears. 1.1. SelectSelect Alter TablesAlter Tables from the Build Options group box.from the Build Options group box. Selecting the Alter Tables option automatically selects and disables theSelecting the Alter Tables option automatically selects and disables the Create Indexes and Create Trigger (only if triggers are needed) option.Create Indexes and Create Trigger (only if triggers are needed) option. In the Build Execute Options group box, only theIn the Build Execute Options group box, only the Build script fileBuild script file option is enabled.option is enabled. 1.1. Click the Settings button in the Build dialog box to set user-definedClick the Settings button in the Build dialog box to set user-defined defaults.defaults. Select the appropriate alter, logging, and scripts settings.Select the appropriate alter, logging, and scripts settings. 1.1. In the Build dialog box, click Build to run the Alter Tables processIn the Build dialog box, click Build to run the Alter Tables process.. WhenWhen the process completes, check any errors listed in the log filethe process completes, check any errors listed in the log file.. S8 S9 S7 S6 S5 S4 S3 S2 S1
  • 153.
    153Yes-V Software Solutions(P) Ltd., Build Process – Alter TableBuild Process – Alter Table  Confirming Your Table AlterConfirming Your Table Alter To confirm your table alter:To confirm your table alter: 1.1. Review the SQL script that was generated by the Alter process.Review the SQL script that was generated by the Alter process. 2.2. Use your native SQL command processor to open the SQLUse your native SQL command processor to open the SQL script. The script is located where you specified on the Scriptsscript. The script is located where you specified on the Scripts tab of the Build Settings dialog box.tab of the Build Settings dialog box. 3.3. Run the script against your database.Run the script against your database. 4.4. Use your query tool and SQL Select statements to confirm thatUse your query tool and SQL Select statements to confirm that the Alter Tables process has created an application table thatthe Alter Tables process has created an application table that corresponds to your record definition and has updated thecorresponds to your record definition and has updated the system catalog tables.system catalog tables. S8 S9 S7 S6 S5 S4 S3 S2 S1
  • 154.
    154Yes-V Software Solutions(P) Ltd., S8 S9 S7 S6 S5 S4 S3 S2 S1 Build Process – Alter TableBuild Process – Alter Table Click BuildClick Build
  • 155.
    155Yes-V Software Solutions(P) Ltd., S8 S9 S7 S6 S5 S4 S3 S2 S1 Build Process – Alter TableBuild Process – Alter Table
  • 156.
    156Yes-V Software Solutions(P) Ltd., SQL FILESQL FILE ---- Start the TransactionStart the Transaction ---- Create temporary tableCreate temporary table CREATE TABLE PSYDEPTREC1 (DEPT_NAME VARCHAR2(10) NOT NULL,CREATE TABLE PSYDEPTREC1 (DEPT_NAME VARCHAR2(10) NOT NULL, EDEPT VARCHAR2(20) NOT NULL,EDEPT VARCHAR2(20) NOT NULL, HDT_LASTUPDATED_BY VARCHAR2(25) NOT NULL,HDT_LASTUPDATED_BY VARCHAR2(25) NOT NULL, V_DATE DATE) TABLESPACE TLLARGE STORAGE (INITIAL 40000 NEXT 100000V_DATE DATE) TABLESPACE TLLARGE STORAGE (INITIAL 40000 NEXT 100000 MAXEXTENTS UNLIMITED PCTINCREASE 0) PCTFREE 10 PCTUSED 80MAXEXTENTS UNLIMITED PCTINCREASE 0) PCTFREE 10 PCTUSED 80 // ---- Copy from source to temp tableCopy from source to temp table INSERT INTO PSYDEPTREC1 (INSERT INTO PSYDEPTREC1 ( DEPT_NAME,DEPT_NAME, EDEPT,EDEPT, HDT_LASTUPDATED_BY,HDT_LASTUPDATED_BY, V_DATE)V_DATE) SELECTSELECT DEPT_NAME,DEPT_NAME, EDEPT,EDEPT, HDT_LASTUPDATED_BY,HDT_LASTUPDATED_BY, V_DATEV_DATE FROM PS_DEPTREC1FROM PS_DEPTREC1 // S8 S9 S7 S6 S5 S4 S3 S2 S1
  • 157.
    157Yes-V Software Solutions(P) Ltd., SQL FILESQL FILE ---- CAUTION:CAUTION: Drop Original TableDrop Original Table DROP TABLE PS_DEPTREC1DROP TABLE PS_DEPTREC1 // ---- Rename TableRename Table RENAME PSYDEPTREC1 TO PS_DEPTREC1RENAME PSYDEPTREC1 TO PS_DEPTREC1 // COMMITCOMMIT // -- Done-- Done CREATE UNIQUE INDEX PS_DEPTREC1 ON PS_DEPTREC1 (DEPT_NAME,CREATE UNIQUE INDEX PS_DEPTREC1 ON PS_DEPTREC1 (DEPT_NAME, EDEPT) TABLESPACE PSINDEX STORAGE (INITIAL 40000 NEXT 100000EDEPT) TABLESPACE PSINDEX STORAGE (INITIAL 40000 NEXT 100000 MAXEXTENTS UNLIMITED PCTINCREASE 0) PCTFREE 10MAXEXTENTS UNLIMITED PCTINCREASE 0) PCTFREE 10 // COMMITCOMMIT // S8 S9 S7 S6 S5 S4 S3 S2 S1
  • 158.
    158Yes-V Software Solutions(P) Ltd., S8 S9 S7 S6 S5 S4 S3 S2 S1 Click BuildClick Build Build Process – Alter TableBuild Process – Alter Table
  • 159.
    159Yes-V Software Solutions(P) Ltd., S8 S9 S7 S6 S5 S4 S3 S2 S1 Build Process – Alter TableBuild Process – Alter Table
  • 160.
    160Yes-V Software Solutions(P) Ltd., Build Process – Alter TableBuild Process – Alter Table S8 S9 S7 S6 S5 S4 S3 S2 S1 5 Columns are there
  • 161.
    161Yes-V Software Solutions(P) Ltd., S8 S9 S7 S6 S5 S4 S3 S2 S1 4 Columns are there Build Process – Alter TableBuild Process – Alter Table
  • 162.
    162Yes-V Software Solutions(P) Ltd., Creating an ApplicationCreating an Application Simple 9 stepsSimple 9 steps 1. Create Field Definition1. Create Field Definition 2. Create Record Definition.2. Create Record Definition. 3. Build the Record Definition.3. Build the Record Definition. 4.4. Create page Definition.Create page Definition. 5. Create Component Definition.5. Create Component Definition. 6. Include pages into component Definition.6. Include pages into component Definition. 7. Creating Menu Definition.7. Creating Menu Definition. 8. Assigning security to the menu.8. Assigning security to the menu. 9. Test the application9. Test the application S8 S9 S7 S6 S5 S4 S3 S2 S1
  • 163.
    Yes-V Software Solutions(P) Ltd., 163 Page DefinitionPage Definition
  • 164.
    164Yes-V Software Solutions(P) Ltd., Page DefinitionPage Definition  Pages are thePages are the graphical interfacegraphical interface between users and yourbetween users and your application databaseapplication database  Using PeopleSoft Application Designer, you can create, modify,Using PeopleSoft Application Designer, you can create, modify, and delete page definitions in your PeopleSoft system.and delete page definitions in your PeopleSoft system.  Page design depends on the type of data that the user plan to accessPage design depends on the type of data that the user plan to access and maintain.i.e,and maintain.i.e,  page may refer a single record definitionpage may refer a single record definition  It may refer multiple recordsIt may refer multiple records S8 S9 S7 S6 S5 S4 S3 S2 S1
  • 165.
    165Yes-V Software Solutions(P) Ltd., Creating New Page DefinitionsCreating New Page Definitions Creating new page definitions canCreating new page definitions can be done by the following twobe done by the following two ways:ways:  Create a blank page byCreate a blank page by selectingselecting FileFile,, NewNew, and, and PagePage from the menufrom the menu S8 S9 S7 S6 S5 S4 S3 S2 S1
  • 166.
    166Yes-V Software Solutions(P) Ltd., Creating New Page DefinitionsCreating New Page Definitions  Clone a page definition byClone a page definition by selectingselecting FileFile,, OpenOpen fromfrom the menu, specifythe menu, specify PagePage forfor the definition in thethe definition in the OpenOpen Definition Dialog boxDefinition Dialog box, select a, select a page, click thepage, click the openopen button,button, then selectthen select FileFile,, Save AsSave As and enter the new pageand enter the new page name, click OK.name, click OK. S8 S9 S7 S6 S5 S4 S3 S2 S1
  • 167.
    167Yes-V Software Solutions(P) Ltd., Including The Record Fields Into PagesIncluding The Record Fields Into Pages Drag fields from a Record onto aDrag fields from a Record onto a page:page:  Open an existing record definitionOpen an existing record definition by selectingby selecting FileFile,, OpenOpen,, RecordRecord fromfrom the menuthe menu  drag field definitions from thedrag field definitions from the record to the pagerecord to the page  double-click the new page field todouble-click the new page field to set the propertiesset the properties S8 S9 S7 S6 S5 S4 S3 S2 S1
  • 168.
    168Yes-V Software Solutions(P) Ltd., Including The Record Fields Into PagesIncluding The Record Fields Into Pages Drag Record fields from the ProjectDrag Record fields from the Project Workspace onto a pageWorkspace onto a page :: • Open the project, drag record fieldsOpen the project, drag record fields from the project workspace to thefrom the project workspace to the page, and double-click the new pagepage, and double-click the new page field to set the properties.field to set the properties. S8 S9 S7 S6 S5 S4 S3 S2 S1
  • 169.
    169Yes-V Software Solutions(P) Ltd., Level-based ControlsLevel-based Controls To accommodate a variety of page designs, PeopleSoft created threeTo accommodate a variety of page designs, PeopleSoft created three level-basedlevel-based controls.controls.  TheThe threethree level-based controls are:level-based controls are:  GridsGrids  Scroll areasScroll areas  Scroll barsScroll bars Why level-based controls?Why level-based controls?  We some times need few of the field controls to display multiple rowsWe some times need few of the field controls to display multiple rows or occurrences of dataor occurrences of data  To do this, we add a level-based control—a scroll area, a grid, or a scrollTo do this, we add a level-based control—a scroll area, a grid, or a scroll bar.bar.  We can then add, edit, delete, find, and scroll through multipleWe can then add, edit, delete, find, and scroll through multiple occurrences of data in a page control or group of controls.occurrences of data in a page control or group of controls.S8 S9 S7 S6 S5 S4 S3 S2 S1
  • 170.
    170Yes-V Software Solutions(P) Ltd., LevelsLevels Levels and Runtime ProcessingLevels and Runtime Processing  Levels play an important role in runtime processing. The componentLevels play an important role in runtime processing. The component processor relies on the level at which you place a field on a page to determineprocessor relies on the level at which you place a field on a page to determine how tohow to process any PeopleCodeprocess any PeopleCode attached to the field in the recordattached to the field in the record definition.definition.  These levels are referenced asThese levels are referenced as occurs levelsoccurs levels on the “Record tab” in theon the “Record tab” in the “properties” dialog box for the level-based control that you are setting.“properties” dialog box for the level-based control that you are setting. Level 0Level 0  This is the first occurs level on a page.This is the first occurs level on a page.  This level is reserved for the primary key fields that are used to search forThis level is reserved for the primary key fields that are used to search for pagespages  This is the nonscrolling area that directly relates to the key information of theThis is the nonscrolling area that directly relates to the key information of the underlying record.underlying record.  Level 0 information is usually display-only with data that the user entered onLevel 0 information is usually display-only with data that the user entered on the initial search page.the initial search page.  There areThere are four levelsfour levels in each level-based controlin each level-based control S8 S9 S7 S6 S5 S4 S3 S2 S1
  • 171.
    171Yes-V Software Solutions(P) Ltd., LevelsLevels Levels 1–3Levels 1–3  These levels include the scrolling data that is related to the Level 0, nonscrollingThese levels include the scrolling data that is related to the Level 0, nonscrolling data.data.  Level 1 is subordinate to Level 0; Level 2 is subordinate to and nested in Level 1.Level 1 is subordinate to Level 0; Level 2 is subordinate to and nested in Level 1.  Level 3 is subordinate to and nested in Level 2. User can nest level-based controlsLevel 3 is subordinate to and nested in Level 2. User can nest level-based controls up to 3 levels.up to 3 levels.  It is possible to have a page that contains no level-based controls, making all fieldsIt is possible to have a page that contains no level-based controls, making all fields set to Level 0.set to Level 0.  This is particularly true for secondary or subpages that contain few data entryThis is particularly true for secondary or subpages that contain few data entry fields.fields.  The default occurs level for a control is set to 1 in the properties dialog box.The default occurs level for a control is set to 1 in the properties dialog box.  If you place a field in or below that control, it is also set to Level 1 in the OrderIf you place a field in or below that control, it is also set to Level 1 in the Order grid, even if it is another level-based control.grid, even if it is another level-based control.  Use Set to Level 0 feature of the horizontal rule control to restart the occurs levelUse Set to Level 0 feature of the horizontal rule control to restart the occurs level count on your page.count on your page.  User can also add any number of level-based controls at the same levelUser can also add any number of level-based controls at the same level  We can nest up to three levels of scrolls or grids on the page.We can nest up to three levels of scrolls or grids on the page.S8 S9 S7 S6 S5 S4 S3 S2 S1
  • 172.
    172Yes-V Software Solutions(P) Ltd., Various Page Controls In A PageVarious Page Controls In A Page S8 S9 S7 S6 S5 S4 S3 S2 S1
  • 173.
    173Yes-V Software Solutions(P) Ltd., Level-based Controls At Same LevelLevel-based Controls At Same Level  Any number of level-based controls (scroll areas or grids) can be present at the sameAny number of level-based controls (scroll areas or grids) can be present at the same level.level. Example:Example: scroll area and a grid, both at Level 1.scroll area and a grid, both at Level 1. S8 S9 S7 S6 S5 S4 S3 S2 S1
  • 174.
    174Yes-V Software Solutions(P) Ltd., Nesting Level-Based ControlsNesting Level-Based Controls Compensation page: There are 2 rate codes for each compensation action in the Level scroll area. S8 S9 S7 S6 S5 S4 S3 S2 S1
  • 175.
    175Yes-V Software Solutions(P) Ltd., Nesting Up to 3 LevelsNesting Up to 3 Levels  EXAMPLEEXAMPLE  The “Additional Pay 1” page shows three levels of data that can be entered, two ofThe “Additional Pay 1” page shows three levels of data that can be entered, two of which are nesting scroll areas in the Earnings scroll area.which are nesting scroll areas in the Earnings scroll area. S8 S9 S7 S6 S5 S4 S3 S2 S1
  • 176.
    176Yes-V Software Solutions(P) Ltd., Keys for Accessing PagesKeys for Accessing Pages Prompt Fields:Prompt Fields: At runtime, you might want to enable your users to look up the valid values that they canAt runtime, you might want to enable your users to look up the valid values that they can enter in a field. For this, PeopleSoft provides prompts or look up buttons.enter in a field. For this, PeopleSoft provides prompts or look up buttons. There areThere are threethree types of prompts:types of prompts:  Drop-down list boxDrop-down list box..  This is a small list that opens below a field in the current page.This is a small list that opens below a field in the current page.  To use a drop-down list box, click the down arrow inside the field and select the requiredTo use a drop-down list box, click the down arrow inside the field and select the required value.value.  Calendar drop-down promptCalendar drop-down prompt  A calendar drop-down prompt opens a small calendar next to a date field to enable theA calendar drop-down prompt opens a small calendar next to a date field to enable the user to easily scan for the correct date.user to easily scan for the correct date.  Prompt buttonPrompt button  A prompt or lookup button opens a lookup page in the user’s browser populated with upA prompt or lookup button opens a lookup page in the user’s browser populated with up toto 300300 available values for that field.available values for that field.  In PeopleSoft Application Designer, associate a prompt with a page control by selectingIn PeopleSoft Application Designer, associate a prompt with a page control by selecting the “the “Show Prompt ButtonShow Prompt Button” check box from the” check box from the DisplayDisplay Options on theOptions on the Record tab ofRecord tab of the properties dialog boxthe properties dialog box  The record field with which the user associate the page control must list values in theThe record field with which the user associate the page control must list values in the Translate Table or prompt table for the system to display the prompt buttonTranslate Table or prompt table for the system to display the prompt button.. S8 S9 S7 S6 S5 S4 S3 S2 S1
  • 177.
    177Yes-V Software Solutions(P) Ltd., Prompt FieldsPrompt Fields S8 S9 S7 S6 S5 S4 S3 S2 S1
  • 178.
    178Yes-V Software Solutions(P) Ltd., Derived Records And Associated PagesDerived Records And Associated Pages Derived and Work FieldsDerived and Work Fields  A field from a derived or work record can be used to store a temporary value thatA field from a derived or work record can be used to store a temporary value that PeopleCode uses to determine the values of other field controls on the page.PeopleCode uses to determine the values of other field controls on the page. Hidden PagesHidden Pages  Hidden pages are work pages that are associated with derived or work recordsHidden pages are work pages that are associated with derived or work records and are often used in work groups.and are often used in work groups.  These pages are created when calculations need to be performed in theThese pages are created when calculations need to be performed in the background by PeopleCode that the user does not need to see.background by PeopleCode that the user does not need to see. HowHow  A page can be made Hidden by selecting the Hidden check box in theA page can be made Hidden by selecting the Hidden check box in the component grid as you set the component definition.component grid as you set the component definition. S8 S9 S7 S6 S5 S4 S3 S2 S1
  • 179.
    179Yes-V Software Solutions(P) Ltd., Page Definition ToolbarPage Definition Toolbar Click the Properties button to open the Page Properties dialog box (ALT+ENTER). Click the Select Group button to select several controls at once Click the Project Workspace button to display or hide the project workspace (View, Project Workspace or ALT+0). Click the Toggle Grid button to display or hide the page grid (View, Show Grid or CTRL+G). S8 S9 S7 S6 S5 S4 S3 S2 S1
  • 180.
    180Yes-V Software Solutions(P) Ltd., Page control toolsPage control tools Frame Group box Horizontal rule Static text Tab separator Check box Drop-down list box Edit box Long edit box Push button or link Radio button Grid Scroll area Scroll bar Secondary page Subpage S8 S9 S7 S6 S5 S4 S3 S2 S1
  • 181.
    181Yes-V Software Solutions(P) Ltd., Adding Page ControlsAdding Page Controls Using the Page Control ToolbarUsing the Page Control Toolbar Page controls can be added by usingPage controls can be added by using the page control portion of thethe page control portion of the page definition toolbarpage definition toolbar • When a Page Control ToolbarWhen a Page Control Toolbar button is clicked, the cursorbutton is clicked, the cursor changes to a cross-shaped iconchanges to a cross-shaped icon or hand depending on the pageor hand depending on the page control type selected and movecontrol type selected and move the cursor to a position on thethe cursor to a position on the page and click once.page and click once. S8 S9 S7 S6 S5 S4 S3 S2 S1
  • 182.
    182Yes-V Software Solutions(P) Ltd., Adding page controlsAdding page controls Using the Insert MenuUsing the Insert Menu • Select the control from theSelect the control from the InsertInsert menu, the cursormenu, the cursor changes to a cross-shapedchanges to a cross-shaped icon or a hand, depending onicon or a hand, depending on the control type selected,the control type selected, move the cursor to amove the cursor to a position on the page andposition on the page and click once.click once. S8 S9 S7 S6 S5 S4 S3 S2 S1
  • 183.
    183Yes-V Software Solutions(P) Ltd., Page control toolsPage control tools FramesFrames Frames are used to visuallyFrames are used to visually organize information on theorganize information on the page.page. How to insert a frame?How to insert a frame?  Click the Frame buttonClick the Frame button on the toolbar, or select Insert,on the toolbar, or select Insert, Frame.Frame.  Drag the frame upon the areaDrag the frame upon the area you want.you want.  To deselect the frame, clickTo deselect the frame, click anywhere outside of the frameanywhere outside of the frame on your page workspace.on your page workspace. S8 S9 S7 S6 S5 S4 S3 S2 S1
  • 184.
    184Yes-V Software Solutions(P) Ltd., Page control toolsPage control tools Setting Frame Label and DisplaySetting Frame Label and Display optionsoptions  Select the frame and double-click,Select the frame and double-click, or right-click on the frame andor right-click on the frame and select page Field properties fromselect page Field properties from the popup menu.the popup menu.  Access the page field propertiesAccess the page field properties dialog box, label tab.dialog box, label tab.  Enter a briefEnter a brief TextText description ofdescription of the function of the control withinthe function of the control within the framethe frame
  • 185.
    185Yes-V Software Solutions(P) Ltd., Page control toolsPage control tools Frames:Frames: Select theSelect the stylestyle for the framefor the frame  You can control the color and line thickness ofYou can control the color and line thickness of a frame by specifying the style.a frame by specifying the style. Select theSelect the Hide BorderHide Border CheckboxCheckbox  Select this check box if you want to hide theSelect this check box if you want to hide the frame’s border.frame’s border.  Use this, if you want to use the style to shadeUse this, if you want to use the style to shade only the background of the framed area or toonly the background of the framed area or to apply other styles.apply other styles.  If you select this option, it will override anyIf you select this option, it will override any border option specified in a style.border option specified in a style. Select theSelect the Adjust layout for Hidden FieldsAdjust layout for Hidden Fields checkcheck boxbox  This option enables automatic verticalThis option enables automatic vertical adjustments to the frame size when hiddenadjustments to the frame size when hidden fields are present.fields are present. .. S8 S9 S7 S6 S5 S4 S3 S2 S1
  • 186.
    186Yes-V Software Solutions(P) Ltd., Page control toolsPage control tools Group Box Control:Group Box Control:  To arrange related fields on a page.To arrange related fields on a page.  We use a group box to surround andWe use a group box to surround and identify a group of related radio buttonsidentify a group of related radio buttons ..  Like a frame, you can resize a groupLike a frame, you can resize a group box.box. To link group boxes to recordTo link group boxes to record definitionsdefinitions  Open the page field properties dialog,Open the page field properties dialog, Record tab.Record tab.  Select a record name and a field name.Select a record name and a field name. Check Box ControlCheck Box Control Used if a data entry fields have one of theUsed if a data entry fields have one of the two values (yes or no).two values (yes or no). S8 S9 S7 S6 S5 S4 S3 S2 S1
  • 187.
    187Yes-V Software Solutions(P) Ltd., Page control toolsPage control tools To link Check Box withTo link Check Box with associated record definitionsassociated record definitions  Open the Page field PropertiesOpen the Page field Properties dialog, Record tab.dialog, Record tab.  Select the record name and fieldSelect the record name and field name from the drop downname from the drop down boxes.boxes.  Enter the “On value” and “OffEnter the “On value” and “Off value” for the check box.value” for the check box. S8 S9 S7 S6 S5 S4 S3 S2 S1
  • 188.
    188Yes-V Software Solutions(P) Ltd., Page control toolsPage control tools Radio Button ControlRadio Button Control Represent one value for a controlRepresent one value for a control with multiple defined values.with multiple defined values. You can add radio button in groups.You can add radio button in groups. Only one button in a group can beOnly one button in a group can be turned on at one time.turned on at one time. S8 S9 S7 S6 S5 S4 S3 S2 S1
  • 189.
    189Yes-V Software Solutions(P) Ltd., Horizontal Rule ControlHorizontal Rule Control Used:Used:  To add horizontal lines to userTo add horizontal lines to user page.page.  As a visual break betweenAs a visual break between controls.controls. To draw a horizontal rule and setTo draw a horizontal rule and set label Propertieslabel Properties::  Click the horizontal Rule button,Click the horizontal Rule button,  Or select Insert, Horizontal Rule.Or select Insert, Horizontal Rule.  Draw a horizontal line to theDraw a horizontal line to the desired length on the page.desired length on the page.  Open the Page Field PropertiesOpen the Page Field Properties dialog box, label , select the styledialog box, label , select the style to control the line color and lineto control the line color and line thickness of a horizontal rule.thickness of a horizontal rule. S8 S9 S7 S6 S5 S4 S3 S2 S1
  • 190.
    190Yes-V Software Solutions(P) Ltd., Horizontal Rule ControlHorizontal Rule Control  The horizontal rule also serves asThe horizontal rule also serves as functional separator of fields andfunctional separator of fields and levels in the order tab of the pagelevels in the order tab of the page definition.definition.  Check the “ Set to Level 0”Check the “ Set to Level 0” option if user want to add stand-option if user want to add stand- alone fields, such as push buttonsalone fields, such as push buttons or hyperlinks below a level-basedor hyperlinks below a level-based control, such as a scroll area.control, such as a scroll area.  Select the Set to Level 0 to forceSelect the Set to Level 0 to force the horizontal rule to be listed atthe horizontal rule to be listed at level 0 in the Order tab.level 0 in the Order tab.  Select the Multi-Currency FieldSelect the Multi-Currency Field option if the field is associatedoption if the field is associated with multi-currency processing.with multi-currency processing. S8 S9 S7 S6 S5 S4 S3 S2 S1
  • 191.
    191Yes-V Software Solutions(P) Ltd., Static Text ControlStatic Text Control Used:Used: To add text to the page.To add text to the page. To describe a control, page or group of controls.To describe a control, page or group of controls. This is a display-only alphanumeric field with a maximum length of 30 characters.This is a display-only alphanumeric field with a maximum length of 30 characters. To insert a static text field:To insert a static text field: Click the Static Text button on the toolbar, or select Insert, Static text.Click the Static Text button on the toolbar, or select Insert, Static text. Position the text field button on the page.Position the text field button on the page. S8 S9 S7 S6 S5 S4 S3 S2 S1
  • 192.
    192Yes-V Software Solutions(P) Ltd., Drop Down List ControlDrop Down List Control To insert a drop down listTo insert a drop down list::  Select the Drop Down list buttonSelect the Drop Down list button on the toolbar, or select Insert,on the toolbar, or select Insert, Drop Down List.Drop Down List.  Drop down lists are used to selectDrop down lists are used to select one from a list of three or moreone from a list of three or more possible valuespossible values.. Associate the drop down list with aAssociate the drop down list with a field.field.  Use the page field propertiesUse the page field properties dialog, Record tab to associate thedialog, Record tab to associate the drop down list with a field.drop down list with a field.  Select style to set the font andSelect style to set the font and color attributes of user drop downcolor attributes of user drop down list data.list data.  Set the field size for the dropSet the field size for the drop down list.down list. S8 S9 S7 S6 S5 S4 S3 S2 S1
  • 193.
    193Yes-V Software Solutions(P) Ltd., Scroll ControlsScroll Controls  Scroll Controls include Scroll areas and scroll bars.Scroll Controls include Scroll areas and scroll bars.  Scrolls, Record Relationships, and Page Processing :Scrolls, Record Relationships, and Page Processing :  When you have more than one record definition on a page, the Scroll ControlsWhen you have more than one record definition on a page, the Scroll Controls in page processing is very important.in page processing is very important.  Scrolls define Parent/child record definition relationships on a page.Scrolls define Parent/child record definition relationships on a page.  The Occur Level to each scroll indicates the relationship among the recordThe Occur Level to each scroll indicates the relationship among the record definitions.definitions.  The primary record on the page is at Level 0 and no scroll or Occurs LevelThe primary record on the page is at Level 0 and no scroll or Occurs Level associated with it.associated with it.  The subordinate record to the primary table will be at level 1.The subordinate record to the primary table will be at level 1.  A table subordinate to level 2 record has a scroll area with an Occurs Level of 2.A table subordinate to level 2 record has a scroll area with an Occurs Level of 2.  Nesting cant be beyond 3 levelsNesting cant be beyond 3 levels S8 S9 S7 S6 S5 S4 S3 S2 S1
  • 194.
    194Yes-V Software Solutions(P) Ltd., Scroll Area ControlScroll Area Control The scroll area is some thing like group box filled with various controls.The scroll area is some thing like group box filled with various controls. S8 S9 S7 S6 S5 S4 S3 S2 S1
  • 195.
    195Yes-V Software Solutions(P) Ltd., Scroll Area ControlScroll Area Control To Insert a scroll area:To Insert a scroll area:  Click the Scroll Area button ,Click the Scroll Area button , on the toolbar or select Insert,on the toolbar or select Insert, Scroll Area.Scroll Area.  Drag the Scroll area to repositionDrag the Scroll area to reposition it on the page as desired.it on the page as desired. To assign general properties to aTo assign general properties to a Scroll area:Scroll area:  Double click on the scroll area,Double click on the scroll area, or right-click to access the pageor right-click to access the page field properties dialog box,field properties dialog box, General tab.General tab.  Type in the page Field Name ofType in the page Field Name of the page in which you havethe page in which you have placed the Scrollplaced the Scroll area.area. S8 S9 S7 S6 S5 S4 S3 S2 S1
  • 196.
    196Yes-V Software Solutions(P) Ltd., Scroll Area ControlScroll Area Control To assign general properties to a Scroll area:To assign general properties to a Scroll area:  Set the Occur Level for the Scroll AreaSet the Occur Level for the Scroll Area  The occur level indicates the relationship among the record definition and theThe occur level indicates the relationship among the record definition and the controls on the page .controls on the page .  It determines how the data is processed.It determines how the data is processed.  Set the Occur count or select Unlimited Occur count if desired.Set the Occur count or select Unlimited Occur count if desired. S8 S9 S7 S6 S5 S4 S3 S2 S1
  • 197.
    197Yes-V Software Solutions(P) Ltd., Scroll BarScroll Bar To Insert a Scroll bar:To Insert a Scroll bar:  Click the Scroll Bar button on the toolbar, or select Insert, Scroll Bar.Click the Scroll Bar button on the toolbar, or select Insert, Scroll Bar.  When a hand-shaped icon appears, position the pointer where the user wantWhen a hand-shaped icon appears, position the pointer where the user want the upper left corner of the scroll bar to begin.the upper left corner of the scroll bar to begin.  Press and hold down the left mouse button as user drag the hand diagonallyPress and hold down the left mouse button as user drag the hand diagonally downward to where the lower right corner of the scroll bar should be.downward to where the lower right corner of the scroll bar should be.  Release the mouse button.Release the mouse button.  Position and size the length of your scroll bar so that all the fields controlledPosition and size the length of your scroll bar so that all the fields controlled by the scroll bar are located to the left of it.by the scroll bar are located to the left of it. S8 S9 S7 S6 S5 S4 S3 S2 S1
  • 198.
    198Yes-V Software Solutions(P) Ltd., Scroll BarScroll Bar S8 S9 S7 S6 S5 S4 S3 S2 S1
  • 199.
    199Yes-V Software Solutions(P) Ltd., Scroll BarScroll Bar Scroll BarScroll Bar useuse  Click the Use tab or select theClick the Use tab or select the scroll bar and double-click toscroll bar and double-click to access the page Field Propertiesaccess the page Field Properties dialog, Use tab.dialog, Use tab.  Set Scroll Attributes:Set Scroll Attributes:  Set the Occur Level and theSet the Occur Level and the Occurs Count.Occurs Count.  In the page control order list,In the page control order list, controls beneath the Scroll barcontrols beneath the Scroll bar will repeat as many times as thewill repeat as many times as the Occur Count on the scroll barOccur Count on the scroll bar above them.above them.  When the Application ProcessorWhen the Application Processor encounters another scroll area,encounters another scroll area, scroll bar, or push button, itscroll bar, or push button, it stops repeating the controls.stops repeating the controls. S8 S9 S7 S6 S5 S4 S3 S2 S1 Properties of the selected scroll Bar
  • 200.
    200Yes-V Software Solutions(P) Ltd., Grid controlGrid control  Grids are tables consisting ofGrids are tables consisting of navigation bars, columns, columnnavigation bars, columns, column headings, rows and row headings.headings, rows and row headings.  User can use gird instead of scrollUser can use gird instead of scroll area or scroll bar to manage multi-area or scroll bar to manage multi- row set of data.row set of data.  Each row in grid corresponds toEach row in grid corresponds to set of controls in a scrollset of controls in a scroll occurrence.occurrence. To Insert a grid control on a page:To Insert a grid control on a page: Click the Grid button on theClick the Grid button on the toolbar, or select Insert, Grid.toolbar, or select Insert, Grid.S8 S9 S7 S6 S5 S4 S3 S2 S1
  • 201.
    201Yes-V Software Solutions(P) Ltd., Grid controlGrid control Grid General PropertiesGrid General Properties  ThiThis is used to associate thes is used to associate the record containing most of therecord containing most of the fields you will use in the grid andfields you will use in the grid and the occurs level.the occurs level.  Enter the main record associatedEnter the main record associated with the grid control i.e., recordwith the grid control i.e., record that contains most of the fieldsthat contains most of the fields that you want to use in the grid.that you want to use in the grid. Note:Note: Any field you display in theAny field you display in the grid that are not from Maingrid that are not from Main Record should be display only orRecord should be display only or related fieldsrelated fields S8 S9 S7 S6 S5 S4 S3 S2 S1
  • 202.
    202Yes-V Software Solutions(P) Ltd., Grid controlGrid control  Enter the page Field Name.Enter the page Field Name.  Enter the Occurs Level toEnter the Occurs Level to designate the hierarchical parentdesignate the hierarchical parent child relationship.child relationship.  Set the Occurs count value toSet the Occurs count value to control the number of rows tocontrol the number of rows to display to the user.display to the user.  Select the Unlimited OccursSelect the Unlimited Occurs Count check box, if desired.Count check box, if desired. S8 S9 S7 S6 S5 S4 S3 S2 S1
  • 203.
    203Yes-V Software Solutions(P) Ltd., Adding page controlsAdding page controls subpage controlsubpage control  A subpage is a predefined, presized group ofA subpage is a predefined, presized group of controls.controls.  Subpages are a powerful means of factoringSubpages are a powerful means of factoring out commonly used page functionality inout commonly used page functionality in your applicationyour application Example: A address control is defined on aExample: A address control is defined on a separate subpage definition that you mightseparate subpage definition that you might use on many different pages.use on many different pages. Defining a Subpage:Defining a Subpage: How to define a Subpage?How to define a Subpage?  Select File, New, Page.Select File, New, Page.  Select File, Object properties or press Alt-Select File, Object properties or press Alt- Enter to access the page properties dialog.Enter to access the page properties dialog.  Select subpage in the page Type drop downSelect subpage in the page Type drop down list.list.  Select the size of the page.Select the size of the page.  Set the “Adjust Layout for Hidden Fields” ifSet the “Adjust Layout for Hidden Fields” if necessary.necessary.  Set Deferred Processing Mode if desired.Set Deferred Processing Mode if desired. S8 S9 S7 S6 S5 S4 S3 S2 S1
  • 204.
    204Yes-V Software Solutions(P) Ltd., Inserting A Subpage Into A PageInserting A Subpage Into A Page  Open the page on which you want toOpen the page on which you want to insert the subpage.insert the subpage.  Select Insert, SubPage.Select Insert, SubPage.  The Insert Subpage dialog box appears.The Insert Subpage dialog box appears.  Select a subpage definition.Select a subpage definition.  Specify the name of the subpage that youSpecify the name of the subpage that you want to insert into the open pagewant to insert into the open page definition.definition.  Select a record definition inSelect a record definition in SubPageSubPage Record Name SubstitutionRecord Name Substitution group box.group box.  The subpage writes its fields to a genericThe subpage writes its fields to a generic record. Specify the application-specificrecord. Specify the application-specific record name to which you want therecord name to which you want the information in the subpage written.information in the subpage written. Note.Note. All of the fields in a subpage must beAll of the fields in a subpage must be associated with fields of a subrecord in theassociated with fields of a subrecord in the specified record definition.specified record definition.  ClickClick OK.OK. S8 S9 S7 S6 S5 S4 S3 S2 S1
  • 205.
    205Yes-V Software Solutions(P) Ltd., Changing Informational SubpageChanging Informational Subpage LabelsLabels  Open the Subpage Properties dialog box.Open the Subpage Properties dialog box.  Note that the Subpage tab displays the information you entered on theNote that the Subpage tab displays the information you entered on the Insert Subpage dialog box.Insert Subpage dialog box.  On the Label tab, enter your informational text label.On the Label tab, enter your informational text label.  Enter the Page Field Name in the General tab.Enter the Page Field Name in the General tab. S8 S9 S7 S6 S5 S4 S3 S2 S1
  • 206.
    206Yes-V Software Solutions(P) Ltd., Defining Secondary PagesDefining Secondary Pages To insert a secondary pageTo insert a secondary page control on a primarycontrol on a primary pagepage::  Select Insert, Secondary Page.Select Insert, Secondary Page.  Select the primary page onSelect the primary page on which you want to display thewhich you want to display the secondary page control.secondary page control.  The secondary page controlThe secondary page control appears like a small pushappears like a small push button with the secondary pagebutton with the secondary page icon on it. This control isicon on it. This control is invisible at runtime.invisible at runtime.  Double-click the control toDouble-click the control to access the Secondary Pageaccess the Secondary Page Properties dialogProperties dialog box:box: Secondary Page tab.Secondary Page tab. S8 S9 S7 S6 S5 S4 S3 S2 S1
  • 207.
    207Yes-V Software Solutions(P) Ltd., Using Secondary PagesUsing Secondary Pages secondary page is just another page to thesecondary page is just another page to the user at runtime, they look and behaveuser at runtime, they look and behave differently than the primary pages.differently than the primary pages. exampleexample::  You can view a secondary page from itsYou can view a secondary page from its primary page only.primary page only.  A secondary page should have OK andA secondary page should have OK and Cancel buttons so that the user canCancel buttons so that the user can dismiss the page (accepting or cancelingdismiss the page (accepting or canceling input) and return to the primary page.input) and return to the primary page.  To offer the user alternative buttons toTo offer the user alternative buttons to dismiss the page, disable the default OKdismiss the page, disable the default OK and Cancel buttons in the Pageand Cancel buttons in the Page Properties dialog box.Properties dialog box. S8 S9 S7 S6 S5 S4 S3 S2 S1
  • 208.
    208Yes-V Software Solutions(P) Ltd., Including Secondary Pages Into Primary PageIncluding Secondary Pages Into Primary Page Secondary Page or a Push Button?Secondary Page or a Push Button?  There are two ways to associate a secondary page with a primary page:There are two ways to associate a secondary page with a primary page:  Insert a push button or link and associate it with your secondary page.Insert a push button or link and associate it with your secondary page.  This automatically displays the secondary page when the user presses the button orThis automatically displays the secondary page when the user presses the button or clicks the link and is the preferred method. Use this method when:clicks the link and is the preferred method. Use this method when:  No procedural PeopleCode logic is necessary before the secondary page is displayedNo procedural PeopleCode logic is necessary before the secondary page is displayed (PeopleCode can be used on the secondary page just like any other page).(PeopleCode can be used on the secondary page just like any other page).  You want to control the formatting of the information (therefore you want to use a page,You want to control the formatting of the information (therefore you want to use a page, and not use the Prompt function).and not use the Prompt function).  The secondary page is used more than once.The secondary page is used more than once.  Insert a secondary page control.Insert a secondary page control.  This control looks like a command push button, but it is invisible at runtime.This control looks like a command push button, but it is invisible at runtime. the Address page contains an Email link at the bottom of the scroll area. This linkthe Address page contains an Email link at the bottom of the scroll area. This link opens the Email Addresses page, enabling the user to enter email addressopens the Email Addresses page, enabling the user to enter email address information.information. S8 S9 S7 S6 S5 S4 S3 S2 S1
  • 209.
    209Yes-V Software Solutions(P) Ltd., Including Secondary Pages Into Primary PageIncluding Secondary Pages Into Primary Page If destination is secondary page,If destination is secondary page, Secondary page groupbox will beSecondary page groupbox will be enabled.enabled. S8 S9 S7 S6 S5 S4 S3 S2 S1
  • 210.
    210Yes-V Software Solutions(P) Ltd., Example Of Secondary PageExample Of Secondary Page The Address page contains an Email link at the bottom of the scroll area. This link opens the Email Addresses page, enabling the user to enter email address information. S8 S9 S7 S6 S5 S4 S3 S2 S1
  • 211.
    211Yes-V Software Solutions(P) Ltd., Setting Page Field Properties for ControlsSetting Page Field Properties for Controls The page field properties of a page control determine how the page control lookThe page field properties of a page control determine how the page control look and function in your application pageand function in your application page The page field properties dialog box of a page control is obtained byThe page field properties dialog box of a page control is obtained by 1.1. Double-clicking the controlDouble-clicking the control 2.2. Selecting theSelecting the Page Field PropertiesPage Field Properties from thefrom the EditEdit menumenu 3.3. By the pop-up menu, which is activated by a right-click on the control .By the pop-up menu, which is activated by a right-click on the control . S8 S9 S7 S6 S5 S4 S3 S2 S1
  • 212.
    212Yes-V Software Solutions(P) Ltd., Setting page field properties for controlSetting page field properties for control The page control properties dialogThe page control properties dialog boxes have the following tabs:boxes have the following tabs:  LabelLabel – Sets the label that– Sets the label that appears on the control.appears on the control.  UseUse – Defines how to use the– Defines how to use the control on the page, such ascontrol on the page, such as display-only, invisible, ordisplay-only, invisible, or hidden. This is also used tohidden. This is also used to manipulate controls onmanipulate controls on multiple level pages, to definemultiple level pages, to define display and related controldisplay and related control fields, the processing of thefields, the processing of the control.control.  GeneralGeneral – Specifies an optional– Specifies an optional internal page field name that isinternal page field name that is referenced by the page .referenced by the page . S8 S9 S7 S6 S5 S4 S3 S2 S1
  • 213.
    213Yes-V Software Solutions(P) Ltd., Setting Page Field PropertiesSetting Page Field Properties  Right Click on a particularRight Click on a particular record field, it displays arecord field, it displays a popup menu from where youpopup menu from where you can select Page Fieldcan select Page Field Properties.Properties. S8 S9 S7 S6 S5 S4 S3 S2 S1
  • 214.
    214Yes-V Software Solutions(P) Ltd., Setting Record Tab PropertiesSetting Record Tab Properties Setting Record PropertiesSetting Record Properties Record NameRecord Name – Select the name of– Select the name of the record definition where thethe record definition where the field is located. If the field isfield is located. If the field is dragged from a record in thedragged from a record in the project workspace, that recordproject workspace, that record name gets selected.name gets selected. Field NameField Name – Select the name of– Select the name of the field from the list of fields ofthe field from the list of fields of the selected record, to which thethe selected record, to which the page control has to bepage control has to be associated.associated. S8 S9 S7 S6 S5 S4 S3 S2 S1 If the field is dragged from aIf the field is dragged from a record in the projectrecord in the project workspace, that record nameworkspace, that record name gets selected.gets selected.
  • 215.
    215Yes-V Software Solutions(P) Ltd., Setting Record Tab PropertiesSetting Record Tab Properties Setting Record PropertiesSetting Record Properties  StyleStyle – Set the font and color– Set the font and color attributes of your control data. Eachattributes of your control data. Each page control has a default style classpage control has a default style class associated with it, which controls howassociated with it, which controls how the page control appears. The defaultthe page control appears. The default style class for an edit box isstyle class for an edit box is PSEDITBOX.PSEDITBOX.  SizeSize – After the control is linked with– After the control is linked with a record name and field, the systema record name and field, the system automatically calculates the pageautomatically calculates the page control size. Three size options arecontrol size. Three size options are available:available:  AverageAverage – Provides sufficient size to– Provides sufficient size to display the field control length indisplay the field control length in average-width characters.average-width characters. S8 S9 S7 S6 S5 S4 S3 S2 S1
  • 216.
    216Yes-V Software Solutions(P) Ltd., Setting Record Tab PropertiesSetting Record Tab Properties  MaximumMaximum - Provides sufficient- Provides sufficient size to display the field controlsize to display the field control length in maximum-widthlength in maximum-width characters.characters.  CustomCustom – Enables you to define– Enables you to define a custom size for edit boxes thata custom size for edit boxes that are not display-only.are not display-only. AlignmentAlignment  Auto –Auto – Left-justifies the contentsLeft-justifies the contents of character fields and right-of character fields and right- justifies the contents of numberjustifies the contents of number and signed number fields.and signed number fields.  Left –Left – Left-justifies the contentsLeft-justifies the contents of the field. If the field is notof the field. If the field is not display-only, the alignment isdisplay-only, the alignment is always left-justified and if the fieldalways left-justified and if the field is display-only, the system usesis display-only, the system uses the alignment that you specify.the alignment that you specify. S8 S9 S7 S6 S5 S4 S3 S2 S1
  • 217.
    217Yes-V Software Solutions(P) Ltd., Setting Record Tab PropertiesSetting Record Tab Properties  Right –Right – Right-justifies the contentsRight-justifies the contents of the field.of the field.  Family Name –Family Name – This display-onlyThis display-only field displays the current family name,field displays the current family name, which was set when the field waswhich was set when the field was created.created.  Display Name –Display Name – Select an option toSelect an option to override the display format that isoverride the display format that is associated with a field.associated with a field. S8 S9 S7 S6 S5 S4 S3 S2 S1
  • 218.
    218Yes-V Software Solutions(P) Ltd., Setting Record Tab PropertiesSetting Record Tab Properties  Display OptionsDisplay Options  Display Zero –Display Zero – Select this optionSelect this option if the page controls are numericif the page controls are numeric and a zero value has to beand a zero value has to be displayed instead of a blank field.displayed instead of a blank field.  Display Century –Display Century – Select for dateSelect for date fields to enable users to enter afields to enable users to enter a date with a 4-digit century. If thisdate with a 4-digit century. If this option is not checked, the centuryoption is not checked, the century is automatically set to the centuryis automatically set to the century of your system date.of your system date.  Password –Password – Select to hide theSelect to hide the value that is entered in a pagevalue that is entered in a page control. This option causescontrol. This option causes characters in this control to appearcharacters in this control to appear online as asterisks.online as asterisks. S8 S9 S7 S6 S5 S4 S3 S2 S1
  • 219.
    219Yes-V Software Solutions(P) Ltd., Setting Record Tab PropertiesSetting Record Tab Properties  Currency Symbol –Currency Symbol – Select toSelect to display a currency symbol indisplay a currency symbol in the field.the field.  Show Prompt Button –Show Prompt Button – SelectSelect to display a prompt buttonto display a prompt button next to the edit box, whichnext to the edit box, which enables the user to look upenables the user to look up valid values for that field.valid values for that field.  1000 Separator –1000 Separator – Select if theSelect if the contents of the page controlcontents of the page control are numeric and you want toare numeric and you want to insert thousand separators toinsert thousand separators to make the numbers easier tomake the numbers easier to read.read. S8 S9 S7 S6 S5 S4 S3 S2 S1
  • 220.
    220Yes-V Software Solutions(P) Ltd., Setting Record Tab PropertiesSetting Record Tab Properties  Auto Fill –Auto Fill – Select to have theSelect to have the system automatically populate thesystem automatically populate the page control with the characterpage control with the character specified in the Fill Character field.specified in the Fill Character field. Auto Fill can affect the actualAuto Fill can affect the actual value of the control, not just thevalue of the control, not just the visual representation.visual representation.  Auto Decimal –Auto Decimal – Select to insert aSelect to insert a decimal point automatically if nonedecimal point automatically if none is provided in the data that isis provided in the data that is entered into the control.entered into the control.  Display Time Zone –Display Time Zone – Select ifSelect if you are setting the properties for ayou are setting the properties for a Time or a DateTime field and youTime or a DateTime field and you want to display the related timewant to display the related time zone.zone. S8 S9 S7 S6 S5 S4 S3 S2 S1
  • 221.
    221Yes-V Software Solutions(P) Ltd., Setting Record Tab PropertiesSetting Record Tab Properties  Enable Spell Check –Enable Spell Check – This option is for edit orThis option is for edit or long edit boxes only, tolong edit boxes only, to enable the user to checkenable the user to check spelling on field content.spelling on field content.  Fill Character –Fill Character – Enter aEnter a character to replace blankcharacter to replace blank spaces in an edit boxspaces in an edit box when the contents of thewhen the contents of the field are displayed. Youfield are displayed. You can use any character as acan use any character as a fill character.fill character. S8 S9 S7 S6 S5 S4 S3 S2 S1
  • 222.
    222Yes-V Software Solutions(P) Ltd., Setting Label PropertiesSetting Label Properties  Type –Type – Select the type of label.Select the type of label. The following options are available:The following options are available:  NoneNone – Select to display no– Select to display no control label on your page. Usedcontrol label on your page. Used for related displays or invisiblefor related displays or invisible controls.controls.  TextText – Select to display text that– Select to display text that you enter in the Text field. Theyou enter in the Text field. The default text is the long name fordefault text is the long name for the field from the associatedthe field from the associated record definition.record definition.  RFT Short (Record FieldRFT Short (Record Field Table short)Table short) – Select to display– Select to display the RFT short name for the fieldthe RFT short name for the field from the associated recordfrom the associated record definition.definition. S8 S9 S7 S6 S5 S4 S3 S2 S1
  • 223.
    223Yes-V Software Solutions(P) Ltd., Setting Label PropertiesSetting Label Properties  RFT LongRFT Long – Select to– Select to display the RFT long namedisplay the RFT long name for the field from thefor the field from the associated record definition.associated record definition. This is the default.This is the default.  Label TextLabel Text  Text –Text – Enter the text exactly asEnter the text exactly as it should appear on the page.it should appear on the page. The default isThe default is Dummy NameDummy Name until you assign a record anduntil you assign a record and field to the control.field to the control. S8 S9 S7 S6 S5 S4 S3 S2 S1
  • 224.
    224Yes-V Software Solutions(P) Ltd., Setting Label PropertiesSetting Label Properties  Label ID –Label ID – The systemThe system automatically inserts the longautomatically inserts the long name or short name from thename or short name from the record definition dependingrecord definition depending on the type of option selectedon the type of option selected inin TypeType options (RFT Longoptions (RFT Long or RFT Short). Ifor RFT Short). If TextText isis selected from theselected from the TypeType options, this option becomesoptions, this option becomes display only and the user isdisplay only and the user is allowed to enter a value in theallowed to enter a value in the TextText S8 S9 S7 S6 S5 S4 S3 S2 S1
  • 225.
    225Yes-V Software Solutions(P) Ltd., Setting Label PropertiesSetting Label Properties  Insert Line Feed –Insert Line Feed – Click to split yourClick to split your control label into multiple lines at thecontrol label into multiple lines at the position of the cursor in the Text field.position of the cursor in the Text field. A thick vertical bar character appearsA thick vertical bar character appears in the Text field.in the Text field.  Style –Style – Select to control the color, font,Select to control the color, font, and other characteristics of a label.and other characteristics of a label.  AlignmentAlignment  Left –Left – Select to align the label to the left-Select to align the label to the left- of-center horizontally. This is the default.of-center horizontally. This is the default.  Centered –Centered – Select to center the labelSelect to center the label horizontally.horizontally.  Right –Right – Select to align the label to theSelect to align the label to the right-of-center horizontally.right-of-center horizontally. S8 S9 S7 S6 S5 S4 S3 S2 S1
  • 226.
    226Yes-V Software Solutions(P) Ltd., Setting Label PropertiesSetting Label Properties  PositionPosition  Left –Left – Positions label to thePositions label to the left side of the field.left side of the field.  TopTop – Positions label above– Positions label above the field.the field.  CustomCustom – Indicates that– Indicates that the label has been manuallythe label has been manually moved on the page.moved on the page.  Display OptionsDisplay Options  First occurs only –First occurs only – SelectSelect to display the label onlyto display the label only with the first occurrence ofwith the first occurrence of a scroll areaa scroll area  No colon –No colon – No colonNo colon appears at the end of theappears at the end of the label text.label text. S8 S9 S7 S6 S5 S4 S3 S2 S1
  • 227.
    227Yes-V Software Solutions(P) Ltd., Setting Use PropertiesSetting Use Properties  Field Use OptionsField Use Options  Display Only –Display Only – Select toSelect to prevent users from modifyingprevent users from modifying the contents of the controlthe contents of the control during application data entry.during application data entry. The system automaticallyThe system automatically selects Display Only whenselects Display Only when you select Related Field. Thisyou select Related Field. This cannot be cleared until youcannot be cleared until you clear Related Field.clear Related Field.  Multi-Currency FieldMulti-Currency Field –– Select to identify the controlSelect to identify the control as associated withas associated with multicurrency processing.multicurrency processing. S8 S9 S7 S6 S5 S4 S3 S2 S1
  • 228.
    228Yes-V Software Solutions(P) Ltd., Setting Use PropertiesSetting Use Properties  Invisible –Invisible – Select to make theSelect to make the control physically present on acontrol physically present on a page but invisible to users. Anpage but invisible to users. An invisible control field can beinvisible control field can be used as a display control fieldused as a display control field or it may be required for aor it may be required for a PeopleCode program that isPeopleCode program that is associated with the page.associated with the page. S8 S9 S7 S6 S5 S4 S3 S2 S1
  • 229.
    229Yes-V Software Solutions(P) Ltd., Setting Use PropertiesSetting Use Properties  Display Control Field –Display Control Field – Select toSelect to indicate that the field controlsindicate that the field controls another field on the same pageanother field on the same page level. The controlled field is alevel. The controlled field is a related field.related field.  Show Label –Show Label – Select to make theSelect to make the control label visible while thecontrol label visible while the control itself is invisible. This iscontrol itself is invisible. This is selected only if Invisible isselected only if Invisible is selected.selected.  Related Field –Related Field – Select toSelect to specify that the contents ofspecify that the contents of this control are ruled bythis control are ruled by another control on the sameanother control on the same page level, a display controlpage level, a display control field.field. S8 S9 S7 S6 S5 S4 S3 S2 S1
  • 230.
    230Yes-V Software Solutions(P) Ltd., Setting Use PropertiesSetting Use Properties WhenWhen Related FieldRelated Field isis selected,selected, Display OnlyDisplay Only option isoption is automatically selected. It alsoautomatically selected. It also makes themakes the Related ControlRelated Control FieldField drop-down list boxdrop-down list box available for you to select theavailable for you to select the related control fieldrelated control field  Related Control Field –Related Control Field – WhenWhen you select Related Field, a list ofyou select Related Field, a list of all controls on the page that areall controls on the page that are marked as display control fieldsmarked as display control fields appears in a drop-down list box.appears in a drop-down list box. Select the field to which thisSelect the field to which this control is related.control is related. .. S8 S9 S7 S6 S5 S4 S3 S2 S1
  • 231.
    231Yes-V Software Solutions(P) Ltd., Setting Use PropertiesSetting Use Properties  Display-Only AppearanceDisplay-Only Appearance  Text Only andText Only and Disabled Edit ControlDisabled Edit Control appliesapplies to edit boxes and drop-downto edit boxes and drop-down list boxes only.list boxes only.  Pop-up Menu – Pop-upPop-up Menu – Pop-up menus are lists of menu itemsmenus are lists of menu items that you can associate with athat you can associate with a field on a page. At runtime, thefield on a page. At runtime, the menu appears on a separatemenu appears on a separate page as a list of links to relatedpage as a list of links to related pages.pages.  Allow Deferred ProcessingAllow Deferred Processing –– Check this check box toCheck this check box to allow deferred processingallow deferred processing S8 S9 S7 S6 S5 S4 S3 S2 S1
  • 232.
    232Yes-V Software Solutions(P) Ltd., General Tab PropertiesGeneral Tab Properties  Setting General PropertiesSetting General Properties  Page Field Name –Page Field Name – Enter a nameEnter a name for the page field that you arefor the page field that you are creating. It does not appear as thecreating. It does not appear as the label for the page field.label for the page field.  Enable as Page AnchorEnable as Page Anchor – Select– Select this to apply an “anchor” tag tothis to apply an “anchor” tag to the current page field on the page.the current page field on the page.  This check box is cleared, byThis check box is cleared, by defaultdefault  the General tab contains only thethe General tab contains only the Page Field Name and Enable asPage Field Name and Enable as Page Anchor settings (If it isPage Anchor settings (If it is checked)checked)S8 S9 S7 S6 S5 S4 S3 S2 S1
  • 233.
    233Yes-V Software Solutions(P) Ltd., View Record PeopleCodeView Record PeopleCode  Page fields are associated with aPage fields are associated with a specific record field. You canspecific record field. You can access the PeopleCode for thataccess the PeopleCode for that record field from the page field inrecord field from the page field in the page definition.the page definition.  To edit or add the record fieldTo edit or add the record field PeopleCode,PeopleCode,  selectselect ViewView,, View RecordView Record PeopleCodePeopleCode from a page.from a page.  Select the PeopleCode eventSelect the PeopleCode event type from the drop-down listtype from the drop-down list box in the PeopleCode editor,box in the PeopleCode editor, edit or add PeopleCode andedit or add PeopleCode and save the changes.save the changes.S8 S9 S7 S6 S5 S4 S3 S2 S1
  • 234.
    234Yes-V Software Solutions(P) Ltd., Page PropertiesPage Properties Page PropertiesPage Properties  Access the Page PropertiesAccess the Page Properties dialog box (selectdialog box (select FileFile,, DefinitionDefinition propertiesproperties), select the General Tab,), select the General Tab, enter a description and any commentsenter a description and any comments about the page and assign an owner Id.about the page and assign an owner Id. S8 S9 S7 S6 S5 S4 S3 S2 S1
  • 235.
    235Yes-V Software Solutions(P) Ltd., Use Tab PropertiesUse Tab Properties Setting Use Tab PropertiesSetting Use Tab Properties  Page Type –Page Type – Use the standardUse the standard page, or select a subpage or apage, or select a subpage or a secondary page from the drop-secondary page from the drop- down list box.down list box.  Page size –Page size – Select a page size.Select a page size. There are different types of pageThere are different types of page sizes to accommodate differentsizes to accommodate different types of workstation monitors.types of workstation monitors.  Additional SettingsAdditional Settings Pop-Up Menu –Pop-Up Menu – List of menuList of menu items that can be associated withitems that can be associated with fields.fields. Allow Deferred Processing –Allow Deferred Processing – Check this checkbox to allowCheck this checkbox to allow deferred processing.deferred processing. Refer Page 233 for explanations.Refer Page 233 for explanations. S8 S9 S7 S6 S5 S4 S3 S2 S1
  • 236.
    236Yes-V Software Solutions(P) Ltd., Saving PageSaving Page  To save your work, selectTo save your work, select FileFile,, SaveSave oror FileFile,, Save As.Save As. S8 S9 S7 S6 S5 S4 S3 S2 S1
  • 237.
    237Yes-V Software Solutions(P) Ltd., Creating an ApplicationCreating an Application Simple 9 stepsSimple 9 steps 1. Create Field Definition1. Create Field Definition 2. Create Record Definition.2. Create Record Definition. 3. Build the Record Definition.3. Build the Record Definition. 4. Create page Definition.4. Create page Definition. 5.5. Create Component DefinitionCreate Component Definition.. 6. Include pages into component Definition.6. Include pages into component Definition. 7. Creating Menu Definition.7. Creating Menu Definition. 8. Assigning security to the menu.8. Assigning security to the menu. 9. Test the application9. Test the application S8 S9 S7 S6 S5 S4 S3 S2 S1
  • 238.
    Yes-V Software Solutions(P) Ltd., 238 Creating Component DefinitionCreating Component Definition
  • 239.
    239Yes-V Software Solutions(P) Ltd., ComponentComponent  A component represents a complete business transaction.A component represents a complete business transaction.  It comprises either a single page or a set of pages that areIt comprises either a single page or a set of pages that are meant to be processed as one.meant to be processed as one.  After you create pages, you add them to one or moreAfter you create pages, you add them to one or more components to access them through menus or in businesscomponents to access them through menus or in business processes.processes. S8 S9 S7 S6 S5 S4 S3 S2 S1
  • 240.
    240Yes-V Software Solutions(P) Ltd., Creating a New Component DefinitionCreating a New Component Definition To create a new component definition:To create a new component definition:  With a new or existing project open in PeopleSoft Application Designer,With a new or existing project open in PeopleSoft Application Designer, select File, New.select File, New.  Double-clickDouble-click Component.Component.  The new component definition appears in the workspace.The new component definition appears in the workspace. To open an existing component definition:To open an existing component definition:  Select File, Open.Select File, Open.  SelectSelect ComponentComponent as the type.as the type.  Specify the selection criteria.Specify the selection criteria.  The component definition appears in the workspace.The component definition appears in the workspace. S8 S9 S7 S6 S5 S4 S3 S2 S1
  • 241.
    241Yes-V Software Solutions(P) Ltd., Setting Component PropertiesSetting Component Properties To open the Component Properties dialog box:To open the Component Properties dialog box:  Open the component definition.Open the component definition.  Select File, Definition Properties.Select File, Definition Properties.  The Component Properties dialog box appears with the GeneralThe Component Properties dialog box appears with the General tab active.tab active. It contains 3 tabsIt contains 3 tabs  generalgeneral  useuse  internet .internet . S8 S9 S7 S6 S5 S4 S3 S2 S1
  • 242.
    242Yes-V Software Solutions(P) Ltd., New Component DefinitionNew Component Definition S8 S9 S7 S6 S5 S4 S3 S2 S1
  • 243.
    243Yes-V Software Solutions(P) Ltd., Setting Component PropertiesSetting Component Properties Setting General PropertiesSetting General Properties DescriptionDescription Enter a descriptive name forEnter a descriptive name for the componentthe component Owner IDOwner ID  View a list of applications with whichView a list of applications with which this component is used. This list isthis component is used. This list is helpful to identify the applicationshelpful to identify the applications that are associated with thethat are associated with the component during the applicationcomponent during the application development phase.development phase. Last UpdatedLast Updated View the date and time ofView the date and time of the last modification made to thethe last modification made to the component and the name of the usercomponent and the name of the user who made the modificationwho made the modification S8 S9 S7 S6 S5 S4 S3 S2 S1
  • 244.
    244Yes-V Software Solutions(P) Ltd., Setting Use PropertiesSetting Use Properties Access the Component PropertiesAccess the Component Properties dialog box. Select the Use tab.dialog box. Select the Use tab. Search recordSearch record Specify the searchSpecify the search record for this component .record for this component . Add search recordAdd search record Specify if youSpecify if you want a different search recordwant a different search record specifically for add actions.specifically for add actions. Force Search ProcessingForce Search Processing Select toSelect to always run search logic (SearchInitalways run search logic (SearchInit PeopleCode) for this component.PeopleCode) for this component. The default is clearThe default is clear Detail pageDetail page Specify the page that youSpecify the page that you want for details.want for details. S8 S9 S7 S6 S5 S4 S3 S2 S1
  • 245.
    245Yes-V Software Solutions(P) Ltd., Setting Use PropertiesSetting Use Properties ActionsActions AddAdd  To add a new high-level key, such asTo add a new high-level key, such as a new employee ID or customer.a new employee ID or customer.  used to insert a new current row orused to insert a new current row or to update future rows.to update future rows. Update/DisplayUpdate/Display to update existing rowsto update existing rows only.only. Update/Display AllUpdate/Display All  Select to update current and futureSelect to update current and future rows in an effective-dated record .rows in an effective-dated record .  Use only with effective-dated records.Use only with effective-dated records.  Do not use these actions unless theDo not use these actions unless the main record that is associated withmain record that is associated with the page definitions is effective-dated.the page definitions is effective-dated.  This is translated to include history atThis is translated to include history at runtimeruntime.. S8 S9 S7 S6 S5 S4 S3 S2 S1
  • 246.
    246Yes-V Software Solutions(P) Ltd., Setting Use PropertiesSetting Use Properties CorrectionCorrection  Select to update anySelect to update any rows (history, current,rows (history, current, and future) in anand future) in an effective-dated recordeffective-dated record  Use only with effective-Use only with effective- dated records.dated records.  This is translated toThis is translated to correct history atcorrect history at runtimeruntime S8 S9 S7 S6 S5 S4 S3 S2 S1
  • 247.
    247Yes-V Software Solutions(P) Ltd., Setting Use PropertiesSetting Use Properties Disable Saving PageDisable Saving Page  Select when you want to hide theSelect when you want to hide the Save button in the toolbar andSave button in the toolbar and disable the Alt+1 (Save) hot key.disable the Alt+1 (Save) hot key.  This prevents the user from beingThis prevents the user from being prompted to save when exiting aprompted to save when exiting a pagepage ..  Used in which the user isn’tUsed in which the user isn’t making database changes andmaking database changes and doesn’t need to be prompted todoesn’t need to be prompted to save.save.  RestrictionRestriction  it doesn’t prevent usingit doesn’t prevent using PeopleCode to save aPeopleCode to save a page with the DoSave()page with the DoSave() or DoSaveNow()or DoSaveNow() functionsfunctions.. S8 S9 S7 S6 S5 S4 S3 S2 S1
  • 248.
    248Yes-V Software Solutions(P) Ltd., Setting Use PropertiesSetting Use Properties Include in NavigationInclude in Navigation  Select to include theSelect to include the component in the menucomponent in the menu navigation at runtime .navigation at runtime .  The default is selected .The default is selected . Mandatory Spell CheckMandatory Spell Check Select to ensure that spellSelect to ensure that spell check is run on allcheck is run on all eligible spell checkeligible spell check enabled fields in theenabled fields in the component when thecomponent when the user saves the pageuser saves the page S8 S9 S7 S6 S5 S4 S3 S2 S1
  • 249.
    249Yes-V Software Solutions(P) Ltd., Setting Use PropertiesSetting Use Properties 3-Tier Execution Location3-Tier Execution Location This section applies to WindowsThis section applies to Windows client applications only.client applications only. Component BuildComponent Build  Specify where you want allSpecify where you want all processing to occur after the keyprocessing to occur after the key list of a page is selected andlist of a page is selected and before the user can interact withbefore the user can interact with the page.the page.  This includes buildingThis includes building component buffers and runningcomponent buffers and running many types of PeopleCodemany types of PeopleCode.. S8 S9 S7 S6 S5 S4 S3 S2 S1
  • 250.
    250Yes-V Software Solutions(P) Ltd., Setting Use PropertiesSetting Use Properties Component SaveComponent Save  Specify where you want allSpecify where you want all processing to occur after theprocessing to occur after the user saves the componentuser saves the component and SaveEdit PeopleCodeand SaveEdit PeopleCode validations have succeeded.validations have succeeded.  It includes SavePreChange,It includes SavePreChange, WorkFlow, andWorkFlow, and SavePostChangeSavePostChange PeopleCode and updates toPeopleCode and updates to the databasethe database..S8 S9 S7 S6 S5 S4 S3 S2 S1
  • 251.
    251Yes-V Software Solutions(P) Ltd., Creating an ApplicationCreating an Application Simple 9 stepsSimple 9 steps 1. Create Field Definition1. Create Field Definition 2. Create Record Definition.2. Create Record Definition. 3. Build the Record Definition.3. Build the Record Definition. 4. Create page Definition.4. Create page Definition. 5. Create Component Definition.5. Create Component Definition. 6.6. Include pages into component DefinitionInclude pages into component Definition.. 7. Creating Menu Definition.7. Creating Menu Definition. 8. Assigning security to the menu.8. Assigning security to the menu. 9. Test the application9. Test the application S8 S9 S7 S6 S5 S4 S3 S2 S1
  • 252.
    Yes-V Software Solutions(P) Ltd., 252 Including Pages into ComponentIncluding Pages into Component
  • 253.
    253Yes-V Software Solutions(P) Ltd., Adding Pages to ComponentsAdding Pages to Components Pages can be added to components inPages can be added to components in 22 waysways 1.Using the1.Using the InsertInsert MenuMenu to Add a Pageto Add a Page  Open a new or existing component in the workspace and make theOpen a new or existing component in the workspace and make the definition active.definition active.  Select Insert, Page into Component.Select Insert, Page into Component.  ClickClick Insert.Insert.  A list of available pages matching your search criteria appears.A list of available pages matching your search criteria appears.  Select the page that you want to add to the component.Select the page that you want to add to the component.  ClickClick Insert.Insert.  The page that you selected appears in the component in the workspace.The page that you selected appears in the component in the workspace.  When you are finished adding pages to your component, clickWhen you are finished adding pages to your component, click Close.Close.  Save your component.Save your component.  Component names can be up to 18 characters in length.Component names can be up to 18 characters in length. S8 S9 S7 S6 S5 S4 S3 S2 S1
  • 254.
    254Yes-V Software Solutions(P) Ltd., ComponentComponent S8 S9 S7 S6 S5 S4 S3 S2 S1
  • 255.
    255Yes-V Software Solutions(P) Ltd., Adding Pages to ComponentsAdding Pages to Components 22.. Dragging a Page Into aDragging a Page Into a ComponentComponent  To drag a page into aTo drag a page into a component:component:  Open the project andOpen the project and component.component.  DragDrag pagespages from thefrom the project workspace to theproject workspace to the componentcomponent S8 S9 S7 S6 S5 S4 S3 S2 S1
  • 256.
    256Yes-V Software Solutions(P) Ltd., Re-ordering PagesRe-ordering Pages Reordering Pages in a ComponentReordering Pages in a Component  After you add pages to your component, you can change the order in whichAfter you add pages to your component, you can change the order in which they appear in the componentthey appear in the component.. Steps:Steps:  Select a row number on the left-hand side of the component definition.Select a row number on the left-hand side of the component definition.  Drag the row to the correct position.Drag the row to the correct position.  The page is inserted immediately below the highlighted line.The page is inserted immediately below the highlighted line. Moving a page in a component S8 S9 S7 S6 S5 S4 S3 S2 S1
  • 257.
    257Yes-V Software Solutions(P) Ltd., Component With Multiple PagesComponent With Multiple Pages Component Multiple Pages in a Component S8 S9 S7 S6 S5 S4 S3 S2 S1
  • 258.
    258Yes-V Software Solutions(P) Ltd., Defining ComponentsDefining Components  When you design pages of aWhen you design pages of a component, the pages should sharecomponent, the pages should share the same basic key structure becausethe same basic key structure because they share the same search recordthey share the same search record Working With the ComponentWorking With the Component Definition WindowDefinition Window  The component definitionThe component definition window has two tabs,window has two tabs, DefinitionDefinition andand StructureStructure,, which provide different views ofwhich provide different views of a component.a component. Definition TabDefinition Tab  The default componentThe default component definition view displays the pagedefinition view displays the page items and correspondingitems and corresponding attributes of a componentattributes of a component definition.definition. Component definition view S8 S9 S7 S6 S5 S4 S3 S2 S1
  • 259.
    259Yes-V Software Solutions(P) Ltd., Setting Page AttributesSetting Page Attributes Each page in a componentEach page in a component has attributes. Eachhas attributes. Each attribute is representedattribute is represented by a column in theby a column in the component definition.component definition. Page NamePage Name Contains theContains the read-only name of theread-only name of the page definition. If youpage definition. If you rename the page, thisrename the page, this column is updatedcolumn is updated automaticallyautomatically.. S8 S9 S7 S6 S5 S4 S3 S2 S1
  • 260.
    260Yes-V Software Solutions(P) Ltd., Setting Page AttributesSetting Page Attributes Item NameItem Name Contains a nameContains a name for each page in thefor each page in the component. This name mustcomponent. This name must be unique in the componentbe unique in the component and the default is the pageand the default is the page name. This name is forname. This name is for informational purposes only.informational purposes only. HiddenHidden Specifies whether theSpecifies whether the page can be viewed by thepage can be viewed by the user at runtimeuser at runtime .. Pages are usually hidden whenPages are usually hidden when they are used in work groupsthey are used in work groups or associated with derivedor associated with derived work records .work records . S8 S9 S7 S6 S5 S4 S3 S2 S1
  • 261.
    261Yes-V Software Solutions(P) Ltd., Setting Page AttributesSetting Page Attributes Item LabelItem Label ::  Serves as the default folderServes as the default folder tab label, unless a differenttab label, unless a different label is specified.label is specified.  The item label should beThe item label should be unique for each page in aunique for each page in a single component menu.single component menu.  The folder tab label isThe folder tab label is usually used when shorterusually used when shorter names are needed for foldernames are needed for folder tabs.tabs. Allow Deferred ProcessingAllow Deferred Processing:: Indicates whether deferredIndicates whether deferred processing is active for thatprocessing is active for that page in its property settings.page in its property settings. S8 S9 S7 S6 S5 S4 S3 S2 S1
  • 262.
    262Yes-V Software Solutions(P) Ltd., Setting Page AttributesSetting Page Attributes Deferred Processing:Deferred Processing: DeferredDeferred mode enables you to defer manymode enables you to defer many of the conditions that needof the conditions that need server processing until runningserver processing until running them on the application server isthem on the application server is required or requested. Forrequired or requested. For example, when a user exits a fieldexample, when a user exits a field that has a field-level event (likethat has a field-level event (like FieldChange or FieldEditFieldChange or FieldEdit PeopleCode, prompt validation,PeopleCode, prompt validation, related display, and so on) thatrelated display, and so on) that event is not run until the nextevent is not run until the next transmission to the applicationtransmission to the application server.server. Deferred processing is theDeferred processing is the default mode at the field, page,default mode at the field, page, and component levels.and component levels. S8 S9 S7 S6 S5 S4 S3 S2 S1
  • 263.
    263Yes-V Software Solutions(P) Ltd., Setting Access KeysSetting Access Keys  We can setWe can set access keysaccess keys by placing an ampersand (by placing an ampersand (&&) in the text of each item) in the text of each item label. Put the ampersand in front of the letter that you want to be underlinedlabel. Put the ampersand in front of the letter that you want to be underlined on the folder tab at runtime.on the folder tab at runtime. Item labels with ampersands (&)S8 S9 S7 S6 S5 S4 S3 S2 S1
  • 264.
    264Yes-V Software Solutions(P) Ltd., Structure TabStructure Tab Structure tab:Structure tab:  The structure view showsThe structure view shows records and scrolls in a treerecords and scrolls in a tree representation. Double-click therepresentation. Double-click the components in this view andcomponents in this view and open their definitionsopen their definitions  You can view the PeopleCodeYou can view the PeopleCode that is attached to any of thethat is attached to any of the components by right-clicking andcomponents by right-clicking and selecting the “selecting the “View PeopleCode”View PeopleCode” menu option.menu option.  The Component PeopleCodeThe Component PeopleCode seen here is different from theseen here is different from the RecordRecord PeopleCodePeopleCode S8 S9 S7 S6 S5 S4 S3 S2 S1
  • 265.
    265Yes-V Software Solutions(P) Ltd., Component Structure TabComponent Structure Tab A key icon appears next to all key and alternative search key fields in the component structure view. An asterisks icon appears next to all fields that are required.S8 S9 S7 S6 S5 S4 S3 S2 S1
  • 266.
    266Yes-V Software Solutions(P) Ltd., Creating an ApplicationCreating an Application Simple 9 stepsSimple 9 steps 1. Create Field Definition1. Create Field Definition 2. Create Record Definition.2. Create Record Definition. 3. Build the Record Definition.3. Build the Record Definition. 4. Create page Definition.4. Create page Definition. 5. Create Component Definition.5. Create Component Definition. 6. Include pages into component Definition.6. Include pages into component Definition. 7.7. Creating Menu Definition.Creating Menu Definition. 8. Assigning security to the menu.8. Assigning security to the menu. 9. Test the application9. Test the application S8 S9 S7 S6 S5 S4 S3 S2 S1
  • 267.
    Yes-V Software Solutions(P) Ltd., 267 Menu DefinitionMenu Definition
  • 268.
    268Yes-V Software Solutions(P) Ltd., MenuMenu A menu is a logical grouping for assigning security to your system. You create a menu as a placeholder for components. Once you save your menu, use the Registration Wizard to assign components and security. You can create two types of menus using PeopleSoft Application Designer: Standard (custom) menus provide an internal reference for components and pages. They are grouped logically into menu groups to assign security. They are not used for navigational purposes. Pop-up menus appear when a user clicks a pop-up button. S8 S9 S7 S6 S5 S4 S3 S2 S1
  • 269.
    269Yes-V Software Solutions(P) Ltd., To create a new menu definition: 1. From the PeopleSoft Application Designer toolbar, select File, New. 2. Select Menu from the list. 3. Click OK. 4. Select the Standard option for the menu type. 5. Click OK. The thick rectangle surrounding the bar item indicates that this element in the menu definition is currently selected. The empty, dashed rectangle is a placeholder for a new bar item label 6. Assign a bar name and label. You can define multiple menu bars for the menu. Double-click the rectangle to display the Bar Item Properties dialog box. S8 S9 S7 S6 S5 S4 S3 S2 S1 Creating MenuCreating Menu
  • 270.
    270Yes-V Software Solutions(P) Ltd., CreatingCreating MenuMenu 7.7. Enter the bar item name and label.Enter the bar item name and label. The most commonly used bar item name is “Use.”The most commonly used bar item name is “Use.” 8. Click OK to accept the Bar Item Properties settings.8. Click OK to accept the Bar Item Properties settings. 9. Set the menu properties.9. Set the menu properties. 10. Save the menu definition10. Save the menu definition S8 S9 S7 S6 S5 S4 S3 S2 S1
  • 271.
    271Yes-V Software Solutions(P) Ltd., S8 S9 S7 S6 S5 S4 S3 S2 S1 CreatingCreating MenuMenu
  • 272.
    272Yes-V Software Solutions(P) Ltd., Creating MenuCreating Menu S8 S9 S7 S6 S5 S4 S3 S2 S1
  • 273.
    273Yes-V Software Solutions(P) Ltd., Creating MenuCreating Menu S8 S9 S7 S6 S5 S4 S3 S2 S1
  • 274.
    274Yes-V Software Solutions(P) Ltd., Setting Menu Item PropertiesSetting Menu Item Properties To set the general and use properties for the menuTo set the general and use properties for the menu definition.definition. To define a menu item: 1. In a standard menu definition, double click a menu item to access it properties. 2. Specify the menu item. 3. Select the Menu Item Component PeopleCode Separator S8 S9 S7 S6 S5 S4 S3 S2 S1
  • 275.
    275Yes-V Software Solutions(P) Ltd.,  44 Click the Select ButtonClick the Select Button  5. Select an enabling component in the Open dialog box.5. Select an enabling component in the Open dialog box.  6. Save the menu item if it has not been saved.6. Save the menu item if it has not been saved.  7. In the menu definition, right-click the menu item, then select7. In the menu definition, right-click the menu item, then select  View PeopleCodeView PeopleCode  8. Add a PeopleCode program in the menu item's ItemSelected8. Add a PeopleCode program in the menu item's ItemSelected  eventevent  9. When you have finished typing the program, save the9. When you have finished typing the program, save the  PeopleCode program and close the PeopleCode editorPeopleCode program and close the PeopleCode editor  10. Override the component search record.10. Override the component search record.  11. Click OK to accept the settings.11. Click OK to accept the settings.  12. Save the menu definition.12. Save the menu definition. S8 S9 S7 S6 S5 S4 S3 S2 S1 Setting Menu Item PropertiesSetting Menu Item Properties
  • 276.
    276Yes-V Software Solutions(P) Ltd., Setting Menu PropertiesSetting Menu Properties S8 S9 S7 S6 S5 S4 S3 S2 S1
  • 277.
    277Yes-V Software Solutions(P) Ltd., Setting Menu PropertiesSetting Menu Properties S8 S9 S7 S6 S5 S4 S3 S2 S1
  • 278.
    278Yes-V Software Solutions(P) Ltd., Setting Menu Item PropertiesSetting Menu Item Properties S8 S9 S7 S6 S5 S4 S3 S2 S1
  • 279.
    279Yes-V Software Solutions(P) Ltd., Setting Menu Item PropertiesSetting Menu Item Properties S8 S9 S7 S6 S5 S4 S3 S2 S1
  • 280.
    280Yes-V Software Solutions(P) Ltd., Adding Components toAdding Components to a Menua Menu S8 S9 S7 S6 S5 S4 S3 S2 S1 Component Register Button
  • 281.
    281Yes-V Software Solutions(P) Ltd., Adding Components toAdding Components to a Menua Menu S8 S9 S7 S6 S5 S4 S3 S2 S1
  • 282.
    282Yes-V Software Solutions(P) Ltd., Adding Components toAdding Components to a Menua Menu S8 S9 S7 S6 S5 S4 S3 S2 S1
  • 283.
    283Yes-V Software Solutions(P) Ltd., Adding Components toAdding Components to a Menua Menu S8 S9 S7 S6 S5 S4 S3 S2 S1
  • 284.
    284Yes-V Software Solutions(P) Ltd., Working with Existing Menu DefinitionWorking with Existing Menu Definition • Add components to a menu. • Rename menu definitions. • Copy a menu definition. • Delete menu items. • Uninstall menu definitions. • Print menu definitions. • Set up menu security. • Import menu groups into portals. S8 S9 S7 S6 S5 S4 S3 S2 S1
  • 285.
    285Yes-V Software Solutions(P) Ltd., Renaming Menu DefinitionsRenaming Menu Definitions  To rename a menu definition:To rename a menu definition:  Close all open definitions in the definition workspace.Close all open definitions in the definition workspace.  Select File, Rename.Select File, Rename.  The Rename Definition dialog box appears.The Rename Definition dialog box appears.  Select Menu from the Definition Type drop-down list box.Select Menu from the Definition Type drop-down list box.  Click Rename.Click Rename.  From the list of available menus, double-click the menu that you want to rename.From the list of available menus, double-click the menu that you want to rename.  Type the new name over the name that is selected on the menu definition.Type the new name over the name that is selected on the menu definition.  Click Rename.Click Rename. Note.Note. If you rename a menu definition, be sure to manually rename the correspondingIf you rename a menu definition, be sure to manually rename the corresponding registryregistry entries.entries. S8 S9 S7 S6 S5 S4 S3 S2 S1
  • 286.
    286Yes-V Software Solutions(P) Ltd., Renaming Menu DefinitionsRenaming Menu Definitions S8 S9 S7 S6 S5 S4 S3 S2 S1
  • 287.
    287Yes-V Software Solutions(P) Ltd., Copying a Menu DefinitionCopying a Menu Definition To copy a menu definition:To copy a menu definition:  Open the menu definition that you want to copy.Open the menu definition that you want to copy.  Select File, Save As.Select File, Save As.  The Save As dialog box appears.The Save As dialog box appears.  Type a new name for the copy of the menu definition.Type a new name for the copy of the menu definition.  ClickClick OK.OK.  You are prompted to save a copy of any PeopleCode that you haveYou are prompted to save a copy of any PeopleCode that you have associated with the menu definitionassociated with the menu definition S8 S9 S7 S6 S5 S4 S3 S2 S1
  • 288.
    288Yes-V Software Solutions(P) Ltd., Copying a Menu DefinitionCopying a Menu Definition S8 S9 S7 S6 S5 S4 S3 S2 S1
  • 289.
    289Yes-V Software Solutions(P) Ltd., Deleting Menu ItemsDeleting Menu Items To delete a menu item:To delete a menu item:  Select the menu item that you want to delete.Select the menu item that you want to delete.  Select Edit, delete.Select Edit, delete.  If you attempt to delete a menu item that is linked to PeopleCode, the system issuesIf you attempt to delete a menu item that is linked to PeopleCode, the system issues a warning.a warning.  If you proceed to delete it, the linked PeopleCode menu items are also deleted.If you proceed to delete it, the linked PeopleCode menu items are also deleted.  If you delete an item by mistake, before you perform any additional edits or saves,If you delete an item by mistake, before you perform any additional edits or saves, select Edit, Undo to restore the menu item.select Edit, Undo to restore the menu item. Note. When deleting menu items, remember to delete any corresponding registry entriesNote. When deleting menu items, remember to delete any corresponding registry entries.. S8 S9 S7 S6 S5 S4 S3 S2 S1
  • 290.
    290Yes-V Software Solutions(P) Ltd., Deleting Menu ItemsDeleting Menu Items S8 S9 S7 S6 S5 S4 S3 S2 S1
  • 291.
    291Yes-V Software Solutions(P) Ltd., Understanding Pop-up MenusUnderstanding Pop-up Menus Pop-up menus define the transition to another page—either a system-defined pagePop-up menus define the transition to another page—either a system-defined page containing a set of standard commands or a pop-up menu page that wascontaining a set of standard commands or a pop-up menu page that was created and associated with the pop-up button by an application developer.created and associated with the pop-up button by an application developer. You can also use pop-up menus to run a PeopleCode program. PeopleCode inYou can also use pop-up menus to run a PeopleCode program. PeopleCode in pop-up menus do not share the same limitations as PeopleCode in standardpop-up menus do not share the same limitations as PeopleCode in standard menus, so pop-up transition menus provide an effective alternative to usingmenus, so pop-up transition menus provide an effective alternative to using command push buttons on pages. Pop-up menu PeopleCode programs can becommand push buttons on pages. Pop-up menu PeopleCode programs can be used for any number of purposes, for example:used for any number of purposes, for example: To perform a modal transfer.To perform a modal transfer. To recalculate a field value.To recalculate a field value. To trigger a PeopleSoft Workflow business event.To trigger a PeopleSoft Workflow business event. S8 S9 S7 S6 S5 S4 S3 S2 S1
  • 292.
    292Yes-V Software Solutions(P) Ltd.,  Behavior of Pop-up Menus in PagesBehavior of Pop-up Menus in Pages  The following standard icons appear on the page at runtime when a pop-up menu is defined for aThe following standard icons appear on the page at runtime when a pop-up menu is defined for a page field.page field.   When a user clicks the pop-up icon (PT_POPUP) on a page, aWhen a user clicks the pop-up icon (PT_POPUP) on a page, a  screenscreen  appears with a list of menu items from which to select.appears with a list of menu items from which to select.  This pop-up icon (PT_POPUP_SKIP) appears if a pop-upThis pop-up icon (PT_POPUP_SKIP) appears if a pop-up  menu hasmenu has  only one menu item. When a user clicks this icon, the targetonly one menu item. When a user clicks this icon, the target  transaction page appears immediately, skipping an intermediate page containing atransaction page appears immediately, skipping an intermediate page containing a list with one menu itemlist with one menu item.. S8 S9 S7 S6 S5 S4 S3 S2 S1 Understanding Pop-up MenusUnderstanding Pop-up Menus
  • 293.
    293Yes-V Software Solutions(P) Ltd., Creating Pop-up MenusCreating Pop-up Menus • Select File, New.Select File, New. The New dialog box appears.The New dialog box appears. • Select Menu.Select Menu. • Click OK.Click OK. The New Menu dialog boxThe New Menu dialog box appears.appears. • Select the PoSelect the Popup option forup option for the menu type.the menu type. • Click OK.Click OK. A new pop-up menuA new pop-up menu definition appears.definition appears. S8 S9 S7 S6 S5 S4 S3 S2 S1
  • 294.
    294Yes-V Software Solutions(P) Ltd., • Define the menu items for the pop-up menu.Define the menu items for the pop-up menu. • Set the Menu Properties.Set the Menu Properties. Add a Description and Comments about your pop-up menu.Add a Description and Comments about your pop-up menu. On the Use tab, type the menu label you want to appear for thatOn the Use tab, type the menu label you want to appear for that pop-up.pop-up. • Save the pop-up menu definition.Save the pop-up menu definition. • To provide users with access to the pop-up menu, associate it with aTo provide users with access to the pop-up menu, associate it with a pagepage fieldfield S8 S9 S7 S6 S5 S4 S3 S2 S1 Creating Pop-up MenusCreating Pop-up Menus
  • 295.
    295Yes-V Software Solutions(P) Ltd., Menu PropertiesMenu Properties S8 S9 S7 S6 S5 S4 S3 S2 S1
  • 296.
    296Yes-V Software Solutions(P) Ltd., Associating a Pop-up Menu With a Page Field • Open the page definition that contains the page field to which you wantOpen the page definition that contains the page field to which you want to associate the pop-up menu.to associate the pop-up menu. • Right-click the page field, then select Page Field Properties.Right-click the page field, then select Page Field Properties. • When the properties dialog box appears, select the Use tab.When the properties dialog box appears, select the Use tab. • In the Popup Menu group box, select from the available pop-up menusIn the Popup Menu group box, select from the available pop-up menus in the drop-down list box.in the drop-down list box. • Click OK.Click OK. • Save the page definitionSave the page definition S8 S9 S7 S6 S5 S4 S3 S2 S1
  • 297.
    297Yes-V Software Solutions(P) Ltd., Creating an ApplicationCreating an Application Simple 9 stepsSimple 9 steps 1. Create Field Definition1. Create Field Definition 2. Create Record Definition.2. Create Record Definition. 3. Build the Record Definition.3. Build the Record Definition. 4. Create page Definition.4. Create page Definition. 5. Create Component Definition.5. Create Component Definition. 6. Include pages into component Definition.6. Include pages into component Definition. 7. Creating Menu Definition.7. Creating Menu Definition. 8.8. Assigning security to the menu.Assigning security to the menu. 9. Test the application9. Test the application S8 S9 S7 S6 S5 S4 S3 S2 S1
  • 298.
    Yes-V Software Solutions(P) Ltd., 298 Assigning SecuritiesAssigning Securities To The MenuTo The Menu
  • 299.
    299Yes-V Software Solutions(P) Ltd., Permission ListsPermission Lists  PermissionPermission Lists are the building blocks of your end user securityare the building blocks of your end user security authorizationsauthorizations..  A Permission List may contain any number of the following permissions,A Permission List may contain any number of the following permissions, includingincluding signon timessignon times,, page permissionspage permissions,, component interfacecomponent interface permissionspermissions, and so on., and so on.  A Permission List may contain one or more permissions, and the smaller theA Permission List may contain one or more permissions, and the smaller the number of permissions within a particular Permission List the more flexiblenumber of permissions within a particular Permission List the more flexible and scaleable that Permission List is.and scaleable that Permission List is. S8 S9 S7 S6 S5 S4 S3 S2 S1
  • 300.
    300Yes-V Software Solutions(P) Ltd., Assigning Permission ListsAssigning Permission Lists  Theoretically, you could create a Permission List tailored forTheoretically, you could create a Permission List tailored for each and every Role, and that Permission List could contain aeach and every Role, and that Permission List could contain a permission of every category from General to Web Librariespermission of every category from General to Web Libraries  you can use a more modular or "mix-and-match" approach. Thisyou can use a more modular or "mix-and-match" approach. This approach involves numerous, specific Permission Lists that youapproach involves numerous, specific Permission Lists that you can add and remove to Role definitions.can add and remove to Role definitions. S8 S9 S7 S6 S5 S4 S3 S2 S1
  • 301.
    301Yes-V Software Solutions(P) Ltd., Working With Permission ListsWorking With Permission Lists  Create a new permission list.Create a new permission list.  Copy permission lists.Copy permission lists.  Delete permission lists.Delete permission lists. S8 S9 S7 S6 S5 S4 S3 S2 S1
  • 302.
    302Yes-V Software Solutions(P) Ltd., Creating a New Permission ListCreating a New Permission List 1.1. Select PeopleTools, Security, Permissions & Roles, PermissionSelect PeopleTools, Security, Permissions & Roles, Permission Lists.Lists. 2.2. On the search page click Add a New Value.On the search page click Add a New Value. 3.3. In the Permission List edit box, enter the name of PermissionIn the Permission List edit box, enter the name of Permission List you want to create.List you want to create. 4.4. From the pages in the Permission List component, select theFrom the pages in the Permission List component, select the appropriate permissions.appropriate permissions. 5.5. Save your work.Save your work. S8 S9 S7 S6 S5 S4 S3 S2 S1
  • 303.
    303Yes-V Software Solutions(P) Ltd., Copying Permission ListsCopying Permission Lists  To clone a permission list:To clone a permission list: 1.1. Select PeopleTools, Security, Permissions & Roles, Copy Permission Lists.Select PeopleTools, Security, Permissions & Roles, Copy Permission Lists. 2.2. In the search page, search for the Permission List that you want to copy (clone), andIn the search page, search for the Permission List that you want to copy (clone), and click it.click it. 3.3. The Permission List Save As page appears.The Permission List Save As page appears. 4.4. On the Permission List Save As page, enter a new name in the To: edit box for theOn the Permission List Save As page, enter a new name in the To: edit box for the Permission List that you want to copy.Permission List that you want to copy. 5.5. Click Save.Click Save.  Note. This copies content reference permissions.Note. This copies content reference permissions. S8 S9 S7 S6 S5 S4 S3 S2 S1
  • 304.
    304Yes-V Software Solutions(P) Ltd., Copying a Permission ListCopying a Permission List Click the Save Button S8 S9 S7 S6 S5 S4 S3 S2 S1
  • 305.
    305Yes-V Software Solutions(P) Ltd., Deleting Permission ListsDeleting Permission Lists  To delete a permission list:To delete a permission list: 1.1. Select PeopleTools, Security, Permissions & Roles, Delete PermissionSelect PeopleTools, Security, Permissions & Roles, Delete Permission Lists.Lists. 2.2. On the search page, locate the Permission List that you want to delete andOn the search page, locate the Permission List that you want to delete and click it.click it. 3.3. The Delete Permission List page appears.The Delete Permission List page appears. 4.4. Click Delete Permission List.Click Delete Permission List. 5.5. Click OK to confirm the deletion, or click Cancel to end without deleting.Click OK to confirm the deletion, or click Cancel to end without deleting. S8 S9 S7 S6 S5 S4 S3 S2 S1
  • 306.
    306Yes-V Software Solutions(P) Ltd., Deleting a Permission ListDeleting a Permission List Press the Delete Button S8 S9 S7 S6 S5 S4 S3 S2 S1
  • 307.
    307Yes-V Software Solutions(P) Ltd., Defining Permission ListsDefining Permission Lists  Set general permissions.Set general permissions.  Set page permissions.Set page permissions.  Set PeopleTools permissions.Set PeopleTools permissions.  Set process permissions.Set process permissions.  Set signon times permissions.Set signon times permissions.  Set component interface permissions.Set component interface permissions.  Set message monitor permissionsSet message monitor permissions S8 S9 S7 S6 S5 S4 S3 S2 S1
  • 308.
    308Yes-V Software Solutions(P) Ltd., Defining Permission ListsDefining Permission Lists  Set web library permissions.Set web library permissions.  Set mass change permissions.Set mass change permissions.  Set personalization permissions.Set personalization permissions.  Add additional links.Add additional links.  Run permission list queriesRun permission list queries S8 S9 S7 S6 S5 S4 S3 S2 S1
  • 309.
    309Yes-V Software Solutions(P) Ltd., Setting General PermissionsSetting General Permissions S8 S9 S7 S6 S5 S4 S3 S2 S1
  • 310.
    310Yes-V Software Solutions(P) Ltd., Setting PeopleTools PermissionsSetting PeopleTools Permissions S8 S9 S7 S6 S5 S4 S3 S2 S1
  • 311.
    311Yes-V Software Solutions(P) Ltd., Object PermissionObject Permission S8 S9 S7 S6 S5 S4 S3 S2 S1
  • 312.
    312Yes-V Software Solutions(P) Ltd., Sign-on PermissionSign-on Permission S8 S9 S7 S6 S5 S4 S3 S2 S1
  • 313.
    313Yes-V Software Solutions(P) Ltd., RolesRoles  Roles are an intermediate object that exist between permission lists and userRoles are an intermediate object that exist between permission lists and user profiles.profiles.  They are designed to aggregate permission lists so that you can arrangeThey are designed to aggregate permission lists so that you can arrange permissions into meaningful collections. If you implement dynamic roles,permissions into meaningful collections. If you implement dynamic roles, then roles enable you to add permissions to users dynamically, which reducesthen roles enable you to add permissions to users dynamically, which reduces administration tasks.administration tasks.  Role users are the User Profiles or users that have membership to a particularRole users are the User Profiles or users that have membership to a particular role.role.  The dynamic role assignment is how to make your security system scale toThe dynamic role assignment is how to make your security system scale to meet the demand of an ever-increasing user populationmeet the demand of an ever-increasing user population S8 S9 S7 S6 S5 S4 S3 S2 S1
  • 314.
    314Yes-V Software Solutions(P) Ltd., Working With RolesWorking With Roles 1.1. Create a new role.Create a new role. 2.2. Copy a role.Copy a role. 3.3. Delete a role.Delete a role. S8 S9 S7 S6 S5 S4 S3 S2 S1
  • 315.
    315Yes-V Software Solutions(P) Ltd., Creating a New RoleCreating a New Role 1.1. Select PeopleTools, Security, Permissions & Roles, Roles.Select PeopleTools, Security, Permissions & Roles, Roles. 2.2. On the search page click Add a New Value.On the search page click Add a New Value. 3.3. In the Role Name edit box, enter the name of role you want toIn the Role Name edit box, enter the name of role you want to create, and click Add.create, and click Add. 4.4. From the pages in the Roles component select the appropriate roleFrom the pages in the Roles component select the appropriate role options.options. 5.5. Save your work.Save your work. S8 S9 S7 S6 S5 S4 S3 S2 S1
  • 316.
    316Yes-V Software Solutions(P) Ltd., Copying RolesCopying Roles 1.1. Select PeopleTools, Security, Permissions & Roles, Copy Roles.Select PeopleTools, Security, Permissions & Roles, Copy Roles. 2.2. On the search page, search for the role that you want to copyOn the search page, search for the role that you want to copy (clone), and click it.(clone), and click it. 3.3. The Role Save As page appears.The Role Save As page appears. 4.4. On the Role Save As page, enter a new name in the as: edit box.On the Role Save As page, enter a new name in the as: edit box. 5.5. Click Save.Click Save. S8 S9 S7 S6 S5 S4 S3 S2 S1
  • 317.
    317Yes-V Software Solutions(P) Ltd., Copying a RoleCopying a Role Click Save ButtonS8 S9 S7 S6 S5 S4 S3 S2 S1
  • 318.
    318Yes-V Software Solutions(P) Ltd., Deleting RolesDeleting Roles 1.1. Select PeopleTools, Security, Permissions & Roles, Delete Roles.Select PeopleTools, Security, Permissions & Roles, Delete Roles. 2.2. On the search page, locate the Permission List that you want to delete andOn the search page, locate the Permission List that you want to delete and click it.click it. 3.3. The Delete Permission List page appears.The Delete Permission List page appears. 4.4. Click Delete Permission List.Click Delete Permission List. 5.5. Click OK to confirm the deletion, or click Cancel to abort.Click OK to confirm the deletion, or click Cancel to abort.S8 S9 S7 S6 S5 S4 S3 S2 S1
  • 319.
    319Yes-V Software Solutions(P) Ltd., Deleting a RoleDeleting a Role S8 S9 S7 S6 S5 S4 S3 S2 S1
  • 320.
    320Yes-V Software Solutions(P) Ltd., Defining Role OptionsDefining Role Options  Describe the role.Describe the role.  Assign permissions to roles.Assign permissions to roles.  Display list of members for a role.Display list of members for a role.  Display list of members who belong to a current role dynamically.Display list of members who belong to a current role dynamically.  Set routing options for users.Set routing options for users.  Decentralize the administration of roles.Decentralize the administration of roles.  Display any additional links for user profiles.Display any additional links for user profiles.  Run role queries.Run role queries.  Inquire when a permission list was last updated.Inquire when a permission list was last updated. S8 S9 S7 S6 S5 S4 S3 S2 S1
  • 321.
    321Yes-V Software Solutions(P) Ltd., Describing the RoleDescribing the Role S8 S9 S7 S6 S5 S4 S3 S2 S1
  • 322.
    322Yes-V Software Solutions(P) Ltd., Assigning Permissions to RolesAssigning Permissions to Roles S8 S9 S7 S6 S5 S4 S3 S2 S1
  • 323.
    323Yes-V Software Solutions(P) Ltd., Displaying List of Members for a RoleDisplaying List of Members for a Role S8 S9 S7 S6 S5 S4 S3 S2 S1
  • 324.
    324Yes-V Software Solutions(P) Ltd., User ProfilesUser Profiles  User Profiles define individual PeopleSoft users. You define User Profiles andUser Profiles define individual PeopleSoft users. You define User Profiles and then link them to one or more Roles.then link them to one or more Roles.  You define User Profiles by entering the appropriate values in the User ProfileYou define User Profiles by entering the appropriate values in the User Profile pagespages  The User Profile contains values that are specific to a user such as a user password,The User Profile contains values that are specific to a user such as a user password, an email address, an employee ID, and so onan email address, an employee ID, and so on  At the top of each page there is the User ID and the Description to help you recallAt the top of each page there is the User ID and the Description to help you recall which User Profile you are viewing or modifying as you move through the pages.which User Profile you are viewing or modifying as you move through the pages.S8 S9 S7 S6 S5 S4 S3 S2 S1
  • 325.
    325Yes-V Software Solutions(P) Ltd., Working With User ProfilesWorking With User Profiles 1.1. Create a new User Profile.Create a new User Profile. 2.2. Copy a User Profile.Copy a User Profile. 3.3. Delete a User Profile.Delete a User Profile. S8 S9 S7 S6 S5 S4 S3 S2 S1
  • 326.
    326Yes-V Software Solutions(P) Ltd., Creating a New User ProfileCreating a New User Profile 1.1. Select PeopleTools, Security, User Profiles, User Profiles.Select PeopleTools, Security, User Profiles, User Profiles. 2.2. On the Find Existing Values page, click Add a New Value.On the Find Existing Values page, click Add a New Value. 3.3. On the Add a New Value page, enter the new User ID in the User ID editOn the Add a New Value page, enter the new User ID in the User ID edit box, and click Add.box, and click Add. 4.4. The User ID can contain up to 30 characters. The name you use can'tThe User ID can contain up to 30 characters. The name you use can't contain a comma (,) or a space. Also, you can't create a User ID namedcontain a comma (,) or a space. Also, you can't create a User ID named PPLSOFT; this ID is a reserved user ID used within PeopleTools.PPLSOFT; this ID is a reserved user ID used within PeopleTools. 5.5. Specify the appropriate values from the pages in the User ProfilesSpecify the appropriate values from the pages in the User Profiles component, and click Save.component, and click Save. S8 S9 S7 S6 S5 S4 S3 S2 S1
  • 327.
    327Yes-V Software Solutions(P) Ltd., Copying a User ProfileCopying a User Profile 1.1. Select PeopleTools, Security, User Profiles, Copy User Profiles.Select PeopleTools, Security, User Profiles, Copy User Profiles. 2.2. On the Find an Existing Value search page, select the User ID you want toOn the Find an Existing Value search page, select the User ID you want to clone.clone. 3.3. On the User Profile Save As page, enter the New User ID, description, andOn the User Profile Save As page, enter the New User ID, description, and the password that the new user ID should use to signon to the system.the password that the new user ID should use to signon to the system. S8 S9 S7 S6 S5 S4 S3 S2 S1
  • 328.
    328Yes-V Software Solutions(P) Ltd., Deleting a User ProfileDeleting a User Profile 1.1. Select PeopleTools, Security, User Profiles, Delete User Profiles.Select PeopleTools, Security, User Profiles, Delete User Profiles. 2.2. On the Delete User Profile page, make sure you have selected the correctOn the Delete User Profile page, make sure you have selected the correct user profile.user profile. 3.3. Click Delete User Profile.Click Delete User Profile. The Delete User Profile removes information related to this particular user profileThe Delete User Profile removes information related to this particular user profile that appears in every security table in the system, PeopleTools, andthat appears in every security table in the system, PeopleTools, and application tables. If you want to prevent any of the information fromapplication tables. If you want to prevent any of the information from being deleted you can specify tables that the delete user process bypasses.being deleted you can specify tables that the delete user process bypasses. S8 S9 S7 S6 S5 S4 S3 S2 S1
  • 329.
    329Yes-V Software Solutions(P) Ltd., Specifying User Profile AttributesSpecifying User Profile Attributes  Set general user profile attributes.Set general user profile attributes.  Set ID Type and Attribute Value.Set ID Type and Attribute Value.  Set roles.Set roles.  Specify workflow settings.Specify workflow settings.  Inquire on role audit information.Inquire on role audit information.  Display additional links added.Display additional links added.  Run queries about a user profileRun queries about a user profile S8 S9 S7 S6 S5 S4 S3 S2 S1
  • 330.
    330Yes-V Software Solutions(P) Ltd., Setting General User Profile AttributesSetting General User Profile Attributes S8 S9 S7 S6 S5 S4 S3 S2 S1
  • 331.
    331Yes-V Software Solutions(P) Ltd., Setting Roles to User ProfileSetting Roles to User Profile S8 S9 S7 S6 S5 S4 S3 S2 S1
  • 332.
    332Yes-V Software Solutions(P) Ltd., Creating an ApplicationCreating an Application Simple 9 stepsSimple 9 steps 1. Create Field Definition1. Create Field Definition 2. Create Record Definition.2. Create Record Definition. 3. Build the Record Definition.3. Build the Record Definition. 4. Create page Definition.4. Create page Definition. 5. Create Component Definition.5. Create Component Definition. 6. Include pages into component Definition.6. Include pages into component Definition. 7. Creating Menu Definition.7. Creating Menu Definition. 8. Assigning security to the menu.8. Assigning security to the menu. 9.9. Test the applicationTest the application S8 S9 S7 S6 S5 S4 S3 S2 S1
  • 333.
    Yes-V Software Solutions(P) Ltd., 333 Testing The ApplicationTesting The Application
  • 334.
    334Yes-V Software Solutions(P) Ltd., Validating ProjectsValidating Projects  To validate a project:To validate a project: 1.1. Close all active component definitions in the definition workspace.Close all active component definitions in the definition workspace. 2.2. Otherwise, the validation occurs on the component, rather than the project.Otherwise, the validation occurs on the component, rather than the project. 3.3. Select Tools, Options.Select Tools, Options. 4.4. Select the Validate tab in the Options dialog box.Select the Validate tab in the Options dialog box. 5.5. Select Validate project integrity.Select Validate project integrity. 6.6. Click OK.Click OK. 7.7. Select Tools, Validate ProjectSelect Tools, Validate Project S8 S9 S7 S6 S5 S4 S3 S2 S1
  • 335.
    335Yes-V Software Solutions(P) Ltd., Validating ProjectsValidating Projects  The validate utility runs a series of tests on the project or components and sends itsThe validate utility runs a series of tests on the project or components and sends its results to the Validate tab in the output window. If errors are found, they are listed onresults to the Validate tab in the output window. If errors are found, they are listed on this tabthis tab S8 S9 S7 S6 S5 S4 S3 S2 S1
  • 336.
    336Yes-V Software Solutions(P) Ltd., Testing Page Control OrderTesting Page Control Order After you have placed all of the controls on your page, you should testAfter you have placed all of the controls on your page, you should test the tab order. You can do this using either the test mode or by viewingthe tab order. You can do this using either the test mode or by viewing the page in the browser. Using the View Page in Browser mode isthe page in the browser. Using the View Page in Browser mode is more useful because you can also check the placement of controls andmore useful because you can also check the placement of controls and subfields on your page. In these testing modes, you can enter data intosubfields on your page. In these testing modes, you can enter data into edit boxes and select radio buttons and check boxes. However, youedit boxes and select radio buttons and check boxes. However, you cannot save data that you enter, and push buttons and links do notcannot save data that you enter, and push buttons and links do not functionfunction S8 S9 S7 S6 S5 S4 S3 S2 S1
  • 337.
    337Yes-V Software Solutions(P) Ltd., To Test Tab flow in Browser Mode:To Test Tab flow in Browser Mode: 1.1. Open the page in PeopleSoft Application Designer that you wantOpen the page in PeopleSoft Application Designer that you want to test.to test. 2.2. Select Layout, View in Browser.Select Layout, View in Browser. 3.3. Select the appropriate browser from the drop-down list box.Select the appropriate browser from the drop-down list box. 4.4. Press the TAB key to move from one field to the next.Press the TAB key to move from one field to the next. Press SHIFT+TAB to move to the previous fieldPress SHIFT+TAB to move to the previous field S8 S9 S7 S6 S5 S4 S3 S2 S1
  • 338.
    338Yes-V Software Solutions(P) Ltd., Viewing Pages in the BrowserViewing Pages in the Browser During the page designDuring the page design process, you shouldprocess, you should periodically view how yourperiodically view how your page looks in the browser.page looks in the browser. How you design your page inHow you design your page in PeopleSoft ApplicationPeopleSoft Application Designer might lookDesigner might look different when vieweddifferent when viewed online, particularly if you areonline, particularly if you are using subpages that containusing subpages that contain multiple fields.multiple fields.S8 S9 S7 S6 S5 S4 S3 S2 S1 Sample Page Viewed in Microsoft Internet Explorer Sample Page in PeopleSoft Application Designer

Editor's Notes

  • #11 Attachment : Maps to a BLOB database type to hold the contents of a file attachment Time : HH represents hours, MI represents minutes, SS represents seconds, and 999999 represents microseconds
  • #14 Format Type Uppercase: Converts the field value to uppercase and signifies that no other formatting options apply to this field. Use this option for code values, such as department ID, for which it doesn’t matter whether the user enters the value in uppercase or lowercase. This is the default format . Mixedcase: Stores uppercase and lowercase characters as entered. Use this option for fields that contain textual data, such as a department or company division name. For example, Accounting – Receivables is more readable than ACCOUNTING – RECEIVABLES. Numbers Only: Forces entries to be numeric. This is useful for enforcing numeric values without redefining the field as a Number field. This option automatically populates fields with leading zeros. For example, if the user enters 1 in a three-digit field, the system changes this to 001. SSN: Formats the entry in U.S. Social Security Number format (999-99-9999). Define the field length as 9, even though the display length is 11. The system automatically adds dashes when formatting the field for display, but the number is stored in the database without the dashes. SIN: Formats the entry in Canadian Social Insurance Number format (999-999-999) and performs the standard check-digit verification for SIN. Define the field length as 9, even though the display length is 11. The system automatically adds dashes when formatting the field for display, but the number is stored in the database without the dashes. Raw Binary: Allows character fields containing embedded NULLs, such as encrypted values. Name: Requires that the field entry be in the PeopleSoft standard name format: [lastname] [suffix],[prefix] [firstname] [middle name/initial] The entry can contain alphabetic characters, spaces, periods, hyphens, and apostrophes. Uppercase and lowercase characters are preserved as entered—in other words, mixed case formatting is included automatically. Valid entries might include: O’Brien,Michael Jones IV,James Phillips MD,Deanna Lynn Reynolds Jr.,Dr. John Q. Phipps-Scott,Adrienne Knauft,Günter   Note. If the name contains Japanese characters, the first and last names must be separated by a space instead of a comma. The Japanese name format can contain hankaku katakana, Zenchiku katakana, hiragana, kanji, and romaji characters. It can also include spaces, periods, and hyphens. Postal Code North America: Formats the entry to U.S. ZIP code format or Canadian postal code format. The following table shows the valid entry formats and how they’re stored in the database. Canadian postal codes are edited to ensure that alpha and numeric characters are entered in the correct positions. The following entry formats apply (stored formats appear in parentheses following the entry format): 99999 (99999) 99999-9999 (99999-9999) 999999999 (99999-9999) A9A9A9 (A9A 9A9) A9A 9A9 (A9A 9A9) Postal Code International: Allows the entry of international postal codes. The field length must be at least 7 digits. If 9 digits are entered, the system assumes that the value is a U.S. ZIP code; if the entry is in A9A9A9 format, the system assumes it’s a Canadian postal code. Then, the value is formatted accordingly. For all other entries, no formatting is applied. Phone Num North America (phone number North America): Formats the entry in North American telephone number format. The following entry formats apply (stored formats appear in parentheses following the entry format): 9999999 (999-9999) 999-9999 (999-9999) 9999999999 (999/999-9999) 999/999-9999 (999/999-9999) Phone Number International: Allows the entry of international telephone numbers. If you enter 7 or 10 digits (and no other characters), the system assumes it’s a North American phone number and formats it accordingly. For all other entries, no formatting is applied. Custom: If you select this value, the Family Name and Display Name fields become available for entry. These selections enable you to apply additional formatting attributes that affect how the field appears on a page.
  • #15 The Format Families dialog box lists the defined format families and enables you to edit, delete, or create new families. You can also determine where each family is used in your applications and perform tests 5.Because a stored format cannot exist alone, a display format is always required. If you are adding to a family that has existing stored formats, a display name and format pair is optional. PeopleSoft Application Designer automatically places all of the current display formats in the new stored format. The display format default is the stored format that you can redefine later.
  • #18 Stored In the Stored group box, enter a name and format. This defines how the format family is to be stored in the database and printed in reports. Display In the Display group box, enter a name for the format. This defines how the format family will appear online. Smart Punctuation Smart punctuation automatically adds or removes punctuation characters to the data that users enter. For instance, if you type in a phone number like 8005551212 and press TAB to exit the entry field, it is reformatted to 800-555-1212. The system uses the punctuation characters specified in the punctuation list to strip out unwanted input and to modify the pattern specified before applying the pattern to the data. For example: Input: (800)555-1212 Display pattern: 999-999-9999 Punctuation set: ()- Stored pattern: 999999999 The “(“ , “)”, and “-“ are stripped out of the input because they appear in the punctuation set. At this point, the input looks like 8005551212. The display pattern is modified to 999[-]!999[-]!9999 because the “-“ is in the punctuation set. The transformed data ( 8005551212 ) is matched against the display pattern of 999[-]!999[-]!9999. The match is successful, so the raw data is transformed into 800-555-1212. Now, the input data has successfully matched the expected display format. The next step is to transform this data into what we want stored. In this case, the stored format has no dashes, as in 999999999. The transformed data ( 800-555-1212 ) is stripped of the smart punctuation characters ( 8005551212 ), and the pattern of the stored format is 999999999. A match is made so that the system stores 8005551212 in the database. Finally, the stored data is reformatted back to the display using 8005551212 and the display pattern. Output to the display is reformatted to 800-555-1212. Make Uppercase Custom format fields support mixed case. With uppercase activated, PeopleSoft Application Designer transforms the data into uppercase when you press TAB to exit the field.
  • #25 1.DB->Display Click this button to process the input field like data from the database. The system applies the stored format pattern to the input, then applies the display format pattern to the result. The output appears in the Transform field, which is the same output displayed for a field using this format. 2.Display->DB Click this button to process the input field like user input from a page. The system applies the display format pattern to the input, then applies the stored format pattern to the result. The transformed output appears in the Transform field. This output reflects what is stored in the database if the operation is successful. On an actual page, when the user presses TAB to exit the field, the system calls the DB->Display function to reformat the user input for the display.
  • #70 Before you begin to create record definitions, you should have a clear picture of how you plan to use the record definition, the fields that it will contain, special edits that you would like to see performed on the record definition, or specific fields in the definition. At the record level, you determine the ultimate purpose of the record definition and how it will be used in the system At the field level , you plan the details of what types of fields to add.
  • #72 SQL Table Select to define a record definition that has a corresponding physical SQL table in the database. Create this table when you run the Build Operation from the Build menu. This is the default setting. SQL View Select to define a record definition that corresponds to a SQL view, which is not a physical SQL table in the database, but rather fields from one or more SQL tables that are reorganized into a different sequence. This provides an alternate view of information that is stored in tables. To create the SQL view, click the Click to open SQL Editor button and enter a SQL Select statement and then run the Build process. Dynamic View Select to define a record definition that can be used like a view in pages and PeopleCode, but is not actually stored as a SQL view in the database. Instead, the system uses the view text as a base for the SQL Select that is performed at runtime. Dynamic views can provide superior performance in some situations, such as search records and in PeopleCode Selects, because they are optimized more efficiently than normal SQL views. Derived/Work Select to define the record definition as a temporary workspace to use during online page processing. A derived or work record is not stored in the database, so you do not build it. SubRecord Select to define the record definition as a subrecord—a group of fields that are commonly used in multiple record definitions—that you can add to other record definitions. This way, you can change a group of fields in one place, as opposed to changing each record definition in which the group of fields is used. Query View Select to define the record definition as a view that is constructed using the PeopleSoft Query tool. Before you can create the view, PeopleSoft Application Designer prompts you to save the definition. Temporary Table Select to define the record definition as a temporary table. Temporary images of the table can be specified on the PeopleTools Options page. Temporary tables are used for running PeopleSoft Application Engine batch processes. Temporary tables can store specific data to update without risking the main application table. Non Standard SQL Table Name Specify the SQL table name that you are defining if you want to override the standard convention of prefixing “PS_” to the record name.
  • #85 A WEBLIB record with an internet script must be granted access with Maintain Security component before it can be run in a PeopleCode program.
  • #94 Using the project workspace tree. To insert a field into a record definition directly from the project workspace by using drag and drop: Locate a field using the PeopleSoft Application Designer project workspace tree. Drag the field from the project workspace tree to the object workspace. The field and its attributes are automatically added to the list of fields in the record definition. Using the Insert menu (Insert, Field). Use the Insert, Field menu selection to search for fields with selection criteria and then add them to the record using the Insert button. You can also double-click a selected field definition and select Insert the Field Definition. Fields are inserted below the selected field in the record definition. Dragging fields from existing records. To drag a field from one record definition to another: Open a record that contains the fields that you need. Select the field. Drag the field to a new record.
  • #98 For example , if you double-click Field Name, the fields are displayed in alphabetical order; double-clicking Num returns the fields to their numeric order. This doesn’t change the order of the fields in the actual record. The numbers that the fields are originally assigned remain the same. This is important when it comes to key fields.
  • #99 To move a field in the same record definition: Select the field that you want to move. Drag the selected field number to the new position in the record definition window. To move a field from one record definition to another: Open the two records between which you want to move the field. Select the field that you want to move. Select Edit, Cut. If this is the correct field to cut from the record, click Yes. Select the new position for the field in the destination record. Select Edit, Paste to paste field into new record definition. The record window automatically renumbers the fields in the new order.
  • #109 Results of Renaming Record Definitions When you rename a record definition, the system automatically renames all references to it, including data on tables with columns named RECNAME where the data matches the record being renamed. The only references that are not renamed are the text portion of SQL functions, such as SQLExec and Scroll Select and the record names in the view text. To find the text portion of SQL functions in PeopleCode or record names in view text, use Edit, Find In to search for the matching text. If you have already SQL Created the underlying tables for the record definition that you renamed, re-create that table. If you want to preserve data in the tables, use the SQL Alter function to rename the database tables.
  • #120 General Tab Description Enter a descriptive name for the record. Record Definition Enter appropriate comments in this area, including details about the record type, use, parent and child relationships, or other information that is important to other application designers. Owner ID Displays a list of applications with which this record is used. This list is helpful to identify the applications with which the record is associated during application development. Last Updated Displays the date and time of the last modification that was made to the record and the name of the user who made the modification. Use Tab Specify the field with which the system maps between the original key and the tablesets in the Set Control Field drop-down list box. Record Relationship Settings Parent Record If this is a subordinate or child record, specify the parent record. Related Language Record Specify a related language record. The master record definition, which contains the appropriate key and nonkey field definitions. A clone of the master record definition, to which you add an additional key for language code. This is the related language record definition. This definition should contain only those nonkey fields for which contents vary by language. Link the two record definitions by specifying the name of the related language record definition in this field on the master record definition. At runtime, the system checks the user’s language preference and retrieves the data value from the appropriate related language record definition. Query Security Record Specify a query security record if you want secure access to a record using a security view. Optimization Delete Record Specify a delete record to use for optimization. Record Name Specify the user-defined audit record. Audit Options While you can audit individual fields at the field level, you might find it more efficient to have the system audit the entire row whenever a user adds, changes, or deletes information. With record-level audits, the system focuses on rows of data, instead of specific fields. Consequently, a record-level audit writes a single row of audit data, rather than writing multiple rows for each insert, change, or delete transaction at the field level. Add Inserts an audit table row whenever a new row is added to the table underlying this record definition. Change Inserts one or two audit table rows whenever a row is changed on the table underlying this record definition. Selective Inserts one or two audit table rows whenever a field that is also included in the record definition for the audit table is changed. Delete Inserts an audit table row whenever a row is deleted from the table underlying this record definition. Record-Level Auto-Update Options These settings are used exclusively for mobile applications, enabling developers to display derived values on a mobile page. They are not available for subrecords. System ID Field Set this field to assign a unique way to identify the record for mobile synchronization purposes. Timestamp Field Set this field to automatically update this field with the date and time when there's a change to the record for mobile synchronization purposes.
  • #123 Record Relationship Settings Parent Record If this is a subordinate or child record, specify the parent record. Related Language Record Specify a related language record. The master record definition, which contains the appropriate key and nonkey field definitions. A clone of the master record definition, to which you add an additional key for language code. This is the related language record definition. This definition should contain only those nonkey fields for which contents vary by language. Link the two record definitions by specifying the name of the related language record definition in this field on the master record definition. At runtime, the system checks the user’s language preference and retrieves the data value from the appropriate related language record definition. Query Security Record Specify a query security record if you want secure access to a record using a security view. Optimization Delete Record Specify a delete record to use for optimization. Record Name Specify the user-defined audit record. Audit Options While you can audit individual fields at the field level, you might find it more efficient to have the system audit the entire row whenever a user adds, changes, or deletes information. With record-level audits, the system focuses on rows of data, instead of specific fields. Consequently, a record-level audit writes a single row of audit data, rather than writing multiple rows for each insert, change, or delete transaction at the field level. Add Inserts an audit table row whenever a new row is added to the table underlying this record definition. Change Inserts one or two audit table rows whenever a row is changed on the table underlying this record definition. Selective Inserts one or two audit table rows whenever a field that is also included in the record definition for the audit table is changed. Delete Inserts an audit table row whenever a row is deleted from the table underlying this record definition. Record-Level Auto-Update Options These settings are used exclusively for mobile applications, enabling developers to display derived values on a mobile page. They are not available for subrecords. System ID Field Set this field to assign a unique way to identify the record for mobile synchronization purposes. Timestamp Field Set this field to automatically update this field with the date and time when there's a change to the record for mobile synchronization purposes.
  • #127 Keys Key Select to identify the field as the search criteria that uniquely identifies each row. You cannot have duplicate values for primary keys. For example, EMPLID is the only key to the PERSONAL_DATA record definition. Therefore, EMPLID must be a unique value for each employee and there can be only one PERSONAL_DATA row per employee. Duplicate Order Key Select to indicate that duplicate values can occur. The order in which you place duplicate order keys in a field list determines the order in which duplicate keys are retrieved. Alternate Search Key Select to identify the field as a key that provides an alternate path into the table data. Duplicate values are allowed in an alternate search key field. If you define a field as an alternate search key in a search record, when you bring up a page, the system prompts you to enter a key or alternate search key values. Descending Key Select to identify the field as descending if you want rows of data to be retrieved in reverse alphanumeric order (for example, 3, 2, and 1). If you clear this check box, the key is ascending, meaning that rows are stored and retrieved in alphanumeric order (for example, 1, 2, and 3). This option applies only to a field that is specified as a key, duplicate order key, or alternate search key. PeopleSoft uses descending order primarily for effective date fields; most character keys are ascending. Search Key Select to make the field available on the basic and advanced search or lookup pages. A search key is valid only for keys and should be used only in search and prompt records. If you select this check box, the system automatically selects List Box Item. Search Edit Enabled only if Search Key is selected. Selecting this option enforces the required property and table edits on the search page. It will also enforce these edits under circumstances where the search page would normally be bypassed. With this option, the user will no longer have the ability to perform partial searches on this field. List Box Item Select if you want the field to appear in the list box preceding a page. If a field has values in the translate table and you designate it as a list box item, the list box automatically shows the translated value instead of the code. From Search Field and Through Search Field Select for fields that are used as search records. If you select From Search Field, the displayed list contains rows in which the field value is greater than or equal to a value that the user enters. If you select Through Search Field, the displayed list contains rows in which the field value is less than or equal to a value that the user enters. If you do not want these fields to be in a search list box, clear the List Box Item check box, even if the field is an alternate search key. Default Search Field Select to control which field name appears in the Search By drop-down list box on the basic search page. Disable Advanced Search Options Select to prevent run-time search pages from displaying advanced search features for this field. Audit The audit options apply only to data that is manipulated on a normal PeopleSoft application page through component processing. These options do not apply to data that is added using SQLExec in PeopleCode or by some other means. PSAUDIT logs the user ID, the date and time the field was modified, and the old and new values. If you want to audit certain fields, regardless of the record definitions in which they’re included, you want to control when the fields are audited. If you want to audit several fields in a record definition, you might want to consider specifying audits at the record definition level. Field Add Audits this field whenever a new row of data is added. Field Change Audits this field whenever the contents are changed. Field Delete Audits this field whenever a row of data is deleted.   System Maintained Select to indicate that the field value is system-generated. This option is for documentation purposes only and doesn’t affect processing. Auto-Update Select to have the field updated with the server’s current date and time whenever a user creates or updates a row. Any user entries—even if permitted on a page—are overwritten by the server time. Record Field Label ID Specify which label, long name or short name, to use for the record. The default is ***Use Default Label***. This enables you to change labels of record fields dynamically anytime that the default label on the field definition is changed. For example, if a field definition has three labels: Label1 (Long Name1, Short Name1), marked as default. Label2 (Long Name2, Short Name2). Label3 (Long Name3, Short Name3). When the label ID in a record field is set to Use Default Label, initially the long name and short name are Long Name1 and Short Name1. If the default label is changed to Label3 in the field definition, then the long name and short name automatically become Long Name3 and Short Name3. Default Value Select the most commonly used value as the default. You can always enter a different value if the default is inappropriate. The more defaults that you provide, the more data entry time you’ll save your users. For a field, you can enter a default value as a system variable or as a combination of record and field names. Constant Specify a value as a default field. The value that you specify is case-sensitive. You can specify a system variable (such as %date or %time) if you want the default to be the current date or time. This is a drop-down list box if this record has translate values for this field. Record Name and Field Name Enter the record and field names of the default value.   Default Page Control Specify the default appearance of a field as it appears on the page that corresponds with the record field that you are creating. Time Zone and Related Date Fields These fields are enabled only if the current field is a time or date and time field. They determine whether the field is displayed or entered in a specified time zone. Typically, you want to make a date field a descending key so that the row with the latest and most current time appears first. If you want the default value to be the current system date, enter the value %date (or %time) as the constant in the Default Values group box. Specified Time Zone Times are always stored in a database base time zone, but when you place a time field on a page, you can display the time in the base time zone or another time zone. If you clear this check box, the time appears in the database base time zone. If you have users in multiple time zones, you can reduce confusion by showing the time zone along with the time. If you select this check box, the system converts the time according to the time zone specified in Time Zone Control Field. This control field must be a field in the current record. Set an appropriate default value for the time zone control field. Date Control Field Select which related date field in the current record stores the calendar date to which this field should be adjusted.
  • #128 Required Select if you don’t want users to skip a field or leave it blank. Users will not be able to save their work until they complete all of the required fields on a page. Edit Type No Edit Select if you don’t want to edit the contents of this field against a table. This is the default, which makes the options in the Table Edit group box unavailable. Table Edit Select to edit the contents of the field against the values that are maintained in the specified table. When you select Table Edit, the Type field becomes available in the Table Edit group box. Table Edit Type Select from the drop-down:   Note. The list of available table edit types is dependent on the field type. Prompt Table with No Edit: Provides users with a list of suggested values, but does not edit the contents of the field against the prompt table. Users can enter any value. Selecting this option makes the Prompt Table field available. Prompt Table Edit: Edits the contents of the field against the values that are maintained in the specified prompt table. Selecting this option activates the Prompt Table field. When you enter a prompt table name and exit the field by pressing TAB, Set Control Field becomes activated. Translate Table Edit: Edits the contents of the field against the translate table. The translate table stores values for fields that must be validated but don’t need individual tables of their own. If you select this option, Prompt Table and Set Control Field become unavailable. Yes/No Table Edit: Makes the values for this field Y (yes) and N (no) only. If you select this option, Prompt Table and Set Control Field become unavailable.1/0 Table Edit (1-True,0-False)  Note. If you add a field (other than with the paste action) to a record and the field name is already defined in the database with previously defined translate values, the system automatically selects Table Edit and selects Translate Table Edit as the table type. For both Translate Table Edit and Yes/No Table Edit, PeopleSoft recommends that you follow our design standards, select Required, and specify a default value for the field in the Record Field Properties dialog box. Prompt Table Enter the name of the record definition that you want to use as the prompt table for this field. If you want the prompt table to vary depending on the context of the field, indicate a field in the derived or work record (DERIVED) that contains the name of the prompt table at runtime. Then, in this field enter, %FieldName. The % is required, and indicates that you’re referencing a derived or work record definition named DERIVED. FieldName is the name of the field in that DERIVED record definition. Set Control Field Select a set control field that overrides the set control field of the record definition specified in the prompt table. If you don’t specify a name in this field, the default is the set control field of the record definition specified in the prompt table. Reasonable Date Select if you want the system to test the field value to determine whether it is within 30 days of the current date. If the date is out of range, a warning message appears when the user exits the field.
  • #129 Drop-down list box . This is a small list that opens below a field in the current page, such as the Job Indicator field on the Work Location page. To use a drop-down list box, the user clicks the down arrow inside the field. One does not have to exit the page. The drop-down list box is a predefined control that you place on your page. Calendar drop-down prompt . A calendar drop-down prompt opens a small calendar next to a date field to enable the user to easily scan for the correct date. The Work Location page contains calendar prompts for the Effective Date, Position Entry Date, and Department Entry Date fields. Place a calendar prompt on a page by associating any date field with an edit box control and selecting the Show Prompt Button in the Display Options of the Record properties of the edit box. Prompt button. A prompt or lookup button opens a lookup page in the user’s browser populated with up to 300 available values for that field. The user can then either select the desired value or refine their search further. For extremely large tables, the system administrator has the option of excluding that table from auto prompting on the Lookup Exclusion Table via PeopleTools, Utilities, Administration. In PeopleSoft Application Designer, associate a prompt with a page control by selecting the Show Prompt Button check box from the Display Options on the Record tab of the properties dialog box. The record field with which you associate the page control must list values in the Translate Table or prompt table for the system to display the prompt button.
  • #136 Build Options The Build Options group box enables you to specify what action you want to occur: Create Tables , Create Indexes , Create Views , Alter Tables , or Create Trigger . If you select Create Tables or Alter Tables, Create Indexes will be automatically selected by default. Also, if you select Alter Tables, Create Indexes and Create Trigger are automatically selected by default. Build Execute Options Build script file Use this option to review and update the SQL before running the script. This is the safest method. Execute SQL now Use this option if you don’t want to invoke another program to run the SQL; the SQL runs as part of the Build process. The disadvantage with running the SQL immediately is that you have no opportunity to review the SQL before it is committed to the database. Execute and build script Use this option to review the SQL that the Build process just ran.
  • #138 Table Creation Options These options determine when a table should and should not be created. Recreate table if it already exists Drop and re-create a table if it already exists. Use this option with extreme care because if data already exists in the table, it is also dropped. If you select this option, the Build process prompts you to confirm your intention before performing any destructive action. If you don't care about losing the data that resides in the table, then this option is faster than the Alter Tables option. Skip table if it already exists Create only those tables that are newly defined. If you want to preserve the data that is already residing in existing tables or you're just interested in creating the tables that do not already exist, select this option. View Creation Options Similar settings are available for creating views that you use for creating tables. Recreate view if it already exists Because views are just logical views of data, it is safe to use this option; you don’t run the risk of losing physical data. Using this option ensures that all views in the project are rebuilt, whether they need to be or not. Skip view if it already exists If you're concerned only with creating views that do not already exist in the database, select this option. This option is useful if you want to run Build Project on a large project and only a subset of the views in the project must be created. This consumes less time than recreating all of the views in the project. Index Creation Options These options determine when an index should be re-created. Recreate index if it already exists Re-create the index for your tables, even if you already have one in place. It re-creates the index no matter what the situation. Recreate index only if modified Re-create the index only if the data is being modified in the indexes.
  • #139 Drop Column Options These options are referenced whenever a field is deleted from a PeopleTools record definition and data exists in the database for that column. Drop column if data present Drop the column and data, and write a warning to the build log. Skip record if data present Abort the alter for that record, and write an error message to the log. Processing continues with the next Change Column Length Options Use these options whenever the length of a character column is reduced in PeopleTools and an alter could result in data truncation. Truncate data if field too short Alter the record and write a warning message to the build log. Note the system will not truncate data for numeric fields because of possible data loss. Skip record if field too short Abort the alter for that record and write an error message to the build log. Processing continues with the next . Alter Any PeopleTools assumes that you want to perform alters for any modifications made to tables, so, by default, all of the check boxes in the Alter Any group box are selected. Alter Any allows for custom alter processing regarding adds, changes, renames, and deletes. For example, you have the flexibility to add, change, and rename fields, but not delete any removed columns. When you complete any other custom external conversion processes, you can then enable the delete processing to drop columns that are no longer defined. Normally, you select all of these options, but during upgrades or operations requiring data conversion steps, you might select a subset of actions. For example: Perform alter with Adds and Changes selected. Perform alter with Rename and Delete selected. Alter Even If No Changes Select this check box to force an alter, even if no changes are made to the tables. This check box is cleared by default. If this check box is selected, the Alter by Table Rename option in the Alter Table Options group box is automatically selected, and the Alter in Place option is disabled. Alter Table Options Alter in Place This is the default option. For database platforms in which Alter in Place is not supported, alter is automatically done by Alter by Table Rename (even if that option is not selected). Alter by Table Rename By selecting this option, a temporary table is created and the data from the original table is imported into the temporary table. The original table is then dropped and the temporary table is renamed to the original table. With Alter by Table Rename selected, the indexes of the old table are dropped before renaming to the new table name and the indexes are re-created after the table is renamed to the new name. This way, the index is created in the new table’s name.
  • #140 Logging Level Specify the detail of information that you want in your Build log output. Fatal errors only Select this option if you're interested in seeing only the operations that failed. Fatal errors and warnings Select this option to add warnings to the fatal errors. Fatal errors, warnings and informational Select this option to see everything that processed successfully and all of the errors and warnings. Note. These options are personal preferences and do not affect the actual build of your SQL tables, but they might help you track down potential failures. For example, if you're processing a large number of definitions, you'll only want to see the operations that failed. Whereas, if you're processing a small number of definitions, you'll want to see all of the successful operations too. Logging Output Specify where and in what form you want to view your log output. Log to output window Write the same information that appears in the log file to the PeopleSoft Application Designer output window. Always be aware of the level that you select. If there is a lot of detail (high logging level plus many records to process), it might be easier to copy the logging information to a file and print it later. Log to file Write the log to a file. If you select this check box, you can specify a location and name for your log file in the Log file name edit box. If you do not select this check box, the edit box is unavailable for entry. Log settings Write all of the runtime options to the log. If you select this check box it is not necessary to rerun a test when you have a problem. Should it be necessary to report a problem with the Build process or troubleshoot, it is important to know the settings that were active.
  • #141 The Write Alter comments to script check box enables you to either include or suppress alter comments Script File The default for the Save as Unicode check box is based on the combination of the UNICODE/ANSI build and the UNICODE/ANSI database. This check box is available only when using MSSQLServer and Oracle databases. For all other platforms (such as Sybase, Informix, DB2, and so on), the check box is permanently unavailable, because the script files are always be ANSI. File Overwrite Options These options indicate whether you want to overwrite automatically or be prompted before script files are overwritten. Your personal preference determines which technique you employ. Always overwrite Select if you don’t mind that your previous build scripts are overwritten. Prompt for each overwrite Select if you are more comfortable being alerted when a script is about to be overwritten. To avoid the possibility of overwriting files altogether, you can use a naming convention that, in itself, prevents any overwrites. For example, you could specify a unique name for each build script, as shown: C:\\TEMP\\PSINDEX1.SQL C:\\TEMP\\PSINDEX2.SQL Script File Names The options available to select in this group box depend on your selection in the Script File Options group box. Output to Single File When you select this option, an edit box appears in the Script File Names group box: All Output File Name. The default name for the generated script is PSBUILD.SQL. Output to Separate Files If you select this option, the following edit boxes appear—one for each build option: Create Table File Name: The default name for this script is PSTABLE.SQL. Create Index File Name: The default name for this script is PSINDEX.SQL. Create Trigger File Name: The default name for this script is PSTRIGR.SQL. Create View File Name: The default name for this script is PSVIEW.SQL. Alter Table File Name: The default name for this script is PSALTER.SQL.
  • #142 Current Definition Choose Current Definition from the Build menu to build or alter the active record definition. Active definition means the definition that is currently active in the definition workspace. Project Choose Project from the Build menu to build or alter all of the records, indexes, and views in the current project—that is, all of the records that appear in the project workspace. You typically find numerous record definitions in the Build Scope list box. Select Definitions into Project In some situations, you might want to build a subset of the records in the project that is currently open. If you do not want to build an entire project or even the current project, you can build only the definitions that you select in the project workspace pressing the CTRL key and selecting multiple records in the project workspace. After you select the appropriate records, right-click and select Build from the pop-up menu. Only the definitions that are selected in the project workspace appear in the Build Scope list box.
  • #153 If you build a script file , then the Build process generates a script file that contains all of the CREATE and ALTER SQL statements so that you can review them before running the SQL through another SQL command processor. If the generated script file meets your requirements, a DBA can run the script later.
  • #175 Nesting controls involves two or more level-based controls on a page . Eg: Two scroll areas, when the second scroll area has an occurs level of 2 . Why nesting controls? Needed when the new data that you want to add is a repeating set of data for each entry in your first level-based control. multiple records addressed within the page has “parent and child” relationship Eg: employees (belonging to a department) can have multiple dependents Restriction Nesting can be up to three levels of scrolls or grids on a page
  • #176 Here we maintain information about the compensation history for a single employee. For each change or override in compensation status, we will enter the details about that change. The first scroll area, Earnings, associates the earning code with the second, subordinate scroll area Eff Date (effective date) and Default Job Data enables the user to enter the effective date for the status change. The third scroll area, Or Overrides to Job Data, which is subordinate to the second, enables the user to enter the overrides to the default job data that appears in the second scroll area. For each of the three scroll areas, you can have several rows of data
  • #180 When a page definition is active, you see the page definition toolbar and page control toolbar.
  • #181 The page control toolbar contains a button for each type of page control that you insert. The buttons display images that look like the controls that they insert
  • #184 A frame can be dragged around almost any control. Position the index finger where you want the upper left corner of the frame to be located and ,when the hand-shaped icon displays, press and hold and drag where u want the lower right corner of the frame and release the mouse.
  • #186 For example, if you are enclosing address controls, you might want to use the label address Frame.
  • #187 Linking a record field with your group box allows you to control hiding and un-hiding of the group box.
  • #191 Hence the horizontal rule also affects the processing of the page. There are only two settings on the horizontal rule “ page field properties” dialog, Use tab . Otherwise if u don’t add horizontal rule between scroll area and push button, the scroll area will automatically expand to encapsulate the lone field below it into its border. When u set the horizontal rule to level 0, it becomes invisible at runtime, and the fields below it are set to level 0 and can process correctly. They will then appear below the level-based control, instead of inside it.
  • #204 Rather than duplicating the same set of page fields on two or more pages, you can create a single subpage that contains those page fields and add it to any page. This makes it much easier to maintain the functionality these page fields represent . Subpages are even more effective when used with corresponding subrecords. In order to support the use of subrecords with subpages, the system uses a record name substitution mechanism for subpage-type page fields Each subpage has a "from" record, determined dynamically by the Page Designer and by the PIA runtime. The “from” record is a record associated with one of the page fields in the subpage . Which page field depends upon the page field ordering, the types of page fields on the subpage, and whether it's record is a subrecord . The "to" record is specified by you in the SubPage Record Name Substitution group box in the Insert Subpage dialog box that displays after you insert the subpage into a page (and on the Subpage tab of the Subpage Properties dialog)
  • #205 In design time, you only need to add the subpage control to represent all controls in the subpage. You have only one place-the subpage definition-to maintain those controls. At run time, you will see all controls defined in the subpage in your page.
  • #211 After the user enters the email information in the Email grid, the user can return to the Address page by clicking OK.
  • #245 Note. To see a subset of search records, type a few characters first. The drop-down list box is populated with a list of all record definitions with names that begin with those characters. This reduces access time and enables you to find specific records faster
  • #257 In the preceding example, the third page (UK) becomes the second.
  • #258 Here the tabs indicates the pages included in this particular component.
  • #259 The default component definition view displays the page items and corresponding attributes of a component definition
  • #262 When the next transmission to the server occurs, PeopleTools determines which fields have changed since the last transmission. Logic on the application server runs the appropriate system edits and PeopleCode events (in field layout order).
  • #275 Name Specify the system name for the menu or menu item. Menu and menu item names must conform to a specific set of naming conventions for the system to recognize them: all upper case letters, no embedded spaces, and no special characters (for example, % ^ & * $ #). Label Specify the text label to appear on the menu. The label appears in the Home bar item or in a cascade menu of a menu group. You can place an ampersand in the text to assign a keyboard shortcut for the menu.
  • #301 “ MIX AND MATCH" Suppose you have three 8-hour shifts at your site. Using the modular approach you could create three different versions of Signon permissions: one for 6 a.m. to 2 p.m., one for 2 p.m. to 10 p.m., and another for 10 p.m. to 6 a.m. Then depending on the shift for a particular Role, you can easily apply or remove the appropriate Signon permission as needed without affecting any other permissions.
  • #303 Permission list names have a 30-character limit. PeopleSoft HCM requires certain naming conventions for permission lists, however PeopleTools does not enforce these application-specific requirements. Therefore, when creating permission lists, PeopleSoft recommends that you keep the following conventions in mind. HCM requires the following: primary permission lists need to start with PP%, and data permission lists need to start with DP%.
  • #335 PeopleSoft Application Designer includes a validate utility to make sure that all definitions included in the project actually exist in your database. An important part of the PeopleSoft upgrade process involves validating your upgrade project