This document provides configuration steps for setting up basic funds management functionality in SAP, including maintaining FM areas, assigning company codes and fiscal year variants, activating account assignment elements, defining business areas, configuring general ledger and financial accounting settings, and more. The detailed steps cover areas like public sector management configuration, financial documents, grants management, and funds management master data.

![SAP Best Practices Funds Management-Basic Settings (951): Configuration Guide
© SAP AG Page 17 of 73
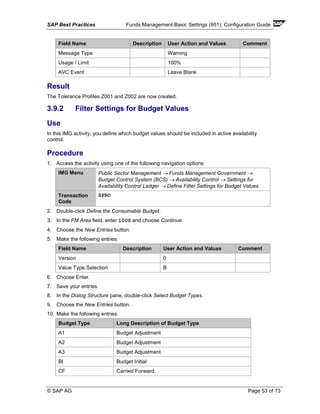
Field Name Description User Action and Values Comment
Posting Period Variant 0010
Max Exch. Rate Variance 10%
Workflow variant 1000
Define default value date Selected
Propose Fiscal Year Selected
Tax Base is Net value Selected
Activate CM Selected
5. Save your entries.
Result
The Global parameters for the Company Code are set.
3.2.8 Define Document Number Ranges for Entry View
Use
Number Ranges must be set up for Entry View of the New General Ledger.
Procedure
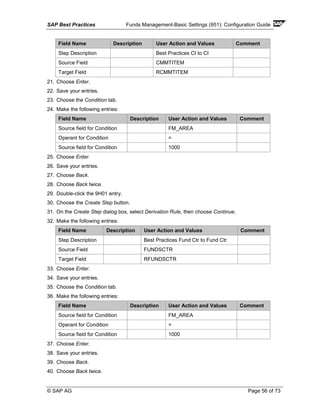
1. Access the activity using one of the following navigation options:
IMG Menu Financial Accounting (New) → Financial Accounting Global Settings →
(New) → Document → Document Number Ranges → Documents in
Entry View → Define Document Number Ranges for Entry View
Transaction
Code
SPRO
2. Make the following entries:
Field Name Description User Action and Values Comment
Company Code 1000
3. Choose the Change Intervals button.
4. Choose the + button to add a number range.
5. Create Number ranges for 01, 02, 03, 04, 05, 06, 07, 08, 09, and so on.
6. Enter a number range value for each number range object created [e.g. 01 = 100000000 to
199999999].
7. Save your entries.
Result
The Number ranges are created for Entry View documents.](https://image.slidesharecdn.com/fundsmanagementconfiguration-sapag-191229143055/85/Funds-management-configuration-sap-ag-17-320.jpg)