Paper - circuit workshop to make a box
•
5 likes•21,517 views

Hackidemia learning activity example

Recommended
More Related Content
Similar to Paper - circuit workshop to make a box
Similar to Paper - circuit workshop to make a box (20)
More from Stefania DRUGA
More from Stefania DRUGA (13)
Recently uploaded
Recently uploaded (20)
Paper - circuit workshop to make a box
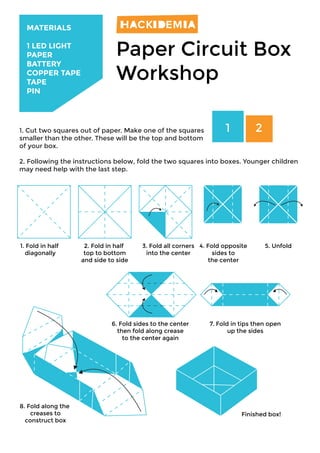
- 1. MATERIALS 1 LED LIGHT PAPER BATTERY COPPER TAPE TAPE PIN Paper Circuit Box Workshop 1. Cut two squares out of paper. Make one of the squares smaller than the other. These will be the top and bottom of your box. 1 2 2. Following the instructions below, fold the two squares into boxes. Younger children may need help with the last step. 1. Fold in half diagonally 2. Fold in half top to bottom and side to side 3. Fold all corners 4. Fold opposite into the center sides to the center 6. Fold sides to the center then fold along crease to the center again 8. Fold along the creases to construct box 5. Unfold 7. Fold in tips then open up the sides Finished box!
- 2. 3. Poke a small hole in the top (larger) of your boxes with your pin. Stick the LED into the hole. 4. Bend the legs of the LED light into an L shape so that they follow the top and run down opposite sides of your box top. Keep track of which side is positive. 5. Set up the circuit: • Run the copper tape from the bottom of the box out to the side. This will be the negative side. • Place a battery negative side down on the copper tape. • Run a piece of copper tape from the top of the battery to the other side of the box. • Secure the circuit into the box bottom with a piece of regular tape. 5. Match up the sides, positive LED leg with positive copper tape side and put the lid on the box. When the box is closed the circuit will complete and the LED will light up. (If the light does not come on you can add more copper tape or try lightly squeezing the sides together.) 6. You’re done! Decorate your box and enjoy. Workshop and instructions by Audrey Fox of Austin Texas with thanks to Jie Qi of MIT Media Lab’s High Low Tech for inspiration.