
Recommended
More Related Content
Similar to DIY PAPER BOX
Similar to DIY PAPER BOX (20)
Recently uploaded
Recently uploaded (20)
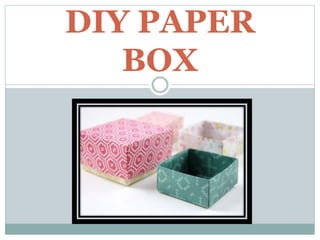
DIY PAPER BOX
- 2. HOW TO MAKE A DIY PAPER BOX? Do you love paper crafts? Then this paper version will definitely help you. This fun DIY paper box is super easy to learn. Isn’t it awesome that a piece of paper can be transformed into a handy dandy paper box with just a few well placed folds? This simple paper box is simple to make and can be used to hold all your personal items like clips, rubber bands or any small thing. You can even make a lid to cover the box and I will show you that also.
- 4. LET’S GET STARTED! MATERIAL REQUIRED : Origami papers
- 5. FOLLOW THE PROCEDURE GIVEN BELOW TO MAKE THIS ORIGAMI BOX. PROCEDURE : Step 1 : Take one origami paper. Step 2 : Fold the paper into half from top to bottom and then unfold it. Step 3 : Fold the paper into half again from left to right and then unfold it. Step 4 : Fold all the four corners of the paper to the center. Step 5 : Rotate the paper so that it becomes a square. Step 6 : Fold the paper from top to bottom and then unfold it. Step 7 : Now, unfold the top and bottom triangles. Step 8 : Fold the paper into half from left to right to the center. Step 9 : Lift the top part of the paper to make it stand up at the crease. Step 10 : While holding the top part with one hand, open the left side with other hand to form one corner of the box. Step 11 : Do the same with the right side also. Step 12 : Form the lower two corners of the box also. Step 13 : Fold the top flap down into the box. Step 14 : Now, fold the lower flap down into the box also. And that’s it the DIY paper box is ready!
- 7. FOLLOW THE PROCEDURE BELOW GIVEN TO MAKE THIS ORIGAMI BOX LID. PROCEDURE : Step 1 : Take a piece of origami paper. Step 2 : Fold the paper into half from top to bottom and then unfold it. Step 3 : Fold the paper into half again from left to right and then unfold it. Step 4 : Fold all the four corners of the paper to the center. Step 5 : Rotate the paper so that it becomes a square. Step 6 : Fold the paper from top to bottom and then unfold it. But leave a gap so the edges of the paper do not touch the center. Step 7 : Now, unfold the top and bottom triangles. Step 8 : Fold the paper into half from left to right to the center. But leave a gap so the edges do not touch the center. Step 9 : Lift the top part of the paper to make it stand up at the crease. Step 10 : While holding the top part with one hand, open the left side with other hand to form one corner of the lid. Step 11 : Do the same with the right side also. Step 12 : Form the lower two corners of the lid also. Step 13 : Fold the top flap down into the lid. Step 14 : Now, fold the lower flap down into the lid also. And that’s it the DIY paper box’s lid is ready!
- 9. The simple origami paper box is ready to use. You can now store your stuff into that and can even cover with a lid. You can also decorate it as per your choice. Make many of these and gift to your friends, family or loved ones with pretty and nice small gift in it. Share your experience in the comment section!
- 10. READ MORE INTERESTING CRAFTS ON http://uniteddiycraftsworld.com/