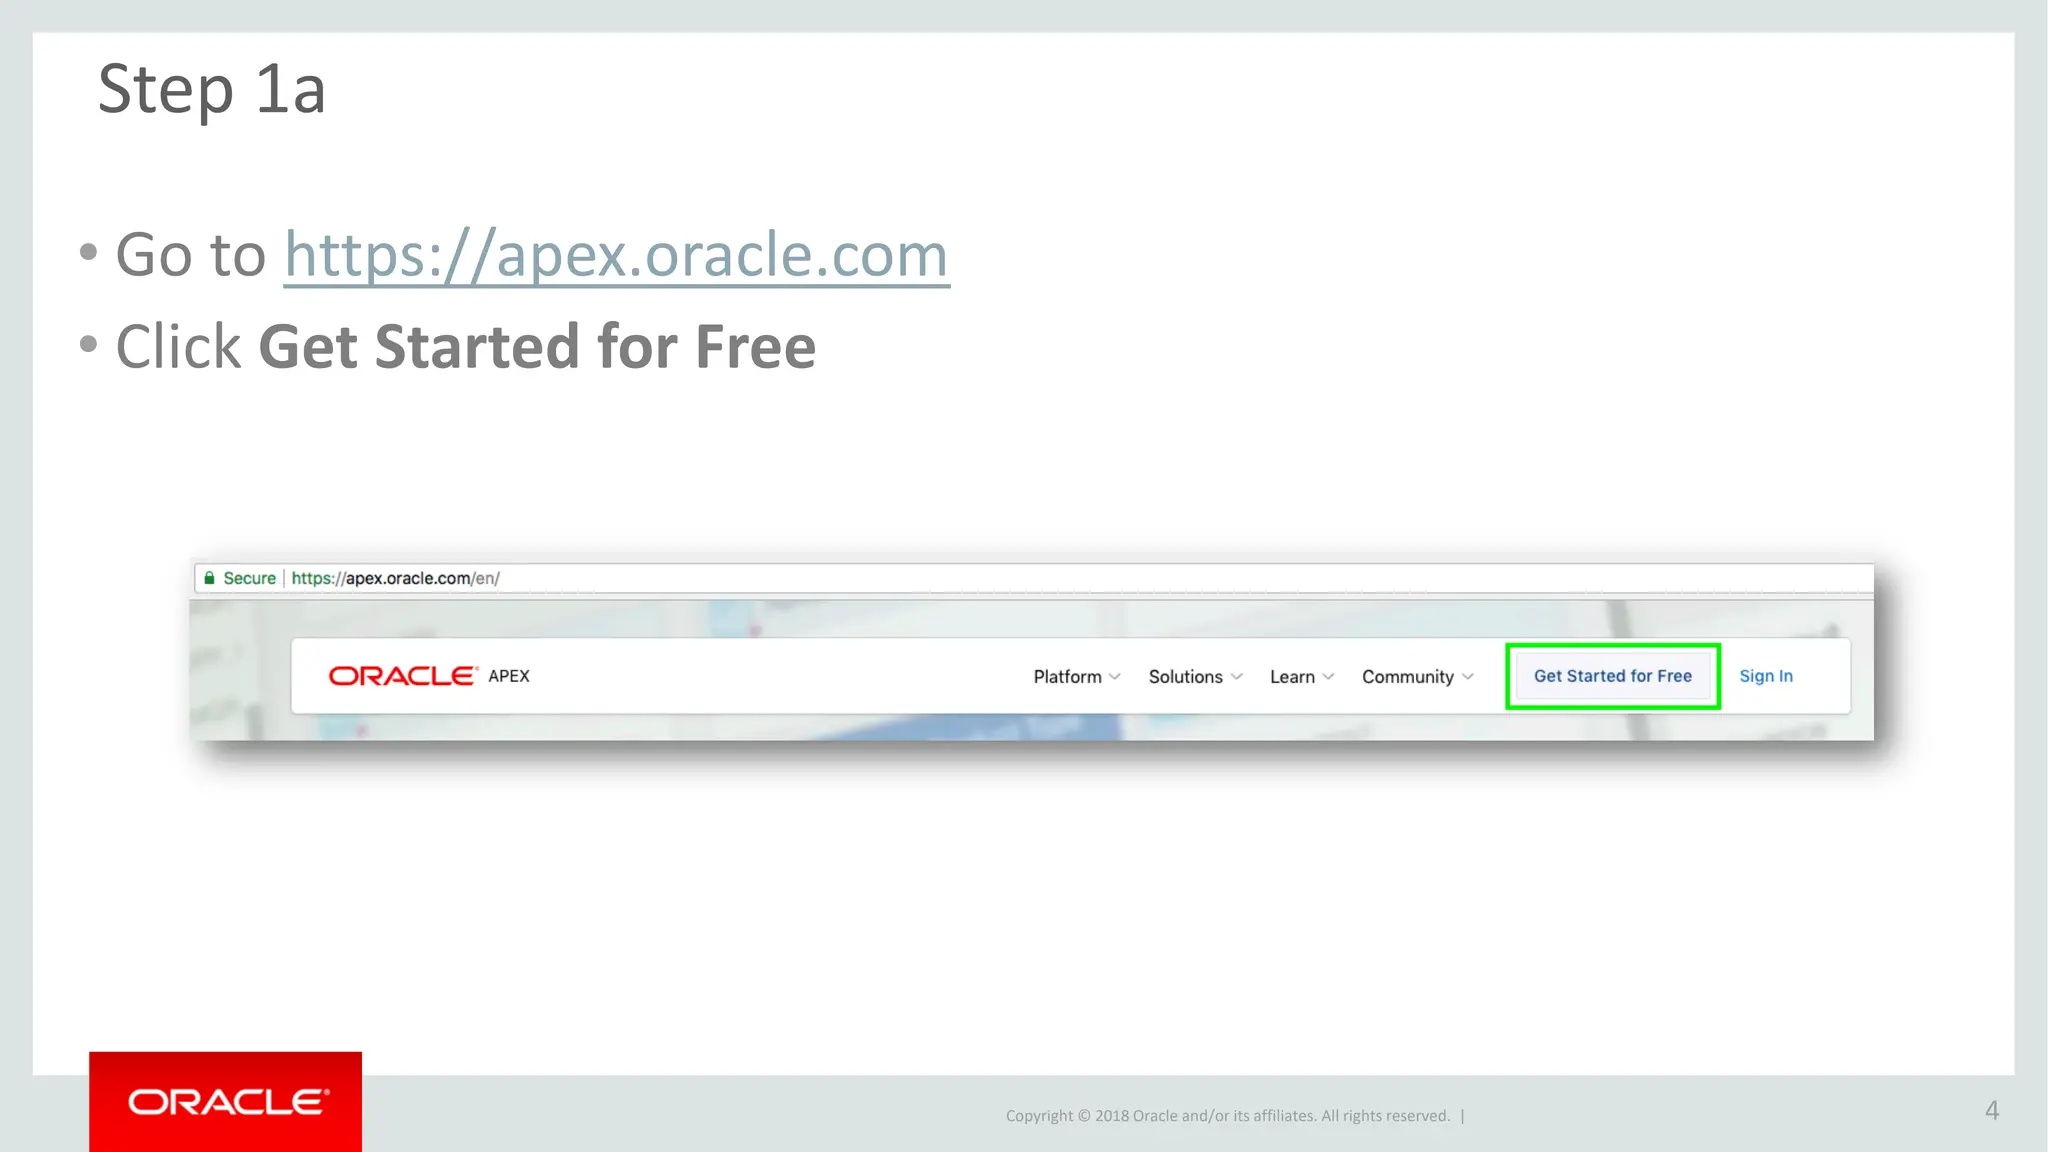
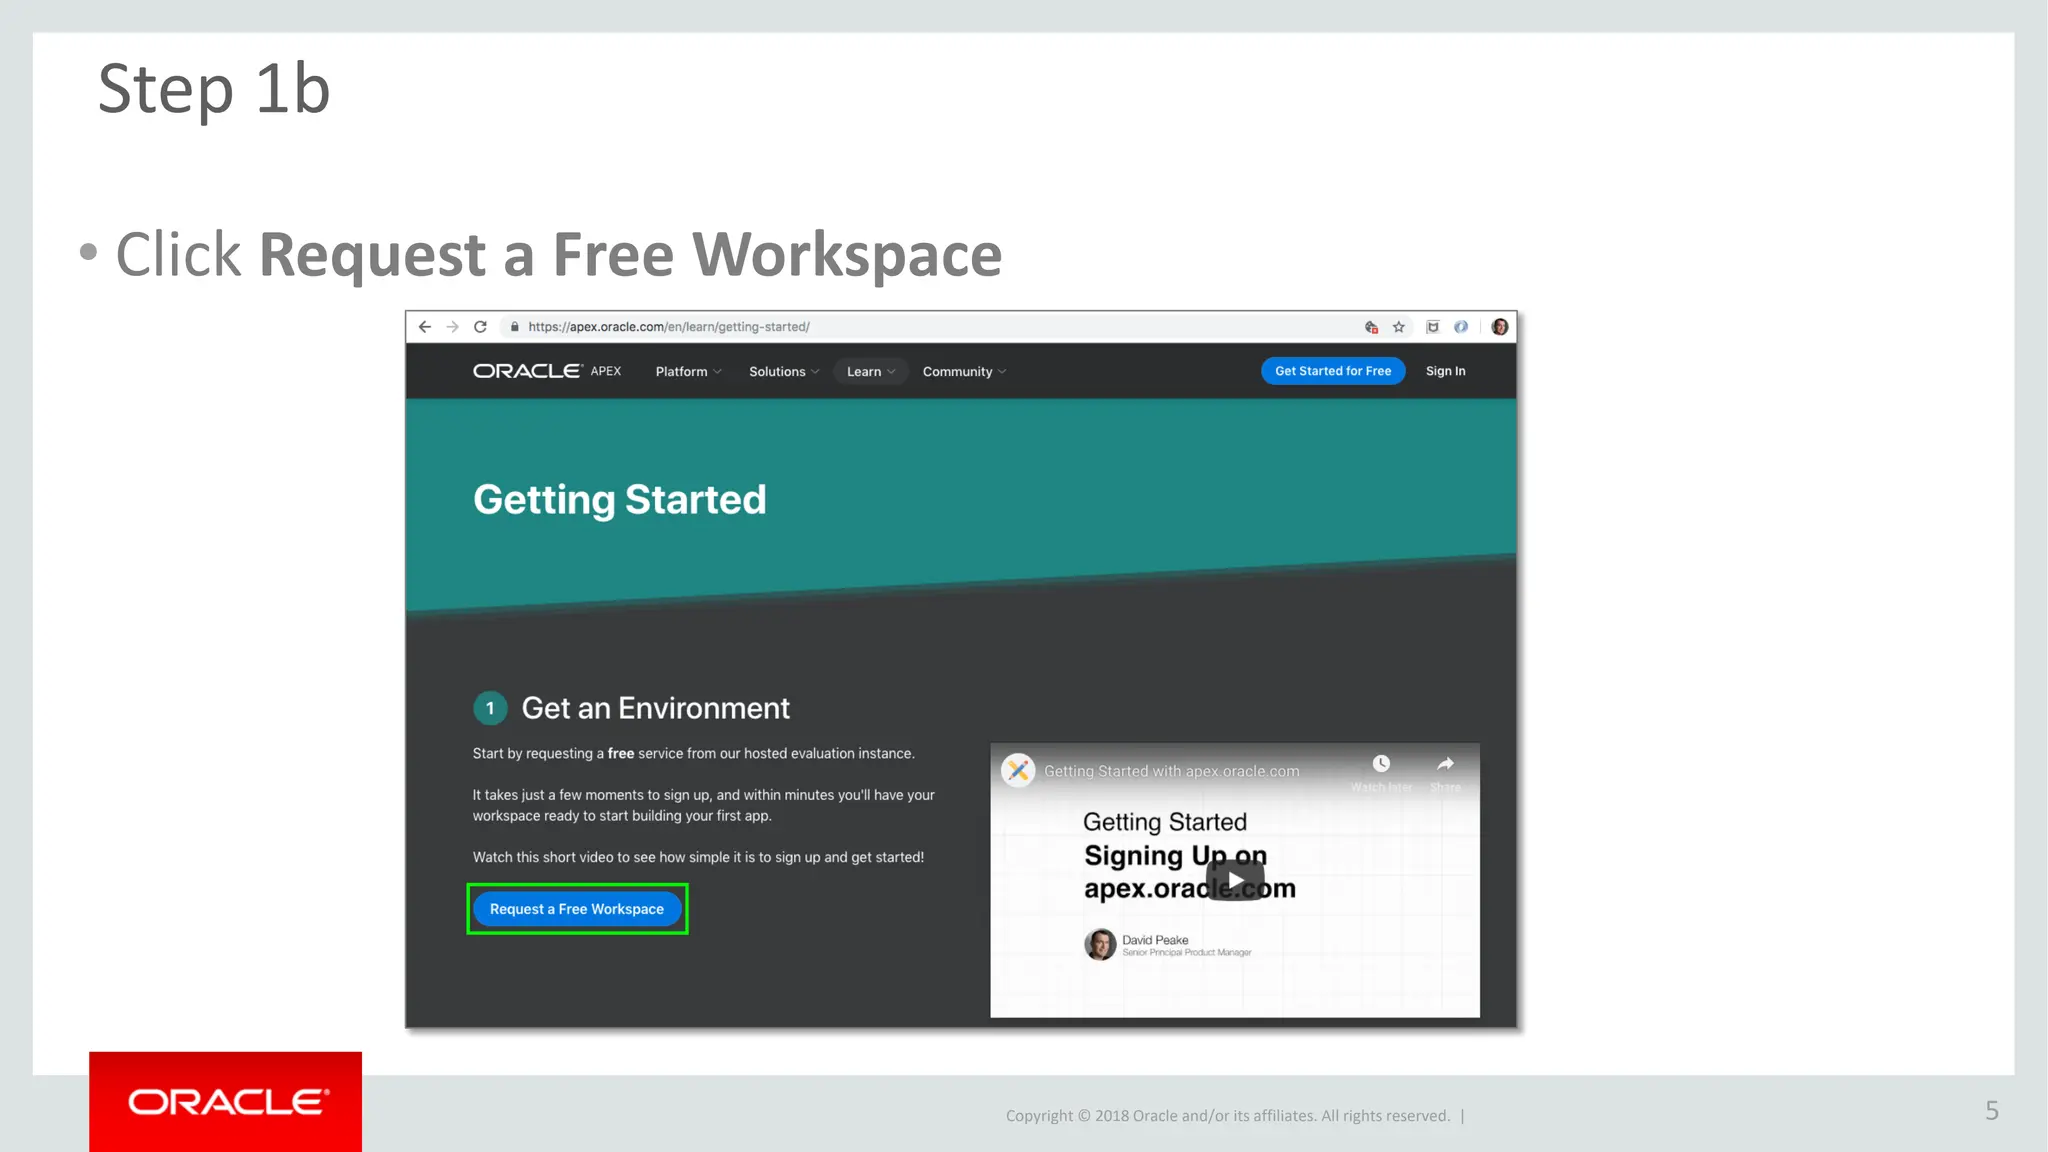
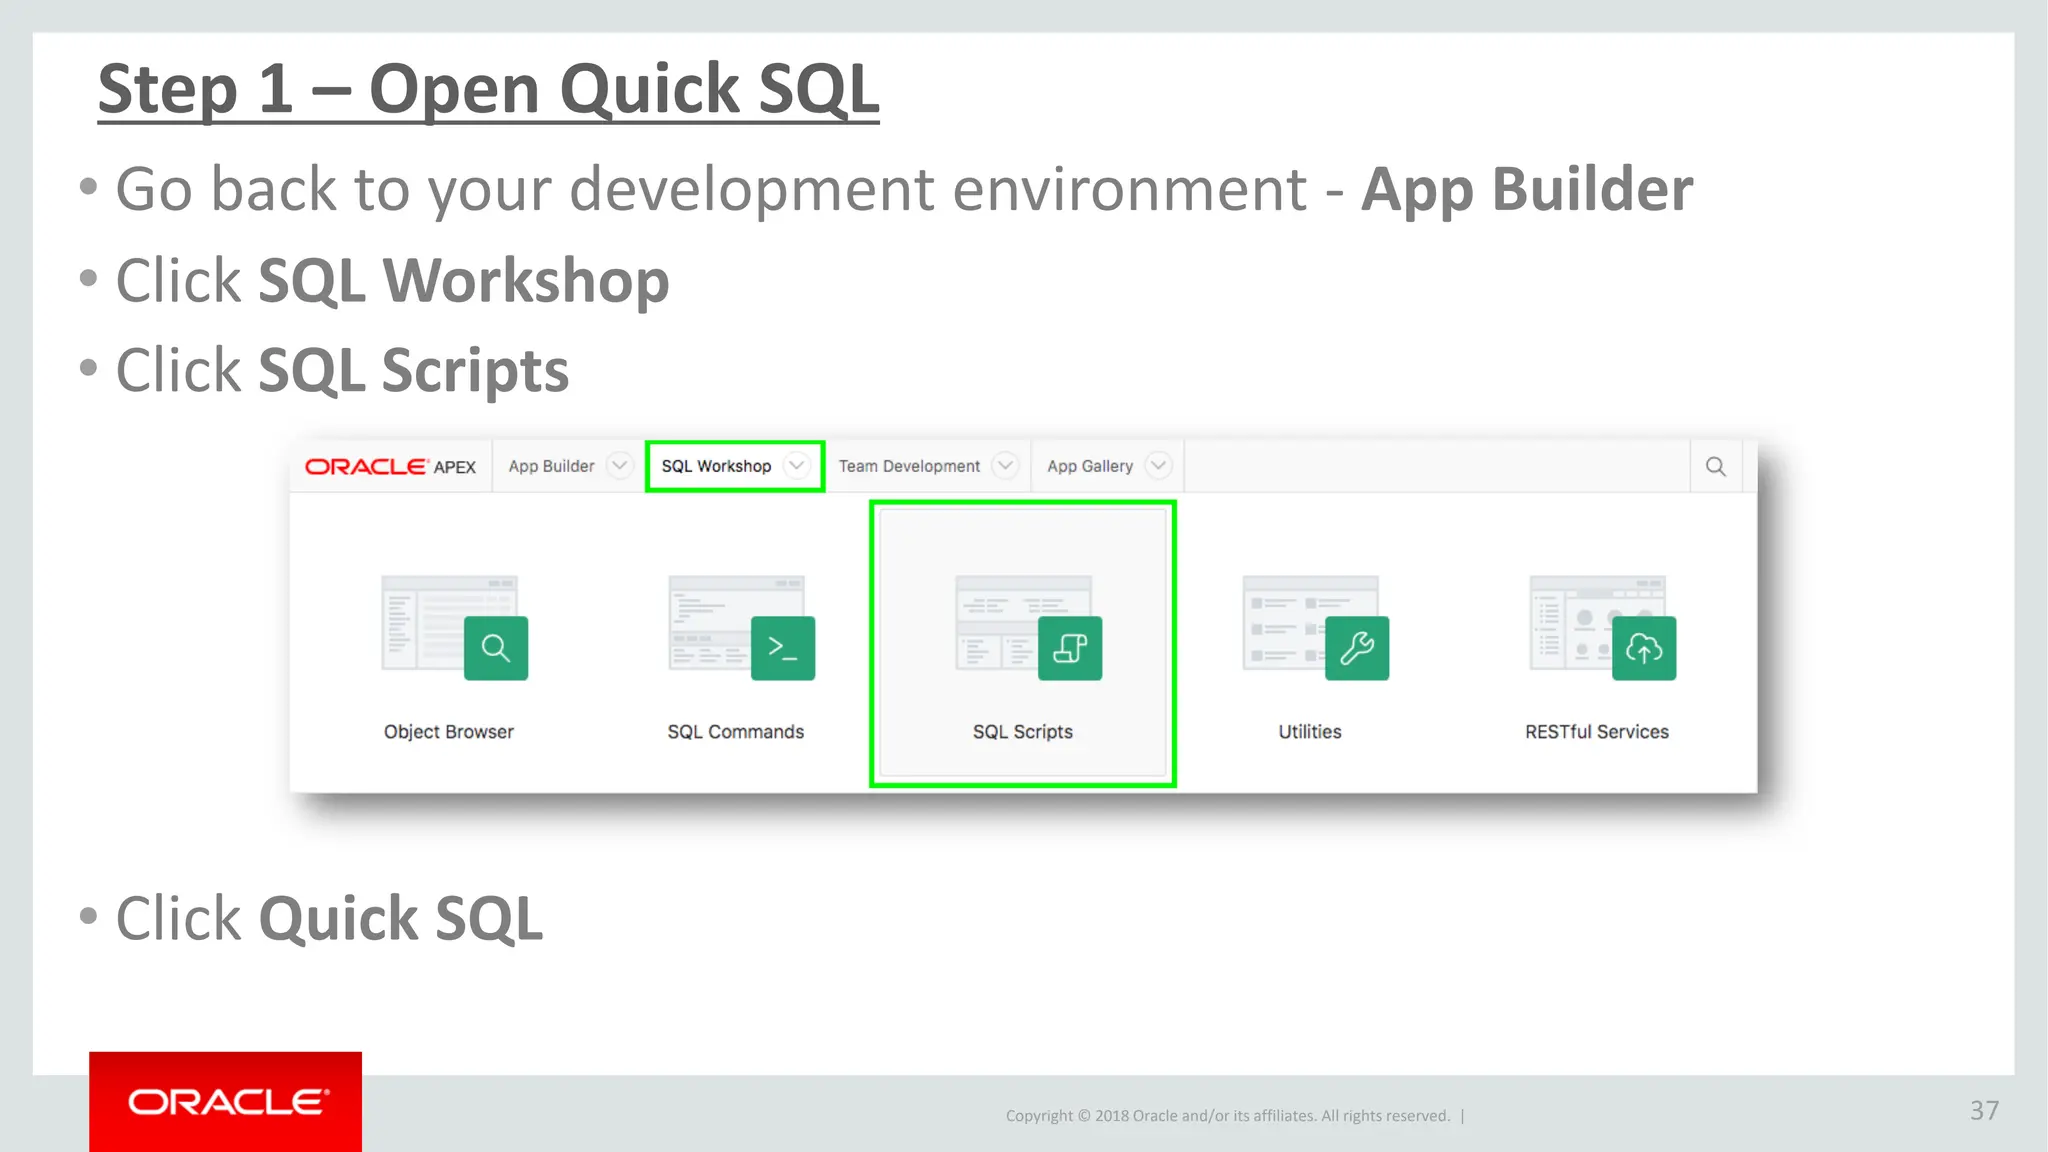
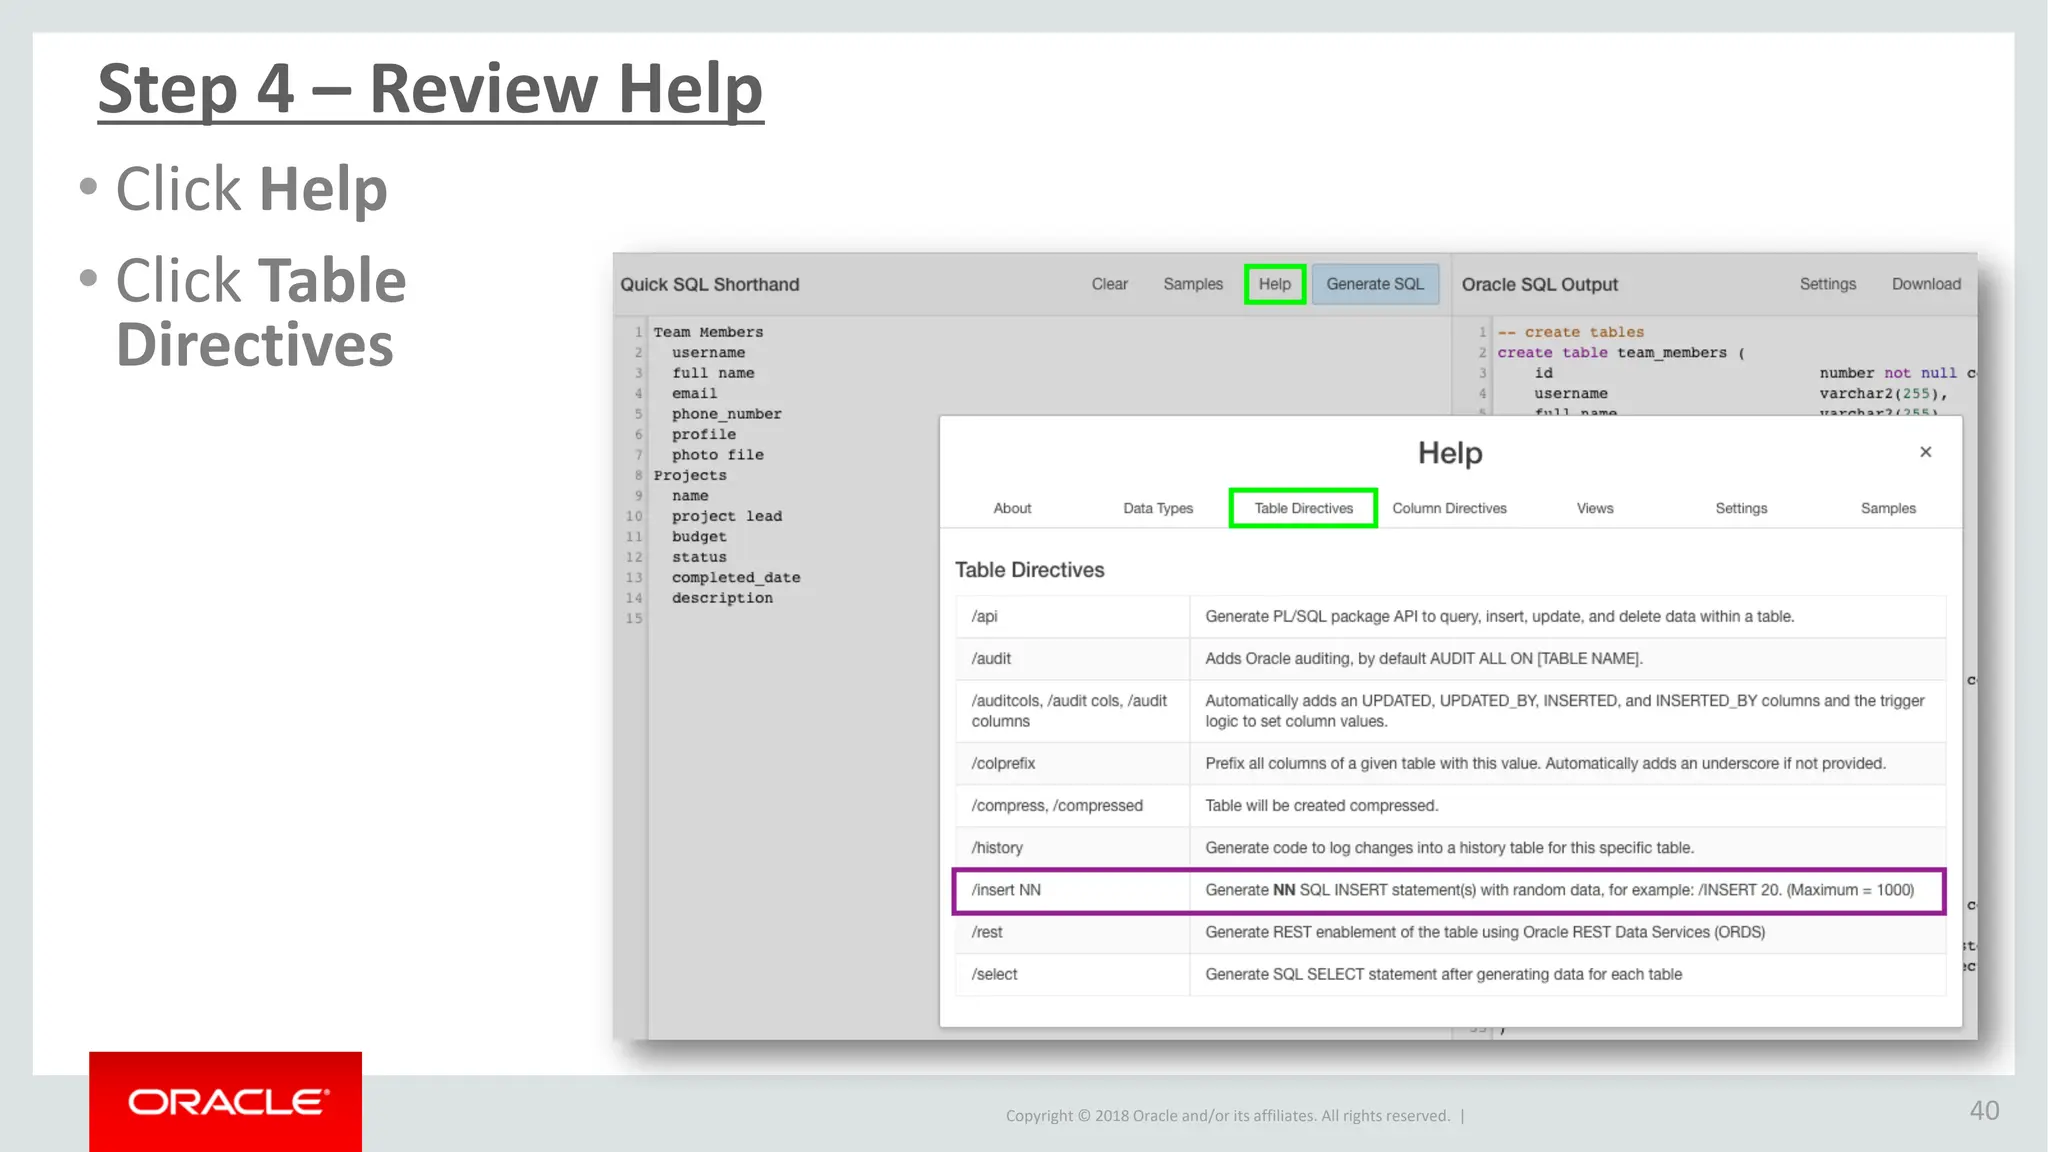
Copyright © 2018, Oracle and/or its affiliates. All rights reserved. |
Oracle APEX Beginner
Hands-On Lab
April, 2019 (v19.1 OTN)
2
Copyright © 2018 Oracle and/or its affiliates. All rights reserved. |
Obtaining a Workspace
Getting Started
3
Copyright © 2018 Oracle and/or its affiliates. All rights reserved. |
• Go to https://apex.oracle.com
• Click Get Started for Free
Step 1a
4
Copyright © 2018 Oracle and/or its affiliates. All rights reserved. |
• Click Request a Free Workspace
Step 1b
5
Copyright © 2018 Oracle and/or its affiliates. All rights reserved. |
• What Type of Workspace - Click Application Development
• Enter your Identification details – First Name, Last Name,
Email, Workspace
{Note: For workspace enter a unique name,
such as first initial and last name}
• Enter Schema details – Schema Name
{Note: For schema name enter the same name
as you entered for workspace}
• Complete the wizard
Step 2
6
Copyright © 2018 Oracle and/or its affiliates. All rights reserved. |
• Check your email
You should get an email from oracle-
application-express_ww@oracle.com
within a few minutes
{Note: If you don’t get an email go
back to Step 1 and make sure to enter
your email correctly}
• Click Create Workspace
• Click Continue to Log In Screen
• Reset your password
Step 3
7
Copyright © 2018 Oracle and/or its affiliates. All rights reserved. |
Creating an App from a Spreadsheet
Building your first app
8
Copyright © 2018 Oracle and/or its affiliates. All rights reserved. |
• Log into your workspace on https://apex.oracle.com
• Click App Builder
• Click Create a New App
Step 1 – Logging In
9
Copyright © 2018 Oracle and/or its affiliates. All rights reserved. |
• Click From a File
Step 2 – Selecting App Type
10
Copyright © 2018 Oracle and/or its affiliates. All rights reserved. |
• Click Copy and Paste
• For Sample Data Set select Project and Tasks
• Click Next
Step 3 – Loading Sample Data
11
Copyright © 2018 Oracle and/or its affiliates. All rights reserved. |
• Enter Table Name {SPREADSHEET}
• Click Load Data
Step 4 – Naming the Table
12
Copyright © 2018 Oracle and/or its affiliates. All rights reserved. |
• Check that 73 rows are loaded
• Click Continue to Create Application Wizard
Step 5 – Verifying Records Loaded
13
Copyright © 2018 Oracle and/or its affiliates. All rights reserved. |
• Enter Name
{App from a Spreadsheet}
• Next to Features,
click Check All
Step 6 – Naming the App
14
Copyright © 2018 Oracle and/or its affiliates. All rights reserved. |
• Click Create Application
Step 7 – Create Application
15
Copyright © 2018 Oracle and/or its affiliates. All rights reserved. |
• Your new application will be displayed in Page Designer
• Click Run Application
Step 8 – App in Page Designer
16
Copyright © 2018 Oracle and/or its affiliates. All rights reserved. |
• Enter your user credentials
• Play around with your new application
Step 9 – Runtime App
17
Copyright © 2018 Oracle and/or its affiliates. All rights reserved. |
Improving the App
Using the Runtime Environment
18
Copyright © 2018 Oracle and/or its affiliates. All rights reserved. |
• Click Spreadsheet
• Click Actions, select Data, select Sort
• For 1, select Start Date; For 2, select End Date; click Apply
Step 1 – Sort the Interactive Report
19
Copyright © 2018 Oracle and/or its affiliates. All rights reserved. |
• Click Actions, select Data, select Compute
• Column Label enter Budget V Cost
• Format Mask select $5,234.10
• Computation Expression enter I – H
• Click Apply
Step 2 – Add a Computation
20
Copyright © 2018 Oracle and/or its affiliates. All rights reserved. |
• Click Actions, select Chart
• Label select Project
• Value select **Budget V Cost
• Function select Sum
• Sort select Label – Ascending
• Orientation select Horizontal
• Click Apply
Step 3 – Add a Chart
21
Copyright © 2018 Oracle and/or its affiliates. All rights reserved. |
Step 3b – Add a Chart
22
Copyright © 2018 Oracle and/or its affiliates. All rights reserved. |
• Click Actions, select Report, select Save Report
• For Save, select As Default Report Settings
• Default Report Type, select Alternative
• Name, enter Date Review
• Click Apply
Step 4 – Save Report
23
Copyright © 2018 Oracle and/or its affiliates. All rights reserved. |
• In the runtime environment,
click the edit icon on a record
• A modal page will be displayed
• In the Developer Toolbar, click
Quick Edit
• Hover over the Status item
(until a blue outline appears)
and click the mouse
• Page Designer displays
with focus on the Status item
Step 5 – Restrict the Status
24
Copyright © 2018 Oracle and/or its affiliates. All rights reserved. |
• In Page Designer, within the Property Editor (right pane),
for Type select Select List
• Under List of Values, for Type select SQL Query
• Next to SQL Query, click Code Editor
Step 5b – Restrict the Status
25
Copyright © 2018 Oracle and/or its affiliates. All rights reserved. |
• Within the Code Editor, enter the following:
select distinct status d, status r
from spreadsheet
order by 1
• Click Validate
• Click OK
• Display Extra Values, select No
• Null Value Display, enter - Select Status -
• Click Save (In the toolbar - top right)
Step 5c – Restrict the Status
26
Copyright © 2018 Oracle and/or its affiliates. All rights reserved. |
• Navigate back to the runtime environment
• Refresh the browser
• Edit a record
• Click Status
Step 6 – Run the App
27
Copyright © 2018 Oracle and/or its affiliates. All rights reserved. |
• Navigate back to the development environment
• In App Builder, navigate to the App Home Page
• Click Create Page
Step 7 – Add a Calendar
28
Copyright © 2018 Oracle and/or its affiliates. All rights reserved. |
• Click Calendar
• Page Name, enter Calendar
• Breadcrumb, select Breadcrumb
• Click Next
Step 7b – Add a Calendar
29
Copyright © 2018 Oracle and/or its affiliates. All rights reserved. |
• Navigation Preference, click Create a new navigation menu entry
• Click Next
• Table / View Name,
select SPREADSHEET (table)
• Click Next
Step 7c – Add a Calendar
30
Copyright © 2018 Oracle and/or its affiliates. All rights reserved. |
• Display Column, select TASK_NAME
• End Date Column, select END_DATE
• Click Create
Step 7d – Add a Calendar
31
Copyright © 2018 Oracle and/or its affiliates. All rights reserved. |
• In the Rendering tab, under Calendar, click Attributes
• In the Property Editor (right pane), click View / Edit Link
• Page, select 3
• Set Items – Name, select P3_ID; Value, select ID
• Clear Cache,
enter 3
• Click OK
• Click Save and Run
Step 8 – Link the Calendar to the Update Form
32
Copyright © 2018 Oracle and/or its affiliates. All rights reserved. |
Step 8b – Link the Calendar to the Update Form
33
Note:
You may need to
navigate to the
month of May
to see calendar
entries.
Copyright © 2018 Oracle and/or its affiliates. All rights reserved. |
Using Quick SQL
Defining new data structures
34
Copyright © 2018 Oracle and/or its affiliates. All rights reserved. |
Original Spreadsheet Table
35
Copyright © 2018 Oracle and/or its affiliates. All rights reserved. |
Napkin Design – Improved data model for Projects
36
Copyright © 2018 Oracle and/or its affiliates. All rights reserved. |
• Go back to your development environment - App Builder
• Click SQL Workshop
• Click SQL Scripts
• Click Quick SQL
Step 1 – Open Quick SQL
37
Copyright © 2018 Oracle and/or its affiliates. All rights reserved. |
• Enter the Table Name {Team Members}
• Indent 2 or more spaces and enter the column names
Step 2 - Enter shorthand for Team Members table
38
Copyright © 2018 Oracle and/or its affiliates. All rights reserved. |
• Enter the Table Name in the first column {Projects}
• Indent 2 or more spaces and enter the column names
Step 3 - Enter details for Projects table
39
Copyright © 2018 Oracle and/or its affiliates. All rights reserved. |
• Click Help
• Click Table
Directives
Step 4 – Review Help
40
Copyright © 2018 Oracle and/or its affiliates. All rights reserved. |
• Click Column
Directives
41
Step 4b – Review Help
Copyright © 2018 Oracle and/or its affiliates. All rights reserved. |
• Click Data Types
42
Step 4c – Review Help
Copyright © 2018 Oracle and/or its affiliates. All rights reserved. |
• Close Help
• Enter /insert xx for tables
• Enter /nn for mandatory columns
• Enter /references team_members
for project lead column
• Enter num for budget column
• Enter /vc30 and /check ASSIGNED,
IN-PROGRESS, COMPLETED for
status column
Step 5 - Improve the Shorthand
43
Copyright © 2018 Oracle and/or its affiliates. All rights reserved. |
• Enter the Table Name indented
{Milestones}
• Indent 2 or more spaces and
enter the column names
Step 6 - Enter details for a child table
44
Copyright © 2018 Oracle and/or its affiliates. All rights reserved. |
• Enter the Table Name indented
{Tasks}
• Indent 2 or more spaces and
enter the column names
Step 7 - Enter details for another child table
45
Copyright © 2018 Oracle and/or its affiliates. All rights reserved. |
• Copy the following URL into a new window in your browser:
{Remember you are on Slide 50 if you click the link directly}
http://www.oracle.com/technetwork/developer-tools/apex/application-express/apex-beginner-quicksql-5095785.txt
• Copy and Paste the full script
into the Quick SQL Shorthand pane
{on the left}
• Click Generate SQL
Step 8 – Complete the Shorthand
46
team_members /insert 10
username /nn /upper
full name
email /nn
phone_number
profile
photo file
projects /insert 20
name /nn
project_lead /nn /references team_members
budget num
status vc30 /nn /check ASSIGNED, IN-PROGRESS, COMPLETED
completed_date
description
milestones /insert 30
name /nn
due_date /nn
description
tasks /insert 100
name /nn
assignee /nn /references team_members
milestone_id /references milestones
start_date /nn
end_date
cost num
description
is_complete_yn /check Y, N
view project_tasks projects tasks
Copyright © 2018 Oracle and/or its affiliates. All rights reserved. |
• Click Settings
• Object Prefix, enter hol
• On Delete, select Restrict
• Primary Keys, select
12c Identity Data Types
• Date Data Type, select TIMESTAMP
WITH LOCAL TIME ZONE
• Audit Columns, check Include
• Row Version Number, check Include
• Click Save Changes
Step 9 – Update the Settings
47
Copyright © 2018 Oracle and/or its affiliates. All rights reserved. |
• Click Save SQL Script
• For Script Name, enter hol
• Click Save Script
• Click Review and Run
{Note: The script will be displayed in
the Script Editor within SQL Scripts}
• Click Run
• Click Run Now
Step 10 – Save, Review, and Run the Script
48
Copyright © 2018 Oracle and/or its affiliates. All rights reserved. |
Using the Create Application Wizard
Creating an app on the tables from Quick SQL
49
Copyright © 2018 Oracle and/or its affiliates. All rights reserved. |
• Click Create App from Script
Step 1 – Start the Create App Wizard
50
Copyright © 2018 Oracle and/or its affiliates. All rights reserved. |
• For Name, enter Projects
• Click Appearance
• For Theme Style, select Vita-Slate
Step 2 – Name the App and Update Appearance
51
Copyright © 2018 Oracle and/or its affiliates. All rights reserved. |
• For Features, click Check All
Step 3 – Add Features
52
Copyright © 2018 Oracle and/or its affiliates. All rights reserved. |
• Click Create Application
Step 4 – Create Application
53
Copyright © 2018 Oracle and/or its affiliates. All rights reserved. |
• Your new application will be displayed in Page Designer
• Click Run Application
Step 5 – App in Page Designer
54
Copyright © 2018 Oracle and/or its affiliates. All rights reserved. |
• Enter your credentials
• Play around with your new application
Step 8 – Runtime App
55
Copyright © 2018 Oracle and/or its affiliates. All rights reserved. |
Updating a Page
Improving the App
56
Copyright © 2018 Oracle and/or its affiliates. All rights reserved. |
• From the development environment,
click App Builder, and then select Create
• Click New Application
Step 1 – Restart the Create App Wizard
57
Copyright © 2018 Oracle and/or its affiliates. All rights reserved. |
• In the Create App Wizard, click Load Blueprint
• For Projects, click Load
Step 2 – Load Blueprint
58
Copyright © 2018 Oracle and/or its affiliates. All rights reserved. |
• Click Add Page
• Click Interactive Grid
• For Page Name,
enter Milestones
• For Table or View, select
HOL_MILESTONES
• Click Add Page
Step 3 – Add a Page
59
Copyright © 2018 Oracle and/or its affiliates. All rights reserved. |
• Click and hold the mouse when hovering over the hamburger for
the Milestones – Interactive Grid page
• Move it up until the page is under Projects
• Release the mouse
Step 4 – Reorder a Page
60
Copyright © 2018 Oracle and/or its affiliates. All rights reserved. |
• For Milestones – Interactive Report with Form page, click Edit
• Click Delete
Step 5 – Delete a Page
61
Copyright © 2018 Oracle and/or its affiliates. All rights reserved. |
• Click Create Application
• In Page Designer, click Run Application
Step 6 – Create App and Run
62
Copyright © 2018 Oracle and/or its affiliates. All rights reserved. |
• In the runtime environment, click Milestones
• In the Developer Toolbar, click Edit Page 6
Step 7 – Navigate to Milestones
63
Copyright © 2018 Oracle and/or its affiliates. All rights reserved. |
• In Page Designer, under Milestones, click Columns
• Click PROJECT_ID
Step 8 – Update Project ID Column
64
Copyright © 2018 Oracle and/or its affiliates. All rights reserved. |
• In the Property Editor, update the following:
oIdentification: Type – select Select List
oHeading: Heading – enter Project
oList of Values: Type – select SQL Query
oList of Values – SQL Query enter
select name d, id r
from hol_projects
order by 1
oDisplay Extra Values – click No
oDisplay Null Value – click No
• Save and Run the App
Step 8b – Update Project ID Column
66
Copyright © 2018 Oracle and/or its affiliates. All rights reserved. |
• In the runtime environment, click Actions, select Columns
• Uncheck Displayed for Id, Row Version, Created, Created By,
Updated, and Updated By
• Click Save
Step 9 – Hide Columns
67
Copyright © 2018 Oracle and/or its affiliates. All rights reserved. |
• In the runtime environment, click Actions, select Report,
select Save
Step 10 – Save the Report
68
Copyright © 2018 Oracle and/or its affiliates. All rights reserved. |
Useful Links
Learn More
69
Copyright © 2018 Oracle and/or its affiliates. All rights reserved. |
Useful Links
• APEX Collateral http://apex.oracle.com
• Hands-on Labs http://apex.oracle.com/hols
• Community http://apex.oracle.com/community
• External Site + Slack http://apex.world
70
oracle-apex-beginner-hands-on-lab-5095868.pdf

oracle-apex-beginner-hands-on-lab-5095868.pdf

  • 2.
    Copyright © 2018,Oracle and/or its affiliates. All rights reserved. | Oracle APEX Beginner Hands-On Lab April, 2019 (v19.1 OTN) 2
  • 3.
    Copyright © 2018Oracle and/or its affiliates. All rights reserved. | Obtaining a Workspace Getting Started 3
  • 4.
    Copyright © 2018Oracle and/or its affiliates. All rights reserved. | • Go to https://apex.oracle.com • Click Get Started for Free Step 1a 4
  • 5.
    Copyright © 2018Oracle and/or its affiliates. All rights reserved. | • Click Request a Free Workspace Step 1b 5
  • 6.
    Copyright © 2018Oracle and/or its affiliates. All rights reserved. | • What Type of Workspace - Click Application Development • Enter your Identification details – First Name, Last Name, Email, Workspace {Note: For workspace enter a unique name, such as first initial and last name} • Enter Schema details – Schema Name {Note: For schema name enter the same name as you entered for workspace} • Complete the wizard Step 2 6
  • 7.
    Copyright © 2018Oracle and/or its affiliates. All rights reserved. | • Check your email You should get an email from oracle- application-express_ww@oracle.com within a few minutes {Note: If you don’t get an email go back to Step 1 and make sure to enter your email correctly} • Click Create Workspace • Click Continue to Log In Screen • Reset your password Step 3 7
  • 8.
    Copyright © 2018Oracle and/or its affiliates. All rights reserved. | Creating an App from a Spreadsheet Building your first app 8
  • 9.
    Copyright © 2018Oracle and/or its affiliates. All rights reserved. | • Log into your workspace on https://apex.oracle.com • Click App Builder • Click Create a New App Step 1 – Logging In 9
  • 10.
    Copyright © 2018Oracle and/or its affiliates. All rights reserved. | • Click From a File Step 2 – Selecting App Type 10
  • 11.
    Copyright © 2018Oracle and/or its affiliates. All rights reserved. | • Click Copy and Paste • For Sample Data Set select Project and Tasks • Click Next Step 3 – Loading Sample Data 11
  • 12.
    Copyright © 2018Oracle and/or its affiliates. All rights reserved. | • Enter Table Name {SPREADSHEET} • Click Load Data Step 4 – Naming the Table 12
  • 13.
    Copyright © 2018Oracle and/or its affiliates. All rights reserved. | • Check that 73 rows are loaded • Click Continue to Create Application Wizard Step 5 – Verifying Records Loaded 13
  • 14.
    Copyright © 2018Oracle and/or its affiliates. All rights reserved. | • Enter Name {App from a Spreadsheet} • Next to Features, click Check All Step 6 – Naming the App 14
  • 15.
    Copyright © 2018Oracle and/or its affiliates. All rights reserved. | • Click Create Application Step 7 – Create Application 15
  • 16.
    Copyright © 2018Oracle and/or its affiliates. All rights reserved. | • Your new application will be displayed in Page Designer • Click Run Application Step 8 – App in Page Designer 16
  • 17.
    Copyright © 2018Oracle and/or its affiliates. All rights reserved. | • Enter your user credentials • Play around with your new application Step 9 – Runtime App 17
  • 18.
    Copyright © 2018Oracle and/or its affiliates. All rights reserved. | Improving the App Using the Runtime Environment 18
  • 19.
    Copyright © 2018Oracle and/or its affiliates. All rights reserved. | • Click Spreadsheet • Click Actions, select Data, select Sort • For 1, select Start Date; For 2, select End Date; click Apply Step 1 – Sort the Interactive Report 19
  • 20.
    Copyright © 2018Oracle and/or its affiliates. All rights reserved. | • Click Actions, select Data, select Compute • Column Label enter Budget V Cost • Format Mask select $5,234.10 • Computation Expression enter I – H • Click Apply Step 2 – Add a Computation 20
  • 21.
    Copyright © 2018Oracle and/or its affiliates. All rights reserved. | • Click Actions, select Chart • Label select Project • Value select **Budget V Cost • Function select Sum • Sort select Label – Ascending • Orientation select Horizontal • Click Apply Step 3 – Add a Chart 21
  • 22.
    Copyright © 2018Oracle and/or its affiliates. All rights reserved. | Step 3b – Add a Chart 22
  • 23.
    Copyright © 2018Oracle and/or its affiliates. All rights reserved. | • Click Actions, select Report, select Save Report • For Save, select As Default Report Settings • Default Report Type, select Alternative • Name, enter Date Review • Click Apply Step 4 – Save Report 23
  • 24.
    Copyright © 2018Oracle and/or its affiliates. All rights reserved. | • In the runtime environment, click the edit icon on a record • A modal page will be displayed • In the Developer Toolbar, click Quick Edit • Hover over the Status item (until a blue outline appears) and click the mouse • Page Designer displays with focus on the Status item Step 5 – Restrict the Status 24
  • 25.
    Copyright © 2018Oracle and/or its affiliates. All rights reserved. | • In Page Designer, within the Property Editor (right pane), for Type select Select List • Under List of Values, for Type select SQL Query • Next to SQL Query, click Code Editor Step 5b – Restrict the Status 25
  • 26.
    Copyright © 2018Oracle and/or its affiliates. All rights reserved. | • Within the Code Editor, enter the following: select distinct status d, status r from spreadsheet order by 1 • Click Validate • Click OK • Display Extra Values, select No • Null Value Display, enter - Select Status - • Click Save (In the toolbar - top right) Step 5c – Restrict the Status 26
  • 27.
    Copyright © 2018Oracle and/or its affiliates. All rights reserved. | • Navigate back to the runtime environment • Refresh the browser • Edit a record • Click Status Step 6 – Run the App 27
  • 28.
    Copyright © 2018Oracle and/or its affiliates. All rights reserved. | • Navigate back to the development environment • In App Builder, navigate to the App Home Page • Click Create Page Step 7 – Add a Calendar 28
  • 29.
    Copyright © 2018Oracle and/or its affiliates. All rights reserved. | • Click Calendar • Page Name, enter Calendar • Breadcrumb, select Breadcrumb • Click Next Step 7b – Add a Calendar 29
  • 30.
    Copyright © 2018Oracle and/or its affiliates. All rights reserved. | • Navigation Preference, click Create a new navigation menu entry • Click Next • Table / View Name, select SPREADSHEET (table) • Click Next Step 7c – Add a Calendar 30
  • 31.
    Copyright © 2018Oracle and/or its affiliates. All rights reserved. | • Display Column, select TASK_NAME • End Date Column, select END_DATE • Click Create Step 7d – Add a Calendar 31
  • 32.
    Copyright © 2018Oracle and/or its affiliates. All rights reserved. | • In the Rendering tab, under Calendar, click Attributes • In the Property Editor (right pane), click View / Edit Link • Page, select 3 • Set Items – Name, select P3_ID; Value, select ID • Clear Cache, enter 3 • Click OK • Click Save and Run Step 8 – Link the Calendar to the Update Form 32
  • 33.
    Copyright © 2018Oracle and/or its affiliates. All rights reserved. | Step 8b – Link the Calendar to the Update Form 33 Note: You may need to navigate to the month of May to see calendar entries.
  • 34.
    Copyright © 2018Oracle and/or its affiliates. All rights reserved. | Using Quick SQL Defining new data structures 34
  • 35.
    Copyright © 2018Oracle and/or its affiliates. All rights reserved. | Original Spreadsheet Table 35
  • 36.
    Copyright © 2018Oracle and/or its affiliates. All rights reserved. | Napkin Design – Improved data model for Projects 36
  • 37.
    Copyright © 2018Oracle and/or its affiliates. All rights reserved. | • Go back to your development environment - App Builder • Click SQL Workshop • Click SQL Scripts • Click Quick SQL Step 1 – Open Quick SQL 37
  • 38.
    Copyright © 2018Oracle and/or its affiliates. All rights reserved. | • Enter the Table Name {Team Members} • Indent 2 or more spaces and enter the column names Step 2 - Enter shorthand for Team Members table 38
  • 39.
    Copyright © 2018Oracle and/or its affiliates. All rights reserved. | • Enter the Table Name in the first column {Projects} • Indent 2 or more spaces and enter the column names Step 3 - Enter details for Projects table 39
  • 40.
    Copyright © 2018Oracle and/or its affiliates. All rights reserved. | • Click Help • Click Table Directives Step 4 – Review Help 40
  • 41.
    Copyright © 2018Oracle and/or its affiliates. All rights reserved. | • Click Column Directives 41 Step 4b – Review Help
  • 42.
    Copyright © 2018Oracle and/or its affiliates. All rights reserved. | • Click Data Types 42 Step 4c – Review Help
  • 43.
    Copyright © 2018Oracle and/or its affiliates. All rights reserved. | • Close Help • Enter /insert xx for tables • Enter /nn for mandatory columns • Enter /references team_members for project lead column • Enter num for budget column • Enter /vc30 and /check ASSIGNED, IN-PROGRESS, COMPLETED for status column Step 5 - Improve the Shorthand 43
  • 44.
    Copyright © 2018Oracle and/or its affiliates. All rights reserved. | • Enter the Table Name indented {Milestones} • Indent 2 or more spaces and enter the column names Step 6 - Enter details for a child table 44
  • 45.
    Copyright © 2018Oracle and/or its affiliates. All rights reserved. | • Enter the Table Name indented {Tasks} • Indent 2 or more spaces and enter the column names Step 7 - Enter details for another child table 45
  • 46.
    Copyright © 2018Oracle and/or its affiliates. All rights reserved. | • Copy the following URL into a new window in your browser: {Remember you are on Slide 50 if you click the link directly} http://www.oracle.com/technetwork/developer-tools/apex/application-express/apex-beginner-quicksql-5095785.txt • Copy and Paste the full script into the Quick SQL Shorthand pane {on the left} • Click Generate SQL Step 8 – Complete the Shorthand 46 team_members /insert 10 username /nn /upper full name email /nn phone_number profile photo file projects /insert 20 name /nn project_lead /nn /references team_members budget num status vc30 /nn /check ASSIGNED, IN-PROGRESS, COMPLETED completed_date description milestones /insert 30 name /nn due_date /nn description tasks /insert 100 name /nn assignee /nn /references team_members milestone_id /references milestones start_date /nn end_date cost num description is_complete_yn /check Y, N view project_tasks projects tasks
  • 47.
    Copyright © 2018Oracle and/or its affiliates. All rights reserved. | • Click Settings • Object Prefix, enter hol • On Delete, select Restrict • Primary Keys, select 12c Identity Data Types • Date Data Type, select TIMESTAMP WITH LOCAL TIME ZONE • Audit Columns, check Include • Row Version Number, check Include • Click Save Changes Step 9 – Update the Settings 47
  • 48.
    Copyright © 2018Oracle and/or its affiliates. All rights reserved. | • Click Save SQL Script • For Script Name, enter hol • Click Save Script • Click Review and Run {Note: The script will be displayed in the Script Editor within SQL Scripts} • Click Run • Click Run Now Step 10 – Save, Review, and Run the Script 48
  • 49.
    Copyright © 2018Oracle and/or its affiliates. All rights reserved. | Using the Create Application Wizard Creating an app on the tables from Quick SQL 49
  • 50.
    Copyright © 2018Oracle and/or its affiliates. All rights reserved. | • Click Create App from Script Step 1 – Start the Create App Wizard 50
  • 51.
    Copyright © 2018Oracle and/or its affiliates. All rights reserved. | • For Name, enter Projects • Click Appearance • For Theme Style, select Vita-Slate Step 2 – Name the App and Update Appearance 51
  • 52.
    Copyright © 2018Oracle and/or its affiliates. All rights reserved. | • For Features, click Check All Step 3 – Add Features 52
  • 53.
    Copyright © 2018Oracle and/or its affiliates. All rights reserved. | • Click Create Application Step 4 – Create Application 53
  • 54.
    Copyright © 2018Oracle and/or its affiliates. All rights reserved. | • Your new application will be displayed in Page Designer • Click Run Application Step 5 – App in Page Designer 54
  • 55.
    Copyright © 2018Oracle and/or its affiliates. All rights reserved. | • Enter your credentials • Play around with your new application Step 8 – Runtime App 55
  • 56.
    Copyright © 2018Oracle and/or its affiliates. All rights reserved. | Updating a Page Improving the App 56
  • 57.
    Copyright © 2018Oracle and/or its affiliates. All rights reserved. | • From the development environment, click App Builder, and then select Create • Click New Application Step 1 – Restart the Create App Wizard 57
  • 58.
    Copyright © 2018Oracle and/or its affiliates. All rights reserved. | • In the Create App Wizard, click Load Blueprint • For Projects, click Load Step 2 – Load Blueprint 58
  • 59.
    Copyright © 2018Oracle and/or its affiliates. All rights reserved. | • Click Add Page • Click Interactive Grid • For Page Name, enter Milestones • For Table or View, select HOL_MILESTONES • Click Add Page Step 3 – Add a Page 59
  • 60.
    Copyright © 2018Oracle and/or its affiliates. All rights reserved. | • Click and hold the mouse when hovering over the hamburger for the Milestones – Interactive Grid page • Move it up until the page is under Projects • Release the mouse Step 4 – Reorder a Page 60
  • 61.
    Copyright © 2018Oracle and/or its affiliates. All rights reserved. | • For Milestones – Interactive Report with Form page, click Edit • Click Delete Step 5 – Delete a Page 61
  • 62.
    Copyright © 2018Oracle and/or its affiliates. All rights reserved. | • Click Create Application • In Page Designer, click Run Application Step 6 – Create App and Run 62
  • 63.
    Copyright © 2018Oracle and/or its affiliates. All rights reserved. | • In the runtime environment, click Milestones • In the Developer Toolbar, click Edit Page 6 Step 7 – Navigate to Milestones 63
  • 64.
    Copyright © 2018Oracle and/or its affiliates. All rights reserved. | • In Page Designer, under Milestones, click Columns • Click PROJECT_ID Step 8 – Update Project ID Column 64
  • 65.
    Copyright © 2018Oracle and/or its affiliates. All rights reserved. | • In the Property Editor, update the following: oIdentification: Type – select Select List oHeading: Heading – enter Project oList of Values: Type – select SQL Query oList of Values – SQL Query enter select name d, id r from hol_projects order by 1 oDisplay Extra Values – click No oDisplay Null Value – click No • Save and Run the App Step 8b – Update Project ID Column 66
  • 66.
    Copyright © 2018Oracle and/or its affiliates. All rights reserved. | • In the runtime environment, click Actions, select Columns • Uncheck Displayed for Id, Row Version, Created, Created By, Updated, and Updated By • Click Save Step 9 – Hide Columns 67
  • 67.
    Copyright © 2018Oracle and/or its affiliates. All rights reserved. | • In the runtime environment, click Actions, select Report, select Save Step 10 – Save the Report 68
  • 68.
    Copyright © 2018Oracle and/or its affiliates. All rights reserved. | Useful Links Learn More 69
  • 69.
    Copyright © 2018Oracle and/or its affiliates. All rights reserved. | Useful Links • APEX Collateral http://apex.oracle.com • Hands-on Labs http://apex.oracle.com/hols • Community http://apex.oracle.com/community • External Site + Slack http://apex.world 70