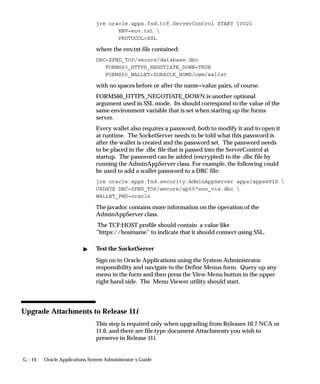
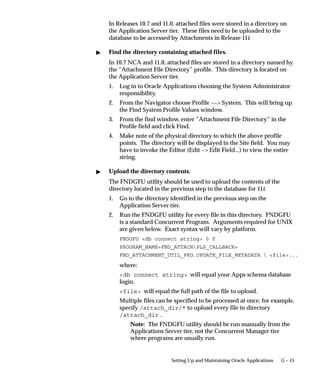
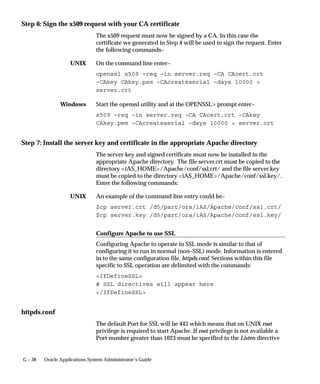
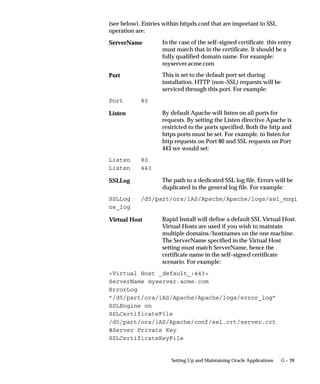
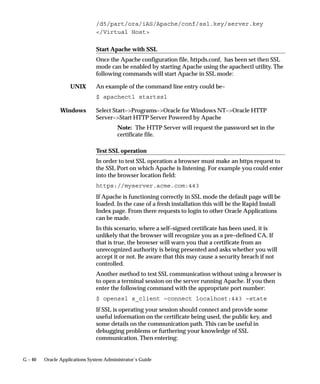
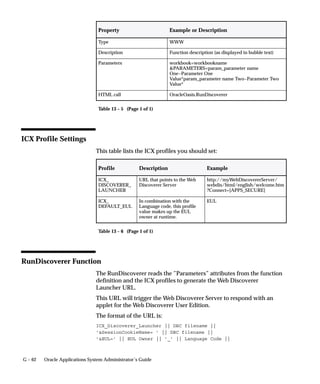
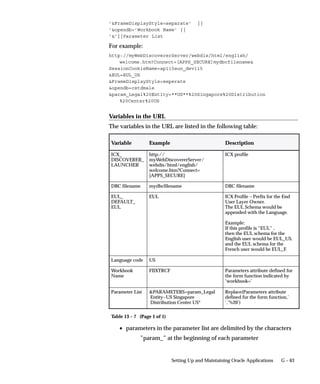
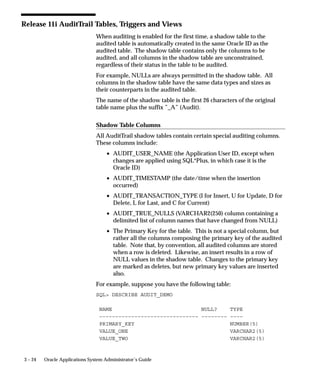
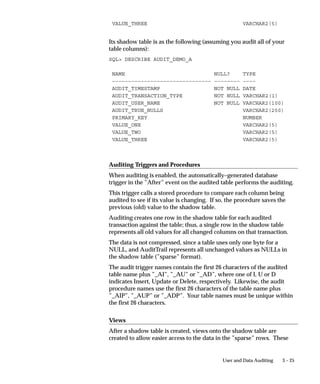
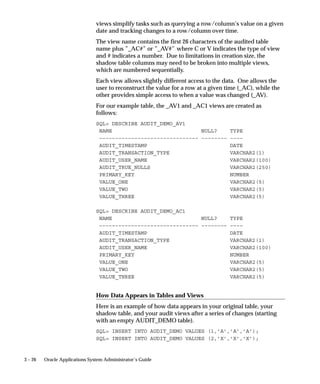
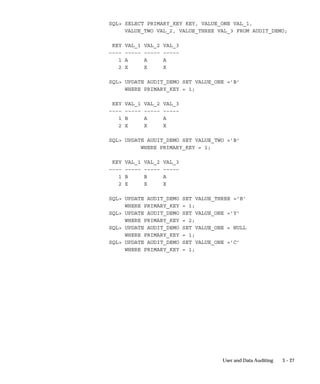
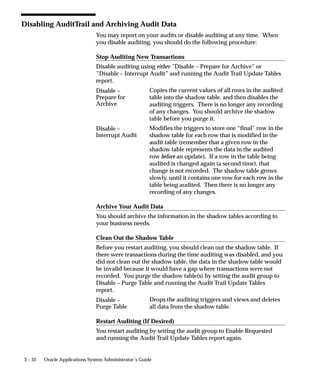
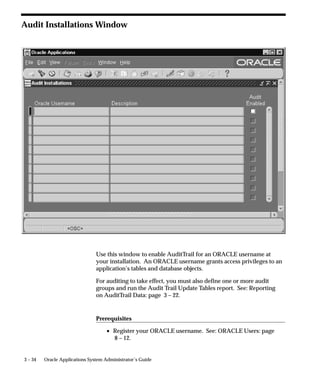
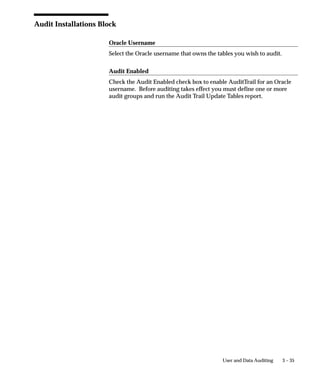
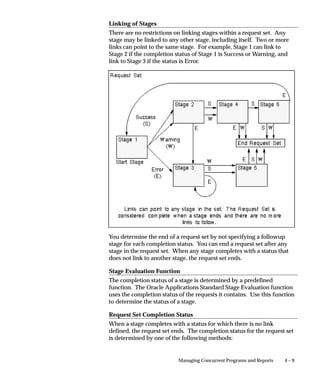
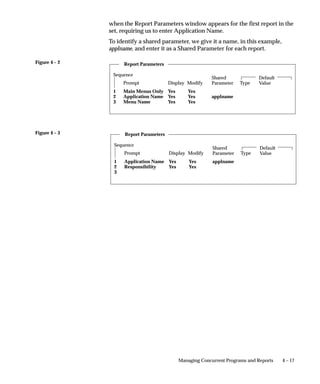
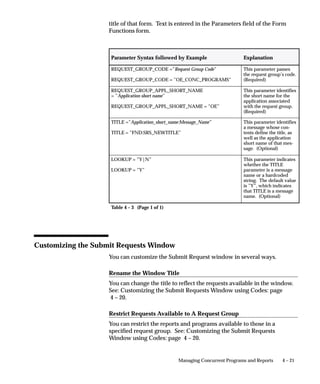
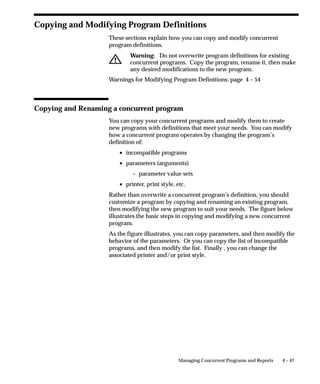
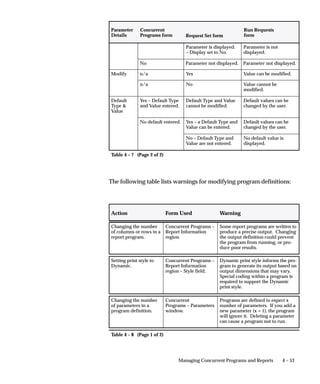
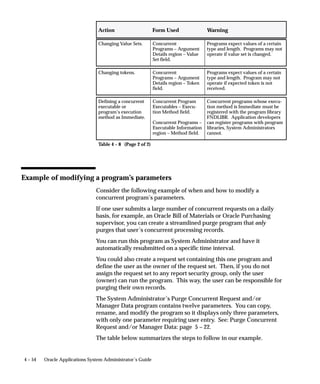
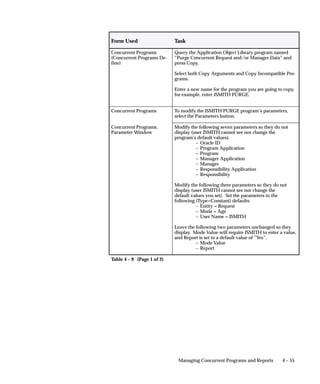
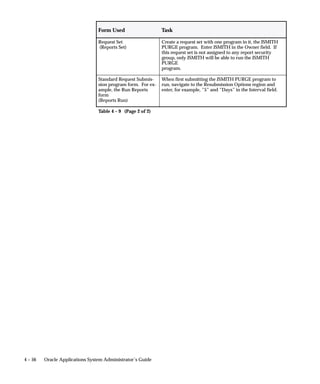
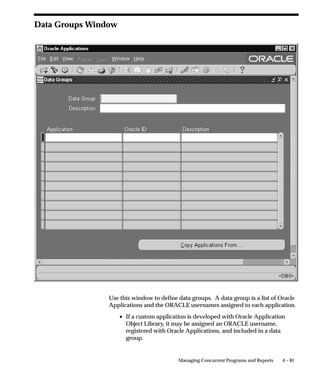
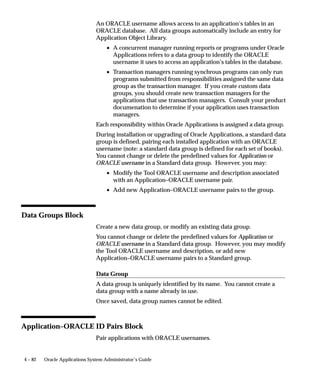
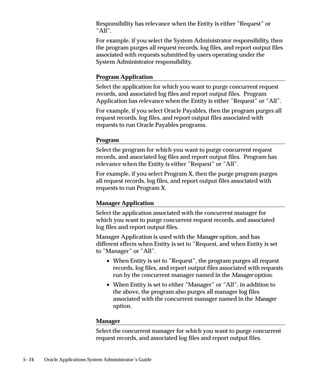
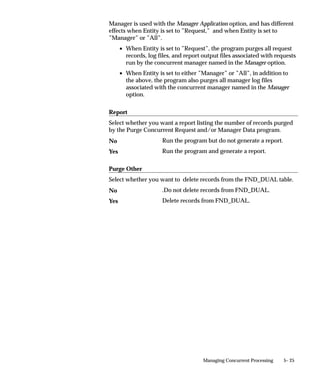
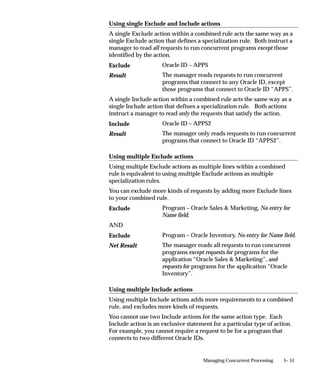
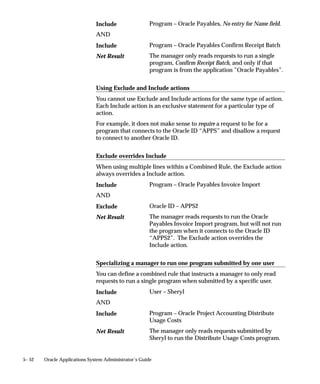
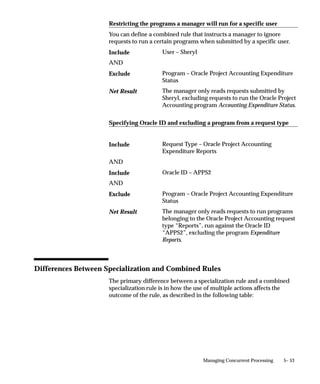
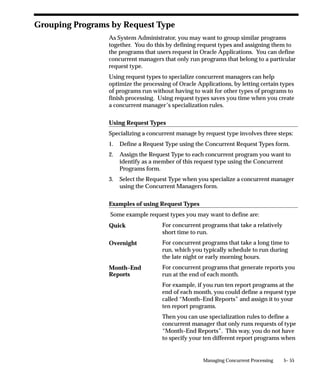
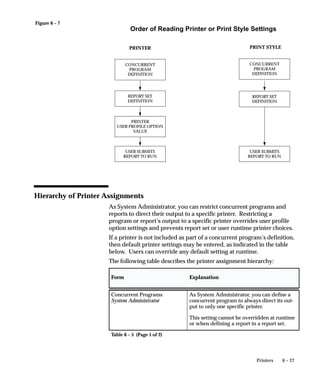
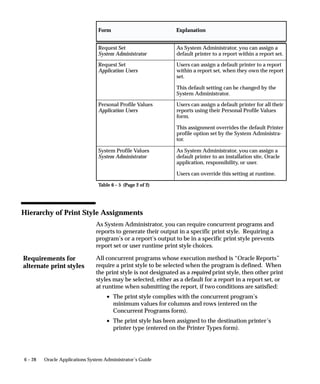
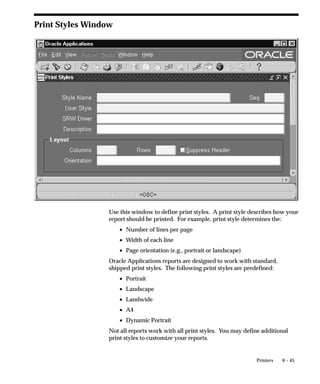
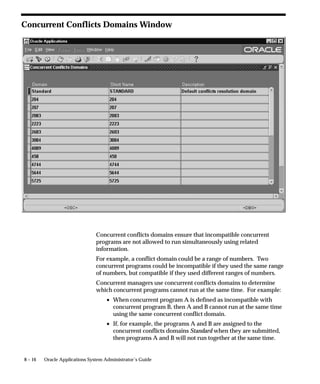
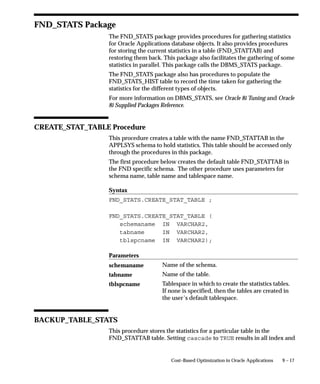
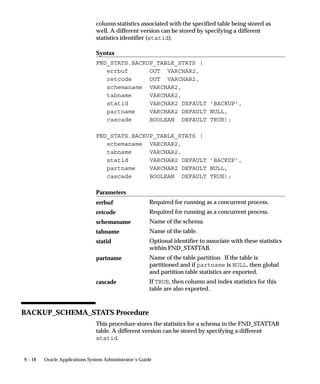
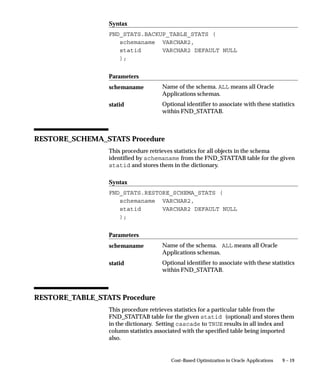
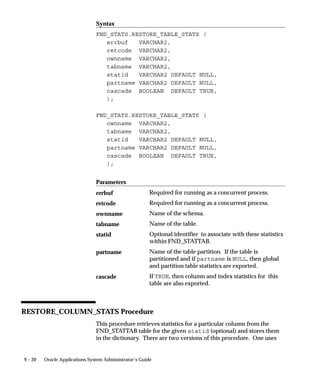
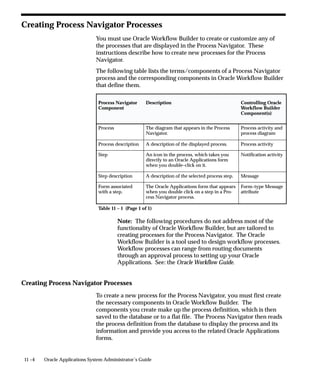
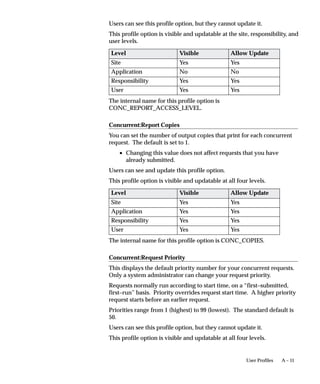
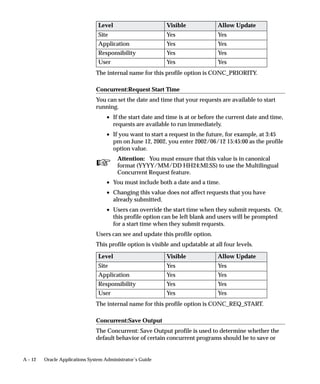
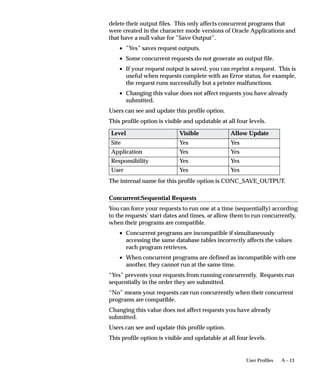
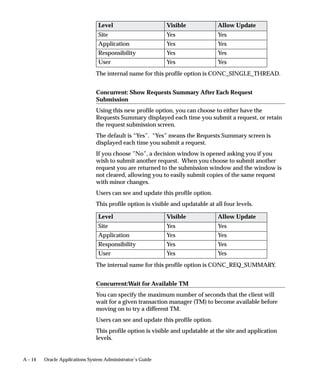
This document provides an overview and instructions for system administration tasks related to Oracle Applications Release 11i, including:
- Managing security by defining responsibilities, security groups, and function security.
- Auditing user activity and reporting on audit trail data.
- Managing concurrent programs, requests, processing, and parallel processing.
- Configuring security, concurrent processing, auditing, and other administrative functions through various windows.


![Attention: Oracle Corporation provides information on
immediate concurrent programs for backwards compatibility
only. We strongly recommend that you do not create any new
immediate concurrent programs. You should define your new
Pro*C concurrent program executables as spawned.
Make sure the environment variable $LUSRLIB includes the modules
that define the functions for the immediate concurrent programs and
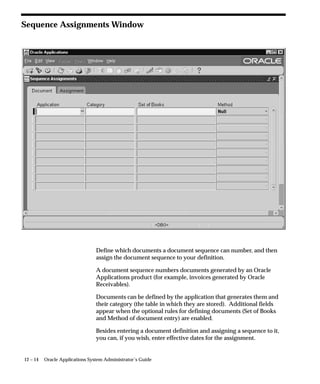
your program library. Set the $LUSRPRG variable to include the object
modules of your library catalog. The file devenv in the directory
$FND_TOP/$APPLUSR defines the variables $LUSRLIB and
$LUSRPRG. The file fndenv executes devenv.
The files devenv and fndenv are UNIX shell scripts that set up the
necessary environment variables.
We recommend that you make a copy of the working program library
before linking your new immediate concurrent program library in case
your new program library does not function as expected. To link your
program library, execute this command from the operating system:
$ adrelink force=y ”fnd UFNDLIBR”
This creates your new program library as UFNDLIBR. You can rename
it, but the name of your new program library must be eight characters
or less.
Testing Pro*C Concurrent Programs
You can use the following method to test your program. You must pass
each argument needed by your program. To pass parameters, enter the
following at the operating system prompt:
$ <program name> <ORACLE username>/<ORACLE password> 0 Y
[<parameter 1> <parameter 2>... ]
The program name must be uppercase and the same name that you
entered in the Execution File field of the Concurrent Program
Executable window. The 0 and Y arguments are required.
If any of your program–specific parameters includes spaces, enclose
that parameter in double quotes. If a parameter contains a literal
double quote, precede that mark with a backslash [].
Managing Concurrent Programs and Reports 4 – 39](https://image.slidesharecdn.com/oracle-apps-system-adminfromscribed-121103012108-phpapp01/85/Oracle-apps-system-admin-169-320.jpg)
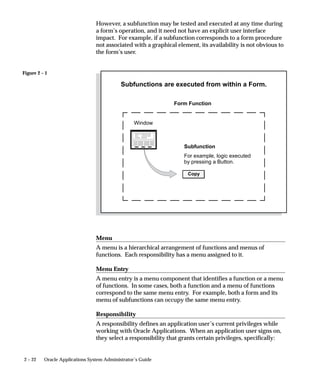
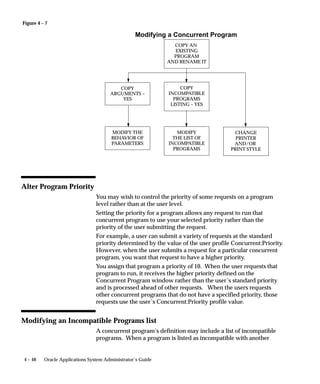
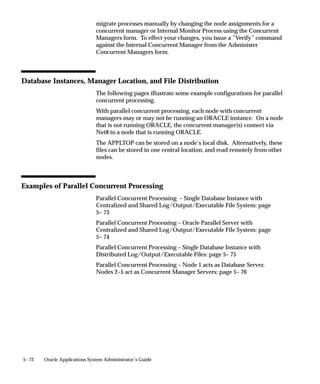
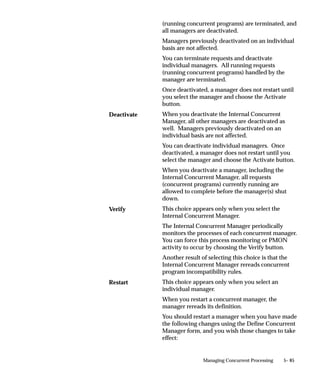
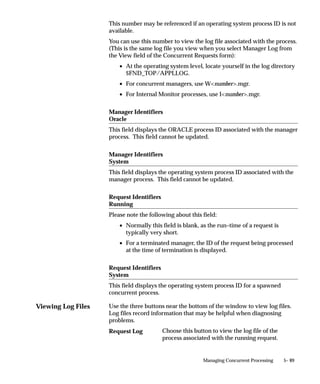
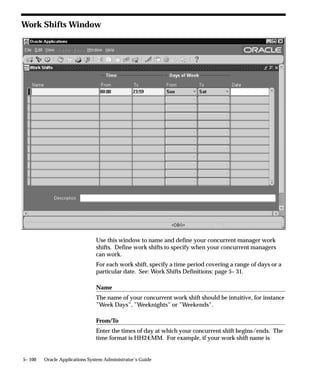
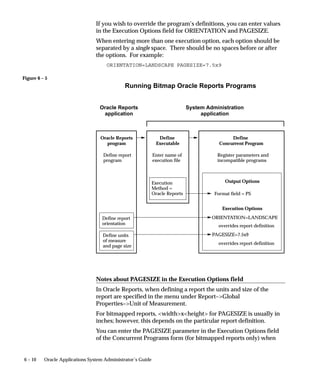
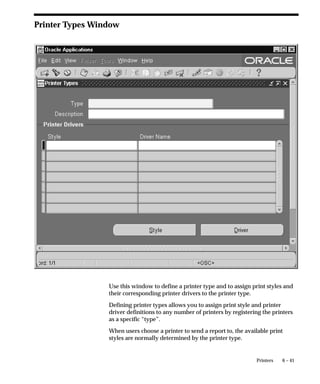
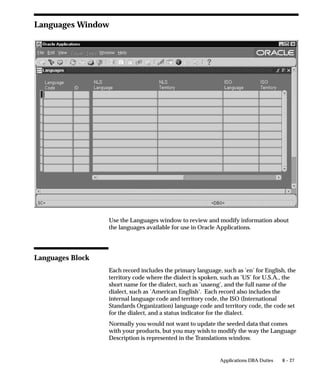
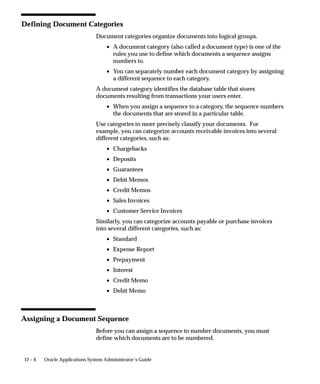
![Log and Out Files
Use names in FCP_LOG and FCP_OUT. This way log and
output/report files can be viewed online.
Testing Your Program
You should test using the <name>.prog file to make sure your script
behaves correctly.
Submitting Concurrent Requests (CONCSUB)
You can test your concurrent program by submitting the program using
the CONCSUB utility from the operating system.
Syntax
You can submit a concurrent request to run any concurrent program by
running the CONCSUB program with the following syntax:
$ CONCSUB <APPS username>/<APPS password>
<responsibility application short name>
<responsibility name>
<username>
[WAIT=N|Y|<n seconds>]
CONCURRENT
<program application short name>
<program name>
[PROGRAM_NAME=”<description>”]
[REPEAT_TIME=<resubmission time>]
[REPEAT_INTERVAL= <number>]
[REPEAT_INTERVAL_UNIT=< resubmission unit>]
[REPEAT_INTERVAL_TYPE=< resubmission type>]
[REPEAT_END=<resubmission end date and time>]
[START=<date>]
[IMPLICIT=< type of concurrent request>
[<parameter 1> ... <parameter n>]
For parameters that follow the CONCURRENT parameter and include
spaces, enclose the parameter argument in double quotes, then again in
single quotes. Oracle Application Object Library requires this syntax
because it parses the argument string twice. For example, to pass this
argument to a program:
Managing Concurrent Programs and Reports 4 – 41](https://image.slidesharecdn.com/oracle-apps-system-adminfromscribed-121103012108-phpapp01/85/Oracle-apps-system-admin-171-320.jpg)

![REPEAT_INTERVAL_TYPE and REPEAT_INTERVAL_UNIT
instead of REPEAT_DAYS.
parameter 1 ... Optional. Your program–specific parameters. If a
parameter n parameter includes spaces, enclose that parameter
in double quotes, then in single quotes. If a
parameter contains a double quotation mark as
part of the argument, precede that mark with a
backslash [].
4 – 46 Oracle Applications System Administrator’s Guide](https://image.slidesharecdn.com/oracle-apps-system-adminfromscribed-121103012108-phpapp01/85/Oracle-apps-system-admin-181-320.jpg)


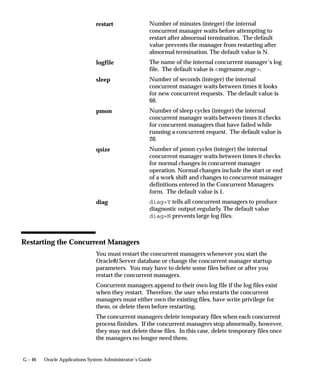
![restart=N
diag=N
sleep=60 (default)
pmon=20 (default)
quesiz=1 (default)
Shutting down the Internal Concurrent Manager from the Operating
System
From the operating system prompt, you can use the CONCSUB utility
to submit a concurrent request, under the SYSADMIN username and
the System Administrator responsibility.
The CONCSUB utility submits a concurrent request and returns you to
the operating system prompt. You must wait until the concurrent
request completes.
To check on the status of your concurrent request, use the Concurrent
Requests form.
CONCSUB applsys/pwd ’Responsibility application shortname’
’Responsibility name’ ’Username’ [WAIT={Y|N|n}] CONCURRENT
’Program application shortname’ PROGRAM
Parameters
applsys/pwd The ORACLE username and password that
connects to Oracle Application Object Library data.
Responsibility The application shortname of the responsibility.
application For the System Administrator responsibility, the
shortname application shortname is SYSADMIN.
Responsibility The name of the responsibility. For the System
name Administrator responsibility, the responsibility
name is System Administrator.
Username The application username of the person who
submits the request. For example, SYSADMIN is
the username of the System Administrator.
WAIT={Y|N|n} Set WAIT to Y if you want CONCSUB to wait until
the request you submitted completes before
CONCSUB returns you to the operating system
prompt.
Set WAIT to N (the default value) if you do not
want CONCSUB to wait.
You can also enter an integer value of n seconds for
CONCSUB to wait before it exits.
5– 62 Oracle Applications System Administrator’s Guide](https://image.slidesharecdn.com/oracle-apps-system-adminfromscribed-121103012108-phpapp01/85/Oracle-apps-system-admin-289-320.jpg)


![Attention: You see “/e” for escape sequences defined using
the Printer Drivers form (because you cannot enter the
backslash ( ) character into a form when your terminal
definition uses backslash as the [Menu] key). You see “e” for
escape sequences originally defined in .pdf files that were
upgraded to release 11 printer drivers.
For non–printable characters, you may represent their value in octal
mode. For example, 0x26 is represented as “ /046 ”. As an example, if
you need to represent the escape sequence:
^ [ ^ L ^ [ l 6 D ( 0 x 26 )
you can represent it as:
/e^L/el6D/046
Using a Spool File
When Spool File is set to No, then a temporary file is created where the
initialization and reset strings are inserted, and the file is sent to the
print command or program.
Set the Spool File to Yes only if the print program creates its own temp
file. This option is recommended when using the Program driver
method and the print program creates its own temp file.
Printers 6 – 21](https://image.slidesharecdn.com/oracle-apps-system-adminfromscribed-121103012108-phpapp01/85/Oracle-apps-system-admin-367-320.jpg)

![Command Line Parameters
When using the PASTA utility from the command line, you can use the
options below.
FNDPSTX [options]
Options:
–f<filename> <filename> is the name of the file to be printed.
–o<filename> <filename> is the name of the output file.
–cx ’x’ is the number of copies required.
–l Print in LANDSCAPE mode. (The default is
PORTRAIT).
–P<printer> <printer> is an OS–specific directive and printer
name. The printer name should not include a
space.
–Cx ’x’ is the maximum number of columns that a page
will have.
PASTA creates a log file that includes all the error messages that are
generated during its run. The file is called ”pasta.log” and is located in
the current directory.
PASTA generates all the temporary files under $APPLTMP in UNIX and
%APPLTMP% on NT. You may need to delete these files manually.
These files have the extension .ps and .tmp.
6 – 40 Oracle Applications System Administrator’s Guide](https://image.slidesharecdn.com/oracle-apps-system-adminfromscribed-121103012108-phpapp01/85/Oracle-apps-system-admin-389-320.jpg)


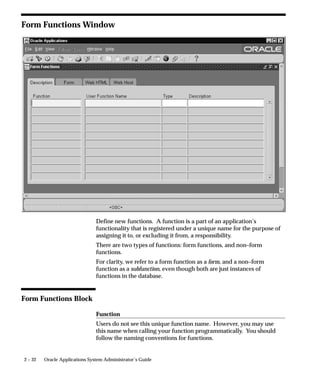
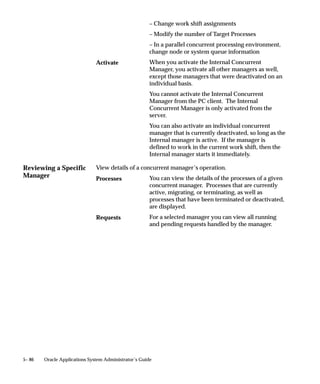
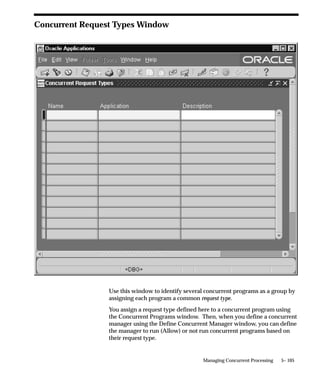
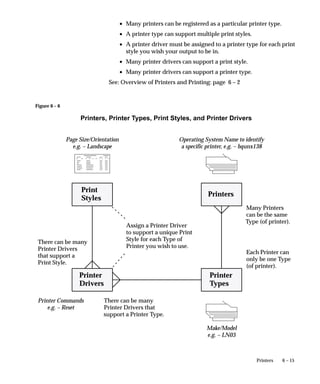
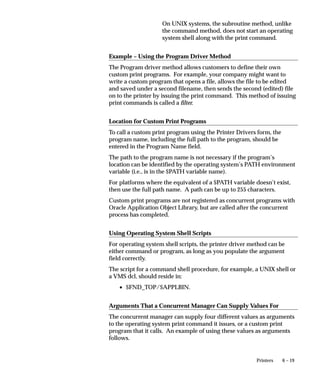
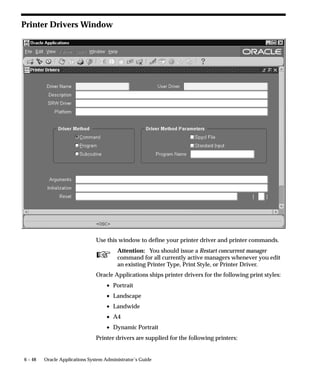
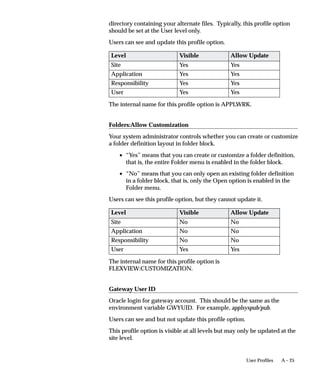
![• Program the driver invokes if the driver method is Program.
• Subroutine the driver invokes if the driver method is Subroutine.
Arguments Region
Arguments
When the Driver Method is set to Program, enter any generic arguments
that must be supplied to the print program.
When the Driver Method is set to Command, enter the full command
and its arguments.
Initialization
Enter the initialization string that must be sent to the printer before the
printer driver can begin printing.
Reset
Enter the reset string that returns the printer to its ready state when
printing is complete
[ ]
The double brackets ([ ]) identify a descriptive flexfield that you can use
to add data fields to this form without programming.
This descriptive flexfield allows you to define special commands
specific to your printer driver and/or the platform it runs on.
Printers 6 – 51](https://image.slidesharecdn.com/oracle-apps-system-adminfromscribed-121103012108-phpapp01/85/Oracle-apps-system-admin-403-320.jpg)


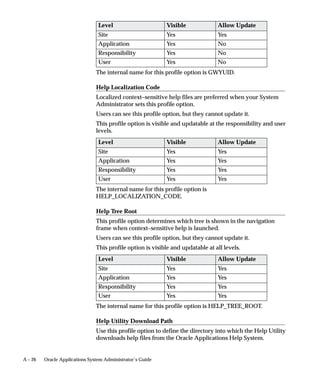
![Example:
optimizer_max_permutations = 79000
_complex_view_merging
This parameter enables the complex view merging feature which
allows certain types of complex views to be merged such as the Apps
KFV views. This parameter is disabled by default, so it must be
explicitly set.
Example:
_complex_view_merging = TRUE
_push_join_predicate
This parameter enables the push join predicate feature that allows the
optimizer to push join predicates inside nonmergeable views. This
helps eliminate full table scans against the adjoining table of a
nonmergeable view. Pushing the join predicate allows the optimizer to
promote an index on the table inside the view and utilize a nested loop
join to the outer referencing table. Push join predicate is disabled by
default, so it must be explicitly enabled.
Example:
_push_join_predicate = TRUE
_sort_elimination_cost_ratio
Setting this parameter to 5 forces the optimizer to only eliminate the
sort when it is 1/5th the cost of the index probe (or conversely the
index probe is 5 times as costly as the sort).
Example:
_sort_elimination_cost_ratio = 5
_use_column_stats_for_function
This parameter allows the optimizer to utilize dictionary statistics for
columns that are involved in no–op expressions such as [col + 0] and
[col || ’’]. If this parameter is disabled (FALSE), the optimizer will
employ internal default statistics for these complex expressions that
can result in higher parse times and more expensive execution plans.
Example:
Cost–Based Optimization in Oracle Applications 9–5](https://image.slidesharecdn.com/oracle-apps-system-adminfromscribed-121103012108-phpapp01/85/Oracle-apps-system-admin-463-320.jpg)
![_use_column_stats_for_function = TRUE
_like_with_bind_as_equality
This parameter forces the optimizer to treat expressions of the form
[indexed–column like :b1] similarly to [index–column =
:b1]. Oracle Applications have many queries which use the LIKE
operator on indexed columns with binds. Since binds are involved,
CBO assigns internal default selectivity estimates for the LIKE operator
(5%), and hence does not consider the index selective.
Example:
_like_with_bind_as_equality = TRUE
_or_expand_nvl_predicate
This parameter allows the optimizer to probe an index for a column
involved in an nvl() function as an r–value.
If enabled, the optimizer transforms expressions of the form
[p.project_id = nvl(:b1,p.project_id)]
into an OR expanded UNION where one side of the UNION contains the
predicate
((:b1 is not null) and (p.project_id =:b1))
and the second branch of the UNION contains the predicate
(:b1 is null)
Therefore, if a value for the project_id bind is supplied, the
optimizer executes the first branch of the UNION and probes the
project_id index.
This improves performance for the Oracle Applications legacy code
which employs the nvl() construct on indexed columns.
Example:
_or_expand_nvl_predicate = TRUE
_push_join_union_view
This parameter allows the optimizer to push join predicates inside
nonmergeable views which contain UNION ALL set operators. This
improves query execution performance for queries joining to views
which contain UNION ALL operators.
9–6 Oracle Applications System Administrator’s Guide](https://image.slidesharecdn.com/oracle-apps-system-adminfromscribed-121103012108-phpapp01/85/Oracle-apps-system-admin-464-320.jpg)


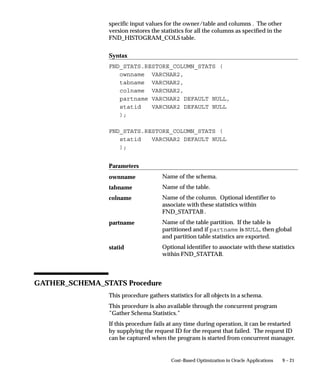
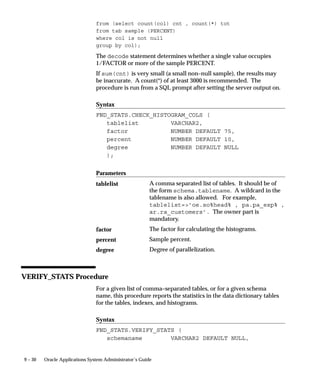
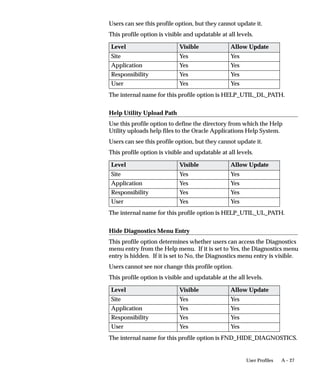
![Parameters
errbuf Required for running as a concurrent process.
retcode Required for running as a concurrent process.
schemaname Schema to analyze. ALL means all Oracle
Applications schemas.
estimate_percent Percentage of rows to use for the statistics using
the estimation. If you enter NULL, the procedure
will default to 10%. The valid range is [00,99].
degree Degree of parallelism. NULL will default to
min(cpu_count, parallel_max_servers).
internal_flag If the value is NOBACKUP then
GATHER_SCHEMA_STATS will not create a
backup of the current statistics. This way the
GATHER_SCHEMA_STATS procedure will be
completed faster. INTERNAL means that the
ANALYZE command will be used instead of
DBMS_STATS.
errors Output errors.
Exceptions
ORA–20000: Schema does not exist or insufficient
privileges.
ORA–20001: Bad input value.
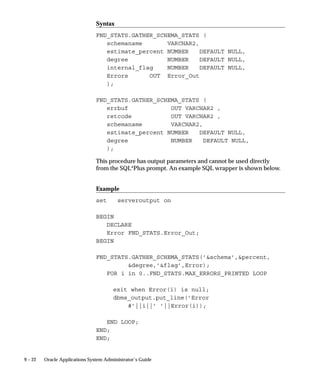
GATHER_INDEX_STATS Procedure
This procedure gathers index statistics. It is equivalent to running
ANALYZE INDEX [ownname.]indname [PARTITION partname]
COMPUTE STATISTICS | ESTIMATE STATISTICS SAMPLE
estimate_percent PERCENT .
It does not execute in parallel.
If the value of backup_flag is BACKUP, then it executes the procedure
EXPORT_TABLE_STATS before gathering the statistics. The exported
data is stored in FND_STATTAB. If the value of backup_flag is not
BACKUP then EXPORT_TABLE_STATS is not performed.
Syntax
FND_STATS.GATHER_INDEX_STATS (
ownname VARCHAR2,
Cost–Based Optimization in Oracle Applications 9 – 23](https://image.slidesharecdn.com/oracle-apps-system-adminfromscribed-121103012108-phpapp01/85/Oracle-apps-system-admin-481-320.jpg)
![indname VARCHAR2,
percent NUMBER DEFAULT NULL,
partname VARCHAR2 DEFAULT NULL,
backup_flag VARCHAR2 DEFAULT NULL
);
Parameters
ownname Schema of index to analyze.
indname Name of index.
percent Percentage of rows to use for the statistics using
the estimation. NULL means to use exact
computation. The valid range is [00,99].
partname Partition name.
backup_flag The value BACKUP indicates that the procedure
EXPORT_TABLE_STATS is executed before
gathering statistics. The default value is NULL.
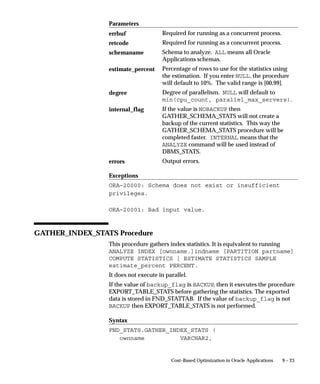
GATHER_TABLE_STATS Procedure
This procedure gathers table and column (and index) statistics. It
attempts to parallelize as much of the work as possible. This operation
does not parallelize if the user does not have select privilege on the
table being analyzed.
If the value of backup_flag is BACKUP, then it executes the procedure
EXPORT_TABLE_STATS before gathering the statistics. The exported
data is stored in FND_STATTAB. If the value of backup_flag is not
BACKUP then EXPORT_TABLE_STATS is not performed.
Syntax
FND_STATS.GATHER_TABLE_STATS (
errbuf OUT VARCHAR2,
retcode OUT VARCHAR2,
ownname VARCHAR2,
tabname VARCHAR2,
percent NUMBER DEFAULT NULL,
degree NUMBER DEFAULT NULL,
partname VARCHAR2 DEFAULT NULL,
backup_flag VARCHAR2 DEFAULT NULL,
9 – 24 Oracle Applications System Administrator’s Guide](https://image.slidesharecdn.com/oracle-apps-system-adminfromscribed-121103012108-phpapp01/85/Oracle-apps-system-admin-482-320.jpg)
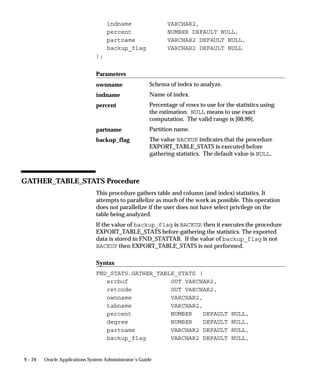
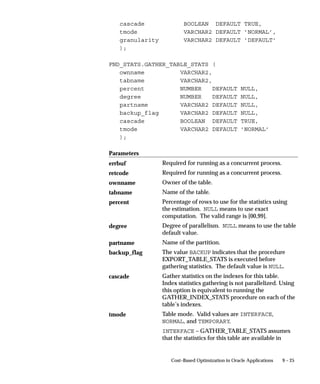
![cascade BOOLEAN DEFAULT TRUE,
tmode VARCHAR2 DEFAULT ’NORMAL’,
granularity VARCHAR2 DEFAULT ’DEFAULT’
);
FND_STATS.GATHER_TABLE_STATS (
ownname VARCHAR2,
tabname VARCHAR2,
percent NUMBER DEFAULT NULL,
degree NUMBER DEFAULT NULL,
partname VARCHAR2 DEFAULT NULL,
backup_flag VARCHAR2 DEFAULT NULL,
cascade BOOLEAN DEFAULT TRUE,
tmode VARCHAR2 DEFAULT ’NORMAL’
);
Parameters
errbuf Required for running as a concurrent process.
retcode Required for running as a concurrent process.
ownname Owner of the table.
tabname Name of the table.
percent Percentage of rows to use for the statistics using
the estimation. NULL means to use exact
computation. The valid range is [00,99].
degree Degree of parallelism. NULL means to use the table
default value.
partname Name of the partition.
backup_flag The value BACKUP indicates that the procedure
EXPORT_TABLE_STATS is executed before
gathering statistics. The default value is NULL.
cascade Gather statistics on the indexes for this table.
Index statistics gathering is not parallelized. Using
this option is equivalent to running the
GATHER_INDEX_STATS procedure on each of the
table’s indexes.
tmode Table mode. Valid values are INTERFACE,
NORMAL, and TEMPORARY.
INTERFACE – GATHER_TABLE_STATS assumes
that the statistics for this table are available in
Cost–Based Optimization in Oracle Applications 9 – 25](https://image.slidesharecdn.com/oracle-apps-system-adminfromscribed-121103012108-phpapp01/85/Oracle-apps-system-admin-483-320.jpg)
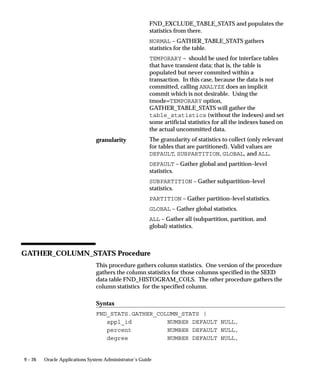
![backup_flag VARCHAR2 DEFAULT NULL,
Errors OUT Error_Out
);
FND_STATS.GATHER_COLUMN_STATS (
ownname VARCHAR2,
tabname VARCHAR2,
colname VARCHAR2,
percent NUMBER DEFAULT NULL,
degree NUMBER DEFAULT NULL,
hsize NUMBER DEFAULT 254,
backup_flag VARCHAR2 DEFAULT NULL,
partname VARCHAR2 DEFAULT NULL
);
FND_STATS.GATHER_COLUMN_STATS (
errbuf OUT VARCHAR2,
retcode OUT VARCHAR2,
ownname VARCHAR2,
tabname VARCHAR2,
colname VARCHAR2,
percent NUMBER DEFAULT NULL,
degree NUMBER DEFAULT NULL,
hsize NUMBER DEFAULT 254,
backup_flag VARCHAR2 DEFAULT NULL,
partname VARCHAR2 DEFAULT NULL
);
Parameters
errbuf Required for running as a concurrent process.
retcode Required for running as a concurrent process.
appl_id Application ID.
ownname Owner of the table.
colname Column name.
tabname Table name.
percent Percentage of rows to use for the statistics using
the estimation. NULL means to use exact
computation. The valid range is [00,99].
Cost–Based Optimization in Oracle Applications 9 – 27](https://image.slidesharecdn.com/oracle-apps-system-adminfromscribed-121103012108-phpapp01/85/Oracle-apps-system-admin-485-320.jpg)
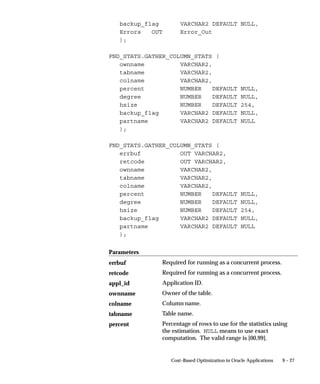
![degree Degree of parallelism. NULL means to use the table
default value.
hsize Number of buckets in the histogram.
backup_flag The value BACKUP indicates that the procedure
EXPORT_TABLE_STATS is executed before
gathering statistics. The default value is NULL.
partname Name of the partition.
errors Error output.
GATHER_ALL_COLUMN_STATS Procedure
This procedure gathers column statistics for the given schema as listed
in the FND_HISTOGRAM_COLS table.
Syntax
FND_STATS.GATHER_ALL_COLUMN_STATS (
ownname VARCHAR2 ,
percent NUMBER DEFAULT NULL,
degree NUMBER DEFAULT NULL
);
FND_STATS.GATHER_ALL_COLUMN_STATS (
errbuf OUT VARCHAR2,
retcode OUT VARCHAR2,
ownname VARCHAR2,
percent NUMBER DEFAULT NULL,
degree NUMBER DEFAULT NULL
);
Parameters
errbuf Required for running as a concurrent process.
retcode Required for running as a concurrent process.
ownname Owner of the table. ALL means all Applications
schemas.
percent Percentage of rows to use for the statistics using
the estimation. NULL means to use exact
computation. The valid range is [00,99].
9 – 28 Oracle Applications System Administrator’s Guide](https://image.slidesharecdn.com/oracle-apps-system-adminfromscribed-121103012108-phpapp01/85/Oracle-apps-system-admin-486-320.jpg)

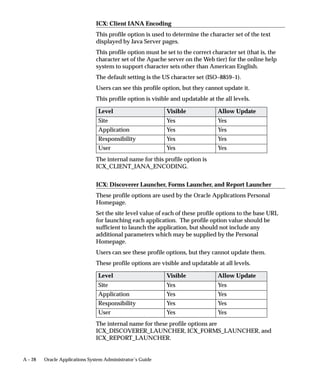


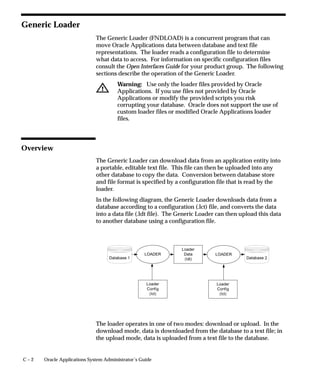
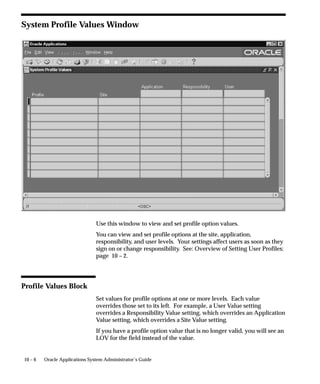
![Profile Options in Oracle Application Object Library
This section lists each profile option in Oracle Application Object
Library. These profile options are available to every product in Oracle
Applications. For each profile option, we give a brief overview of how
Oracle Application Object Library uses the profile’s setting.
A table is provided for most profile options that lists the access levels for
the profile option. There are four possible levels at which system
administrators can view and update a profile option value: site,
application, responsibility, and user. This table lists whether the profile
option’s value is visible at each of these levels, and whether it is
updatable at each level.
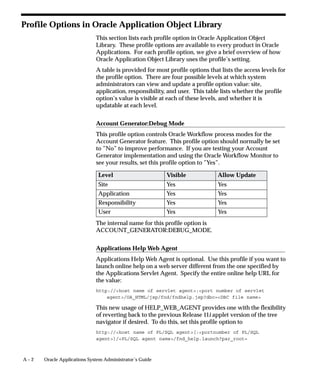
Account Generator:Debug Mode
This profile option controls Oracle Workflow process modes for the
Account Generator feature. This profile option should normally be set
to ”No” to improve performance. If you are testing your Account
Generator implementation and using the Oracle Workflow Monitor to
see your results, set this profile option to ”Yes”.
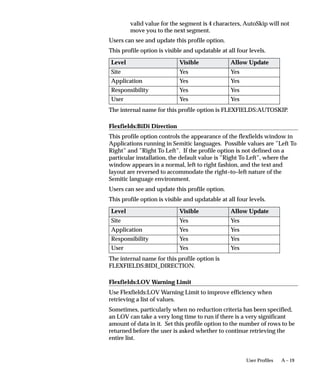
Level Visible Allow Update
Site Yes Yes
Application Yes Yes
Responsibility Yes Yes
User Yes Yes
The internal name for this profile option is
ACCOUNT_GENERATOR:DEBUG_MODE.
Applications Help Web Agent
Applications Help Web Agent is optional. Use this profile if you want to
launch online help on a web server different from the one specified by
the Applications Servlet Agent. Specify the entire online help URL for
the value:
http://<host name of servlet agent>:<port number of servlet
agent>/OA_HTML/jsp/fnd/fndhelp.jsp?dbc=<DBC file name>
This new usage of HELP_WEB_AGENT provides one with the flexibility
of reverting back to the previous Release 11i applet version of the tree
navigator if desired. To do this, set this profile option to
http://<host name of PL/SQL agent>[:<portnumber of PL/SQL
agent>]/<PL/SQL agent name>/fnd_help.launch?par_root=
A–2 Oracle Applications System Administrator’s Guide](https://image.slidesharecdn.com/oracle-apps-system-adminfromscribed-121103012108-phpapp01/85/Oracle-apps-system-admin-540-320.jpg)


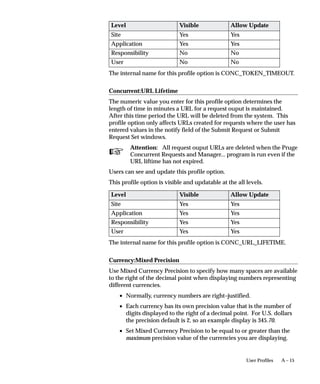
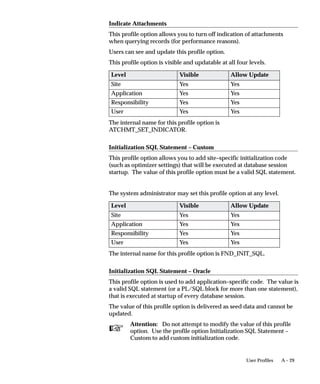
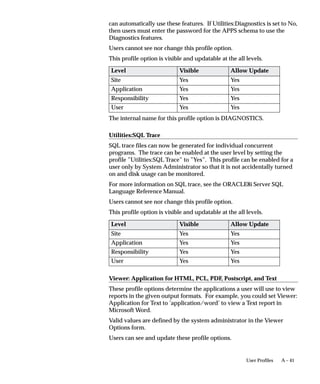
![For example, if you are reporting on rows displaying U.S. dollars
(precision=2), Japanese yen (precision=0), and Bahraini dinar
(precision=3), set Mixed Currency Precision=3.
Users can see and update this profile option.
This profile option is visible and updatable at all four levels.
Level Visible Allow Update
Site Yes Yes
Application Yes Yes
Responsibility Yes Yes
User Yes Yes
The internal name for this profile option is
CURRENCY:MIXED_PRECISION.
Currency:Negative Format
You can use different formats to identify negative currency. The default
identifier is a hyphen ( – ) preceding the currency amount, as in ”–xxx”.
You can also select:
Angle brackets < > < xxx >
Trailing hyphen – xxx –
Parentheses () ( xxx )
Square Brackets [ ] [ xxx ]
If you use the negative number formats of “(xxx)” or “[xxx],” in Oracle
Applications Release 11, your negative numbers appear as “<xxx>”.
Users can see and update this profile option.
This profile option is visible and updatable at all four levels.
Level Visible Allow Update
Site Yes Yes
Application Yes Yes
Responsibility Yes Yes
User Yes Yes
The internal name for this profile option is
CURRENCY:NEGATIVE_FORMAT.
Note: Currency:Negative Format only affects the display
currency. Non–currency negative numbers appear with a
preceding hyphen regardless of the option selected here.
A – 16 Oracle Applications System Administrator’s Guide](https://image.slidesharecdn.com/oracle-apps-system-adminfromscribed-121103012108-phpapp01/85/Oracle-apps-system-admin-558-320.jpg)
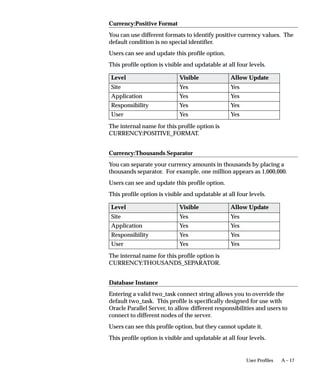
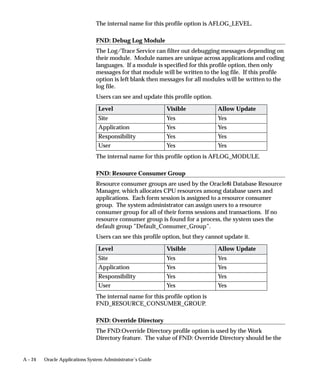
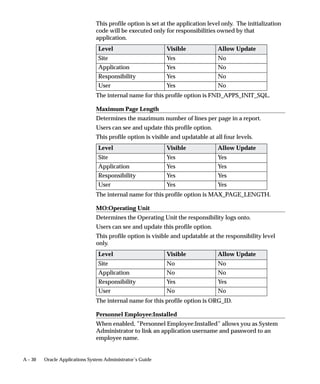
![Level Visible Allow Update
Site Yes Yes
Application Yes Yes
Responsibility Yes Yes
User Yes Yes
The internal name for this profile option is INSTANCE_PATH.
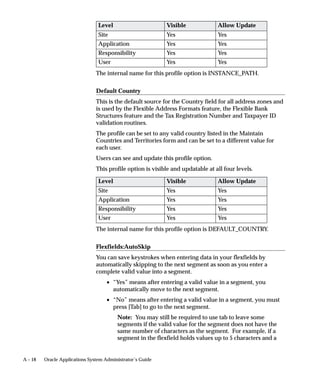
Default Country
This is the default source for the Country field for all address zones and
is used by the Flexible Address Formats feature, the Flexible Bank
Structures feature and the Tax Registration Number and Taxpayer ID
validation routines.
The profile can be set to any valid country listed in the Maintain
Countries and Territories form and can be set to a different value for
each user.
Users can see and update this profile option.
This profile option is visible and updatable at all four levels.
Level Visible Allow Update
Site Yes Yes
Application Yes Yes
Responsibility Yes Yes
User Yes Yes
The internal name for this profile option is DEFAULT_COUNTRY.
Flexfields:AutoSkip
You can save keystrokes when entering data in your flexfields by
automatically skipping to the next segment as soon as you enter a
complete valid value into a segment.
• “Yes” means after entering a valid value in a segment, you
automatically move to the next segment.
• “No” means after entering a valid value in a segment, you must
press [Tab] to go to the next segment.
Note: You may still be required to use tab to leave some
segments if the valid value for the segment does not have the
same number of characters as the segment. For example, if a
segment in the flexfield holds values up to 5 characters and a
A – 18 Oracle Applications System Administrator’s Guide](https://image.slidesharecdn.com/oracle-apps-system-adminfromscribed-121103012108-phpapp01/85/Oracle-apps-system-admin-560-320.jpg)