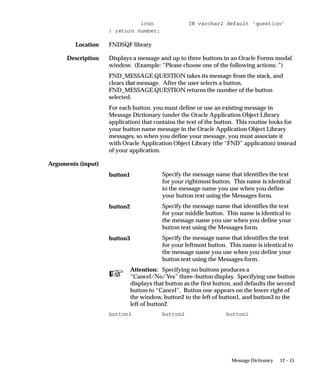
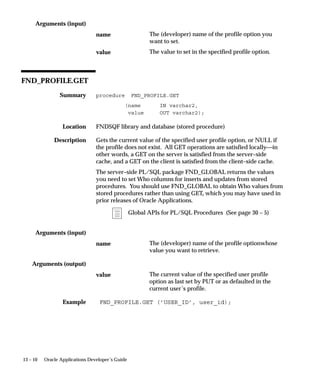
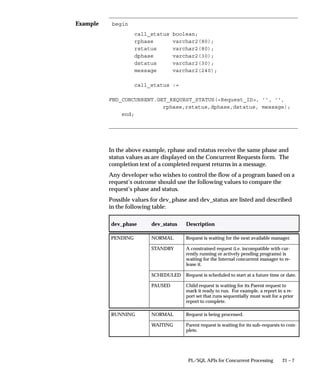
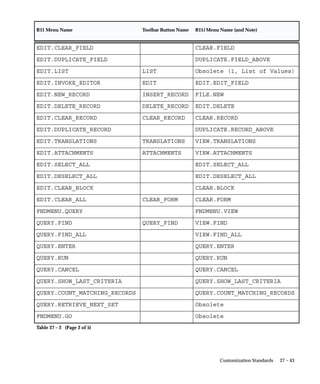
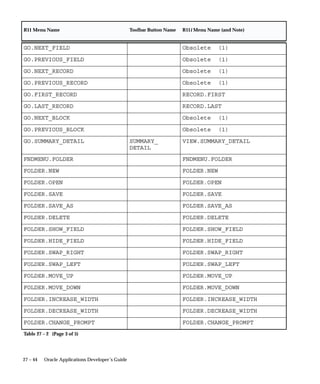
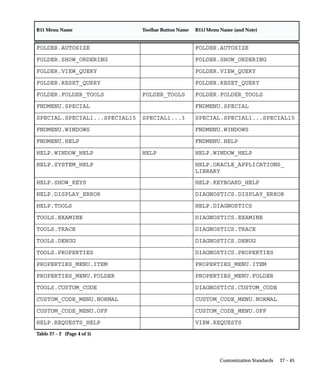
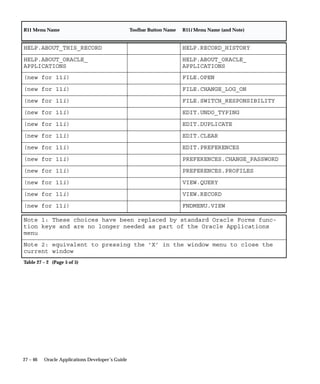
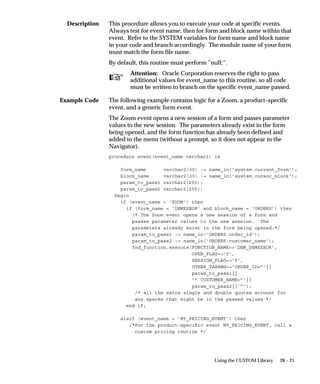
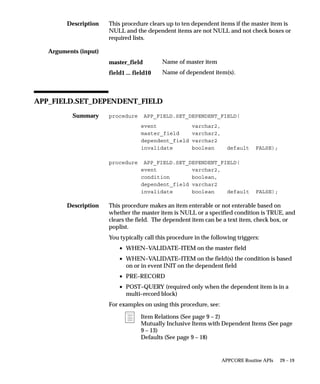
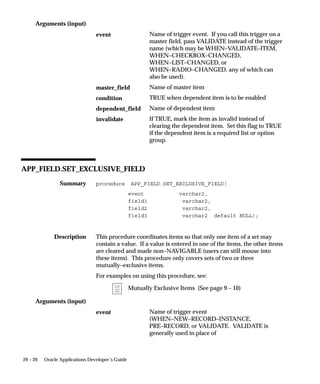
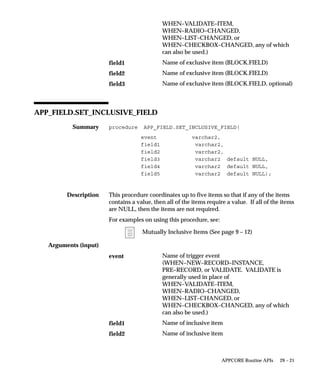
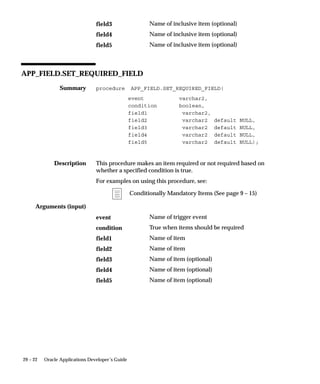
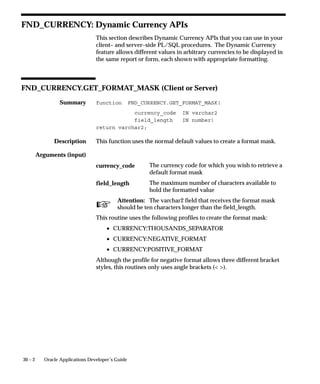
Downloaded 242 times


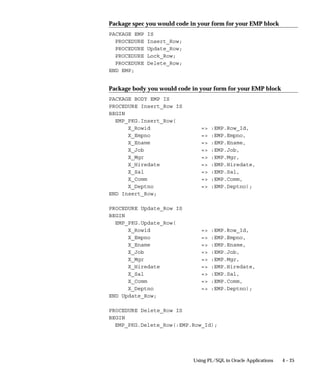
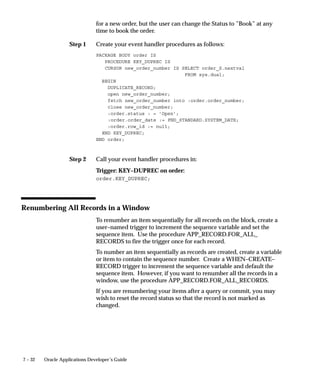
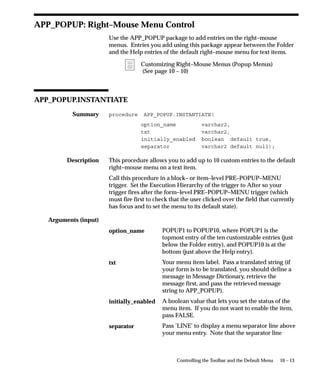
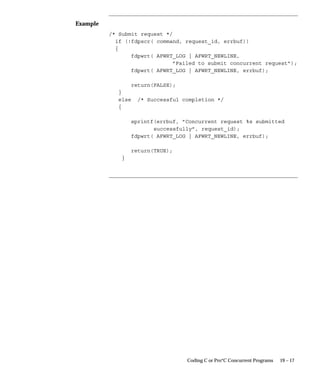
![Syntax:
Example:
viiPreface
Oracle provides powerful tools you can use to create, store, change,
retrieve, and maintain information in an Oracle database. But if you
use Oracle tools such as SQL*Plus to modify Oracle Applications data,
you risk destroying the integrity of your data and you lose the ability to
audit changes to your data.
Because Oracle Applications tables are interrelated, any change you
make using an Oracle Applications form can update many tables at
once. But when you modify Oracle Applications data using anything
other than Oracle Applications forms, you might change a row in one
table without making corresponding changes in related tables. If your
tables get out of synchronization with each other, you risk retrieving
erroneous information and you risk unpredictable results throughout
Oracle Applications.
When you use Oracle Applications forms to modify your data, Oracle
Applications automatically checks that your changes are valid. Oracle
Applications also keeps track of who changes information. But, if you
enter information into database tables using database tools, you may
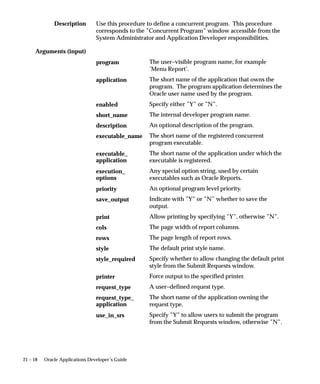
store invalid information. You also lose the ability to track who has
changed your information because SQL*Plus and other database tools
do not keep a record of changes.
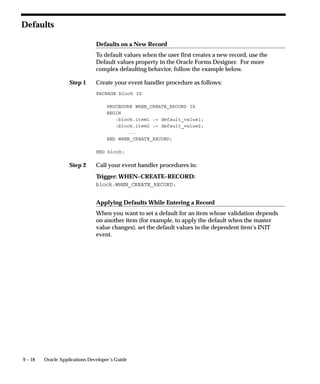
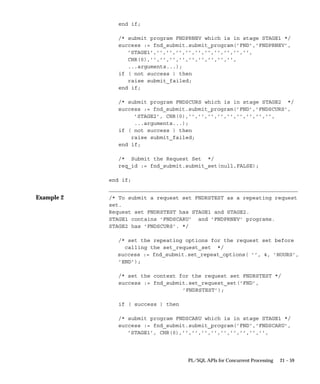
Typographic Conventions
This manual uses the following typographic conventions to distinguish
important elements from the body of the manual.
Function Keys
Forms function keys are represented by the key name enclosed in
square brackets: [Next Item].
For key mappings for your particular keyboard type, refer to the
following sources:
• Online help Show Keys screen (for most keyboards, [Ctrl–K] or
Help–>Keyboard Help from within Oracle Applications)
Command and Example Syntax
Commands and examples appear in a monotype font, as follows:
SET_CANVAS_PROPERTY(canvas_name, property, value);
/*](https://image.slidesharecdn.com/oracleapplicationsdevelopersguide-130620021047-phpapp01/85/Oracle-applications-developer-s-guide-29-320.jpg)

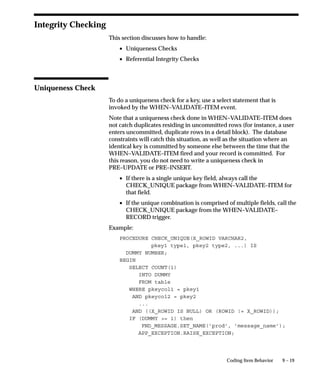
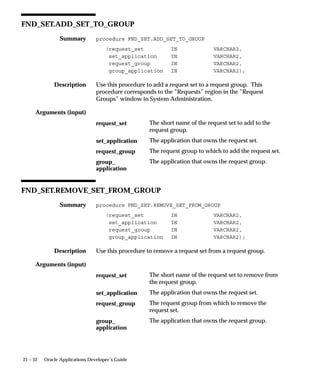
![1 – 13Overview of Coding Standards
Property Classes
Property classes are sets of attributes that can be applied to almost any
Oracle Forms object. The TEMPLATE form automatically contains
property classes, via references to APPSTAND, that enforce standard
cosmetic appearances and behaviors for all widgets and containers as
described in the Oracle Applications User Interface Standards for
Forms–Based Products.
Property Classes
Oracle Applications User Interface Standards for Forms–Based
Products
Rules for attaching the property classes to specific objects are discussed
in Chapters 5 and 6.
Setting the Properties of Container Objects (See page 5 – 1)
Setting the Properties of Widget Objects (See page 6 – 1)
Do not override any attribute set by a property class unless this manual
explicitly states that it is acceptable, or there is a compelling reason to
do so. Overriding an inherited attribute is very rarely required.
Application–specific Property Classes, Object Groups and Objects
Each application should take advantage of the referencing capabilities
of Oracle Forms to help implement standards for their particular
application in the same manner as APPSTAND.
For example, the General Ledger application might have specified
standard widths and behaviors for ”Total” fields throughout the
application. A GL_TOTAL Property Class, referenced into each form,
could set properties such as width, format mask, etc. A General
Ledger developer, after referencing in this set of property classes, can
then simply apply the GL_TOTAL property class to each item in the
form that is a Total field and it inherits its standard appearance and
behavior automatically. Entire items or blocks can also be reused.
Further, property classes can be based on other property classes, so the
GL_TOTAL class could be based on the standard TEXT_ITEM_
DISPLAY_ONLY class in APPSTAND. Such subclassing allows the
application–specific object to inherit changes made within APPSTAND
automatically.
Most Oracle Applications products also have a ”standard” form
(typically called [Application short name]STAND, such as GLSTAND
or BOMSTAND) in the same directory if you install the development](https://image.slidesharecdn.com/oracleapplicationsdevelopersguide-130620021047-phpapp01/85/Oracle-applications-developer-s-guide-45-320.jpg)
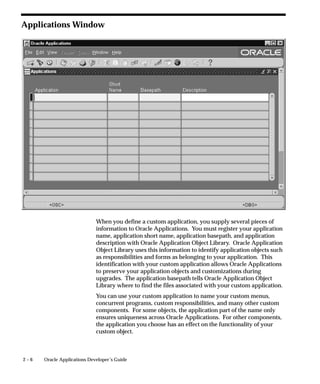


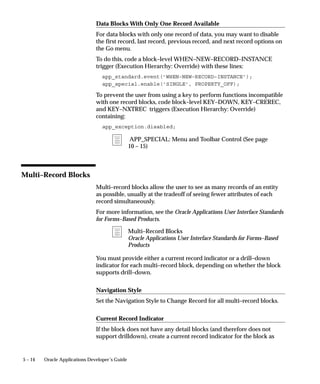
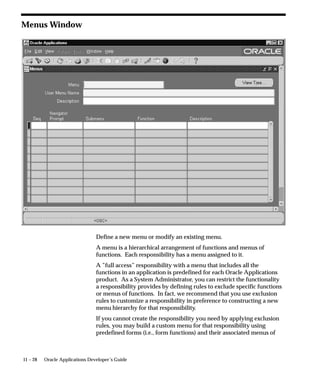
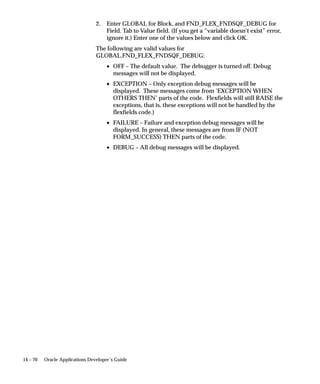
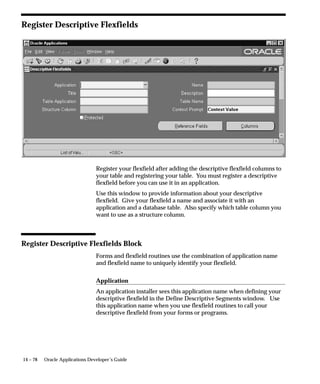
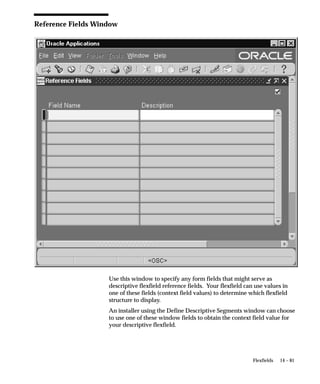
![5 – 13Setting the Properties of Container Objects
Navigation
Navigation to items outside a dialog block must be prevented while the
modal window is open. [Tab] must be restricted to fields within that
window. The following guidelines prevent the user from navigating
out of a dialog block:
• The Navigation Style of the block is usually Same Record. It
should never be Change Data Block.
• The Next and Previous Navigation Data Blocks should be the
same as the data block itself.
• Set Next and Previous Navigation Item properties as necessary
to keep the user inside the dialog block.
Data Blocks With No Base Table
You may need to implement blocks that have no base table or view.
Use transactional triggers (ON–INSERT, ON–LOCK, etc.) if such a
block must process commits.
Do not base the block on a dummy table such as FND_DUAL.
For example, the ”Move Inventory Items” form submits a concurrent
request to process the data entered on the screen. Code an
ON–INSERT trigger to call the concurrent process submission routine.
Concurrent Processing (See page 15 – 2)
Single–Record Data Blocks
Single–record blocks allow the user to see as many items of an entity as
possible, at the tradeoff of only seeing one record at a time.
Navigation Styles
If the block has no detail blocks, or it has detail blocks but they are in
different windows, the Navigation Style should be Same Record;
otherwise it is Change Data Block.](https://image.slidesharecdn.com/oracleapplicationsdevelopersguide-130620021047-phpapp01/85/Oracle-applications-developer-s-guide-119-320.jpg)


![7 – 13Controlling Window, Block and Region Behavior
Controls
”Controls” is another term for fields, items, or widgets. Includes text
items, display items, check boxes, scroll bars, buttons, tabs, option
groups, and so on.
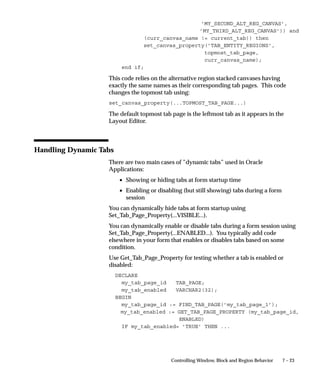
Tabbed Region Behavior
The desired Oracle Applications behavior for tabbed regions is to show
the tab page and move focus to the appropriate field depending on
which tab is clicked. You must write code to achieve this behavior,
because the standard behavior in Oracle Forms is to put the focus in the
tab widget itself when the user clicks on a tab.
In Oracle Forms, ”cursor focus” is the same thing as ”mouse focus,”
thus the term is simply ”focus.”
Keyboard–only Operation
Users can access a tab directly via the keyboard using a definable hot
key to access a list of available tabs (the [F2] key by default).
In addition, as the user presses Next Field or Previous Field, navigation
cycles through all the fields of the block, and across tab pages as
appropriate. The selected tab must always be synchronized with the
current group of fields that is being displayed. Because many tabbed
regions use stacked canvases to hold the fields, rather than placing the
fields directly on tab pages, the code needs to keep the tabs
synchronized with the stacked canvases.
Dynamic Tab Layouts
Hide a tab at startup if it will not apply for the duration of the form
session. Do not hide and show tabs within a form session. It is
acceptable, though not ideal, to have only one tab remaining visible.
Dynamically disable and enable a tab if its state is determined by data
within each record.
Other Behaviors
Tabs should operate in enter–query mode. The field that a go_item call
goes to in enter–query mode must be queryable. Some forms also
require canvas scrolling within a tab page.](https://image.slidesharecdn.com/oracleapplicationsdevelopersguide-130620021047-phpapp01/85/Oracle-applications-developer-s-guide-167-320.jpg)
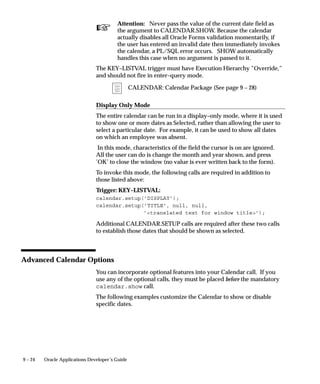
![9 – 23Coding Item Behavior
The Calendar
The Calendar is a standard object that allows selection of date and time
values from a Calendar. It also allows the developer to specify
validation rules ensuring that only valid dates can be selected. Both
the List and Edit functions should invoke the Calendar on any date
field.
For each date field within a form, you should provide the code
necessary for the user to call the Calendar feature. However, the
calendar is not a replacement for validating the data in the field.
The Calendar is automatically included in the TEMPLATE form.
For more information on the user interface standards for the Calendar,
see the Oracle Applications User Interface Standards for Forms–Based
Products.
Calendar
Oracle Applications User Interface Standards for Forms–Based
Products
LOV for Date and Datetime Fields
Date and datetime fields should enable the List lamp. When the user
invokes List on these fields, the form opens the Calendar window.
Date fields should use the ENABLE_LIST_LAMP LOV, which is
included in the TEMPLATE form. This setting enables the menu and
Toolbar List of Values entries for your date fields. Set ’”Validate from
List” to No on fields that use this LOV. If you leave ”Validate from
List” set to Yes, you will see an LOV that has no columns.
Required Calls
Each date field within a form needs to have the following code:
Trigger: KEY–LISTVAL:
calendar.show([first_date]);
By default, the Calendar shows the month of the value in the date field
(if a value exists) upon first opening. If no specific date is supplied, the
Calendar shows the current month.
Do not pass the current field into CALENDAR.SHOW as a parameter,
as this forces validation of the field. The current field is used as a
default. Generally, the code in KEY–LISTVAL should be:
calendar.show;](https://image.slidesharecdn.com/oracleapplicationsdevelopersguide-130620021047-phpapp01/85/Oracle-applications-developer-s-guide-223-320.jpg)


![Example 1
Example 2
Summary
Description
10 – 17Controlling the Toolbar and the Default Menu
For Oracle Applications products, icon files are
included in a .jar file included in the Oracle
Applications installation.
A boolean value that lets you set the initial status
of the menu item. If you do not want to enable the
item when your application starts, pass FALSE.
The default value is TRUE.
Pass ’LINE’ to display a menu separator line above
your menu entry. The LINE argument is ignored
for SPECIAL1(_CHECKBOX), SPECIAL16, or
SPECIAL31. The default is no line.
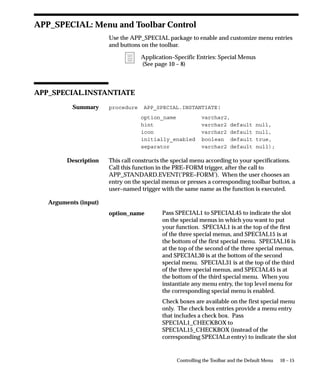
APP_SPECIAL.INSTANTIATE(’SPECIAL3’,’&Book Order’, ’POBKORD’,
TRUE, ’LINE’);
app_special.instantiate(’SPECIAL12_CHECKBOX’,
’Specia&l 12 Check Box with Line’,
separator=>’LINE’);
app_special.set_checkbox(’SPECIAL12_CHECKBOX’,’TRUE’);
results in a menu entry that looks like the following:
––––––––––––––––––––––––––––––––––
[x] Special 12 Check Box with Line
APP_SPECIAL.ENABLE
procedure APP_SPECIAL.ENABLE(
option_name varchar2,
state number);
This call controls the enabling and disabling of the items in the menu,
including the Special menu (and their corresponding toolbar buttons),
allowing you to customize your menus for each block.
Menu and Toolbar Entries (See page 10 – 2)
If a special function is available for most of the blocks in a form, create
a form level PRE–BLOCK trigger that enables the function. For any
block where this is not a valid function, code a block level PRE–BLOCK
trigger with Execution Hierarchy set to Override that disables the
function.
initially_enabled
separator](https://image.slidesharecdn.com/oracleapplicationsdevelopersguide-130620021047-phpapp01/85/Oracle-applications-developer-s-guide-247-320.jpg)


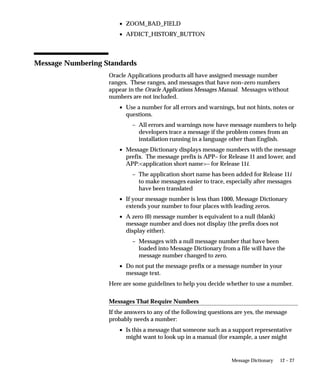

![12 – 26 Oracle Applications Developer’s Guide
Message Naming Standards
The following suggested standards provide a consistent naming
convention for message names.
• Message names are hardcoded into forms and programs and
should never change.
• Use descriptive words and make your message names
meaningful to other developers. Your name should clearly
summarize the content or purpose of the message.
• Message names can contain no more than 30 characters.
• Make message names all uppercase. Although message names
are case insensitive, this provides consistency so that messages
can be searched for easily.
• Do not use spaces in message names; use underscore characters
instead to separate words.
• Message names should not contain message numbers (or
prefixes), because message numbers may change over time.
• Include your two–to–three–character application short name or
abbreviation as the first word in each message name (optional).
Use a group identifier as the second word in each message name
Include a group identifier that indicates the functional area or
organizational function that your message addresses. Your group
identifier should correspond to the group identifier you use in your
form names, which helps break your set of messages into smaller,
manageable chunks.
FND_FLEX_SEGMENT_NOT_REGISTERED
[group identifier is FLEX, for Flexfields]
FND_MD_MESSAGE_NOT_FOUND
[group identifier is MD, for Message Dictionary]
FND_MESSAGE_NOT_FOUND
Some examples of message names are:
• INV_UOM_REQUIRED
• AP_MATCH_BAD_SEGMENT
• SPEC_INFO_IN_USE
• MAND_PARAMETER_NULL
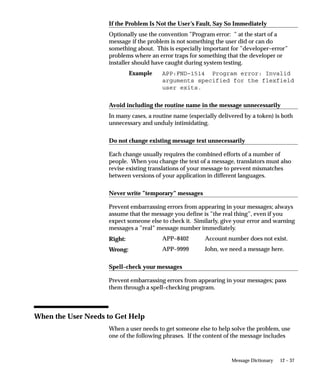
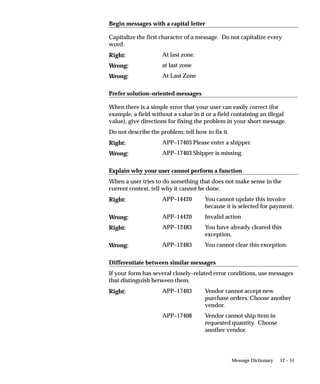
Right:
Right:
Wrong:](https://image.slidesharecdn.com/oracleapplicationsdevelopersguide-130620021047-phpapp01/85/Oracle-applications-developer-s-guide-314-320.jpg)
![12 – 35Message Dictionary
&ENTITY1
&TOKEN
&NUMBER
&NAME
&TYPE
The &ROUTINE_NAME token, for instance, might be used in a
message as follows:
APP–0123 Could not run routine &ROUTINE_NAME.
Even a descriptive token name can contain ambiguities, so use the
notes field to clarify the purpose of your token if translators might not
know exactly what your token represents. This information is
important to translators, since your token often provides critical
information about the purpose and context of your message.
Attention: Do not change or remove an existing token name
without also changing the code that calls the message.
Use two messages to distinguish singular and plural token values
Do not use the same message for both singular and plural token
values. Simply placing an ”(s)” after your token is not acceptable, since
your message may be translated into a language that does not specify
plural forms with a trailing ”s”, or any other trailing letter or letters.
For example:
One row updated.
&NUMBER_OF_ROWS rows updated.
[Two distinct messages]
&NUMBER_OF_ROWS row(s) updated.
&NUMBER_OF_ROWS rows updated.
[No singular message defined]
Converting a Date or Date–Time Value
If you pass dates in tokens, use a conversion routine to make the date
appear in the correct format. Otherwise, they will show up as
DD–MON–YY format no matter what the NLS_DATE_FORMAT is set
to.
Wrong:
Wrong:
Wrong:
Wrong:
Wrong:
Right:
Wrong:
Wrong:](https://image.slidesharecdn.com/oracleapplicationsdevelopersguide-130620021047-phpapp01/85/Oracle-applications-developer-s-guide-324-320.jpg)
![12 – 45Message Dictionary
• flexfields (usually not capitalized unless referring to a specific
flexfield, such as the Accounting Flexfield)
• descriptive flexfields (not capitalized)
• Message Dictionary
Formatting Messages (Multiple Paragraphs, etc.)
Keep message formatting simple. Where you need to have multiple
sections or paragraphs in the message, use a blank line to separate
them.
APP:FND–01234 Unable to execute [Trigger]
trigger.
Please contact your support representative.
Additional information for support representative:
Check that the trigger exists in the form.
Avoid using tab characters or spaces for formatting, because these are
difficult to see and are hard to maintain or translate. Avoid using
complex formatting in Message Dictionary.
Emphasis
Do not use uppercase, mixed case, exclamation marks ( ! ), multiple
punctuation marks (such as ”Do you want to quit???” or ”Do you want
to quit?!”), or anything else for emphasis. Emphasis is not translatable.
The fact that the user has just gotten a message in a dialog box should
be enough to make the user pay attention. Ensure that the message is
called using the correct routine for the situation (error, warning, etc.).
Terminal Punctuation
Use terminal punctuation (period, question mark) at the end of your
message if it is a complete sentence. If there is no terminal
punctuation, users and translators may wonder if the message was
accidentally truncated.
Please enter a value.
Please enter a value between 1 and 9.
Please enter a value
Do you want to quit?
Example:
Right:
Right:
Wrong:
Right:](https://image.slidesharecdn.com/oracleapplicationsdevelopersguide-130620021047-phpapp01/85/Oracle-applications-developer-s-guide-334-320.jpg)
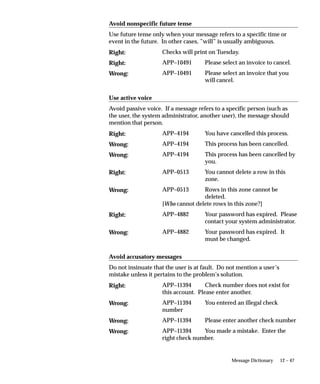
![12 – 47Message Dictionary
Avoid nonspecific future tense
Use future tense only when your message refers to a specific time or
event in the future. In other cases, ”will” is usually ambiguous.
Checks will print on Tuesday.
APP–10491 Please select an invoice to cancel.
APP–10491 Please select an invoice that you
will cancel.
Use active voice
Avoid passive voice. If a message refers to a specific person (such as
the user, the system administrator, another user), the message should
mention that person.
APP–4194 You have cancelled this process.
APP–4194 This process has been cancelled.
APP–4194 This process has been cancelled by
you.
APP–0513 You cannot delete a row in this
zone.
APP–0513 Rows in this zone cannot be
deleted.
[Who cannot delete rows in this zone?]
APP–4882 Your password has expired. Please
contact your system administrator.
APP–4882 Your password has expired. It
must be changed.
Avoid accusatory messages
Do not insinuate that the user is at fault. Do not mention a user’s
mistake unless it pertains to the problem’s solution.
APP–11394 Check number does not exist for
this account. Please enter another.
APP–11394 You entered an illegal check
number
APP–11394 Please enter another check number
APP–11394 You made a mistake. Enter the
right check number.
Right:
Right:
Wrong:
Right:
Wrong:
Wrong:
Right:
Wrong:
Right:
Wrong:
Right:
Wrong:
Wrong:
Wrong:](https://image.slidesharecdn.com/oracleapplicationsdevelopersguide-130620021047-phpapp01/85/Oracle-applications-developer-s-guide-336-320.jpg)
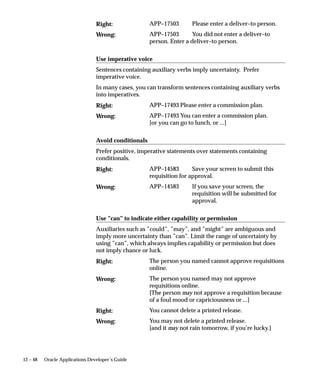
![12 – 48 Oracle Applications Developer’s Guide
APP–17503 Please enter a deliver–to person.
APP–17503 You did not enter a deliver–to
person. Enter a deliver–to person.
Use imperative voice
Sentences containing auxiliary verbs imply uncertainty. Prefer
imperative voice.
In many cases, you can transform sentences containing auxiliary verbs
into imperatives.
APP–17493 Please enter a commission plan.
APP–17493 You can enter a commission plan.
[or you can go to lunch, or ...]
Avoid conditionals
Prefer positive, imperative statements over statements containing
conditionals.
APP–14583 Save your screen to submit this
requisition for approval.
APP–14583 If you save your screen, the
requisition will be submitted for
approval.
Use ”can” to indicate either capability or permission
Auxiliaries such as ”could”, ”may”, and ”might” are ambiguous and
imply more uncertainty than ”can”. Limit the range of uncertainty by
using ”can”, which always implies capability or permission but does
not imply chance or luck.
The person you named cannot approve requisitions
online.
The person you named may not approve
requisitions online.
[The person may not approve a requisition because
of a foul mood or capriciousness or ...]
You cannot delete a printed release.
You may not delete a printed release.
[and it may not rain tomorrow, if you’re lucky.]
Right:
Wrong:
Right:
Wrong:
Right:
Wrong:
Right:
Wrong:
Right:
Wrong:](https://image.slidesharecdn.com/oracleapplicationsdevelopersguide-130620021047-phpapp01/85/Oracle-applications-developer-s-guide-337-320.jpg)
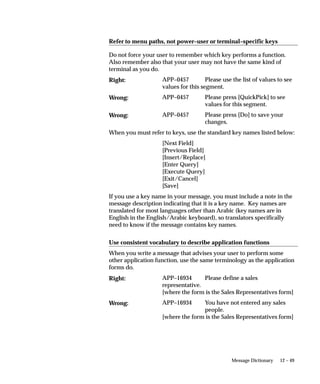
![12 – 49Message Dictionary
Refer to menu paths, not power–user or terminal–specific keys
Do not force your user to remember which key performs a function.
Also remember also that your user may not have the same kind of
terminal as you do.
APP–0457 Please use the list of values to see
values for this segment.
APP–0457 Please press [QuickPick] to see
values for this segment.
APP–0457 Please press [Do] to save your
changes.
When you must refer to keys, use the standard key names listed below:
[Next Field]
[Previous Field]
[Insert/Replace]
[Enter Query]
[Execute Query]
[Exit/Cancel]
[Save]
If you use a key name in your message, you must include a note in the
message description indicating that it is a key name. Key names are
translated for most languages other than Arabic (key names are in
English in the English/Arabic keyboard), so translators specifically
need to know if the message contains key names.
Use consistent vocabulary to describe application functions
When you write a message that advises your user to perform some
other application function, use the same terminology as the application
forms do.
APP–16934 Please define a sales
representative.
[where the form is the Sales Representatives form]
APP–16934 You have not entered any sales
people.
[where the form is the Sales Representatives form]
Right:
Wrong:
Wrong:
Right:
Wrong:](https://image.slidesharecdn.com/oracleapplicationsdevelopersguide-130620021047-phpapp01/85/Oracle-applications-developer-s-guide-338-320.jpg)
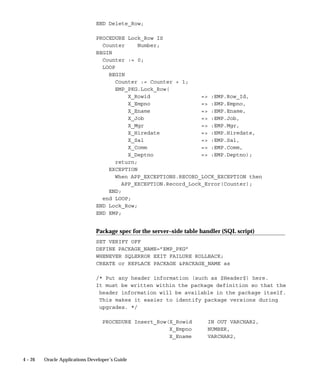
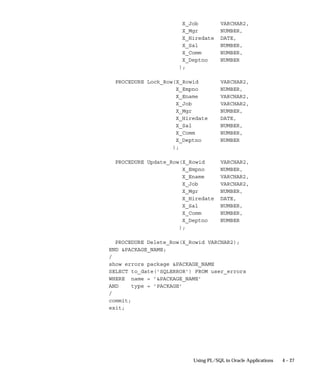
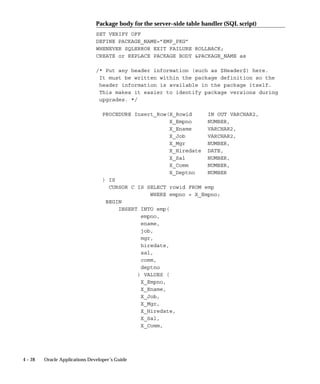
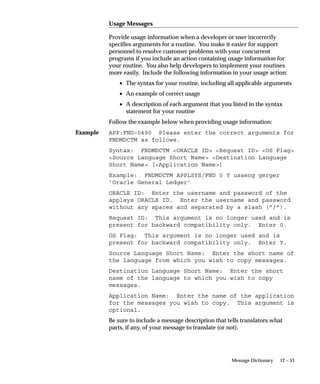
![Example
12 – 53Message Dictionary
Usage Messages
Provide usage information when a developer or user incorrectly
specifies arguments for a routine. You make it easier for support
personnel to resolve customer problems with your concurrent
programs if you include an action containing usage information for
your routine. You also help developers to implement your routines
more easily. Include the following information in your usage action:
• The syntax for your routine, including all applicable arguments
• An example of correct usage
• A description of each argument that you listed in the syntax
statement for your routine
Follow the example below when providing usage information:
APP:FND–0490 Please enter the correct arguments for
FNDMDCTM as follows.
Syntax: FNDMDCTM <ORACLE ID> <Request ID> <OS Flag>
<Source Language Short Name> <Destination Language
Short Name> [<Application Name>]
Example: FNDMDCTM APPLSYS/FND 0 Y usaeng gerger
’Oracle General Ledger’
ORACLE ID: Enter the username and password of the
applsys ORACLE ID. Enter the username and password
without any spaces and separated by a slash (”/”).
Request ID: This argument is no longer used and is
present for backward compatibility only. Enter 0.
OS Flag: This argument is no longer used and is
present for backward compatibility only. Enter Y.
Source Language Short Name: Enter the short name of
the language from which you wish to copy messages.
Destination Language Short Name: Enter the short
name of the language to which you wish to copy
messages.
Application Name: Enter the name of the application
for the messages you wish to copy. This argument is
optional.
Be sure to include a message description that tells translators what
parts, if any, of your message to translate (or not).](https://image.slidesharecdn.com/oracleapplicationsdevelopersguide-130620021047-phpapp01/85/Oracle-applications-developer-s-guide-342-320.jpg)

![Syntax
13 – 12 Oracle Applications Developer’s Guide
User Profile C Functions
Oracle Application Object Library provides you with two functions you
can call from concurrent programs you write in the C programming
language. You can use these functions to store and retrieve profile
option values.
Attention: fdpgov and fdppov are not valid for Release 11
and later. You should use afpoget and afpoput instead, and
you should convert any old C code that uses fdpgov and
fdppov to use afpoget and afpoput instead.
afpoget
Get the current value of a profile option. Returns TRUE if successful,
FALSE if it cannot find the profile option value. Returns FALSE when
retrieving a profile that exists but has no value. You must include the
file fdpopt.h in your C code file (#include <fdpopt.h>) to use this C
function. For concurrent programs, the current user is the user who
submitted the concurrent request, and afpoget() reads the value at the
time the request runs, not the time the user submitted the request.
When the function afpoget() returns successfully, it sets option_value to
the value of your requested user profile option. If you are not sure of
the length of the value afpoget() will return, you should define
option_value[] to be at least 241 characters long.
boolean afpoget(option_name, option_value)
text *option_name;
text *option_value;
the name of the profile option.
the profile option value returned by the function.
afpoput
Change the value of a profile option for the current session. Create a
profile option. Returns TRUE if successful, FALSE if it tries to change
the value of a profile option for which the WRITE flag is set to No, or if
it tries to create a profile option for which the ENABLE_CREATE flag is
not set. You must include the file fdpopt.h in your C code file
(#include <fdpopt.h>) to use this C function.
option_name
option_value](https://image.slidesharecdn.com/oracleapplicationsdevelopersguide-130620021047-phpapp01/85/Oracle-applications-developer-s-guide-360-320.jpg)
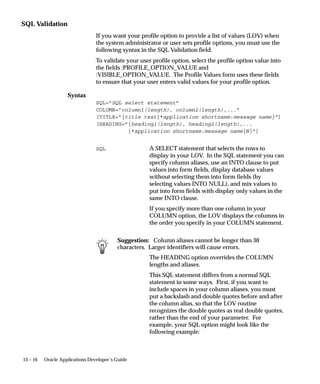
![Syntax
13 – 16 Oracle Applications Developer’s Guide
SQL Validation
If you want your profile option to provide a list of values (LOV) when
the system administrator or user sets profile options, you must use the
following syntax in the SQL Validation field.
To validate your user profile option, select the profile option value into
the fields :PROFILE_OPTION_VALUE and
:VISIBLE_OPTION_VALUE. The Profile Values form uses these fields
to ensure that your user enters valid values for your profile option.
SQL=”SQL select statement”
COLUMN=”column1(length), column2(length),...”
[TITLE=”{title text|*application shortname:message name}”]
[HEADING=”{heading1(length), heading2(length),...
|*application shortname:message name|N}”]
A SELECT statement that selects the rows to
display in your LOV. In the SQL statement you can
specify column aliases, use an INTO clause to put
values into form fields, display database values
without selecting them into form fields (by
selecting values INTO NULL), and mix values to
put into form fields with display only values in the
same INTO clause.
If you specify more than one column in your
COLUMN option, the LOV displays the columns in
the order you specify in your COLUMN statement.
Suggestion: Column aliases cannot be longer than 30
characters. Larger identifiers will cause errors.
The HEADING option overrides the COLUMN
lengths and aliases.
This SQL statement differs from a normal SQL
statement in some ways. First, if you want to
include spaces in your column aliases, you must
put a backslash and double quotes before and after
the column alias, so that the LOV routine
recognizes the double quotes as real double quotes,
rather than the end of your parameter. For
example, your SQL option might look like the
following example:
SQL](https://image.slidesharecdn.com/oracleapplicationsdevelopersguide-130620021047-phpapp01/85/Oracle-applications-developer-s-guide-364-320.jpg)
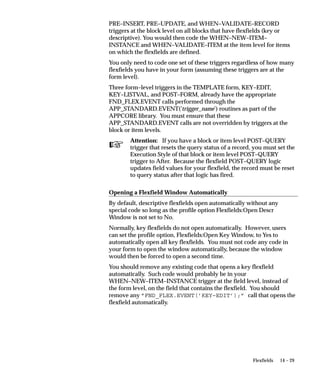


![14 – 31Flexfields
FND_KEY_FLEX.DEFINE(
/* Arguments that specify flexfield location */
BLOCK=>’block_name’,
FIELD=>’concatenated_segments_field_name’,
[DESCRIPTION=>’description_field_name’,]
[ID=>’Unique_ID_field’,]
[DATA_FIELD=>’concatenated_hidden_IDs_field’,]
/* Arguments that specify the flexfield */
APPL_SHORT_NAME=>’application_short_name’,
CODE=>’key_flexfield_code’,
NUM=>’structure_number’,
/* Other optional parameters */
[VALIDATE=>’{FOR_INSERT|FULL|PARTIAL|NONE|
PARTIAL_IF_POSSIBLE}’,]
[VDATE=>’date’,]
[DISPLAYABLE=>’{ALL | flexfield_qualifier |
segment_number}[0{ALL |
flexfield_qualifier | segment_number}]’,]
[INSERTABLE=>’{ALL | flexfield_qualifier |
segment_number}[0{ALL |
flexfield_qualifier | segment_number}]’,]
[UPDATEABLE=>’{ALL | flexfield_qualifier |
segment_number}[0{ALL |
flexfield_qualifier | segment_number}]’,]
[VRULE=>’flexfield qualifiern
segment qualifiern
{I[nclude]|E[xclude]}n
APPL=application_short_name;
NAME=Message Dictionary message namen
validation value1n
validation value2...
[0flexfield qualifiern
segment qualifiern
{I[nclude]|E[xclude]}n
APPL=application_short_name;](https://image.slidesharecdn.com/oracleapplicationsdevelopersguide-130620021047-phpapp01/85/Oracle-applications-developer-s-guide-405-320.jpg)
![14 – 32 Oracle Applications Developer’s Guide
NAME=Message Dictionary message namen
validation value1n
validation value2...]’,]
[COPY=>’block.fieldn{ALL | flexfield
qualifier | segment_number}
[0block.fieldn{ALL | flexfield
qualifier | segment_number}]’,]
[DERIVED=>’block.fieldnSegment qualifier’,]
[DERIVE_ALWAYS=>’{Y|N}’,]
[DINSERT=>’{Y|N}’,]
[VALATT=>’block.fieldn
flexfield qualifiern
segment qualifier’,]
[TITLE =>’Title’,]
[REQUIRED=>’{Y|N}’,]
[AUTOPICK=>’{Y|N}’,]
[USEDBFLDS=>’{Y|N}’,]
[ALLOWNULLS=>’{Y|N}’,]
[DATA_SET=>’set number’,]
[COLUMN=>’{column1(n) | column1 alias(n)
[, column2(n), ...] [INTO block.field]}’,]
[WHERE_CLAUSE=>’where clause’,]
[COMBQP_WHERE=>’{where clause|NONE}’,]
[WHERE_CLAUSE_MSG=>’APPL=application_short_
name;NAME=message_name’,]
[QUERY_SECURITY=>’{Y|N|}’,]
[QBE_IN=>’{Y|N}’,]
[READ_ONLY=>’{Y|N}’,]
[LONGLIST=>’{Y|N}’,]
[NO_COMBMSG=>’APPL=application_short_
name;NAME=message_name’,]
[AUTOCOMBPICK=>’{Y|N}’,]
[LOCK_FLAG=>’{Y|N}’,]
[HELP=>’APPL=application_short_name;
TARGET=target_name’]
);
You should not use a colon ( : ) in block.field references for the
VALATT, COPY, or DERIVED arguments. The arguments for these](https://image.slidesharecdn.com/oracleapplicationsdevelopersguide-130620021047-phpapp01/85/Oracle-applications-developer-s-guide-406-320.jpg)
![14 – 33Flexfields
routines go to an Oracle Application Object Library cover routine and
are not directly interpreted in PL/SQL.
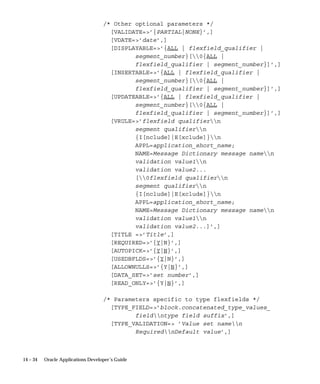
Range (Type) Flexfield Definition Syntax
Use FND_RANGE_FLEX.DEFINE for a range flexfield. You use the
same procedure for a ”type” flexfield (which may also include range
flexfield segments) that contains extra fields corresponding to each
segment of the related key flexfield. For example, a type flexfield for
the Accounting Flexfield might contain one field for each Accounting
Flexfield segment, but you might enter only the values Yes or No in
those fields, instead of normal segment values. The Assign Function
Parameters form uses a type flexfield for its segment usage field (you
enter ”Yes” for any segment whose value you want to use). You may
build a type flexfield that contains more than one ”type column” (a
”column” of fields in the flexfield pop–up window that correspond to
the actual segment fields). If you do, you can specify your TYPE_
argument values multiple times, using 0 to separate the values.
Attention: You should not append ”_LOW” or ”_HIGH” to
the FIELD, DESCRIPTION, DATA_FIELD or other values,
since this procedure appends them automatically. When you
use more than one type column, ensure that all TYPE_
arguments specify type columns in the same order to avoid
having argument values applied to the wrong type column.
FND_RANGE_FLEX.DEFINE(
/* Arguments that specify flexfield location */
BLOCK=>’block_name’,
FIELD=>’concatenated_segments_field_name’,
[DESCRIPTION=>’description_field_name’,]
[DATA_FIELD=>’concatenated_hidden_IDs_field’,]
/* Arguments that specify the flexfield */
APPL_SHORT_NAME=>’application_short_name’,
CODE=>’key_flexfield_code’,
NUM=>’structure_number’,](https://image.slidesharecdn.com/oracleapplicationsdevelopersguide-130620021047-phpapp01/85/Oracle-applications-developer-s-guide-408-320.jpg)
![14 – 34 Oracle Applications Developer’s Guide
/* Other optional parameters */
[VALIDATE=>’{PARTIAL|NONE}’,]
[VDATE=>’date’,]
[DISPLAYABLE=>’{ALL | flexfield_qualifier |
segment_number}[0{ALL |
flexfield_qualifier | segment_number}]’,]
[INSERTABLE=>’{ALL | flexfield_qualifier |
segment_number}[0{ALL |
flexfield_qualifier | segment_number}]’,]
[UPDATEABLE=>’{ALL | flexfield_qualifier |
segment_number}[0{ALL |
flexfield_qualifier | segment_number}]’,]
[VRULE=>’flexfield qualifiern
segment qualifiern
{I[nclude]|E[xclude]}n
APPL=application_short_name;
NAME=Message Dictionary message namen
validation value1n
validation value2...
[0flexfield qualifiern
segment qualifiern
{I[nclude]|E[xclude]}n
APPL=application_short_name;
NAME=Message Dictionary message namen
validation value1n
validation value2...]’,]
[TITLE =>’Title’,]
[REQUIRED=>’{Y|N}’,]
[AUTOPICK=>’{Y|N}’,]
[USEDBFLDS=>’{Y|N}’,]
[ALLOWNULLS=>’{Y|N}’,]
[DATA_SET=>’set number’,]
[READ_ONLY=>’{Y|N}’,]
/* Parameters specific to type flexfields */
[TYPE_FIELD=>’block.concatenated_type_values_
fieldntype field suffix’,]
[TYPE_VALIDATION=> ’Value set namen
RequirednDefault value’,]](https://image.slidesharecdn.com/oracleapplicationsdevelopersguide-130620021047-phpapp01/85/Oracle-applications-developer-s-guide-409-320.jpg)
![14 – 35Flexfields
[TYPE_SIZES=>’type_value_display_
sizenDescription_display_size’,]
[TYPE_HEADING=>’type column heading’,]
[TYPE_DATA_FIELD=>’block.type_data_field’,]
[TYPE_DESCRIPTION=>’block.type_
description_field’,]
[SCOLUMN=>’single column title’,]
[HELP=>’APPL=application_short_name;
TARGET=target_name’]
);
Attention: TYPE_FIELD, TYPE_DATA_FIELD and
TYPE_DESCRIPTION require the block.fieldname
construction, unlike other flexfield arguments that specify field
names without block names.
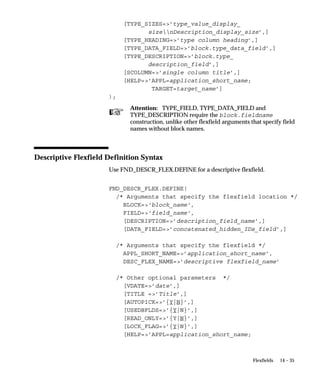
Descriptive Flexfield Definition Syntax
Use FND_DESCR_FLEX.DEFINE for a descriptive flexfield.
FND_DESCR_FLEX.DEFINE(
/* Arguments that specify the flexfield location */
BLOCK=>’block_name’,
FIELD=>’field_name’,
[DESCRIPTION=>’description_field_name’,]
[DATA_FIELD=>’concatenated_hidden_IDs_field’,]
/* Arguments that specify the flexfield */
APPL_SHORT_NAME=>’application_short_name’,
DESC_FLEX_NAME=>’descriptive flexfield_name’
/* Other optional parameters */
[VDATE=>’date’,]
[TITLE =>’Title’,]
[AUTOPICK=>’{Y|N}’,]
[USEDBFLDS=>’{Y|N}’,]
[READ_ONLY=>’{Y|N}’,]
[LOCK_FLAG=>’{Y|N}’,]
[HELP=>’APPL=application_short_name;](https://image.slidesharecdn.com/oracleapplicationsdevelopersguide-130620021047-phpapp01/85/Oracle-applications-developer-s-guide-411-320.jpg)
![14 – 36 Oracle Applications Developer’s Guide
TARGET=target_name’,]
[CONTEXT_LIKE=>’WHERE_clause_fragment’}
);
Flexfield Definition Arguments
The following arguments apply to all types of flexfields unless noted
otherwise. For those arguments that you would want to specify more
than once, you separate the multiple argument values using 0 (as
noted).
Arguments that Specify the Flexfield Location
Name of the block that contains your flexfield.
Your value field, ID field (if any), and description
field (if any) must all be in the same block.
Name of the field where you want to put your
flexfield. This is a displayed, non–database form
field that contains your concatenated segment
values plus delimiters.
Description field for your flexfield. This is a
displayed, non–database, non–enterable field that
contains concatenated descriptions of your
segment values. If you do not specify the
DESCRIPTION parameter, your form does not
display concatenated segment descriptions.
For a key flexfield only. Specify the field, if any,
that contains the unique ID (CCID) for your key
flexfield.
The concatenated hidden IDs field is a
non–displayed form field that contains the
concatenated segment hidden IDs.
Arguments that Specify which Flexfield to Use
Shortname of the application with which your
flexfield is registered.
Key or range flexfields only. The short code that
identifies your flexfield. This is the flexfield code
BLOCK
FIELD
DESCRIPTION
ID
DATA_FIELD
APPL_SHORT_
NAME
CODE](https://image.slidesharecdn.com/oracleapplicationsdevelopersguide-130620021047-phpapp01/85/Oracle-applications-developer-s-guide-412-320.jpg)

![14 – 60 Oracle Applications Developer’s Guide
The update procedures provide a special argument, ENABLED, in
addition to the optional arguments you can specify. You specify N for
this argument to disable the flexfield, and you specify Y to enable the
flexfield. You cannot use ENABLED in your normal flexfield definition
procedure calls (which automatically enable the flexfield).
Update Key Flexfield Definition Syntax
Use FND_KEY_FLEX.UPDATE_DEFINITION to update the definition
for a key flexfield on a foreign key or combinations form. Other than
the ENABLED argument, which you can only use for update
procedures, the arguments are the same as you use for the flexfield
definition procedures (See page 14 – 36).
FND_KEY_FLEX.UPDATE_DEFINITION(
/* Arguments that specify flexfield location and
thus identify the flexfield */
BLOCK=>’block_name’,
FIELD=>’concatenated_segments_field_name’,
/* Argument to enable or disable flexfield */
[ENABLED=>’{Y|N}’,]
/* Other optional parameters */
[VALIDATE=>’{FOR_INSERT|FULL|PARTIAL|NONE|
PARTIAL_IF_POSSIBLE}’,]
[VDATE=>’date’,]
[DISPLAYABLE=>’{ALL | flexfield_qualifier |
segment_number}[0{ALL |
flexfield_qualifier | segment_number}]’,]
[INSERTABLE=>’{ALL | flexfield_qualifier |
segment_number}[0{ALL |
flexfield_qualifier | segment_number}]’,]
[UPDATEABLE=>’{ALL | flexfield_qualifier |
segment_number}[0{ALL |
flexfield_qualifier | segment_number}]’,]
[VRULE=>’flexfield qualifiern
segment qualifiern](https://image.slidesharecdn.com/oracleapplicationsdevelopersguide-130620021047-phpapp01/85/Oracle-applications-developer-s-guide-436-320.jpg)
![14 – 61Flexfields
{I[nclude]|E[xclude]}n
APPL=application_short_name;
NAME=Message Dictionary message namen
validation value1n
validation value2...
[0flexfield qualifiern
segment qualifiern
{I[nclude]|E[xclude]}n
APPL=application_short_name;
NAME=Message Dictionary message namen
validation value1n
validation value2...]’,]
[COPY=>’block.fieldn{ALL | flexfield
qualifier | segment_number}
[0block.fieldn{ALL | flexfield
qualifier | segment_number}]’,]
[DERIVED=>’block.fieldnSegment qualifier’,]
[DINSERT=>’{Y|N}’,]
[VALATT=>’block.fieldn
flexfield qualifiern
segment qualifier’,]
[TITLE =>’Title’,]
[REQUIRED=>’{Y|N}’,]
[AUTOPICK=>’{Y|N}’,]
[USEDBFLDS=>’{Y|N}’,]
[ALLOWNULLS=>’{Y|N}’,]
[DATA_SET=>’set number’,]
[COLUMN=>’{column1(n) | column1 alias(n)
[, column2(n), ...]}’,]
[WHERE_CLAUSE=>’where clause’,]
[COMBQP_WHERE=>’{Y|N}’,]
[WHERE_CLAUSE_MSG=>’APPL=application_short_
name;NAME=message_name’,]
[QUERY_SECURITY=>’{Y|N}’,]
[QBE_IN=>’{Y|N}’,]
[READ_ONLY=>’{Y|N}’,]
[LONGLIST=>’{Y|N}’,]
[NO_COMBMSG=>’{Y|N}’,]
[LOCK_FLAG=>’{Y|N}’,]](https://image.slidesharecdn.com/oracleapplicationsdevelopersguide-130620021047-phpapp01/85/Oracle-applications-developer-s-guide-437-320.jpg)

![14 – 62 Oracle Applications Developer’s Guide
[AUTOCOMBPICK=>’{Y|N}’,]
[DERIVE_ALWAYS=>’{Y|N}’,]
[HELP=>’APPL=application_short_name;
TARGET=target_name’]
);
Update Range (Type) Flexfield Definition Syntax
Use FND_RANGE_FLEX.UPDATE_DEFINITION for a range flexfield.
You use the same procedure for a ”type” flexfield (which may also
include range flexfield segments) that contains extra fields
corresponding to each segment of the related key flexfield.
Other than the ENABLED argument, which you can only use for
update procedures, the arguments are the same as you use for the
flexfield definition procedures
Flexfield Definition Arguments (See page 14 – 36)
Attention: You should not append ”_LOW” or ”_HIGH” to
the FIELD, DESCRIPTION, DATA_FIELD or other values,
since this procedure appends them automatically. When you
use more than one type column, ensure that all TYPE_
arguments specify type columns in the same order to avoid
having argument values applied to the wrong type column.
FND_RANGE_FLEX.UPDATE_DEFINITION(
/* Arguments that specify flexfield location */
BLOCK=>’block_name’,
FIELD=>’concatenated_segments_field_name’,
/* Argument to enable or disable flexfield */
[ENABLED=>’{Y|N}’,]
/* Other optional parameters */
[VALIDATE=>’{PARTIAL|NONE}’,]
[VDATE=>’date’,]
[DISPLAYABLE=>’{ALL | flexfield_qualifier |](https://image.slidesharecdn.com/oracleapplicationsdevelopersguide-130620021047-phpapp01/85/Oracle-applications-developer-s-guide-439-320.jpg)
![14 – 63Flexfields
segment_number}[0{ALL |
flexfield_qualifier | segment_number}]’,]
[INSERTABLE=>’{ALL | flexfield_qualifier |
segment_number}[0{ALL |
flexfield_qualifier | segment_number}]’,]
[UPDATEABLE=>’{ALL | flexfield_qualifier |
segment_number}[0{ALL |
flexfield_qualifier | segment_number}]’,]
[VRULE=>’flexfield qualifiern
segment qualifiern
{I[nclude]|E[xclude]}n
APPL=application_short_name;
NAME=Message Dictionary message namen
validation value1n
validation value2...
[0flexfield qualifiern
segment qualifiern
{I[nclude]|E[xclude]}n
APPL=application_short_name;
NAME=Message Dictionary message namen
validation value1n
validation value2...]’,]
[TITLE =>’Title’,]
[REQUIRED=>’{Y|N}’,]
[AUTOPICK=>’{Y|N}’,]
[USEDBFLDS=>’{Y|N}’,]
[ALLOWNULLS=>’{Y|N}’,]
[DATA_SET=>’set number’,]
[READ_ONLY=>’{Y|N}’,]
/* Parameters specific to type flexfields */
[TYPE_FIELD=>’block.concatenated_type_values_
fieldntype field suffix’,]
[TYPE_VALIDATION=> ’Value set namen
RequirednDefault value’,]
[TYPE_SIZES=>’type_value_display_
sizenDescription_display_size’,]
[TYPE_HEADING=>’type column heading’,]
[TYPE_DATA_FIELD=>’block.type_data_field’,]](https://image.slidesharecdn.com/oracleapplicationsdevelopersguide-130620021047-phpapp01/85/Oracle-applications-developer-s-guide-440-320.jpg)
![14 – 64 Oracle Applications Developer’s Guide
[TYPE_DESCRIPTION=>’block.type_
description_field’,]
[SCOLUMN=>’single column title’]
[HELP=>’APPL=application_short_name;
TARGET=target_name’]
);
Attention: TYPE_FIELD, TYPE_DATA_FIELD and
TYPE_DESCRIPTION require the block construction, unlike
other flexfield arguments that specify field names without
block names.
Update Descriptive Flexfield Definition Syntax
Use FND_DESCR_FLEX.UPDATE_DEFINITION for a descriptive
flexfield. Other than the ENABLED argument, which you can only use
for update procedures, the arguments are the same as you use for the
flexfield definition procedures (See page 14 – 36).
FND_DESCR_FLEX.UPDATE_DEFINITION(
/* Arguments that specify the flexfield location */
BLOCK=>’block_name’,
FIELD=>’field_name’,
/* Argument to enable or disable flexfield */
[ENABLED=>’{Y|N}’,]
/* Other optional parameters */
[VDATE=>’date’,]
[TITLE =>’Title’,]
[AUTOPICK=>’{Y|N}’,]
[USEDBFLDS=>’{Y|N}’,]
[READ_ONLY=>’{Y|N}’,]
[LOCK_FLAG=>’{Y|N}’,]
[HELP=>’APPL=application_short_name;
TARGET=target_name’,]
[CONTEXT_LIKE=>’WHERE_clause_fragment’}
);](https://image.slidesharecdn.com/oracleapplicationsdevelopersguide-130620021047-phpapp01/85/Oracle-applications-developer-s-guide-442-320.jpg)


![18 – 3Coding Oracle Reports Concurrent Programs
Using PL/SQL Libraries
Immediately before running a report, the concurrent manager
dynamically prepends several values onto the environment variable
$REPORTS25_PATH, as shown below:
REPORTS25_PATH =
$[PROD]_TOP/$APPLPLS:$[PROD]_TOP/$APPLREP
:$[PROD]_TOP/$APPLREP/LANGDIR
:$AU_TOP/$APPLPLS:$REPORTS25_PATH
This puts the PL/SQL libraries in the $[PROD]_TOP/$APPLPLS, any
other report objects such as external queries, boiler plate text etc. in
$[PROD]_TOP/$APPLREP, and sharable libraries in
$AU_TOP/$APPLPLS in REPORTS25_PATH before the concurrent
manager runs a report. $[PROD]_TOP is the application basepath of
the application owning the report, and LANGDIR is the directory for a
particular language, such as US or FR.
The APPLSYS.env, set at installation, sets REPORTS25_PATH to
$AU_TOP/$APPLPLS. This may be modified to include customized
libraries.
Oracle Applications Concepts
Bitmapped Oracle Reports
If you define a concurrent program with the bitmapped version of
Oracle Reports, select PostScript, HTML, or PDF as appropriate from
the Output Type poplist in the Define Concurrent Program form.
You can control the orientation of the bitmapped report by passing the
ORIENTATION parameter or token. For example, to generate a report
with landscape orientation, specify the following option in the
Execution Option field:
ORIENTATION=LANDSCAPE
Do not put spaces before or after the execution options values. The
parameters should be separated by only a single space. You can also
specify an orientation of PORTRAIT.
You can control the dimensions of the generated output with the
PAGESIZE parameter. A specified <width>x<height> in the Execution
Options field overrides the values specified in the report definition.
For example:
ORIENTATION=LANDSCAPE PAGESIZE=8x11.5](https://image.slidesharecdn.com/oracleapplicationsdevelopersguide-130620021047-phpapp01/85/Oracle-applications-developer-s-guide-586-320.jpg)


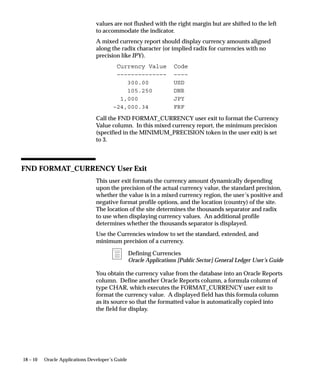
![18 – 10 Oracle Applications Developer’s Guide
values are not flushed with the right margin but are shifted to the left
to accommodate the indicator.
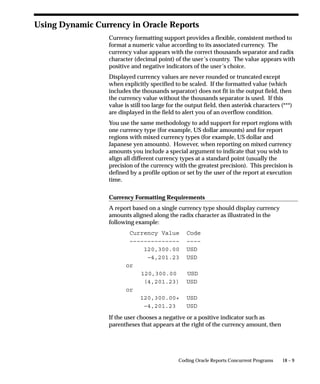
A mixed currency report should display currency amounts aligned
along the radix character (or implied radix for currencies with no
precision like JPY).
Currency Value Code
–––––––––––––– ––––
300.00 USD
105.250 DNR
1,000 JPY
–24,000.34 FRF
Call the FND FORMAT_CURRENCY user exit to format the Currency
Value column. In this mixed currency report, the minimum precision
(specified in the MINIMUM_PRECISION token in the user exit) is set
to 3.
FND FORMAT_CURRENCY User Exit
This user exit formats the currency amount dynamically depending
upon the precision of the actual currency value, the standard precision,
whether the value is in a mixed currency region, the user’s positive and
negative format profile options, and the location (country) of the site.
The location of the site determines the thousands separator and radix
to use when displaying currency values. An additional profile
determines whether the thousands separator is displayed.
Use the Currencies window to set the standard, extended, and
minimum precision of a currency.
Defining Currencies
Oracle Applications [Public Sector] General Ledger User’s Guide
You obtain the currency value from the database into an Oracle Reports
column. Define another Oracle Reports column, a formula column of
type CHAR, which executes the FORMAT_CURRENCY user exit to
format the currency value. A displayed field has this formula column
as its source so that the formatted value is automatically copied into
the field for display.](https://image.slidesharecdn.com/oracleapplicationsdevelopersguide-130620021047-phpapp01/85/Oracle-applications-developer-s-guide-594-320.jpg)
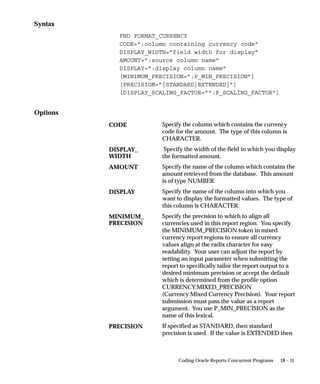
![18 – 11Coding Oracle Reports Concurrent Programs
Syntax
FND FORMAT_CURRENCY
CODE=”:column containing currency code”
DISPLAY_WIDTH=”field width for display”
AMOUNT=”:source column name”
DISPLAY=”:display column name”
[MINIMUM_PRECISION=”:P_MIN_PRECISION”]
[PRECISION=”{STANDARD|EXTENDED}”]
[DISPLAY_SCALING_FACTOR=””:P_SCALING_FACTOR”]
Options
Specify the column which contains the currency
code for the amount. The type of this column is
CHARACTER.
Specify the width of the field in which you display
the formatted amount.
Specify the name of the column which contains the
amount retrieved from the database. This amount
is of type NUMBER.
Specify the name of the column into which you
want to display the formatted values. The type of
this column is CHARACTER.
Specify the precision to which to align all
currencies used in this report region. You specify
the MINIMUM_PRECISION token in mixed
currency report regions to ensure all currency
values align at the radix character for easy
readability. Your user can adjust the report by
setting an input parameter when submitting the
report to specifically tailor the report output to a
desired minimum precision or accept the default
which is determined from the profile option
CURRENCY:MIXED_PRECISION
(Currency:Mixed Currency Precision). Your report
submission must pass the value as a report
argument. You use P_MIN_PRECISION as the
name of this lexical.
If specified as STANDARD, then standard
precision is used. If the value is EXTENDED then
CODE
DISPLAY_
WIDTH
AMOUNT
DISPLAY
MINIMUM_
PRECISION
PRECISION](https://image.slidesharecdn.com/oracleapplicationsdevelopersguide-130620021047-phpapp01/85/Oracle-applications-developer-s-guide-595-320.jpg)
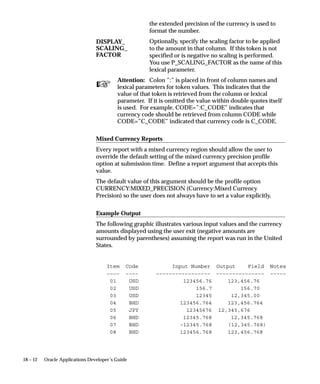
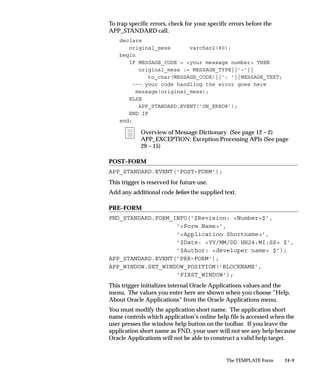
![18 – 13Coding Oracle Reports Concurrent Programs
09 BHD –123456.768 (123,456.768)
10 BHD 1234567.768 1,234,567.768
11 BHD –1234567.768 (1,234,567.768)
12 BHD 12345678.768 12,345,678.768
13 BHD –12345678.768 (12345678.768) [1]
14 BHD 123456789.768 123,456,789.768 [2]
15 BHD –123456789.768 (123456789.768)
16 BHD 1234567890.768 1234567890.768
17 BHD –1234567890.768 *************** [3]
18 BHD 12345678901.768 12345678901.768 [1,2]
19 BHD –12345678901.768 *************** [3]
20 BHD 123456789012.768 *************** [3]
21 USD 123456.765 123,456.765
22 USD 123456.7654 123,456.7654 [2]
23 USD 123456.76543 123,456.76543 [2,4]
Code Name Precision
USD US dollars 2
BHD Bahraini dinars 3
JPY Japanese yen 0
[1] – Thousands indicators are stripped
[2] – Digit occupies space normally reserved for
positive or negative indicator
[3] – Value cannot fit in the field: overflow
condition
[4] – Radix is shifted to the left due to the precision
of the number exceeding MINIMUM_PRECISION
If the precision of the input number is less than the precision of the
currency then the number is padded with 0’s to match the precision of
the currency.
If the precision of the input number is greater than the precision of the
currency then the radix of that number might get misaligned from
other currency amounts in the column.
If there is one space allocated on the right for displaying the positive or
negative format character (for example the profile option for displaying
negative number is set to ”()” or ”<>”) and the current number does
not use that space (if the number is positive) then that space is used. If
this is not sufficient, then the number is left shifted to display the full
precision.](https://image.slidesharecdn.com/oracleapplicationsdevelopersguide-130620021047-phpapp01/85/Oracle-applications-developer-s-guide-598-320.jpg)
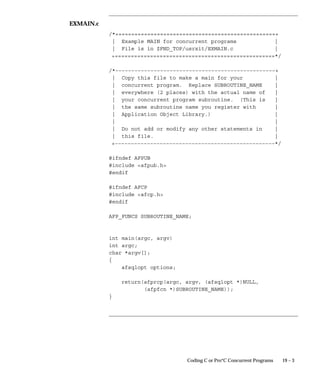
![EXMAIN.c
19 – 3Coding C or Pro*C Concurrent Programs
/*==================================================+
| Example MAIN for concurrent programs |
| File is in $FND_TOP/usrxit/EXMAIN.c |
+==================================================*/
/*––––––––––––––––––––––––––––––––––––––––––––––––––+
| Copy this file to make a main for your |
| concurrent program. Replace SUBROUTINE_NAME |
| everywhere (2 places) with the actual name of |
| your concurrent program subroutine. (This is |
| the same subroutine name you register with |
| Application Object Library.) |
| |
| Do not add or modify any other statements in |
| this file. |
+––––––––––––––––––––––––––––––––––––––––––––––––––*/
#ifndef AFPUB
#include <afpub.h>
#endif
#ifndef AFCP
#include <afcp.h>
#endif
AFP_FUNCS SUBROUTINE_NAME;
int main(argc, argv)
int argc;
char *argv[];
{
afsqlopt options;
return(afprcp(argc, argv, (afsqlopt *)NULL,
(afpfcn *)SUBROUTINE_NAME));
}](https://image.slidesharecdn.com/oracleapplicationsdevelopersguide-130620021047-phpapp01/85/Oracle-applications-developer-s-guide-613-320.jpg)
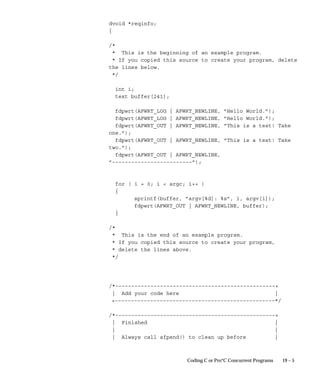
![EXPROG.c
19 – 4 Oracle Applications Developer’s Guide
/*==================================================+
| Example SUBROUTINE for concurrent programs |
| File is in $FND_TOP/usrxit/EXPROG.c |
+==================================================*/
/*––––––––––––––––––––––––––––––––––––––––––––––––––+
| Copy this file to write a subroutine for your |
| concurrent program. Replace SUBROUTINE_NAME |
| with the actual name of your concurrent program |
| (This is the same subroutine name you register |
| with Application Object Library.) |
| |
| Remember to register your subroutine and |
| concurrent program with Application Object |
| Library and to add it to a library if you wish |
| it to be run as an immediate program. |
| |
| Add your code where indicated. |
| |
| Call afpend() to exit your subroutine. |
+––––––––––––––––––––––––––––––––––––––––––––––––––*/
#ifndef AFPUB
#include <afpub.h>
#endif
#ifndef AFCP
#include <afcp.h>
#endif
/*––––––––––––––––––––––––––––––––––––––––––––––––––+
| Add other include files you need here. |
| |
| You will need fddmsg.h if you use Message |
| Dictionary. |
+––––––––––––––––––––––––––––––––––––––––––––––––––*/
boolean SUBROUTINE_NAME(argc, argv, reqinfo)
int argc;
text *argv[];](https://image.slidesharecdn.com/oracleapplicationsdevelopersguide-130620021047-phpapp01/85/Oracle-applications-developer-s-guide-614-320.jpg)
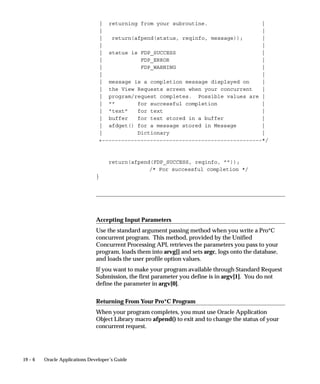
![19 – 5Coding C or Pro*C Concurrent Programs
dvoid *reqinfo;
{
/*
* This is the beginning of an example program.
* If you copied this source to create your program, delete
the lines below.
*/
int i;
text buffer[241];
fdpwrt(AFWRT_LOG | AFWRT_NEWLINE, ”Hello World.”);
fdpwrt(AFWRT_LOG | AFWRT_NEWLINE, ”Hello World.”);
fdpwrt(AFWRT_OUT | AFWRT_NEWLINE, ”This is a test! Take
one.”);
fdpwrt(AFWRT_OUT | AFWRT_NEWLINE, ”This is a test! Take
two.”);
fdpwrt(AFWRT_OUT | AFWRT_NEWLINE,
”–––––––––––––––––––––––––”);
for ( i = 0; i < argc; i++ )
{
sprintf(buffer, ”argv[%d]: %s”, i, argv[i]);
fdpwrt(AFWRT_OUT | AFWRT_NEWLINE, buffer);
}
/*
* This is the end of an example program.
* If you copied this source to create your program,
* delete the lines above.
*/
/*––––––––––––––––––––––––––––––––––––––––––––––––––+
| Add your code here |
+––––––––––––––––––––––––––––––––––––––––––––––––––*/
/*––––––––––––––––––––––––––––––––––––––––––––––––––+
| Finished |
| |
| Always call afpend() to clean up before |](https://image.slidesharecdn.com/oracleapplicationsdevelopersguide-130620021047-phpapp01/85/Oracle-applications-developer-s-guide-615-320.jpg)
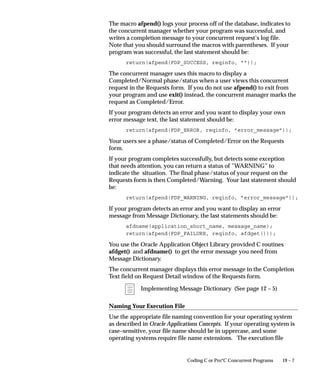
![19 – 6 Oracle Applications Developer’s Guide
| returning from your subroutine. |
| |
| return(afpend(status, reqinfo, message)); |
| |
| status is FDP_SUCCESS |
| FDP_ERROR |
| FDP_WARNING |
| |
| message is a completion message displayed on |
| the View Requests screen when your concurrent |
| program/request completes. Possible values are |
| ”” for successful completion |
| ”text” for text |
| buffer for text stored in a buffer |
| afdget() for a message stored in Message |
| Dictionary |
+––––––––––––––––––––––––––––––––––––––––––––––––––*/
return(afpend(FDP_SUCCESS, reqinfo, ””));
/* For successful completion */
}
Accepting Input Parameters
Use the standard argument passing method when you write a Pro*C
concurrent program. This method, provided by the Unified
Concurrent Processing API, retrieves the parameters you pass to your
program, loads them into arvg[] and sets argc, logs onto the database,
and loads the user profile option values.
If you want to make your program available through Standard Request
Submission, the first parameter you define is in argv[1]. You do not
define the parameter in argv[0].
Returning From Your Pro*C Program
When your program completes, you must use Oracle Application
Object Library macro afpend() to exit and to change the status of your
concurrent request.](https://image.slidesharecdn.com/oracleapplicationsdevelopersguide-130620021047-phpapp01/85/Oracle-applications-developer-s-guide-616-320.jpg)
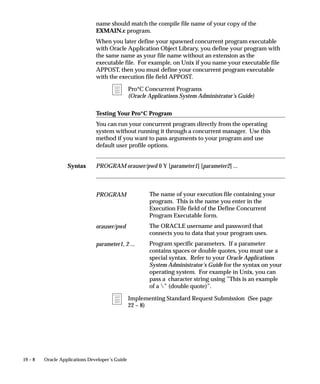
![Syntax
19 – 8 Oracle Applications Developer’s Guide
name should match the compile file name of your copy of the
EXMAIN.c program.
When you later define your spawned concurrent program executable
with Oracle Application Object Library, you define your program with
the same name as your file name without an extension as the
executable file. For example, on Unix if you name your executable file
APPOST, then you must define your concurrent program executable
with the execution file field APPOST.
Pro*C Concurrent Programs
(Oracle Applications System Administrator’s Guide)
Testing Your Pro*C Program
You can run your concurrent program directly from the operating
system without running it through a concurrent manager. Use this
method if you want to pass arguments to your program and use
default user profile options.
PROGRAM orauser/pwd 0 Y [parameter1] [parameter2] ...
The name of your execution file containing your
program. This is the name you enter in the
Execution File field of the Define Concurrent
Program Executable form.
The ORACLE username and password that
connects you to data that your program uses.
Program specific parameters. If a parameter
contains spaces or double quotes, you must use a
special syntax. Refer to your Oracle Applications
System Administrator’s Guide for the syntax on your
operating system. For example in Unix, you can
pass a character string using ”This is an example
of a ” (double quote)”.
Implementing Standard Request Submission (See page
22 – 8)
PROGRAM
orauser/pwd
parameter1, 2 ...](https://image.slidesharecdn.com/oracleapplicationsdevelopersguide-130620021047-phpapp01/85/Oracle-applications-developer-s-guide-618-320.jpg)

![Example
Summary
19 – 11Coding C or Pro*C Concurrent Programs
No content, for successful completion.
For text.
For text stored in a buffer.
For a message stored in the Message Dictionary.
/* use afpend to return messages with a success code */
char errbuf[241];
if (!submit())
{
/* return failure with a message */
return(afpend(FDP_ERROR, reqinfo,
”Failed in submit()”));
}
else if (!setprofiles())
{
/* return warning with a message */
return(afpend(FDP_WARNING, reqinfo,
”Failed in setprofiles()”));
}
else if (!subrequest(argc, argv, reqinfo, errbuf))
{
/* return failure with a message */
return(afpend(FDP_ERROR, reqinfo, errbuf));
}
else
{
/* Successful completion. */
return(afpend(FDP_SUCCESS, reqinfo, ””));
}
fdpfrs()
afreqstate fdpfrs (request_id, errbuf);
text request_id;
text errbuf;
””
”text”
buffer
afdget()](https://image.slidesharecdn.com/oracleapplicationsdevelopersguide-130620021047-phpapp01/85/Oracle-applications-developer-s-guide-622-320.jpg)
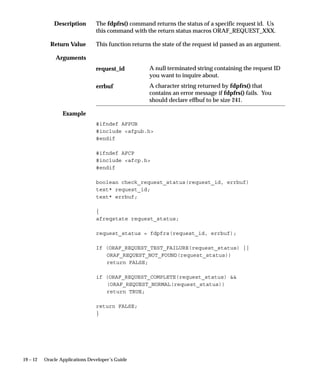
![Summary
Description
Return Value
Arguments
19 – 13Coding C or Pro*C Concurrent Programs
fdpscp()
#include <afcp.h>
boolean fdpscp( argc_ptr, argv_ptr, args_method, errbuf)
int *argc_ptr;
char **argv_ptr[];
text args_method;
text *errbuf;
This function exists for compatibility with concurrent programs written
with prior versions of Oracle Application Object Library. When writing
new concurrent programs, use the unified concurrent processing API.
The function fdpscp() was called in the first statement of any spawned
Pro*C concurrent program. This function retrieves the parameters your
program expects, loads them into the argv[] array, and prints a
standard header including the run date and time in the log file. It also
logs your program onto the database. This function connects your
program to the database using the ORACLE ID that is assigned to the
application with which your concurrent program is defined.
This function returns TRUE if it successfully retrieves all the
parameters your concurrent request is called with. Otherwise, it
returns FALSE. If this function returns FALSE, your concurrent
program should print the contents of errbuf and exit with failure.
A pointer to argc, the first argument to main(). You
should call fdpscp() using &argc.
A pointer to argv, the second argument to main().
You should call fdpscp() using &argv.
This parameter is not currently used. You should
initialize it to (text)’0’.
A character string returned by fdpscp() that
contains an error message if fdpscp() returns
argc_ptr
argv_ptr
args_method
errbuf](https://image.slidesharecdn.com/oracleapplicationsdevelopersguide-130620021047-phpapp01/85/Oracle-applications-developer-s-guide-624-320.jpg)
![Example
Summary
19 – 14 Oracle Applications Developer’s Guide
FALSE. You should declare errbuf[] to be size 241.
#include <afcp.h>
/* This is an example of a Pro*C concurrent program. This
sample program prints its input parameter to the
log file. */
routine()
{
text args_method = (text)’0’;
text errbuf[241];
if (!fdpscp( &argc, &argv, args_method, errbuf ) ){
fdpwrt( AFWRT_LOG | AFWRT_NEWLINE,
”Error calling fdpscp” );
fdpwrt( AFWRT_LOG | AFWRT_NEWLINE, errbuf );
return(afpend(FDP_ERROR, reqinfo, ”Failed to get
arguments”));
}
if (!fdpwrt(AFWRT_LOG | AFWRT_NEWLINE, argv[1] )) {
return(afpend(FDP_ERROR, reqinfo, ”Failed to write
arguments”));
}
{return(afpend(FDP_SUCCESS, reqinfo, ””));}
}
fdpscr()
#include <afcp.h>
boolean fdpscr( command, request_id, errbuf )
text *command;
text *request_id;
text *errbuf;](https://image.slidesharecdn.com/oracleapplicationsdevelopersguide-130620021047-phpapp01/85/Oracle-applications-developer-s-guide-625-320.jpg)
![Description
Return Value
Arguments
Example
19 – 15Coding C or Pro*C Concurrent Programs
The fdpscr() function submits a request to run a concurrent program.
You can only call this function from a Pro*C concurrent programs. The
user profile options of the child request default to those of the parent
concurrent program. You must commit after you call this function for
your request to become eligible to be run by a concurrent manager. If
you perform a rollback without having committed, your request will be
lost.
If fdpscr() successfully submits your concurrent request, it returns
TRUE. Otherwise, fdpscr() returns FALSE.
A character string that contains the parameters to
your concurrent program, preceded by the word
CONCURRENT. You should use the same
command you use when you call a concurrent
program from a form, omitting the #FND.
A character string returned by fdpscr() that
contains the request id that is assigned to your
concurrent request. You should declare
request_id[] to be size 12.
A character string returned by fdpscr() that
contains an error message if fdpscr() returns
FALSE. You should declare errbuf[] to be size 214.
/* Submit request */
if (!fdpscr( command, request_id, errbuf))
{
fdpwrt( AFWRT_LOG | AFWRT_NEWLINE,
”Failed to submit concurrent request”);
fdpwrt( AFWRT_LOG | AFWRT_NEWLINE, errbuf);
return(FALSE);
}
else /* Successful completion */
{
sprintf(errbuf, ”Concurrent request %s submitted
successfully”, request_id);
fdpwrt( AFWRT_LOG | AFWRT_NEWLINE, errbuf);
return(TRUE);
command
request_id
errbuf](https://image.slidesharecdn.com/oracleapplicationsdevelopersguide-130620021047-phpapp01/85/Oracle-applications-developer-s-guide-626-320.jpg)
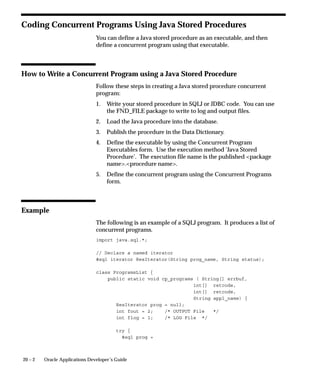
![20 – 2 Oracle Applications Developer’s Guide
Coding Concurrent Programs Using Java Stored Procedures
You can define a Java stored procedure as an executable, and then
define a concurrent program using that executable.
How to Write a Concurrent Program using a Java Stored Procedure
Follow these steps in creating a Java stored procedure concurrent
program:
1. Write your stored procedure in SQLJ or JDBC code. You can use
the FND_FILE package to write to log and output files.
2. Load the Java procedure into the database.
3. Publish the procedure in the Data Dictionary.
4. Define the executable by using the Concurrent Program
Executables form. Use the execution method ’Java Stored
Procedure’. The execution file name is the published <package
name>.<procedure name>.
5. Define the concurrent program using the Concurrent Programs
form.
Example
The following is an example of a SQLJ program. It produces a list of
concurrent programs.
import java.sql.*;
// Declare a named iterator
#sql iterator ResIterator(String prog_name, String status);
class ProgramsList {
public static void cp_programs ( String[] errbuf,
int[] retcode,
int[] retcode,
String appl_name) {
ResIterator prog = null;
int fout = 2; /* OUTPUT File */
int flog = 1; /* LOG File */
try {
#sql prog =](https://image.slidesharecdn.com/oracleapplicationsdevelopersguide-130620021047-phpapp01/85/Oracle-applications-developer-s-guide-631-320.jpg)
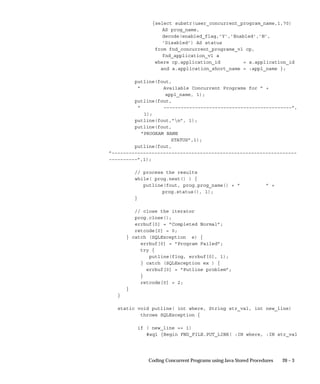
![20 – 3Coding Concurrent Programs using Java Stored Procedures
{select substr(user_concurrent_program_name,1,70)
AS prog_name,
decode(enabled_flag,’Y’,’Enabled’,’N’,
’Disabled’) AS status
from fnd_concurrent_programs_vl cp,
fnd_application_vl a
where cp.application_id = a.application_id
and a.application_short_name = :appl_name };
putline(fout,
” Available Concurrent Programs for ” +
appl_name, 1);
putline(fout,
” –––––––––––––––––––––––––––––––––––––––––––––”,
1);
putline(fout,”n”, 1);
putline(fout,
”PROGRAM NAME
STATUS”,1);
putline(fout,
”–––––––––––––––––––––––––––––––––––––––––––––––––––––––––––––––––
––––––––––”,1);
// process the results
while( prog.next() ) {
putline(fout, prog.prog_name() + ” ” +
prog.status(), 1);
}
// close the iterator
prog.close();
errbuf[0] = ”Completed Normal”;
retcode[0] = 0;
} catch (SQLException e) {
errbuf[0] = ”Program Failed”;
try {
putline(flog, errbuf[0], 1);
} catch (SQLException ex ) {
errbuf[0] = ”Putline problem”;
}
retcode[0] = 2;
}
}
static void putline( int where, String str_val, int new_line)
throws SQLException {
if ( new_line == 1)
#sql {Begin FND_FILE.PUT_LINE( :IN where, :IN str_val](https://image.slidesharecdn.com/oracleapplicationsdevelopersguide-130620021047-phpapp01/85/Oracle-applications-developer-s-guide-632-320.jpg)
![20 – 4 Oracle Applications Developer’s Guide
); End;};
else
#sql {Begin FND_FILE.PUT( :IN where, :IN str_val);
End;};
}
}
To publish the procedure in the Data Dictionary use following pl/sql
script:
create or replace package FND_CONC_JSP as
/* $Header: ProgramsList.sql 115.0 99/04/26 11:24:10 vvengala
noship $ */
Procedure programs_list(errbuf OUT varchar2,
retcode OUT number,
appl_short_name IN varchar2);
end conc_programs;
/
create or replace package body FND_CONC_JSP as
procedure programs_list(errbuf OUT varchar2,
retcode OUT number,
appl_short_name IN varchar2)
as language java
name ’ProgramsList.cp_programs(java.lang.String[], int[],
java.lang.String)’;
end conc_programs;
/](https://image.slidesharecdn.com/oracleapplicationsdevelopersguide-130620021047-phpapp01/85/Oracle-applications-developer-s-guide-633-320.jpg)


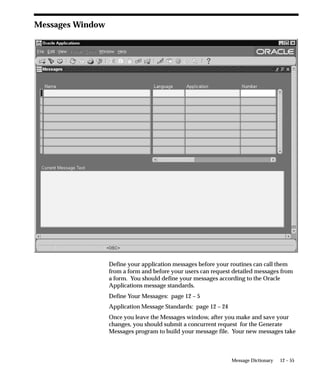
This document provides an overview and guidelines for developing applications using Oracle Forms and PL/SQL. It covers setting up the application framework, building database objects, using PL/SQL, and setting properties of container objects like windows, canvases, and blocks. The document contains information on Oracle Application Object Library classes, coding standards, performance best practices, and examples of coding item, event, and table handlers on both the client and server side.


![[Oracle数据库11 g初学者指南].oracle.database.11g,.a.beginner's.guide](https://cdn.slidesharecdn.com/ss_thumbnails/oracle11g-oracle-database-11g-a-beginners-guide-100617013656-phpapp01-thumbnail.jpg?width=640&height=640&fit=bounds)


![C sharp programming[1]](https://cdn.slidesharecdn.com/ss_thumbnails/csharpprogramming1-130330104844-phpapp01-thumbnail.jpg?width=640&height=640&fit=bounds)

![ABAP_RESTful_Programming_Model_EN[1].pdf](https://cdn.slidesharecdn.com/ss_thumbnails/abaprestfulprogrammingmodelen1-231210152009-537059a3-thumbnail.jpg?width=640&height=640&fit=bounds)


