Download free for 30 days
Sign in
Upload
Language (EN)
Support
Business
Mobile
Social Media
Marketing
Technology
Art & Photos
Career
Design
Education
Presentations & Public Speaking
Government & Nonprofit
Healthcare
Internet
Law
Leadership & Management
Automotive
Engineering
Software
Recruiting & HR
Retail
Sales
Services
Science
Small Business & Entrepreneurship
Food
Environment
Economy & Finance
Data & Analytics
Investor Relations
Sports
Spiritual
News & Politics
Travel
Self Improvement
Real Estate
Entertainment & Humor
Health & Medicine
Devices & Hardware
Lifestyle
Change Language
Language
English
Español
Português
Français
Deutsche
Cancel
Save
EN
YS
Uploaded by
Yuta Shimada
710 views
OpsWorks aws-cli#11
JAWS-UG CLI#11 OpsWorks
Technology
◦
Read more
2
Save
Share
Embed
Embed presentation
Download
Download to read offline
1
/ 11
2
/ 11
3
/ 11
4
/ 11
5
/ 11
6
/ 11
7
/ 11
8
/ 11
9
/ 11
10
/ 11
11
/ 11
More Related Content
PDF
コンテナにおけるパフォーマンス調査でハマった話
by
Yuta Shimada
PPTX
LINEのMySQL運用について 修正版
by
LINE Corporation
PPT
Hatena's Infrastructure from the beginning
by
Shinji Tanaka
PDF
Rubyによるお手軽分散処理
by
maebashi
PDF
LINEのMySQL運用について
by
LINE Corporation
PDF
知っておくべきCephのIOアクセラレーション技術とその活用方法 - OpenStack最新情報セミナー 2015年9月
by
VirtualTech Japan Inc.
PPTX
Azure サポート エンジニア直伝 ~ PowerShell 実践活用術 ~
by
ShuheiUda
PDF
松本克彦 ピグにおけるリアルタイムランキングの導入
by
matsumoto_katsuhiko
コンテナにおけるパフォーマンス調査でハマった話
by
Yuta Shimada
LINEのMySQL運用について 修正版
by
LINE Corporation
Hatena's Infrastructure from the beginning
by
Shinji Tanaka
Rubyによるお手軽分散処理
by
maebashi
LINEのMySQL運用について
by
LINE Corporation
知っておくべきCephのIOアクセラレーション技術とその活用方法 - OpenStack最新情報セミナー 2015年9月
by
VirtualTech Japan Inc.
Azure サポート エンジニア直伝 ~ PowerShell 実践活用術 ~
by
ShuheiUda
松本克彦 ピグにおけるリアルタイムランキングの導入
by
matsumoto_katsuhiko
What's hot
PDF
[db tech showcase Tokyo 2015] A32:Amazon Redshift Deep Dive by アマゾン データ サービス ...
by
Insight Technology, Inc.
PDF
AzureでOracle
by
Kuniteru Asami
PPTX
ふりかえり Windows Azure
by
Takekazu Omi
PPT
アメーバピグにおける自作サーバ運用
by
Akihiro Kuwano
PDF
[db tech showcase Tokyo 2014] C34:[楽天] 詳説 楽天のデータベースアーキテクチャ史 -シングルノードから仮想化フラッシ...
by
Insight Technology, Inc.
PDF
[db tech showcase Tokyo 2015] C27:楽天MySQL Backup Structure by 楽天株式会社 粟田啓介
by
Insight Technology, Inc.
PDF
Monitoring Intelligence
by
netopscoding
PDF
Rds徹底入門
by
Junpei Nakada
PPTX
Microsoft azure
by
ssuser184f93
PPTX
Persistence on Azure - Microsoft Azure の永続化
by
Takekazu Omi
PDF
第6回 ZABBIX-JP勉強会
by
Kodai Terashima
PPTX
クラウドデザイン パターンに見る クラウドファーストな アプリケーション設計 Data Management編
by
Takekazu Omi
PDF
今日から使えるCouchbaseシステムアーキテクチャデザインパターン集
by
Couchbase Japan KK
PPT
20170329 D3 DBAが夜間メンテをしなくなった日 発表資料
by
dcubeio
PPTX
VMware on IBM CloudのためのVM移行/リストアとセキュリティ対策手法
by
株式会社クライム
PDF
VisualStudio2010ReadyDay Azureセッション資料
by
Shinichiro Isago
PDF
これから始めるAzure Kubernetes Service入門
by
Yuto Takei
PDF
S10 日本東西リージョンでのディザスタ リカバリ環境の実現
by
Microsoft Azure Japan
PDF
Couchbase introduction-20150611
by
Couchbase Japan KK
PPTX
Sql azureデータバックアップ方法
by
貴仁 大和屋
[db tech showcase Tokyo 2015] A32:Amazon Redshift Deep Dive by アマゾン データ サービス ...
by
Insight Technology, Inc.
AzureでOracle
by
Kuniteru Asami
ふりかえり Windows Azure
by
Takekazu Omi
アメーバピグにおける自作サーバ運用
by
Akihiro Kuwano
[db tech showcase Tokyo 2014] C34:[楽天] 詳説 楽天のデータベースアーキテクチャ史 -シングルノードから仮想化フラッシ...
by
Insight Technology, Inc.
[db tech showcase Tokyo 2015] C27:楽天MySQL Backup Structure by 楽天株式会社 粟田啓介
by
Insight Technology, Inc.
Monitoring Intelligence
by
netopscoding
Rds徹底入門
by
Junpei Nakada
Microsoft azure
by
ssuser184f93
Persistence on Azure - Microsoft Azure の永続化
by
Takekazu Omi
第6回 ZABBIX-JP勉強会
by
Kodai Terashima
クラウドデザイン パターンに見る クラウドファーストな アプリケーション設計 Data Management編
by
Takekazu Omi
今日から使えるCouchbaseシステムアーキテクチャデザインパターン集
by
Couchbase Japan KK
20170329 D3 DBAが夜間メンテをしなくなった日 発表資料
by
dcubeio
VMware on IBM CloudのためのVM移行/リストアとセキュリティ対策手法
by
株式会社クライム
VisualStudio2010ReadyDay Azureセッション資料
by
Shinichiro Isago
これから始めるAzure Kubernetes Service入門
by
Yuto Takei
S10 日本東西リージョンでのディザスタ リカバリ環境の実現
by
Microsoft Azure Japan
Couchbase introduction-20150611
by
Couchbase Japan KK
Sql azureデータバックアップ方法
by
貴仁 大和屋
Viewers also liked
PDF
ENGAGE2014: All it Takes is One Post: Social Media Etiquette Training - Joe L...
by
GuideSpark
PPTX
ENGAGE2014 East: Leveraging Latest Trends to Influence Communication Strategy...
by
GuideSpark
PPTX
FOI 101
by
Jodie Mozdzer Gil
PDF
ENGAGE2015: How is EMC Transforming Employee Communications? - Kevin Close, EMC
by
GuideSpark
PDF
ENAGE2014: The Art of Engaging Millennials - Lee McEnany Caraher, DoubleForte
by
GuideSpark
PDF
ENGAGE2014: The Future of Employee Communications - Keith Kitani, GuideSpark
by
GuideSpark
PPTX
Pulpal pahology
by
ravi acharya
PPTX
Ni ti alloy
by
ravi acharya
PPTX
Wound healing
by
ravi acharya
ENGAGE2014: All it Takes is One Post: Social Media Etiquette Training - Joe L...
by
GuideSpark
ENGAGE2014 East: Leveraging Latest Trends to Influence Communication Strategy...
by
GuideSpark
FOI 101
by
Jodie Mozdzer Gil
ENGAGE2015: How is EMC Transforming Employee Communications? - Kevin Close, EMC
by
GuideSpark
ENAGE2014: The Art of Engaging Millennials - Lee McEnany Caraher, DoubleForte
by
GuideSpark
ENGAGE2014: The Future of Employee Communications - Keith Kitani, GuideSpark
by
GuideSpark
Pulpal pahology
by
ravi acharya
Ni ti alloy
by
ravi acharya
Wound healing
by
ravi acharya
Similar to OpsWorks aws-cli#11
PDF
AWS Black Belt Tech シリーズ 2015 - AWS OpsWorks
by
Amazon Web Services Japan
PDF
[AWSマイスターシリーズ] AWS OpsWorks
by
Amazon Web Services Japan
PDF
AWS OpsWorksのご紹介
by
Amazon Web Services Japan
PDF
AWS OpsWorksハンズオン
by
Amazon Web Services Japan
PDF
JAWSUG初心者向けトラック 【Deploy&Ops】
by
Yukihiko SAWANOBORI
PDF
AWS Black Belt Online Seminar 2017 AWS OpsWorks
by
Amazon Web Services Japan
PDF
Aws OpsWorks [JAWSDAYS 2014 ACEに聞けトラック]
by
Yukihiko SAWANOBORI
PDF
aws_opsworks
by
Yukihiko SAWANOBORI
PDF
JAWS DAYS 2015 AWS OpsWorksの仕組みと活用方法のご紹介
by
Kenji Funasaki
PDF
opsworks本番前提でopsworksを使わないで開発する話 at #jawsug #chibadan
by
Yasuhiro Araki, Ph.D
PDF
Chef(Server)と AWS OpsWorks(tm)の比較
by
Yukihiko SAWANOBORI
PPTX
同じサービスを ECSとOpsWorksで 運用してみた
by
Jun Ichikawa
PDF
AWS サービスアップデートまとめ 2013年9月
by
Yasuhiro Horiuchi
PDF
よくわかるAWS OpsWorks: AWS OpsWorksの概要&アップデート紹介
by
Kenji Funasaki
PDF
3分でわかる(気になれる) AWS OpsWorks
by
Yuuki Namikawa
PDF
AWS Black Belt Techシリーズ AWS Command Line Interface
by
Amazon Web Services Japan
PDF
AWS CLI Conference 2016
by
Tomoaki Sakatoku
PDF
AWS運用自動化への第一歩
by
Trainocate Japan, Ltd.
PDF
オンプレを少しずつコンテナ化する
by
Kenkichi Okazaki
PPTX
サバカン屋のサバ缶はre:Inventで通用したのか&すぐに使える!最新運用ネタ #re:Port2016
by
Kohei Hoshi
AWS Black Belt Tech シリーズ 2015 - AWS OpsWorks
by
Amazon Web Services Japan
[AWSマイスターシリーズ] AWS OpsWorks
by
Amazon Web Services Japan
AWS OpsWorksのご紹介
by
Amazon Web Services Japan
AWS OpsWorksハンズオン
by
Amazon Web Services Japan
JAWSUG初心者向けトラック 【Deploy&Ops】
by
Yukihiko SAWANOBORI
AWS Black Belt Online Seminar 2017 AWS OpsWorks
by
Amazon Web Services Japan
Aws OpsWorks [JAWSDAYS 2014 ACEに聞けトラック]
by
Yukihiko SAWANOBORI
aws_opsworks
by
Yukihiko SAWANOBORI
JAWS DAYS 2015 AWS OpsWorksの仕組みと活用方法のご紹介
by
Kenji Funasaki
opsworks本番前提でopsworksを使わないで開発する話 at #jawsug #chibadan
by
Yasuhiro Araki, Ph.D
Chef(Server)と AWS OpsWorks(tm)の比較
by
Yukihiko SAWANOBORI
同じサービスを ECSとOpsWorksで 運用してみた
by
Jun Ichikawa
AWS サービスアップデートまとめ 2013年9月
by
Yasuhiro Horiuchi
よくわかるAWS OpsWorks: AWS OpsWorksの概要&アップデート紹介
by
Kenji Funasaki
3分でわかる(気になれる) AWS OpsWorks
by
Yuuki Namikawa
AWS Black Belt Techシリーズ AWS Command Line Interface
by
Amazon Web Services Japan
AWS CLI Conference 2016
by
Tomoaki Sakatoku
AWS運用自動化への第一歩
by
Trainocate Japan, Ltd.
オンプレを少しずつコンテナ化する
by
Kenkichi Okazaki
サバカン屋のサバ缶はre:Inventで通用したのか&すぐに使える!最新運用ネタ #re:Port2016
by
Kohei Hoshi
OpsWorks aws-cli#11
1.
© Copyright 2015,
TDC Software Engineering Inc. All rights reserved. 1 AWS-CLI OpsWorksを使ってみよう 第 1 版 AWS-UG CLI#11 島田雄太
2.
© Copyright 2015,
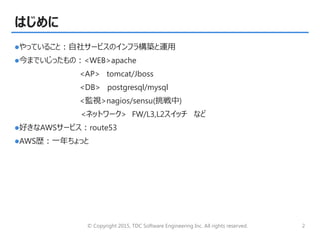
TDC Software Engineering Inc. All rights reserved. 2 はじめに やっていること:自社サービスのインフラ構築と運用 今までいじったもの:<WEB>apache <AP> tomcat/Jboss <DB> postgresql/mysql <監視>nagios/sensu(挑戦中) <ネットワーク> FW/L3,L2スイッチ など 好きなAWSサービス:route53 AWS歴:一年ちょっと
3.
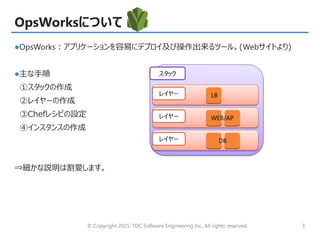
© Copyright 2015,
TDC Software Engineering Inc. All rights reserved. 3 OpsWorksについて OpsWorks:アプリケーションを容易にデプロイ及び操作出来るツール。(Webサイトより) 主な手順 ①スタックの作成 ②レイヤーの作成 ③Chefレシピの設定 ④インスタンスの作成 ⇒細かな説明は割愛します。 スタック レイヤー レイヤー レイヤー LB WEB/AP DB
4.
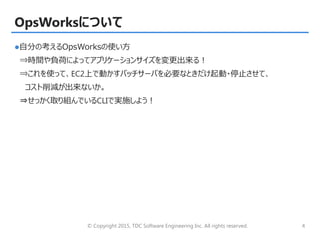
© Copyright 2015,
TDC Software Engineering Inc. All rights reserved. 4 OpsWorksについて 自分の考えるOpsWorksの使い方 ⇒時間や負荷によってアプリケーションサイズを変更出来る! ⇒これを使って、EC2上で動かすバッチサーバを必要なときだけ起動・停止させて、 コスト削減が出来ないか。 ⇒せっかく取り組んでいるCLIで実施しよう!
5.
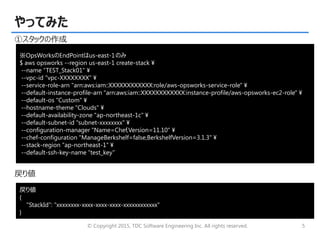
© Copyright 2015,
TDC Software Engineering Inc. All rights reserved. 5 やってみた ①スタックの作成 戻り値 ※OpsWorksのEndPointはus-east-1のみ $ aws opsworks --region us-east-1 create-stack ¥ --name “TEST_Stack01" ¥ --vpc-id "vpc-XXXXXXXX" ¥ --service-role-arn "arn:aws:iam::XXXXXXXXXXXX:role/aws-opsworks-service-role" ¥ --default-instance-profile-arn "arn:aws:iam::XXXXXXXXXXXX:instance-profile/aws-opsworks-ec2-role" ¥ --default-os "Custom" ¥ --hostname-theme "Clouds" ¥ --default-availability-zone "ap-northeast-1c" ¥ --default-subnet-id "subnet-xxxxxxxx" ¥ --configuration-manager "Name=Chef,Version=11.10" ¥ --chef-configuration "ManageBerkshelf=false,BerkshelfVersion=3.1.3" ¥ --stack-region "ap-northeast-1" ¥ --default-ssh-key-name “test_key" 戻り値 { "StackId": “xxxxxxxx-xxxx-xxxx-xxxx-xxxxxxxxxxxx" }
6.
© Copyright 2015,
TDC Software Engineering Inc. All rights reserved. 6 やってみた ②レイヤーの作成 $ cat << EOT >> custom-recipe.json { "Setup": ["opsworks_initial_setup","ssh_host_keys","ssh_users","mysql::client","dependencies","ebs"], "Configure": ["ssh_users","mysql::client","agent_version"], "Deploy": ["deploy::default"], "Undeploy": [], "Shutdown": ["opsworks_shutdown::default"] } EOT $ aws opsworks --region us-east-1 create-layer ¥ --stack-id " xxxxxxxx-xxxx-xxxx-xxxx-xxxxxxxxxxxx " ¥ --type "custom" ¥ --name “TEST Layer01" ¥ --shortname “test-layer" ¥ --enable-auto-healing ¥ --auto-assign-elastic-ips ¥ --no-auto-assign-public-ips ¥ --custom-recipes file://./custom-recipe.json ¥ --install-updates-on-boot
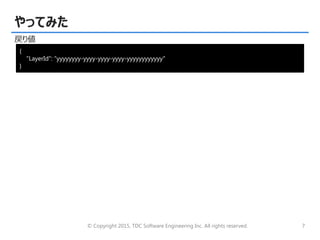
7.
© Copyright 2015,
TDC Software Engineering Inc. All rights reserved. 7 やってみた 戻り値 { "LayerId": “yyyyyyyy-yyyy-yyyy-yyyy-yyyyyyyyyyyy" }
8.
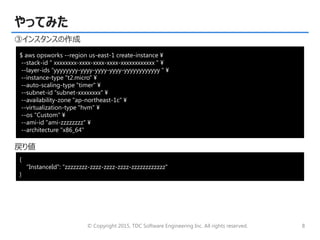
© Copyright 2015,
TDC Software Engineering Inc. All rights reserved. 8 やってみた ③インスタンスの作成 戻り値 $ aws opsworks --region us-east-1 create-instance ¥ --stack-id " xxxxxxxx-xxxx-xxxx-xxxx-xxxxxxxxxxxx " ¥ --layer-ids “yyyyyyyy-yyyy-yyyy-yyyy-yyyyyyyyyyyy " ¥ --instance-type "t2.micro" ¥ --auto-scaling-type "timer" ¥ --subnet-id "subnet-xxxxxxxx" ¥ --availability-zone "ap-northeast-1c" ¥ --virtualization-type "hvm" ¥ --os "Custom" ¥ --ami-id "ami-zzzzzzzz" ¥ --architecture "x86_64" { "InstanceId": “zzzzzzzz-zzzz-zzzz-zzzz-zzzzzzzzzzzz" }
9.
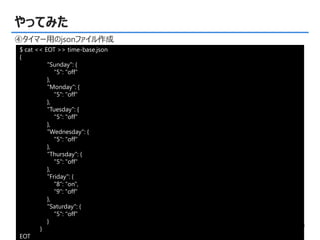
© Copyright 2015,
TDC Software Engineering Inc. All rights reserved. 9 やってみた ④タイマー用のjsonファイル作成 $ cat << EOT >> time-base.json { "Sunday": { "5": "off" }, "Monday": { "5": "off" }, "Tuesday": { "5": "off" }, "Wednesday": { "5": "off" }, "Thursday": { "5": "off" }, "Friday": { "8": "on", “9": "off" }, "Saturday": { "5": "off" } } EOT
10.
© Copyright 2015,
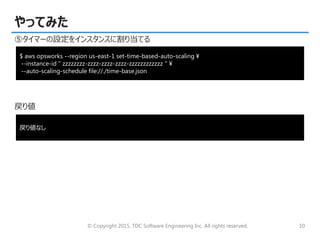
TDC Software Engineering Inc. All rights reserved. 10 やってみた ⑤タイマーの設定をインスタンスに割り当てる 戻り値 $ aws opsworks --region us-east-1 set-time-based-auto-scaling ¥ --instance-id " zzzzzzzz-zzzz-zzzz-zzzz-zzzzzzzzzzzz " ¥ --auto-scaling-schedule file://./time-base.json 戻り値なし
11.
© Copyright 2015,
TDC Software Engineering Inc. All rights reserved. 11 以上になります。 ご清聴ありがとうございました!
Download

![© Copyright 2015, TDC Software Engineering Inc. All rights reserved. 6
やってみた
②レイヤーの作成
$ cat << EOT >> custom-recipe.json
{
"Setup": ["opsworks_initial_setup","ssh_host_keys","ssh_users","mysql::client","dependencies","ebs"],
"Configure": ["ssh_users","mysql::client","agent_version"],
"Deploy": ["deploy::default"],
"Undeploy": [],
"Shutdown": ["opsworks_shutdown::default"]
}
EOT
$ aws opsworks --region us-east-1 create-layer ¥
--stack-id " xxxxxxxx-xxxx-xxxx-xxxx-xxxxxxxxxxxx " ¥
--type "custom" ¥
--name “TEST Layer01" ¥
--shortname “test-layer" ¥
--enable-auto-healing ¥
--auto-assign-elastic-ips ¥
--no-auto-assign-public-ips ¥
--custom-recipes file://./custom-recipe.json ¥
--install-updates-on-boot](https://image.slidesharecdn.com/opsworksaws-cli11-150202091815-conversion-gate02/85/OpsWorks-aws-cli-11-6-320.jpg)


![[db tech showcase Tokyo 2015] A32:Amazon Redshift Deep Dive by アマゾン データ サービス ...](https://cdn.slidesharecdn.com/ss_thumbnails/dbts-tokyo-2015a32amazon-redshiftamazondataservicejapan-150623010123-lva1-app6892-thumbnail.jpg?width=640&height=640&fit=bounds)


![[db tech showcase Tokyo 2014] C34:[楽天] 詳説 楽天のデータベースアーキテクチャ史 -シングルノードから仮想化フラッシ...](https://cdn.slidesharecdn.com/ss_thumbnails/dbtstokyo2014c34hardware-141211191008-conversion-gate01-thumbnail.jpg?width=640&height=640&fit=bounds)
![[db tech showcase Tokyo 2015] C27:楽天MySQL Backup Structure by 楽天株式会社 粟田啓介](https://cdn.slidesharecdn.com/ss_thumbnails/dbts-tokyo-2015c27mysqlrakuten-150617022225-lva1-app6892-thumbnail.jpg?width=640&height=640&fit=bounds)


![[AWSマイスターシリーズ] AWS OpsWorks](https://cdn.slidesharecdn.com/ss_thumbnails/20131016aws-meister-regenerate-opsworks-131025012637-phpapp02-thumbnail.jpg?width=640&height=640&fit=bounds)


![Aws OpsWorks [JAWSDAYS 2014 ACEに聞けトラック]](https://cdn.slidesharecdn.com/ss_thumbnails/awsopsworksoverview-140316224852-phpapp02-thumbnail.jpg?width=640&height=640&fit=bounds)


