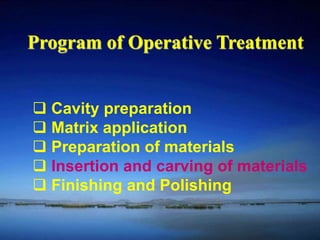
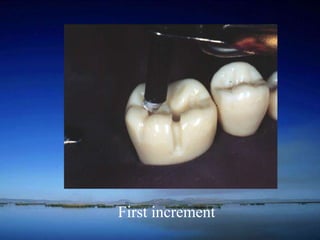
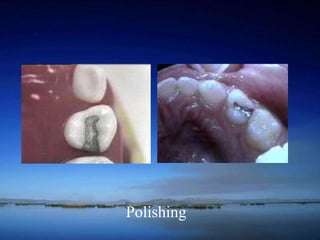
Operative Dentistry 2 
Upload By:Ahmed Ali Abbas 
Babylon University College of Dentistry 
Download from 
theoptimalsmile.wix.com/dentistry
Definition of Operative Dentistry 
Operative dentistry is 
the ART and SCIENCE of the 
diagnosis, treatment, prognosis 
of defects of teeth which do not 
require full coverage restorations 
for correction.
Indication of Operative Dentistry 
 Caries; 
 Malformed, discolored, 
or fractured teeth; 
 Restoration replacement.
Program of Operative Treatment 
 Patient assessment 
 Examination and diagnosis 
 Treatment planning 
 Pain control: local anesthetic 
 Isolation of the operating field
Program of Operative Treatment 
 Cavity preparation 
 Matrix application 
 Preparation of materials 
 Insertion and carving of materials 
 Finishing and Polishing
Cavity Preparation 
The mechanical alteration of a 
defective, injured, or diseased tooth 
in order to best receive a restorative 
material which will re-establish a 
healthy state for the tooth including 
esthetic corrections where indicated, 
along with normal form and function.
Cavity Structure 
 walls 
 angles 
 cavity
Classification of cavity 
 Class I 
 Class II 
 Class III 
 Class IV 
 Class V 
 Class VI 
—G.V.Black in 1908
Cavity 
 Simple cavity: only one tooth 
surface is involved. 
 Compound cavity: two surfaces 
are involved. 
 Complex cavity: three or more 
surfaces are involved.
QUIZ 
TIME
Class 1 
Class 2 
Class 1 
Class 2 
Class 3 
Class 4 
Class 5 
Class 6
Stages and Steps 
in Cavity Preparation 
Initial cavity preparation stage 
Final cavity preparation stage
Initial cavity preparation stage 
Step 1 Outline form and initial depth 
Step 2 Primary resistance form 
Step 3 Primary retention form 
Step 4 Convenience form
Final cavity preparation stage 
Step 5 Removal of any remaining infected 
dentin if indicated 
Step 6 Pulp protection 
Step 7 Secondary resistance & retention form 
Step 8 Procedure for finishing external walls 
Step 9 Final procedures
Initial cavity preparation stage 
Step 1 Outline form and initial depth 
Step 2 Primary resistance form 
Step 3 Primary retention form 
Step 4 Convenience form
Outline Form and Initial Depth Ⅰ 
Definition: 
placing the cavity margins in the 
positions they will occupy in the final 
preparation; 
preparing an initial depth of 0.2~0.8 mm 
pulpally of the dentinoenamel junction 
position or normal root surface position.
Maxillary Class Ⅰ outline form
Mandibular Class Ⅰ outline form
Maxillary Class Ⅱ outline form
Mandibular Class Ⅱ outline form
Common Error
Outline Form and Initial Depth Ⅱ 
Principles: without any exception 
all friable and/or weakened enamel 
should be removed 
all faults should be included 
all margins should be placed in a 
position to afford good finishing of 
the margins of the restoration.
Outline Form and Initial Depth Ⅲ 
Features: 
preserving cuspal strength 
preserving marginal ridge strength 
minimizing facio-lingual extension 
using enameloplasty 
connecting two close faults or cavities 
restricting the depth of the preparation 
into dentin.
Initial cavity preparation stage 
Step 1 Outline form and initial depth 
Step 2 Primary resistance form 
Step 3 Primary retention form 
Step 4 Convenience form
Primary Resistance Form Ⅰ 
Definition: 
The shape and placement of the cavity 
walls that best enable both the 
restoration and the tooth to withstand, 
without fracture, masticatory forces 
delivered principally in the long axis of 
the the tooth.
Primary Resistance Form Ⅱ 
Principles: 
To utilize the box shape with a relatively 
flat floor to resist occlusal loading by 
virtue of being at right angles to 
mastication force; 
To restrict the extension of the external 
walls (keep as small as possible) to 
allow strong cusp and ridge areas to 
remain with sufficient dentin support;
Primary Resistance Form Ⅲ 
Principles: 
To have a slight rounding of internal 
line angles to reduce stress 
concentration in tooth structure; 
To provide enough thickness of 
restorative material to prevent its 
fracture under load.
Primary Resistance Form Ⅳ 
Feature: 
Box shape 
Relatively flat floors 
Inclusion of weakened tooth structure 
Preservation of cusps and marginal ridges 
Rounded internal line angles 
Adequate thickness of restorative materials 
Reduction of cusps for capping if indicated
Initial cavity preparation stage 
Step 1 Outline form and initial depth 
Step 2 Primary resistance form 
Step 3 Primary retention form 
Step 4 Convenience form
Primary Retention Form Ⅰ 
Definition: 
The shape or form of the prepared 
cavity that resists displacement or 
removal of the restoration from 
tipping or lifting forces. 
In many respects retention and resistance form 
are accomplished in the same cutting procedure.
Primary Retention Form Ⅱ 
Principles: depending on the materials 
Amalgam restoration: 
developing external cavity walls that 
converge occlusally and dovetail design
The devotail design provide retention form 
to the occlusal portion of the cavity. 
The occlusal convergence of the walls offers 
retention in the proximal portion of the cavity 
against displacement occlusally.
Primary Retention Form Ⅲ 
Principles: depending on the materials 
Composite restoration: 
a mechanical bond between the material 
and conditioned, prepared tooth structure.
Initial cavity preparation stage 
Step 1 Outline form and initial depth 
Step 2 Primary resistance form 
Step 3 Primary retention form 
Step 4 Convenience form
Convenience Form Ⅰ 
Conception: 
The shape or form of the cavity that 
provides for adequate observation, 
accessibility, and ease of operation 
in preparing and restoring the cavity.
Convenience Form Ⅱ 
Principles: 
Allow access for caries removal 
Allow access for restoration placement 
Allow access to margins for finishing, 
evaluation and cleaning
Convenience Form
Final cavity preparation stage 
Step 5 Removal of any remaining infected 
dentin if indicated 
Step 6 Pulp protection 
Step 7 Secondary resistance & retention form 
Step 8 Procedure for finishing external walls 
Step 9 Final procedures
Removal of any remaining 
infected dentin if indicated 
Definition: 
The elimination of any infected carious 
tooth structure or faulty restorative 
material left in the tooth after initial 
cavity preparation.
Removal of dentinal caries using round burs and spoon excavators
Final cavity preparation stage 
Step 5 Removal of any remaining infected 
dentin if indicated 
Step 6 Pulp protection 
Step 7 Secondary resistance & retention form 
Step 8 Procedure for finishing external walls 
Step 9 Final procedures
Pulp protection 
Using liners or bases 
to protect the pulp or 
to aid pulpal recovery or both.
Final cavity preparation stage 
Step 5 Removal of any remaining infected 
dentin if indicated 
Step 6 Pulp protection 
Step 7 Secondary resistance & retention form 
Step 8 Procedure for finishing external walls 
Step 9 Final procedures
Secondary resistance and 
retention forms Ⅰ 
Most compound and complex cavity 
preparations require additional 
resistance and retention form. 
The exception being those preparations 
that are very conservative.
Secondary resistance and 
retention forms Ⅱ 
Mechanical forms 
Cavity wall conditioning form
Mechnical form: 
 Proximal locks 
 Proximal slots
Proximal locks
Slot on gingival wall
Final cavity preparation stage 
Step 5 Removal of any remaining infected 
dentin if indicated 
Step 6 Pulp protection 
Step 7 Secondary resistance & retention form 
Step 8 Finishing external walls 
Step 9 Final procedures
Finishing the external walls Ⅰ 
Definition: 
is the further development of a 
specific cavosurface design and 
degree of smoothness that produces 
the maximum effectiveness of the 
restorative material being used.
Finishing the external walls Ⅱ 
Objectives: 
 To create the best marginal seal possible 
between the restorative material and tooth 
structure; 
 To afford a smooth marginal junction; 
 To provide maximum strength of both the 
tooth and the restorative material at and 
near the margin.
The strongest enamel margin is that margin 
which is composed of full-length enamel rods 
that are supported on the cavity side by shorter 
enamel rods, all of which extend to sound dentin.
Finishing the external walls Ⅲ 
The design of the cavosurface angle 
The degree of smoothness of the wall
The design of the cavosurface angle: 
depending on the material 
 amalgam: 90° 
 composite: beveling 30°~ 40°
Final cavity preparation stage 
Step 5 Removal of any remaining infected 
dentin if indicated 
Step 6 Pulp protection 
Step 7 Secondary resistance & retention form 
Step 8 Procedure for finishing external walls 
Step 9 Final procedures
Final procedures 
 cleaning 
 inspecting 
 varnishing 
 conditioning
Program of Operative Treatment 
 Cavity preparation 
 Matrix application 
 Preparation of materials 
 Insertion and carving of materials 
 Finishing and Polishing
Matrix Application 
Tofflemire Matrix System 
Ivory Matrix System
Matrix retainer, Band & Wedge
Matrix in Retainer
Contour Matrix 
Rounded instrument 
such as a spoon 
excavator
Matrix on Tooth
Occlusal View
Wedge place
Contour Band
Ready for restoration
Program of Operative Treatment 
 Cavity preparation 
 Matrix application 
 Preparation of materials 
 Insertion and carving of materials 
 Finishing and Polishing
Armamentarium 
 Amalgam Capsule 
 Amalgamator 
 Squeeze Cloth 
 Amalgam carrier
Activate Mercury
Program of Operative Treatment 
 Cavity preparation 
 Matrix application 
 Preparation of materials 
 Insertion and carving of materials 
 Finishing and Polishing
Insertion and carving 
Class Ⅰ 
Class Ⅱ
Armamentarium 
 Amalgam Condensers 
 Anatomic Burnishers 
 Carves 
— Cleoid or Discoid
Check condenser fit
First increment
Start with the smallest condenser
Step condenser over mass
Continue adding increment
Condense toward walls
Use alternative instruments
Overpacked
Create initial grooves
Carve to margin
Enhance grooves
Remove flash
Final shape and burnishing
Completed restoration
Initial Increment
Initial Condensation
Lateral Condensation
Overpacking
Marginal Ridge Condensation
Condense to Margins
Create Occlusal Embrasure
Occlusal Embrasure
Occlusal Embrasure
Occlusal Embrasure
Removing Ridge
Removing Band
Flash & Excess
Moving Excess
Check with interproximal carve
Instrument on Tooth Structure
Completed Restoration
Rubber dam removal
Program of Operative Treatment 
 Cavity preparation 
 Matrix application 
 Preparation of materials 
 Insertion and carving of materials 
 Finishing and Polishing
Polishing
Evaluate the restoration Class I 
 Verify that cavosurface margin can be seen 
— Flash 
— Underfilled 
— Voids 
 Check the overall shape of the anatomy 
— Look for bulky ridges that might be high 
in occlusion
Evaluate the restoration Class II 
Check proximal contact 
Check flash and overhangs proximally 
Check underfill proximally 
Check outline form
Check Occlusion 
Evaluate carefully with marking paper 
or ribbon in Miller forceps 
 Check gently in centric occlusion 
 Check all excursive movement
Strasbourg
Opretive dentistry

Opretive dentistry

  • 1.
    Operative Dentistry 2 Upload By:Ahmed Ali Abbas Babylon University College of Dentistry Download from theoptimalsmile.wix.com/dentistry
  • 2.
    Definition of OperativeDentistry Operative dentistry is the ART and SCIENCE of the diagnosis, treatment, prognosis of defects of teeth which do not require full coverage restorations for correction.
  • 3.
    Indication of OperativeDentistry  Caries;  Malformed, discolored, or fractured teeth;  Restoration replacement.
  • 4.
    Program of OperativeTreatment  Patient assessment  Examination and diagnosis  Treatment planning  Pain control: local anesthetic  Isolation of the operating field
  • 5.
    Program of OperativeTreatment  Cavity preparation  Matrix application  Preparation of materials  Insertion and carving of materials  Finishing and Polishing
  • 6.
    Cavity Preparation Themechanical alteration of a defective, injured, or diseased tooth in order to best receive a restorative material which will re-establish a healthy state for the tooth including esthetic corrections where indicated, along with normal form and function.
  • 7.
    Cavity Structure walls  angles  cavity
  • 8.
    Classification of cavity  Class I  Class II  Class III  Class IV  Class V  Class VI —G.V.Black in 1908
  • 9.
    Cavity  Simplecavity: only one tooth surface is involved.  Compound cavity: two surfaces are involved.  Complex cavity: three or more surfaces are involved.
  • 10.
  • 11.
    Class 1 Class2 Class 1 Class 2 Class 3 Class 4 Class 5 Class 6
  • 12.
    Stages and Steps in Cavity Preparation Initial cavity preparation stage Final cavity preparation stage
  • 13.
    Initial cavity preparationstage Step 1 Outline form and initial depth Step 2 Primary resistance form Step 3 Primary retention form Step 4 Convenience form
  • 14.
    Final cavity preparationstage Step 5 Removal of any remaining infected dentin if indicated Step 6 Pulp protection Step 7 Secondary resistance & retention form Step 8 Procedure for finishing external walls Step 9 Final procedures
  • 15.
    Initial cavity preparationstage Step 1 Outline form and initial depth Step 2 Primary resistance form Step 3 Primary retention form Step 4 Convenience form
  • 16.
    Outline Form andInitial Depth Ⅰ Definition: placing the cavity margins in the positions they will occupy in the final preparation; preparing an initial depth of 0.2~0.8 mm pulpally of the dentinoenamel junction position or normal root surface position.
  • 17.
    Maxillary Class Ⅰoutline form
  • 18.
  • 19.
    Maxillary Class Ⅱoutline form
  • 20.
  • 21.
  • 23.
    Outline Form andInitial Depth Ⅱ Principles: without any exception all friable and/or weakened enamel should be removed all faults should be included all margins should be placed in a position to afford good finishing of the margins of the restoration.
  • 24.
    Outline Form andInitial Depth Ⅲ Features: preserving cuspal strength preserving marginal ridge strength minimizing facio-lingual extension using enameloplasty connecting two close faults or cavities restricting the depth of the preparation into dentin.
  • 28.
    Initial cavity preparationstage Step 1 Outline form and initial depth Step 2 Primary resistance form Step 3 Primary retention form Step 4 Convenience form
  • 29.
    Primary Resistance FormⅠ Definition: The shape and placement of the cavity walls that best enable both the restoration and the tooth to withstand, without fracture, masticatory forces delivered principally in the long axis of the the tooth.
  • 30.
    Primary Resistance FormⅡ Principles: To utilize the box shape with a relatively flat floor to resist occlusal loading by virtue of being at right angles to mastication force; To restrict the extension of the external walls (keep as small as possible) to allow strong cusp and ridge areas to remain with sufficient dentin support;
  • 31.
    Primary Resistance FormⅢ Principles: To have a slight rounding of internal line angles to reduce stress concentration in tooth structure; To provide enough thickness of restorative material to prevent its fracture under load.
  • 32.
    Primary Resistance FormⅣ Feature: Box shape Relatively flat floors Inclusion of weakened tooth structure Preservation of cusps and marginal ridges Rounded internal line angles Adequate thickness of restorative materials Reduction of cusps for capping if indicated
  • 34.
    Initial cavity preparationstage Step 1 Outline form and initial depth Step 2 Primary resistance form Step 3 Primary retention form Step 4 Convenience form
  • 35.
    Primary Retention FormⅠ Definition: The shape or form of the prepared cavity that resists displacement or removal of the restoration from tipping or lifting forces. In many respects retention and resistance form are accomplished in the same cutting procedure.
  • 36.
    Primary Retention FormⅡ Principles: depending on the materials Amalgam restoration: developing external cavity walls that converge occlusally and dovetail design
  • 37.
    The devotail designprovide retention form to the occlusal portion of the cavity. The occlusal convergence of the walls offers retention in the proximal portion of the cavity against displacement occlusally.
  • 39.
    Primary Retention FormⅢ Principles: depending on the materials Composite restoration: a mechanical bond between the material and conditioned, prepared tooth structure.
  • 41.
    Initial cavity preparationstage Step 1 Outline form and initial depth Step 2 Primary resistance form Step 3 Primary retention form Step 4 Convenience form
  • 42.
    Convenience Form Ⅰ Conception: The shape or form of the cavity that provides for adequate observation, accessibility, and ease of operation in preparing and restoring the cavity.
  • 43.
    Convenience Form Ⅱ Principles: Allow access for caries removal Allow access for restoration placement Allow access to margins for finishing, evaluation and cleaning
  • 44.
  • 45.
    Final cavity preparationstage Step 5 Removal of any remaining infected dentin if indicated Step 6 Pulp protection Step 7 Secondary resistance & retention form Step 8 Procedure for finishing external walls Step 9 Final procedures
  • 46.
    Removal of anyremaining infected dentin if indicated Definition: The elimination of any infected carious tooth structure or faulty restorative material left in the tooth after initial cavity preparation.
  • 47.
    Removal of dentinalcaries using round burs and spoon excavators
  • 48.
    Final cavity preparationstage Step 5 Removal of any remaining infected dentin if indicated Step 6 Pulp protection Step 7 Secondary resistance & retention form Step 8 Procedure for finishing external walls Step 9 Final procedures
  • 49.
    Pulp protection Usingliners or bases to protect the pulp or to aid pulpal recovery or both.
  • 54.
    Final cavity preparationstage Step 5 Removal of any remaining infected dentin if indicated Step 6 Pulp protection Step 7 Secondary resistance & retention form Step 8 Procedure for finishing external walls Step 9 Final procedures
  • 55.
    Secondary resistance and retention forms Ⅰ Most compound and complex cavity preparations require additional resistance and retention form. The exception being those preparations that are very conservative.
  • 56.
    Secondary resistance and retention forms Ⅱ Mechanical forms Cavity wall conditioning form
  • 57.
    Mechnical form: Proximal locks  Proximal slots
  • 58.
  • 61.
  • 62.
    Final cavity preparationstage Step 5 Removal of any remaining infected dentin if indicated Step 6 Pulp protection Step 7 Secondary resistance & retention form Step 8 Finishing external walls Step 9 Final procedures
  • 63.
    Finishing the externalwalls Ⅰ Definition: is the further development of a specific cavosurface design and degree of smoothness that produces the maximum effectiveness of the restorative material being used.
  • 64.
    Finishing the externalwalls Ⅱ Objectives:  To create the best marginal seal possible between the restorative material and tooth structure;  To afford a smooth marginal junction;  To provide maximum strength of both the tooth and the restorative material at and near the margin.
  • 65.
    The strongest enamelmargin is that margin which is composed of full-length enamel rods that are supported on the cavity side by shorter enamel rods, all of which extend to sound dentin.
  • 66.
    Finishing the externalwalls Ⅲ The design of the cavosurface angle The degree of smoothness of the wall
  • 67.
    The design ofthe cavosurface angle: depending on the material  amalgam: 90°  composite: beveling 30°~ 40°
  • 71.
    Final cavity preparationstage Step 5 Removal of any remaining infected dentin if indicated Step 6 Pulp protection Step 7 Secondary resistance & retention form Step 8 Procedure for finishing external walls Step 9 Final procedures
  • 72.
    Final procedures cleaning  inspecting  varnishing  conditioning
  • 75.
    Program of OperativeTreatment  Cavity preparation  Matrix application  Preparation of materials  Insertion and carving of materials  Finishing and Polishing
  • 76.
    Matrix Application TofflemireMatrix System Ivory Matrix System
  • 77.
  • 79.
  • 80.
    Contour Matrix Roundedinstrument such as a spoon excavator
  • 81.
  • 82.
  • 83.
  • 84.
  • 85.
  • 86.
    Program of OperativeTreatment  Cavity preparation  Matrix application  Preparation of materials  Insertion and carving of materials  Finishing and Polishing
  • 87.
    Armamentarium  AmalgamCapsule  Amalgamator  Squeeze Cloth  Amalgam carrier
  • 88.
  • 91.
    Program of OperativeTreatment  Cavity preparation  Matrix application  Preparation of materials  Insertion and carving of materials  Finishing and Polishing
  • 92.
    Insertion and carving Class Ⅰ Class Ⅱ
  • 93.
    Armamentarium  AmalgamCondensers  Anatomic Burnishers  Carves — Cleoid or Discoid
  • 94.
  • 95.
  • 96.
    Start with thesmallest condenser
  • 97.
  • 98.
  • 99.
  • 100.
  • 101.
  • 102.
  • 103.
  • 104.
  • 105.
  • 106.
  • 107.
    Final shape andburnishing
  • 108.
  • 109.
  • 110.
  • 111.
  • 112.
  • 113.
  • 114.
  • 115.
  • 116.
  • 117.
  • 118.
  • 119.
  • 120.
  • 121.
  • 122.
  • 123.
  • 124.
  • 125.
  • 126.
  • 127.
    Program of OperativeTreatment  Cavity preparation  Matrix application  Preparation of materials  Insertion and carving of materials  Finishing and Polishing
  • 128.
  • 129.
    Evaluate the restorationClass I  Verify that cavosurface margin can be seen — Flash — Underfilled — Voids  Check the overall shape of the anatomy — Look for bulky ridges that might be high in occlusion
  • 130.
    Evaluate the restorationClass II Check proximal contact Check flash and overhangs proximally Check underfill proximally Check outline form
  • 131.
    Check Occlusion Evaluatecarefully with marking paper or ribbon in Miller forceps  Check gently in centric occlusion  Check all excursive movement
  • 132.