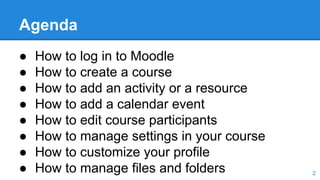
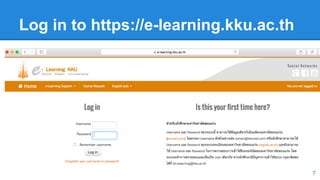
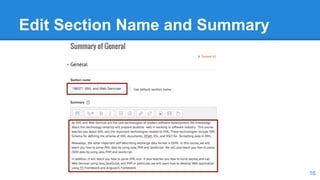
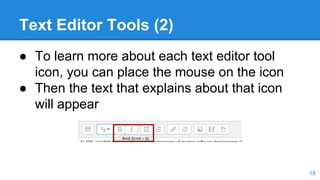
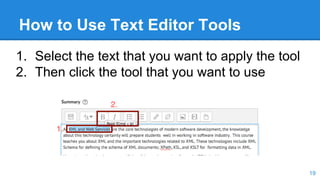
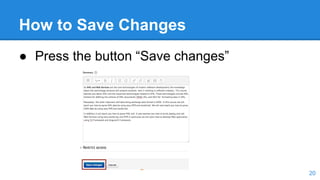
Moodle Basics
Assoc. Prof. Dr. Kanda Runapongsa Saikaew
Asst. Prof. Dr. Pattarawit Polpinit
Department of Computer Engineering,
Khon Kaen University, Thailand
Agenda
● How to log in to Moodle
● How to create a course
● How to add an activity or a resource
● How to add a calendar event
● How to edit course participants
● How to manage settings in your course
● How to customize your profile
● How to manage files and folders 2
E-learning KKU
3
● Use Moodle as a learning platform
What is Moodle?
● MOODLE - Modular Object-Oriented Dynamic Learning
Environment
● CMS - Content Management System
● VLE - Virtual Learning Environment
● Open Source - free
● Open access to world-wide information
● Differentiate learning & accommodate multiple learning
styles
● Create communication & collaboration channels
4
Tools of Moodle
● Calendar & Personal Content
● Resource Tools
○ Files created in Moodle, Office, PDF, and web links
● Activity Tools
○ Online and offline assignments
○ Individual and group
○ Graded and ungraded
5
How to Log in to Moodle
● Go to https://e-learning.kku.ac.th
● Login with the username and password that
you use for your KKU mail account
6
Log in to https://e-learning.kku.ac.th
7
How to create a course
● Click at tab “Course Request” and then fill out the form
8
Fill in the Course Request Form (1)
● Fill in the course id, course full name, course
short name, and course category
9
Fill in the Course Request Form (2)
● Fill in the supporting information and click
button Request a course
10
The Message after Requesting a Course
● After the teacher requests a course, the
teacher will see the notice message
11
The New Course as Requested
12
How to Make a Change
● The layout of a course homepage revolves around the
weeks/topics in the center of the page
● To make a change of the course web, press the icon
“Turn editing on”
13
How to Edit Course Summary
● Press the gear icon at the topmost topic
14
How to Change Section Name
● Uncheck the checkbox “use default section
name” to change the section name
15
Edit Section Name and Summary
16
Text Editor Tools (1)
1. Text Editor Tool Icons
2. If you see the arrow on any icon, you can
click to expand the commands
17
Text Editor Tools (2)
● To learn more about each text editor tool
icon, you can place the mouse on the icon
● Then the text that explains about that icon
will appear
18
How to Use Text Editor Tools
1. Select the text that you want to apply the tool
2. Then click the tool that you want to use
19
How to Save Changes
● Press the button “Save changes”
20
Updated Course Summary
21
How to Edit Topic Summary (1)
● Press the gear icon of the topic
22
How to Edit Topic Summary (2)
23
How to Add an Activity or Resource
● Press menu “Add an activity or resource”
24
Choose an Activity type
● Select the activity
that you want to
choose
● Press the button
“Add”
25
How to Create a Quiz
26
How to Edit Quiz
● Press the button “Edit Quiz”
27
How to Add Questions into a Quiz
● Press the button “Add a question ...”
28
How to Choose Question Type
● Choose Questions
type
● Press the button
“Add”
29
How to Edit Short Answer Question
● Specify question name and question text
30
How to Edit Question Answer
31
How to Save Question Information
● Click the button “Save changes”
32
Sample Short Answer Question
33
How to Add a Resource
● Click menu “Add an activity or resource”
34
Choose a Resource Type
35
Specify Resource Information
36
● Fill in the resource name and description
Area to Upload the File
● Scroll down and then you will find the
content section where you can upload files
37
Upload the file to the Server
● Drag and drop the file to the e-learning
system
38
Successfully Uploaded File
39
● You will now see the icon of the uploaded
file
Save Changes and Display
● After you make any change, you should click
the button to save the change
40
Resource Section
● Resource section
41
Move a Resource or an Activity (1)
● We can move a resource or an activity by
pressing the bullet in front of the resource or
activity
42
Move a Resource or an Activity (2)
● Place the resource where you want it to be
43
Move a Resource or an Activity (3)
● The resource has moved to where you want
it to be
44
How to Create an Assignment
● Choose menu “Add an activity or a resource”
45
Select Activity Type as Assignment
● Select activity type
as “Assignment”
● Click button “Add”
46
Specify Assignment Information
● Specify assignment name and description
47
Specify Assignment Dates
● Specify available date, due date, and cut-off date
48
Save Changes of the Assignment
49
Assignment Information
50
Resources or Activities in a Topic
51
Agenda
● How to log in to Moodle
● How to create a course
● How to add an activity or a resource
● How to add a calendar event
● How to edit roster associations
● How to manage settings in your course
● How to customize your profile
● How to manage files and folders 52
How to Add a Calendar Event
● Go to block “Upcoming Events”
● Click Add Event
53
Create a New Event
54
Edit the Calendar Event
● Modify the event by clicking at the gear icon
55
Upcoming Events Block
● Upcoming Events block display only about
upcoming events within 3 weeks
56
Add a New Block
● In the block “Add a Block”, select the block
type that you want to add
57
A New Calendar Block
● A new calendar block which displays all
events in each month
58
Course Participants Users
● Usually the Institute of Learning and
Innovation Technology at KKU will add
course participant users for all KKU courses
● However, the teacher can also add, modify,
or delete course users
59
How to Edit Course Participants
● Click at menu “Participants” in the block
“Navigation”
60
Choose User Type & Find User
● Choose User Type
● Find User by using
email
● Then press button
“Search”
61
Enrol users
● Press button “Enrol” to enrol the found user
● Press button “Finish enrolling users”
62
List of Enrolled Users
63
How to Manage Settings
● Go to block Administration
64
Edit Course Settings
65
Please Remember to Save Changes
66
How to Edit User Profile
● Go to the block
“Administration”
● Expand the section
“My profile settings”
67
How to Edit User Profile
● Choose menu “Edit profile”
68
Edit User Profile
69
Save Changes in User Profile
● Press button “Update profile” to save changes
70
How to Navigate in Moodle
● Go to the block
“Navigation”
● Click menu “My
courses”
71
How to Go to a Specific Course
● Click at menu
of the targeted course
72
How to Manage Files and Folders
● Add the block “My
private files”
73
Go to menu to Handle Files
● In block “My private files”, click menu
“manage my private files...”
74
Manage Files Menu
● Click menu to add a file
75
Add a File on Dropbox
● If you have files on Dropbox, you can add a
file on Dropbox
76
Add a File on Google Drive
● If you have a file on Google Drive, you can
add a file on Google Drive
77
Create a New Folder (1)
● Click the icon to create a new folder
78
Create a New Folder (2)
● Specify folder name
79
Upload a File
● You can upload a file on your computer
80
Uploaded File in the Created Folder
● Uploaded file in the created folder
81
Conclusions
● You have learned how to log in, create a
course, add a resource, add an activity,
create an assignment, create an event, edit
course settings, edit user profile, and
manage files and folders
● In practices, we have used Moodle with
Google Apps and Facebook
82
References
http://moodle.wisc.edu/moodle-basics/
83
Thank You
● Asst. Prof. Dr. Kanda Runapongsa Saikaew
Email: krunapon@kku.ac.th
Web: http://gear.kku.ac.th/~krunapon
● Asst. Prof. Dr. Pattarawit Polpinit
Email: polpinit@kku.ac.th
Web: http://gear.kku.ac.th/~polpinit
84

Moodle basics

  • 1.
    Moodle Basics Assoc. Prof.Dr. Kanda Runapongsa Saikaew Asst. Prof. Dr. Pattarawit Polpinit Department of Computer Engineering, Khon Kaen University, Thailand
  • 2.
    Agenda ● How tolog in to Moodle ● How to create a course ● How to add an activity or a resource ● How to add a calendar event ● How to edit course participants ● How to manage settings in your course ● How to customize your profile ● How to manage files and folders 2
  • 3.
    E-learning KKU 3 ● UseMoodle as a learning platform
  • 4.
    What is Moodle? ●MOODLE - Modular Object-Oriented Dynamic Learning Environment ● CMS - Content Management System ● VLE - Virtual Learning Environment ● Open Source - free ● Open access to world-wide information ● Differentiate learning & accommodate multiple learning styles ● Create communication & collaboration channels 4
  • 5.
    Tools of Moodle ●Calendar & Personal Content ● Resource Tools ○ Files created in Moodle, Office, PDF, and web links ● Activity Tools ○ Online and offline assignments ○ Individual and group ○ Graded and ungraded 5
  • 6.
    How to Login to Moodle ● Go to https://e-learning.kku.ac.th ● Login with the username and password that you use for your KKU mail account 6
  • 7.
    Log in tohttps://e-learning.kku.ac.th 7
  • 8.
    How to createa course ● Click at tab “Course Request” and then fill out the form 8
  • 9.
    Fill in theCourse Request Form (1) ● Fill in the course id, course full name, course short name, and course category 9
  • 10.
    Fill in theCourse Request Form (2) ● Fill in the supporting information and click button Request a course 10
  • 11.
    The Message afterRequesting a Course ● After the teacher requests a course, the teacher will see the notice message 11
  • 12.
    The New Courseas Requested 12
  • 13.
    How to Makea Change ● The layout of a course homepage revolves around the weeks/topics in the center of the page ● To make a change of the course web, press the icon “Turn editing on” 13
  • 14.
    How to EditCourse Summary ● Press the gear icon at the topmost topic 14
  • 15.
    How to ChangeSection Name ● Uncheck the checkbox “use default section name” to change the section name 15
  • 16.
    Edit Section Nameand Summary 16
  • 17.
    Text Editor Tools(1) 1. Text Editor Tool Icons 2. If you see the arrow on any icon, you can click to expand the commands 17
  • 18.
    Text Editor Tools(2) ● To learn more about each text editor tool icon, you can place the mouse on the icon ● Then the text that explains about that icon will appear 18
  • 19.
    How to UseText Editor Tools 1. Select the text that you want to apply the tool 2. Then click the tool that you want to use 19
  • 20.
    How to SaveChanges ● Press the button “Save changes” 20
  • 21.
  • 22.
    How to EditTopic Summary (1) ● Press the gear icon of the topic 22
  • 23.
    How to EditTopic Summary (2) 23
  • 24.
    How to Addan Activity or Resource ● Press menu “Add an activity or resource” 24
  • 25.
    Choose an Activitytype ● Select the activity that you want to choose ● Press the button “Add” 25
  • 26.
    How to Createa Quiz 26
  • 27.
    How to EditQuiz ● Press the button “Edit Quiz” 27
  • 28.
    How to AddQuestions into a Quiz ● Press the button “Add a question ...” 28
  • 29.
    How to ChooseQuestion Type ● Choose Questions type ● Press the button “Add” 29
  • 30.
    How to EditShort Answer Question ● Specify question name and question text 30
  • 31.
    How to EditQuestion Answer 31
  • 32.
    How to SaveQuestion Information ● Click the button “Save changes” 32
  • 33.
  • 34.
    How to Adda Resource ● Click menu “Add an activity or resource” 34
  • 35.
  • 36.
    Specify Resource Information 36 ●Fill in the resource name and description
  • 37.
    Area to Uploadthe File ● Scroll down and then you will find the content section where you can upload files 37
  • 38.
    Upload the fileto the Server ● Drag and drop the file to the e-learning system 38
  • 39.
    Successfully Uploaded File 39 ●You will now see the icon of the uploaded file
  • 40.
    Save Changes andDisplay ● After you make any change, you should click the button to save the change 40
  • 41.
  • 42.
    Move a Resourceor an Activity (1) ● We can move a resource or an activity by pressing the bullet in front of the resource or activity 42
  • 43.
    Move a Resourceor an Activity (2) ● Place the resource where you want it to be 43
  • 44.
    Move a Resourceor an Activity (3) ● The resource has moved to where you want it to be 44
  • 45.
    How to Createan Assignment ● Choose menu “Add an activity or a resource” 45
  • 46.
    Select Activity Typeas Assignment ● Select activity type as “Assignment” ● Click button “Add” 46
  • 47.
    Specify Assignment Information ●Specify assignment name and description 47
  • 48.
    Specify Assignment Dates ●Specify available date, due date, and cut-off date 48
  • 49.
    Save Changes ofthe Assignment 49
  • 50.
  • 51.
  • 52.
    Agenda ● How tolog in to Moodle ● How to create a course ● How to add an activity or a resource ● How to add a calendar event ● How to edit roster associations ● How to manage settings in your course ● How to customize your profile ● How to manage files and folders 52
  • 53.
    How to Adda Calendar Event ● Go to block “Upcoming Events” ● Click Add Event 53
  • 54.
    Create a NewEvent 54
  • 55.
    Edit the CalendarEvent ● Modify the event by clicking at the gear icon 55
  • 56.
    Upcoming Events Block ●Upcoming Events block display only about upcoming events within 3 weeks 56
  • 57.
    Add a NewBlock ● In the block “Add a Block”, select the block type that you want to add 57
  • 58.
    A New CalendarBlock ● A new calendar block which displays all events in each month 58
  • 59.
    Course Participants Users ●Usually the Institute of Learning and Innovation Technology at KKU will add course participant users for all KKU courses ● However, the teacher can also add, modify, or delete course users 59
  • 60.
    How to EditCourse Participants ● Click at menu “Participants” in the block “Navigation” 60
  • 61.
    Choose User Type& Find User ● Choose User Type ● Find User by using email ● Then press button “Search” 61
  • 62.
    Enrol users ● Pressbutton “Enrol” to enrol the found user ● Press button “Finish enrolling users” 62
  • 63.
  • 64.
    How to ManageSettings ● Go to block Administration 64
  • 65.
  • 66.
    Please Remember toSave Changes 66
  • 67.
    How to EditUser Profile ● Go to the block “Administration” ● Expand the section “My profile settings” 67
  • 68.
    How to EditUser Profile ● Choose menu “Edit profile” 68
  • 69.
  • 70.
    Save Changes inUser Profile ● Press button “Update profile” to save changes 70
  • 71.
    How to Navigatein Moodle ● Go to the block “Navigation” ● Click menu “My courses” 71
  • 72.
    How to Goto a Specific Course ● Click at menu of the targeted course 72
  • 73.
    How to ManageFiles and Folders ● Add the block “My private files” 73
  • 74.
    Go to menuto Handle Files ● In block “My private files”, click menu “manage my private files...” 74
  • 75.
    Manage Files Menu ●Click menu to add a file 75
  • 76.
    Add a Fileon Dropbox ● If you have files on Dropbox, you can add a file on Dropbox 76
  • 77.
    Add a Fileon Google Drive ● If you have a file on Google Drive, you can add a file on Google Drive 77
  • 78.
    Create a NewFolder (1) ● Click the icon to create a new folder 78
  • 79.
    Create a NewFolder (2) ● Specify folder name 79
  • 80.
    Upload a File ●You can upload a file on your computer 80
  • 81.
    Uploaded File inthe Created Folder ● Uploaded file in the created folder 81
  • 82.
    Conclusions ● You havelearned how to log in, create a course, add a resource, add an activity, create an assignment, create an event, edit course settings, edit user profile, and manage files and folders ● In practices, we have used Moodle with Google Apps and Facebook 82
  • 83.
  • 84.
    Thank You ● Asst.Prof. Dr. Kanda Runapongsa Saikaew Email: krunapon@kku.ac.th Web: http://gear.kku.ac.th/~krunapon ● Asst. Prof. Dr. Pattarawit Polpinit Email: polpinit@kku.ac.th Web: http://gear.kku.ac.th/~polpinit 84