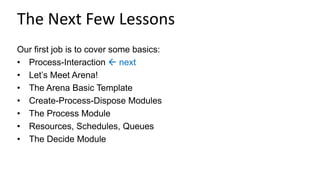
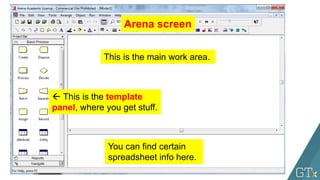
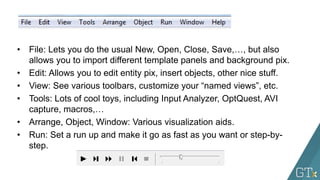
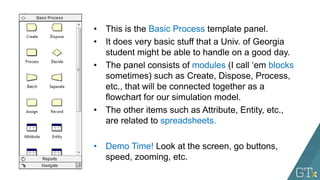
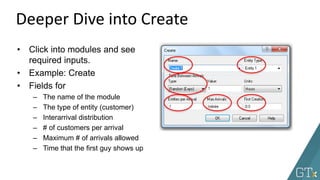
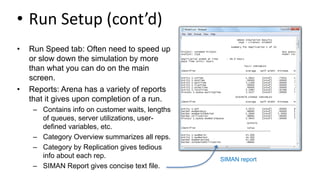
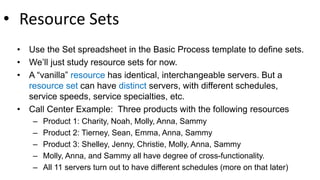
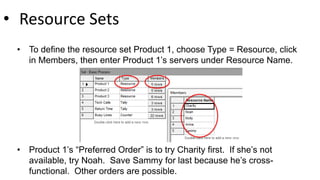
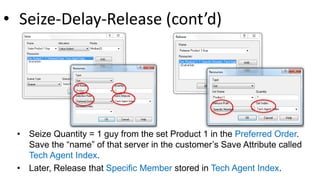
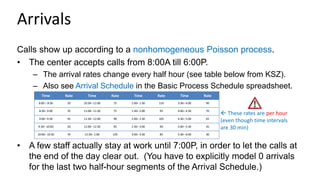
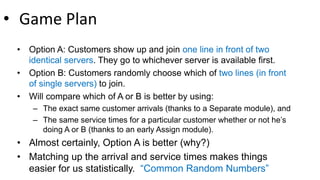
Computer Simulation
Module 5: Arena
Dave Goldsman, Ph.D.
Introduction
Stewart School of Industrial and Systems Engineering
Professor
Last Module: We looked at general
principles behind simulation
languages. How do they work?
This Module: We’ll learn about
Arena, a popular simulation
language.
Idea: Go through a series of
tutorials that will allow you to
fearlessly simulate real-world
systems.
Module Overview
More Overview
This module is built on numerous
mini-tutorials.
Many will be self-contained and
will focus on a specific topic…
…Yet the tutorials are organized
in groups that build to a common
goal (e.g., a non-trivial demo).
Each lesson contains written
notes, but you must WATCH the
videos to see the “live” stuff.
I Gotta Have More
Overview!
.
Rough Groupings of Topics:
A. Introductory material  now
B. Modeling multi-channel systems
C. Building to a call center model
D. Some demos on interesting
miscellaneous models
Pre-Show Notes…
• Arena is easy, but if it’s not your
cup of tea (whatever reason),…
• …There are many other
simulation languages around.
• Arena is a good choice to enable
you to learn those languages.
• In any case, we’ll do lots of
examples from which you may
find useful applications.
The Next Few Lessons
Our first job is to cover some basics:
• Process-Interaction  next
• Let’s Meet Arena!
• The Arena Basic Template
• Create-Process-Dispose Modules
• The Process Module
• Resources, Schedules, Queues
• The Decide Module
This Time: Discussed what’s
coming up in this module on the
Arena computer simulation
language.
Next Time: A brief review of the
Process-Interaction modeling
approach. We’ll use this to get our
subsequent terminology straight
and to re-introduce P-I.
Summary
Computer Simulation
Module 5: Arena
Dave Goldsman, Ph.D.
Process-Interaction Review
Stewart School of Industrial and Systems Engineering
Professor
Last Lesson: We simply discussed
what’s coming up in this Arena
module.
This Lesson: A quick review of the
Process-Interaction approach that
Arena uses.
Idea: It’s just a flowchart!
Lesson Overview
Process-Interaction
• Consider a generic customer
(entity) and the sequence of
events and activities
(processes) it undergoes as it
moves through the system.
• At any time, the system may
have many entities
interacting with each other as
they compete for resources.
• Arena takes this process-
interaction “world view.”
P-I (cont’d)
• The entities flow through a
network of modules (blocks) that
describe their behavior.
• The network can be represented
as a process flowchart.
• Example: People show up at the
barber, get served (maybe after
waiting in line), and then leave.
• In Arena:
– Create (generate cust arrivals)
– Process (use the barber)
– Dispose (outta here)
Generate arrivals Get Haircut Outta here!
Wait in line
If It Quacks Like a Flowchart…
This Time: Talked about the Process-
Interaction modeling approach and
how it relates to Arena.
Next Time: A first look at Arena. How
to get it, and a sneak peak.
Summary
Computer Simulation
Module 5: Arena
Dave Goldsman, Ph.D.
Let’s Meet Arena!
Stewart School of Industrial and Systems Engineering
Professor
Last Lesson: Reviewed the
Process-Interaction approach. This
is what Arena uses.
This Lesson: Let’s finally meet
Arena!
We’ll show how to get the software,
and then take a first look.
Lesson Overview
• Easy to download and install free student version of Arena.
• https://www.arenasimulation.com/academic/students
• This is a Windows product.
• If you’re indeed using Windows, then there is certain Arena stuff
you’ll occasionally use that’s stored deep down in a “Rockwell
Software” directory (don’t worry about this for now).
• If you don’t have Windows, it ain’t a problem…
• You can also use Arena via the Georgia Tech virtual labs.
• Or you can really be nerdy and partition your disk to use a
Windows OS.
Getting Arena
Start Me Up! Arena screen
This is the main work area.
 This is the template
panel, where you get stuff.
You can find certain
spreadsheet info here.
• File: Lets you do the usual New, Open, Close, Save,…, but also
allows you to import different template panels and background pix.
• Edit: Allows you to edit entity pix, insert objects, other nice stuff.
• View: See various toolbars, customize your “named views”, etc.
• Tools: Lots of cool toys, including Input Analyzer, OptQuest, AVI
capture, macros,…
• Arrange, Object, Window: Various visualization aids.
• Run: Set a run up and make it go as fast as you want or step-by-
step.
• This is the Basic Process template panel.
• It does very basic stuff that a Univ. of Georgia
student might be able to handle on a good day.
• The panel consists of modules (I call ‘em blocks
sometimes) such as Create, Dispose, Process,
etc., that will be connected together as a
flowchart for our simulation model.
• The other items such as Attribute, Entity, etc.,
are related to spreadsheets.
• Demo Time! Look at the screen, go buttons,
speed, zooming, etc.
This Time: Finally got to meet
Arena! We downloaded Arena
and then reviewed what the main
screen looks like.
Next Time: We’ll look at the Basic
Process template in more detail.
The components of this template
will allow us to put together our
first simulations.
Summary
Computer Simulation
Module 5: Arena
Dave Goldsman, Ph.D.
Basic Process Template
Stewart School of Industrial and Systems Engineering
Professor
Last Lesson: We were introduced
to Arena and went on our first
date with it.
This Lesson: We’ll look at the
Basic Process template in some
detail. The items from this
template will allow us to put
together our initial simulations.
Idea: Click and drag items to
build the simulation.
Lesson Overview
• This is the top half of the Basic Process panel.
• It does very basic stuff that a Univ. of Georgia
student might be able to handle on a good day.
• More-advanced templates available for non-
UGA students: File > Template Panel > Attach
• The panel consists of modules such as Create,
Dispose, Process, etc., that will be connected
together as a flowchart representation for our
simulation model.
• Example: Create generates customer arrivals.
• You’ll drag these modules over to the work area
to build the flowchart, fill in some numbers, and
then hit the go button to run the simulation.
• This is bottom half of the Basic Process panel.
• These items such as Attribute, Entity, etc., are
spreadsheets that are both informational and
which will allow us to change certain system
parameters.
• Example: The Variable spreadsheet defines
global quantities such as WIP that are updated
as the simulation progresses. Resource keeps
track of the names and capacities of the different
resources (servers).
• Demo Time! Look at a couple of modules and
spreadsheets. Load a new template. Build a
model.
This Time: Reviewed the modules
and spreadsheets available on the
Basic Process template.
Next Time: We’ll learn about the
Create, Process, and Dispose
modules, and then build our first
official simulation.
Summary
Computer Simulation
Module 5: Arena
Dave Goldsman, Ph.D.
Create-Process-Dispose
Modules
Stewart School of Industrial and Systems Engineering
Professor
Last Lesson: Learned about the
Basic Process template.
This Lesson: We’ll discuss the
Create, Process, and Dispose
modules, and then build our first
official simulation.
Idea: The modules are easy, but it
turns out that there’s a lot going
on inside of them.
Lesson Overview
• Create: Periodically generate
customer arrivals.
• Process: Have work performed
on the customers; maybe have
to wait in line.
• Dispose: Customers leave the
system after service.
• Fun Facts:
– “Dispose” is called “Terminate”
in the language GPSS
– “Send to Die” in Automod.
Create-Process-Dispose
• Drag and drop from template.
• Modules (usually) connect
automatically.
• Connects are “instantaneous”
for customers.
• Hit “go” and see guys move…
• …But customers don’t look
good and no lines form. Be
patient and see demos.
How to Use
• Click into modules and see
required inputs.
• Example: Create
• Fields for
– The name of the module
– The type of entity (customer)
– Interarrival distribution
– # of customers per arrival
– Maximum # of arrivals allowed
– Time that the first guy shows up
Deeper Dive into Create
• Process module has fields for
– The name of the module
– Type of action. This is where you
can try to reserve a server or
free a server who’s currently in
use. More on this in next lesson.
– How long will you be delayed?
I.e., what is the service time?
• Dispose module
– Nothing deep here – you just get
rid of entities.
– You can name the module.
Process and Dispose Modules
• Create-Process-Dispose
• Connecting the modules
• Go over input fields
• Expressions and Build
Expression
• CONT and DISC functions
• Some other Arena-defined
functions
Demo Time!
This Time: Discussed aspects of the
Basic Process template’s Create-
Process-Dispose modules.
Next Time: Deep dive on the
Process module. It does a lot more
than you may think!
Summary
Computer Simulation
Module 5: Arena
Dave Goldsman, Ph.D.
Details on the Process
Module
Stewart School of Industrial and Systems Engineering
Professor
Last Lesson: Learned about the
Create-Process-Dispose modules.
This Lesson: We’ll learn more
goodies about the Process module.
Idea: It allows you to grab servers,
use them, and then let them go for
the next guy to use. And along the
way, it automatically sets up a
queue!
Lesson Overview
Seize-Delay-Release
You’ll take one of the following “actions” in the Process module:
• Delay: Spend time in the Process (self-service).
• Seize-Delay-Release: Grab at least one resource (server), spend
time getting served, and then free the server for the next customer.
If you Seize and the server isn’t available, you may have to wait in
a queue.
• Seize-Delay: Grab at least one resource and spend time getting
served. Remember to Release the server sometime later, else he
gets deadlocked and a giant line will form!
• Delay-Release: Use a previously Seize’d server for a while, and
then free him for the next guy to use.
www.youtube.com/watch?v=eAyVgPtC5Zc
Resource Dialog Box
If you do a Seize or Release, a dialog box pops up asking which and
how many resource(s) you want to Add (Seize) or Delete (Release).
Resource Dialog Box (cont’d)
Example:
• A customer walks into the Process
module, and does a Seize-Delay-
Release to grab and use one unit of
the resource Barber.
• Hit the Add button, name the resource
Barber, and set Quantity = 1.
• The Process is given a default name
of “Process 1” and includes the
resource as well as the default queue
“Process 1.Queue” (talk about later).
• Process = Resource + Queue
Resource Dialog Box (cont’d)
Slightly Different Example: Now every
customer uses TWO barbers. (They
all have lots of flowing locks like your
gentle teacher). How to do?
• Set Quantity = 2 in Add or Edit box.
• Distinction: There may be 5
barbers in the store, but each
customer needs exactly 2 of them.
We’ll show in the next lesson how
to use the Resource Spreadsheet
to set the Barber’s “capacity” to 5.
• Different permutations of Seize-
Delay-Release
• Notice that a queue magically
pops up!
• Multiple resources
• Warning about deadlocks
Demo Time!
This Time: Learned lots more about
the Process module, including the
Seize-Delay-Release sequence
and the associated queue that
magically gets set up.
Next Time: We’ll finally take a look
at some Arena spreadsheets:
Resource, Schedule, and Queue.
Summary
Computer Simulation
Module 5: Arena
Dave Goldsman, Ph.D.
Resource, Schedule, and
Queue Spreadsheets
Stewart School of Industrial and Systems Engineering
Professor
Last Lesson: Talked about the
Seize-Delay-Release functionality
of the Process module – how do
you reserve and use servers?
This Lesson: Now it’s time to look
at some of those spreadsheets you
may have noticed.
You can change resource
capacities, the types of queues,
etc.
Lesson Overview
Resource Spreadsheet
Click on the spreadsheet in the Basic Process template, and you get a
list of the resources that the model is using (at the bottom of the screen).
• Example: Two resources, Barber and Pedicurist. The resource Barber has fixed
capacity 4 (four barbers on duty); there’s only 1 Pedicurist.
• Reminder: Capacity is the number of the resource’s servers on duty, not necessarily
the number of the servers that a customer requests.
• Note: A resource’s servers are regarded as identical and interchangeable.
• The resources are automatically sent to the spreadsheet when we define them in the
Process module. Or, we can just double-click a new row and define a resource right
there in the spreadsheet.
• Can change fixed capacity, or make a schedule that varies the capacity over time.
Schedule Spreadsheet
Can set schedules for servers.
• Example: Go to the Resource Spreadsheet and change the Type to “Based on
Schedule”. The dialog box will change slightly to accommodate a schedule name
(which we’ve called “Barber Sched”).
• Now go over to the Schedule Spreadsheet and you’ll see that Barber Sched is already
there, waiting for your input.
• The key is to enter stuff into the “Durations” box.
Schedule Spreadsheet
Can set schedules for arrivals.
• Example: Go to a Create module and change the
Type to “Schedule”. The dialog box will change
slightly to accommodate a schedule name (which
we’ve called “Arrival Sched”).
• Now go over to the Schedule Spreadsheet and
you’ll see that Arrival Sched is already there,
waiting for your input.
• We’ll see in the demo how to enter stuff into the
“Durations” box.
• Resource Spreadsheet
• Resource and Arrival Schedules
• Queue Spreadsheet
• Resource Animation
• Queue Animations
Demo Time!
This Time: Discussed the Resource,
Schedule, and Queue Spreadsheets,
along with some of their
ramifications.
Next Time: We’ll discuss the Decide
module, which allows us to make
probabilistic and conditional
decisions that affect the entities’
paths through the model.
Summary
Computer Simulation
Module 5: Arena
Dave Goldsman, Ph.D.
The Decide Module
Stewart School of Industrial and Systems Engineering
Professor
Last Lesson: The Resource,
Schedule, Queue Spreadsheets
This Lesson: The Decide module,
which allows customers to make
probabilistic and conditional
choices about their paths.
Idea: A flexible module enabling
you to go this way and that way!
www.youtube.com/watch?v=z4uWfs3sH7s
Lesson Overview
Decide Module
• When an entity gets to a Decide
module, he can…
– Randomly go to either of two locations
(“2-way by Chance”) (probabilities are
given in percentages)
– Randomly go to any of various
locations (“N-way by Chance”)
– Go to either of two locations if a
condition is satisfied (“2-way by
Condition”)
– Go to any of various locations if a
condition is satisfied (“N-way by
Condition”)
• Decide Module
• Example: Go to Process 2 with prob 0.75, and Process 3 w.p. 0.25.
• Demo Time!
75% this way
25% this way
This Time: The Decide module,
which gives customers lots of
choices about moving through the
model.
Next Time: The Assign module,
which allows us to give values to
attributes and variables, and even
assign graphics to entities.
Summary
Computer Simulation
Module 5: Arena
Dave Goldsman, Ph.D.
The Assign Module
Stewart School of Industrial and Systems Engineering
Professor
Last Lesson: The Decide module,
which makes probabilistic and
conditional decisions about where
customers go.
This Time: The Assign module,
which allows us to give values to
attributes and variables, and even
assign graphics to entities.
Idea: Very power, general tool.
Lesson Overview
The Next Few Lessons
Cover material that’ll eventually allow us
to simulate multi-channel customer flows:
• The Assign Module  now
• Attribute, Variable, Entity
Spreadsheets
• Arena Internal Variables
• Displaying Stuff
• Batch, Separate, Record
• Run Setup and Control
• Two-Channel Mfg Example
Attributes
Each customer passing through the
system has various properties
(attributes).
• Tom is 6’ tall, weighs 160 lbs, loves
baseball, and has LDL cholesterol = 108.
• Justin B. is 4’11” tall, weighs 280 lbs,
loves eating lard, and has LDL = 543.
• Both guys have 4 attributes, though other
guys may have different numbers of
attributes.
• Attributes need to be numerical; for
example, BB = 11 and lard = 28.
Variables
• Unlike attributes, whose values
are specific to each customer,
variables are global.
• If you change a variable
anyplace in the Arena program,
it gets changed everywhere.
• Example: WIP might be
incremented when an entity is
Create’d, and decremented if
it’s Dispose’d – these events
could occur anywhere.
• Assign Module
• So how can you change attributes, variables, and other stuff?
• Use the very powerful and flexible Assign module.
This customer has
a weight of 160 lbs
• Use of Assign for attributes and
variables
• Use of Assign for entity pictures
• Using Decide and Assign
together
Demo Time!
This Time: Talked about Attributes,
Variables, and then the Assign
module.
Next Time: The Attribute, Variable,
and Entity Spreadsheets.
Summary
Computer Simulation
Module 5: Arena
Dave Goldsman, Ph.D.
Attribute, Variable, and Entity
Spreadsheets
Stewart School of Industrial and Systems Engineering
Professor
Last Lesson: Discussed the Assign
module, and how it can be used to
(i) give values to attributes and
variables, and (ii) change entity
graphics.
This Lesson: The Attribute,
Variable, and Entity spreadsheets.
Lesson Overview
• Spreadsheets
• The Attribute Spreadsheet keeps track of existing attributes that you
might define in an Assign.
• Can make your own (double click).
• Can be vectorized.
• Variable Spreadsheet pretty much the same.
• Entity Spreadsheet allows you to set initial picture.
• Demo Time!
This Time: Easy discussion about
the Attribute, Variable, and Entity
Spreadsheets.
Next Time: We’ll discuss a few Arena
“internal” variables that are
automatically calculated as the
simulation proceeds. These have a
great variety of uses.
Summary
Computer Simulation
Module 5: Arena
Dave Goldsman, Ph.D.
Arena Internal Variables
Stewart School of Industrial and Systems Engineering
Professor
Last Lesson: The Attribute,
Variable, and Entity Spreadsheets.
This Lesson: Talk about Arena’s so-
called “internal” variables that are
automatically calculated as the
simulation proceeds.
Idea: Incredibly useful. Help you
make decisions based on the
simulation’s current state.
Lesson Overview
• Internal Variables
• Dirty Little Secret: Arena keeps track of and continuously updates
lots of stuff as the simulation runs.
• Good for making decisions, drawing graphs, etc.
• Examples:
– TNOW = current simulated time
– NR(Barber) = # of resource Barber’s servers now working
– NQ(Process 1.Queue) = # customers in that queue
– Create 1.NumberOut = # of customers who have so far left the module named
Create 1
• Huge list is available if you sniff around Build Expression.
• Demo Time! Go to the shortest line.
This Time: Introduced internal
variables such as TNOW, NR(), etc.
They’re constantly updated and
provide lots of relevant info.
Next Time: How to display variables,
graphs, and results.
Summary
Computer Simulation
Module 5: Arena
Dave Goldsman, Ph.D.
Displaying Variables, Graphs,
and Results
Stewart School of Industrial and Systems Engineering
Professor
Last Lesson: Talked about some
useful internal variables that Arena
constantly updates.
This Lesson: How can we display
the values of certain variables in
real time, construct graphs, and
produce output result files?
Lesson Overview
• Getting Information
• How to display information as the simulation is running?
– Arena provides lots of capability.
– For example, consider the toolbar...
– You can get an analog or digital clock.
– Calendar
– Variable displays, which keep track of the values of variables in real time.
– Histograms
– Graphs
• When the simulation is over, it will automatically generate an
output report giving info on server usage, queue length, customer
waits and cycle times, and other user-defined quantities.
• Demo time, including drill press example!
This Time: Discussed ways to display
the values of certain variables in real
time, construct graphs, and produce
output files.
Next Time: A quick tutorial on the
Batch, Separate, and Record
modules.
Summary
Computer Simulation
Module 5: Arena
Dave Goldsman, Ph.D.
Batch, Separate, and Record
Modules
Stewart School of Industrial and Systems Engineering
Professor
Last Lesson: Looked at a bunch of
ways to obtain information during
and after the run – e.g., histograms,
graphs, output reports.
This Lesson: Discuss the Batch,
Separate, and Record modules.
These are the last modules for the
Basic Process template… We’re
making good progress!
Lesson Overview
• Batch Module
• Combine (“batch”) multiple customers into
one “super”-customer.
• Batch Size = 3 accumulates 3 guys before
sending off the super-customer.
• If info about the individual customers in a
batch won’t be needed later on, then
choose Type = Permanent.
• But if you want eventually to reconstitute
the original members, set Type =
Temporary.
• Temporary batches will need to be split
before being Dispose’d (keep watching).
• Separate Module
• Duplicate a single entity, or split
multiple entities that had been
combined in a Batch module.
• If dealing with a Permanent batch,
usually use Duplicate Original to get
several customers all with the same
attributes.
• If dealing with a Temporary batch,
use Split Existing Batch to
reproduce customers with original
attributes.
Record Module
• Collect statistics when an entity
passes through the module.
• We’ll talk more about this module
as we encounter it in future
examples.
• Demo Time! Now we’ll look at a
couple of permutations of the
Batch and Separate modules.
This Time: Finished off the Basic
Resources template with the Batch,
Separate, and Record modules.
Next Time: We’ll look at a bunch of
Run Setup and other control
functionalities.
Summary
Computer Simulation
Module 5: Arena
Dave Goldsman, Ph.D.
Run Setup and Control
Stewart School of Industrial and Systems Engineering
Professor
Last Lesson: Finished off the Basic
Resources template with the Batch,
Separate, and Record modules.
This Lesson: We’ll be looking at a
bunch of easy little trivia points to
help you get your simulation runs
going efficiently.
Lesson Overview
• Run Setup
Run > Setup gives you lots of stuff.
• Replication Parameters tab
– Number of Reps: # of indep runs.
– Initialize Between Reps: Do you start
the stats collection and/or system state
from scratch for each replication?
– Warm-up Period: How long to run
before you start keeping data.
– Rep Length: How long each run is.
– Terminating Condition: Any special
ways to stop the simulation (besides
rep length condition from this tab or
max arrivals from Create module)?
• Run Setup (cont’d)
• Run Speed tab: Often need to speed up
or slow down the simulation by more
than what you can do on the main
screen.
• Reports: Arena has a variety of reports
that it gives upon completion of a run.
– Contains info on customer waits, lengths
of queues, server utilizations, user-
defined variables, etc.
– Category Overview summarizes all reps.
– Category by Replication gives tedious
info about each rep.
– SIMAN Report gives concise text file.
SIMAN report
Run > Setup > Run Control gives
a variety of ways that you can
run the simulation.
Example: Batch mode, which
turns off all graphics and result in
extremely fast runs.
Demo Time! Let’s…
• Look at some reports.
• Stop the simulation the first
time the queue size hits 4.
Run Control
This Time: Learned how to do
various setup and run control
tasks. For instance, we heard
about independent reps, run
termination from the setup
menu, and output reports.
Next Time: A small case study
for a two-channel manufacturing
system, where we put a lot of
the previous material together.
Summary
Computer Simulation
Module 5: Arena
Dave Goldsman, Ph.D.
Simple Two-Channel
Manufacturing Example
Stewart School of Industrial and Systems Engineering
Professor
Last Lesson: Discussed various
various run setup and control
tasks. E.g., how to implement
indep reps, run speed, reports.
This Lesson: Demo a two-
channel manufacturing system,
where we finally put a lot of the
previous material together.
Watch how we use attributes!
Lesson Overview
• The Story
• This is Model 4-1 “An Electronic Assembly and Test System” from the
KSZ (2015) text, Simulation with Arena.
• Two different arrival streams
– Type A parts show up 1-at-a-time; Type B’s 4-at-a-time.
– Type A’s show up a little more often than Type B’s.
• A’s feed into a Prep A server; B’s go to Prep B. Different service times.
• Then the parts get processed by the same Sealer server, but again with
different service time distributions.
• All parts undergo an inspection. If they pass, they exit.
• If they don’t pass, they go to a Rework server, and then another
inspection. Whether or not they pass, they exit the system.
• The Story (cont’d)
I stole this flowchart from KSZ…
• The Story (cont’d)
• How to handle different A and B service times at Sealer?
– Trick 1: Pre-assign the service times as an attribute (Sealer Time) in an
Assign module immediately after each customer arrives. Use that
attribute regardless of being a Type A or B part.
– Trick 2: While we’re at it, use the Assign to store each customer’s arrival
time as an attribute. Use the Arena variable TNOW to do so.
• Record departure times just before parts get Dispose’d, This will allow
us to get average cycle times (depart – arrival times) for any of the 3
types of parts (pass on first try, pass on second, fail both).
• Let’s Get Logical
• Dave’s Alternative Trick: Is there another way to model the process
time at the Sealer without having to assign a Sealer Time attribute for
A’s and B’s?
• Yes! It involves a little work, but it’s nice to know.
– Note that the entity types (Part A and Part B) are assigned in the
respective Create modules.
– Instead of assigning the Sealer Time as an attribute in the Assign module,
we can just wait until the Sealer Process module and use the following
logical expression, where (x==y) = 1 if x=y, and 0 otherwise. (See why?)
((Entity.Type == Part A) * TRIA(1,3,4)) + ((Entity.Type == Part B) * WEIB(2.5,5.3))
• Demo Time!
This Time: Our first “real” system – a
small manufacturing system.
Learned a couple of nice tricks
involving attributes and logic.
Next Time: Fake Customers!
Summary
Computer Simulation
Module 5: Arena
Dave Goldsman, Ph.D.
Fake Customers
Stewart School of Industrial and Systems Engineering
Professor
Last Lesson: Demo’d a small
electronic assembly and test
system.
This Lesson: We’ll talk about “fake”
customers!
Idea: These aren’t real customers
at all… their purpose is just to do
some task that Arena needs.
Lesson Overview
The Next Few Lessons
We’ll now cover material that will lead
us to the simulation of a call center:
• Fake Customers  now
• The Advanced Process Template
• Resource Failures + Maintenance
• The Blocks Template
• The Joy of Sets
• Description of Call Center
• Call Center Demo
Fake Customers
• You can use “fake” customers to
accomplish various tasks during
a simulation.
• Not actual customers that you
care about in terms of waiting
times or use of resources.
• Demo Time will explain all!
– Calculate normal probabilities
– Keep track of which time period
you’re in (part of Call Center
example coming up)
– Breakdown demon
This Time: Talked about fake
customers. We’ll be using these
several times in upcoming
applications.
Next Time: Now that we’re experts in
the Basic Process template, we’ll
move on to the Advanced Process
template for more good stuff!
Summary
Computer Simulation
Module 5: Arena
Dave Goldsman, Ph.D.
The Advanced Process
Template
Stewart School of Industrial and Systems Engineering
Professor
Last Lesson: Introduced “fake”
customers, which can be used for a
variety of purposes, including
arrivals of breakdown demons.
This Lesson: We’ll add to our
arsenal of modules by introducing
the Advanced Process template!
Idea: Lots of great new stuff,
though I don’t expect you to
memorize everything.
Lesson Overview
• Advanced Process Template
• File > Template Panel > Attach (and hopefully you find it in the
Rockwell Software  Arena  Template directory).
• Lots of new modules and
spreadsheets.
• I don’t expect you to memorize
them all.
• Concentrate for now on a few of
these (comment on others later):
– Seize, Delay, Release modules
– Expression, Failure spreadsheets.
• Seize, Delay, Release
• Why do we have separate Seize, Delay, and Release modules?
Aren’t they right there in the Process module?
• Yup, but sometimes you need to do things that are too complicated
for the Process module version of Seize–Delay–Release.
• Now you can handle things like…
– Seize–Assign–Delay–Release
– Non-symmetric multiple Seize’s and Release’s
– Complicated Seize’s and Release’s that might depend on sets of servers (as in the
upcoming Call Center example)
• Demo Time!
– Will talk about some of these Seize, Delay, Release issues.
– Will also sneak in some wisdom about the Expression spreadsheet.
This Time: Learned about the
Advanced Process template, which
gives us a new bag of tricks to play
with!
Next Time: How to deal with
resource failures and maintenance.
Summary
Computer Simulation
Module 5: Arena
Dave Goldsman, Ph.D.
Resource Failures and
Maintenance
Stewart School of Industrial and Systems Engineering
Professor
Last Lesson: Learned about the
Advanced Process treasure chest.
This Lesson: We’ll study model
breakdowns and maintenance in a
way that’s more direct than via fake
customers.
Idea: It’s just a certain type of
schedule!
Lesson Overview
• Failures
• You can cause resource failures by scheduling “breakdown demons”
(fake customers with high priority). But this isn’t elegant.
• Better way is to use the Resource and Failure spreadsheets in
conjunction with each other.
• Failures (cont’d)
• Go to Resource spreadsheet in the Basic Process template.
• Click on Failures column.
• Add a Failure Name.
• Choose Failure Rule (will discuss in a minute).
• Go to the Failure spreadsheet in the Advanced Process template,
where you’ll see your new failure name.
• Choose type of failure:
– Count (failure after a certain # of arrivals)
– Time (after a certain amount of time)
• Choose downtime (for repair): Can be any expression.
• Remarks
• Can schedule multiple failures by using multiple rows of the Failures
column in the Resource spreadsheet, e.g., type I failure, type II
failure, scheduled maintenance.
• Types of Failure Rules:
– Ignore (complete service of current customer, but reduce repair time).
E.g., if repair time = 1 hour and cust still needs 10 min, then repair time
gets reduced to 50 min and finishes at 60 min mark.
– Wait (complete service of current cust and delay repair). E.g., if repair
time = 1 hr and cust needs 10 min, then repair finishes at 70 min mark.
– Preempt (stop service of current cust, but complete service after the
repair). Repair stops at 60 min mark, cust finishes at 70 min mark.
• Demo Time!
This Time: How ironic! We
succeeded in learning how to
implement failures in Arena!
Next Time: A quick intro to the Blocks
template, which gives us a
kraaAaZy number of new things to
look at… but we’ll be very gentle
about this.
Summary
Computer Simulation
Module 5: Arena
Dave Goldsman, Ph.D.
The Blocks Template
Stewart School of Industrial and Systems Engineering
Professor
Last Lesson: Discussed the
implementation of resource failures.
This Lesson: We’ll add to our bag of
tricks by introducing the Blocks
template.
These are lots or blocks in this
template, but don’t be intimidated.
Lesson Overview
• Blocks Template
• File > Template Panel > Attach (and hopefully you find it in the
Rockwell Software  Arena  Template directory).
• Huge number of blocks!
• Do not be scared!
• They’re sort of a self-contained
language (related to SIMAN).
• Very specialized and low-level.
• Very useful, but we’ll only need a
few for now:
– Seize, Delay, Release, Queue, Alter
• Eh??
• Yikes! Why are we seeing stuff like Seize, Delay, Release yet again!?
At least two reasons…
– Arena has been built in many layers over the years, and these are what’s left from
SIMAN – the “original” incarnation of Arena.
– But in any case, and for whatever reason, certain primitive blocks such as the
Queue block can’t even connect to a Seize module from the Advanced Process
template or a Process module from the Basic Process template. So you’re stuck!
• Demo Time!
– A Queue-Seize-Delay-Release example using primitive blocks (we’ll see this again
in the Call Center example coming up).
– Using the Alter block to change the number of resources.
This Time: The Blocks template!
Later on, we’ll find a number of
interesting uses for some of these
guys.
Next Time: The joy of sets! How to
use certain vectorized sets to make
modeling easier.
Summary
Computer Simulation
Module 5: Arena
Dave Goldsman, Ph.D.
The Joy of Sets
Stewart School of Industrial and Systems Engineering
Professor
Last Lesson: Talked about the
Blocks template, which we’ll
occasionally use to help with
specialized little issues.
This Lesson: What are sets, and
how do they enhance our modeling
ability?
Idea: We’ll especially concentrate
on resource sets.
Lesson Overview
Sets
• As in baby math class, a set is just a
group of elements. Elements are
allowed to belong to more than 1 set.
• “Elements” can mean a lot of things in
Arena, and so there are various types
of sets:
– Resource (e.g., a set of servers)
– Counter
– Tally
– Entity Type
– Entity Picture
– …and tougher stuff later
• Resource Sets
• Use the Set spreadsheet in the Basic Process template to define sets.
• We’ll just study resource sets for now.
• A “vanilla” resource has identical, interchangeable servers. But a
resource set can have distinct servers, with different schedules,
service speeds, service specialties, etc.
• Call Center Example: Three products with the following resources
– Product 1: Charity, Noah, Molly, Anna, Sammy
– Product 2: Tierney, Sean, Emma, Anna, Sammy
– Product 3: Shelley, Jenny, Christie, Molly, Anna, Sammy
– Molly, Anna, and Sammy all have degree of cross-functionality.
– All 11 servers turn out to have different schedules (more on that later)
• Resource Sets
• To define the resource set Product 1, choose Type = Resource, click
in Members, then enter Product 1’s servers under Resource Name.
• Product 1’s “Preferred Order” is to try Charity first. If she’s not
available, try Noah. Save Sammy for last because he’s cross-
functional. Other orders are possible.
• Seize-Delay-Release
• Have to be a little careful with Seize-Delay-Release for a resource set.
• The problem is that you have to make sure that you Release the same
guy that you originally Seize’d. (If you release a random server, some
other customer may lose his server!)
• Let’s Seize a server from the set Product 1 in Preferred Order. Make
sure we remember who it is. Then when we’re done, Release that
same guy.
• Seize-Delay-Release (cont’d)
• Seize Quantity = 1 guy from the set Product 1 in the Preferred Order.
Save the “name” of that server in the customer’s Save Attribute called
Tech Agent Index.
• Later, Release that Specific Member stored in Tech Agent Index.
• Remarks
• Various Seize Selection Rules are possible:
– Cyclical
– Random
– Preferred Order
– Specific Member
– Largest Remaining Capacity
– Smallest Number Busy
• This stuff will be very useful when we do our Call Center example.
• Demo Time! A simple model with 4 servers.
This Time: How joyful! We
introduced sets, especially resource
sets. Then we showed how to use
Seize-Delay-Release with such
sets.
Next Time: We’ll describe in Plain
English the Call Center example
that seems to be all the rage these
days.
Summary
Computer Simulation
Module 5: Arena
Dave Goldsman, Ph.D.
Description of Call Center
Example
Stewart School of Industrial and Systems Engineering
Professor
Last Lesson: Mainly discussed
resource sets, and how to use
Seize-Delay-Release with them.
Have to be a little careful.
This Lesson: What we’ve all been
waiting for! Let’s start describing
the Call Center example.
When we’re done with this, you
can be consultants!
Lesson Overview
Call Center Description
Program is arranged in submodels.
• Create and Direct Arrivals
– How often do calls show up and where do they go?
• Tech Support Calls
– What kind of tech support do you need?
• Returned Tech Calls
– Sometimes the guy has to get back to you.
• Sales Calls
• Order Status Calls
• Time Period Counter – What ½-hour period of the day is it?
Submodel
Arrivals
Calls show up according to a nonhomogeneous Poisson process.
• The center accepts calls from 8:00A till 6:00P.
– The arrival rates change every half hour (see table below from KSZ).
– Also see Arrival Schedule in the Basic Process Schedule spreadsheet.
• A few staff actually stay at work until 7:00P, in order to let the calls at
the end of the day clear out. (You have to explicitly model 0 arrivals
for the last two half-hour segments of the Arrival Schedule.)
 These rates are per hour
(even though time intervals
are 30 min)
Time Rate Time Rate Time Rate Time Rate
8:00 – 8:30 20 10:30– 11:00 75 1:00– 1:30 110 3:30– 4:00 90
8:30– 9:00 35 11:00– 11:30 75 1:30– 2:00 95 4:00– 4:30 70
9:00– 9:30 45 11:30– 12:00 90 2:00– 2:30 105 4:30– 5:00 65
9:30– 10:00 50 12:00– 12:30 95 2:30– 3:00 90 5:00– 5:30 45
10:00– 10:30 70 12:30– 1:00 105 3:00– 3:30 85 5:30– 6:00 30
Phone Lines
There are 26 phone lines. If you get a busy signal, you balk and get
killed off.
• Use a Queue block with capacity 0 to try to Seize a line. If the Seize
fails, there’s no place to go in the Queue, and out you go.
• The Queue and Seize both come from the Blocks template panel.
This is the only place where you can get a Queue block, and it only
connects to this kind of Seize. (Recall that you can also use a Seize
within a Process module in the Basic Process template, and there’s
another Seize in the Advanced Process template!)
Types of Calls
There are 3 general types of calls, which we’ll handle with an “N-way by
Chance” Decide module. Each customer hears a recording for a
UNIF(0.1,0.6) amount of time, while he makes his choice of call type.
• 76% go to Tech Support.
• 16% go to Sales.
– There are 7 identical, faceless Sales guys that we’ll need to schedule
(but not on an individual basis).
– Sales calls take TRIA(4,15,45).
• 8% go to Order Status.
– Most callers can do self-service in a TRIA(2,3,4) amount of time. But…
– 15% of customers need a Sales guy for TRIA(3,5,10).
Tech Support
There are 3 specific types of Tech Support calls (which we’ll again
handle via a Decide module):
• 25% are for Product 1.
• 34% are for Product 2.
• 41% are for Product 3.
• Each customer gets another recording for a UNIF(0.1,0.5) amount of
time, while he makes his choice.
• All Tech Support calls require staff for a TRIA(3,6,18) duration of
time.
Call Backs
4% of Tech Support calls require additional investigation.
• This additional investigation is carried out by another group of staff
that we won’t worry about. The customer’s original server is freed
up when he makes the determination that more research is needed.
• The investigation takes an EXPO(60) amount of time.
• At that point, the original Tech Support guy will call the customer
back using one of the 26 phone lines (but with high priority).
• That call takes TRIA(2,4,9) time.
Tech Support Info
Tech Support staff have some interesting issues.
• They all have 8 hr days + 30 min for lunch.
• They all have different schedules. We’ll need Resource Schedules to
model this on an individual basis.
• They all have different product expertise. We’ll need Sets to model
this. Here are the Preferred Orders for the sets:
– Product 1: Charity, Noah, Molly, Anna, Sammy
– Product 2: Tierney, Sean, Emma, Anna, Sammy
– Product 3: Shelley, Jenny, Christie, Molly, Anna, Sammy
Tech Support Staff Schedules (from KSZ)
This Time: Gave a long, tedious
verbal description of the Call Center
model.
Next Time: Gigantic Demo Time!
Now we get to see the Arena
program in its full glory!
Summary
Computer Simulation
Module 5: Arena
Dave Goldsman, Ph.D.
Call Center
Stewart School of Industrial and Systems Engineering
Professor
Last Lesson: Plain English
description of the Call Center
model, along with some Arena
details (but no actual demo).
This Lesson: It’s Demo Time!
Idea: We’re putting together
ideas from many of the recent
lessons. Everything from fake
customers to resource sets.
Lesson Overview
Be On The Lookout
As we go thru the model, keep an eye
out for some interesting things…
• Submodels
• Fake customers used as timers
• Use Queue with capacity 0 to kick out
callers getting busy signal
• NHPP arrivals
• 3 resource sets for Tech Support
• Tricky Seize-Delay-Release
• Quirky callback procedure
Demo Time!
Top-Level View
Tech Support Submodel
Time Period Counter
Arrivals Submodel
This Time: We put together a lot of
stuff and finally demo’d the Call
Center example in all of its radiant
glory.
Next Time: We’ll describe an
Inventory system in Plain English
before doing an analogous demo.
Summary
Computer Simulation
Module 5: Arena
Dave Goldsman, Ph.D.
An Inventory System
Stewart School of Industrial and Systems Engineering
Professor
Last Lesson: Call Center simulation
demo.
This Lesson: Plain English
description of simple Inventory
system and then a demo.
Lesson Overview
The Next Few Lessons
We’ll now look at several demos.
• An Inventory Model  now
• One Line vs. Two Lines?
• A Re-entrant Queue
• SMARTS files and Rockwell demos
• A Manufacturing System (with
transporters, conveyors, …)
• Description of (s,S) Policy
• Simulate the widget inventory stock over time.
• Use modules from the Basic and Advanced panels.
• Customer interarrivals are EXPO(0.1).
• Demand size is a DISC function.
• Demand is always “met” (backlogged, if necessary).
• Inventory is “taken” at the start of each day.
• If inventory is below s, we order up to S.
• Delivery lead time is UNIF(0.5,1) before order arrives (pretty quick,
but by the time it arrives, other customers will have arrived).
• Order costs (set-up + incremental), holding costs, penalty costs.
• Description (cont’d)
• Calculate average total cost per day over 120 days.
• Inventory, unit costs, and all of the other parameters are variables.
• Inventory is decremented by demands, incremented by orders.
• Interarrival times, demands, lead time, are expressions from
Advanced Process template.
• Accumulated costs are calculated in the Statistic spreadsheet in the
Advanced panel.
• Daily inventory review is conducted by a “fake” customer.
Demo Time!
This Time: Discussed and demo’d a
nice little (s,S) inventory policy.
Next Time: One Line, Two Lines,
Red Line, Blue Line?
https://www.youtube.com/watch?v=yauPbZKzChs
Summary
Computer Simulation
Module 5: Arena
Dave Goldsman, Ph.D.
One Line vs. Two Lines?
Stewart School of Industrial and Systems Engineering
Professor
Last Lesson: We worked on an
(s,S) inventory policy example.
This Lesson: Should we use one
line feeding into two parallel
servers or separate lines feeding
into two individual servers?
Idea: We’ll use a very cool trick
called common random
numbers to do an apples-to-
apples comparison.
Lesson Overview
• Game Plan
• Option A: Customers show up and join one line in front of two
identical servers. They go to whichever server is available first.
• Option B: Customers randomly choose which of two lines (in front
of single servers) to join.
• Will compare which of A or B is better by using:
– The exact same customer arrivals (thanks to a Separate module), and
– The same service times for a particular customer whether or not he’s
doing A or B (thanks to an early Assign module).
• Almost certainly, Option A is better (why?)
• Matching up the arrival and service times makes things
easier for us statistically. “Common Random Numbers”
And now… it’s
Demo Time!
This Time: Used Arena to compare
two different server configurations for
a simple queueing system.
Next Time: We’ll look at a kraaAaZy
re-entrant queueing system. Very
non-intuitive, very kool. Simulation
was the first way people used to
analyze these things.
Summary
Computer Simulation
Module 5: Arena
Dave Goldsman, Ph.D.
A Crazy Re-entrant Queue
Stewart School of Industrial and Systems Engineering
Professor
Last Lesson: We compared
different queueing strategies – one
line vs. two lines.
This Lesson: A more-interesting
system – a re-entrant queue.
Idea: If you re-use servers and
mess around with priorities, you
can get some pretty non-intuitive
outcomes!
Lesson Overview
Re-entrant Queues
• Customers go to Server 1, then to Server 2, then back to Server 1,
back to 2, and finally back to 1. That is, 1  2  1  2  1.
– These returns are why we call the queues “re-entrant”.
– They’re depicted in Arena as 5 separate Process modules with Seize-Delay-
Release trios. (It’s OK to Seize the same server in different Process modules.)
• This seems like a perfectly boring model. Let’s make it interesting.
– All service times are exponential. Here are the means:
1 (0.1)  2 (0.5)  1 (0.1)  2 (0.1)  1 (0.5)
– …and the customer priorities:
1 (low)  2 (high)  1 (medium)  2 (low)  1 (high)
– Thus, on the customer’s 3rd visit to Server 1, he has a high-priority
EXPO(0.5) service time.
Get ready for… Demo Time!
You’re gonna see mind-blowing
behavior!
This Time: So cool, so very cool.
Words escape me.
Next Time: We’re going to get
smart… literally!
SMARTS files! 
Summary
Computer Simulation
Module 5: Arena
Dave Goldsman, Ph.D.
SMARTS and Rockwell
Files
Stewart School of Industrial and Systems Engineering
Professor
Last Lesson: Re-entrant Q’s and
phenomenal behavior!
This Lesson: Rockwell has hidden
away some beautiful little gems:
SMARTS files and demos.
Idea: These make great bedtime
reading.
Lesson Overview
• SMARTS + Rockwell Demos
• SMARTS: Very nice tutorial files organized by subject area.
– E.g., there’s a SMARTS file to create customers with a time-dependent
arrival rate that varies according to an equation (an expression).
– 100s of SMARTS files
• Rockwell has also prepared many professional demos.
• Libraries > Documents > Rockwell Software > Arena
• Some Typical Examples that we’ll demo:
– SMARTS - Arrivals Varying Rate via Expression
– SMARTS - Queues Evaluate Conditions Before Proceeding
– Rockwell Emergency Room
– Rockwell Mission to Mars Demo Time!
This Time: Looked at several
Rockwell SMARTS and demo files.
Next Time: We’ll demo a easy-
looking yet fairly sophisticated
manufacturing cell, along with a
couple of variations involving
transporters and conveyors.
Summary
Computer Simulation
Module 5: Arena
Dave Goldsman, Ph.D.
A Manufacturing System
Stewart School of Industrial and Systems Engineering
Professor
Last Lesson: Cool SMARTS and
Rockwell demos.
This Lesson: We’ll demo a easy-
looking yet fairly sophisticated
manufacturing cell, along with a
couple of variations involving
transporters and conveyors.
Idea: Introduce movement and
multiple part paths. Extremely
useful stuff that generalizes!
Lesson Overview
• Description
• Manufacturing cell with 3 types of parts.
• Each part type follows a different path (“sequence”) thru the system.
– Different service times at each station (depending on part type and place in
visitation sequence).
– E.g., Part type 2’s visit stations 1 > 2 > 4 > 2 > 3, each with different service times.
• Movement requires the Advanced Transfer template
– Route, Station, Enter, Leave modules
– Sequences spreadsheet
– “Advanced Sets” (which is where the sequences come in).
• Parts can move in a variety of ways:
– By themselves, transporters, conveyors.
– Requires construction of transporter and conveyor paths
Demo Time!
This Time: We did demos on a small,
yet sophisticated manufacturing cell,
along with some variants involving
movement.
Next Time: Details and
generalizations of this model
Summary
Computer Simulation
Module 5: Arena
Dave Goldsman, Ph.D.
A Manufacturing System in Detail
Part 1. Introduction + Advanced Transfer Panel
Stewart School of Industrial and Systems Engineering
Professor
A bunch of additional lessons related to our Manufacturing Example!
1. Advanced Transfer Panel Modules related to movement
– Station, Route, Enter, Leave
2. Sequences of visitation locations
3. Sets and Advanced Sets (e.g., sets of Sequences)
4. Detailed walk-through of the model
5. Parts can move in a variety of ways:
– By themselves
– Via transporters
– Via conveyors
– Requires construction of transporter and conveyor paths
Coming Up…
An entire panel related to movement
1. This Lesson: Where you move
– Station: Somewhere you can go to
– Route: Tells you where you’re going.
Similar to Connect, except it takes time
– Enter: General way to get into a Station
– Leave: General way to depart a Station
2. Subsequent Lessons: How you
move
Mini-Demo with Station and Route!
Advanced Transfer
Computer Simulation
Module 5: Arena
Dave Goldsman, Ph.D.
A Manufacturing System in Detail
Part 2. Sequences
Stewart School of Industrial and Systems Engineering
Professor
A bunch of additional lessons related to our Manufacturing Example!
1. Advanced Transfer Panel Modules related to movement
– Station, Route, Enter, Leave
2. Sequences of visitation locations
3. Sets and Advanced Sets (e.g., sets of Sequences)
4. Detailed walk-through of the model
5. Parts can move in a variety of ways:
– By themselves
– Via transporters
– Via conveyors
– Requires construction of transporter and conveyor paths
Coming Up…
Each type of customer follows a different
path (sequence) thru the system.
– A sequence goes from station to station
– Maybe have different service time distribution
at each station (depending on customer type
and place in visitation sequence).
Example:
– Part Type 1’s visit stations 1 > 2 > 3 > 4
– Part Type 2’s visit 1 > 2 > 4 > 2 > 3
– Part Type 3’s visit 2 > 1 > 3
– Each with different service times
distributions
Sequences
Three different Sequences
Part Type 2 Sequence
Type 2 Process Time at Cell 2
Defining Sequences and
Assigning Attributes
Demo Time!
Computer Simulation
Module 5: Arena
Dave Goldsman, Ph.D.
A Manufacturing System in Detail
Part 3. Advanced Sets
Stewart School of Industrial and Systems Engineering
Professor
A bunch of additional lessons related to our Manufacturing Example!
1. Advanced Transfer Panel Modules related to movement
– Station, Route, Enter, Leave
2. Sequences of visitation locations
3. Sets and Advanced Sets (e.g., sets of Sequences)
4. Detailed walk-through of the model
5. Parts can move in a variety of ways:
– By themselves
– Via transporters
– Via conveyors
– Requires construction of transporter and conveyor paths
Coming Up…
• Found in Advanced Process panel
• Used for kraaAaZy types of sets,
e.g., sets of sequences!
• Our Advanced set will be called Part
Sequences, and will consist of the
“elements” (sequences):
{Part 1 Process Plan, Part 2 Process Plan,
Part 3 Process Plan}
• Think of Part Sequences as a vector,
Part Sequences(2) = Part 2 Process Plan
Advanced Sets
Mini-Demo!
Computer Simulation
Module 5: Arena
Dave Goldsman, Ph.D.
A Manufacturing System in Detail
Part 4. Model Walk-Through
Stewart School of Industrial and Systems Engineering
Professor
A bunch of additional lessons related to our Manufacturing Example!
1. Advanced Transfer Panel Modules related to movement
– Station, Route, Enter, Leave
2. Sequences of visitation locations
3. Sets and Advanced Sets (e.g., sets of Sequences)
4. Detailed walk-through of the model
5. Parts can move in a variety of ways:
– By themselves
– Via transporters
– Via conveyors
– Requires construction of transporter and conveyor paths
Coming Up…
• Description
• Manufacturing cell with three types of parts.
• Each part type follows a different path (“sequence”) thru the system.
– Different service times at each station (depending on part type and place in
visitation sequence).
– E.g., Part Type 2’s visit stations 1 > 2 > 4 > 2 > 3, each with different service times.
• Movement requires the Advanced Transfer template
– Route, Station modules (will look at Enter and Leave modules later)
– Sequences spreadsheet
– Advanced Sets (which is where the sequences come in).
• Service times usually handled in Sequence definitions (except Cell 1)
• Cell 3 has two servers: An old slow guy, and a young 20% faster guy
Demo Time!
Computer Simulation
Module 5: Arena
Dave Goldsman, Ph.D.
A Manufacturing System in Detail
Part 5. Transporters and Conveyors
Stewart School of Industrial and Systems Engineering
Professor
A bunch of additional lessons related to our Manufacturing Example!
1. Advanced Transfer Panel Modules related to movement
– Station, Route, Enter, Leave
2. Sequences of visitation locations
3. Sets and Advanced Sets (e.g., sets of Sequences)
4. Detailed walk-through of the model
5. Parts can move in a variety of ways:
– By themselves
– Via transporters
– Via conveyors
– Requires construction of transporter and conveyor paths
Coming Up…
We’ll look at ENTER – LEAVE modules
for Station-to-Station movement.
Different way you can travel, via…
• Resource (e.g., an assistant)
– Seize-Release
• Transporter (e.g., a car)
– Request-Free
– Requires Distance Set
• Conveyor
– Access-Exit
– Requires Segment Set
Other Ways to Move
Demo Time!
Last Few Lessons: We discussed in
detail a small, yet sophisticated
manufacturing cell, along with some
variants involving movement.
This ends our module on Arena.
• We’ll still see Arena later on.
• We only scratched the surface.
Next Time: An entire module on
generating Unif(0,1)’s!!!
Summary

Module05 arena

  • 1.
    Computer Simulation Module 5:Arena Dave Goldsman, Ph.D. Introduction Stewart School of Industrial and Systems Engineering Professor
  • 2.
    Last Module: Welooked at general principles behind simulation languages. How do they work? This Module: We’ll learn about Arena, a popular simulation language. Idea: Go through a series of tutorials that will allow you to fearlessly simulate real-world systems. Module Overview
  • 3.
    More Overview This moduleis built on numerous mini-tutorials. Many will be self-contained and will focus on a specific topic… …Yet the tutorials are organized in groups that build to a common goal (e.g., a non-trivial demo). Each lesson contains written notes, but you must WATCH the videos to see the “live” stuff.
  • 4.
    I Gotta HaveMore Overview! . Rough Groupings of Topics: A. Introductory material  now B. Modeling multi-channel systems C. Building to a call center model D. Some demos on interesting miscellaneous models
  • 5.
    Pre-Show Notes… • Arenais easy, but if it’s not your cup of tea (whatever reason),… • …There are many other simulation languages around. • Arena is a good choice to enable you to learn those languages. • In any case, we’ll do lots of examples from which you may find useful applications.
  • 6.
    The Next FewLessons Our first job is to cover some basics: • Process-Interaction  next • Let’s Meet Arena! • The Arena Basic Template • Create-Process-Dispose Modules • The Process Module • Resources, Schedules, Queues • The Decide Module
  • 7.
    This Time: Discussedwhat’s coming up in this module on the Arena computer simulation language. Next Time: A brief review of the Process-Interaction modeling approach. We’ll use this to get our subsequent terminology straight and to re-introduce P-I. Summary
  • 8.
    Computer Simulation Module 5:Arena Dave Goldsman, Ph.D. Process-Interaction Review Stewart School of Industrial and Systems Engineering Professor
  • 9.
    Last Lesson: Wesimply discussed what’s coming up in this Arena module. This Lesson: A quick review of the Process-Interaction approach that Arena uses. Idea: It’s just a flowchart! Lesson Overview
  • 10.
    Process-Interaction • Consider ageneric customer (entity) and the sequence of events and activities (processes) it undergoes as it moves through the system. • At any time, the system may have many entities interacting with each other as they compete for resources. • Arena takes this process- interaction “world view.”
  • 11.
    P-I (cont’d) • Theentities flow through a network of modules (blocks) that describe their behavior. • The network can be represented as a process flowchart. • Example: People show up at the barber, get served (maybe after waiting in line), and then leave. • In Arena: – Create (generate cust arrivals) – Process (use the barber) – Dispose (outta here)
  • 12.
    Generate arrivals GetHaircut Outta here! Wait in line If It Quacks Like a Flowchart…
  • 13.
    This Time: Talkedabout the Process- Interaction modeling approach and how it relates to Arena. Next Time: A first look at Arena. How to get it, and a sneak peak. Summary
  • 14.
    Computer Simulation Module 5:Arena Dave Goldsman, Ph.D. Let’s Meet Arena! Stewart School of Industrial and Systems Engineering Professor
  • 15.
    Last Lesson: Reviewedthe Process-Interaction approach. This is what Arena uses. This Lesson: Let’s finally meet Arena! We’ll show how to get the software, and then take a first look. Lesson Overview
  • 16.
    • Easy todownload and install free student version of Arena. • https://www.arenasimulation.com/academic/students • This is a Windows product. • If you’re indeed using Windows, then there is certain Arena stuff you’ll occasionally use that’s stored deep down in a “Rockwell Software” directory (don’t worry about this for now). • If you don’t have Windows, it ain’t a problem… • You can also use Arena via the Georgia Tech virtual labs. • Or you can really be nerdy and partition your disk to use a Windows OS. Getting Arena
  • 17.
    Start Me Up!Arena screen This is the main work area.  This is the template panel, where you get stuff. You can find certain spreadsheet info here.
  • 18.
    • File: Letsyou do the usual New, Open, Close, Save,…, but also allows you to import different template panels and background pix. • Edit: Allows you to edit entity pix, insert objects, other nice stuff. • View: See various toolbars, customize your “named views”, etc. • Tools: Lots of cool toys, including Input Analyzer, OptQuest, AVI capture, macros,… • Arrange, Object, Window: Various visualization aids. • Run: Set a run up and make it go as fast as you want or step-by- step.
  • 19.
    • This isthe Basic Process template panel. • It does very basic stuff that a Univ. of Georgia student might be able to handle on a good day. • The panel consists of modules (I call ‘em blocks sometimes) such as Create, Dispose, Process, etc., that will be connected together as a flowchart for our simulation model. • The other items such as Attribute, Entity, etc., are related to spreadsheets. • Demo Time! Look at the screen, go buttons, speed, zooming, etc.
  • 20.
    This Time: Finallygot to meet Arena! We downloaded Arena and then reviewed what the main screen looks like. Next Time: We’ll look at the Basic Process template in more detail. The components of this template will allow us to put together our first simulations. Summary
  • 21.
    Computer Simulation Module 5:Arena Dave Goldsman, Ph.D. Basic Process Template Stewart School of Industrial and Systems Engineering Professor
  • 22.
    Last Lesson: Wewere introduced to Arena and went on our first date with it. This Lesson: We’ll look at the Basic Process template in some detail. The items from this template will allow us to put together our initial simulations. Idea: Click and drag items to build the simulation. Lesson Overview
  • 23.
    • This isthe top half of the Basic Process panel. • It does very basic stuff that a Univ. of Georgia student might be able to handle on a good day. • More-advanced templates available for non- UGA students: File > Template Panel > Attach • The panel consists of modules such as Create, Dispose, Process, etc., that will be connected together as a flowchart representation for our simulation model. • Example: Create generates customer arrivals. • You’ll drag these modules over to the work area to build the flowchart, fill in some numbers, and then hit the go button to run the simulation.
  • 24.
    • This isbottom half of the Basic Process panel. • These items such as Attribute, Entity, etc., are spreadsheets that are both informational and which will allow us to change certain system parameters. • Example: The Variable spreadsheet defines global quantities such as WIP that are updated as the simulation progresses. Resource keeps track of the names and capacities of the different resources (servers). • Demo Time! Look at a couple of modules and spreadsheets. Load a new template. Build a model.
  • 25.
    This Time: Reviewedthe modules and spreadsheets available on the Basic Process template. Next Time: We’ll learn about the Create, Process, and Dispose modules, and then build our first official simulation. Summary
  • 26.
    Computer Simulation Module 5:Arena Dave Goldsman, Ph.D. Create-Process-Dispose Modules Stewart School of Industrial and Systems Engineering Professor
  • 27.
    Last Lesson: Learnedabout the Basic Process template. This Lesson: We’ll discuss the Create, Process, and Dispose modules, and then build our first official simulation. Idea: The modules are easy, but it turns out that there’s a lot going on inside of them. Lesson Overview
  • 28.
    • Create: Periodicallygenerate customer arrivals. • Process: Have work performed on the customers; maybe have to wait in line. • Dispose: Customers leave the system after service. • Fun Facts: – “Dispose” is called “Terminate” in the language GPSS – “Send to Die” in Automod. Create-Process-Dispose
  • 29.
    • Drag anddrop from template. • Modules (usually) connect automatically. • Connects are “instantaneous” for customers. • Hit “go” and see guys move… • …But customers don’t look good and no lines form. Be patient and see demos. How to Use
  • 30.
    • Click intomodules and see required inputs. • Example: Create • Fields for – The name of the module – The type of entity (customer) – Interarrival distribution – # of customers per arrival – Maximum # of arrivals allowed – Time that the first guy shows up Deeper Dive into Create
  • 31.
    • Process modulehas fields for – The name of the module – Type of action. This is where you can try to reserve a server or free a server who’s currently in use. More on this in next lesson. – How long will you be delayed? I.e., what is the service time? • Dispose module – Nothing deep here – you just get rid of entities. – You can name the module. Process and Dispose Modules
  • 32.
    • Create-Process-Dispose • Connectingthe modules • Go over input fields • Expressions and Build Expression • CONT and DISC functions • Some other Arena-defined functions Demo Time!
  • 33.
    This Time: Discussedaspects of the Basic Process template’s Create- Process-Dispose modules. Next Time: Deep dive on the Process module. It does a lot more than you may think! Summary
  • 34.
    Computer Simulation Module 5:Arena Dave Goldsman, Ph.D. Details on the Process Module Stewart School of Industrial and Systems Engineering Professor
  • 35.
    Last Lesson: Learnedabout the Create-Process-Dispose modules. This Lesson: We’ll learn more goodies about the Process module. Idea: It allows you to grab servers, use them, and then let them go for the next guy to use. And along the way, it automatically sets up a queue! Lesson Overview
  • 36.
    Seize-Delay-Release You’ll take oneof the following “actions” in the Process module: • Delay: Spend time in the Process (self-service). • Seize-Delay-Release: Grab at least one resource (server), spend time getting served, and then free the server for the next customer. If you Seize and the server isn’t available, you may have to wait in a queue. • Seize-Delay: Grab at least one resource and spend time getting served. Remember to Release the server sometime later, else he gets deadlocked and a giant line will form! • Delay-Release: Use a previously Seize’d server for a while, and then free him for the next guy to use. www.youtube.com/watch?v=eAyVgPtC5Zc
  • 37.
    Resource Dialog Box Ifyou do a Seize or Release, a dialog box pops up asking which and how many resource(s) you want to Add (Seize) or Delete (Release).
  • 38.
    Resource Dialog Box(cont’d) Example: • A customer walks into the Process module, and does a Seize-Delay- Release to grab and use one unit of the resource Barber. • Hit the Add button, name the resource Barber, and set Quantity = 1. • The Process is given a default name of “Process 1” and includes the resource as well as the default queue “Process 1.Queue” (talk about later). • Process = Resource + Queue
  • 39.
    Resource Dialog Box(cont’d) Slightly Different Example: Now every customer uses TWO barbers. (They all have lots of flowing locks like your gentle teacher). How to do? • Set Quantity = 2 in Add or Edit box. • Distinction: There may be 5 barbers in the store, but each customer needs exactly 2 of them. We’ll show in the next lesson how to use the Resource Spreadsheet to set the Barber’s “capacity” to 5.
  • 40.
    • Different permutationsof Seize- Delay-Release • Notice that a queue magically pops up! • Multiple resources • Warning about deadlocks Demo Time!
  • 41.
    This Time: Learnedlots more about the Process module, including the Seize-Delay-Release sequence and the associated queue that magically gets set up. Next Time: We’ll finally take a look at some Arena spreadsheets: Resource, Schedule, and Queue. Summary
  • 42.
    Computer Simulation Module 5:Arena Dave Goldsman, Ph.D. Resource, Schedule, and Queue Spreadsheets Stewart School of Industrial and Systems Engineering Professor
  • 43.
    Last Lesson: Talkedabout the Seize-Delay-Release functionality of the Process module – how do you reserve and use servers? This Lesson: Now it’s time to look at some of those spreadsheets you may have noticed. You can change resource capacities, the types of queues, etc. Lesson Overview
  • 44.
    Resource Spreadsheet Click onthe spreadsheet in the Basic Process template, and you get a list of the resources that the model is using (at the bottom of the screen). • Example: Two resources, Barber and Pedicurist. The resource Barber has fixed capacity 4 (four barbers on duty); there’s only 1 Pedicurist. • Reminder: Capacity is the number of the resource’s servers on duty, not necessarily the number of the servers that a customer requests. • Note: A resource’s servers are regarded as identical and interchangeable. • The resources are automatically sent to the spreadsheet when we define them in the Process module. Or, we can just double-click a new row and define a resource right there in the spreadsheet. • Can change fixed capacity, or make a schedule that varies the capacity over time.
  • 45.
    Schedule Spreadsheet Can setschedules for servers. • Example: Go to the Resource Spreadsheet and change the Type to “Based on Schedule”. The dialog box will change slightly to accommodate a schedule name (which we’ve called “Barber Sched”). • Now go over to the Schedule Spreadsheet and you’ll see that Barber Sched is already there, waiting for your input. • The key is to enter stuff into the “Durations” box.
  • 46.
    Schedule Spreadsheet Can setschedules for arrivals. • Example: Go to a Create module and change the Type to “Schedule”. The dialog box will change slightly to accommodate a schedule name (which we’ve called “Arrival Sched”). • Now go over to the Schedule Spreadsheet and you’ll see that Arrival Sched is already there, waiting for your input. • We’ll see in the demo how to enter stuff into the “Durations” box.
  • 47.
    • Resource Spreadsheet •Resource and Arrival Schedules • Queue Spreadsheet • Resource Animation • Queue Animations Demo Time!
  • 48.
    This Time: Discussedthe Resource, Schedule, and Queue Spreadsheets, along with some of their ramifications. Next Time: We’ll discuss the Decide module, which allows us to make probabilistic and conditional decisions that affect the entities’ paths through the model. Summary
  • 49.
    Computer Simulation Module 5:Arena Dave Goldsman, Ph.D. The Decide Module Stewart School of Industrial and Systems Engineering Professor
  • 50.
    Last Lesson: TheResource, Schedule, Queue Spreadsheets This Lesson: The Decide module, which allows customers to make probabilistic and conditional choices about their paths. Idea: A flexible module enabling you to go this way and that way! www.youtube.com/watch?v=z4uWfs3sH7s Lesson Overview
  • 51.
    Decide Module • Whenan entity gets to a Decide module, he can… – Randomly go to either of two locations (“2-way by Chance”) (probabilities are given in percentages) – Randomly go to any of various locations (“N-way by Chance”) – Go to either of two locations if a condition is satisfied (“2-way by Condition”) – Go to any of various locations if a condition is satisfied (“N-way by Condition”)
  • 52.
    • Decide Module •Example: Go to Process 2 with prob 0.75, and Process 3 w.p. 0.25. • Demo Time! 75% this way 25% this way
  • 53.
    This Time: TheDecide module, which gives customers lots of choices about moving through the model. Next Time: The Assign module, which allows us to give values to attributes and variables, and even assign graphics to entities. Summary
  • 54.
    Computer Simulation Module 5:Arena Dave Goldsman, Ph.D. The Assign Module Stewart School of Industrial and Systems Engineering Professor
  • 55.
    Last Lesson: TheDecide module, which makes probabilistic and conditional decisions about where customers go. This Time: The Assign module, which allows us to give values to attributes and variables, and even assign graphics to entities. Idea: Very power, general tool. Lesson Overview
  • 56.
    The Next FewLessons Cover material that’ll eventually allow us to simulate multi-channel customer flows: • The Assign Module  now • Attribute, Variable, Entity Spreadsheets • Arena Internal Variables • Displaying Stuff • Batch, Separate, Record • Run Setup and Control • Two-Channel Mfg Example
  • 57.
    Attributes Each customer passingthrough the system has various properties (attributes). • Tom is 6’ tall, weighs 160 lbs, loves baseball, and has LDL cholesterol = 108. • Justin B. is 4’11” tall, weighs 280 lbs, loves eating lard, and has LDL = 543. • Both guys have 4 attributes, though other guys may have different numbers of attributes. • Attributes need to be numerical; for example, BB = 11 and lard = 28.
  • 58.
    Variables • Unlike attributes,whose values are specific to each customer, variables are global. • If you change a variable anyplace in the Arena program, it gets changed everywhere. • Example: WIP might be incremented when an entity is Create’d, and decremented if it’s Dispose’d – these events could occur anywhere.
  • 59.
    • Assign Module •So how can you change attributes, variables, and other stuff? • Use the very powerful and flexible Assign module. This customer has a weight of 160 lbs
  • 60.
    • Use ofAssign for attributes and variables • Use of Assign for entity pictures • Using Decide and Assign together Demo Time!
  • 61.
    This Time: Talkedabout Attributes, Variables, and then the Assign module. Next Time: The Attribute, Variable, and Entity Spreadsheets. Summary
  • 62.
    Computer Simulation Module 5:Arena Dave Goldsman, Ph.D. Attribute, Variable, and Entity Spreadsheets Stewart School of Industrial and Systems Engineering Professor
  • 63.
    Last Lesson: Discussedthe Assign module, and how it can be used to (i) give values to attributes and variables, and (ii) change entity graphics. This Lesson: The Attribute, Variable, and Entity spreadsheets. Lesson Overview
  • 64.
    • Spreadsheets • TheAttribute Spreadsheet keeps track of existing attributes that you might define in an Assign. • Can make your own (double click). • Can be vectorized. • Variable Spreadsheet pretty much the same. • Entity Spreadsheet allows you to set initial picture. • Demo Time!
  • 65.
    This Time: Easydiscussion about the Attribute, Variable, and Entity Spreadsheets. Next Time: We’ll discuss a few Arena “internal” variables that are automatically calculated as the simulation proceeds. These have a great variety of uses. Summary
  • 66.
    Computer Simulation Module 5:Arena Dave Goldsman, Ph.D. Arena Internal Variables Stewart School of Industrial and Systems Engineering Professor
  • 67.
    Last Lesson: TheAttribute, Variable, and Entity Spreadsheets. This Lesson: Talk about Arena’s so- called “internal” variables that are automatically calculated as the simulation proceeds. Idea: Incredibly useful. Help you make decisions based on the simulation’s current state. Lesson Overview
  • 68.
    • Internal Variables •Dirty Little Secret: Arena keeps track of and continuously updates lots of stuff as the simulation runs. • Good for making decisions, drawing graphs, etc. • Examples: – TNOW = current simulated time – NR(Barber) = # of resource Barber’s servers now working – NQ(Process 1.Queue) = # customers in that queue – Create 1.NumberOut = # of customers who have so far left the module named Create 1 • Huge list is available if you sniff around Build Expression. • Demo Time! Go to the shortest line.
  • 69.
    This Time: Introducedinternal variables such as TNOW, NR(), etc. They’re constantly updated and provide lots of relevant info. Next Time: How to display variables, graphs, and results. Summary
  • 70.
    Computer Simulation Module 5:Arena Dave Goldsman, Ph.D. Displaying Variables, Graphs, and Results Stewart School of Industrial and Systems Engineering Professor
  • 71.
    Last Lesson: Talkedabout some useful internal variables that Arena constantly updates. This Lesson: How can we display the values of certain variables in real time, construct graphs, and produce output result files? Lesson Overview
  • 72.
    • Getting Information •How to display information as the simulation is running? – Arena provides lots of capability. – For example, consider the toolbar... – You can get an analog or digital clock. – Calendar – Variable displays, which keep track of the values of variables in real time. – Histograms – Graphs • When the simulation is over, it will automatically generate an output report giving info on server usage, queue length, customer waits and cycle times, and other user-defined quantities. • Demo time, including drill press example!
  • 73.
    This Time: Discussedways to display the values of certain variables in real time, construct graphs, and produce output files. Next Time: A quick tutorial on the Batch, Separate, and Record modules. Summary
  • 74.
    Computer Simulation Module 5:Arena Dave Goldsman, Ph.D. Displaying Variables, Graphs, and Results Stewart School of Industrial and Systems Engineering Professor
  • 75.
    Last Lesson: Talkedabout some useful internal variables that Arena constantly updates. This Lesson: How can we display the values of certain variables in real time, construct graphs, and produce output result files? Lesson Overview
  • 76.
    • Getting Information •How to display information as the simulation is running? – Arena provides lots of capability. – For example, consider the toolbar... – You can get an analog or digital clock. – Calendar – Variable displays, which keep track of the values of variables in real time. – Histograms – Graphs • When the simulation is over, it will automatically generate an output report giving info on server usage, queue length, customer waits and cycle times, and other user-defined quantities. • Demo time, including drill press example!
  • 77.
    This Time: Discussedways to display the values of certain variables in real time, construct graphs, and produce output files. Next Time: A quick tutorial on the Batch, Separate, and Record modules. Summary
  • 78.
    Computer Simulation Module 5:Arena Dave Goldsman, Ph.D. Batch, Separate, and Record Modules Stewart School of Industrial and Systems Engineering Professor
  • 79.
    Last Lesson: Lookedat a bunch of ways to obtain information during and after the run – e.g., histograms, graphs, output reports. This Lesson: Discuss the Batch, Separate, and Record modules. These are the last modules for the Basic Process template… We’re making good progress! Lesson Overview
  • 80.
    • Batch Module •Combine (“batch”) multiple customers into one “super”-customer. • Batch Size = 3 accumulates 3 guys before sending off the super-customer. • If info about the individual customers in a batch won’t be needed later on, then choose Type = Permanent. • But if you want eventually to reconstitute the original members, set Type = Temporary. • Temporary batches will need to be split before being Dispose’d (keep watching).
  • 81.
    • Separate Module •Duplicate a single entity, or split multiple entities that had been combined in a Batch module. • If dealing with a Permanent batch, usually use Duplicate Original to get several customers all with the same attributes. • If dealing with a Temporary batch, use Split Existing Batch to reproduce customers with original attributes.
  • 82.
    Record Module • Collectstatistics when an entity passes through the module. • We’ll talk more about this module as we encounter it in future examples. • Demo Time! Now we’ll look at a couple of permutations of the Batch and Separate modules.
  • 83.
    This Time: Finishedoff the Basic Resources template with the Batch, Separate, and Record modules. Next Time: We’ll look at a bunch of Run Setup and other control functionalities. Summary
  • 84.
    Computer Simulation Module 5:Arena Dave Goldsman, Ph.D. Run Setup and Control Stewart School of Industrial and Systems Engineering Professor
  • 85.
    Last Lesson: Finishedoff the Basic Resources template with the Batch, Separate, and Record modules. This Lesson: We’ll be looking at a bunch of easy little trivia points to help you get your simulation runs going efficiently. Lesson Overview
  • 86.
    • Run Setup Run> Setup gives you lots of stuff. • Replication Parameters tab – Number of Reps: # of indep runs. – Initialize Between Reps: Do you start the stats collection and/or system state from scratch for each replication? – Warm-up Period: How long to run before you start keeping data. – Rep Length: How long each run is. – Terminating Condition: Any special ways to stop the simulation (besides rep length condition from this tab or max arrivals from Create module)?
  • 87.
    • Run Setup(cont’d) • Run Speed tab: Often need to speed up or slow down the simulation by more than what you can do on the main screen. • Reports: Arena has a variety of reports that it gives upon completion of a run. – Contains info on customer waits, lengths of queues, server utilizations, user- defined variables, etc. – Category Overview summarizes all reps. – Category by Replication gives tedious info about each rep. – SIMAN Report gives concise text file. SIMAN report
  • 88.
    Run > Setup> Run Control gives a variety of ways that you can run the simulation. Example: Batch mode, which turns off all graphics and result in extremely fast runs. Demo Time! Let’s… • Look at some reports. • Stop the simulation the first time the queue size hits 4. Run Control
  • 89.
    This Time: Learnedhow to do various setup and run control tasks. For instance, we heard about independent reps, run termination from the setup menu, and output reports. Next Time: A small case study for a two-channel manufacturing system, where we put a lot of the previous material together. Summary
  • 90.
    Computer Simulation Module 5:Arena Dave Goldsman, Ph.D. Simple Two-Channel Manufacturing Example Stewart School of Industrial and Systems Engineering Professor
  • 91.
    Last Lesson: Discussedvarious various run setup and control tasks. E.g., how to implement indep reps, run speed, reports. This Lesson: Demo a two- channel manufacturing system, where we finally put a lot of the previous material together. Watch how we use attributes! Lesson Overview
  • 92.
    • The Story •This is Model 4-1 “An Electronic Assembly and Test System” from the KSZ (2015) text, Simulation with Arena. • Two different arrival streams – Type A parts show up 1-at-a-time; Type B’s 4-at-a-time. – Type A’s show up a little more often than Type B’s. • A’s feed into a Prep A server; B’s go to Prep B. Different service times. • Then the parts get processed by the same Sealer server, but again with different service time distributions. • All parts undergo an inspection. If they pass, they exit. • If they don’t pass, they go to a Rework server, and then another inspection. Whether or not they pass, they exit the system.
  • 93.
    • The Story(cont’d) I stole this flowchart from KSZ…
  • 94.
    • The Story(cont’d) • How to handle different A and B service times at Sealer? – Trick 1: Pre-assign the service times as an attribute (Sealer Time) in an Assign module immediately after each customer arrives. Use that attribute regardless of being a Type A or B part. – Trick 2: While we’re at it, use the Assign to store each customer’s arrival time as an attribute. Use the Arena variable TNOW to do so. • Record departure times just before parts get Dispose’d, This will allow us to get average cycle times (depart – arrival times) for any of the 3 types of parts (pass on first try, pass on second, fail both).
  • 95.
    • Let’s GetLogical • Dave’s Alternative Trick: Is there another way to model the process time at the Sealer without having to assign a Sealer Time attribute for A’s and B’s? • Yes! It involves a little work, but it’s nice to know. – Note that the entity types (Part A and Part B) are assigned in the respective Create modules. – Instead of assigning the Sealer Time as an attribute in the Assign module, we can just wait until the Sealer Process module and use the following logical expression, where (x==y) = 1 if x=y, and 0 otherwise. (See why?) ((Entity.Type == Part A) * TRIA(1,3,4)) + ((Entity.Type == Part B) * WEIB(2.5,5.3))
  • 96.
  • 97.
    This Time: Ourfirst “real” system – a small manufacturing system. Learned a couple of nice tricks involving attributes and logic. Next Time: Fake Customers! Summary
  • 98.
    Computer Simulation Module 5:Arena Dave Goldsman, Ph.D. Fake Customers Stewart School of Industrial and Systems Engineering Professor
  • 99.
    Last Lesson: Demo’da small electronic assembly and test system. This Lesson: We’ll talk about “fake” customers! Idea: These aren’t real customers at all… their purpose is just to do some task that Arena needs. Lesson Overview
  • 100.
    The Next FewLessons We’ll now cover material that will lead us to the simulation of a call center: • Fake Customers  now • The Advanced Process Template • Resource Failures + Maintenance • The Blocks Template • The Joy of Sets • Description of Call Center • Call Center Demo
  • 101.
    Fake Customers • Youcan use “fake” customers to accomplish various tasks during a simulation. • Not actual customers that you care about in terms of waiting times or use of resources. • Demo Time will explain all! – Calculate normal probabilities – Keep track of which time period you’re in (part of Call Center example coming up) – Breakdown demon
  • 102.
    This Time: Talkedabout fake customers. We’ll be using these several times in upcoming applications. Next Time: Now that we’re experts in the Basic Process template, we’ll move on to the Advanced Process template for more good stuff! Summary
  • 103.
    Computer Simulation Module 5:Arena Dave Goldsman, Ph.D. The Advanced Process Template Stewart School of Industrial and Systems Engineering Professor
  • 104.
    Last Lesson: Introduced“fake” customers, which can be used for a variety of purposes, including arrivals of breakdown demons. This Lesson: We’ll add to our arsenal of modules by introducing the Advanced Process template! Idea: Lots of great new stuff, though I don’t expect you to memorize everything. Lesson Overview
  • 105.
    • Advanced ProcessTemplate • File > Template Panel > Attach (and hopefully you find it in the Rockwell Software Arena Template directory). • Lots of new modules and spreadsheets. • I don’t expect you to memorize them all. • Concentrate for now on a few of these (comment on others later): – Seize, Delay, Release modules – Expression, Failure spreadsheets.
  • 106.
    • Seize, Delay,Release • Why do we have separate Seize, Delay, and Release modules? Aren’t they right there in the Process module? • Yup, but sometimes you need to do things that are too complicated for the Process module version of Seize–Delay–Release. • Now you can handle things like… – Seize–Assign–Delay–Release – Non-symmetric multiple Seize’s and Release’s – Complicated Seize’s and Release’s that might depend on sets of servers (as in the upcoming Call Center example) • Demo Time! – Will talk about some of these Seize, Delay, Release issues. – Will also sneak in some wisdom about the Expression spreadsheet.
  • 107.
    This Time: Learnedabout the Advanced Process template, which gives us a new bag of tricks to play with! Next Time: How to deal with resource failures and maintenance. Summary
  • 108.
    Computer Simulation Module 5:Arena Dave Goldsman, Ph.D. Resource Failures and Maintenance Stewart School of Industrial and Systems Engineering Professor
  • 109.
    Last Lesson: Learnedabout the Advanced Process treasure chest. This Lesson: We’ll study model breakdowns and maintenance in a way that’s more direct than via fake customers. Idea: It’s just a certain type of schedule! Lesson Overview
  • 110.
    • Failures • Youcan cause resource failures by scheduling “breakdown demons” (fake customers with high priority). But this isn’t elegant. • Better way is to use the Resource and Failure spreadsheets in conjunction with each other.
  • 111.
    • Failures (cont’d) •Go to Resource spreadsheet in the Basic Process template. • Click on Failures column. • Add a Failure Name. • Choose Failure Rule (will discuss in a minute). • Go to the Failure spreadsheet in the Advanced Process template, where you’ll see your new failure name. • Choose type of failure: – Count (failure after a certain # of arrivals) – Time (after a certain amount of time) • Choose downtime (for repair): Can be any expression.
  • 112.
    • Remarks • Canschedule multiple failures by using multiple rows of the Failures column in the Resource spreadsheet, e.g., type I failure, type II failure, scheduled maintenance. • Types of Failure Rules: – Ignore (complete service of current customer, but reduce repair time). E.g., if repair time = 1 hour and cust still needs 10 min, then repair time gets reduced to 50 min and finishes at 60 min mark. – Wait (complete service of current cust and delay repair). E.g., if repair time = 1 hr and cust needs 10 min, then repair finishes at 70 min mark. – Preempt (stop service of current cust, but complete service after the repair). Repair stops at 60 min mark, cust finishes at 70 min mark. • Demo Time!
  • 113.
    This Time: Howironic! We succeeded in learning how to implement failures in Arena! Next Time: A quick intro to the Blocks template, which gives us a kraaAaZy number of new things to look at… but we’ll be very gentle about this. Summary
  • 114.
    Computer Simulation Module 5:Arena Dave Goldsman, Ph.D. The Blocks Template Stewart School of Industrial and Systems Engineering Professor
  • 115.
    Last Lesson: Discussedthe implementation of resource failures. This Lesson: We’ll add to our bag of tricks by introducing the Blocks template. These are lots or blocks in this template, but don’t be intimidated. Lesson Overview
  • 116.
    • Blocks Template •File > Template Panel > Attach (and hopefully you find it in the Rockwell Software Arena Template directory). • Huge number of blocks! • Do not be scared! • They’re sort of a self-contained language (related to SIMAN). • Very specialized and low-level. • Very useful, but we’ll only need a few for now: – Seize, Delay, Release, Queue, Alter
  • 117.
    • Eh?? • Yikes!Why are we seeing stuff like Seize, Delay, Release yet again!? At least two reasons… – Arena has been built in many layers over the years, and these are what’s left from SIMAN – the “original” incarnation of Arena. – But in any case, and for whatever reason, certain primitive blocks such as the Queue block can’t even connect to a Seize module from the Advanced Process template or a Process module from the Basic Process template. So you’re stuck! • Demo Time! – A Queue-Seize-Delay-Release example using primitive blocks (we’ll see this again in the Call Center example coming up). – Using the Alter block to change the number of resources.
  • 118.
    This Time: TheBlocks template! Later on, we’ll find a number of interesting uses for some of these guys. Next Time: The joy of sets! How to use certain vectorized sets to make modeling easier. Summary
  • 119.
    Computer Simulation Module 5:Arena Dave Goldsman, Ph.D. The Joy of Sets Stewart School of Industrial and Systems Engineering Professor
  • 120.
    Last Lesson: Talkedabout the Blocks template, which we’ll occasionally use to help with specialized little issues. This Lesson: What are sets, and how do they enhance our modeling ability? Idea: We’ll especially concentrate on resource sets. Lesson Overview
  • 121.
    Sets • As inbaby math class, a set is just a group of elements. Elements are allowed to belong to more than 1 set. • “Elements” can mean a lot of things in Arena, and so there are various types of sets: – Resource (e.g., a set of servers) – Counter – Tally – Entity Type – Entity Picture – …and tougher stuff later
  • 122.
    • Resource Sets •Use the Set spreadsheet in the Basic Process template to define sets. • We’ll just study resource sets for now. • A “vanilla” resource has identical, interchangeable servers. But a resource set can have distinct servers, with different schedules, service speeds, service specialties, etc. • Call Center Example: Three products with the following resources – Product 1: Charity, Noah, Molly, Anna, Sammy – Product 2: Tierney, Sean, Emma, Anna, Sammy – Product 3: Shelley, Jenny, Christie, Molly, Anna, Sammy – Molly, Anna, and Sammy all have degree of cross-functionality. – All 11 servers turn out to have different schedules (more on that later)
  • 123.
    • Resource Sets •To define the resource set Product 1, choose Type = Resource, click in Members, then enter Product 1’s servers under Resource Name. • Product 1’s “Preferred Order” is to try Charity first. If she’s not available, try Noah. Save Sammy for last because he’s cross- functional. Other orders are possible.
  • 124.
    • Seize-Delay-Release • Haveto be a little careful with Seize-Delay-Release for a resource set. • The problem is that you have to make sure that you Release the same guy that you originally Seize’d. (If you release a random server, some other customer may lose his server!) • Let’s Seize a server from the set Product 1 in Preferred Order. Make sure we remember who it is. Then when we’re done, Release that same guy.
  • 125.
    • Seize-Delay-Release (cont’d) •Seize Quantity = 1 guy from the set Product 1 in the Preferred Order. Save the “name” of that server in the customer’s Save Attribute called Tech Agent Index. • Later, Release that Specific Member stored in Tech Agent Index.
  • 126.
    • Remarks • VariousSeize Selection Rules are possible: – Cyclical – Random – Preferred Order – Specific Member – Largest Remaining Capacity – Smallest Number Busy • This stuff will be very useful when we do our Call Center example. • Demo Time! A simple model with 4 servers.
  • 127.
    This Time: Howjoyful! We introduced sets, especially resource sets. Then we showed how to use Seize-Delay-Release with such sets. Next Time: We’ll describe in Plain English the Call Center example that seems to be all the rage these days. Summary
  • 128.
    Computer Simulation Module 5:Arena Dave Goldsman, Ph.D. Description of Call Center Example Stewart School of Industrial and Systems Engineering Professor
  • 129.
    Last Lesson: Mainlydiscussed resource sets, and how to use Seize-Delay-Release with them. Have to be a little careful. This Lesson: What we’ve all been waiting for! Let’s start describing the Call Center example. When we’re done with this, you can be consultants! Lesson Overview
  • 130.
    Call Center Description Programis arranged in submodels. • Create and Direct Arrivals – How often do calls show up and where do they go? • Tech Support Calls – What kind of tech support do you need? • Returned Tech Calls – Sometimes the guy has to get back to you. • Sales Calls • Order Status Calls • Time Period Counter – What ½-hour period of the day is it? Submodel
  • 131.
    Arrivals Calls show upaccording to a nonhomogeneous Poisson process. • The center accepts calls from 8:00A till 6:00P. – The arrival rates change every half hour (see table below from KSZ). – Also see Arrival Schedule in the Basic Process Schedule spreadsheet. • A few staff actually stay at work until 7:00P, in order to let the calls at the end of the day clear out. (You have to explicitly model 0 arrivals for the last two half-hour segments of the Arrival Schedule.)  These rates are per hour (even though time intervals are 30 min) Time Rate Time Rate Time Rate Time Rate 8:00 – 8:30 20 10:30– 11:00 75 1:00– 1:30 110 3:30– 4:00 90 8:30– 9:00 35 11:00– 11:30 75 1:30– 2:00 95 4:00– 4:30 70 9:00– 9:30 45 11:30– 12:00 90 2:00– 2:30 105 4:30– 5:00 65 9:30– 10:00 50 12:00– 12:30 95 2:30– 3:00 90 5:00– 5:30 45 10:00– 10:30 70 12:30– 1:00 105 3:00– 3:30 85 5:30– 6:00 30
  • 132.
    Phone Lines There are26 phone lines. If you get a busy signal, you balk and get killed off. • Use a Queue block with capacity 0 to try to Seize a line. If the Seize fails, there’s no place to go in the Queue, and out you go. • The Queue and Seize both come from the Blocks template panel. This is the only place where you can get a Queue block, and it only connects to this kind of Seize. (Recall that you can also use a Seize within a Process module in the Basic Process template, and there’s another Seize in the Advanced Process template!)
  • 133.
    Types of Calls Thereare 3 general types of calls, which we’ll handle with an “N-way by Chance” Decide module. Each customer hears a recording for a UNIF(0.1,0.6) amount of time, while he makes his choice of call type. • 76% go to Tech Support. • 16% go to Sales. – There are 7 identical, faceless Sales guys that we’ll need to schedule (but not on an individual basis). – Sales calls take TRIA(4,15,45). • 8% go to Order Status. – Most callers can do self-service in a TRIA(2,3,4) amount of time. But… – 15% of customers need a Sales guy for TRIA(3,5,10).
  • 134.
    Tech Support There are3 specific types of Tech Support calls (which we’ll again handle via a Decide module): • 25% are for Product 1. • 34% are for Product 2. • 41% are for Product 3. • Each customer gets another recording for a UNIF(0.1,0.5) amount of time, while he makes his choice. • All Tech Support calls require staff for a TRIA(3,6,18) duration of time.
  • 135.
    Call Backs 4% ofTech Support calls require additional investigation. • This additional investigation is carried out by another group of staff that we won’t worry about. The customer’s original server is freed up when he makes the determination that more research is needed. • The investigation takes an EXPO(60) amount of time. • At that point, the original Tech Support guy will call the customer back using one of the 26 phone lines (but with high priority). • That call takes TRIA(2,4,9) time.
  • 136.
    Tech Support Info TechSupport staff have some interesting issues. • They all have 8 hr days + 30 min for lunch. • They all have different schedules. We’ll need Resource Schedules to model this on an individual basis. • They all have different product expertise. We’ll need Sets to model this. Here are the Preferred Orders for the sets: – Product 1: Charity, Noah, Molly, Anna, Sammy – Product 2: Tierney, Sean, Emma, Anna, Sammy – Product 3: Shelley, Jenny, Christie, Molly, Anna, Sammy
  • 137.
    Tech Support StaffSchedules (from KSZ)
  • 138.
    This Time: Gavea long, tedious verbal description of the Call Center model. Next Time: Gigantic Demo Time! Now we get to see the Arena program in its full glory! Summary
  • 139.
    Computer Simulation Module 5:Arena Dave Goldsman, Ph.D. Call Center Stewart School of Industrial and Systems Engineering Professor
  • 140.
    Last Lesson: PlainEnglish description of the Call Center model, along with some Arena details (but no actual demo). This Lesson: It’s Demo Time! Idea: We’re putting together ideas from many of the recent lessons. Everything from fake customers to resource sets. Lesson Overview
  • 141.
    Be On TheLookout As we go thru the model, keep an eye out for some interesting things… • Submodels • Fake customers used as timers • Use Queue with capacity 0 to kick out callers getting busy signal • NHPP arrivals • 3 resource sets for Tech Support • Tricky Seize-Delay-Release • Quirky callback procedure Demo Time!
  • 142.
    Top-Level View Tech SupportSubmodel Time Period Counter Arrivals Submodel
  • 143.
    This Time: Weput together a lot of stuff and finally demo’d the Call Center example in all of its radiant glory. Next Time: We’ll describe an Inventory system in Plain English before doing an analogous demo. Summary
  • 144.
    Computer Simulation Module 5:Arena Dave Goldsman, Ph.D. An Inventory System Stewart School of Industrial and Systems Engineering Professor
  • 145.
    Last Lesson: CallCenter simulation demo. This Lesson: Plain English description of simple Inventory system and then a demo. Lesson Overview
  • 146.
    The Next FewLessons We’ll now look at several demos. • An Inventory Model  now • One Line vs. Two Lines? • A Re-entrant Queue • SMARTS files and Rockwell demos • A Manufacturing System (with transporters, conveyors, …)
  • 147.
    • Description of(s,S) Policy • Simulate the widget inventory stock over time. • Use modules from the Basic and Advanced panels. • Customer interarrivals are EXPO(0.1). • Demand size is a DISC function. • Demand is always “met” (backlogged, if necessary). • Inventory is “taken” at the start of each day. • If inventory is below s, we order up to S. • Delivery lead time is UNIF(0.5,1) before order arrives (pretty quick, but by the time it arrives, other customers will have arrived). • Order costs (set-up + incremental), holding costs, penalty costs.
  • 148.
    • Description (cont’d) •Calculate average total cost per day over 120 days. • Inventory, unit costs, and all of the other parameters are variables. • Inventory is decremented by demands, incremented by orders. • Interarrival times, demands, lead time, are expressions from Advanced Process template. • Accumulated costs are calculated in the Statistic spreadsheet in the Advanced panel. • Daily inventory review is conducted by a “fake” customer. Demo Time!
  • 149.
    This Time: Discussedand demo’d a nice little (s,S) inventory policy. Next Time: One Line, Two Lines, Red Line, Blue Line? https://www.youtube.com/watch?v=yauPbZKzChs Summary
  • 150.
    Computer Simulation Module 5:Arena Dave Goldsman, Ph.D. One Line vs. Two Lines? Stewart School of Industrial and Systems Engineering Professor
  • 151.
    Last Lesson: Weworked on an (s,S) inventory policy example. This Lesson: Should we use one line feeding into two parallel servers or separate lines feeding into two individual servers? Idea: We’ll use a very cool trick called common random numbers to do an apples-to- apples comparison. Lesson Overview
  • 152.
    • Game Plan •Option A: Customers show up and join one line in front of two identical servers. They go to whichever server is available first. • Option B: Customers randomly choose which of two lines (in front of single servers) to join. • Will compare which of A or B is better by using: – The exact same customer arrivals (thanks to a Separate module), and – The same service times for a particular customer whether or not he’s doing A or B (thanks to an early Assign module). • Almost certainly, Option A is better (why?) • Matching up the arrival and service times makes things easier for us statistically. “Common Random Numbers”
  • 153.
  • 154.
    This Time: UsedArena to compare two different server configurations for a simple queueing system. Next Time: We’ll look at a kraaAaZy re-entrant queueing system. Very non-intuitive, very kool. Simulation was the first way people used to analyze these things. Summary
  • 155.
    Computer Simulation Module 5:Arena Dave Goldsman, Ph.D. A Crazy Re-entrant Queue Stewart School of Industrial and Systems Engineering Professor
  • 156.
    Last Lesson: Wecompared different queueing strategies – one line vs. two lines. This Lesson: A more-interesting system – a re-entrant queue. Idea: If you re-use servers and mess around with priorities, you can get some pretty non-intuitive outcomes! Lesson Overview
  • 157.
    Re-entrant Queues • Customersgo to Server 1, then to Server 2, then back to Server 1, back to 2, and finally back to 1. That is, 1  2  1  2  1. – These returns are why we call the queues “re-entrant”. – They’re depicted in Arena as 5 separate Process modules with Seize-Delay- Release trios. (It’s OK to Seize the same server in different Process modules.) • This seems like a perfectly boring model. Let’s make it interesting. – All service times are exponential. Here are the means: 1 (0.1)  2 (0.5)  1 (0.1)  2 (0.1)  1 (0.5) – …and the customer priorities: 1 (low)  2 (high)  1 (medium)  2 (low)  1 (high) – Thus, on the customer’s 3rd visit to Server 1, he has a high-priority EXPO(0.5) service time.
  • 158.
    Get ready for…Demo Time! You’re gonna see mind-blowing behavior!
  • 159.
    This Time: Socool, so very cool. Words escape me. Next Time: We’re going to get smart… literally! SMARTS files!  Summary
  • 160.
    Computer Simulation Module 5:Arena Dave Goldsman, Ph.D. SMARTS and Rockwell Files Stewart School of Industrial and Systems Engineering Professor
  • 161.
    Last Lesson: Re-entrantQ’s and phenomenal behavior! This Lesson: Rockwell has hidden away some beautiful little gems: SMARTS files and demos. Idea: These make great bedtime reading. Lesson Overview
  • 162.
    • SMARTS +Rockwell Demos • SMARTS: Very nice tutorial files organized by subject area. – E.g., there’s a SMARTS file to create customers with a time-dependent arrival rate that varies according to an equation (an expression). – 100s of SMARTS files • Rockwell has also prepared many professional demos. • Libraries > Documents > Rockwell Software > Arena • Some Typical Examples that we’ll demo: – SMARTS - Arrivals Varying Rate via Expression – SMARTS - Queues Evaluate Conditions Before Proceeding – Rockwell Emergency Room – Rockwell Mission to Mars Demo Time!
  • 163.
    This Time: Lookedat several Rockwell SMARTS and demo files. Next Time: We’ll demo a easy- looking yet fairly sophisticated manufacturing cell, along with a couple of variations involving transporters and conveyors. Summary
  • 164.
    Computer Simulation Module 5:Arena Dave Goldsman, Ph.D. A Manufacturing System Stewart School of Industrial and Systems Engineering Professor
  • 165.
    Last Lesson: CoolSMARTS and Rockwell demos. This Lesson: We’ll demo a easy- looking yet fairly sophisticated manufacturing cell, along with a couple of variations involving transporters and conveyors. Idea: Introduce movement and multiple part paths. Extremely useful stuff that generalizes! Lesson Overview
  • 166.
    • Description • Manufacturingcell with 3 types of parts. • Each part type follows a different path (“sequence”) thru the system. – Different service times at each station (depending on part type and place in visitation sequence). – E.g., Part type 2’s visit stations 1 > 2 > 4 > 2 > 3, each with different service times. • Movement requires the Advanced Transfer template – Route, Station, Enter, Leave modules – Sequences spreadsheet – “Advanced Sets” (which is where the sequences come in). • Parts can move in a variety of ways: – By themselves, transporters, conveyors. – Requires construction of transporter and conveyor paths
  • 167.
  • 168.
    This Time: Wedid demos on a small, yet sophisticated manufacturing cell, along with some variants involving movement. Next Time: Details and generalizations of this model Summary
  • 169.
    Computer Simulation Module 5:Arena Dave Goldsman, Ph.D. A Manufacturing System in Detail Part 1. Introduction + Advanced Transfer Panel Stewart School of Industrial and Systems Engineering Professor
  • 170.
    A bunch ofadditional lessons related to our Manufacturing Example! 1. Advanced Transfer Panel Modules related to movement – Station, Route, Enter, Leave 2. Sequences of visitation locations 3. Sets and Advanced Sets (e.g., sets of Sequences) 4. Detailed walk-through of the model 5. Parts can move in a variety of ways: – By themselves – Via transporters – Via conveyors – Requires construction of transporter and conveyor paths Coming Up…
  • 171.
    An entire panelrelated to movement 1. This Lesson: Where you move – Station: Somewhere you can go to – Route: Tells you where you’re going. Similar to Connect, except it takes time – Enter: General way to get into a Station – Leave: General way to depart a Station 2. Subsequent Lessons: How you move Mini-Demo with Station and Route! Advanced Transfer
  • 173.
    Computer Simulation Module 5:Arena Dave Goldsman, Ph.D. A Manufacturing System in Detail Part 2. Sequences Stewart School of Industrial and Systems Engineering Professor
  • 174.
    A bunch ofadditional lessons related to our Manufacturing Example! 1. Advanced Transfer Panel Modules related to movement – Station, Route, Enter, Leave 2. Sequences of visitation locations 3. Sets and Advanced Sets (e.g., sets of Sequences) 4. Detailed walk-through of the model 5. Parts can move in a variety of ways: – By themselves – Via transporters – Via conveyors – Requires construction of transporter and conveyor paths Coming Up…
  • 175.
    Each type ofcustomer follows a different path (sequence) thru the system. – A sequence goes from station to station – Maybe have different service time distribution at each station (depending on customer type and place in visitation sequence). Example: – Part Type 1’s visit stations 1 > 2 > 3 > 4 – Part Type 2’s visit 1 > 2 > 4 > 2 > 3 – Part Type 3’s visit 2 > 1 > 3 – Each with different service times distributions Sequences
  • 176.
    Three different Sequences PartType 2 Sequence Type 2 Process Time at Cell 2 Defining Sequences and Assigning Attributes Demo Time!
  • 177.
    Computer Simulation Module 5:Arena Dave Goldsman, Ph.D. A Manufacturing System in Detail Part 3. Advanced Sets Stewart School of Industrial and Systems Engineering Professor
  • 178.
    A bunch ofadditional lessons related to our Manufacturing Example! 1. Advanced Transfer Panel Modules related to movement – Station, Route, Enter, Leave 2. Sequences of visitation locations 3. Sets and Advanced Sets (e.g., sets of Sequences) 4. Detailed walk-through of the model 5. Parts can move in a variety of ways: – By themselves – Via transporters – Via conveyors – Requires construction of transporter and conveyor paths Coming Up…
  • 179.
    • Found inAdvanced Process panel • Used for kraaAaZy types of sets, e.g., sets of sequences! • Our Advanced set will be called Part Sequences, and will consist of the “elements” (sequences): {Part 1 Process Plan, Part 2 Process Plan, Part 3 Process Plan} • Think of Part Sequences as a vector, Part Sequences(2) = Part 2 Process Plan Advanced Sets Mini-Demo!
  • 180.
    Computer Simulation Module 5:Arena Dave Goldsman, Ph.D. A Manufacturing System in Detail Part 4. Model Walk-Through Stewart School of Industrial and Systems Engineering Professor
  • 181.
    A bunch ofadditional lessons related to our Manufacturing Example! 1. Advanced Transfer Panel Modules related to movement – Station, Route, Enter, Leave 2. Sequences of visitation locations 3. Sets and Advanced Sets (e.g., sets of Sequences) 4. Detailed walk-through of the model 5. Parts can move in a variety of ways: – By themselves – Via transporters – Via conveyors – Requires construction of transporter and conveyor paths Coming Up…
  • 182.
    • Description • Manufacturingcell with three types of parts. • Each part type follows a different path (“sequence”) thru the system. – Different service times at each station (depending on part type and place in visitation sequence). – E.g., Part Type 2’s visit stations 1 > 2 > 4 > 2 > 3, each with different service times. • Movement requires the Advanced Transfer template – Route, Station modules (will look at Enter and Leave modules later) – Sequences spreadsheet – Advanced Sets (which is where the sequences come in). • Service times usually handled in Sequence definitions (except Cell 1) • Cell 3 has two servers: An old slow guy, and a young 20% faster guy
  • 183.
  • 184.
    Computer Simulation Module 5:Arena Dave Goldsman, Ph.D. A Manufacturing System in Detail Part 5. Transporters and Conveyors Stewart School of Industrial and Systems Engineering Professor
  • 185.
    A bunch ofadditional lessons related to our Manufacturing Example! 1. Advanced Transfer Panel Modules related to movement – Station, Route, Enter, Leave 2. Sequences of visitation locations 3. Sets and Advanced Sets (e.g., sets of Sequences) 4. Detailed walk-through of the model 5. Parts can move in a variety of ways: – By themselves – Via transporters – Via conveyors – Requires construction of transporter and conveyor paths Coming Up…
  • 186.
    We’ll look atENTER – LEAVE modules for Station-to-Station movement. Different way you can travel, via… • Resource (e.g., an assistant) – Seize-Release • Transporter (e.g., a car) – Request-Free – Requires Distance Set • Conveyor – Access-Exit – Requires Segment Set Other Ways to Move Demo Time!
  • 187.
    Last Few Lessons:We discussed in detail a small, yet sophisticated manufacturing cell, along with some variants involving movement. This ends our module on Arena. • We’ll still see Arena later on. • We only scratched the surface. Next Time: An entire module on generating Unif(0,1)’s!!! Summary