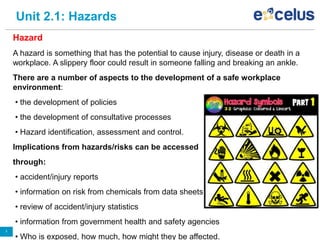
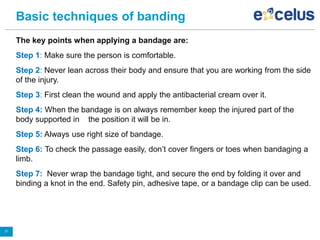
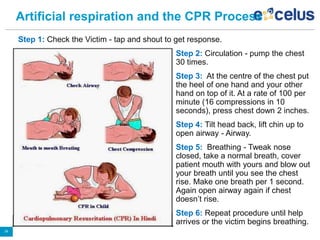
2. Occupational health and safety (OHAS)
Training & Skill Development
Email: tsd.content@ikyaglobal.com
OBJECTIVES:
M2/ Lesson 02 Occupational health and safety (OHAS)
2
UNIT 2.1 – HAZARD
UNIT 2.2 – SAFE WORKING PRACTICES
UNIT 2.3 – EMERGENCIES AND FIRST AID PROCEDURES
UNIT 2.4 – REPORTING AND DOCUMENTATION
Unit 2.1: Hazards
Hazard
A hazard is something that has the potential to cause injury, disease or death in a
workplace. A slippery floor could result in someone falling and breaking an ankle.
There are a number of aspects to the development of a safe workplace
environment:
• the development of policies
• the development of consultative processes
• Hazard identification, assessment and control.
Implications from hazards/risks can be accessed
through:
• accident/injury reports
• information on risk from chemicals from data sheets
• review of accident/injury statistics
• information from government health and safety agencies
• Who is exposed, how much, how might they be affected.
3
Types of Hazard
4
Physical hazards
During the coal unloading, preparation and handling operations, thousands of
tones of coal are manipulated, producing dust, noise and vibrations.
The presence of large quantities of accumulated dust can produce an explosion
hazard in addition to the inhalation hazard.
• During coking, ambient and radiant heat are the major physical concerns,
particularly on the topside of the batteries, where the majority of the workers are
deployed.
• Noise may be a problem in mobile equipment, primarily from drive mechanism
and vibrating components that are not adequately maintained.
Types of Hazard
Chemical hazards
• The major health concern associated with coking operations is emissions from the
ovens during charging of the coal, coking and pushing of the coke.
• Materials utilized for sealing leaks in lids and doors may also be a concern during
mixing and when lids and doors are removed.
5
6
Types of Hazard
Mechanical hazards
• The mechanical hazards of greatest concern are associated with the mobile
equipment on the pusher side, coke side and the larry car on top of the battery.
Caught-between and struck-by accidents associated with mobile rail-type
equipment account for the highest number of fatal coke-oven production incidents.
• Skin surface burns from hot materials and surfaces and eye irritation from dust
particles are responsible for more numerous, less severe occurrences.
Types of Hazard
7
Electrical hazards
The main hazards of working with electricity are:
• electric shock and burns from contact with live parts
• injury from exposure to arcing, fire from faulty electrical equipment or
installations
• explosion caused by unsuitable electrical apparatus.
Unit 2.2 Safe working practices
8
Safe working practices
Safe practices for avoiding general shop hazards
• Never use compressed air to blow chips away from a machine
• Keep the floor clear of stock and tools, and clean spilled oils or coolants
• Know where the fire extinguisher is kept and how to use it
• Always keep machines turned off when making adjustments to them
Things you must do
To make sure that chemicals are stored and handled safely at your workplace you must:
• store the chemicals according to manufacturer instructions
• use and handle the chemicals according to manufacturer instructions
• ensure that stored chemicals cannot mix or react with incompatible substances. This
may include apparently harmless substances, such as dust, air or water
• make provision for containing spillages of chemicals so that they cannot come into
contact or mix with incompatible substances through spillage or leakage, as this may
release toxic gases, cause fire or an explosion
Things you must do
• Ensure that chemicals are not allowed to contaminate food, food packaging or
personal use products, including animal food and ingredients for either human or
animal consumption
• Identify potential ignition sources and ensure they are kept away from flammable
chemicals – this can be done by providing adequate protection or by separation.
This is particularly important if maintenance is carried out involving welding or
gas cutting
• ensure that bulk containers for chemicals have stable foundations and supports
• ensure that all risks are controlled when transferring chemicals within, to, or from
the premises
• ensure all chemical containers are protected from damage that may be caused
by impact, load or mechanical stress. This includes pipe work, attachments and
other equipment
• minimise the risk of fire spreading to or from the chemicals. Providing protection,
such as fire rated barriers or distances between sheds may assist.
9
Personal protective equipment (PPE)
10
• Personal protective equipment serves as the last resort for controlling hazards
and is one, but not the only, ancillary or temporary measure. To make full and
proper use of personal protective equipment, one should first make sure that the
equipment can fulfill the working requirements.
Personal Protective Equipment
• • Safety helmet: Safety helmets protect the head of the wearer from injuries
caused by falling or wavering objects.
• Earmuffs, earplugs: Earmuffs and earplugs protect the ears of the wearer from
injuries by loud noises.
Personal protective equipment (PPE)
11
• • Goggles, visor: Goggles and visors protect the eyes of the wearer from
injuries caused by strong light or flying objects.
• • Safety boots: Safety boots protect the feet of the wearer from injuries, puncture
wounds and slipping.
• • Hand Protection: Gloves should fit snugly. Workers wear the right gloves for
the job (for example, heavy-duty rubber gloves for concrete work, welding gloves
for welding, insulated gloves and sleeves when exposed to electrical hazards).
Safe material Handling
12
Every worker has to lift and move heavy material during the job whenever required.
He may be required to move the job manually or by using forklift for lifting and
moving. Extreme care should be taken while lifting or moving the job so that no
damage occurs to the job or plant and also to prevent accidents at work place.
• • Lifting and moving the job manually
• • Lifting or moving the job using fork lift
• • Assist in lifting of heavy job
• • Attaching the job to the overhead crane’s sling / hook in a proper and balanced
manner.
Safe material Handling
13
Points to be taken care of while lifting / moving material
• Lift the materials in correct posture.
• Do not try to lift too heavy materials alone.
• Ensure the grip is right so that the job doesn’t slip from hand and fall
• Put down the job at the destined place properly.
• Do not throw the job on ground.
• Avoid double handling.
• Take rest breaks during hevy or repetitive work.
Unit 2.3: Emergencies and first aid procedures
14
Dealing with emergency situations
You can encounter emergencies day in day out. Neither should they be ignored
nor should you panic. In case of an emergency,
• stay calm;
• do not panic;
• ensure people around you also stay calm;
• inform your immediate supervisor;
• if you need to stay with the victim, ask someone from your team to inform your
supervisor;
• inform supervisor so that the victim receives first aid.
Classification of Fire and Fire Extinguishers
• At site, fire may be caused by:
1. heating of metal;
2. electrical heating or short circuits;
3. loose fires caused by welding or smoking;
4. ignition of combustible material;
5. chemical fires;
6. lack of proper housekeeping and/or accumulation of waste.
15
UNIT 2.4: Fire Prevention
Fire is defined as a self-sustaining combustion process in which a substance (fuel)
combines with oxygen in air to produce immense heat and light.
Fire hazards pose threats to life and property.
• • Fire is categorized into class A, B and C fire.
• • A fire extinguisher is a fire protection device used to extinguish or control small
fires during fire emergency situations.
• • Dry chemical is a powder based. They stops and halts the production of fire
supporting by “free radicals”, accordingly extinguish the fire.
16
Types of fire Extinguishers
• • Dry chemical: These types of fire extinguisher are in powder form. They stops
and halts the production of fire supporting by “free-radicals”, accordingly
extinguish the fire.
• • Foams: This type is applied over aspirated or non-aspirated fuels. It forms a
seal or foamy blanket over the fuel and stops oxygen to reach near the fuel.
Unlike powder type, foam type fire extinguisher is used to extinguish fires without
flashback
• • Water: It cools burning material by absorbing heat through the use of air
pressurized water. It is successful to extinguish class A fires. Unlike dry chemicals
and foams based fire extinguisher it is harmless, inexpensive and easy to clean.
• • Clean agents and carbon dioxide: These types of extinguisher displace
oxygen, control chemical chain reaction and remove heat from fire zone. This
extinguisher does not leave any remains after release which is ideal for
electronics items and sensitive documents.
17
Types of fire Extinguishers
• Different fuels create different fires and require different types of fire extinguishing
agents.
18
Demonstrate
Steps for using the fire extinguisher
Step 1: Pull the pin from the top of the extinguisher for releasing locking
mechanism which discharges the extinguisher.
Step 2: Aim the extinguisher towards the base of the fire not the flame.
Step 3: Squeeze the lever slowly. Deliver the extinguishing agent in the
extinguisher. When the lever of extinguisher is released, the discharge of
extinguishing agent stops.
Step 4: Sweep from side to side. Move the fire extinguisher to and fro by sweeping
motion until the fire is under control. Operate the extinguisher from a safe distance.
Move towards the fire when it starts to reduce.
19
How to use fire extinguisher
20
Tips - During fire outbreak
• 1. On noticing a fire, immediately start shouting “fire” at top of your voice. Do not
wait for the automatic fire alarms to start ringing.
• 2. Take a fire extinguisher
• 3. Use extinguisher as per fire type: - Water and co2 fire extinguishers for general
fires - Foam type extinguishers for oil fires - Co2 fire extinguisher only for
electrical fires.
• 4. Switch off all main switches during an electrical fire.
• 5. Do not try to switch off electrical equipment. Cut the power from the main
source.
• 6. do not panic and alert the building fire department
• 7. Call the fire brigade immediately.
• 8. Ensure that the water sprinklers and other fire-fighting equipment have started
operating.
• 9. First priority should be to save people. Help others to safely get out of the floor
• 10. Alert the nearest hospital to prepare to treat serious burn injuries.
21
Activity
• • Conduct a skill practice activity.
• • Ask the students to assemble together.
• • Explain the purpose and duration of the activity.
• • Set guidelines pertaining to discipline and expected tasks.
22
UNIT 2.5: Emergencies, rescue and first aid
procedures
Demonstrate
Steps - How to free a person from electrocution
If find someone is suffering from electric shock, approach with extreme caution and
following first aid steps.
Step 1: Firstly take the suffered person away from the electricity source as fast as
possible. Turning off the electric supply of machine is the best method for doing
this.
Step 2: If this seems impossible, remove the person from electricity source by
using a piece of wood or insulating material.
Step 3: Don’t touch the victim getting the electric shock because you could also
get shock too.
Step 4: After successful executing the victim from the electricity source, call the
ambulance, if victim is unconscious. Give first-aid to victim till the time ambulance is
coming.
Step 5: If victim is conscious and looking well, monitor its condition, as the results
of shock must not be clear immediately.
23
Electric Shock
24
Bleeding and Wounds
Bleeding and Wounds
• Step 1: Cover the wound by a clean cloth and gloved hand; then apply firm and
steady pressure on wound for 5 mins at least.
• Step 2: Lift up the injured leg or arm above the victim’s heart level.
• Step 3: Secure the wound by a bandage when bleeding stops. Ensure that
bandage is not fixed too tightly—it may stops blood circulation.
• Step 4: Check the victim for shock.
Burns
Chemical or Compressed Gas Burns
• Step 1: Use a drench hose and emergency shower for at least 15 mins to rinse
away all residues of chemicals.
• Step 2: Cover the burn by a clean and dry cloth or special dressing for burns.
25
Heat or electrical burns
Heat or Electrical Burns
• Step 1: Cool burning of skin by water.
• Step 2: Place the burned area under cold running water if the skin is not broken and
gently compress the wound by hand. Bandage the wound by a dry and clean cloth.
• Step 3: If blister appear, don’t try to break it.
• Step 4: Do not apply ointments or creams.
• Step 5: If skin is cracked, or if injuries are severe: • Do not clean the wound or
remove embedded clothing. • Cover the injury insecurely with a clean, dry cloth. •
Expect shock and treat accordingly.
Choking
• Step 1: Wrap your arms around the stomach and stand directly behind the victim.
• Step 2: Just above the navel and well below the ribs, make a fist by a hand. Place
that fist with the thumb and forefinger side toward you.
• Step 3: Hold the fist by other hand and pull it rapidly towards you by a slightly
upward and inward thrust. If required, repeat it.
26
Basic techniques of banding
The key points when applying a bandage are:
Step 1: Make sure the person is comfortable.
Step 2: Never lean across their body and ensure that you are working from the side
of the injury.
Step 3: First clean the wound and apply the antibacterial cream over it.
Step 4: When the bandage is on always remember keep the injured part of the
body supported in the position it will be in.
Step 5: Always use right size of bandage.
Step 6: To check the passage easily, don’t cover fingers or toes when bandaging a
limb.
Step 7: Never wrap the bandage tight, and secure the end by folding it over and
binding a knot in the end. Safety pin, adhesive tape, or a bandage clip can be used.
27
Artificial respiration and the CPR Process
Step 1: Check the Victim - tap and shout to get response.
Step 2: Circulation - pump the chest
30 times.
Step 3: At the centre of the chest put
the heel of one hand and your other
hand on top of it. At a rate of 100 per
minute (16 compressions in 10
seconds), press chest down 2 inches.
Step 4: Tilt head back, lift chin up to
open airway - Airway.
Step 5: Breathing - Tweak nose
closed, take a normal breath, cover
patient mouth with yours and blow out
your breath until you see the chest
rise. Make one breath per 1 second.
Again open airway again if chest
doesn’t rise.
Step 6: Repeat procedure until help
arrives or the victim begins breathing.
28
Correct method to move injured people
during an emergency
Step 1: Stand on either side of the conscious victim. Grab the victim’s wrist with
the hand closest to the victim’s feet on your side.
Step 2: Use your other hand to grasp the clothing on the shoulder nearest to you
and pull the victim’s arms to help them to a sitting position.
Step 3: Assist the victim to his or her feet and place the arms around your
shoulders, if possible.
Step 4: Place your free hand around the person’s waist and let him or her set the
pace on hobbling out.
Step.5: Help the victim for moving slowly.
29
Thank You!
Copyrights @Excelus Learning Solutions(A Division of Quess Corp Ltd.), 2016.

Module 2.pptx

  • 1.
    2. Occupational healthand safety (OHAS) Training & Skill Development Email: tsd.content@ikyaglobal.com
  • 2.
    OBJECTIVES: M2/ Lesson 02Occupational health and safety (OHAS) 2 UNIT 2.1 – HAZARD UNIT 2.2 – SAFE WORKING PRACTICES UNIT 2.3 – EMERGENCIES AND FIRST AID PROCEDURES UNIT 2.4 – REPORTING AND DOCUMENTATION
  • 3.
    Unit 2.1: Hazards Hazard Ahazard is something that has the potential to cause injury, disease or death in a workplace. A slippery floor could result in someone falling and breaking an ankle. There are a number of aspects to the development of a safe workplace environment: • the development of policies • the development of consultative processes • Hazard identification, assessment and control. Implications from hazards/risks can be accessed through: • accident/injury reports • information on risk from chemicals from data sheets • review of accident/injury statistics • information from government health and safety agencies • Who is exposed, how much, how might they be affected. 3
  • 4.
    Types of Hazard 4 Physicalhazards During the coal unloading, preparation and handling operations, thousands of tones of coal are manipulated, producing dust, noise and vibrations. The presence of large quantities of accumulated dust can produce an explosion hazard in addition to the inhalation hazard. • During coking, ambient and radiant heat are the major physical concerns, particularly on the topside of the batteries, where the majority of the workers are deployed. • Noise may be a problem in mobile equipment, primarily from drive mechanism and vibrating components that are not adequately maintained.
  • 5.
    Types of Hazard Chemicalhazards • The major health concern associated with coking operations is emissions from the ovens during charging of the coal, coking and pushing of the coke. • Materials utilized for sealing leaks in lids and doors may also be a concern during mixing and when lids and doors are removed. 5
  • 6.
    6 Types of Hazard Mechanicalhazards • The mechanical hazards of greatest concern are associated with the mobile equipment on the pusher side, coke side and the larry car on top of the battery. Caught-between and struck-by accidents associated with mobile rail-type equipment account for the highest number of fatal coke-oven production incidents. • Skin surface burns from hot materials and surfaces and eye irritation from dust particles are responsible for more numerous, less severe occurrences.
  • 7.
    Types of Hazard 7 Electricalhazards The main hazards of working with electricity are: • electric shock and burns from contact with live parts • injury from exposure to arcing, fire from faulty electrical equipment or installations • explosion caused by unsuitable electrical apparatus.
  • 8.
    Unit 2.2 Safeworking practices 8 Safe working practices Safe practices for avoiding general shop hazards • Never use compressed air to blow chips away from a machine • Keep the floor clear of stock and tools, and clean spilled oils or coolants • Know where the fire extinguisher is kept and how to use it • Always keep machines turned off when making adjustments to them Things you must do To make sure that chemicals are stored and handled safely at your workplace you must: • store the chemicals according to manufacturer instructions • use and handle the chemicals according to manufacturer instructions • ensure that stored chemicals cannot mix or react with incompatible substances. This may include apparently harmless substances, such as dust, air or water • make provision for containing spillages of chemicals so that they cannot come into contact or mix with incompatible substances through spillage or leakage, as this may release toxic gases, cause fire or an explosion
  • 9.
    Things you mustdo • Ensure that chemicals are not allowed to contaminate food, food packaging or personal use products, including animal food and ingredients for either human or animal consumption • Identify potential ignition sources and ensure they are kept away from flammable chemicals – this can be done by providing adequate protection or by separation. This is particularly important if maintenance is carried out involving welding or gas cutting • ensure that bulk containers for chemicals have stable foundations and supports • ensure that all risks are controlled when transferring chemicals within, to, or from the premises • ensure all chemical containers are protected from damage that may be caused by impact, load or mechanical stress. This includes pipe work, attachments and other equipment • minimise the risk of fire spreading to or from the chemicals. Providing protection, such as fire rated barriers or distances between sheds may assist. 9
  • 10.
    Personal protective equipment(PPE) 10 • Personal protective equipment serves as the last resort for controlling hazards and is one, but not the only, ancillary or temporary measure. To make full and proper use of personal protective equipment, one should first make sure that the equipment can fulfill the working requirements. Personal Protective Equipment • • Safety helmet: Safety helmets protect the head of the wearer from injuries caused by falling or wavering objects. • Earmuffs, earplugs: Earmuffs and earplugs protect the ears of the wearer from injuries by loud noises.
  • 11.
    Personal protective equipment(PPE) 11 • • Goggles, visor: Goggles and visors protect the eyes of the wearer from injuries caused by strong light or flying objects. • • Safety boots: Safety boots protect the feet of the wearer from injuries, puncture wounds and slipping. • • Hand Protection: Gloves should fit snugly. Workers wear the right gloves for the job (for example, heavy-duty rubber gloves for concrete work, welding gloves for welding, insulated gloves and sleeves when exposed to electrical hazards).
  • 12.
    Safe material Handling 12 Everyworker has to lift and move heavy material during the job whenever required. He may be required to move the job manually or by using forklift for lifting and moving. Extreme care should be taken while lifting or moving the job so that no damage occurs to the job or plant and also to prevent accidents at work place. • • Lifting and moving the job manually • • Lifting or moving the job using fork lift • • Assist in lifting of heavy job • • Attaching the job to the overhead crane’s sling / hook in a proper and balanced manner.
  • 13.
    Safe material Handling 13 Pointsto be taken care of while lifting / moving material • Lift the materials in correct posture. • Do not try to lift too heavy materials alone. • Ensure the grip is right so that the job doesn’t slip from hand and fall • Put down the job at the destined place properly. • Do not throw the job on ground. • Avoid double handling. • Take rest breaks during hevy or repetitive work.
  • 14.
    Unit 2.3: Emergenciesand first aid procedures 14 Dealing with emergency situations You can encounter emergencies day in day out. Neither should they be ignored nor should you panic. In case of an emergency, • stay calm; • do not panic; • ensure people around you also stay calm; • inform your immediate supervisor; • if you need to stay with the victim, ask someone from your team to inform your supervisor; • inform supervisor so that the victim receives first aid.
  • 15.
    Classification of Fireand Fire Extinguishers • At site, fire may be caused by: 1. heating of metal; 2. electrical heating or short circuits; 3. loose fires caused by welding or smoking; 4. ignition of combustible material; 5. chemical fires; 6. lack of proper housekeeping and/or accumulation of waste. 15
  • 16.
    UNIT 2.4: FirePrevention Fire is defined as a self-sustaining combustion process in which a substance (fuel) combines with oxygen in air to produce immense heat and light. Fire hazards pose threats to life and property. • • Fire is categorized into class A, B and C fire. • • A fire extinguisher is a fire protection device used to extinguish or control small fires during fire emergency situations. • • Dry chemical is a powder based. They stops and halts the production of fire supporting by “free radicals”, accordingly extinguish the fire. 16
  • 17.
    Types of fireExtinguishers • • Dry chemical: These types of fire extinguisher are in powder form. They stops and halts the production of fire supporting by “free-radicals”, accordingly extinguish the fire. • • Foams: This type is applied over aspirated or non-aspirated fuels. It forms a seal or foamy blanket over the fuel and stops oxygen to reach near the fuel. Unlike powder type, foam type fire extinguisher is used to extinguish fires without flashback • • Water: It cools burning material by absorbing heat through the use of air pressurized water. It is successful to extinguish class A fires. Unlike dry chemicals and foams based fire extinguisher it is harmless, inexpensive and easy to clean. • • Clean agents and carbon dioxide: These types of extinguisher displace oxygen, control chemical chain reaction and remove heat from fire zone. This extinguisher does not leave any remains after release which is ideal for electronics items and sensitive documents. 17
  • 18.
    Types of fireExtinguishers • Different fuels create different fires and require different types of fire extinguishing agents. 18
  • 19.
    Demonstrate Steps for usingthe fire extinguisher Step 1: Pull the pin from the top of the extinguisher for releasing locking mechanism which discharges the extinguisher. Step 2: Aim the extinguisher towards the base of the fire not the flame. Step 3: Squeeze the lever slowly. Deliver the extinguishing agent in the extinguisher. When the lever of extinguisher is released, the discharge of extinguishing agent stops. Step 4: Sweep from side to side. Move the fire extinguisher to and fro by sweeping motion until the fire is under control. Operate the extinguisher from a safe distance. Move towards the fire when it starts to reduce. 19
  • 20.
    How to usefire extinguisher 20
  • 21.
    Tips - Duringfire outbreak • 1. On noticing a fire, immediately start shouting “fire” at top of your voice. Do not wait for the automatic fire alarms to start ringing. • 2. Take a fire extinguisher • 3. Use extinguisher as per fire type: - Water and co2 fire extinguishers for general fires - Foam type extinguishers for oil fires - Co2 fire extinguisher only for electrical fires. • 4. Switch off all main switches during an electrical fire. • 5. Do not try to switch off electrical equipment. Cut the power from the main source. • 6. do not panic and alert the building fire department • 7. Call the fire brigade immediately. • 8. Ensure that the water sprinklers and other fire-fighting equipment have started operating. • 9. First priority should be to save people. Help others to safely get out of the floor • 10. Alert the nearest hospital to prepare to treat serious burn injuries. 21
  • 22.
    Activity • • Conducta skill practice activity. • • Ask the students to assemble together. • • Explain the purpose and duration of the activity. • • Set guidelines pertaining to discipline and expected tasks. 22
  • 23.
    UNIT 2.5: Emergencies,rescue and first aid procedures Demonstrate Steps - How to free a person from electrocution If find someone is suffering from electric shock, approach with extreme caution and following first aid steps. Step 1: Firstly take the suffered person away from the electricity source as fast as possible. Turning off the electric supply of machine is the best method for doing this. Step 2: If this seems impossible, remove the person from electricity source by using a piece of wood or insulating material. Step 3: Don’t touch the victim getting the electric shock because you could also get shock too. Step 4: After successful executing the victim from the electricity source, call the ambulance, if victim is unconscious. Give first-aid to victim till the time ambulance is coming. Step 5: If victim is conscious and looking well, monitor its condition, as the results of shock must not be clear immediately. 23
  • 24.
  • 25.
    Bleeding and Wounds Bleedingand Wounds • Step 1: Cover the wound by a clean cloth and gloved hand; then apply firm and steady pressure on wound for 5 mins at least. • Step 2: Lift up the injured leg or arm above the victim’s heart level. • Step 3: Secure the wound by a bandage when bleeding stops. Ensure that bandage is not fixed too tightly—it may stops blood circulation. • Step 4: Check the victim for shock. Burns Chemical or Compressed Gas Burns • Step 1: Use a drench hose and emergency shower for at least 15 mins to rinse away all residues of chemicals. • Step 2: Cover the burn by a clean and dry cloth or special dressing for burns. 25
  • 26.
    Heat or electricalburns Heat or Electrical Burns • Step 1: Cool burning of skin by water. • Step 2: Place the burned area under cold running water if the skin is not broken and gently compress the wound by hand. Bandage the wound by a dry and clean cloth. • Step 3: If blister appear, don’t try to break it. • Step 4: Do not apply ointments or creams. • Step 5: If skin is cracked, or if injuries are severe: • Do not clean the wound or remove embedded clothing. • Cover the injury insecurely with a clean, dry cloth. • Expect shock and treat accordingly. Choking • Step 1: Wrap your arms around the stomach and stand directly behind the victim. • Step 2: Just above the navel and well below the ribs, make a fist by a hand. Place that fist with the thumb and forefinger side toward you. • Step 3: Hold the fist by other hand and pull it rapidly towards you by a slightly upward and inward thrust. If required, repeat it. 26
  • 27.
    Basic techniques ofbanding The key points when applying a bandage are: Step 1: Make sure the person is comfortable. Step 2: Never lean across their body and ensure that you are working from the side of the injury. Step 3: First clean the wound and apply the antibacterial cream over it. Step 4: When the bandage is on always remember keep the injured part of the body supported in the position it will be in. Step 5: Always use right size of bandage. Step 6: To check the passage easily, don’t cover fingers or toes when bandaging a limb. Step 7: Never wrap the bandage tight, and secure the end by folding it over and binding a knot in the end. Safety pin, adhesive tape, or a bandage clip can be used. 27
  • 28.
    Artificial respiration andthe CPR Process Step 1: Check the Victim - tap and shout to get response. Step 2: Circulation - pump the chest 30 times. Step 3: At the centre of the chest put the heel of one hand and your other hand on top of it. At a rate of 100 per minute (16 compressions in 10 seconds), press chest down 2 inches. Step 4: Tilt head back, lift chin up to open airway - Airway. Step 5: Breathing - Tweak nose closed, take a normal breath, cover patient mouth with yours and blow out your breath until you see the chest rise. Make one breath per 1 second. Again open airway again if chest doesn’t rise. Step 6: Repeat procedure until help arrives or the victim begins breathing. 28
  • 29.
    Correct method tomove injured people during an emergency Step 1: Stand on either side of the conscious victim. Grab the victim’s wrist with the hand closest to the victim’s feet on your side. Step 2: Use your other hand to grasp the clothing on the shoulder nearest to you and pull the victim’s arms to help them to a sitting position. Step 3: Assist the victim to his or her feet and place the arms around your shoulders, if possible. Step 4: Place your free hand around the person’s waist and let him or her set the pace on hobbling out. Step.5: Help the victim for moving slowly. 29
  • 30.
    Thank You! Copyrights @ExcelusLearning Solutions(A Division of Quess Corp Ltd.), 2016.