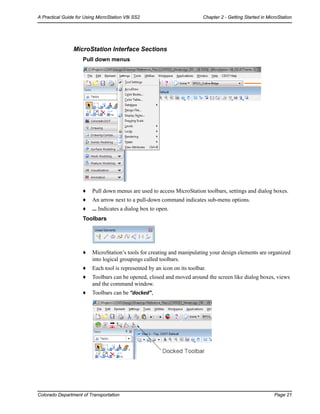
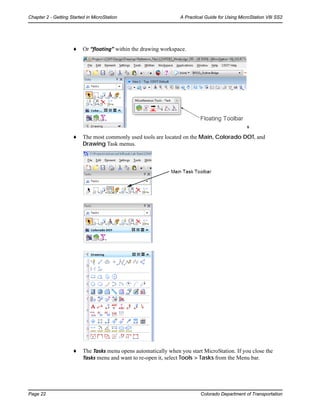
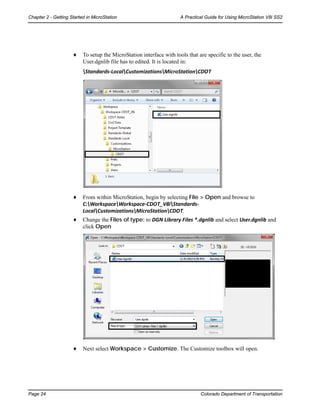
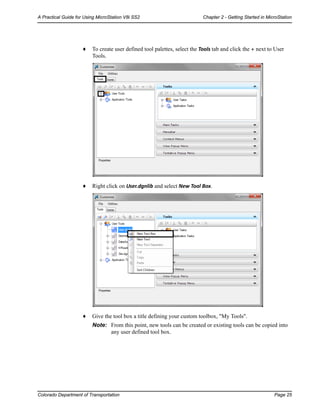
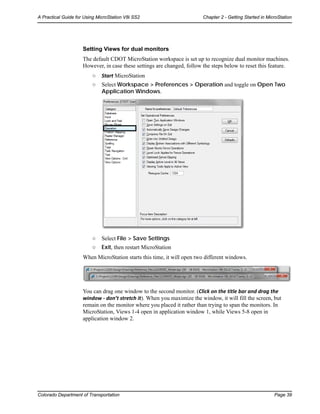
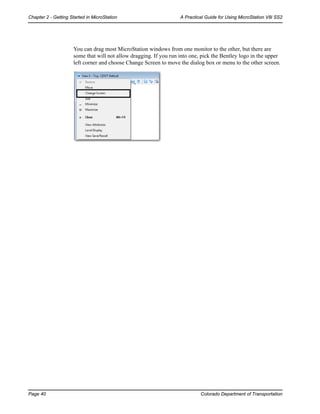
Colorado Department of Transportation Page 17
Chapter 2 - Getting Started in MicroStation
Design File Basics
This Section identifies the basics of working in a MicroStation V8i SS2 design file. This includes mouse
mechanics, opening and navigating in a design file, toolbars, views, snaps, and how to get help.
Chapter Objectives:
• Identify mouse settings and mouse mechanics
• Open an existing MicroStation design file
• Create a new MicroStation design file
• Navigate within a MicroStation design file
• Interface introduction
• How to get help
Mouse Mechanics
There are three types of mouse “points” you can execute in MicroStation. These points
correspond to the different buttons on the mouse.
Data point <D> - used to select tools, pull down menus, etc., identify coordinate locations,
place and manipulate elements, or confirm actions before they take place. The left button is
the default data button. Used when prompted to Accept.
Reset <R> - releases the current operation or rejects a highlighted element. The right button
is the default reset button. Used when prompted to Reject.
Tentative <D><R> - used to temporarily locate a point in space or an element. Using the
Data point and Reset buttons simultaneously is the default tentative mouse command.
Using the Mouse
Click - tap the mouse button once.
Double click - tap the mouse button twice quickly.
Snap - locate an existing point on an element by using tentative <D><R>, then a data
point <D> to accept.
Page 18 Colorado Department of Transportation
Chapter 2 - Getting Started in MicroStation A Practical Guide for Using MicroStation V8i SS2
Wheel Mouse Settings
MicroStation V8i SS2 supports wheel mice. You can set your middle wheel to perform several
different view control options including zoom in/out, pan radial, pan with zoom, etc. 
There are CDOT default settings for the Wheel Mouse.
Pan - this works the same way as most software packages. Once you have clicked the
middle button, you get the little hand symbol and while you hold down on the left button
the view can be moved or pulled around.
Note: This WILL NOT WORK if you override the tentative button settings.
Double Click - this will expand the viewing area to include all elements within the design
file that are currently turned on.
Roll - by rolling the mouse ball, the user can Zoom In and Zoom Out of the current view.
Alt + Roll - used to Pan Left and Pan Right.
Default configuration settings can be changed by selecting Workspace> Preferences >
Mouse Wheel.
Starting MicroStation
To start MicroStation on the Windows platform:
• From the Windows Start Button, select Start > All Programs > Bentley >
MicroStation V8i (SELECTseries 2) > MicroStation V8i (SELECTseries 2).
or
• Double-click on the MicroStation V8 XM icon located on your desktop.
MicroStation will start and the MicroStation Manager dialog box will appear on your screen.
Colorado Department of Transportation Page 19
A Practical Guide for Using MicroStation V8i SS2 Chapter 2 - Getting Started in MicroStation
The MicroStation Manager
The MicroStation Manager is your file management interface to MicroStation.
By default, a MicroStation design file has an extension of .dgn. “Design file” is a generic term
used to describe all MicroStation files, regardless of their use - design, drafting, etc. In addition
to MicroStation V8i SS2 DGN files, you can also open previous version MicroStation files and
AutoCAD files (.dwg or .dxf). This is designated under List Files of Type drop down.
Use the MicroStation Manager icons to move within folders, create a new folder, change the
default MicroStation Manager look, create a new file, compress a file, and see past directory
history.
In the Workspace category, select
User: Your login name
Project: Your project name - this is the same as your JPC number
Interface: CDOT for the customized CDOT interface settings
For Training purposes your workspace settings will be:
User: CDOT User
Project: 12345 (the JPC for this class)
Interface: CDOT
Page 20 Colorado Department of Transportation
Chapter 2 - Getting Started in MicroStation A Practical Guide for Using MicroStation V8i SS2
Note: A more detailed discussion of the CDOT Workspace, which is set with the Project
and Interface options, will take place in the “Creating a CDOT Project” chapter.
Opening a MicroStation Design File
To open a MicroStation design file:
• Set Look in: to the drive containing your file
• Navigate to the correct directory
Set Files of type to All files (*.*) (or to the type of file you wish to open)
• Click the file name to highlight the file
• Click the Open button to open file
Note: MicroStation design files have a default extension of .dgn, but can have any
extension.
The CDOT Default MicroStation Interface
Colorado Department of Transportation Page 21
A Practical Guide for Using MicroStation V8i SS2 Chapter 2 - Getting Started in MicroStation
MicroStation Interface Sections
Pull down menus
♦ Pull down menus are used to access MicroStation toolbars, settings and dialog boxes.
♦ An arrow next to a pull-down command indicates sub-menu options.
♦ ... Indicates a dialog box to open.
Toolbars
♦ MicroStation’s tools for creating and manipulating your design elements are organized
into logical groupings called toolbars.
♦ Each tool is represented by an icon on its toolbar.
♦ Toolbars can be opened, closed and moved around the screen like dialog boxes, views
and the command window.
♦ Toolbars can be “docked”,
Page 22 Colorado Department of Transportation
Chapter 2 - Getting Started in MicroStation A Practical Guide for Using MicroStation V8i SS2
♦ Or “floating” within the drawing workspace.
S
♦ The most commonly used tools are located on the Main, Colorado DOT, and
Drawing Task menus.
♦ The Tasks menu opens automatically when you start MicroStation. If you close the
Tasks menu and want to re-open it, select Tools > Tasks from the Menu bar.
Colorado Department of Transportation Page 23
A Practical Guide for Using MicroStation V8i SS2 Chapter 2 - Getting Started in MicroStation
♦ Use the Task drop-down menu to display Tasks and toolboxes based on the menu’s
hierarchy. Selecting the main task list shows all available task menus. Selecting a task
menu shows all of the toolboxes within that task. Selecting a toolbox displays only the
tools within that box.
Customizing the Tasks Menu
♦ In the CDOT workspace there is a folder called Standards-Local. This folder contains
all the files that are specific to each individual user.
Page 24 Colorado Department of Transportation
Chapter 2 - Getting Started in MicroStation A Practical Guide for Using MicroStation V8i SS2
♦ To setup the MicroStation interface with tools that are specific to the user, the
User.dgnlib file has to edited. It is located in:
Standards-LocalCustomizationsMicroStationCDOT
♦ From within MicroStation, begin by selecting File > Open and browse to
C:WorkspaceWorkspace-CDOT_V8iStandards-
LocalCustomizationsMicroStationCDOT.
♦ Change the Files of type: to DGN Library Files *.dgnlib and select User.dgnlib and
click Open
♦ Next select Workspace > Customize. The Customize toolbox will open.
Colorado Department of Transportation Page 25
A Practical Guide for Using MicroStation V8i SS2 Chapter 2 - Getting Started in MicroStation
♦ To create user defined tool palettes, select the Tools tab and click the + next to User
Tools.
♦ Right click on User.dgnlib and select New Tool Box.
♦ Give the tool box a title defining your custom toolbox, "My Tools".
Note: From this point, new tools can be created or existing tools can be copied into
any user defined tool box.
Page 26 Colorado Department of Transportation
Chapter 2 - Getting Started in MicroStation A Practical Guide for Using MicroStation V8i SS2
♦ Adding existing tools by click the + next to Application Tools and then clicking the +
next to MicroStation
♦ Scroll down to Linear Elements and click the + to show the available tools.
Colorado Department of Transportation Page 27
A Practical Guide for Using MicroStation V8i SS2 Chapter 2 - Getting Started in MicroStation
♦ Right click on Place Smartline and select Copy.
♦ Scroll back to the top and right click on My Tools and select Paste to place the tool in
your new Tool Box.
♦ Do the same process and copy the Place Active Line Terminator from the Cells tools.
Note: A List of Key-ins can be found in the CDOT CADD Manual - 6.6.1
MicroStation Key-in References.
Page 28 Colorado Department of Transportation
Chapter 2 - Getting Started in MicroStation A Practical Guide for Using MicroStation V8i SS2
♦ To create a tool from scratch, right click on My Tools and select New Tool. Rename it
to Annotation.
♦ In the Key-in field, replace NULL with lv=DRAFT_Text-1; word place text above
Colorado Department of Transportation Page 29
A Practical Guide for Using MicroStation V8i SS2 Chapter 2 - Getting Started in MicroStation
♦ Change the Balloon Text to Place Annotation Above. Balloon Text is what will
display when hovering your cursor over the icon.
♦ To select an icon, click in the Icon area and then on the three dots. Change the Look for
Icons in: to Applications. Click the + next to MicroStation. Scroll down to text and
click the + to view the available icons. Select the Place Text icon and click OK.
Page 30 Colorado Department of Transportation
Chapter 2 - Getting Started in MicroStation A Practical Guide for Using MicroStation V8i SS2
♦ Under General Settings, change tool Presentation to Icon Only
♦ Now that we have the tool box built we can add it to the tasks list. On the right, in the
Tasks tab, highlight User.dgnlib.
Colorado Department of Transportation Page 31
A Practical Guide for Using MicroStation V8i SS2 Chapter 2 - Getting Started in MicroStation
♦ Then Left click and hold the My Tools tool box on the left and drop it to the
User.dgnlib in the Tasks Section on the right.
♦ You can now see the customized tool box in the Task area.
Tool Settings
♦ Many tools have parameters or settings associated with them, which are shown in the
Tool Settings dialog box. Each time you select a new drawing tool, the optional
settings will appear in the Tool Settings box.
Page 32 Colorado Department of Transportation
Chapter 2 - Getting Started in MicroStation A Practical Guide for Using MicroStation V8i SS2
The Primary Toolbar
♦ The Primary toolbar contains commonly used MicroStation tools.
♦ This is on toolbar you’ll frequently use, so you will probably want to open and docked.
♦ Select Tools > Primary to toggle on the Primary toolbar.
The Key-in Browser Box
♦ Many MicroStation commands can be accomplished by keying in the command text
(e.g. Place Line).
♦ Key-ins can also be used to input data (e.g. XY=<x,y,z> to locate a coordinate).
Note: Key-ins are not case sensitive.
♦ This is another toolbar you’ll frequently use. Select Utilities > Key-in to open, then
dock the box.
♦ When you’re ready to key in a command, set the focus in the Key-in box by data
pointing in it.
♦ After you key in the command, use the <Enter> or <Tab> key to activate the
command.
Views
♦ The area where graphics are placed is called a view.
♦ Up to eight view windows can be opened.
Colorado Department of Transportation Page 33
A Practical Guide for Using MicroStation V8i SS2 Chapter 2 - Getting Started in MicroStation
♦ Open and close views from Window > Views or the Views dialog box.
♦ You can set different view perspectives (top, front, rotated, etc.).
You can also select Window > Views > Dialog to open the View Groups toolbar where
you can quickly turn views on or off.
♦ You can use the control buttons in the upper right-hand corner to maximize, minimize
or close a view.
Status Bar
The Status Bar is MicroStation’s command center composed of the following areas (left to
right):
♦ Select Tool - displays the name of the active drawing tool.
♦ Prompt - displays the next user operation needed by MicroStation.
♦ Information and Messages - displays current element parameter settings, error
messages, etc. A data point <D> in this area activates the Message Center.
Page 34 Colorado Department of Transportation
Chapter 2 - Getting Started in MicroStation A Practical Guide for Using MicroStation V8i SS2
♦ Snap Mode - displays the active snap mode used in conjunction with a tentative point
or AccuSnap.
♦ Locks - displays a list of locks that you can toggle on/off.
♦ Active Level - displays the current level on which graphics are placed. A data point
<D> in this area activates the Level Manager.
♦ Select Set - displays number of elements in the current selection set. A data point <D>
in this area activates selection set commands.
♦ Fence Mode - displays the active fence mode setting. A data point <D> in this area
allows you to change the active fence.
♦ Workmode - a data point <D> in this area displays the current Workmode - DGN, V7,
or DWG.
♦ Changes Indicator - if a diskette icon is shown, the file has been modified since
opened. If the icon shows a “X” , it means the file is read only.
♦ Design History - if the icon is dimmed , Design History is not initialized. If Design
History is initialized without committed changes, the icon will include a pencil .
♦ Dialog with Focus - indicates what is controlling the input focus. These include Home
, Tool Settings , Key-in , AccuDraw , or nothing.
Colorado Department of Transportation Page 35
A Practical Guide for Using MicroStation V8i SS2 Chapter 2 - Getting Started in MicroStation
♦ Digital Rights Status - File is not protected or signed.
Many of these concepts will be covered in complementary modules.
Show/Hide toolbar options
You can select which tools you want to include on any toolbar. This helps streamline your
toolbars for the way you work and lets you customize your MicroStation setup.
To show/hide tools, right click on any toolbar and toggle the tools on/off as desired. The
changes are stored in your MicroStation Workspace.
Page 36 Colorado Department of Transportation
Chapter 2 - Getting Started in MicroStation A Practical Guide for Using MicroStation V8i SS2
Controlling the mouse
By default, the left mouse button is the Data button, the right is the Reset and the left and
right together is the Tentative.
Note: The middle button has been set to be the scroll wheel by default.
You can change these button assignments by selecting Workspace > Button
Assignments.
View Control toolbar
The View Control toolbar is located by default in the lower-left corner of the
MicroStation interface. The horizontal and vertical scroll bars also help you move around
in the view. To use the View Control toolbar and scroll bars, turn on the options under
Workspace > Preferences > View Options. To show the scroll bars, turn on Scroll
Bars on View Windows. To show the view toolbox settings, turn on Show View
Toolbox and set the location from the pull down menu.
Use the following View Control tools as follows:
♦ View Attributes - to set view attribute settings.
♦ View Display Mode - to change the view’s rendering options.
♦ Adjust View Brightness - Changes brightness settings on rendered views.
Colorado Department of Transportation Page 37
A Practical Guide for Using MicroStation V8i SS2 Chapter 2 - Getting Started in MicroStation
♦ Update View - to update a view (refresh or redraw).
♦ Zoom In - to increase the magnification of a view by Zoom factor.
♦ Zoom Out - to decrease the magnification of a view by Zoom factor.
♦ Window Area - to increase the magnification of a view by drawing a “box” around the
area you want to see close up.
♦ Fit View - to show all displayable elements in a view.
♦ Rotate View - to rotate the view (top, front, etc.)
♦ Pan View - to move around in the view (up, down, left, right, etc.)
♦ Walk - to interactively walk through a 3D model.
♦ Fly - to interactively fly through a 3D model.
♦ Navigate View - to interactively navigate a 3D view.
♦ View Previous - to step back through view operations.
Page 38 Colorado Department of Transportation
Chapter 2 - Getting Started in MicroStation A Practical Guide for Using MicroStation V8i SS2
♦ View Next - to step ahead through view operations.
♦ Copy View - to copy the contents from one view to another.
♦ Change View Perspective - to change the Perspective Angle.
♦ Camera Settings - to adjust the Camera in a 3D view.
♦ Clip Volume - to apply Clip Volume to a view.
♦ Clip Mask - to apply Clip Mask to a view.
You can set your middle wheel to perform several different view control options including
zoom in/out, pan radial, pan with zoom, etc. These options are set under Workspace >
Preferences > Mouse Wheel.
Colorado Department of Transportation Page 39
A Practical Guide for Using MicroStation V8i SS2 Chapter 2 - Getting Started in MicroStation
Setting Views for dual monitors
The default CDOT MicroStation workspace is set up to recognize dual monitor machines.
However, in case these settings are changed, follow the steps below to reset this feature.
○ Start MicroStation
○ Select Workspace > Preferences > Operation and toggle on Open Two
Application Windows.
○ Select File > Save Settings
○ Exit, then restart MicroStation
When MicroStation starts this time, it will open two different windows.
You can drag one window to the second monitor. (Click on the title bar and drag the
window - don’t stretch it). When you maximize the window, it will fill the screen, but
remain on the monitor where you placed it rather than trying to span the monitors. In
MicroStation, Views 1-4 open in application window 1, while Views 5-8 open in
application window 2.
Page 40 Colorado Department of Transportation
Chapter 2 - Getting Started in MicroStation A Practical Guide for Using MicroStation V8i SS2
You can drag most MicroStation windows from one monitor to the other, but there are
some that will not allow dragging. If you run into one, pick the Bentley logo in the upper
left corner and choose Change Screen to move the dialog box or menu to the other screen.

MicroStation Chapter-2 By Misson Choudhury.pdf

  • 1.
    Colorado Department ofTransportation Page 17 Chapter 2 - Getting Started in MicroStation Design File Basics This Section identifies the basics of working in a MicroStation V8i SS2 design file. This includes mouse mechanics, opening and navigating in a design file, toolbars, views, snaps, and how to get help. Chapter Objectives: • Identify mouse settings and mouse mechanics • Open an existing MicroStation design file • Create a new MicroStation design file • Navigate within a MicroStation design file • Interface introduction • How to get help Mouse Mechanics There are three types of mouse “points” you can execute in MicroStation. These points correspond to the different buttons on the mouse. Data point <D> - used to select tools, pull down menus, etc., identify coordinate locations, place and manipulate elements, or confirm actions before they take place. The left button is the default data button. Used when prompted to Accept. Reset <R> - releases the current operation or rejects a highlighted element. The right button is the default reset button. Used when prompted to Reject. Tentative <D><R> - used to temporarily locate a point in space or an element. Using the Data point and Reset buttons simultaneously is the default tentative mouse command. Using the Mouse Click - tap the mouse button once. Double click - tap the mouse button twice quickly. Snap - locate an existing point on an element by using tentative <D><R>, then a data point <D> to accept.
  • 2.
    Page 18 ColoradoDepartment of Transportation Chapter 2 - Getting Started in MicroStation A Practical Guide for Using MicroStation V8i SS2 Wheel Mouse Settings MicroStation V8i SS2 supports wheel mice. You can set your middle wheel to perform several different view control options including zoom in/out, pan radial, pan with zoom, etc. There are CDOT default settings for the Wheel Mouse. Pan - this works the same way as most software packages. Once you have clicked the middle button, you get the little hand symbol and while you hold down on the left button the view can be moved or pulled around. Note: This WILL NOT WORK if you override the tentative button settings. Double Click - this will expand the viewing area to include all elements within the design file that are currently turned on. Roll - by rolling the mouse ball, the user can Zoom In and Zoom Out of the current view. Alt + Roll - used to Pan Left and Pan Right. Default configuration settings can be changed by selecting Workspace> Preferences > Mouse Wheel. Starting MicroStation To start MicroStation on the Windows platform: • From the Windows Start Button, select Start > All Programs > Bentley > MicroStation V8i (SELECTseries 2) > MicroStation V8i (SELECTseries 2). or • Double-click on the MicroStation V8 XM icon located on your desktop. MicroStation will start and the MicroStation Manager dialog box will appear on your screen.
  • 3.
    Colorado Department ofTransportation Page 19 A Practical Guide for Using MicroStation V8i SS2 Chapter 2 - Getting Started in MicroStation The MicroStation Manager The MicroStation Manager is your file management interface to MicroStation. By default, a MicroStation design file has an extension of .dgn. “Design file” is a generic term used to describe all MicroStation files, regardless of their use - design, drafting, etc. In addition to MicroStation V8i SS2 DGN files, you can also open previous version MicroStation files and AutoCAD files (.dwg or .dxf). This is designated under List Files of Type drop down. Use the MicroStation Manager icons to move within folders, create a new folder, change the default MicroStation Manager look, create a new file, compress a file, and see past directory history. In the Workspace category, select User: Your login name Project: Your project name - this is the same as your JPC number Interface: CDOT for the customized CDOT interface settings For Training purposes your workspace settings will be: User: CDOT User Project: 12345 (the JPC for this class) Interface: CDOT
  • 4.
    Page 20 ColoradoDepartment of Transportation Chapter 2 - Getting Started in MicroStation A Practical Guide for Using MicroStation V8i SS2 Note: A more detailed discussion of the CDOT Workspace, which is set with the Project and Interface options, will take place in the “Creating a CDOT Project” chapter. Opening a MicroStation Design File To open a MicroStation design file: • Set Look in: to the drive containing your file • Navigate to the correct directory Set Files of type to All files (*.*) (or to the type of file you wish to open) • Click the file name to highlight the file • Click the Open button to open file Note: MicroStation design files have a default extension of .dgn, but can have any extension. The CDOT Default MicroStation Interface
  • 5.
    Colorado Department ofTransportation Page 21 A Practical Guide for Using MicroStation V8i SS2 Chapter 2 - Getting Started in MicroStation MicroStation Interface Sections Pull down menus ♦ Pull down menus are used to access MicroStation toolbars, settings and dialog boxes. ♦ An arrow next to a pull-down command indicates sub-menu options. ♦ ... Indicates a dialog box to open. Toolbars ♦ MicroStation’s tools for creating and manipulating your design elements are organized into logical groupings called toolbars. ♦ Each tool is represented by an icon on its toolbar. ♦ Toolbars can be opened, closed and moved around the screen like dialog boxes, views and the command window. ♦ Toolbars can be “docked”,
  • 6.
    Page 22 ColoradoDepartment of Transportation Chapter 2 - Getting Started in MicroStation A Practical Guide for Using MicroStation V8i SS2 ♦ Or “floating” within the drawing workspace. S ♦ The most commonly used tools are located on the Main, Colorado DOT, and Drawing Task menus. ♦ The Tasks menu opens automatically when you start MicroStation. If you close the Tasks menu and want to re-open it, select Tools > Tasks from the Menu bar.
  • 7.
    Colorado Department ofTransportation Page 23 A Practical Guide for Using MicroStation V8i SS2 Chapter 2 - Getting Started in MicroStation ♦ Use the Task drop-down menu to display Tasks and toolboxes based on the menu’s hierarchy. Selecting the main task list shows all available task menus. Selecting a task menu shows all of the toolboxes within that task. Selecting a toolbox displays only the tools within that box. Customizing the Tasks Menu ♦ In the CDOT workspace there is a folder called Standards-Local. This folder contains all the files that are specific to each individual user.
  • 8.
    Page 24 ColoradoDepartment of Transportation Chapter 2 - Getting Started in MicroStation A Practical Guide for Using MicroStation V8i SS2 ♦ To setup the MicroStation interface with tools that are specific to the user, the User.dgnlib file has to edited. It is located in: Standards-LocalCustomizationsMicroStationCDOT ♦ From within MicroStation, begin by selecting File > Open and browse to C:WorkspaceWorkspace-CDOT_V8iStandards- LocalCustomizationsMicroStationCDOT. ♦ Change the Files of type: to DGN Library Files *.dgnlib and select User.dgnlib and click Open ♦ Next select Workspace > Customize. The Customize toolbox will open.
  • 9.
    Colorado Department ofTransportation Page 25 A Practical Guide for Using MicroStation V8i SS2 Chapter 2 - Getting Started in MicroStation ♦ To create user defined tool palettes, select the Tools tab and click the + next to User Tools. ♦ Right click on User.dgnlib and select New Tool Box. ♦ Give the tool box a title defining your custom toolbox, "My Tools". Note: From this point, new tools can be created or existing tools can be copied into any user defined tool box.
  • 10.
    Page 26 ColoradoDepartment of Transportation Chapter 2 - Getting Started in MicroStation A Practical Guide for Using MicroStation V8i SS2 ♦ Adding existing tools by click the + next to Application Tools and then clicking the + next to MicroStation ♦ Scroll down to Linear Elements and click the + to show the available tools.
  • 11.
    Colorado Department ofTransportation Page 27 A Practical Guide for Using MicroStation V8i SS2 Chapter 2 - Getting Started in MicroStation ♦ Right click on Place Smartline and select Copy. ♦ Scroll back to the top and right click on My Tools and select Paste to place the tool in your new Tool Box. ♦ Do the same process and copy the Place Active Line Terminator from the Cells tools. Note: A List of Key-ins can be found in the CDOT CADD Manual - 6.6.1 MicroStation Key-in References.
  • 12.
    Page 28 ColoradoDepartment of Transportation Chapter 2 - Getting Started in MicroStation A Practical Guide for Using MicroStation V8i SS2 ♦ To create a tool from scratch, right click on My Tools and select New Tool. Rename it to Annotation. ♦ In the Key-in field, replace NULL with lv=DRAFT_Text-1; word place text above
  • 13.
    Colorado Department ofTransportation Page 29 A Practical Guide for Using MicroStation V8i SS2 Chapter 2 - Getting Started in MicroStation ♦ Change the Balloon Text to Place Annotation Above. Balloon Text is what will display when hovering your cursor over the icon. ♦ To select an icon, click in the Icon area and then on the three dots. Change the Look for Icons in: to Applications. Click the + next to MicroStation. Scroll down to text and click the + to view the available icons. Select the Place Text icon and click OK.
  • 14.
    Page 30 ColoradoDepartment of Transportation Chapter 2 - Getting Started in MicroStation A Practical Guide for Using MicroStation V8i SS2 ♦ Under General Settings, change tool Presentation to Icon Only ♦ Now that we have the tool box built we can add it to the tasks list. On the right, in the Tasks tab, highlight User.dgnlib.
  • 15.
    Colorado Department ofTransportation Page 31 A Practical Guide for Using MicroStation V8i SS2 Chapter 2 - Getting Started in MicroStation ♦ Then Left click and hold the My Tools tool box on the left and drop it to the User.dgnlib in the Tasks Section on the right. ♦ You can now see the customized tool box in the Task area. Tool Settings ♦ Many tools have parameters or settings associated with them, which are shown in the Tool Settings dialog box. Each time you select a new drawing tool, the optional settings will appear in the Tool Settings box.
  • 16.
    Page 32 ColoradoDepartment of Transportation Chapter 2 - Getting Started in MicroStation A Practical Guide for Using MicroStation V8i SS2 The Primary Toolbar ♦ The Primary toolbar contains commonly used MicroStation tools. ♦ This is on toolbar you’ll frequently use, so you will probably want to open and docked. ♦ Select Tools > Primary to toggle on the Primary toolbar. The Key-in Browser Box ♦ Many MicroStation commands can be accomplished by keying in the command text (e.g. Place Line). ♦ Key-ins can also be used to input data (e.g. XY=<x,y,z> to locate a coordinate). Note: Key-ins are not case sensitive. ♦ This is another toolbar you’ll frequently use. Select Utilities > Key-in to open, then dock the box. ♦ When you’re ready to key in a command, set the focus in the Key-in box by data pointing in it. ♦ After you key in the command, use the <Enter> or <Tab> key to activate the command. Views ♦ The area where graphics are placed is called a view. ♦ Up to eight view windows can be opened.
  • 17.
    Colorado Department ofTransportation Page 33 A Practical Guide for Using MicroStation V8i SS2 Chapter 2 - Getting Started in MicroStation ♦ Open and close views from Window > Views or the Views dialog box. ♦ You can set different view perspectives (top, front, rotated, etc.). You can also select Window > Views > Dialog to open the View Groups toolbar where you can quickly turn views on or off. ♦ You can use the control buttons in the upper right-hand corner to maximize, minimize or close a view. Status Bar The Status Bar is MicroStation’s command center composed of the following areas (left to right): ♦ Select Tool - displays the name of the active drawing tool. ♦ Prompt - displays the next user operation needed by MicroStation. ♦ Information and Messages - displays current element parameter settings, error messages, etc. A data point <D> in this area activates the Message Center.
  • 18.
    Page 34 ColoradoDepartment of Transportation Chapter 2 - Getting Started in MicroStation A Practical Guide for Using MicroStation V8i SS2 ♦ Snap Mode - displays the active snap mode used in conjunction with a tentative point or AccuSnap. ♦ Locks - displays a list of locks that you can toggle on/off. ♦ Active Level - displays the current level on which graphics are placed. A data point <D> in this area activates the Level Manager. ♦ Select Set - displays number of elements in the current selection set. A data point <D> in this area activates selection set commands. ♦ Fence Mode - displays the active fence mode setting. A data point <D> in this area allows you to change the active fence. ♦ Workmode - a data point <D> in this area displays the current Workmode - DGN, V7, or DWG. ♦ Changes Indicator - if a diskette icon is shown, the file has been modified since opened. If the icon shows a “X” , it means the file is read only. ♦ Design History - if the icon is dimmed , Design History is not initialized. If Design History is initialized without committed changes, the icon will include a pencil . ♦ Dialog with Focus - indicates what is controlling the input focus. These include Home , Tool Settings , Key-in , AccuDraw , or nothing.
  • 19.
    Colorado Department ofTransportation Page 35 A Practical Guide for Using MicroStation V8i SS2 Chapter 2 - Getting Started in MicroStation ♦ Digital Rights Status - File is not protected or signed. Many of these concepts will be covered in complementary modules. Show/Hide toolbar options You can select which tools you want to include on any toolbar. This helps streamline your toolbars for the way you work and lets you customize your MicroStation setup. To show/hide tools, right click on any toolbar and toggle the tools on/off as desired. The changes are stored in your MicroStation Workspace.
  • 20.
    Page 36 ColoradoDepartment of Transportation Chapter 2 - Getting Started in MicroStation A Practical Guide for Using MicroStation V8i SS2 Controlling the mouse By default, the left mouse button is the Data button, the right is the Reset and the left and right together is the Tentative. Note: The middle button has been set to be the scroll wheel by default. You can change these button assignments by selecting Workspace > Button Assignments. View Control toolbar The View Control toolbar is located by default in the lower-left corner of the MicroStation interface. The horizontal and vertical scroll bars also help you move around in the view. To use the View Control toolbar and scroll bars, turn on the options under Workspace > Preferences > View Options. To show the scroll bars, turn on Scroll Bars on View Windows. To show the view toolbox settings, turn on Show View Toolbox and set the location from the pull down menu. Use the following View Control tools as follows: ♦ View Attributes - to set view attribute settings. ♦ View Display Mode - to change the view’s rendering options. ♦ Adjust View Brightness - Changes brightness settings on rendered views.
  • 21.
    Colorado Department ofTransportation Page 37 A Practical Guide for Using MicroStation V8i SS2 Chapter 2 - Getting Started in MicroStation ♦ Update View - to update a view (refresh or redraw). ♦ Zoom In - to increase the magnification of a view by Zoom factor. ♦ Zoom Out - to decrease the magnification of a view by Zoom factor. ♦ Window Area - to increase the magnification of a view by drawing a “box” around the area you want to see close up. ♦ Fit View - to show all displayable elements in a view. ♦ Rotate View - to rotate the view (top, front, etc.) ♦ Pan View - to move around in the view (up, down, left, right, etc.) ♦ Walk - to interactively walk through a 3D model. ♦ Fly - to interactively fly through a 3D model. ♦ Navigate View - to interactively navigate a 3D view. ♦ View Previous - to step back through view operations.
  • 22.
    Page 38 ColoradoDepartment of Transportation Chapter 2 - Getting Started in MicroStation A Practical Guide for Using MicroStation V8i SS2 ♦ View Next - to step ahead through view operations. ♦ Copy View - to copy the contents from one view to another. ♦ Change View Perspective - to change the Perspective Angle. ♦ Camera Settings - to adjust the Camera in a 3D view. ♦ Clip Volume - to apply Clip Volume to a view. ♦ Clip Mask - to apply Clip Mask to a view. You can set your middle wheel to perform several different view control options including zoom in/out, pan radial, pan with zoom, etc. These options are set under Workspace > Preferences > Mouse Wheel.
  • 23.
    Colorado Department ofTransportation Page 39 A Practical Guide for Using MicroStation V8i SS2 Chapter 2 - Getting Started in MicroStation Setting Views for dual monitors The default CDOT MicroStation workspace is set up to recognize dual monitor machines. However, in case these settings are changed, follow the steps below to reset this feature. ○ Start MicroStation ○ Select Workspace > Preferences > Operation and toggle on Open Two Application Windows. ○ Select File > Save Settings ○ Exit, then restart MicroStation When MicroStation starts this time, it will open two different windows. You can drag one window to the second monitor. (Click on the title bar and drag the window - don’t stretch it). When you maximize the window, it will fill the screen, but remain on the monitor where you placed it rather than trying to span the monitors. In MicroStation, Views 1-4 open in application window 1, while Views 5-8 open in application window 2.
  • 24.
    Page 40 ColoradoDepartment of Transportation Chapter 2 - Getting Started in MicroStation A Practical Guide for Using MicroStation V8i SS2 You can drag most MicroStation windows from one monitor to the other, but there are some that will not allow dragging. If you run into one, pick the Bentley logo in the upper left corner and choose Change Screen to move the dialog box or menu to the other screen.