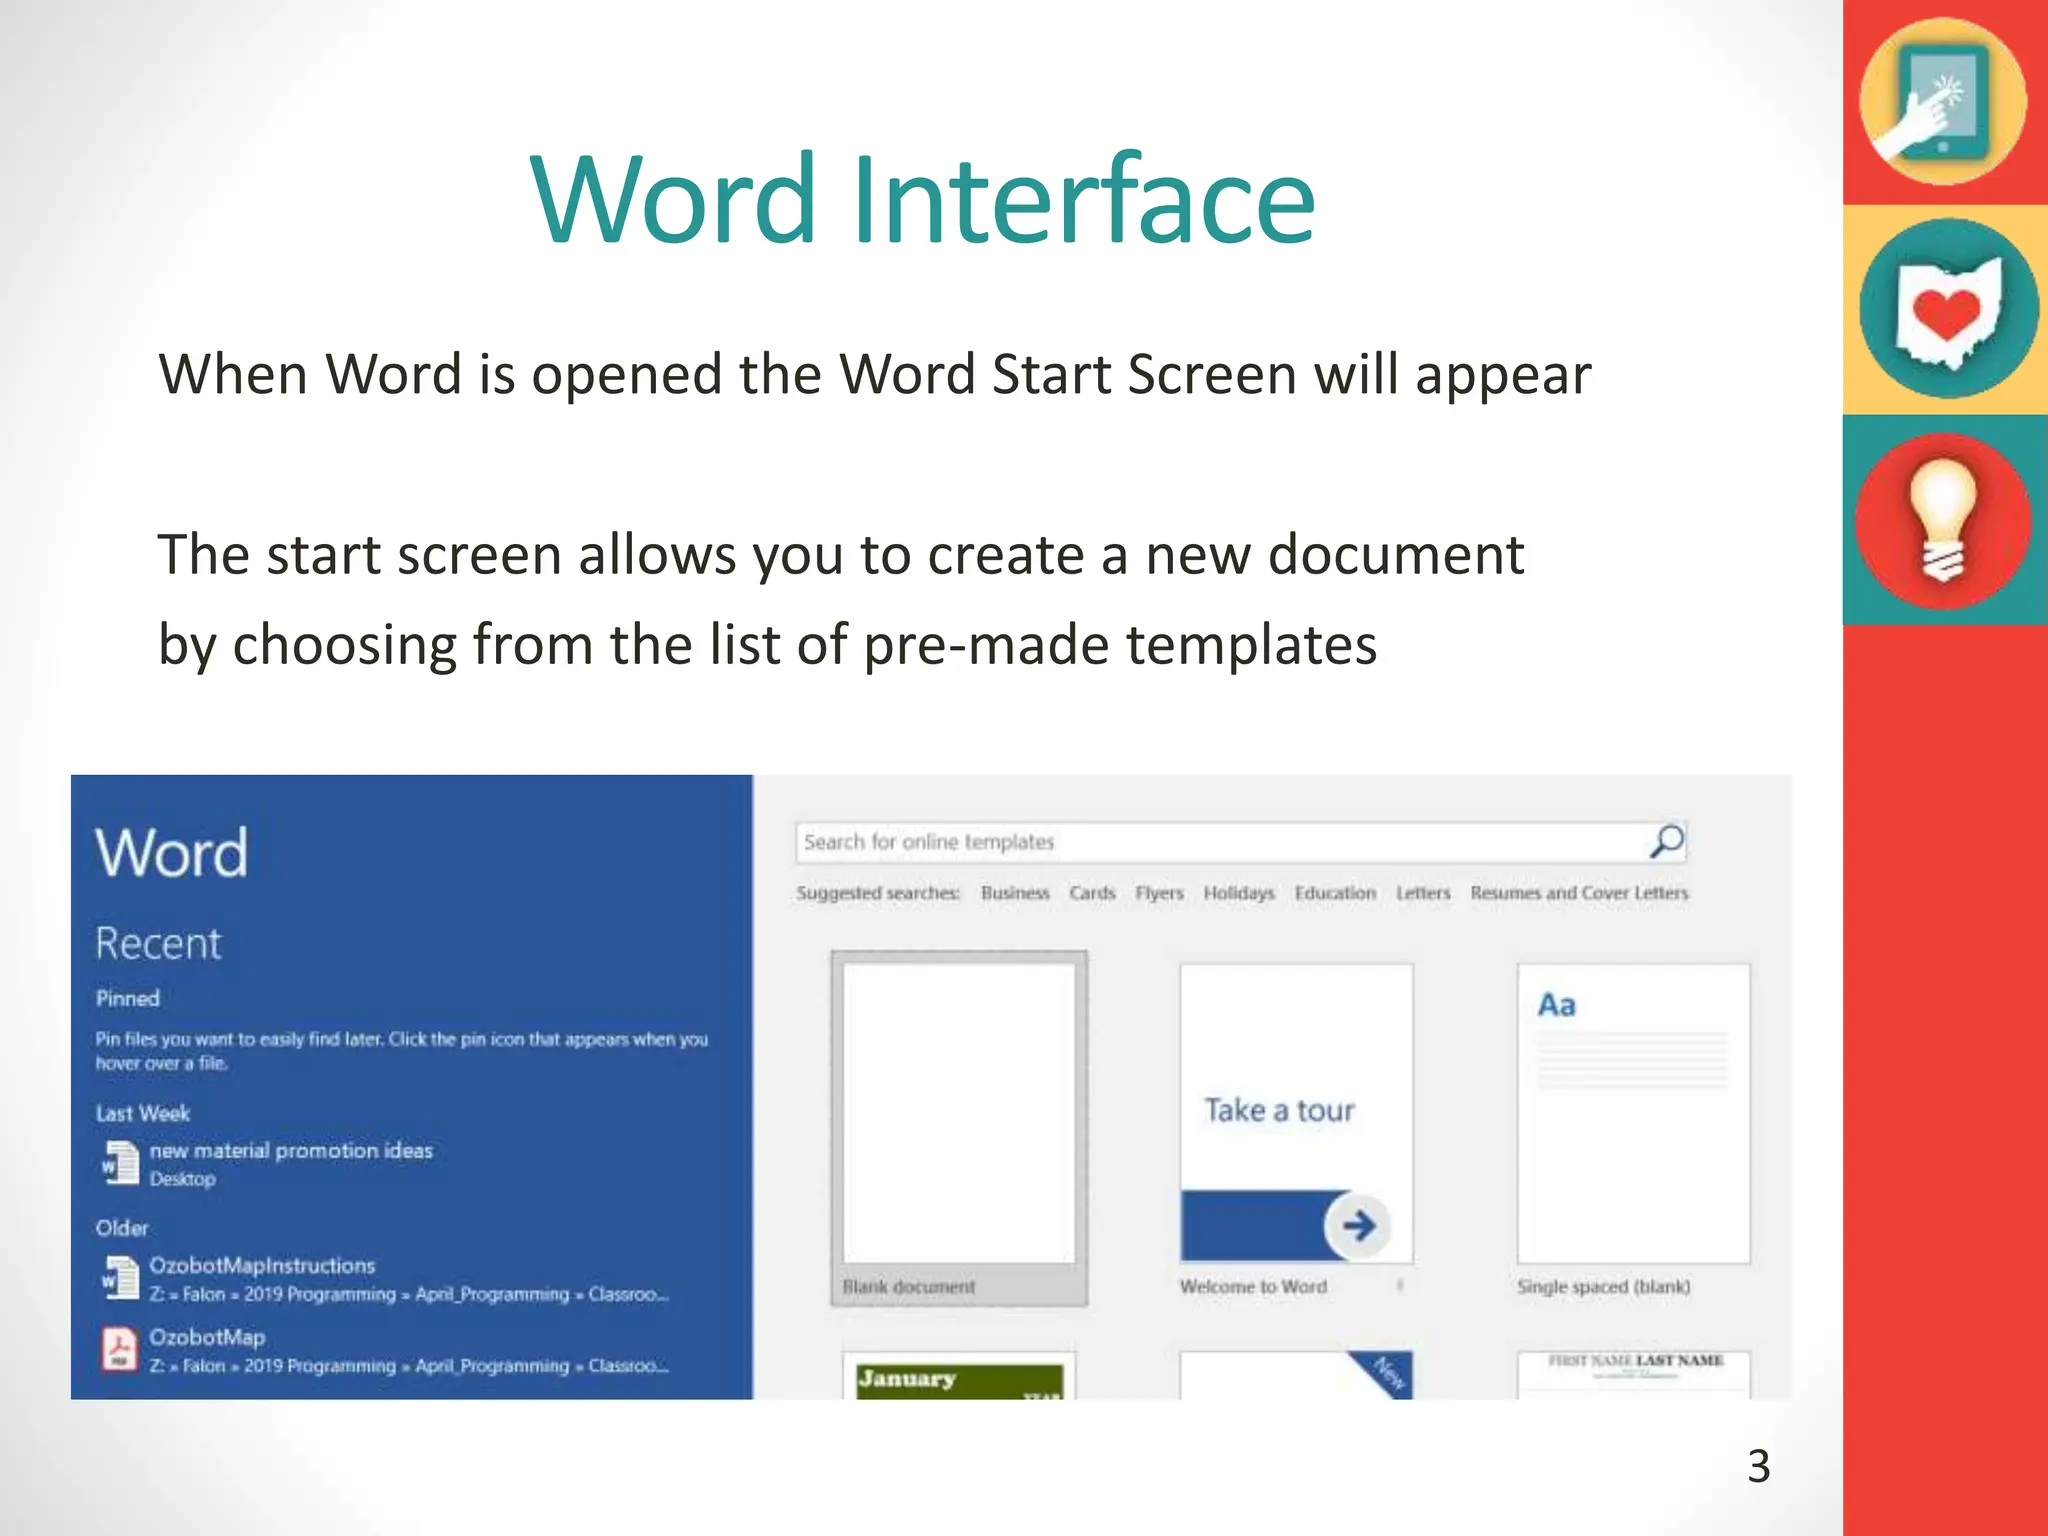
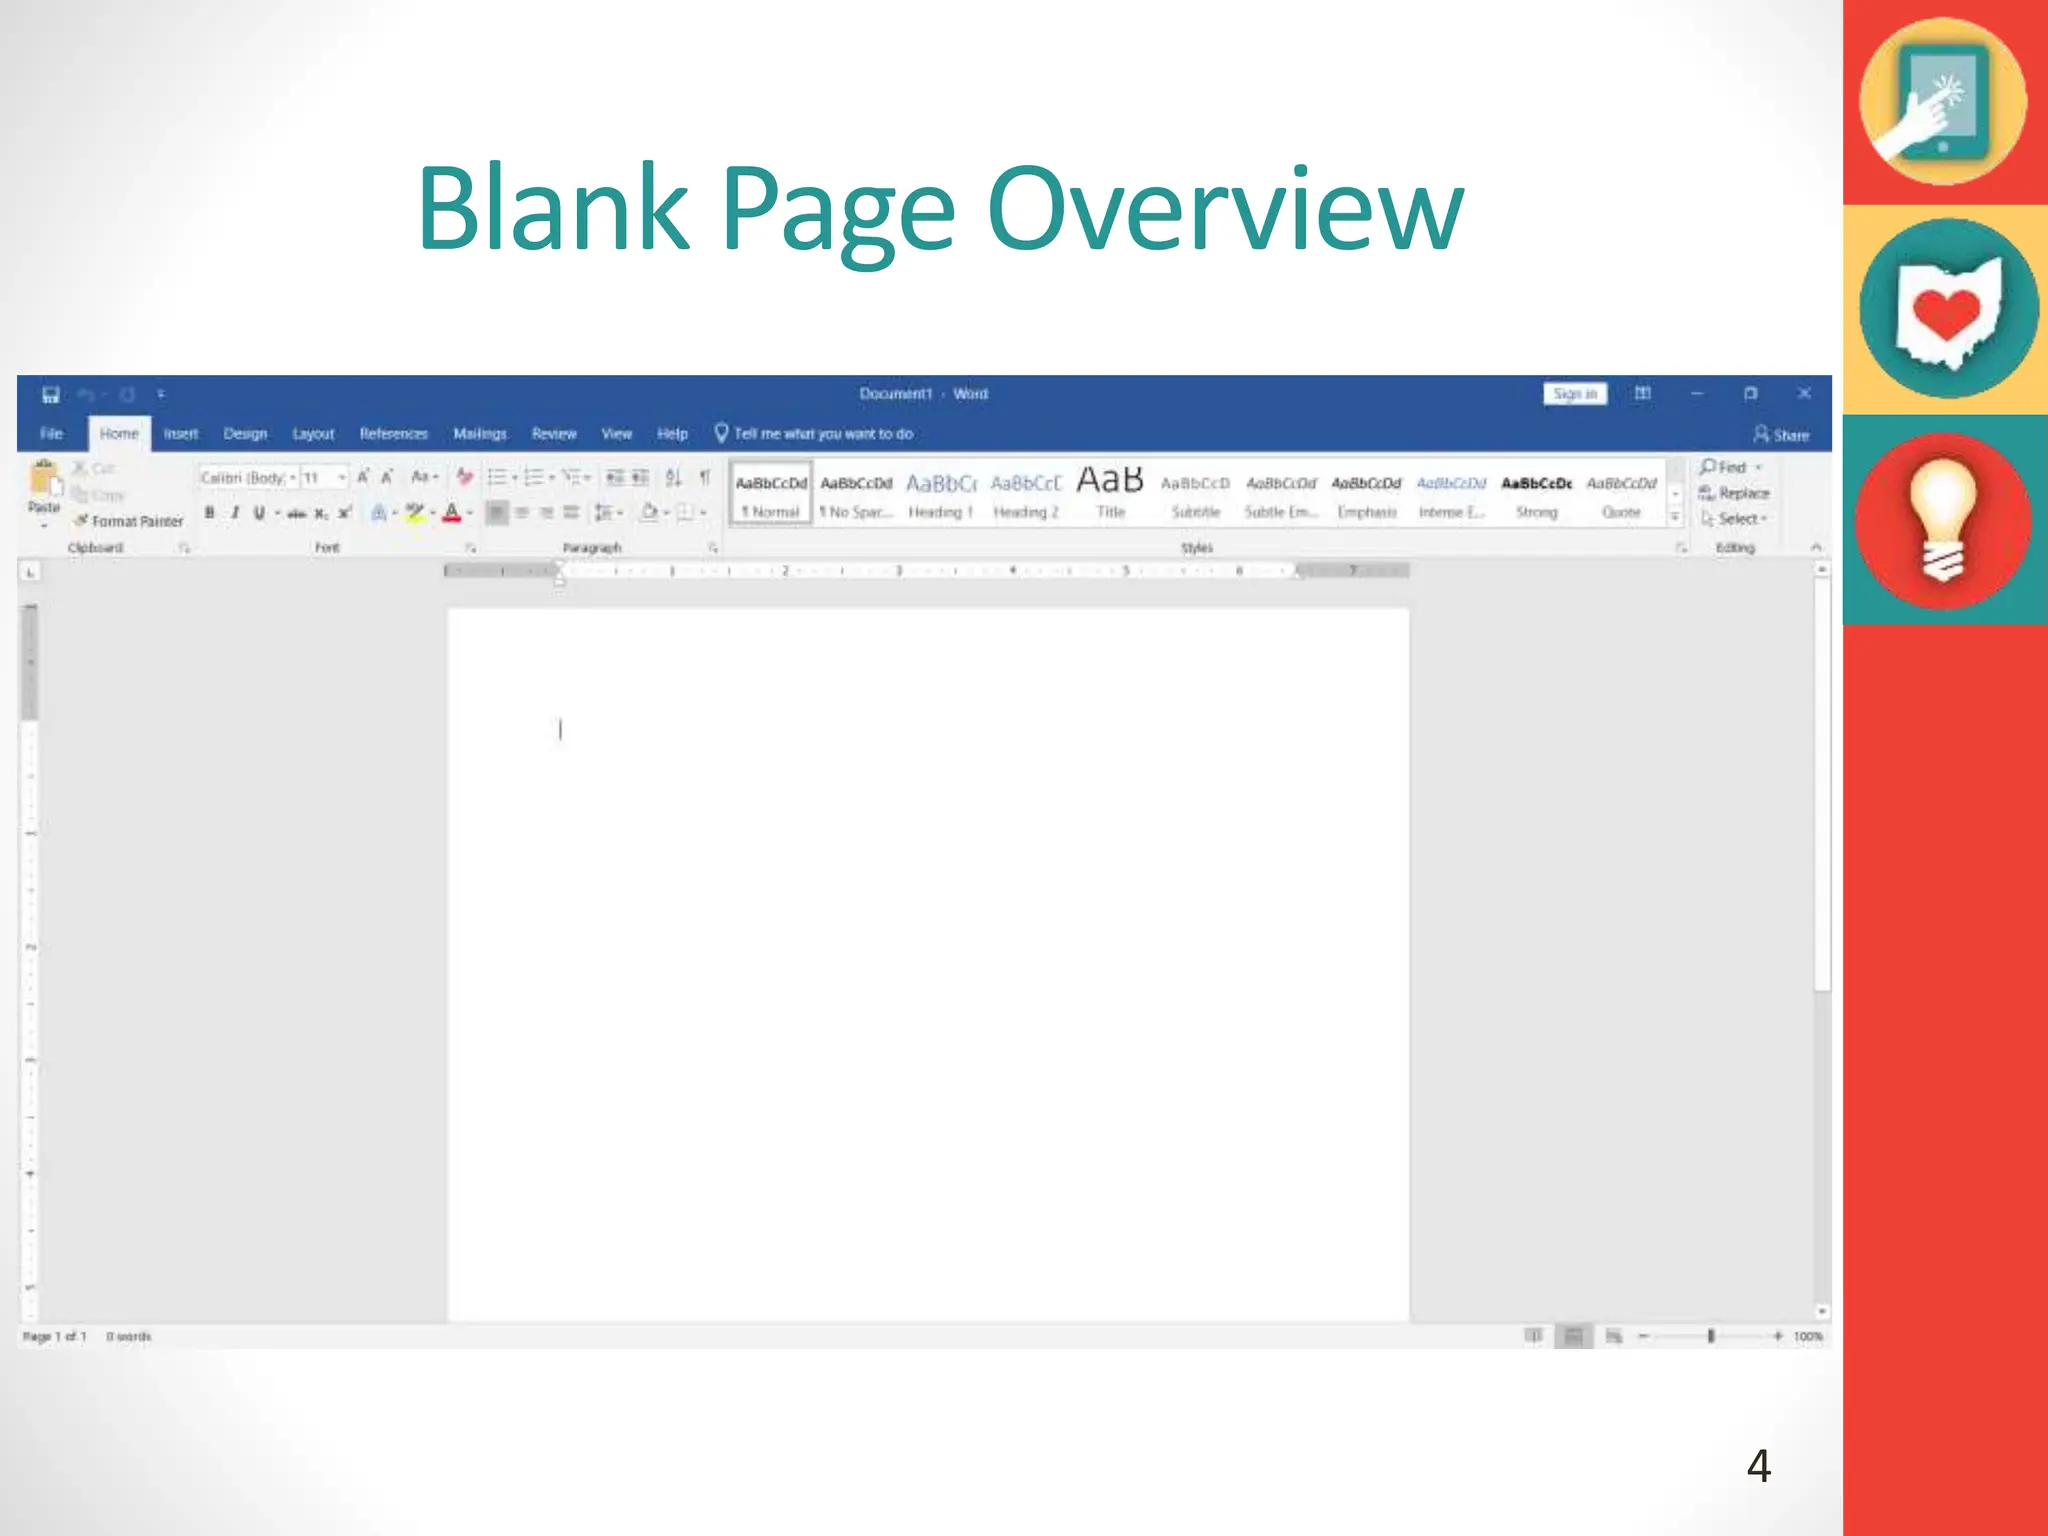
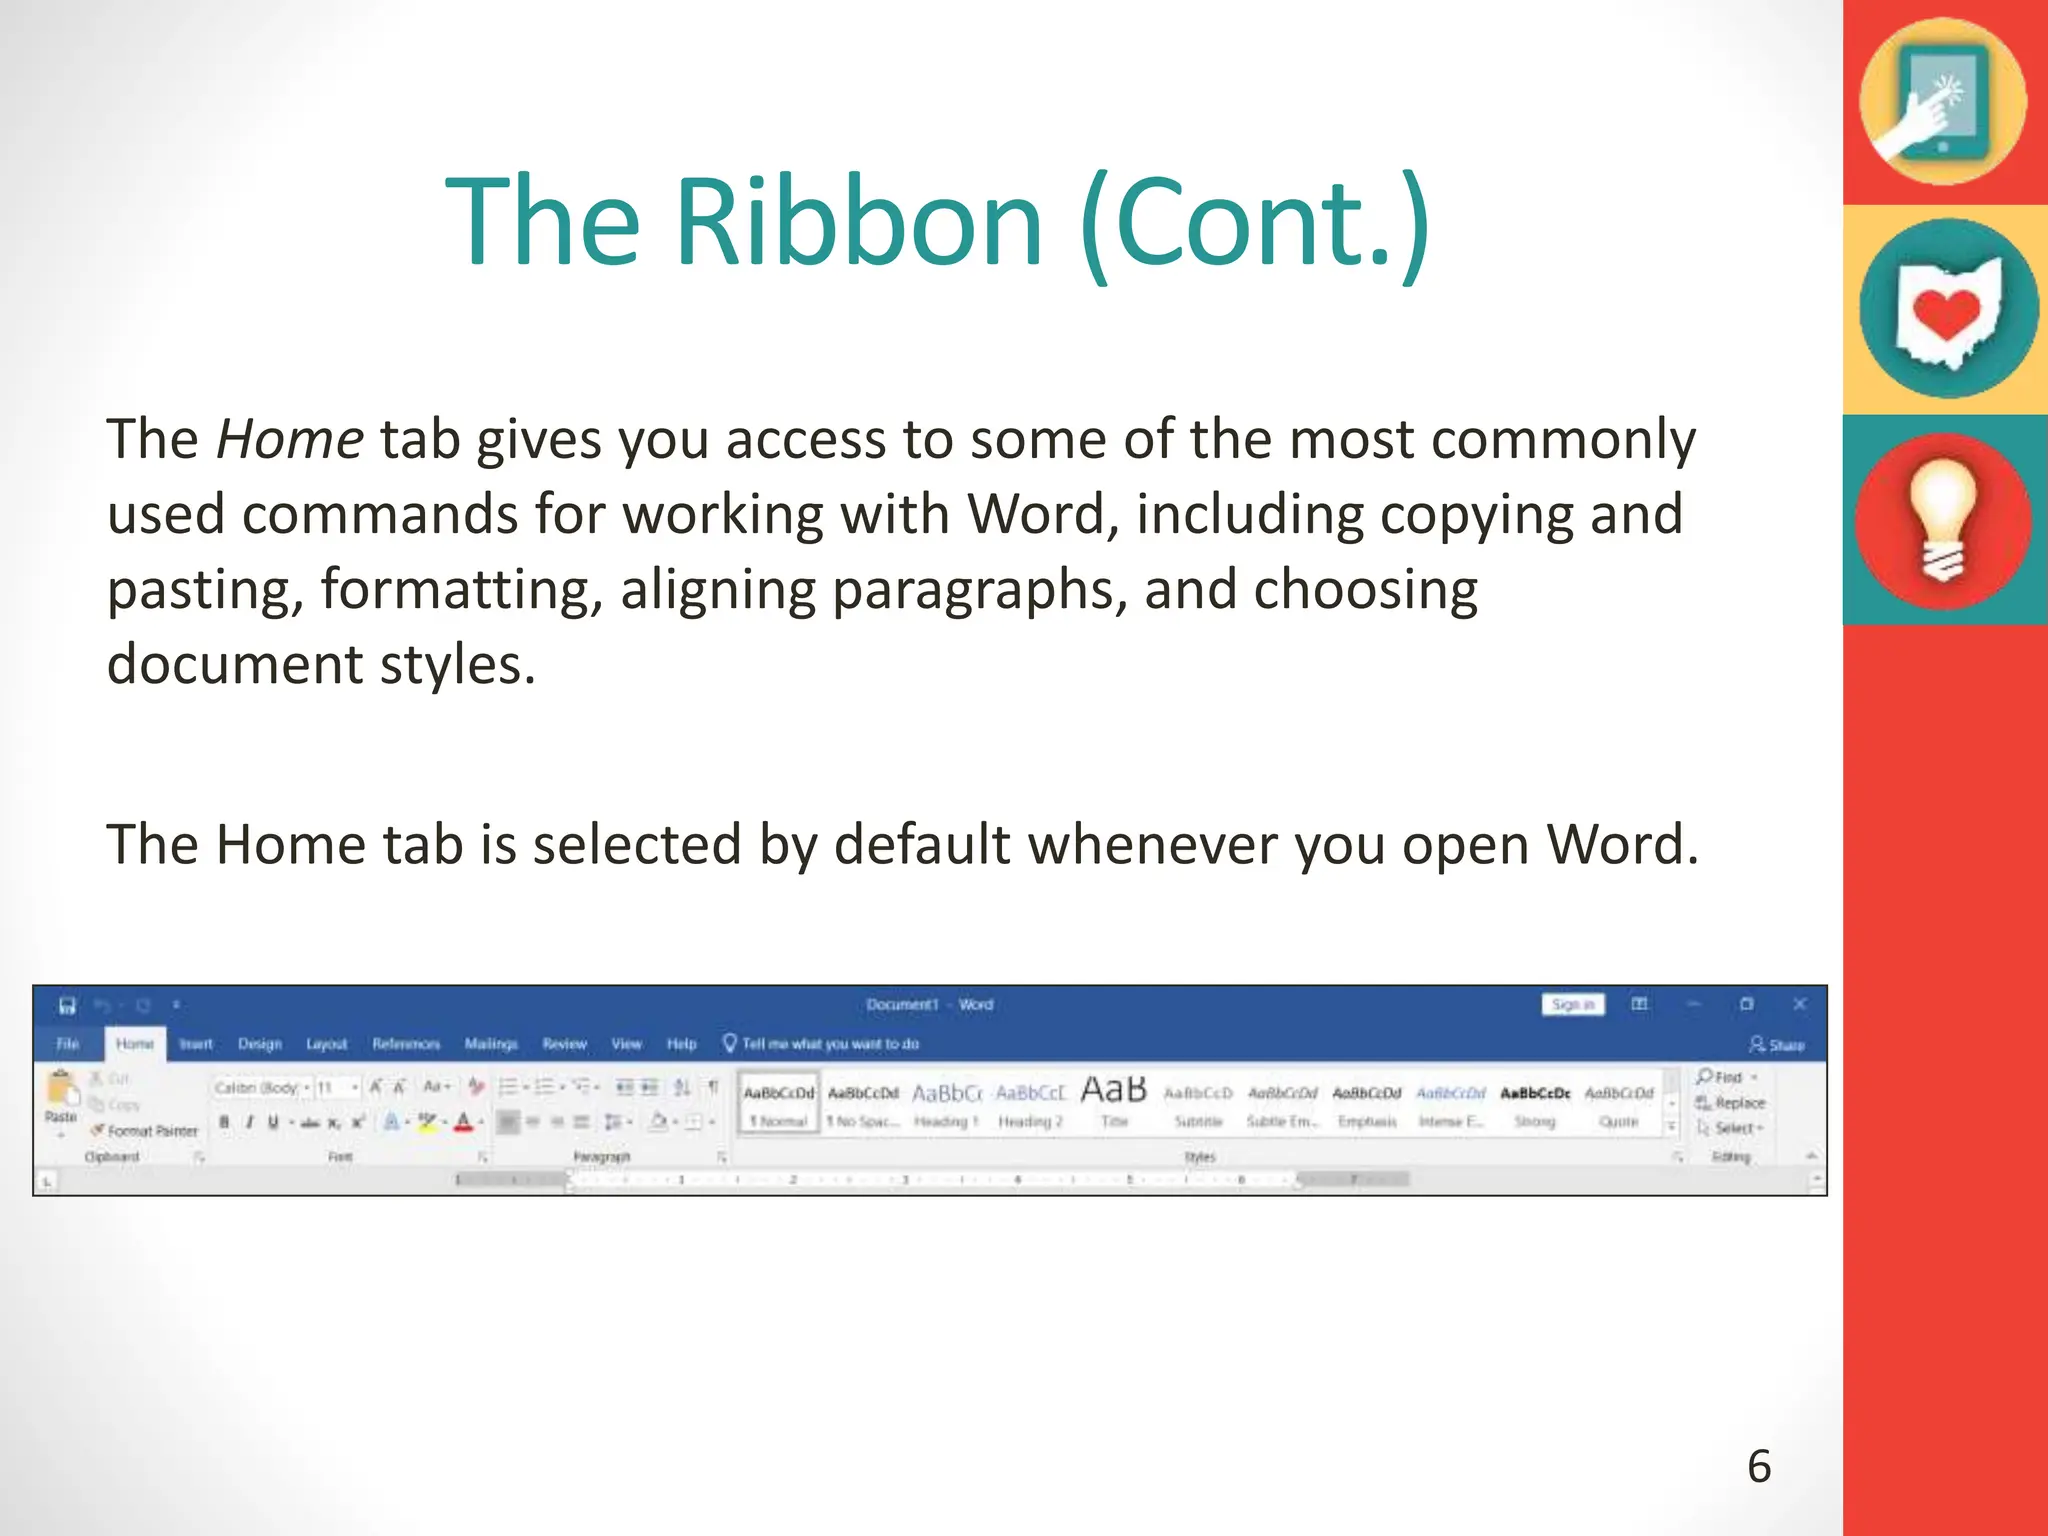
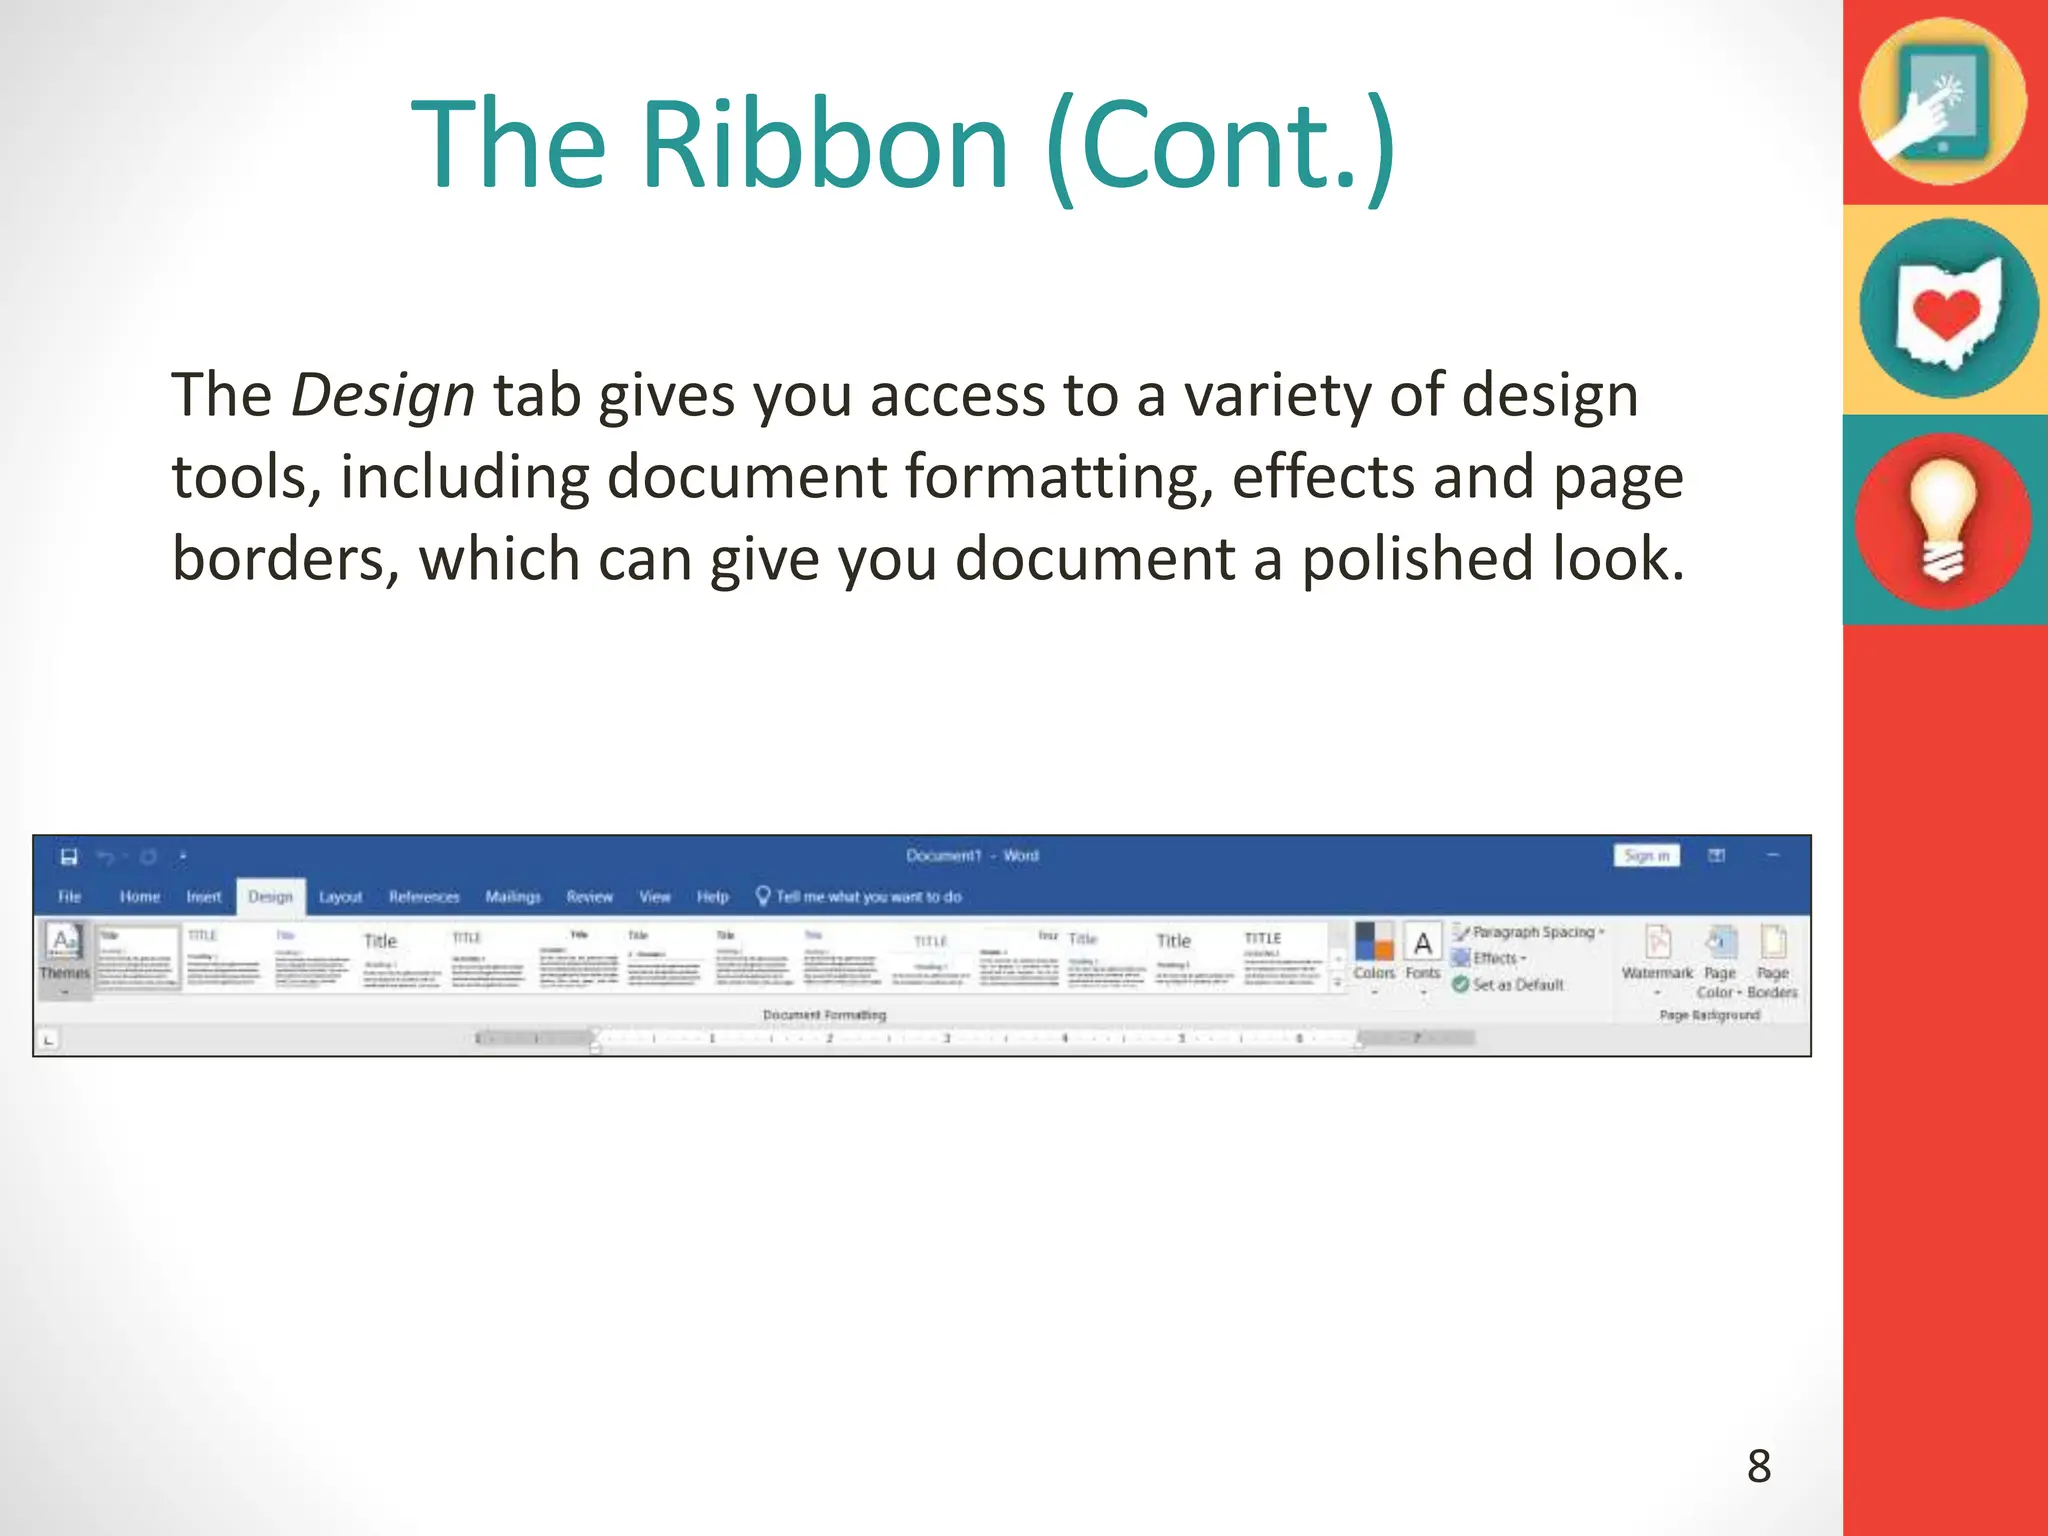
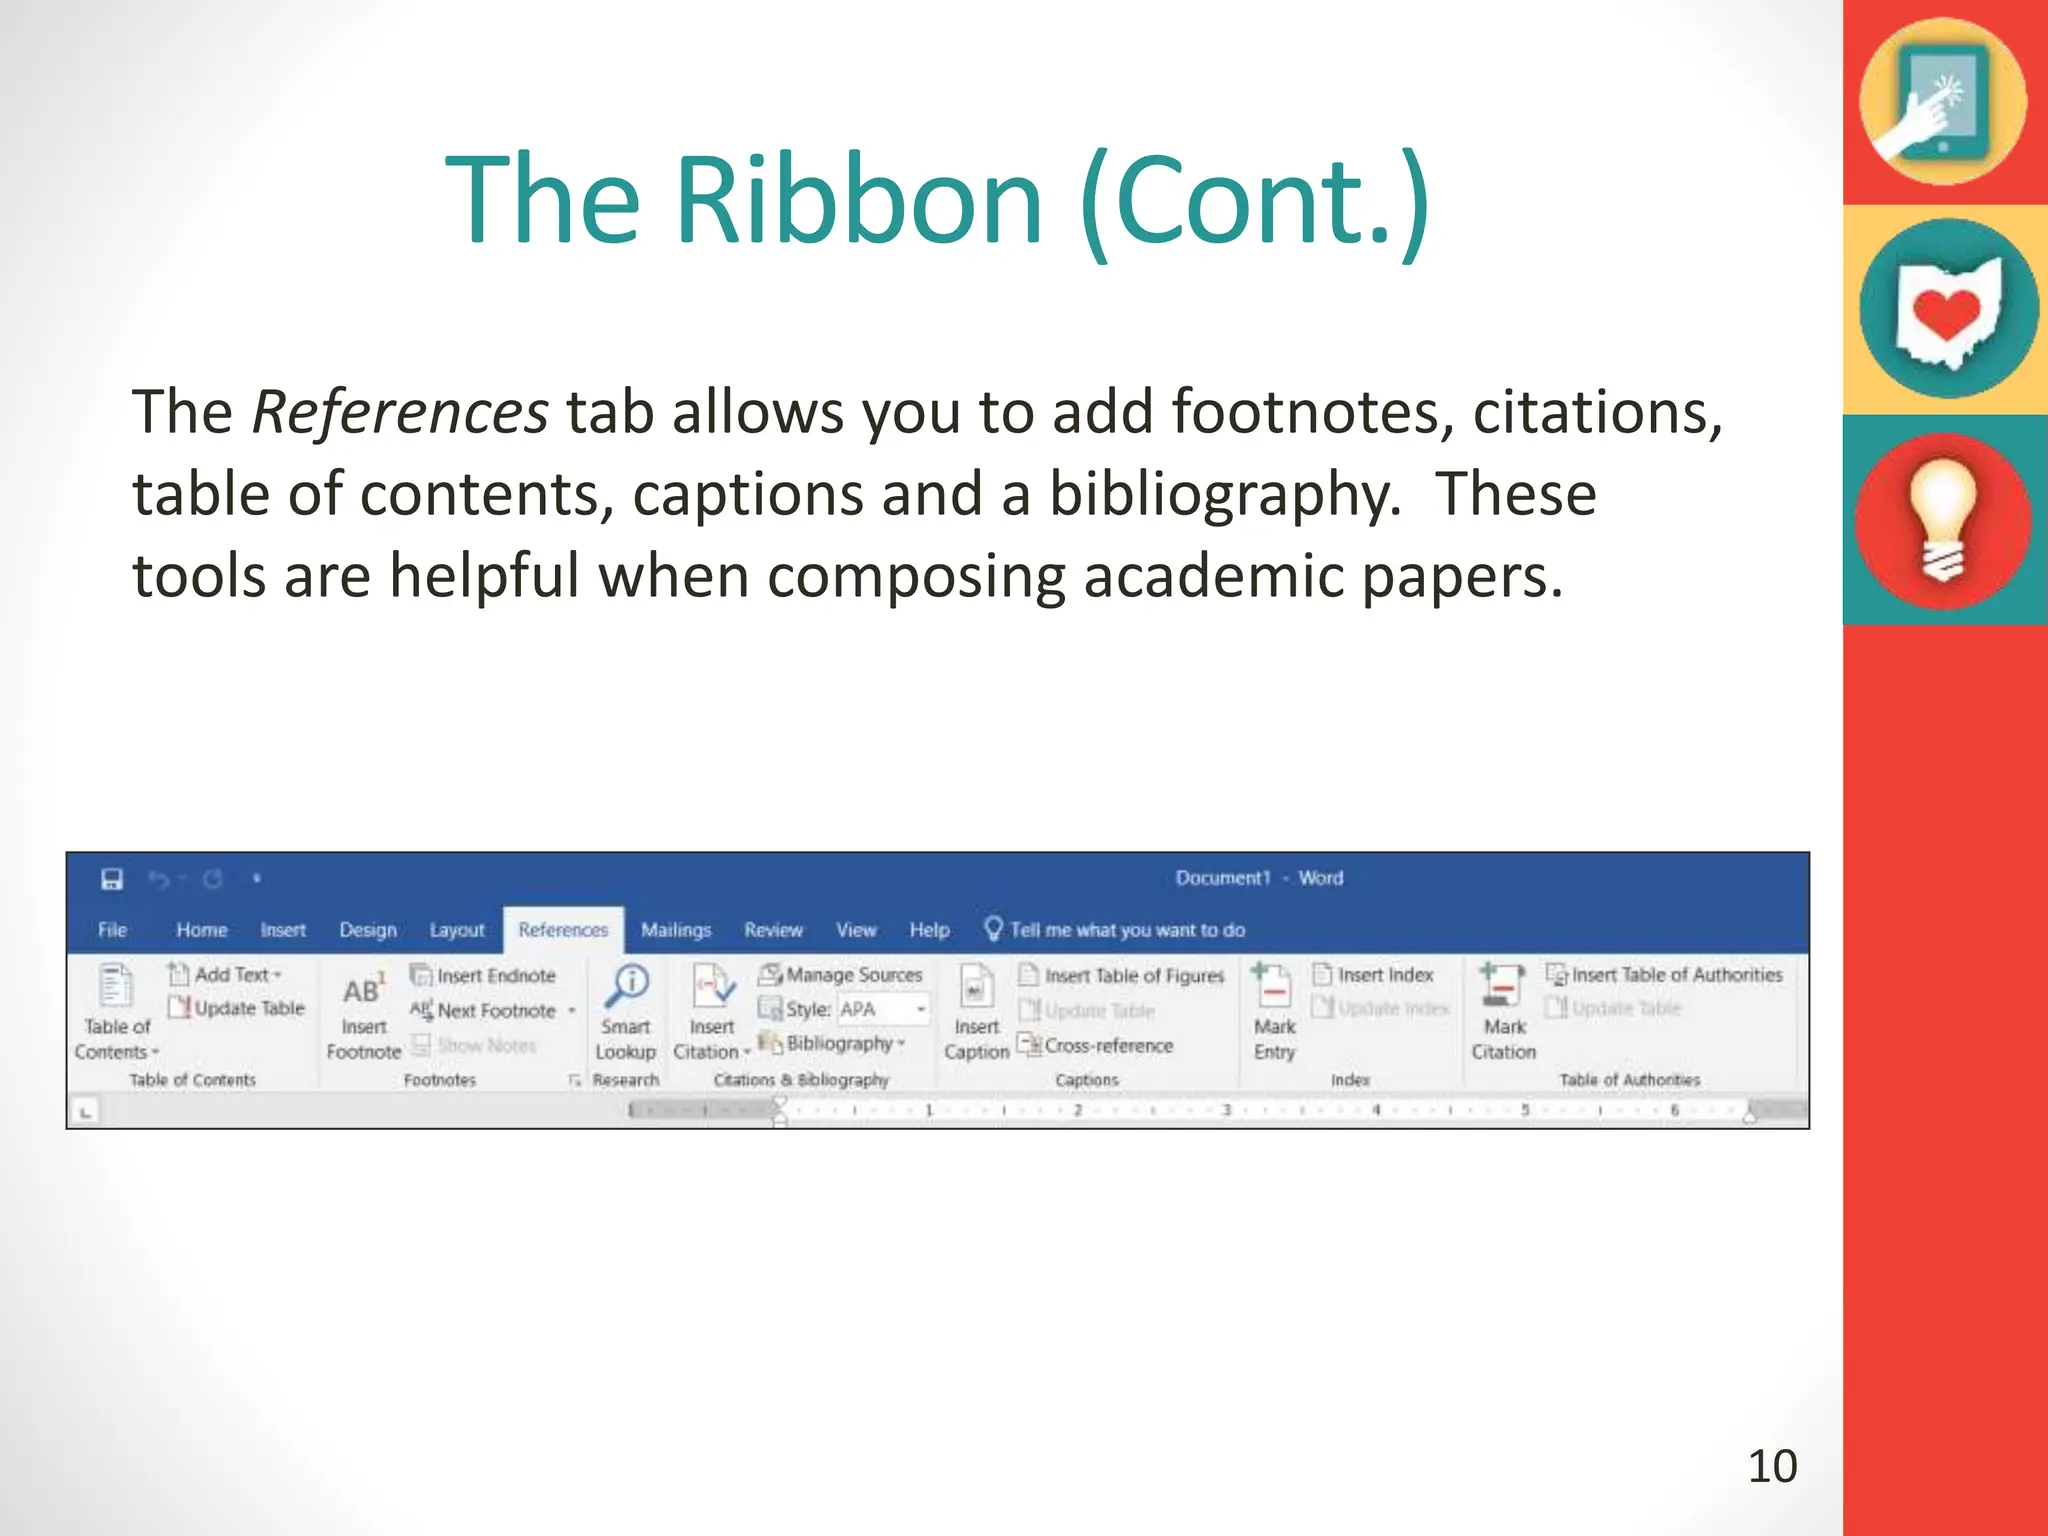
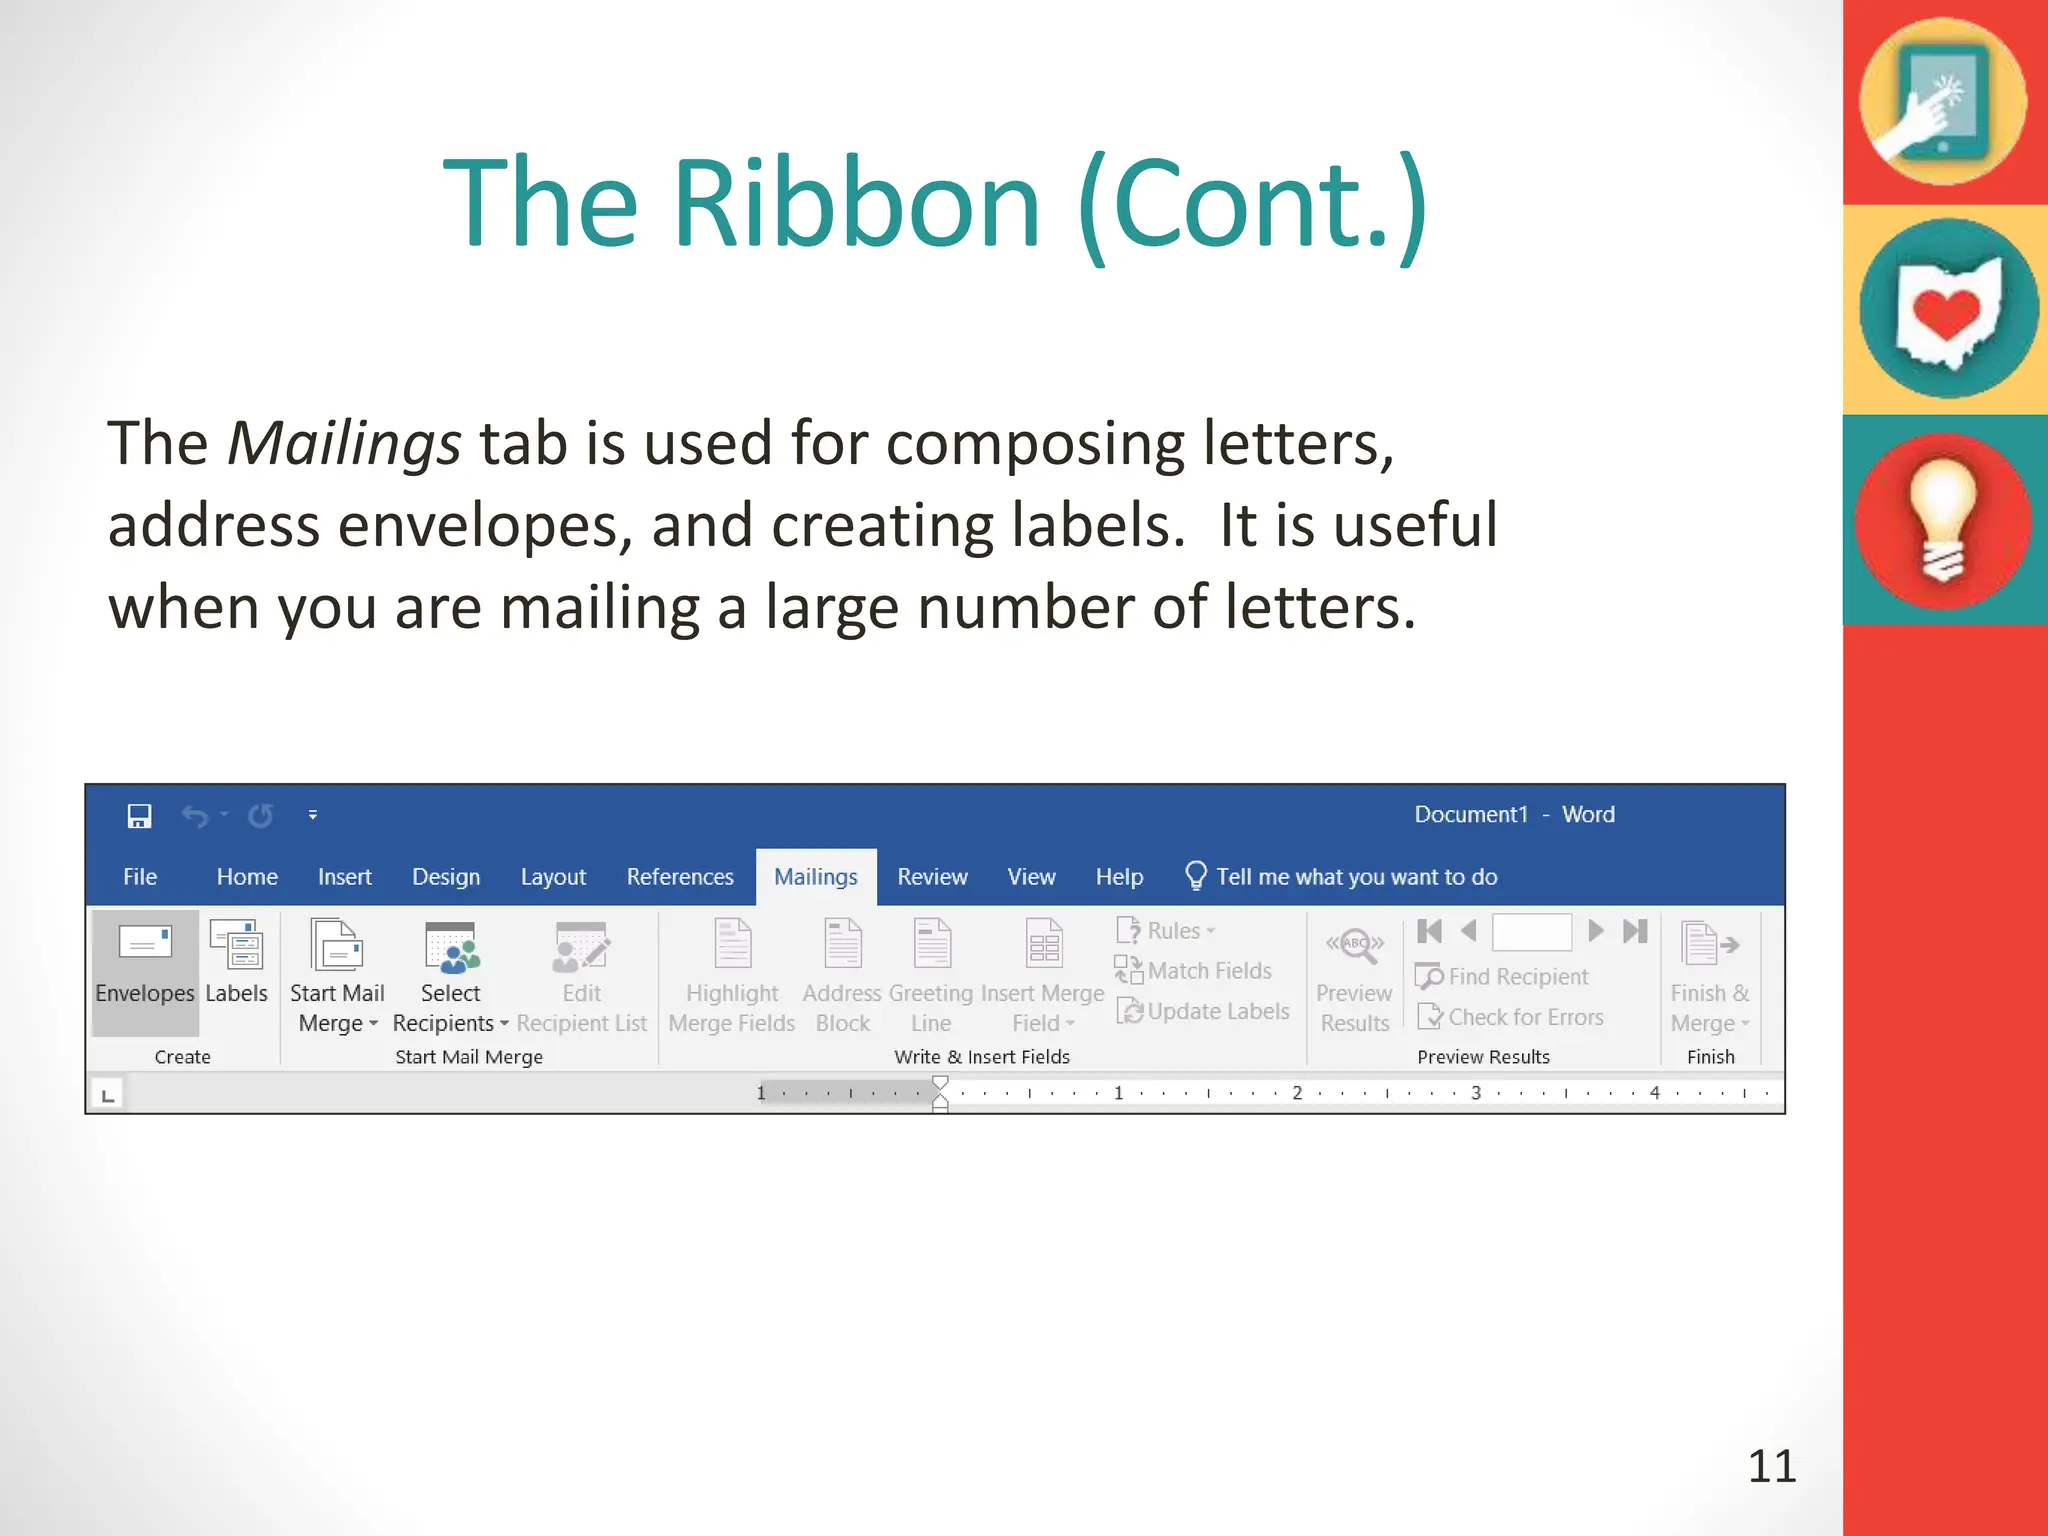
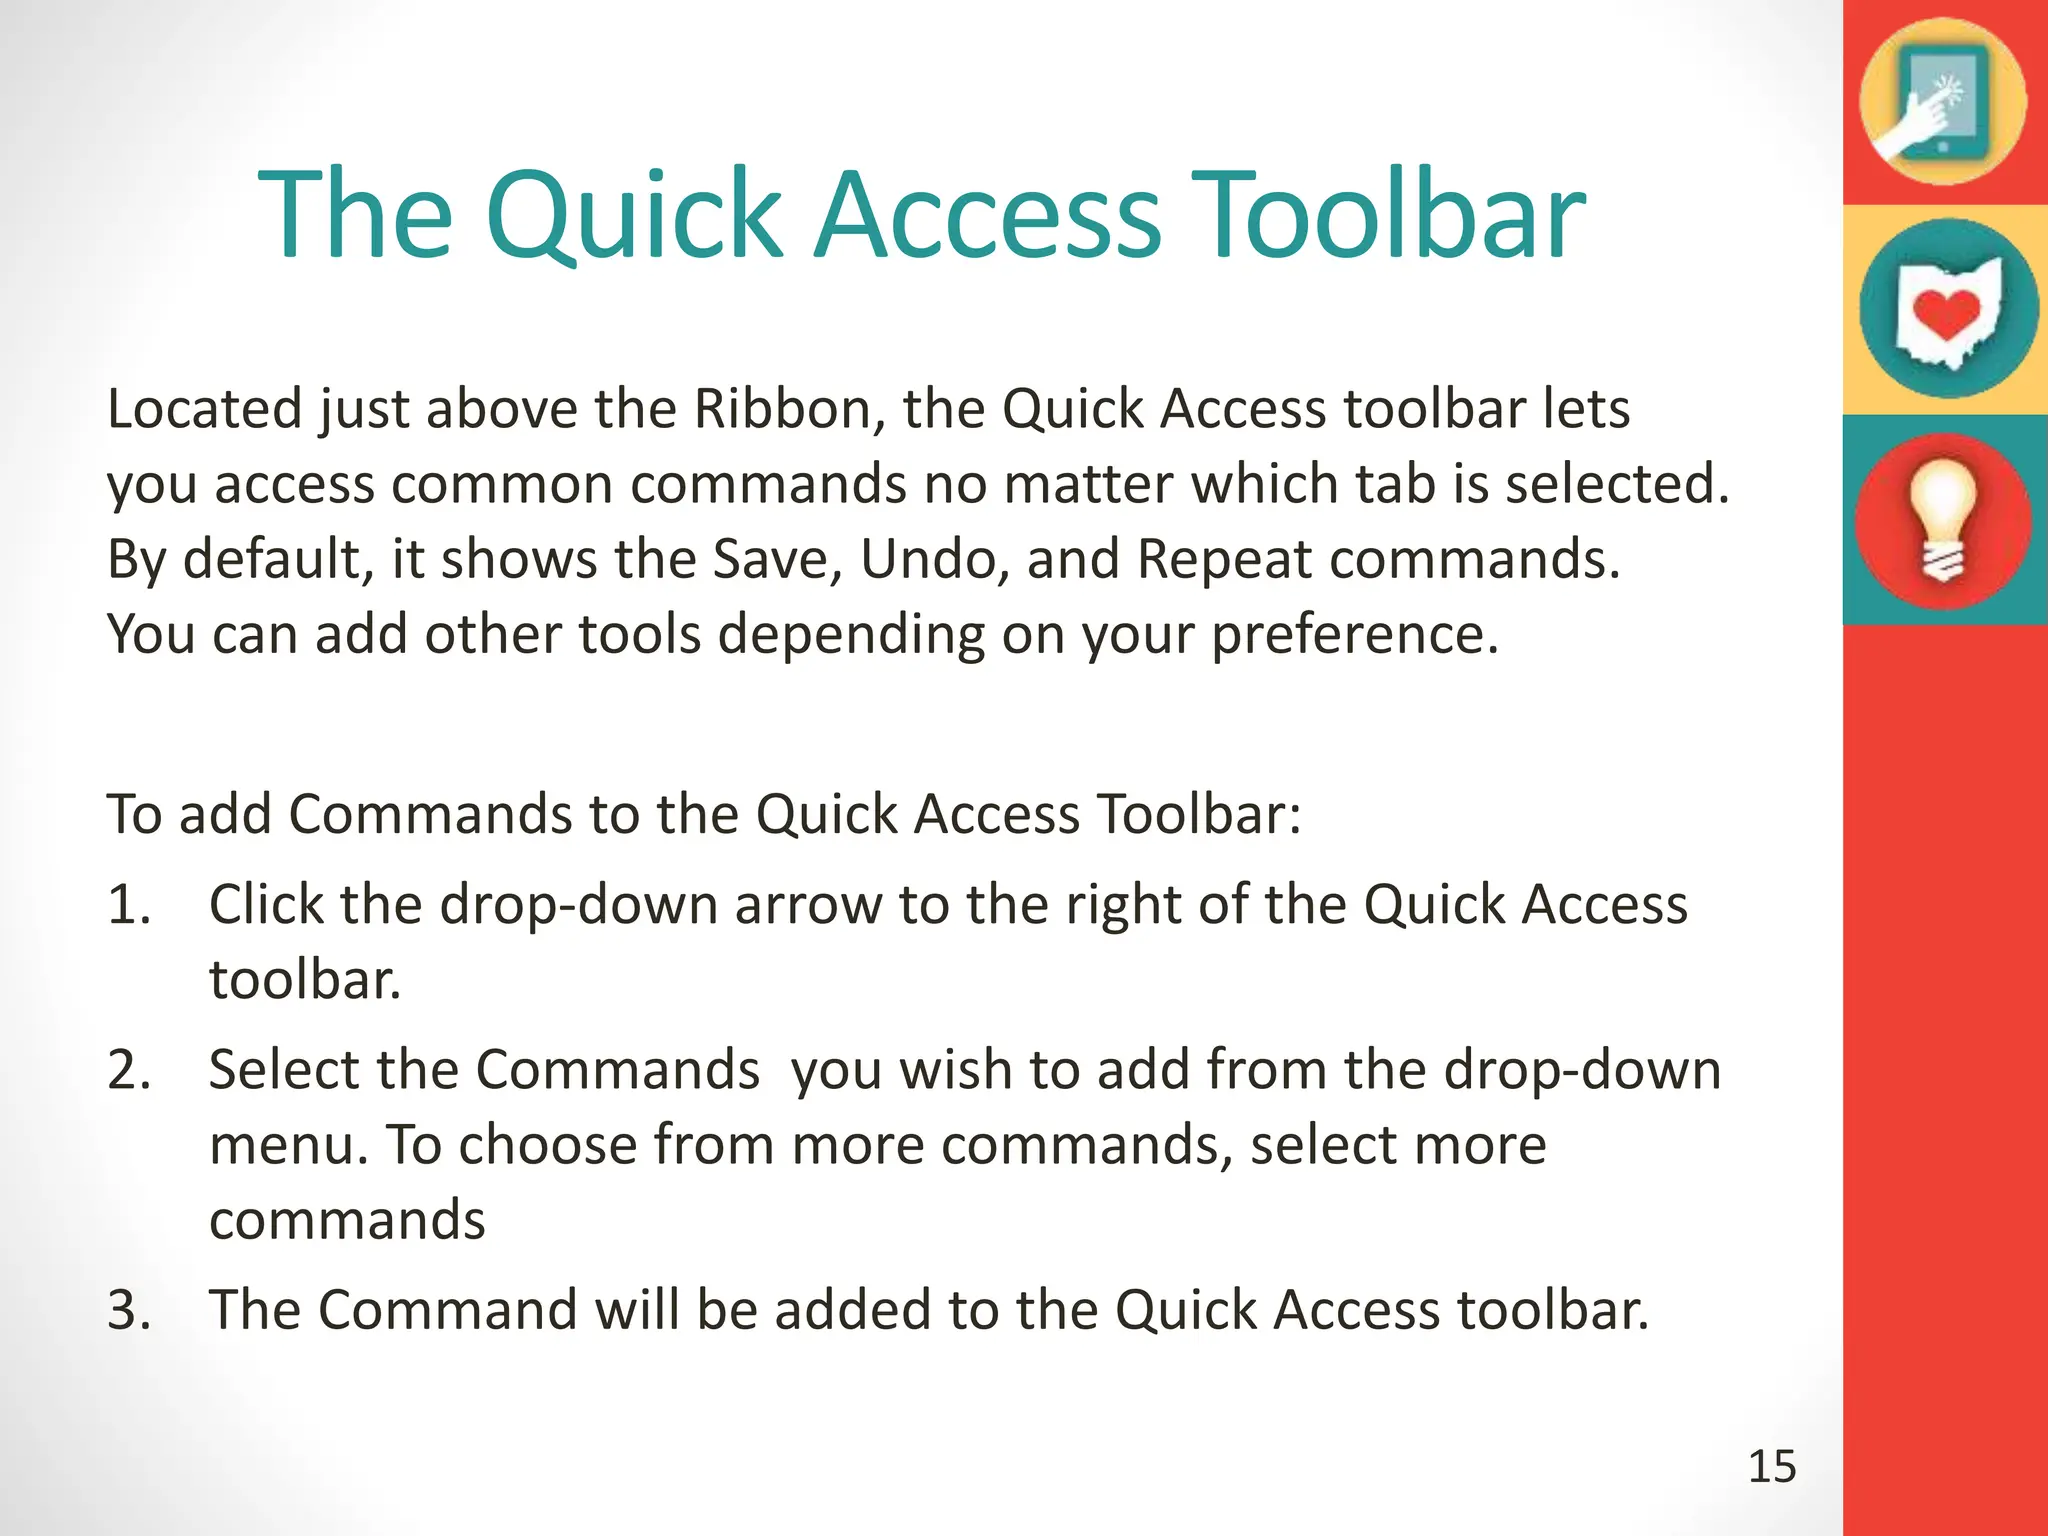
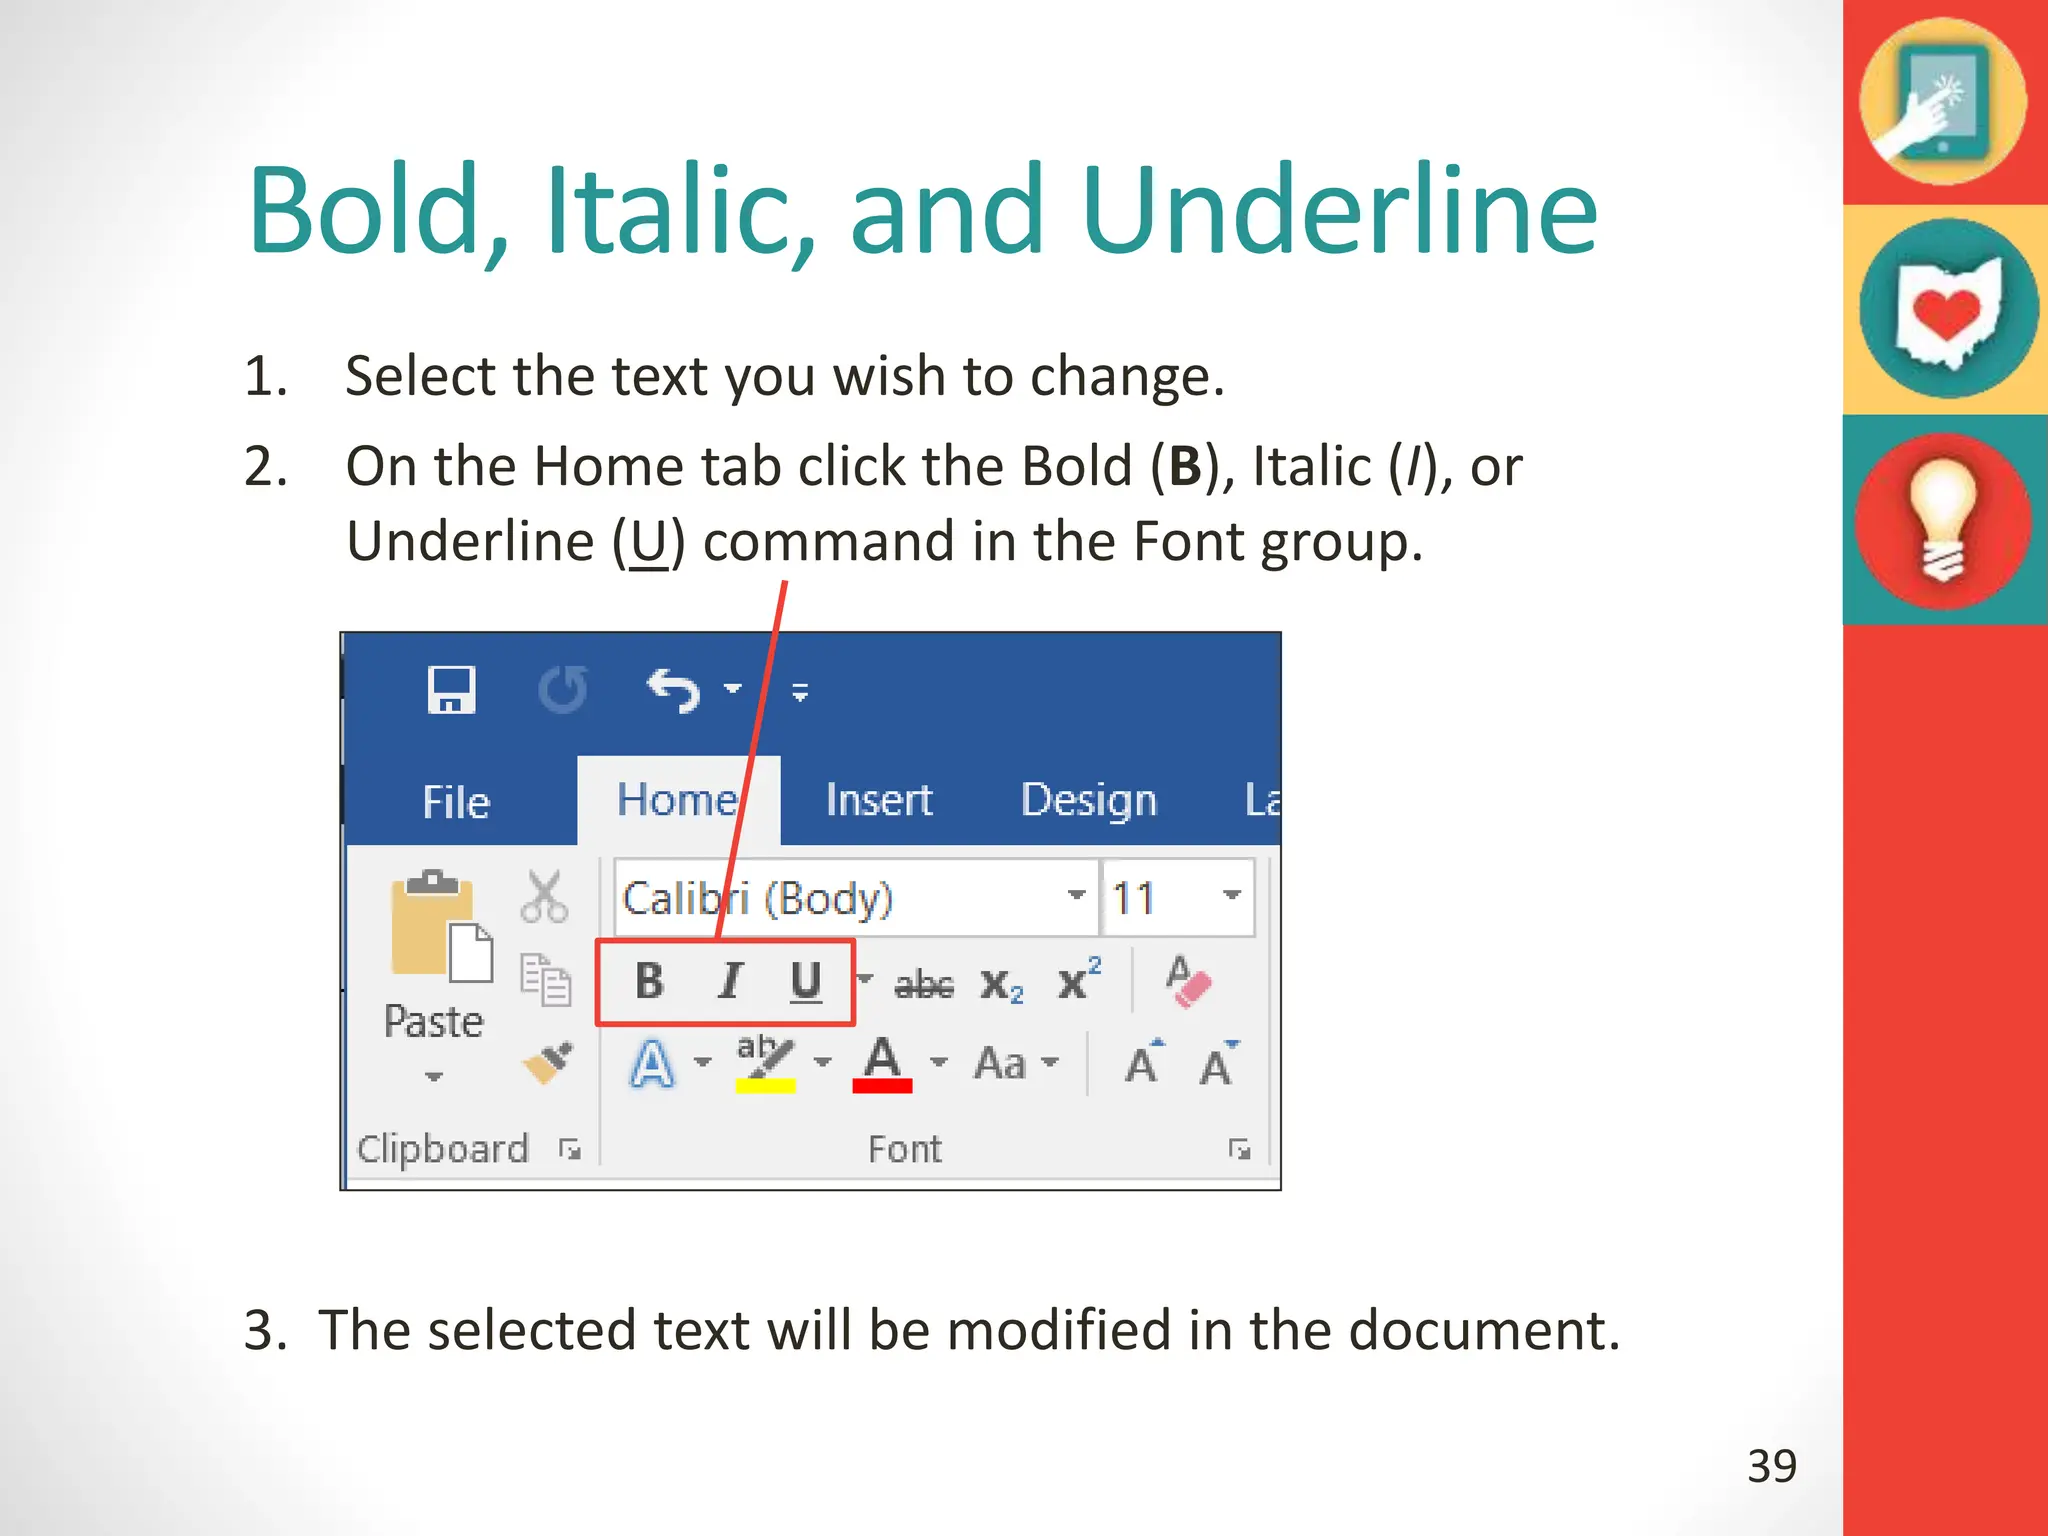
SlideShare a Scribd company logo
Microsoft Word
Word 2016 is a word processing application/program
that allows you to create a variety of documents like
letters, flyers, and reports
Word 2016 allows you to
do more with your word
processing project
1
Microsoft Word
Content
• Word Interface
• The Ribbon
• The Quick Access Toolbar
• The Document View
• The Insertion Point
• Formatting (Font, Font Size, Font Color and
more)
• Page Layout
• Opening, Saving & Exporting a Document
2
Word Interface
When Word is opened the Word Start Screen will appear
The start screen allows you to create a new document
by choosing from the list of pre-made templates
3
Blank Page Overview
4
The Ribbon
The Ribbon contains multiple tabs, each with several groups of
tools. The tools provided in the ribbon will help you complete
common tasks in Word.
The Ribbon has ten tabs:
1. File
2. Home
3. Insert
4. Design
5. Layout
6. References
7. Mailings
8. Review
9. View
10. Help
11. Format (Contextual/Special tab)
5
The Ribbon (Cont.)
The Home tab gives you access to some of the most commonly
used commands for working with Word, including copying and
pasting, formatting, aligning paragraphs, and choosing
document styles.
The Home tab is selected by default whenever you open Word.
6
The Ribbon (Cont.)
The Insert tab allows you to insert pictures, charts,
tables, shapes, cover pages, and more to your
document, which can help you communicate
information visually and add style to your document.
7
The Ribbon (Cont.)
The Design tab gives you access to a variety of design
tools, including document formatting, effects and page
borders, which can give you document a polished look.
8
The Ribbon (Cont.)
The Layout tab allows you to change the print formatting of
your document, including margin width, page orientation,
page breaks, and more. These tools will be helpful when
preparing to print a document.
9
The Ribbon (Cont.)
The References tab allows you to add footnotes, citations,
table of contents, captions and a bibliography. These
tools are helpful when composing academic papers.
10
The Ribbon (Cont.)
The Mailings tab is used for composing letters,
address envelopes, and creating labels. It is useful
when you are mailing a large number of letters.
11
The Ribbon (Cont.)
The Review tab has Word’s powerful editing features,
such as adding comments and tracking changes. These
features make it easy to share and collaborate on
documents.
12
The Ribbon (Cont.)
The View tab allows you to switch between different
views for your document and split the screen to view two
parts of your document at once. These tools will also be
helpful when preparing to print a document.
13
The Ribbon (Cont.)
Contextual tabs under Format will appear on the Ribbon
when working with certain items, such as tables and
pictures. These tabs contain special tools that can help
you format items as needed.
14
The Quick Access Toolbar
Located just above the Ribbon, the Quick Access toolbar lets
you access common commands no matter which tab is selected.
By default, it shows the Save, Undo, and Repeat commands.
You can add other tools depending on your preference.
To add Commands to the Quick Access Toolbar:
1. Click the drop-down arrow to the right of the Quick Access
toolbar.
2. Select the Commands you wish to add from the drop-down
menu. To choose from more commands, select more
commands
3. The Command will be added to the Quick Access toolbar.
15
The Quick Access Toolbar Cont.
Step 2 Step 3
16
The Ruler
The Ruler is located at the top and to the left of you
document. It makes it easier to adjust your document
with precision. If you want, you can hide the Ruler to
create more screen space.
Ruler
17
The Ruler (Cont.)
To show or hide the Ruler:
1. Click the view tab.
2. Click the check box next to Ruler show or
hide the ruler.
18
Document Views
Word 2016 has a variety of viewing options that change how your
document is displayed. You can choose to view your document in
Read Mode, Print Layout, or Web Layout. These views can be
useful for various tasks.
To change document views, locate and select the desired
document view tool in the bottom-right corner of the Word
window.
Read
Mode
Print
Mode
Web
Mode
19
Read Mode
In this view, all of the editing
tools are hidden so your
document fills the screen.
Arrows appear on the left
and right side of the screen
to toggle through the pages
of your document.
20
Print Mode
This is the default view
where you create and
edit your document.
There are page breaks
in between each page,
indicating how your
document will look
when printed.
Page
Breaks
21
Web Layout
This view removes
page breaks. It can
help you visualize how
your document will
display as a webpage.
No Page
Breaks
22
The Insertion Point
The insertion point is the blinking vertical line in your
document. It indicates where you can enter text on the page.
Blank document: When a new, document opens, the
insertion point is located in the top left corner of the page.
23
The Insertion Point (Cont.)
Adding spaces: Press the
space bar to add spaces after
a word or in between text.
New Paragraph line: Press
Enter on your keyboard to
move the insertion point to
the next paragraph line.
Press the
space bar to
add spaces
Press “Enter” to
move the insertion
point to the next
paragraph line
24
The Insertion Point Cont.
Manual placement: After a text has been entered,
you can use the mouse to move the insertion point
to a specific place in your document.
Simply click the location in the text where you wish
to place it.
Click to manually
place the insertion
point in a specific
location
25
Selecting Text
1. Place the insertion point next to the text you
wish to select.
2. Click the mouse and while holding it down
drag you mouse over the text to select it.
3. Release the mouse button. You have selected
the text. A highlighted box will appear over
the selected text.
26
Selecting Text (Cont.)
When you select text or images in Word, a toolbar will appear
How to delete text:
Highlight the text the you wish to delete then hit the
“Delete” key on the keyboard.
27
Copy and Paste Text
To copy and paste text:
Copying text creates a duplicate of the text.
1. Select the text you wish to copy
2. Click the Copy command on
the Home tab or right click the
selected text and click Copy.
28
Copy and Paste Text (Cont.)
3. Place the insertion point where you
wish the text to appear.
4. Click the Paste command on the Home tab
or right click and click paste.
5. Then the copied text will appear.
29
Cut and Paste Text
1. Select the text you wish to cut.
2. Click the Cut command
on the Home tab or
right click the selected
text and select cut.
30
Cut and Paste Text (Cont.)
3. Place your insertion point where you wish the text to appear.
4. Click the Paste command on the Home tab or
right click and select paste and the text will appear.
31
How to Change Font
Word 2016 provides a variety of other fonts
you can use to customize text and titles.
1. Select the text you wish to change.
32
How to Change Font (Cont.)
2. On the Home tab click the drop-down arrow next to
the Font box. A menu of font styles will appear.
3. Move the mouse over the list of font styles, then
select the font you would like to use
4. The font will change
in the document.
33
Changing Font Size
1. Select the text you wish to change.
34
Changing Font Size (Cont.)
2. Select the desired font size formatting option
Font size drop-down arrow: On the Home tab, click the Font
size drop-down arrow. A menu of font sizes will appear.
When you move the mouse over the various font sizes, a live
preview of the font size will appear in the document.
35
Font Color
1. Select the text you wish to change.
2. On the Home tab, click the Font Color drop-down
arrow. The Font Color menu appears
3. Move the mouse over the various font colors. A live
preview of the color will appear in the document.
36
Font Color (Cont.)
4. Select the font color you wish to use.
The font color will change in the document.
37
Highlight Text
Highlighting text can be useful when marking
important text in your document.
1. Select the text you wish to highlight.
2. From the Home tab, click the Text
Highlighter Color drop-down arrow.
3. Select the desired
highlight color.
38
Bold, Italic, and Underline
1. Select the text you wish to change.
2. On the Home tab click the Bold (B), Italic (I), or
Underline (U) command in the Font group.
3. The selected text will be modified in the document.
39
Changing Text Alignment
1. Select the text you wish to modify.
2. On the Home tab, select one of the four alignment
options from the paragraph section
Align Text left
Center
Align Text Right
Justify
40
Page Orientation
To change page orientation:
1. Select the Page Layout tab.
2. Click the “Orientation” command in the Page Setup Section.
3. A drop-down menu will appear. Click either “Portrait”
or “Landscape” to change the page orientation.
4. Once one is selected the page will change.
41
Changing Page Size
To change the page size:
Word has a variety of predefined page sizes to choose from.
1. Select the “Layout” tab, then click the “Size” command.
2. A drop-down menu will appear.
The current page size is highlighted
42
Margins
43
Backstage View
Backstage view gives you various options for saving,
opening a file, printing, and sharing your document.
To access Backstage view:
1. Click the file tab on the
Ribbon. Backstage view will
appear.
44
Backstage View (Cont.)
45
New Document
To begin a new project in Word
1. Select the file tab. Backstage view will appear.
2. Select New, then click a template.
3. A new, document
will appear.
46
How to: Open an Existing
Document
1. Navigate to Backstage view, then click Open.
2. Choose “Browse”
47
How to: Open an Existing
Document (Cont.)
3. The Open dialog box appears. Locate and
select your document, then click Open.
48
Save and Save As
In Word there are two says to save a file, SAVE and SAVE AS.
SAVE is used when a document is open or edited to save
what you are working on.
SAVE AS is used to save the document to a location and
change the name of the document.
It is important to save your document whenever you start a
new project or make changes to an existing one. Saving
early and often can prevent you work from being lost. You
will also need to pay close attention to where you save the
document so it will be easy to find later.
49
To Save a Document
1. Locate and select the Save command on the
Quick Access toolbar.
2. If you are saving the document for the first
time Save As will appear in Backstage view.
3. You will then need to choose where to save the
file and give it a file name.
50
51
To Save a Document (Cont.)
4. The Save As dialog box will appear. Select the
location where you wish to save the document.
5. Enter a file name for the document, then click Save.
52
How To: Export Word to PDF
1. Click the File tab to access Backstage view.
2. Click Export, then select Create PDF/XPS.
53
How To: Export Word to PDF (Cont.)
3. The Save As dialog box will appear. Select the
location where you wish to export the documents,
enter a file name, then click Publish.
54
Exporting to Other File Types
A file can also be exported to Word 97-2003 doc,
or a plain-text version
1. Click the file tab to access Backstage view
2. Click Export, then select “Change File Type”
55
Exporting to Other File Types (Cont.)
3. Select a file type, then click Save As.
Select a common file type,
then click “Save As” to export
56
Exporting to Other File Types (Cont.)
4. The Save As dialog box will appear. Select the location
where you wish to export the document, enter a file name,
then click Save.
57
Exporting to Other File Types (Cont.)
You can also use the
Save As type: drop-down
menu in the Save As
dialog box to save
documents in a variety
of file types.
58
Thank You
59

More Related Content

Similar to Microsoft Word Basics .pptx

Introduction to Microsoft Office
Introduction to Microsoft OfficeIntroduction to Microsoft Office
Introduction to Microsoft Office
jeffrey233617
 
Word2016.ppt
Word2016.pptWord2016.ppt
Word2016.ppt
AbhiSharma267039
 
computer Ms word and it's importance.pdf
computer Ms word and it's importance.pdfcomputer Ms word and it's importance.pdf
computer Ms word and it's importance.pdf
TheRealHeroes
 
Word2016.pptx
Word2016.pptxWord2016.pptx
Word2016.pptx
MaAngeluzClariceMati
 
Word.pptx
Word.pptxWord.pptx
Word.pptx
BontuShuku
 
Basic Features of MS Word 2016.pptx
Basic Features of MS Word 2016.pptxBasic Features of MS Word 2016.pptx
Basic Features of MS Word 2016.pptx
mhavzgreda1
 
3. Basics of Microsoft word.pdf
3. Basics of Microsoft word.pdf3. Basics of Microsoft word.pdf
3. Basics of Microsoft word.pdf
TonarSystems
 
POWER POINT.pptx
POWER POINT.pptxPOWER POINT.pptx
POWER POINT.pptx
BontuShuku
 
Microsoft words Basic details for students
Microsoft words Basic details for studentsMicrosoft words Basic details for students
Microsoft words Basic details for students
singhrinku615
 
Word 2007 intro
Word 2007 introWord 2007 intro
Word 2007 introedshee
 
Microsoft Word Basic Features
Microsoft Word Basic FeaturesMicrosoft Word Basic Features
Microsoft Word Basic Features
AkashMeghwar2
 
Explore MS Word2016.pptx
Explore MS Word2016.pptxExplore MS Word2016.pptx
Explore MS Word2016.pptx
MohsinHaiderSultan
 
Advanced Microsoft word seminar
Advanced Microsoft word seminarAdvanced Microsoft word seminar
Advanced Microsoft word seminar
M'mama Sawaneh
 
Task 2
Task 2Task 2
Task 2
KavitaPunia1
 
MS Word
MS WordMS Word
MS Word
sachinupreti2
 
Word
WordWord
Unit 1.pptx
Unit 1.pptxUnit 1.pptx
Unit 1.pptx
Leenachaudhari27
 
Microsoft word features
Microsoft word featuresMicrosoft word features
Microsoft word features
Saira Randhawa
 
Unit4
Unit4Unit4

Similar to Microsoft Word Basics .pptx (20)

Introduction to Microsoft Office
Introduction to Microsoft OfficeIntroduction to Microsoft Office
Introduction to Microsoft Office
 
awert.pptx
awert.pptxawert.pptx
awert.pptx
 
Word2016.ppt
Word2016.pptWord2016.ppt
Word2016.ppt
 
computer Ms word and it's importance.pdf
computer Ms word and it's importance.pdfcomputer Ms word and it's importance.pdf
computer Ms word and it's importance.pdf
 
Word2016.pptx
Word2016.pptxWord2016.pptx
Word2016.pptx
 
Word.pptx
Word.pptxWord.pptx
Word.pptx
 
Basic Features of MS Word 2016.pptx
Basic Features of MS Word 2016.pptxBasic Features of MS Word 2016.pptx
Basic Features of MS Word 2016.pptx
 
3. Basics of Microsoft word.pdf
3. Basics of Microsoft word.pdf3. Basics of Microsoft word.pdf
3. Basics of Microsoft word.pdf
 
POWER POINT.pptx
POWER POINT.pptxPOWER POINT.pptx
POWER POINT.pptx
 
Microsoft words Basic details for students
Microsoft words Basic details for studentsMicrosoft words Basic details for students
Microsoft words Basic details for students
 
Word 2007 intro
Word 2007 introWord 2007 intro
Word 2007 intro
 
Microsoft Word Basic Features
Microsoft Word Basic FeaturesMicrosoft Word Basic Features
Microsoft Word Basic Features
 
Explore MS Word2016.pptx
Explore MS Word2016.pptxExplore MS Word2016.pptx
Explore MS Word2016.pptx
 
Advanced Microsoft word seminar
Advanced Microsoft word seminarAdvanced Microsoft word seminar
Advanced Microsoft word seminar
 
Task 2
Task 2Task 2
Task 2
 
MS Word
MS WordMS Word
MS Word
 
Word
WordWord
Word
 
Unit 1.pptx
Unit 1.pptxUnit 1.pptx
Unit 1.pptx
 
Microsoft word features
Microsoft word featuresMicrosoft word features
Microsoft word features
 
Unit4
Unit4Unit4
Unit4
 

More from FaizanAhmed396943

Understanding Spreadsheets .ppt
Understanding Spreadsheets          .pptUnderstanding Spreadsheets          .ppt
Understanding Spreadsheets .ppt
FaizanAhmed396943
 
2. Chapter 2 - Pressure & Fluid Statics (FM1) (Complete).pdf
2. Chapter 2 - Pressure & Fluid Statics (FM1) (Complete).pdf2. Chapter 2 - Pressure & Fluid Statics (FM1) (Complete).pdf
2. Chapter 2 - Pressure & Fluid Statics (FM1) (Complete).pdf
FaizanAhmed396943
 
basic concepts of fluid mechanics (FM-1).pdf
basic concepts of fluid mechanics (FM-1).pdfbasic concepts of fluid mechanics (FM-1).pdf
basic concepts of fluid mechanics (FM-1).pdf
FaizanAhmed396943
 
Chapter 9 Mechanical Injection Systems.pdf
Chapter 9 Mechanical Injection Systems.pdfChapter 9 Mechanical Injection Systems.pdf
Chapter 9 Mechanical Injection Systems.pdf
FaizanAhmed396943
 
Flate Plate Collector (theory presentation).pdf
Flate Plate Collector (theory presentation).pdfFlate Plate Collector (theory presentation).pdf
Flate Plate Collector (theory presentation).pdf
FaizanAhmed396943
 
PhotoVoltaic Panel (Theory presentation).pdf
PhotoVoltaic Panel (Theory presentation).pdfPhotoVoltaic Panel (Theory presentation).pdf
PhotoVoltaic Panel (Theory presentation).pdf
FaizanAhmed396943
 
clean energy technology (overview) .pdf
clean energy technology (overview)  .pdfclean energy technology (overview)  .pdf
clean energy technology (overview) .pdf
FaizanAhmed396943
 
Plumbing_services [Dr. Kamakshi Memorial Hospital].pptx
Plumbing_services [Dr. Kamakshi Memorial Hospital].pptxPlumbing_services [Dr. Kamakshi Memorial Hospital].pptx
Plumbing_services [Dr. Kamakshi Memorial Hospital].pptx
FaizanAhmed396943
 

More from FaizanAhmed396943 (8)

Understanding Spreadsheets .ppt
Understanding Spreadsheets          .pptUnderstanding Spreadsheets          .ppt
Understanding Spreadsheets .ppt
 
2. Chapter 2 - Pressure & Fluid Statics (FM1) (Complete).pdf
2. Chapter 2 - Pressure & Fluid Statics (FM1) (Complete).pdf2. Chapter 2 - Pressure & Fluid Statics (FM1) (Complete).pdf
2. Chapter 2 - Pressure & Fluid Statics (FM1) (Complete).pdf
 
basic concepts of fluid mechanics (FM-1).pdf
basic concepts of fluid mechanics (FM-1).pdfbasic concepts of fluid mechanics (FM-1).pdf
basic concepts of fluid mechanics (FM-1).pdf
 
Chapter 9 Mechanical Injection Systems.pdf
Chapter 9 Mechanical Injection Systems.pdfChapter 9 Mechanical Injection Systems.pdf
Chapter 9 Mechanical Injection Systems.pdf
 
Flate Plate Collector (theory presentation).pdf
Flate Plate Collector (theory presentation).pdfFlate Plate Collector (theory presentation).pdf
Flate Plate Collector (theory presentation).pdf
 
PhotoVoltaic Panel (Theory presentation).pdf
PhotoVoltaic Panel (Theory presentation).pdfPhotoVoltaic Panel (Theory presentation).pdf
PhotoVoltaic Panel (Theory presentation).pdf
 
clean energy technology (overview) .pdf
clean energy technology (overview)  .pdfclean energy technology (overview)  .pdf
clean energy technology (overview) .pdf
 
Plumbing_services [Dr. Kamakshi Memorial Hospital].pptx
Plumbing_services [Dr. Kamakshi Memorial Hospital].pptxPlumbing_services [Dr. Kamakshi Memorial Hospital].pptx
Plumbing_services [Dr. Kamakshi Memorial Hospital].pptx
 

Recently uploaded

CLASS 11 CBSE B.St Project AIDS TO TRADE - INSURANCE
CLASS 11 CBSE B.St Project AIDS TO TRADE - INSURANCECLASS 11 CBSE B.St Project AIDS TO TRADE - INSURANCE
CLASS 11 CBSE B.St Project AIDS TO TRADE - INSURANCE
BhavyaRajput3
 
Sha'Carri Richardson Presentation 202345
Sha'Carri Richardson Presentation 202345Sha'Carri Richardson Presentation 202345
Sha'Carri Richardson Presentation 202345
beazzy04
 
Language Across the Curriculm LAC B.Ed.
Language Across the  Curriculm LAC B.Ed.Language Across the  Curriculm LAC B.Ed.
Language Across the Curriculm LAC B.Ed.
Atul Kumar Singh
 
Operation Blue Star - Saka Neela Tara
Operation Blue Star   -  Saka Neela TaraOperation Blue Star   -  Saka Neela Tara
Operation Blue Star - Saka Neela Tara
Balvir Singh
 
Chapter 3 - Islamic Banking Products and Services.pptx
Chapter 3 - Islamic Banking Products and Services.pptxChapter 3 - Islamic Banking Products and Services.pptx
Chapter 3 - Islamic Banking Products and Services.pptx
Mohd Adib Abd Muin, Senior Lecturer at Universiti Utara Malaysia
 
The French Revolution Class 9 Study Material pdf free download
The French Revolution Class 9 Study Material pdf free downloadThe French Revolution Class 9 Study Material pdf free download
The French Revolution Class 9 Study Material pdf free download
Vivekanand Anglo Vedic Academy
 
Additional Benefits for Employee Website.pdf
Additional Benefits for Employee Website.pdfAdditional Benefits for Employee Website.pdf
Additional Benefits for Employee Website.pdf
joachimlavalley1
 
Francesca Gottschalk - How can education support child empowerment.pptx
Francesca Gottschalk - How can education support child empowerment.pptxFrancesca Gottschalk - How can education support child empowerment.pptx
Francesca Gottschalk - How can education support child empowerment.pptx
EduSkills OECD
 
Home assignment II on Spectroscopy 2024 Answers.pdf
Home assignment II on Spectroscopy 2024 Answers.pdfHome assignment II on Spectroscopy 2024 Answers.pdf
Home assignment II on Spectroscopy 2024 Answers.pdf
Tamralipta Mahavidyalaya
 
Introduction to AI for Nonprofits with Tapp Network
Introduction to AI for Nonprofits with Tapp NetworkIntroduction to AI for Nonprofits with Tapp Network
Introduction to AI for Nonprofits with Tapp Network
TechSoup
 
Embracing GenAI - A Strategic Imperative
Embracing GenAI - A Strategic ImperativeEmbracing GenAI - A Strategic Imperative
Embracing GenAI - A Strategic Imperative
Peter Windle
 
Instructions for Submissions thorugh G- Classroom.pptx
Instructions for Submissions thorugh G- Classroom.pptxInstructions for Submissions thorugh G- Classroom.pptx
Instructions for Submissions thorugh G- Classroom.pptx
Jheel Barad
 
Overview on Edible Vaccine: Pros & Cons with Mechanism
Overview on Edible Vaccine: Pros & Cons with MechanismOverview on Edible Vaccine: Pros & Cons with Mechanism
Overview on Edible Vaccine: Pros & Cons with Mechanism
DeeptiGupta154
 
A Strategic Approach: GenAI in Education
A Strategic Approach: GenAI in EducationA Strategic Approach: GenAI in Education
A Strategic Approach: GenAI in Education
Peter Windle
 
Biological Screening of Herbal Drugs in detailed.
Biological Screening of Herbal Drugs in detailed.Biological Screening of Herbal Drugs in detailed.
Biological Screening of Herbal Drugs in detailed.
Ashokrao Mane college of Pharmacy Peth-Vadgaon
 
Unit 2- Research Aptitude (UGC NET Paper I).pdf
Unit 2- Research Aptitude (UGC NET Paper I).pdfUnit 2- Research Aptitude (UGC NET Paper I).pdf
Unit 2- Research Aptitude (UGC NET Paper I).pdf
Thiyagu K
 
Unit 8 - Information and Communication Technology (Paper I).pdf
Unit 8 - Information and Communication Technology (Paper I).pdfUnit 8 - Information and Communication Technology (Paper I).pdf
Unit 8 - Information and Communication Technology (Paper I).pdf
Thiyagu K
 
Lapbook sobre os Regimes Totalitários.pdf
Lapbook sobre os Regimes Totalitários.pdfLapbook sobre os Regimes Totalitários.pdf
Lapbook sobre os Regimes Totalitários.pdf
Jean Carlos Nunes Paixão
 
Welcome to TechSoup New Member Orientation and Q&A (May 2024).pdf
Welcome to TechSoup   New Member Orientation and Q&A (May 2024).pdfWelcome to TechSoup   New Member Orientation and Q&A (May 2024).pdf
Welcome to TechSoup New Member Orientation and Q&A (May 2024).pdf
TechSoup
 
Supporting (UKRI) OA monographs at Salford.pptx
Supporting (UKRI) OA monographs at Salford.pptxSupporting (UKRI) OA monographs at Salford.pptx
Supporting (UKRI) OA monographs at Salford.pptx
Jisc
 

Recently uploaded (20)

CLASS 11 CBSE B.St Project AIDS TO TRADE - INSURANCE
CLASS 11 CBSE B.St Project AIDS TO TRADE - INSURANCECLASS 11 CBSE B.St Project AIDS TO TRADE - INSURANCE
CLASS 11 CBSE B.St Project AIDS TO TRADE - INSURANCE
 
Sha'Carri Richardson Presentation 202345
Sha'Carri Richardson Presentation 202345Sha'Carri Richardson Presentation 202345
Sha'Carri Richardson Presentation 202345
 
Language Across the Curriculm LAC B.Ed.
Language Across the  Curriculm LAC B.Ed.Language Across the  Curriculm LAC B.Ed.
Language Across the Curriculm LAC B.Ed.
 
Operation Blue Star - Saka Neela Tara
Operation Blue Star   -  Saka Neela TaraOperation Blue Star   -  Saka Neela Tara
Operation Blue Star - Saka Neela Tara
 
Chapter 3 - Islamic Banking Products and Services.pptx
Chapter 3 - Islamic Banking Products and Services.pptxChapter 3 - Islamic Banking Products and Services.pptx
Chapter 3 - Islamic Banking Products and Services.pptx
 
The French Revolution Class 9 Study Material pdf free download
The French Revolution Class 9 Study Material pdf free downloadThe French Revolution Class 9 Study Material pdf free download
The French Revolution Class 9 Study Material pdf free download
 
Additional Benefits for Employee Website.pdf
Additional Benefits for Employee Website.pdfAdditional Benefits for Employee Website.pdf
Additional Benefits for Employee Website.pdf
 
Francesca Gottschalk - How can education support child empowerment.pptx
Francesca Gottschalk - How can education support child empowerment.pptxFrancesca Gottschalk - How can education support child empowerment.pptx
Francesca Gottschalk - How can education support child empowerment.pptx
 
Home assignment II on Spectroscopy 2024 Answers.pdf
Home assignment II on Spectroscopy 2024 Answers.pdfHome assignment II on Spectroscopy 2024 Answers.pdf
Home assignment II on Spectroscopy 2024 Answers.pdf
 
Introduction to AI for Nonprofits with Tapp Network
Introduction to AI for Nonprofits with Tapp NetworkIntroduction to AI for Nonprofits with Tapp Network
Introduction to AI for Nonprofits with Tapp Network
 
Embracing GenAI - A Strategic Imperative
Embracing GenAI - A Strategic ImperativeEmbracing GenAI - A Strategic Imperative
Embracing GenAI - A Strategic Imperative
 
Instructions for Submissions thorugh G- Classroom.pptx
Instructions for Submissions thorugh G- Classroom.pptxInstructions for Submissions thorugh G- Classroom.pptx
Instructions for Submissions thorugh G- Classroom.pptx
 
Overview on Edible Vaccine: Pros & Cons with Mechanism
Overview on Edible Vaccine: Pros & Cons with MechanismOverview on Edible Vaccine: Pros & Cons with Mechanism
Overview on Edible Vaccine: Pros & Cons with Mechanism
 
A Strategic Approach: GenAI in Education
A Strategic Approach: GenAI in EducationA Strategic Approach: GenAI in Education
A Strategic Approach: GenAI in Education
 
Biological Screening of Herbal Drugs in detailed.
Biological Screening of Herbal Drugs in detailed.Biological Screening of Herbal Drugs in detailed.
Biological Screening of Herbal Drugs in detailed.
 
Unit 2- Research Aptitude (UGC NET Paper I).pdf
Unit 2- Research Aptitude (UGC NET Paper I).pdfUnit 2- Research Aptitude (UGC NET Paper I).pdf
Unit 2- Research Aptitude (UGC NET Paper I).pdf
 
Unit 8 - Information and Communication Technology (Paper I).pdf
Unit 8 - Information and Communication Technology (Paper I).pdfUnit 8 - Information and Communication Technology (Paper I).pdf
Unit 8 - Information and Communication Technology (Paper I).pdf
 
Lapbook sobre os Regimes Totalitários.pdf
Lapbook sobre os Regimes Totalitários.pdfLapbook sobre os Regimes Totalitários.pdf
Lapbook sobre os Regimes Totalitários.pdf
 
Welcome to TechSoup New Member Orientation and Q&A (May 2024).pdf
Welcome to TechSoup   New Member Orientation and Q&A (May 2024).pdfWelcome to TechSoup   New Member Orientation and Q&A (May 2024).pdf
Welcome to TechSoup New Member Orientation and Q&A (May 2024).pdf
 
Supporting (UKRI) OA monographs at Salford.pptx
Supporting (UKRI) OA monographs at Salford.pptxSupporting (UKRI) OA monographs at Salford.pptx
Supporting (UKRI) OA monographs at Salford.pptx
 

Microsoft Word Basics .pptx

  • 1. Microsoft Word Word 2016 is a word processing application/program that allows you to create a variety of documents like letters, flyers, and reports Word 2016 allows you to do more with your word processing project 1
  • 2. Microsoft Word Content • Word Interface • The Ribbon • The Quick Access Toolbar • The Document View • The Insertion Point • Formatting (Font, Font Size, Font Color and more) • Page Layout • Opening, Saving & Exporting a Document 2
  • 3. Word Interface When Word is opened the Word Start Screen will appear The start screen allows you to create a new document by choosing from the list of pre-made templates 3
  • 5. The Ribbon The Ribbon contains multiple tabs, each with several groups of tools. The tools provided in the ribbon will help you complete common tasks in Word. The Ribbon has ten tabs: 1. File 2. Home 3. Insert 4. Design 5. Layout 6. References 7. Mailings 8. Review 9. View 10. Help 11. Format (Contextual/Special tab) 5
  • 6. The Ribbon (Cont.) The Home tab gives you access to some of the most commonly used commands for working with Word, including copying and pasting, formatting, aligning paragraphs, and choosing document styles. The Home tab is selected by default whenever you open Word. 6
  • 7. The Ribbon (Cont.) The Insert tab allows you to insert pictures, charts, tables, shapes, cover pages, and more to your document, which can help you communicate information visually and add style to your document. 7
  • 8. The Ribbon (Cont.) The Design tab gives you access to a variety of design tools, including document formatting, effects and page borders, which can give you document a polished look. 8
  • 9. The Ribbon (Cont.) The Layout tab allows you to change the print formatting of your document, including margin width, page orientation, page breaks, and more. These tools will be helpful when preparing to print a document. 9
  • 10. The Ribbon (Cont.) The References tab allows you to add footnotes, citations, table of contents, captions and a bibliography. These tools are helpful when composing academic papers. 10
  • 11. The Ribbon (Cont.) The Mailings tab is used for composing letters, address envelopes, and creating labels. It is useful when you are mailing a large number of letters. 11
  • 12. The Ribbon (Cont.) The Review tab has Word’s powerful editing features, such as adding comments and tracking changes. These features make it easy to share and collaborate on documents. 12
  • 13. The Ribbon (Cont.) The View tab allows you to switch between different views for your document and split the screen to view two parts of your document at once. These tools will also be helpful when preparing to print a document. 13
  • 14. The Ribbon (Cont.) Contextual tabs under Format will appear on the Ribbon when working with certain items, such as tables and pictures. These tabs contain special tools that can help you format items as needed. 14
  • 15. The Quick Access Toolbar Located just above the Ribbon, the Quick Access toolbar lets you access common commands no matter which tab is selected. By default, it shows the Save, Undo, and Repeat commands. You can add other tools depending on your preference. To add Commands to the Quick Access Toolbar: 1. Click the drop-down arrow to the right of the Quick Access toolbar. 2. Select the Commands you wish to add from the drop-down menu. To choose from more commands, select more commands 3. The Command will be added to the Quick Access toolbar. 15
  • 16. The Quick Access Toolbar Cont. Step 2 Step 3 16
  • 17. The Ruler The Ruler is located at the top and to the left of you document. It makes it easier to adjust your document with precision. If you want, you can hide the Ruler to create more screen space. Ruler 17
  • 18. The Ruler (Cont.) To show or hide the Ruler: 1. Click the view tab. 2. Click the check box next to Ruler show or hide the ruler. 18
  • 19. Document Views Word 2016 has a variety of viewing options that change how your document is displayed. You can choose to view your document in Read Mode, Print Layout, or Web Layout. These views can be useful for various tasks. To change document views, locate and select the desired document view tool in the bottom-right corner of the Word window. Read Mode Print Mode Web Mode 19
  • 20. Read Mode In this view, all of the editing tools are hidden so your document fills the screen. Arrows appear on the left and right side of the screen to toggle through the pages of your document. 20
  • 21. Print Mode This is the default view where you create and edit your document. There are page breaks in between each page, indicating how your document will look when printed. Page Breaks 21
  • 22. Web Layout This view removes page breaks. It can help you visualize how your document will display as a webpage. No Page Breaks 22
  • 23. The Insertion Point The insertion point is the blinking vertical line in your document. It indicates where you can enter text on the page. Blank document: When a new, document opens, the insertion point is located in the top left corner of the page. 23
  • 24. The Insertion Point (Cont.) Adding spaces: Press the space bar to add spaces after a word or in between text. New Paragraph line: Press Enter on your keyboard to move the insertion point to the next paragraph line. Press the space bar to add spaces Press “Enter” to move the insertion point to the next paragraph line 24
  • 25. The Insertion Point Cont. Manual placement: After a text has been entered, you can use the mouse to move the insertion point to a specific place in your document. Simply click the location in the text where you wish to place it. Click to manually place the insertion point in a specific location 25
  • 26. Selecting Text 1. Place the insertion point next to the text you wish to select. 2. Click the mouse and while holding it down drag you mouse over the text to select it. 3. Release the mouse button. You have selected the text. A highlighted box will appear over the selected text. 26
  • 27. Selecting Text (Cont.) When you select text or images in Word, a toolbar will appear How to delete text: Highlight the text the you wish to delete then hit the “Delete” key on the keyboard. 27
  • 28. Copy and Paste Text To copy and paste text: Copying text creates a duplicate of the text. 1. Select the text you wish to copy 2. Click the Copy command on the Home tab or right click the selected text and click Copy. 28
  • 29. Copy and Paste Text (Cont.) 3. Place the insertion point where you wish the text to appear. 4. Click the Paste command on the Home tab or right click and click paste. 5. Then the copied text will appear. 29
  • 30. Cut and Paste Text 1. Select the text you wish to cut. 2. Click the Cut command on the Home tab or right click the selected text and select cut. 30
  • 31. Cut and Paste Text (Cont.) 3. Place your insertion point where you wish the text to appear. 4. Click the Paste command on the Home tab or right click and select paste and the text will appear. 31
  • 32. How to Change Font Word 2016 provides a variety of other fonts you can use to customize text and titles. 1. Select the text you wish to change. 32
  • 33. How to Change Font (Cont.) 2. On the Home tab click the drop-down arrow next to the Font box. A menu of font styles will appear. 3. Move the mouse over the list of font styles, then select the font you would like to use 4. The font will change in the document. 33
  • 34. Changing Font Size 1. Select the text you wish to change. 34
  • 35. Changing Font Size (Cont.) 2. Select the desired font size formatting option Font size drop-down arrow: On the Home tab, click the Font size drop-down arrow. A menu of font sizes will appear. When you move the mouse over the various font sizes, a live preview of the font size will appear in the document. 35
  • 36. Font Color 1. Select the text you wish to change. 2. On the Home tab, click the Font Color drop-down arrow. The Font Color menu appears 3. Move the mouse over the various font colors. A live preview of the color will appear in the document. 36
  • 37. Font Color (Cont.) 4. Select the font color you wish to use. The font color will change in the document. 37
  • 38. Highlight Text Highlighting text can be useful when marking important text in your document. 1. Select the text you wish to highlight. 2. From the Home tab, click the Text Highlighter Color drop-down arrow. 3. Select the desired highlight color. 38
  • 39. Bold, Italic, and Underline 1. Select the text you wish to change. 2. On the Home tab click the Bold (B), Italic (I), or Underline (U) command in the Font group. 3. The selected text will be modified in the document. 39
  • 40. Changing Text Alignment 1. Select the text you wish to modify. 2. On the Home tab, select one of the four alignment options from the paragraph section Align Text left Center Align Text Right Justify 40
  • 41. Page Orientation To change page orientation: 1. Select the Page Layout tab. 2. Click the “Orientation” command in the Page Setup Section. 3. A drop-down menu will appear. Click either “Portrait” or “Landscape” to change the page orientation. 4. Once one is selected the page will change. 41
  • 42. Changing Page Size To change the page size: Word has a variety of predefined page sizes to choose from. 1. Select the “Layout” tab, then click the “Size” command. 2. A drop-down menu will appear. The current page size is highlighted 42
  • 44. Backstage View Backstage view gives you various options for saving, opening a file, printing, and sharing your document. To access Backstage view: 1. Click the file tab on the Ribbon. Backstage view will appear. 44
  • 46. New Document To begin a new project in Word 1. Select the file tab. Backstage view will appear. 2. Select New, then click a template. 3. A new, document will appear. 46
  • 47. How to: Open an Existing Document 1. Navigate to Backstage view, then click Open. 2. Choose “Browse” 47
  • 48. How to: Open an Existing Document (Cont.) 3. The Open dialog box appears. Locate and select your document, then click Open. 48
  • 49. Save and Save As In Word there are two says to save a file, SAVE and SAVE AS. SAVE is used when a document is open or edited to save what you are working on. SAVE AS is used to save the document to a location and change the name of the document. It is important to save your document whenever you start a new project or make changes to an existing one. Saving early and often can prevent you work from being lost. You will also need to pay close attention to where you save the document so it will be easy to find later. 49
  • 50. To Save a Document 1. Locate and select the Save command on the Quick Access toolbar. 2. If you are saving the document for the first time Save As will appear in Backstage view. 3. You will then need to choose where to save the file and give it a file name. 50
  • 51. 51
  • 52. To Save a Document (Cont.) 4. The Save As dialog box will appear. Select the location where you wish to save the document. 5. Enter a file name for the document, then click Save. 52
  • 53. How To: Export Word to PDF 1. Click the File tab to access Backstage view. 2. Click Export, then select Create PDF/XPS. 53
  • 54. How To: Export Word to PDF (Cont.) 3. The Save As dialog box will appear. Select the location where you wish to export the documents, enter a file name, then click Publish. 54
  • 55. Exporting to Other File Types A file can also be exported to Word 97-2003 doc, or a plain-text version 1. Click the file tab to access Backstage view 2. Click Export, then select “Change File Type” 55
  • 56. Exporting to Other File Types (Cont.) 3. Select a file type, then click Save As. Select a common file type, then click “Save As” to export 56
  • 57. Exporting to Other File Types (Cont.) 4. The Save As dialog box will appear. Select the location where you wish to export the document, enter a file name, then click Save. 57
  • 58. Exporting to Other File Types (Cont.) You can also use the Save As type: drop-down menu in the Save As dialog box to save documents in a variety of file types. 58