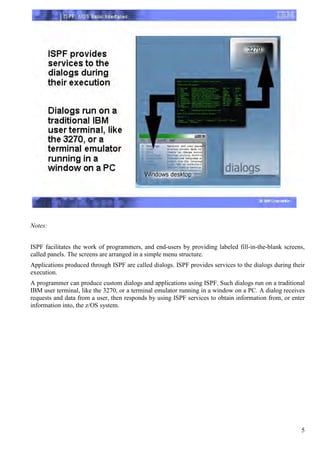
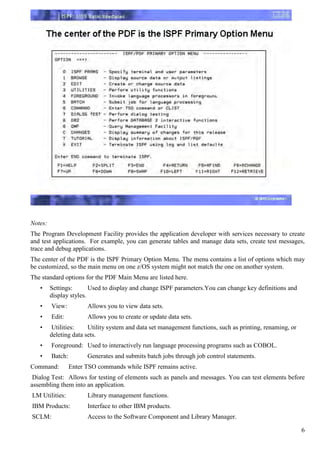
The document provides an overview of the Interactive System Productivity Facility (ISPF) and the Time Sharing Option (TSO) mainframe operating system. ISPF is a development toolset for z/OS that facilitates programming and end-user work by providing labeled screens and services to create dialog applications. TSO is IBM's mainframe time-sharing system, and ISPF can be seen as an extension to TSO that provides additional interactive processing capabilities. Upon completing the course, users will understand how to navigate ISPF, work with data sets, submit and monitor background jobs, and more.
The document provides an overview of the initial program load (IPL) process in z/OS. It describes how the bootstrap loads the operating system from disk into memory and passes control to the IPL control program IEAIPL00. This program initializes the system environment and loads initialization programs that initialize system areas, address spaces, and subsystems to start the operating system. The document also discusses system parameters and parmlib members that control the initialization process.
SMP/E is a tool used to install and maintain software on z/OS systems. It controls changes at the element level, selecting proper levels of elements to install from potential changes and calling system utilities to install the changes. SMP/E manages this process through zones like the Global, Target, and Distribution zones. It uses terminology like SYSMODs, elements, and FMIDs to track changes and prerequisites for installation. The basic process flow involves receiving updates, applying them to the Target zone, testing, then accepting them to the Distribution zone.
z16 zOS Support - March 2023 - SHARE in Atlanta.pdfMarna Walle
The document provides information about installing and configuring z/OS for the IBM z16 server. Key points include:
- z/OS V2.3 or higher is required for base support of the z16, while higher releases provide more capabilities. PTFs are categorized for required, exploitation, and recommended functions.
- SMP/E's REPORT MISSINGFIX command can identify missing z16 PTFs using fix categories rather than manually checking the PSP bucket.
- General upgrade best practices include having the latest z/OS service installed before the hardware, keeping changes limited in scope, and reviewing restrictions.
- The z/OSMF upgrade workflow provides an interactive guide to upgrading to
Here are a few ways to specify a dummy VSAM dataset in JCL:
1. Specify DISP=(NEW,PASS) to allocate a new dummy VSAM dataset that will be deleted at the end of the job.
2. Specify DISP=(MOD,PASS) to use an existing dummy VSAM dataset if it already exists, or create a new one.
3. Specify AMP='AMORG' to indicate to the system that this is a VSAM file even though it may not physically exist. The system will treat it like a VSAM file for authorization checking.
4. Omit the DD statement entirely for files that are only used for authorization checking and not actually accessed by the program.
Maintec Technologies provides affordable access to latest Mainframe infrastructure for development, training, additional short term capacity increases and outsourcing needs. Leverage our Mainframe infrastructure, without investing the time, expense and manpower it would take to build your own!.
1) To access the TSO service at the University of Georgia, users must identify themselves by entering their USERID and password during the LOGON process.
2) The Interactive System Productivity Facility/Program Development Facility (ISPF/PDF) is a component of TSO that facilitates interaction with the TSO service. This guide describes how to use ISPF/PDF.
3) Key conventions used in this guide include showing commands in UPPERCASE and information the user provides in lowercase. "Next to" indicates the character position immediately to the right of the indicating arrow.
The document discusses implementing a Parallel Sysplex which couples multiple z/OS systems together using hardware and software services. Key steps include defining coupling facility structures, configuring XCF signalling paths using CTCs or a coupling facility, formatting and configuring sysplex couple data sets, and defining CFRM policies to manage coupling facility resources.
This document discusses various DB2 database objects and utilities. It provides descriptions of storage groups, databases, tablespaces, tables, indexes, views, and the utilities for unload, load, reorganization, running statistics, and copy. It includes examples of creating and using these objects and utilities.
This chapter discusses Job Control Language (JCL) and the Display and Search Facility (SDSF) in 3 sentences: It introduces JCL, which uses statements like JOB, EXEC, and DD to describe programs, inputs, and outputs for execution on the mainframe. It also explains how to check job outputs using SDSF, which allows viewing and searching system logs, monitoring jobs, and controlling job execution order and output printing. Key topics covered include basic JCL coding, procedures, concatenation, continuation, and using SDSF to view job status and outputs.
This document provides an introduction to using Job Control Language (JCL) and the System Display and Search Facility (SDSF) on IBM mainframe systems. It explains the basic components of JCL, including the JOB, EXEC, and DD statements. It also describes how to create JCL procedures, override procedure statements, and use utilities and system libraries. The document concludes by explaining how SDSF allows users to monitor jobs, view outputs, and issue commands to the operating system.
Z4R: Intro to Storage and DFSMS for z/OSTony Pearson
This session covers basic storage concepts for z/OS operating system with examples for Flash, Disk and Tape devices and how to use DFSMS policy-based management. Presented at IBM TechU in Johannesburg, South Africa September 2019
The document provides an overview of utilities used in the IBM Z/OS mainframe operating system. It discusses the objectives and agenda of a training course on IBM utilities. The first session covers the introduction and types of utilities, including dataset utilities, system utilities, and access method services. Common dataset utilities like IEFBR14, IEBGENER, IEBCOPY, and SORT are introduced. The document provides examples of using IEFBR14 to create and delete datasets, and examples of using IEBCOPY and IEBGENER to copy datasets and work with partitioned dataset members.
I Didn't Know You Could Do That with zOS.pdfMarna Walle
1. The document discusses several new and updated features in recent z/OS releases: controlling GDGE maximum limits, using z/OS UNIX commands on MVS data sets, sending redacted dumps from z/OSMF Incident Log using Data Privacy for Diagnostics, installing individual products using z/OSMF portable software instances, viewing SNA application activity via the Function Registry, managing resource shortages with JES2's Emergency Subsystem, and a planned z/OS UUID capability.
2. The topics provide insights into system usage and improvements for problem diagnosis, software management, and urgent system tasks.
3. Users can benefit from these features to better understand their systems, install software easily, and respond to
The document describes various DB2 online utilities including UNLOAD, LOAD, REBUILD INDEX, COPY, RECOVER, RUNSTATS, MODIFY RECOVERY, QUIESCE, and REORG. These utilities perform functions like unloading and loading data, rebuilding indexes, taking image copies of data, recovering data to a prior point in time, updating catalog statistics, and reorganizing tablespaces.
Upgrade to zOS V2.5 - Planning and Tech Actions.pdfMarna Walle
This is a critical presentation for those that are upgrading from z/OS 3.1 from z/OS V2.4/V2.5. Using this presentation, you can see the planning activities and technical upgrade actions.
CICS is the power of mainframe. It has all the capabilities to handle online transactions. The ppt covers highly useful CICS concepts to refresh your CICS knowledge quickly.
The document provides an example JCL used to run a COBOL program. It includes:
1) A JOB statement that identifies the job name, programmer, class, and priority.
2) A STEP statement specifying the COBOL program "COBPROG" to execute.
3) DD statements defining the input and output files for the COBOL program.
The document then explains each part of the JCL and how it will execute the COBOL program on the MVS operating system.
The document provides an overview of Job Control Language (JCL) used to communicate with the IBM mainframe operating system. It describes the key components of JCL including JOB, EXEC and DD statements. JOB statements name a job and supply accounting/scheduling information. EXEC statements call programs for execution and can invoke cataloged procedures. DD statements define resources like input/output files used by the job. The document outlines the format, fields and common parameters used in each JCL statement type.
This document provides an overview of the SORT control statements and functions in IBM z/OS Syncsort including:
- SORT FLOW shows the basic processing flow of a SORT job
- STOPAFT and SKIPREC parameters control the number of records sorted/copied
- INCLUDE/OMIT allows filtering records based on specified conditions
- INREC reformats input records before sorting
- JOIN merges sorted data from two different files based on matching fields
- Other functions covered include OUTREC, SUM, DUPKEYS and OUTFIL reports
Contains information about the DB2 DSNZPARM that forms the DB2 configuration parameters. All about the different types of zPARMs. A way to update them dynamically.
[1] O documento descreve o SMP/E e como ele gerencia a instalação e modificações de software. [2] O SMP/E recebe modificações de software chamadas SYSMODs, aplica-as às bibliotecas-alvo e aceita-as às bibliotecas de distribuição, mantendo registro dessas alterações. [3] Os principais comandos SMP/E descritos incluem RECEIVE, APPLY, RESTORE, ACCEPT e comandos para exibir dados.
This document lists various MVS abend codes and provides brief explanations for each. Codes range from S001 to S013-88 and cover issues like incorrect DD statements, I/O errors, invalid record lengths, incorrect DCB parameters, and other errors opening and processing datasets. The document suggests checking DCBs, DD statements, block sizes, record formats, and other attributes when encountering these abend codes.
The document provides instructions for using the XDC command in SDSF to save job output or syslog information to a dataset. For job output, the user selects the XDC command against the job name, fills out a form to specify the dataset name and other properties, and sees a "Print Closed" message once complete. To save syslog information, the user opens a print dataset with either NEW or MOD, specifies the date range to print with the PT command, and closes the print with PT CLOSE.
DB2 for z/OS and DASD-based Disaster Recovery - Blowing away the mythsFlorence Dubois
Is your Disaster Recovery solution based on DASD replication functions? In most cases, all you will need to do is a normal restart of DB2 for z/OS. But this assumes the DASD copy is consistent. Otherwise, it is guaranteed data corruption that will have to be fixed up, possibly several weeks or months after the event. This presentation will tell you everything you need to know about the Copy Services for IBM System z and what is required to ensure data consistency. It will address the most common myths and misconceptions about these DASD replication solutions. It will also provide hints and tips on how to tune for fast DB2 restart and how to optimise GRECP/LPL recovery.
JCL (Job Control Language) is used on IBM mainframes to instruct the operating system how to run batch jobs and start subsystems. It acts as an interface between application programming and the MVS Operating System. JCL is used for compiling and executing batch programs, controlling jobs, allocating files, sorting files, and more. JCL uses statements like JOB, EXEC, and DD to identify the job, specify execution parameters, and define file allocations respectively.
This document provides tips for improving productivity in TSO/ISPF. It discusses logging on using different 3278 terminal types, starting ISPF directly from the logon command, customizing ISPF settings such as log and list defaults, and using the ISPF editor more efficiently with features like masks, bounds, and macros. The overall goals are to describe ways to set up ISPF for maximum efficiency and learn techniques for getting more out of the editor.
El documento describe la evolución del CICS-UMA (Centro de Investigación y Ciencias de la Salud de la Universidad de Málaga) desde su creación en 1975 como una licenciatura de optometría hasta su conversión en el CICS-UMA en 2000. Se detallan cambios clave como la regularización del plan de estudios en 1990, la semestralización de los módulos en 1998 con un énfasis en lo clínico y comunitario, y el desarrollo de un plan de estudios basado en competencias y áreas de formación en 2009 junto
Philip young current state of mainframe hacking - vanguard - 101016Philip Young
Literally a ‘black box’ to some, the mainframe is a mainstay of processing power for the enterprise. Yet, throughout the world, teams responsible for securing these machines know almost nothing about it. Due to either a lack of maturity within cybersecurity, or the assumption these systems are ‘unhackable,’ the mainframe is oddly missing from most security discussions. This talk focuses on current known attack vectors that were either created by the speaker or by the (few) others in this space. Philip uses live, real world examples of poor operational awareness, exposures and new advances in mainframe “hacking”. Attendees will be able to operationalize their knowledge with the very tools the speaker used allowing them to begin (or force) discussions with their security teams.
CA World - mft1755 - gaps in your defense hacking the mainframe - philip youngPhilip Young
The document discusses gaps in mainframe security and how hackers are increasingly targeting mainframes. It notes that while mainframes are seen as inherently secure, they are actually vulnerable in several ways. The presentation will explore current mainframe hacking techniques using tools like Nmap, how flat network architectures have increased risk, and steps organizations can take to optimize mainframe security beyond just compliance, such as vulnerability scanning and penetration testing.
This session is aimed at the regular ISPF user who wants to learn about recent features of ISPF that can make life easier, and also at those that want to learn about the new features for ISPF in z/OS V2R2.
This document discusses mainframe encryption and self-encrypting drives. It summarizes the evolution of IBM's RACF password encryption algorithms over time from encoding to DES to KDFAES. It also discusses self-encrypting drives, how they work to encrypt data in real-time, and potential risks around trusting drive encryption implementations and algorithms. The document advocates moving encryption higher in the software stack and using open implementations when possible rather than relying solely on drive-based encryption.
Security necromancy - Further adventures in mainframe hacking - DEF CON 23bigendiansmalls
The document discusses security vulnerabilities in mainframe systems like z/OS. It notes that there are far fewer documented vulnerabilities for mainframe systems than for Windows or Mac OS. It also discusses IBM's perspective that details of mainframe vulnerabilities should not be publicly available due to the critical nature of workloads and potential damage if vulnerabilities were exploited. The document introduces an individual named "SmallsBigEndian" who conducts mainframe security research and hacking.
Web-enabling Mainframe Applications discusses five methods for extending legacy mainframe applications: refacing, repurposing, restructuring, reengineering, and replacing. Refacing involves putting a graphical user interface on green screens. Repurposing changes an application's purpose using business rules. Restructuring breaks applications into presentation, data, and connectivity layers. Reengineering completely rewrites applications. Replacing substitutes applications with ERP packages. The document describes Attachmate products that implement these methods like e-Vantage for refacing, repurposing, and integrating applications.
How To Master PACBASE For Mainframe In Only Seven DaysSrinimf-Slides
IBM VisualAge Pacbase is a code-switching structured programming language that is developed and maintained by IBM. VisualAge Pacbase runs on both IBM and non-IBM mainframes and integrates with IBM WebSphere Studio Application Developer. When compiling Pacbase code it is first translated into COBOL and then compiled to binary.
Co-presentation with Brian Marshall, Mark Wilson, and Chad Rikansrud at SHARE Atlanta, 2016. - Discussing The various approaches to mainframe security and hacking.
The Walking Dead comic book volume 3, Safety Behind Bars
The Walking Dead centers around Rick Grimes, a former police officer who was shot in the line of duty and wakes up from a coma after the world has succumbed to the zombie plague. Dazed from months in the hospital, and confused as to why he can't find anyone alive, he makes his way home only to find his wife and son missing. He packs up supplies from his station and travels to Atlanta in search of his family after hearing the cities would be safe (heard from Morgan and Duane Jones, his previous neighbors). Arriving in the city on horseback, Rick is overcome by a horde of zombies and narrowly escapes death with the aid of another survivor named Glenn, who has been scavenging the city for supplies. Glenn takes Rick back to his camp just outside of town where Rick's wife Lori and son Carl happen to be living, alive and well. His partner and best friend Shane had taken Lori and Carl to the outskirts of Atlanta to wait for rescue by the US Government. There they found a small group of survivors.
In the rush to release a new product, a new version or simply trying to get things working, security can sometimes be an afterthought. In this talk, Ben Bromhead CTO of Instaclustr, will explore the various ways in which you can setup and secure Cassandra appropriately for your threat environmen
Hardening cassandra for compliance or paranoiazznate
Cassandra at rest encryption, inter-node communication encryption, client-server communication encryption, authentication, authorization, and securing JMX management were discussed. The document provided guidance on implementing encryption at rest using commercial and open source options, setting up SSL for inter-node and client-server communication using self-signed certificates, implementing authentication and authorization best practices from RBMS, and securing JMX access.
Seattle C* Meetup: Hardening cassandra for compliance or paranoiazznate
Details how to secure Apache Cassandra clusters. Covers client to server and server to server encryption, securing management and tooling, using authentication and authorization, as well as options for encryption at rest.
An invited talk by Xavier Leroy explaining the current state of OCaml at the OCaml Users and Developers Workshop 2014. http://ocaml.org/meetings/ocaml/2014/
Philip Young and Chad Rikansrud of ZedSec390 gave a presentation at RSA 2017 on managing enterprise risk through legacy system testing. They discussed testing mainframe and legacy systems used by many large companies, government agencies, and other organizations present. The presentation included a disclaimer that the views expressed were their own and not of their employers.
AAPG POSTERS - Evolution of the Mardin UpliftJoshua Doubek
The document discusses Turkey's geographic location between Europe and Asia and provides stratigraphic and geological information about the Mardin High region in southeast Turkey. Gravity measurements and seismic data indicate the presence of southward-verging thrust faults correlated with high gravity anomalies in the area. Well data, remote sensing images, and cross-sections are used to analyze the stratigraphy and structure of the Mardin High. The licenses held by TransAtlantic are located on this regional uplift, which is interpreted to be a focal point for hydrocarbon migration from Paleozoic source rocks located to the north and south.
How to Start a Movement with Your Blog - with Gideon ShalwickLeslie Samuel
How do you go from being burnt out to re-inventing yourself and starting a movement? That’s what we explore in this episode. Gideon shares his journey of starting Become a Blogger all the way to launching Entrevana.
Dokumen tersebut merangkum sejarah perkembangan komputer dari masa ke masa, mulai dari cikal bakalnya dengan penemuan Charles Babbage pada abad ke-19 hingga perkembangan lima generasi komputer. Komputer generasi pertama menggunakan tabung hampa udara dan berukuran besar, sementara generasi berikutnya semakin mengecil berkat penemuan transistor dan sirkuit terpadu.
This document provides information about operating systems and their functions. It discusses the different types of operating systems like single program OS, multiprogramming OS, time sharing OS, and real time OS. It also describes the key functions of an operating system like process management, storage management, and information management. Process management involves scheduling processes and allocating CPU time between multiple running programs. The document discusses different process scheduling techniques like FCFS, SJN, and deadline scheduling. It also explains the difference between preemptive and non-preemptive scheduling approaches.
The document discusses various aspects of operating systems and software. It describes the Windows operating system and how it uses mouse and keyboard as input devices. It then discusses in detail how to use the mouse functions like clicking, double clicking, right clicking, and dragging. It also discusses keyboard shortcuts and functions. The document then covers the different types of operating systems like single-program OS, multi-programming OS, time-sharing OS, real-time OS, and interactive OS. It also defines system software and application software and provides examples. Finally, it discusses the various services provided by operating systems.
The document contains information about 10 students including their names and student IDs. It then provides an overview of topics to be covered in introductory lessons on Python programming language, Microsoft Excel, and the Windows operating system. These include basic concepts like data types, functions, and interfaces in each topic.
This document provides an overview of using DB2 on IBM mainframe systems. It discusses logging into TSO, allocating datasets for DB2 use, using the SPUFI tool to interactively execute SQL statements against DB2, and some key DB2 concepts like logical unit of work and the different views that programs and the system have of the DB2 environment.
The document provides instructions for installing and customizing features in Microsoft Office 2007. It discusses how to open the Control Panel, click on Installed Programs, select the Office program to change, and click Change. It describes the Settings dialog box where you can add or remove features by expanding folders and selecting installation options. It also covers updating or installing features and describes keyboard shortcuts for navigating features and changing installation options.
The document provides details about 12 sample Visual Basic applications to demonstrate the use of various controls and programming concepts in Visual Basic. It includes applications to display labels and textboxes, perform arithmetic operations, use option buttons, create a student form, use timers and shapes, move items between lists, format text, use menus for calculations, print a series, and create a puzzle game. Code snippets are provided for each application example.
This document provides an introduction to Visual FoxPro, a Relational Database Management System. It discusses starting Visual FoxPro, using its menus and shortcut keys, and the concept of a database management system. The key points covered are:
- Visual FoxPro allows working with logically related tables of data simultaneously. A table contains rows and columns equivalent to records and fields.
- Starting Visual FoxPro involves opening its icon from the programs menu or desktop shortcut.
- The menu system includes a menu bar, pads, pull-down menus, and options. Shortcut keys can also access menus and commands.
- A database management system (DBMS) organizes data into tables and allows adding, modifying, deleting, and
CSPI is a new programming interface introduced in CONSTEEL 11 that allows users to build parametric models using custom code. The CSPI panel appears on the left side of the CONSTEEL window and can be minimized or maximized. When maximized, the code input area is available for writing CSPI scripts using variables, loops, commands, and other programming tools. CSPI scripts can create and modify structural objects, import/export files, and obtain user input to make interactive parametric models.
This document contains information about various components and responsibilities of an operating system. It discusses user interfaces like graphical user interfaces (GUIs) and command line interfaces (CLIs). It also describes basic management functions performed by the operating system, including file management, task management, and memory management. File management involves creating, defining, saving, and deleting files. Task management includes multi-tasking, multi-programming, and multi-processing capabilities. Memory management refers to how the operating system allocates and manages RAM and uses virtual memory.
Microsoft Word is a word processing program that allows users to create, edit, and print documents. It has several advantages over other software and typewriters, including easier formatting, the ability to easily edit text without retyping, and the ability to print documents after making corrections. The Word interface includes common windows elements like menus, toolbars, and scroll bars. It enables formatting of text through options like fonts, alignment, bullets and numbering, tables, and drawing tools. Basic functions like opening, saving, copying/pasting, and printing documents can be performed through menu options or keyboard shortcuts.
This tutorial provides step-by-step instructions for analyzing a 2D truss bridge using the FEPC finite element analysis software. The tutorial defines the 7 nodes, 11 truss elements, material properties, boundary conditions restraining the left and right nodes, and vertical loads of 40,000 lbs at node 3 and 20,000 lbs at node 5 to represent vehicles on the bridge.
The document discusses key topics relating to operating systems including:
1) It defines common operating system terminology like multitasking and multiprocessing.
2) It describes the main components of an operating system like the kernel, shell, and file system.
3) It identifies different types of interfaces for interacting with an operating system such as command line interfaces, menu interfaces, and graphical user interfaces.
The document provides information on Visual Basic .NET (VB.NET) programming, including an introduction to VB.NET, the integrated development environment (IDE), common controls used in VB.NET, and an example "Hello World" program. It describes the VB.NET IDE layout including the toolbox, solution explorer, properties window, and code editor. It also discusses naming conventions, common controls like buttons and textboxes, and the layout toolbar for arranging controls.
INTRODUCTION CHAP. 1 complete access to all the hardware and can.docxvrickens
The document discusses the history of operating systems and their evolution alongside computer hardware. Early computers in the 1940s-1950s used vacuum tubes and had no operating systems - programming was done directly in machine language by rewiring circuits on plugboards. As computers grew in complexity, operating systems emerged to manage hardware resources and provide abstract interfaces to application programs. Modern operating systems run on vast amounts of code, manage numerous hardware devices and users, and allow multiple programs to run simultaneously through timesharing and virtual memory techniques.
This document provides an overview of the Microsoft Office Professional 2010 software suite. It describes the main programs included in Office Professional 2010, which are Word, Excel, PowerPoint, OneNote, Outlook, Access, and Publisher. It also discusses the common user interface across Office 2010 programs, including the ribbon interface and Backstage view. Finally, it promotes certification through the Microsoft Office Specialist program as a way for individuals and employers to validate skills in Office 2010 applications.
This document provides information about operating system features in a computer module for 9th grade students. It begins with directions for how to use the module and explains the different parts of the module. It then discusses operating systems, including the two main types of interfaces - command line and graphical user interface (GUI). It also compares the three most common operating systems - Windows, Mac OS X, and Linux. The document provides details on specific features of Windows operating systems and how to check your computer's operating system.
An introduction to Computer Programming
Contents:
Computer programs
Qbasic
-Features
- Rules
- Parts
- Qbasic Editor screen
Commands/ Keywords and their functions
Development cycle
Program Planning
1. The document provides instructions for typing and using Kannada language in OpenOffice on Ubuntu. It explains how to set the Kannada input method using SCIM and install the Lohit Kannada font for typing Kannada.
2. Steps are given to set the Kannada language settings in OpenOffice, including enabling Complex Text Layout and setting Kannada as the default language.
3. Keyboard shortcuts are described for typing Kannada characters and switching between input languages in OpenOffice using the SCIM input method.
Visual Studio, Eclipse, and NetBeans are three popular IDEs. Visual Studio features include automatic indentation, side-by-side editing, IntelliSense, debugging tools, and reusable code snippets. Eclipse features include file encoding settings, automatic saving, type filters, launch configurations, and code formatting options. NetBeans provides a full-featured Java EE environment out of the box and strong support for HTML5, JavaScript, and CSS development.
In his public lecture, Christian Timmerer provides insights into the fascinating history of video streaming, starting from its humble beginnings before YouTube to the groundbreaking technologies that now dominate platforms like Netflix and ORF ON. Timmerer also presents provocative contributions of his own that have significantly influenced the industry. He concludes by looking at future challenges and invites the audience to join in a discussion.
Generating privacy-protected synthetic data using Secludy and MilvusZilliz
During this demo, the founders of Secludy will demonstrate how their system utilizes Milvus to store and manipulate embeddings for generating privacy-protected synthetic data. Their approach not only maintains the confidentiality of the original data but also enhances the utility and scalability of LLMs under privacy constraints. Attendees, including machine learning engineers, data scientists, and data managers, will witness first-hand how Secludy's integration with Milvus empowers organizations to harness the power of LLMs securely and efficiently.
AI 101: An Introduction to the Basics and Impact of Artificial IntelligenceIndexBug
Imagine a world where machines not only perform tasks but also learn, adapt, and make decisions. This is the promise of Artificial Intelligence (AI), a technology that's not just enhancing our lives but revolutionizing entire industries.
Let's Integrate MuleSoft RPA, COMPOSER, APM with AWS IDP along with Slackshyamraj55
Discover the seamless integration of RPA (Robotic Process Automation), COMPOSER, and APM with AWS IDP enhanced with Slack notifications. Explore how these technologies converge to streamline workflows, optimize performance, and ensure secure access, all while leveraging the power of AWS IDP and real-time communication via Slack notifications.
TrustArc Webinar - 2024 Global Privacy SurveyTrustArc
How does your privacy program stack up against your peers? What challenges are privacy teams tackling and prioritizing in 2024?
In the fifth annual Global Privacy Benchmarks Survey, we asked over 1,800 global privacy professionals and business executives to share their perspectives on the current state of privacy inside and outside of their organizations. This year’s report focused on emerging areas of importance for privacy and compliance professionals, including considerations and implications of Artificial Intelligence (AI) technologies, building brand trust, and different approaches for achieving higher privacy competence scores.
See how organizational priorities and strategic approaches to data security and privacy are evolving around the globe.
This webinar will review:
- The top 10 privacy insights from the fifth annual Global Privacy Benchmarks Survey
- The top challenges for privacy leaders, practitioners, and organizations in 2024
- Key themes to consider in developing and maintaining your privacy program
Unlock the Future of Search with MongoDB Atlas_ Vector Search Unleashed.pdfMalak Abu Hammad
Discover how MongoDB Atlas and vector search technology can revolutionize your application's search capabilities. This comprehensive presentation covers:
* What is Vector Search?
* Importance and benefits of vector search
* Practical use cases across various industries
* Step-by-step implementation guide
* Live demos with code snippets
* Enhancing LLM capabilities with vector search
* Best practices and optimization strategies
Perfect for developers, AI enthusiasts, and tech leaders. Learn how to leverage MongoDB Atlas to deliver highly relevant, context-aware search results, transforming your data retrieval process. Stay ahead in tech innovation and maximize the potential of your applications.
#MongoDB #VectorSearch #AI #SemanticSearch #TechInnovation #DataScience #LLM #MachineLearning #SearchTechnology
UiPath Test Automation using UiPath Test Suite series, part 6DianaGray10
Welcome to UiPath Test Automation using UiPath Test Suite series part 6. In this session, we will cover Test Automation with generative AI and Open AI.
UiPath Test Automation with generative AI and Open AI webinar offers an in-depth exploration of leveraging cutting-edge technologies for test automation within the UiPath platform. Attendees will delve into the integration of generative AI, a test automation solution, with Open AI advanced natural language processing capabilities.
Throughout the session, participants will discover how this synergy empowers testers to automate repetitive tasks, enhance testing accuracy, and expedite the software testing life cycle. Topics covered include the seamless integration process, practical use cases, and the benefits of harnessing AI-driven automation for UiPath testing initiatives. By attending this webinar, testers, and automation professionals can gain valuable insights into harnessing the power of AI to optimize their test automation workflows within the UiPath ecosystem, ultimately driving efficiency and quality in software development processes.
What will you get from this session?
1. Insights into integrating generative AI.
2. Understanding how this integration enhances test automation within the UiPath platform
3. Practical demonstrations
4. Exploration of real-world use cases illustrating the benefits of AI-driven test automation for UiPath
Topics covered:
What is generative AI
Test Automation with generative AI and Open AI.
UiPath integration with generative AI
Speaker:
Deepak Rai, Automation Practice Lead, Boundaryless Group and UiPath MVP
Removing Uninteresting Bytes in Software FuzzingAftab Hussain
Imagine a world where software fuzzing, the process of mutating bytes in test seeds to uncover hidden and erroneous program behaviors, becomes faster and more effective. A lot depends on the initial seeds, which can significantly dictate the trajectory of a fuzzing campaign, particularly in terms of how long it takes to uncover interesting behaviour in your code. We introduce DIAR, a technique designed to speedup fuzzing campaigns by pinpointing and eliminating those uninteresting bytes in the seeds. Picture this: instead of wasting valuable resources on meaningless mutations in large, bloated seeds, DIAR removes the unnecessary bytes, streamlining the entire process.
In this work, we equipped AFL, a popular fuzzer, with DIAR and examined two critical Linux libraries -- Libxml's xmllint, a tool for parsing xml documents, and Binutil's readelf, an essential debugging and security analysis command-line tool used to display detailed information about ELF (Executable and Linkable Format). Our preliminary results show that AFL+DIAR does not only discover new paths more quickly but also achieves higher coverage overall. This work thus showcases how starting with lean and optimized seeds can lead to faster, more comprehensive fuzzing campaigns -- and DIAR helps you find such seeds.
- These are slides of the talk given at IEEE International Conference on Software Testing Verification and Validation Workshop, ICSTW 2022.
How to Get CNIC Information System with Paksim Ga.pptxdanishmna97
Pakdata Cf is a groundbreaking system designed to streamline and facilitate access to CNIC information. This innovative platform leverages advanced technology to provide users with efficient and secure access to their CNIC details.
For the full video of this presentation, please visit: https://www.edge-ai-vision.com/2024/06/building-and-scaling-ai-applications-with-the-nx-ai-manager-a-presentation-from-network-optix/
Robin van Emden, Senior Director of Data Science at Network Optix, presents the “Building and Scaling AI Applications with the Nx AI Manager,” tutorial at the May 2024 Embedded Vision Summit.
In this presentation, van Emden covers the basics of scaling edge AI solutions using the Nx tool kit. He emphasizes the process of developing AI models and deploying them globally. He also showcases the conversion of AI models and the creation of effective edge AI pipelines, with a focus on pre-processing, model conversion, selecting the appropriate inference engine for the target hardware and post-processing.
van Emden shows how Nx can simplify the developer’s life and facilitate a rapid transition from concept to production-ready applications.He provides valuable insights into developing scalable and efficient edge AI solutions, with a strong focus on practical implementation.
Full-RAG: A modern architecture for hyper-personalizationZilliz
Mike Del Balso, CEO & Co-Founder at Tecton, presents "Full RAG," a novel approach to AI recommendation systems, aiming to push beyond the limitations of traditional models through a deep integration of contextual insights and real-time data, leveraging the Retrieval-Augmented Generation architecture. This talk will outline Full RAG's potential to significantly enhance personalization, address engineering challenges such as data management and model training, and introduce data enrichment with reranking as a key solution. Attendees will gain crucial insights into the importance of hyperpersonalization in AI, the capabilities of Full RAG for advanced personalization, and strategies for managing complex data integrations for deploying cutting-edge AI solutions.
Taking AI to the Next Level in Manufacturing.pdfssuserfac0301
Read Taking AI to the Next Level in Manufacturing to gain insights on AI adoption in the manufacturing industry, such as:
1. How quickly AI is being implemented in manufacturing.
2. Which barriers stand in the way of AI adoption.
3. How data quality and governance form the backbone of AI.
4. Organizational processes and structures that may inhibit effective AI adoption.
6. Ideas and approaches to help build your organization's AI strategy.
In the rapidly evolving landscape of technologies, XML continues to play a vital role in structuring, storing, and transporting data across diverse systems. The recent advancements in artificial intelligence (AI) present new methodologies for enhancing XML development workflows, introducing efficiency, automation, and intelligent capabilities. This presentation will outline the scope and perspective of utilizing AI in XML development. The potential benefits and the possible pitfalls will be highlighted, providing a balanced view of the subject.
We will explore the capabilities of AI in understanding XML markup languages and autonomously creating structured XML content. Additionally, we will examine the capacity of AI to enrich plain text with appropriate XML markup. Practical examples and methodological guidelines will be provided to elucidate how AI can be effectively prompted to interpret and generate accurate XML markup.
Further emphasis will be placed on the role of AI in developing XSLT, or schemas such as XSD and Schematron. We will address the techniques and strategies adopted to create prompts for generating code, explaining code, or refactoring the code, and the results achieved.
The discussion will extend to how AI can be used to transform XML content. In particular, the focus will be on the use of AI XPath extension functions in XSLT, Schematron, Schematron Quick Fixes, or for XML content refactoring.
The presentation aims to deliver a comprehensive overview of AI usage in XML development, providing attendees with the necessary knowledge to make informed decisions. Whether you’re at the early stages of adopting AI or considering integrating it in advanced XML development, this presentation will cover all levels of expertise.
By highlighting the potential advantages and challenges of integrating AI with XML development tools and languages, the presentation seeks to inspire thoughtful conversation around the future of XML development. We’ll not only delve into the technical aspects of AI-powered XML development but also discuss practical implications and possible future directions.
HCL Notes and Domino License Cost Reduction in the World of DLAUpanagenda
Webinar Recording: https://www.panagenda.com/webinars/hcl-notes-and-domino-license-cost-reduction-in-the-world-of-dlau/
The introduction of DLAU and the CCB & CCX licensing model caused quite a stir in the HCL community. As a Notes and Domino customer, you may have faced challenges with unexpected user counts and license costs. You probably have questions on how this new licensing approach works and how to benefit from it. Most importantly, you likely have budget constraints and want to save money where possible. Don’t worry, we can help with all of this!
We’ll show you how to fix common misconfigurations that cause higher-than-expected user counts, and how to identify accounts which you can deactivate to save money. There are also frequent patterns that can cause unnecessary cost, like using a person document instead of a mail-in for shared mailboxes. We’ll provide examples and solutions for those as well. And naturally we’ll explain the new licensing model.
Join HCL Ambassador Marc Thomas in this webinar with a special guest appearance from Franz Walder. It will give you the tools and know-how to stay on top of what is going on with Domino licensing. You will be able lower your cost through an optimized configuration and keep it low going forward.
These topics will be covered
- Reducing license cost by finding and fixing misconfigurations and superfluous accounts
- How do CCB and CCX licenses really work?
- Understanding the DLAU tool and how to best utilize it
- Tips for common problem areas, like team mailboxes, functional/test users, etc
- Practical examples and best practices to implement right away
Things to Consider When Choosing a Website Developer for your Website | FODUUFODUU
Choosing the right website developer is crucial for your business. This article covers essential factors to consider, including experience, portfolio, technical skills, communication, pricing, reputation & reviews, cost and budget considerations and post-launch support. Make an informed decision to ensure your website meets your business goals.
3. Notes:
The Interactive System Productivity Facility (ISPF) is a robust development tool set for the z/OS
operating system. It has been used since 1975 to increase the productivity of the development of host-
based applications, because it provides an extensive set of programmer oriented facilities.
A thorough foundation in the ISPF utilities is provided. This includes the library utilities, data set utilities,
move/copy utility, data set list utility, and compare/search utilities.
The final topic covers the processing of background jobs. It explains the phases of a background job. You
will learn to submit a job for background processing, monitor the status of a job while it is waiting,
executing, or waiting for its output to print, and how to retrieve the output for a job that is completed.
Upon completion of this course, you should be able to:
• Describe the purpose of ISPF and its relationship to TSO
• Effectively navigate throughout ISPF and describe its menu structure in detail
• Describe the nature of sequential and partitioned data sets, how they are named, created and
allocated
• View and browse data sets
• Utilize the ISPF edit facility, import primary commands and line commands
• Insert, delete, copy, move, repeat, exclude, redisplay, and shift lines
• Change and maintain edit profiles
• Search for and change data
3
4. • Utilize the main functions of the library utility, data set utility, move/copy utility, data set list
utility, and compare/search utility
• Mark data set members with various options using member selection lists
• Allocate new data sets using an appropriate block size for the DASD device
• Display data sets across the entire system or across an individual volume
• Describe the phases involved in the life of a background job
• Use the ISPF Batch Selection Panel to create multiple jobs steps for language processing
• Use the OUTLIST Utility and SDSF to display job status and display/print job output
The Time Sharing Option (TSO) is IBM's mainframe time-sharing operating system, which also has a
long and rich heritage.
ISPF can be seen as an extension to TSO. It is housed "under" TSO, and sometimes the acronym
TSO/ISPF is used to describe the facility provided by these closely associated subsystems. The services
provided by ISPF complement those of the host TSO system to provide interactive processing.
4
5. Notes:
ISPF facilitates the work of programmers, and end-users by providing labeled fill-in-the-blank screens,
called panels. The screens are arranged in a simple menu structure.
Applications produced through ISPF are called dialogs. ISPF provides services to the dialogs during their
execution.
A programmer can produce custom dialogs and applications using ISPF. Such dialogs run on a traditional
IBM user terminal, like the 3270, or a terminal emulator running in a window on a PC. A dialog receives
requests and data from a user, then responds by using ISPF services to obtain information from, or enter
information into, the z/OS system.
5
6. Notes:
The Program Development Facility provides the application developer with services necessary to create
and test applications. For example, you can generate tables and manage data sets, create test messages,
trace and debug applications.
The center of the PDF is the ISPF Primary Option Menu. The menu contains a list of options which may
be customized, so the main menu on one z/OS system might not match the one on another system.
The standard options for the PDF Main Menu are listed here.
• Settings: Used to display and change ISPF parameters.You can change key definitions and
display styles.
• View: Allows you to view data sets.
• Edit: Allows you to create or update data sets.
• Utilities: Utility system and data set management functions, such as printing, renaming, or
deleting data sets.
• Foreground: Used to interactively run language processing programs such as COBOL.
• Batch: Generates and submits batch jobs through job control statements.
Command: Enter TSO commands while ISPF remains active.
Dialog Test: Allows for testing of elements such as panels and messages. You can test elements before
assembling them into an application.
LM Utilities: Library management functions.
IBM Products: Interface to other IBM products.
SCLM: Access to the Software Component and Library Manager.
6
7. Notes:
You can navigate through ISPF in four different ways. The four different techniques are:
• Action Bars
• Point-and-Shoot
• Selection by Option Code
• Function Keys
7
8. Notes:
The action bar appears at the very top of the panel, and the choices presented vary from panel to panel.
Each word on the action bar represents a category of options. If you place the cursor on one of the action
bar words, and press the Enter key, you will see a list of the options for the category.
Then in the list move the cursor over an option and press Enter to select it.
8
9. Notes:
Point-and-shoot means that you can move the cursor to one of the menu selections in the area illustrated
here, then press the Enter key in order to make your selection.
This feature is not available on every z/OS system.
9
10. Notes:
You can get to the command area quickly by pressing the Home key. No matter where the cursor may be,
the home key will immediately place the cursor in the command area.
A selection can be made in the traditional way by entering the selection code in the command area. Then
press the Enter key to complete the selection.
10
11. Notes:
The function keys represent the final technique. The keys themselves are usually located across the top of
the keyboard. The purpose or action represented by each key is shown at the bottom of the panel. To
activate an option, just press the corresponding function key.
Using PFSHOW command, you can display either the long or short form of the keys, or remove with
PFSHOW OFF.
ISPF responds to PF and PA keys on the 3270 keyboard. The table here shows the meaning of the keys to
ISPF.
Two of the most important keys are PF3 (duplicated by PF15) and PF4 (duplicated by PF16). PF3 is the
End key and it terminates an ISPF function. For example, after building several job steps in the Batch Job
section, you press PF3. The job is submitted and you are returned to the previous menu.
The PF4 performs almost the exact same function. The only difference is that it returns you to the ISPF
Primary Option Menu.
11
12. PA1 Attention: Interrupt the current position.
PA2 Reshow: Redisplay the current screen.
PF1/13 Help: Enter the tutorial, or view help.
PF2/14 Split: Enter split screen mode.
PF3/15 End: Terminate the current operation.
PA4/16 Return: Return to the primary option menu.
PA7/19 Up: Move the screen window up.
PF8/20 Down: Move the screen window down.
PF9/21 Swap: Activate the other logical screen in split screen mode.
PF10/22 Left: Move the screen window left.
PF11/23 Right: Move the screen window right.
PF12/24 Retrieve: Redisplay the last issued ISPF command.
12
13. Notes:
Use the KEYS command to change your function key definitions and labels. The KEYS command will
display either the "PF Key Definitions and Labels" panel or the "Keylist Change" panel for the keylist of
the panel from which the KEYS command was invoked. You can use the KEYS command from any
display without ending the function that you currently are running (and without having to enter split
screen mode). When you enter an END command from the KEYS panel, ISPF returns to the function that
you were running when you entered the KEYS command.
13
14. Notes:
Many of the functions on the ISPF Primary Option Menu lead to additional menus. If you select option 3,
for example, the next ISPF screen you receive is another menu, showing many more options. You can
bypass the second menu by specifying both options at the primary menu. Just separate the options with a
period.
Option ===> 3.2
You can also jump from one option to another without having to "fall back" to the ISPF Primary Option
Menu. For example, if you are editing a file (in option 2), you can jump directly to the utilities option.
Type an equal sign, followed by the desired option number. Example:
Command ===> = 3
14
15. Notes:
You are in the ISPF Primary Option Menu. Navigate from here to the (3) Utility Selection Panel. Type 3,
then press Enter.
You are in the Utility Selection Panel. Navigate to the Move/Copy Utility. Enter 3, then Press Enter.
To navigate DIRECTLY to the (3.3) Move/Copy Utility. Enter 3.3, then press Enter
15
16. Notes:
In split-screen mode, the screen is split horizontally into two separate screens, and you may view two
different ISPF panels at the same time.
To enter split-screen mode, you place the cursor on the line where you want the split to occur. Then press
PF2. Immediately the screen splits into two logical screens, and each logical screen is an independent
session. To switch between screens press PF9.
To end split screen mode, simply end one of the sessions by typing ‘exit’ on the command line or
pressing F3 from the Primary Options Menu.
16
17. Notes:
You can use the START command to start a dialog in a new logical screen. This function is similar to the
function nesting made available with action bars except that the nesting occurs in a new screen.
17
18. Notes:
Format: SWAP PREV|NEXT|screen_name|n
Although you can alternately use any logical screen, only one of the logical screens is considered active at
a time. The location of the cursor identifies the active screen. You make a screen active by using the
SWAP command and its parameters to choose the desired screen.
The parameters on the SWAP command-LIST, PREV, NEXT, screen_name, and n-control which screens
you see displayed.
SWAP command without parameters in 3270 mode:
If only one screen exists, this command has no effect. If more than one screen exists, this command
moves the cursor between the two logical screens that are displayed.
If only two screens are present, the cursor moves to the one that it is not currently on. If more than two
screens exist, this command defaults to the SWAP LIST command and causes the ISPF task list to display
in a pop-up window.
Entering SWAP PREV changes the focus to the next lower screen number from the one where the
command is entered. Repeatedly issuing the same command causes each lower-numbered screen to
display until screen number 1 is reached, then the counter wraps back to screen number 32 (or your
installation's maximum number).
18
19. Entering SWAP NEXT changes the focus to the next higher screen number from the one where the
command is entered. Repeatedly issuing the same command causes each higher-numbered screen to
display until screen number 32 (or your maximum) is reached, then the counter wraps back to screen
number 1.
Entering SWAP screen_name changes the focus to the screen named screen_name if it is active.
Entering SWAP n changes the focus to the screen numbered n (ZSCREEN variable) if it is active.
SWAP LIST command in 3270 mode:
This command displays the ISPF Task List, from which you can select which screen to display. The
screen you select replaces the screen on which you entered the command.
19
21. Notes:
For compatibility reasons, because records in an MVS system in the 1960s existed as 80-column punched
cards, even today's JCL and program source code on a modern z/OS system is maintained as a file of 80-
byte records. Every statement is a full 80 bytes long even if it is completely blank.
In the z/OS environment, files are known as data sets. z/OS lets you maintain two types of data sets under
TSO: sequential and partitioned. In a sequential data set, the records of a file can be retrieved only in the
same order they were written. To process a record somewhere within the file, you have to read all of the
preceding records.
Since there is no provision for subdirectories, file naming and the use of partitioned data sets support all
the processing that occurs on a mainframe under z/OS.
A partitioned data set (PDS) consists of a directory and one or more members. A PDS is also called a
library.
Each member is functionally the same as a sequential data set, and you can process an individual member
of a partitioned data set as if it were a sequential data set. On the other hand, you can process the entire
library, the entire PDS, as a single file.
The minimum allocation for a data set is one track of disk space, and this can usually amount to a
significant amount of space. For a small file that contains only a small amount of information, much
space can be wasted if it is stored in a data set all by itself. Instead it can be stored as one of many
members in a partitioned data set. This is how most source code and JCL is stored under z/OS.
Each partitioned data set contains a directory and data area. The directory maintains housekeeping
information about the members stored in the data area. It stores an index of member names and their
locations.
21
22. Notes:
Standard TSO data set naming calls for three qualifiers within the name of the data set.
The naming is illustrated on the slide.
Qualifiers can be up to eight characters long and when you specify a data set name, you separate the
qualifiers by periods.
The data set name consists of three qualifiers listed below.
• High-level Qualifier
• User Determined Qualifier
• Type of Data
22
23. Notes:
Partitioned data sets appear to the z/OS operating system to be no different than any other type of data set,
and just by seeing the name it is not possible to tell absolutely if the data set is partitioned or not. The
operating system has the information internally about its organization, but this is not necessarily reflected
in the name.
In order to deal with a specific member of a partitioned data set, the member name is placed at the end of
the data set name inside parentheses.
The data set name shown at the right is a partitioned data set. The member name, which is the name in
parentheses, can be up to eight characters long, and must start with a letter.
23
24. The View Entry Panel appears when you select View (option 1) from the ISPF Primary Option Menu. An
image of the View Entry Panel is shown on the right. This panel facilitates viewing and browsing of a
data set, but does not provide the ability to edit or change data.
Two areas of particular interest here are the fields in the panel and the action bar at the top of the panel.
Action Bar
The action bar of the View Action Panel displays some important choices.
The Menu selection provides a drop down list with a subset of the items on the ISPF Primary Option
Menu.
The RefList selection facilitates the use of Personal Data Set Lists and Library Lists, a feature that you
can use to speed up access to frequently used data sets. The RefMode drop-down menu controls the
action taken when you select a data set from a personal list.
The Utilities selection provides quick access to all the functionality available in the Utilities (option 3)
section of the ISPF Primary Action Panel.
The ISPF Library section permits you to enter a data set name. The project ID identifies the project
associated with the data set. It usually defaults to the user ID from your LOGON command. The three
components of the data set name, Project, Group, and Type, are strung together to form the z/OS data set
name.
The Workstation selection enables you to more fully utilize your desktop workstation's potential by
giving you the ability to edit host data on the workstation, and workstation data on the host. ISPF calls
this function distributed editing.
After selecting the data set desired, either the one specified in the ISPF Library Section or the Other
Partitioned... section, the view command is executed by pressing Enter.
24
25. Notes:
If the data set is partitioned, you can specify the name of the member in the Member field. You may also
enter a pattern for the member name. A pattern consists of a partial member name plus the symbols * or
% or both.
For example, the member name PAY* will select all members that begin with the three letters P-A-Y.
The next panel you receive will present you with that list for further selection.
In the example on the right, browse searches MFM3984.PAYROLL.COBOL first to locate the member
PAY2A. If not found, it searches MFM3984.TESTPAY.COBOL to find PAY2A.
If the data set you specify is partitioned, and you specify a pattern of the member name, or if you do not
specify a member name at all, you will receive a member list.
25
27. Notes:
After you have selected the member you want to display, the browse panel displays the first 22 lines of
the data. An example is shown here on the right. This is a listing of a COBOL program.
The heading line displays the data set name, current line position, and current columns displayed. In this
screen, only browsing is allowed. You are not permitted to edit the member.
27
28. Notes:
Scrolling functions let you specify both the direction and amount you move as you peruse the data. PF7
and PF8 move the window up and down respectively. PF10 and PF11 move it left and right.
You may specify the amount of the scroll by entering a value in the SCROLL field at the lower right hand
side. The default value is HALF. This means that when you press any of the function keys mentioned
above, the window moves a half page in the direction desired. Possible values are shown below.
28
31. Notes:
You can position the display to a certain line number by using the LOCATE command, followed by the
line number. Remember that this line number refers to the line number as it appears on the left-hand side
of the window.
You can also assign a label to a line number in the member by positioning the cursor on a specific line,
then typing a period, followed by the label in the line command area.
Then in the future you can use the label to go there immediately, using the LOCATE command. Example:
Command ===> LOCATE .TOPDIV
31
32. Notes:
You can use the FIND command to search for a specific string of characters. You type FIND at the
command line followed by the string. If the search string contains blanks or characters, enclose it in either
single or double quotes.
An example is FIND "PROCEDURE DIVISION"
This command will find the next line that contains the target string.
You can also add one of the following qualifiers after the search string.
• NEXT
• PREV
• FIRST
• LAST
• ALL
32
36. Notes:
In this unit you will learn about the ISPF editor facility. This includes all the functions available under
selection 2 on the ISPF Primary Option Menu. The ISPF editor facilitates the editing and making of
changes to a data set or member of a data set. You may edit a sequential data set or enter only the name
of a partitioned data set and receive a member selection list.
Important commands include I to insert lines, D to delete lines, R to repeat lines, C to copy lines, and M
to move lines. You will learn to customize your editor environment by creating different edit profiles.
There are also editing modes that will help you fine tune the way you want the editor to work.
For advanced editing, you will learn how to change text throughout the source data. You may use a search
range and affect the condition under which the search finds a match. You may exclude text and redisplay
it.
36
37. Notes:
The Edit Entry Panel appears when you select View (option 2) from the ISPF Primary Option Menu. An
image of the Edit Entry Panel is shown on the right. This panel facilitates the editing and making of
changes to a data set or member of a data set.
This panel looks almost identical to the View Entry Panel and operates in virtually the exact same way.
The ISPF Library section permits you to enter a default data set name. This data set name will always be
displayed upon entry into this panel. Under Other Partitioned or Sequential Data Set, you may specify a
data set name that is different than the default.
37
38. Notes:
For a partitioned data set, the member list appears, as it does with the View Panel, except the upper left
corner says EDIT followed by the name of the data set.
Each member of the data set is listed along with its statistics such as the created and changed dates. You
can select a certain member by positioning the cursor on the dot next to the member name, or by typing S
in the left column of the line that has the name of the member. If the list exceeds the room available on a
single screen, it may be scrolled using F7 and F8.
38
39. Notes:
The ISPF Edit Panel is shown on the right. It shows a sample data set member, and a COBOL program,
called PGM1G1
The first six columns of the lines containing COBOL source code represent the line command area. If
specified in the profile setting, the editor displays the line number in this area. The remaining portion of
the lines represents the screen window. You can use the same scrolling functions used in the View Panel.
PF11 moves the window right and PF10 moves it to the left. PF7 moves the window up, and PF8 moves
it down. Scrolling amount is subject to the scroll function that appears at the lower right part of the panel.
In the ISPF editor, there are
• primary commands
• line commands
The Primary commands are entered in the Command Input Area. They apply to the entire source member.
Line commands are entered over the numbers in the line command area and they affect individual lines
Primary commands are typed at the command prompt.
39
40. Notes:
Lines can be inserted by the I command, which is typed in the line command area at the spot where the
lines are to be inserted. The I command creates blank lines which can subsequently be entered. It shifts
existing lines which follows further down in the file. The inserted lines contain apostrophes in the line
number area until you type the source data. When you press the Enter key, the editor deletes any inserted
lines that do not contain data.
There are two forms of this command
I Inserts a single line following this line
In Inserts n lines following this line
40
42. Notes:
Lines can be deleted using the D command, typed into the line command area at the line when deletion is
to begin. There are three forms of this command
• D Deletes this line
• Dn Deletes n lines starting with this line
• DD Delete the block of lines beginning with the first DD
• command and ending with the second DD command.
42
45. Notes:
The R command lets you repeat a single line or a group of lines one or more times.
The repeated line falls in immediately after the original line.
The R command has several forms
• R Repeat this line
• Rn Repeat this line n times
• RR Repeat a block of lines
When you use the RR command, the first RR marks the start of the block. The second RR command
indicates the end of the block, and, if you so choose, the number of times to repeat the block.
45
48. Notes:
Copying lines is similar to repeating them, except that you are able to specify a destination.
The C command has several forms
• C Copies one line
• Cn Copies n lines
• CC Marks a block of lines for copying
Then you move elsewhere in the member and type either an A or a B. If you type an A, the source lines
are copied after the destination line. If you type a B, they are placed before the destination line.
48
50. Notes:
CC Marks a block of lines for copying
Then you move elsewhere in the member and type either an A or a B. If you type an A, the source lines
are copied after the destination line. If you type a B, they are placed before the destination line.
50
51. Notes:
Moving lines is similar to copying them except that the source lines are deleted from their original
location after they are moved.
The M command has several forms
• M Moves a single line
• Mn Moves n lines
• MM Marks a block of lines to move
Then you move elsewhere in the member and type either an A or B. If you type an A, the source lines are
copied after the destination line. If you type a B, they are placed before the destination line.
51
53. Notes:
MM Marks a block of lines to move
Then you move elsewhere in the member and type either an A or B. If you type an A, the source lines are
copied after the destination line. If you type a B, they are placed before the destination line.
53
54. Notes:
The library, that is the Project, Group, and Type you specify, must already exist.
ISPF creates an empty workspace in virtual storage for the new member.
Once in the ISPF Edit Panel, you can use the INSERT number of lines as you see necessary and enter
your source data. ISPF writes the new member onto disk when you exit the edit session.
54
55. Notes:
The COPY command is used to copy one or more lines of data from a sequential data set, member of a
partitioned data set (PDS), into the member, data set currently being edited or viewed.
Use the A (after) or B (before) line commands or the AFTER or BEFORE keyword along with a label, to
specify where the data is to be copied.
If a member name is specified as part of the command, and "after" or "before" is properly specified, the
entire member or a range of lines in the member will be copied in immediately.
Command ===> copy memnam copy in the member "memnam".
or Command ===> copy (memnam) 2 10 copy in lines 2-10 of "memnam".
A partially qualified or fully qualified data set name may be specified as part of the command. This can
be a sequential data set or another partitioned data set.
Command ===> copy seqds Copies a sequential data set.
or Command ===> copy 'userid.seqds' Copies a sequential data set.
Command ===> copy pds(a) copies member a.
or Command ===> copy pds 6 10 member list is displayed and lines 6-10 are copied
from the selected member.
or Command ===> copy 'userid.seqds' Copies a sequential data set.
Command ===> copy pds(a) copies member a.
or Command ===> copy pds 6 10 member list is displayed and lines 6-10 are copied
from the selected member.
55
56. To use "extended copy", enter the COPY command without a member name, data set name, or file
pathname. Having specified the destination line, a panel will be displayed allowing you to enter the name
of a sequential data set, PDS (and member).
Command ===> copy after .here requests extended-copy panel.
You have the option of copying an entire data set, member, or file, or of selecting one or more lines to be
copied.
56
57. Notes:
CREATE Command
The CREATE command (may be abbreviated CRE ) is used to create a new member of a partitioned data
set (PDS), a new sequential data set, using one or more lines of the data being edited or viewed.
In a PDS, the new member will be created in the lowest level library of the current concatenation only if
it does not exist in that library. If it exists in a higher level library, a warning message is displayed and
the member is created. (Use the REPLACE command to replace an existing member.)
To specify the lines to be put into the new member, use:
. line commands C or CC or else a range operand to copy line(s).
. line commands M or MM to move line(s). (copy, then delete)
If you specify the member name as part of the command, and the move or copy line commands (or
range operand) are entered, the new member will be created immediately from the data that you are
editing or viewing. The member name may be entered with or without parentheses.
Command ===> create memnam creates the new member "memnam".
Command ===> create (memnam) creates the new member "memnam".
A partially qualified or fully qualified data set name may be specified as part of the command.
Command ===> create pds(a) creates member a.
Command ===> create 'userid.pds(a) creates member a
Command ===> create 'userid.seq creates sequential data set
57
58. To use "extended create", enter the CREATE command without a member name or data set name. If the
range operand is specified, or the move or copy line commands are entered, a panel will be displayed
allowing you to enter either the name of a PDS and member, the name of a sequential data set.
Command ===> cre .strt .end requests extended-create panel.
or Command ===> cre .zfirst .zlast requests extended-create panel.
REPLACE Command
The REPLACE command (may be abbreviated REPL ) is used to replace amember of a partitioned data
set (PDS), an entire sequential data set using one or more lines of the data being edited or viewed.
In a PDS, a new member will be created or an existing member will be replaced in the lowest level library
of the concatenation.
To specify the lines to be put into the member being replaced, use:
. line commands C or CC or else a range operand to copy line(s).
. line commands M or MM to move line(s). (copy, then delete)
If the member name is specified as part of the command, and the move or copy lines commands (or range
operand) are entered, the named member of the PDS will be replaced immediately. Member name may
be entered with or without parentheses. To ensure that a member is replaced instead of a sequential data
set by the same name, use parentheses.
Command ===> replace memnam replaces the member "memnam".
Command ===> replace (memnam) replaces the member "memnam".
A partially qualified or fully qualified data set name may be specified s part of the command. This can be
a sequential data set or another partitioned data set.
Command ===> replace seqds replaces a sequential data set.
or Command ===> replace 'userid.seqds' replaces a sequential data set.
Command ===> replace seqds replaces a sequential data set.
or Command ===> replace 'userid.seqds' replaces a sequential data set.
Command ===> replace pds(a) replaces member a.
Command ===> replace 'userid.pds(a)' replaces member a.
To use extended replace , enter the REPLACE command without a member name, data set name, or file
pathname. If a range operand is specified, or once the move or copy line commands have been entered, a
panel will be displayed. You can enter the name of any sequential data set or PDS (and member).
Command ===> repl .strt .end requests extended-replace panel.
or Command ===> repl .zfirst .zlast requests extended-replace panel.
58
60. Notes:
When you have completed all editing in the ISPF Edit Panel, press the End key, PF3. When you do this
ISPF saves your changed member to the primary library. You are returned to the Edit Entry Panel. If you
press PF3 again, ISPF returns to the ISPF Primary Option Panel.
In the Edit Entry Panel, you can skip some steps and return directly to the ISPF Primary Option Panel by
pressing PF4. ISPF saves the changed member in the process.
Still another alternative is to enter SAVE at the Command line to cause the member to be saved. Entering
CANCEL causes the changes to be discarded, and you are returned to the Edit Entry Panel.
60
61. Notes:
The edit profile controls many of the operations involved in editing such as column boundaries, tab
settings, the generation of line numbers, editing using all capitals, and other items.
For each user, ISPF maintains a number of separate profiles. There are default profiles for each data set
type. For example, there is a default for COBOL files. You can also make up additionalprofiles for any
data set type.
The profile in effect for an edit session can be entered in the Profile Name field in the Edit Entry Panel.
61
62. Notes:
Inside the Editor Panel, you can display the edit profile that is in effect by typing PROFILE at the
command line. The top several lines of the display becomes shaded and the text like =PROF>, =TABS>
or =COLS> appears in the line number command area for the lines displaying the profile.
The several lines at the top will show the setting of various edit modes. For example, the profile name is
COBOL. The settings for RECOVERY, NUMBER, HEX, NULLS, TABS, AUTONUM, AUTOLIST,
and PACK are all set to OFF.
CAPS, AUTOSAVE, STATS, and NOTE are set to ON. Other settings like PROFILE and IMACRO
have different values. The next panel shows an example of the result of entering the profile command.
Editing exists profile
If an edit profile exists which you would like to activate, you can do that by placing its name in the
PROFILE command.
Example: PROFILE COB2. The profile named COB2 is retrieved.
If this profile does not exist, a new one is created using the current profile settings. This represents the
manner in which you can create new profiles. You can change the profiles settings as you wish, then issue
a PROFILE command specifying the new profile name. Changes you make to the PROFILE are saved
when you exit the edit session.
To avoid changes to the profile being saved at the end of the session you may use the PROFILE LOCK
command.
62
63. Notes:
The column boundaries
Column boundaries control the width of the area in which source data can be placed, and the range of
columns for editing data. The area within the boundaries represent the columns to which editing
commands apply. The COBOL default is 7 for the left boundary and 72 for the right boundary. For other
types, such as an assembler source file (ASM), the standard left margin is 1 and the right margin is 71.
The =BNDS> line illustrates the current settings.
63
64. Notes:
You can change the BOUNDS setting in the profile using the BOUNDS primary command. At the
command prompt, you can type a command like BOUNDS 7 80.
This will cause a new, left boundary and a new right boundary to be set to 7 and 80, respectively. This
form of the command is the BOUNDS primary command.
To set only the left boundary, issue the same command, but use an asterisk for the right boundary. To set
only the right boundary, use the asterisk in place of the left boundary. A BOUNDS command without
specifying anything resets the defaults.
64
65. Notes:
Another alternative is to use the BOUNDS command as a line command. Enter BOUNDS in the line
command area. The editor responds by displaying a =BNDS> line at the place where you entered the
command.
You may move the terminal cursor to the spot on the line where you want to set up new boundaries. Type
a less-than sign to mark the new left boundary, and type a greater-than sign to mark a new right boundary.
65
66. Notes:
Tab stops are especially important for editing members containing source files like COBOL or
Assembler, because certain constructs must begin in specific columns.
There are two types of tab stops supported by the ISPF editor, hardware and logical. You move among
hardware tab stops by pressing the Tab key on the 3270 terminal or terminal-emulator.
With logical tab stops you enter a special tab character like a @ or #. The editor will take the subsequent
text and align it to the closest tab stop inserting spaces as necessary to position it.
You may very effectively mix tab stops. For example, in the DATA DIVISION of a COBOL program,
you will want to control very specifically the columns where level numbers, PIC, and VALUE clauses
fall. Hardware tabbing works well.
In the PROCEDURE DIVISION, where indentation is more important than specific column positions,
logical tabbing is more suitable and useful.
66
67. Notes:
Hardware tab stops are activated by typing the TABS command in the line command area.
Upon pressing Enter, the editor gives you a =TABS> line. On this line you enter an asterisk (*)
immediately to the left of the desired position for the tab stop.
The asterisk defines the position for an attribute byte. This is a special character recognizable by the 3270
hardware as a tab position. The attribute byte actually takes up a position and displays as blank. However,
you will not be able to type any source data into this position. Source data will fall in starting at the
position immediately to the right of the asterisk. You could enter a TABS OFF command to deactivate all
tabs, or you can do one of the following:
- Position the cursor on the attribute byte and press ENTER.
- Blank out the sequence number for the line and press ENTER.
Either of the above will temporarily eliminate tabs on a single line.
TABS ON, typed at the command line, will activate hardware tab stops and TABS OFF turns them off.
67
68. Notes:
To activate logical tabbing, type the TAB command at the command line, followed by the character to be
used to mark the tab position. From then on, that character can be typed in any source line to generate the
logical tabbing effect. TAB with no character turns off logical tabbing.
68
69. Notes:
Using an edit mask, you can predefine a lines initial contents to be used each time you insert a line using
the I command. Start by entering the MASK command in the line command area. A line beginning with
=MASK> is inserted, and you enter your edit mask.
Subsequently, until you change the mask line, each line created using the I command will start with the
contents of the mask line. To remove the current mask line, use the D line command to delete it. The
default mask line is blank.
Alternatively, you can achieve the effect of a mask line by inserting one blank line, enter your data, and
then repeat it using an R command.
69
70. Notes:
CAPS mode forces all characters typed to automatically appear in uppercase.
With this mode turned off, no automatic conversion is applied. When turned on, this is quite useful for
COBOL programs and other types of program source code, which is generally all entered in uppercase
characters.
There are also two associated commands typed in the line command mode. LC typed at a line converts all
characters on the line to lowercase, and UC converts all characters on the line to uppercase. You can
convert a number of contiguous lines by following the LC or UC command by the number of lines you
want to convert.
70
71. Notes:
With STATS mode turned on, statistics are maintained for each member in a library. These are the
statistics displayed in the member selection lists.
The items it shows are listed below.
• VV.MM - The version and modification level number
• CREATED -The date the member was initially created
• CHANGED - The date and time that the member was last edited
• SIZE - The current number of lines in the member
• INIT - The number of lines initially in this version of the member
• MOD - The number of lines that have been modified since this version of the member was created
• ID - The user-id of the person who most recently edited the member
71
72. Notes:
The ISPF editor is capable of maintaining a record of all changes you make during an edit session if you
turn on RECOVERY Mode. The changes are maintained in the special file called the recovery data set.
If during an edit session, the system crashes, the recovery data set is left opened. When you edit the
member again, the editor will sense this and give you an opportunity to apply the changes again.
RECOVERY mode also provides an undo capability. Since, changes are being logged, you may enter the
UNDO command at anytime to back out the last change made. You may enter successive UNDO
commands until all changes made during the current edit session have been backed out.
72
73. Notes:
With HEX Mode on, all characters are displayed in hexadecimal format.
Each actual character is replaced by its two-byte hexadecimal equivalent.
You can change any character by changing its two-byte code.
The two-byte code is equivalent to PACKED-DECIMAL in COBOL.
Therefore this mode can be used to create or modify such data.
73
74. Notes:
The ISPF editor also offers a CHANGE command. However, the change commands takes two strings.
The first string is a target string, and the second is a replacement string.
For example, you can type at the command prompt
CHANGE FORMAT PRINT
If the target or replacement string contains spaces or special characters they need to be placed in quotes.
The first occurrence of the target string FORMAT is changed to PRINT. If you wish to replace all
occurrences throughout the source member, add the keyword ALL the end of the command. Lines
changed are marked with ==CHG> in the line command area.
On every CHANGE command, you must specify a "from" string and a "to“ string. In most cases you
simply enter CHANGE or its abbreviations CHG or C, followed by the two character strings.
Example - ===> change demo test
If you want to use the same string that was used in the previous CHANGE command, use an * (asterisk).
Example - ===> chg * * 40 60 (change demo to test in cols 40 to 60)
In some cases, you want to change a string of characters that cannot be entered in the simple format
shown above. For these cases, special strings can be entered. For example, to change the expression "a =
b" to "c = d" you must use delimited strings as the expressions contain blanks.
Example - ===> c 'a = b' 'c = d'
74
75. Notes:
You may limit the range affected by a CHANGE command by specifying a search range. The search
range is communicated by following the replacement string with two labels that have been assigned to the
first line and last line of the range respectively.
Labels are assigned by positioning the cursor at a line, and typing the label, preceded by a period (.) .
In the CHANGE command, you need to include the period as part of the label. The following CHANGE
command changes all occurrences of the string FORMAT to PRINT, within the lines labeled .TOPLN
and .BOTLN.
75
76. Notes:
NEXT
NEXT can be entered as an optional parameter with the CHANGE command.
(It is never required, however, since next is the default).
Command ===> change xx yy next changes the next "xx" to "yy".
A search for the next occurrence of the string "xx" will be made, starting at the beginning of the first line
being displayed (if the cursor is still on line 2), or at the cursor location (if the cursor is within the data
part of the display).
If the string is changed, the cursor will be placed at the end of the "yy" string. If the RCHANGE PF key
is then pressed, scanning will continue, changing the next occurrence, and then the next, etc., until the
bottom of data is reached.
If the string is not found by the bottom of the data, a BOTTOM OF DATA message will be displayed.
To continue scanning, wrapping around from the bottom of the data to the top, use RCHANGE or
RFIND.
76
77. PREV
PREV can be entered as an optional parameter with the CHANGE command.
Command ===> c xx yy prev changes the previous "xx" to "yy".
A search for the previous occurrence of the string "xx" will be made, starting at the end of the line
preceding the first line being displayed (if the cursor is still on line 2), or at the cursor location (if the
cursor is within the data portion of the display).
If the string is changed, the cursor will be placed at the end of the string. If the RCHANGE PF key is
then pressed, scanning backwards will continue until the string is changed again, or the top of the data is
reached. If the string is not found by the top of the data, a TOP OF DATA message will be displayed. To
continue backwards scanning, wrapping around from the top of the data to the bottom, use RCHANGE or
RFIND.
FIRST
FIRST can be entered as an optional parameter with the CHANGE command.
Command ===> chg xx yy first changes the first "xx" to "yy".
A search for the first occurrence of the string "xx" will be made, starting at the beginning of the first line
of the data and continuing until the string is found, or the bottom of data is reached.
If the string is changed, the cursor will be placed at the end of the changing the second occurrence, then
the third occurrence, etc., until the bottom of data is reached.
If the string is not found by the bottom of the data, a message will be displayed, indicating that the
characters cannot be found.
LAST
LAST can be entered as an optional parameter with the CHANGE command.
Command ===> chg xx yy last changes the last "xx" to "yy".
A search for the last occurrence of the string "xx" will be made, starting at the end of the last line of the
data and continuing backward until the string is found, or the top of data is reached.
If the string is changed, the cursor will be placed at the end of the string. If the RCHANGE PF key is
then pressed, backwards scanning will continue, changing the next to the last occurrence, the third from
the last occurrence, etc., until the top of data is reached. If the string is not found by the top of the data, a
message will be displayed, indicating that the characters cannot be found.
ALL
ALL can be entered as an optional parameter with the CHANGE command.
Command ===> c xx yy all changes all "xx" to yy".
A search for all the occurrences of the string "xx" will be made, starting at the beginning of the first line
of the data and continuing to the bottom of data.
If the string is found one or more times, all occurrences will be changed, and the cursor will be placed at
the end of the first changed characters. A message will be displayed indicating the number of times that
the string was changed. Each line will be flagged with =CHG=>.
If it is impossible to change one or more occurrences of the "from" string, a message will be displayed
indicating the number of times that the error occurred. Each line will also be flagged with =ERR=>.
If the string is not found by the bottom of the data, a message will be displayed, indicating that the
characters cannot be found.
77
78. Notes:
CHARS
CHARS can be entered as an optional parameter with the CHANGE command.
(It is never required, however, since CHARS is the default).
Command ===> chg xx yy chars changes the chars "xx" to "yy"
Any occurrence of the character string "xx" that is within the specified (or default) bounds will be
considered a match.
In the list below, all occurrences of the character string "do" would be changed.
CHARS DO - DO DONT ADO ADOPT 'DO' ¢ADO (DONT) ADO-
PREFIX
PREFIX (or the abbreviation PRE ) can be entered as an optional parameter with the CHANGE
command.
Command ===> chg xx yy prefix changes the prefix "xx" to "yy".
Only those occurrences of the character string "xx" that are a prefix to a word or label and that are within
the specified (or default) bounds will be considered a match.
A prefix is defined as being preceded by a non-alphameric character and followed by an alphameric
character.
78
79. The prefix parameter could be used for example to change all labels or words beginning with "er",
without changing words ending in "er".
In the list below, only DONT and (DONT) strings would be changed:
PREFIX DO - DO DONT ADO ADOPT 'DO' ¢ADO (DONT) ADO-
SUFFIX
SUFFIX (or the abbreviation SUF ) can be entered as an optional parameter with the CHANGE
command.
Command ===> chg xx yy suffix changes the suffix "xx" to "yy".
Only those occurrences of the character string "xx" that are a suffix to a word or label and that are within
the specified (or default) bounds will be considered a match.
A suffix is defined as being preceded by an alphameric character and followed by a non-alphameric
character.
The suffix parameter could be used for example to change all labels or words ending with "g" without
changing all occurrences of the character "g".
In the list below, only ADO, ¢ADO and ADO- strings would be changed:
SUFFIX DO - DO DONT ADO ADOPT 'DO' ¢ADO (DONT) ADO-
WORD
WORD can be entered as an optional parameter with the CHANGE command.
Command ===> chg xx yy word changes the word "xx" to "yy".
Only those occurrences of the character string "xx" that are a word (or a label) and that are within the
specified (or default) bounds will be considered a match.
A word is defined as being preceded and followed by a non-alphameric character.
The "word" parameter could be used for example to change all words "do", without changing all
occurrences of the character string "do".
In the list below, only DO and 'DO' strings would be changed:
WORD DO - DO DONT ADO ADOPT 'DO' ¢ADO (DONT) ADO-
79
80. Notes:
You may exclude lines before executing your change command using the EXCLUDE command. You can
type the following command
EXCLUDE FILLER ALL
This command has the effect of excluding all lines within the source that contains the string FILLER.
Such lines will not be displayed.
In the subsequent FIND or CHANGE command you should add either the X or NX option. If you add X,
only the excluded lines are searched. If you add NX, only the lines which are not excluded are searched.
A block of excluded lines is replaced by a single line indicating that the block of lines is hidden.
80
81. Notes:
You may also exclude lines by using the XX command in the line command area.
There are three forms of the exclude command:
X Excludes this line
Xn Excludes n lines starting with this line
XX Excludes the block of lines beginning with the first XX command
81
84. Notes:
A single F typed in the spot where lines were excluded shows or redisplays the first line. A command
like F8 redisplays the first 8 lines. Likewise a single L displays the last line excluded, and L7 redisplays
the last 7 lines.
An S command redisplays lines based on indentation level. If you type S9, lines within the first 9
excluded lines are redisplayed as long are they are not among the ones most indented. This can be useful
for lining up IF and ELSE clauses in large blocks of indented code.
The RESET displays all excluded lines. This is typed at the command prompt, not in the line command
area.
84
85. Notes:
Examples:
Command ===> delete all x deletes all excluded lines from the data
Command ===> delete all nx .a .b deletes all non-excluded lines from the inclusive range defined by
the labels, ".a" and ".b".
Command ===> delete all .a .b deletes all lines from the inclusive range defined by the labels, ".a"
and ".b".
Command ===> delete x .a .b deletes all excluded lines from the inclusive range defined by the
labels, ".a" and ".b".
The parameters may be entered in any order. The "range" is optional and ALL is optional when X or NX
is specified.
85
86. Notes:
The ISPF editor provides some line level commands to help shift or change the indentation of groups of
lines. All these are typed in the line command area.
A single ( shifts the line left 1 position. A (7 shifts the line left 7 positions. A ) shifts the line right 1
position, and a )8 shifts it right 8 positions.
You can shift a whole block of text left by marking the first line with (( and the last line with ((. Mark the
first line with ((7 and the last line with ((, and the whole block will be shifted left 7 positions. You may
shift right using )) and )), or ))8 and )) to shift a whole block right 8 positions.
These commands are equivalent to using the Insert and Delete keys on the 3270 terminal.
Depending on the quantity and type of lines requiring shifting, it may be easier to use the keys on the
keyboard.
86
88. Notes:
This unit covers the some of the functions in selection 3 of the ISPF Primary Action Menu. This
represents the ISPF utilities. With the ISPF utilities, you can display and print library and data set
member lists.
You can also reset statistics for ISPF library members, and define commands to be used with specific
dialogs.
88
89. Notes:
The ISPF Utilities are accessed through option 3 of the ISPF Primary Options Menu. When you select
option 3, you see the Utility Selection Panel, shown on the slide. There are typically 15 different utility
options; all 15 are listed shown on the slide.
Some of the things you can do with the utilities:
• Display and print library and data set member lists
• Reset statistics for ISPF library members
• Define commands to be used with specific dialogs
• Compare data sets and search for strings of data
• Move, copy, lock, promote, and print library and data set members
89
90. Notes:
If you select option 1 on the Utility Selection Panel, you see the Library Utility Panel shown here. This
set of utilities targets a specific data set and then allows you to operate on its members. This is in contrast
to the DSLIST Utility, option 4 on the (3) Utility Selection Panel. The DSLIST allows you to perform
many similar functions, but targets lists of data sets, and allows you to operate on individual data sets
within the lists.
Among the most important functions are browse member, print member, rename member, and delete
member.
Options
You start by entering the name of a partitioned data set in the ISPF Library section. You can specify the
name of a member, in which case you can immediately select B, D, E, P, R, and V at the command
prompt.
If you do not supply a member name and leave the command prompt blank, you see a member selection
list panel when you press Enter.
Furthermore, you can enter the name of an existing member and a new name for the new member. Then,
if you select the R option, the member will be renamed with the new name you have chosen.
90
91. The options that you can use in the Library Utility applied to a member of a partitioned data set are:
C Compress data set
V View member
X Print index listing
B Browse member
L Print entire data set
D Delete member
I Data set information
R Rename member
S Short data set information
P Print member
These options operate either on an entire library, or on a specific member.
Options that operate on an entire library:
C Compress data set
X Print index listing
L Print entire data set
I Data set information
S Short data set information
Options that operate on a specific Member:
V View member
B Browse member
D Delete member
R Rename member
P Print member
91
92. Notes:
After the selections are made, press enterIf a member name is left blank, the member selection list panel
appears just like other member lists you have seen, and is very powerful in this context. You may move
through the member list, and enter one of the utility codes to the left of one member or multiple members.
For example, you can place a B next to PAY2A to browse it, a D next to PAY34 to delete it, and a P next
to PAY31 to print it.
Feel free to place the appropriate codes next to desired members, even scroll forward and backward
through the member list if it is large. When you have made your selections, press Enter.
92
93. Notes:
Option 2 of the (3) Utility Selection Panel is named the data set utility because options on it deal with
data set libraries rather than on PDS members. These options include the allocation of a new data set,
renaming an entire data set, deleting an entire data set, cataloging and uncataloging of data sets, and
display of space usage information.
Again, many of the functions in this section can be performed by the Dslist utility. This will be explained
in more detail in the next topic.
CATALOG/UNCATALOG
z/OS maintains a structure of catalogs to store the names and information of files. A file need not be part
of the catalog, but commonly used files should be cataloged. Cataloging a data set means that OS/390
keeps track of what disk media it occupies.
To access a file that is not cataloged, you must supply the data set name and the volume/serial for the
volume in which it resides. Most files you will use and manipulate under ISPF will be cataloged.
Under ISPF, data sets are cataloged automatically when they are allocated.
However, occasionally jobs fail and there are loose ends which must be patched up. A failed job may
leave a data set uncataloged. Occasionally, there will be non-ISPF data sets that must be accessed.
For these reasons the Data Set Utility provides a catalog data set function (C) and an uncatalog data set
(U) function.
When you catalog a data set, the volume/serial of the volume must be specified. The system examines
the volume table of contents (VTOC) and obtains the characteristics of the data set.
93
94. Notes:
After entering the name of the data set, you can leave the Option Prompt blank, and press Enter.
This will cause the Data Set Information panel to appear. It contains detailed information about the
allocation, format, and utilization of the data set.
94
95. Notes:
Before you can use a data set, it must be allocated. Option A on the Data Set Utility Panel is for allocating
data sets.
You enter the name of the data set and select option A. If the data set does not exist, ISPF displays the
allocate panel.
If you want to place the new data set on a specific volume, you must enter the volume's serial number in
that field.
If you leave it blank, OS/390 will select a default volume, unless you specify a generic unit.
In the generic unit field, you can specify the type of DASD you want to use, such as 3380.
Under normal circumstances, you do not specify the volume serial numberor generic unit.
Space for a new data
The space requirement for a new data set is specified through three parameters – space units, primary
quantity, and secondary quantity.
The space units field determines the unit of measurement for allocation. You may allocate in terms of
blocks (BLKS), tracks (TRKS), or cylinders (CYLS).
The primary quantity field should contain the amount of space the data set will require.
95
96. In the secondary quantity field, you should place a secondary allocation, which is necessary to expand the
data set. If required, it will be added to the primary quantity. Up to 15 allocations will be made. After that
the only way to expand the data set is copy or move it to a new data set with a larger allocation.
Expiration Date
Specify a date when the file can be considered expired and can be deleted
In the file expiration data parameter you can specify a date when the file can be considered expired and
can be deleted. The expiration date is not normally filled in for disk data sets, since it interferes with their
reorganization. They cannot be deleted until the expiration data is reached.
Directory blocks
The directory blocks field determines whether you are creating a sequential data set or a partitioned data
set. If set to zero, the new data set becomes a sequential data set.
To create a partitioned data set, enter a value in the directory blocks field. This parameter represents the
number of 255-byte directory blocks that should be allocated for the library. Normally, each block can
accommodate six member entries for standard ISPF source members.
Non-standard ISPF source members do not have ISPF statistics, and there is less information which must
be stored in the directory blocks. In these data sets, each directory block can hold up to 21 members.
96
97. Notes:
If you select the rename option, you are presented with the Rename Data Set panel. The data set name at
the top of the screen is carried over from the initial Data Set Utility panel. You enter the new name for the
data set under the ISPF Library fields.
97
98. Notes:
The D option on the Data Set Utility panel provides you the ability to delete a data set.
Enter the name of the data set you want to delete. Press Enter. ISPF provides a pop-up window that will
request confirmation from you that you truly wish to delete the data set.
The deletion of the data set frees space for immediate use by z/OS for other data sets. Once it is deleted, it
is gone. To get it back, it must be restored from backup.
98
99. Notes:
Selection 3 on the Utility Selection Panel, represents the move/copy Utility. With this utility, you can
move or copy sequential or partitioned data sets. Copying a data set means reproducing it to another
location. Afterwards you have two versions, the original and the copy. When you move a data set, it is
copied from one location to another, but the original is scratched, and only one version remains.
With the move/copy utility, you may also move or copy a member from one partitioned data set to
another. Likewise, copying a member implies reproducing it. Moving a member means that the original is
scratched. Moving or copying does not allocate a new data set. Both from and to data sets must already
exist.
The C and M options are used to copy or move either a data set or member of a data set. CP and MP are
also provided to print the data set or member as it is copied. Actually, the data copied is placed in the list
data set that is submitted to for batch print when the ISPF session is ended.
To copy a sequential data set, you must enter the data set name information of the from data set in the
section From ISPF Library. Leave the member name blank. You can enter up to four library names. ISPF
concatenates these searches for each of the libraries until it finds the data set.
Select your copy or move option, then press Enter.
In the entry panel that follows you have the opportunity to specify the to data set. For a sequential data
set, you need to enter a project, group, and type.
There are a number of data sets options to consider at the bottom of the screen.
If you select Mod, and the to data set already exists, the copied or moved data is added to the end of the
existing data set. If you select OLD, the previous contents of the to data set are erased.
99
100. You can also choose to store the output data set in packed (compressed) format.
The third set of options has to do with the Source Configuration Library Manager (SCLM) module.
In the second panel, specify the name of the to data set, and also the name of the to member.
When copying members of a PDS, you must consider the Replace option. If you enter a slash (/), you will
replace like-named members.
This means that duplicate members will be deleted from the to data set before they are copied or moved.
If you do not select this option, duplicate members WILL NOT be copied or moved.
100
101. Notes:
You can copy all members from one PDS to another very easily.
When entering the From ISPF Library, place an asterisk in the Member field. This will tell the utility to
copy all members it finds in the from data set. In such an operation, you should consider carefully the
Replace Like-Named Members option on the Specify-To entry panel.
The member selection list shows the names of the members that appear in the from data set. You can
select the members you wish to move or copy, by placing an S in the left-most column of the selection
list.
An important part of this member selection list display is the Rename column. Here you may add a new
member name next to any member you select. The member will be copied or moved and the to version
will possess the member name from the Rename column.
101
102. Notes:
The fourth selection on the ISPF Primary Option Menu provides access to the DSLIST utility. This might
be one of the most useful areas of the feature provided by ISPF.
The main panel for the DSLIST Utility is shown here. At the top are four options. The most useful of
these is Display Data Set List, since it is really the starting point for almost all the operations you will do
with the DSLIST utility.
If you leave the option prompt blank and press Enter, the utility provides a list of data sets.
First, you must enter parameters that indicate the scope of the data set list you want to start with. These
two important parameters are DSNAME Level and Volume Serial.
In the fields Confirm Data Set Delete and Confirm Member Delete, it is a good idea to set these options
by typing the slash (/). This will ensure later that you are prompted for assurance before the utility permits
a data set or member to be deleted.
On the Data Set Utility Panel, there are four possible views to select from. You make your selection by
entering a number 1 through 4 at Initial View field.
The four views are listed below.
Volume – The VOLUME option displays the volume where each of the data sets in the list reside.
Space – The SPACE option displays information on track allocation and usage.
Attrib – The ATTRIB option displays the characteristics of the data sets.
Total – The TOTAL option displays all of the previous information, along with the creation and
expiration dates and the date each data set was last referenced.
102
103. If you enter a high-level data set name qualifier, perhaps only a project id in the DSNAME level field,
you would then press Enter. The utility searches all cataloged data sets across the entire system with front
portions of their names matching the value you specified. An example of such a list is shown here.
You may also specify a Volume Serial parameter and leave the DSNAME level field blank. The list will
show all data sets on the specified disk volume, cataloged or uncataloged.
Finally, you can specify both a DSNAME level parameter and a Volume Serial parameter. In this case the
list will show only data sets matching the name qualifier on the specified disk volume.
There are three options in addition to leaving the option prompt blank.
• The P option will cause the list of data sets to be entered into the list data set for printing when the
ISPF session ends.
• The V option provides information taken from the volume table of contents VTOC of the
specified disk. It shows the number of tracks, their overall usage, and amount of space left on the
disk.
• The PV option places the same information, as displayed by the V option, in the list data set for
printing when the session ends.
The VTOC information is of greater use to system programmers than that of application programmers.
Specifying Dsname Level
* A single asterisk by itself indicates that at least one qualifier is needed to occupy that position. A single
asterisk within a qualifier indicates that zero or more characters can occupy that position.
** A double asterisk indicates that zero or more qualifiers can occupy that position. A double asterisk
within a qualifier is invalid.
% A single percent sign indicates that any one single alphameric or national character can occupy that
position.
%%... One to eight percent signs can be specified in each qualifier.
The following examples are valid for Dsname Level:
Dsname Level Data Set List
SYS1.PARMLIB One data set name.
SYS1.* All data set names with SYS1 as the first qualifier and at least one more
qualifier.
SYS1 or SYS1.** All data set names with SYS1 as the first qualifier
**.CLIST All data set names with a qualifier of CLIST .
AAA%*.B*%%%B All data sets that start with AAA, have at least one more character in the
high level qualifier and have a second qualifier that begins and ends in B
with at least three letters between the Bs.
103
104. Notes:
The functions available for use within the data set list are shown here:
B Browse data set
C Catalog data set
D Delete entire data set
E Edit data set
I Data set information
M Member list only
P Print entire data set
R Rename entire data set
S Sort data set information
U Uncatalog data set
X Print data set index listing
Z Compress data set
All of these functions are present in one or more forms within ISPF. The DSLIST utility provides a
manner of using these within the context of a data set list.
The data set list represents the branching off point for any of several desired actions. For example, you
can move the cursor down to a particular data set name, enter B for browse, and press Enter.
104
105. If the data set is a PDS, you will receive a member list showing all members in the data set.
From that list you can select a member by typing an S next to it, and pressing Enter. Immediately you are
taken to a browse panel in order to browse the source data contained in that member.
If the data set is a sequential data set, and you select it with a B for browse, you will be taken immediately
to the browse panel to see its source data.
The PF3 key takes you back to the data set list.
105
106. Notes:
Option 14 on the Utility Selection Panel brings up the Search-For Utility. This utility allows you to search
for one or more characters in a data set. The search string is entered on the first line. Spaces or special
characters must be placed in quotes. In this basic Search Utility, search strings are not case-sensitive, and
may be entered in uppercase or lowercase.
You can specify that data set here. If you leave the Member Field blank, Search-For displays a member
list. In the member list, you can select the members you want searched by placing an S next to each.
In the panel shown here, if you place an asterisk in the Member Field, all members in the library would be
searched. You may also choose to process in foreground or batch mode.
On the Search-For Utility Panel you can enter a slash to select the option that will specify additional
search strings. A pop-up window appears titled Search-For Strings. Here you may enter single or multiple
search strings.
You may include the keywords PREFIX, SUFFIX, or WORD after any search string to consider a match.
At the beginning of a word, end of a word, or acomplete word, respectively. You cannot include multiple
keywords on one line. If you want to search for the same string at the beginning or end of a line, place the
same search string on two different lines, one with PREFIX and one with SUFFIX.
When you specify multiple search strings, you may also supply the keyword C. C stands for continuation,
and it indicates that the search string from the previous line is being continued.
For example: ==> COMPUTE WORD
==> AMOUNT WORD C
The selection scenario shown indicates to locate all lines that contain COMPUTE and AMOUNT.
106