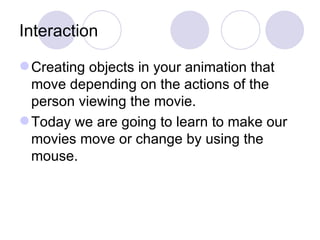
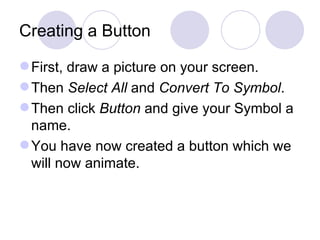
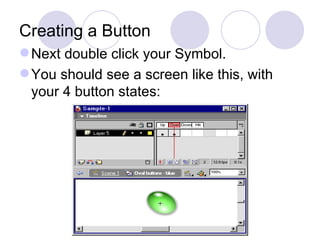
Graphical Animation Adding Interaction To Your Presentation
Interaction Creating objects in your animation that move depending on the actions of the person viewing the movie. Today we are going to learn to make our movies move or change by using the mouse.
The Four Button States Up, Over, Down and Hit Up – This is how your button looks when the viewer sees your animation but does NO action. Over – This is the KeyFrame the user will see when you roll your mouse over the button (but do NOT click).
The Four Button States Down – This is the KeyFrame the user will see when they CLICK and hold down the mouse button. Hit – This is the area of the animation that controls where the user must place the mouse to make any changes happen. This is NOT shown in your movie, unless you copy and paste it into a new layer.
The Hit State The HIT KeyFrame can be the same place as your animation, meaning you roll your mouse over or click an object to make it “move”. The HIT KeyFrame can be somewhere else on the animation, for instance create a button saying “Move Me”. Remember the contents of the Hit KeyFrame are not visible to the viewer of the movie. You must create a New Layer and copy and paste the button into the same location on the screen.
Creating a Button First, draw a picture on your screen.  Then  Select All  and  Convert To Symbol . Then click  Button  and give your Symbol a name. You have now created a button which we will now animate.
Creating a Button Next double click your Symbol. You should see a screen like this, with your 4 button states:
Inserting Keyframe In Over, Down and Hit, Insert KeyFrame or Insert Blank Keframe. If you Insert KeyFrame the original button will still be visible. If you Insert Blank KeyFrame your screen will be blank.
Over KeyFrame In the OVER KeyFrame draw the picture or insert the image you want the user to see when the Mouse ROLLS OVER the Hit KeyFrame area with the button NOT pressed.
Down KeyFrame In the DOWN KeyFrame draw the picture or insert the image you want the user to see when the mouse button is clicked when the user has the mouse inside the Hit KeyFrame area.
Hit KeyFrame This one is more complicated.  If you want the user to roll over the image to create the interaction, leave the KeyFrame EXACTLY the same as the first Image. If you want the user to roll over a DIFFERENT part of the animation to create interaction, Insert Blank KeyFrame.
Hit KeyFrame Next, in the Blank KeyFrame, draw a picture, insert an image or write something. This part of the button WILL NOT be seen by the user. It is the area the mouse must roll over or click to make the animation interact.  So, we need copy this image, go back to the Scene, create a New Layer and paste the image. You must place the image in EXACTLY the same place. Double click the button again, go back to the Hit KeyFrame and check they are lined up.
Task today Create an Animation with at least THREE buttons. For this activity I want you to work alone. Remember, use Layers  carefully  and you can create animations as before, around the buttons. Add your completed animation to your website.

M5 - Graphic Animation - Buttons

  • 1.
    Graphical Animation AddingInteraction To Your Presentation
  • 2.
    Interaction Creating objectsin your animation that move depending on the actions of the person viewing the movie. Today we are going to learn to make our movies move or change by using the mouse.
  • 3.
    The Four ButtonStates Up, Over, Down and Hit Up – This is how your button looks when the viewer sees your animation but does NO action. Over – This is the KeyFrame the user will see when you roll your mouse over the button (but do NOT click).
  • 4.
    The Four ButtonStates Down – This is the KeyFrame the user will see when they CLICK and hold down the mouse button. Hit – This is the area of the animation that controls where the user must place the mouse to make any changes happen. This is NOT shown in your movie, unless you copy and paste it into a new layer.
  • 5.
    The Hit StateThe HIT KeyFrame can be the same place as your animation, meaning you roll your mouse over or click an object to make it “move”. The HIT KeyFrame can be somewhere else on the animation, for instance create a button saying “Move Me”. Remember the contents of the Hit KeyFrame are not visible to the viewer of the movie. You must create a New Layer and copy and paste the button into the same location on the screen.
  • 6.
    Creating a ButtonFirst, draw a picture on your screen. Then Select All and Convert To Symbol . Then click Button and give your Symbol a name. You have now created a button which we will now animate.
  • 7.
    Creating a ButtonNext double click your Symbol. You should see a screen like this, with your 4 button states:
  • 8.
    Inserting Keyframe InOver, Down and Hit, Insert KeyFrame or Insert Blank Keframe. If you Insert KeyFrame the original button will still be visible. If you Insert Blank KeyFrame your screen will be blank.
  • 9.
    Over KeyFrame Inthe OVER KeyFrame draw the picture or insert the image you want the user to see when the Mouse ROLLS OVER the Hit KeyFrame area with the button NOT pressed.
  • 10.
    Down KeyFrame Inthe DOWN KeyFrame draw the picture or insert the image you want the user to see when the mouse button is clicked when the user has the mouse inside the Hit KeyFrame area.
  • 11.
    Hit KeyFrame Thisone is more complicated. If you want the user to roll over the image to create the interaction, leave the KeyFrame EXACTLY the same as the first Image. If you want the user to roll over a DIFFERENT part of the animation to create interaction, Insert Blank KeyFrame.
  • 12.
    Hit KeyFrame Next,in the Blank KeyFrame, draw a picture, insert an image or write something. This part of the button WILL NOT be seen by the user. It is the area the mouse must roll over or click to make the animation interact. So, we need copy this image, go back to the Scene, create a New Layer and paste the image. You must place the image in EXACTLY the same place. Double click the button again, go back to the Hit KeyFrame and check they are lined up.
  • 13.
    Task today Createan Animation with at least THREE buttons. For this activity I want you to work alone. Remember, use Layers carefully and you can create animations as before, around the buttons. Add your completed animation to your website.