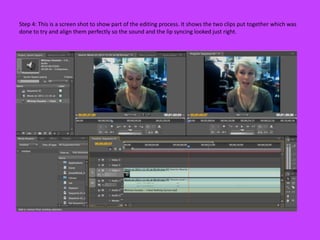
Lip Syncing Practice
Step 1: To start of we had to search for our chosen song on YouTube. The screen shot below shows evidence of this.
We used YouTube because in order to convert the file to MP3 we would need to use a YouTube converter website.
Step 2: Once we found the song on YouTube we had to turn it into an MP3 in order to import into Adobe
Premier Pro. To do this we had to copy the URL from YouTube into ‘Video2mp3’ which is a website that
converts YouTube videos into MP3 files. Once the download was complete the following page appeared and
     the
screen shot below shows this.
Step 3:Now that the song has been downloaded the next step was to import it into Adobe Premier Pro along
with a video of Lauren lip syncing over the song which had been filmed earlier using photo booth. I have
inserted a screen shot showing the MP3 file being imported into the program. After this, we started to edit
both the song and the video so that they were in sync with one another.
Step 4: This is a screen shot to show part of the editing process. It shows the two clips put together which was
done to try and align them perfectly so the sound and the lip syncing looked just right.
Step 5: Once the editing was completely finished we had to take out the sound of the video so that it was only
     the music from the MP3 file playing. To do this I had to left click the bar of the video and select ‘unlink’
     which took away the sound.
Step 6: This screen shot shows the last and final step. The lip sync is now complete and this is the finishing
     product.

Lip Sync Practice

  • 1.
  • 2.
    Step 1: Tostart of we had to search for our chosen song on YouTube. The screen shot below shows evidence of this. We used YouTube because in order to convert the file to MP3 we would need to use a YouTube converter website.
  • 3.
    Step 2: Oncewe found the song on YouTube we had to turn it into an MP3 in order to import into Adobe Premier Pro. To do this we had to copy the URL from YouTube into ‘Video2mp3’ which is a website that converts YouTube videos into MP3 files. Once the download was complete the following page appeared and the screen shot below shows this.
  • 4.
    Step 3:Now thatthe song has been downloaded the next step was to import it into Adobe Premier Pro along with a video of Lauren lip syncing over the song which had been filmed earlier using photo booth. I have inserted a screen shot showing the MP3 file being imported into the program. After this, we started to edit both the song and the video so that they were in sync with one another.
  • 5.
    Step 4: Thisis a screen shot to show part of the editing process. It shows the two clips put together which was done to try and align them perfectly so the sound and the lip syncing looked just right.
  • 6.
    Step 5: Oncethe editing was completely finished we had to take out the sound of the video so that it was only the music from the MP3 file playing. To do this I had to left click the bar of the video and select ‘unlink’ which took away the sound.
  • 7.
    Step 6: Thisscreen shot shows the last and final step. The lip sync is now complete and this is the finishing product.