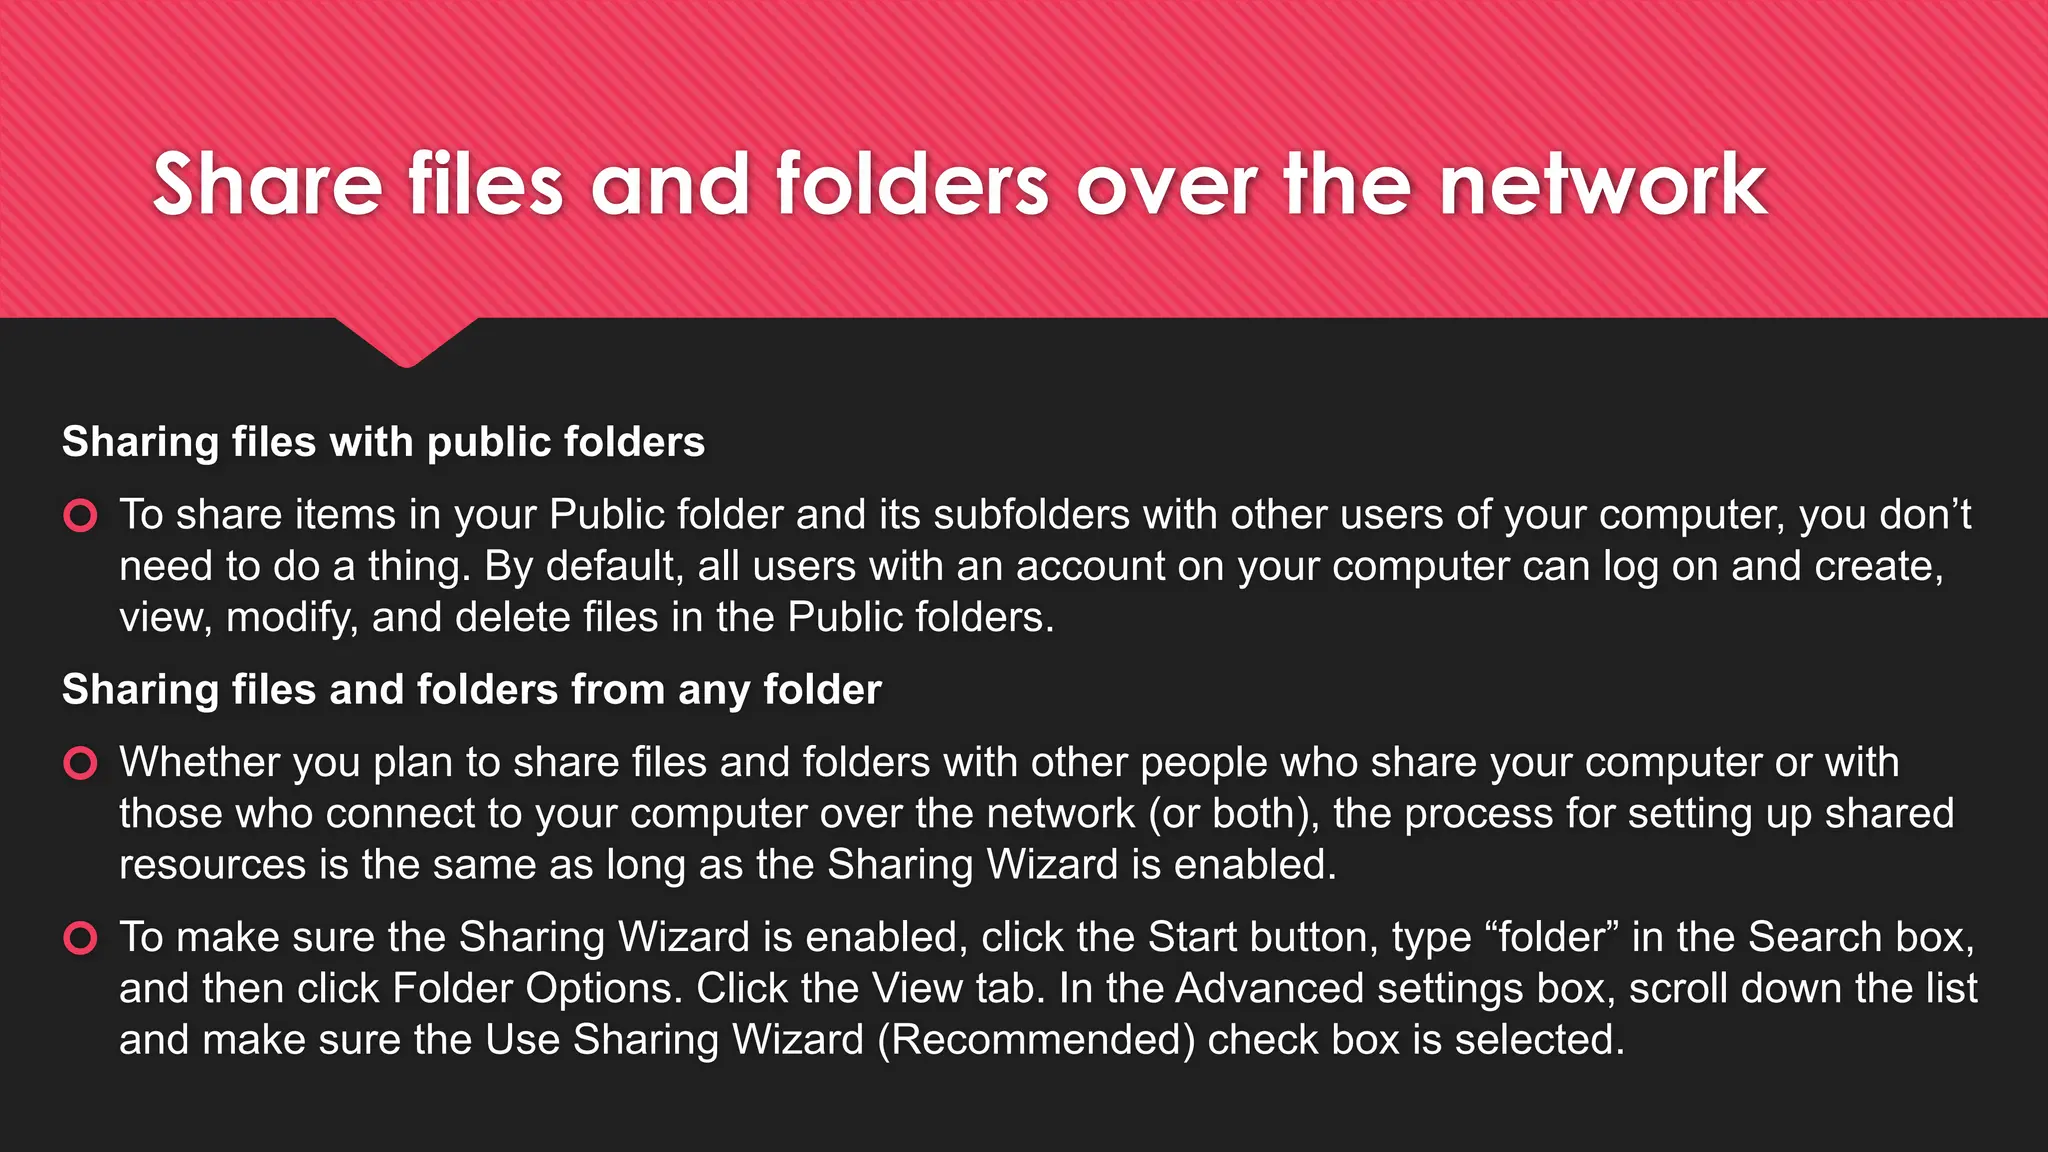
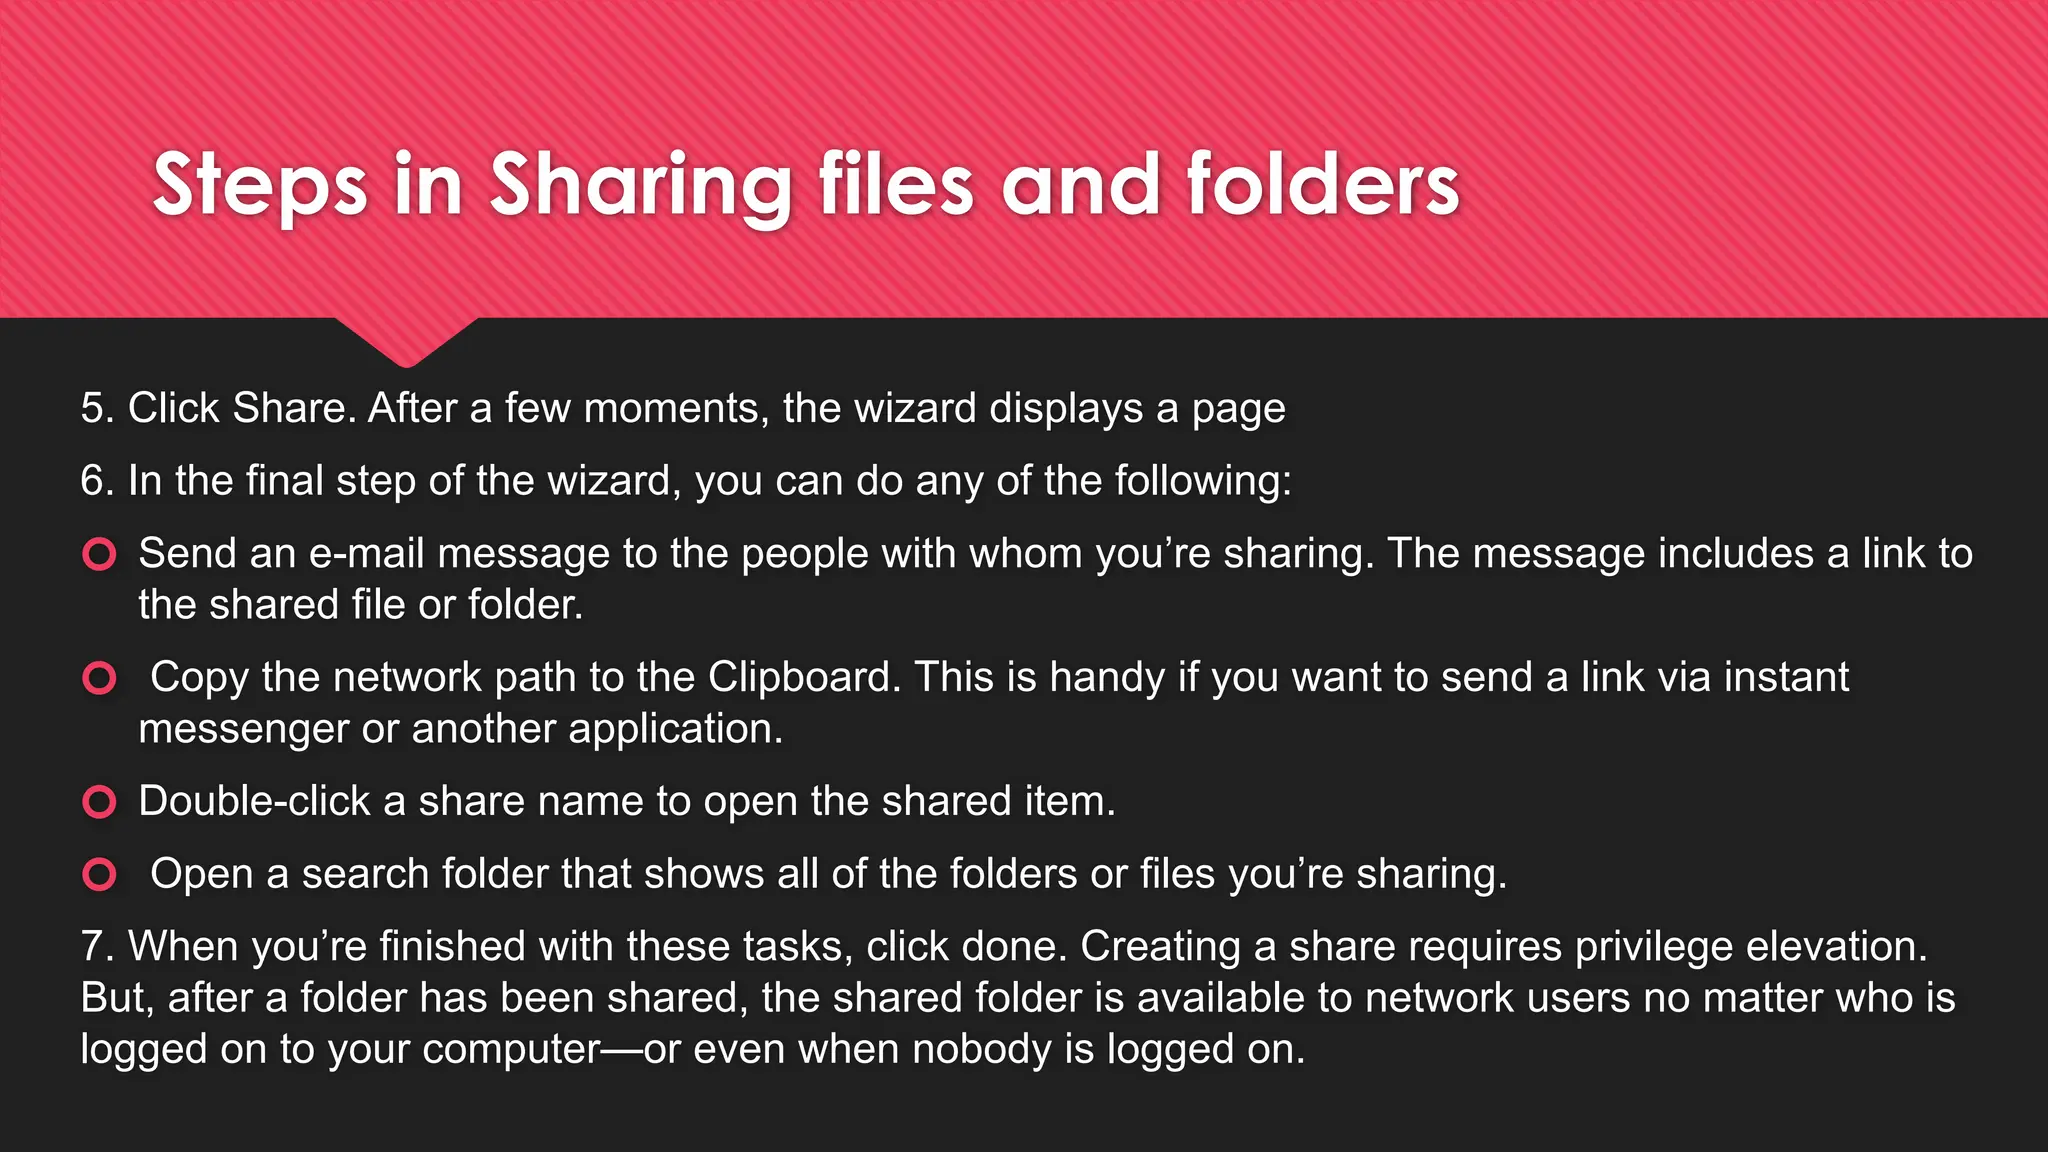
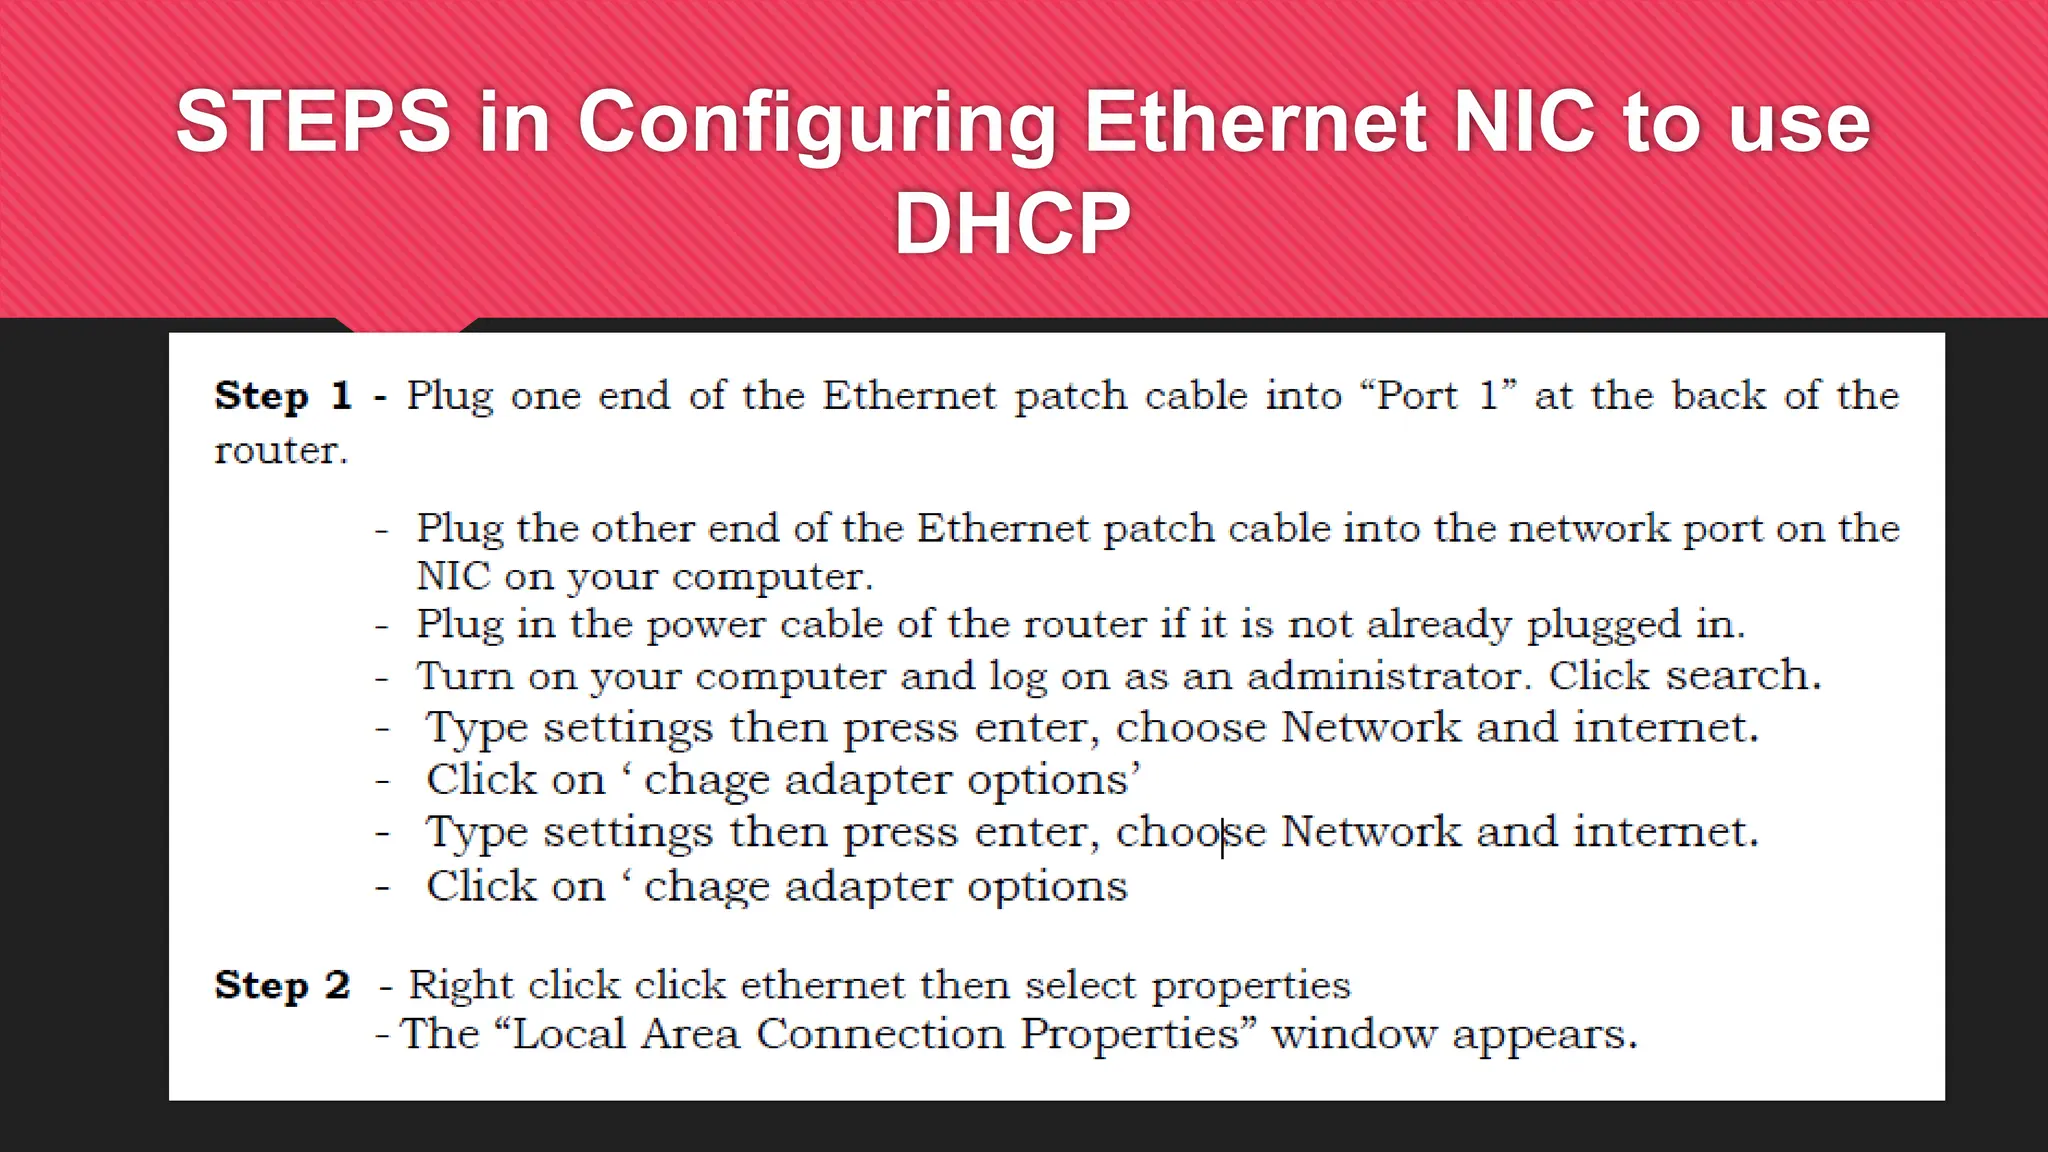
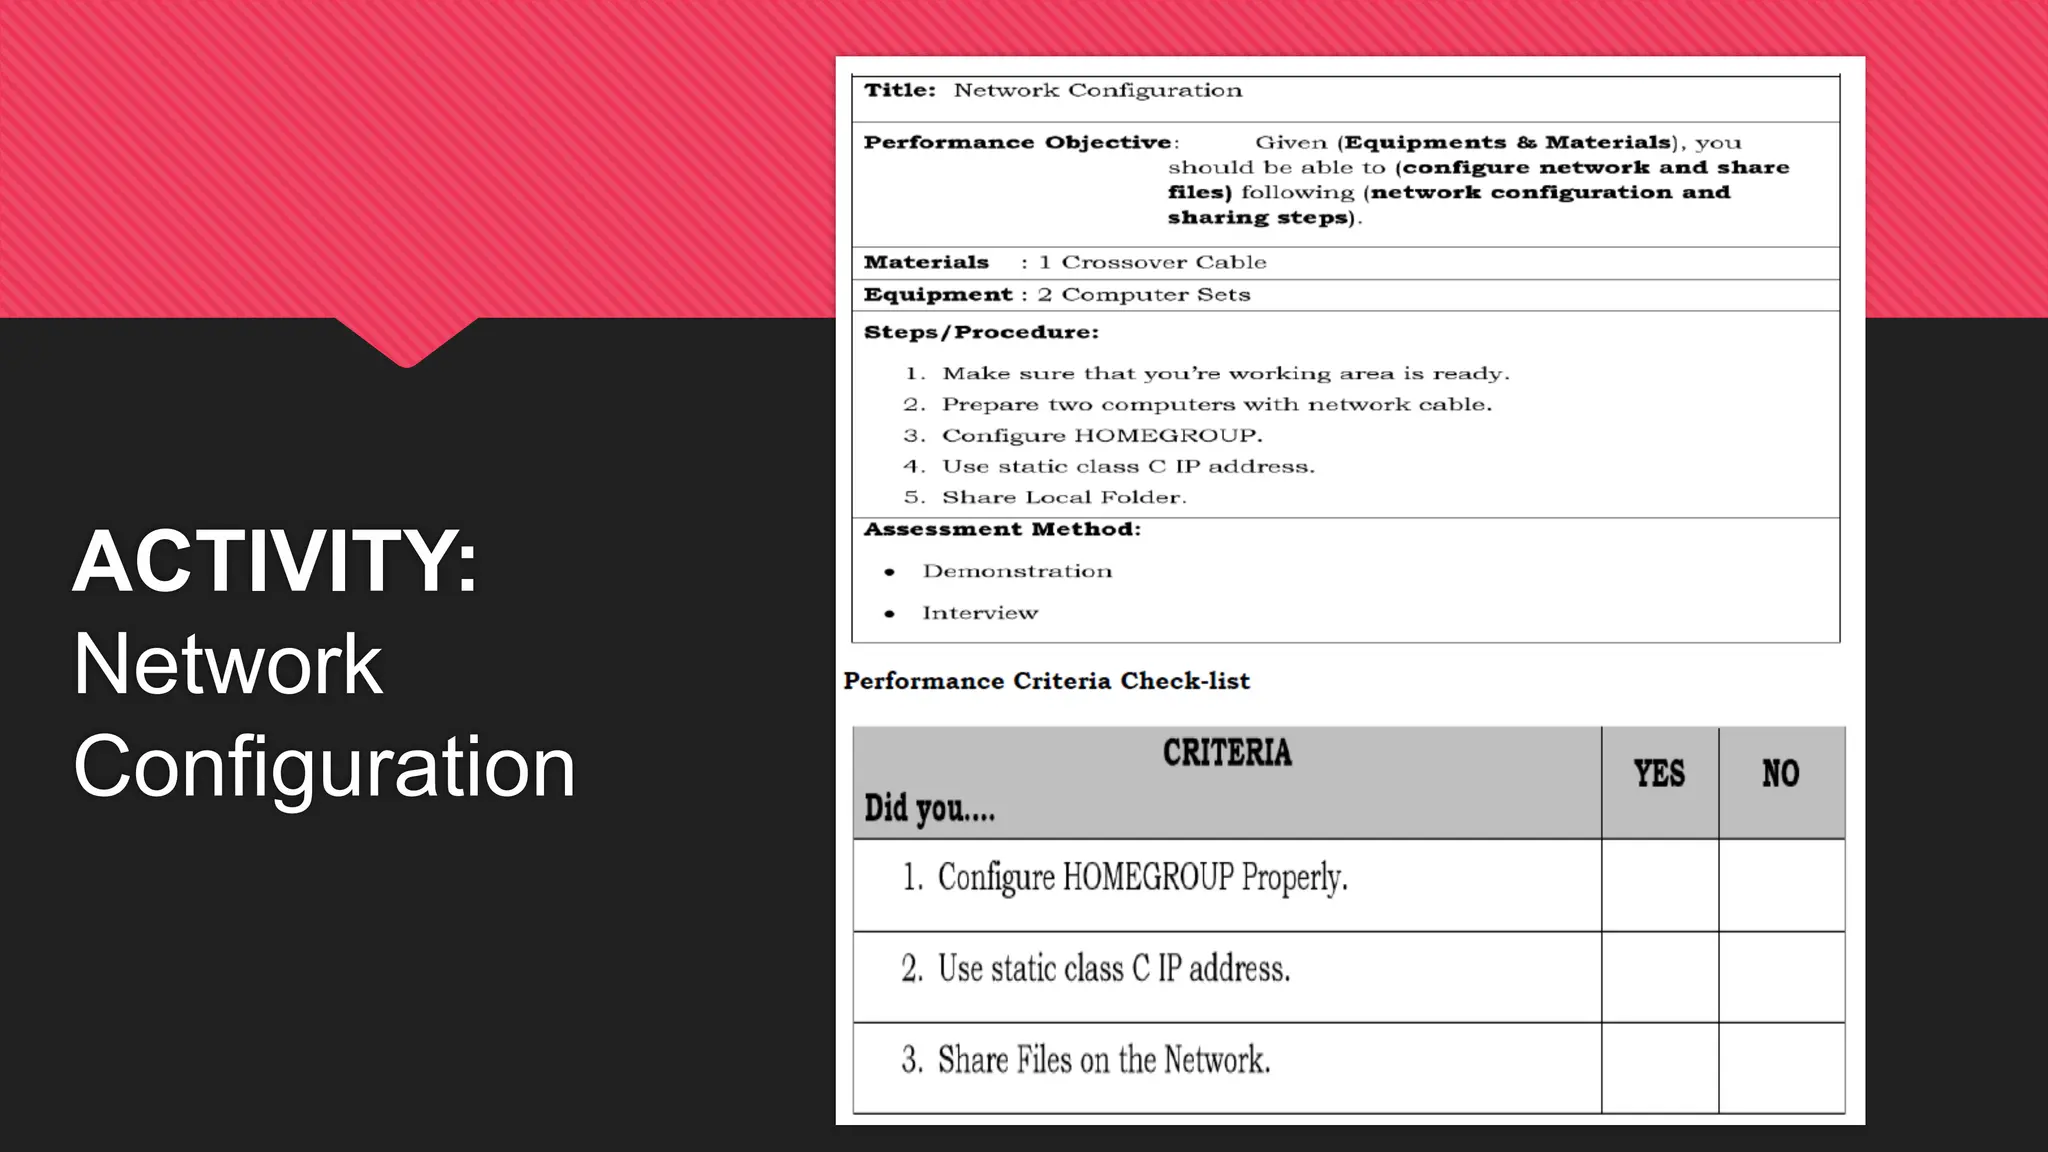
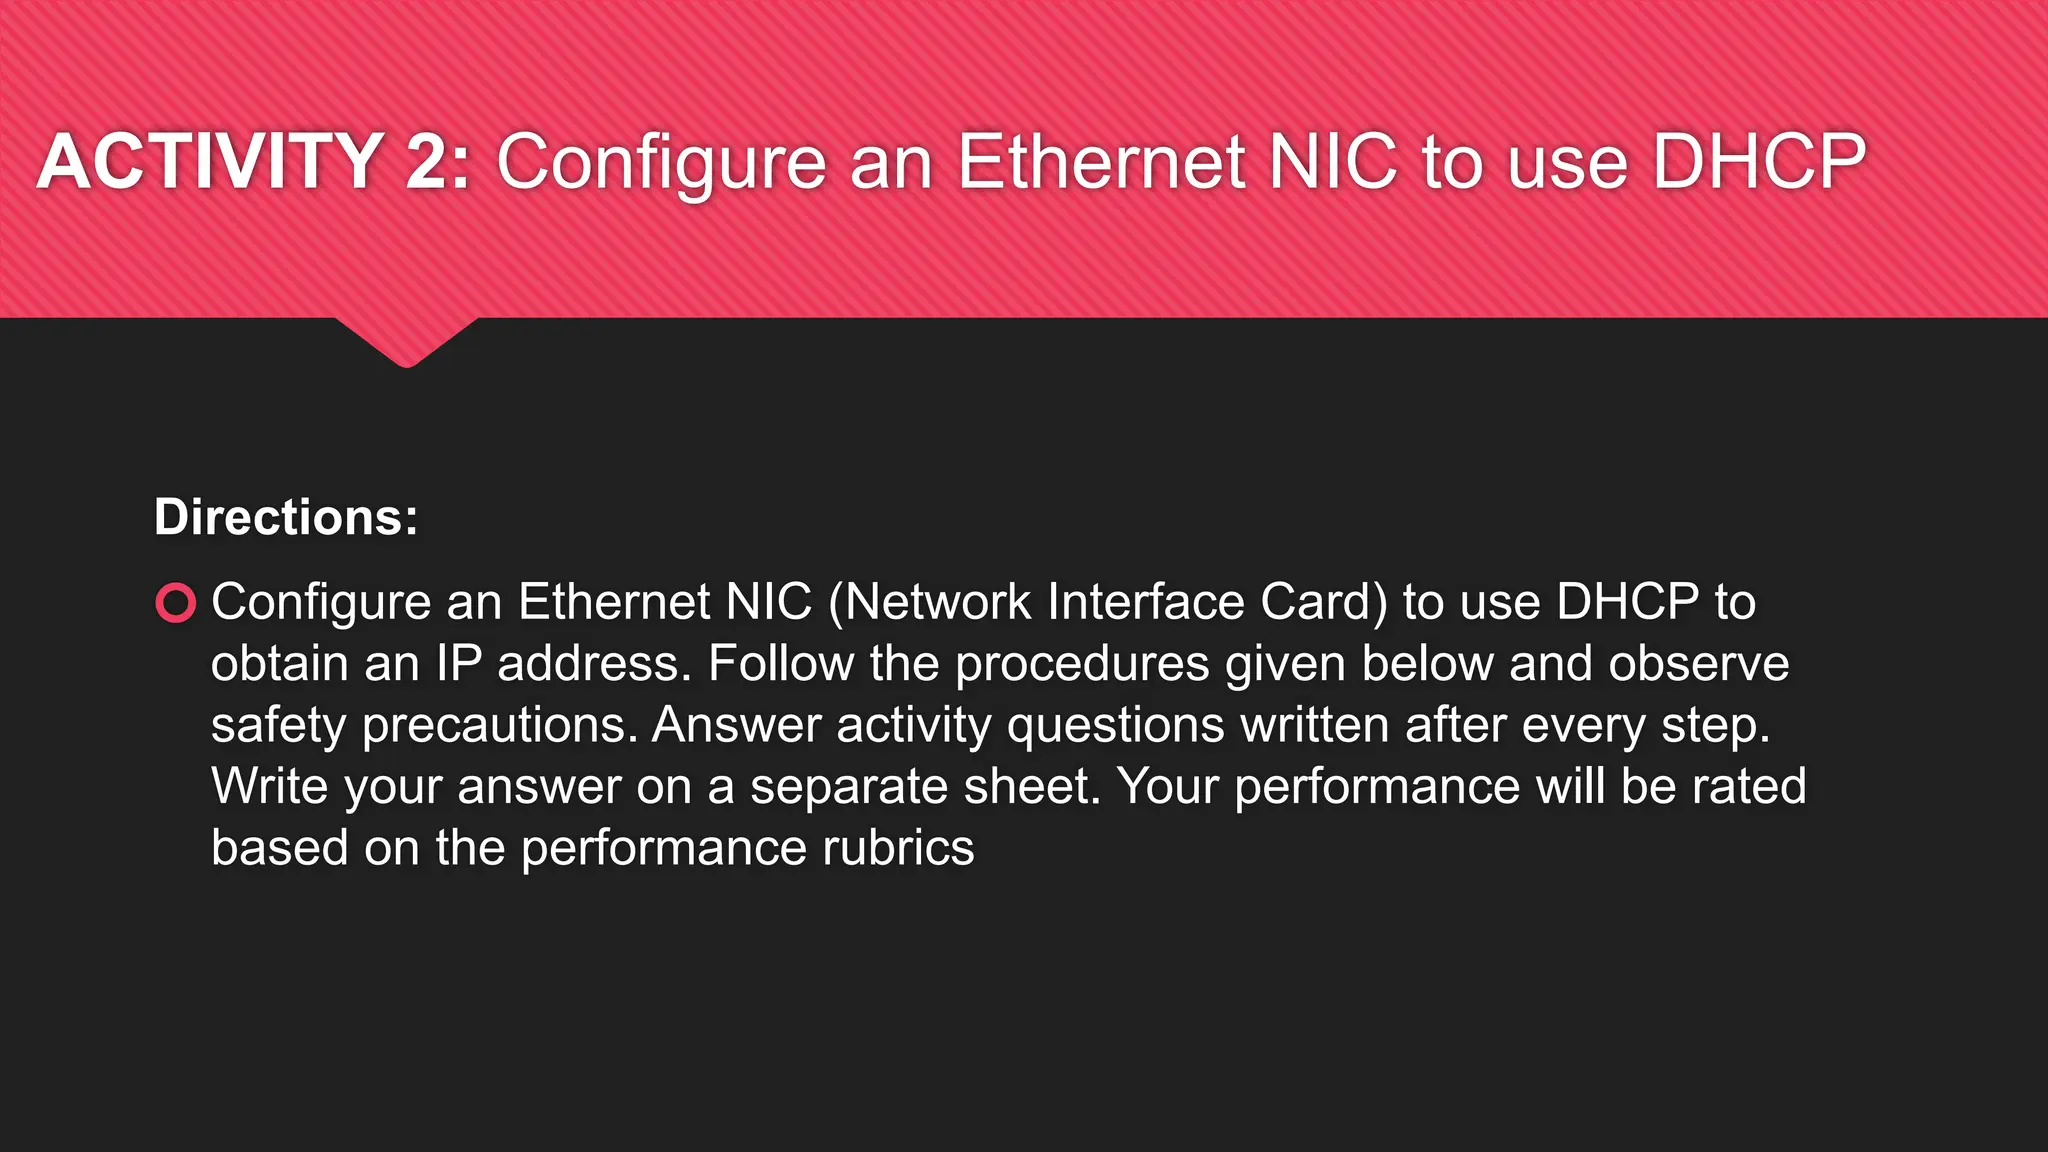
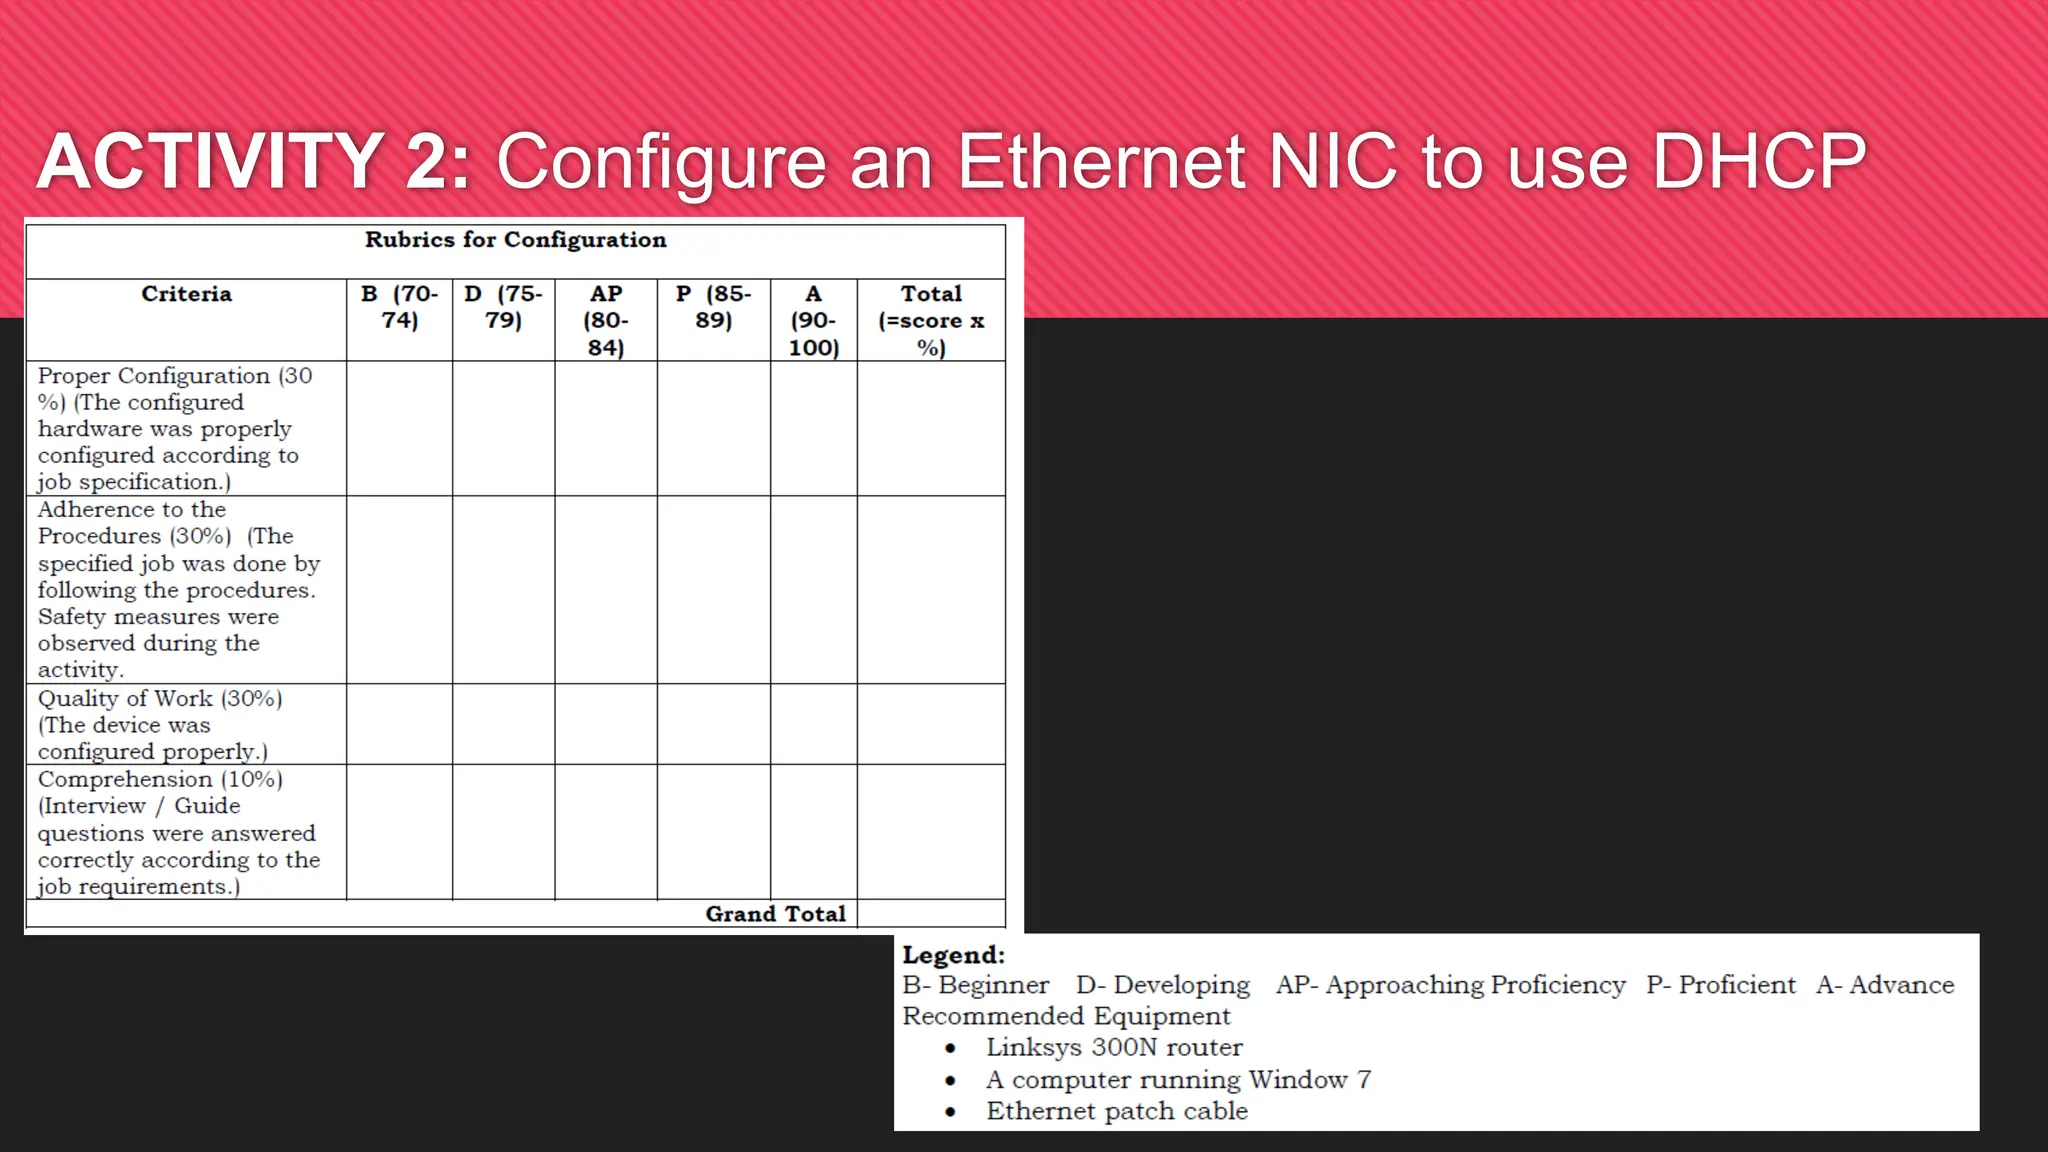
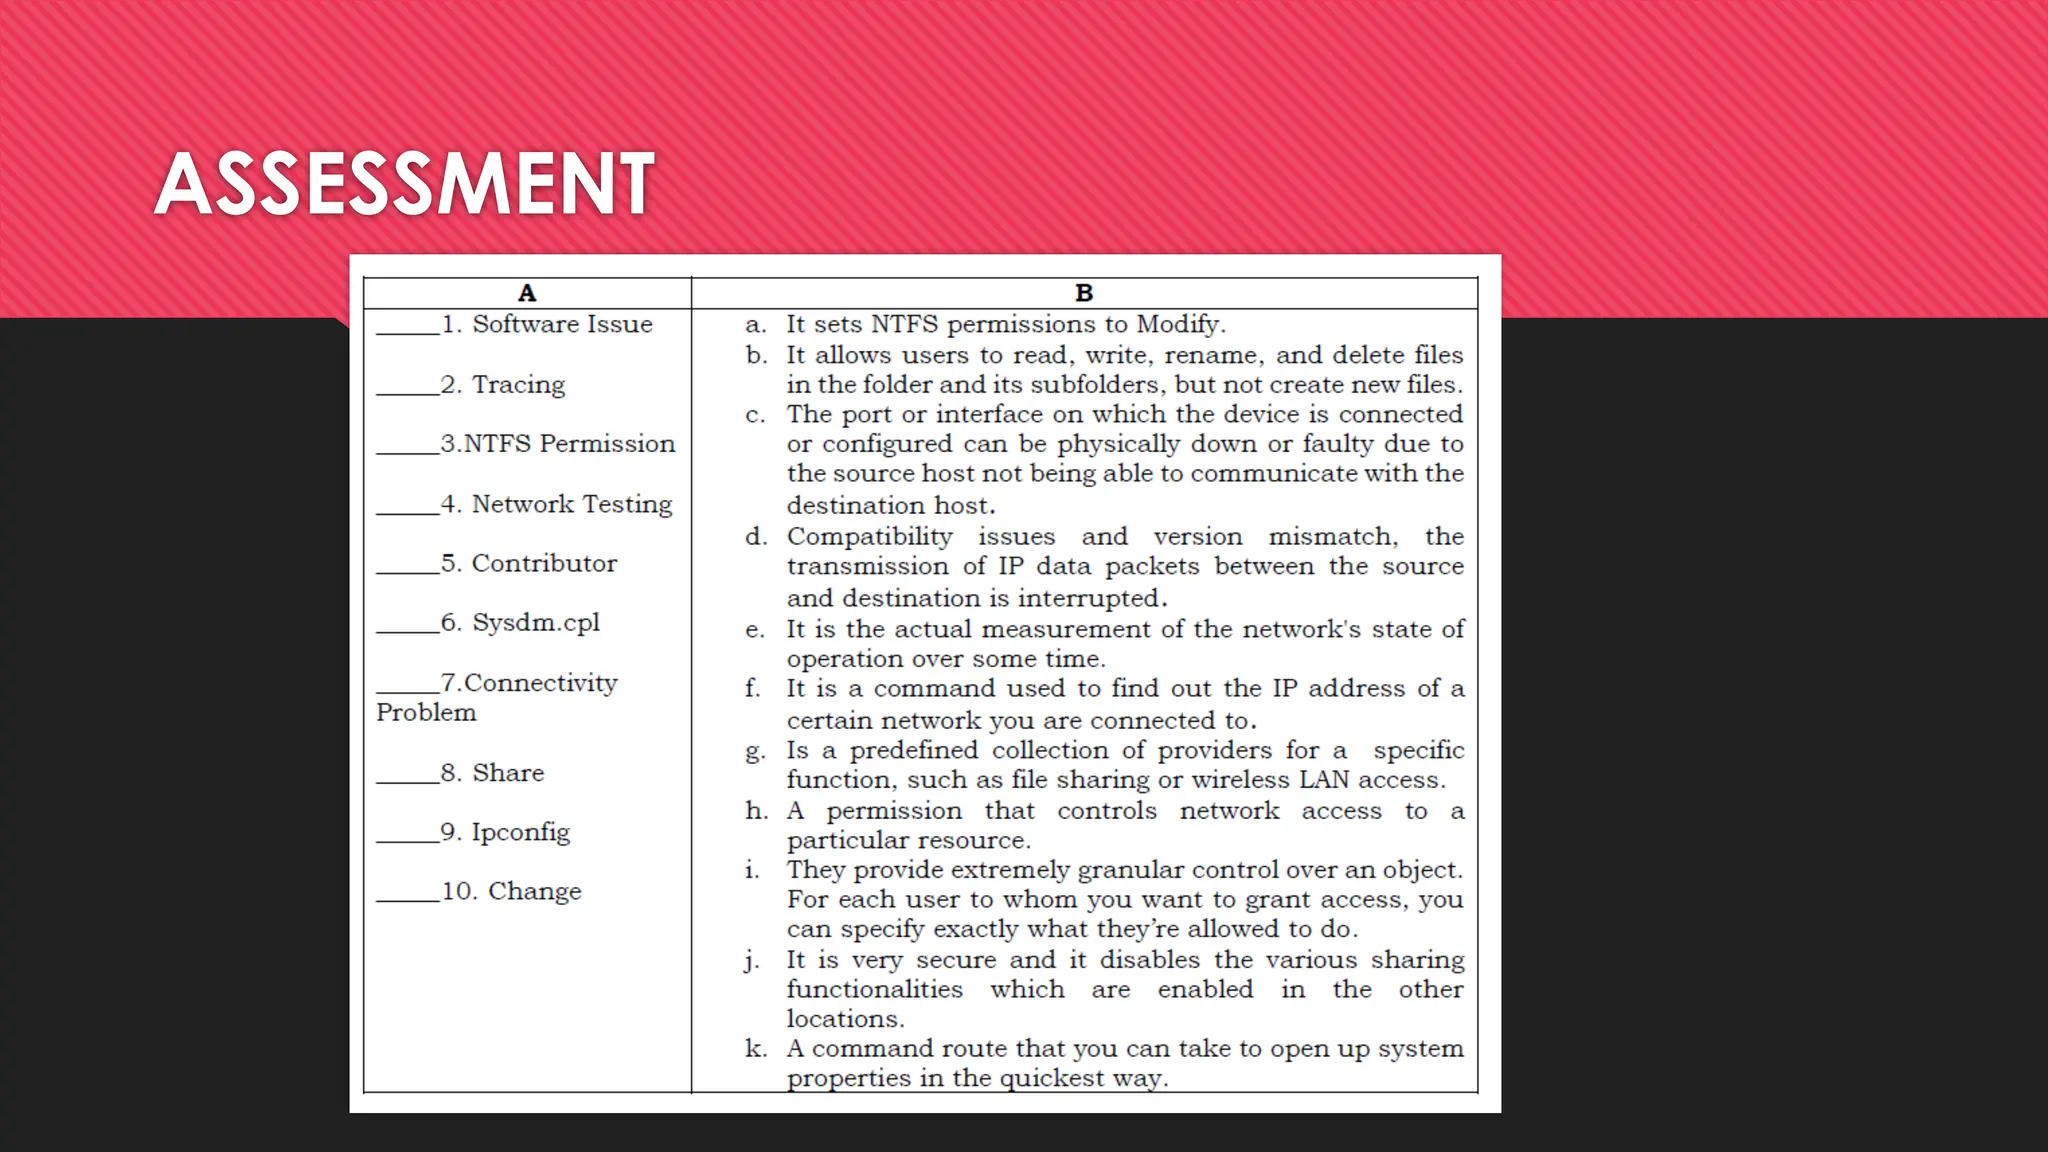
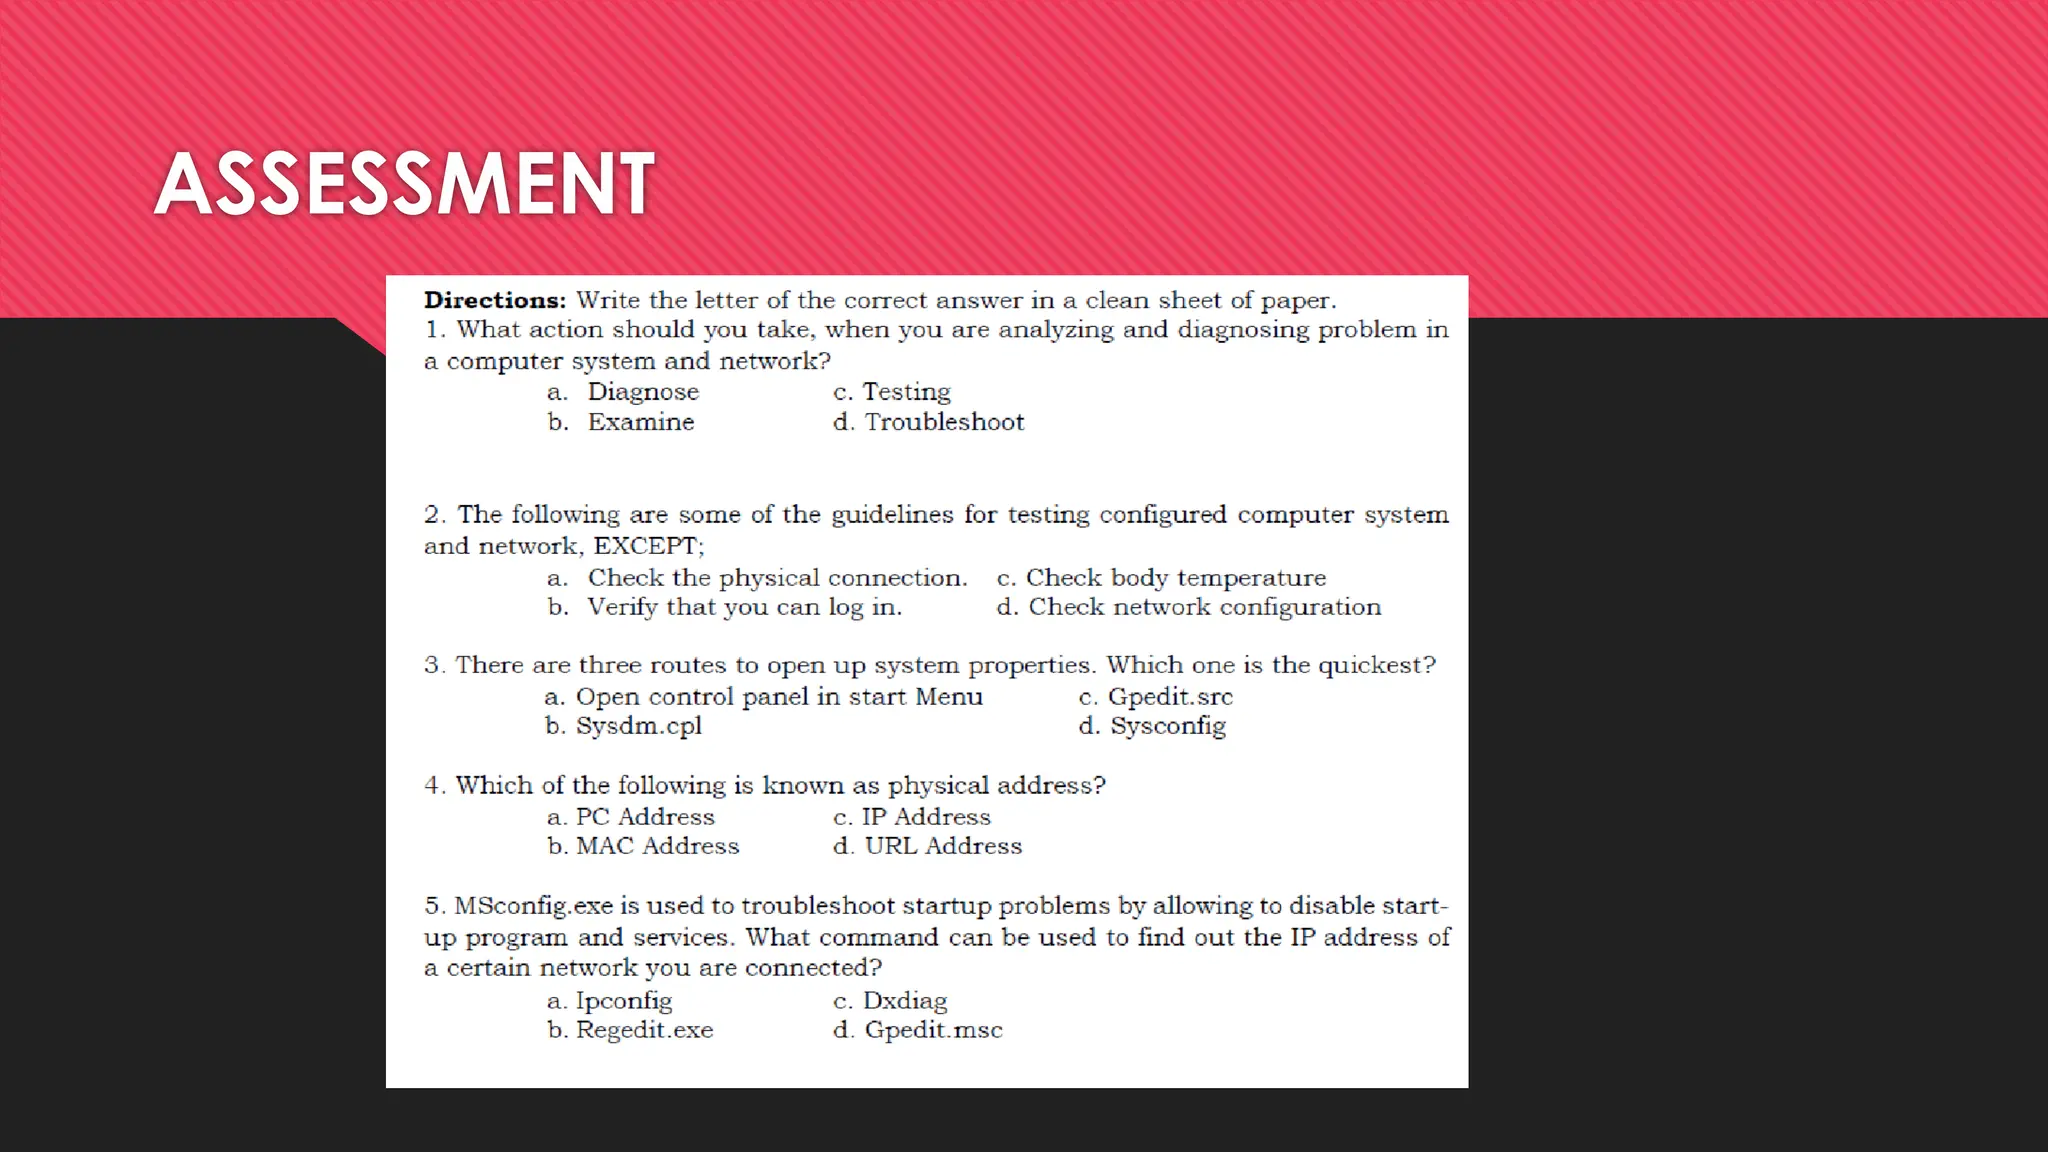
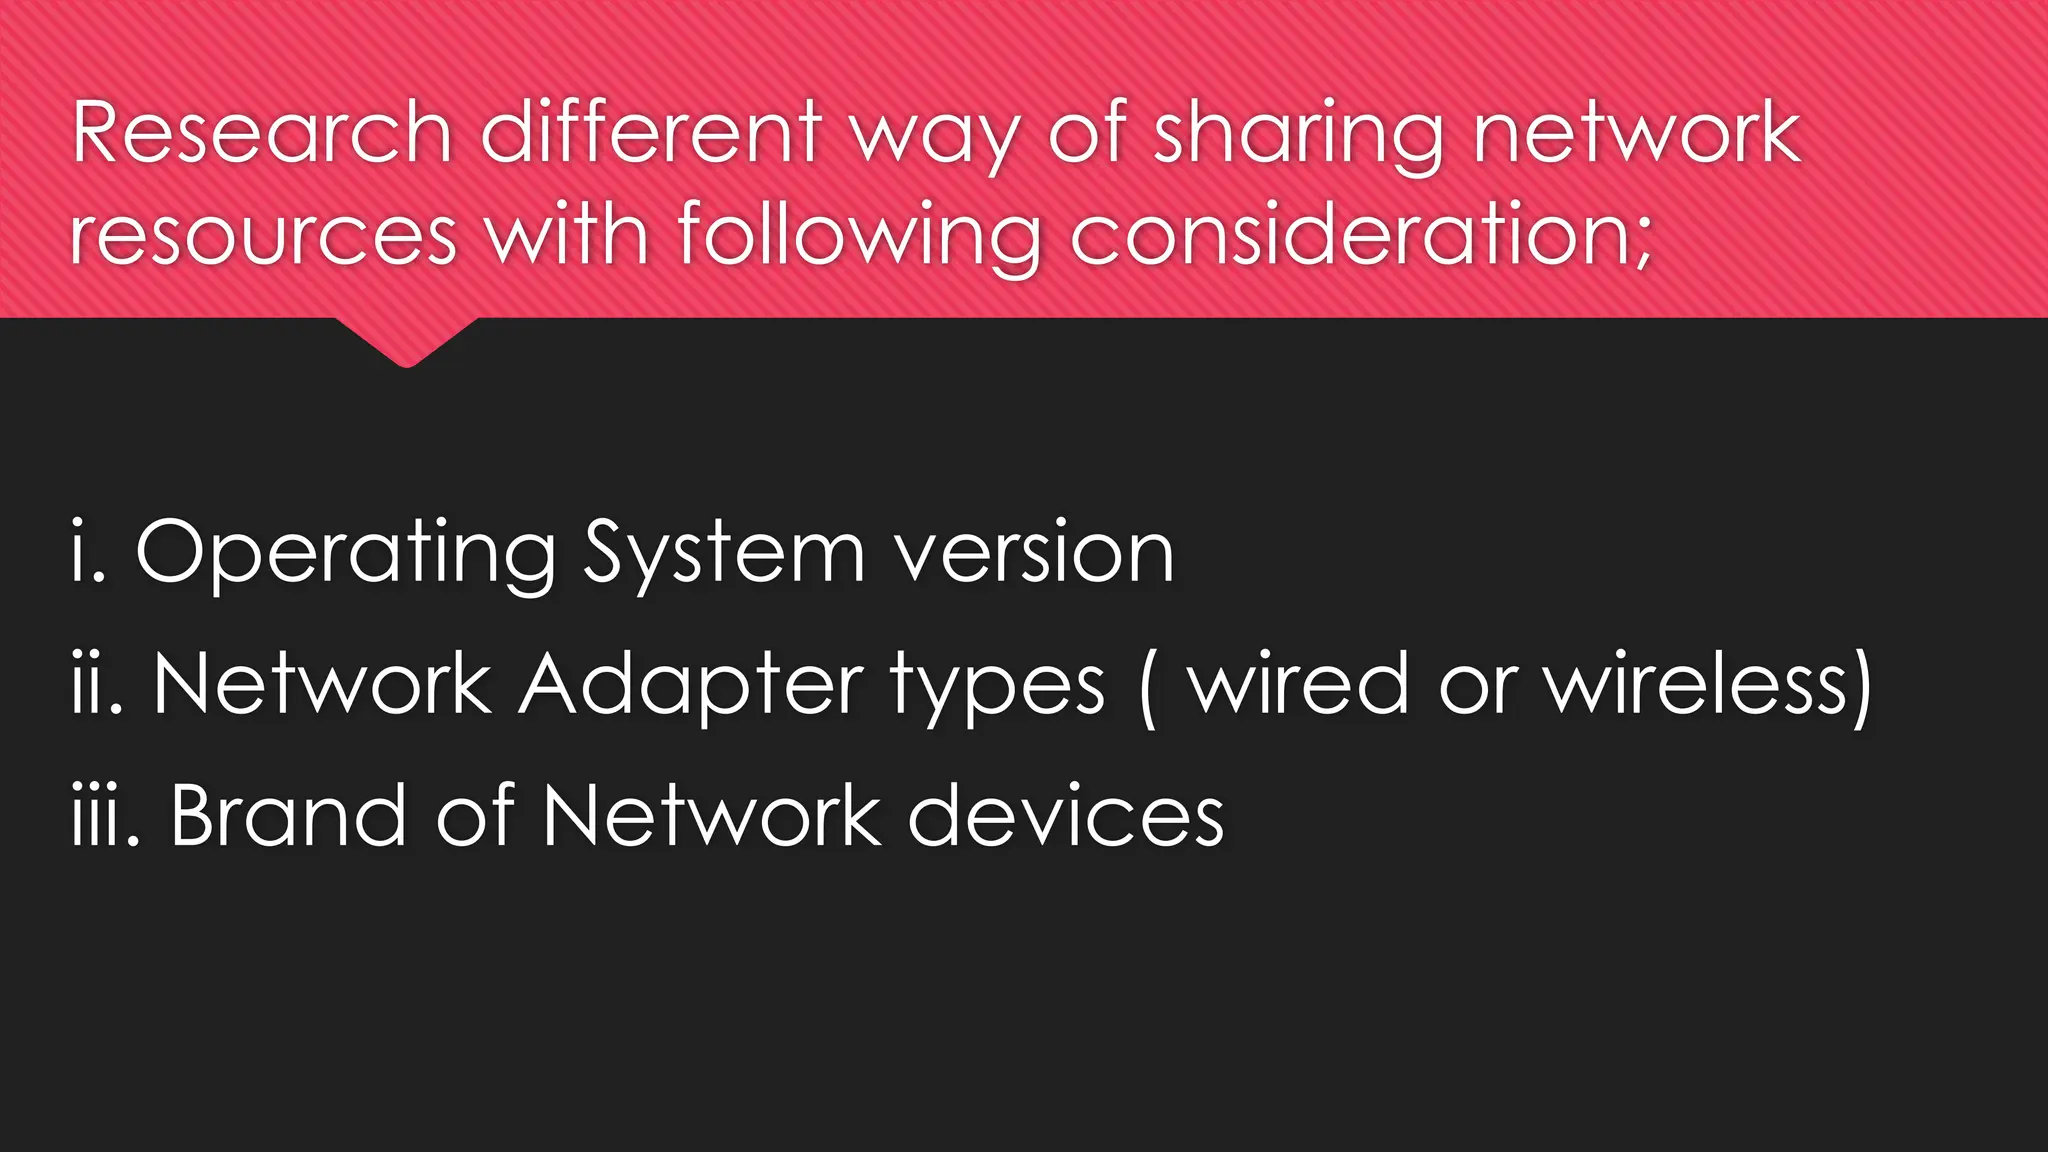
Set Network Configuration
(Configure an Ethernet NIC to use DHCP, ipconfig command, Share
files and folders over the network)
BY: Sir Lau
Ipconfig
is a command used to find out the IP address
of a certain network you are connected to.
How to use the ipconfig command?
1) Click on Start Button, then type cmd
(command prompt) on the search box.
2) Type ipconfig and press enter. The
figure below shows the IP
configuration window using the
ipconfig command.
Share files and folders over the network
Sharing files with public folders
🞆 To share items in your Public folder and its subfolders with other users of your computer, you don’t
need to do a thing. By default, all users with an account on your computer can log on and create,
view, modify, and delete files in the Public folders.
Sharing files and folders from any folder
🞆 Whether you plan to share files and folders with other people who share your computer or with
those who connect to your computer over the network (or both), the process for setting up shared
resources is the same as long as the Sharing Wizard is enabled.
🞆 To make sure the Sharing Wizard is enabled, click the Start button, type “folder” in the Search box,
and then click Folder Options. Click the View tab. In the Advanced settings box, scroll down the list
and make sure the Use Sharing Wizard (Recommended) check box is selected.
Steps in Sharing files and folders
1. In Windows Explorer, select the folders or files you want to share. (You can select
multiple objects.)
2. In the Command bar, click Share. (Alternatively, right-click, and then click Share.)
3. With the Sharing Wizard, it’s quick and easy to share files with other people.
4. In the file sharing box, enter the name of the user with whom you want to share
files or folders, and then click Add. You can type a name in the box or click the arrow
to display a list of available names. Repeat for each person you want to add. The list
includes all of the users who have an account on your computer, plus everyone.
Steps in Sharing files and folders
For each user, select a permission level. Your choices are:
🞆 Reader Users with this permission level can view shared files and run shared programs, but
cannot change or delete files. Selecting. Reader in the Sharing Wizard is equivalent to setting
NTFS permissions to Read & Execute.
🞆 Contributor This permission level, which is available only for shared folders (not shared files),
allows the user to view all files, add files, and change or delete files that the user adds. Selecting.
Contributor sets NTFS permissions to Modify.
🞆 Co-owner Users who are assigned the Co-owner permission have the same privileges that you
do as the Owner: They can view, change, add, and delete files in a shared folder. Selecting. Co-
owner sets NTFS permissions to Full Control for this user.
Steps in Sharing files and folders
5. Click Share. After a few moments, the wizard displays a page
6. In the final step of the wizard, you can do any of the following:
🞆 Send an e-mail message to the people with whom you’re sharing. The message includes a link to
the shared file or folder.
🞆 Copy the network path to the Clipboard. This is handy if you want to send a link via instant
messenger or another application.
🞆 Double-click a share name to open the shared item.
🞆 Open a search folder that shows all of the folders or files you’re sharing.
7. When you’re finished with these tasks, click done. Creating a share requires privilege elevation.
But, after a folder has been shared, the shared folder is available to network users no matter who is
logged on to your computer—or even when nobody is logged on.
STEPS in Configuring Ethernet NIC to use
DHCP
STEPS in Configuring Ethernet NIC to use
DHCP
ACTIVITY:
Network
Configuration
ACTIVITY 2: Configure an Ethernet NIC to use DHCP
Directions:
🞆 Configure an Ethernet NIC (Network Interface Card) to use DHCP to
obtain an IP address. Follow the procedures given below and observe
safety precautions. Answer activity questions written after every step.
Write your answer on a separate sheet. Your performance will be rated
based on the performance rubrics
ACTIVITY 2: Configure an Ethernet NIC to use DHCP
Activity Questions:
1. What is the name and model number of the NIC in the “Connect using:” field?
2. What are the items listed in the “This connection uses the following items:” field?
3. What is the IP address and subnet mask of the “Ethernet Adapter’’
4. What is the IP address of the DHCP server?
ASSESSMENT
ASSESSMENT
Research different way of sharing network
resources with following consideration;
i. Operating System version
ii. Network Adapter types ( wired or wireless)
iii. Brand of Network devices

LESSON 6 - File Sharing Files for IT.pptx

  • 1.
    Set Network Configuration (Configurean Ethernet NIC to use DHCP, ipconfig command, Share files and folders over the network) BY: Sir Lau
  • 2.
    Ipconfig is a commandused to find out the IP address of a certain network you are connected to.
  • 3.
    How to usethe ipconfig command? 1) Click on Start Button, then type cmd (command prompt) on the search box. 2) Type ipconfig and press enter. The figure below shows the IP configuration window using the ipconfig command.
  • 4.
    Share files andfolders over the network Sharing files with public folders 🞆 To share items in your Public folder and its subfolders with other users of your computer, you don’t need to do a thing. By default, all users with an account on your computer can log on and create, view, modify, and delete files in the Public folders. Sharing files and folders from any folder 🞆 Whether you plan to share files and folders with other people who share your computer or with those who connect to your computer over the network (or both), the process for setting up shared resources is the same as long as the Sharing Wizard is enabled. 🞆 To make sure the Sharing Wizard is enabled, click the Start button, type “folder” in the Search box, and then click Folder Options. Click the View tab. In the Advanced settings box, scroll down the list and make sure the Use Sharing Wizard (Recommended) check box is selected.
  • 5.
    Steps in Sharingfiles and folders 1. In Windows Explorer, select the folders or files you want to share. (You can select multiple objects.) 2. In the Command bar, click Share. (Alternatively, right-click, and then click Share.) 3. With the Sharing Wizard, it’s quick and easy to share files with other people. 4. In the file sharing box, enter the name of the user with whom you want to share files or folders, and then click Add. You can type a name in the box or click the arrow to display a list of available names. Repeat for each person you want to add. The list includes all of the users who have an account on your computer, plus everyone.
  • 6.
    Steps in Sharingfiles and folders For each user, select a permission level. Your choices are: 🞆 Reader Users with this permission level can view shared files and run shared programs, but cannot change or delete files. Selecting. Reader in the Sharing Wizard is equivalent to setting NTFS permissions to Read & Execute. 🞆 Contributor This permission level, which is available only for shared folders (not shared files), allows the user to view all files, add files, and change or delete files that the user adds. Selecting. Contributor sets NTFS permissions to Modify. 🞆 Co-owner Users who are assigned the Co-owner permission have the same privileges that you do as the Owner: They can view, change, add, and delete files in a shared folder. Selecting. Co- owner sets NTFS permissions to Full Control for this user.
  • 7.
    Steps in Sharingfiles and folders 5. Click Share. After a few moments, the wizard displays a page 6. In the final step of the wizard, you can do any of the following: 🞆 Send an e-mail message to the people with whom you’re sharing. The message includes a link to the shared file or folder. 🞆 Copy the network path to the Clipboard. This is handy if you want to send a link via instant messenger or another application. 🞆 Double-click a share name to open the shared item. 🞆 Open a search folder that shows all of the folders or files you’re sharing. 7. When you’re finished with these tasks, click done. Creating a share requires privilege elevation. But, after a folder has been shared, the shared folder is available to network users no matter who is logged on to your computer—or even when nobody is logged on.
  • 8.
    STEPS in ConfiguringEthernet NIC to use DHCP
  • 9.
    STEPS in ConfiguringEthernet NIC to use DHCP
  • 10.
  • 11.
    ACTIVITY 2: Configurean Ethernet NIC to use DHCP Directions: 🞆 Configure an Ethernet NIC (Network Interface Card) to use DHCP to obtain an IP address. Follow the procedures given below and observe safety precautions. Answer activity questions written after every step. Write your answer on a separate sheet. Your performance will be rated based on the performance rubrics
  • 12.
    ACTIVITY 2: Configurean Ethernet NIC to use DHCP
  • 13.
    Activity Questions: 1. Whatis the name and model number of the NIC in the “Connect using:” field? 2. What are the items listed in the “This connection uses the following items:” field? 3. What is the IP address and subnet mask of the “Ethernet Adapter’’ 4. What is the IP address of the DHCP server?
  • 14.
  • 15.
  • 16.
    Research different wayof sharing network resources with following consideration; i. Operating System version ii. Network Adapter types ( wired or wireless) iii. Brand of Network devices

Editor's Notes

  • #14  1.D 2.G 3.I 4.E 5.A 6.K 7.C 8.H 9.F 10.B
  • #15  1. D 2. C 3. B 4. B 5. A