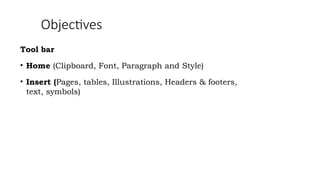
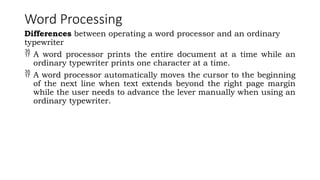
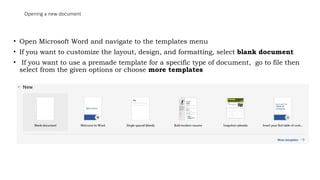
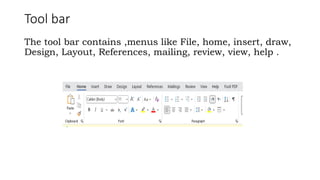
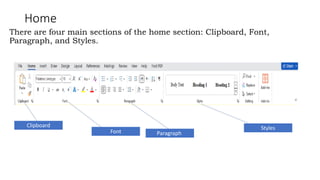
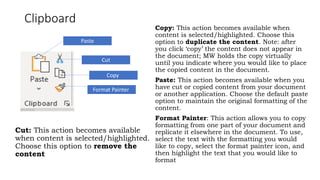
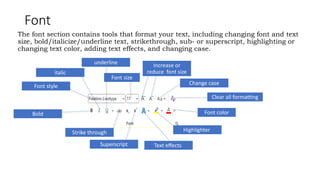
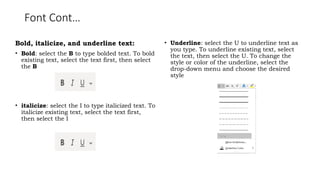
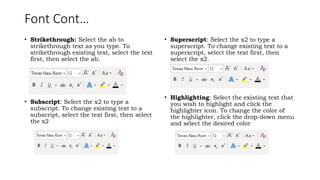
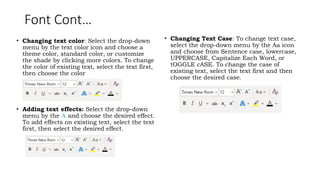
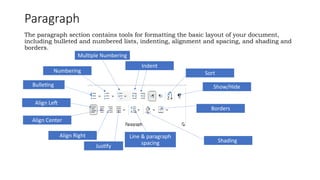
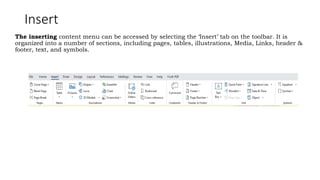
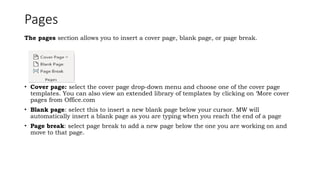
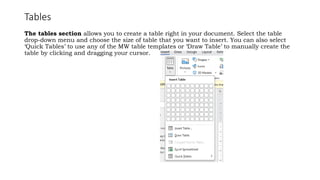
Computer Applications
practical
Microsoft Word processing
Objectives
Tool bar
• Home (Clipboard, Font, Paragraph and Style)
• Insert (Pages, tables, Illustrations, Headers & footers,
text, symbols)
Word Processing
Word processing software, also known as a word processor, is used
to create, edit, format, save and print documents that contain text and
graphics.
Examples of word processing documents include letters, memos,
reports, mailing labels, and newsletters.
Advantages of word processing software over ordinary typewriter include
 Easy and fast to make changes to the document.
 Has many features to create documents that look professional and visually
appealing.
 Documents can normally be previewed before being printed.
 Documents can be saved for future use and editing.
 Convenient to create form letters and mailing labels.
Word Processing
Differences between operating a word processor and an ordinary
typewriter
 A word processor prints the entire document at a time while an
ordinary typewriter prints one character at a time.
 A word processor automatically moves the cursor to the beginning
of the next line when text extends beyond the right page margin
while the user needs to advance the lever manually when using an
ordinary typewriter.
Opening a new document
• Open Microsoft Word and navigate to the templates menu
• If you want to customize the layout, design, and formatting, select blank document
• If you want to use a premade template for a specific type of document, go to file then
select from the given options or choose more templates
Tool bar
The tool bar contains ,menus like File, home, insert, draw,
Design, Layout, References, mailing, review, view, help .
Home
There are four main sections of the home section: Clipboard, Font,
Paragraph, and Styles.
Font
Clipboard Styles
Paragraph
Clipboard
Cut: This action becomes available
when content is selected/highlighted.
Choose this option to remove the
content
Copy: This action becomes available when
content is selected/highlighted. Choose this
option to duplicate the content. Note: after
you click ‘copy’ the content does not appear in
the document; MW holds the copy virtually
until you indicate where you would like to place
the copied content in the document.
Paste: This action becomes available when you
have cut or copied content from your document
or another application. Choose the default paste
option to maintain the original formatting of the
content.
Format Painter: This action allows you to copy
formatting from one part of your document and
replicate it elsewhere in the document. To use,
select the text with the formatting you would
like to copy, select the format painter icon, and
then highlight the text that you would like to
format
Paste
Cut
Copy
Format Painter
Font
The font section contains tools that format your text, including changing font and text
size, bold/italicize/underline text, strikethrough, sub- or superscript, highlighting or
changing text color, adding text effects, and changing case.
underline
Strike through
Superscript Text effects
Highlighter
Font color
Font style
Bold
italic
Font size
Increase or
reduce font size
Clear all formatting
Change case
Font Cont…
Changing font style text size.
Click the left-hand drop-down menu to
change the font. Scroll to view all available
fonts and click to select your choice. To
change the font of existing text, highlight
the text first, then click the drop-down
menu and select the desired font.
Changing text size
Click the right-hand drop-down menu to
change the text size. Select the desired size,
or click in the text box to manually type a
specific size. You can also use the icons to
the right of the text box to either increase
text size (A^ ) or decrease text size (A ). To

edit existing text, select the text before
changing the size.
Font style
Font size
Font Cont…
Bold, italicize, and underline text:
• Bold: select the B to type bolded text. To bold
existing text, select the text first, then select
the B
• italicize: select the I to type italicized text. To
italicize existing text, select the text first,
then select the I
• Underline: select the U to underline text as
you type. To underline existing text, select
the text, then select the U. To change the
style or color of the underline, select the
drop-down menu and choose the desired
style
Font Cont…
• Strikethrough: Select the ab to
strikethrough text as you type. To
strikethrough existing text, select the text
first, then select the ab.
• Subscript: Select the x2 to type a
subscript. To change existing text to a
subscript, select the text first, then select
the x2
• Superscript: Select the x2 to type a
superscript. To change existing text to a
superscript, select the text first, then
select the x2.
• Highlighting: Select the existing text that
you wish to highlight and click the
highlighter icon. To change the color of
the highlighter, click the drop-down menu
and select the desired color
Font Cont…
• Changing text color: Select the drop-down
menu by the text color icon and choose a
theme color, standard color, or customize
the shade by clicking more colors. To change
the color of existing text, select the text first,
then choose the color
• Adding text effects: Select the drop-down
menu by the A and choose the desired effect.
To add effects on existing text, select the text
first, then select the desired effect.
• Changing Text Case: To change text case,
select the drop-down menu by the Aa icon
and choose from Sentence case, lowercase,
UPPERCASE, Capitalize Each Word, or
tOGGLE cASE. To change the case of
existing text, select the text first and then
choose the desired case.
Paragraph
The paragraph section contains tools for formatting the basic layout of your document,
including bulleted and numbered lists, indenting, alignment and spacing, and shading and
borders.
Borders
Align Left
Indent
Multiple Numbering
Numbering
Bulleting
Sort
Show/Hide
Align Center
Align Right
Justify
Line & paragraph
spacing Shading
Paragraph Cont…
Bulleted and numbered lists.
To start a bulleted or numbered list, click the
corresponding icon. Use the drop-down menu
to change the shape of the bullet or the style of
numbering. To indent underneath one of the
points in the list, hit ‘enter’ to create a new
bullet and then hit ‘tab’. To create a list out of
existing content, select all of the content and
then click the icon of the list you want to
create
Paragraph Cont…
Indenting .To change the indent of your
paragraph, or how far it is from the edge
of the paper, place your cursor to the left
of the text, then select either the
‘decrease indent’ or ‘increase indent’
icons.
Decrease indent increases indent
• Alignment. There are four alignment options
in MW: left, center, right, and justify. Left- and
right-align will align content with their
respective margins. The center alignment will
center content on the page. The justify
alignment evenly distributes the text between
the margins. To set alignment, click the
corresponding icon. To change alignment of
existing content, select the content first, then
click the icon.
Align Left
Align Center
Align Right Justify
Paragraph Cont…
Text spacing. To change text spacing, select
the drop-down menu by the spacing icon. Then,
choose the preset spacing you want, or select
‘Line Spacing Options…’ to customize the
spacing. There is also the option to ‘add/remove
space after paragraph’. Selecting this option will
change how much space is automatically added
when pressing the enter button to create a new
line.
Shading. Shading is similar to highlighting,
but offers a wider range of colors. To shade
your content, select the drop-down menu by
the paint bucket icon and choose a color. To
shade pre-existing content, select the
content first, then choose a color.
Paragraph Cont…
Borders. Use the border feature to add an outline to your content. Select the drop-down
menu by the grid icon and choose which borders you want to apply to your content. To add
borders on pre-existing content, select the content first, then choose the border you want.
Select ‘Borders and Shading…’ from the drop-down menu to change the style, color, or
weight of the borders.
Styles
The styles section contains preset formatting options that can be applied to your document
overall. Open the drop-down menu to view all available presets, or select ‘Create a Style’ to
save your current formatting to the Styles library.
Insert
The inserting content menu can be accessed by selecting the ‘Insert’ tab on the toolbar. It is
organized into a number of sections, including pages, tables, illustrations, Media, Links, header &
footer, text, and symbols.
Pages
The pages section allows you to insert a cover page, blank page, or page break.
• Cover page: select the cover page drop-down menu and choose one of the cover page
templates. You can also view an extended library of templates by clicking on ‘More cover
pages from Office.com
• Blank page: select this to insert a new blank page below your cursor. MW will
automatically insert a blank page as you are typing when you reach the end of a page
• Page break: select page break to add a new page below the one you are working on and
move to that page.
Tables
The tables section allows you to create a table right in your document. Select the table
drop-down menu and choose the size of table that you want to insert. You can also select
‘Quick Tables’ to use any of the MW table templates or ‘Draw Table’ to manually create the
table by clicking and dragging your cursor.

Lecture notes, Microsoft word processing.pptx

  • 1.
  • 2.
    Objectives Tool bar • Home(Clipboard, Font, Paragraph and Style) • Insert (Pages, tables, Illustrations, Headers & footers, text, symbols)
  • 3.
    Word Processing Word processingsoftware, also known as a word processor, is used to create, edit, format, save and print documents that contain text and graphics. Examples of word processing documents include letters, memos, reports, mailing labels, and newsletters. Advantages of word processing software over ordinary typewriter include  Easy and fast to make changes to the document.  Has many features to create documents that look professional and visually appealing.  Documents can normally be previewed before being printed.  Documents can be saved for future use and editing.  Convenient to create form letters and mailing labels.
  • 4.
    Word Processing Differences betweenoperating a word processor and an ordinary typewriter  A word processor prints the entire document at a time while an ordinary typewriter prints one character at a time.  A word processor automatically moves the cursor to the beginning of the next line when text extends beyond the right page margin while the user needs to advance the lever manually when using an ordinary typewriter.
  • 5.
    Opening a newdocument • Open Microsoft Word and navigate to the templates menu • If you want to customize the layout, design, and formatting, select blank document • If you want to use a premade template for a specific type of document, go to file then select from the given options or choose more templates
  • 6.
    Tool bar The toolbar contains ,menus like File, home, insert, draw, Design, Layout, References, mailing, review, view, help .
  • 7.
    Home There are fourmain sections of the home section: Clipboard, Font, Paragraph, and Styles. Font Clipboard Styles Paragraph
  • 8.
    Clipboard Cut: This actionbecomes available when content is selected/highlighted. Choose this option to remove the content Copy: This action becomes available when content is selected/highlighted. Choose this option to duplicate the content. Note: after you click ‘copy’ the content does not appear in the document; MW holds the copy virtually until you indicate where you would like to place the copied content in the document. Paste: This action becomes available when you have cut or copied content from your document or another application. Choose the default paste option to maintain the original formatting of the content. Format Painter: This action allows you to copy formatting from one part of your document and replicate it elsewhere in the document. To use, select the text with the formatting you would like to copy, select the format painter icon, and then highlight the text that you would like to format Paste Cut Copy Format Painter
  • 9.
    Font The font sectioncontains tools that format your text, including changing font and text size, bold/italicize/underline text, strikethrough, sub- or superscript, highlighting or changing text color, adding text effects, and changing case. underline Strike through Superscript Text effects Highlighter Font color Font style Bold italic Font size Increase or reduce font size Clear all formatting Change case
  • 10.
    Font Cont… Changing fontstyle text size. Click the left-hand drop-down menu to change the font. Scroll to view all available fonts and click to select your choice. To change the font of existing text, highlight the text first, then click the drop-down menu and select the desired font. Changing text size Click the right-hand drop-down menu to change the text size. Select the desired size, or click in the text box to manually type a specific size. You can also use the icons to the right of the text box to either increase text size (A^ ) or decrease text size (A ). To  edit existing text, select the text before changing the size. Font style Font size
  • 11.
    Font Cont… Bold, italicize,and underline text: • Bold: select the B to type bolded text. To bold existing text, select the text first, then select the B • italicize: select the I to type italicized text. To italicize existing text, select the text first, then select the I • Underline: select the U to underline text as you type. To underline existing text, select the text, then select the U. To change the style or color of the underline, select the drop-down menu and choose the desired style
  • 12.
    Font Cont… • Strikethrough:Select the ab to strikethrough text as you type. To strikethrough existing text, select the text first, then select the ab. • Subscript: Select the x2 to type a subscript. To change existing text to a subscript, select the text first, then select the x2 • Superscript: Select the x2 to type a superscript. To change existing text to a superscript, select the text first, then select the x2. • Highlighting: Select the existing text that you wish to highlight and click the highlighter icon. To change the color of the highlighter, click the drop-down menu and select the desired color
  • 13.
    Font Cont… • Changingtext color: Select the drop-down menu by the text color icon and choose a theme color, standard color, or customize the shade by clicking more colors. To change the color of existing text, select the text first, then choose the color • Adding text effects: Select the drop-down menu by the A and choose the desired effect. To add effects on existing text, select the text first, then select the desired effect. • Changing Text Case: To change text case, select the drop-down menu by the Aa icon and choose from Sentence case, lowercase, UPPERCASE, Capitalize Each Word, or tOGGLE cASE. To change the case of existing text, select the text first and then choose the desired case.
  • 14.
    Paragraph The paragraph sectioncontains tools for formatting the basic layout of your document, including bulleted and numbered lists, indenting, alignment and spacing, and shading and borders. Borders Align Left Indent Multiple Numbering Numbering Bulleting Sort Show/Hide Align Center Align Right Justify Line & paragraph spacing Shading
  • 15.
    Paragraph Cont… Bulleted andnumbered lists. To start a bulleted or numbered list, click the corresponding icon. Use the drop-down menu to change the shape of the bullet or the style of numbering. To indent underneath one of the points in the list, hit ‘enter’ to create a new bullet and then hit ‘tab’. To create a list out of existing content, select all of the content and then click the icon of the list you want to create
  • 16.
    Paragraph Cont… Indenting .Tochange the indent of your paragraph, or how far it is from the edge of the paper, place your cursor to the left of the text, then select either the ‘decrease indent’ or ‘increase indent’ icons. Decrease indent increases indent • Alignment. There are four alignment options in MW: left, center, right, and justify. Left- and right-align will align content with their respective margins. The center alignment will center content on the page. The justify alignment evenly distributes the text between the margins. To set alignment, click the corresponding icon. To change alignment of existing content, select the content first, then click the icon. Align Left Align Center Align Right Justify
  • 17.
    Paragraph Cont… Text spacing.To change text spacing, select the drop-down menu by the spacing icon. Then, choose the preset spacing you want, or select ‘Line Spacing Options…’ to customize the spacing. There is also the option to ‘add/remove space after paragraph’. Selecting this option will change how much space is automatically added when pressing the enter button to create a new line. Shading. Shading is similar to highlighting, but offers a wider range of colors. To shade your content, select the drop-down menu by the paint bucket icon and choose a color. To shade pre-existing content, select the content first, then choose a color.
  • 18.
    Paragraph Cont… Borders. Usethe border feature to add an outline to your content. Select the drop-down menu by the grid icon and choose which borders you want to apply to your content. To add borders on pre-existing content, select the content first, then choose the border you want. Select ‘Borders and Shading…’ from the drop-down menu to change the style, color, or weight of the borders.
  • 19.
    Styles The styles sectioncontains preset formatting options that can be applied to your document overall. Open the drop-down menu to view all available presets, or select ‘Create a Style’ to save your current formatting to the Styles library.
  • 20.
    Insert The inserting contentmenu can be accessed by selecting the ‘Insert’ tab on the toolbar. It is organized into a number of sections, including pages, tables, illustrations, Media, Links, header & footer, text, and symbols.
  • 21.
    Pages The pages sectionallows you to insert a cover page, blank page, or page break. • Cover page: select the cover page drop-down menu and choose one of the cover page templates. You can also view an extended library of templates by clicking on ‘More cover pages from Office.com • Blank page: select this to insert a new blank page below your cursor. MW will automatically insert a blank page as you are typing when you reach the end of a page • Page break: select page break to add a new page below the one you are working on and move to that page.
  • 22.
    Tables The tables sectionallows you to create a table right in your document. Select the table drop-down menu and choose the size of table that you want to insert. You can also select ‘Quick Tables’ to use any of the MW table templates or ‘Draw Table’ to manually create the table by clicking and dragging your cursor.