Downloaded 909 times


![13
Engr. Abu Sayed, M.Sc in Textile Engineer, Email id- testleader9@gmail.com
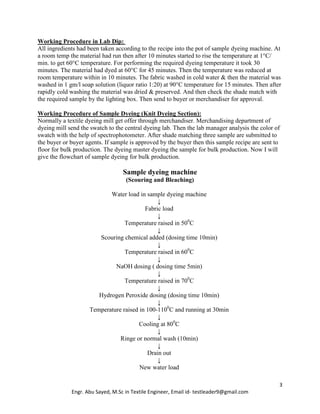
Processing Cycle for Yarn Dyeing:
Set the dye bath with soft water at ambient temperature and as per MLR
Enter the RFD (Ready For Dyeing) yarn in to the processing vessel.
Add Chemical [Code-1]. Circulate for 3 minutes (In -> Out) and hold for 10 minutes.
Drain.
Check pH. It should be 6 - 7. Check for channeling.
Fill cold water, add chemicals [Code-2], Circulate for 5 minutes (In -> Out) and hold for
10 minutes.
Raise temperature to 40°C and hold for 5 minutes.
Add dissolved dyestuff [Code-3] in 2 to 3 portions with Out -> In circulation at 40°C.
Raise temperature to 60°C @ 1.5°C/minute and hold for 15 minutes.
Add Chemicals [Code-4] in two parts with In->Out circulation and run for 45 minutes.
Check the sample and drain the dye bath.
Rinse at room temperature for 5 minutes and drain.
Give overflow rinse as per the dept of shade - 3 to 5 minutes.
Fill fresh water, add chemicals [Code-5] and hold for 5 minutes. Drain.
Fill hot water (60°C), add chemicals [Code-6] and circulate for 3 minutes.
Raise the temperature to 95°C and run for 15 minutes. Drain.
Rinse at 70°C for 10 minutes followed by 5 minutes overflow wash. Drain.
Fill fresh cold water, add chemicals [Code-7] & [Code-8] and circulate for 3 minutes,
hold for 15 minutes and then drain.
Fill Cold water, add chemicals [Code-9], circulate for 3 minutes and hold for 10 minutes.
Drain.
Unload the batch.
Notes on Dyeing:
For Shades above 7%, two soaping operations are necessary.
Dye fixing is optional but not a substitute for thorough washing.
Pressure difference during In->Out and Out ->In operations has to maintain a constant.
Package Dyeing Of Unmercerised Cotton Yarn With High Exhaust Reactive Dyes](https://image.slidesharecdn.com/labtips-150419040945-conversion-gate02/85/LABORATORY-CALCULATIONS-PROCEDRES-13-320.jpg)


![16
Engr. Abu Sayed, M.Sc in Textile Engineer, Email id- testleader9@gmail.com
but general formula is 6:1 salt: soda, if used
power soda then 3:1]
Soda – X g/L
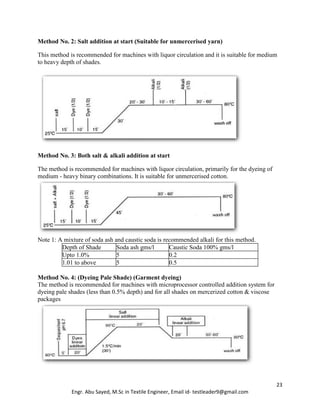
Recipe calculation After Treatment
Fixing agent (Neofix ECO/CIBA fix FRD) -
0.5 g/l
Soaping agent(Lipotol PS-60) - 0.8 g/l
Acetic acid - 1 g/l
Dye + Salt + Water and other chemicals Softening
Acetic acid - 0.2 g/l
Softener (Perrostol CWS) - 1 g/l.
Are taken by pipette in the pot, Then wash
fabric keep in the pot
Set. Time and temp. (60-80˚c x 60)
Fabric unload
Cold wash 2 times
Hot wash with Rsk
Dyer
Shade matching.
Sequence of cotton fabric dyeing Sequence of white fabric dyeing for cotton
Fabric loading
Required amount of water was taken (1:10)
Required amount of water was taken into the
M/C
Scouring
[NOF-0.5g/l, 2146-0.5g/l, JN-0.5g/l,
SIFA0.7g/l, NaOH: 3-4g/l, H2O2 4-8g/l 110°c
x 60 ́].
Fabric loading
Hot wash [NOF, Soda 90°c x 20, 1:10]
Acid wash /chemical remove
[A/Acid-0.5g/l, H2O2-0.5g/l, 60°c x 10 ́].
Scouring [NOF, 2146, JN, SIFA, H2O2 110°c
x 60 ́]
Enzyme
[Enzyme: 0.5g/l; UL/Biosoft 2xl. 50°c x 60 ́
PH 4.5].
Wash
Leveling
[LRDS-0.5-1g/l, JN -0.5g/l10 ́ PH 6.5-7].
Acid wash /chemical remove [A/Acid 60°c x
10 ́]
Salt (Glaubar salt– 60g/l) Enzyme [Enzyme UL 50°c x 45 ́ PH-4.5]
Color [60°-90°c x 60 ́] A/Acid [PH - 6 - 6.5]
Soda (power soda – 15g/l) Syno white 4BK [60°-80°c x 20 ́]
RSK hot [60°c x 60 ́] Washing
A/Acid (neutralization) A/Acid
Fixing [Dyaploe-Dco 30°c x 10 ́ PH 5.5] Softener [Hcs]
Softener [HCS 40°c x 20 ́] Washing
Unload the dyed fabric](https://image.slidesharecdn.com/labtips-150419040945-conversion-gate02/85/LABORATORY-CALCULATIONS-PROCEDRES-16-320.jpg)

![18
Engr. Abu Sayed, M.Sc in Textile Engineer, Email id- testleader9@gmail.com
% Stock Soln = 1
Therefore, recipe calculation for dyes and auxiliaries in g/l will be as follows:
For dyes:
We know,
Dye = (Shade % * Weight of the fabric in gm)/ (Stock solution %)
For,
1. Rema Blue RR = (1.122*5)/1=5.61 g/l
2. React Red KHW = (2.014*5)/1= 10.07 g/l
3. React Yellow KHW = (1.486*5)/1= 7.43 g/l.
For auxiliaries:
We know,
Salt in g/l = (Required amount (%) * Sample weight * LR) / 1000
Required Salt = (70*5*8)/1000 = 2.8 gm.
For Soda ash (conc.20%):
We know,
Required amount of solution (mls) = (g/l required * wt of substrate * LR) / (10 * concentration
(%) of stock soln)
Required amount of soda ash in C.C. = (5*5*8)/(10*20) = 1.0
For Caustic soda (38 Be.):
We know,
Required alkali soln in c.c. = (Required amount (%) * wt of substrate * LR) /conversion value
from Be. to g/l of alkali
Required caustic soda = (1.32*5*8)/441 = 0.12 c.c.
[Since 38 °Be.NaOH= 441 gm NaOH 100% per 1lit NaOH soln]
Extra Water required:
= M:L – (required water to make soln of dyes & auxiliaries) = (5*8) – [(5.61+10.07+7.43) +
(1.0+0.12) ]
= 40 – 24.112
= 15.77 (Salt is added in solid form)
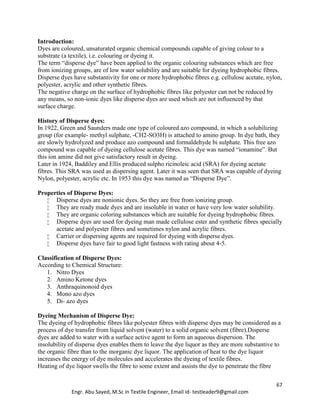
Equipments of Recipe Section:
Microprocessor pH Meter (Hanna Instrument)
Digital pipette
Digital Weighting Meter with Glass Box (Explorer, USA)
There are different matching systems followed in Labs. They are:
Tube light matching.
Sun light matching.
Ultra Violet matching.
Sodium light matching (show room).](https://image.slidesharecdn.com/labtips-150419040945-conversion-gate02/85/LABORATORY-CALCULATIONS-PROCEDRES-18-320.jpg)


![31
Engr. Abu Sayed, M.Sc in Textile Engineer, Email id- testleader9@gmail.com
electronic balance with a minimum readability of 0.1 mg. In order to ensure reproducible results,
sample handling is very critical especially when hygroscopic materials are weighed.
pH:
pH is a scale between 0 and 14 used to express the concentration of hydronium (H3O+, or H+)
ions in a solution. It is defined by Equation.
pH = – log [H+]
Major Chemicals Used in Wet Processing:
Acids, bases, salts, surfactants, oxidising agents and reducing agents are the major chemicals
those are widely used in wet processing industry.
Acid:
An acid (from the Latin acidus/acēre meaning sour) is a substance which reacts with a base.
Commonly, acids can be identified as tasting sour, reacting with metals such as calcium, and
reacting with bases such as sodium carbonate. Aqueous acids have a pH under 7, with acidity
increasing the lower the pH. Chemicals or substances having the property of an acid are said to
be acidic.The following standard solutions are used in the acid analysis. They are usually
prepared in advance and consumed within a certain period of time.
1. H2SO4, 0.1 N, 0.25N, 0.5 N and 1 N;
2. HCl, 0.1N, 0.25 N, 0.5 N and 1 N;
3. HNO3, 0.1 N;
There are two types of acid
1. Inorganic acid
2. Organic acid
Inorganic Acid:
Inorganic acid are Sulphuric acid (H2SO4), Hydrochloric acid (HCl), Nitric acid (HNO3),
Phosphoric acid (H3PO4), etc.
Sulphuric Acid (H2SO4):
The concentration of sulphuric acid (H2SO4) can be determined by using Baume’s (ºBé)
hydrometer. The titration of sulphuric acid is carried out using sodium hydroxide in the presence
of phenolphthalein as an indicator. The end point is reached when a faint pink color is persistent.
HCl
The concentration of hydrochloric acid (HCl) can be determined using a hydrometer, in a very
similar manner to the determination of sulphuric acid concentration. Hydrochloric acid is a
volatile acid at high concentration.](https://image.slidesharecdn.com/labtips-150419040945-conversion-gate02/85/LABORATORY-CALCULATIONS-PROCEDRES-31-320.jpg)


![69
Engr. Abu Sayed, M.Sc in Textile Engineer, Email id- testleader9@gmail.com
Polyester fabric dyeing by Disperse dyes
Sample weight = 5 gm.
M: L = 1: 15
Recipe:
Disperse dyes = 1.0 %
Disperse dyes = 0.4%
Disperse dyes = 0.8 %
Dispersing agent = 1 g/l
Leveling agent = 1 g/l
Acid (CH3COOH) = 0.4 g /l
Calculations:
We know, Dyes = Fabric weight in gm x shade %
Stock solution %
Water = 75ml.
Suppose, Dyes Stock solution = 1 % & chemical = 20 g/l
Disperse dyes = 5 gm x 1.0 % = 5 ml.
1 %
Disperse dyes = 5 gm x 0.4 % = 2 ml.
1 %
Disperse dyes = 5 gm x 0.8 % = 4 ml.
1 %
Dispersing agent = 1 g/l = 5 x 1 x 15 / 20 = 3.75 ml.
Leveling agent = 1 g/l = 5 x 1 x 15 / 20 = 3.75 ml.
Acid (CH3COOH) = 0.4 g /l = 5 x 0.4 x 15 / 20 = 1.5 ml. ( pH: 4.5).
Total volume = 75 ml
Required water = 75 – (5+2 + 4 +3.75 + 3.75 + 1.5) ml = 55 ml.
In dye pot, 5 gm sample + 5 ml +2 ml + 4ml + 3.75 ml + 3.75 ml + 1.5 ml + 55 ml.
Time & Temperature = 60 min x 130o
C.
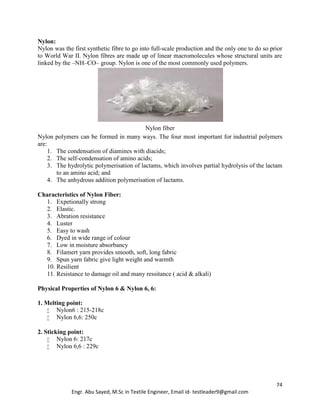
Sample dyeing process for polyester Sequence of polyester fabric dyeing
Fabric weight Required amount of water was taken into the
M/C
Fabric cold wash Fabric loading
Recipe calculation Hot wash [MI, Soda 90°c x 20 ́]
Dye + water + blm + rtm are taken the
Up to 6 by pipette
Cold wash
Wash fabric keep in the pot
Set temp. And time (130°c x 30 ́)
Acetic Acid /Benlon
Fabrics unload Leveling [blm, RTM 60°c x 10 ́]
Cold wash 2 times Color dosing [130°c x 40 ́]
Reduction cleaning
[Hydrose, Caustic, Detergent 70°c x 20 ́]
Shade check
Dyer Hot wash [MI 60 ́]
Shade matching Shade check
Unloading](https://image.slidesharecdn.com/labtips-150419040945-conversion-gate02/85/LABORATORY-CALCULATIONS-PROCEDRES-69-320.jpg)


![113
Engr. Abu Sayed, M.Sc in Textile Engineer, Email id- testleader9@gmail.com
without hammer or chesser or tessel. This is called scale. In boiler, temporary hard water produce
CaCO3 & Mg (OH) 2, the combination of CaCO3 & Mg (OH)2 is called scale.
Ca (HCO3)2 --> CaCO3 + CO2 + H2O
Mg (HCO3)2 --> Mg CO3 + CO2 + H2O
MgCO3 + H2O --> Mg (OH)2 + CO2
[CaCO3 + Mg (OH)2 ] --> Scale.
As a result, in boiler more heat will be needed & for that, more fuel will be required. For scale
formation, equally heat transformation in boiler tube is not possible very often. As a result, for
excess heat of a particular part of the tube, the tube may burst.
Heat loss of tube up to 40% according to the diameter of the tube. Heat loss by pipe scaling up to
40% for 20 mm scale.
SCALE THICKNESS HEAT LOSS
1 mm approximately 10%
3 mm „ 17%
5 mm „ 22%
10 mm „ 30%
20 mm „ 43%
Corrosion can be a serious problem in boiler, if hard water is used in it. Dissolved O2 in the
presence of CO2 is the common cause of corrosion. Fe present in hard water reacts with CO2 to
form Fe CO3, which is the main process of corrosion. This Fe CO3 is hydrolyzed & produce
Fe(OH)2, this agent / component damage the boiler.
Fe + H2O + CO2 --> Fe CO3 + H2O
Fe CO3 + H2O --> Fe(OH)2 + CO2
Desizing: Hard water de-active enzymes & insolubilize size materials such as starch, PVA etc.
Scouring: Hard react with soap during scouring. Soap is the Na & K salt of higher fatty acid
(C17H35COONa). The Hard water does not easily form lather by reacting with soap. The Ca &
Mg salt of hard water reacts with soap and produce insoluble organic salts which becomes the
wastage of soap.
CaSO4 + 2 C17H35COONa --> (C17H35COO)2Ca + Na2SO4
Insoluble organic salt
If we use hard water in wet processing, then they produce insoluble salt which is deposited with
the fabric. As a result, the surface of scoured fabric become harsh, hard & non-flexible which
creates problem in the next process like produced uneven dyeing.
Bleaching: Hard water decompose bleach bath.
H2O2 --> H2O + [O]
Mercerizing: It forms insoluble metal acid, reduce absorbency and luster.
Dyeing: Ca2+ and Mg2+ ions of hard water react with dye molecules and precipitated the dye.
As a result dyestuffs are spoilt. Hence, uneven shade (depth of dyeing) of color is produced.
Printing: It breaks the emulsion, change it’s thickness and efficiency and it is also harmful for
thickener. Hard water causes problems inprinting process like dyeing.
Finishing: Hard water interfere with catalysts, cause resins and other additives to become non
reactive, break emulsion and deactives soap.](https://image.slidesharecdn.com/labtips-150419040945-conversion-gate02/85/LABORATORY-CALCULATIONS-PROCEDRES-113-320.jpg)


![197
Engr. Abu Sayed, M.Sc in Textile Engineer, Email id- testleader9@gmail.com
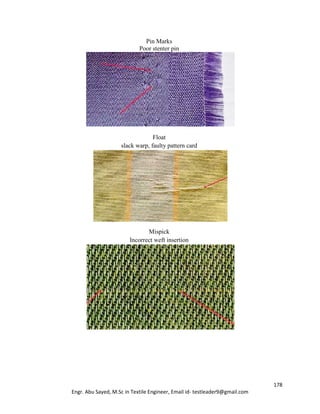
Disappearing stitches in stretch denim:
Where the thread looks much smaller on seams sewn in the warp direction than in the weft
direction of the fabric. To prevent this use a heavier thread size on top stitching [120 to 150 Tex],
go to a longer stitch length [from 8 to 6 S.P.I] and make sure the thread tensions are as loose as
possible so the thread sits on top of the fabric rather than burying in the fabric on seams sewn in
the warp.
Disappearing stitches in stretch denim
Thread discolouration after laundry in jeans:
The thread picks up the indigo dyes from the fabric giving the thread a ‘dirty’ appearance. A
common discoloration would be the pick up of a greenish or turquoise tint. The main reasons are
improper pH level, improper water temperature, improper chemical selection and shortcuts on
wash methods. The solutions for this are using thread with proper colour fastness characteristics,
correct pH level and low water temperature during laundry, using the proper chemicals and
laundry cycles, and using denimcol PCC or similar additive in wash. Do not over load washers
with too many garments at one time.
Thread discoloration after laundry in jeans](https://image.slidesharecdn.com/labtips-150419040945-conversion-gate02/85/LABORATORY-CALCULATIONS-PROCEDRES-197-320.jpg)


![214
Engr. Abu Sayed, M.Sc in Textile Engineer, Email id- testleader9@gmail.com
Formula:
= [(31" + 2") × (24" + 2" ) /36] / 44
= 0.541yds
Yoke:
A shaped piece fabric in a garment, fitted about or below the neck and shoulders, from which the
rest of the garment hangs. It can be split in two, called the ―split yoke.
Yoke of shirt
Formula:
= [(21" + 4") × (4"+ 1") / 36] / 44
= 0.079yds
Front part:
The front part of a shirt.
Front part of shirt
214
Engr. Abu Sayed, M.Sc in Textile Engineer, Email id- testleader9@gmail.com
Formula:
= [(31" + 2") × (24" + 2" ) /36] / 44
= 0.541yds
Yoke:
A shaped piece fabric in a garment, fitted about or below the neck and shoulders, from which the
rest of the garment hangs. It can be split in two, called the ―split yoke.
Yoke of shirt
Formula:
= [(21" + 4") × (4"+ 1") / 36] / 44
= 0.079yds
Front part:
The front part of a shirt.
Front part of shirt](https://image.slidesharecdn.com/labtips-150419040945-conversion-gate02/85/LABORATORY-CALCULATIONS-PROCEDRES-214-320.jpg)
![215
Engr. Abu Sayed, M.Sc in Textile Engineer, Email id- testleader9@gmail.com
Formula:
= ([{31"-1 ¼" + 1"} × {12" + 2 ½" }] 2" /36) / 44
= 0.562 yds
Sleeve:
The part of a garment that covers the arm and is usually cut wider than the cuffs. Most sleeve
lengths fall between 32 and 36 inches.
Sleeve
Formula:
=( [{34 ½" -11"} +1"] × {21" +1"} × 2 /36) / 44
= 0.68yds](https://image.slidesharecdn.com/labtips-150419040945-conversion-gate02/85/LABORATORY-CALCULATIONS-PROCEDRES-215-320.jpg)
![216
Engr. Abu Sayed, M.Sc in Textile Engineer, Email id- testleader9@gmail.com
Cuff:
A fold or band serving as a trimming or finish for the bottom of a sleeve. Some cuff styles
include: French Cuffs and Barrel Cuffs.
Cuff
Formula:
= [(9" + 3") × (2 ½" + ½" ) ×2 /36] / 44
= 0.05yds
Pocket:
A small bag like attachment forming part of a garment and used to carry small articles, as a flat
pouch sewn inside a pair of pants or a piece of material sewn on its sides and bottom to the
outside of a shirt.
Pocket
Formula:
= [(6" +2") (5½" +1") /36] / 44
= 0.032yds
Collar:
The part of a shirt that encompasses the neckline of thegarment, often so as to fold or roll over.
Comes in various shapes, depending on the face shape and occasion.
216
Engr. Abu Sayed, M.Sc in Textile Engineer, Email id- testleader9@gmail.com
Cuff:
A fold or band serving as a trimming or finish for the bottom of a sleeve. Some cuff styles
include: French Cuffs and Barrel Cuffs.
Cuff
Formula:
= [(9" + 3") × (2 ½" + ½" ) ×2 /36] / 44
= 0.05yds
Pocket:
A small bag like attachment forming part of a garment and used to carry small articles, as a flat
pouch sewn inside a pair of pants or a piece of material sewn on its sides and bottom to the
outside of a shirt.
Pocket
Formula:
= [(6" +2") (5½" +1") /36] / 44
= 0.032yds
Collar:
The part of a shirt that encompasses the neckline of thegarment, often so as to fold or roll over.
Comes in various shapes, depending on the face shape and occasion.](https://image.slidesharecdn.com/labtips-150419040945-conversion-gate02/85/LABORATORY-CALCULATIONS-PROCEDRES-216-320.jpg)
![217
Engr. Abu Sayed, M.Sc in Textile Engineer, Email id- testleader9@gmail.com
Collar
Formula:
= [(16" + 5") × (2" +1") × 4/36] / 44
= 0.159yds
Total Consumption for one Garment:
= 0.541+0.079+0.562+0.68+0.05+0.159+0.032
= 2.100yds/ per garment
Per dz = 2.100 ×12
= 25.20/dz (ypd) + 5%(wastage)
= {25.20 ×5 / 100} + 25.20
= 1.26 + 25.20
=26.46yds
If the price for the fabric is $0.95 per yds. The cost for the garment will be
Cost per dozen (Fabric) = .95x 26.46
= $ 25.14
Accessories: cost /dz = US $ 6.00 (1 piece all time $ .15)
CM /dz = US $ 10.00
...........................................................................................................
Subtotal = US $ 41.14
Transport cost from factory to sea or airport (.5%) = US $ 0.20
Clearing and loading cost (2%) = US $ 0.90
Overhead cost (.5%) = US$ 0.20
............................................................................................................
Net cost price = US$ 42.44
Profit (10%) = US $ 4.2
............................................................................................................
Net FOB price = US$ 46.64](https://image.slidesharecdn.com/labtips-150419040945-conversion-gate02/85/LABORATORY-CALCULATIONS-PROCEDRES-217-320.jpg)


![241
Engr. Abu Sayed, M.Sc in Textile Engineer, Email id- testleader9@gmail.com
2. Calculation of Product SAM (SAM): Make a list of product category that you manufacture
and get standard minutes (SAM) of all products you make from work study engineers. If you
don’t have product SAM then calculate the SAM. Or you can use average. Suppose you are
producing shirt and its SAM is 25 minutes.
3. Factory Average Efficiency: This data is collected from industrial engineer. Or calculate it
with historical data. Suppose average line efficiency is 50%. Read the article - How to calculate
efficiency of a production line or batch?
Calculation of production capacity (in pieces): Once you have above information use
following formula to calculate production capacity.
Production capacity (in pieces) = (Capacity in hours*60/product SAM)*line efficiency
For Example: Suppose a factory has 8 sewing lines and each line has 25 machines. Total 200
machines and working shift is 10 hours per day. Total factory capacity per day is 2000 hours
(200 machines * 10 hours). If factory is producing only one style (Shirt) of SAM 25 minutes and
used all 200 machines daily production capacity at 50%
= (2000*60/25)*50% Pieces
= (2000*60*50) / (25*100) Pieces
= 2400 Pieces
[Note: Production will vary according to the line efficiency and during learning curve or in the
initial days when style is loaded to the line]
Production (capacity) planning is normally done based on sewing capacity. Having knowledge of
the capacity in other processes (internal or external) is also very important. Otherwise planner
may fail and will not be able to meet the dead line. Other departments such as Cutting room
capacity, Finishing room capacity, Washing Capacity and capacity of the value added jobs.
How to calculate operator efficiency at work?
In apparel manufacturing, skills and expertise of a sewing operator is being presented in
“Efficiency” term. An operator with higher efficiency produces more garments than an operator
with lower efficiency in the same time frame. When operators work with higher efficiency,
manufacturing cost of the factory goes down.
Secondly, factory capacity is estimated according to the operator efficiency or line efficiency.
Hence, efficiency is one of the mostly used performance measuring tools. So how do you
calculate operator efficiency in factory? To calculate operator efficiency you will be needed
standard minutes (SAM) of the garment and operations your operator is making. Use following
formula and calculate operator efficiency.
Efficiency calculation formula:
Efficiency (%) = [Total minute produced by an operator/Total minute attended by him *100]
Where,
Total minutes produced = Total pieces made by an operator X SAM of the operation [minutes]](https://image.slidesharecdn.com/labtips-150419040945-conversion-gate02/85/LABORATORY-CALCULATIONS-PROCEDRES-241-320.jpg)
![242
Engr. Abu Sayed, M.Sc in Textile Engineer, Email id- testleader9@gmail.com
Total minutes attended = Total hours worked on the machine X 60 [minutes]
Example: An operator was doing an operation of SAM 0.50 minutes. In an 8 hours shift day he
produces 400 pieces. So according to the efficiency calculating formula, that operator’s overall
efficiency
= (400 x 0.50) / (8 X 60)*100%
= 200/480*100%
= 41.67%
On-Standard Operator Efficiency:
Operator efficiency can be expressed in more specific ways, like ‘On-Standard Efficiency’
instead ‘over-all efficiency’. An operator may be attending all hours in a shift but if he has not
been given on-standard work to do in all hours, he will not be able to produce minutes as per his
capability and skill level. In this case, to know operator’s on-standard efficiency following
formula is used.
Operator on-standard efficiency (%) = Total minute produced /Total on-standard minute attended
*100%
Where,
Total minutes produced = Total pieces made by an operator X SAM of the operation [minutes]
Total on-standard minute attended = (Total hours worked – Loss time) x 60 [minutes]
Example: An operator was doing an operation of SAM 0.50 minutes. In an 8 hours shift day he
produces 400 pieces. Operator was idle ‘waiting for work’ for 30 minutes and his machine broke
down for 15 minutes in hours shift. So according to the efficiency calculating formula, that
operator’s on-standard efficiency
= (400 x 0.50) / {480 – (30 +15)}*100%
= 200/435*100%
= 45.98%
The above example clarifies that if an operator sits idle during shift hours his overall efficiency
will go down.](https://image.slidesharecdn.com/labtips-150419040945-conversion-gate02/85/LABORATORY-CALCULATIONS-PROCEDRES-242-320.jpg)


This document provides information about lab dip development and dyeing processes. It begins with an overview of lab dip development, which involves matching dye samples to buyer's swatches. Key objectives of lab dip include calculating dye recipes, comparing samples to swatches, and approving the final lab dip. Common stock solutions and an example calculation for a 0.5% shade are also provided. The document then outlines the general procedure for lab dip dyeing and provides a flow chart depicting the process for sample dyeing from scouring through to softening. Additional details include a recipe and calculations for dyeing cotton with reactive dyes and information about the turquoise color including its types and the specific process flow for dyeing cotton knit fabric that


