Download to read offline

![ii
About this manual
The manuals and how to use them
The KROME comes with the following manuals.
• Video Manual (approximately 60 minutes)
• Quick Start Guide (printed and PDF)
• Operation Guide (PDF)
• Parameter Guide (PDF)
• Voice Name List (PDF)
All of these manuals are on the included accessory disc.
A printed copy is included only for the Quick Start
Guide.
Video Manual
This video illustrates the main functionality of the
KROME.
Quick Start Guide
This provides a simple explanation of the KROME’s
functions. To begin, please watch the Video Manual and
read the Quick Start Guide.
Operation Guide
Put simply, the Operation Guide is designed to answer
the question, “How do I do this?”
It explains the names and functions of each part of the
KROME, basic operation, an overview of each mode,
how to edit sounds, record on the sequencer, and so on.
This guide also explains the basics of effects, the
Arpeggiator, Drum Track, and Drum Kits.
Finally, it also contains a troubleshooting guide as well as
supplemental information such as a list of specifications.
Parameter Guide
The Parameter Guide is designed to answer the question,
“What does this do?”
Organized by mode and page, the Parameter Guide
includes information on each and every parameter in the
KROME.
Voice Name List
The Voice Name List lists all of the sounds and setups
that are in the KROME when it is shipped from the
factory, including Programs, Combinations,
Multisamples, Drumsamples, Drum Kits, Arpeggio
Patterns, Drum Track Patterns, Template Songs, and
Effect Presets.
PDF versions
The KROME PDF manuals are designed for easy
navigation and searching. They include extensive PDF
contents information, which generally appears on the
side of the window in your PDF reader and lets you jump
quickly to a specific section. All cross‐references are
hyper‐links, so that clicking on them automatically takes
you to the source of the reference.
Conventions in this manual
References to the KROME
The KROME is available in 88‐key, 73‐key, and 61‐key
models. The manuals refer to all models without
distinction as “the KROME.” The front panel and rear
panel illustrations in the manual show the 61‐key model,
but they apply identically to the other models.
Abbreviations for the manuals: QS, OG, PG,
VNL
In the documentation, references to the manuals are
abbreviated as follows.
QS: Quick Start Guide
OG: Operation Guide
PG: Parameter Guide
VNL: The Voice Name List
Symbols , , Note, Tips
These symbols respectively indicate a caution, a MIDI‐
related explanation, a supplementary note, or a tip.
Example screen displays
The parameter values shown in the example screens of
this manual are only for explanatory purposes, and may
not necessary match the values that appear in the Display
of your instrument.
MIDI-related explanations
CC# is an abbreviation for Control Change Number.
In explanations of MIDI messages, numbers in square
brackets [ ] always indicate hexadecimal numbers.
What is REMs * ?
(Resonant structure and Electronic circuit
Modeling System) is Korg’s proprietary technology for
digitally recreating the numerous factors that produce
and influence a sound, ranging from the sound‐
production mechanisms of acoustic instruments and
electric/electronic musical instruments, to the resonances
of an instrument body or speaker cabinet, the sound field
in which the instrument is played, the propagation route
of the sound, the electrical and acoustic response of mics
and speakers, and the changes produced by vacuum
tubes and transistors.
* All product names and company names are the
trademarks or registered trademarks of their respective
owners.
Thank you for purchasing the Korg KROME Music Workstation. To help you get the most out of your new
instrument, please read this manual carefully.](https://image.slidesharecdn.com/kromemusicworkstasion73key-160923011437/85/Krome-music-workstasion-73key-2-320.jpg)
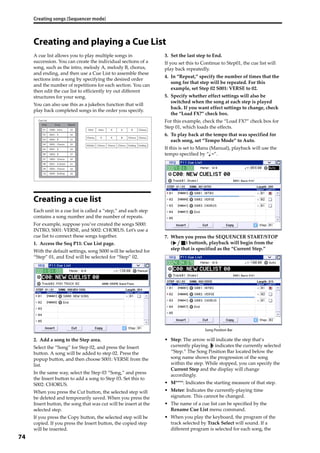
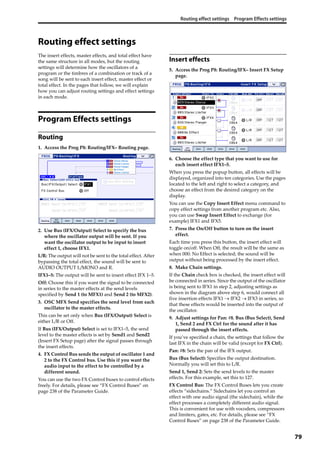
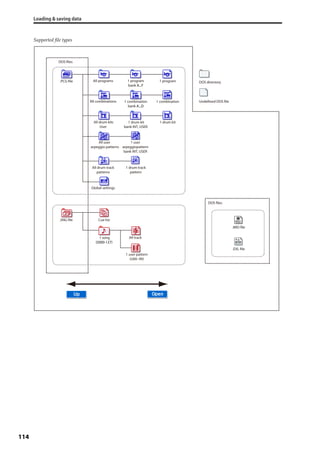
![Basic Information Basic operations
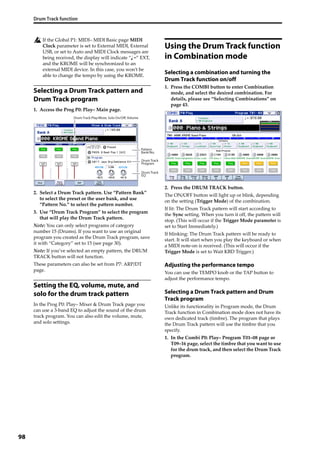
13
In any page of Program or Combination mode,
pressing EXIT a maximum of two times will
immediately allow you to use the numeric keys or
INC/DEC buttons to select programs or combinations.
In Sequencer mode, pressing EXIT a maximum of three
times will allow you to select a song.
EXIT button (in dialog boxes)
When a dialog box is displayed, this has the same
function as the Cancel, Done, or Exit button.
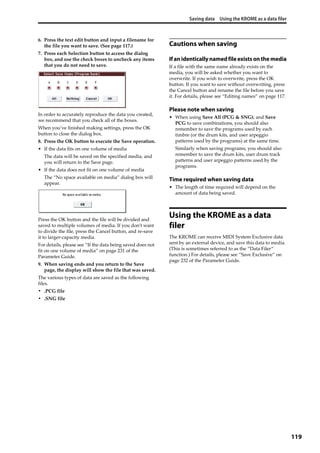
Initialize the KROME
• With the power off, press the power switch while
holding down the ENTER button and numeric key
[0].
(While data is being loaded, the display will
indicate “Now writing into internal Memory.”)
The result will be the same as when you’ve
executed Load Preload/Demo Data All.
(See page 125)](https://image.slidesharecdn.com/kromemusicworkstasion73key-160923011437/85/Krome-music-workstasion-73key-17-320.jpg)


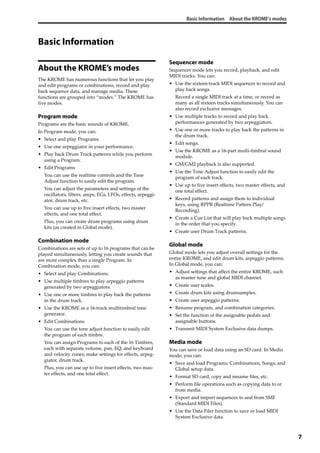
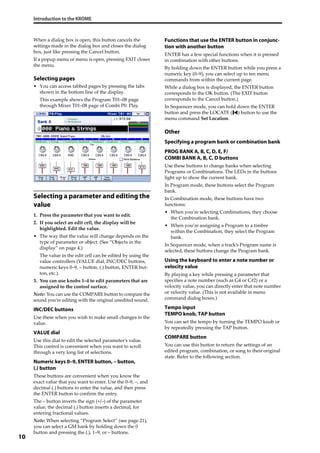
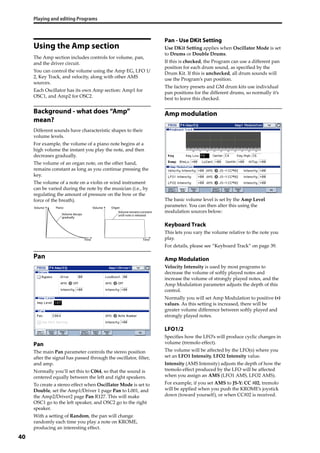
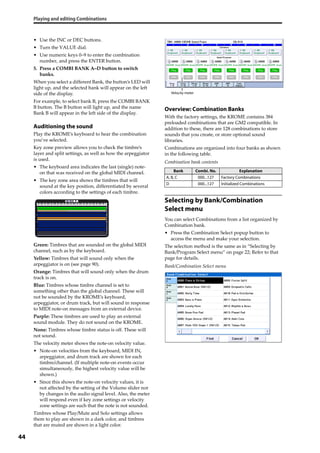
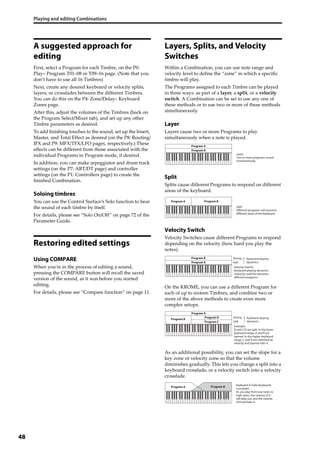
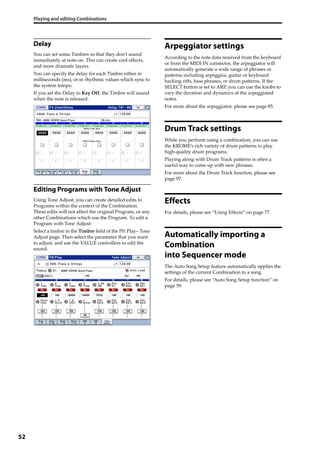
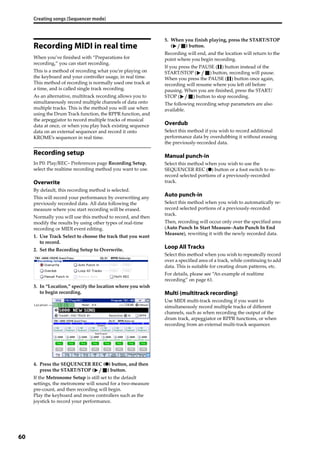
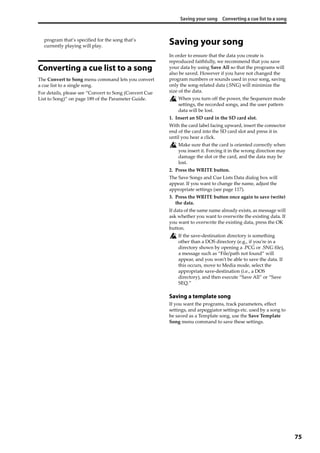
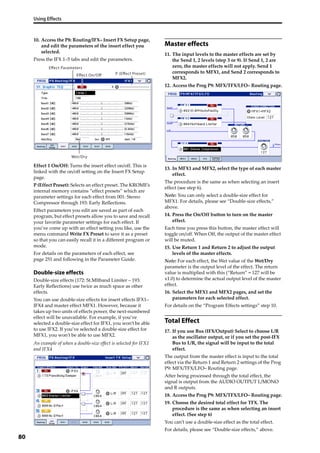
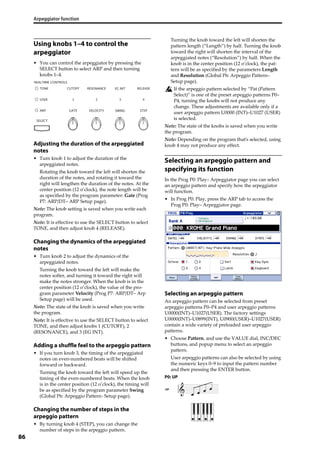
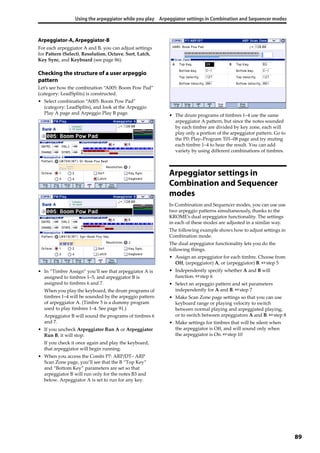
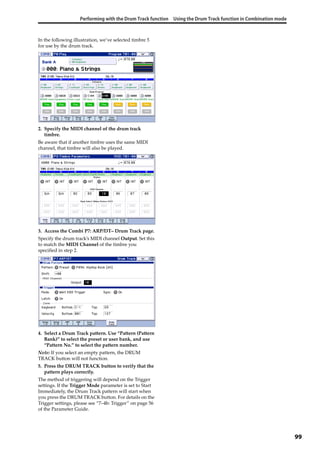
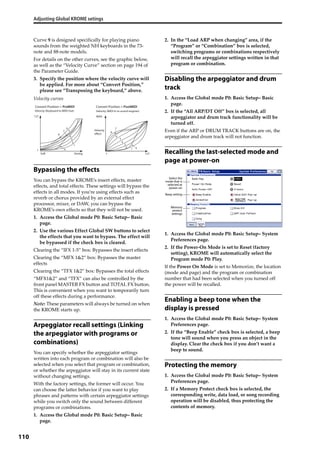
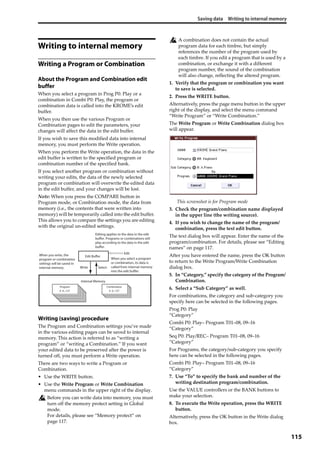
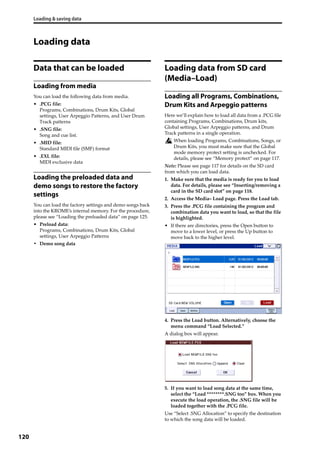
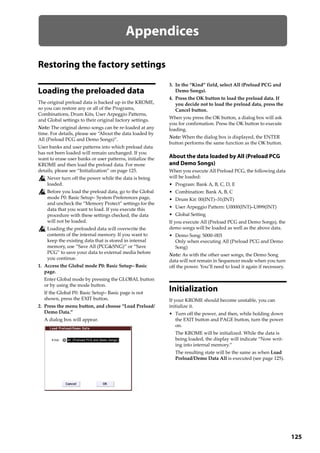
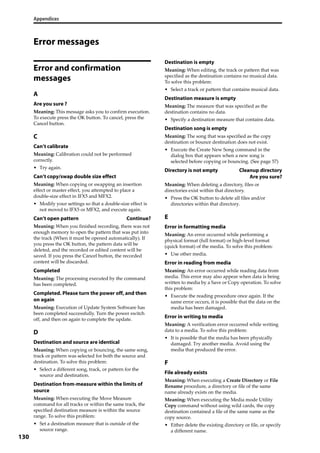
![Playing and editing Programs
24
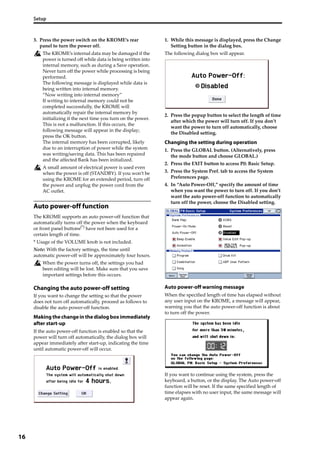
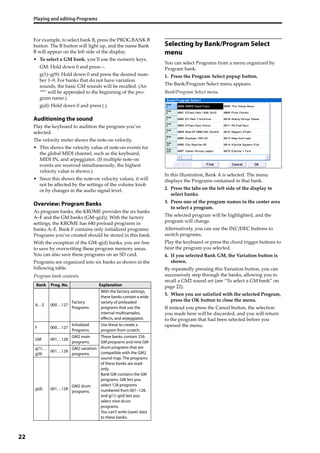
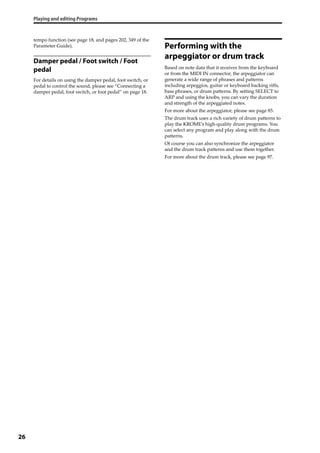
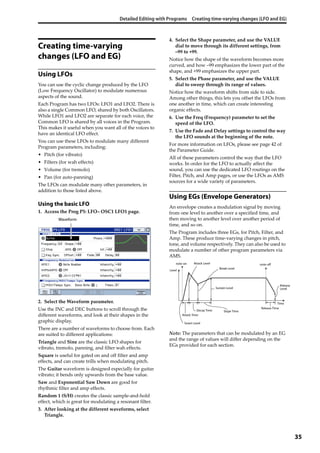
Program information
In the Prog P0: Play– Main page you can view the
following information about the selected program.
OSC Picture: This is a graphic that represents the
program’s oscillator.
OSC Oct: For a double oscillator or double drums, this
indicates “Oct” (the basic pitch of the oscillator).
SW1, SW2: This indicates the function that’s assigned
to the SW1/SW2 buttons, and the on/off state of the
buttons.
Realtime Controls – TONE CONTROLS/USER
CONTROLS/ARP CONTROLS:
This shows information about the functions of the
REALTIME CONTROLS knob that’s currently selected.
Use the SELECT button to choose the functions that
will be controlled by the knobs. For more information
about these functions, please see page 28.
EQ (Low, Mid[Hz], Mid, High): This shows the 3‐band
EQ settings. You can use the value controllers to edit
the values.
Effect Controls– IFX, MFX, TFX:
This shows the effects that are assigned. The KROME
provides insert effects 1–5, master effects 1 and 2, and a
total effect. For the master effects, you can edit the
return levels.
Velocity Meter:
This meter shows the note‐on velocity value.
The meter shows the note‐on velocity of the keyboard,
MIDI IN, and arpeggiator etc. (If multiple note‐on
messages are received simultaneously, the highest
velocity value is shown.)
Using Controllers
In addition to using the keyboard, the KROME lets you
control the sound by using the joystick, SW1 and SW2
buttons, knobs 1–4, damper pedal, and foot switch or
foot pedal.
These controls let you modify the tone, pitch, volume,
effects, etc. in realtime as you play.
Joystick
The joystick moves in four directions: left, right, up
(away from yourself), and down (towards yourself).
Each of the four directions can be used to control a
different function, such as modulating Program or
effects parameters. These assignments can be different
for every Program, but generally, they do the following:
Standard Joystick functions
For details, please see page 82.
Joystick Lock
This function lets you maintain the effect that had been
applied prior to releasing your hand from the joystick.
You can use the SW1/SW2 buttons or a foot switch
connected to the KROME to lock the current position
so that the effect will continue even after the joystick
returns to the center position. For details, please see
“Locking the Joystick” on page 25.
SW1, SW2
You can use these buttons to control program
parameters via AMS (Alternate Modulation), or effect
parameters via Dmod (Dynamic Modulation).
They can also transpose the keyboard by octaves, turn
portamento on/off, or to lock the position joystick.
Each button can work as either a Toggle or Momentary
button. In Toggle mode, the assigned function is
switched between on and off each time the button is
pressed. In Momentary mode, the assigned function is
active on only as long as you hold down the button.
In Program mode, you can check the assignments of
SW1 and SW2 on the Prog P0: Play– Main page.
For details, please see “Program information” on
page 24.
SW1,
SW2
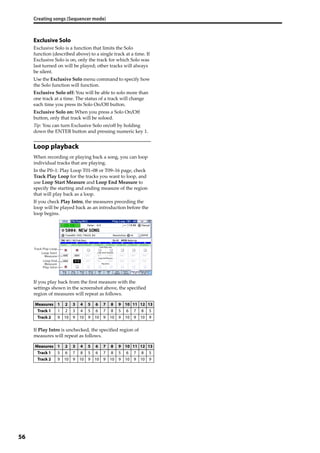
OSC
Picture
OSC Oct
EQ
Realtime Controls
- Tone Controls
- User Controls
- Arp Controls
Effect Infomation
IFX 1-5
MFX 1, 2,
Send level
(On/Off)
TFX (On/Off)
Velocity Meter
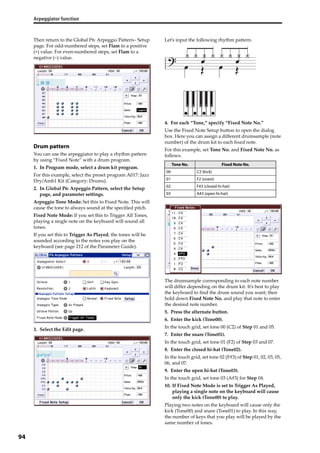
Move the joystick…
Controller
Name
Normally controls…
Left JS–X Pitch bend down
Right JS+X Pitch bend up
Up (away from yourself) JS+Y Vibrato
Down (towards yourself) JS–Y Filter LFO (wah)
[SW1], [SW2]
(Lock
function)
Joystick](https://image.slidesharecdn.com/kromemusicworkstasion73key-160923011437/85/Krome-music-workstasion-73key-28-320.jpg)

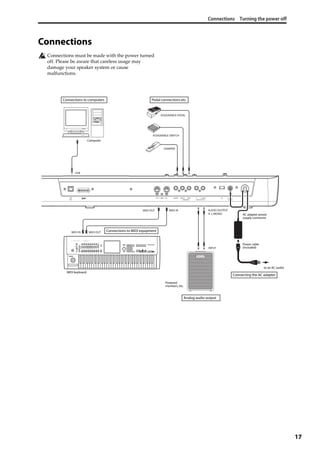
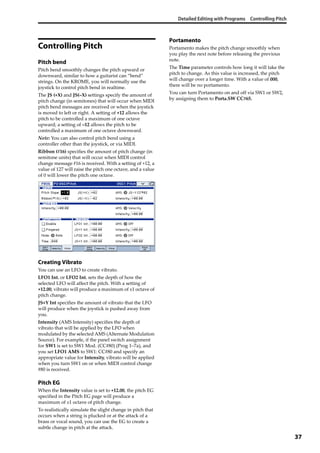
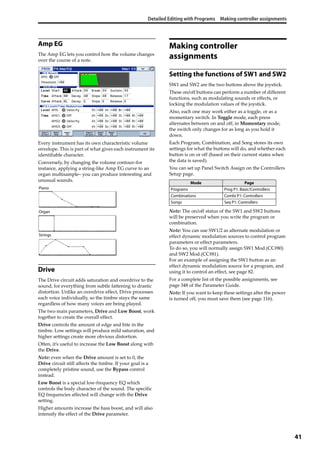
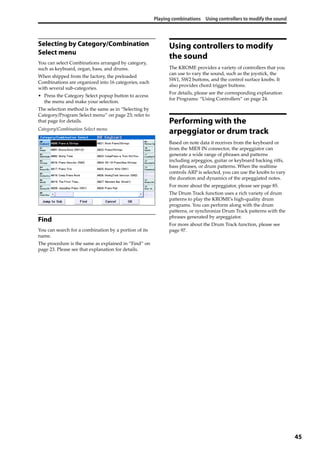
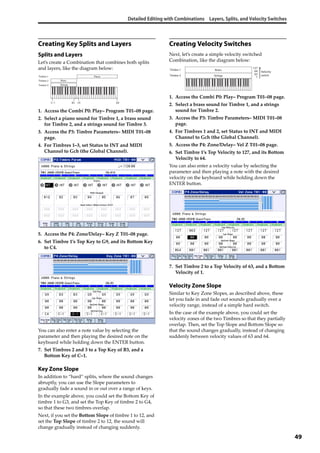
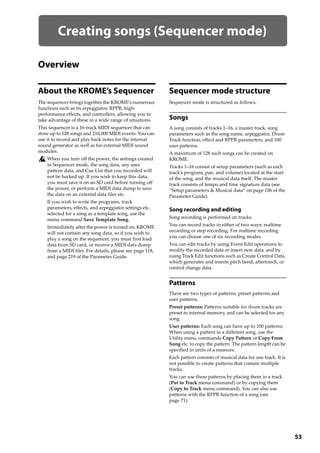
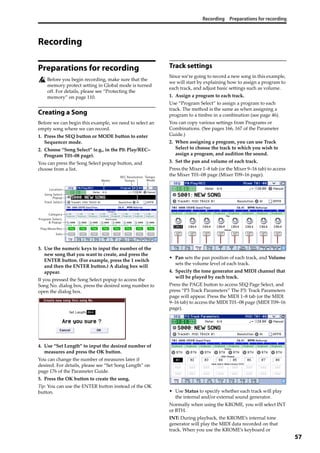
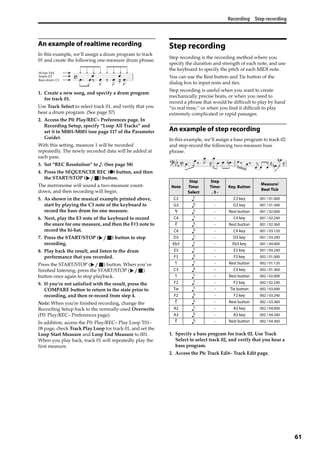
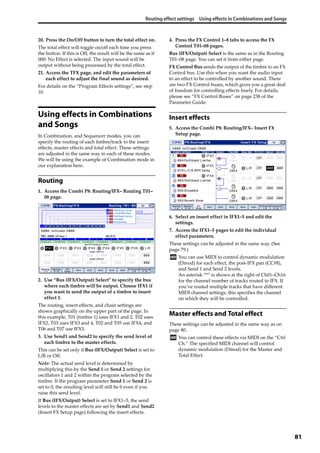
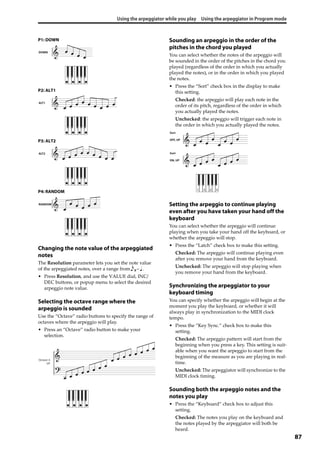
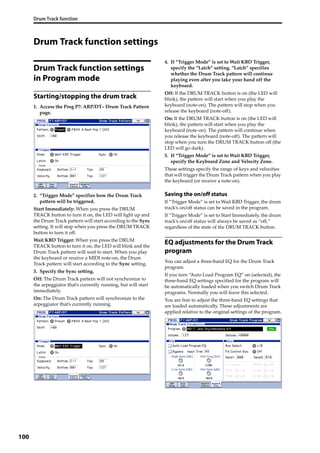
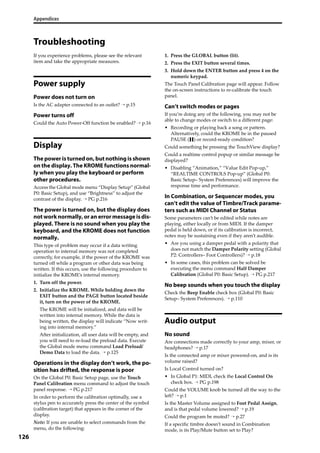
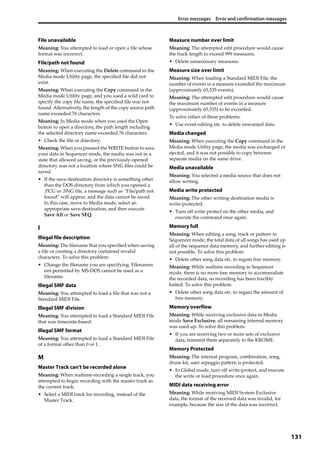
![Easy Program editing Using Tone Adjust
29
USER controls
In the USER section you can turn knobs 1–4 to control
various aspects of the sound such as volume,
portamento time,
pan, filter and amp EG, pitch LFO, and master effect
send level.
In USER, the most useful functions are assigned
individually for each preload program.
The table below shows the standard assignments of the
Realtime Controls knobs:
For details, please see page 16 of the Parameter Guide.
ARP controls
In the ARP section you can control the arpeggiator in
realtime.
For details on functionality, please see page 86.
Saving the edits you made by moving the
knobs
The realtime control knobs are an ideal way to modify
the sound while you perform. As needed, press the
front panel WRITE button to Write the Program into
memory and save the sound you’ve edited. (See
“Saving your edits” on page 30.)
However for Realtime Controls USER knobs 1–4,
the edited settings can be saved only if you’ve
assigned CC#70–79.
Internally, a single knob usually affects several
different parameters. When you write a Program, the
edits are saved into the individual program
parameters, and not to the knob itself.
After writing the Program, you’ll notice that the knobs
have returned to their center positions–since the old
“edited” values are now the new “saved” values.
Assigning Realtime Controls USER functions
to knobs 1–4
You can assign the functions that knobs 1–4 will
perform when Realtime Controls USER is selected.
(See page 41)
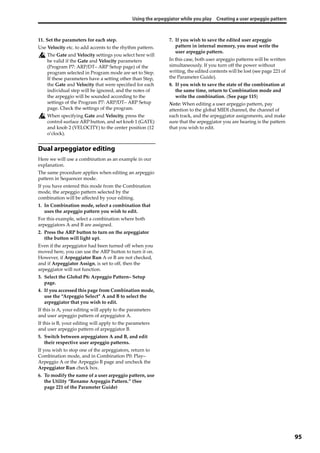
Using Tone Adjust
The Tone Adjust function lets you edit the parameters
of the program. The program parameters that are most
effective for editing will be assigned to the controllers
in the display.
1. Access the Prog P0: Play– Tone Adjust page.
This page shows and reflects data generated by the
tone adjust function, letting you view the parameter
assignments and their precise values.
2. To edit the sound, select a slider (1–8) or button (1–
8) in the display, and use the VALUE dial etc. to
use it. (You can edit the value of a slider by
dragging it in the display.)
Note: You can assign the principal program
parameters to the various controllers in the display. For
details, please see page 7 of the Parameter Guide.
For example:
1. Select Program A069, “Deluxe E.Piano.”
2. Access the P0: Play– Tone Adjust page.
3. Look at the assignments for sliders 5, 6, and 8 in
the display.
Slider 5 is assigned to F/A EG Attack Time; slider 6 is
assigned to F/A EG Decay Time; and slider 8 is
assigned to F/A EG Release Time.
4. Raise each of the three sliders so that they are
about 4/5 of the way to the top.
The display should show their values as between +60
and +70. This means that you have edited the filter EG
and amp EG attack, delay, and release to longer values.
5. Play a few notes.
Notice that the sound has changed from an electric
piano into a soft pad. Next, let’s add just a bit of filter
modulation, to make the sound more rich.
6. Notice the assignment of slider 2 in the display.
Slider 2 is assigned to “[OSC1] Filter LFO1 Int A”
(OSC1 filter LFO1 intensity). It will adjust the amount
of filter modulation produced by LFO1.
7. Lower slider 2 slightly so that the display indicates
about –6.
8. Play a few more notes.
The filter modulation has added some shimmer to the
sound. Now, maybe it could use a bit more edge…
9. Look at the assignments for switches 6 and 7 in the
display.
These are programmed to raise the Filter Cutoff and
Filter Resonance, respectively. Switches are just on/off,
but you can set a specific value for the On position;
notice the +10 and +40 in the switch’s value boxes.
10. Press each of the two switch buttons.
The sound now has a more interesting character, due
to the filters. Since it’s brighter, we’ve also restored
some of the electric piano character.
Pretty easy, huh? Note: depending on the parameter,
you may occasionally hear glitches in the sound as you
move the control.
Knob MIDI CC Normally controls…
TONE1 74 Filter Cutoff Frequency
TONE2 71 Filter Resonance
TONE3 79 Filter EG Intensity
TONE4 72 EG Release Time
USER1, 2 Varies for each Program
USER3 Often Chorus Depth - but can vary per Program
USER4 Often Reverb Depth - but can vary per Program](https://image.slidesharecdn.com/kromemusicworkstasion73key-160923011437/85/Krome-music-workstasion-73key-33-320.jpg)
![Playing and editing Programs
30
Changing parameter assignments
The factory Programs include default assignments of
Tone Adjust parameters to the sliders, and buttons in
the display. If you like, you can change any of the
assignments. To do so:
1. Access the Prog P0: Play– Tone Adjust page.
2. Press the popup button located to the left of the
assigned parameter.
A popup window will appear, with a long menu of
parameters. You can tell various things about the
selections, just from the way they appear in the menu:
Parameters which affect only OSC1 or OSC2 are
prefixed with [OSC1] and [OSC2], respectively.
Parameters which affect both Oscillators, but which are
specific to Programs, are prefixed with [OSC1&2].
The other group of parameters at the beginning of the
list, are “Common.” That is, you can use them with
most Programs.
Parameters can only be assigned to one Tone Adjust
control at a time. If a parameter is already assigned, it’s
grayed out.
3. Select a parameter from the menu.
The parameter is now assigned to the control. To close
the list without making any changes, press a location
in the display outside the popup window, or press the
EXIT button.
Comparing the unedited
sound
Using COMPARE
When you’re in the process of editing a sound,
pressing the COMPARE button will recall the last
saved version of the sound, as it was before you started
editing.
For details, please see “Compare function” on page 11.
Saving your edits
After you’ve edited a program, you must save it if you
want to keep the changes you’ve made. If you re‐select
the program or turn off the power after editing, your
edits will be lost.
1. Press the WRITE button.
The Write Program dialog box will appear. If you want
to modify the writing‐destination or name, you can do
so (see page 117).
2. Press the WRITE button once again to save (write)
the program.
For details, please see “Writing a Program or
Combination” on page 115.
You can also save programs on an SD card as PCG files.
For details, please see “Saving to SD card (Media–
Save)” on page 118.](https://image.slidesharecdn.com/kromemusicworkstasion73key-160923011437/85/Krome-music-workstasion-73key-34-320.jpg)

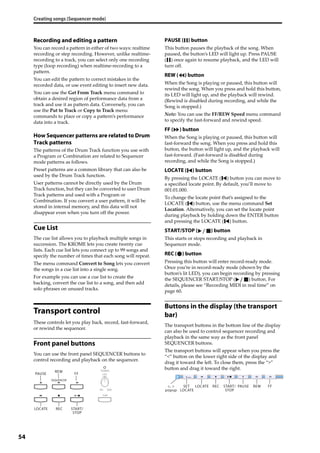
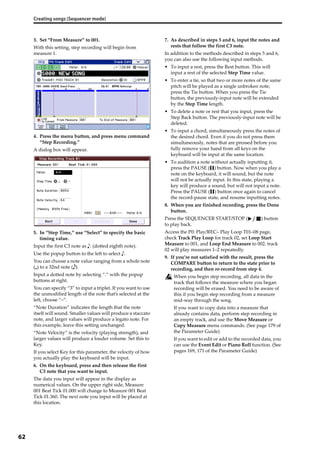
![Playing and editing Programs
34
4. Press the Multisample popup button for
multisample1.
This brings up a list of Multisamples, organized by
category. Use the tabs on the left of the display to
browse through the different categories.
5. Select a Multisample by touching its name in the
list. You can also use Find to search for a
Multisample.
6. Press the OK button to confirm your selection.
7. Perform the same steps for multisample2,
selecting a different Multisample than for
multisample1.
Now that you’ve assigned Multisamples to
multisample1 and multisample2, let’s set up the
velocity ranges and crossfades.
Multisamples have now been assigned to multisample
1 and 2.
8. Specify the velocity range and crossfade range.
Press the Velocity tab to access the OSC1 Velocity page.
Set the multisample 2 “Threshold Velocity” to 001, and
turn “Crossfade” Off.
9. Set the multisample 1 “Threshold Velocity” to 80.
You can also set “Threshold Velocity” by dragging the
bottom edge of the line graph.
With these settings, Multisample2 will sound for notes
played with a velocity of 79 or less, and Multisample1
will sound for notes played with a velocity of 80 or
greater.
The Velocity Split meter shows the oscillator’s eight
multisamples and the velocity zones of each oscillator.
The meter on the left shows the note‐on velocity. This
lets you see which multisample and oscillator will
sound for that specific velocity.
10. Set the multisample 1 “Crossfade” to 20, and its
“Curve” to Linear.
The state of this split is shown visually in the screen.
The two multisamples will fade across the range from
80 to 100, with multisample 2 fading‐out while
multisample 1 fades‐in. This produces a smooth
change without any sudden switch.
11. As necessary, use the Prog P2: OSC/Pitch– OSC1
Setup page to adjust the “Level” of the two
multisamples.
Assigning a drum kit
What is a drum kit?
Drum kits are created or edited in Global mode. For
each note of the keyboard, you can assign up to eight
drum instrument samples, and use layering,
crossfading, or velocity switching to switch between
them. Then, in Program mode, you can adjust filter
and amp settings, and specify effects and routing to the
audio output jacks. (See page 105)
To use a drum kit in a Program, set Oscillator Mode to
Drums or Double Drums, and choose one of the 48
user drum kits or the nine GM2 drum kits.
Selecting a drum kit
1. Access the Prog P1: Basic/Controllers– Program
Basic page.
2. Set “Oscillator Mode” to Drums or Double
Drums.
3. Select a drum kit in the Prog P2: OSC/Pitch– OSC1
Setup page.
4. Specify the basic pitch of the oscillator. For a drum
kit, set “Octave” to +0 [8ʹ].
Multisample popup button](https://image.slidesharecdn.com/kromemusicworkstasion73key-160923011437/85/Krome-music-workstasion-73key-38-320.jpg)

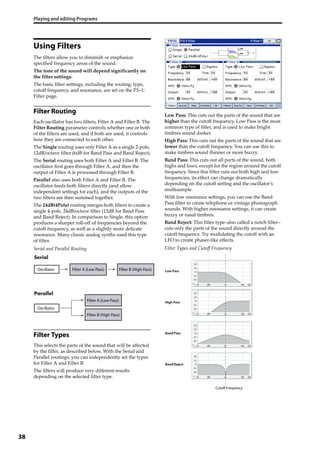


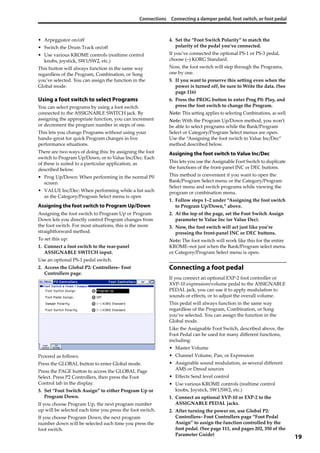
![Dynamic modulation, Common FX LFO Common FX LFO
83
Common FX LFO
Two Common FX LFOs are available for modulation
effects, such as choruses, filters, phasers, etc. Normally,
the phase of the LFOs of multiple modulation‐type
effects will not be synchronized even if you set them to
the identical Frequency, since the LFOs are being
generated independently.
However, if you select Common 1 or Common 2 for the
LFO Type parameter of a modulation‐type effect, the
effect will use the one of the common LFOs instead of
its own individual LFO. This allows you to use a single
Common FX LFO to control two or more modulation‐
type effects such as flanger, phaser, or auto‐pan with
the same phase. Since you can make independent
settings for LFO waveform and phase offset for each
effect, you are free to create complex combinations of
effects.
Stereo FlangerCommon FX LFO1
Common FX LFO
Stereo Phaser
Stereo Auto Pan
Waveform = TriangleFrequency[Hz]
Reset Phase Offset = 0 [deg]
Waveform = Sine
Phase Offset = 0 [deg]
Waveform = Sine
Phase Offset = +90 [deg]
LFO Type = Common1
Generate original LFO waveform](https://image.slidesharecdn.com/kromemusicworkstasion73key-160923011437/85/Krome-music-workstasion-73key-87-320.jpg)


![105
Using Drum Kits
Drum Kit Overview
What’s a Drum Kit?
A drum kit is a collection of drumsamples (drum set
sounds such as bass drum, snare, or cymbals, as well as
a wide variety of other percussion sounds), with each
sample assigned to a note of the keyboard.
• Each key can play a different sound
• On each key, you can use up to eight Drumsamples,
with velocity crossfades
• Each key has separate settings for the most
important sound parameters, including volume,
filter cutoff and resonance, envelope attack and
decay, pitch, drive and low boost, and gain for each
band of the Program EQ.
For instance, you could combine high drive and
low cutoff frequency to create a lo‐fi effect on only a
few sounds, while the rest of the sounds remained
clear and pristine.
• Each note can be routed to different Insert Effects,
or have separate FX Send amounts. For instance,
you can send a snare sound through a dedicated
compressor.
You can use Drum Kits only in Programs whose
Oscillator Mode is set to Single or Double Drums.
Drum Kit memory structure
The KROME has over 161 Drum Kits, divided into
Internal, User, and GM (General MIDI) groups as
shown below. You can edit or write into any of the
locations except for the GM bank, which cannot be
erased.
Drum Kit contents
The 9 Drum Kits in the GM bank are compatible with
the GM2 sound map. The other Drum Kits may use
different mappings, where appropriate.
Using a drum kit in a program
(Oscillator Mode)
In the Program P1: Basic Ctrls– Program Basic page, set
the Oscillator Mode parameter to Drums or Double
Drums. Then for the oscillator, select the drum kit that
you want to use.
Before you start editing…
Selecting a drum program
Drum Kits are edited in Global Mode. While you’re in
Global Mode, you’ll play the kit that you’re editing as if
you were playing it from within the Program, Combi,
or Song which was selected before you entered Global
mode.
So, before you enter Global mode, it’s best to select a
Program which is already set up for drums, with the
appropriate EG settings, effects, and so on. Just use the
Program Category select popup, and choose a drum
Program such as “Studio Standard Kit.”
Even if the program’s oscillator is set to Double
Drums, this page will show only the single drum
kit that is selected by Drum Kit Select.
Matching the key of the keyboard
with the drum kit
In order for the note mappings to match the keyboard,
the Oscillator’s Octave setting needs to be +0 [8ʹ]. All
Drum Kit Programs should have this setting already. If
you’re unsure, you can check this yourself:
1. Go to the OSC1 Setup tab of the OSC/Pitch page.
With a setting other than +0 [8ʹ], the relationship
between the keys and the Drum Kit sound map will be
incorrect.
2. Set the Global P0: Basic Setup– Basic parameter
“Key Transpose” to +00.
Make sure that Memory Protect is
disabled
Before you start editing, go to the Global P0: Basic
Setup– System Preferences page, and look in the
Memory Protect section. Make sure that Drum Kit is
not checked–if so, you won’t be able to make any edits.
Drum Kits may be used by more than
one Program
When you edit a Drum Kit, all Programs that use that
Drum Kit will be affected. To avoid changing the
factory voicing, you may wish to copy Drum Kits to
empty locations in the USER banks before editing.
Bank No. Contents
INT 00...31 Preload Drum Kits
User 32...47 User Drum Kits
GM 0 48...56 GM2 Drum Kits](https://image.slidesharecdn.com/kromemusicworkstasion73key-160923011437/85/Krome-music-workstasion-73key-109-320.jpg)
![Editing a Drum Kit
107
5. Select a Drumsample by touching its name in the
list.
6. Press the OK button to confirm your selection.
7. Switch the slot to 2, and make settings for
Drumsample 2 in the same way.
Now that you’ve assigned Drumsamples to
Drumsample1 and Drumsample2, let’s set up the
velocity ranges and crossfades.
8. Access the P5: Drum Kit– Velocity Split page.
9. Set Drumsample2’s Threshold Velocity to 1, and
its Crossfade to Off.
10. Set Drumsample1’s Threshold Velocity to 80.
You can edit the Threshold Velocity setting by
touching and dragging the graphic on the right
(see “* EG, Velocity Split” on page 6).
Now, Drumsample2 will sound when you play softly,
at velocities of 79 or less–and Drumsample1 will sound
when you play harder, with velocities of 80 or more.
The meter at the left side of the Velocity Split graphic
indicates the note‐on velocity value. This lets you
verify the drumsample that will be sounded by a given
velocity.
11. Next, set Drumsample1’s Crossfade to 20, and its
Curve to Linear.
Notice that the graphic now shows the two ranges
tapering into one another. Between 80 and 100,
Drumsample2 will fade out, and Drumsample1 will
fade in, creating a gradual velocity transition instead of
a hard split.
Fine-tuning the sound of each sample
1. If you like, adjust the Levels for the two
Drumsamples.
This can be very useful in creating a smooth velocity
split or crossfade.
2. As necessary, specify the tuning, EG parameters,
and filter.
Access the P5: Drum Kit– Sample Parameter page.
Adjust Tune, Attack (Amp EG Attack), Decay (Amp
EG Decay), Cutoff and Resonance for each
drumsample.
3. You can also edit the drive, boost, and EQ for each
drumsample.
Access the P5: Drum Kit– Drive/EQ page.
Adjust Drive, Low Boost, and 3 Band EQ Gain [dB]
for each drumsample.
4. Repeat “Basic Editing,” on page 106 to set up each
key of the Drum Kit.
5. You can also copy settings from one key to
another, using the Copy Key Setup menu
command.
Using Exclusive Groups
1. Access the P5: Drum Kit– Voice/Mixer page.
2. Use the Exclusive Groups to make one drum
sound cut off another drum sound ‐ such as closed
and open hi‐hats.
For example, let’s say that you’ve assigned an open hi‐
hat and a closed hi‐hat to the same exclusive group:
• Play the open hi‐hat sound.
• While it’s still ringing, play the closed hi‐hat.
• The open hi‐hat sound will be cut off–simulating
the action of a physical hi‐hat.](https://image.slidesharecdn.com/kromemusicworkstasion73key-160923011437/85/Krome-music-workstasion-73key-111-320.jpg)


![Error messages Error and confirmation messages
133
R
Root directory is full
Meaning: When attempting to create a file or directory
at the root level of the media, you exceeded the
maximum number of files or folder that could be
created in the root directory of that media.
• Either delete an existing file or directory, or Open a
directory to move down one level before creating a
file or directory.
S
Selected file/path is not correct
Meaning: When loading a divided .PCG file, you
attempted to load a .PCG file of the same name that
was not divided or had differing contents.
• Load the correct .PCG file.
Source is empty
Meaning: No data exists in the track or pattern that
you specified as the source.
• Specify a track or pattern that contains musical
data.
Meaning: This message will appear when you execute
Swap Insert Effect if one of the effects to be swapped
(“Source1” or “Source2”) is a double‐size effect, and is
therefore an unusable IFX number.
• If you want to execute the Swap procedure on a
double‐size effect, specify an IFX number to which
a double‐size effect is assigned.
T
The internal memory has been corrupted, likely
due to an interruption of power while the system
was writing/saving data. This has been repaired
and the affected Bank has been initialized. [OK]
Meaning: A memory write procedure did not end
normally, perhaps because the power was turned off
while processing was still underway after you wrote a
program or other data into internal memory.
• The KROME will automatically initialize itself in
order to repair the internal memory. This message
will appear at this time; press OK to close the
dialog box. In some cases, the preload bank data
may be temporarily initialized. As necessary, use
the Global mode Load Preload/Demo Data
command to load the preload data into internal
memory, or if you have your own backup PCG,
load it using Media mode.
There is not readable data
Meaning: Either the file size is 0 or the file does not
contain data that can be accessed by the load or open
procedure. Alternatively, the data is damaged etc., and
cannot be loaded or accessed.
This file is already loaded
Meaning: When loading a divided .PCG file, you
attempted to load a file that had already been loaded.
• Load the .PCG files that have not yet been loaded.
U
Unable to create directory
Meaning: You attempted to create a directory that
would exceed the maximum path name length (76
characters for the full path name).
Unable to save file
Meaning: When executing the Media mode Utility
menu command Copy, the copy destination path
length exceeded 76 characters.
Meaning: When saving a file in Media mode, the save
destination path exceeded 76 characters.
Meaning: When you executed the Media mode Utility
menu command Copy, the file management data
exceeded the size of the management area.
Y
You can’t undo this operation Are you sure?
Meaning: Once you enter event editing (even if you
leave event editing without actually editing an event),
it will no longer be possible to execute Compare to
listen to the previous edit. If you wish to enter event
editing, press the OK button. To cancel, press the
Cancel button.
You can’t undo last operation Are you sure?
Meaning: When you exit recording or event editing in
Sequencer mode, the memory area for Undo (Compare
function) is not allocated. If you wish to keep the data
that was just recorded or edited, press the OK button.
If you wish to return to the previous data (i.e., to delete
the data that was just recorded or edited), press the
Cancel button.
Meaning: When editing in Sequencer mode, memory
area for Undo (Compare function) cannot be allocated.
If you wish to execute the edit, press the OK button (It
will not be possible to undo your edit). If you decide
not to execute the edit, press the Cancel button.
• In order to allocate memory area for Undo
(Compare function), delete unneeded data such as
songs, tracks, or patterns. We recommend that you
data to media before you execute the edit
procedure.](https://image.slidesharecdn.com/kromemusicworkstasion73key-160923011437/85/Krome-music-workstasion-73key-137-320.jpg)
![Appendices
134
Specifications
Operating temperature 0 – +40 °C
Keyboard
61-note
Semi-Weighted Keyboard (velocity sensitive, no aftertouch)
Normally C2–C7 (adjustable in the range [C1...C6]–[C3...C8])
73-note
Semi-Weighted Keyboard (velocity sensitive, no aftertouch)
Normally C1–C7 (adjustable in the range [C0...C6]–[C2...C8])
88-note
NH (Natural weighted hammer action) Keyboard (no aftertouch)
* The NH Keyboard delivers a playing feel similar to that of an acoustic piano, with low
notes being heavier and high notes being lighter.
System EDS-X (Enhanced Definition Synthesis-eXpanded)
Sound Engine
Maximum Polyphony
120 voices max, single mode
60 voices max, double mode
* The actual maximum polyphony will vary depending on oscillator settings such as
stereo multisamples and velocity crossfading.
Preset PCM
3.8 Gbytes (when calculated as 48kHz 16-bit linear data)
583 multisamples (including twelve stereo),
2,080 drumsamples (including 474 stereo)
Programs
Oscillator
OSC1 (Single), OSC1+2 (Double): Stereo multisamples are supported
8 velocity zones per oscillator, with switching, crossfades and layers.
Filters
Four types of filter routing (single, serial, parallel, 24 dB)
Two multi-mode filters per voice (low pass, high pass, band pass, band reject)
Driver Per-voice nonlinear driver and low boost.
EQ Three bands, with sweepable mid.
Modulation
For each voice, two envelope generators (Filter & Amp), two LFOs, two key tracking
generators (Filter & Amp), and two AMS mixers
In addition, pitch EG, common LFO, and two common key tracking generators
Combinations
16 Timbres
Up to sixteen timbres, keyboard and velocity split/layer/crossfade, and modifications
to the program setting via the Tone Adjust function
Master Keyboard
functionality
These allow you to control external MIDI devices
Drum Kits
Stereo and mono drumsamples.
8-way velocity switches with crossfades and adjustable crossfade shapes (Linear, Power, Layer).
The number of
…
-Combinations
-Programs
-Drum Kits
User Combinations 512 Combinations/384 Preload
User Programs 768 Programs/640 Preload
User Drum Kits 48 Drum Kits/32 Preload
Preset Programs 256 GM2 Programs + 9 GM2 Drum Programs
Effects
5 Insert Effects In-line processing; stereo in - stereo out.
2 Master Effects Two effects sends; stereo in - stereo out.
1 Total Effect
For overall processing on the main outputs, such as compression, limiting, and EQ;
stereo in - stereo out.
3-band Track EQ
High, low, and sweepable mid band. Per Program in Program Mode, per Timbre in
Combination mode (16 total), and per Track in Sequencer mode (16 total).
Effects types
193 types (Usable for insert, master, or total effects. However, double-size effects
cannot be used as the total effect.)
Modulation Dynamic Modulation, two common LFOs
Effects Control Bus Stereo side-chaining for limiter, gates, vocoders, etc.
Effects Presets Up to 32 per Effect
Dual polyphonic arpeggiators
Program mode: one arpeggiator available. Combination and Sequencer modes: two arpeggiators available.
5 preset arpeggio patterns
1028 user arpeggio patterns (900 preload)
Drum Track
Preset patterns 605 patterns (Held in common with sequencer preset patterns.)
User patterns
1,000 patterns. Patterns created in Sequencer mode can be converted to drum track
user patterns.
Trigger Mode / Sync / Zone settings can be specified
Sequencer
16 MIDI Tracks & 1 Master Track
128 Songs
Resolution: 480 ppq (parts per quarter-note)
Tempo: 40.00–300.00 bpm (1/100 bpm resolution)
Up to 210,000 MIDI events
16 preset/16 user template songs
Cue List function
20 cue lists. Songs can be arranged consecutively or repeatedly in up to 99 steps. A cue
list can be converted back into a song.
Patterns/RPPR
605 Presets /100 User Patterns (per Song)
RPPR (Realtime Pattern Play/Recording): 1 set per Song.
Format Korg (KROME) format, SMF (formats 0 and 1) supported
Media
Load, Save, Utility
Data Filer functionality (Save and Load MIDI System Exclusive Data)](https://image.slidesharecdn.com/kromemusicworkstasion73key-160923011437/85/Krome-music-workstasion-73key-138-320.jpg)
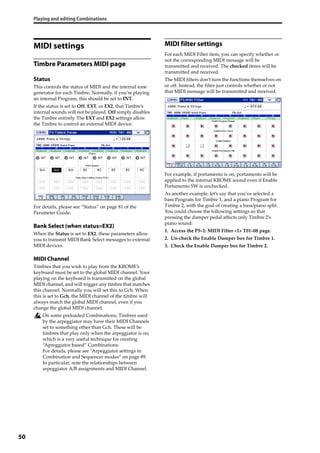
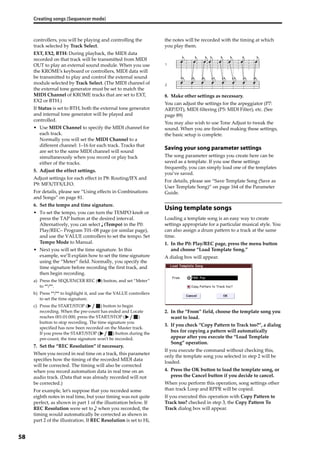
![MIDI Implementation Chart
Consult your local Korg distributor for more information on MIDI IMPLEMENTATION.
MIDI Implementation Chart
Date : 2011. 10. 04
Ver.: 1.00
KROME
*C
*E, *4
Whencuelistisselected,correspondstocuelist. *1
Whencuelistisselected,correspondstocuelist0-19. *1
*1
*1
*P
Memorized
[Music Workstation]
PolyphonicaftertouchandChannelaftertouch *A(receive)
transmittedonlyassequencedata *A(receive)
All note numbers 0–127 can be transmitted
by the Arpeggiator or as sequence data
Bank Select (MSB, LSB) *P
Joystick (+Y, –Y), Knob1-4 *C
Pedal, Portamento Time, Volume, IFX pan, Pan *C
Expression, Effect Control 1, 2 *C
Damper, Portamento Sw., Sostenuto, Soft *C
Sound(RealtimeControlTONE1–4:74,71,79,72) *C
Switch 1, 2, Foot Switch, Controller *C
Send 1, 2, Effect ON/OFF (IFXs, MFXs, TFX) *C
Arpeggiator Controllers *C, *2
Data Entry (MSB, LSB) *C
Data Increment, Decrement *C
RPN (LSB, MSB) *C, *3
RealtimeControlUSER1−4,Seq.Data *C(Seqwhenreceived)
All Sound Off, Reset All Controllers *C
0, 32
1, 2, 17, 19, 20, 21
4, 5, 7, 8, 10
11, 12, 13
64, 65, 66, 67
70–79
80–83
91–95
14, 22–25
6, 38
96, 97
100, 101
0–119
120, 121
Notes *P, *A, *C, *E: Transmitted/received when Global P1: MIDI Filter (Program Change, Aftertouch, Control Change, Exclusive) is Enable, respectively.
*1: When Global P1: MIDI Clock is Internal, transmitted but not received. The opposite for External MIDI.
*2: Valid if assigned as a MIDI control change in Global P2: Controllers. The number shown here is the CC default assignment.
*3: RPN (LSB,MSB)=00,00: Pitch bend range, 01,00: Fine tune, 02,00: Coarse tune
*4: In addition to Korg exclusive messages, Inquiry, GM System On, Master Volume, Master Balance, Master Fine Tune, and Master Coarse
Tune are supported.
System
Real Time
Clock
Command
Aux
Messages
Local On/Off
All Notes Off
Active Sense
Reset
Function Transmitted Recognized Remarks
Basic
Channel
Default
Changed
Aftertouch
Pitch Bend
Polyphonic (Key)
Monophonic (Channel)
Program
Change Variable Range
System Exclusive
System
Common
Song Position
Song Select
Tune
Velocity Note On
Note Off
Note
Number: True Voice
Mode Memorized
Messages
Altered
Control
Change
Mode 1: OMNI ON, POLY Mode 2: OMNI ON, MONO : Yes
Mode 3: OMNI OFF, POLY Mode 4: OMNI OFF, MONO : No
0 – 127
9n, V=1 – 127
0 – 127
1 – 16
1 – 16
0 – 127
0 – 127
9n, V=1 – 127
0 – 127
0 – 127
0 – 127 0 – 127
123 – 127
1 – 16
1 – 16
3](https://image.slidesharecdn.com/kromemusicworkstasion73key-160923011437/85/Krome-music-workstasion-73key-140-320.jpg)


The document provides information about the manuals that come with the Korg KROME music workstation. It includes a video manual, quick start guide, operation guide, parameter guide, and voice name list. The operation guide explains how to use the KROME's features, edit sounds, record in the sequencer, and more. The parameter guide details each parameter in the KROME. The document also outlines some conventions used in the manuals.