Jump N-Carry JNCAIR 1700 Jump Starter User Manual
•
1 like•1,271 views

This is the user manual of Jump N-Carry JNCAIR 1700 Jump Starter. >> READ MORE: https://www.obdadvisor.com/jump-starter-with-air-compressor/ Here is a detailed review of the best jump starters based on my own experience, including: - Compatibility - Features and Functions - Pros and Cons Check it out to get the REVIEW and some NOTES about using the tool.

More Related Content
What's hot
Similar to Jump N-Carry JNCAIR 1700 Jump Starter User Manual
Similar to Jump N-Carry JNCAIR 1700 Jump Starter User Manual (20)
More from Tim Miller
More from Tim Miller (20)
Recently uploaded
Recently uploaded (20)
Jump N-Carry JNCAIR 1700 Jump Starter User Manual
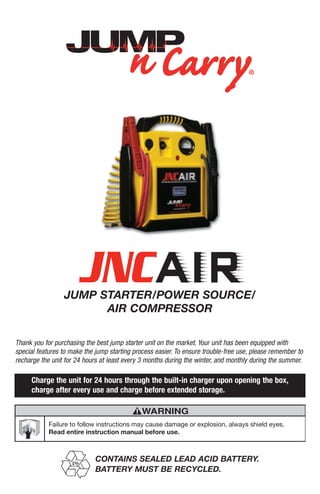
- 1. JUMP STARTER/POWER SOURCE/ AIR COMPRESSOR Thank you for purchasing the best jump starter unit on the market. Your unit has been equipped with special features to make the jump starting process easier. To ensure trouble-free use, please remember to recharge the unit for 24 hours at least every 3 months during the winter, and monthly during the summer. Charge the unit for 24 hours through the built-in charger upon opening the box, charge after every use and charge before extended storage. Pb CONTAINS SEALED LEAD ACID BATTERY. BATTERY MUST BE RECYCLED. Failure to follow instructions may cause damage or explosion, always shield eyes. Read entire instruction manual before use. WARNING
- 2. Safety Information General precautions for use: • Never work alone with electrical equipment. Make sure that someone is around to give assistance if you need help. • Always store, use, and charge the Jump-N-Carry® in an area where children cannot get to the unit. • The charger uses household 110/120 Volt electrical supply, which if misused, may cause injury or fire. • Use the Jump-N-Carry® to charge/jump start lead-acid batteries only. Do not use the unit to recharge dry cell batteries. • Remove jewelry such as rings, bracelets, necklaces and watches when working around a battery. A lead acid battery can produce a short circuit current, which can melt metals and result in a severe burn. • Do not drop tools or other metal objects on or near the battery as a spark may result, igniting explosive gases. • Never jump start or attempt to recharge a frozen battery. WARNING Read these instructions completely before using the Jump-N-Carry® and save them for future reference. Before using the Jump-N-Carry® to jump start a car, truck, boat or to power any equipment, read these instructions and the instruction manual/safety information provided by the car, truck, boat or equipment manufacturer. Following all manufacturers’ instructions and safety procedures will reduce the risk of accident. Working around lead-acid batteries may be dangerous. Lead-acid batteries release explosive gases during normal operation, charging and jump starting. Carefully read and follow these instructions for safe use. Always follow the specific instructions in this manual and on the Jump-N-Carry® each time you jump start using the Jump-N-Carry® . All lead-acid batteries (car, truck and boat) produce hydrogen gas which may violently explode in the presence of fire or sparks. Do not smoke, use matches or a cigarette lighter while near batteries. Do not handle the battery while wearing vinyl clothing because static electricity sparks are generated when vinyl clothing is rubbed. Review all cautionary material on the Jump-N-Carry® and in the engine compartment. Always wear eye protection, appropriate protective clothing and other safety equipment when working near lead-acid batteries. Do not touch eyes while working on or around lead-acid batteries. Always store clamps in their holsters, away from each other or common conductors. Improper storage of clamps may cause the clamps to come in contact with each other, or a common conductor, causing the battery to short circuit and generate high enough heat to ignite most materials. Never touch the air compressor or fittings connected to the air compressor, with bare hands during or immediately after usage. It will become very hot during and after use, if necessary, wear heat resistant gloves. Use extreme care while working within the engine compartment, because moving parts may cause severe injury. Read and follow all safety instructions published in the vehicle's Owner's Manual. While the battery in the Jump-N-Carry® is a sealed unit with no free liquid acid, batteries being charged with the Jump-N-Carry® unit likely contain liquid acids which are hazardous if spilled.
- 3. Jump Starting Instructions 1. Use in a well ventilated area. Shield eyes with safety glasses or goggles. 2. Turn off the ignition before making cable connections. NOTE: A good, solid and clean connection is essential for a successful jump start (see Performance and Temperature section). 3. Taking care to never touch the clamps together, first remove the RED POS (+) clamp from it’s holster and connect it to the RED POS (+) battery terminal. Then remove the BLACK NEG (–) clamp from it’s holster and connect it to the engine ground, or a non-moving metal engine part. Never connect to the fuel line, fuel injector or carburator as the engine ground. NOTE: Many vehicles feature alternate starting points, away from the battery. Always use the alternate starting points whenever available. CAUTION: Stay clear of batteries while jump starting. 4. After jump starting, disconnect the BLACK NEG (–) clamp first, then disconnect the RED POS (+) clamp. 5. Always return the clamps to their holsters after use. Never attach the clamps to the handle of the Jump-N-Carry® . 6. After use, recharge the Jump-N-Carry® (see Recharging Jump-N-Carry® section). When jump starting, do not use the unit for more than 6 seconds without a 3 minute rest period between use. See the Warranty for important details. To ensure trouble-free use, please remember to recharge the unit for 24 hours at least once every 3 months during the winter, and monthly during the summer (see Recharging Jump-N-Carry® section). Air Compressor Instructions 1. Remove valve stem cap and connect compressor hose to the valve stem. 2. Turn on the air compressor and use the gauge to monitor the tire's pressure. 3. Once the tire has reached the appropriate PSI (noted on the tire or in the Owner's Manual), turn off the compressor. 4. Disconnect the compressor hose and return to storage clip. It is always good practice to test the tire pressure with an independent and properly calibrated tire gauge. 5. Replace valve stem cap. NOTE: The Jump-N-Carry® air compressor features an overheating protection switch that could result in a temporary shut-down of the air compressor while in use, if recommended operating temperature is exceeded. After cooling, the air compressor will reset itself and resume normal operation. Your air compressor is equipped with a permanently lubricated, maintenance free motor. Never try to lubricate the compressor. Regularly clean dust and dirt from the compressor cooling fins.
- 4. Performance and Temperature Performance of your Jump-N-Carry® will depend upon several factors: • A good, solid connection between the Jump-N-Carry® clamps and the battery and ground connections are a must. Moving the clamps back and forth while connecting to the battery will help create a better connection. • Clean connections between your vehicle or equipment battery and its terminals are very important. For an optimal connection, corrosion (soft grayish-white build-up) on battery terminals must be removed. With the ignition turned off, disconnect the battery cables and clean the terminals and battery posts with a baking soda solution. • All batteries are affected by temperature changes, and the small, lightweight battery in the Jump-N-Carry® is more sensitive to storage temperature than a standard automotive battery. Temperatures above 20ºC decrease amperage output. The ideal storage environment is room temperature, or 68ºF. Battery Status Gauge Press and hold the red test button to display the battery status on the gauge. • The Green shaded area indicates the unit is capable of jump starting. • The Yellow shaded area indicates the unit needs to be recharged. • The Red shaded area indicates the unit must be recharged before use. You can also get a quick check of the vehicle’s charging system by depressing the red test button while connected to a running vehicle and observing the gauge. 12 Volt DC Power The Jump-N-Carry® is equipped with a standard 12 volt DC outlet. Plug any accessory up to 12 Amps into the socket and the Jump-N-Carry® will provide power. If the amperage rating is exceeded, a built-in auto-reset circuit breaker automatically shuts power off until the accessory, or overload source, is removed. After extreme power source usage, recharge the unit for 36-48 hours. Storage The Jump-N-Carry® may be stored virtually anywhere, and in any position. However, take precautions to ensure that the positive and negative clamps do not come into contact with each other or a common metal surface. We recommend storing the Jump-N-Carry® in the box in which it was originally received.
- 5. Recharging Jump-N-Carry Recharging Using AC Power The Jump-N-Carry® requires a household extension cord (not included) for AC charging. • Plug the female end of the extension cord into the charger plug on the front of the unit. The charger plug has 2 blades and resembles a standard household plug that would fit into a 120 Volt AC wall outlet. • Plug the male end of the extension cord into a 120 Volt AC outlet. NOTE: The Jump-N-Carry® features automatic AC recharging, which eliminates the possibility of overcharging the unit. Charge the unit for the recommended amount of time, as indicated below. Once the time has expired, check the battery charging status gauge (see Battery Status Gauge section) to ensure charging is complete. It is recommended that the Jump-N-Carry® be recharged after every use. SUGGESTED AC RECHARGE TIMES After a single jump start: 1 hour After using the air compressor: 12 hours or overnight After using as portable power: 24-36 hours Recharging Using 12 Volt Power Jump-N-Carry® may also be recharged by using the included Male-Male 12V Extension Cord (Part No. ESA1). Plug one end into the 12 Volt outlet on the Jump-N-Carry® and the other end into the vehicle’s 12 Volt power port socket. The vehicle must be running to charge with this method. SUGGESTED 12 VOLT RECHARGE TIMES After jump starting: 20 minuntes After using the air compressor: 2 hours After using as portable power: 2 hours NOTE: It is strongly recommended that the Jump-N-Carry® be recharged using the AC charging method. Recharging from a vehicle’s 12 volt power outlet should be done only when the AC alternative is unavailable.
- 6. Troubleshooting/FAQs Q. What should I do if the Jump-N-Carry® will not hold a charge? A. Load test the battery. Charge battery 24 hours before load testing. Connect a load tester (available at your local auto parts store) to the Jump-N-Carry® clamps to check battery amperage. Depending on the model of load tester, your load testing procedure may vary. A generic load test would bring the voltage down to 9.0 volts and result in an amp reading of 70 amps for 6 seconds. Repeat this load test every 10 minutes for a total of three tests. If the amperage has dropped below 50 amps on the last test, suspect a bad or weak battery. Q. What is the ideal use for the Jump-N-Carry® ? A. The Jump-N-Carry® performs strongly when a vehicle’s battery needs an extra boost because a light or radio was left on, or when a vehicle has been sitting for a long period of time. The Jump-N-Carry® will start vehicles without any other batteries present, but the primary use is for an extra boost. Q. Will the Jump-N-Carry® start every vehicle? A. No. In addition to a dead battery, a car may have other mechanical problems that would prevent the Jump-N-Carry® from starting the vehicle. Battery Replacement and Disposal The Jump-N-Carry® battery may be removed by unscrewing the perimeter screws on the back cover. Disconnect the wires from the battery terminals. Note the position of the battery and wire locations. • Two wire connections go to each terminal. • The small wires are color coded – red for positive, black for negative. • The large cable is identified by the color of the clamp attached to the cable – red for positive, black for negative. Caution: It is possible for the cables to become crossed inside the case when the battery is removed. The cables always travel straight to the battery terminals and should never cross each other. • All red wires (red clamp) attach to the positive side of the battery. All black wires (black clamp) attach to the negative side of the battery. • To connect a new battery, slide the battery fully into the case. Note the color of the wires and match the color to the battery terminals. • Replace the perimeter screws on the back cover. • Charge the for 24 hours upon installation of a new battery. The authorized replacement battery for the Jump-N-Carry® JNCAIR is the Clore PROFORMER Battery Model No. JNC105. JNC105 is a kit that includes the battery and all necessary hardware. Pb This unit contains a sealed non-spillable lead-acid battery. This battery must be recycled. Consult your state or local government concerning regulations for proper disposal.
- 7. Q. How often should I recharge the Jump-N-Carry® ? A. To maximize battery life, charging after every use is recommended. The Jump-N-Carry® should not be left in a discharged state. The battery in the Jump-N-Carry® has no memory problems and should not be treated as a rechargeable tool (cordless drills, camcorders, etc.). Q. How many jump starts can I get from the Jump-N-Carry® before recharging? A. A large number of factors affect this answer, including the following: the length of time for each jump start, the charge level of the original battery, the length of time between jump starts, the temperature of the vehicles being jump started (winter cold makes for difficult starting), the size of the engines (4-cycl, 6-cycl, 8-cycl, etc.), the mechanical condition of the engine and starter, and more. These factors must all be weighed on an individual basis before an accurate answer can be given. It’s feasible to get 10-30 starts (individual’s results will differ) from a single charge, but this violates the rule of immediate charging after every use. Q. After jump starting, can I leave the unit hooked to the battery to recharge the Jump-N-Carry® while the engine is running? A. NO. Attempting to recharge the Jump-N-Carry® by this method is not recommended. Vehicle alternators output anywhere from 25-125 amps. This charging rate greatly exceeds the recommended recharging rate for Jump-N-Carry® . Charging by this method will result in overcharging the Jump-N-Carry® battery, and may void the product warranty. Q. What accessories can be used in the optional 12 volt outlet? A. Any accessory up to 12 amps can be powered by the Jump-N-Carry® . This unit is equipped with an automatic reset circuit breaker should the current exceed 12 amps. At the same time, this limits any recharge current through the 12-volt outlet to 12 amps. One can power almost any 12-volt tool or accessory (examples: impact wrenches, fans, radios, cellular phones, navigation equipment, camcorders, emergency power, trolling motors, coolers, small refrigerators, etc.). Q. How long should I expect the Jump-N-Carry® to take to fill my tire? A. Many aspects affect how quickly a tire will fill, but a good rule of thumb is that a typical car tire that is completely flat will fill within 4-7 minutes. Q. After using the air compressor for a long period of time, sometimes it shuts off – is this normal? A. Yes. The safety features of the Jump-N-Carry® include a sensor to ensure that the compressor does not exceed it’s recommended operating temperature range. Contributing factors for higher temperatures while in use are: long operating cycles, low battery charge, clogged vents, operation in a poorly ventilated environment. Q. Why is the Jump-N-Carry® taking too long to inflate a tire? A. With the hose attached to your tire stem and the compressor running, apply small amounts of soapy water to the hose connections. The presence of bubbles indicates a potential problem. Make sure the connection is properly tightened. If this does not stop the leak, contact Clore Automotive Technical Service.
- 8. Jump-N-Carry® Limited Warranty Clore Automotive warrants the Jump-N-Carry® to be free from defects in material and workmanship, excepting abuse or misuse, for a period of 1 year from the date of sale to the original user or consumer purchaser. If the Jump-N-Carry® malfunctions or fails within the warranty period, return it to your place of purchase, compete with your dated sales receipt, for an over-the-counter exchange. You may also ship the unit (with original sales reciept) to us for warranty service at the address listed at the bottom of this page. This warranty excludes and does not include malfunctions or failure of the Jump-N-Carry® which were caused by mishandling, modifications, normal wear, unreasonable use or damage to the Jump-N-Carry® . This warranty is in lieu of all other express warranties. The duration of any implied warranty, including but not limited to any implied warranty of merchantability or fitness for a particular purpose, made in respect to the Jump-N-Carry® is limited to the period of the express warranty set forth above. In no event shall Clore Automotive be liable for consequential or incidental damages. Some states do not allow limitations on the length of the implied warranty or the exclusion or limitation of incidental or consequential damages so the above limitations or exclusions may not apply to you. This warranty gives you specific legal rights and you may also have other rights which vary from state to state. For Warranty or Service Technical Service will quickly diagnose a problem with your Jump-N-Carry® . To obtain the fastest and most efficient repair of your unit, perform the following steps: 1. If the unit will not jump start, recharge the unit for 24 hours. 2. If recharging the unit does not solve the problem, call Clore Automotive Technical Service at (913) 310-1050. 3. If your Jump-N-Carry® needs replacement parts, call Clore Automotive Technical Service at (913) 310-1050 for express part delivery. Jump-N-Carry Warranty Service Department 8600 NE Underground Drive, Pillar 248 Kansas City, MO 64161 (913) 310-1050 WARNING: This product contains chemicals, including lead, known to the State of California to cause Cancer and birth defects or other reproductive harm. Wash hands after handling. © 2005 Clore Automotive 842-026-000