


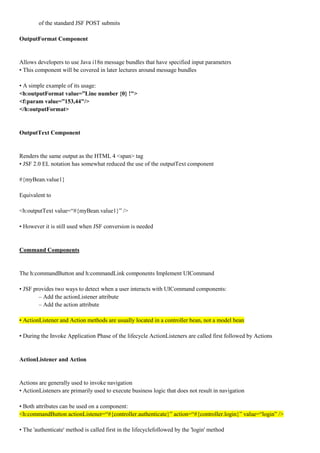
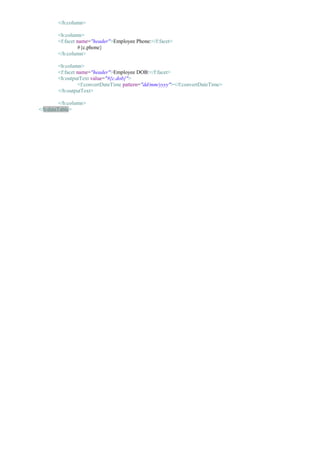
![Basic Selection Tag Usage
Each selection tag works like a parent-child container, and
has two necessary parts
The parent tag with the currently selected value:
<h:selectOneMenu value="#{modelBean.ourColor}">
The child tag(s) listing available items:
<f:selectItem itemLabel="Red" itemValue="red" />
The finished selectOneMenu code would be:
<h:selectOneMenu value="#{modelBean.ourColor}">
<f:selectItem itemLabel="Red" itemValue="red" />
<f:selectItem itemLabel="Green" itemValue="green" />
<f:selectItem itemLabel="Blue" itemValue="blue" />
</h:selectOneMenu>
Dynamic Selection Tag Usage
The available items can also be dynamically pulled from a bean:
<h:selectOneMenu value="#{modelBean.ourColor}">
<f:selectItems value="#{modelBean.availableColors}" />
</h:selectOneMenu>
The dynamic items could be an Array of Strings:
private String[] availableColors = {"Red", "Blue", "Green"};
public String[] getAvailableColors() {
return availableColors;
}
The items can now be modified directly in the backing bean list instead of at the page level
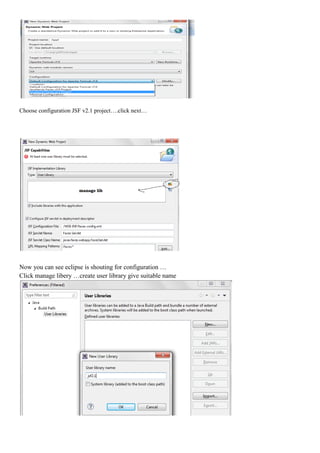
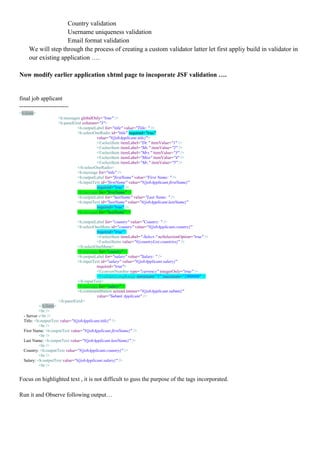
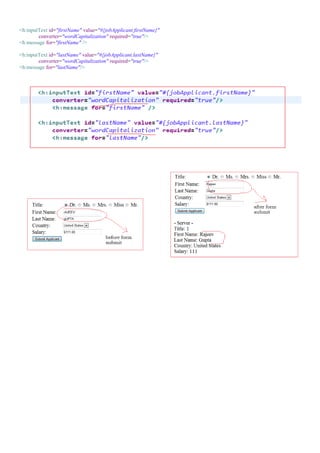
Now We will continue our previous program job applicant application
Now we will add two selection components to our page:
– h:selectOneRadio for title
• With a series of hardcoded f:selectItem
– h:selectOneMenu for country
• With a bound list of f:selectItems
• We will also introduce an h:panelGrid component to clean up our form layout](https://image.slidesharecdn.com/introductiontojsf2-130206233132-phpapp01/85/jsf2-Notes-20-320.jpg)
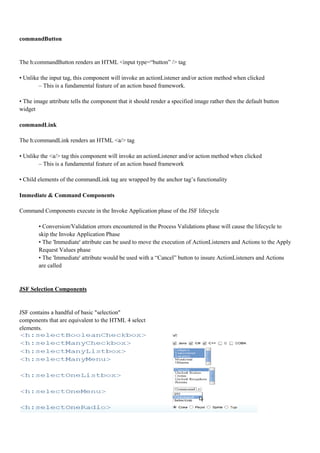
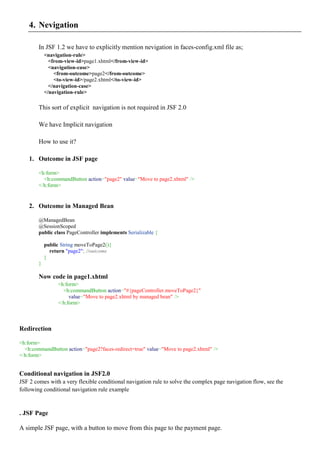
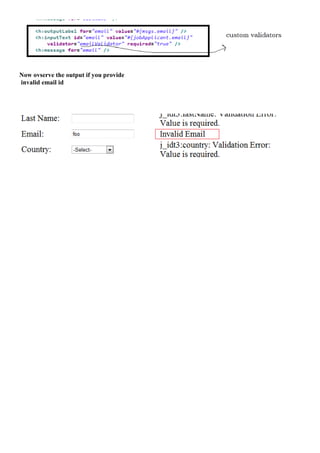
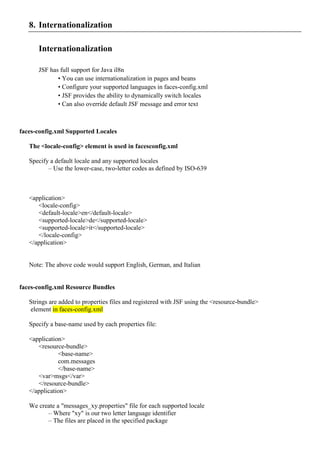
![Step 1: Insert h:selectOneRadio Component
Insert the following at the top of the form:
<h:outputLabel for="title" value="Title: " />
<h:selectOneRadio id="title" value="#{jobApplicant.title}">
<f:selectItem itemLabel="Dr." itemValue="1" />
<f:selectItem itemLabel="Ms." itemValue="2" />
<f:selectItem itemLabel="Mrs." itemValue="3" />
<f:selectItem itemLabel="Miss" itemValue="4"/>
<f:selectItem itemLabel="Mr." itemValue="5"/>
</h:selectOneRadio>
• Each f:selectItem is hard coded into the page which is not a best practice
– Have to copy-paste between pages using the same component
– Incorrectly mixes model and view
– Better to dynamically load from a bean or database
Step 2: Insert h:selectOneMenu Component
Insert the following markup before the h:commandButton:
<h:outputLabel for="country" value="Country: " />
<h:selectOneMenu id="country" value="#{jobApplicant.country}">
<f:selectItem itemLabel="-Select-" noSelectionOption="true" />
<f:selectItems value="#{countryList.countries}" />
</h:selectOneMenu>
<br />
• Note our combination of selectable items:
– f:selectItem is used to present a default String that is not considered a selection (via noSelectionOption)
– f:selectItems has a value binding
• The values are not hard coded into the page and can be dynamically updated
Step 3: Add Variables to JobApplicant
Add two variables to JobApplicant.java:
private String title;
private String country;
• Generate getters and setters
• Note: These two variables are used to bind the model to the view
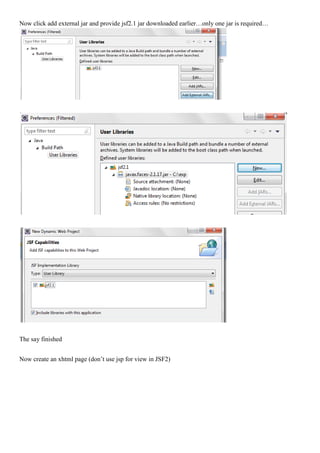
Step 4: Create CountryList Bean
Create a new bean class CountryList
@ManagedBean
@ApplicationScoped
public class CountryList {
private String[] countries = { "Canada", "United States" };
public String[] getCountries() {](https://image.slidesharecdn.com/introductiontojsf2-130206233132-phpapp01/85/jsf2-Notes-21-320.jpg)
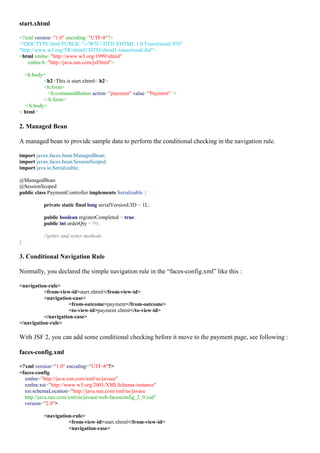
![return countries;
}
public void setCountries(String[] countryList) {
this.countries = countryList;
}
}
• Note: ApplicationScoped because it serves as a common list of countries bound to the h:selectOneMenu (Support
Managed Bean)
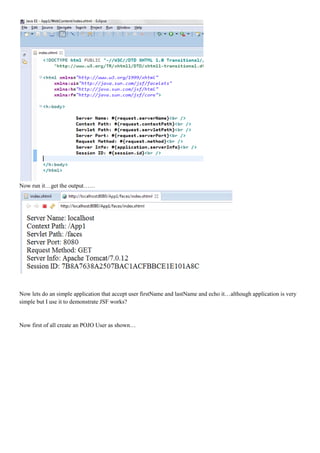
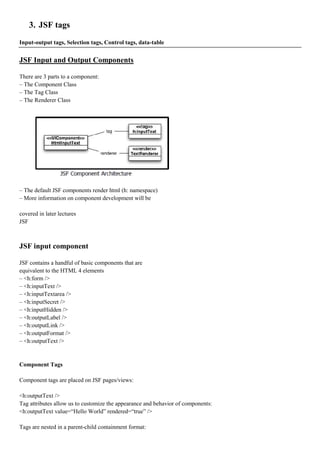
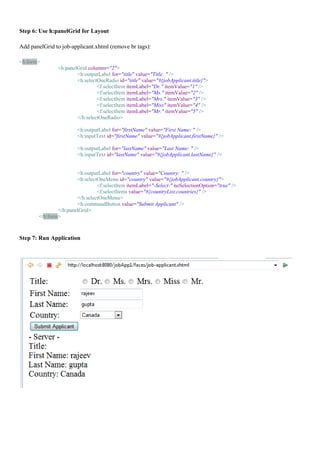
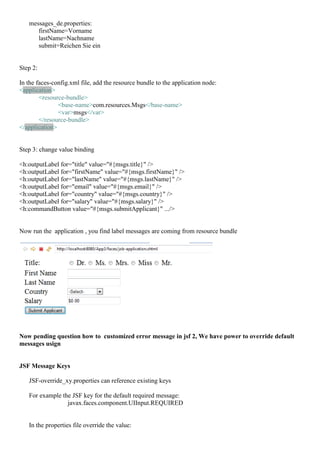
Step 5: Update Server Output
Update the server output after h:form tag:
<br />
- Server -<br />
Title: <h:outputText value="#{jobApplicant.title}" /><br />
First Name: <h:outputText value="#{jobApplicant.firstName}"
/><br />
Last Name: <h:outputText value="#{jobApplicant.lastName}"
/><br />
Country: <h:outputText value="#{jobApplicant.country}"
/><br />
Now run it to have this
h:panelGrid Description
h:panelGrid renders an HTML table
• Will be used to layout our existing components
• New rows are defined by the integer attribute 'columns'
– Once X number of child components are rendered a new row is started
• Child components are each placed in a table cell](https://image.slidesharecdn.com/introductiontojsf2-130206233132-phpapp01/85/jsf2-Notes-22-320.jpg)
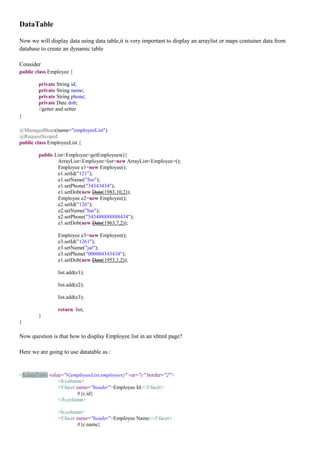
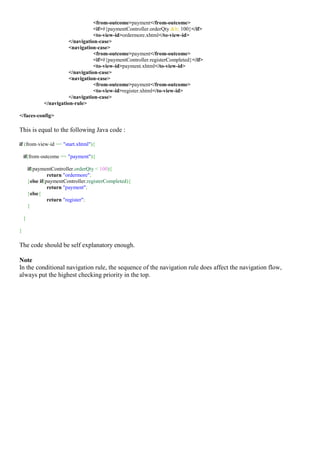

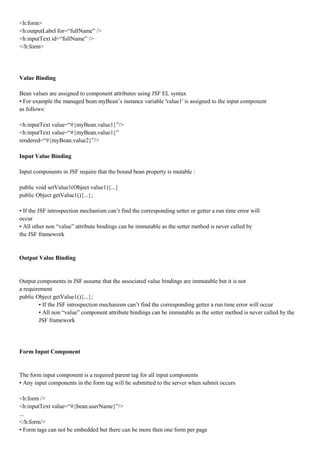
![model
package com.beans;
import java.io.Serializable;
import javax.faces.bean.ManagedBean;
import javax.faces.bean.ViewScoped;
@ManagedBean(name="jobApplicant")
@ViewScoped
public class JobApplicant implements Serializable {
private static final long serialVersionUID = 1L;
private String firstName;
private String lastName;
private Integer title;
private String country;
private int salary;
public JobApplicant(){}
//getter and setter
}
for countries
package com.beans;
import javax.faces.bean.ApplicationScoped;
import javax.faces.bean.ManagedBean;
@ManagedBean(name="countryList")
@ApplicationScoped
public class CountryList {
private String[] countries = { "Canada", "United States" };
public String[] getCountries() {
return countries;
}
public void setCountries(String[] countryList) {
this.countries = countryList;
}
}
Now run the application and play with it……..](https://image.slidesharecdn.com/introductiontojsf2-130206233132-phpapp01/85/jsf2-Notes-31-320.jpg)

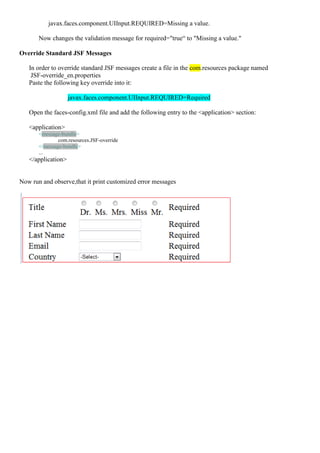
![Custom Validator Exercise
Now lets add an email field and we only want to allow valid email into it.
Step 1;
Add after last name field:
<h:outputLabel for="email" value="email:" />
<h:inputText id="email" value="#{jobApplicant.email}"
validator="emailValidator" required="true" />
<h:message for="email" />
Step 2: add email field to our bean with getter and setter…….
Step 3: Create an validator class EmailValidator that implements Validator inteface
Step 4:
Add @FacesValidator("emailValidator") over it, so that it get register with framework.
Step 5:
Implement validate() method
As
@Override
public void validate(FacesContext arg0, UIComponent arg1, Object arg2)
throws ValidatorException {
String inputEmail = (String) arg2;
// Set the email pattern string. (?i) is a flag for case-insensitive.
Pattern p = Pattern.compile("(?i)b[A-Z0-9._%-]+@[A-Z0-9.-]+.[A-Z]{2,4}b");
// Match the given string with the pattern
Matcher m = p.matcher(inputEmail);
// Check whether match is found
boolean matchFound = m.matches();
if (!matchFound) {
String invalidEmailMsg = "Invalid Email";
FacesMessage message = new FacesMessage(
FacesMessage.SEVERITY_ERROR, invalidEmailMsg,
invalidEmailMsg);
throw new ValidatorException(message);
}
}
Now you must have understand that we have to refer
this validator in <h:inputText>](https://image.slidesharecdn.com/introductiontojsf2-130206233132-phpapp01/85/jsf2-Notes-37-320.jpg)
![Language Files
In each "messages_xy.properties" file we would specify:
– Key used in our page/bean
– Internationalized value for the key
For example the content of messages_en.properties:
firstName=First Name
lastName=Last Name
submit=Submit
And the content of messages_de.properties:
firstName=Vorname
lastName=Nachname
submit=Reichen Sie ein
Using Internationalization in Pages
In our page we can access these properties files using the EL (Expression Language)
The EL uses the <var> element specified in the <resource-bundle> to retrieve key values:
<h:outputText value="#{msgs['firstName']}" />
Or
<h:outputText value="#{msgs.firstName}" />
Would display:
– "First Name" in English
"Vorname" in German
Lets start modifiying existing application to support internationlization
Step 1: Create Resource Bundle
Create a file Msgs_en.properties in a new com.resources package and paste the
following into it:
title=Title
firstName=First Name
lastName=Last Name
email=Email
country=Country
salary=Salary
submitApplicant=Submit Applicant
Let create another resource bunld for german language](https://image.slidesharecdn.com/introductiontojsf2-130206233132-phpapp01/85/jsf2-Notes-43-320.jpg)

This document provides a comprehensive tutorial on JavaServer Faces (JSF) 2.0, outlining its features, applications, and how to set up a JSF environment using tools like Java 7, Tomcat 7, and Eclipse Juno. It includes detailed explanations of various aspects, such as managed beans, JSF tags, component lifecycle, and examples of creating simple applications. The document serves as a step-by-step guide for learning JSF, focusing on user interface development for Java web applications.