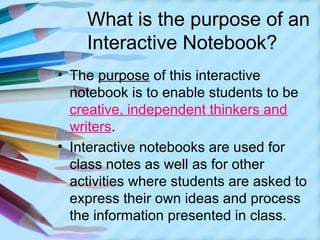
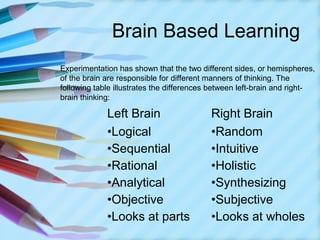
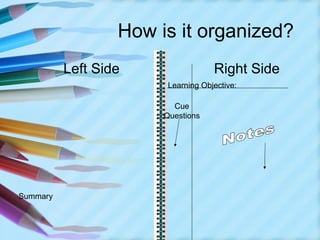
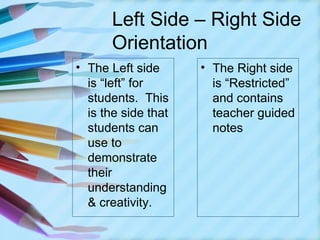
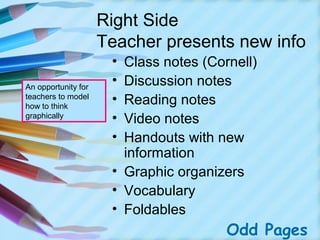
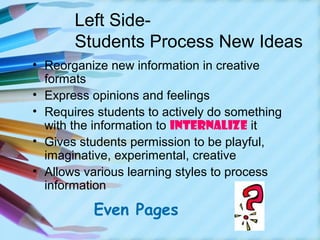
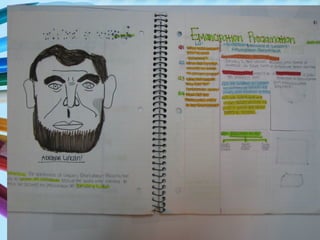
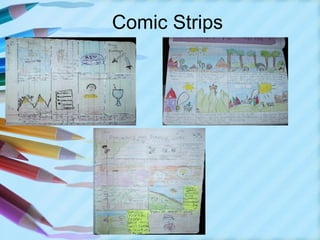
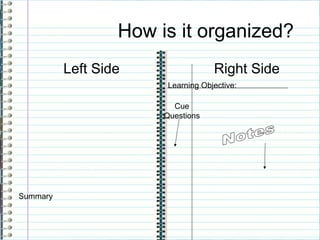
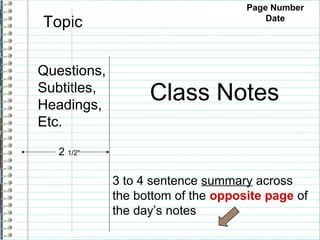
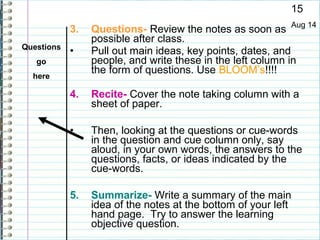
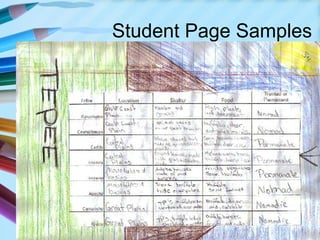
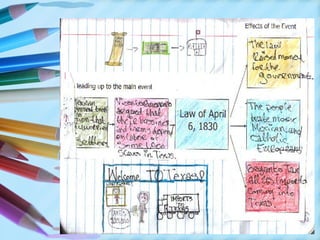
Have you ever heard
your students say . . .
What is the purpose of an
    Interactive Notebook?
• The purpose of this interactive
  notebook is to enable students to be
  creative, independent thinkers and
  writers.
• Interactive notebooks are used for
  class notes as well as for other
  activities where students are asked to
  express their own ideas and process
  the information presented in class.
Interactive Notebooks…
• Organize the student
• Help students sequence
  assignments
• Encourage pride in student work
• Facilitate cooperative interaction
• Appeal to multiple intelligences
• Provide opportunities to spiral
  instruction and facilitate learning
• Formative & Summative
Students can…
• Transform written concepts into
  visuals
• Find main points of a lesson or
  concept
• Organize historical events into a
  topical map
• Draw whatever illustration that
  makes sense to them
• Personalize the historic event
  or lesson.
Parts of the Notebook
   •   Cover Page
   •   Rubric
   •   Table of Contents
   •   Unit Cover Page
   •   Standards/objectives
   •   Notes/Activities
   •   Student Reflection
   •   Parent Review
Right vs. Left side of the spiral


 Left brain              Right brain
 controls the            controls the
 right side              left side
Brain Based Learning
Experimentation has shown that the two different sides, or hemispheres,
of the brain are responsible for different manners of thinking. The
following table illustrates the differences between left-brain and right-
brain thinking:

             Left Brain                    Right Brain
             •Logical                      •Random
             •Sequential                   •Intuitive
             •Rational                     •Holistic
             •Analytical                   •Synthesizing
             •Objective                    •Subjective
             •Looks at parts               •Looks at wholes
How is it organized?
          Left Side                 Right Side
                        Learning Objective:

                         Cue
                       Questions


Summary
Left Side – Right Side
       Orientation
• The Left side      • The Right side
  is “left” for        is “Restricted”
  students. This       and contains
  is the side that     teacher guided
  students can         notes
  use to
  demonstrate
  their
  understanding
  & creativity.
Right Side
                     Teacher presents new info
                      • Class notes (Cornell)
An opportunity for
                      • Discussion notes
teachers to model
how to think
                      • Reading notes
graphically
                      • Video notes
                      • Handouts with new
                        information
                      • Graphic organizers
                      • Vocabulary
                      • Foldables
                                        Odd Pages
Left Side-
       Students Process New Ideas
• Reorganize new information in creative
  formats
• Express opinions and feelings
• Requires students to actively do something
  with the information to internalize it
• Gives students permission to be playful,
  imaginative, experimental, creative
• Allows various learning styles to process
  information

          Even Pages
What can go in it?
•   Drawings
•   Poetry
•   Raps
•   Graphic organizers
•   Cartoons
•   Maps
•   Charts and graphs
•   Invitations
•   Letters
•   ANYTHING!!!
More Examples of Left Side
Acrostics
Comic Strips
Venns & Thinking Maps
Why use them?
• Students use both their visual and
  linguistic intelligences

  – Approach understanding in many ways
  – Use many types of writing and graphic
    techniques
  – Each student can select their best
    medium to explore and learn new
    content
     (DIFFERENTIATED INSTRUCTION!!!!)
Note taking becomes an
                     active process

                      – Students are invited to take notes—
               nts      it’s fun! 
       ostude
W hat d out it?       – Students will read their notes—they
      ab
think                   have to in order to process for the
                        left side
                      – Students will be working with
                        (rehearsing) the information which
                        facilitates learning
                      – Students will actively be involved
                        with the information
Notebooks help students
to systematically
organize as they learn

 – Organization is key to the
   notebook
 – Concepts like
   • Table of Contents
   • Numbering pages
   • Topic headings
 – They stress the organization of
   a book & they don’t lose papers
   
Notebooks become a
portfolio of individual
learning
– These are personal
– Creative
– They record student growth in
  history
– They show progress
– They serve as a chronological
  record of the learning and are
  great for review
Getting Started…
Language Arts
Interactive Notebook
•   Implementation
•   Notebooks can be kept in your backpack, binder or
    stored in the classroom. Bring it to class every day. It
    will not be in your best interest to lose it.
•   Number the pages sequentially. Do not remove any
    pages. Both right and left pages should be
    numbered. It is important that all of us have the same
    information on the same page.
•   The first pages are reserved for a table of contents,
    and instructions. Other information will be included as
    appendices.
•   Use color to help organize your information.
•   Handouts, foldables and other papers should be
    glued or taped in place. No staples.
•   You will need other supplies: markers, glue stick,
    tape, ruler, pencils, colored pencils
•   Notebooks will be graded randomly using self, peer
    and teacher checklists.
Lets Begin….
• Have students save 5-10 pages at
  the front of the notebook to house
  information about notebook
  (rubrics,syllabus), and the
  cumulative table of contents.
• Have them number the pages
  immediately so that they start in
  an organized fashion.
• Number each page front and back
• Odd pages on left Even pages on
  the right.
• There will be no blank pages
• Pages do not get torn out!!!
Page            Topic           Date Grade
14   summary                    8/14
15   How to use Cornell Notes   8/14
16
17
18
19
20
Student Handouts

• The notebook should hold everything
  when possible
• Folding and gluing, cutting and
  gluing are key to organization
• As students age and material
  becomes too complex a separate
  folder (pocket folder) can be added
  to hold handouts that are multi-
  paged or make a pocket foldable
Cornell Notes

(For right sides of spiral)
Basic Cornell
Notes Instruction
     Sheet


               Samples
Why use Cornell
notes? taking stimulates
  • Cornell note
    critical thinking skills.

  • Note taking helps students
    remember what is said in class.

  • A good set of notes can help
    students work on assignments and
    prepare for tests outside of the
    classroom.

  • Good Notes help students organize
    and process data and information.

  • Helps student recall by getting them
    to process their notes multiple times.
How is it organized?
          Left Side                 Right Side
                        Learning Objective:

                         Cue
                       Questions


Summary
Page Number
Topic                                   Date


Questions,
Subtitles,
Headings,
                   Class Notes
Etc.

   2 1/2”

             3 to 4 sentence summary across
             the bottom of the opposite page of
             the day’s notes
Cornell Notes Step by Step                                           15
                                                                     Aug 14

Learning Objective:   Explain the process involved in taking organized
                      Cornell notes. How will this help me?

                             Note-taking column
           1.    Document- Always write the date and topic
                 at the top of the page
           2.    Write Notes- The large box to the right is for
                 writing notes.

                 Skip a line between ideas and topics.

           •     Don't use complete sentences. Use
                 abbreviations, whenever possible. Develop a
                 shorthand of your own, such as using "&" for
                 the word "and".

           •     Use whatever method works best for you
15
            3.   Questions- Review the notes as soon as Aug 14
                 possible after class.
Questions
            •    Pull out main ideas, key points, dates, and
   go            people, and write these in the left column in
                 the form of questions. Use BLOOM’s!!!!
  here

            4.   Recite- Cover the note taking column with a
                 sheet of paper.

            •    Then, looking at the questions or cue-words
                 in the question and cue column only, say
                 aloud, in your own words, the answers to the
                 questions, facts, or ideas indicated by the
                 cue-words.

            5.   Summarize- Write a summary of the main
                 idea of the notes at the bottom of your left
                 hand page. Try to answer the learning
                 objective question.
Remember…


 •Summary added AFTER questions
 are finished

  •Summary should address the day’s
learning objective

  •Summaries DO NOT replace left side
processing. You still need to process
your notes. (on the left side)
Cover Page Examples
Student Page Samples
Interactive studentnotebooks. ppt

Interactive studentnotebooks. ppt

  • 2.
    Have you everheard your students say . . .
  • 4.
    What is thepurpose of an Interactive Notebook? • The purpose of this interactive notebook is to enable students to be creative, independent thinkers and writers. • Interactive notebooks are used for class notes as well as for other activities where students are asked to express their own ideas and process the information presented in class.
  • 5.
    Interactive Notebooks… • Organizethe student • Help students sequence assignments • Encourage pride in student work • Facilitate cooperative interaction • Appeal to multiple intelligences • Provide opportunities to spiral instruction and facilitate learning • Formative & Summative
  • 6.
    Students can… • Transformwritten concepts into visuals • Find main points of a lesson or concept • Organize historical events into a topical map • Draw whatever illustration that makes sense to them • Personalize the historic event or lesson.
  • 7.
    Parts of theNotebook • Cover Page • Rubric • Table of Contents • Unit Cover Page • Standards/objectives • Notes/Activities • Student Reflection • Parent Review
  • 8.
    Right vs. Leftside of the spiral Left brain Right brain controls the controls the right side left side
  • 9.
    Brain Based Learning Experimentationhas shown that the two different sides, or hemispheres, of the brain are responsible for different manners of thinking. The following table illustrates the differences between left-brain and right- brain thinking: Left Brain Right Brain •Logical •Random •Sequential •Intuitive •Rational •Holistic •Analytical •Synthesizing •Objective •Subjective •Looks at parts •Looks at wholes
  • 10.
    How is itorganized? Left Side Right Side Learning Objective: Cue Questions Summary
  • 11.
    Left Side –Right Side Orientation • The Left side • The Right side is “left” for is “Restricted” students. This and contains is the side that teacher guided students can notes use to demonstrate their understanding & creativity.
  • 12.
    Right Side Teacher presents new info • Class notes (Cornell) An opportunity for • Discussion notes teachers to model how to think • Reading notes graphically • Video notes • Handouts with new information • Graphic organizers • Vocabulary • Foldables Odd Pages
  • 13.
    Left Side- Students Process New Ideas • Reorganize new information in creative formats • Express opinions and feelings • Requires students to actively do something with the information to internalize it • Gives students permission to be playful, imaginative, experimental, creative • Allows various learning styles to process information Even Pages
  • 15.
    What can goin it? • Drawings • Poetry • Raps • Graphic organizers • Cartoons • Maps • Charts and graphs • Invitations • Letters • ANYTHING!!!
  • 16.
  • 17.
  • 18.
  • 21.
  • 22.
    Why use them? •Students use both their visual and linguistic intelligences – Approach understanding in many ways – Use many types of writing and graphic techniques – Each student can select their best medium to explore and learn new content (DIFFERENTIATED INSTRUCTION!!!!)
  • 23.
    Note taking becomesan active process – Students are invited to take notes— nts it’s fun!  ostude W hat d out it? – Students will read their notes—they ab think have to in order to process for the left side – Students will be working with (rehearsing) the information which facilitates learning – Students will actively be involved with the information
  • 24.
    Notebooks help students tosystematically organize as they learn – Organization is key to the notebook – Concepts like • Table of Contents • Numbering pages • Topic headings – They stress the organization of a book & they don’t lose papers 
  • 25.
    Notebooks become a portfolioof individual learning – These are personal – Creative – They record student growth in history – They show progress – They serve as a chronological record of the learning and are great for review
  • 26.
  • 27.
    Language Arts Interactive Notebook • Implementation • Notebooks can be kept in your backpack, binder or stored in the classroom. Bring it to class every day. It will not be in your best interest to lose it. • Number the pages sequentially. Do not remove any pages. Both right and left pages should be numbered. It is important that all of us have the same information on the same page. • The first pages are reserved for a table of contents, and instructions. Other information will be included as appendices. • Use color to help organize your information. • Handouts, foldables and other papers should be glued or taped in place. No staples. • You will need other supplies: markers, glue stick, tape, ruler, pencils, colored pencils • Notebooks will be graded randomly using self, peer and teacher checklists.
  • 28.
    Lets Begin…. • Havestudents save 5-10 pages at the front of the notebook to house information about notebook (rubrics,syllabus), and the cumulative table of contents. • Have them number the pages immediately so that they start in an organized fashion. • Number each page front and back • Odd pages on left Even pages on the right. • There will be no blank pages • Pages do not get torn out!!!
  • 29.
    Page Topic Date Grade 14 summary 8/14 15 How to use Cornell Notes 8/14 16 17 18 19 20
  • 30.
    Student Handouts • Thenotebook should hold everything when possible • Folding and gluing, cutting and gluing are key to organization • As students age and material becomes too complex a separate folder (pocket folder) can be added to hold handouts that are multi- paged or make a pocket foldable
  • 31.
    Cornell Notes (For rightsides of spiral)
  • 32.
  • 33.
    Why use Cornell notes?taking stimulates • Cornell note critical thinking skills. • Note taking helps students remember what is said in class. • A good set of notes can help students work on assignments and prepare for tests outside of the classroom. • Good Notes help students organize and process data and information. • Helps student recall by getting them to process their notes multiple times.
  • 34.
    How is itorganized? Left Side Right Side Learning Objective: Cue Questions Summary
  • 35.
    Page Number Topic Date Questions, Subtitles, Headings, Class Notes Etc. 2 1/2” 3 to 4 sentence summary across the bottom of the opposite page of the day’s notes
  • 36.
    Cornell Notes Stepby Step 15 Aug 14 Learning Objective: Explain the process involved in taking organized Cornell notes. How will this help me? Note-taking column 1. Document- Always write the date and topic at the top of the page 2. Write Notes- The large box to the right is for writing notes. Skip a line between ideas and topics. • Don't use complete sentences. Use abbreviations, whenever possible. Develop a shorthand of your own, such as using "&" for the word "and". • Use whatever method works best for you
  • 37.
    15 3. Questions- Review the notes as soon as Aug 14 possible after class. Questions • Pull out main ideas, key points, dates, and go people, and write these in the left column in the form of questions. Use BLOOM’s!!!! here 4. Recite- Cover the note taking column with a sheet of paper. • Then, looking at the questions or cue-words in the question and cue column only, say aloud, in your own words, the answers to the questions, facts, or ideas indicated by the cue-words. 5. Summarize- Write a summary of the main idea of the notes at the bottom of your left hand page. Try to answer the learning objective question.
  • 38.
    Remember… •Summary addedAFTER questions are finished •Summary should address the day’s learning objective •Summaries DO NOT replace left side processing. You still need to process your notes. (on the left side)
  • 39.
  • 41.