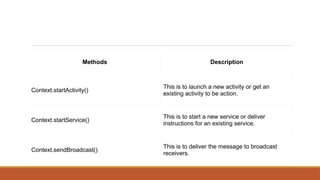
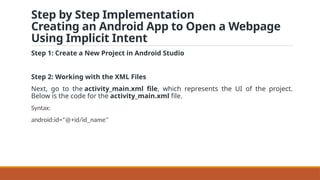
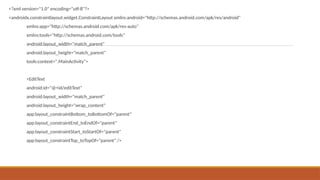
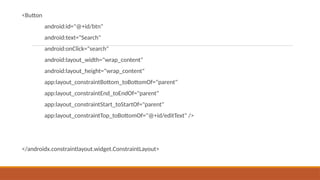
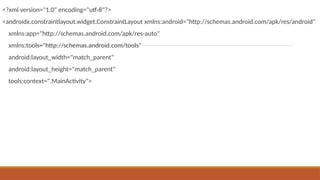
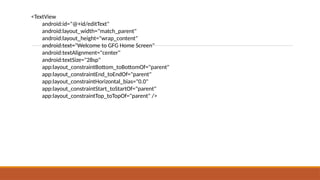
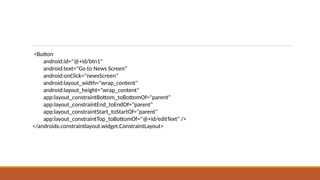
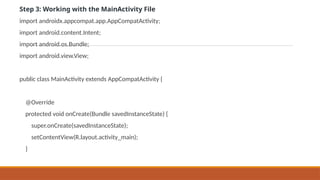
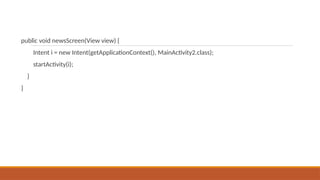
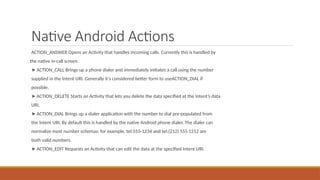
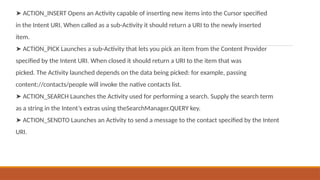
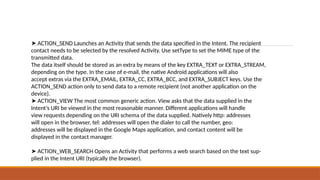
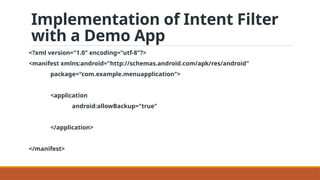
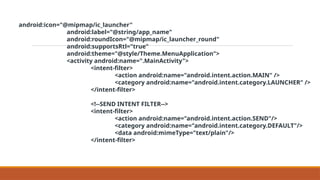
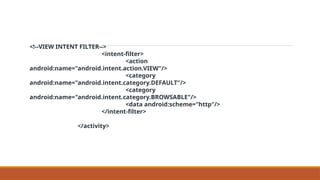
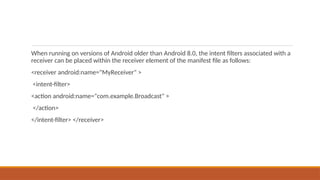
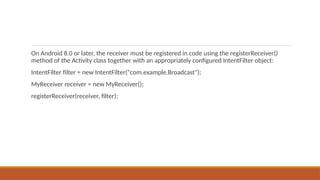
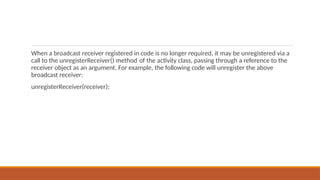
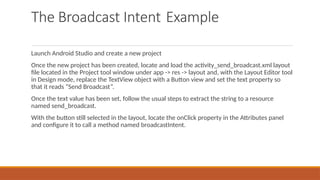
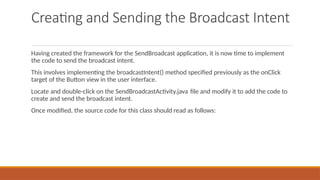
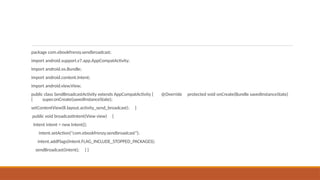
19CSC27 – Mobile
Application Development
UNIT 2
By
C.Abinaya Devi
AP/CSE
Intent, Adapter, SQLite and Content
Provider
Intents: Intents to launch activities – Using intent filters – Broadcast
events using intents. Adapters – Dialogue classes – Working with
SQLite databases – Create and use content providers – Native
Android content providers.
Intents
Intents are probably the most unique, and important, concept in
Android development.
Use Intents to broadcast data between applications and application
components, and start Activities or Services, both explicitly and using
late runtime binding.
Using implicit Intents you’ll learn how to request that an action be
performed on a piece of data, letting Android determine which
application components can best service that request.
Contd..
Android Intent is the message that is passed between components
such as activities, content providers, broadcast receivers, services
etc.
It is generally used with startActivity() method to invoke activity,
broadcast receivers etc.
The dictionary meaning of intent is intention or purpose. So, it can
be described as the intention to do action.
Android intents are mainly used to:
Start the service
Launch an activity
Display a web page
Display a list of contacts
Broadcast a message
Dial a phone call etc.
Types of Android Intents
There are two types of intents in android:
1. implicit
2. explicit.
Explicit Intent
Explicit Intent specifies the component. In such case, intent provides the external
class to be invoked.
Intent i = new Intent(getApplicationContext(), ActivityTwo.class);
startActivity(i);
Implicit Intent
Implicit Intent doesn't specifiy the component. In such case, intent provides
information of available components provided by the system that is to be invoked.
For example, you may write the following code to view the webpage.
Intent intent=new Intent(Intent.ACTION_VIEW);
intent.setData(Uri.parse("http://www.javatpoint.com"));
startActivity(intent);
Methods Description
Context.startActivity()
This is to launch a new activity or get an
existing activity to be action.
Context.startService()
This is to start a new service or deliver
instructions for an existing service.
Context.sendBroadcast()
This is to deliver the message to broadcast
receivers.
Step by Step Implementation
Creating an Android App to Open a Webpage
Using Implicit Intent
Step 1: Create a New Project in Android Studio
Step 2: Working with the XML Files
Next, go to the activity_main.xml file, which represents the UI of the project.
Below is the code for the activity_main.xml file.
Syntax:
android:id="@+id/id_name"
<?xml version="1.0" encoding="utf-8"?>
<androidx.constraintlayout.widget.ConstraintLayout xmlns:android="http://schemas.android.com/apk/res/android"
xmlns:app="http://schemas.android.com/apk/res-auto"
xmlns:tools="http://schemas.android.com/tools"
android:layout_width="match_parent"
android:layout_height="match_parent"
tools:context=".MainActivity">
<EditText
android:id="@+id/editText"
android:layout_width="match_parent"
android:layout_height="wrap_content"
app:layout_constraintBottom_toBottomOf="parent"
app:layout_constraintEnd_toEndOf="parent"
app:layout_constraintStart_toStartOf="parent"
app:layout_constraintTop_toTopOf="parent" />
<Button
android:id="@+id/btn"
android:text="Search"
android:onClick="search"
android:layout_width="wrap_content"
android:layout_height="wrap_content"
app:layout_constraintBottom_toBottomOf="parent"
app:layout_constraintEnd_toEndOf="parent"
app:layout_constraintStart_toStartOf="parent"
app:layout_constraintTop_toBottomOf="@+id/editText" />
</androidx.constraintlayout.widget.ConstraintLayout>
Step 3: Working with the MainActivity File
Now, we will create the Backend of the App. For this, Open the MainActivity file and
instantiate the component (Button) created in the XML file using the findViewById()
method. This method binds the created object to the UI Components with the help
of the assigned ID.
Syntax:
ComponentType object = findViewById(R.id.IdOfTheComponent);
import androidx.appcompat.app.AppCompatActivity;
import android.content.Intent;
import android.net.Uri;
import android.os.Bundle;
import android.view.View;
import android.widget.Button;
import android.widget.EditText;
public class MainActivity extends AppCompatActivity {
@Override
protected void onCreate(Bundle savedInstanceState) {
EditText editText;
Button button;
super.onCreate(savedInstanceState);
setContentView(R.layout.activity_main);
button = findViewById(R.id.btn);
editText = findViewById(R.id.editText);
button.setOnClickListener(new View.OnClickListener() {
@Override
public void onClick(View view) {
String url=editText.getText().toString();
Intent intent = new Intent(Intent.ACTION_VIEW, Uri.parse(url));
startActivity(intent);
}
});
}
}
Step by Step Implementation
How to create an Android App to move to the next activity using Explicit Intent(with Example)
Step 1: Create a New Project in Android Studio
Step 2: Working with the activity_main.xml File
Next, go to the activity_main.xml file, which represents the UI of the project.
Below is the code for the activity_main.xml file.
<?xml version="1.0" encoding="utf-8"?>
<androidx.constraintlayout.widget.ConstraintLayout xmlns:android="http://schemas.android.com/apk/res/android"
xmlns:app="http://schemas.android.com/apk/res-auto"
xmlns:tools="http://schemas.android.com/tools"
android:layout_width="match_parent"
android:layout_height="match_parent"
tools:context=".MainActivity">
<TextView
android:id="@+id/editText"
android:layout_width="match_parent"
android:layout_height="wrap_content"
android:text="Welcome to GFG Home Screen"
android:textAlignment="center"
android:textSize="28sp"
app:layout_constraintBottom_toBottomOf="parent"
app:layout_constraintEnd_toEndOf="parent"
app:layout_constraintHorizontal_bias="0.0"
app:layout_constraintStart_toStartOf="parent"
app:layout_constraintTop_toTopOf="parent" />
<Button
android:id="@+id/btn1"
android:text="Go to News Screen"
android:onClick="newsScreen"
android:layout_width="wrap_content"
android:layout_height="wrap_content"
app:layout_constraintBottom_toBottomOf="parent"
app:layout_constraintEnd_toEndOf="parent"
app:layout_constraintStart_toStartOf="parent"
app:layout_constraintTop_toBottomOf="@+id/editText" />
</androidx.constraintlayout.widget.ConstraintLayout>
Step 3: Working with the MainActivity File
import androidx.appcompat.app.AppCompatActivity;
import android.content.Intent;
import android.os.Bundle;
import android.view.View;
public class MainActivity extends AppCompatActivity {
@Override
protected void onCreate(Bundle savedInstanceState) {
super.onCreate(savedInstanceState);
setContentView(R.layout.activity_main);
}
public void newsScreen(View view) {
Intent i = new Intent(getApplicationContext(), MainActivity2.class);
startActivity(i);
}
}
Native Android Actions
ACTION_ANSWER Opens an Activity that handles incoming calls. Currently this is handled by
the native in-call screen.
➤ ACTION_CALL Brings up a phone dialer and immediately initiates a call using the number
supplied in the Intent URI. Generally it’s considered better form to useACTION_DIAL if
possible.
➤ ACTION_DELETE Starts an Activity that lets you delete the data specified at the Intent’s data
URI.
➤ ACTION_DIAL Brings up a dialer application with the number to dial pre-populated from
the Intent URI. By default this is handled by the native Android phone dialer. The dialer can
normalize most number schemas: for example, tel:555-1234 and tel:(212) 555 1212 are
both valid numbers.
➤ ACTION_EDIT Requests an Activity that can edit the data at the specified Intent URI.
➤ ACTION_INSERT Opens an Activity capable of inserting new items into the Cursor specified
in the Intent URI. When called as a sub-Activity it should return a URI to the newly inserted
item.
➤ ACTION_PICK Launches a sub-Activity that lets you pick an item from the Content Provider
specified by the Intent URI. When closed it should return a URI to the item that was
picked. The Activity launched depends on the data being picked: for example, passing
content://contacts/people will invoke the native contacts list.
➤ ACTION_SEARCH Launches the Activity used for performing a search. Supply the search term
as a string in the Intent’s extras using theSearchManager.QUERY key.
➤ ACTION_SENDTO Launches an Activity to send a message to the contact specified by the Intent
URI.
➤ ACTION_SEND Launches an Activity that sends the data specified in the Intent. The recipient
contact needs to be selected by the resolved Activity. Use setType to set the MIME type of the
transmitted data.
The data itself should be stored as an extra by means of the key EXTRA_TEXT or EXTRA_STREAM,
depending on the type. In the case of e-mail, the native Android applications will also
accept extras via the EXTRA_EMAIL, EXTRA_CC, EXTRA_BCC, and EXTRA_SUBJECT keys. Use the
ACTION_SEND action only to send data to a remote recipient (not another application on the
device).
➤ ACTION_VIEW The most common generic action. View asks that the data supplied in the
Intent’s URI be viewed in the most reasonable manner. Different applications will handle
view requests depending on the URI schema of the data supplied. Natively http: addresses
will open in the browser, tel: addresses will open the dialer to call the number, geo:
addresses will be displayed in the Google Maps application, and contact content will be
displayed in the contact manager.
➤ ACTION_WEB_SEARCH Opens an Activity that performs a web search based on the text sup-
plied in the Intent URI (typically the browser).
Using intent filters
•Implicit intent uses the intent filter to serve the user request.
•The intent filter specifies the types of intents that an activity, service, or broadcast
receiver can respond.
•Intent filters are declared in the Android manifest file.
•Intent filter must contain <action>
Ex
<intent-filter
android:icon="drawable resource"
android:label="string resource"
android:priority="integer" >
. . .
</intent-filter>
Most of the intent filter are describe by its
1.<action>,
2.<category> and
3.<data>.
1. <action>
<action android:name="string" />
Adds an action to an intent filter. An <intent-filter> element must contain one or
more <action> elements. If there are no <action> elements in an intent filter, the
filter doesn’t accept any Intent objects.
Examples of common action:
•ACTION_VIEW: Use this action in intent with startActivity() when you have some
information that activity can show to the user like showing an image in a gallery
app or an address to view in a map app
•ACTION_SEND: You should use this in intent with startActivity() when you have
some data that the user can share through another app, such as an email app or
social sharing app.
2. <category>
Syntax:
<category android:name="string" />
Example of common categories:
•CATEGORY_BROWSABLE: The target activity allows itself to be started by a web
browser to display data referenced by a link.
3. <data>
Syntax:
<data android:scheme="string"
android:host="string"
android:port="string"
android:path="string"
android:pathPattern="string"
android:pathPrefix="string"
android:mimeType="string" />
Adds a data specification to an intent filter. The specification can be just a data type, just a URI, or
both a data type and a URI.
Implementation of Intent Filter
with a Demo App
<?xml version="1.0" encoding="utf-8"?>
<manifest xmlns:android="http://schemas.android.com/apk/res/android"
package="com.example.menuapplication">
<application
android:allowBackup="true"
</application>
</manifest>
android:icon="@mipmap/ic_launcher"
android:label="@string/app_name"
android:roundIcon="@mipmap/ic_launcher_round"
android:supportsRtl="true"
android:theme="@style/Theme.MenuApplication">
<activity android:name=".MainActivity">
<intent-filter>
<action android:name="android.intent.action.MAIN" />
<category android:name="android.intent.category.LAUNCHER" />
</intent-filter>
<!--SEND INTENT FILTER-->
<intent-filter>
<action android:name="android.intent.action.SEND"/>
<category android:name="android.intent.category.DEFAULT"/>
<data android:mimeType="text/plain"/>
</intent-filter>
<!--VIEW INTENT FILTER-->
<intent-filter>
<action
android:name="android.intent.action.VIEW"/>
<category
android:name="android.intent.category.DEFAULT"/>
<category
android:name="android.intent.category.BROWSABLE"/>
<data android:scheme="http"/>
</intent-filter>
</activity>
Broadcast events using intents
As a system-level message-passing mechanism, Intents are capable of sending structured
messages across process boundaries.
So far you’ve looked at using Intents to start new application components, but they can also be
used to broadcast messages anonymously between components with the sendBroadcast
method.
Broadcast Receivers to listen for, and respond to, these broadcast Intents within your
applications.
. Broadcast Intents are used to notify listeners of system or application events, extending the
eventdriven programming model between applications.
Broadcasting Intents helps make your application more open; by broadcasting an event using an
Intent
For example, by listening for the incoming call broadcast, you can modify the ringtone or volume
based on the caller
Android uses Broadcast Intents extensively to broadcast system events like battery-charging
levels, network connections, and incoming calls.
Broadcasting Events with Intents
1. Broadcast intents are Intent objects that are broadcast via a call to the sendBroadcast(),
sendStickyBroadcast() or sendOrderedBroadcast() methods of the Activity class (the latter
being used when results are required from the broadcast).
2. In addition to providing a messaging and event system between application components,
broadcast intents are also used by the Android system to notify interested applications about
key system events (such as the external power supply or headphones being connected or
disconnected).
3. When a broadcast intent is created, it must include an action string in addition to optional
data and a category string.
1. As with standard intents, data is added to a broadcast intent using key-value pairs in conjunction
with the putExtra() method of the intent object.
2. The optional category string may be assigned to a broadcast intent via a call to the addCategory()
method.
3. The action string, which identifies the broadcast event, must be unique and typically uses the
application’s package name syntax.
For example, the following code fragment creates and sends a broadcast intent including a unique
action string and data:
Intent intent = new Intent();
intent.setAction("com.example.Broadcast");
intent.putExtra("MyData", 1000); sendBroadcast(intent);
1. Android 3.0 introduced a launch control security measure that prevents components of
stopped applications from being launched via an intent.
2. To get around this, however, a flag can be added to the intent before it is sent to indicate
that the intent is to be allowed to start a component of a stopped application.
This flag is FLAG_INCLUDE_STOPPED_PACKAGES and would be used as outlined in the following
adaptation of the previous code fragment:
Intent intent = new Intent();
intent.addFlags(Intent.FLAG_INCLUDE_STOPPED_PACKAGES);
intent.setAction("com.example.Broadcast"); intent.putExtra("MyData", 1000);
sendBroadcast(intent);
An Overview of Broadcast Receivers
An application listens for specific broadcast intents by registering a broadcast receiver.
Broadcast receivers are implemented by extending the Android BroadcastReceiver class and
overriding the onReceive() method.
The broadcast receiver may then be registered, either within code (for example within an
activity), or within a manifest file.
The following code outlines a template
Broadcast Receiver subclass:
package com.example.broadcastdetector;
import android.content.BroadcastReceiver;
import android.content.Context;
import android.content.Intent;
public class MyReceiver extends BroadcastReceiver {
public MyReceiver() {
}
@Override
public void onReceive(Context context, Intent intent) {
// Implement code here to be performed when
// broadcast is detected } }
When registering a broadcast receiver within a manifest file, a <receiver> entry must be added
for the receiver.
The following example manifest file registers the above example broadcast receiver:
<?xml version="1.0" encoding="utf-8"?>
<manifest xmlns:android="http://schemas.android.com/apk/res/android"
package="com.example.broadcastdetector.broadcastdetector"
android:versionCode="1" android:versionName="1.0" >
<uses-sdk android:minSdkVersion="17“ /> <application
android:icon="@mipmap/ic_launcher"
android:label="@string/app_name" >
<receiver android:name="MyReceiver" >
</receiver> </application> </manifest>
When running on versions of Android older than Android 8.0, the intent filters associated with a
receiver can be placed within the receiver element of the manifest file as follows:
<receiver android:name="MyReceiver" >
<intent-filter>
<action android:name="com.example.Broadcast" >
</action>
</intent-filter> </receiver>
On Android 8.0 or later, the receiver must be registered in code using the registerReceiver()
method of the Activity class together with an appropriately configured IntentFilter object:
IntentFilter filter = new IntentFilter("com.example.Broadcast");
MyReceiver receiver = new MyReceiver();
registerReceiver(receiver, filter);
When a broadcast receiver registered in code is no longer required, it may be unregistered via a
call to the unregisterReceiver() method of the activity class, passing through a reference to the
receiver object as an argument. For example, the following code will unregister the above
broadcast receiver:
unregisterReceiver(receiver);
The Broadcast Intent Example
Launch Android Studio and create a new project
Once the new project has been created, locate and load the activity_send_broadcast.xml layout
file located in the Project tool window under app -> res -> layout and, with the Layout Editor tool
in Design mode, replace the TextView object with a Button view and set the text property so
that it reads “Send Broadcast”.
Once the text value has been set, follow the usual steps to extract the string to a resource
named send_broadcast.
With the button still selected in the layout, locate the onClick property in the Attributes panel
and configure it to call a method named broadcastIntent.
Creating and Sending the Broadcast Intent
Having created the framework for the SendBroadcast application, it is now time to implement
the code to send the broadcast intent.
This involves implementing the broadcastIntent() method specified previously as the onClick
target of the Button view in the user interface.
Locate and double-click on the SendBroadcastActivity.java file and modify it to add the code to
create and send the broadcast intent.
Once modified, the source code for this class should read as follows:
package com.ebookfrenzy.sendbroadcast;
import android.support.v7.app.AppCompatActivity;
import android.os.Bundle;
import android.content.Intent;
import android.view.View;
public class SendBroadcastActivity extends AppCompatActivity { @Override protected void onCreate(Bundle savedInstanceState)
{ super.onCreate(savedInstanceState);
setContentView(R.layout.activity_send_broadcast); }
public void broadcastIntent(View view) {
Intent intent = new Intent();
intent.setAction("com.ebookfrenzy.sendbroadcast");
intent.addFlags(Intent.FLAG_INCLUDE_STOPPED_PACKAGES);
sendBroadcast(intent); } }
https://www.techotopia.com/index.php/Android_Broadcast_Intents_and_Broadcast_Receivers

Intents in Mobile Application Development.pptx

  • 1.
    19CSC27 – Mobile ApplicationDevelopment UNIT 2 By C.Abinaya Devi AP/CSE
  • 2.
    Intent, Adapter, SQLiteand Content Provider Intents: Intents to launch activities – Using intent filters – Broadcast events using intents. Adapters – Dialogue classes – Working with SQLite databases – Create and use content providers – Native Android content providers.
  • 3.
    Intents Intents are probablythe most unique, and important, concept in Android development. Use Intents to broadcast data between applications and application components, and start Activities or Services, both explicitly and using late runtime binding. Using implicit Intents you’ll learn how to request that an action be performed on a piece of data, letting Android determine which application components can best service that request.
  • 4.
    Contd.. Android Intent isthe message that is passed between components such as activities, content providers, broadcast receivers, services etc. It is generally used with startActivity() method to invoke activity, broadcast receivers etc. The dictionary meaning of intent is intention or purpose. So, it can be described as the intention to do action.
  • 5.
    Android intents aremainly used to: Start the service Launch an activity Display a web page Display a list of contacts Broadcast a message Dial a phone call etc.
  • 6.
    Types of AndroidIntents There are two types of intents in android: 1. implicit 2. explicit.
  • 7.
    Explicit Intent Explicit Intentspecifies the component. In such case, intent provides the external class to be invoked. Intent i = new Intent(getApplicationContext(), ActivityTwo.class); startActivity(i);
  • 9.
    Implicit Intent Implicit Intentdoesn't specifiy the component. In such case, intent provides information of available components provided by the system that is to be invoked. For example, you may write the following code to view the webpage. Intent intent=new Intent(Intent.ACTION_VIEW); intent.setData(Uri.parse("http://www.javatpoint.com")); startActivity(intent);
  • 10.
    Methods Description Context.startActivity() This isto launch a new activity or get an existing activity to be action. Context.startService() This is to start a new service or deliver instructions for an existing service. Context.sendBroadcast() This is to deliver the message to broadcast receivers.
  • 11.
    Step by StepImplementation Creating an Android App to Open a Webpage Using Implicit Intent Step 1: Create a New Project in Android Studio Step 2: Working with the XML Files Next, go to the activity_main.xml file, which represents the UI of the project. Below is the code for the activity_main.xml file. Syntax: android:id="@+id/id_name"
  • 12.
    <?xml version="1.0" encoding="utf-8"?> <androidx.constraintlayout.widget.ConstraintLayoutxmlns:android="http://schemas.android.com/apk/res/android" xmlns:app="http://schemas.android.com/apk/res-auto" xmlns:tools="http://schemas.android.com/tools" android:layout_width="match_parent" android:layout_height="match_parent" tools:context=".MainActivity"> <EditText android:id="@+id/editText" android:layout_width="match_parent" android:layout_height="wrap_content" app:layout_constraintBottom_toBottomOf="parent" app:layout_constraintEnd_toEndOf="parent" app:layout_constraintStart_toStartOf="parent" app:layout_constraintTop_toTopOf="parent" />
  • 13.
  • 14.
    Step 3: Workingwith the MainActivity File Now, we will create the Backend of the App. For this, Open the MainActivity file and instantiate the component (Button) created in the XML file using the findViewById() method. This method binds the created object to the UI Components with the help of the assigned ID. Syntax: ComponentType object = findViewById(R.id.IdOfTheComponent);
  • 15.
    import androidx.appcompat.app.AppCompatActivity; import android.content.Intent; importandroid.net.Uri; import android.os.Bundle; import android.view.View; import android.widget.Button; import android.widget.EditText; public class MainActivity extends AppCompatActivity { @Override protected void onCreate(Bundle savedInstanceState) { EditText editText; Button button; super.onCreate(savedInstanceState); setContentView(R.layout.activity_main); button = findViewById(R.id.btn); editText = findViewById(R.id.editText);
  • 16.
    button.setOnClickListener(new View.OnClickListener() { @Override publicvoid onClick(View view) { String url=editText.getText().toString(); Intent intent = new Intent(Intent.ACTION_VIEW, Uri.parse(url)); startActivity(intent); } }); } }
  • 17.
    Step by StepImplementation How to create an Android App to move to the next activity using Explicit Intent(with Example) Step 1: Create a New Project in Android Studio Step 2: Working with the activity_main.xml File Next, go to the activity_main.xml file, which represents the UI of the project. Below is the code for the activity_main.xml file.
  • 18.
    <?xml version="1.0" encoding="utf-8"?> <androidx.constraintlayout.widget.ConstraintLayoutxmlns:android="http://schemas.android.com/apk/res/android" xmlns:app="http://schemas.android.com/apk/res-auto" xmlns:tools="http://schemas.android.com/tools" android:layout_width="match_parent" android:layout_height="match_parent" tools:context=".MainActivity">
  • 19.
    <TextView android:id="@+id/editText" android:layout_width="match_parent" android:layout_height="wrap_content" android:text="Welcome to GFGHome Screen" android:textAlignment="center" android:textSize="28sp" app:layout_constraintBottom_toBottomOf="parent" app:layout_constraintEnd_toEndOf="parent" app:layout_constraintHorizontal_bias="0.0" app:layout_constraintStart_toStartOf="parent" app:layout_constraintTop_toTopOf="parent" />
  • 20.
    <Button android:id="@+id/btn1" android:text="Go to NewsScreen" android:onClick="newsScreen" android:layout_width="wrap_content" android:layout_height="wrap_content" app:layout_constraintBottom_toBottomOf="parent" app:layout_constraintEnd_toEndOf="parent" app:layout_constraintStart_toStartOf="parent" app:layout_constraintTop_toBottomOf="@+id/editText" /> </androidx.constraintlayout.widget.ConstraintLayout>
  • 21.
    Step 3: Workingwith the MainActivity File import androidx.appcompat.app.AppCompatActivity; import android.content.Intent; import android.os.Bundle; import android.view.View; public class MainActivity extends AppCompatActivity { @Override protected void onCreate(Bundle savedInstanceState) { super.onCreate(savedInstanceState); setContentView(R.layout.activity_main); }
  • 22.
    public void newsScreen(Viewview) { Intent i = new Intent(getApplicationContext(), MainActivity2.class); startActivity(i); } }
  • 23.
    Native Android Actions ACTION_ANSWEROpens an Activity that handles incoming calls. Currently this is handled by the native in-call screen. ➤ ACTION_CALL Brings up a phone dialer and immediately initiates a call using the number supplied in the Intent URI. Generally it’s considered better form to useACTION_DIAL if possible. ➤ ACTION_DELETE Starts an Activity that lets you delete the data specified at the Intent’s data URI. ➤ ACTION_DIAL Brings up a dialer application with the number to dial pre-populated from the Intent URI. By default this is handled by the native Android phone dialer. The dialer can normalize most number schemas: for example, tel:555-1234 and tel:(212) 555 1212 are both valid numbers. ➤ ACTION_EDIT Requests an Activity that can edit the data at the specified Intent URI.
  • 24.
    ➤ ACTION_INSERT Opensan Activity capable of inserting new items into the Cursor specified in the Intent URI. When called as a sub-Activity it should return a URI to the newly inserted item. ➤ ACTION_PICK Launches a sub-Activity that lets you pick an item from the Content Provider specified by the Intent URI. When closed it should return a URI to the item that was picked. The Activity launched depends on the data being picked: for example, passing content://contacts/people will invoke the native contacts list. ➤ ACTION_SEARCH Launches the Activity used for performing a search. Supply the search term as a string in the Intent’s extras using theSearchManager.QUERY key. ➤ ACTION_SENDTO Launches an Activity to send a message to the contact specified by the Intent URI.
  • 25.
    ➤ ACTION_SEND Launchesan Activity that sends the data specified in the Intent. The recipient contact needs to be selected by the resolved Activity. Use setType to set the MIME type of the transmitted data. The data itself should be stored as an extra by means of the key EXTRA_TEXT or EXTRA_STREAM, depending on the type. In the case of e-mail, the native Android applications will also accept extras via the EXTRA_EMAIL, EXTRA_CC, EXTRA_BCC, and EXTRA_SUBJECT keys. Use the ACTION_SEND action only to send data to a remote recipient (not another application on the device). ➤ ACTION_VIEW The most common generic action. View asks that the data supplied in the Intent’s URI be viewed in the most reasonable manner. Different applications will handle view requests depending on the URI schema of the data supplied. Natively http: addresses will open in the browser, tel: addresses will open the dialer to call the number, geo: addresses will be displayed in the Google Maps application, and contact content will be displayed in the contact manager. ➤ ACTION_WEB_SEARCH Opens an Activity that performs a web search based on the text sup- plied in the Intent URI (typically the browser).
  • 26.
    Using intent filters •Implicitintent uses the intent filter to serve the user request. •The intent filter specifies the types of intents that an activity, service, or broadcast receiver can respond. •Intent filters are declared in the Android manifest file. •Intent filter must contain <action>
  • 27.
  • 28.
    Most of theintent filter are describe by its 1.<action>, 2.<category> and 3.<data>.
  • 29.
    1. <action> <action android:name="string"/> Adds an action to an intent filter. An <intent-filter> element must contain one or more <action> elements. If there are no <action> elements in an intent filter, the filter doesn’t accept any Intent objects. Examples of common action: •ACTION_VIEW: Use this action in intent with startActivity() when you have some information that activity can show to the user like showing an image in a gallery app or an address to view in a map app •ACTION_SEND: You should use this in intent with startActivity() when you have some data that the user can share through another app, such as an email app or social sharing app.
  • 30.
    2. <category> Syntax: <category android:name="string"/> Example of common categories: •CATEGORY_BROWSABLE: The target activity allows itself to be started by a web browser to display data referenced by a link.
  • 31.
    3. <data> Syntax: <data android:scheme="string" android:host="string" android:port="string" android:path="string" android:pathPattern="string" android:pathPrefix="string" android:mimeType="string"/> Adds a data specification to an intent filter. The specification can be just a data type, just a URI, or both a data type and a URI.
  • 32.
    Implementation of IntentFilter with a Demo App <?xml version="1.0" encoding="utf-8"?> <manifest xmlns:android="http://schemas.android.com/apk/res/android" package="com.example.menuapplication"> <application android:allowBackup="true" </application> </manifest>
  • 33.
    android:icon="@mipmap/ic_launcher" android:label="@string/app_name" android:roundIcon="@mipmap/ic_launcher_round" android:supportsRtl="true" android:theme="@style/Theme.MenuApplication"> <activity android:name=".MainActivity"> <intent-filter> <action android:name="android.intent.action.MAIN"/> <category android:name="android.intent.category.LAUNCHER" /> </intent-filter> <!--SEND INTENT FILTER--> <intent-filter> <action android:name="android.intent.action.SEND"/> <category android:name="android.intent.category.DEFAULT"/> <data android:mimeType="text/plain"/> </intent-filter>
  • 34.
  • 35.
    Broadcast events usingintents As a system-level message-passing mechanism, Intents are capable of sending structured messages across process boundaries. So far you’ve looked at using Intents to start new application components, but they can also be used to broadcast messages anonymously between components with the sendBroadcast method. Broadcast Receivers to listen for, and respond to, these broadcast Intents within your applications. . Broadcast Intents are used to notify listeners of system or application events, extending the eventdriven programming model between applications. Broadcasting Intents helps make your application more open; by broadcasting an event using an Intent
  • 36.
    For example, bylistening for the incoming call broadcast, you can modify the ringtone or volume based on the caller Android uses Broadcast Intents extensively to broadcast system events like battery-charging levels, network connections, and incoming calls.
  • 37.
    Broadcasting Events withIntents 1. Broadcast intents are Intent objects that are broadcast via a call to the sendBroadcast(), sendStickyBroadcast() or sendOrderedBroadcast() methods of the Activity class (the latter being used when results are required from the broadcast). 2. In addition to providing a messaging and event system between application components, broadcast intents are also used by the Android system to notify interested applications about key system events (such as the external power supply or headphones being connected or disconnected). 3. When a broadcast intent is created, it must include an action string in addition to optional data and a category string.
  • 38.
    1. As withstandard intents, data is added to a broadcast intent using key-value pairs in conjunction with the putExtra() method of the intent object. 2. The optional category string may be assigned to a broadcast intent via a call to the addCategory() method. 3. The action string, which identifies the broadcast event, must be unique and typically uses the application’s package name syntax. For example, the following code fragment creates and sends a broadcast intent including a unique action string and data: Intent intent = new Intent(); intent.setAction("com.example.Broadcast"); intent.putExtra("MyData", 1000); sendBroadcast(intent);
  • 39.
    1. Android 3.0introduced a launch control security measure that prevents components of stopped applications from being launched via an intent. 2. To get around this, however, a flag can be added to the intent before it is sent to indicate that the intent is to be allowed to start a component of a stopped application. This flag is FLAG_INCLUDE_STOPPED_PACKAGES and would be used as outlined in the following adaptation of the previous code fragment: Intent intent = new Intent(); intent.addFlags(Intent.FLAG_INCLUDE_STOPPED_PACKAGES); intent.setAction("com.example.Broadcast"); intent.putExtra("MyData", 1000); sendBroadcast(intent);
  • 40.
    An Overview ofBroadcast Receivers An application listens for specific broadcast intents by registering a broadcast receiver. Broadcast receivers are implemented by extending the Android BroadcastReceiver class and overriding the onReceive() method. The broadcast receiver may then be registered, either within code (for example within an activity), or within a manifest file.
  • 41.
    The following codeoutlines a template Broadcast Receiver subclass: package com.example.broadcastdetector; import android.content.BroadcastReceiver; import android.content.Context; import android.content.Intent; public class MyReceiver extends BroadcastReceiver { public MyReceiver() { } @Override public void onReceive(Context context, Intent intent) { // Implement code here to be performed when // broadcast is detected } }
  • 42.
    When registering abroadcast receiver within a manifest file, a <receiver> entry must be added for the receiver. The following example manifest file registers the above example broadcast receiver: <?xml version="1.0" encoding="utf-8"?> <manifest xmlns:android="http://schemas.android.com/apk/res/android" package="com.example.broadcastdetector.broadcastdetector" android:versionCode="1" android:versionName="1.0" > <uses-sdk android:minSdkVersion="17“ /> <application android:icon="@mipmap/ic_launcher" android:label="@string/app_name" > <receiver android:name="MyReceiver" > </receiver> </application> </manifest>
  • 43.
    When running onversions of Android older than Android 8.0, the intent filters associated with a receiver can be placed within the receiver element of the manifest file as follows: <receiver android:name="MyReceiver" > <intent-filter> <action android:name="com.example.Broadcast" > </action> </intent-filter> </receiver>
  • 44.
    On Android 8.0or later, the receiver must be registered in code using the registerReceiver() method of the Activity class together with an appropriately configured IntentFilter object: IntentFilter filter = new IntentFilter("com.example.Broadcast"); MyReceiver receiver = new MyReceiver(); registerReceiver(receiver, filter);
  • 45.
    When a broadcastreceiver registered in code is no longer required, it may be unregistered via a call to the unregisterReceiver() method of the activity class, passing through a reference to the receiver object as an argument. For example, the following code will unregister the above broadcast receiver: unregisterReceiver(receiver);
  • 46.
    The Broadcast IntentExample Launch Android Studio and create a new project Once the new project has been created, locate and load the activity_send_broadcast.xml layout file located in the Project tool window under app -> res -> layout and, with the Layout Editor tool in Design mode, replace the TextView object with a Button view and set the text property so that it reads “Send Broadcast”. Once the text value has been set, follow the usual steps to extract the string to a resource named send_broadcast. With the button still selected in the layout, locate the onClick property in the Attributes panel and configure it to call a method named broadcastIntent.
  • 47.
    Creating and Sendingthe Broadcast Intent Having created the framework for the SendBroadcast application, it is now time to implement the code to send the broadcast intent. This involves implementing the broadcastIntent() method specified previously as the onClick target of the Button view in the user interface. Locate and double-click on the SendBroadcastActivity.java file and modify it to add the code to create and send the broadcast intent. Once modified, the source code for this class should read as follows:
  • 48.
    package com.ebookfrenzy.sendbroadcast; import android.support.v7.app.AppCompatActivity; importandroid.os.Bundle; import android.content.Intent; import android.view.View; public class SendBroadcastActivity extends AppCompatActivity { @Override protected void onCreate(Bundle savedInstanceState) { super.onCreate(savedInstanceState); setContentView(R.layout.activity_send_broadcast); } public void broadcastIntent(View view) { Intent intent = new Intent(); intent.setAction("com.ebookfrenzy.sendbroadcast"); intent.addFlags(Intent.FLAG_INCLUDE_STOPPED_PACKAGES); sendBroadcast(intent); } }
  • 49.