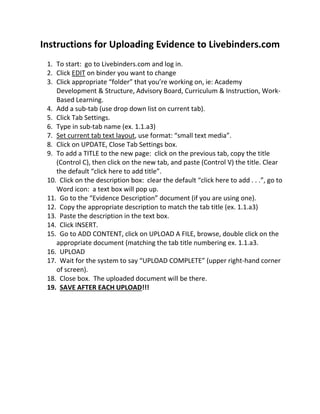
The document provides instructions for uploading evidence files to Livebinders.com in 17 steps: 1) log into Livebinders.com and open the desired binder, 2) add a sub-tab to an existing folder tab using the drop down menu, 3) set the tab text layout and update the settings, 4) copy and paste the tab title from the previous tab, 5) clear the default description and copy the appropriate description from an evidence document, 6) paste and insert the description, 7) browse and upload the corresponding evidence file, and 8) save after each upload is complete.
Unit 3 Emotional Intelligence and Spiritual Intelligence.pdf
Documenting Your Academy story - Creating an Evidence Binder
1. Instructions for Uploading Evidence to Livebinders.com
1. To start: go to Livebinders.com and log in.
2. Click EDIT on binder you want to change
3. Click appropriate “folder” that you’re working on, ie: Academy
Development & Structure, Advisory Board, Curriculum & Instruction, Work-
Based Learning.
4. Add a sub-tab (use drop down list on current tab).
5. Click Tab Settings.
6. Type in sub-tab name (ex. 1.1.a3)
7. Set current tab text layout, use format: “small text media”.
8. Click on UPDATE, Close Tab Settings box.
9. To add a TITLE to the new page: click on the previous tab, copy the title
(Control C), then click on the new tab, and paste (Control V) the title. Clear
the default “click here to add title”.
10. Click on the description box: clear the default “click here to add . . .”, go to
Word icon: a text box will pop up.
11. Go to the “Evidence Description” document (if you are using one).
12. Copy the appropriate description to match the tab title (ex. 1.1.a3)
13. Paste the description in the text box.
14. Click INSERT.
15. Go to ADD CONTENT, click on UPLOAD A FILE, browse, double click on the
appropriate document (matching the tab title numbering ex. 1.1.a3.
16. UPLOAD
17. Wait for the system to say “UPLOAD COMPLETE” (upper right-hand corner
of screen).
18. Close box. The uploaded document will be there.
19. SAVE AFTER EACH UPLOAD!!!