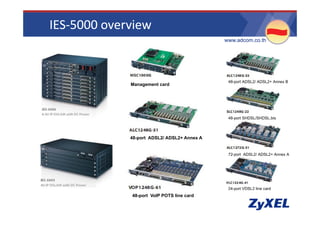
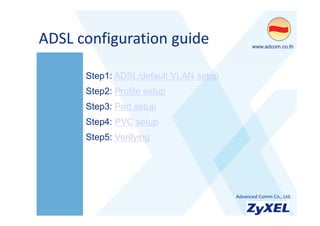
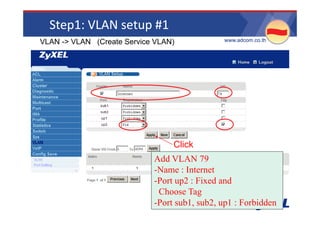
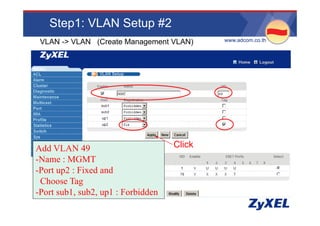
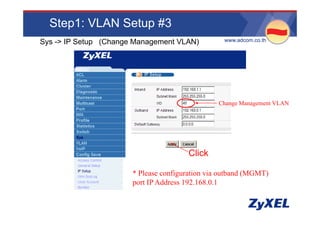
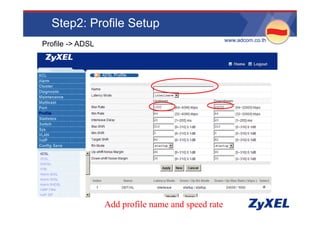
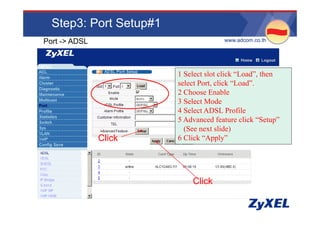
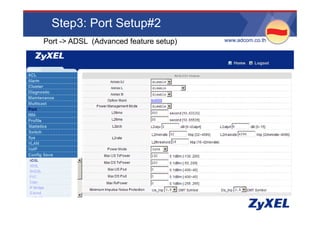
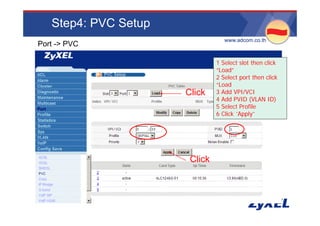
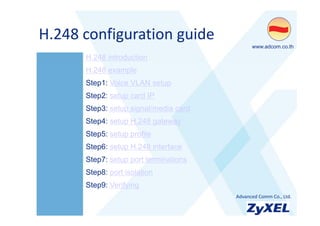
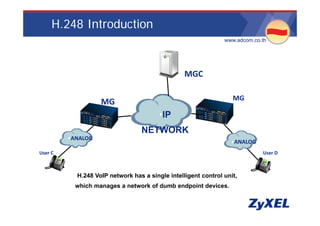
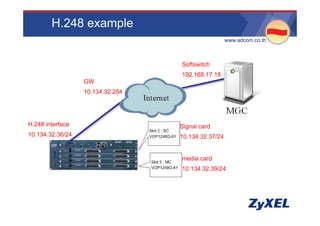
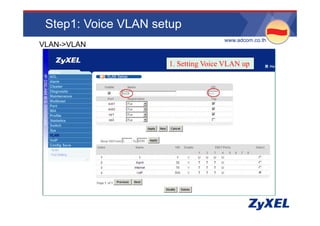
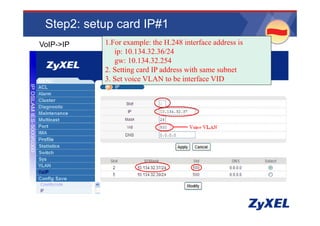
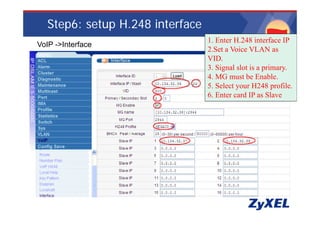
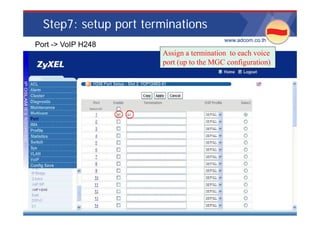
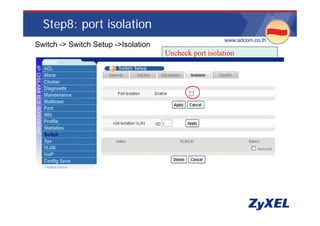
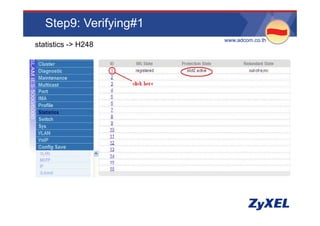
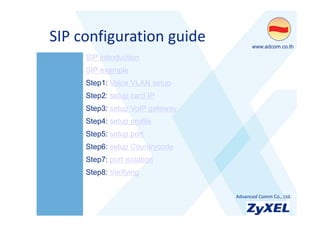
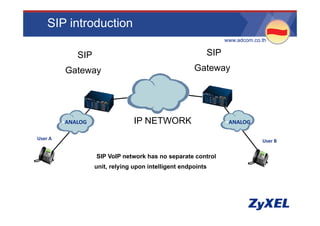
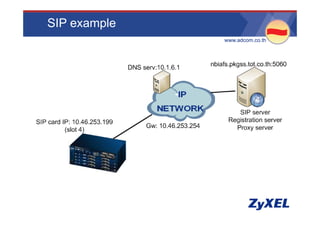
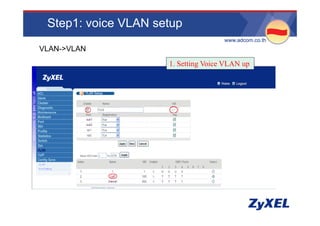
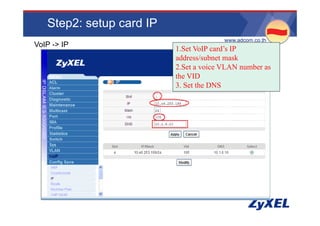
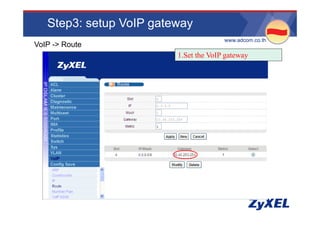
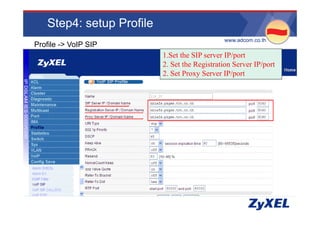
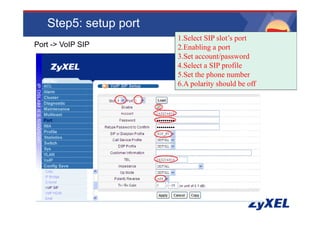
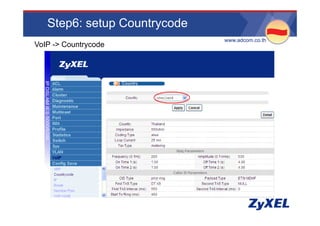
•www.adcom.co.th


IES‐5000 System
Configuration guide


                      •Advanced Comm Co., Ltd.
Agenda
A   d                                  •www.adcom.co.th


•Products overview
•Get Start
 Get Start
•ADSL configuration guide
 H 248    fi     i     id
•H.248 configuration guide
•SIP configuration guide
•Configuration File & Firmware
 Diagnostic
•Diagnostic


                                 •Advanced Comm Co., Ltd.
Products overview
Products overview              •www.adcom.co.th


 •IES‐5000 overview
  MSC1000G      i
 •MSC1000G overview
 •ALC1248G‐51 overview
 •VOP1248G‐61 overview
   p            g
 •Splitter wiring


                         •Advanced Comm Co., Ltd.
IES‐5000 overview
                                              •www.adcom.co.th


                                               •48-port ADSL2/ ADSL2+ Annex B
             Management card


                                               •48-port SHDSL/SHDSL.bis


             •48-port ADSL2/ ADSL2+ Annex A
              48 port


                                               •72-port ADSL2/ ADSL2+ Annex A


                                               •24-port VDSL2 line ca d
                                                   po t   S      e card
             •48-port VoIP POTS line card
MSC1000G overview
                                                 •www.adcom.co.th


            ACO 
            ACO

   Alarm 


                                                          Console 
                                                           port 
                                                           port

                   1000 Base T 
   SFP Open Slot
   SFP Open Slot    Ethernet 
                    Eth    t
                                  Out‐of‐band 
                                  Management 
ALC1248G‐51 overview
                                                             •www.adcom.co.th


           Power
                                   Telco 50 connecter      Telco 50 connecter
           LED

                   ALC1248G‐51
                   ALC1248G 51
System
LED


          Alarm     Console port
          LED
                                    •Maximum transmission rate up to 25 Mbps/
                                                                p         p
                                    •1.2 Mbps for ADSL2+, support Annex M,L
VOP1248G‐61 overview
                                                                    •www.adcom.co.th


      Power 
       LED 

System 
  LED 


          Alarm 
           LED          Test in/out port                 Telco 50 connector 
                   Console port 


                                   -support H.248 version 2 or SIP singling protocol
                                    upon firmware using (default is SIP)
Splitter wiring
            •IES‐5005                                                •www.adcom.co.th
  •MSC‐1024
                                      •PBX
                          •P1   •P2                                                •Splitter
•ALC‐1248

•VOP‐1248


                                                                •1
                                                                             •Disconnection


                                                               •10


                                                                            •Back Mount Frame


                  •Splitter
                                                        •Splitter


      •DSL CPE
       DSL CPE
                                             •DSL CPE
Get Start
G t St t          •www.adcom.co.th


•Login
•IP setup
 IP setup


            •Advanced Comm Co., Ltd.
Login #1
                                  •www.adcom.co.th

•Web browser


               IP Address : 192.168.1.1
               Username : admin
               Password : 1234
               * Outband IP Address : 192.168.0.1
Login #2
                                         •www.adcom.co.th

Console CLI


              9600 bps, No parity, 8 data bits, 1 stop
              bit,No flow control
              Username : admin
              Password : 1234
IP Setup
                                         •www.adcom.co.th
Sys -> IP Setup


                  Click

                      Change IP and gateway to
                       Management Network
ADSL configuration guide
ADSL configuration guide                     •www.adcom.co.th


      Step1: ADSL/default VLAN setup
      Step2: Profile setup
      Step3: Port setup
      Step4: PVC setup
      Step5: Verifying


                                       •Advanced Comm Co., Ltd.
Step1: VLAN setup #1
VLAN -> VLAN (Create Service VLAN)            •www.adcom.co.th


                                 Click
                            Add VLAN 79
                            -Name : Internet
                            -Port up2 : Fixed and
                             Choose Tag
                             Ch      T
                            -Port sub1, sub2, up1 : Forbidden
Step1: VLAN Setup #2
 VLAN -> VLAN (Create Management VLAN)    •www.adcom.co.th


Add VLAN 49                       Click
-Name : MGMT
-Port up2 : Fixed and
 Choose Tag
-Port sub1, sub2, up1 : F bidd
 P t b1 b2          1 Forbidden
Step1: VLAN Setup #3
Sys -> IP Setup (Change Management VLAN)          •www.adcom.co.th


                                                Change Management VLAN


                                       Click

                       * Please configuration via outband (MGMT)
                       port IP Address 192.168.0.1
Step2: Profile Setup
                                                •www.adcom.co.th
Profile -> ADSL


                  Add profile name and speed rate
Step3: Port Setup#1
Port -> ADSL                          •www.adcom.co.th


                        1 Select slot click “Load”, then
                        select Port, click “Load”.
                        2 Choose Enable
                        3 Select Mode
                        4 Select ADSL Profile
                          Se ec      S      o e
                        5 Advanced feature click “Setup”
                          (See next slide)
               Click    6 Click “Apply”
                                 Apply


                            Click
Step3: Port Setup#2
Port -> ADSL (Advanced feature setup)   •www.adcom.co.th
Step3: Port Setup#3
                                                                  •www.adcom.co.th
Port -> ADSL -> Copy
                 Select port then click or click All for select
                 All port then Click Apply to Delete


                                                  1 Click


                                                                      3 Click
                                         2 Click
Step4: PVC Setup
                                 •www.adcom.co.th
Port -> PVC

                               1 Select slot then click
                               “Load”
                               2 Select port then click
                               “Load
                      Click    3 Add VPI/VCI
                               4 Add PVID (VLAN ID)
                               5 Select Profile
                               6 Click “Apply”
                                        Apply


                       Click
Step5: Verifying
                                •www.adcom.co.th
Statistics -> Port Statistics
H.248 configuration guide
H 248 configuration guide
                                             •www.adcom.co.th

      H.248 introduction
      H.248 example
      Step1: Voice VLAN setup
      Step2: setup card IP
      Step3: setup signal/media card
      Step4: setup H.248 gateway
      Step5: setup profile
      Step6: setup H.248 interface
      Step7: setup port terminations
      Step8: port isolation
      Step9: Verifying
                                       •Advanced Comm Co., Ltd.
H.248 Introduction
                                                                •www.adcom.co.th


                                                 •MGC

                                                                   •MG
                    •MG
                                          •IP
                                           IP

 •
                                   NETWORK
          •ANALOG
                                                                   •ANALOG
•User C                                                                      •User D


            •H.248 VoIP network has a single intelligent control unit,
            which manages a network of dumb endpoint devices.
H.248 example
                                                     •www.adcom.co.th


                                    •Softswitch
                                    •192.168.17.18
                   •GW
                   •10.134.32.254


•H.248 interface                    •Signal card
•10.134.32.36/24                    •10.134.32.37/24
                                      0 3 3 3 /


                                    •media card
                                    •10.134.32.39/24
Step1: Voice VLAN setup
                                 •www.adcom.co.th
•VLAN->VLAN

                     1. Setting Voice
                     1 S tti V i VLAN up
Step2: setup card IP#1
                                                   •www.adcom.co.th
•VoIP->IP   1.For example: the H.248 interface address is
               ip: 10.134.32.36/24
               gw: 10 134 32 254
                    10.134.32.254
            2. Setting card IP address with same subnet
            3. Set voice VLAN to be interface VID
Step2: setup card IP#2
                                              •www.adcom.co.th
•VoIP->IP
                 1. Set another card with the same subnet
                 2.
                 2 Set voice VLAN to be interface VID
Step3: setup signal/media card
                                         •www.adcom.co.th
•VoIP->VoIP H248       1.   Set a master card to be signal mode
                       2.   Another card must be a media mode
                       3.
                       3    Than use a signal IP address to be a
                                   se
                            Master IP
Step4: setup H.248 gateway
                                          •www.adcom.co.th
•VoIP->Route

                    1. Set Voice t
                    1 S t V i gateway address
                                          dd
                    Notice: Only set onto a signal card
Step5: setup profile
                                             •www.adcom.co.th
•Profile ->VoIP H248

                          1. Set your softswitch IP address
Step6: setup H.248 interface
                                  1. Enter H.248 interface IP
                                       •www.adcom.co.th
•VoIP ->Interface
                                  2.Set a Voice VLAN as
                                  VID.
                                  3. Signal slot is a primary.
                                  4. MG must be Enable.
                                  5.
                                  5 Select your H248 profile
                                                         profile.
                                  6. Enter card IP as Slave
Step7: setup port terminations
                                          •www.adcom.co.th
•Port -> VoIP H248
                        Assign a termination to each voice
                        port (up to the MGC configuration)
Step8: port isolation
                                                        •www.adcom.co.th
•Switch -> Switch Setup ->Isolation
                                      Uncheck port isolation
Step9: Verifying#1
                        •www.adcom.co.th
•statistics -> H248
Step9: Verifying#2
                     •www.adcom.co.th
Step9: Verifying#3
                                 •www.adcom.co.th
•statistics -> Port statistics
Step9: Verifying#4
                     •www.adcom.co.th
SIP configuration guide
SIP configuration guide                •www.adcom.co.th

     SIP introduction
     SIP example
     Step1: Voice VLAN setup
     Step2: setup card IP
     Step3: setup VoIP gateway
     Step4: setup profile
     Step5: setup port
     Step6: setup Countrycode
     Step7: port isolation
     Step8: Verifying


                                 •Advanced Comm Co., Ltd.
SIP introduction
                                                                 •www.adcom.co.th


             •SIP                                         •SIP
          Gateway                                      Gateway


          •ANALOG               •IP NETWORK                       •ANALOG

•User A
•User A                                                                       •User B

                    •SIP VoIP network has no separate control
                    unit, relying upon intelligent endpoints
                      i     l i        i lli         d i
SIP example
              •www.adcom.co.th
Step1: voice VLAN setup
                                  •www.adcom.co.th
•VLAN->VLAN
                      1. Setting Voice
                      1 S tti V i VLAN up
Step2: setup card IP
                                       •www.adcom.co.th
VoIP -> IP
                          1.Set VoIP card’s IP
                          address/subnet mask
                          2.Set a voice VLAN number as
                          the VID
                          3. Set the DNS
Step3: setup VoIP gateway
                                       •www.adcom.co.th
VoIP -> Route
                         1.Set the VoIP gateway
Step4: setup Profile
                                             •www.adcom.co.th
Profile -> VoIP SIP
                          1.Set the SIP server IP/port
                          2. Set h Registration Server IP/port
                          2 S the R i        i S       IP/
                          2. Set Proxy Server IP/port
Step5: setup port
                       1.Select
                       1 S l t SIP slot’s port
                                     l •www.adcom.co.th
                                        t’     t
Port -> VoIP SIP       2.Enabling a port
                       3.Set account/password
                       4.Select a SIP profile
                       5.Set the phone number
                       6.A polarity should be off
                           p      y
Step6: setup Countrycode
                              •www.adcom.co.th
VoIP -> Countrycode
Step7: port isolation
                                                        •www.adcom.co.th
•Switch -> Switch Setup ->Isolation
                                      Uncheck port isolation
Step8: verifying
                                                     •www.adcom.co.th
•statistics -> Port statistics -> Select line card
Configuration File & Firmware
Configuration File & Firmware                     •www.adcom.co.th


     •Backup & Restore configuration file
     •Factory default & reboot
     •Factory default & reboot
     •Firmware upgrade


                                            •Advanced Comm Co., Ltd.
Backup & Restore configuration file
                                      •www.adcom.co.th
•Maintenance -> CFG Backup


•Maintenance -> CFG Restore
 M i t              R t
Factory default & reboot
                            •www.adcom.co.th

•Maintenance -> CFG reset


•Maintenance -> Reboot
Firmware upgrade
                                               •www.adcom.co.th
 •Maintenance -> FW Upgrade
                              1.Check to which card, need to be
                              upgraded.
                              upgraded
                              2.Browse a firmware for that card
                              3.Click “Upgrade” button
                              Notice:
                              N i unmatched fi
                                             h d firmware-card type
                                                              d
                              may cause a card damage.
Diagnostic                •www.adcom.co.th


 •ADSL diagnostic
 •VoIP diagnostic
 •VoIP diagnostic


                    •Advanced Comm Co., Ltd.
ADSL diagnostic
                                           •www.adcom.co.th
•Diagnostic -> LDM Test


                          Items: in loop diagnostic mode (LDM)
                          hlog: show the channel mechanism in
                          logarithm scale
                          qln: show quiet line noise in root mean
                          square level
                          snr: display signal to noise
VoIP diagnostic
                                           •www.adcom.co.th
•Diagnostic -> MLT


                     Mode: in metallic line test (MLT)
                     test - test performed from MG directly
                                 p                           y
                     Relay - In: test inner loop from external device
                             Out: test outer loop from external device
                             Off: prohibit relay process
                            Both: perform inner/outer external loop
•www.adcom.co.th


THANK YOU


            •Advanced Comm Co., Ltd.

Ies5000 config guide

  • 1.
  • 2.
    Agenda A d •www.adcom.co.th •Products overview •Get Start Get Start •ADSL configuration guide H 248 fi i id •H.248 configuration guide •SIP configuration guide •Configuration File & Firmware Diagnostic •Diagnostic •Advanced Comm Co., Ltd.
  • 3.
    Products overview Products overview •www.adcom.co.th •IES‐5000 overview MSC1000G i •MSC1000G overview •ALC1248G‐51 overview •VOP1248G‐61 overview p g •Splitter wiring •Advanced Comm Co., Ltd.
  • 4.
    IES‐5000 overview •www.adcom.co.th •48-port ADSL2/ ADSL2+ Annex B Management card •48-port SHDSL/SHDSL.bis •48-port ADSL2/ ADSL2+ Annex A 48 port •72-port ADSL2/ ADSL2+ Annex A •24-port VDSL2 line ca d po t S e card •48-port VoIP POTS line card
  • 5.
    MSC1000G overview •www.adcom.co.th ACO  ACO Alarm  Console  port  port 1000 Base T  SFP Open Slot SFP Open Slot Ethernet  Eth t Out‐of‐band  Management 
  • 6.
    ALC1248G‐51 overview •www.adcom.co.th Power Telco 50 connecter Telco 50 connecter LED ALC1248G‐51 ALC1248G 51 System LED Alarm Console port LED •Maximum transmission rate up to 25 Mbps/ p p •1.2 Mbps for ADSL2+, support Annex M,L
  • 7.
    VOP1248G‐61 overview •www.adcom.co.th Power  LED  System  LED  Alarm  LED  Test in/out port  Telco 50 connector  Console port  -support H.248 version 2 or SIP singling protocol upon firmware using (default is SIP)
  • 8.
    Splitter wiring •IES‐5005 •www.adcom.co.th •MSC‐1024 •PBX •P1 •P2 •Splitter •ALC‐1248 •VOP‐1248 •1 •Disconnection •10 •Back Mount Frame •Splitter •Splitter •DSL CPE DSL CPE •DSL CPE
  • 9.
    Get Start G t Stt •www.adcom.co.th •Login •IP setup IP setup •Advanced Comm Co., Ltd.
  • 10.
    Login #1 •www.adcom.co.th •Web browser IP Address : 192.168.1.1 Username : admin Password : 1234 * Outband IP Address : 192.168.0.1
  • 11.
    Login #2 •www.adcom.co.th Console CLI 9600 bps, No parity, 8 data bits, 1 stop bit,No flow control Username : admin Password : 1234
  • 12.
    IP Setup •www.adcom.co.th Sys -> IP Setup Click Change IP and gateway to Management Network
  • 13.
    ADSL configuration guide ADSL configuration guide •www.adcom.co.th Step1: ADSL/default VLAN setup Step2: Profile setup Step3: Port setup Step4: PVC setup Step5: Verifying •Advanced Comm Co., Ltd.
  • 14.
    Step1: VLAN setup #1 VLAN -> VLAN(Create Service VLAN) •www.adcom.co.th Click Add VLAN 79 -Name : Internet -Port up2 : Fixed and Choose Tag Ch T -Port sub1, sub2, up1 : Forbidden
  • 15.
    Step1: VLAN Setup#2 VLAN -> VLAN (Create Management VLAN) •www.adcom.co.th Add VLAN 49 Click -Name : MGMT -Port up2 : Fixed and Choose Tag -Port sub1, sub2, up1 : F bidd P t b1 b2 1 Forbidden
  • 16.
    Step1: VLAN Setup#3 Sys -> IP Setup (Change Management VLAN) •www.adcom.co.th Change Management VLAN Click * Please configuration via outband (MGMT) port IP Address 192.168.0.1
  • 17.
    Step2: Profile Setup •www.adcom.co.th Profile -> ADSL Add profile name and speed rate
  • 18.
    Step3: Port Setup#1 Port-> ADSL •www.adcom.co.th 1 Select slot click “Load”, then select Port, click “Load”. 2 Choose Enable 3 Select Mode 4 Select ADSL Profile Se ec S o e 5 Advanced feature click “Setup” (See next slide) Click 6 Click “Apply” Apply Click
  • 19.
    Step3: Port Setup#2 Port-> ADSL (Advanced feature setup) •www.adcom.co.th
  • 20.
    Step3: Port Setup#3 •www.adcom.co.th Port -> ADSL -> Copy Select port then click or click All for select All port then Click Apply to Delete 1 Click 3 Click 2 Click
  • 21.
    Step4: PVC Setup •www.adcom.co.th Port -> PVC 1 Select slot then click “Load” 2 Select port then click “Load Click 3 Add VPI/VCI 4 Add PVID (VLAN ID) 5 Select Profile 6 Click “Apply” Apply Click
  • 22.
    Step5: Verifying •www.adcom.co.th Statistics -> Port Statistics
  • 23.
    H.248 configuration guide H 248 configurationguide •www.adcom.co.th H.248 introduction H.248 example Step1: Voice VLAN setup Step2: setup card IP Step3: setup signal/media card Step4: setup H.248 gateway Step5: setup profile Step6: setup H.248 interface Step7: setup port terminations Step8: port isolation Step9: Verifying •Advanced Comm Co., Ltd.
  • 24.
    H.248 Introduction •www.adcom.co.th •MGC •MG •MG •IP IP • NETWORK •ANALOG •ANALOG •User C •User D •H.248 VoIP network has a single intelligent control unit, which manages a network of dumb endpoint devices.
  • 25.
    H.248 example •www.adcom.co.th •Softswitch •192.168.17.18 •GW •10.134.32.254 •H.248 interface •Signal card •10.134.32.36/24 •10.134.32.37/24 0 3 3 3 / •media card •10.134.32.39/24
  • 26.
    Step1: Voice VLANsetup •www.adcom.co.th •VLAN->VLAN 1. Setting Voice 1 S tti V i VLAN up
  • 27.
    Step2: setup cardIP#1 •www.adcom.co.th •VoIP->IP 1.For example: the H.248 interface address is ip: 10.134.32.36/24 gw: 10 134 32 254 10.134.32.254 2. Setting card IP address with same subnet 3. Set voice VLAN to be interface VID
  • 28.
    Step2: setup cardIP#2 •www.adcom.co.th •VoIP->IP 1. Set another card with the same subnet 2. 2 Set voice VLAN to be interface VID
  • 29.
    Step3: setup signal/mediacard •www.adcom.co.th •VoIP->VoIP H248 1. Set a master card to be signal mode 2. Another card must be a media mode 3. 3 Than use a signal IP address to be a se Master IP
  • 30.
    Step4: setup H.248gateway •www.adcom.co.th •VoIP->Route 1. Set Voice t 1 S t V i gateway address dd Notice: Only set onto a signal card
  • 31.
    Step5: setup profile •www.adcom.co.th •Profile ->VoIP H248 1. Set your softswitch IP address
  • 32.
    Step6: setup H.248interface 1. Enter H.248 interface IP •www.adcom.co.th •VoIP ->Interface 2.Set a Voice VLAN as VID. 3. Signal slot is a primary. 4. MG must be Enable. 5. 5 Select your H248 profile profile. 6. Enter card IP as Slave
  • 33.
    Step7: setup portterminations •www.adcom.co.th •Port -> VoIP H248 Assign a termination to each voice port (up to the MGC configuration)
  • 34.
    Step8: port isolation •www.adcom.co.th •Switch -> Switch Setup ->Isolation Uncheck port isolation
  • 35.
    Step9: Verifying#1 •www.adcom.co.th •statistics -> H248
  • 36.
    Step9: Verifying#2 •www.adcom.co.th
  • 37.
    Step9: Verifying#3 •www.adcom.co.th •statistics -> Port statistics
  • 38.
    Step9: Verifying#4 •www.adcom.co.th
  • 39.
    SIP configuration guide SIP configuration guide •www.adcom.co.th SIP introduction SIP example Step1: Voice VLAN setup Step2: setup card IP Step3: setup VoIP gateway Step4: setup profile Step5: setup port Step6: setup Countrycode Step7: port isolation Step8: Verifying •Advanced Comm Co., Ltd.
  • 40.
    SIP introduction •www.adcom.co.th •SIP •SIP Gateway Gateway •ANALOG •IP NETWORK •ANALOG •User A •User A •User B •SIP VoIP network has no separate control unit, relying upon intelligent endpoints i l i i lli d i
  • 41.
    SIP example •www.adcom.co.th
  • 42.
    Step1: voice VLANsetup •www.adcom.co.th •VLAN->VLAN 1. Setting Voice 1 S tti V i VLAN up
  • 43.
    Step2: setup cardIP •www.adcom.co.th VoIP -> IP 1.Set VoIP card’s IP address/subnet mask 2.Set a voice VLAN number as the VID 3. Set the DNS
  • 44.
    Step3: setup VoIPgateway •www.adcom.co.th VoIP -> Route 1.Set the VoIP gateway
  • 45.
    Step4: setup Profile •www.adcom.co.th Profile -> VoIP SIP 1.Set the SIP server IP/port 2. Set h Registration Server IP/port 2 S the R i i S IP/ 2. Set Proxy Server IP/port
  • 46.
    Step5: setup port 1.Select 1 S l t SIP slot’s port l •www.adcom.co.th t’ t Port -> VoIP SIP 2.Enabling a port 3.Set account/password 4.Select a SIP profile 5.Set the phone number 6.A polarity should be off p y
  • 47.
    Step6: setup Countrycode •www.adcom.co.th VoIP -> Countrycode
  • 48.
    Step7: port isolation •www.adcom.co.th •Switch -> Switch Setup ->Isolation Uncheck port isolation
  • 49.
    Step8: verifying •www.adcom.co.th •statistics -> Port statistics -> Select line card
  • 50.
    Configuration File & Firmware Configuration File &Firmware •www.adcom.co.th •Backup & Restore configuration file •Factory default & reboot •Factory default & reboot •Firmware upgrade •Advanced Comm Co., Ltd.
  • 51.
    Backup & Restore configuration file •www.adcom.co.th •Maintenance -> CFG Backup •Maintenance -> CFG Restore M i t R t
  • 52.
    Factory default & reboot •www.adcom.co.th •Maintenance -> CFG reset •Maintenance -> Reboot
  • 53.
    Firmware upgrade •www.adcom.co.th •Maintenance -> FW Upgrade 1.Check to which card, need to be upgraded. upgraded 2.Browse a firmware for that card 3.Click “Upgrade” button Notice: N i unmatched fi h d firmware-card type d may cause a card damage.
  • 54.
    Diagnostic •www.adcom.co.th •ADSL diagnostic •VoIP diagnostic •VoIP diagnostic •Advanced Comm Co., Ltd.
  • 55.
    ADSL diagnostic •www.adcom.co.th •Diagnostic -> LDM Test Items: in loop diagnostic mode (LDM) hlog: show the channel mechanism in logarithm scale qln: show quiet line noise in root mean square level snr: display signal to noise
  • 56.
    VoIP diagnostic •www.adcom.co.th •Diagnostic -> MLT Mode: in metallic line test (MLT) test - test performed from MG directly p y Relay - In: test inner loop from external device Out: test outer loop from external device Off: prohibit relay process Both: perform inner/outer external loop
  • 57.
    •www.adcom.co.th THANK YOU •Advanced Comm Co., Ltd.