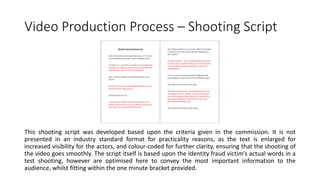
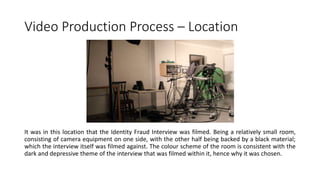
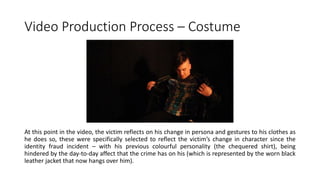
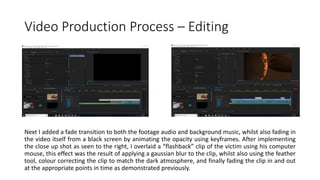
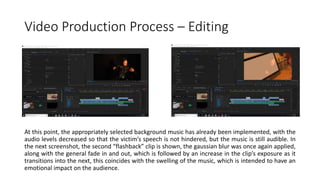
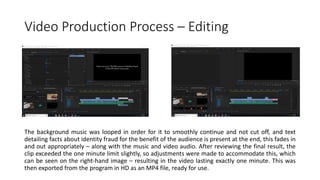
Identity Fraud Interview Video
Production Evaluation
Video Production Process – Shooting Script
This shooting script was developed based upon the criteria given in the commission. It is not
presented in an industry standard format for practicality reasons, as the text is enlarged for
increased visibility for the actors, and colour-coded for further clarity, ensuring that the shooting of
the video goes smoothly. The script itself is based upon the Identity fraud victim’s actual words in a
test shooting, however are optimised here to convey the most important information to the
audience, whilst fitting within the one minute bracket provided.
Video Production Process – Location
It was in this location that the Identity Fraud Interview was filmed. Being a relatively small room,
consisting of camera equipment on one side, with the other half being backed by a black material;
which the interview itself was filmed against. The colour scheme of the room is consistent with the
dark and depressive theme of the interview that was filmed within it, hence why it was chosen.
Video Production Process – Costume
At this point in the video, the victim reflects on his change in persona and gestures to his clothes as
he does so, these were specifically selected to reflect the victim’s change in character since the
identity fraud incident – with his previous colourful personality (the chequered shirt), being
hindered by the day-to-day affect that the crime has on his (which is represented by the worn black
leather jacket that now hangs over him).
Video Production Process – Lighting / Camerawork
A closeup shot is used here to emphasise the emotion of the speaking victim, with half of his face
immersed in darkness, whilst the other half is visible due to the angle of the studio lighting. This
was done to reflect the victim’s deteriorating personality once more, with the contrast of light and
darkness, whilst the particular angle highlights the emotion present on the face of the victim to the
audience also.
Video Production Process – Actor’s Emotions
During the interview, a close-up shot clearly demonstrates the emotions of the actor. This shot in
particular showcases tears upon the face of the victim, this strategy of emphasising emotion draws
empathy from the audience. The eyes of the victim are probably the central focus of this shot, as
they are glazed with supposed tears, being a key aspect of human communication.
Video Production Process – Footage Organisation
I recorded many takes, slightly varying in style and tone, so that I had plenty of options when it
came to constructing the final piece later on in the editing process. Experimental elements include,
camera angles, lighting, the degree of performance / emotion displayed, along with some shots to
be implemented as cutaways – which were shot in a different location to give the audience a sense
of realism. All of these clips were organised into respective folders so that they could be easily
located when required, before being imported into Premiere Pro for editing.
Video Production Process – Editing
I imported the selected clips into Premiere Pro, and began to piece the footage together on the
timeline. It was at this point I realised that some clips contained distracting background noise, so in
order to increase the audio’s quality, I exported the clips as MP3 files, imported them into the audio
editing program Audacity, and used the noise reduction tool in order to make the audio sound
smoother and pleasant to the ear. This audio was then exported in HD, before being imported back
into Premiere Pro and the program’s timeline through the Replace Footage tool.
Video Production Process – Editing
Next I added a fade transition to both the footage audio and background music, whilst also fading in
the video itself from a black screen by animating the opacity using keyframes. After implementing
the close up shot as seen to the right, I overlaid a “flashback” clip of the victim using his computer
mouse, this effect was the result of applying a gaussian blur to the clip, whilst also using the feather
tool, colour correcting the clip to match the dark atmosphere, and finally fading the clip in and out
at the appropriate points in time as demonstrated previously.
Video Production Process – Editing
At this point, the appropriately selected background music has already been implemented, with the
audio levels decreased so that the victim’s speech is not hindered, but the music is still audible. In
the next screenshot, the second “flashback” clip is shown, the gaussian blur was once again applied,
along with the general fade in and out, which is followed by an increase in the clip’s exposure as it
transitions into the next, this coincides with the swelling of the music, which is intended to have an
emotional impact on the audience.
Video Production Process – Editing
The background music was looped in order for it to smoothly continue and not cut off, and text
detailing facts about identity fraud for the benefit of the audience is present at the end, this fades in
and out appropriately – along with the music and video audio. After reviewing the final result, the
clip exceeded the one minute limit slightly, so adjustments were made to accommodate this, which
can be seen on the right-hand image – resulting in the video lasting exactly one minute. This was
then exported from the program in HD as an MP4 file, ready for use.

Identity fraud evaluation

  • 1.
    Identity Fraud InterviewVideo Production Evaluation
  • 2.
    Video Production Process– Shooting Script This shooting script was developed based upon the criteria given in the commission. It is not presented in an industry standard format for practicality reasons, as the text is enlarged for increased visibility for the actors, and colour-coded for further clarity, ensuring that the shooting of the video goes smoothly. The script itself is based upon the Identity fraud victim’s actual words in a test shooting, however are optimised here to convey the most important information to the audience, whilst fitting within the one minute bracket provided.
  • 3.
    Video Production Process– Location It was in this location that the Identity Fraud Interview was filmed. Being a relatively small room, consisting of camera equipment on one side, with the other half being backed by a black material; which the interview itself was filmed against. The colour scheme of the room is consistent with the dark and depressive theme of the interview that was filmed within it, hence why it was chosen.
  • 4.
    Video Production Process– Costume At this point in the video, the victim reflects on his change in persona and gestures to his clothes as he does so, these were specifically selected to reflect the victim’s change in character since the identity fraud incident – with his previous colourful personality (the chequered shirt), being hindered by the day-to-day affect that the crime has on his (which is represented by the worn black leather jacket that now hangs over him).
  • 5.
    Video Production Process– Lighting / Camerawork A closeup shot is used here to emphasise the emotion of the speaking victim, with half of his face immersed in darkness, whilst the other half is visible due to the angle of the studio lighting. This was done to reflect the victim’s deteriorating personality once more, with the contrast of light and darkness, whilst the particular angle highlights the emotion present on the face of the victim to the audience also.
  • 6.
    Video Production Process– Actor’s Emotions During the interview, a close-up shot clearly demonstrates the emotions of the actor. This shot in particular showcases tears upon the face of the victim, this strategy of emphasising emotion draws empathy from the audience. The eyes of the victim are probably the central focus of this shot, as they are glazed with supposed tears, being a key aspect of human communication.
  • 7.
    Video Production Process– Footage Organisation I recorded many takes, slightly varying in style and tone, so that I had plenty of options when it came to constructing the final piece later on in the editing process. Experimental elements include, camera angles, lighting, the degree of performance / emotion displayed, along with some shots to be implemented as cutaways – which were shot in a different location to give the audience a sense of realism. All of these clips were organised into respective folders so that they could be easily located when required, before being imported into Premiere Pro for editing.
  • 8.
    Video Production Process– Editing I imported the selected clips into Premiere Pro, and began to piece the footage together on the timeline. It was at this point I realised that some clips contained distracting background noise, so in order to increase the audio’s quality, I exported the clips as MP3 files, imported them into the audio editing program Audacity, and used the noise reduction tool in order to make the audio sound smoother and pleasant to the ear. This audio was then exported in HD, before being imported back into Premiere Pro and the program’s timeline through the Replace Footage tool.
  • 9.
    Video Production Process– Editing Next I added a fade transition to both the footage audio and background music, whilst also fading in the video itself from a black screen by animating the opacity using keyframes. After implementing the close up shot as seen to the right, I overlaid a “flashback” clip of the victim using his computer mouse, this effect was the result of applying a gaussian blur to the clip, whilst also using the feather tool, colour correcting the clip to match the dark atmosphere, and finally fading the clip in and out at the appropriate points in time as demonstrated previously.
  • 10.
    Video Production Process– Editing At this point, the appropriately selected background music has already been implemented, with the audio levels decreased so that the victim’s speech is not hindered, but the music is still audible. In the next screenshot, the second “flashback” clip is shown, the gaussian blur was once again applied, along with the general fade in and out, which is followed by an increase in the clip’s exposure as it transitions into the next, this coincides with the swelling of the music, which is intended to have an emotional impact on the audience.
  • 11.
    Video Production Process– Editing The background music was looped in order for it to smoothly continue and not cut off, and text detailing facts about identity fraud for the benefit of the audience is present at the end, this fades in and out appropriately – along with the music and video audio. After reviewing the final result, the clip exceeded the one minute limit slightly, so adjustments were made to accommodate this, which can be seen on the right-hand image – resulting in the video lasting exactly one minute. This was then exported from the program in HD as an MP4 file, ready for use.