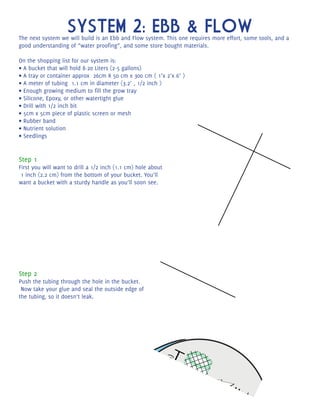
Lesson 6: BUILD IT! 
First you will need to figure out what kind of hydroponics system you want. You should choose a system that 
is well suited to the type of plant you want to grow, as well as one that will fit your budget. We will provide 
instructions on how to build several hydroponics systems. 
If the system(s) are to be setup in a classroom environment, we have 2 systems that are especially cost effec-tive. 
The first is a Wick Hydroponics system, that will be setup in a 2L water or pop bottle. These are great because 
kids can make them by themselves and the only thing that will need to be purchased is the nutrient solution 
and possibly some seeds. the cost of each system is around 25¢ 
Each system will support 1 plant, and contain a nutrient reservoir. 
For each system you will need a 2L bottle, some growing medium, a straw or other tubing, some seeds, and 
nutrient solution. 
We have found that creeping charlie is great for these systems because it grows so readily. That being said 
plants should be a cutting or seedling ready to transplant into the newly created systems. 
Step 1 
Get an empty 2L soda bottle. Or more if you plan on growing more than 1 plant. 
But you knew that allready didn’t you?
Step 2 
Cut as shown in the picture, and flip the top piece 
upside down and place back inside the bottle. You may 
want to tape a ridge of cardboard or something rela-tively 
thick to the edge of the lower half of the bottle. 
This will help support the upper part. 
Step 3 
Now get your wick material. Actual wick can be pur-chase 
and used, but usually a few cut strips of a COT-TON 
T-shirt will suffice. Pull the wick material through 
the opening of the bottle. If the growing medium is too 
loose/small and it will fall through, replace the cap on 
the bottle, and cut appropriately sized holes or slits for 
your system. 
- or -
Step 4 
Fill the top part with growing medium. In place of a 
store bought medium, shredded paper, shredded fabric, 
or hay can be used. Be sure that the - 
wick material is 
or near the top of the growing medium - to ensure that A) it 
doesn’t fall through, and B) so that the nutrient solu-tion 
will be drawn up enough to reach the plant. 
Step 5 
Fill the lower half of the bottle with nutrient solution, 
so it almost touches the bottles original opening. The 
wick(s) should be almost touching the bottom of the 
bottle when the top half is placed in the bottom.
OPTIONAL Step 6 
An optional, but beneficial, step is to insert a straw, or 
tube down into the solution, so you can blow into it to 
aerate the system and give the roots more oxygen. In a 
classroom you could have some aerated and some not, 
to see what the effect on growth is. 
The solution in these systems should be changed every 
2 weeks. 
With these systems, a wide range of conditions can be observed, since they are all self contained, and built 
with basically garbage, try altering grow mediums, lighting, even try messing with the nutrient solution. What 
happens when you dilute the nutrients to half strength? What happens when you replace half the nutrients 
in a system, with the grape pop that was originally in the bottle? Which will provide better growing results; 
chunks of asphalt or lego pieces? 
These systems are so simple but do alot to illustrate how hydroponics work, and how plants grow in general. 
On the next page we will see a more complex system that can support several plants, but is still quite simple 
and inexpensive to build.
SYSTEM 2: EBB & FLOW 
The next system we will build is an Ebb and Flow system. This one requires more effort, some tools, and a 
good understanding of “water proofing”, and some store bought materials. 
On the shopping list for our system is: 
• A bucket that will hold 8-20 Liters (2-5 gallons) 
• A tray or container approx 26cm X 50 cm x 300 cm ( 1’x 2’x 6’ ) 
• A meter of tubing 1.1 cm in diameter (3.2’ , 1/2 inch ) 
• Enough growing medium to fill the grow tray 
• Silicone, Epoxy, or other watertight glue 
• Drill with 1/2 inch bit 
• 5cm x 5cm piece of plastic screen or mesh 
• Rubber band 
• Nutrient solution 
• Seedlings 
Step 1 
First you will want to drill a 1/2 inch (1.1 cm) hole about 
1 inch (2.2 cm) from the bottom of your bucket. You’ll 
want a bucket with a sturdy handle as you’ll soon see. 
Step 2 
Push the tubing through the hole in the bucket. 
Now take your glue and seal the outside edge of 
the tubing, so it doesn’t leak. 
Mesh 
Rubber inches (4.4 cm) 
2
Step 3 
Next drill a 1/2 inch (1.1 cm) hole 1 inch (2.2 cm) from 
the bottom, in the side of your grow tray. 
Step 4 
Push the other end of tube through so than 
about 2 inches (4.4 cm ) is poking through 
into the tray. 
2 inches (4.4 cm)
Mesh 
2 inches (4.4 cm) 
Step 5 
Now seal the edges of the hole you just made, and make sure that there is some extra coming through into 
the grow tray. Now take the piece of mesh and use it to cover the Rubber end of the Band 
tube in the grow tray, and attach 
it using the rubber band. This keeps the growing medium from entering and clogging the tube. Mouse over the 
grow tray for a better visual. 
Tube 
Grow Tub 
STEP 6 
Fill the tray with your chosen grow medium about 1 inch (2.2 cm) from the top, and your system is almost 
ready to go.
Step 7 
It is best to set this up on a small table with a shelf higher than it nearby. Fill your bucket with nutrient solu-tion, 
and raise it above your growing tray. The bucket will empty into the tray, saturating the medium. Once 
the bucket has drained into the tray, lower it below the tray, and the nutrients will drain back into the bucket! 
You will need to do this several times per day to ensure the plants get enough nutrients, and moisture. 
CONGRATULATIONS 
you have completed the hydroponics dictionary Hydro-School. We would love to hear from you with any sug-gestions, 
comments, and of course we want to see those homemade hydroponics systems and the plants in 
them! 
Send Us your stories, comments and photos at 
Info@hydroponicsdictionary.com

Hydroponics School Lesson Plan 6 - Build It

  • 1.
    Lesson 6: BUILDIT! First you will need to figure out what kind of hydroponics system you want. You should choose a system that is well suited to the type of plant you want to grow, as well as one that will fit your budget. We will provide instructions on how to build several hydroponics systems. If the system(s) are to be setup in a classroom environment, we have 2 systems that are especially cost effec-tive. The first is a Wick Hydroponics system, that will be setup in a 2L water or pop bottle. These are great because kids can make them by themselves and the only thing that will need to be purchased is the nutrient solution and possibly some seeds. the cost of each system is around 25¢ Each system will support 1 plant, and contain a nutrient reservoir. For each system you will need a 2L bottle, some growing medium, a straw or other tubing, some seeds, and nutrient solution. We have found that creeping charlie is great for these systems because it grows so readily. That being said plants should be a cutting or seedling ready to transplant into the newly created systems. Step 1 Get an empty 2L soda bottle. Or more if you plan on growing more than 1 plant. But you knew that allready didn’t you?
  • 2.
    Step 2 Cutas shown in the picture, and flip the top piece upside down and place back inside the bottle. You may want to tape a ridge of cardboard or something rela-tively thick to the edge of the lower half of the bottle. This will help support the upper part. Step 3 Now get your wick material. Actual wick can be pur-chase and used, but usually a few cut strips of a COT-TON T-shirt will suffice. Pull the wick material through the opening of the bottle. If the growing medium is too loose/small and it will fall through, replace the cap on the bottle, and cut appropriately sized holes or slits for your system. - or -
  • 3.
    Step 4 Fillthe top part with growing medium. In place of a store bought medium, shredded paper, shredded fabric, or hay can be used. Be sure that the - wick material is or near the top of the growing medium - to ensure that A) it doesn’t fall through, and B) so that the nutrient solu-tion will be drawn up enough to reach the plant. Step 5 Fill the lower half of the bottle with nutrient solution, so it almost touches the bottles original opening. The wick(s) should be almost touching the bottom of the bottle when the top half is placed in the bottom.
  • 4.
    OPTIONAL Step 6 An optional, but beneficial, step is to insert a straw, or tube down into the solution, so you can blow into it to aerate the system and give the roots more oxygen. In a classroom you could have some aerated and some not, to see what the effect on growth is. The solution in these systems should be changed every 2 weeks. With these systems, a wide range of conditions can be observed, since they are all self contained, and built with basically garbage, try altering grow mediums, lighting, even try messing with the nutrient solution. What happens when you dilute the nutrients to half strength? What happens when you replace half the nutrients in a system, with the grape pop that was originally in the bottle? Which will provide better growing results; chunks of asphalt or lego pieces? These systems are so simple but do alot to illustrate how hydroponics work, and how plants grow in general. On the next page we will see a more complex system that can support several plants, but is still quite simple and inexpensive to build.
  • 5.
    SYSTEM 2: EBB& FLOW The next system we will build is an Ebb and Flow system. This one requires more effort, some tools, and a good understanding of “water proofing”, and some store bought materials. On the shopping list for our system is: • A bucket that will hold 8-20 Liters (2-5 gallons) • A tray or container approx 26cm X 50 cm x 300 cm ( 1’x 2’x 6’ ) • A meter of tubing 1.1 cm in diameter (3.2’ , 1/2 inch ) • Enough growing medium to fill the grow tray • Silicone, Epoxy, or other watertight glue • Drill with 1/2 inch bit • 5cm x 5cm piece of plastic screen or mesh • Rubber band • Nutrient solution • Seedlings Step 1 First you will want to drill a 1/2 inch (1.1 cm) hole about 1 inch (2.2 cm) from the bottom of your bucket. You’ll want a bucket with a sturdy handle as you’ll soon see. Step 2 Push the tubing through the hole in the bucket. Now take your glue and seal the outside edge of the tubing, so it doesn’t leak. Mesh Rubber inches (4.4 cm) 2
  • 6.
    Step 3 Nextdrill a 1/2 inch (1.1 cm) hole 1 inch (2.2 cm) from the bottom, in the side of your grow tray. Step 4 Push the other end of tube through so than about 2 inches (4.4 cm ) is poking through into the tray. 2 inches (4.4 cm)
  • 7.
    Mesh 2 inches(4.4 cm) Step 5 Now seal the edges of the hole you just made, and make sure that there is some extra coming through into the grow tray. Now take the piece of mesh and use it to cover the Rubber end of the Band tube in the grow tray, and attach it using the rubber band. This keeps the growing medium from entering and clogging the tube. Mouse over the grow tray for a better visual. Tube Grow Tub STEP 6 Fill the tray with your chosen grow medium about 1 inch (2.2 cm) from the top, and your system is almost ready to go.
  • 8.
    Step 7 Itis best to set this up on a small table with a shelf higher than it nearby. Fill your bucket with nutrient solu-tion, and raise it above your growing tray. The bucket will empty into the tray, saturating the medium. Once the bucket has drained into the tray, lower it below the tray, and the nutrients will drain back into the bucket! You will need to do this several times per day to ensure the plants get enough nutrients, and moisture. CONGRATULATIONS you have completed the hydroponics dictionary Hydro-School. We would love to hear from you with any sug-gestions, comments, and of course we want to see those homemade hydroponics systems and the plants in them! Send Us your stories, comments and photos at Info@hydroponicsdictionary.com